Abandoned - 2-Node EL5 Cluster
|
Alteeve Wiki :: How To :: Abandoned - 2-Node EL5 Cluster |
This paper is VERY much a work in progress. It is NOT complete and should NOT be followed. It is largely a dumping ground for my thoughts and notes as I work through the process. Please do not reference or link to this talk until this warning is removed. Really, it would be very embarrassing for both of us. :)
Overview
This first cluster How-To will cover building a two node cluster. This is a good place to start as the step up to 3+ node is significant. Having a working 2-node will give you a much stronger foundation for that step up. In fact, this How-To will be a prerequisite for the 3+ Node How To.
The initial cluster will be built for two purposes;
- VM Hosting; Make a virtual server "float" between two real servers for high-availability.
- iSCSI Target on top of LVM + DRBD.
Progress
Feb. 02, 2010 I finally got the hardware in place to start building the cluster I will need to create this How To. Progress should now really start!
Oct. 15, 2009 I've gotten permission from Canada Equity's owner to use the docs I created for them on this public How To. I will post here once it is complete and signed off on.
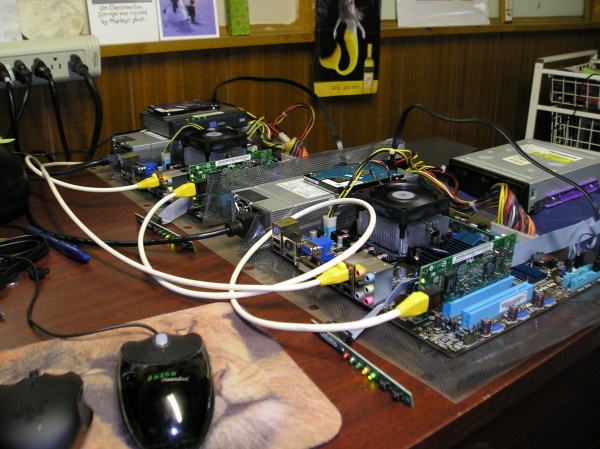
Pics and Screenshots
These are in no particular order yet.


OS Install
Start with a stock CentOS 5 install. This How-To uses CentOS 5.4 x86_64, however it should be fairly easy to adapt to other CentOS 5*, RHEL5 or other RHEL5-based distributions.
Requirements
You will need two computer systems with multi-core CPUs with proper virtualization support. Each node will need a minimum of two network cards each, ideally three. This paper will use three, but if you only have two, you can merge the back-channel and Internet facing NICs (that will make more sense later).
The nodes used in this article are:
- ASUS M4A78L-M
- AMD Athlon II x2 250
- 2GB Kingston DDR2 KVR800D2N6K2/4G (split between the two nodes)
- 2x Intel 82540 PCI NICs
Note: This is not an endorsement of the above hardware. It is simply what determined to be the most economical hardware available at the time. Had budget been less of a concern, other hardware may well have been chosen.
Kickstart
This is a sample kickstart script used by this paper. Be sure to set your how password string and network settings.
Warning! This kickstart script will erase your hard drive! Adapt it, don't blindly use it.
# Kickstart file automatically generated by anaconda.

install
cdrom
lang en_US.UTF-8
keyboard us
xconfig --startxonboot
network --device eth0 --bootproto static --ip 192.168.1.71 --netmask 255.255.255.0 --gateway 192.168.1.1 --nameserver 192.139.81.117,192.139.81.1 --hostname san01.alteeve.com
rootpw --iscrypted #your_secret_hash
firewall --disabled
selinux --permissive
authconfig --enableshadow --enablemd5
timezone --utc America/Toronto
bootloader --location=mbr --driveorder=sda --append="rhgb quiet"

# Hard drive info.
zerombr yes
clearpart --linux --drives=sda

part     /boot --fstype ext3 --size=250 --asprimary
part     pv.11 --size=100 --grow
volgroup san01 --pesize=32768 pv.11
logvol   /     --fstype ext3 --name=lv01 --vgname=san01 --size=20000
logvol   swap  --fstype swap --name=lv00 --vgname=san01 --size=2048

%packages
@cluster-storage
@development-libs
@editors
@text-internet
@virtualization
@gnome-desktop
@core
@base
@clustering
@base-x
@development-tools
@graphical-internet
kmod-gnbd-xen
kmod-gfs-xen
isns-utils
perl-XML-SAX
perl-XML-NamespaceSupport
lynx
bridge-utils
device-mapper-multipath
xorg-x11-server-Xnest
xorg-x11-server-Xvfb
pexpect
imake
-slrn
-fetchmail
-mutt
-cadaver
-vino
-evince
-gok
-gnome-audio
-esc
-gimp-print-utils
-desktop-printing
-im-chooser
-file-roller
-gnome-mag
-nautilus-sendto
-eog
-gnome-pilot
-orca
-mgetty
-dump
-dosfstools
-autofs
-pcmciautils
-dos2unix
-rp-pppoe
-unix2dos
-mtr
-mkbootdisk
-irda-utils
-rdist
-bluez-utils
-talk
-synaptics
-linuxwacom
-wdaemon
-evolution
-nspluginwrapper
-evolution-webcal
-ekiga
-evolution-connector
Post OS Install
First up is the networking component.
eth1 and eth2
Configure your eth1 and eth2 devices to also be static IPs. If your hardware has an integrated IPMI controller piggy-backing on one of the interfaces, set that device to be your back-channel. Next, set you highest-performance/bandwidth device to be your DRBD LAN. Use your remaining ethernet device for your Internet facing card.
This paper used the following:
- eth0
- Back-channel on the 192.168.1.0/24 subnet.
- eth1
- DRBD LAN on the 10.0.0.0/24 subnet.
- eth2
- Internet-facing LAN on the 192.168.2.0/24 subnet.
Which interface and what subnets your use are entirely up to you to decide. The only thing to pay attention to are:
- Your DRBD LAN is used for nothing but DRBD communication.
- Your back-channel be setup on your IPMI/management interfaces, where applicable.
- Your Internet-facing LAN be the one with the default gateway setup.
/etc/hosts
Add an entry for your two nodes using the back-channel IPs.
Add to both nodes (adapt for your network) <lang source="bash"> 192.168.1.71 an_san01 an_san01.alteeve.com 192.168.1.72 an_san02 an_san02.alteeve.com </lang>
iptables
Be sure to flush IPTables and disable it from starting on your nodes.
chkconfig --level 2345 iptables off
/etc/init.d/iptables stop
DRBD
Install DRBD:
yum -y install drbd83.x86_64 kmod-drbd83-xen.x86_64
Create the Logical Volume for the DRBD device on each node. Replace san01 with your Volume Group name.
an_san01
lvcreate -L 400G -n lv02 /dev/san01
an_san02
lvcreate -L 400G -n lv02 /dev/san02
Next, on both nodes, edit or create /etc/drbd.conf so that it is like this:
global {
        usage-count yes;
}
common {
        protocol C;
        syncer { rate 33M; }
}
resource r0 {
        device    /dev/drbd0;
        meta-disk internal;
        net {
                allow-two-primaries;
        }
        startup {
                become-primary-on both;
        }
	# The 'on' name must be the same as the output of 'uname -n'.
        on an_san01.alteeve.com {
                address   10.0.0.71:7789;
		disk      /dev/san01/lv02;
        }
        on an_san02.alteeve.com {
                address   10.0.0.72:7789;
        	disk      /dev/san02/lv02;
        }
}
With that file in place on both nodes, run the following command and make sure the output is the contents of the file above in a somewhat altered syntax. If you get an error, address it before proceeding.
drbdadm dump
If it's all good, you should see something like this:
# /etc/drbd.conf
common {
    protocol               C;
    syncer {
        rate             33M;
    }
}

# resource r0 on an_san02.alteeve.com: not ignored, not stacked
resource r0 {
    on an_san01.alteeve.com {
        device           /dev/drbd0 minor 0;
        disk             /dev/san01/lv02;
        address          ipv4 10.0.0.71:7789;
        meta-disk        internal;
    }
    on an_san02.alteeve.com {
        device           /dev/drbd0 minor 0;
        disk             /dev/san02/lv02;
        address          ipv4 10.0.0.72:7789;
        meta-disk        internal;
    }
    net {
        allow-two-primaries;
    }
    startup {
        become-primary-on both;
    }
}
Once you see this, you can restart the drbd daemon.
Setup the DRBD Resource r0
From the rest of this section, pay attention to whether you see
- Primary
- Secondary
- Both
These indicate which node to run the following commands on. There is no functional difference between either node, so just randomly choose one to be Primary and the other will be Secondary. Once you've chosen which is which, be consistent with which node you run the commands on. Of course, if a command block is proceeded by Both, run the following code block on both nodes.
Both
/etc/init.d/drbd restart
You should see output like this:
  --==  Thank you for participating in the global usage survey  ==--
The server's response is:

you are the 2278th user to install this version
Restarting all DRBD resources: 0: Failure: (119) No valid meta-data signature found.

	==> Use 'drbdadm create-md res' to initialize meta-data area. <==

Command '/sbin/drbdsetup 0 disk /dev/san01/lv02 /dev/san02/lv02 internal --set-defaults --create-device' terminated with exit code 10
Don't worry about those errors.
Primary: Initiate the device by run the following commands one at a time:
drbdadm create-md r0
drbdadm attach r0
drbdadm syncer r0
drbdadm connect r0
Secondary: Configure and connect the device on the second node by run ningthe following commands one at a time:
drbdadm create-md r0
drbdadm attach r0
drbdadm connect r0
Primary: Start the sync between the two nodes by calling:
drbdadm -- --overwrite-data-of-peer primary r0
Secondary: At this point, we need to promote the secondary node to 'Primary' position.
drbdadm primary r0
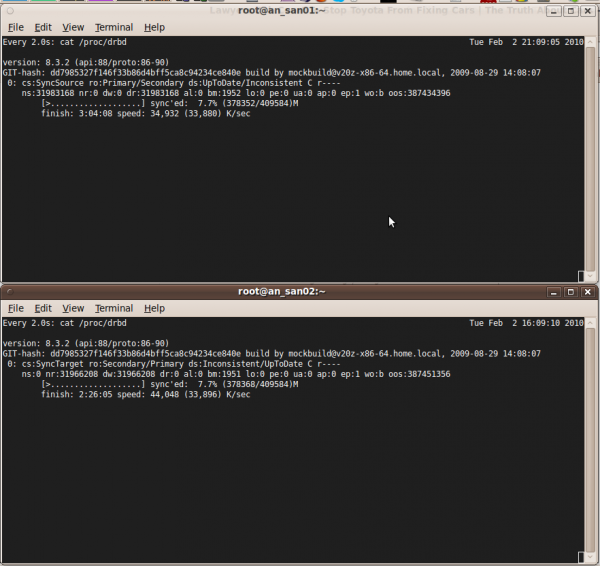
Both: Make sure that both nodes are sync'ing by watching the sync process by running:
watch cat /proc/drbd
Both: You should see something like:
Every 2.0s: cat /proc/drbd                                                                Tue Feb  2 23:53:29 2010

version: 8.3.2 (api:88/proto:86-90)
GIT-hash: dd7985327f146f33b86d4bff5ca8c94234ce840e build by mockbuild@v20z-x86-64.home.local, 2009-08-29 14:08:07
 0: cs:SyncSource ro:Primary/Primary ds:UpToDate/Inconsistent C r----
    ns:366271552 nr:0 dw:0 dr:366271552 al:0 bm:22355 lo:0 pe:0 ua:0 ap:0 ep:1 wo:b oos:53146012
        [================>...] sync'ed: 87.4% (51900/409584)M
        finish: 0:22:27 speed: 39,364 (33,888) K/sec
You do not need to wait for the sync. to complete before proceeding.
| Any questions, feedback, advice, complaints or meanderings are welcome. | |||
| Alteeve's Niche! | Alteeve Enterprise Support | Community Support | |
| © 2025 Alteeve. Intelligent Availability® is a registered trademark of Alteeve's Niche! Inc. 1997-2025 | |||
| legal stuff: All info is provided "As-Is". Do not use anything here unless you are willing and able to take responsibility for your own actions. | |||