Build an m2 Anvil! - Detailed
|
Alteeve Wiki :: Build an m2 Anvil! - Detailed |
| Warning: This is an in-progress document. Do not expect anything here to be accurate or correct. This warning will be removed when the guide is completed. You can track the progress on Striker's Github page. |
This guide will walk you through all the steps needed to build an Anvil! platform.
| Note: This guide covers a lot of background reasoning and high-level discussion of the Anvil! platform in general. If you don't care about this and want concise instructions, see the link below. |
A What?
An Anvil! Platform is, fundamentally, a system designed to keep your (virtual) servers running, if at all possible.
An Anvil! Platform contains three parts;
- A hardware architecture
- An easy to use web interface, called Striker.
- An autonomous "decision engine", called ScanCore.
Collectively, these parts for the Anvil! platform, the first Intelligent Availability™ platform ever.
The Anvil! Architecture
| Note: The Anvil! architecture is a vendor-neutral platform. However, some hardware may not yet have a ScanCore agent yet. If you have as-yet unsupported hardware, please let us know. |
We'll go into the architecture further down, but in brief, it fulfils the 'complete stack redundancy' requirement of IA.
In brief, the architecture includes;
- Dual network-connected UPSes
- Dual network-switched PDUs
- Dual stacked ethernet switches
- Dual server host nodes
- Dual Striker dashboards
Together, they provide a platform in which all components are fully redundant and electrically and mechanically isolated. This allows the Anvil! platform to survive not just a failure, but also recovery and normal maintenance without service interruption.
The Striker WebUI
The Striker WebUI is designed to be as easy to use as possible. This is not for your benefit, but instead for the protection of the Anvil! itself.
This is in-line with the Remove the human part of "Intelligent Availability".
The consistent Anvil! architecture allows Striker to make a lot of assumptions, dramatically assisting with the "simplicity" goal.
The ScanCore Decision Engine
ScanCore is the heart of the Anvil! platform's Intelligent Availability, providing the Intelligent_Availability#Intelligent_Availability_Is_Proactive proactive component of Intelligent Availability.
ScanCore runs on all Anvil! nodes and Striker dashboards. On each machine, it invokes all available scan agents and then analyses the results to make "big picture" decisions on what, if anything, to do to best protect the hosted servers.
Fundamentally, this results in one of two actions;
- Preventative Live Migration
- Load Shedding
Here is an example of both scenarios.
Power loss
Power is lost to one UPS, no action is taken because the backup UPS has power. Later, power is lost to both UPSes, ScanCore determines the greatest threat to availability is no longer component failure, but instead, depletion of the batteries. Redundant node is powered off to shed load and extend run-time. Power stays out for too long and the strongest UPS drops below a minimal run-time and ScanCore gracefully shuts down hosted servers and then the active node. Later, power is restored. Striker dashboards boot and begin monitoring the UPS charge rate. When safe, the nodes are rebooted and hosted servers are started, all autonomously.
ScanCore can differentiate between a local node suffering a cooling failure versus an environmental loss of cooling. When the latter is detected, it will also shed load to reduce thermal output and slow the rate of heating. Likewise, when the room returns to nominal temperatures, ScanCore will restore full redundancy.
Hardware Degredation
Under normal operation, both nodes are equally healthy so either can be 'active' at any given time.
At some point, the active node loses a cooling fan. ScanCore will wait a short time to ensure it isn't a transient issue, and then declare the peer is healthier and live-migrate the servers autonomously.
Should the fan not be repaired, but later a hard drive fail on the new host, ScanCore will weigh the failures against each other and decide that the cooling failure (alone, without overheating sensors) is less dangerous than a degraded RAID array, thus live-migrating the hosted servers back again.
Scan agents are free to set failure conditions and assign those conditions weight. ScanCore itself simply sums the weights from the various agents, compares them against each node and determines which node is healthier. In this way, preventative load shedding is always getting smarter.
Building an Anvil
Building an Anvil! requires a few steps;
- Preparing your network
- Selecting and assembling appropriate hardware
- Creating the install media and building the first Striker dashboard
- Using the first dashboard to build the second dashboard
- Creating an "Install Manifest" and building an Anvil! node pair
Preparing Your Network
Before we start Assembling hardware, we need to have a plan for the three networks we will use, what their subnets will be and what IP address(es) we will assign to devices.
The Anvil! will use three separate /16 (255.255.0.0) networks;
We will be using six interfaces, bonded into three pairs of two NICs in Active/Passive (mode=1) configuration. Each link of each bond will be on alternate switches and network card. We will also configure affinity by specifying interfaces bcn_link1, sn_link1 and ifn_link1 as primary for the bcn_bond1, sn_bond1 and ifn_bond1 interfaces, respectively. This way, when everything is working fine, all traffic is routed through the same switch to minimise traffic on the switch stack.
| Note: Red Hat supports bonding modes 0 and 2 as of RHEL 6.4. We do not recommend these bonding modes for two reasons. First, we've found the most reliable and consistent ability to survive switch failure and recovery with mode 1 only. Second, Intelligent Availability requires consistent performance in a degraded state. Other bond bonds aggregate the bandwidth of the bond members, meaning the loss of a member will result in a reduction in performance. |
We will be using three VLANs to isolate the three networks:
- BCN will have VLAN ID of 100.
- SN will have VLAN ID number 200.
- IFN will have VLAN ID number 300.
- All other unassigned ports will be in the default VLAN ID of 1, effectively disabling those ports.
The actual mapping of interfaces to bonds to networks will be:
| Subnet | Cable Colour | VLAN ID | Link 1 | Link 2 | Bond | IP |
|---|---|---|---|---|---|---|
| BCN | White | 100 | bcn_link1 | bcn_link2 | bcn_bond1 | 10.20.x.y/16 |
| SN | Green | 200 | sn_link1 | sn_link2 | sn_bond1 | 10.10.x.y/16 |
| IFN | Black | 300 | ifn_link1 | ifn_link2 | ifn_bond1 | 10.255.x.y/16 |
In almost all cases, the BCN and IFN should stay the same across all Anvil! installs. The IFN will likely vary on every install as it depends entirely on what your existing network uses. The only time to you should change the BCN or SN would be if they collide with your existing network. In those rare cases, we've avoided the collision by dropping the '0 from second octet.
- If your IFN collides with the BCN, switch to 10.2.0.0/16
- If your IFN collides with the SN, switch to 10.2.0.0/16
Now that we've defined out subnets, we need to plan the actual IP addresses to assign to the foundation pack devices, Anvil! nodes and Striker dashboards. Most of these will be on the BCN, and we will use the third octet to describe the device with the IP. The fourth octet will describe the actual device.
For Anvil! nodes, we will use the third octet to identify the Anvil!’s sequence. We're building our third Anvil! in this tutorial, so the third octet will be 'x.x.30.x' for the node and 'x.x.31.x' for the IPMI interface.
IP address allocation plan:
Foundation Pack:
| Device | Host Name | Subnet | IP Address | Note |
|---|---|---|---|---|
| Ethernet Switch 1 | an-switch01.alteeve.ca | BCN | 10.20.1.1 | |
| Ethernet Switch 2 | an-switch02.alteeve.ca | BCN | 10.20.1.2 | Not used when stacked. |
| Switched PDU 1 | an-pdu01.alteeve.ca | BCN | 10.20.2.1 | |
| Switched PDU 2 | an-pdu02.alteeve.ca | BCN | 10.20.2.2 | |
| UPS 1 | an-ups01.alteeve.ca | BCN | 10.20.3.1 | |
| UPS 2 | an-ups02.alteeve.ca | BCN | 10.20.3.2 |
Striker dashboards;
| Device | Host Name | Subnet | IP Address | Note |
|---|---|---|---|---|
| Striker 1, BCN | an-striker01.alteeve.ca, an-striker01.bcn | BCN | 10.20.4.1 | |
| Striker 1, IFN | an-striker01.ifn | IFN | 10.255.4.1 | |
| Striker 1, IPMI | an-striker01.ipmi | BCN | 10.20.5.1 | Only used on dashboards with IPMI BMCs |
| Striker 2, BCN | an-striker02.alteeve.ca, an-striker02.bcn | BCN | 10.20.4.2 | |
| Striker 2, IFN | an-striker02.ifn | IFN | 10.255.4.2 | |
| Striker 2, IPMI | an-striker02.ipmi | BCN | 10.20.5.2 | Only used on dashboards with IPMI BMCs |
Anvil! nodes;
| Device | Host Name | Subnet | IP Address | Note |
|---|---|---|---|---|
| Anvil! 3, Node 1, BCN | an-a03n01.alteeve.ca, an-a03n01.bcn | BCN | 10.20.30.1 | The '30 reflects the sequence number. |
| Anvil! 3, Node 1, IPMI | an-a03n01.ipmi | BCN | 10.20.31.1 | The '31 reflects the sequence number, plus one one for the IPMI. |
| Anvil! 3, Node 1, SN | an-a03n01.sn | SN | 10.10.30.1 | |
| Anvil! 3, Node 1, IFN | an-a03n01.ifn | IFN | 10.255.30.1 | |
| Anvil! 3, Node 2, BCN | an-a03n02.alteeve.ca, an-a03n02.bcn | BCN | 10.20.30.2 | The '30 reflects the sequence number. |
| Anvil! 3, Node 2, IPMI | an-a03n02.ipmi | BCN | 10.20.31.2 | The '31 reflects the sequence number, plus one one for the IPMI. |
| Anvil! 3, Node 2, SN | an-a03n02.sn | SN | 10.10.30.2 | |
| Anvil! 3, Node 2, IFN | an-a03n02.ifn | IFN | 10.255.30.2 |
With this planned out, we'll be ready to assign IP addresses as we go!
Selecting And Assembling Hardware
The Anvil! can be thought of as having three distinct parts;
- The 'Foundation Pack'; UPSes, PDUs and ethernet switches. A single foundation pack can host two or five Anvil! node pairs.
- A pair of Anvil! nodes, onto which your servers are hosted and protected.
- A pair of Striker dashboards, which can host N node pairs.
Node pairs act as a single unit to host and protect your servers. Your servers can migrate between these two nodes without interruption, and ScanCore may migrate them for you, depending on changing threats. Servers can be moved from one Anvil! to another through a cold migration process, which is useful when your needs grow beyond your first Anvil! pair. The Striker dashboards monitor and manage any number of node pairs, limited only by their ability to store ScanCore data coming from the various node pairs.
With this in mind, there are three things to consider;
- How fast does the foundation pack need to be and how many node pairs do I plan to use?
- How many servers do I plan to host on an Anvil! node pair, and what kind of performance needs do they have?
- How busy do you expect the ScanCore databases on the Striker dashboards to be?
Selecting hardware requires understanding your expected load type, understanding the performance options available and figuring out how to make it work within your budget.
Once selected and acquired, the next step is to assemble the hardware into a foundation pack, assemble the dashboards and assemble the node pairs.
Overview
This starts by download the Striker ISO generator, running it against either a RHEL or CentOS 6 ISO and it spits out an Anvil! build ISO. You can then burn this to a DVD or write it to a USB drive (using another small tool).
You boot the first Striker dashboard off of the ISO use it build up the dashboard machine.
Once done, you can get rid of the ISO if you'd like. All further installs will happen over the network!
The Striker UI acts as an "Install Target". When you enable it, you can then boot other dashboards or nodes, choose to boot of the network and they will boot and install from Striker, just the same as if you had booted up from the ISO, just a lot more conveniently.
Staged Installs
Building dashboards and nodes is a 2-stage process.
The first stage is like installing firmware on a router; It gets the base OS install and initial configuration, but it is a generic system at that point.
The second stage is where you configure the system for your environment.
The "Install Target" function handles the stage-1 install for both dashboards and nodes. The stage-2 is handled differently for dashboards and nodes, which we'll cover in a bit.
Why Do I Have To Build My Own ISO?
The Anvil! platform itself works like an appliance. That is to say, builds and manages the operating systems under the Striker dashboards and Anvil! nodes.
We had to choose early on if we were going to create our own operating system or not, and we chose not to. The additional burden of maintaining an OS would distract us from our core goal of building the most resilient, intelligent availability platform.
So how to resolve this?
For completely understandable reasons, we can't simply repackage and distribute a RHEL or CentOS based Anvil! install ISO. Red Hat and CentOS work very hard to deliver their ISOs and they want to ensure that, if their name is on something, they've tested it to be up to their standards.
So given that we don't want to create a distro, and we respect Red Hat and CentOS's trademarks, the best option available was for us to create an ISO generation tool, and that's what we've done.
You run our tool against the stock ISO and it will generate an ready-to-go Anvil! ISO.
Build the Anvil! ISO
| Note: We've tested this tool on Fedora, RHEL and CentOS operating systems. It may not work on other distributions. If you have trouble, please contact us and we'll work to extend support to new distros. |
The build process is pretty simple;
- Download the RHEL or CentOS 6 DVD ISO.
- Download anvil-generate-iso.
- Install dependencies.
- Build the Anvil! ISO.
- (Optional) Write the ISO to a USB drive
Download the RHEL or CentOS ISO
The first question to ask is;
"Do I want to build on RHEL or CentOS?".
The answer is up to you, but it comes down to your support comfort level. If you are a proper business, then going with RHEL makes the most sense. You will need to purchase a RHEL entitlement and Resilient Storage Add-On which includes the High-Availability Add-On.
If you're looking for a "free-as-in-beer" solution, or if you want to do a proof of concept/testing, CentOS is a perfectly fine option.
Please be sure to get the 64-bit version of the 6-series release. The 32-bit is not supported, nor is the 7-series (yet).
For CentOS, download both DVD 1 and 2. For RHEL, there is only DVD 1.
Save the ISO in any directory you want, just make a note of where they are.
Download anvil-generate-iso
| Note: When version 2 is officially released, the download location will change from github to alteeve.ca proper. |
Download the tool:
wget -c https://raw.githubusercontent.com/ClusterLabs/striker/master/tools/anvil-generate-iso
chmod 755 anvil-generate-iso
Install Dependencies
The ISO generator requires a few program to work properly. So we'll install them now:
yum install createrepo genisoimage libcdio
For Fedora:
dnf install createrepo genisoimage libcdio
For Ubuntu (tested on 16.04 LTS):
apt-get install createrepo genisoimage libcdio-utils fuseiso
For OpenSUSE (tested on 42.1):
zypper in createrepo genisoimage libcdio16 libcdio-utils
Build the ISO
| Note: This tool requires access to the Internet to work properly. |
To build a RHEL-based Anvil! ISO, run:
./anvil-generate-iso --source ./rhel-server-6.8-x86_64-dvd.iso
To build a CentOS-based Anvil! ISO, run:
./anvil-generate-iso --source ./CentOS-6.8-x86_64-bin-DVD1.iso,./CentOS-6.8-x86_64-bin-DVD2.iso
(Note that both CentOS ISOs are listed with a ',' separating them without spaces).
Once the ISO generation starts, the process is the same for both types.
License agreements are important, so please do read them before proceeding.
Once your agree or decline the third party tools, the generation will start.
RHEL output:
- Generating md5sum of the source: [/home/digimer/anvil/iso/rhel-server-6.8-x86_64-dvd.iso], please wait a moment...
- The source ISO is: [RHEL 6.8, Disk 1].
- The working directory: [/home/digimer/anvil/iso/anvil/RHEL] doesn't exist.
- Can I create it (and needed subdirectories) now? [Y/n]
CentOS output:
- Generating md5sum of the source: [/home/digimer/anvil/iso/CentOS-6.8-x86_64-bin-DVD1.iso], please wait a moment...
- The source ISO is: [CentOS 6.8, Disk 1].
- Generating md5sum of the source: [/home/digimer/anvil/iso/CentOS-6.8-x86_64-bin-DVD2.iso], please wait a moment...
- The source ISO is: [CentOS 6.8, Disk 2].
- The working directory: [/home/digimer/anvil/iso/anvil/CentOS] doesn't exist.
- Can I create it (and needed subdirectories) now? [Y/n]
- Thank you, proceeding now.
In the example here, the ISO tools will create a build directory called ./anvil/iso/anvil/RHEL or ./anvil/iso/anvil/CentOS if you allow it to do so.
The rest of the build will be automated.
RHEL output (CentOS output is nearly identical);
- Thank you, proceeding now.
- The source ISO: [/data1/VMs/files/rhel-server-6.8-x86_64-dvd.iso] is not mounted. Will read and copy files directly out of the ISO.
- Reading the contents of the: [rhel-server-6.8-x86_64-dvd.iso] ISO now...
- Done. Read in: [6000] files across: [134] directories.
- Found: [3997] source packages.
- We're looking through the source ISO(s) to find which installation packages are needed.
- Please be patient! This can take a minute.
- Ready to copy files!
- Packages copied. Copying auxiliary source files now.
- Verifying 'syslinux' was created.
- The 'syslinux' directory was not in the source. Creating it now, if needed.
- Auxiliary files now in place, ready to grab Anvil! files.
- Downloading the Striker source code.
- This might take a few minutes on slow connections, please be patient.
- Downloading: [https://github.com/ClusterLabs/striker/archive/2.0.0b-rc1.zip] to: [/home/digimer/anvil/iso/anvil/RHEL/striker.zip], which is: [<unknown>]... Redirected.
- Downloading: [https://codeload.github.com/ClusterLabs/striker/zip/2.0.0b-rc1] to: [/home/digimer/anvil/iso/anvil/RHEL/striker.zip], which is: [<unknown>]... Finished! Took: [8] second(s).
- Extracting the Striker source file.
- Downloading packages from the Alteeve's Niche! repository now.
- If your connection is slow, this might take a few minutes. Please be patient.
...
<several packages downloaded>
...
- New ISO generated. Calculating sum...
- All done!

The ISO file: [/home/digimer/anvil/iso/anvil/Anvil_m2-v2.0.0b-rc1_RHEL-6.8.iso] has been generated!
- The size is: [1.02 GiB] and the md5sum is: [e72a21de00f9cc67886389cde5a165ca]
Ding! Dinner is ready!
| Note: In the example above, version 2.0.0b-rc1 was the latest release. The version available when you generate your iso, and the resulting ISO file names, will almost certainly be different. |
You can now either burn the Anvil_m2-v2.0.0b-rc1_RHEL-6.8.iso (or Anvil_m2-v2.0.0b-rc1_CentOS-6.8.iso) ISO to a DVD disk.
Optional: Create a USB Boot Drive
| Note: This is optional. If you don't have an optical drive on the machine you plan to make a Striker dashboard, then you can use anvil-usb-installer. |
If you plan to install from a USB drive, download anvil-usb-installer as well.
wget -c https://raw.githubusercontent.com/ClusterLabs/striker/master/tools/anvil-usb-installer
chmod 755 anvil-usb-installer
We'll need a few more programs for this tool.
yum install mkdosfs parted rsync syslinux udevadm
For Fedora:
dnf install mkdosfs parted rsync syslinux udevadm
For Ubuntu (tested on 16.04 LTS):
apt-get install dosfstools parted rsync syslinux udev
For OpenSUSE (tested on 42.1):
zypper in dosfstools parted rsync syslinux udev
| Warning: This project will completely wipe all data from the target storage device. Be certain you are pointing anvil-usb-installer at the right target! |
In my case, my USB drive came up as /dev/sdb and I am building a RHEL version, so the command I will run is:
sudo ./anvil-usb-installer --iso ./anvil/Anvil_m2-v2.0.0b-rc1_RHEL-6.8.iso --usb /dev/sdb
-=] Anvil! USB Installer
- USB device path: . [/dev/sdb]
- Target drive: .... [ASMT 2105]
- The capacity is: . [931.51 GiB (1000.20 GB)]
- The source ISO is: [./anvil/Anvil_m2-v2.0.0b-rc1_RHEL-6.8.iso]
=======================================================================
[ WARNING ] - This device will be completely erased! All existing data
[ WARNING ]   will be lost!
=======================================================================
Proceed? [y/N]
Verify this is the drive you want to overwrite!
If so, press 'y' and hit '<enter>'.
- Thank you, Proceeding
- Wiping out existing partition geometry and MBR from: [/dev/sdb]
- Creating a new partition.
Warning: The resulting partition is not properly aligned for best performance: 8192s % 65535s != 0s
- Verifying that the new partition was created successfully.
- Formatting the new partition: [/dev/sdb1]
- Writing out the master boot record to: [/dev/sdb]
- Installing syslinux on: [/dev/sdb1]
- Creating the temporary USB mount point: [/tmp/anvil_usb]
- Creating the temporary ISO mount point: [/tmp/anvil_iso]
- Mounting the USB partition: [/dev/sdb1] on: [/tmp/anvil_usb]
- Mounting the source ISO: [./anvil/Anvil_m2-v2.0.0b-rc1_RHEL-6.8.iso]
  on: [/tmp/anvil_iso]
- Verifying they mounted.
- Verifying that everything we're about to copy is under 4 GiB for 'vfat'
  compatibility.
- Copying the source ISO contents to the USB device.
- Protecting the USB drive in case 'striker-usb-insert' is set to force-initialize.
- Copying the source ISO to the USB drive. This might take a bit, please be
  patient!
- Copying the 'syslinux' files into place.
- Cleaning up, please wait while the USB drive is finalized!
  If the OS cached data being written to the USB, this might take a bit.
- Unmounting: [/tmp/anvil_iso]
- Removing the temporary mount point: [/tmp/anvil_iso]
- Unmounting: [/tmp/anvil_usb]
- Removing the temporary mount point: [/tmp/anvil_usb]
Done!

Plug the USB drive into the machine you wish to make a Striker dashboard. Press
the key for you system to manually select a boot device (usually <F10> or
<F12>) and choose this USB drive. Select the appropriate Striker number from
the menu.

NOTE: The Install performed by this USB drive is fully automated, once started.
      Any data on the target machine will be erased without further warning!

Have fun!
| Note: Don't worry about the warning. This will only be needed once. |
All done!
Building The First Striker Dashboard
The first dashboard will be booted off of either the DVD or USB drive. How exactly you do this will depend on your hardware, so please consult your machine's service manual for instructions on how to choose a temporary boot device.
Hardware Requirements
The Striker dashboard has fairly modest system requirements. The only hard requirement is that the machine can run RHEL or CentOS 6 and that it has two network interfaces (wireless is NOT supported).
The recommended minimum configuration is:
- Intel Core i5 v5 (or AMD equivalent) or newer CPU
- 8 GiB of RAM
- 128 GiB SSD
- 4x 1 Gbps NICs
The above specs will provide plenty of performance for hosting the ScanCore database as well as provide network redundancy on both the Back-Channel Network and the Intranet-Facing Network.
Stage-1 Striker Install
Boot from the USB drive or DVD (ISO). Press the key to select a temporary boot device and choose the boot device you created.
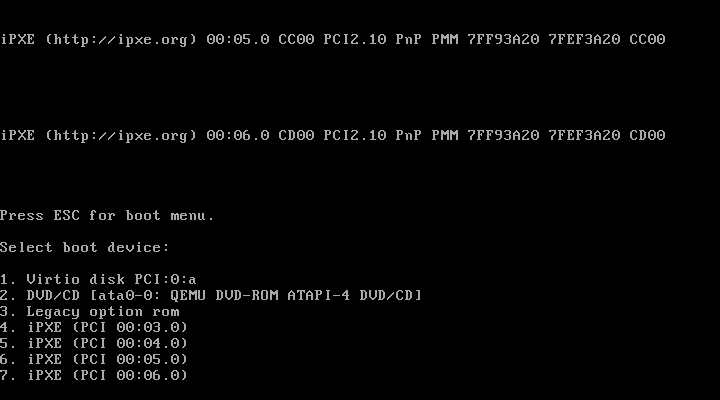
Once you select the boot device, you will see the Striker boot menu.
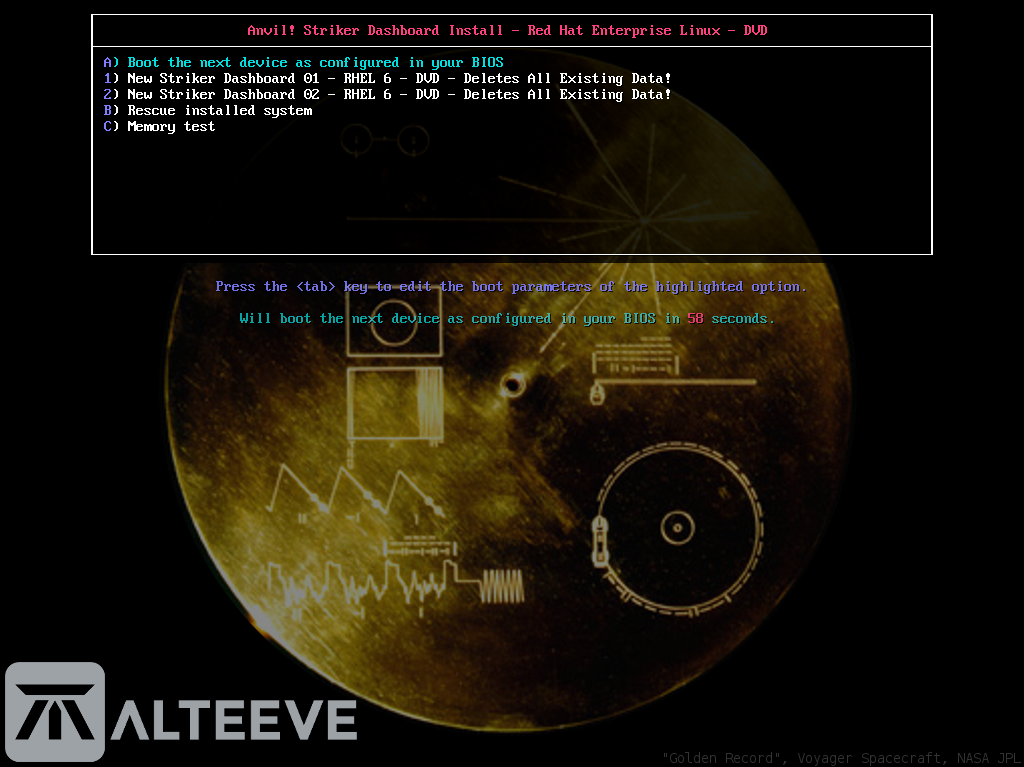
| Warning: Once selected, the rest of the stage-1 install is automated. Any existing data on the machine will be erased! |
We're building "Striker 01", so that is what we'll choose.
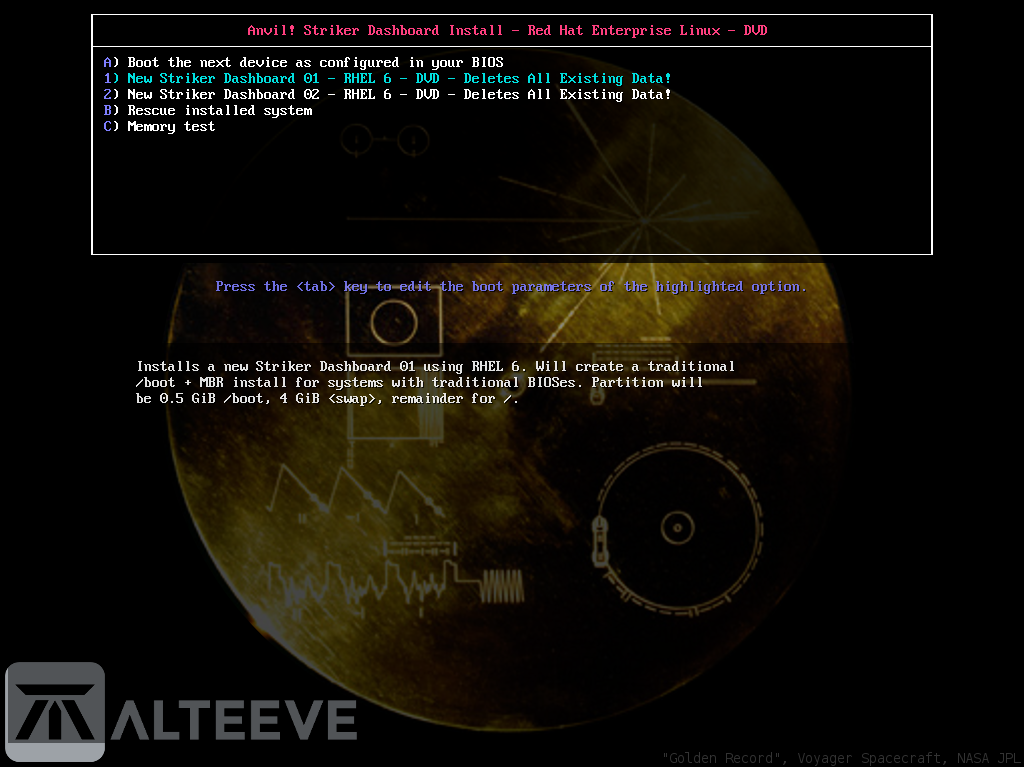
The rest of the install is automated.
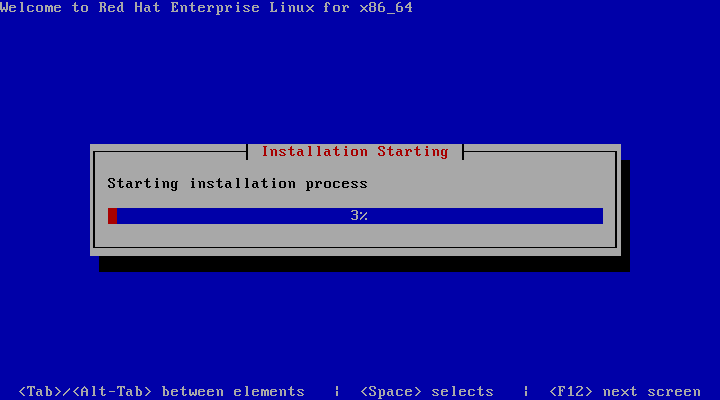
When the stage-1 install is finished, you will be presented with a standard RHEL login.
| Note: The user name is 'root' and the password is 'Initial1'. This is the case for all stage-1 installed dashboards and nodes. |
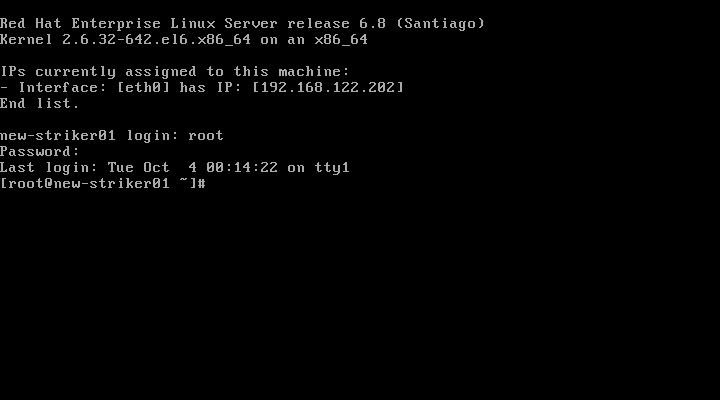
That's all for stage-1!
Stage-2 Striker Install
There are several ways to customise Striker for your environment. Below is a couple of examples with a link to the complete list.
striker-installer Switches
Example striker-install Invocations
| Note: This is a standard bash call, so please be sure to quote anything with spaces and to escape special characters like !. |
| Warning: The --host-uuid <uuid> MUST be unique across dashboards. Please don't directly copy and past without changing the UUID (use uuidgen to create one for you). |
The most common install will look like this:
./striker-installer \
 -c "Alteeve's Niche! Inc." \
 -n "an-striker01.alteeve.ca" \
 -u "admin:super secret password" \
 -i 10.255.4.1/16,dg=10.255.255.254,dns1=8.8.8.8,dns2=8.8.4.4 \
 -b 10.20.4.1/16 \
 -p 10.20.10.200:10.20.10.209 \
 --peer-dashboard hostname=an-striker02.alteeve.ca,bcn_ip=10.20.4.2 \
 --host-uuid 32e47561-5840-4c6a-9732-2627efcd0af2 \
 --router-mode \
 --rhn "rhn_admin:rhn_secret"
This will configure the dashboard as the first striker using the standard BCN address '10.20.4.1' with a '255.255.0.0' subnet mask. In this example, the internet-facing network is '10.255.0.0/16', so we set the IFN address '10.255.4.1/16' and '10.255.255.254' gateway using Google's open DNS servers. The host name is set to 'an-striker01.alteeve.ca', the administrative user (and striker web user) is 'admin' and the nice long password of 'super secret password'.
We want this Striker to stay in sync with its peer, 'an-striker02.alteeve.ca', so we tell this machine where to find it. Don't worry that the peer doesn't exist yet. When it is built, they will sync when they find each other for the first time later.
We want to use this as an "Install Target", so we set a few extra options. We tell it to route BCN traffic to the internet (when "Install Target" is activated only) and we tell this machine to offer up IP addresses from '10.20.10.200' to '10.20.10.209'. These are only needed for a short time when a machine (node or dashboard) boots without an operating system (or when you are about to reload the OS).
This is a RHEL install proper, so the Red Hat user name 'rhn_user' and password are set so that the machine is registered and the needed subscriptions added. Obviously, there is no need to use --rhn when you're installing based on CentOS.
Later, when we're ready to do stage-2 on the second dashboard, we would use:
./striker-installer \
 -c "Alteeve's Niche! Inc." \
 -n "an-striker01.alteeve.ca" \
 -u "admin:super secret password" \
 -i 10.255.4.2/16,dg=10.255.255.254,dns1=8.8.8.8,dns2=8.8.4.4 \
 -b 10.20.4.2/16 \
 -p 10.20.10.210:10.20.10.219 \
 --peer-dashboard hostname=an-striker01.alteeve.ca,bcn_ip=10.20.4.1 \
 --host-uuid c63dda20-accb-4cc5-a2ff-8fc5be8d953b \
 --router-mode \
 --rhn "rhn_admin:rhn_secret"
The main differences are the final octet of the BCN and IFN addresses are '2', the hostname is 'an-striker02', the peer information points to Striker 1 and the lease range is from '10.20.10.210' to '10.20.10.219'.
Running striker-installer
For this document, we are using KVM virtual servers (the same foundation used in the Anvil! itself). When run on a workstation, it uses the IFN '192.168.122.0/24', so we'll adapt our 'striker-installer' to suit. We'll do this by editing the provides 'striker-installer.example'.
vim striker-installer.example
./striker-installer \
 -c "Alteeve's Niche! Inc." \
 -n "an-striker01.alteeve.ca" \
 -u "admin:super secret password" \
 -i 192.168.122.251/24,dg=192.168.122.1,dns1=8.8.8.8,dns2=8.8.4.4 \
 -b 10.20.4.1/16 \
 -p 10.20.10.200:10.20.10.209 \
 --peer-dashboard hostname=an-striker02.alteeve.ca,bcn_ip=10.20.4.2 \
 --host-uuid 32e47561-5840-4c6a-9732-2627efcd0af2 \
 --router-mode \
 --rhn "rhn_admin:rhn_secret"
| Note: For this tutorial, the admin password is 'super secret password'. Please use a different password in your environment! |
With that edited, we can start the install!
sh /root/striker-installer.example
If your striker dashboard has a Siig, and if you accepted the ASIX user license when you created the Anvil! ISO, the drivers will be compiled and loaded, the interface will be started and if available, an IP address will be acquired. Many smaller Striker dashboards are built on Intel NUCs with these Siig adapters as their IFN interface, so this behaviour makes sure everything is up and running before the install starts. If your machine does not have a Siig adapter, this step is skipped.
The install starts by checking for an Internet connection. If a connection is found and if the base OS is RHEL and if --rhn was used, the machine will register with Red Hat.
The beginning of the install will look something like this
 ##############################################################################
 #   ___ _       _ _                                    The Anvil! Dashboard  #
 #  / __| |_ _ _(_) |_____ _ _                                 -=] Installer  #
 #  \__ \  _| '_| | / / -_) '_|                                               #
 #  |___/\__|_| |_|_\_\___|_|                                                 #
 #                                               https://alteeve.ca/w/Striker #
 ##############################################################################

Sanity-checking command line switches:
Done.

Checking the operating system to ensure it is compatible.
- We're on a RHEL (based) OS, good. Checking version.
- Looks good! You're on: [6.8]
- This OS is RHEL proper.
Done.

Checking for an Internet connection...
- Internet access detected.
Done.

RHN credentials given. Attempting to register now.
- [ Note ] Please be patient, this might take a minute...
- Registration was successful.
- Adding 'Optional' channel...
- Output: [Repository 'rhel-6-server-optional-rpms' is enabled for this system.]
- 'Optional' channel added successfully.
Done.

Backing up some network related system files.
- The backup directory: [/root/anvil] doesn't exist, creting it.
- Backup directory successfully created.
- Backing up: [/etc/udev/rules.d/70-persistent-net.rules]
- It exists, backing it up.
- Copying: [/etc/udev/rules.d/70-persistent-net.rules] to: [/root/anvil/]
- Backing up: [/etc/sysconfig/network-scripts]
- Copying: [/etc/sysconfig/network-scripts] to: [/root/anvil/]
- Backing up: [/etc/rc.local]
- It exists, backing it up.
- Copying: [/etc/rc.local] to: [/root/anvil/]
Done.

Checking if we need to freeze NetworkManager on the active interface.
- NetworkManager isn't running, freeze not needed.
Done

Making sure all network interfaces are up.
- The network interface: [eth1] is down. It must be started for the next stage.
- Checking if: [/etc/sysconfig/network-scripts/ifcfg-eth1] exists.
- Config file exists, changing BOOTPROTO to 'none'.
- Attempting to bring up: [eth1]...
- Checking to see if it is up now.
- The interface: [eth1] is now up!
- The network interface: [eth2] is down. It must be started for the next stage.
- Checking if: [/etc/sysconfig/network-scripts/ifcfg-eth2] exists.
- Config file exists, changing BOOTPROTO to 'none'.
- Attempting to bring up: [eth2]...
- Checking to see if it is up now.
- The interface: [eth2] is now up!
- The network interface: [eth3] is down. It must be started for the next stage.
- Checking if: [/etc/sysconfig/network-scripts/ifcfg-eth3] exists.
- Config file exists, changing BOOTPROTO to 'none'.
- Attempting to bring up: [eth3]...
- Checking to see if it is up now.
- The interface: [eth3] is now up!
Done.
Mapping the Network
There is no way for a program to know that a given network interface is going to be used for a particular task. To handle this in a user-friendly way, the installer will ask you to unplug each cable, wait a moment, and then plug it back in. The installer can see which interface loses a connection and determine which interface you manipulated.
This mapping is the last step before the automated portion takes over.
| Note: Striker dashboards with four interfaces will have redundant connections to the BCN and IFN. Larger installs using proper server-grade equipment should have four interfaces (and redundant power) for additional resiliency. It is not required, as the two Striker dashboards are inherently redundant for each other. |
When two interfaces are found, the mapping order will be:
- "Back-Channel Network - Link 1"
- "Internet-Facing Network - Link 1"
When four interfaces are found, the mapping order will be:
- "Back-Channel Network - Link 1"
- "Back-Channel Network - Link 2"
- "Internet-Facing Network - Link 1"
- "Internet-Facing Network - Link 2"
Lets see what this looks like with four interfaces
-=] Configuring network to enable access to Anvil! systems.
- Beginning NIC identification...
- Please unplug the interface you want to make:
  [Back-Channel Network, Link 1]
Unplug the interface you want to make BCN link 1.
- NIC with MAC: [52:54:00:71:20:fa] will become: [bcn_link1]
  (it is currently: [eth2])
- Please plug in all network cables to proceed.
Plug it back in and unplug the interface you want to make BCN link 2.
- Please unplug the interface you want to make:
  [Back-Channel Network, Link 2]
Plug it back in and unplug the interface you want to make IFN link 1.
- NIC with MAC: [52:54:00:3d:bc:57] will become: [bcn_link2]
  (it is currently: [eth3])
- Please plug in all network cables to proceed.
- Please unplug the interface you want to make:
  [Internet-Facing Network, Link 1]
Plug it back in and unplug the interface you want to make IFN link 2.
- NIC with MAC: [52:54:00:d3:a9:0f] will become: [ifn_link1]
  (it is currently: [eth0])
- Please plug in all network cables to proceed.
- Please unplug the interface you want to make:
  [Internet-Facing Network, Link 2]
Finally, plug it back in.
You will now see a summary of what will be done.
- NIC with MAC: [52:54:00:55:c0:6e] will become: [ifn_link2]
  (it is currently: [eth1])
- Please plug in all network cables to proceed.
Done.

Here is what you selected:
- Interface: [52:54:00:71:20:FA], currently named: [eth2],
  will be renamed to: [bcn_link1]
- Interface: [52:54:00:3D:BC:57], currently named: [eth3],
  will be renamed to: [bcn_link2]
- Interface: [52:54:00:D3:A9:0F], currently named: [eth0],
  will be renamed to: [ifn_link1]
- Interface: [52:54:00:55:C0:6E], currently named: [eth1],
  will be renamed to: [ifn_link2]

The Back-Channel Network interface will be set to:
- IP:      [10.20.4.1]
- Netmask: [255.255.0.0]

The Internet-Facing Network interface will be set to:
- IP:      [192.168.122.251]
- Netmask: [255.255.255.0]
- Gateway: [192.168.122.1]
- DNS1:    [8.8.8.8]
- DNS2:    [8.8.4.4]

Shall I proceed? [Y/n]
If you are happy, press '<enter>' to start the install. If you made a mistake, type 'n' + '<enter>' and the install will exit. Simply restart the install and try again until you are happy.
Stage-2 Install Completes
From here on out, the rest of the install is automated. It might take a while, so this is a good time to go grab a $drink.
When it is done, it will reboot and you will see the graphical login screen!
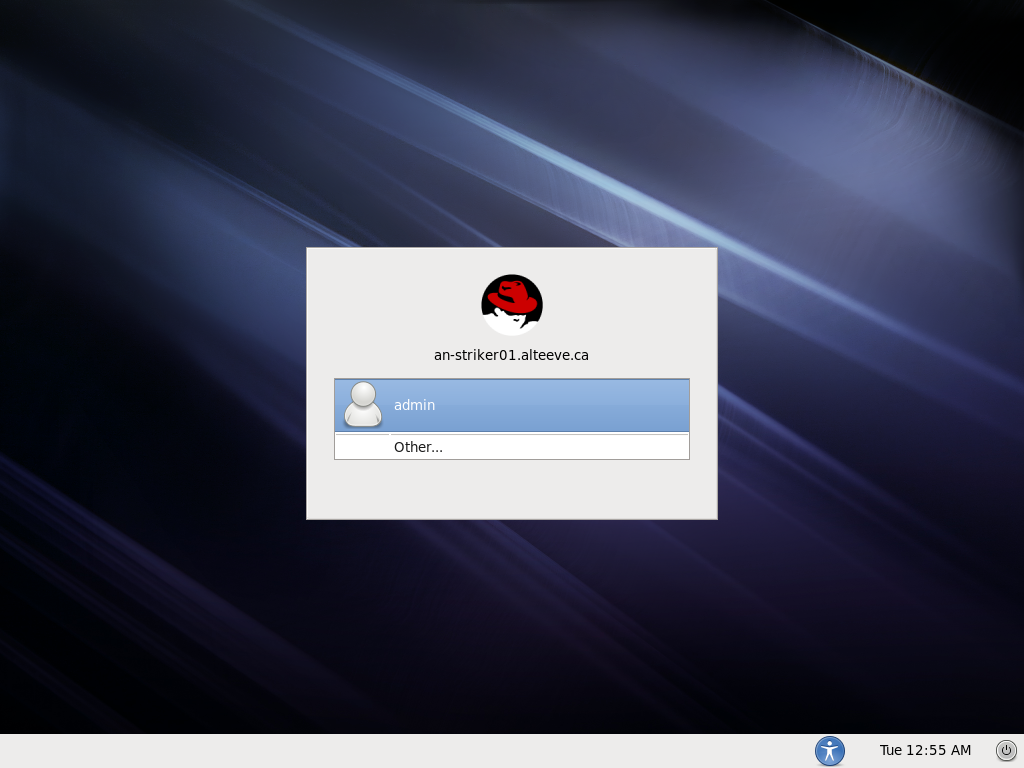
You should now be able to access the Striker web interface from any device on the BCN of IFN with a web browser.
Enter the dashboard's IP address into your browser and you should see the login prompt.
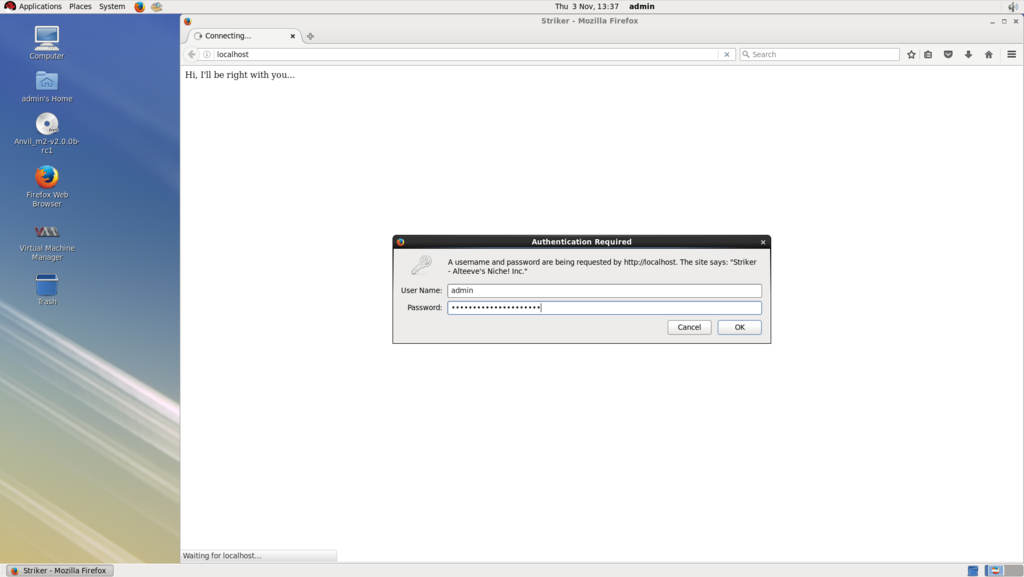
Login using the user name and password you specified during the stage-2 install. In our case, we stuck with the default user 'admin'.
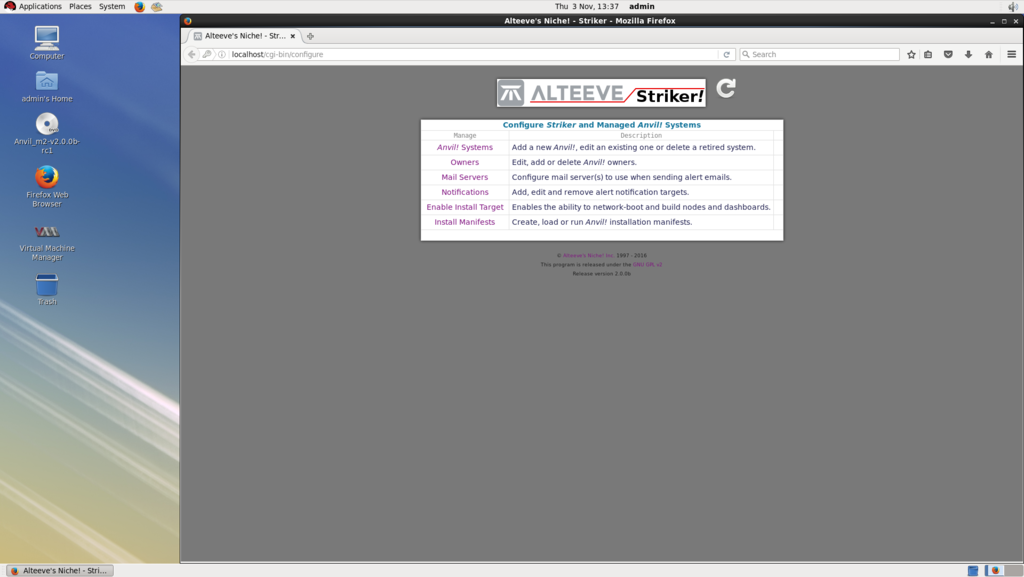
Voila! You have your first Striker dashboard built. If all went well, you no longer need the install media. Future installs can be done over the network from this Striker.
Enabling 'Install Target'
Now that we have the first dashboard built, we can build the second using it as a PXE server.
From the Striker web interface, select ''.
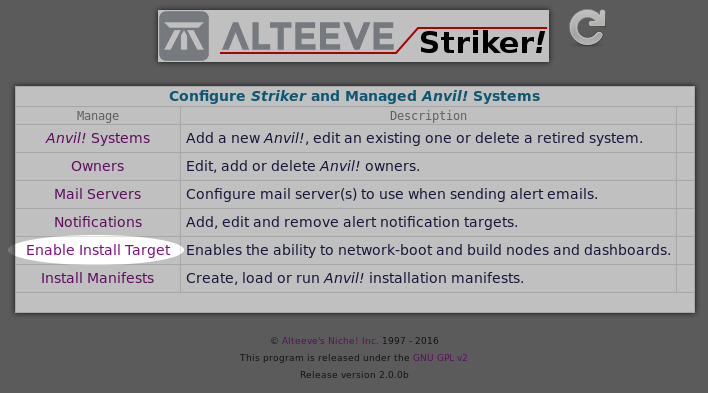
| Warning: Enabling '' causes a DHCP server to start running on Striker’s BCN. If you haven't isolated the BCN from the IFN. This could cause normal clients to get their IP from Striker, which wouldn't work in most cases. |
Read and then confirm:
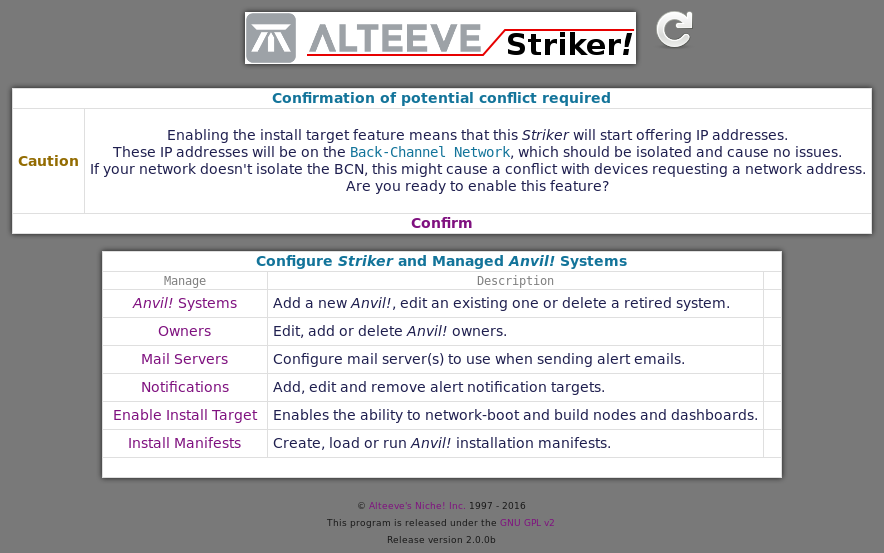
Now you can boot bare-iron machines using their network interface!
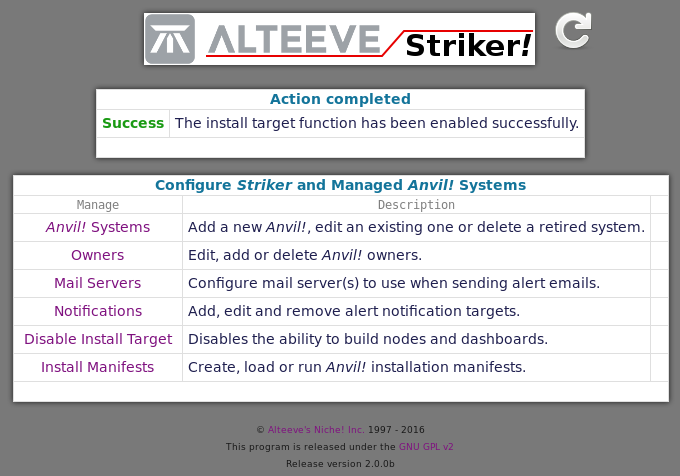
Done!
Building The Second Striker From The First
As before, building a Striker dashboard is a two-stage process. The difference this time is that we don't use the ISO (or USB drive) we made before. Now we're going to install off of the first dashboard directly.
Second Striker Stage-1 Install
Boot your second dashboard and manually select the boot device. How exactly you do this will depend on the vendor of your machine.
| Note: If your machine has multiple network-bootable devices, you may need to experiment to find which one is connected to the BCN. |
Select "New Striker 02 dashboard", and the rest of the stage-1 install will complete automatically.
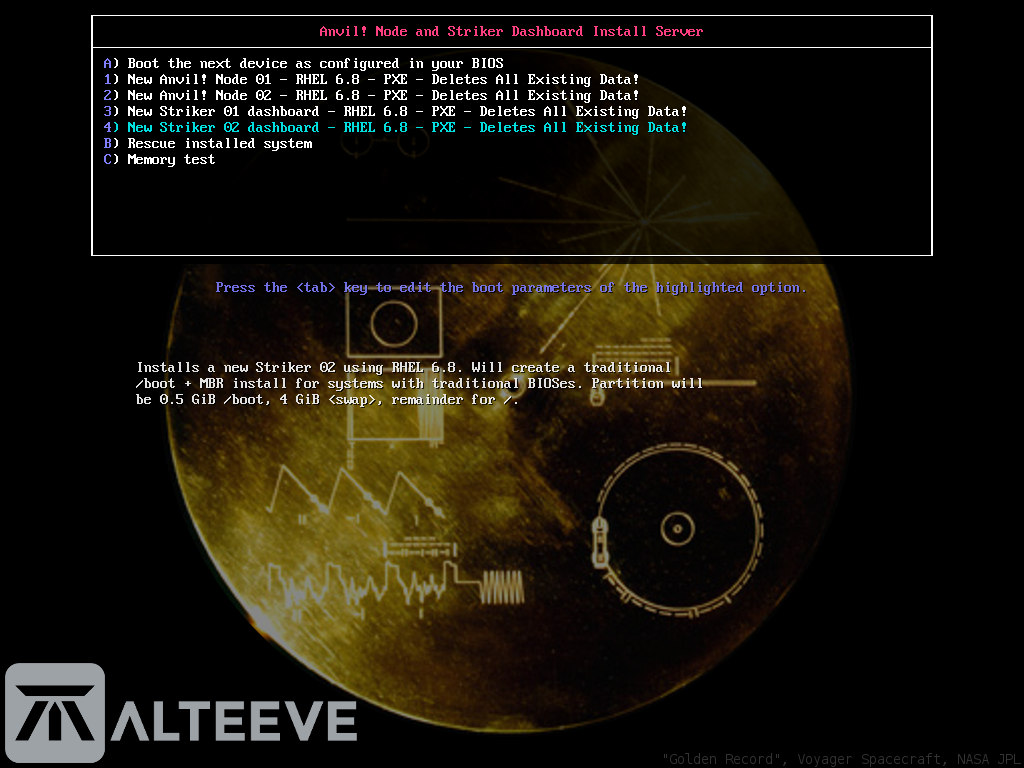
When done, you will see the same default login screen as you did for the first Striker dashboard install.
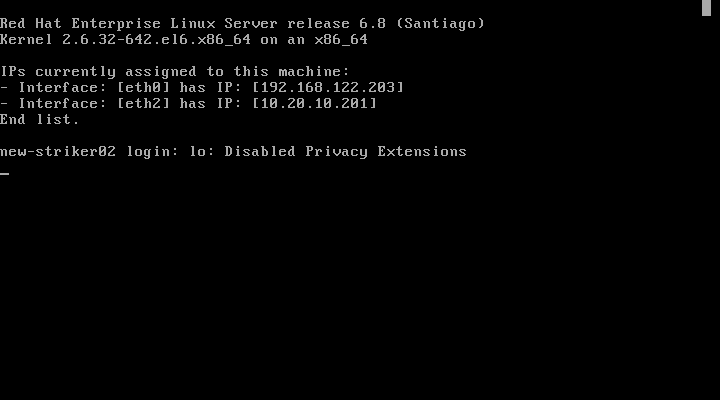
Second Striker Stage-2 Install
As before, the login user for stage-1 is 'root' and the password is 'Initial1'.
Once you log in, edit '/root/striker-installer.example', edit it to suit your needs and then run it. The rest of the install proceeds exactly as it did for the first Striker install above.
Here is our '/root/striker-installer.example'.
| Warning: The --host-uuid <uuid> MUST be unique across dashboards. Please don't directly copy and past without changing the UUID (use uuidgen to create one for you). |
The most common install will look like this:
./striker-installer \
 -c "Alteeve's Niche! Inc." \
 -n "an-striker02.alteeve.ca" \
 -u "admin:super secret password" \
 -i 192.168.122.252/24,dg=192.168.122.1,dns1=8.8.8.8,dns2=8.8.4.4 \
 -b 10.20.4.2/16 \
 -p 10.20.10.210:10.20.10.219 \
 --peer-dashboard hostname=an-striker01.alteeve.ca,bcn_ip=10.20.4.1 \
 --host-uuid a9a9cdc5-0c10-4ee1-9102-ecba16f75e09 \
 --router-mode \
 --rhn "rhn_admin:rhn_Initial1"
With that edited, we can run the file as a script and perform our stage-2 install.
sh /root/striker-installer.example
Map the network interfaces when prompted and the rest of the stage-2 install will be completed automatically. When it is done, it will reboot and present you with the same login screen as before.
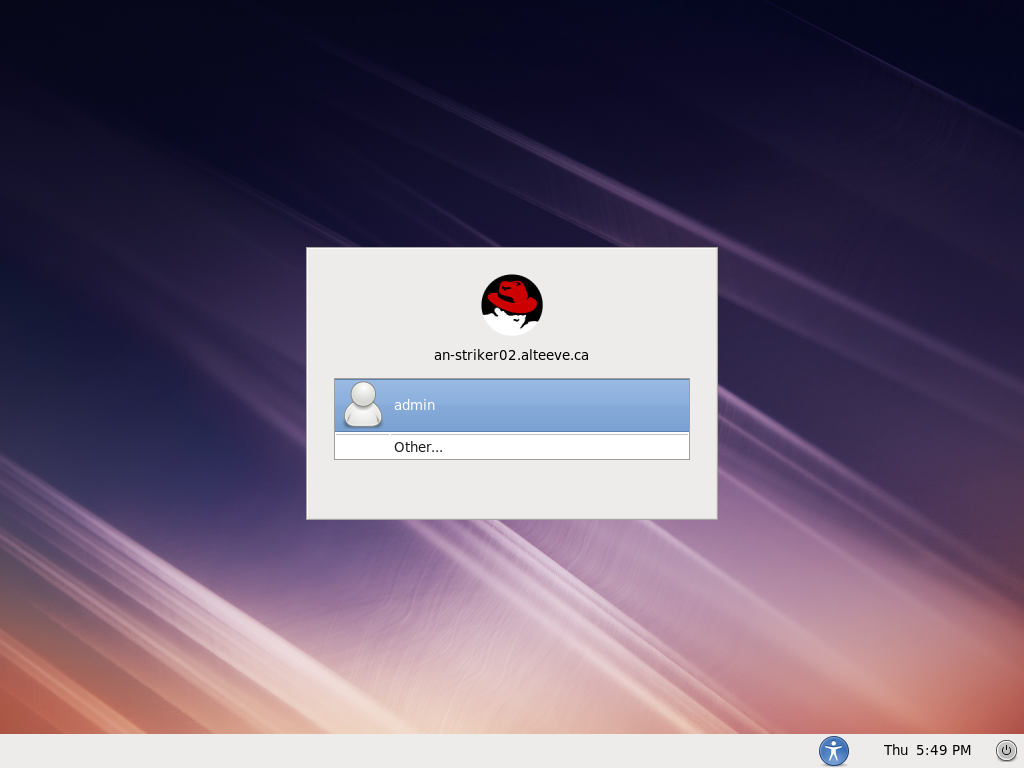
Done!
Building The First Anvil!
Building an Anvil! node pair is also a 2-stage process. The main difference is that stage-2 is controlled by an 'Install Manifest' that we run on a Striker dashboard. Striker then uses that manifest as a reference to control how the nodes are partitioned, named, and configured.
The benefit of this approach is that the manifest is recorded and can be used in the future to rebuild a node that was damaged or destroyed.
Node Stage-1 Install
Running the stage-1 install for nodes is identical to how it was run for the second Striker.
Boot the nodes and select a temporary boot device.
| Note: Nodes will have six network bootable interfaces, so you might need to experiment to find which ones are on the BCN. Once you find them, it is a good idea to make note of the adapter's ID. It will save you having to hunt around if you need to rebuild or replace the node in the future. |
Select "New Anvil! Node 01", and the rest of the stage-1 install will complete automatically.
| an-a03n01 | an-a03n02 |
|---|---|
| Note: The node install starts by "zero'ing out" the first 100 GiB of the disk. This causes the stage-1 install to appear to hang for a while. Please be patient. |
When done, you will see the same default login screen as you did for the Striker dashboards.
| an-a03n01 | an-a03n02 |
|---|---|
 |
 |
There is no need to log in this time, however. Make a note of the IP addresses that each node got. We want to use the BCN IP addresses, which are the '10.20.0.0/16' IPs (unless you changed the BCN subnet when you built your Striker dashboards).
In the example above, the IPs we care about are:
| an-a03n01 | an-a03n02 |
|---|---|
| 10.20.10.204 | 10.20.10.205 |
| Note: The 'Install Target' feature is no longer needed. You can now disable it by clicking on ''. |
Stage-1 is done!
Before we start using Striker, lets look at the top navigation options. These will remain consistent throughout all of Striker's UI.

If you click on the top-centre logo, you will be taken to the main Striker configuration menu with the list of configured Anvil! systems. In day to day use, this will be mainly used for switching between the Anvil! systems you want to view or work on.

You will not want to use your browser's "back" button when navigating Striker. This is because the back button on most browsers will not reload the page. Using this button instead tells Striker to refresh when appropriate.

When you want to refresh your view of the Anvil!, media library or other pages, press this button. Generally speaking, the browser's "reload" button will do the right thing, so it is less important to always use this one. However, there are times when a browser reload won't work, so it is a good idea to get into the habit of refreshing the page this way.
| Note: By default, an Anvil! main page will NOT update on its own. You can change this by setting 'sys::reload_page_timer = X' in Striker’s configuration file '/etc/striker/striker.conf'. |
Creating An 'Install Manifest'
To create an 'Install Manifest', click on the '' button on Striker.
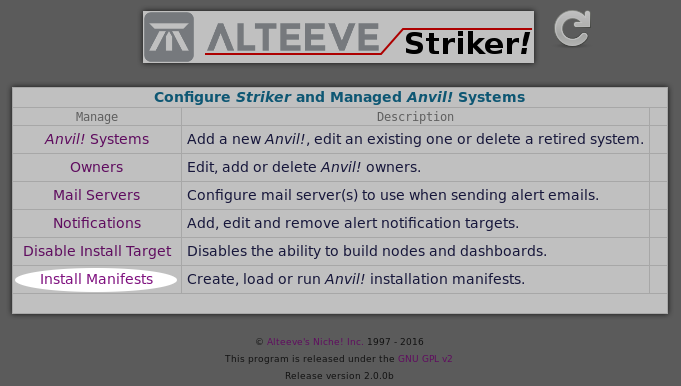
The 'Install Manifest' form is long, but most of it will be auto-filled for you.
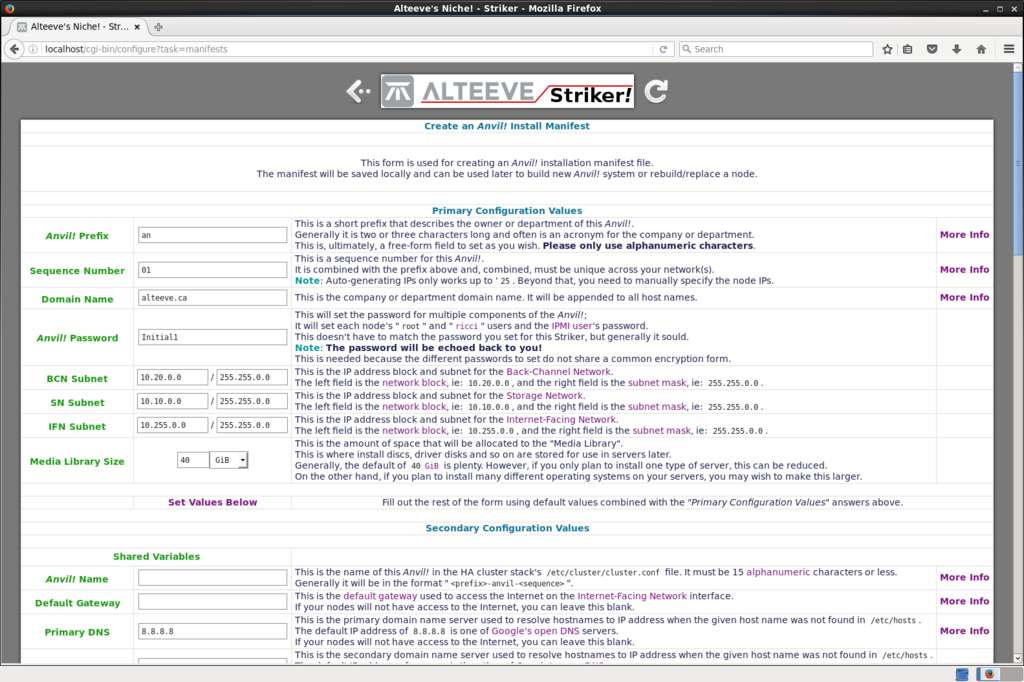
The main part to be aware of are the eight fields at the top.
| Field | What it does | What it should be set to | Restrictions |
|---|---|---|---|
| Anvil! Prefix | This prefix is used by people with multiple Anvil! systems and can help group Anvil! pairs by client, department or location. | This is pre-set using the Dashboard's prefix and likely doesn't need to change. | Only letters or numbers are allowed. Generally this is 2 or 3 characters, but there is no hard limit on it's length. |
| Sequence Number | Provides a differentiation between Anvil!' systems with the same prefix. This sequence number will be used to preset IP addresses and PDU outlet numbers. | a simple digit. | There is no hard limit, but numbers over 24 will likely require manual setting of IPs. |
| Domain Name | Sets the domain name portion of the nodes' hostnames and foundation pack equipment. | Generally, this should be set to your organisation's host name (or division, client, etc). | This must be a standard domain name comprising letters, numbers and hyphens. |
| Anvil! Password | Sets the node's 'root' and 'ricci' passwords. | Something kept private! | Note: The password set is echoed back to you and must be stored in plain text in the ScanCore database in order to interact with the nodes. Don't use the same password you use elsewhere and restrict access to the Striker dashboards! |
| BCN Subnet | The private management network used for inter-node, dashboard to node and node to foundation pack communication. | 10.20.0.0/16, except when that would conflict with existing networks. | A valid IPv4 subnet. |
| SN Subnet | The private storage network used for inter-node storage replication. | 10.10.0.0/16, except when that would conflict with existing networks. | A valid IPv4 subnet. |
| IFN Subnet | The public network used to communicate with your network equipment and clients. | Free IPv4 addresses available on your network. The form will try to select sane default IPs, though you will want to verify the selected IPs are available. | A valid IPv4 subnet. |
| Media Library Size | How much space to allocate for ISOs (images of CD and DVD disks) used to install servers or "put into" a server's (virtual) optical drive. | Between 10 and 40 GiB is sufficient for most users. | Start small, the size can be extended later if needed. It can not be shrunk. |
In this tutorial, we will be creating our third Anvil! system, and we'll stick with the default 'an' prefix and 'alteeve.ca' domain name. Our IFN subnet is '192.168.122.0/24' and we'll start with a modest 10 GiB media library size.
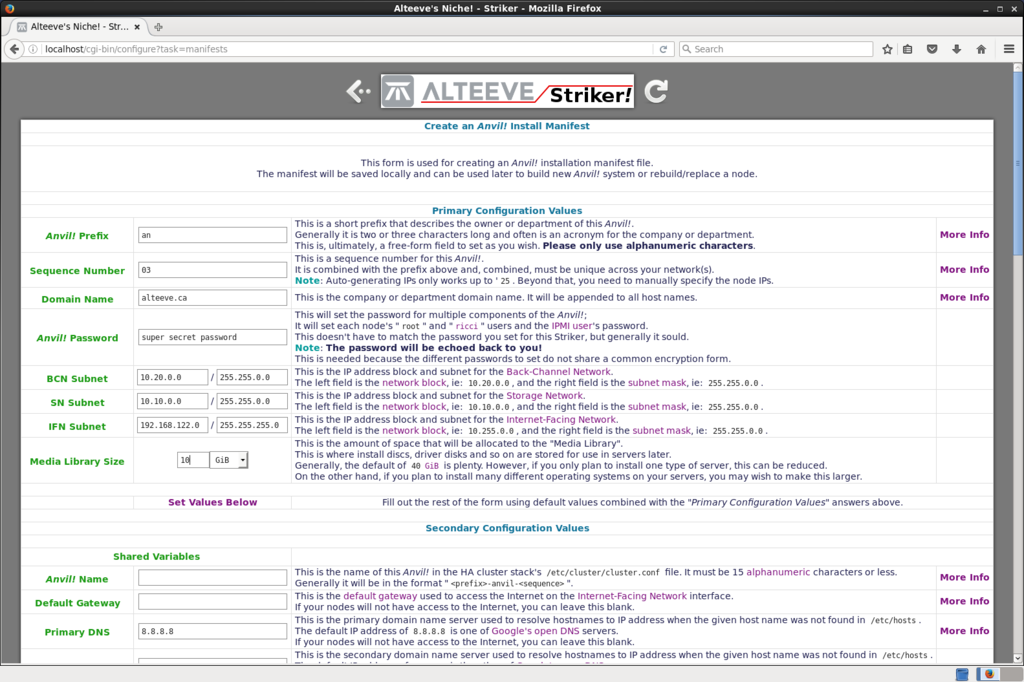
With that set, click on '' and the form will do its best to set the rest of the form's details for you.
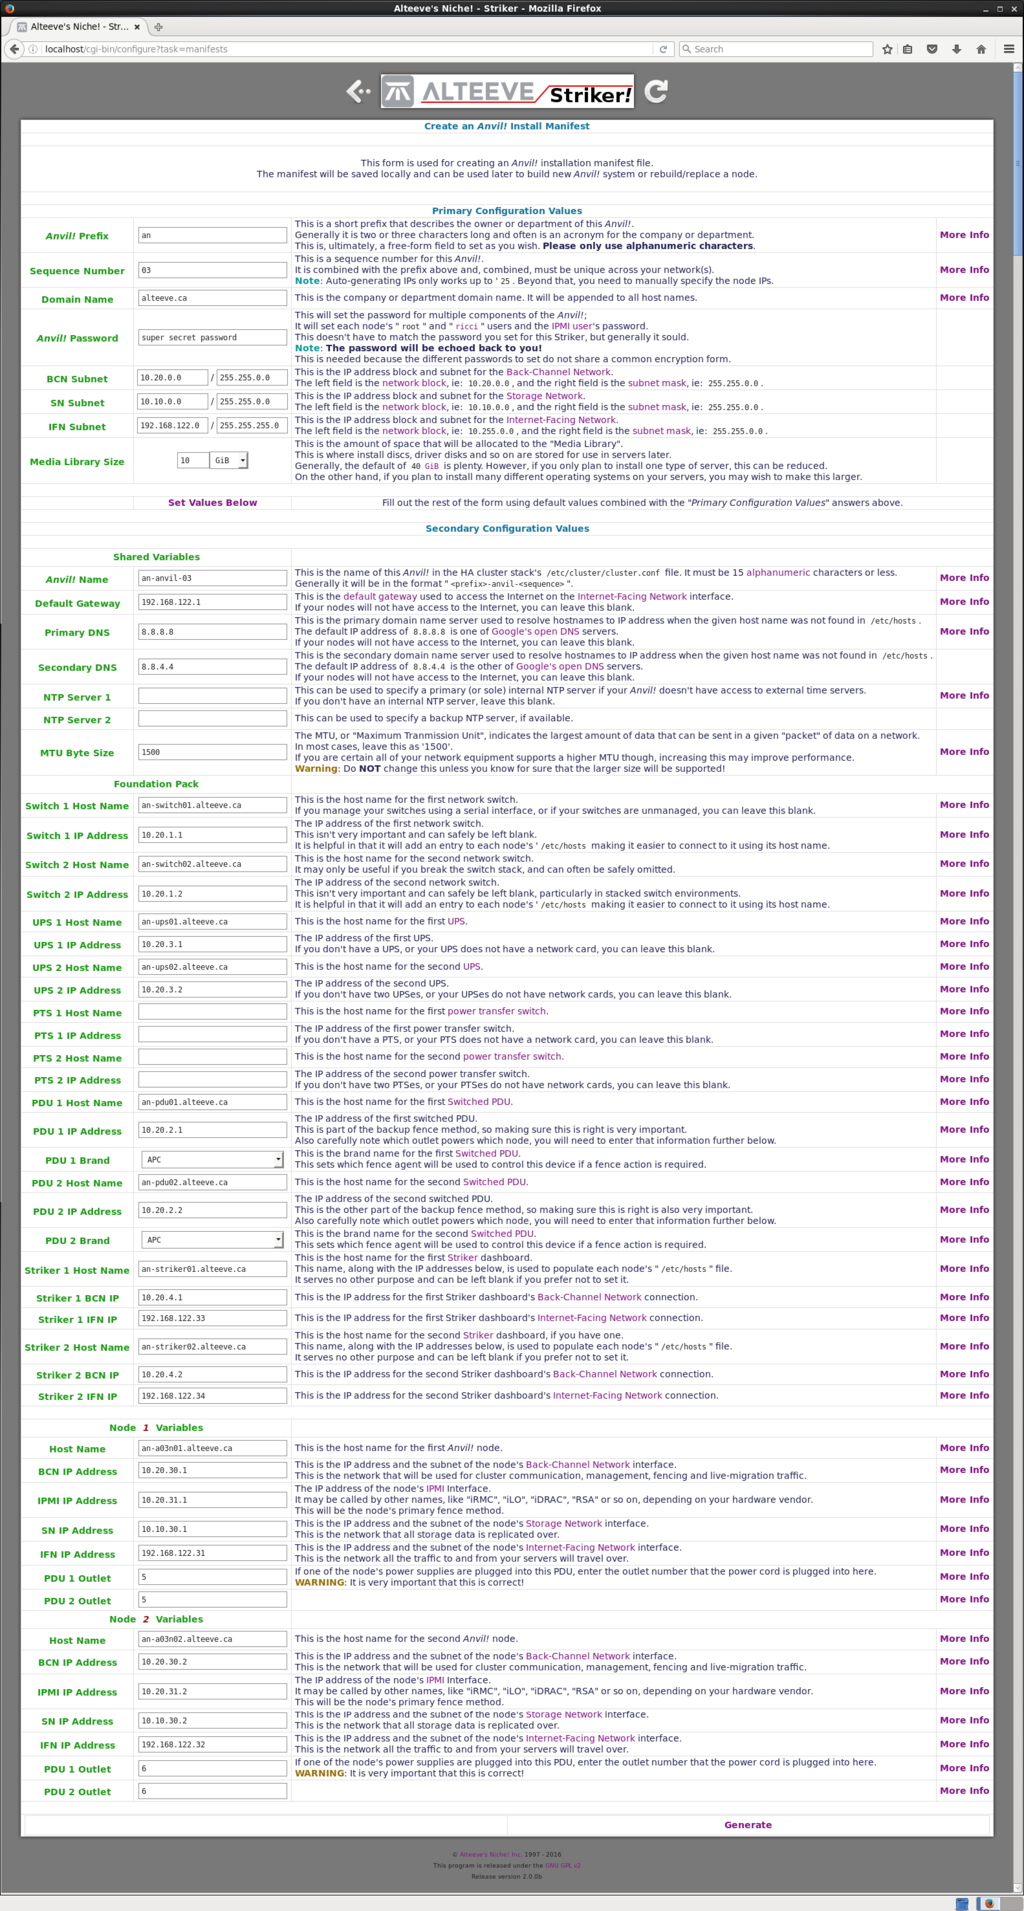
Please review all the fields the first time you create a manifest. Each field is explained and there is a link on the right for all fields that will take you to our wiki and explain each field in much more detail, if needed.
The main fields to check are:
- Are the IFN IP addresses of the nodes right?
- Are the IP addresses of the foundation pack devices and Striker dashboards right?
- Are the PDU outlet port numbers correct?
| Warning: It is critical that the PDUs and their outlet ports map properly to the nodes and their PSUs. Double and triple check these values! |
Once you are happy with the fields, click on '' to view a summary of the manifest data.
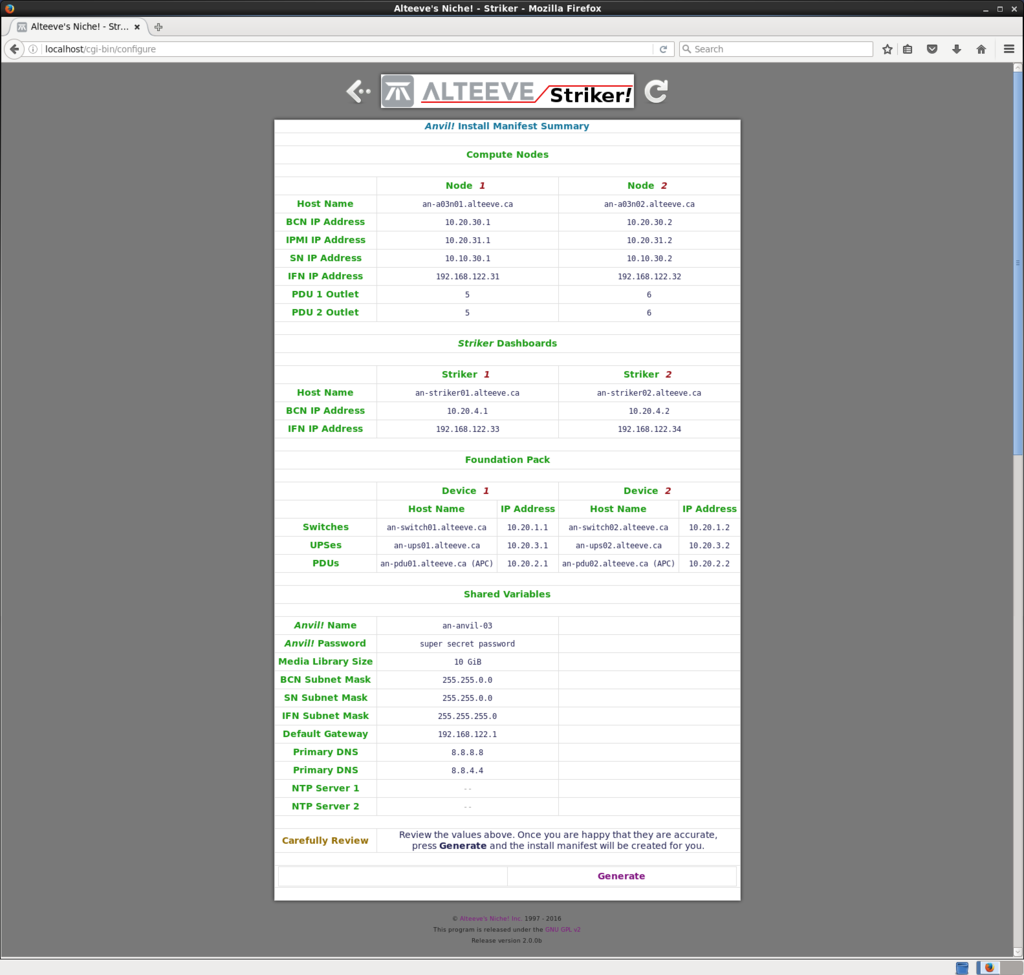
Careful! Be sure that the summary data is as you expect it to be. Once generated, this manifest will control the Anvil! node pair construction and regeneration should a node fail. It is very important that the data is correct.
If you are happy, click '' on the summary and the 'Install Manifest' will be created and saved.
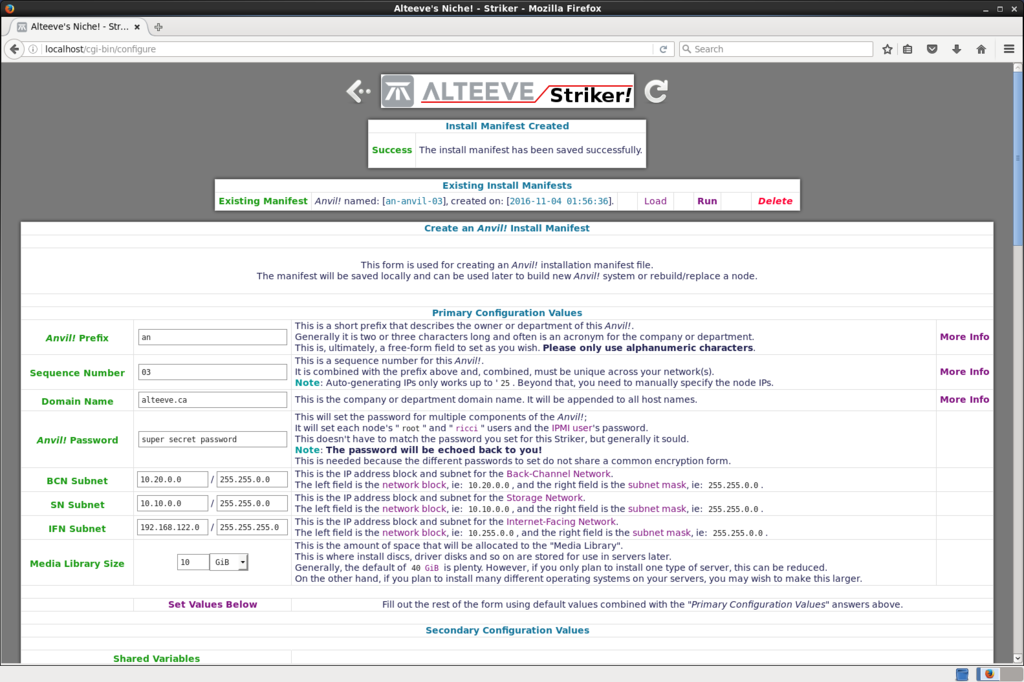
The 'Install Manifest' is saved in the ScanCore database. As such, it is immediately sync'ed to other dashboards and will remain in Striker until you delete it.
All done!
Anvil! Node Pair Stage-2 Install
Now that the manifest has been created and both nodes have completed their stage-1 installs, we're ready to build the Anvil! node pair!

At this stage, there is only one manifest to choose. So click on ''.
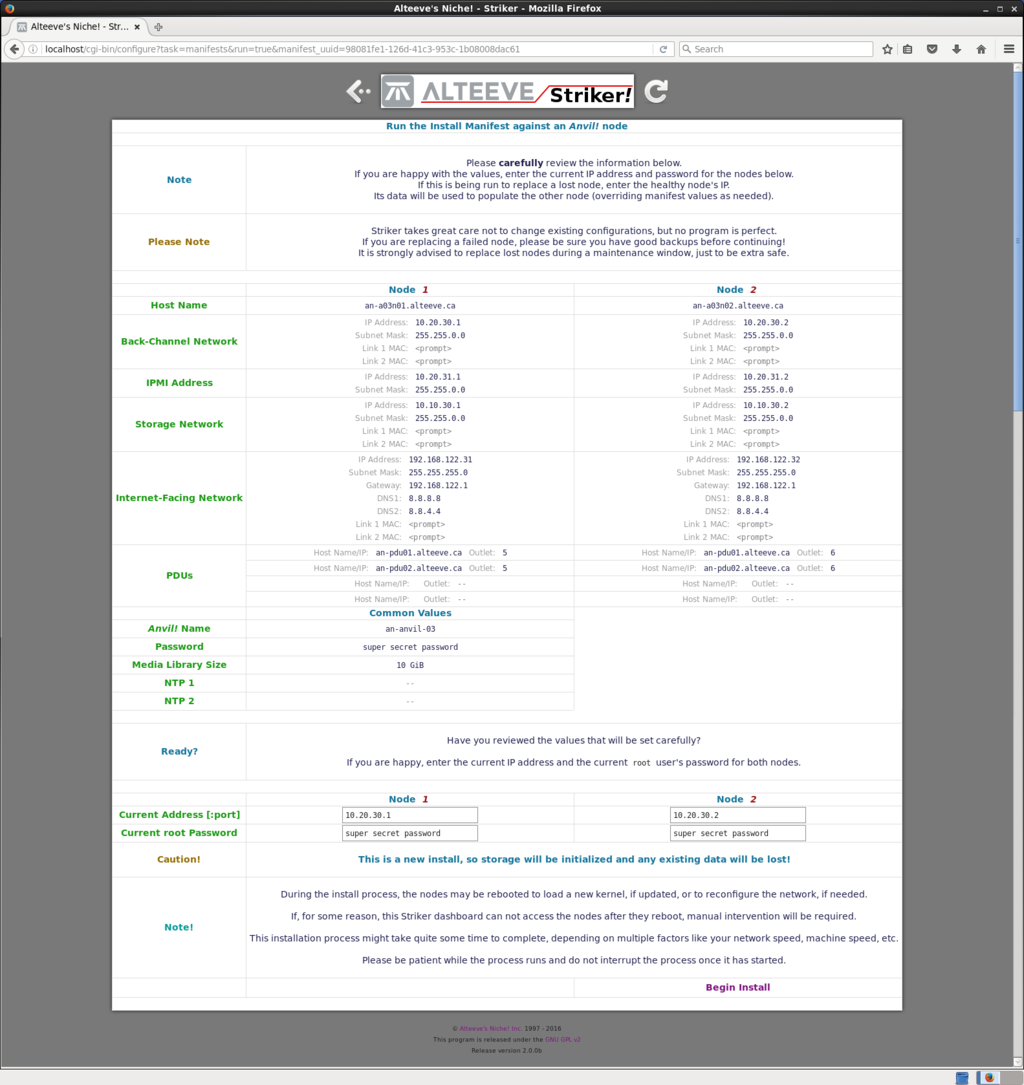
The manifest always defaults to each node's BCN IP address and the recorded password.
In our case, both nodes just finished their stage-1 install, so they will have the temporary IPs we noted earlier and both will use the default stage-1 password 'Initial1'.
Recall that the temporary IPs of the two newly built nodes were:
| an-a03n01 | an-a03n02 |
|---|---|
| 10.20.10.204 | 10.20.10.205 |
So we will update the login fields.
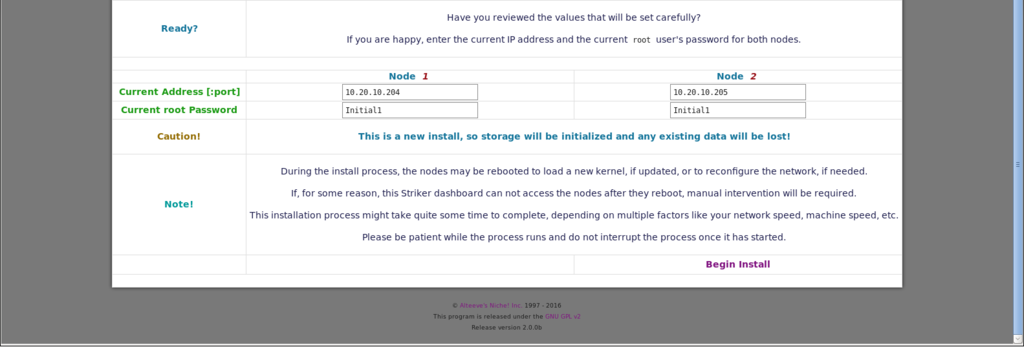
| Warning: Be sure to review the manifest data! This is particularly true when you have multiple manifests. Don't run the wrong one by accident. |
When you're ready, click on ''.
Anvil! Node Pair Stage-2 Network Mapping
Once the run begins, it will verify that it can talk to both nodes, do some sanity checks and then begin the network mapping process. This is virtually identical to what you did when you mapped the dashboard's network, except this time the prompts are in the browser.
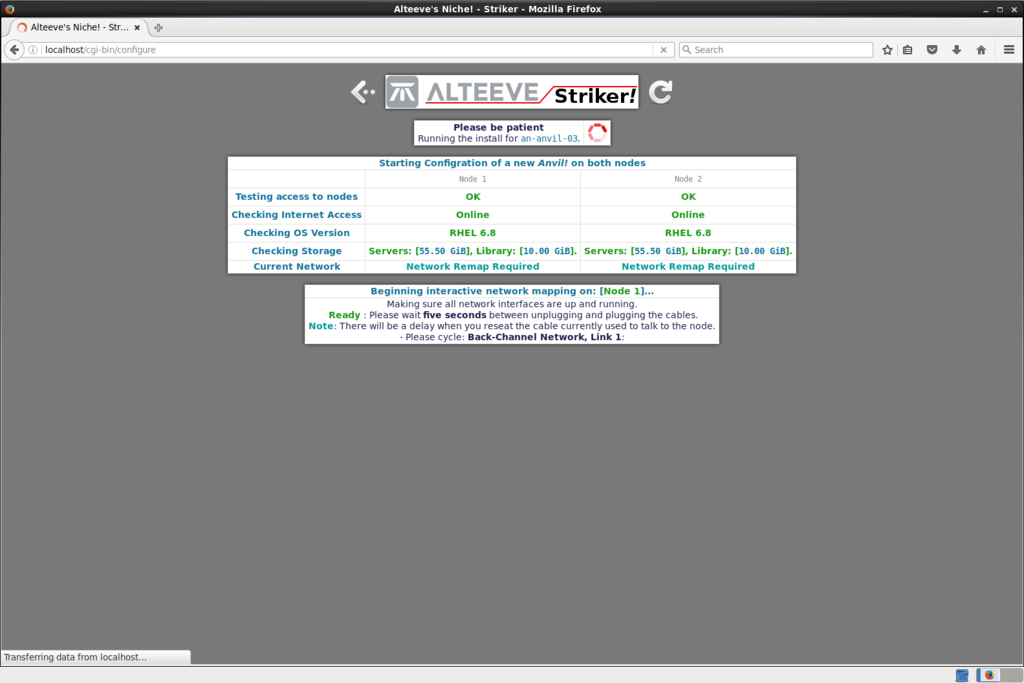
If you can't see the screen when you unplug the cables, don't worry. The order of the prompts is always the same. If you wait five seconds between each unplug and another five seconds after plugging the cables back in, you will be able to reliably map without seeing the screen. Do wait a minute between node 1 and 2 though so that node 2 has time to prepare for the remap.
The map order is always;
- . Back-Channel Network, Link 1
- . Back-Channel Network, Link 2
- . Storage Network, Link 1
- . Storage Network, Link 2
- . Internet-Facing Network, Link 1
- . Internet-Facing Network, Link 2
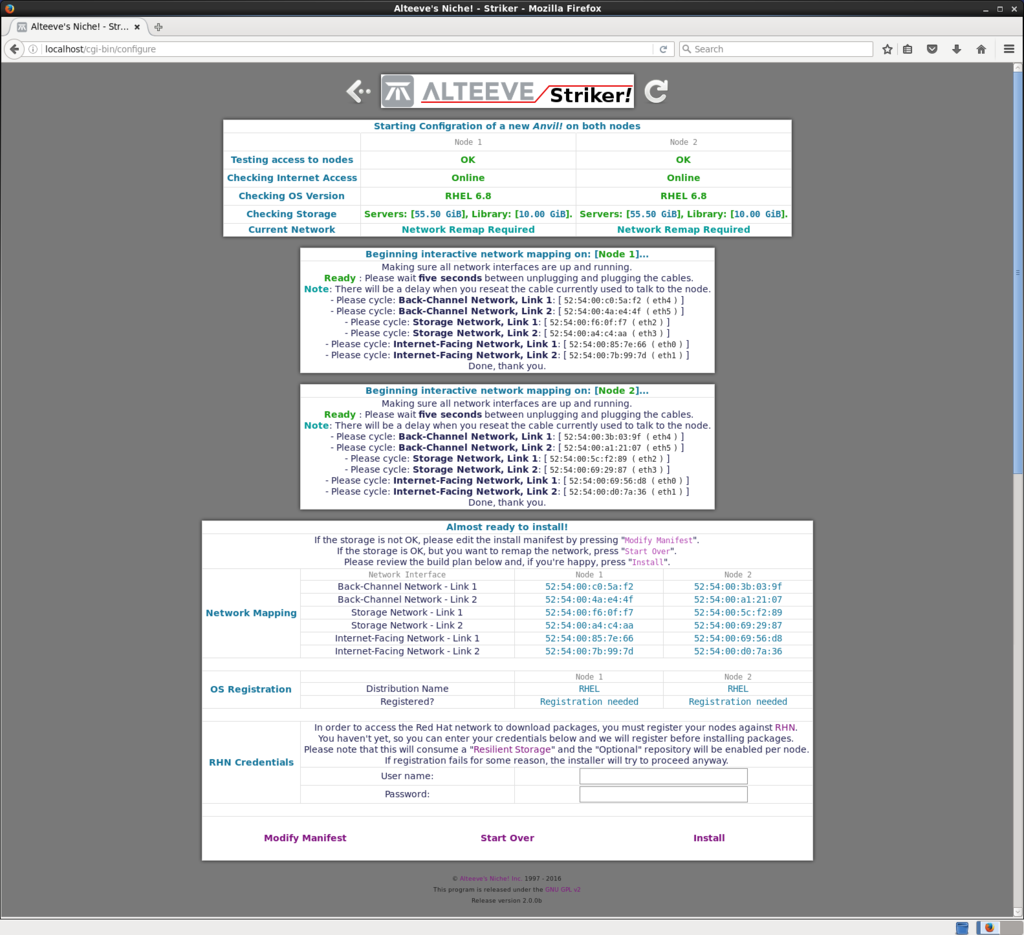
Once you've mapped both nodes and are happy with the results, you're ready to proceed.
If your nodes are built on RHEL proper, you will see the fields for registering your nodes with Red Hat, as you can see above. If you built on CentOS, those fields will be absent.
| Note: If you don't register with Red Hat and you are using RHEL, the nodes will not be updated during the install. |
If you made a mistake mapping the network, just keep going until all the interfaces have been unplugged and plugged back in. You can start over by clicking on ''.
Anvil! Node Pair Stage-2 Under Way
| Warning: Do not browse away once the install has started! If you do for some reason, reboot both nodes, see what IPs they have and re-run the install manifest. |
| Note: Once you click on '', the network mapping is recorded. If you run the manifest again against the same hardware nodes, you won't have to map the network again, unless you specifically choose to. |
If you are happy with the mapping, the click on '' to begin.
Once the install starts, you will have about 20 to 30 minutes to wait.
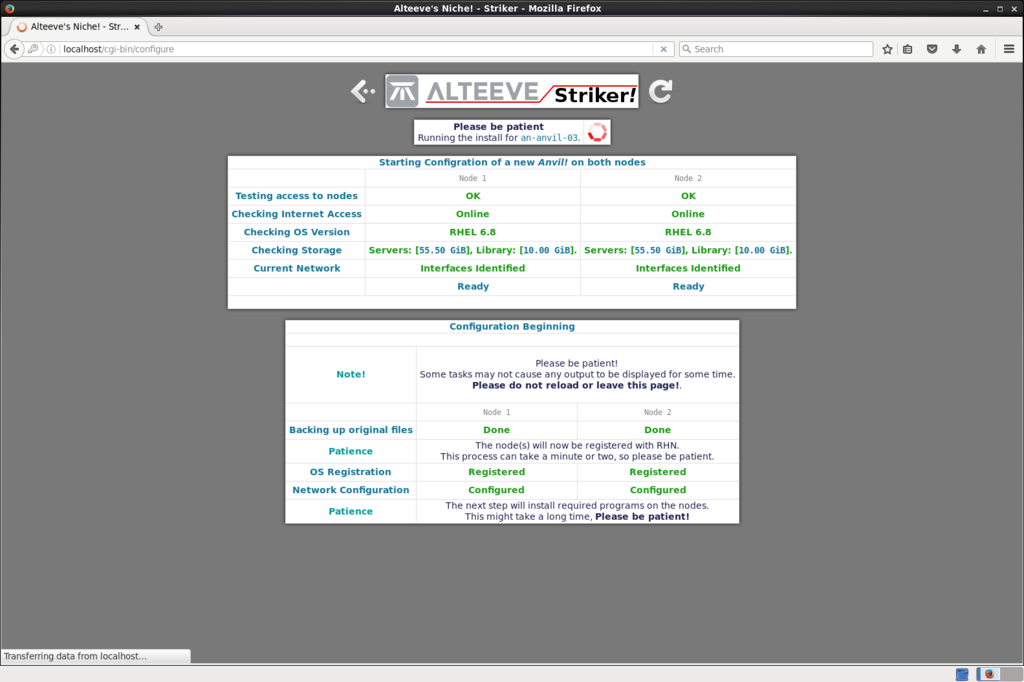
After some time, possibly quite some time depending on your nodes, the install will finish.
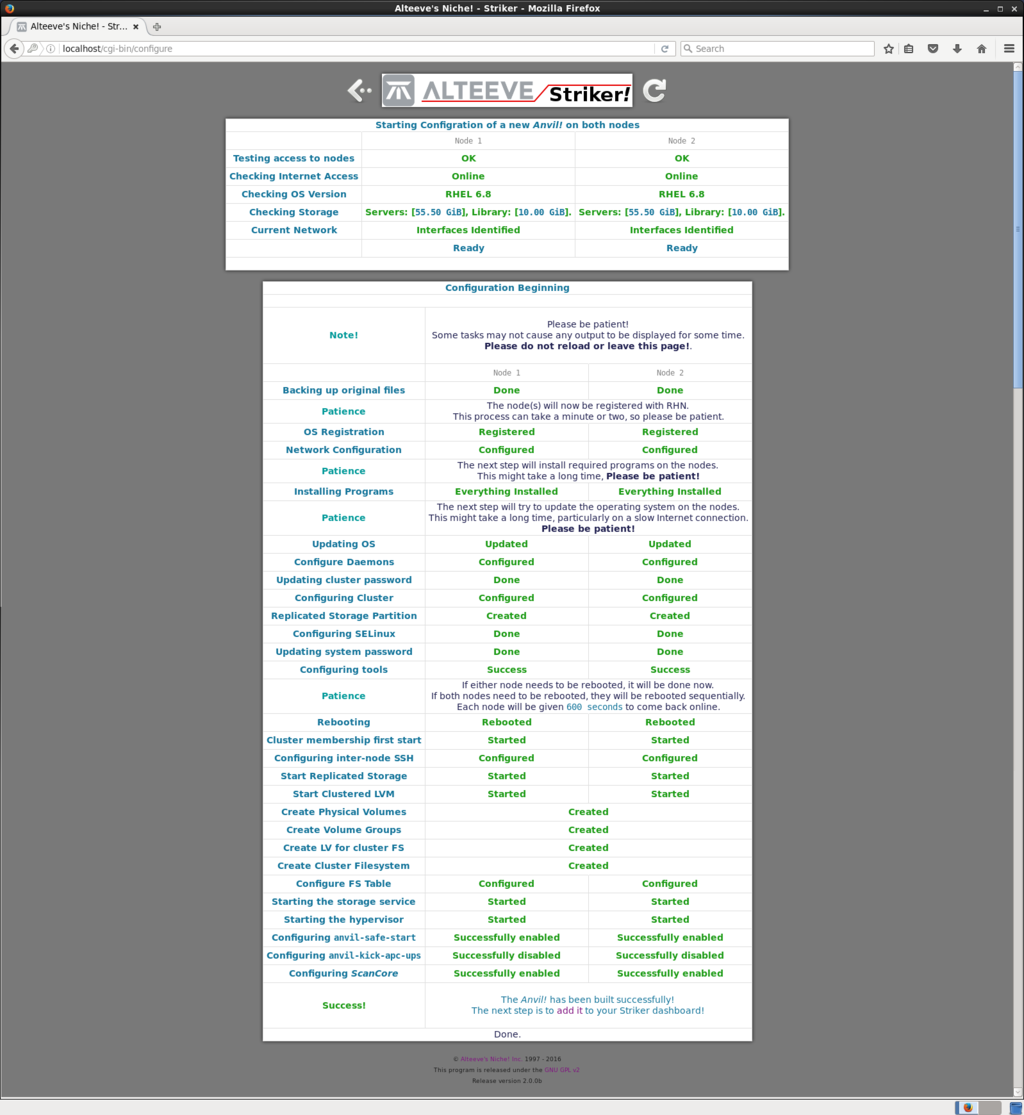
Click on '' at the bottom to record the new Striker in the database.

Adding The New Anvil! To The Database
The Anvil! is not automatically added because there are a few things you need to tell Striker.
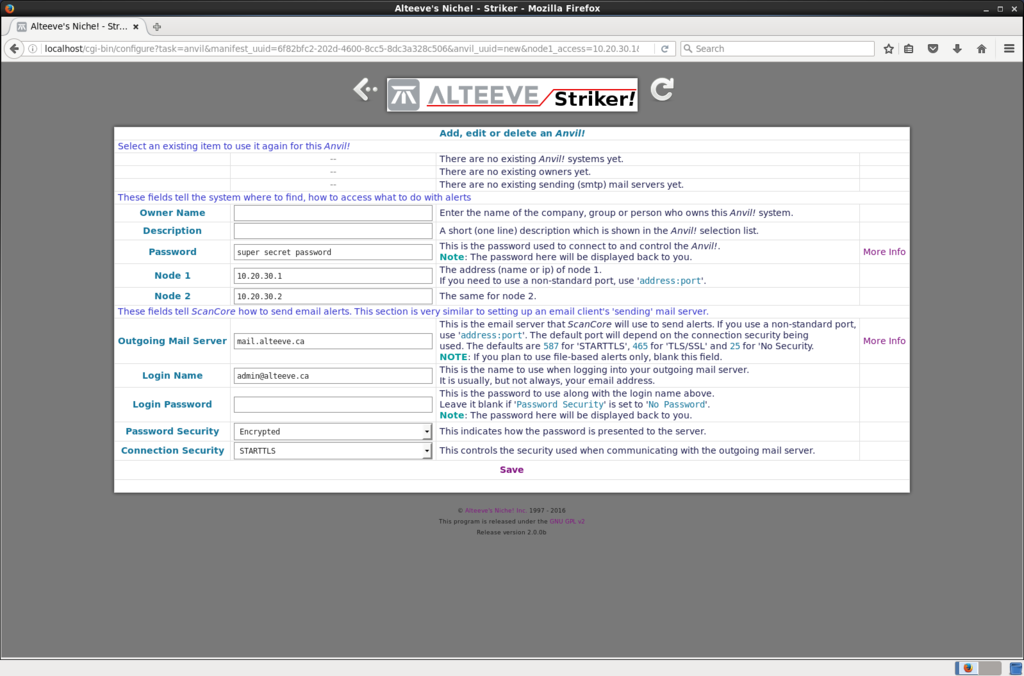
There are two sections; The top section where you need to saw who owns the new Anvil! and a short description that will be displayed in the Anvil! selection list. The owner name and description are for your benefit and you can set them to whatever makes sense to you. The 'owner' might well be a department, site name and so on.
The second section is the information needed to send email alerts. If you don't plan to use email-based alerts, simply clear the 'Login Name' field. If you do want to use email alerts, however, please fill out the information needed to connect to your SMTP server.
| Note: Anvil! nodes run a local copy of postfix that queues and sends emails. If your outgoing email server supports encrypted connections, then alerts from the nodes to the mail server will be securely delivered. |
If you have added an Anvil! system before, then you will be able to select existing owners and outgoing mail servers, saving the need to re-enter the information.
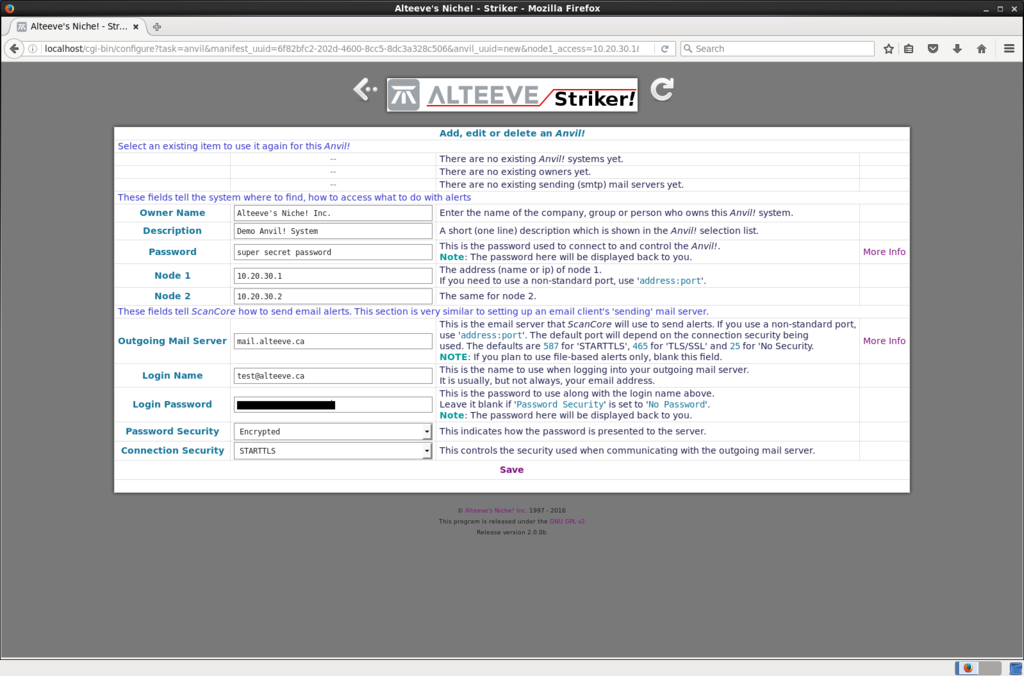
With the form filled out, click on ''.
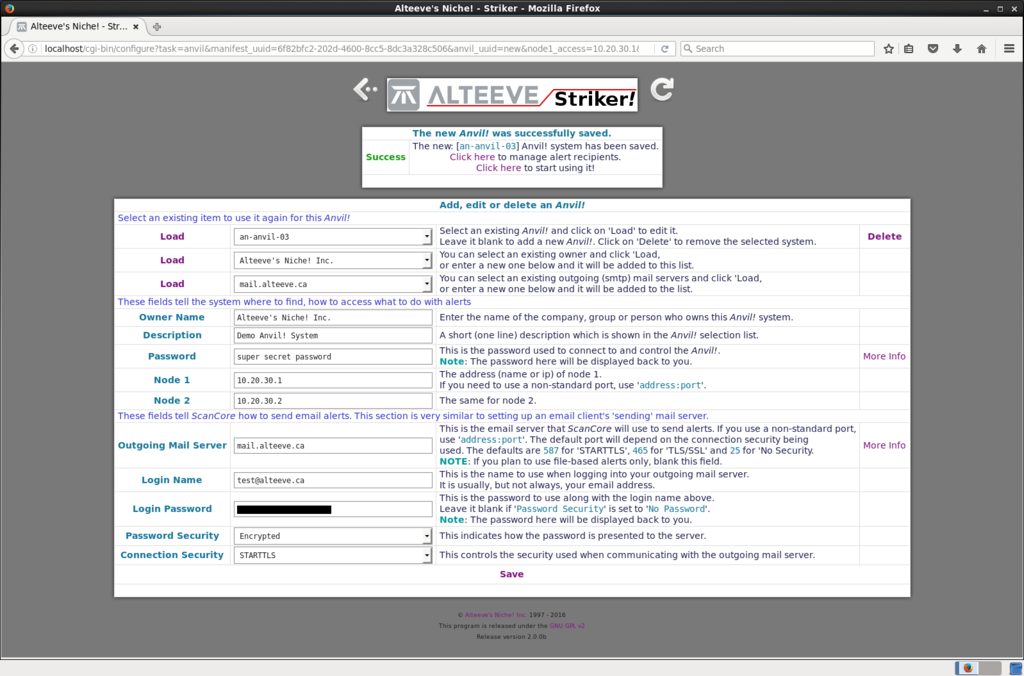
Once saved, you will see a 'success' message along with two buttons; One for managing alert recipients and one to start working with the new Anvil! right away.
When you saved the new Anvil!, you told the nodes how to send email alerts, but not were to send them. When you click on the button for alert recipients, you get a chance to define who will receive alerts, and what level of alerts they want to receive. We'll cover that menu in a moment.
When this is a new Anvil! system, click on ' to manage alert recipients. This will open a new tab in your browser with the alert recipient menu. Then click on ' to start using it' to view your newly built Anvil! system
Setting Up Alert Recipients
Alert recipients can be one of two types; Alerts sent by email and alerts written to a local file.
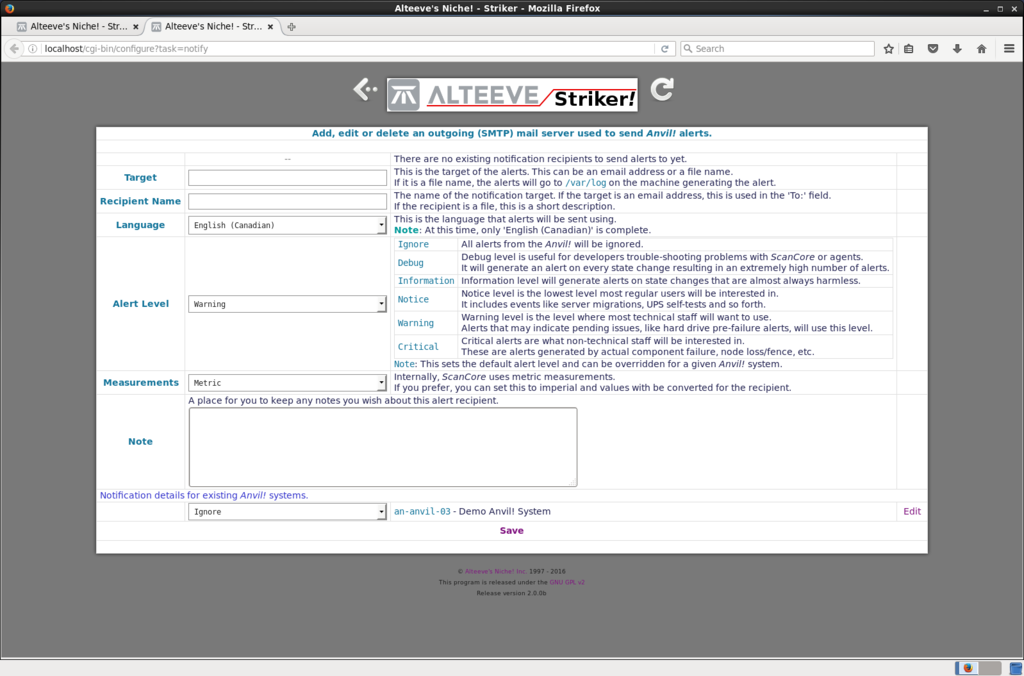
The first field, 'Target', determines what the recipient type is. If it is an email address, then the recipient will be sent alerts over email. Otherwise, it is assumed that the notification target is a file. In that case, alerts will be written to '/var/log/$filename' on the machine generating the alert.
Generally speaking, most users will want to send alerts via email. The main users who will use the file-type alert target are users whose Anvil! system is not connected to the public Internet. If this is your case, then you can periodically pick up the file for analysis. Be sure to delete or empty the file when you pick it up, if you want to keep its size small.
The second field, 'Recipient Name', is mainly used for email notification targets. This is used when sending to email and is used in the email's 'To' field.
If you have multiple languages installed, then you can select the recipient's language.
The second field, 'Recipient Name', is mainly used for email notification targets. This is used when sending to email and is used in the email's 'To' field.
If you have multiple languages installed, then you can select the recipient's language.
The 'Alert Level' is a selection box that determines what alert level this recipient wants, if at all, when new Anvil! systems are added.
The 'Measurements' lets you choose between sending measurements to the recipient in metric or imperial measurements.
The 'Notes' field is purely for your benefit to store information about the alert recipient. Use it however you want, if at all.
Lastly, there is a section to select the alert level the recipient for each existing Anvil! system. We just added the first one, so only it is shown. Select the desired alert level, and you're done!

When you're happy with your entry, click on ''.
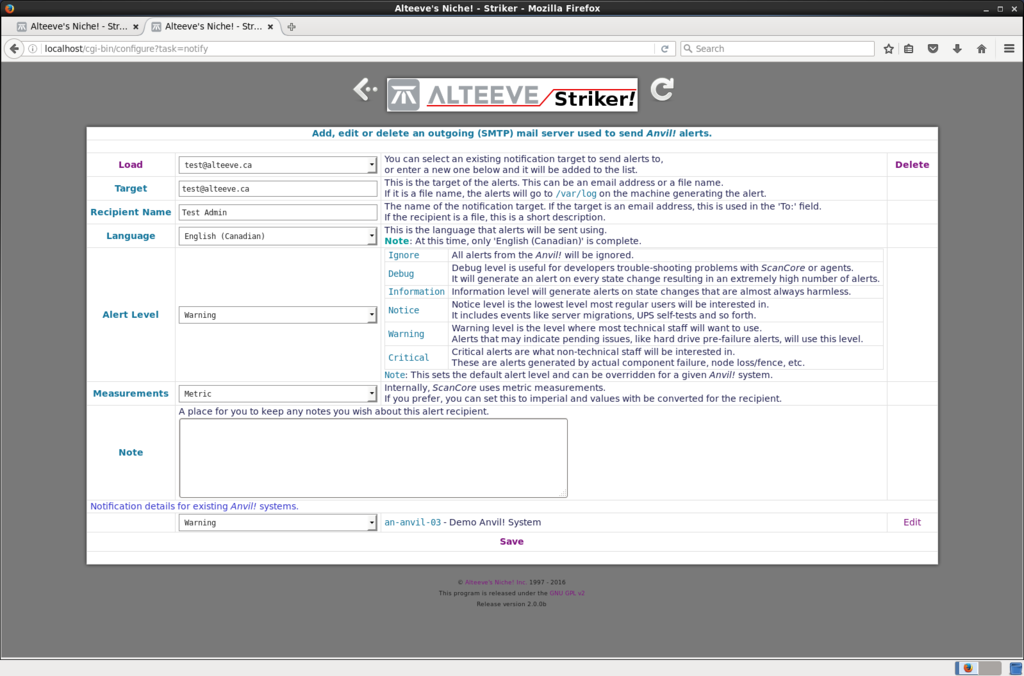
Voila! You'll see the drop-down box at the top. If you want to change anything, go for it and then click '' again.
You can close the tab now.
Using Your New Anvil! System
When you load an Anvil! system, there will be a delay while the current state of the Anvil! is examined.

After a moment, the main Anvil! menu page will be displayed.
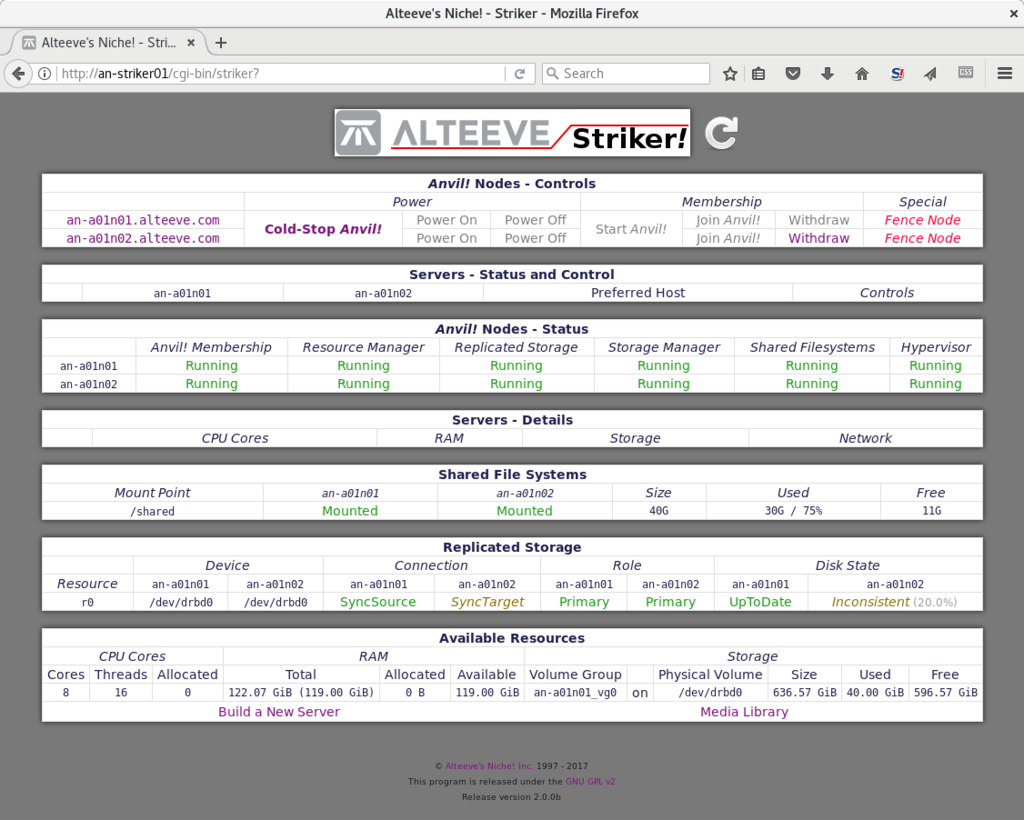
That's it, you're done!
Adding An Existing Anvil! To Striker
We just saw how to add an Anvil! system to Striker after a successful install manifest run. Now, lets look at how to add an existing Anvil! manually.
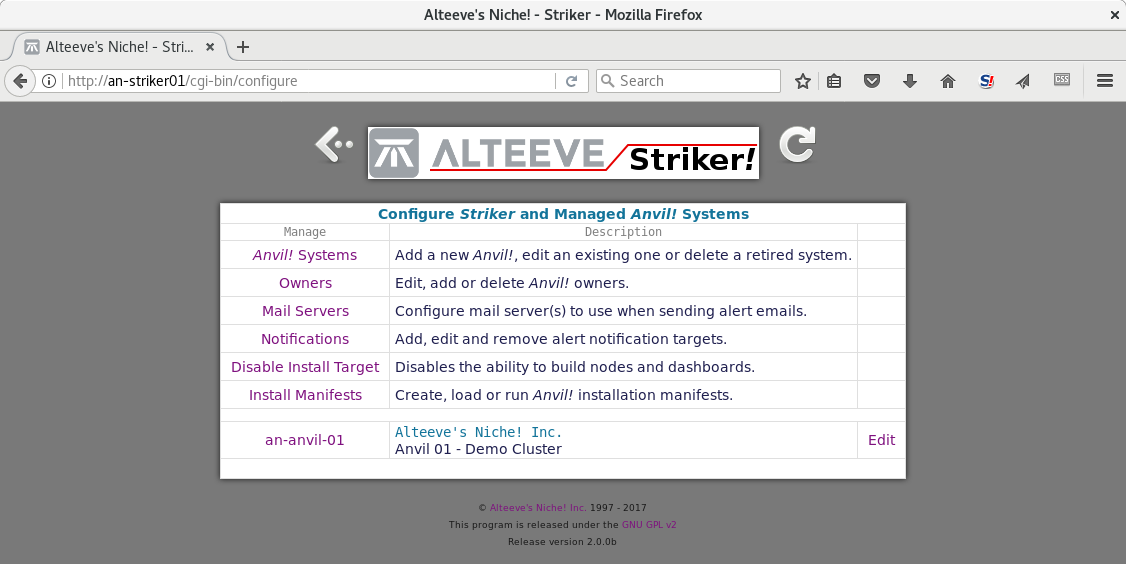
From any page, click on the logo at the top of Striker to access the main menu.
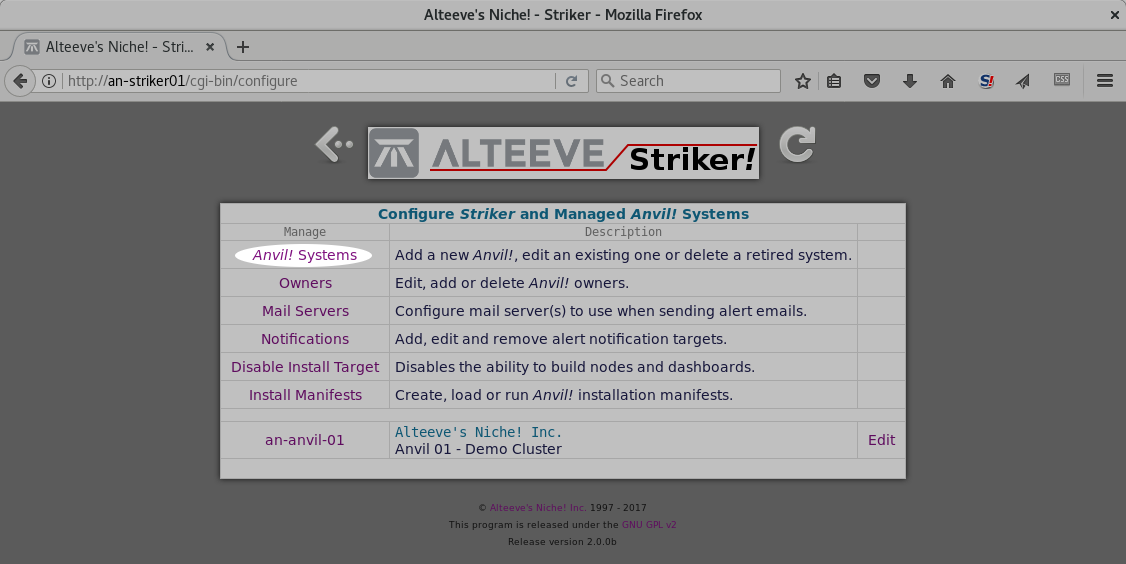
Click on the top button, "".
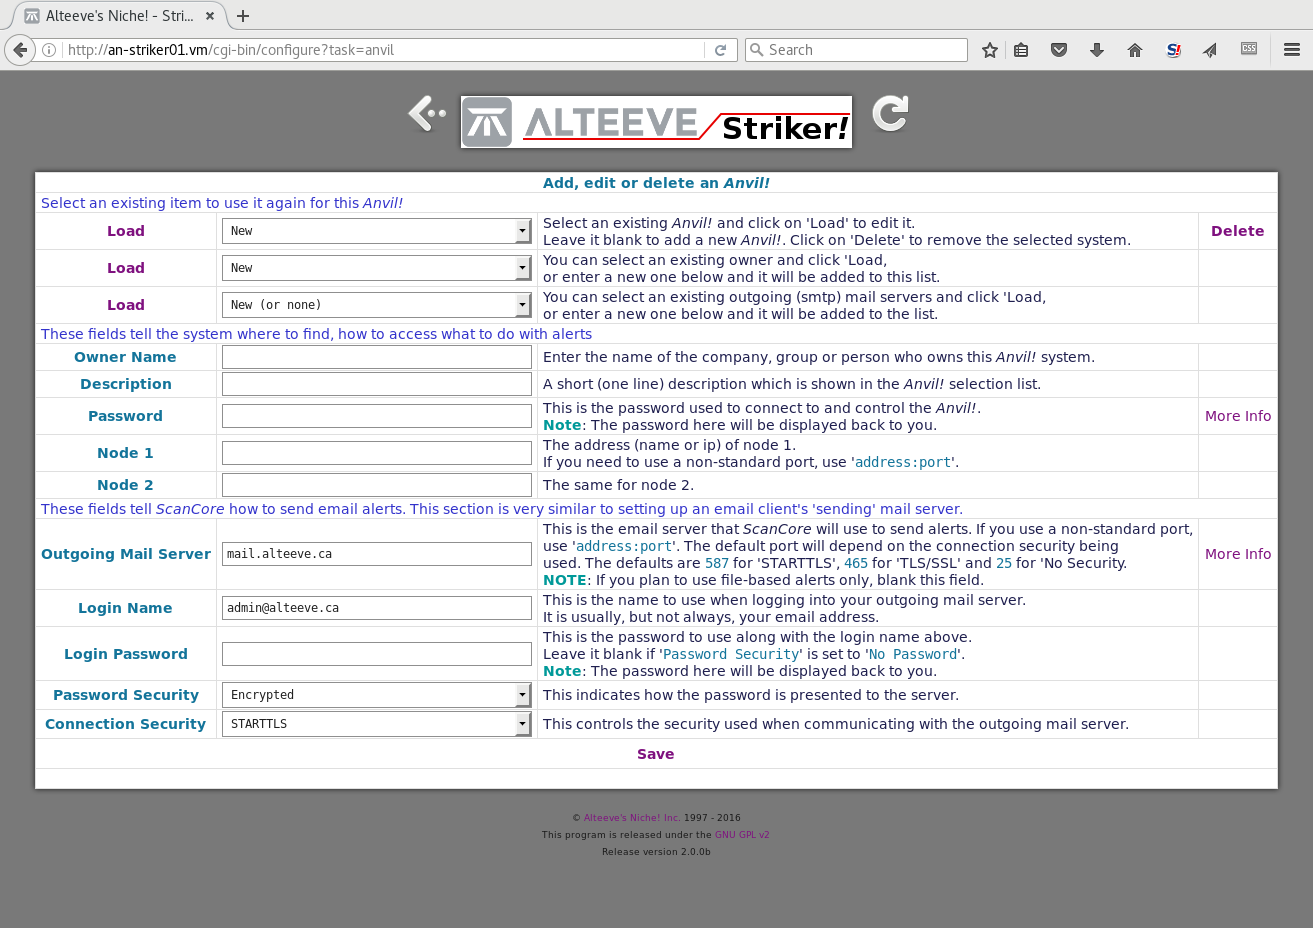
Last time, much of the form was filled out for you by Striker using data from the install manifest. This time, we're adding an Anvil! manually, so we will need to specify things manually.
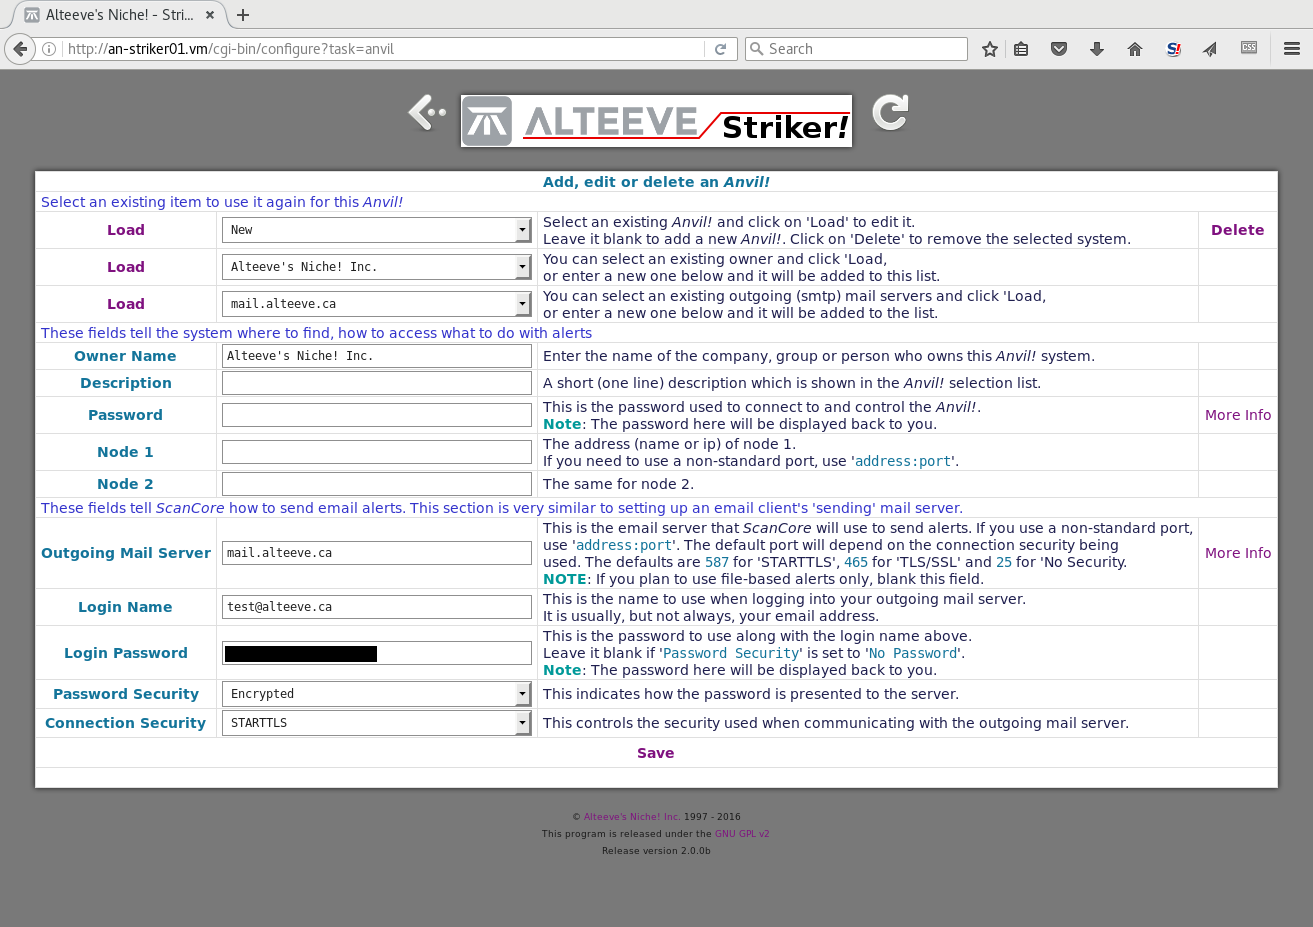
If you plan to use the same owner or outgoing mail server, select them from the drop down box and then click on "". If you want to use a new owner or outgoing mail server, then leave the selection box as 'New' and enter the details in the main form. When you save the Anvil!, the new owner and/or outgoing mail server will be created at the same time.
In our case, we're using the same owner and mail server, so we loaded them from the selection boxes.
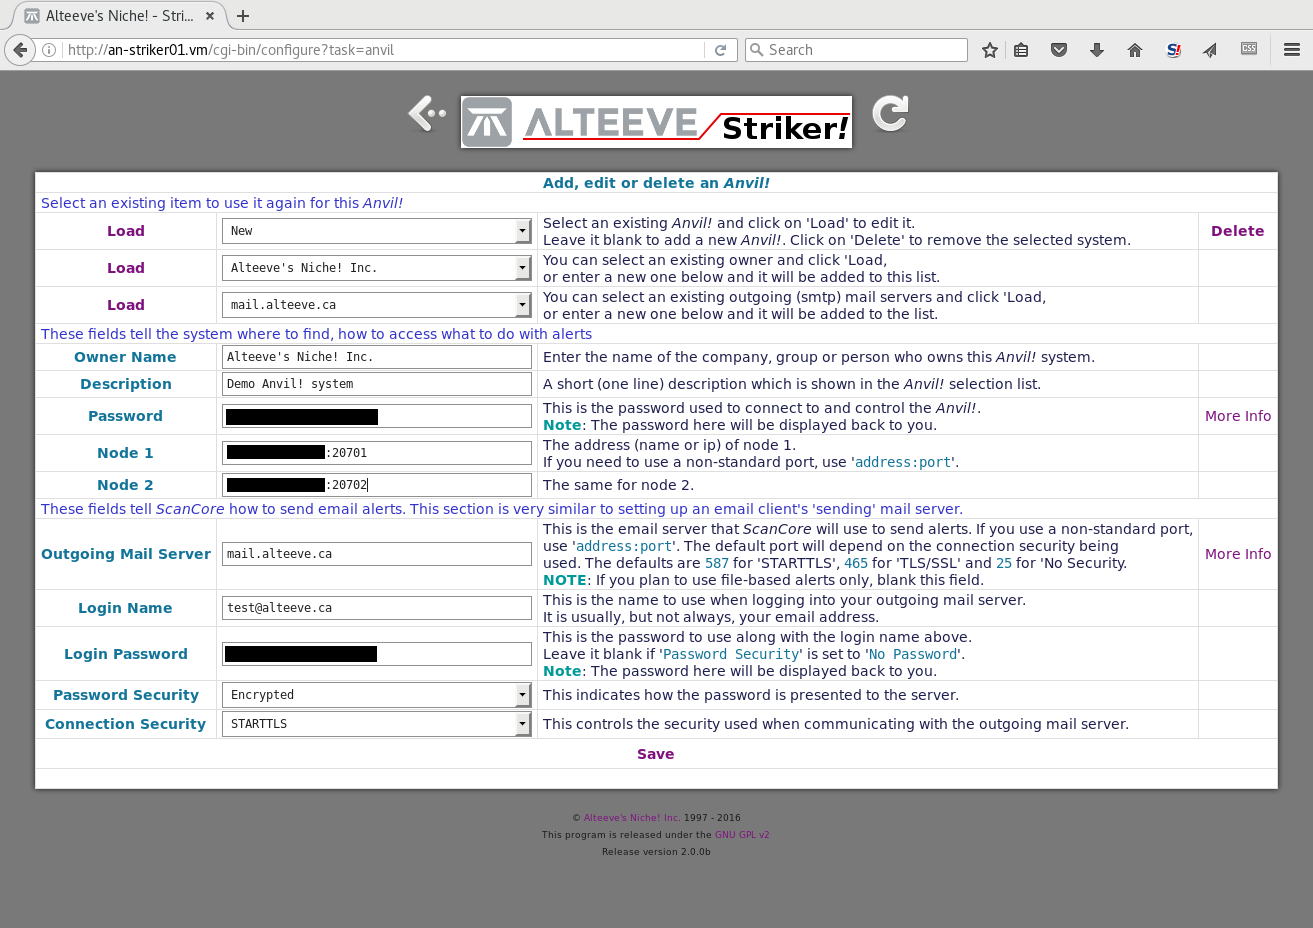
In our case, we're configuring access to an Anvil! that is remote. To handle this, both nodes will have the same IP address, but unique ports to access them via standard TCP port forwards. To do this, we enter the public IP address and port as 'a.b.c.d:x'
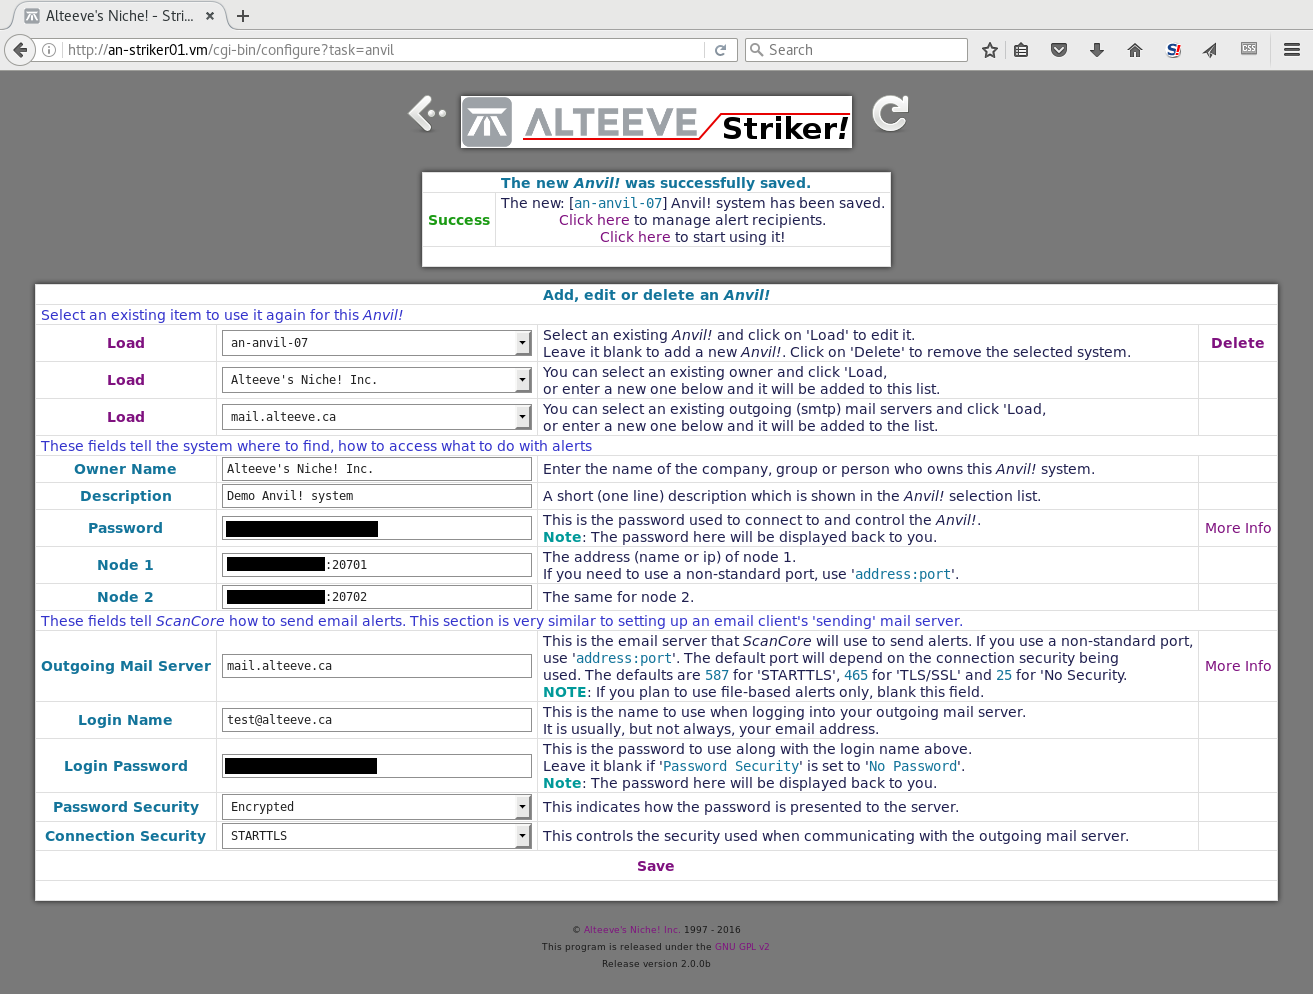
When you're ready, click on 'Save' to finish.
| Note: If you want to add new alert recipients for this Anvil!, you can click on the link to do so at the top. Otherwise, click on the " to start using it!" link. |
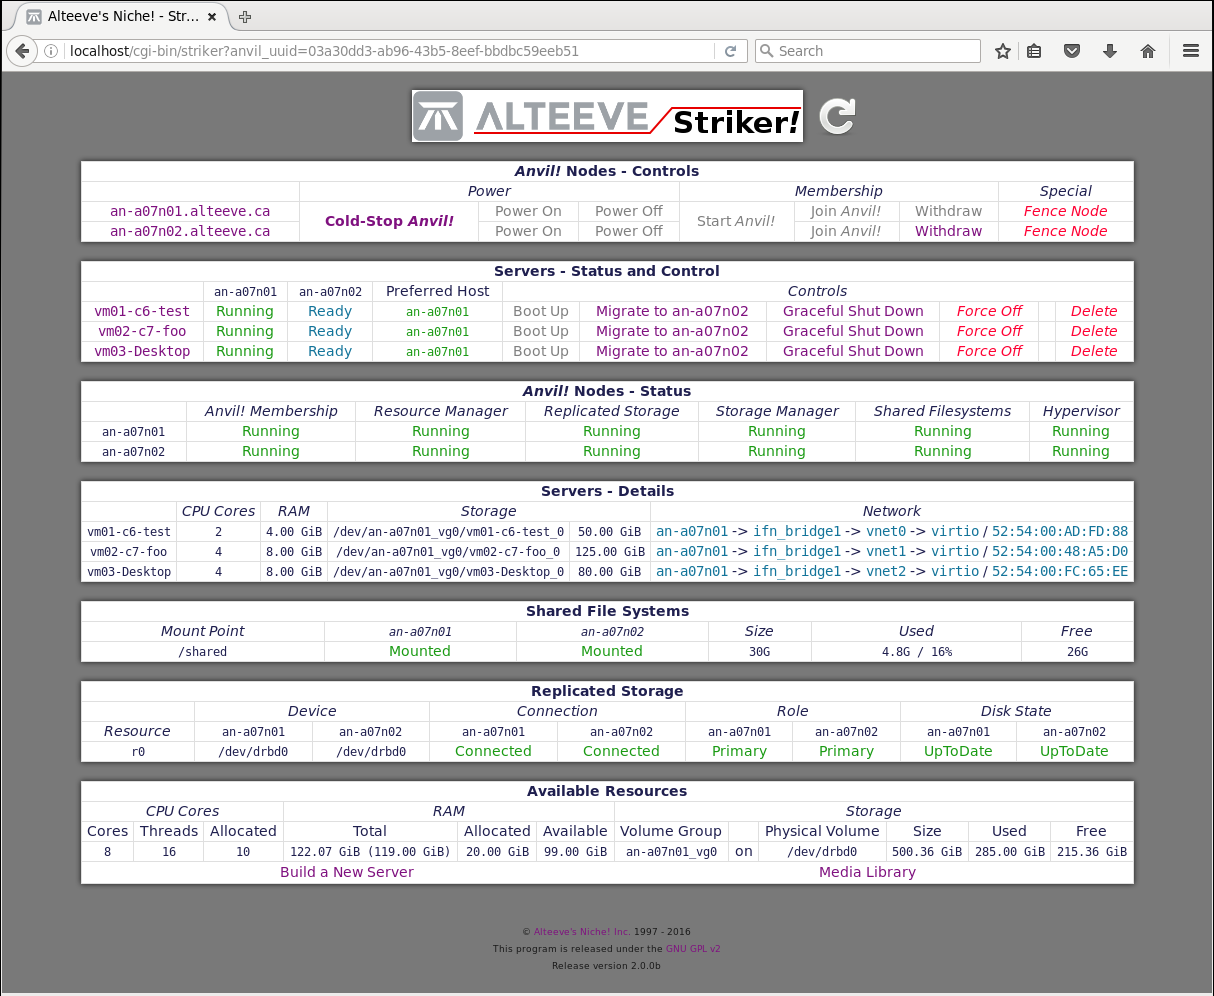
Voila!
Adding A New ScanCore Database To Nodes
In order for Striker to manage an Anvil!, the nodes need to write to the Striker’s ScanCore database.
To do this, edit each node's /etc/striker/striker.conf file and add the striker database connection information:
| Note: In the example below, the nodes are remote, and so from the perspective of the nodes, the dashboards are also remote. In the same way that we configured the new Anvil! to have the same IP but different ports, the same is reverse on the way back. If the Anvil! and dashboards are on the same subnet, then use the BCN IP addresses. |
| Warning: When connecting nodes to dashboards by directly forwarding TCP ports, please read this link on SSL connections and this one on SSH tunnels for securing the PostgreSQL connection. |
It should look like this;
scancore::db::3::host			=	1.2.3.4
scancore::db::3::port			=	15432
scancore::db::3::name			=	scancore
scancore::db::3::user			=	secret
scancore::db::3::password		=	super secret password

scancore::db::4::host			=	1.2.3.4
scancore::db::4::port			=	25432
scancore::db::4::name			=	scancore
scancore::db::4::user			=	admin
scancore::db::4::password		=	secret
Save and exit. The next time ScanCore loops, it will connect to and sync with the new ScanCore databases. As soon as that happens, you're ready to go.
If you get the error:
-=] Error - Error Code 176 - Fatal Error - Striker.pm at 386 [=-

The 'AN::Tools::Striker' module's 'load_anvil()' method was called before ScanCore has run on both nodes. Please make sure that ScanCore is enabled and has run at least once.

Exiting.
Please wait about a minute and the error should go away.
Managing Two Anvil! System
The new Anvil! should now be available!
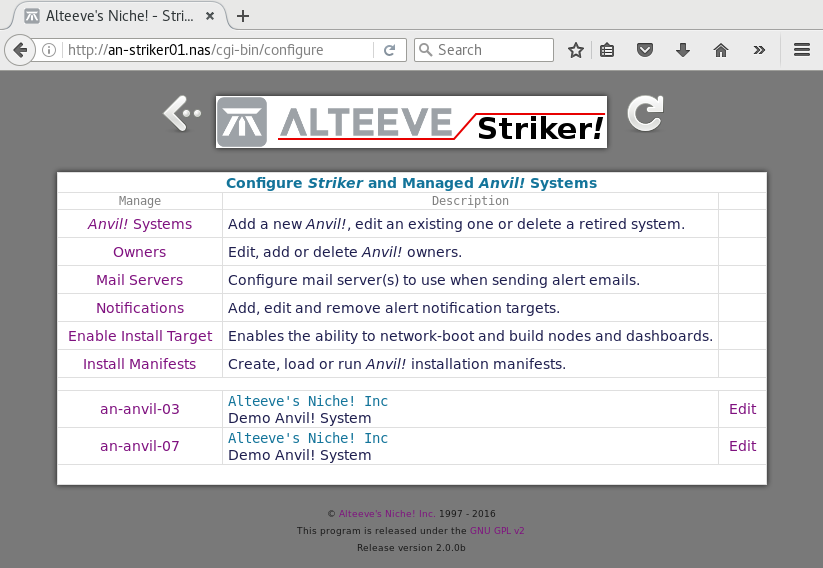
At the bottom of the menu will be all configured Anvil! systems. In this case, we can see '' and ''.
| Note: Now that two Anvil! systems exist, Striker will load the selection menu by default from now on instead of automatically loading the previously-alone Anvil!. |
Click on the name of the Anvil! on the left that you want to manage. If you want to edit (or delete) an Anvil!, click on '' to the right of the given system.
Building Servers
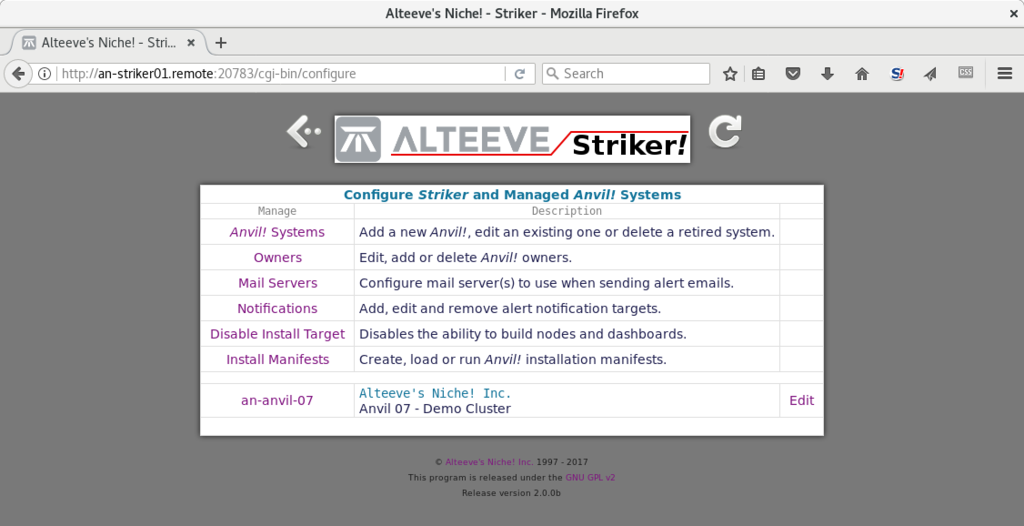
Building a server on an Anvil! is pretty close to installing an operating system on traditional hardware. The only difference, of course, is that there is no drive to put a physical disc into. So before we can build the first server, we need an operating system disc image (called an ISO).
Striker uses a library to upload and store install media, driver discs or any other "CD" or "DVD" you might want to use. It is called the 'Media Library", and the library is specific to each Anvil! pair. So to access the library, first load the Anvil! main page.
Add Disc Images To The Media Library
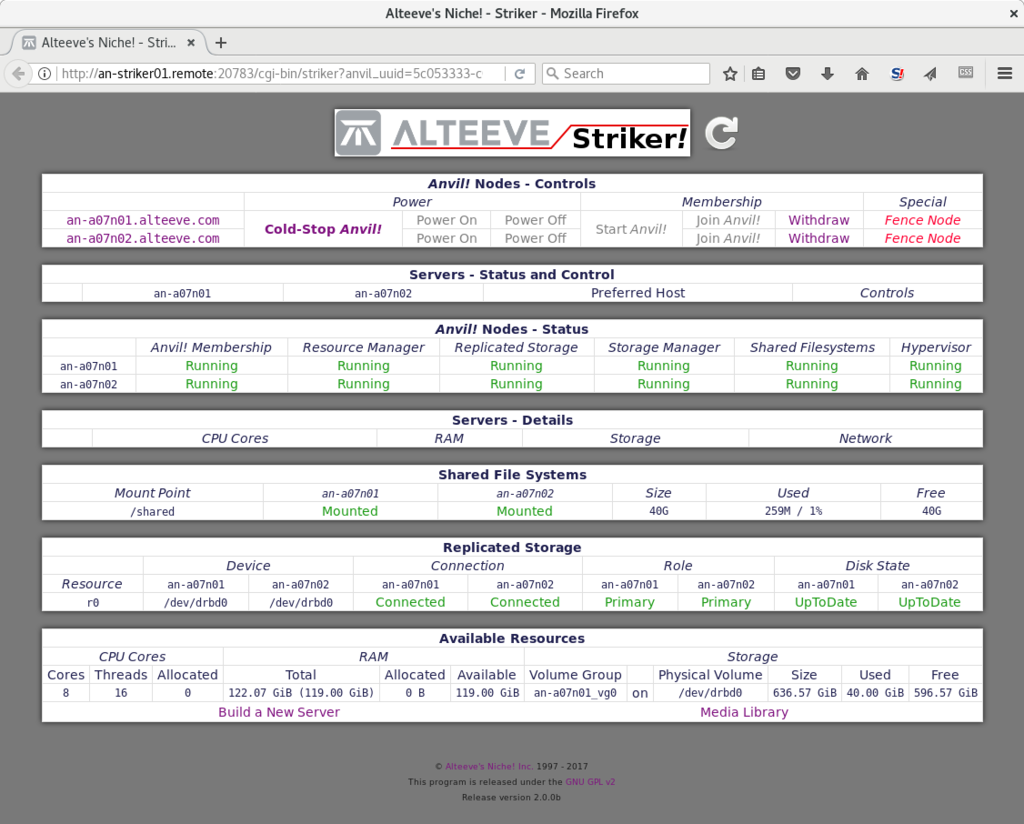
Look for the '' button at the bottom right.

The media library starts with a summary of the used and available free space. Below that is a list of files already in the library, if any.
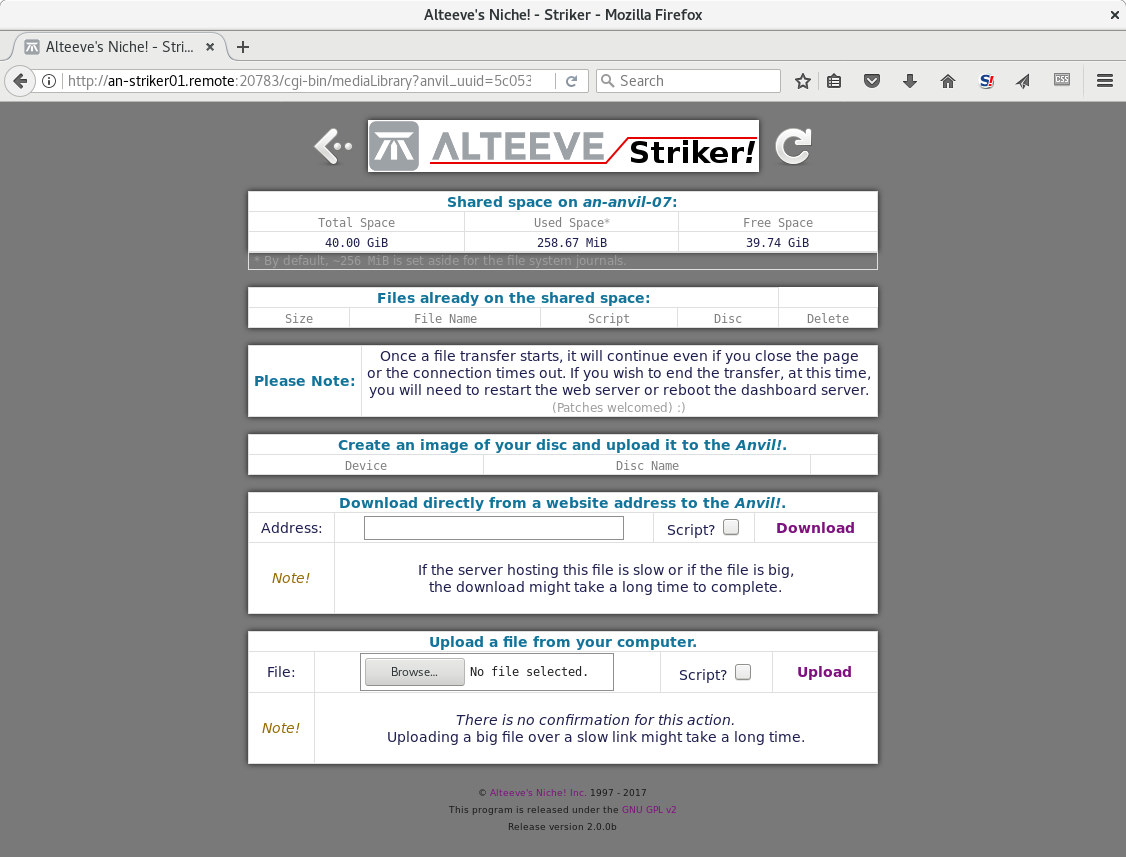
The three remaining sections provide three ways to upload disc images to the library.
- . Image a physical disk.
- . Pass a URL to an image for direct-download to the Anvil!.
- . Upload an ISO directly from your computer.
We'll try all three to show how each works.
Imaging A Physical Disc
| Note: This process uses the optical drive on the Striker dashboard itself. The drive can be internal or plugged in over USB. |
The first method we will show takes a physical CD or DVD disc in a physical drive, converts it to a ISO and then uploads it to the Anvil!. This is also very useful if you have software, drivers or updates sent to you by a vendor. Disc images can also be used to "insert" into existing server's optical drive.

The disc in the drive is the disc used to build the dashboard. We don't want that one, so lets eject it and then reload the page.

We will use Windows 2008 R2 as our first server, so we'll insert the physical disc into the drive.

Click on ''.
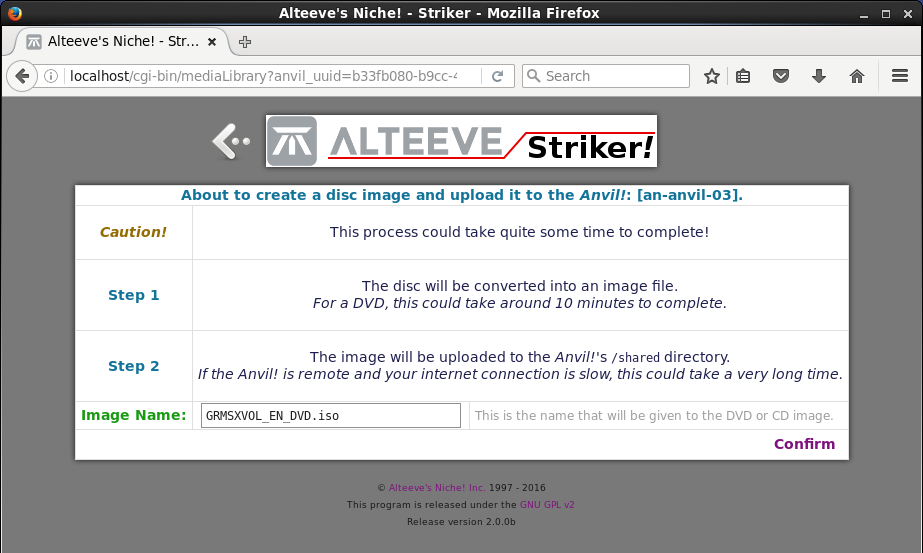
It won't start the imaging process right away. You have the option to choose the ISO's file name. In this case, the default file name "GRMSXVOL_EN_DVD.iso" isn't very helpful. So we'll give it a more verbose name.
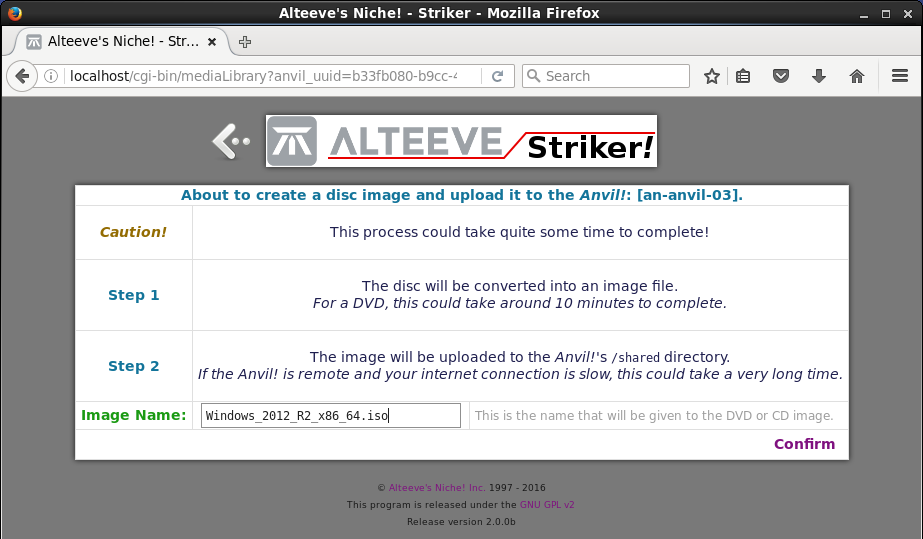
The name 'Windows_2012_R2_x86_64.iso' will be a lot more informative. Now we're ready, just click '' to begin!
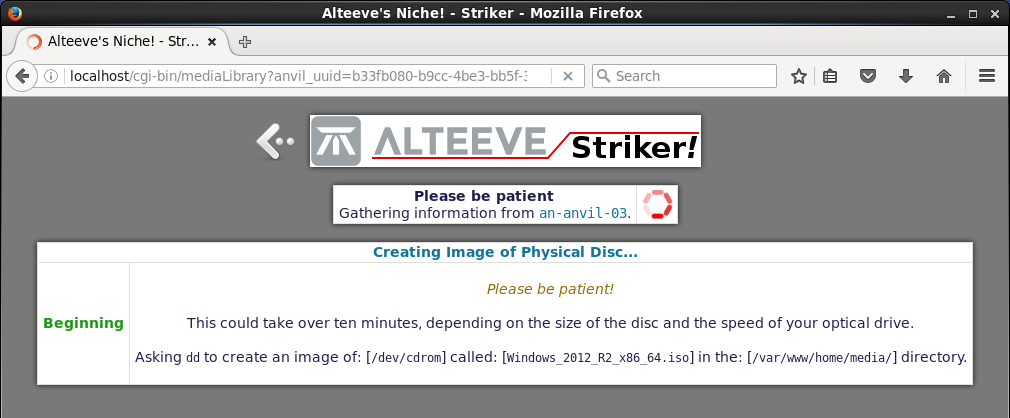
The first step is to convert the physical disc into an ISO image file on the dashboard.
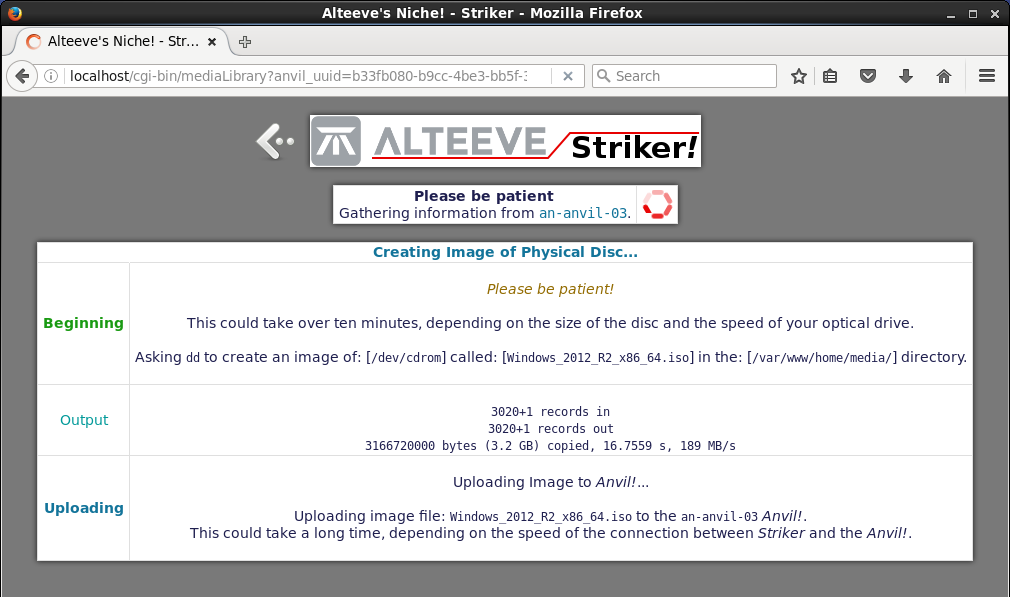
Next, the image file is uploaded to the Anvil!'s shared storage.
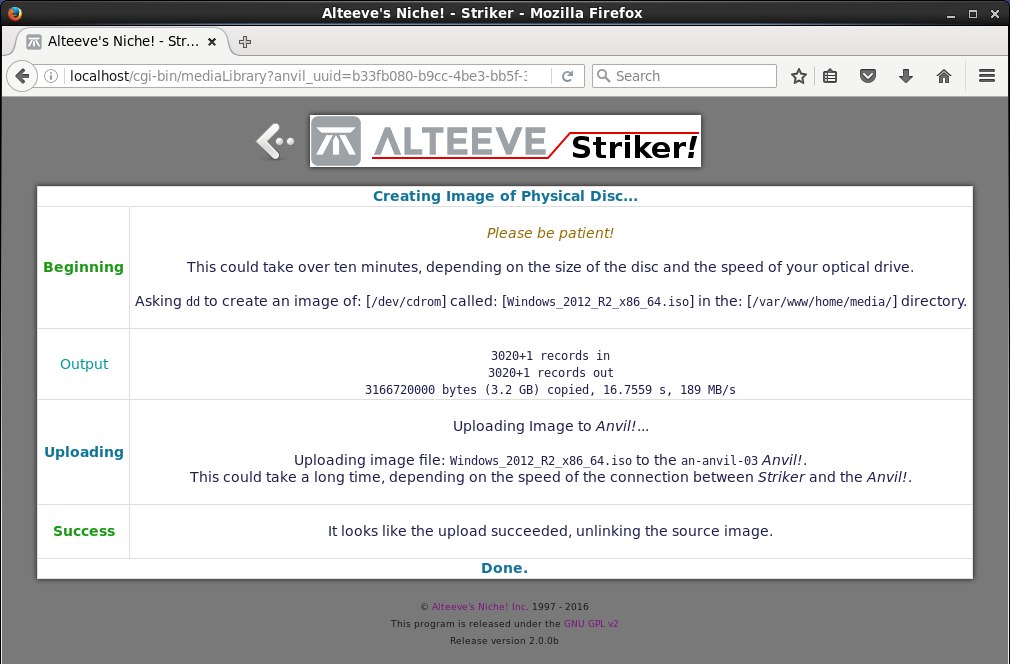
Click on the back button and you will see the image now in the library. It will stay in the library until you decide to delete it. So you can safely store the original disc, you won't need it again.
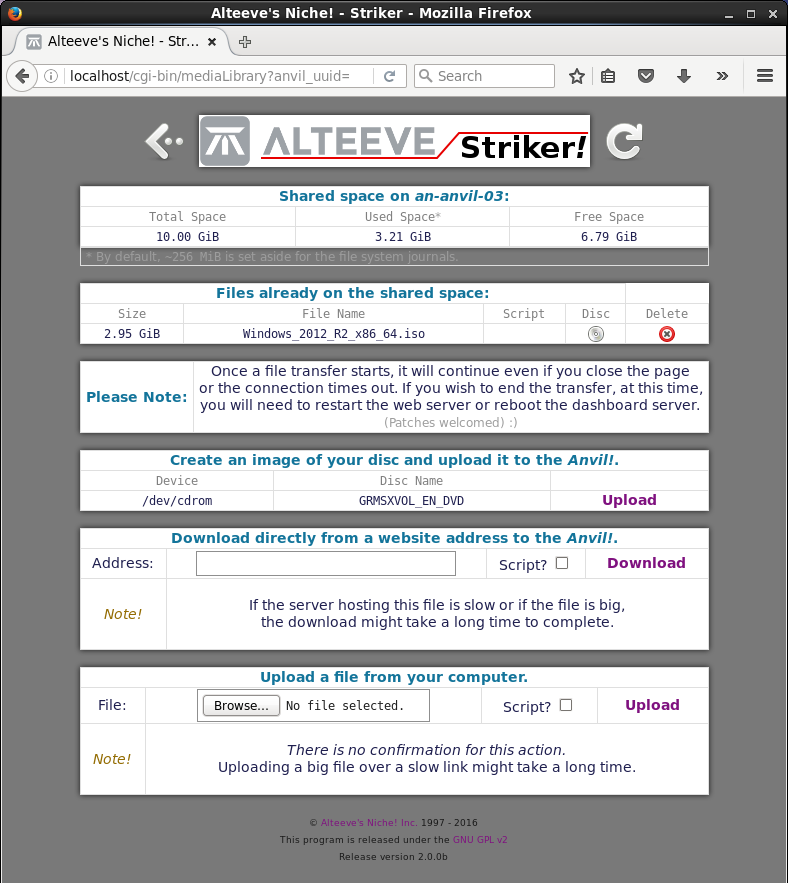
Done!
Directly Download An ISO
The most common way to add a disc image to the media library is to pass a URL to Striker. It will connect to one of the Anvil! nodes and directly download the target URL to the library. You can use ftp, http or https addresses.

For this example, we will download a CentOS version 7 disc images. We'll use a mirror close to us, which is likely not the best mirror for you. If you are following along, please check the mirror list for a mirror closest to you.
The closest mirror to us is "http://mirror.csclub.uwaterloo.ca/centos/7/isos/x86_64/CentOS-7-x86_64-DVD-1511.iso" hosted by the University of Waterloo Computer Science Club (thanks!).
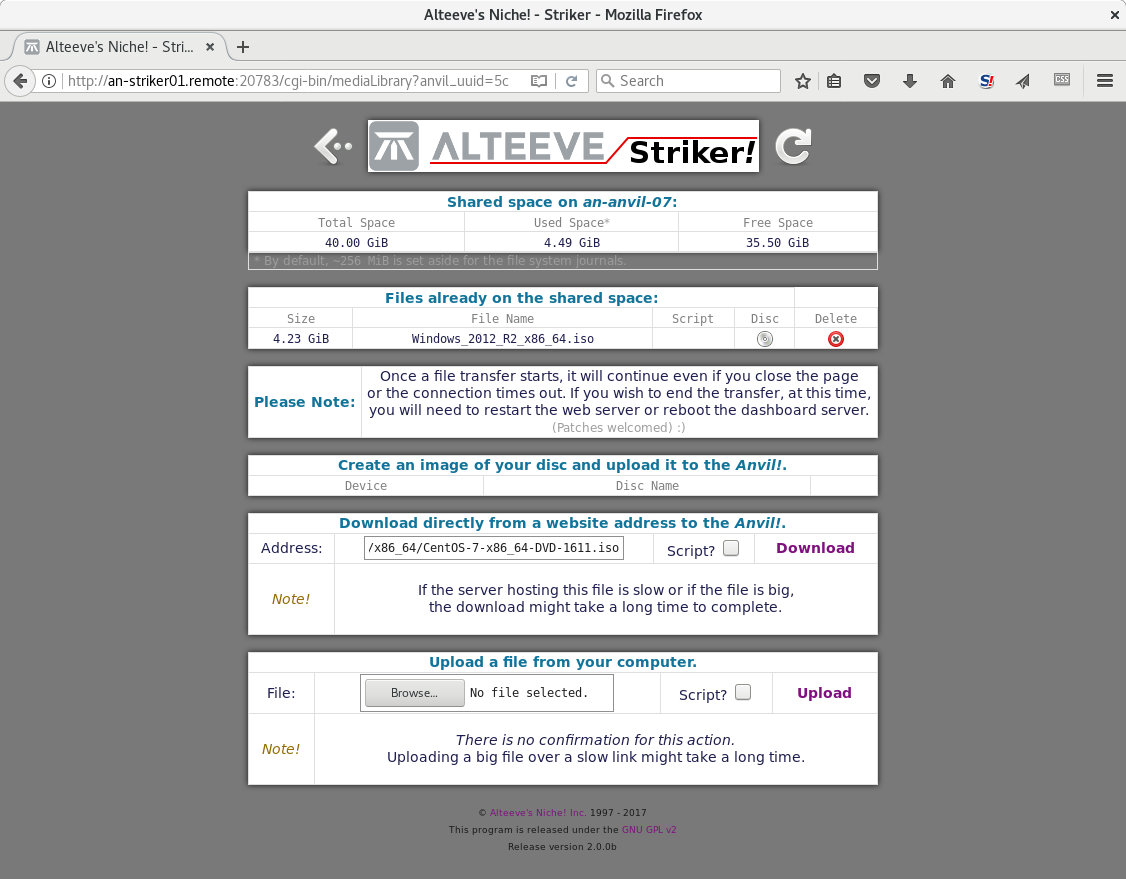
| Note: Please ignore the 'Script?' check box for now. We will explore it's use and purpose later on in this tutorial. |
Paste the URL into the 'Address' field and then click on '' button.
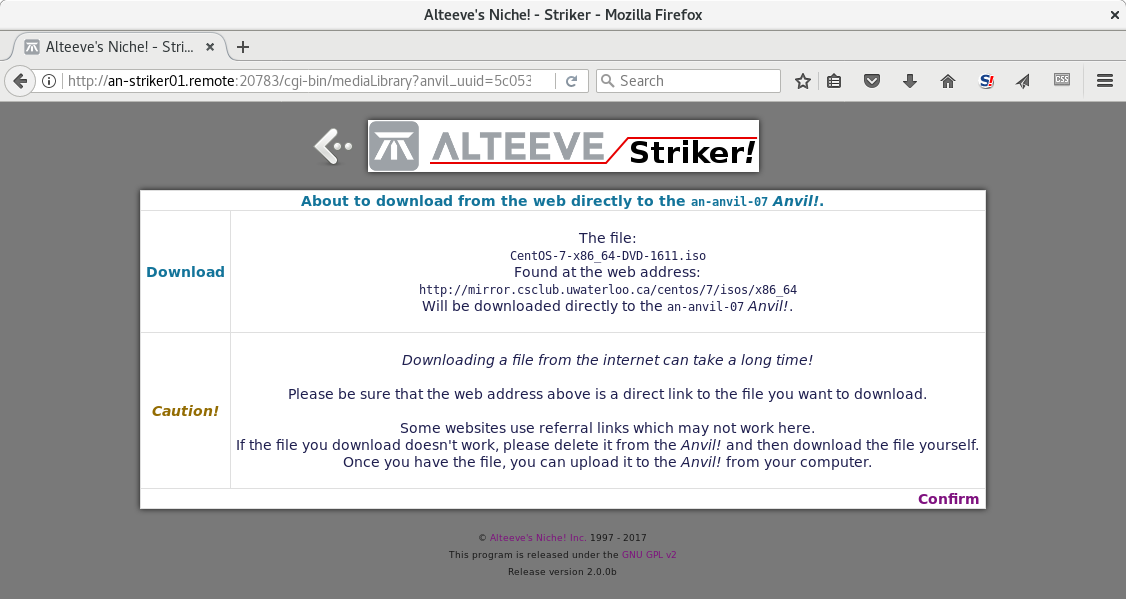
You will be asked to confirm the download. When ready, click on ''.
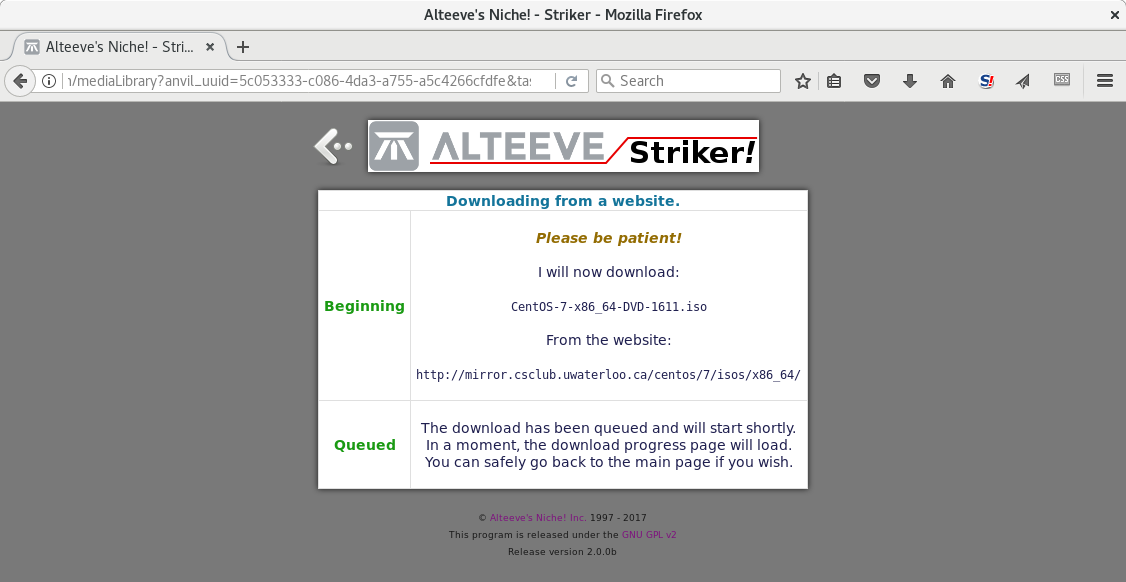
The download will be sent to one of the nodes (usually node 1).
Once requested, the page will reload into the download monitor screen.
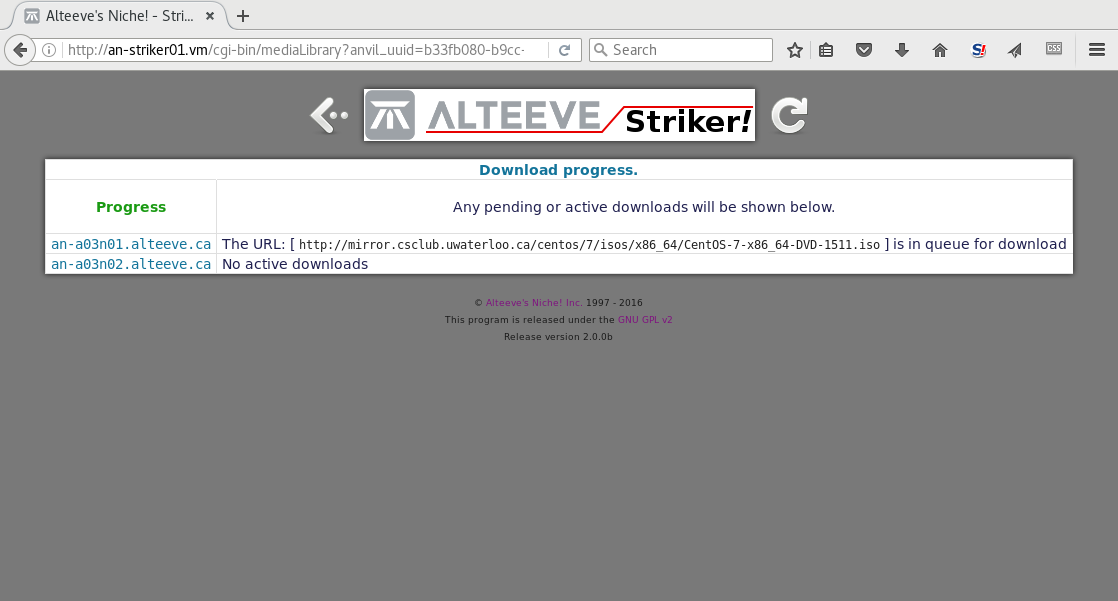
Depending on timing, you may see that the download is in queue for less than a minute before the download actually starts.
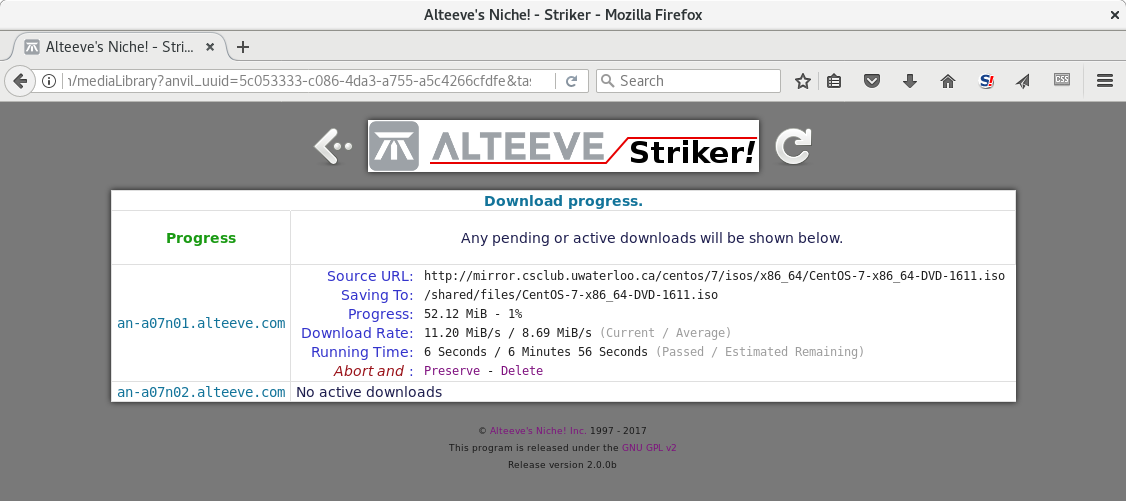
When the download starts, you can either leave the page to refresh periodically so that you can monitor the download, or return to the main page and do other work. The download will proceed in the background.
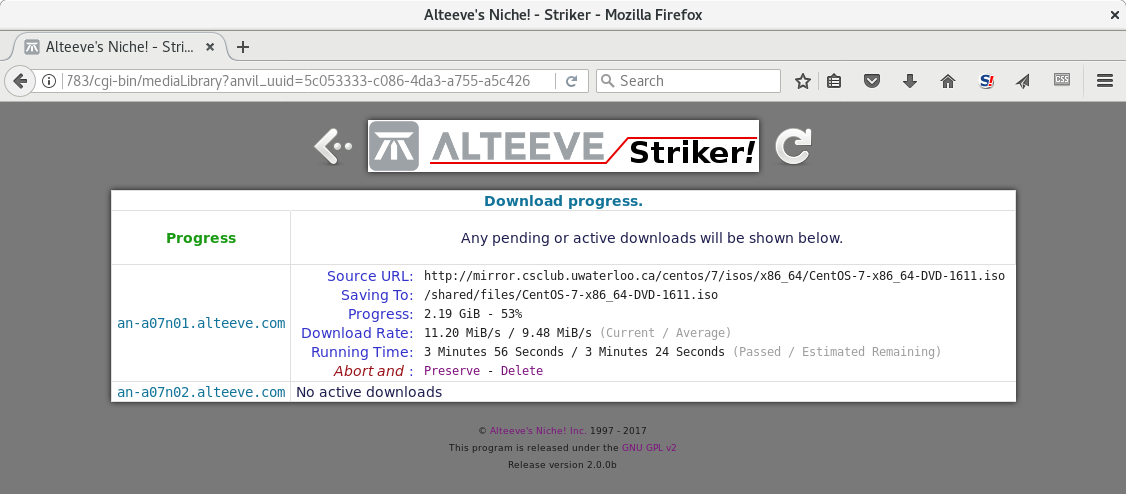
With each refresh, the current and average download rates will be shown. This can be useful for tracking downloads that slow down because of congestion, for example.
If you want to cancel a download, you have two options;
- Abort and .
- Abort and .
The '' option will cancel the download, but it will leave the partially downloaded file in the library. There is no visual indication that the download is incomplete, save for the reduced size. You should only do this if you plan to restart the download. This is possible if you wanted to switch to a faster mirror, for example. If the download is restarted with the same output file (even if it is from a different URL), the download will pick up where it left off.
The '' option will cancel the download and delete the partial file. This is what you will want to do most times.
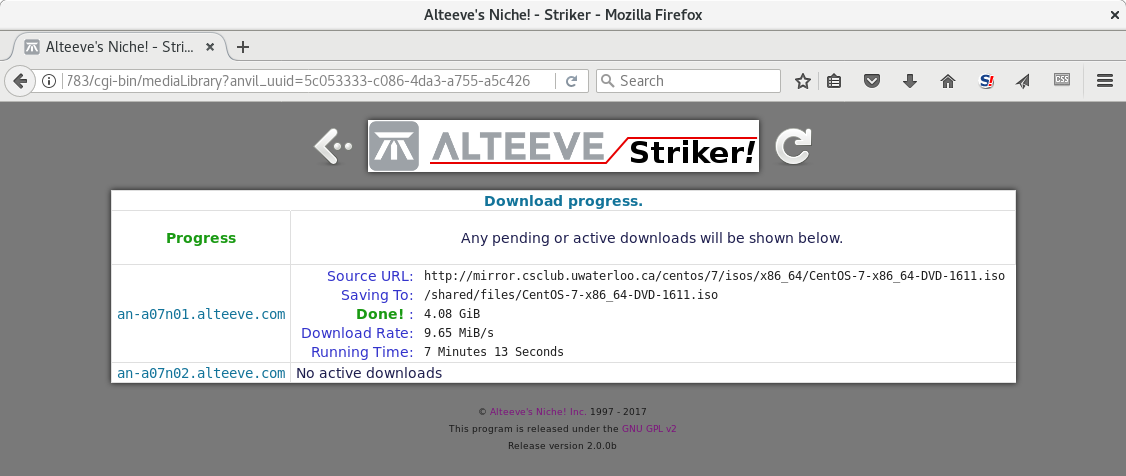
When the download completes, for a short time, a message showing that the download completed will be displayed.
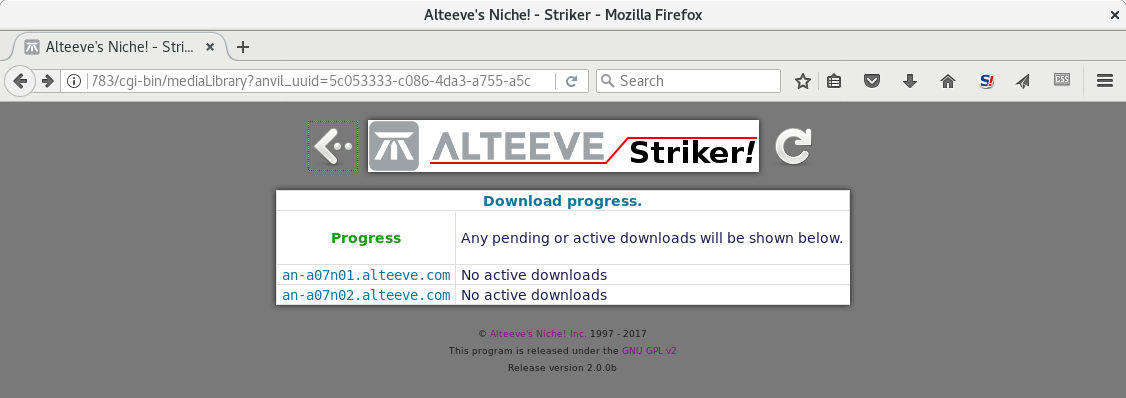
If the download monitor page is left open, eventually no download will show on either node.
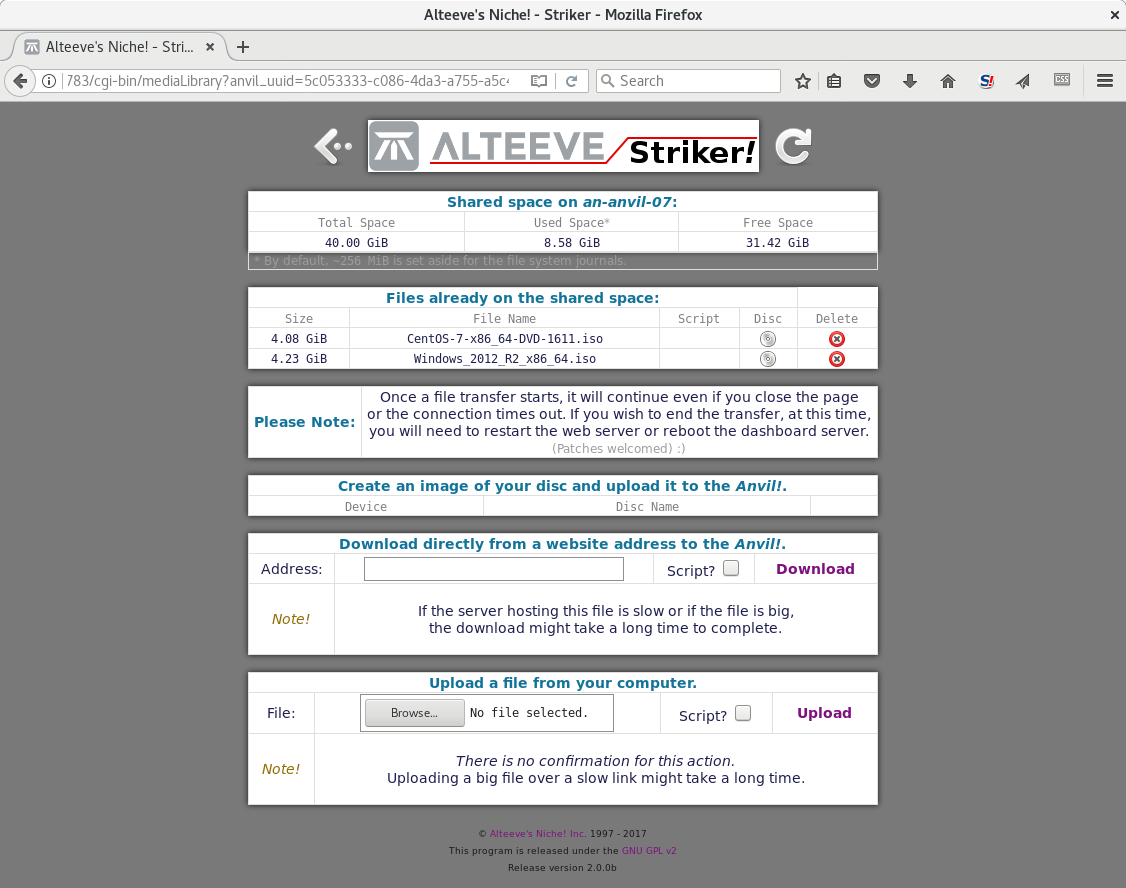
Done!
Upload An ISO From Your Computer
The final option for loading a disc image is to upload an ISO image f from your computer to the media library. This will cause the ISO to be uploaded to the Striker dashboard, and the Striker will push the ISO to the Anvil! directly.

If you have an ISO image on your computer, then you can upload it to Striker. This is often needed if the image was made available through an authenticated service, had to be renamed or similar reasons.
| Note: When provisioning windows servers, the Anvil! will use an emulated network card and storage controller that are optimised for higher performance. These are called "virtio". These work like any other brand of network or storage hardware in Windows, but the drivers need to be available during the operating system installation. |
We will cover this is detail when we provision a Windows server later in this tutorial. For now, we will download the latest signed virtio drivers from the Fedora Project. Follow the link in the previous sentence and then click on the "Stable virtio-win iso" link. Save it anywhere on your computer.
We're using this example because, you will note, that the download URL is this:
When downloaded, though, the file name changes to reflect the specific version. At the time of writing this, the resulting file was saved as 'virtio-win-0.1.126.iso'.
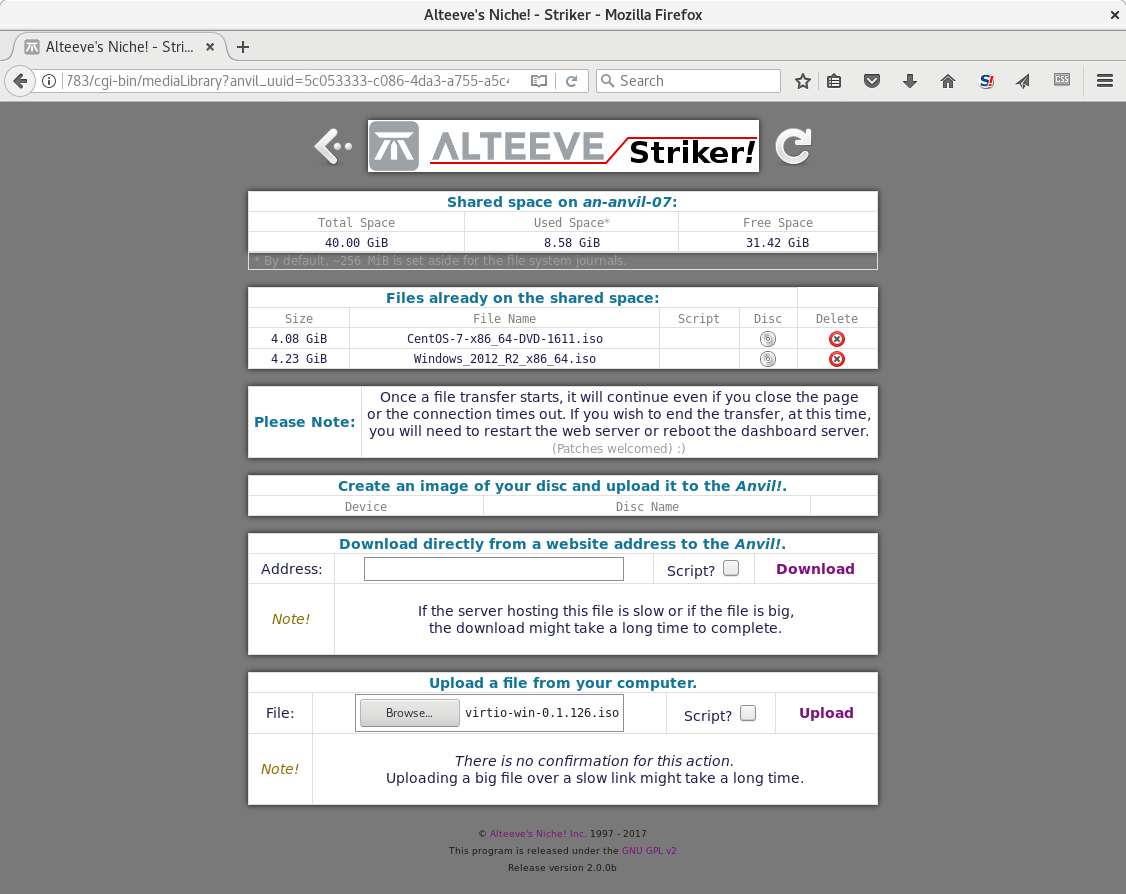
When you click on the '' button, you will be presented with an OS-specific file browser. Browse to where you downloaded the file and select it.
| Note: When you start the upload, your browser may or may not show the upload progress. If you don't see the upload running directly, please just wait a couple minutes. |
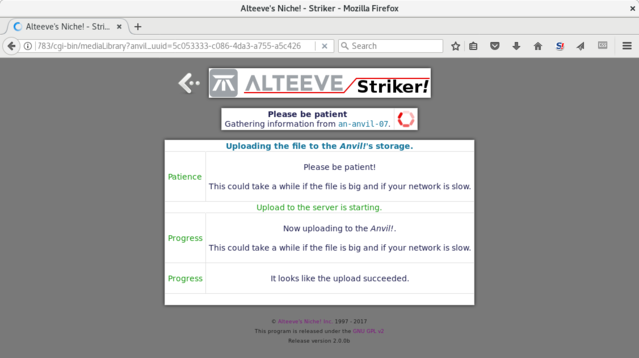
With the file selected, click on the '' button to start the upload. After a minute, the upload to Striker will complete and Striker will begin copying the ISO to the Anvil!.
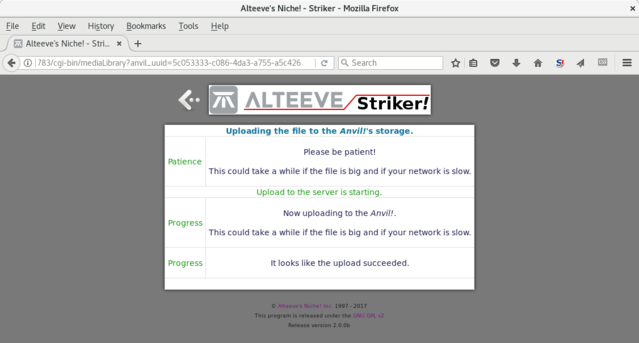
Once finished, the disc image is on the Anvil!.
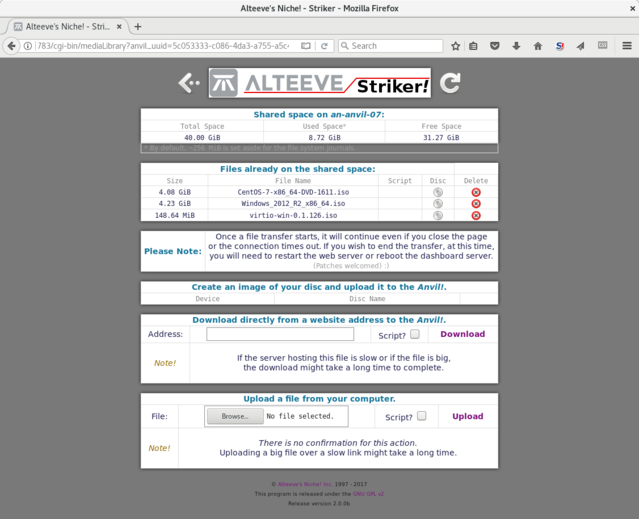
With this, we have everything we need to start provisioning servers!
Provision A RHEL 7 Server
We will start by provisioning a RHEL 7 based guest as the operating system install is simple, allowing us to focus on the Striker and Anvil! portion of the process.

Off of the main page, click on '' at the bottom-left of the page.
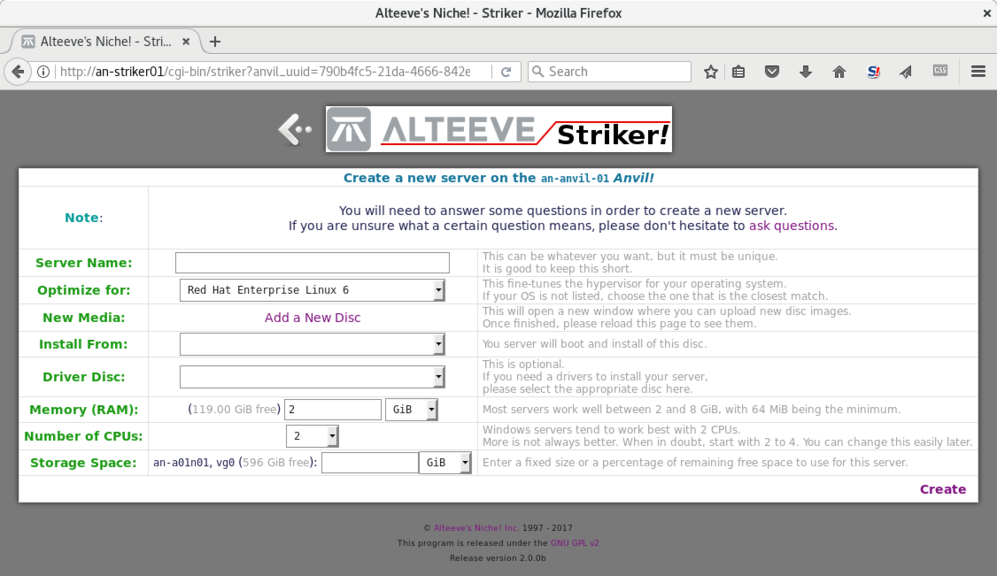
The Seven Provision Form Fields
The new server form has seven sections;
| Entry | Description | ||
|---|---|---|---|
| Server Name | This is a free-form field you can use to give the server. Keeping it short an unique among all your Anvil! systems is ideal. This way, you can migrate the server to other Anvil! systems at a later date and not worry about name collisions. | ||
| Optimize for | This is a drop-down list of common operating system types. It alters how the emulated hardware is configured to help get better compatibility and performance with various systems.
| ||
| Install From | This will be the disc image that the new server will boot off of. This is a drop-down list of all '*.iso' files in the media library. | ||
| Driver Disc | When needed, this is an optional disc image, like a second DVD drive, with a second disc. This is usually used for drivers, as we will see later when we build a windows server. It could also be a "Disc 2", if your operating system spans install media. | ||
| Memory | This is where you tell the Anvil! how much RAM to allocate to the new server. This can be changed later as needed. The maximum available is shown just to the left of the field. | ||
| CPUs | This is how many CPU cores to allocate to this server. It is a select box ranging based on how many cores are on the node. You can change this later, if you need.
| ||
| Storage | This is how much (replicated) disk space to allocate to the new server. The amount free is listed on the left of the input form. On the right are the units to use; MiB, GiB, TiB or a percentage.
|
Log Into Striker
When the server is created, it will be just like a traditional, "bare iron" server. That is to say, the (virtual) hardware is assembled, powered on and the install disc is booted.
So the install process requires "plugging in a monitor and keyboard".
We do this using the "Virtual Machine Manager" program, which you can find on Striker’s desktop. [[Build_an_m2_Anvil!_-_Detailed#Second_Striker_Stage-2_Install|Log into Striker] and on the desktop, look for the 'VM' icon on the desktop.

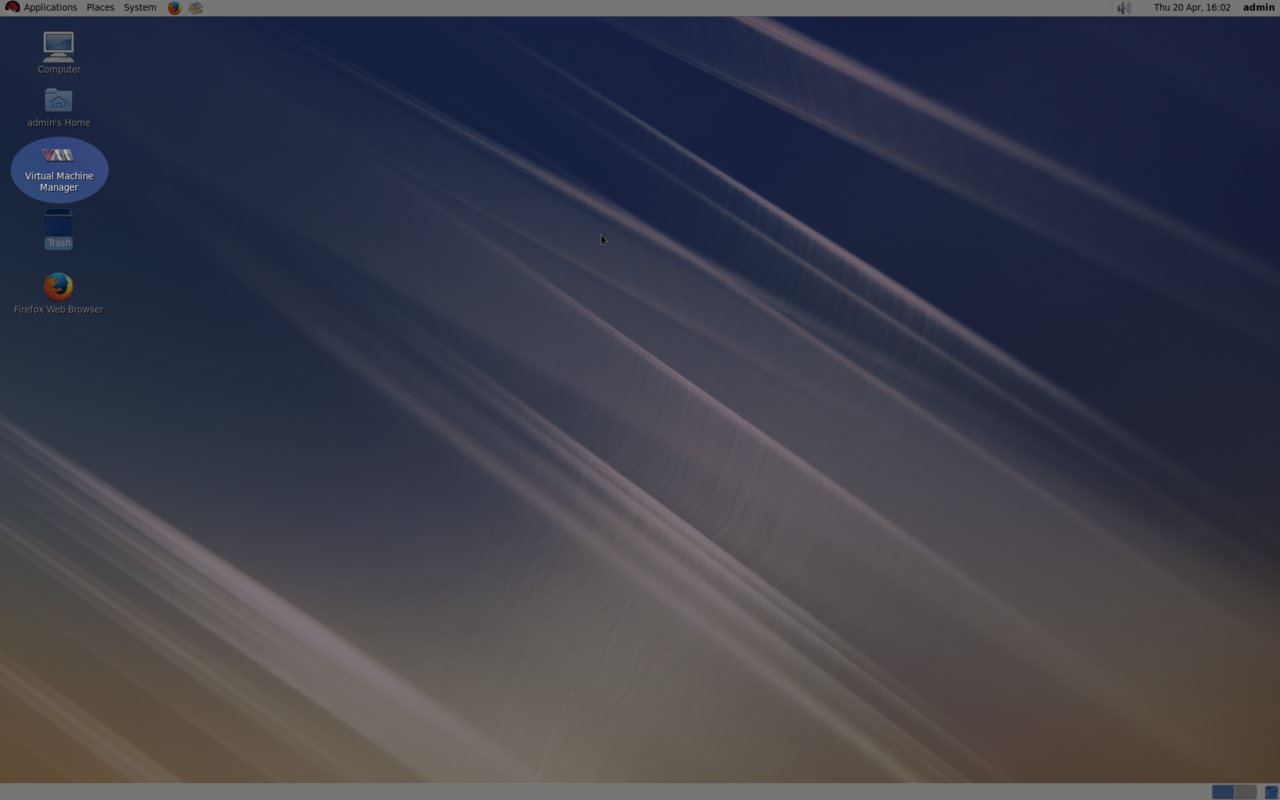
Double-click on the icon and VMM will start and automatically connect to the Anvil! nodes. At first, you won't see anything and that is fine. Once you create the server, you will see it appear and then you can double-click on it to gain access.
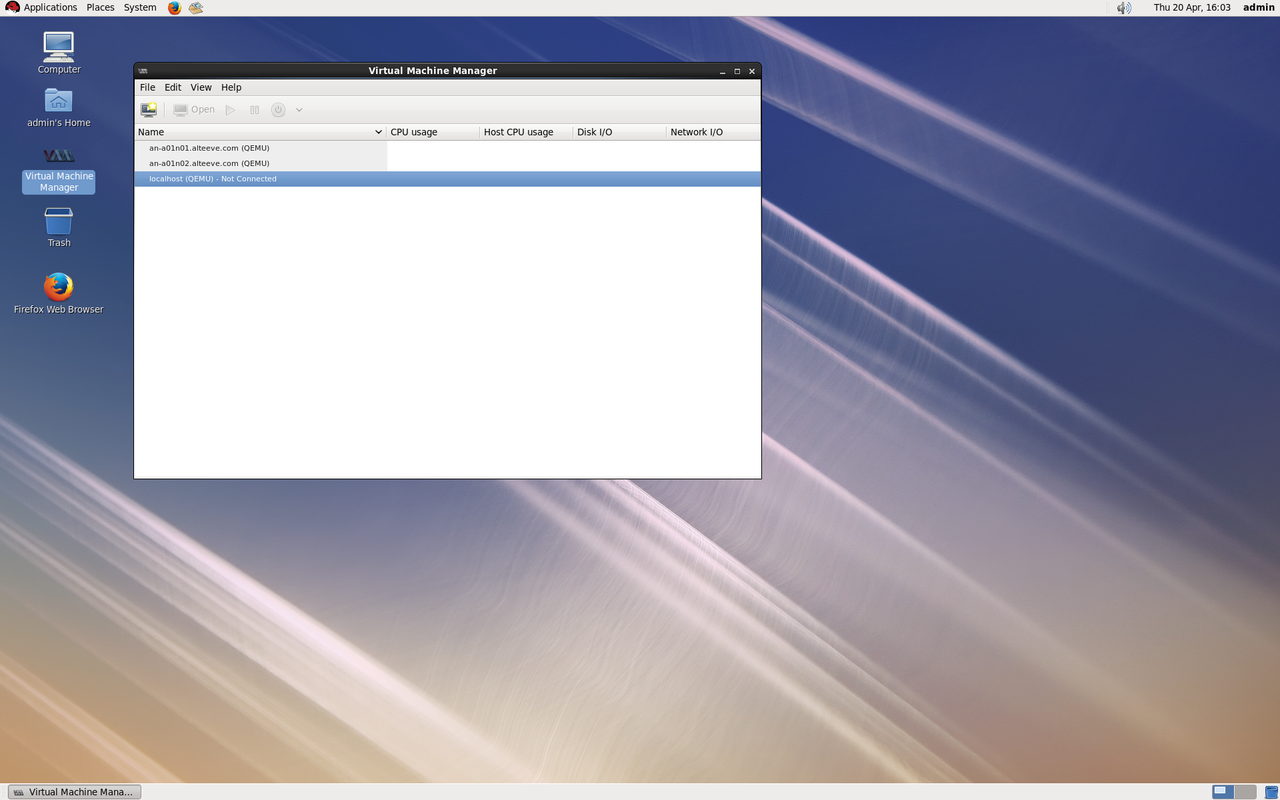
Once connected to the server, you will effectively be using a monitor, mouse and keyboard plugged into a traditional bare iron server. You then do the rest of the operating system installation exactly as you would have on real hardware.
Now, back to provisioning the server!
Creating The RHEL 7 Server
- Server Name
We're going to name the server, creatively, 'srv01-centos7'. Purely out of our own convention, we like to prefix all names with a sequence number that grows for every server on any Anvil! system we manage. We do this so that we can be sure that, where ever we might move servers in the future, there won't be a name collision. You are more than free to do whatever makes sense to you. The second part is a simple descriptor and it can also be whatever makes sense to you. This server has no purpose, so we're going to just name it after the OS version.
- Optimize For
There isn't an entry for CentOS 7, but there is for RHEL 7. We know that CentOS is based on RHEL, so that is the closest entry.
- Install From
We're going to select 'CentOS-7-x86_64-DVD-1511.iso', as that is the file we downloaded from the CentOS website in the Media Library part earlier.
- Driver Disc
CentOS 7 doesn't need any drivers or second install disk, so we'll leave this blank.
- Memory
This tutorial is using a rather modest system, so we only have 4 GiB free. We'll give half of that to this server.
- CPUs
As a rule of thumb, we recommend allocating two cores to new servers. Do performance and load testing to see if you really need more before allocating more. This helps insure that no one server can unduly load the host. Of course, if you plan to only host one server on your Anvil!, start with N-2 cores. So if you have 8 cores, use 6. We'll stick to '2' for this example server.
- Storage
We've got a modest amount of space, so we'll start with a mere 10 GiB.
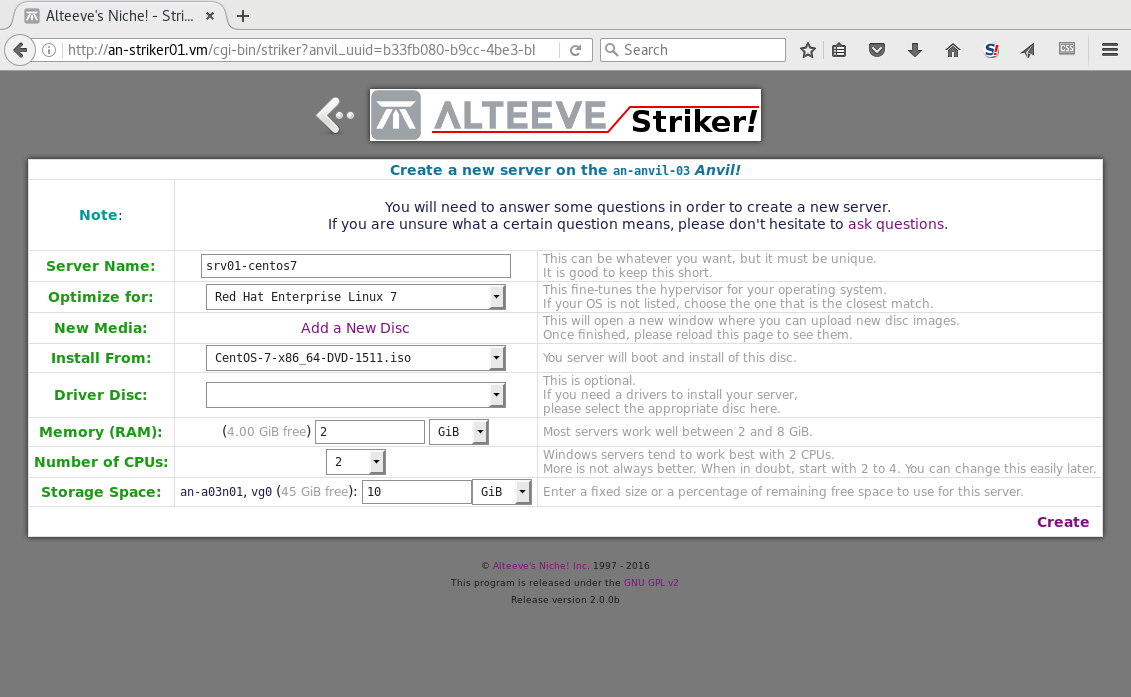
Click on ""!
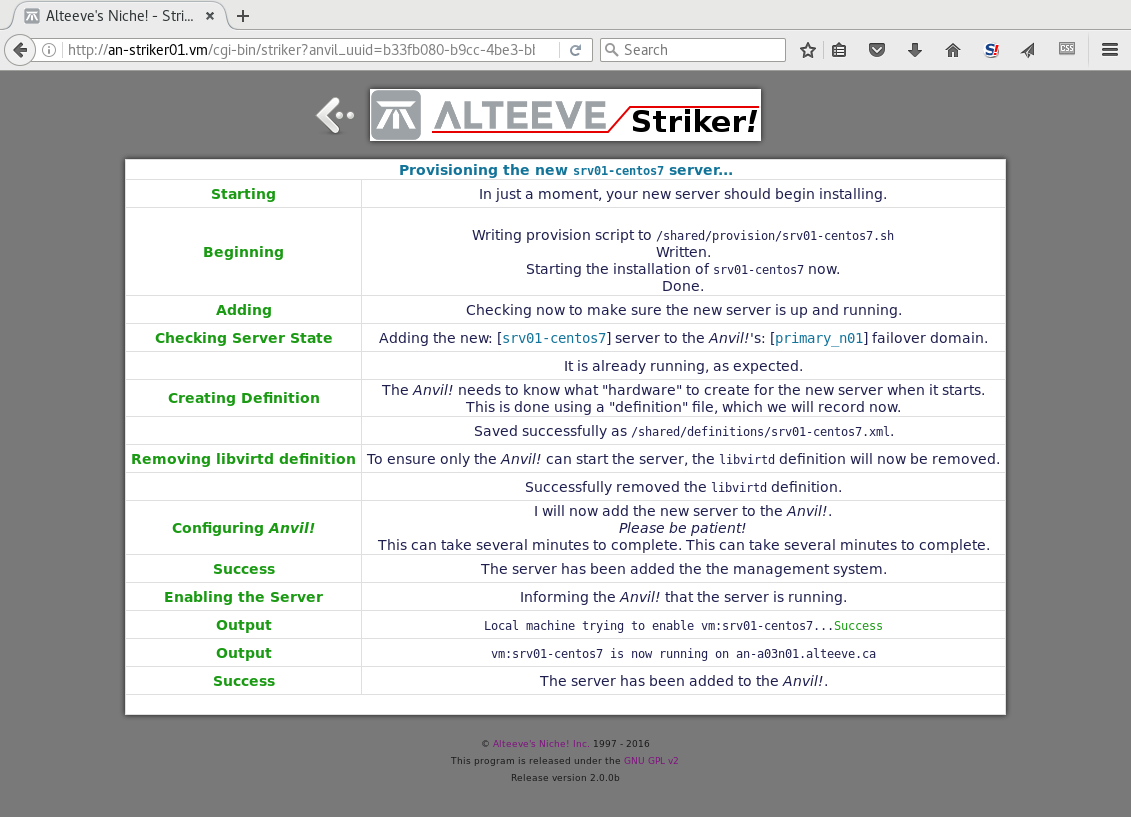
The server is created and then two things now happen;
- . The server is added to the Anvil!. Once complete, there is nothing more to do. It will already be under the Anvil! system's protection. You can return to the main menu
- . The server will appear in Virtual Machine Manager. You can double-click on it and proceed with the operating system install just as you would on a bare-iron server.
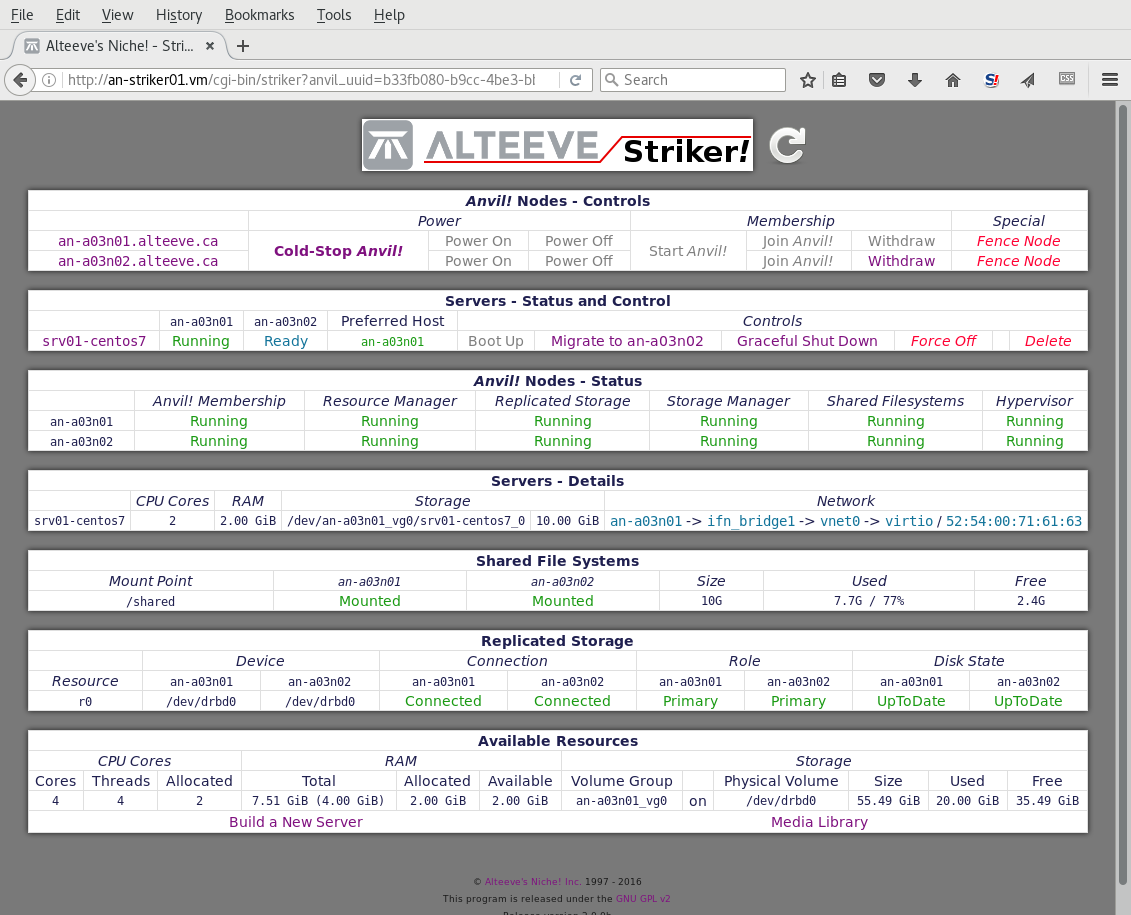
Going back to the Anvil! menu, you can now see the new server is up and running! We'll come back to managing the server in Striker later. Lets look at the operating system install now.
Installing The CentOS 7 Operating System
| Note: This isn't meant to be a CentOS 7 install tutorial, so please excuse the brief overview of the actual installation process. Please see the CentOS documentation for a deeper dive. |
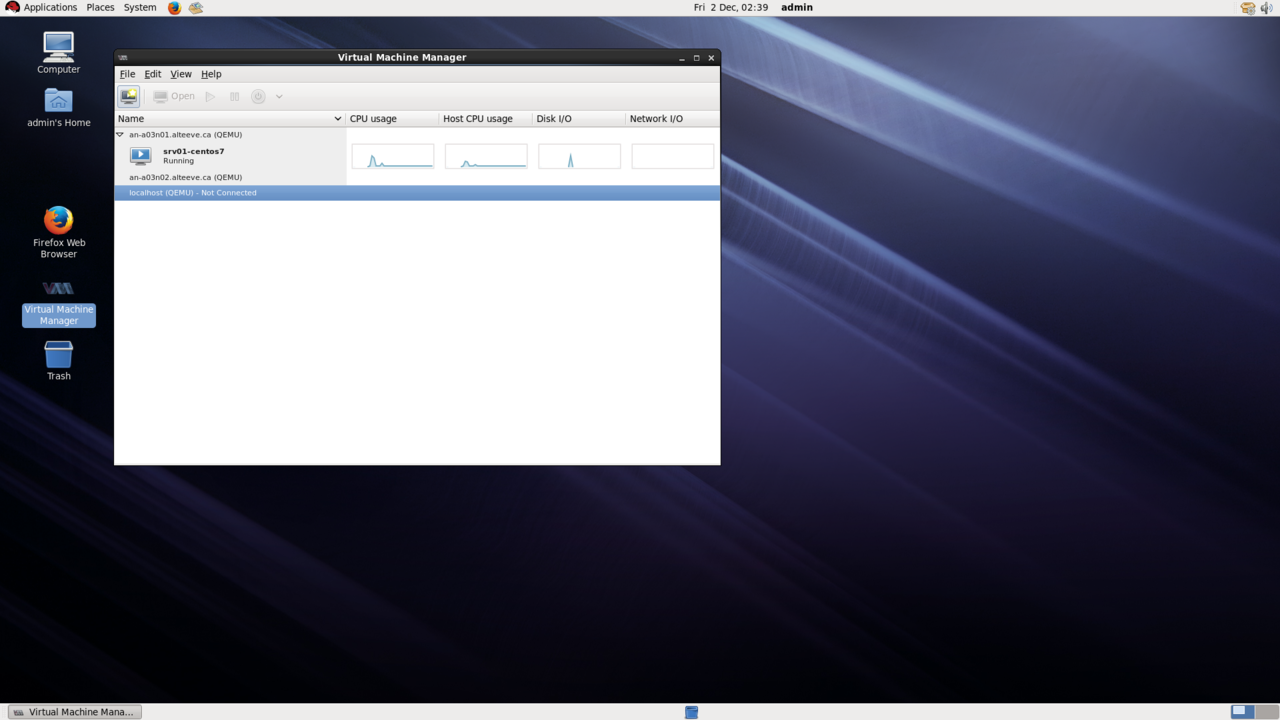
You can now see the new 'srv01-centos7' server in VMM. Double-click on it.
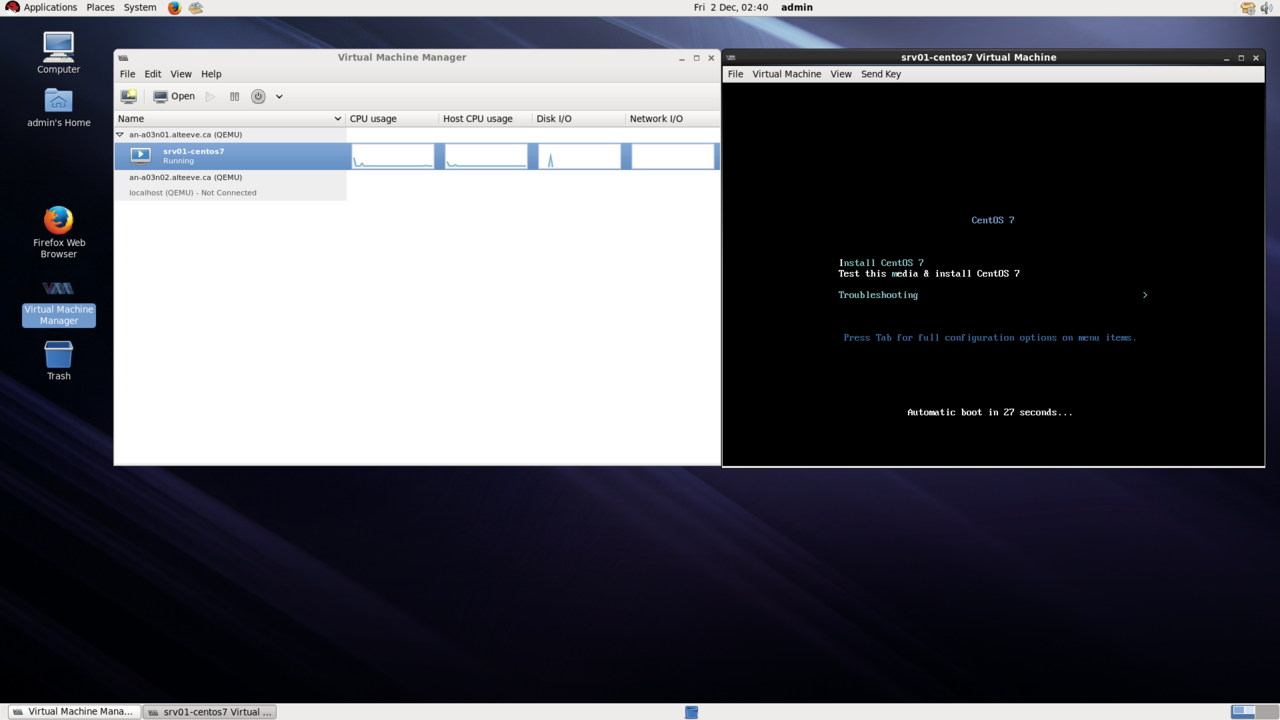
From here, you proceed as you would doing a normal OS install on normal hardware.
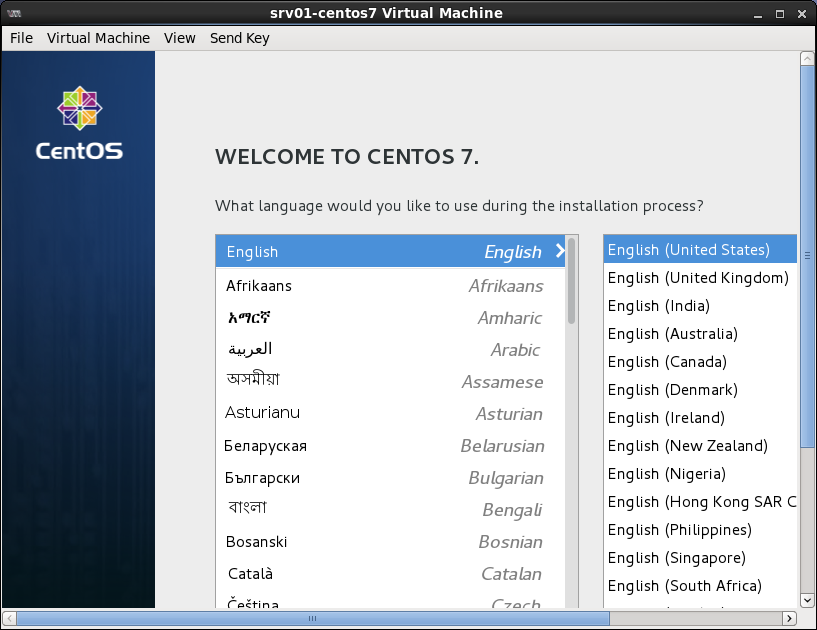
The window won't auto resize, so if you find that the full screen isn't visible, you can resize it easily.
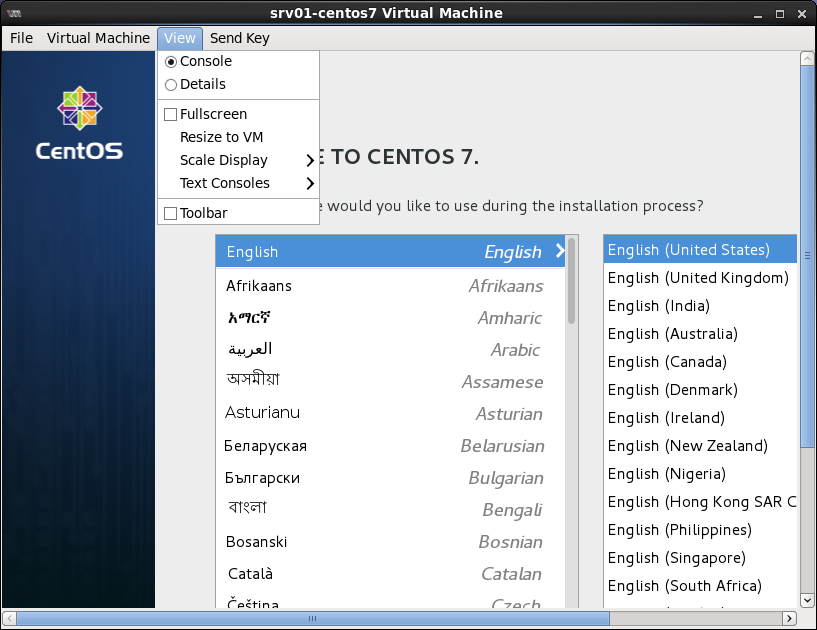
click on 'View' -> 'Resize to VM'.
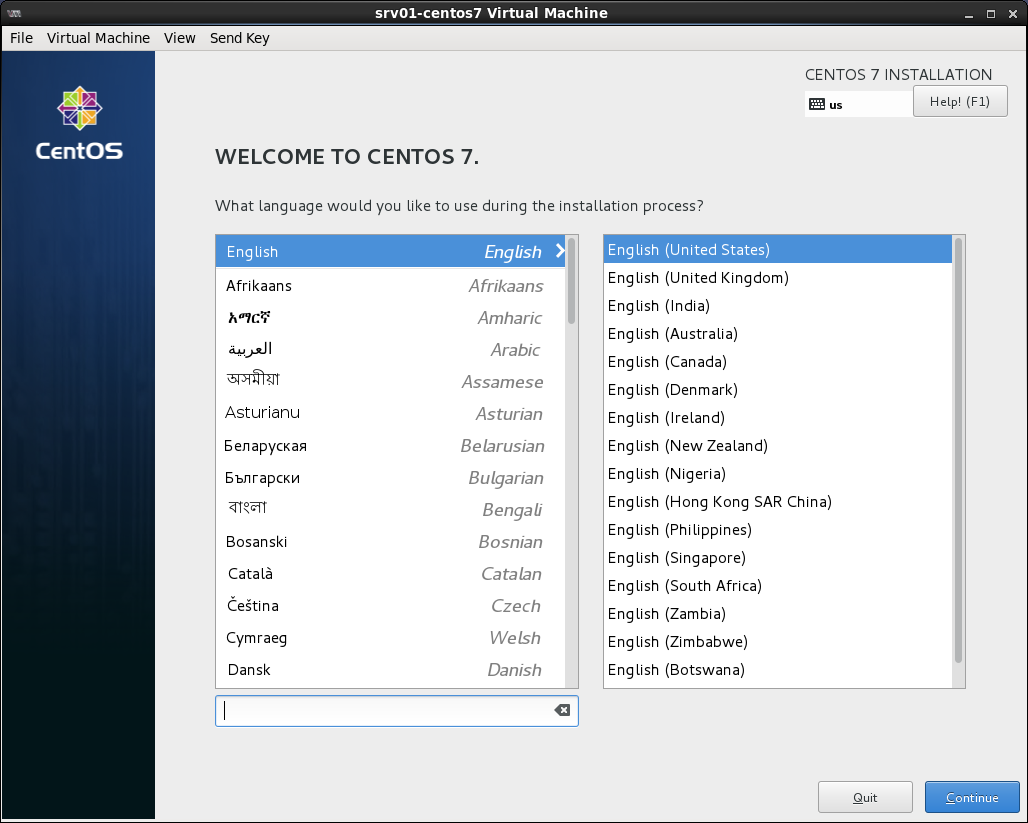
That's better!
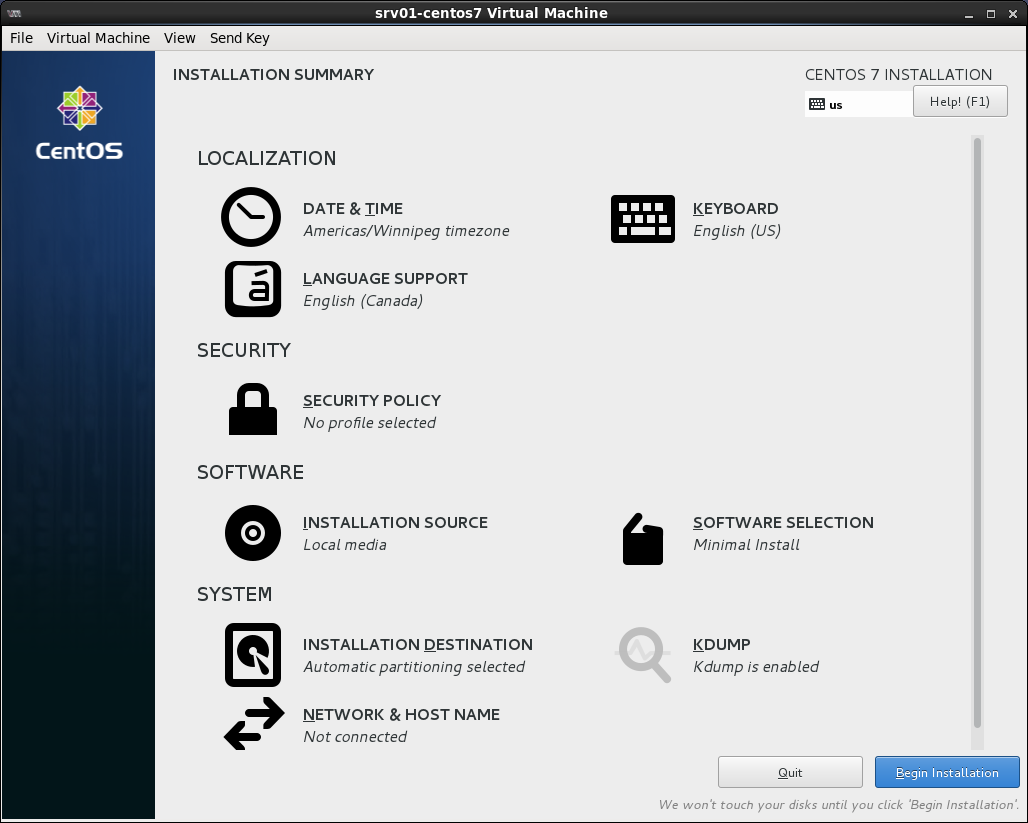
Now you can proceed with the OS install normally.
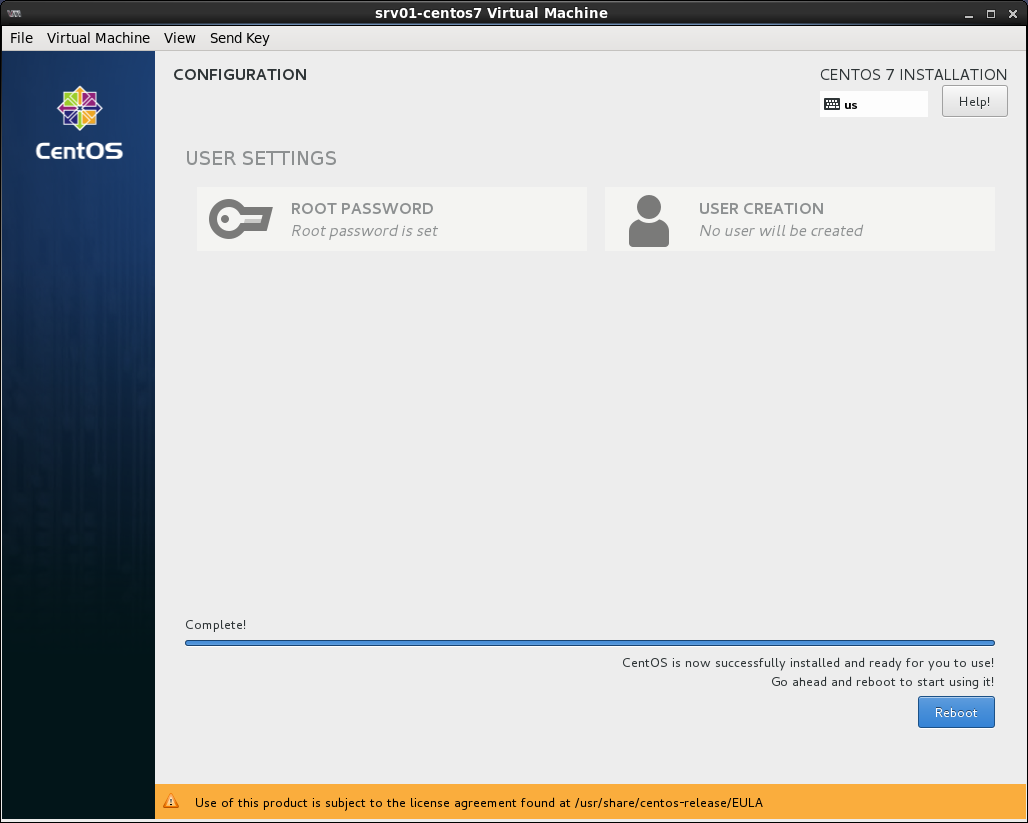
When the install is done, the install will ask you to reboot. On some OSes, it will reboot on its own.
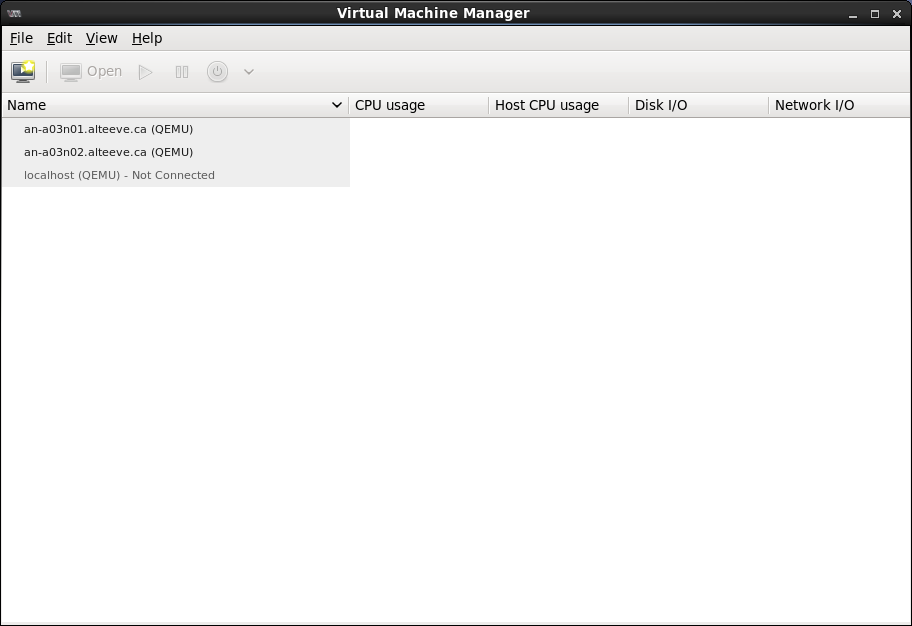
When a server shuts off (or reboots), it will vanish from virtual machine manager. This is by design. The standard virtualization tools are not cluster-aware, so the Anvil! hides them to prevent accidental manipulation and to ensure split-brains can't happen.
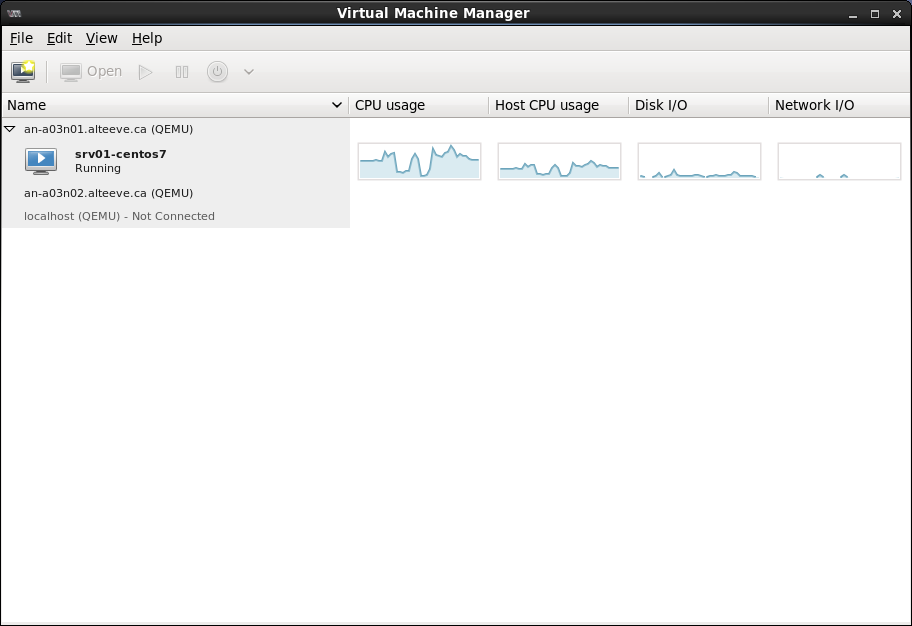
Within a few seconds, the server will start back up again.
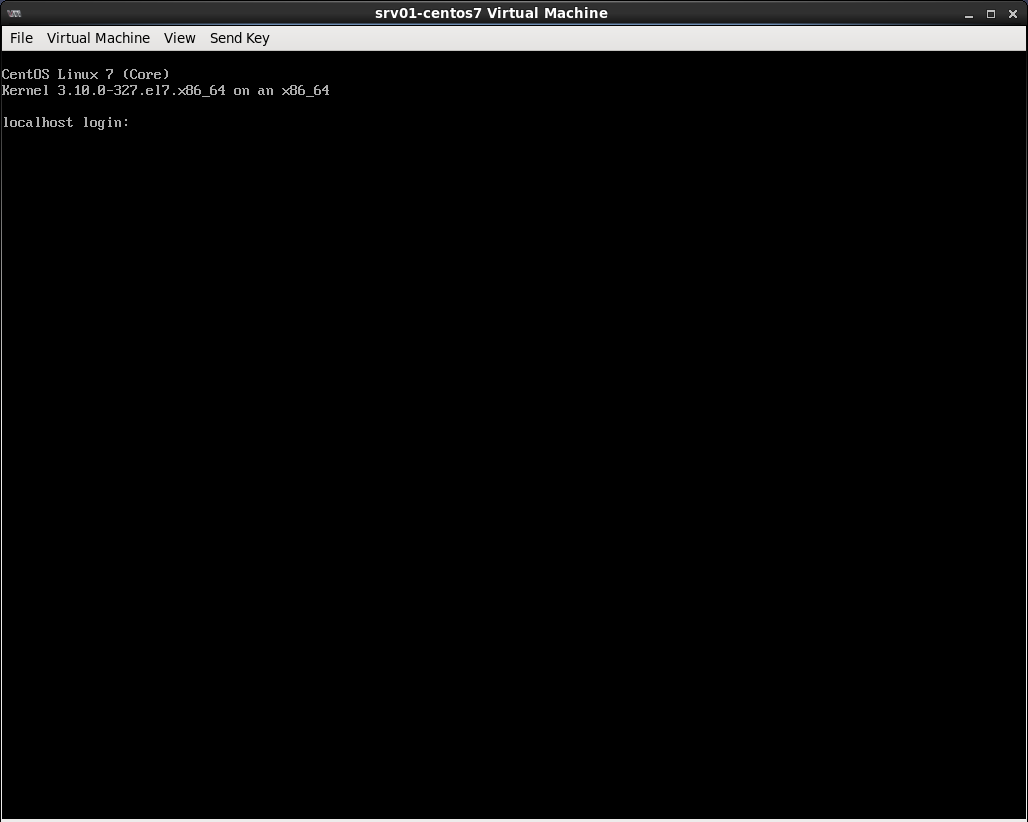
Done!
At this point, you can switch to connecting to the server using SSH, RDP or any other remote access technology that you prefer. You should only ever have to use Virtual Machine Manager again if you lose remote access for some reason. These rare cases would be similar to having to go sit at a bare iron server after losing access for some reason.
With Virtual Machine Manager, because it is effectively a monitor plugged into a machine, you can monitor the full boot process, shutdown, boot off of rescue media and so on.
Post Install Notes
There are a few things to know about running servers on Anvil! systems.
Powering Down Gracefully
The Anvil! makes no attempt to "reach inside" your servers. There are no agents that are needed and you can even use full disk encryption without any issue. To the Anvil!, network and storage is simply bit streams that we pass to and from hardware.
The down-side to this, however, is that the system has limited ability to control your servers. Specifically with regard to emergency or planned shut downs.
To shut down a server, we send an ACPI "power button" event to your server. For this to be useful, you need to ensure that your operating system will react to this by gracefully shutting down applications and the operating system itself.
Please be sure to test graceful shutdowns using the Striker interface BEFORE going into production.
When Will Servers Be Powered Off?
There are only two times when the Anvil! will shut down your servers;
- . When you ask it to, by clicking on '' in Striker
- . When ScanCore determines that a power off is imminent. This is the case if UPSes are almost depleted or if both nodes are approaching critical temperatures.
What If I Want To Shut Down The Server?
The Anvil! platform treats any unexpected shutdown of a server like a failure and turn the server back on. So trying to shut down a server using your operating system's normal power off command will result in a reboot.
To shut down the server and leave it off, be you must first click on '' from Striker. This will the Anvil! that you want the server to be off, and send the ACPI power button event to your server to start the shutdown process for you.
A Warning On Automatic Operating System Updates and Windows
Many Microsoft Windows versions will perform operating system shut downs when the operating system has is shutting down. In an emergency shut down, this can significantly delay the shut down process and could result in a hard power off in the middle of an update being installed. This could happen as UPS batteries are draining in a power outage, for example.
Also, because the Anvil! can't look inside your server, if the server hasn't powered off two minutes after being asked to, it has to assume that the server has crashed or hung, so the server will be forced off.
To deal with this;
- Disable automatic updates and manually install operating system updates on a schedule and ensure that you reboot to ensure updates are fully installed.
- Check to see if any updates are pending before gracefully shutting down a server. If there are, use your operating system's reboot command to install the updates before clicking on '' in Striker.
With this, you should never have a problem.
Provision A Windows 2012 Server
| Note: Please review "Provisioning A RHEL 7 Server section, particularly the Post Install Notes section. Steps and information covered there will not be covered here. |
The large majority of servers running on Anvil! systems are one flavour of Microsoft Windows or another. So the second server we will build will use
The new server form has seven sections;
| Entry | Description | ||
|---|---|---|---|
| Server Name | This is a free-form field you can use to give the server. Keeping it short an unique among all your Anvil! systems is ideal. This way, you can migrate the server to other Anvil! systems at a later date and not worry about name collisions. | ||
| Optimize for | This is a drop-down list of common operating system types. It alters how the emulated hardware is configured to help get better compatibility and performance with various systems.
| ||
| Install From | This will be the disc image that the new server will boot off of. This is a drop-down list of all '*.iso' files in the media library. | ||
| Driver Disc | When needed, this is an optional disc image, like a second DVD drive, with a second disc. This is usually used for drivers, as we will see later when we build a windows server. It could also be a "Disc 2", if your operating system spans install media. | ||
| Memory | This is where you tell the Anvil! how much RAM to allocate to the new server. This can be changed later as needed. The maximum available is shown just to the left of the field. | ||
| CPUs | This is how many CPU cores to allocate to this server. It is a select box ranging based on how many cores are on the node. You can change this later, if you need.
| ||
| Storage | This is how much (replicated) disk space to allocate to the new server. The amount free is listed on the left of the input form. On the right are the units to use; MiB, GiB, TiB or a percentage.
|
| Any questions, feedback, advice, complaints or meanderings are welcome. | |||
| Alteeve's Niche! | Alteeve Enterprise Support | Community Support | |
| © 2025 Alteeve. Intelligent Availability® is a registered trademark of Alteeve's Niche! Inc. 1997-2025 | |||
| legal stuff: All info is provided "As-Is". Do not use anything here unless you are willing and able to take responsibility for your own actions. | |||

