Managing Drive Failures with AN!CDB: Difference between revisions
| Line 177: | Line 177: | ||
* If (all) the logical disk(s) are '<span style="color: #1a9a13;">Optimal</span>', you will be able to mark the disk as a 'Hpt Spare'. | * If (all) the logical disk(s) are '<span style="color: #1a9a13;">Optimal</span>', you will be able to mark the disk as a 'Hpt Spare'. | ||
In this section, we will add it to a degraded logical disk. Managing hot-spares is covered further below. | In this section, we will add it to a degraded logical disk. Managing hot-spares is covered further below. Do note though; If you mark a disk as a hot-spare when a logical disk is degraded, it will automatically be added to that degraded logical disk and rebuild will begin. | ||
If there are multiple degraded logical disks, you will see multiple '<span style="color: #7f117f;">Add to Logical Disk #X</span>' options, one for each degraded logical disk. In our case, there is just one logical disk, so there is just one option. | If there are multiple degraded logical disks, you will see multiple '<span style="color: #7f117f;">Add to Logical Disk #X</span>' options, one for each degraded logical disk. In our case, there is just one logical disk, so there is just one option. | ||
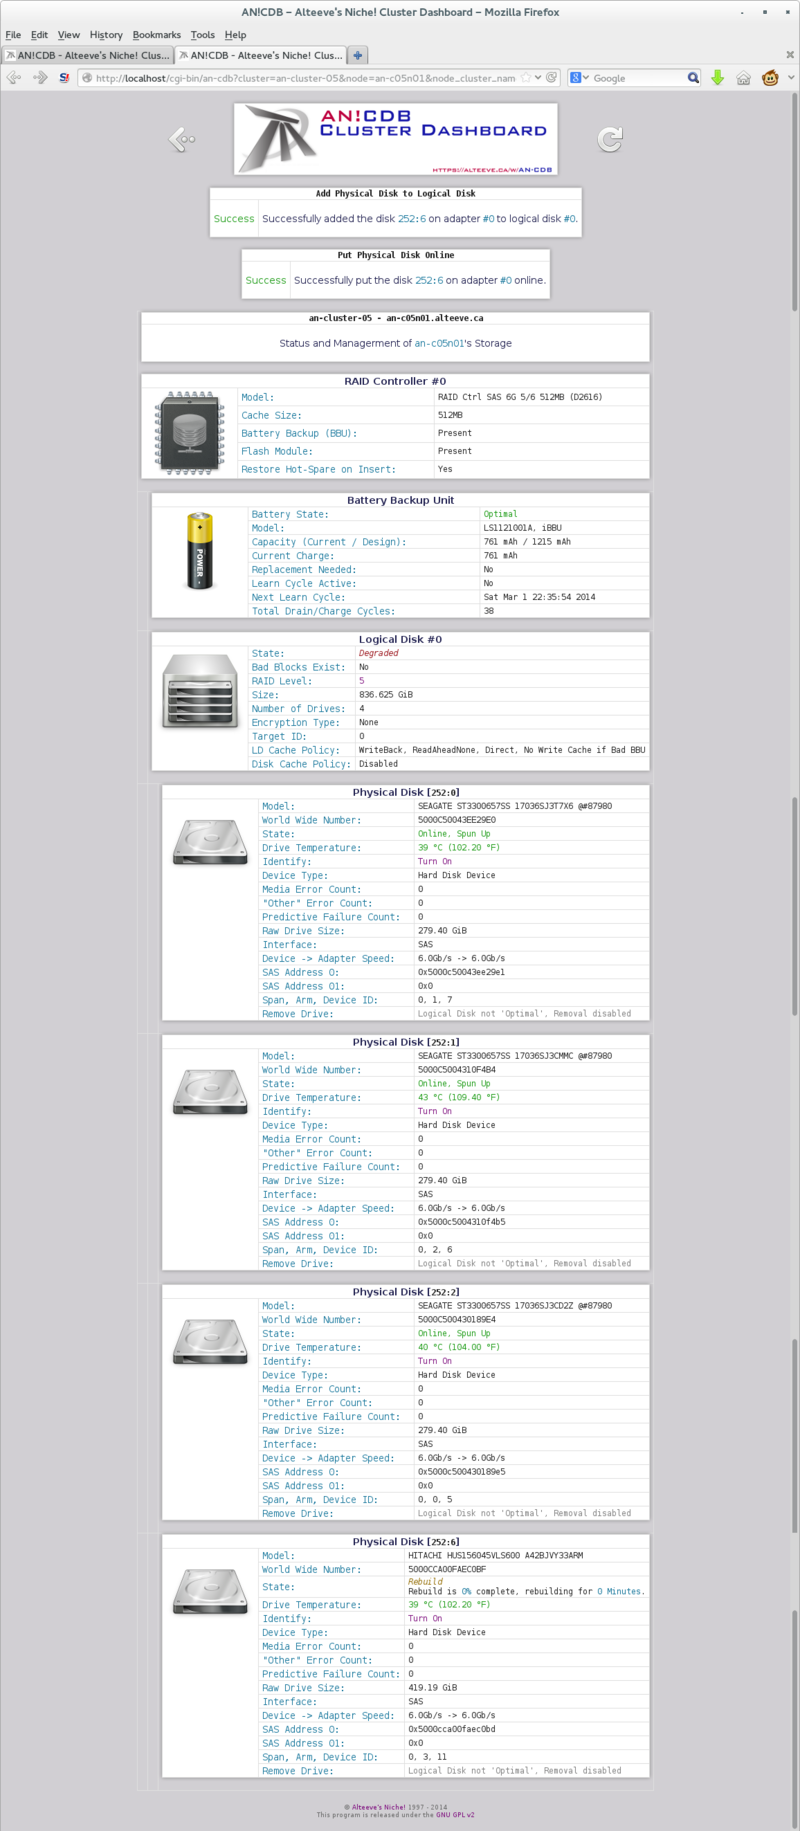
[[Image:an-cdb_storage- | [[Image:an-cdb_storage-control_19.png|thumb|800px|center|Recovered physical disk's <span class="code">Add to Logical Disk #0</span> button highlighted.]] | ||
Once you click on '<span style="color: #7f117f;">Add to Logical Disk #X</span>', the physical disk will appear under the logical disk and rebuild will begin automatically. | Once you click on '<span style="color: #7f117f;">Add to Logical Disk #X</span>', the physical disk will appear under the logical disk and rebuild will begin automatically. | ||
[[Image:an-cdb_storage- | [[Image:an-cdb_storage-control_20.png|thumb|800px|center|Recovered physical disk's back in the logical disk and rebuild has begun.]] | ||
Done. | |||
== Recovering from Accidental Ejection of Good Drive == | == Recovering from Accidental Ejection of Good Drive == | ||
Revision as of 19:33, 16 February 2014
|
Alteeve Wiki :: How To :: Managing Drive Failures with AN!CDB |
| Note: At this time, only LSI-based controllers are supported. Please see this section of the AN!Cluster Tutorial 2 for required node configuration. |
The AN!CDB dashboard supports basic drive management for nodes using LSI-based RAID controllers. This covers most all Fujitsu servers.
This guide will show you how to handle a few common storage management tasks easily and quickly.
Starting The Storage Manager
From the main AN!CDB page, under the "Cluster Nodes - Control window, click on the name of the node you wish to manage.
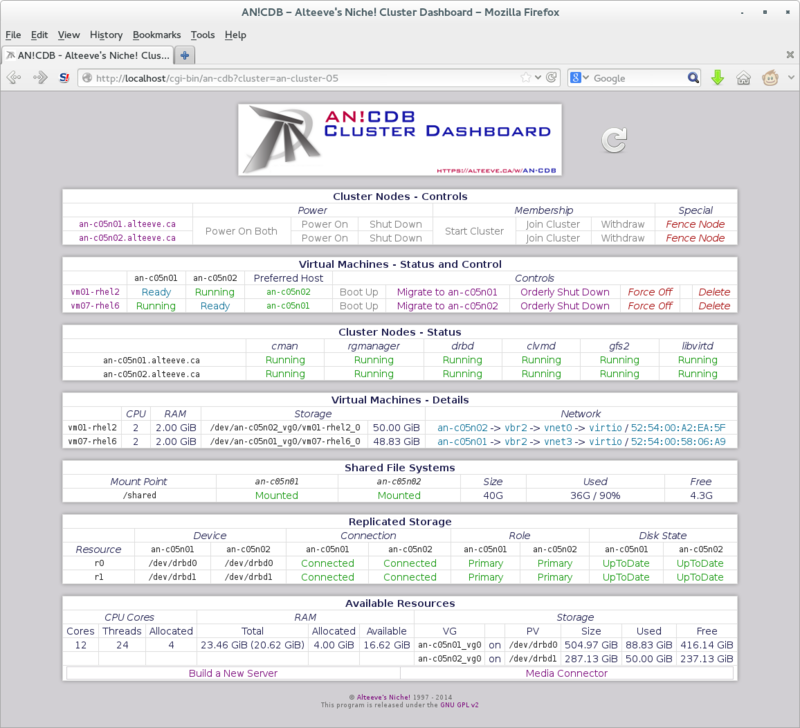
This will open a new tab (or window) showing the current configuration and state of the node's storage.
Storage Display Window
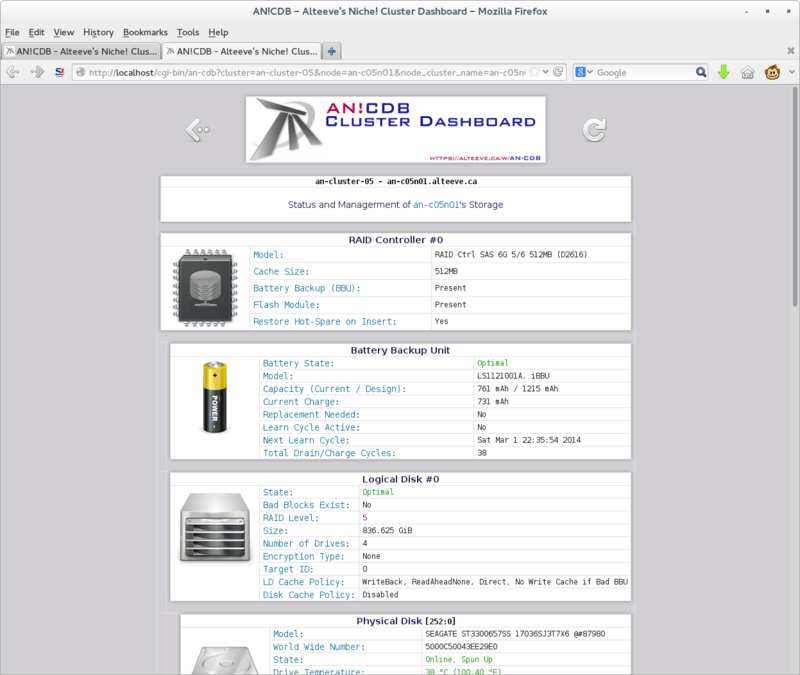
The storage display window shows your storage controller(s), their auxiliary power supply for write-back caching if installed, the logical disk(s) and each logical disk's constituent drives.
The auxiliary power and logical disks will be slightly indented under their parent controller.
The physical disks associates with a given logical disk are further indented, to show their association.
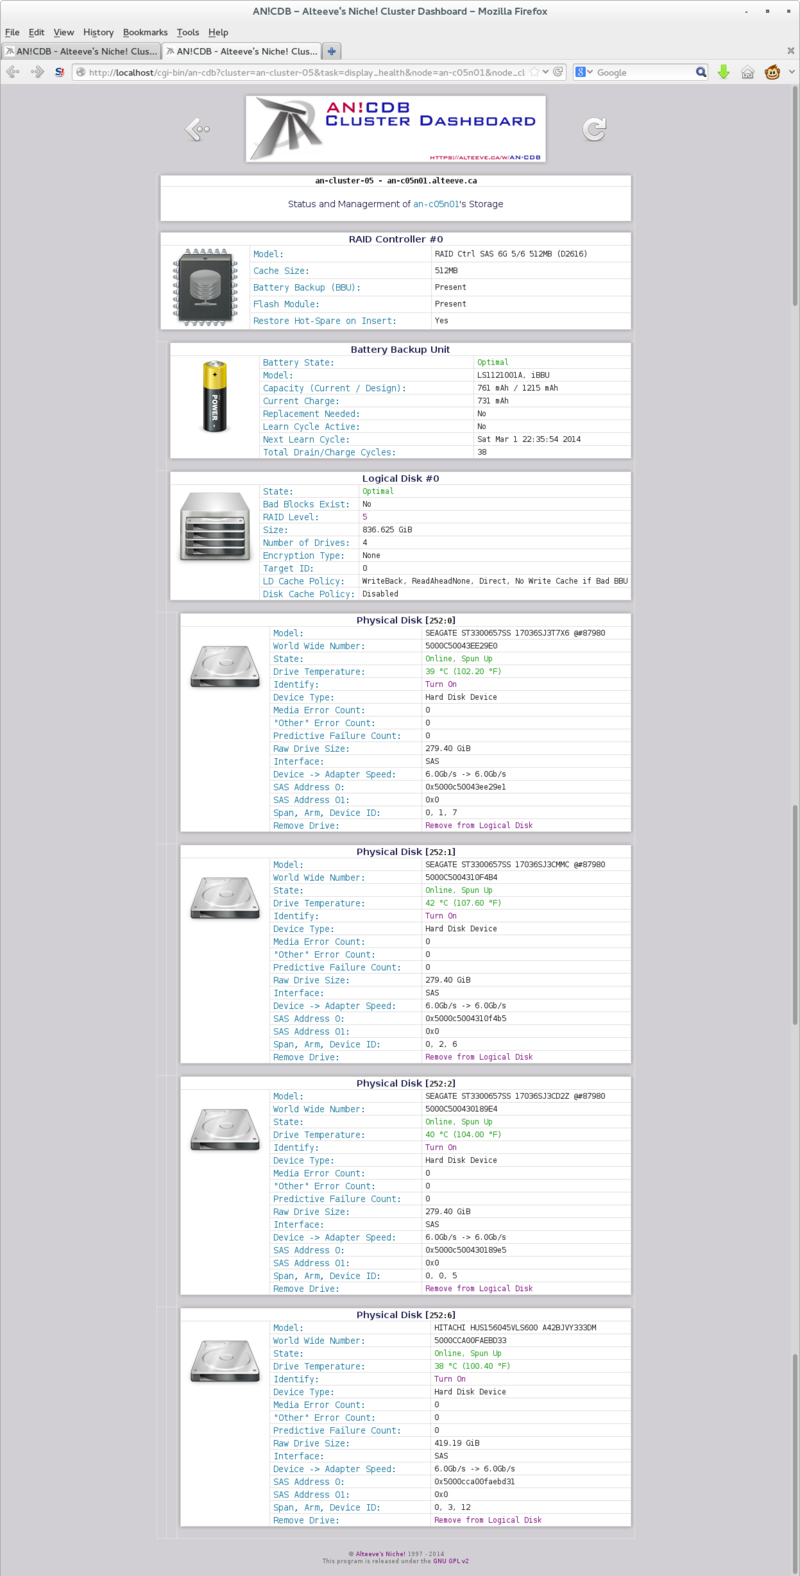
In this example, we have only one RAID controller, it has an auxiliary power pack and a single logical volume has been created.
The Logical volume is a RAID level 5 array with four physical disks.
Controlling the Physical Disk Identification ID Light
The first task we will explore is using identification lights to match a physical disk listing with a physical drive in a node.
If a drive fails completely, it's fault light will light up, making the failed drive easy to find. However, the AN!CDB alert system can notify us of pending failures. In these cases, the drive's fault light will not illuminate. So it becomes critical to identify the failing drive. Removing the wrong drive, when another drive is unhealthy, may well leave your node non-operational.
That's no fun.
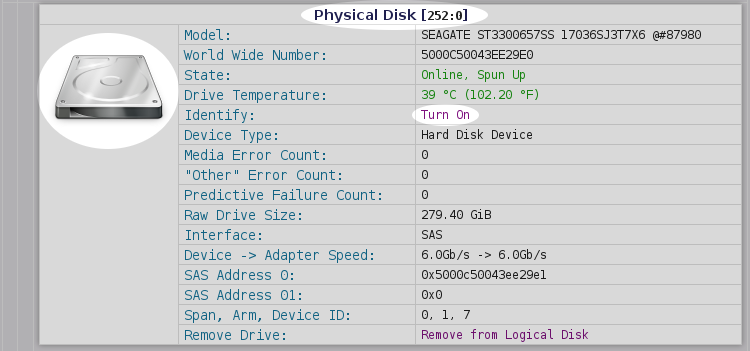
Each physical drive will have a buttons labelled either Turn On or Turn Off, depending on the current state of the identification LED.
Illumination a Drive's ID Light
Let's illuminate!
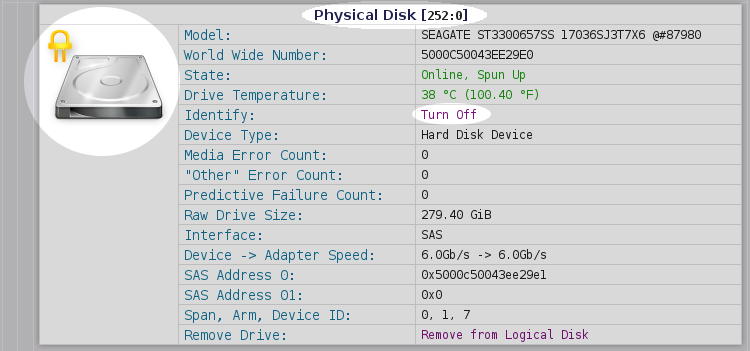
We will identify the drive with the somewhat-cryptic name '252:0'.
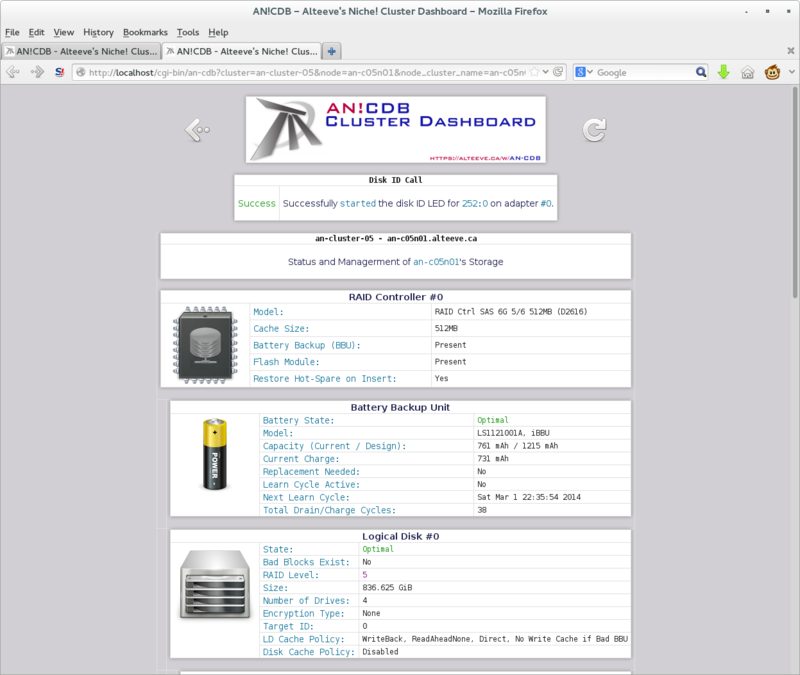
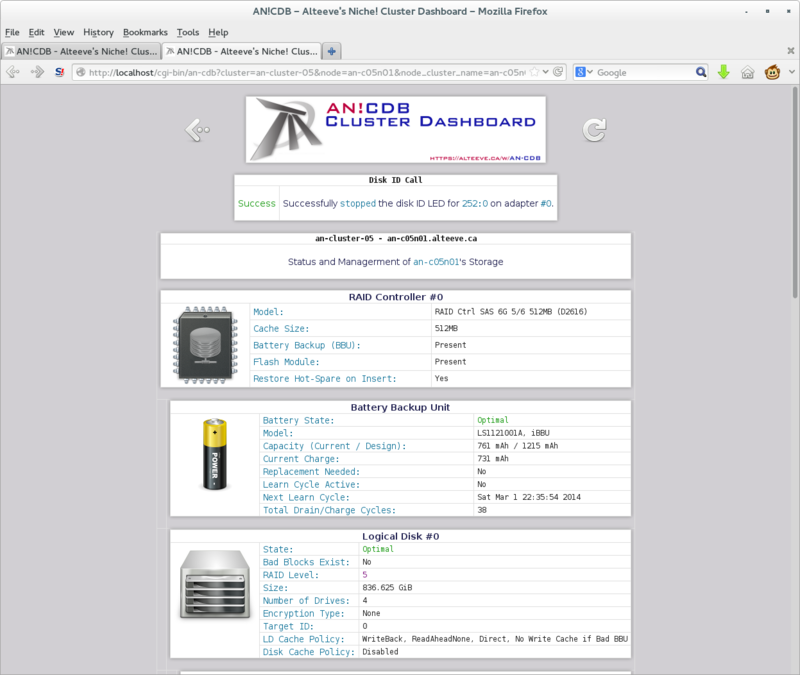
The storage page will reload, indicating whether the command succeeded or not.
If you now look at the front of your node, you should see one of the drives lit up.
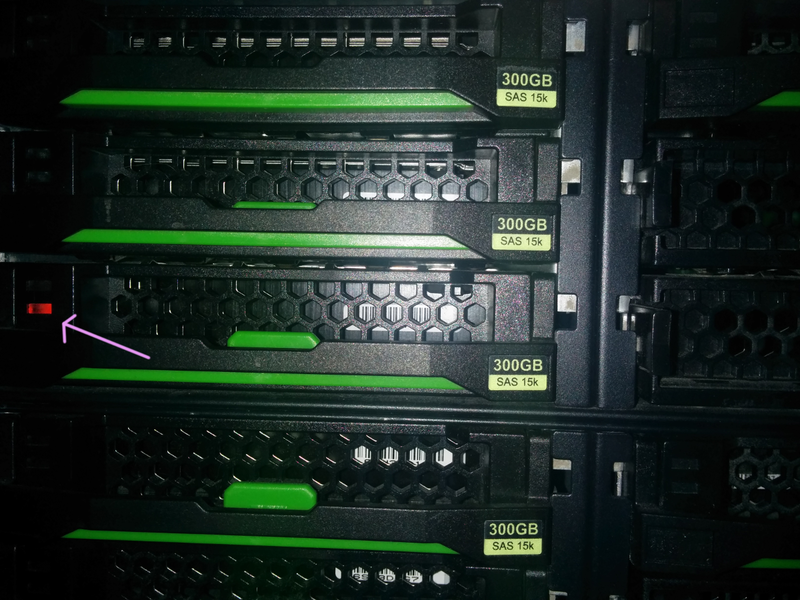
Most excellent.
Shutting off a Drive's ID Light
To turn the ID light off, simply click on the drive's Turn Off button.
As before, the success or failure will be reported.
Refreshing The Storage Page
After issuing a command to the storage manager, please do not use your browser's "refresh" function. It is always better to click on the reload icon.
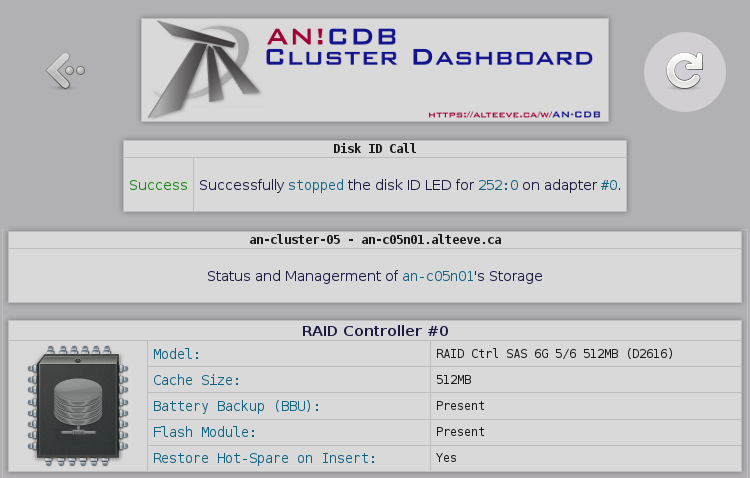
This will reload the page with the most up to date state of the storage in your node.
Failure and Recovery
There are many ways for hard drives to fail.
In this section, we're going to sort-of simulate four failures;
- Drive vanishes entirely
- Drive is failed but still online
- Good drive was ejected by accident, recovering
- Drive has not yet failed, but may soon
The first three are going to be sort of mashed together. We'll simply eject the drive while it's running, causing it to disappear and for the array to degrade. If this happened in real life, you would simply eject it and insert a new drive.
For the second case, we'll re-insert the ejected drive. The drive will be listed as failed ("Unconfigured(bad)"). We'll tell the controller to "spin down" the drive, making it safe to remove. If the real world, we would then eject it and install a new drive.
In the third case, we will again eject the drive, and then re-insert it. In this case, we won't spin down the drive, but instead mark it as healthy again.
Lastly, we will discuss predictive failure. In these cases, the drive has not failed yet, but confidence in the drive has been lost, so pre-failure replacement will be done.
Drive Vanishes Entirely
If a drive fails catastrophically, say the controller on the drive fails, you may find that the drive simply no longer appears in the list of physical disks under the logical disk.
Likewise, if the disk is physically ejected (by accident or otherwise), the same result will be seen.
The logical drive will list as 'Degraded', but none of the disks will show errors.
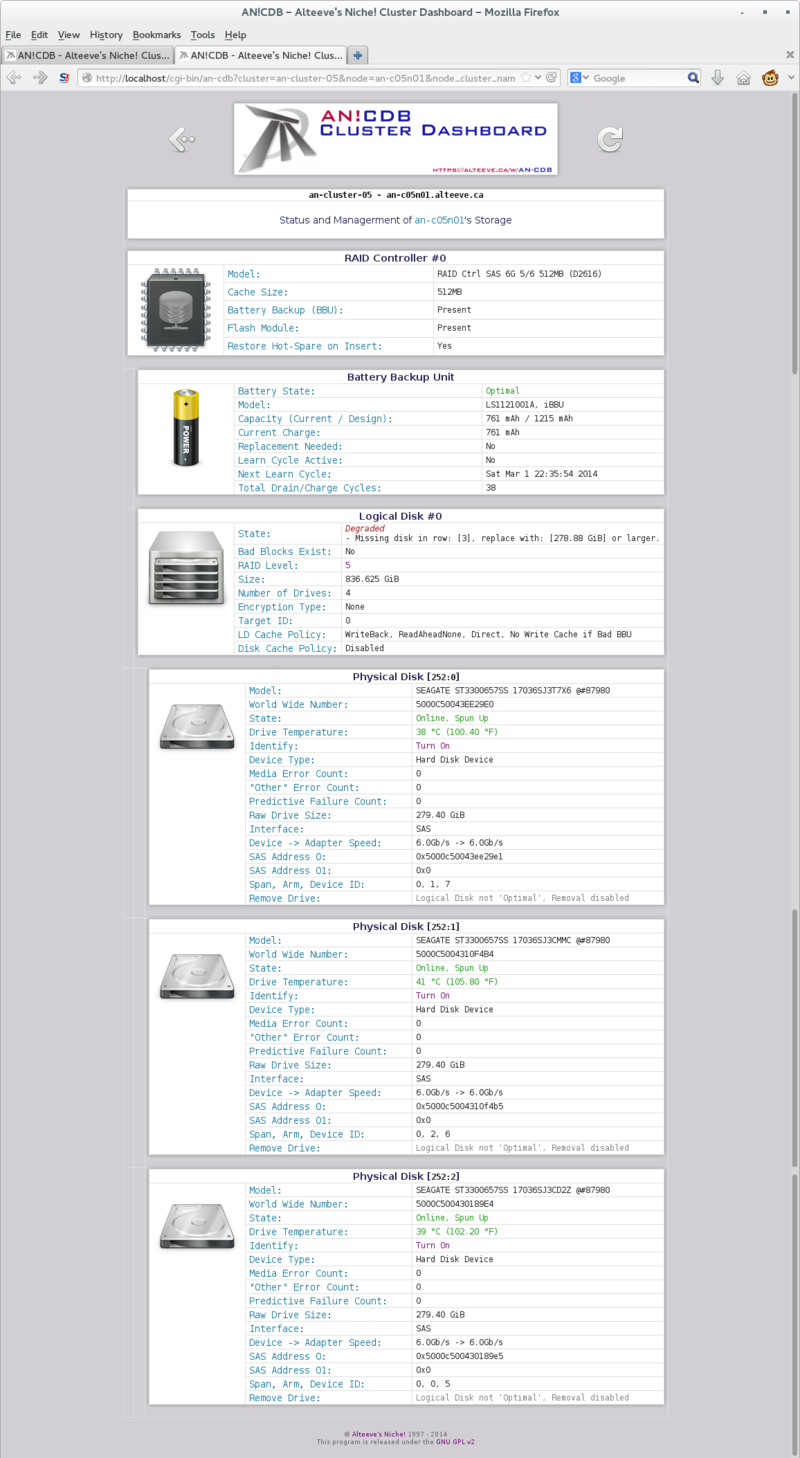
If you look under Logical Disk #X, you will see the number of physical disks in the logical disk beside the 'Number of Drives'. When you count the actual number of disks under the logical drive though, you will see the number of displayed disks is smaller.
In this situation, the best thing to do is locate the failed disk. The 'Failed' LED should be illuminated on bay with the failed or missing disk. If it is not lit, however, you may need to light up the ID LED on the remaining good disks and use a simple process of illimination to find the dead drive.
Once you know which disk is dead, remove it and install a replacement disk. So long as 'Restore Hot-Spare on Insert' is set to 'Yes', the drive should immediately be added to the logical disk and the rebuild process should start.
Inserting a Replacement Physical Disk
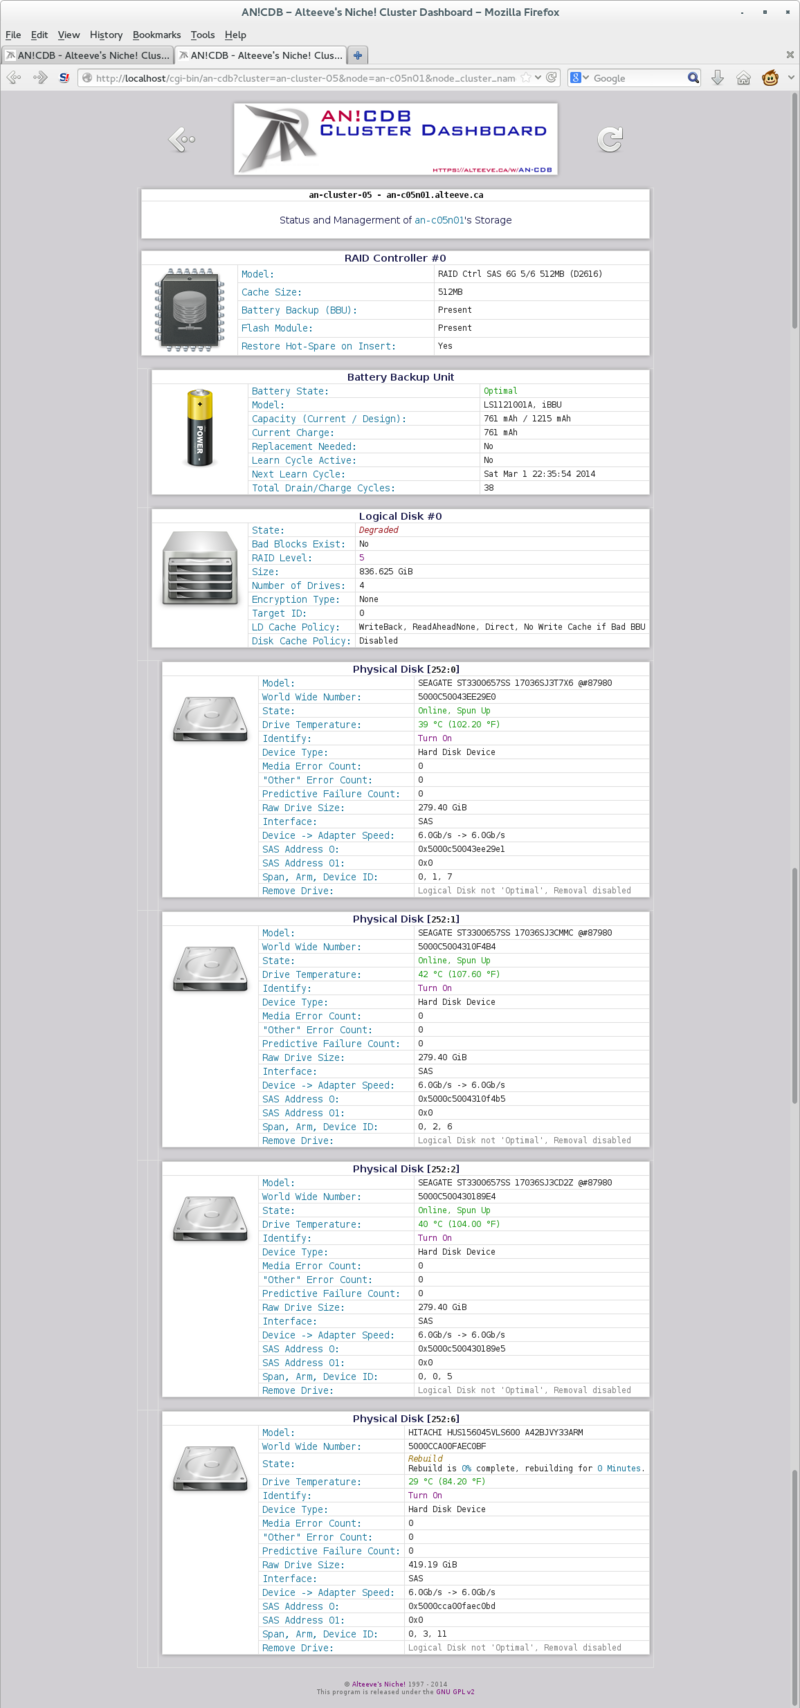
If the replacement drive doesn't automatically get added to the logical disk, you can add the new physical disk to the Degraded logical disk using the storage manager. The new disk will come up as 'Unconfigured(good), Spun Up'. Directly beneath that, you will see the option to 'Add to Logical Disk #X', where X is the logical disk number that is degraded.
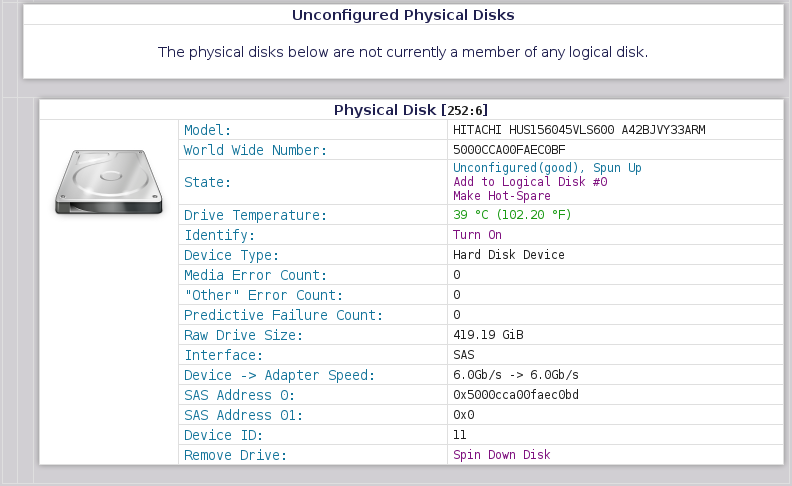
Click on that and the drive will be added to the logical disk. The rebuild process will start immediately.
Drive is Failed but Still Online
If a drive has failed, but it's controller is still working, the drive should appear as 'Unconfigured(bad).
This will be one of the most common failures you will have to deal with.
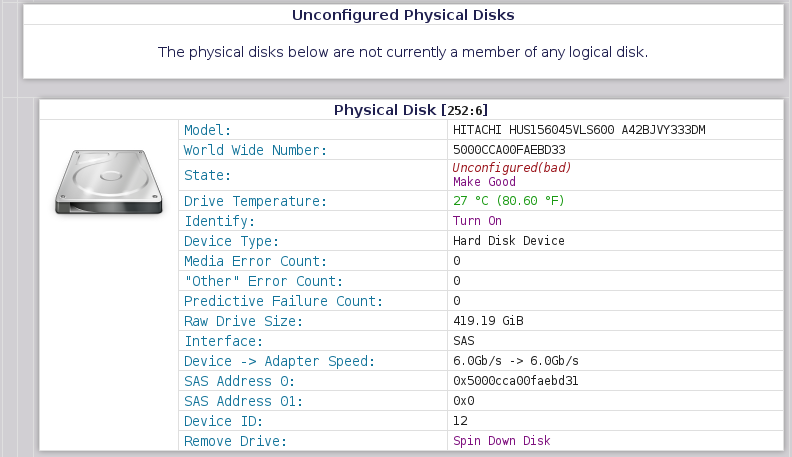
You will generally have two options here.
- Prepare it for removal
- Try and make the drive "good" again
Preparing a Failed Disk for Removal
A failed disk may still be "spun up", meaning that it's platters are rotating. This places centripidal force on the drive, and moving the disk out of it's rotational axis before the drive has spun down completely could cause a head-crash. Further, the electrical connection to the drive will still be active, making it possible to cause a short when the drive is mechanically ejected, which could damager the drive's controller, the backplane or the RAID controller itself.
To avoid this risk, before a drive is removed, we must prepare it for removal. This will spin-down the disk and make it safe to eject with minimal risk of electrical shorts.
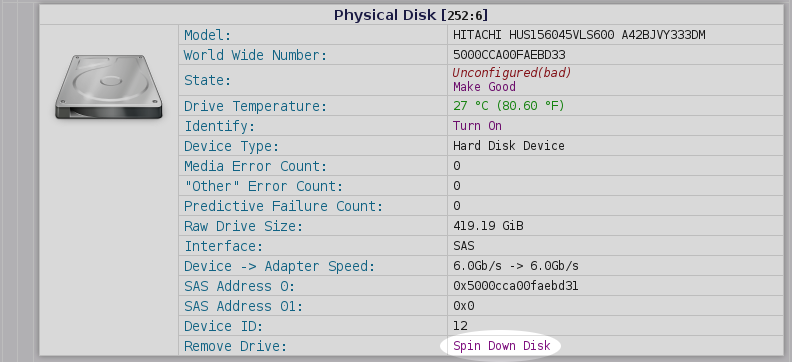
To prepare it for removal, you will click on 'Spin Down Disk'.
| Note: In the example below, AN!CDB's first attempt to spin down the drive failed. So it attempted, successfully, to mark the disk as 'good' and then tried to spin it down a second time, which worked. Be sure to physically record the disk as failed! |
Once spun down, the physical disk will be shown to be safe to remove.
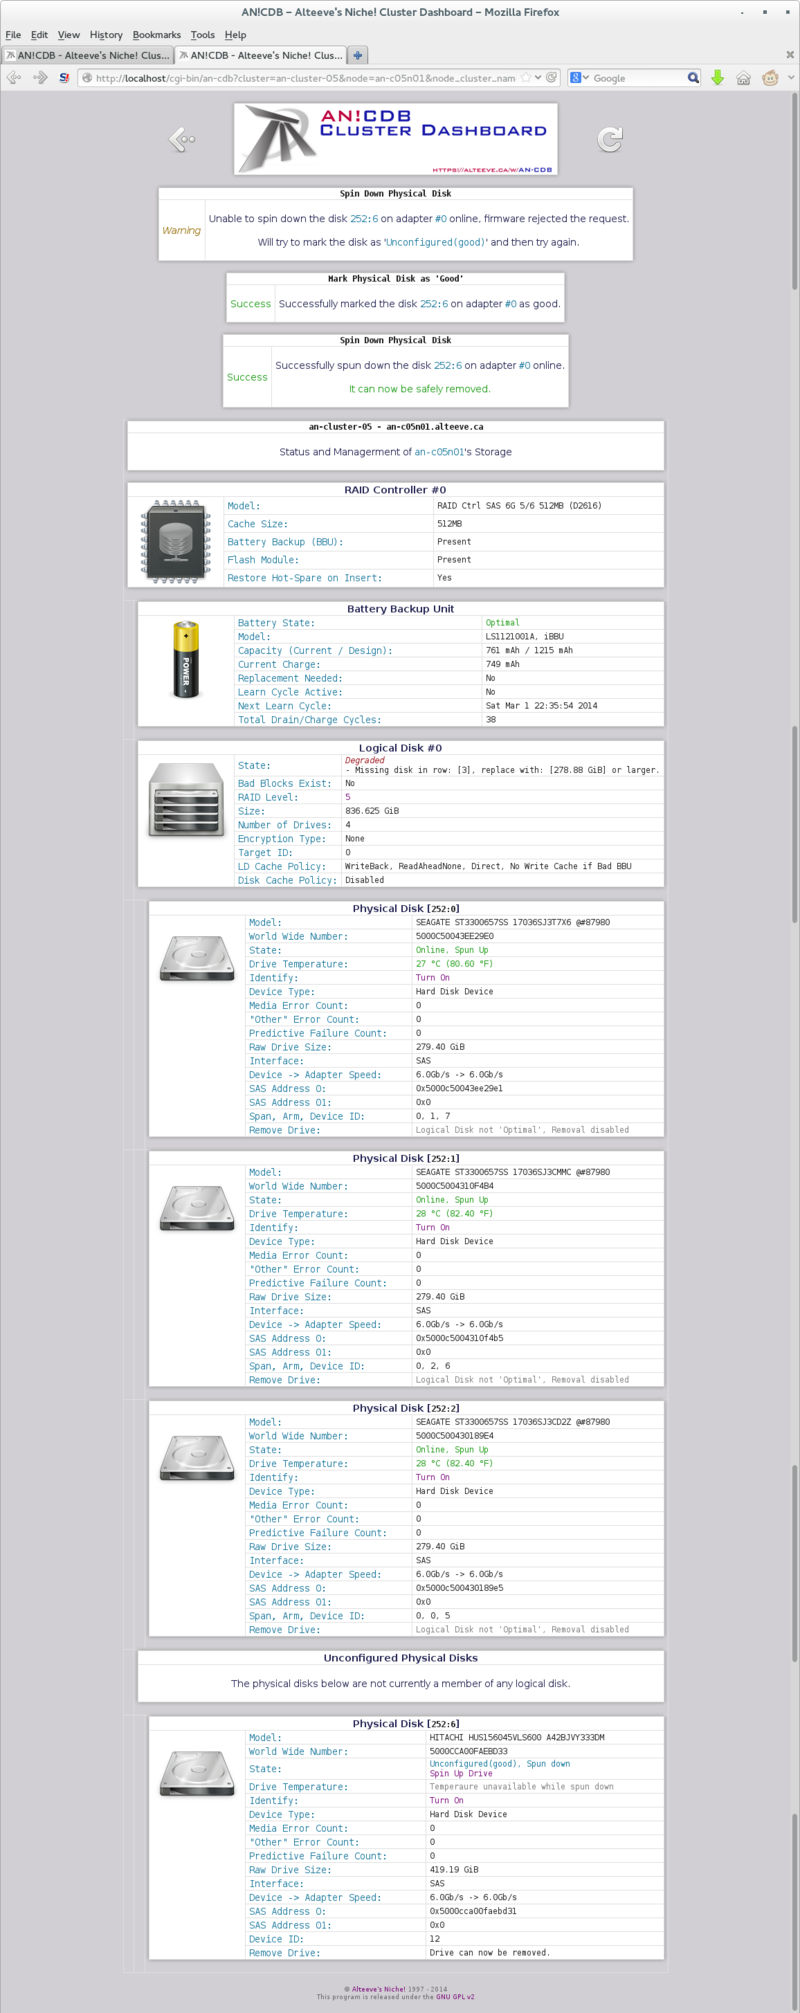
Once you insert the new disk, it should automatically be added to the logical disk and the rebuild process should start. If it doesn't, please see "Inserting a Replacement Physical Disk" above.
Attempting to Recover a Failed Disk
| Warning: If you do now know why the drive failed, replace it. Even if it appears to recover, it will likely fail again soon. |
Depending on why the physical disk failed, it may be possible to mark is as "good" again. This should only be done in two cases;
- You know why the disk was flagged as failed and you trust it is actually healthy
- To try and restore redundancy to the logical disk while you wait for the replacement disk to arrive
Underneath the 'Unconfigured(good), Spun Up' disk state will be the option 'Make good'.
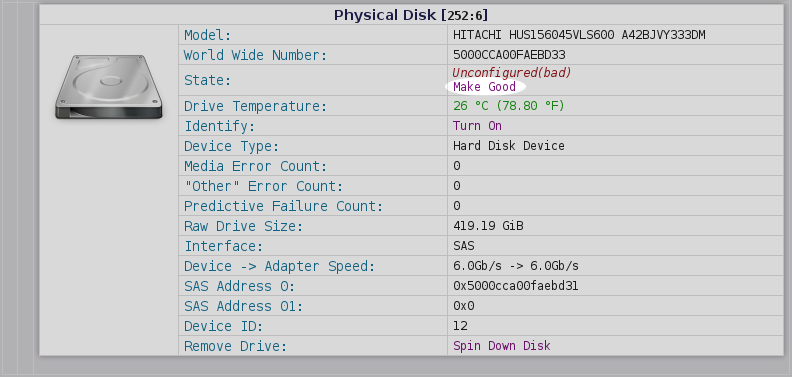
If this works, the disk state will change to 'Unconfigured(good), Spun Up'. Below this, one of two options will be available;
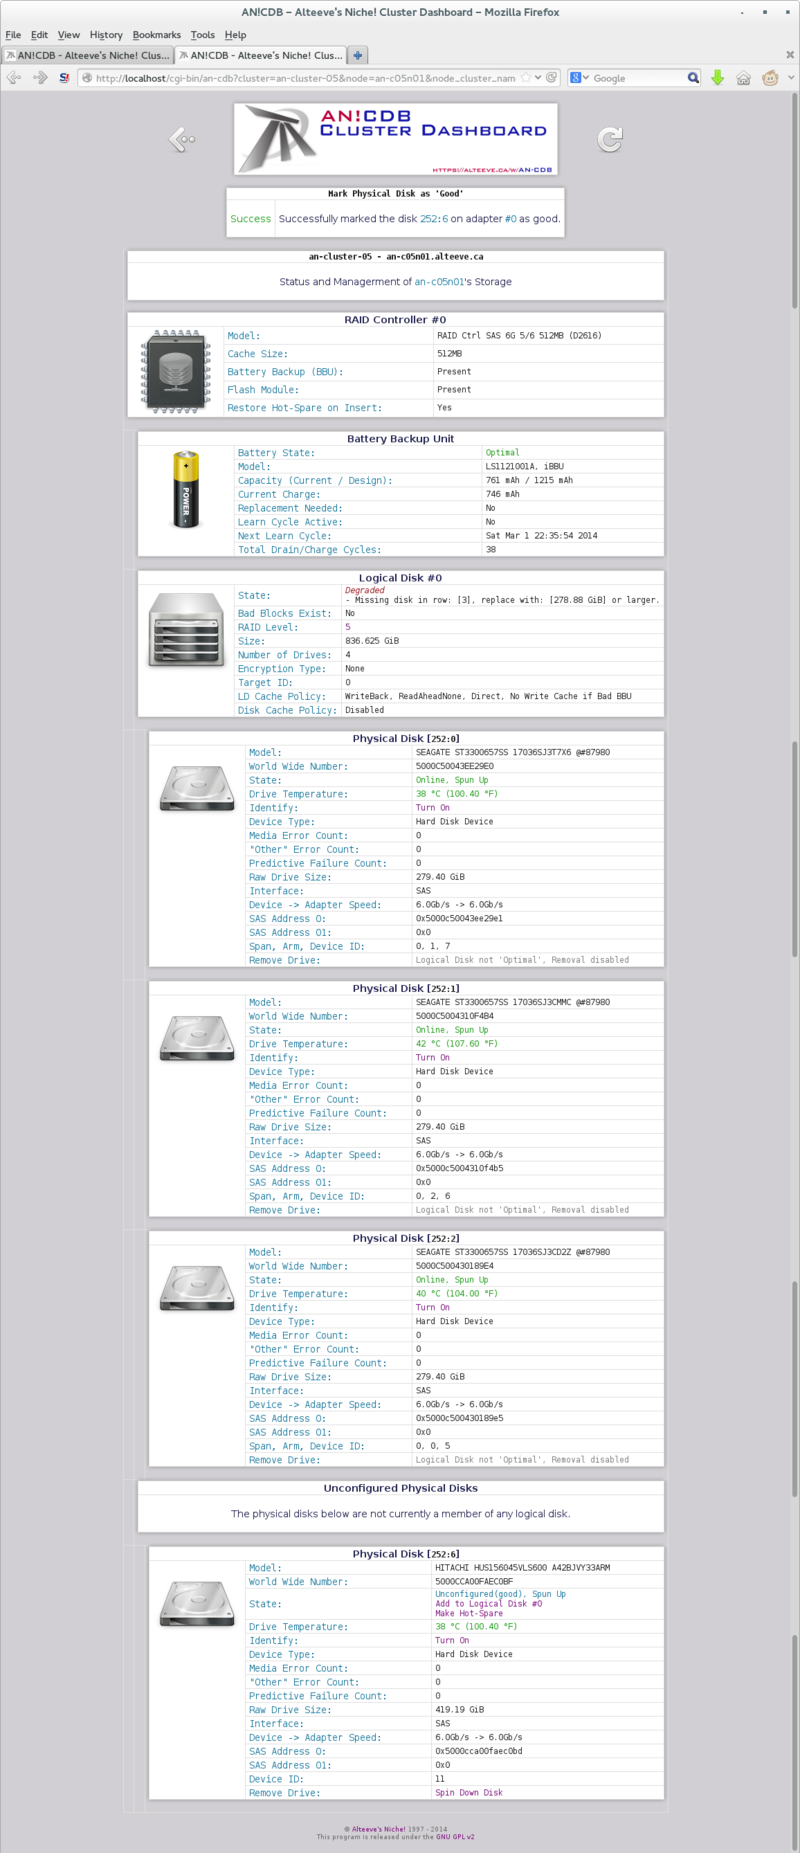
- If (one of) the logical disk(s) are defraded, Add to Logical Disk #X will be available.
- If (all) the logical disk(s) are 'Optimal', you will be able to mark the disk as a 'Hpt Spare'.
In this section, we will add it to a degraded logical disk. Managing hot-spares is covered further below. Do note though; If you mark a disk as a hot-spare when a logical disk is degraded, it will automatically be added to that degraded logical disk and rebuild will begin.
If there are multiple degraded logical disks, you will see multiple 'Add to Logical Disk #X' options, one for each degraded logical disk. In our case, there is just one logical disk, so there is just one option.
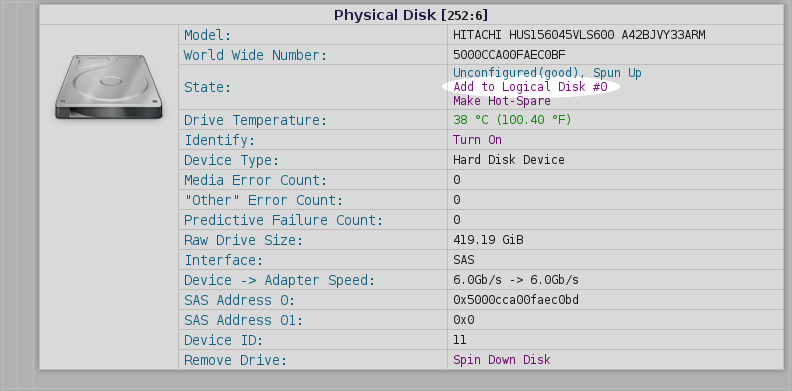
Once you click on 'Add to Logical Disk #X', the physical disk will appear under the logical disk and rebuild will begin automatically.
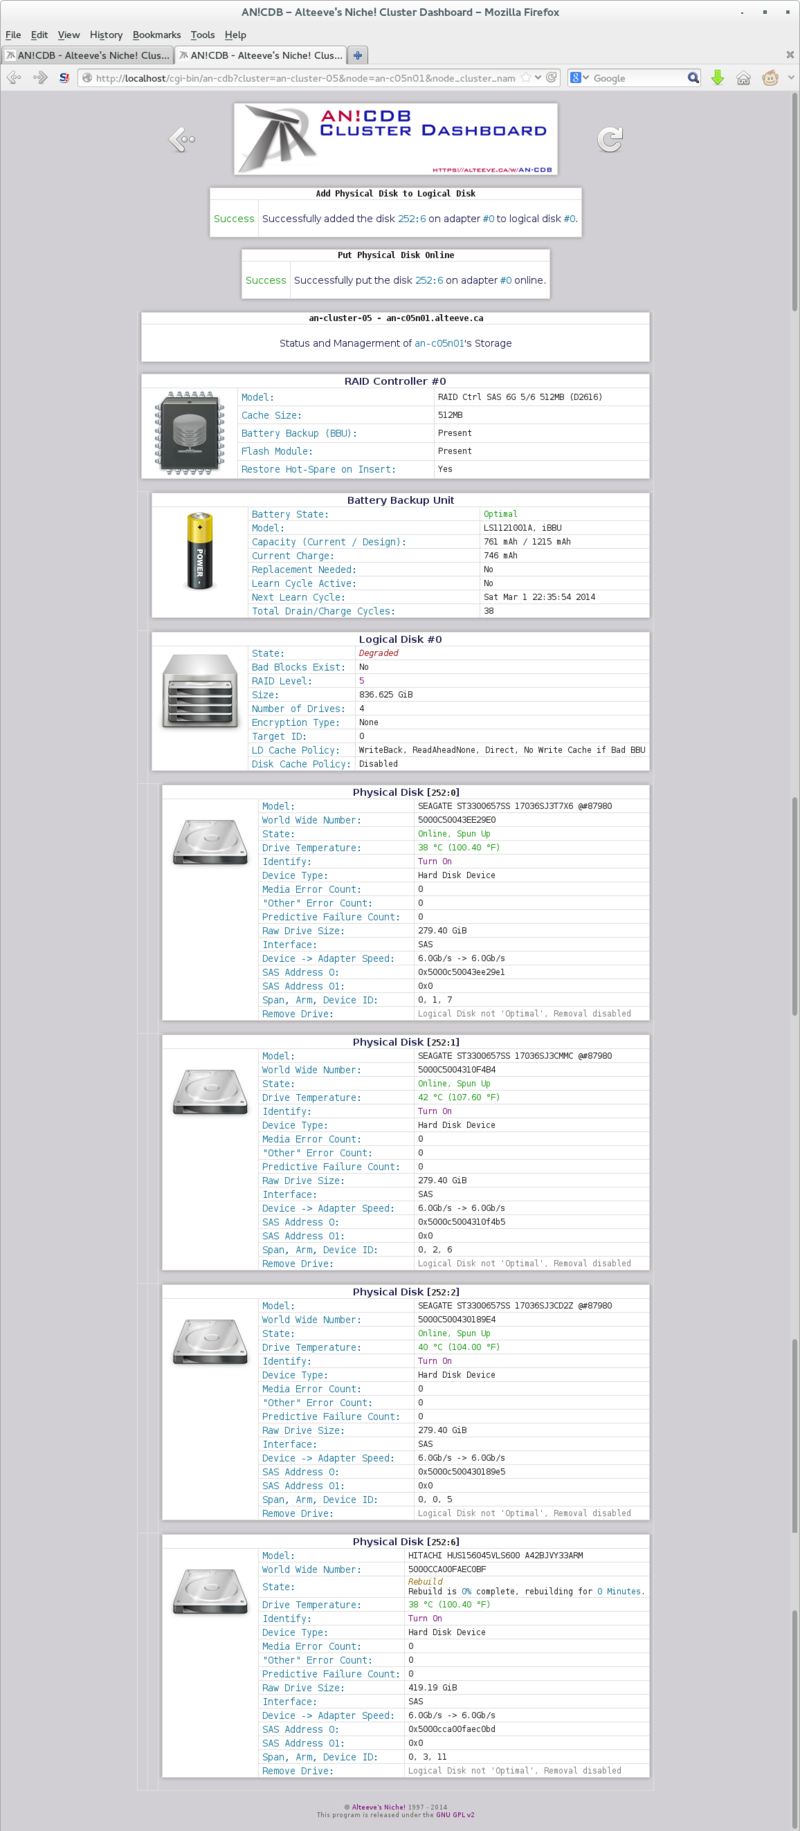
Done.
Recovering from Accidental Ejection of Good Drive
There are numerous reasons why a perfectly good drive might get ejected from a node. In spite of the risks in the above warning, people often seem to eject a running disk. Perhaps out of ignorance, or out of a desire to simulate a failure. In any case, it happens and it is important to know how to recover from it.
As we discussed above, ejecting a disk will cause it to vanish from the list of physical disks and the logical disk it was in will become degraded.
Once re-inserted, the disk will be flagged as 'Unconfigured(bad)'. In this case, you know the disk is fine, so marking it as good after reinserting it is fine.
Please jump up to that section to finish recovering the physical disk.
Pre-Failure Drive Replacement
Managing Hot-Spares
In this final section, we will add a "Hot-Spare" drive to our node. A "Hot-Spare" is an unused drive that the control knows can be used to immediately replace a failed drive.
This is a popular option for people who want to return to a fully redundant state as soon after a failure as possible.
We will Configure a Hot-Spare, show how it replaces a failed drive, and show how to unmark a drive as a hot-spare, in case the Hot-Spare itself goes bad.
Creating a Hot-Spare
Example of a Hot-Spare Working
Replacing a Failing Hot-Spare
| Any questions, feedback, advice, complaints or meanderings are welcome. | |||
| Alteeve's Niche! | Alteeve Enterprise Support | Community Support | |
| © 2025 Alteeve. Intelligent Availability® is a registered trademark of Alteeve's Niche! Inc. 1997-2025 | |||
| legal stuff: All info is provided "As-Is". Do not use anything here unless you are willing and able to take responsibility for your own actions. | |||

