Anvil! m2 Tutorial: Difference between revisions
No edit summary |
|||
| (79 intermediate revisions by the same user not shown) | |||
| Line 1: | Line 1: | ||
{{howto_header}} | {{howto_header}} | ||
{{warning|1= | {{warning|1=This tutorial is '''NOT''' complete! It is being written using [[Striker]] version <span class="code">1.2.0 β</span>. Things may change between now and final release.}} | ||
'''How to build an '''''Anvil!''''' from scratch in under a day!''' | |||
I hear you now; "''Oh no, another book!''" | |||
Well don't despair. If this tutorial is a "book", it's a picture book. | |||
You should be able to finish the entire build in a day or so. | |||
If you're familiar with RHEL/Linux, then you might well be able to finish by lunch! | |||
[[image:RN3-m2_01.jpg|thumb|right|400px|A typical ''Anvil!'' build-out]] | |||
= What is an 'Anvil!', Anyway? = | |||
Simply put; | |||
* '' | * The ''Anvil!'' is a high-availability cluster platform for hosting virtual machines. | ||
Slightly less simply put; | |||
* The ''Anvil!'' is; | |||
** '''Exceptionally easy to build and operate.''' | |||
** A pair of "[[node]]s" that work as one to host one or more '''highly-available (virtual) servers''' in a manner transparent to the servers. | |||
*** Hosted servers can '''live-migrate''' between nodes, allowing business-hours maintenance of all systems without downtime. | |||
*** Existing expertise and work-flow are almost 100% maintained requiring almost '''no training for staff and users'''. | |||
** A "[[Foundation Pack]]" of fault-tolerant network switches, switched [[PDU]]s and [[UPS]]es. Each Foundation pack can support one or more "Compute Pack" node pairs. | |||
** A pair of "[[Striker]]" dashboard management and support systems which provide very simple, '''web-based management''' on the ''Anvil!'' and it's hosted servers. | |||
** A "[[Scan Core]]" monitoring and alert system tightly couple to all software and hardware systems that provides '''fault detection''', '''predictive failure analysis''', and '''environmental monitoring''' with an '''early-warning system'''. | |||
*** Optionally, "Scan Core" can automatically, gracefully shut down an ''Anvil!'' and it's hosted servers in low-battery and over-temperature events as well as automatically recovery when safe to do so. | |||
** Optional commercial supported with '''24x7x365 monitoring''', installation, management and customization services. | |||
** 100% open source ([https://www.gnu.org/licenses/gpl-2.0.html GPL v2+] license) with HA systems built to be compliant with [http://www.redhat.com/en/services/support Red Hat support]. | |||
** '''No vendor lock-in.''' | |||
*** Entirely [[COTS]] equipment, entirely open platform. You are always free to shift vendors at any time. | |||
Pretty darn impressive, really. | |||
== What This Tutorial Is == | |||
This is meant to be a quick to follow project. | |||
It assumes no prior experience with Linux, High Availability clustering or virtual servers. | |||
It does require a basic understanding of things like networking, but as few assumptions as possible are made about prior knowledge. | |||
== What This Tutorial Is Not == | |||
Unlike the [[AN!Cluster Tutorial 2|main tutorial]], this tutorial is '''not''' meant to give the reader an in-depth understanding of High Availability concepts. | |||
Likewise, it will not go into depth on why the ''Anvil!'' is designed the way it is. | |||
It | It will not go into a discussion of how and why you should choose hardware for this project, either. | ||
All this said, this tutorial will try to provide links to the appropriate sections in the [[AN!Cluster Tutorial 2|main tutorial]] as needed. So if there is a point where you feel lost, please take a break and follow those thinks. | |||
== What is Needed? == | |||
= | {{note|1=[[AN!Cluster_Tutorial_2#A_Note_on_Hardware|We are]] an unabashed [http://www.fujitsu.com/global/ Fujitsu], [http://www.brocade.com Brocade] and [http://www.apc.com/home/ca/en/ APC] reseller. No vendor is perfect, of course, but we've selected these companies for their high quality build standards and excellent post-sales support. You are, of course, perfectly able to substitute in any hardware you like, just so long as it meets the system requirements listed.}} | ||
Some [[AN!Cluster_Tutorial_2#A_Note_on_Hardware|system requirements]]; | |||
(All equipment must support [[RHEL]] version 6) | |||
=== A machine for Striker === | |||
A server? An appliance! | |||
The | The Striker dashboard runs like your home router; It has a web-interface that allows you to create, manage and access new highly-available servers, manage nodes and monitor foundation pack hardware. | ||
{|style="width: 100%;" | |||
|style="width: 710px"|[[image:Fujitsu_Primergy_RX1330-M1_Front-Left.jpg|thumb|center|700px|Fujitsu Primergy [http://www.fujitsu.com/fts/products/computing/servers/primergy/rack/rx1330m1/ RX1330 M1]; Photo by [http://mediaportal.ts.fujitsu.com/pages/view.php?ref=33902&k= Fujitsu].]] | |||
|[[image:Intel_NUC_NUC5i5RYH.png|thumb|center|200px|[http://www.intel.com/content/www/us/en/nuc/nuc-kit-nuc5i5ryh.html Intel NUC NUC5i5RYH]; Photo by [http://www.intel.com/content/dam/www/public/us/en/images/photography-consumer/16x9/65596-tall-nuc-kit-i5-i3-ry-frontangle-white-16x9.png/_jcr_content/renditions/intel.web.256.144.png Intel].]] | |||
|} | |||
The Striker dashboard has very low performance requirements. If you build two dashboards, then no redundancy in the dashboard itself is required as each will provide backup for the other. | |||
We have used; | |||
* Small but powerful machines like the [http://www.intel.com/content/www/us/en/nuc/nuc-kit-nuc5i5ryh.html Intel Core i5 NUC NUC5i5RYH] with a simple [http://www.siig.com/it-products/networking/wired/usb-3-0-to-gigabit-ethernet-adapter.html Siig JU-NE0211-S1 USB 3.0 to gigabit ethernet] adapter. | |||
* On the other end of the scale, we've used fully redundant [http://www.fujitsu.com/fts/products/computing/servers/primergy/rack/rx1330m1/ Fujitsu Primergy RX 1330 M1] servers with four network interfaces. The decision here will be principally guided by your budget. | |||
If you use a pair on non-redundant "appliance" machines, be sure to stager each of them across the two power power rails and network switches. | |||
=== A Pair of Anvil! Nodes === | |||
The more fault-tolerant, the better! | |||
The ''Anvil!'' Nodes host power your highly-available servers, but the servers themselves are totally decoupled from the hardware. You can move your servers back and forth between these nodes without any interruption. If a node catastrophically fails without warning, the survivor will reboot your servers within seconds ensuring the most minimal service interruptions (typical recovery time from node crash to server being at the login prompt is 30 to 90 seconds). | |||
{|style="width: 100%;" | |||
|style="width: 710px"|[[image:Fujitsu_Primergy_RX300-S8_Front-Left.jpg|thumb|left|700px|The beastly Fujitsu Primergy [http://www.fujitsu.com/fts/products/computing/servers/primergy/rack/rx300/ RX300 S8]; Photo by [http://mediaportal.ts.fujitsu.com/pages/view.php?ref=30751&search=!collection4+rx300&order_by=field12&sort=DESC&offset=0&archive=0&k= Fujitsu].]] | |||
|[[image:Fujitsu_Primergy_TX1320-M1_Front-Left.jpg|thumb|center|200px|The rediculously tiny Fujitsu Primergy [http://www.fujitsu.com/fts/products/computing/servers/primergy/tower/tx1320m1/ TX1320 M1]; Photo by [http://mediaportal.ts.fujitsu.com/pages/view.php?ref=34197&search=!collection4+tx1320&order_by=field12&sort=DESC&offset=0&archive=0&k= Fujitsu].]] | |||
|} | |||
The requirements are two servers with the following; | |||
* A CPU with [https://en.wikipedia.org/wiki/Hardware-assisted_virtualization hardware-accelerated virtualization] | |||
* Redundant power supplies | |||
* [[IPMI]] or vendor-specific [https://en.wikipedia.org/wiki/Integrated_Remote_Management_Controller out-of-band management], like Fujitsu's iRMC, HP's iLO, Dell's iDRAC, etc | |||
* Six network interfaces, 1 [[Gbit]] or faster (yes, six!) | |||
* 4 [[GiB]] of RAM and 44.5 GiB of storage for the host operating system, plus sufficient RAM and storage for your servers | |||
Beyond these requirements, the rest is up to you; your performance requirements, your budget and your desire for as much fault-tolerance as possible. | |||
= | {{note|1=If you have a bit of time, you should really read the section [[AN!Cluster_Tutorial_2#Recommended_Hardware.3B_A_Little_More_Detail|discussing hardware considerations]] from the main tutorial before purchasing hardware for this project. It is very much not a case of "buy the most expensive and you're good".}} | ||
=== Foundation Pack === | |||
The foundation pack is the bedrock that the ''Anvil!'' node pairs sit on top of. | |||
The foundation pack provides two independent power "rails" and each ''Anvil!'' node has two power supplies. When you plug in each node across the two rails, you get full fault tolerance. | |||
If you have redundant power supplies on your switches and/or Striker dashboards, they can span the rails too. If they have only one power supply, then you're still OK. You plug the first switch and dashboard into the first power rail, the second switch and dashboard into the second rail and you're covered! Of course, be sure you plug the first dashboard's network connections into the same switch! | |||
{|style="width: 100%;" | |||
!colspan="2"|UPSes | |||
|- | |||
|style="width: 710px"|[[image:APC_SMT1500RM2U_Front-Right.jpg|thumb|left|700px|APC [http://www.apc.com/products/resource/include/techspec_index.cfm?base_sku=SMT1500RM2U SmartUPS 1500 RM2U] 120vAC UPS. Photo by [http://www.apcmedia.com/prod_image_library/index.cfm?search_item=SMT1500RM2U APC].]] | |||
|[[image:APC SMT1500_Front-Right.jpg|thumb|center|200px|APC [http://www.apc.com/products/resource/include/techspec_index.cfm?base_sku=SMT1500 SmartUPS 1500 Pedestal] 120vAC UPS. Photo by [http://www.apcmedia.com/prod_image_library/index.cfm?search_item=SMT1500 APC].]] | |||
|- | |||
!colspan="2"|Switched PDUs | |||
|- | |||
|style="width: 710px"|[[image:APC_AP7900_Front-Right.jpg|thumb|left|400px|APC [http://www.apc.com/products/resource/include/techspec_index.cfm?base_sku=AP7900 AP7900 8-Outlet 1U] 120vAC PDU. Photo by [http://www.apcmedia.com/prod_image_library/index.cfm?search_item=AP7900# APC].]] | |||
|[[image:APC_AP7931_Front-Right.jpg|thumb|center|100px|APC [http://www.apc.com/products/resource/include/techspec_index.cfm?base_sku=AP7900 AP7931 16-Outlet 0U] 120vAC PDU. Photo by [http://www.apcmedia.com/prod_image_library/index.cfm?search_item=AP7931# APC].]] | |||
|- | |||
!colspan="2"|Network Switches | |||
|- | |||
|style="width: 510px"|[[image:Brocade_icx6610-48_front-left.png|thumb|left|400px|Brocade [http://www.brocade.com/products/all/switches/product-details/icx-6610-switch/index.page ICX6610-48] 8x SFP+, 48x 1Gbps RJ45, 160Gbit stacked switch. Photo by [http://newsroom.brocade.com/Image-Gallery/Product-Images Brocade].]] | |||
|[[image:Brocade_icx6450-25_front_01.jpg|thumb|left|400px|Brocade [http://www.brocade.com/products/all/switches/product-details/icx-6430-and-6450-switches/index.page ICX6450-48] 4x SFP+, 24x 1Gbps RJ45, 40Gbit stacked switch. Photo by [http://newsroom.brocade.com/Image-Gallery/Product-Images Brocade].]] | |||
|} | |||
It is easy, and actually critical, that the hardware you select be fault-tolerant. The trickiest part is ensuring your switches can fail back and forth without interrupting traffic, a concept called "[http://www.brocade.com/downloads/documents/html_product_manuals/FI_08010a_STACKING/GUID-BF6FC236-5FD7-4E42-B774-E4EFFD484FC2.html hitless fail-over]". The power is, by comparison, much easier to deal with. | |||
You will need; | |||
* Two [[UPS]]es (Uninterruptable Power Supplies) with enough battery capacity to run your entire ''Anvil!'' for your minimum no-power hold up time. | |||
* Two switched [[PDU]]s (Power Distribution Units) (basically network-controller power bars) | |||
* Two network switches with hitless fail-over support, if stacked. Redundant power supplies are recommended. | |||
= What is the Build Process? = | |||
The core of the ''Anvil!'''s support and management is the [[Striker]] dashboard. It will become the platform off of which nodes and other dashboards are built from. | |||
So the build process consists of: | |||
== Setup the Striker Dashboard == | |||
If you're not familiar with installing Linux, please don't worry. It is quite easy and we'll walk through each step carefully. | |||
We will: | |||
# Do a minimal install off of a standard [[RHEL]] 6 install disk. | |||
# Grab the Striker install script and run it. | |||
# Load up the Striker Web Interface. | |||
That's it, we're web-based from there on. | |||
== Preparing the Anvil! Nodes == | |||
{{Note|1=Every server vendor has it's own way to configure a node's BIOS and storage. For this reason, we're skipping that part here. Please consult your server or motherboard manual to enable network booting and for creating your storage array.}} | |||
It's rather difficult to fully automate the node install process, but Striker does automate the vast majority of it. | |||
It simplifies the few manual parts by automatically becoming a simple menu-driven target for operating system installs. | |||
The main goal of this stage is to get an operating system onto the nodes so that the web-based installer can take over. | |||
# Boot off the network | |||
# Select the "''Anvil!'' Node" install option | |||
# Select the network card to install from, wait for the install to finish | |||
# Find and note the node's IP address. | |||
# Repeat for the second node. | |||
We can proceed from here using the web interface. | |||
Some mini tutorials that might be helpful: | |||
* [[Configuring Network Boot on Fujitsu Primergy]] | |||
* [[Configuring Hardware RAID Arrays on Fujitsu Primergy]] | |||
* [[Encrypted Arrays with LSI SafeStore]] (Also covers '<span class="code">[https://github.com/digimer/striker/blob/master/tools/anvil-self-destruct anvil-self-destruct]</span>') | |||
== Configure the Foundation Pack Backup Fencing == | |||
{{note|1=Every vendor has their own way of configuring their hardware. We we describe the setup for the APC-brand switched PDUs.}} | |||
We need to ensure that the switched PDUs are ready for use as [[AN!Cluster_Tutorial_2#Concept.3B_Fencing|fence devices]] '''before''' we configure an ''Anvil!''. | |||
Thankfully, this is pretty easy. | |||
* [[Configuring an APC AP7900]] | |||
* [[Configuring Brocade Switches]] | |||
* [[Configuring APC SmartUPS with AP9630 Network Cards]] | |||
== Create an "Install Manifest" == | |||
An "Install Manifest" is a simple file you can create using Striker. | |||
You just enter a few things like the name and sequence number of the new ''Anvil!'' and the password to use. It will recommend all the other settings needed, which you can tweak if you want. | |||
Once the manifest is created, you can load it, specify the new nodes' IP addresses and let it run. When it finishes, your ''Anvil!'' will be ready! | |||
== Adding Your New Anvil! to Striker == | |||
The last step will be to add your shiny new ''Anvil!'' to your Striker system. | |||
== Basic Use of Striker == | |||
It's all well and good that you have an ''Anvil!'', but it doesn't mean much unless you can use it. So we will finish this tutorial by covering a few basic tasks; | |||
* Create a new server | |||
* Migrate a server between nodes. | |||
* Modify an existing server | |||
We'll also cover the nodes; | |||
* Powering nodes off and on (for upgrades, repairs or maintenance) | |||
* Cold-stop your ''Anvil!'' (before an extended power outage, as an example) | |||
* Cold-start your ''Anvil!'' (after power is restored, continuing the example) | |||
The full Striker instructions can be found on the [[Striker]] page. | |||
= Building a Striker Dashboard = | |||
We recommend [https://access.redhat.com/products/red-hat-enterprise-linux/evaluation Red Hat Enterprise Linux] (RHEL), but you can also use the free, [http://wiki.centos.org/FAQ/General#head-4b2dd1ea6dcc1243d6e3886dc3e5d1ebb252c194 binary-compatible] rebuild called [[CentOS]]. Collectively these (and other RHEL-based operating systems) are often call "EL" (for "Enterprise Linux"). We will be using release version 6, which is abbreviated to simple '''EL6'''. | |||
== Installing the Operating System == | |||
If you are familiar with installing RHEL or CentOS, please do a normal "Desktop" or "Minimal" install. If you install 'Minimal', please install the '<span class="code">perl</span>' package as well. | |||
If you are not familiar with Linux in general, or RHEL/CentOS in particular, don't worry. | |||
Here is a complete walk-through of the process: | |||
* [[Anvil! m2 Tutorial - Installing RHEL/Centos|''Anvil!'' m2 Tutorial - Installing RHEL/Centos]] | |||
== Download the Striker Installer == | |||
The Striker installer is a small "command line" program that you download and run. | |||
We need to download it from the Internet. You can download it in your browser [https://raw.githubusercontent.com/digimer/striker/master/tools/striker-installer by clicking here], if you like. | |||
To do that, run this command: | |||
== | <syntaxhighlight lang="bash"> | ||
wget -c https://raw.githubusercontent.com/digimer/striker/master/tools/striker-installer | |||
</syntaxhighlight> | |||
<syntaxhighlight lang="text"> | |||
--2014-12-29 17:10:48-- https://raw.githubusercontent.com/digimer/striker/master/tools/striker-installer | |||
Resolving raw.githubusercontent.com... 23.235.44.133 | |||
Connecting to raw.githubusercontent.com|23.235.44.133|:443... connected. | |||
HTTP request sent, awaiting response... 200 OK | |||
Length: 154973 (151K) [text/plain] | |||
Saving to: “striker-installer” | |||
100%[======================================>] 154,973 442K/s in 0.3s | |||
2014-12-29 17:10:48 (442 KB/s) - “striker-installer” saved [154973/154973] | |||
</syntaxhighlight> | |||
To tell Linux that a file is actually a program, we have to set it's "[https://en.wikipedia.org/wiki/Modes_%28Unix%29 mode]" to be "executable". To do this, run this command: | |||
<syntaxhighlight lang="bash"> | |||
chmod a+x striker-installer | |||
</syntaxhighlight> | |||
There is no output from that command, so lets verify that it worked with the '<span class="code">ls</span>' too. | |||
<syntaxhighlight lang="bash"> | |||
ls -lah striker-installer | |||
</syntaxhighlight> | |||
<syntaxhighlight lang="text"> | |||
-rwxr-xr-x. 1 root root 152K Dec 29 17:10 striker-installer | |||
</syntaxhighlight> | |||
See the '<span class="code">-rwxr-xr-x.</span>' line? That tells use that the file is now 'e<span class="code">x</span>ecutable'. | |||
We're ready! | |||
== Knowing What we Want == | |||
When we run the Striker installer, we're going to tell it how to configure itself. So to do this, we need to make a few decisions. | |||
=== What company or organization name to use? === | |||
When a user logs into Striker, they are asked for a user name and password. The box that pops up has a company (or organization) name to help tell the user what they are connecting to. | |||
This can be whatever makes sense to you. For this tutorial, we'll use '<span class="code">Alteeve's Niche!</span>'. | |||
=== What do we want to call this Striker dashboard? === | |||
To help identify this machine on the network and to differentiate it from the other dashboards you might build, we'll want to give it a name. This name has to be similar to a domain name you would see on the Internet, but beyond that it can be whatever you want. | |||
Generally, this name is made up of a two or three letter "prefix" that describes who owns it. Our name is "Alteeve's Niche!", we we use the prefix '<span class="code">an-</span>'. Following this is a description of the machine followed by our domain name. | |||
This is our first Striker dashboard and our domain name is '<span class="code">alteeve.ca</span>', so we're going to use the name '<span class="code">an-striker01.alteeve.ca</span>'. | |||
=== How can we send email? === | |||
The ''Anvil!'' nodes will send out an email alert should anything of note happen. In order to do this though, it needs to know what mail server to use and what email address and password to use when authenticating. | |||
You will need to get this information from whomever provides you with email services. | |||
In our case, our mail server is at the address '<span class="code">mail.alteeve.ca</span>' listening for connections on [[TCP]] port '<span class="code">587</span>'. We're going to use the email account '<span class="code">example@alteeve.ca</span>' which has the password '<span class="code">Initial1</span>'. | |||
=== When user name and password to use? === | |||
There is no default user account or default password on Striker dashboards. | |||
Both the user name and password are up to you to choose. Most people use the user name '<span class="code">admin</span>', but this is by convention only. | |||
For this tutorial, we're going to use the user name '<span class="code">admin</span>' and the password '<span class="code">Initial1</span>'. | |||
=== What IP addresses to use === | |||
{{note|1=This section requires a basic understanding of how networks work. If you want a bit more information on networking in the ''Anvil!'', please see the "[[AN!Cluster_Tutorial_2#Subnets|Subnets]]" section of the main tutorial.}} | |||
The Striker dashboard will connect to two networks; | |||
* [[Internet-Facing Network]] (The [[IFN]]); Your existing network, usually connected to the Internet. | |||
* [[Back-Channel Network]] (The [[BCN]]); The dedicated network used by the ''Anvil!'' | |||
The IP address we use on the IFN will depend on your current network. Most networks use <span class="code">192.168.1.0/24</span>, <span class="code">10.255.0.0/16</span> or similar. In order to access the Internet, we're going to need to specify the [[default gateway]] and a couple [[DNS]] servers to use. | |||
For this tutorial, we'll be using the IP address '<span class="code">10.255.4.1/16</span>', the default gateway is '<span class="code">10.255.255.254</span>' and we'll use [https://developers.google.com/speed/public-dns/ Google's open DNS servers] at the IP addresses '<span class="code">8.8.8.8</span>' and '<span class="code">8.8.4.4</span>'. | |||
The IP address we use on the BCN is almost always on the '<span class="code">10.20.0.0/16</span>' network. For this tutorial, we'll be using the IP address '<span class="code">10.20.4.1/16</span>'. | |||
=== Do we want to be an Anvil! node install target? === | |||
One of the really nice features of Striker dashboards is that you can use them to automatically install the base operating system on new and replacement ''Anvil!'' nodes. | |||
To do this, Striker can be told to setup a "<span class="code">[[PXE]]</span>" (''P're-boot e''X''ecution ''E''nvironment) server. When this is enabled, you can tell a new node to "boot off the network". Doing this allows you to boot and install an operating system without using a boot disc. Also, it allows us to specify special install instruction, removing the need to ask you how you want to configure the OS. | |||
The Striker dashboard will do everything for you to be an install target. | |||
When it's done, it will offer up IP addresses on the BCN network (to avoid conflicting with any existing [[DHCP]] servers you might have). It will configure RHEL and/or CentOS install targets and all the ancillary steps needed to make all this work. | |||
We will need to tell it a few things though; | |||
* What range of IPs should it offer to new nodes being installed? | |||
* Do we want to offer RHEL as a target? If so, where do we find the install media? | |||
* Do we want to offer CentOS as a target? If so, where do we find the install media? | |||
{{note|1=If you are using CentOS, switch to setup CentOS and skip RHEL.}} | |||
For this tutorial, we're going to use the choose; | |||
* A network range of '<span class="code">10.20.10.200</span>' to '<span class="code">10.20.10.210</span>' | |||
* Setup as a RHEL install target using the disc in the DVD drive | |||
* Skip being a CentOS install target. | |||
=== Do we need to register with RHN? === | |||
If you are using CentOS, the answer is "No". | |||
If you are using RHEL, and if you skipped registration during the OS install like we did above, you will need to register now. We skipped it at the time to avoid the [[#Enabling_Network_Access|network hassle]] some people run into. | |||
To save an extra step of manually registering, we can tell the Striker installer that we want to register and what our RHN credentials are. This will be the user name and password Red Hat gave you when you signed up for the trial or when you bought your Red Hat support. | |||
We're going to do that here. For the sake of documentation, we'll use the pretend credentials '<span class="code">user</span>' and the password '<span class="code">password</span>'. | |||
=== Mapping network connections === | |||
In the same way that every car has a unique [https://en.wikipedia.org/wiki/Vehicle_identification_number VIN], so does every network card. Each network port has it's own [[MAC address]]. | |||
There is no inherent way for the Striker installer to know which network port plugs into what network. So the first step of the installer needs to ask you to unplug and then plug in each network card when prompted. | |||
If you want to know more about how networks are used in the ''Anvil!'', please see: | |||
* "[[AN!Cluster_Tutorial_2#Planning_The_Use_of_Physical_Interfaces|Planning The Use of Physical Interfaces]]" in the main tutorial | |||
If your Striker dashboard has just two network interfaces, then the first will ask you which interface plugs into your [[Back-Channel Network]] and then which one plugs into your [[Internet-Facing Network]]. | |||
If your Striker dashboard has four network interfaces, then two will be paired up for the [[BCN]] and two will be paired up for the [[IFN]]. This will allow you to span each pair across the two switches for redundancy. | |||
The Striker installer is smart enough to sort this all out for you. You just need to unplug the right cables when prompter. | |||
== Running the Striker Installer == | |||
Excellent, now we're ready! | |||
When we run the <span class="code">striker-installer</span> program, we will tell Striker of our decisions using "command line switches". These take the form of: | |||
* <span class="code">-x value</span> | |||
* <span class="code">--foo value</span> | |||
If the '<span class="code">value</span>' has a space in it, then we'll put quotes around it. | |||
If you want to know more about the switches, you can run '<span class="code">./striker-installer</span>' by itself and all the available switches and how to use them will be explained. | |||
{{note|1=This uses the 'git' repository option. It will be redone later without this option once version 1.2.0 is released. Please do not use 'git' versions in production!}} | |||
Here is how we take our decisions above and turn them into a command line call: | |||
{|class="wikitable" | |||
!Purpose | |||
!Switch | |||
!Value | |||
!Note | |||
|- | |||
|Company name | |||
|class="code"|-c | |||
|class="code"|"Alteeve's Niche\!" | |||
|At the command line, the <span class="code">!</span> has a special meaning.<br/>By using '<span class="code">\!</span>' we're telling the system to treat it literally. | |||
|- | |||
|Host name | |||
|class="code"|-n | |||
|class="code"|an-striker01.alteeve.ca | |||
|The network name of the Striker dashboard. | |||
|- | |||
|Mail server | |||
|class="code"|-m | |||
|class="code"|mail.alteeve.ca:587 | |||
|The server name and [[TCP]] port number of the mail server we route email to. | |||
|- | |||
|Email user | |||
|class="code"|-e | |||
|class="code"|"example@alteeve.ca:Initial1" | |||
|In this case, the password doesn't have a space, so quotes aren't needed.<br />We're using them to show what it would look like if you did need it. | |||
|- | |||
|Striker user | |||
|class="code"|-u | |||
|class="code"|"admin:Initial1" | |||
|As with the email user, we don't need quotes here because our password doesn't have a space in it.<br />It's harmless to use quotes though, so we use them. | |||
|- | |||
|[[IFN]] IP address | |||
|class="code"|-i | |||
|class="code"|10.255.4.1/16,dg=10.255.255.254,dns1=8.8.8.8,dns2=8.8.4.4 | |||
|Sets the IP address, default gateway and DNS servers to use on the Internet-Facing Network. | |||
|- | |||
|[[BCN]] IP address | |||
|class="code"|-b | |||
|class="code"|10.20.4.1/16 | |||
|Sets the IP address of the Back-Channel Network. | |||
|- | |||
|Boot IP Range | |||
|class="code"|-p | |||
|class="code"|10.20.10.200:10.20.10.210 | |||
|The range of IP addresses we will offer to nodes using this Striker dashboard to install their operating system. | |||
|- | |||
|RHEL Install Media | |||
|class="code"|--rhel-iso | |||
|class="code"|dvd | |||
|Tell Striker to setup RHEL as an install target and to use the files on the disc in the DVD drive. | |||
{{note|1=If you didn't install off of a DVD, then change this to either:<br /> | |||
"<span class="code">--rhel-iso /path/to/local/rhel-server-6.6-x86_64-dvd.iso</span>"<br /> | |||
or<br /> | |||
"<span class="code">--rhel-uso <nowiki>http://some.url/rhel-server-6.6-x86_64-dvd.iso</nowiki></span>"<br /> | |||
Striker will copy your local copy or download the remote copy to the right location.}} | |||
|- | |||
|RHN Credentials | |||
|class="code"|--rhn | |||
|class="code"|"user:secret" | |||
|The Red Hat Network user and password needed to register this machine with Red Hat.<br /> | |||
{{note|1=Skip this if you're using CentOS.}} | |||
|} | |||
{{note|1=In Linux, you and put a '<span class="code"> \</span>' to spread one command over multiple lines. We're doing it this way to make it easier to read only. You can type the whole command on one line.}} | |||
Putting it all together, this is what our command will look like: | |||
<syntaxhighlight lang="bash"> | |||
./striker-installer \ | |||
-c "Alteeve's Niche\!" \ | |||
-n an-striker01.alteeve.ca \ | |||
-m mail.alteeve.ca:587 \ | |||
-e "example@alteeve.ca:Initial1" \ | |||
-u "admin:Initial1" \ | |||
-i 10.255.4.1/16,dg=10.255.255.254,dns1=8.8.8.8,dns2=8.8.4.4 \ | |||
-b 10.20.4.1/16 \ | |||
-p 10.20.10.200:10.20.10.210 \ | |||
--rhel-iso dvd \ | |||
--rhn "user:secret" | |||
</syntaxhighlight> | |||
Done! | |||
When you press <span class="code"><enter></span>, the install will start. | |||
=== Let's Go! === | |||
Here is what the install should look like: | |||
<syntaxhighlight lang="text"> | |||
############################################################################## | |||
# ___ _ _ _ The Anvil! Dashboard # | |||
# / __| |_ _ _(_) |_____ _ _ -=] Installer # | |||
# \__ \ _| '_| | / / -_) '_| # | |||
# |___/\__|_| |_|_\_\___|_| # | |||
# https://alteeve.ca/w/Striker # | |||
############################################################################## | |||
[ Note ] - Will install the latest version from git. | |||
############################################################################## | |||
# [ Warning ] - Please do NOT use a git version in production! # | |||
############################################################################## | |||
Sanity checks complete. | |||
Checking the operating system to ensure it is compatible. | |||
- We're on a RHEL (based) OS, good. Checking version. | |||
- Looks good! You're on: [6.6] | |||
- This OS is RHEL proper. | |||
- RHN credentials given. Attempting to register now. | |||
- [ Note ] Please be patient, this might take a minute... | |||
- Registration was successful. | |||
- Adding 'Optional' channel... | |||
- 'Optional' channel added successfully. | |||
Done. | |||
Backing up some network related system files. | |||
- Backing up: [/etc/udev/rules.d/70-persistent-net.rules] | |||
- Previous backup exists, skipping. | |||
- Backing up: [/etc/sysconfig/network-scripts] | |||
- Previous backup exists, skipping. | |||
Done. | |||
Checking if we need to freeze NetworkManager on the active interface. | |||
- NetworkManager is running, will examine interfaces. | |||
- Freezing interfaces: eth0 | |||
- Note: Other interfaces may go down temporarily. | |||
Done | |||
Making sure all network interfaces are up. | |||
- The network interface: [eth1] is down. It must be started for the next stage. | |||
- Checking if: [/etc/sysconfig/network-scripts/ifcfg-eth1] exists. | |||
- Config file exists, changing BOOTPROTO to 'none'. | |||
- Attempting to bring up: [eth1]... | |||
- Checking to see if it is up now. | |||
- The interface: [eth1] is now up! | |||
- The network interface: [eth2] is down. It must be started for the next stage. | |||
- Checking if: [/etc/sysconfig/network-scripts/ifcfg-eth2] exists. | |||
- Config file exists, changing BOOTPROTO to 'none'. | |||
- Attempting to bring up: [eth2]... | |||
- Checking to see if it is up now. | |||
- The interface: [eth2] is now up! | |||
- The network interface: [eth3] is down. It must be started for the next stage. | |||
- Checking if: [/etc/sysconfig/network-scripts/ifcfg-eth3] exists. | |||
- Config file exists, changing BOOTPROTO to 'none'. | |||
- Attempting to bring up: [eth3]... | |||
- Checking to see if it is up now. | |||
- The interface: [eth3] is now up! | |||
Done. | |||
-=] Configuring network to enable access to Anvil! systems. | |||
</syntaxhighlight> | |||
This is where you now need to unplug each network cable, wait a few seconds and then plug it back in. | |||
<syntaxhighlight lang="text"> | |||
Beginning NIC identification... | |||
- Please unplug the interface you want to make: | |||
[Back-Channel Network, Link 1] | |||
</syntaxhighlight> | |||
When you unplug the cable, you will see: | |||
<syntaxhighlight lang="text"> | |||
- NIC with MAC: [52:54:00:00:7a:51] will become: [bcn-link1] | |||
(it is currently: [eth0]) | |||
- Please plug in all network cables to proceed. | |||
</syntaxhighlight> | |||
When you plug it back in, it will move on to the next interface. Repeat this for your other (or three other) network interfaces. | |||
<syntaxhighlight lang="text"> | |||
- Please unplug the interface you want to make: | |||
[Back-Channel Network, Link 2] | |||
</syntaxhighlight> | |||
<syntaxhighlight lang="text"> | |||
- NIC with MAC: [52:54:00:a1:77:b7] will become: [bcn-link2] | |||
(it is currently: [eth1]) | |||
- Please plug in all network cables to proceed. | |||
</syntaxhighlight> | |||
<syntaxhighlight lang="text"> | |||
- Please unplug the interface you want to make: | |||
[Internet-Facing Network, Link 1] | |||
</syntaxhighlight> | |||
<syntaxhighlight lang="text"> | |||
- NIC with MAC: [52:54:00:00:7a:50] will become: [ifn-link1] | |||
(it is currently: [eth2]) | |||
- Please plug in all network cables to proceed. | |||
</syntaxhighlight> | |||
<syntaxhighlight lang="text"> | |||
- Please unplug the interface you want to make: | |||
[Internet-Facing Network, Link 2] | |||
</syntaxhighlight> | |||
<syntaxhighlight lang="text"> | |||
- NIC with MAC: [52:54:00:a1:77:b8] will become: [ifn-link2] | |||
(it is currently: [eth3]) | |||
- Please plug in all network cables to proceed. | |||
</syntaxhighlight> | |||
A summary will be shown: | |||
<syntaxhighlight lang="text"> | |||
Here is what you selected: | |||
- Interface: [52:54:00:00:7A:51], currently named: [eth0], | |||
will be renamed to: [bcn-link1] | |||
- Interface: [52:54:00:A1:77:B7], currently named: [eth1], | |||
will be renamed to: [bcn-link2] | |||
- Interface: [52:54:00:00:7A:50], currently named: [eth2], | |||
will be renamed to: [ifn-link1] | |||
- Interface: [52:54:00:A1:77:B8], currently named: [eth3], | |||
will be renamed to: [ifn-link2] | |||
The Back-Channel Network interface will be set to: | |||
- IP: [10.20.4.1] | |||
- Netmask: [255.255.0.0] | |||
The Internet-Facing Network interface will be set to: | |||
- IP: [10.255.4.1] | |||
- Netmask: [255.255.0.0] | |||
- Gateway: [10.255.255.254] | |||
- DNS1: [8.8.8.8] | |||
- DNS2: [8.8.4.4] | |||
Shall I proceed? [Y/n] | |||
</syntaxhighlight> | |||
{{note|1=If you are not happy with this, press '<span class="code">n</span>' and the network mapping part will start over. If you want to change the command line switches, press '<span class="code">ctrl</span>' + '<span class="code">c</span>' to cancel the install entirely.}} | |||
If you are happy with the install plan, press '<span class="code"><enter></span>'. | |||
<syntaxhighlight lang="text"> | |||
- Thank you, I will start to work now. | |||
</syntaxhighlight> | |||
There is no other intervention needed now. The rest of the install will complete automatically, but it might take some time. | |||
Now is a good time to go have a <span class="code">$drink</span>. | |||
{{warning|1=There are times when it might look like the install has hung or crashed. It almost certainly has not. Some of the output from the system buffers and it can take many minutes at times before you see output. '''Please be patient!'''}} | |||
<syntaxhighlight lang="text"> | |||
Configuring this system's host name. | |||
- Reading in the existing hostname file. | |||
- Writing out the new version. | |||
Done. | |||
-=] Beginning configuration and installation processes now. [=- | |||
Checking if anything needs to be installed. | |||
- The AN!Repo hasn't been added yet, adding it now. | |||
- Added. Clearing yum's cache. | |||
- output: [Loaded plugins: product-id, refresh-packagekit, rhnplugin, security,] | |||
- output: [ : subscription-manager] | |||
- output: [Cleaning repos: InstallMedia an-repo rhel-x86_64-server-6] | |||
- output: [Cleaning up Everything] | |||
- Done! | |||
Checking for OS updates. | |||
</syntaxhighlight> | |||
{|class="wikitable" style="text-align: center;" | |||
|<html><iframe width="320" height="240" src="//www.youtube.com/embed/B3lLYOGDsts" frameborder="0" allowfullscreen></iframe></html> | |||
|- | |||
|<span style="font-size:small; color: #7f7f7f;">"[http://www.jeopardy.com/ Final Jeopardy]" theme is<br />© 2014 Sony Corporation of America</span> | |||
|} | |||
-=] Some time and '''much''' output later ... [=- | |||
<syntaxhighlight lang="text"> | |||
Setting root user's password. | |||
- Output: [Changing password for user root.] | |||
- Output: [passwd: all authentication tokens updated successfully.] | |||
Done! | |||
############################################################################## | |||
# NOTE: Your 'root' user password is now the same as the Striker user's # | |||
# password you just specified. If you want a different password, # | |||
# change it now with 'passwd'! # | |||
############################################################################## | |||
Writing the new udev rules file: [/etc/udev/rules.d/70-persistent-net.rules] | |||
Done. | |||
Deleting old network configuration files: | |||
- Deleting file: [/etc/sysconfig/network-scripts/ifcfg-eth0] | |||
- Deleting file: [/etc/sysconfig/network-scripts/ifcfg-eth3] | |||
- Deleting file: [/etc/sysconfig/network-scripts/ifcfg-eth1] | |||
- Deleting file: [/etc/sysconfig/network-scripts/ifcfg-eth2] | |||
Done. | |||
Writing new network configuration files. | |||
[ Warning ] - Please confirm the network settings match what you expect and | |||
then reboot this machine. | |||
Installation of Striker is complete! | |||
</syntaxhighlight> | |||
'''*Ding*''' | |||
Striker is done! | |||
The output above was truncated as it is thousands of lines long. If you want to see the full output though, you can: | |||
* [[Anvil! m2 Tutorial - Sample Install Output|''Anvil!'' m2 Tutorial - Sample Install Output]] | |||
Reboot the system and your new Striker dashboard will be ready to use! | |||
<syntaxhighlight lang="bash"> | |||
reboot | |||
</syntaxhighlight> | |||
<syntaxhighlight lang="text"> | |||
Broadcast message from root@an-striker01.alteeve.ca | |||
(/dev/pts/0) at 3:41 ... | |||
The system is going down for reboot NOW! | |||
</syntaxhighlight> | |||
= Using Striker = | |||
From here on in, we'll be using a normal web browser. | |||
== Self-Signed SSL Certificate == | |||
{{note|1=By default, Striker listens for connections on both normal HTTP and secure HTTPS. We will use HTTPS for this tutorial to show how to accept a self-signed SSL certificate. We do this to encrypt traffic going between your computer and the Striker dashboard.}} | |||
To connect to Striker, open up your favourite web browser and point it at the Striker server (use the [[Anvil!_m2_Tutorial#What_IP_addresses_to_use|IFN or BCN IP address]] set during the install). | |||
In our case, that means we want to connect to [https://10.255.4.1 https://10.255.4.1]. | |||
{{note|1=This tutorial is shown using Firefox. The steps to accept a self-signed SSL certificate will be a little different on other browsers.}} | |||
[[image:Striker-1.2.0b_Connect_Enter-URL_.png|thumb|center|665px|Striker - Enter the URL.]] | |||
Type the address into your browser and then press '<span class="code"><enter></span>'. | |||
[[image:Striker-1.2.0b_SSL-Understand-Risks.png|thumb|center|665px|Striker - "I understand the risks"]] | |||
SSL-based security normally requires an independent third party to validate the certificate, which requires a fee. | |||
If you want to do this, [[PPPower_Server#SSL_Virtual_Hosts|here is how to do it]]. | |||
In our case, we know that the Striker machine is ours, so this isn't really needed. So we need to tell the browser that we trust the certificate. | |||
Click to expand "<span class="code">I Understand the Risks</span>". | |||
[[image:Striker-1.2.0b_SSL-Add-Exception.png|thumb|center|665px|Striker - "Add Exception..."]] | |||
Click on the "<span class="code">Add Exception...</span>" button. | |||
[[image:Striker-1.2.0b_SSL-Confirm-Exception.png|thumb|center|507px|Striker - "Confirm Exception"]] | |||
Understandably, the browser is being cautious and is being careful to explain what you are doing. So we need to confirm what we're asking by clicking on "<span class="code">Confirm Security Exception</span>". | |||
That's it, we can now access Striker! | |||
== Logging In == | |||
When you connect to Striker, a pop-up window will ask your for your user name and password. | |||
[[image:Striker-1.2.0b_Login-Popup.png|thumb|center|665px|Striker - Login Pop-up]] | |||
The user name and password are the ones [[#When_user_name_and_password_to_use.3F|use chose during the Striker install]]. | |||
Enter them and click on "<span class="code">OK</span>". | |||
[[image:Striker-1.2.0b_First-Page.png|thumb|center|665px|Striker - First Page]] | |||
That's in, we're in! | |||
= Create an "Install Manifest" = | |||
To build a new ''Anvil!'', we need to create an "Install Manifest". This is a simple [[XML]] file that Striker will use as a blueprint on how to build up a pair of nodes into your ''Anvil!''. It will also serve as instructions for rebuilding or replacing a node that failed down the road. | |||
Once created, the Install Manifest will be saved for future use. You can also download it for safe keeping. | |||
[[image:Striker-1.2.0b_Install-Manifest_Start.png|thumb|center|665px|Striker - Start creating the 'Install Manifest'.]] | |||
Click on the "<span class="code">Install Manifests</span>" file. | |||
[[image:Striker-1.2.0b_Install-Manifest_Blank-Form.png|thumb|center|665px|Striker - Install Manifest - Blank form]] | |||
Don't worry, we only need to set the fields in the top, and Striker will auto-fill the rest. | |||
== Filling Out the Top Form == | |||
There are only a few fields you have to set manually. | |||
[[image:Striker-1.2.0b_Install-Manifest_Form_Top-Section.png|thumb|center|665px|Striker - Install Manifest - Form - Top section]] | |||
{{warning|1=The password will be saved in plan-text in the install manifest out of necessity. So you might want to use a unique password.}} | |||
A few things you might want to set: | |||
* If you are building your first ''Anvil!'', and if you are following convention, you '''only''' need to set the password you want to use. | |||
* If you are building another ''Anvil!'', then increment the "<span class="code">Sequence Number</span>" (ie: use '<span class="code">2</span>' for your second ''Anvil!'', '<span class="code">8</span>' for your eighth, etc.). | |||
* If you're main network, the [[IFN]], isn't using '<span class="code">10.255.0.0/255.255.0.0</span>', then change this to reflect your network. | |||
* If your site has no Internet access, you can [[Anvil! m2 Tutorial - Create Local Repositories|create a local repository]] and then pass the path to the repository file in the '<span class="code">Repository</span>' field. | |||
[[image:Striker-1.2.0b_Install-Manifest_Form_Top-Section-Filled-Out.png|thumb|center|665px|Striker - Install Manifest - Form - Top section filled out]] | |||
For this tutorial, we will be creating our fifth internally-used ''Anvil!'', so we will set: | |||
* "<span class="code">Sequence Number</span>" to '<span class="code">5</span>' | |||
* "<span class="code">''Anvil!'' Password</span>" to '<span class="code">Initial1</span>' | |||
== Auto-Populating the rest of the Form == | |||
Everything else will be left as default values. If you want to know what the other fields are for, read the description to their right. Some also have a "<span class="code">More Info</span>" button that links to the appropriate section of the main tutorial. | |||
[[image:Striker-1.2.0b_Install-Manifest_Form_Set-Below-Values.png|thumb|center|665px|Striker - Install Manifest - Form - "Set Below Values"]] | |||
Once ready, click on '<span class="code">Set Below Values</span>' | |||
[[image:Striker-1.2.0b_Install-Manifest_Form_Fields-Set.png|thumb|center|665px|Striker - Install Manifest - Form - Fields set]] | |||
When you do this, Striker will fill out all the fields in the second section of the form. | |||
Review these values, particularly if your [[IFN]] is a '<span class="code">/24</span>' ([[netmask]] of '<span class="code">255.255.255.0</span>'). | |||
{{warning|1=It is vital that the "<span class="code">PDU X Outlet</span>" assigned to each node' [[AN!Cluster_Tutorial_2#Why_Switched_PDUs.3F|switched PDU]] correspond to the port numbers you've actually plugged the nodes into!}} | |||
== Generating the Install Manifest == | |||
[[image:Striker-1.2.0b_Install-Manifest_Generate.png|thumb|center|665px|Striker - Install Manifest - Form - Generate]] | |||
Once you're happy with the settings, and have updated any you want to tune, click on the "<span class="code">Generate</span>" button at the bottom-right. | |||
[[image:Striker-1.2.0b_Install-Manifest_Summary.png|thumb|center|665px|Striker - Install Manifest - Summary]] | |||
Striker will show you a condensed summary of the install manifest. Please review it '''carefully''' to make sure everything is right. | |||
[[image:Striker-1.2.0b_Install-Manifest_Summary-Generate.png|thumb|center|665px|Striker - Install Manifest - Form - Summary - Generate]] | |||
Once you are happy, click on "<span class="code">Generate</span>". | |||
[[image:Striker-1.2.0b_Install-Manifest_Created.png|thumb|center|665px|Striker - Install Manifest - Generated]] | |||
Done! | |||
You can now create a new manifest if you want, download the one you just created or, if you're ready, run the one you just made. | |||
= Building an Anvil! = | |||
{{Warning|1=Be sure your switched PDUs are configured! The install will fail if it tries to reach the PDUs and can not do so!}} | |||
* [[Configuring an APC AP7900]] | |||
== Installing the OS on the Nodes via Striker == | |||
If you recall, one of Striker's nice features is acting as a boot target for new ''Anvil!'' nodes. | |||
Before we can run our new install manifest, we need to have the nodes running a fresh install. So that is what we will do first. | |||
{{note|1=How you enable network booting will depend on your hardware. Please consult your vendor's document.}} | |||
* [[Configuring Hardware RAID Arrays on Fujitsu Primergy]] | |||
* [[Configuring Network Boot on Fujitsu Primergy]] | |||
=== Building a Node's OS Using Striker === | |||
{{warning|1=This process will completely erase '''ALL''' data on your server! Be certain there is nothing on the node you want to save before proceeding!}} | |||
If your network has a normal [[DHCP]] server, it will be hard to ensure that your new node gets it's IP address (and boot instructions) from Striker. | |||
{{note|1=The easiest way to deal with this is to unplug the [[IFN]] and [[SN]] links until after your node has booted.}} | |||
[[image:Fujitsu_RX300-S8_Boot-Screen.png|thumb|center|665px|Fujitsu RX300 S6 - BIOS boot screen - <span class="code"><F12> Boot Menu</span>]] | |||
Boot your node and, when prompted, press the key assigned to your server to manually select a boot device. | |||
* On most computers, including Fujitsu servers, this is the <span class="code"><F12></span> key. | |||
* On HP machines, this is the <span class="code"><F11></span> key. | |||
This will bring up a menu list of bootable devices (found and enabled in the BIOS). | |||
If you see one or more entries with "<span class="code">IBA GE Slot ####</span>" in them, those are your network cards. (<span class="code">IBA GE</span> is short for "Intel Boot Agent, Gigabit Ethernet) | |||
You will have to experiment to figure out which one is on the [[BCN]], but once you figure it out on one node, you will know the right one to use on the second node, assuming you've cabled the machines the same way (and you really should have!). | |||
[[image:Fujitsu_RX300-S8_Boot-Selection.png|thumb|center|665px|Fujitsu RX300 S6 - BIOS selection screen]] | |||
In my case, the "<span class="code">PCI BEV: IBA GE Slot 0201 v1338</span>" was the boot option of one of the interfaces on my node's BCN, so that is what I selected. | |||
Once selected, the node will send out a "[[DHCP]] reqest" (a broadcast message sent to the entire network asking if anyone will give it an IP address). | |||
The Striker machine will answer with an offer. If you want to see what this looks like, open a terminal on your Striker dashboard and run: | |||
<syntaxhighlight lang="bash"> | |||
tail -f -n 0 /var/log/messages | |||
</syntaxhighlight> | |||
When the request comes in and Striker sends on offer, you should see something like this: | |||
<syntaxhighlight lang="text"> | |||
Dec 31 19:16:30 an-striker01 dhcpd: DHCPDISCOVER from 00:1b:21:81:c3:35 via bcn-bond1 | |||
Dec 31 19:16:31 an-striker01 dhcpd: DHCPOFFER on 10.20.10.200 to 00:1b:21:81:c3:35 via bcn-bond1 | |||
Dec 31 19:16:32 an-striker01 dhcpd: DHCPREQUEST for 10.20.10.200 (10.20.4.1) from 00:1b:21:81:c3:35 via bcn-bond1 | |||
Dec 31 19:16:32 an-striker01 dhcpd: DHCPACK on 10.20.10.200 to 00:1b:21:81:c3:35 via bcn-bond1 | |||
Dec 31 19:16:32 an-striker01 xinetd[14839]: START: tftp pid=14848 from=10.20.10.200 | |||
Dec 31 19:16:32 an-striker01 in.tftpd[14849]: tftp: client does not accept options | |||
</syntaxhighlight> | |||
The '<span class="code">00:1b:21:81:c3:35</span>' string is the [[MAC]] address of the network interface you just booted from. | |||
Pretty cool, eh? | |||
Back to the node... | |||
[[image:Fujitsu_RX300-S8_PXE-Boot-Started.png|thumb|center|665px|Fujitsu RX300 S6 - PXE boot starting]] | |||
Here we see what the DHCP transaction looks like from the node's side. | |||
* See the "<span class="code">CLIENT IP: 10.20.10.200</span>"? That is the first IP in the [[#Do_we_want_to_be_an_Anvil.21_node_install_target.3F|range we selected earlier]]. | |||
* See the "<span class="code">DHCP IP: 10.20.4.1</span>"? That is the IP address of the Striker dashboard, confirming that it was the one who we're booting off of. | |||
* The "<span class="code">TFTP...</span>" shows us that the node is downloading the boot image. There is some more text after that, but it tends to fly by and it isn't as interesting, anyway. | |||
[[image:Fujitsu_RX300-S8_PXE-Boot-Main-Page.png|thumb|center|665px|Fujitsu RX300 S6 - PXE boot main page]] | |||
Shortly after, you will see the "Boot Menu". | |||
If you do nothing, after 60 seconds, the menu will close and the node will try to boot off of it's hard drive. If you press the 'down' arrow, it will stop the timer. This is used in case someone sets their node to boot off of the network card all the time, their node will still boot normally, it will just take about a minute longer. | |||
{{note|1=If you specified both RHEL and [[CentOS]] install media, you will see four options in your menu. If you installed CentOS only, then that will be show instead of RHEL.}} | |||
[[image:Fujitsu_RX300-S8_PXE-Boot-Main-RHEL-Node-Selected.png|thumb|center|665px|Fujitsu RX300 S6 - PXE boot - RHEL 6 Node selected]] | |||
We want to build a [[RHEL]] based node, so we're going to select option "<span class="code">2) Anvil! M3 node - Traditional BIOS - RHEL 6</span>". | |||
[[image:Fujitsu_RX300-S8_PXE-Boot-Install-Loading.png|thumb|center|665px|Fujitsu RX300 S6 - PXE boot - RHEL 6 install loading]] | |||
After you press <span class="code"><enter></span>, you will see a whirl of text go by. | |||
[[image:Fujitsu_RX300-S8_PXE-Boot-Install-NIC-Selection.png|thumb|center|665px|Fujitsu RX300 S6 - PXE boot - RHEL 6 NIC selection screen]] | |||
Up until now, we were working with the machine's BIOS, which lives below the software on the machine. | |||
At this stage, the operating system (or rather, it's installer) has taken over. It is separate, so it doesn't know which network card was used to get to this point. | |||
Unfortunately, that means we need to select which NIC to install from. | |||
If you watched Striker's log file, you will recall that it told us the DHCP request came in from "<span class="code">00:1b:21:81:c3:35</span>". Thanks to that, we know exactly which interface to choose; "<span class="code">eth5</span>" in my case. | |||
If you didn't watch the logs, but if you've unplugged the [[IFN]] and [[SN]] network cards, then this shouldn't be too tedious. | |||
If you don't know which port to use, start with '<span class="code">eth0</span>' and work your way up. If you select the wrong interface, it will time out and let you choose again. | |||
{{note|1=If your nodes are effectively identical, then it's likely that the '<span class="code">ethX</span>' device you end up using on the first node will be the same on the second node, but that is not a guarantee.}} | |||
[[image:Fujitsu_RX300-S8_PXE-Boot-Install-Configuring-eth0.png|thumb|center|665px|Fujitsu RX300 S6 - PXE boot - RHEL 6 - Configuring <span class="code">eth0</span>]] | |||
No matter which interface you select, the OS will try to configure '<span class="code">eth0</span>'. This is normal. Odd, but normal. | |||
[[image:Fujitsu_RX300-S8_Install_Retrieving-install-image.png|thumb|center|665px|Fujitsu RX300 S6 - Downloading install image]] | |||
Once you get the right interface, the system will download the "install image". This of it like a specialized small live CD; It gets your system running well enough to install the actual operating system. | |||
[[image:Fujitsu_RX300-S8_Install_Formatting-HDD.png|thumb|center|665px|Fujitsu RX300 S6 - Formatting hard drive]] | |||
Next, the installer will partition and format the hard drive. If you created a hardware [[RAID]] array, it will look like just one big hard drive to the OS. | |||
[[image:Fujitsu_RX300-S8_Install_Underway.png|thumb|center|665px|Fujitsu RX300 S6 - Install underway]] | |||
Once the format is done, the install of the OS itself will start. | |||
If you have fast servers, this step won't take very long at all. If you have more modest servers, it might take a little while. | |||
[[image:Fujitsu_RX300-S8_Install_Complete.png|thumb|center|665px|Fujitsu RX300 S6 - Install complete!]] | |||
Finally, the install will finish. | |||
It will wait until you tell it to reboot. | |||
{{note|1=ToDo: Show the user how to disable the dashboard's DHCP server.}} | |||
'''Before you do!''' | |||
Remember to plug your network cables back in if you unplugged them earlier. Once they're in, click on '<span class="code">reboot</span>'. | |||
=== Looking Up the New Node's IP Address === | |||
[[image:Striker-v1.2.0b_Node-Install_First-Boot.png|thumb|center|665px|Node Install - First boot]] | |||
== | The default user name is '<span class="code">root</span>' and the default password is '<span class="code">Initial1</span>'. | ||
[[ | [[image:Striker-v1.2.0b_Node-Install_First-Login.png|thumb|center|665px|Node Install - First login]] | ||
Excellent! | |||
In order for Striker to be able to use the new node, we have to tell it where to find it. To do this, we need to know the node's IP address. | |||
We can look at the IP addresses already assigned to the node using the command: | |||
<syntaxhighlight lang="bash"> | |||
ifconfig | |||
</syntaxhighlight> | |||
<syntaxhighlight lang="text"> | <syntaxhighlight lang="text"> | ||
eth0 Link encap:Ethernet HWaddr A0:36:9F:02:E0:04 | |||
inet6 addr: fe80::a236:9fff:fe02:e004/64 Scope:Link | |||
UP BROADCAST RUNNING MULTICAST MTU:1500 Metric:1 | |||
RX packets:0 errors:0 dropped:0 overruns:0 frame:0 | |||
TX packets:12 errors:0 dropped:0 overruns:0 carrier:0 | |||
collisions:0 txqueuelen:1000 | |||
RX bytes:0 (0.0 b) TX bytes:2520 (2.4 KiB) | |||
Memory:ce400000-ce4fffff | |||
lo Link encap:Local Loopback | |||
inet addr:127.0.0.1 Mask:255.0.0.0 | |||
inet6 addr: ::1/128 Scope:Host | |||
UP LOOPBACK RUNNING MTU:65536 Metric:1 | |||
RX packets:0 errors:0 dropped:0 overruns:0 frame:0 | |||
TX packets:0 errors:0 dropped:0 overruns:0 carrier:0 | |||
collisions:0 txqueuelen:0 | |||
RX bytes:0 (0.0 b) TX bytes:0 (0.0 b) | |||
</syntaxhighlight> | |||
{{note|1=If the text scrolls off your screen, press '<span class="code">ctrl</span> + <span class="code">PgUp</span>' to scroll up one "page" at a time.}} | |||
Depending on how your network is setup, your new node may have not booted with an IP address, as is the case above (note that there is no IP address beside '<span class="code">eth0</span>'). | |||
This is because RHEL6, by default, doesn't enable network interfaces that weren't using during the install. | |||
Thankfully, this is usually easy to fix. | |||
On most servers, the six network cards will be named '<span class="code">eth0</span>' through '<span class="code">eth5</span>', as we saw during the install. | |||
| | |||
You can try this command to see if you get an IP address: | |||
<syntaxhighlight lang="bash"> | |||
ifup eth1 | |||
</syntaxhighlight> | </syntaxhighlight> | ||
<syntaxhighlight lang="text"> | |||
Determining IP information for eth1... done. | |||
</syntaxhighlight> | |||
This looks good! Lets take a look at what we got: | |||
<syntaxhighlight lang="bash"> | |||
ifconfig eth1 | |||
</syntaxhighlight> | |||
<syntaxhighlight lang="text"> | |||
eth1 Link encap:Ethernet HWaddr A0:36:9F:02:E0:05 | |||
inet addr:10.255.1.24 Bcast:10.255.255.255 Mask:255.255.0.0 | |||
inet6 addr: fe80::a236:9fff:fe02:e005/64 Scope:Link | |||
UP BROADCAST RUNNING MULTICAST MTU:1500 Metric:1 | |||
RX packets:435 errors:0 dropped:0 overruns:0 frame:0 | |||
TX packets:91 errors:0 dropped:0 overruns:0 carrier:0 | |||
collisions:0 txqueuelen:1000 | |||
RX bytes:33960 (33.1 KiB) TX bytes:13947 (13.6 KiB) | |||
Memory:ce500000-ce5fffff | |||
</syntaxhighlight> | |||
See the part that says '<span class="code">inet addr:10.255.1.24</span>'? That is telling us that this new node has the IP address '<span class="code">10.255.1.24</span>'. | |||
That's all we need! | |||
Jot this down and lets go back to the Striker installer. | |||
== Running the Install Manifest == | |||
{{note|1=Did you remember to install the OS on both nodes? If not, repeat the steps above for the second node.}} | |||
[[image:Striker-1.2.0b_Install-Manifest_Run.png|thumb|center|665px|Striker - Install Manifest - Run]] | |||
When you're ready, click on "<span class="code">Run</span>". | |||
[[image:Striker-1.2.0b_Install-Manifest_Current-IPs.png|thumb|center|665px|Striker - Install Manifest - Summary and current nodes' IPs and passwords]] | |||
A summary of the install manifest will be show, please review it carefully and be sure you are about to run the correct one. | |||
[[#Looking Up the New Node's IP Address|If you recall]], we noted the IP address each new node got after it's operating system was installed. This is where you enter each machine's current IP address and '''current''' password, which is usually "<span class="code">Initial1</span>" when installed via Striker. | |||
When ready, click on '<span class="code">Begin Install</span>'! | |||
=== Initial hardware scan === | |||
{{note|1=This section will be a little long, mainly due to screen shots and explaining what is happening. Baring trouble though, once the network remap is done, everything else is automated. So long as the install finishes successfully, there is no need to read all this outside of curiosity.}} | |||
Before the install starts, Striker looks to see if there is enough storage to meet the requested space and to see if the network needs to be mapped. | |||
A remap is needed if the install manifest doesn't recognize the physical network interfaces and if the network wasn't previously configured. | |||
In this tutorial, the nodes are totally new so both will be remapped. | |||
[[image:Striker-1.2.0b_Hardware-scan_01.png|thumb|center|665px|Striker - v1.2.0b - Initial sanity checks and network remap started]] | |||
The steps explained; | |||
{|class="wikitable" | |||
|- | |||
|style="color: #13749a; font-weight: bold;"|Testing access to nodes | |||
|This is a simple test to ensure that Striker can log into the two nodes. If this fails, check the IP address and password | |||
|- | |||
|style="color: #13749a; font-weight: bold;"|Checking OS version | |||
|The ''Anvil!'' is supported on [[Red Hat Enterprise Linux]] and [[CentOS]] version 6 or newer. This check ensures that one these versions is in use.<br />{{note|1=If the y-stream ("<span class="code">6.x</span>") sub-version is not "<span class="code">6</span>", a warning will me issued but the install will proceed.}} | |||
|- | |||
|style="color: #13749a; font-weight: bold;"|Checking Internet access | |||
|A check is made to ping the open DNS server at IP address '<span class="code">8.8.8.8</span>' as a test of Internet access. If no access is found, the installer will warn you but it will try to proceed.<br />{{note|1=This steps checks for network routes that might conflict with the default route and will temporarily delete any found from the active routing table.}}{{note|1=If you don't have Internet access and if the install fails, be sure to [[Anvil! m2 Tutorial - Create Local Repositories|setup a local repository]] and specify it in the Install Manifest.}} | |||
|- | |||
|style="color: #13749a; font-weight: bold;"|Checking for execution environment | |||
|The Striker installer copies a couple of small programs written in the "<span class="code">[[perl]]</span>" programming language to assist with the configuration of the nodes. This check ensures that <span class="code">perl</span> has been installed and, if not, attempts to install it. | |||
|- | |||
|style="color: #13749a; font-weight: bold;"|Checking storage | |||
|This step is one of the more important ones. It examines the existing partitions and/or available free hard space, compares it against the requested storage pool and media library size and tries to determine if the install can proceed safely.<br /><br />If it can, it tells you how the storage will be divided up (if at all). This is where you can confirm that the to-be-created storage pools are, in fact, what you want. | |||
|- | |||
|style="color: #13749a; font-weight: bold;"|Current Network | |||
|Here, Striker checks to see if the network has already been configured or not. If not, it checks to see if it recognizes the interfaces already. In this tutorial, it doesn't so it determines that the network on both nodes needs to be "remapped". That is, it needs to determine which physical interface (by [[MAC]] address) will be used for which role. | |||
|} | |||
=== Remapping the network === | |||
{{note|1=If you can not monitor the screen and unplug the network at the same time, the remap order will be: | |||
# [[Back-Channel Network]] - Link 1 | |||
# [[Back-Channel Network]] - Link 2 | |||
# [[Storage Network]] - Link 1 | |||
# [[Storage Network]] - Link 2 | |||
# [[Internet-Facing Network]] - Link 1 | |||
# [[Internet-Facing Network]] - Link 2 | |||
You can do all these in sequence without watching the screen. Please allow five seconds per step. That is, unplug the cable, '''count to 5''', plug the cable in, '''count to 5''', unplug the next cable. | |||
If you get any cables wrong, don't worry. | |||
Just proceed by unplugging the rest until all have been unplugged at least once. You will get a chance to re-run the mapping if you don't get it right the first time.}} | |||
In order for Striker to map the network, it needs to first make sure all interfaces have been started. It does this by configuring each inactive interface to have no address and then "brings them up" so that the operating system will be able to monitor their state. | |||
Next, Striker asks you to physically unplug, wait a few seconds and then plug back in each network interface. | |||
As you do this, Striker sees the OS report a given interface losing and then restoring it's network link. It knows which MAC address is assigned to each device, and thus can map out how to reconfigure the network. | |||
It might feel a little tedious, but this is the last step you need to do manually. | |||
{{note|1=All six network interfaces must be plugged into a switch for this stage to complete. The installer will prompt you and then wait if this is not the case.}} | |||
==== Mapping Node 1 - "Back-Channel Network - Link 1" ==== | |||
[[image:Striker-1.2.0b_Network-Remap_Node-1_BCN-Link1.png|thumb|center|665px|Striker - Network Remap - Node 1 - BCN Link 1 prompt]] | |||
The first interface to map is the "[[Back-Channel Network]] - Link 1". This is the primary [[BCN]] link. | |||
Please unplug it, '''count to 5''' and then plug it back in. | |||
==== Mapping Node 1 - "Back-Channel Network - Link 2" ==== | |||
[[image:Striker-1.2.0b_Network-Remap_Node-1_BCN-Link2.png|thumb|center|665px|Striker - Network Remap - Node 1 - BCN Link 2 prompt]] | |||
Notice that it now shows the [[MAC]] address and current device name for BCN Link 1? Nice! | |||
The next interface to map is the "[[Back-Channel Network]] - Link 2". This is the backup [[BCN]] link. | |||
Please unplug it, '''count to 5''' and then plug it back in. | |||
==== Mapping Node 1 - "Storage Network - Link 1" ==== | |||
[[image:Striker-1.2.0b_Network-Remap_Node-1_SN-Link1.png|thumb|center|665px|Striker - Network Remap - Node 1 - SN Link 1 prompt]] | |||
Next up is the "[[Storage Network]] - Link 1". This is the primary [[SN]] link. | |||
Please unplug it, '''count to 5''' and then plug it back in. | |||
==== Mapping Node 1 - "Storage Network - Link 2" ==== | |||
[[image:Striker-1.2.0b_Network-Remap_Node-1_SN-Link2.png|thumb|center|665px|Striker - Network Remap - Node 1 - SN Link 2 prompt]] | |||
Next is the "[[Storage Network]] - Link 2". This is the backup [[SN]] link. | |||
Please unplug it, '''count to 5''' and then plug it back in. | |||
==== Mapping Node 1 - "Internet-Facing Network - Link 1" ==== | |||
[[image:Striker-1.2.0b_Network-Remap_Node-1_IFN-Link1.png|thumb|center|665px|Striker - Network Remap - Node 1 - IFN Link 1 prompt]] | |||
Now we're onto the last network pair with the "[[Internet-Facing Network]] - Link 1". This is the primary [[IFN]] link. | |||
Please unplug it, '''count to 5''' and then plug it back in. | |||
==== Mapping Node 1 - "Internet-Facing Network - Link 2" ==== | |||
[[image:Striker-1.2.0b_Network-Remap_Node-1_IFN-Link2.png|thumb|center|665px|Striker - Network Remap - Node 1 - IFN Link 2 prompt]] | |||
Last for this node is the "[[Internet-Facing Network]] - Link 2". This is the secondary [[IFN]] link. | |||
Please unplug it, '''count to 5''' and then plug it back in. | |||
=== Mapping Node 1 - Done! === | |||
[[image:Striker-1.2.0b_Network-Remap_Node-1_Complete.png|thumb|center|665px|Striker - Network Remap - Node 1 - Complete]] | |||
This ends the remap of the first node. | |||
==== Mapping Node 2 - "Back-Channel Network - Link 1" ==== | |||
[[image:Striker-1.2.0b_Network-Remap_Node-2_BCN-Link1.png|thumb|center|665px|Striker - Network Remap - Node 2 - BCN Link 1 prompt]] | |||
Now we're on to the second node! | |||
The prompts are going to be in the same order as it was for node 1. | |||
The first interface to map is the "[[Back-Channel Network]] - Link 1". This is the primary [[BCN]] link. | |||
Please unplug it, '''count to 5''' and then plug it back in. | |||
==== Mapping Node 2 - "Back-Channel Network - Link 2" ==== | |||
[[image:Striker-1.2.0b_Network-Remap_Node-2_BCN-Link2.png|thumb|center|665px|Striker - Network Remap - Node 2 - BCN Link 2 prompt]] | |||
Notice that it now shows the [[MAC]] address and current device name for BCN Link 1? Nice! | |||
The next interface to map is the "[[Back-Channel Network]] - Link 2". This is the backup [[BCN]] link. | |||
Please unplug it, '''count to 5''' and then plug it back in. | |||
==== Mapping Node 2 - "Storage Network - Link 1" ==== | |||
[[image:Striker-1.2.0b_Network-Remap_Node-2_SN-Link1.png|thumb|center|665px|Striker - Network Remap - Node 2 - SN Link 1 prompt]] | |||
Next up is the "[[Storage Network]] - Link 1". This is the primary [[SN]] link. | |||
Please unplug it, '''count to 5''' and then plug it back in. | |||
==== Mapping Node 2 - "Storage Network - Link 2" ==== | |||
[[image:Striker-1.2.0b_Network-Remap_Node-2_SN-Link2.png|thumb|center|665px|Striker - Network Remap - Node 2 - SN Link 2 prompt]] | |||
Next is the "[[Storage Network]] - Link 2". This is the backup [[SN]] link. | |||
Please unplug it, '''count to 5''' and then plug it back in. | |||
==== Mapping Node 2 - "Internet-Facing Network - Link 1" ==== | |||
[[image:Striker-1.2.0b_Network-Remap_Node-2_IFN-Link1.png|thumb|center|665px|Striker - Network Remap - Node 2 - IFN Link 1 prompt]] | |||
Now we're onto the last network pair with the "[[Internet-Facing Network]] - Link 1". This is the primary [[IFN]] link. | |||
Please unplug it, '''count to 5''' and then plug it back in. | |||
==== Mapping Node 2 - "Internet-Facing Network - Link 2" ==== | |||
[[image:Striker-1.2.0b_Network-Remap_Node-2_IFN-Link2.png|thumb|center|665px|Striker - Network Remap - Node 2 - IFN Link 2 prompt]] | |||
Last for this node is the "[[Internet-Facing Network]] - Link 2". This is the secondary [[IFN]] link. | |||
Please unplug it, '''count to 5''' and then plug it back in. | |||
==== Mapping Node 2 - Done! ==== | |||
[[image:Striker-1.2.0b_Network-Remap_Node-2_Complete.png|thumb|center|665px|Striker - Network Remap - Node 2 - Complete]] | |||
This ends the remap of the first node. | |||
== | === Final review === | ||
[[image:Striker-1.2.0b_Install-Summary-and-Review-Menu.png|thumb|center|665px|Striker - Install summary and review]] | |||
Now that Striker has had a chance to review the hardware it can tell you '''exactly''' how it will build your ''Anvil!''. | |||
The main two points to review are the storage layout and the networking. | |||
==== Optional; Registering with RHN ==== | |||
{{warning|1=If you skip RHN registration and if you haven't defined a local repository with the needed packages, the install will almost certainly fail! | |||
Each node will consume a "Base" and "Resilient Storage" entitlement as well as use the "Optional" package group. If you do not have sufficient entitlements, the install will likely fail as well.}} | |||
{{note|1=[[CentOS]] users can ignore this section.}} | |||
If Striker detected that you are running [[RHEL]] proper, and if it detected that the nodes haven't been registered with Red Hat yet, it will provide an opportunity to register the nodes as part of the install process. | |||
The | The user name and password are passed to the nodes only (via [[SSH]]) and registration works via the '<span class="code">rhn_register</span>' tool. | ||
=== | ==== If you are unhappy with the planned storage layout ==== | ||
If the storage is not going to be allocated the way you like, you will need to modify the Install Manifest itself. | |||
To do this, click on the '<span class="code">Modify Manifest</span>' button at the bottom-left. | |||
'' | This will take you back to the same page that you used to create the original manifest. Adjust the storage and then generate a new manifest. After being created, locate it at the top of the page and press '<span class="code">Run</span>'. The new run should show you your newly configured storage. | ||
==== If you are unhappy with the planned network mapping ==== | |||
If you mixed up the cables when you were reseating them during the mapping stage, simply click on the '<span class="code">Remap Network</span>' button at the bottom-center of the page. | |||
The portion of the install that just ran will start over. | |||
=== Running the install! === | |||
'' | If you are happy with the plan, press the '<span class="code">Install</span>' button at the bottom-right. | ||
There is now nothing more for you to do, so long as nothing fails. '''If''' something fails, correct the error and then re-run the install. Striker tries to be smart enough to figure out what part of the install was already completely and pick up where it left off on subsequent runs. | |||
=== Understanding the output === | |||
{{warning|1=The install process can '''take a long time''' to run, please don't interrupt it! | |||
== | On my test system (pair of older Fujitsu RX300 S6 nodes) and a fast internet connection, the "<span style="color: #13749a; font-weight: bold;">Installing Programs</span>" stage alone took over ten minutes to complete and appear on the screen. The "<span style="color: #13749a; font-weight: bold;">Updating OS</span>" stage took another five minutes. The entire process taking up to a half-hour to complete. | ||
Please be patient and let the program run.}} | |||
[[image:Striker-1.2.0b_Install-Complete.png|thumb|center|665px|Striker - Install completed successfully!]] | |||
The sanity check runs one more time just the be sure nothing changed. Once done, the install starts. | |||
Below is a table that explains what is happening at each stage: | |||
{|class="wikitable" | |||
|- | |||
|style="color: #13749a; font-weight: bold;"|Backing up original files | |||
|No program is perfect, so Striker makes backups of all files it might change under '<span class="code">/root/</span>'. If Striker sees that backups already exist, it '''does not''' copy them again, to help ensure re-runs don't clobber original backups. | |||
|- | |||
|style="color: #13749a; font-weight: bold;"|OS Registration | |||
|If you are running [[RHEL]] and the nodes were not registered with RHN, and if you provided RHN credentials, this is where they will be registered. This process can take a couple of minutes to complete, depending on the speen of your network and the load on the RHN servers. | |||
|- | |||
|style="color: #13749a; font-weight: bold;"|Network configuration | |||
|Here, the existing network configuration files are removed and new ones are written, if needed, based on the mapping done earlier. When this completes, you will have six interfaces bound into three fault-tolerant bonds with the [[IFN]] bond being connected to the node's '<span class="code"></span>ifn-bridge1<span class="code"></span>' virtual bridge. | |||
{{note|1=The network changes '''are not''' activated at this stage! If the network was changed, the node will be queued up to reboot later.}} | |||
|- | |||
|style="color: #13749a; font-weight: bold;"|Repo: '<span class="code">X</span>' | |||
|The <span class="code">[https://alteeve.ca/repo/el6/ an.repo]</span> repository, plus any you defined earlier, are added to the nodes and activated at this stage. | |||
|- | |||
|style="color: #13749a; font-weight: bold;"|Installing programs | |||
|{{note|1=This is usually the longest stage of the install, please be patient.}} | |||
At this stage, all additional software that is needed for the ''Anvil!'' nodes to work is installed. This requires a pretty large download which, depending on the speed of your Internet connection, could take a very long time to complete. Using a [[Anvil! m2 Tutorial - Create Local Repositories|local repository]] can greatly speed this stage up. | |||
|- | |||
|style="color: #13749a; font-weight: bold;"|Updating OS | |||
|{{note|1=This is usually the second longest stage of the install, please still be patient.}} | |||
At this stage, all of the pre-installed programs on the nodes are updated. This requires downloading more packages from the Internet, so it can be slow depending on the speed of your connection. Again, using a local repository can dramatically speed up this stage. | |||
|- | |||
|style="color: #13749a; font-weight: bold;"|Configuring daemons | |||
|At this stage, all installed [[daemons]] are configured so that they start or don't start when the node boots. | |||
|- | |||
|style="color: #13749a; font-weight: bold;"|Updating cluster password | |||
|The cluster uses it's own password, which in turn Striker uses to create and remove servers from the ''Anvil!''. That password is set here. | |||
|- | |||
|style="color: #13749a; font-weight: bold;"|Configuring cluster | |||
|Here, the core configuration file for the cluster stack is created and written out. | |||
|- | |||
|style="color: #13749a; font-weight: bold;"|Configuring cluster LVM | |||
|By default, [[LVM]] is not cluster-aware. At this stage, we reconfigure it so that it becomes cluster aware. | |||
|- | |||
|style="color: #13749a; font-weight: bold;"|Configure IPMI | |||
|Our primary [[AN!Cluster_Tutorial_2#Concept.3B_Fencing|fence method]] is to use the [[IPMI]] baseboard in each node. At this stage, their IPs are assigned and their password is set. | |||
|- | |||
|style="color: #13749a; font-weight: bold;"|Partitioning Pool 1 | |||
|If needed, the first partition is created on each node for storing the "Media Library" data and for the servers that will eventually run on the first node. | |||
If a partition is created, the node will be scheduled for reboot. | |||
|- | |||
|style="color: #13749a; font-weight: bold;"|Partitioning Pool 2 | |||
|Again if needed, the second partition is created on each node for storing the servers that will run on node 2. | |||
If a partition is created, the node will be scheduled for reboot. | |||
|- | |||
|style="color: #13749a; font-weight: bold;"|Rebooting | |||
|If either or both node needs to be rebooted for changed to take effected, that will happen at this stage. | |||
{{note|1=Striker reboots node 1 first, then node 2. Should node 1 fail to come back up, the installer will abort immediately. This way, hopefully, you can use node 2 to try and diagnose the problem with node 2 instead of risking both nodes being left inaccessible.}} | |||
|- | |||
|style="color: #13749a; font-weight: bold;"|Pool 1 Meta-data | |||
|After the reboot, the first partition will be configured for use in the ''Anvil!'''s replicated storage subsystem, called [[DRBD]]. This step configures the storage for pool 1, if needed. | |||
|- | |||
|style="color: #13749a; font-weight: bold;"|Pool 2 Meta-data | |||
|This stage handles configuring the storage for pool 2, if needed. | |||
|- | |||
|style="color: #13749a; font-weight: bold;"|Cluster membership first start | |||
|At this stage, communication between the nodes on the [[BCN]] is verified. If access is good, the cluster stack's communication and fencing layer will start for the first time. Once started, fencing mechanisms are tested. | |||
{{note|1=If either fence method fails, the install will abort. It is not safe to proceed until fencing works, so please address any issues that arise at this stage before trying to re-run the installer!}} | |||
|- | |||
|style="color: #13749a; font-weight: bold;"|Configuring <span class="code">root</span>'s SSH | |||
|Each node needs to record the other's [[SSH]] "fingerprint" in order for [[live-migration]] of the servers to work. This is ensured at this stage. | |||
|- | |||
|style="color: #13749a; font-weight: bold;"|DRBD first start | |||
|When both nodes are new, the replicated storage will need to be initialized in order for it to work. This is handled here. If there was existing data, then the replication is simply started. | |||
|- | |||
|style="color: #13749a; font-weight: bold;"|Start clustered LVM | |||
|The replicated storage is raw and needs to be managed. The ''Anvil!'' uses clustered [[LVM]] for this. Here we start the [[daemon]] the provides this capability. | |||
{{note|1=After this stage, the storage acts as one on both nodes, so the following storage configuration happens on one node only.}} | |||
|- | |||
|style="color: #13749a; font-weight: bold;"|Create Physical Volumes | |||
|Here, each replicated storage device that backs our two storage pools is configured for use by clustered LVM as a "Physical Volume" ([[PV]]). | |||
|- | |||
|style="color: #13749a; font-weight: bold;"|Create Volume Groups | |||
|This is the second stage of the [[LVM]] configuration. Here, the PVs are assigned to a "Volume Group" ([[VG]]). | |||
|- | |||
|style="color: #13749a; font-weight: bold;"|Create the LV for cluster FS | |||
|The ''Anvil!'' uses a small amount of space, 40 [[GiB]] by default, for storing server definition files, provision scripts and install media (DVD images). This step carves a small "Logical Volume" ([[LV]]) out of the first storage pool's [[VG]]. | |||
|- | |||
|style="color: #13749a; font-weight: bold;"|Create Clustered Filesystem | |||
|The [[LV]] from the previous step is, basically, raw storage. This step formats it with the [[GFS2]] filesystem which allows for the data on it to be accessed by both nodes at the same time. | |||
|- | |||
|style="color: #13749a; font-weight: bold;"|Configure FS Table | |||
(mislabelled in the screen shot) | |||
|If the cluster filesystem was created, the information about this new filesystem is added the each node's central file system table. | |||
|- | |||
|style="color: #13749a; font-weight: bold;"|Starting the storage service | |||
|With the storage now configured and running, it is now placed under the cluster's management and control. | |||
|- | |||
|style="color: #13749a; font-weight: bold;"|Starting the hypervisor | |||
|This enables virtualization layer needed for the ''Anvil!'' to host servers. | |||
|- | |||
|style="color: #13749a; font-weight: bold;"|Updating system password | |||
|This is the last stage of the install! Here, the '<span class="code">root</span>' password on each node is changed to match that defined in the install manifest. | |||
|} | |||
Done! | |||
Your ''Anvil!'' is now ready to be added to Striker. | |||
{{footer}} | {{footer}} | ||
Latest revision as of 19:13, 11 November 2015
| Warning: This tutorial is NOT complete! It is being written using Striker version 1.2.0 β. Things may change between now and final release. |
How to build an Anvil! from scratch in under a day!
I hear you now; "Oh no, another book!"
Well don't despair. If this tutorial is a "book", it's a picture book.
You should be able to finish the entire build in a day or so.
If you're familiar with RHEL/Linux, then you might well be able to finish by lunch!
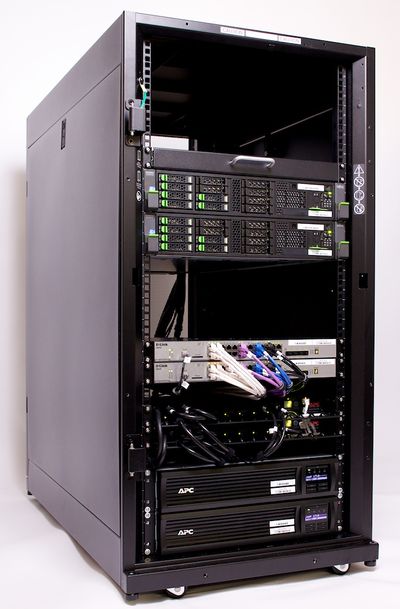
What is an 'Anvil!', Anyway?
Simply put;
- The Anvil! is a high-availability cluster platform for hosting virtual machines.
Slightly less simply put;
- The Anvil! is;
- Exceptionally easy to build and operate.
- A pair of "nodes" that work as one to host one or more highly-available (virtual) servers in a manner transparent to the servers.
- Hosted servers can live-migrate between nodes, allowing business-hours maintenance of all systems without downtime.
- Existing expertise and work-flow are almost 100% maintained requiring almost no training for staff and users.
- A "Foundation Pack" of fault-tolerant network switches, switched PDUs and UPSes. Each Foundation pack can support one or more "Compute Pack" node pairs.
- A pair of "Striker" dashboard management and support systems which provide very simple, web-based management on the Anvil! and it's hosted servers.
- A "Scan Core" monitoring and alert system tightly couple to all software and hardware systems that provides fault detection, predictive failure analysis, and environmental monitoring with an early-warning system.
- Optionally, "Scan Core" can automatically, gracefully shut down an Anvil! and it's hosted servers in low-battery and over-temperature events as well as automatically recovery when safe to do so.
- Optional commercial supported with 24x7x365 monitoring, installation, management and customization services.
- 100% open source (GPL v2+ license) with HA systems built to be compliant with Red Hat support.
- No vendor lock-in.
- Entirely COTS equipment, entirely open platform. You are always free to shift vendors at any time.
Pretty darn impressive, really.
What This Tutorial Is
This is meant to be a quick to follow project.
It assumes no prior experience with Linux, High Availability clustering or virtual servers.
It does require a basic understanding of things like networking, but as few assumptions as possible are made about prior knowledge.
What This Tutorial Is Not
Unlike the main tutorial, this tutorial is not meant to give the reader an in-depth understanding of High Availability concepts.
Likewise, it will not go into depth on why the Anvil! is designed the way it is.
It will not go into a discussion of how and why you should choose hardware for this project, either.
All this said, this tutorial will try to provide links to the appropriate sections in the main tutorial as needed. So if there is a point where you feel lost, please take a break and follow those thinks.
What is Needed?
| Note: We are an unabashed Fujitsu, Brocade and APC reseller. No vendor is perfect, of course, but we've selected these companies for their high quality build standards and excellent post-sales support. You are, of course, perfectly able to substitute in any hardware you like, just so long as it meets the system requirements listed. |
Some system requirements;
(All equipment must support RHEL version 6)
A machine for Striker
A server? An appliance!
The Striker dashboard runs like your home router; It has a web-interface that allows you to create, manage and access new highly-available servers, manage nodes and monitor foundation pack hardware.
 |
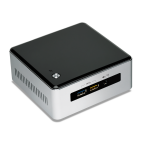 |
The Striker dashboard has very low performance requirements. If you build two dashboards, then no redundancy in the dashboard itself is required as each will provide backup for the other.
We have used;
- Small but powerful machines like the Intel Core i5 NUC NUC5i5RYH with a simple Siig JU-NE0211-S1 USB 3.0 to gigabit ethernet adapter.
- On the other end of the scale, we've used fully redundant Fujitsu Primergy RX 1330 M1 servers with four network interfaces. The decision here will be principally guided by your budget.
If you use a pair on non-redundant "appliance" machines, be sure to stager each of them across the two power power rails and network switches.
A Pair of Anvil! Nodes
The more fault-tolerant, the better!
The Anvil! Nodes host power your highly-available servers, but the servers themselves are totally decoupled from the hardware. You can move your servers back and forth between these nodes without any interruption. If a node catastrophically fails without warning, the survivor will reboot your servers within seconds ensuring the most minimal service interruptions (typical recovery time from node crash to server being at the login prompt is 30 to 90 seconds).
 |
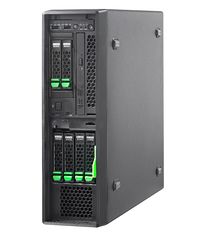 |
The requirements are two servers with the following;
- A CPU with hardware-accelerated virtualization
- Redundant power supplies
- IPMI or vendor-specific out-of-band management, like Fujitsu's iRMC, HP's iLO, Dell's iDRAC, etc
- Six network interfaces, 1 Gbit or faster (yes, six!)
- 4 GiB of RAM and 44.5 GiB of storage for the host operating system, plus sufficient RAM and storage for your servers
Beyond these requirements, the rest is up to you; your performance requirements, your budget and your desire for as much fault-tolerance as possible.
| Note: If you have a bit of time, you should really read the section discussing hardware considerations from the main tutorial before purchasing hardware for this project. It is very much not a case of "buy the most expensive and you're good". |
Foundation Pack
The foundation pack is the bedrock that the Anvil! node pairs sit on top of.
The foundation pack provides two independent power "rails" and each Anvil! node has two power supplies. When you plug in each node across the two rails, you get full fault tolerance.
If you have redundant power supplies on your switches and/or Striker dashboards, they can span the rails too. If they have only one power supply, then you're still OK. You plug the first switch and dashboard into the first power rail, the second switch and dashboard into the second rail and you're covered! Of course, be sure you plug the first dashboard's network connections into the same switch!
| UPSes | |
|---|---|
 |
 |
| Switched PDUs | |
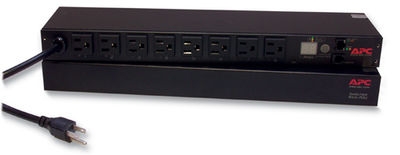 |
 |
| Network Switches | |
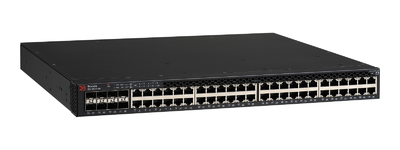 |
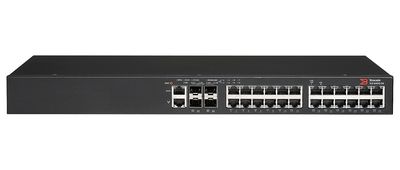 |
It is easy, and actually critical, that the hardware you select be fault-tolerant. The trickiest part is ensuring your switches can fail back and forth without interrupting traffic, a concept called "hitless fail-over". The power is, by comparison, much easier to deal with.
You will need;
- Two UPSes (Uninterruptable Power Supplies) with enough battery capacity to run your entire Anvil! for your minimum no-power hold up time.
- Two switched PDUs (Power Distribution Units) (basically network-controller power bars)
- Two network switches with hitless fail-over support, if stacked. Redundant power supplies are recommended.
What is the Build Process?
The core of the Anvil!'s support and management is the Striker dashboard. It will become the platform off of which nodes and other dashboards are built from.
So the build process consists of:
Setup the Striker Dashboard
If you're not familiar with installing Linux, please don't worry. It is quite easy and we'll walk through each step carefully.
We will:
- Do a minimal install off of a standard RHEL 6 install disk.
- Grab the Striker install script and run it.
- Load up the Striker Web Interface.
That's it, we're web-based from there on.
Preparing the Anvil! Nodes
It's rather difficult to fully automate the node install process, but Striker does automate the vast majority of it.
It simplifies the few manual parts by automatically becoming a simple menu-driven target for operating system installs.
The main goal of this stage is to get an operating system onto the nodes so that the web-based installer can take over.
- Boot off the network
- Select the "Anvil! Node" install option
- Select the network card to install from, wait for the install to finish
- Find and note the node's IP address.
- Repeat for the second node.
We can proceed from here using the web interface.
Some mini tutorials that might be helpful:
- Configuring Network Boot on Fujitsu Primergy
- Configuring Hardware RAID Arrays on Fujitsu Primergy
- Encrypted Arrays with LSI SafeStore (Also covers 'anvil-self-destruct')
Configure the Foundation Pack Backup Fencing
| Note: Every vendor has their own way of configuring their hardware. We we describe the setup for the APC-brand switched PDUs. |
We need to ensure that the switched PDUs are ready for use as fence devices before we configure an Anvil!.
Thankfully, this is pretty easy.
- Configuring an APC AP7900
- Configuring Brocade Switches
- Configuring APC SmartUPS with AP9630 Network Cards
Create an "Install Manifest"
An "Install Manifest" is a simple file you can create using Striker.
You just enter a few things like the name and sequence number of the new Anvil! and the password to use. It will recommend all the other settings needed, which you can tweak if you want.
Once the manifest is created, you can load it, specify the new nodes' IP addresses and let it run. When it finishes, your Anvil! will be ready!
Adding Your New Anvil! to Striker
The last step will be to add your shiny new Anvil! to your Striker system.
Basic Use of Striker
It's all well and good that you have an Anvil!, but it doesn't mean much unless you can use it. So we will finish this tutorial by covering a few basic tasks;
- Create a new server
- Migrate a server between nodes.
- Modify an existing server
We'll also cover the nodes;
- Powering nodes off and on (for upgrades, repairs or maintenance)
- Cold-stop your Anvil! (before an extended power outage, as an example)
- Cold-start your Anvil! (after power is restored, continuing the example)
The full Striker instructions can be found on the Striker page.
Building a Striker Dashboard
We recommend Red Hat Enterprise Linux (RHEL), but you can also use the free, binary-compatible rebuild called CentOS. Collectively these (and other RHEL-based operating systems) are often call "EL" (for "Enterprise Linux"). We will be using release version 6, which is abbreviated to simple EL6.
Installing the Operating System
If you are familiar with installing RHEL or CentOS, please do a normal "Desktop" or "Minimal" install. If you install 'Minimal', please install the 'perl' package as well.
If you are not familiar with Linux in general, or RHEL/CentOS in particular, don't worry.
Here is a complete walk-through of the process:
Download the Striker Installer
The Striker installer is a small "command line" program that you download and run.
We need to download it from the Internet. You can download it in your browser by clicking here, if you like.
To do that, run this command:
wget -c https://raw.githubusercontent.com/digimer/striker/master/tools/striker-installer
--2014-12-29 17:10:48--  https://raw.githubusercontent.com/digimer/striker/master/tools/striker-installer
Resolving raw.githubusercontent.com... 23.235.44.133
Connecting to raw.githubusercontent.com|23.235.44.133|:443... connected.
HTTP request sent, awaiting response... 200 OK
Length: 154973 (151K) [text/plain]
Saving to: “striker-installer”

100%[======================================>] 154,973      442K/s   in 0.3s

2014-12-29 17:10:48 (442 KB/s) - “striker-installer” saved [154973/154973]
To tell Linux that a file is actually a program, we have to set it's "mode" to be "executable". To do this, run this command:
chmod a+x striker-installer
There is no output from that command, so lets verify that it worked with the 'ls' too.
ls -lah striker-installer
-rwxr-xr-x. 1 root root 152K Dec 29 17:10 striker-installer
See the '-rwxr-xr-x.' line? That tells use that the file is now 'executable'.
We're ready!
Knowing What we Want
When we run the Striker installer, we're going to tell it how to configure itself. So to do this, we need to make a few decisions.
What company or organization name to use?
When a user logs into Striker, they are asked for a user name and password. The box that pops up has a company (or organization) name to help tell the user what they are connecting to.
This can be whatever makes sense to you. For this tutorial, we'll use 'Alteeve's Niche!'.
What do we want to call this Striker dashboard?
To help identify this machine on the network and to differentiate it from the other dashboards you might build, we'll want to give it a name. This name has to be similar to a domain name you would see on the Internet, but beyond that it can be whatever you want.
Generally, this name is made up of a two or three letter "prefix" that describes who owns it. Our name is "Alteeve's Niche!", we we use the prefix 'an-'. Following this is a description of the machine followed by our domain name.
This is our first Striker dashboard and our domain name is 'alteeve.ca', so we're going to use the name 'an-striker01.alteeve.ca'.
How can we send email?
The Anvil! nodes will send out an email alert should anything of note happen. In order to do this though, it needs to know what mail server to use and what email address and password to use when authenticating.
You will need to get this information from whomever provides you with email services.
In our case, our mail server is at the address 'mail.alteeve.ca' listening for connections on TCP port '587'. We're going to use the email account 'example@alteeve.ca' which has the password 'Initial1'.
When user name and password to use?
There is no default user account or default password on Striker dashboards.
Both the user name and password are up to you to choose. Most people use the user name 'admin', but this is by convention only.
For this tutorial, we're going to use the user name 'admin' and the password 'Initial1'.
What IP addresses to use
| Note: This section requires a basic understanding of how networks work. If you want a bit more information on networking in the Anvil!, please see the "Subnets" section of the main tutorial. |
The Striker dashboard will connect to two networks;
- Internet-Facing Network (The IFN); Your existing network, usually connected to the Internet.
- Back-Channel Network (The BCN); The dedicated network used by the Anvil!
The IP address we use on the IFN will depend on your current network. Most networks use 192.168.1.0/24, 10.255.0.0/16 or similar. In order to access the Internet, we're going to need to specify the default gateway and a couple DNS servers to use.
For this tutorial, we'll be using the IP address '10.255.4.1/16', the default gateway is '10.255.255.254' and we'll use Google's open DNS servers at the IP addresses '8.8.8.8' and '8.8.4.4'.
The IP address we use on the BCN is almost always on the '10.20.0.0/16' network. For this tutorial, we'll be using the IP address '10.20.4.1/16'.
Do we want to be an Anvil! node install target?
One of the really nice features of Striker dashboards is that you can use them to automatically install the base operating system on new and replacement Anvil! nodes.
To do this, Striker can be told to setup a "PXE" (P're-boot eXecution Environment) server. When this is enabled, you can tell a new node to "boot off the network". Doing this allows you to boot and install an operating system without using a boot disc. Also, it allows us to specify special install instruction, removing the need to ask you how you want to configure the OS.
The Striker dashboard will do everything for you to be an install target.
When it's done, it will offer up IP addresses on the BCN network (to avoid conflicting with any existing DHCP servers you might have). It will configure RHEL and/or CentOS install targets and all the ancillary steps needed to make all this work.
We will need to tell it a few things though;
- What range of IPs should it offer to new nodes being installed?
- Do we want to offer RHEL as a target? If so, where do we find the install media?
- Do we want to offer CentOS as a target? If so, where do we find the install media?
| Note: If you are using CentOS, switch to setup CentOS and skip RHEL. |
For this tutorial, we're going to use the choose;
- A network range of '10.20.10.200' to '10.20.10.210'
- Setup as a RHEL install target using the disc in the DVD drive
- Skip being a CentOS install target.
Do we need to register with RHN?
If you are using CentOS, the answer is "No".
If you are using RHEL, and if you skipped registration during the OS install like we did above, you will need to register now. We skipped it at the time to avoid the network hassle some people run into.
To save an extra step of manually registering, we can tell the Striker installer that we want to register and what our RHN credentials are. This will be the user name and password Red Hat gave you when you signed up for the trial or when you bought your Red Hat support.
We're going to do that here. For the sake of documentation, we'll use the pretend credentials 'user' and the password 'password'.
Mapping network connections
In the same way that every car has a unique VIN, so does every network card. Each network port has it's own MAC address.
There is no inherent way for the Striker installer to know which network port plugs into what network. So the first step of the installer needs to ask you to unplug and then plug in each network card when prompted.
If you want to know more about how networks are used in the Anvil!, please see:
- "Planning The Use of Physical Interfaces" in the main tutorial
If your Striker dashboard has just two network interfaces, then the first will ask you which interface plugs into your Back-Channel Network and then which one plugs into your Internet-Facing Network.
If your Striker dashboard has four network interfaces, then two will be paired up for the BCN and two will be paired up for the IFN. This will allow you to span each pair across the two switches for redundancy.
The Striker installer is smart enough to sort this all out for you. You just need to unplug the right cables when prompter.
Running the Striker Installer
Excellent, now we're ready!
When we run the striker-installer program, we will tell Striker of our decisions using "command line switches". These take the form of:
- -x value
- --foo value
If the 'value' has a space in it, then we'll put quotes around it.
If you want to know more about the switches, you can run './striker-installer' by itself and all the available switches and how to use them will be explained.
| Note: This uses the 'git' repository option. It will be redone later without this option once version 1.2.0 is released. Please do not use 'git' versions in production! |
Here is how we take our decisions above and turn them into a command line call:
| Purpose | Switch | Value | Note | ||
|---|---|---|---|---|---|
| Company name | -c | "Alteeve's Niche\!" | At the command line, the ! has a special meaning. By using '\!' we're telling the system to treat it literally. | ||
| Host name | -n | an-striker01.alteeve.ca | The network name of the Striker dashboard. | ||
| Mail server | -m | mail.alteeve.ca:587 | The server name and TCP port number of the mail server we route email to. | ||
| Email user | -e | "example@alteeve.ca:Initial1" | In this case, the password doesn't have a space, so quotes aren't needed. We're using them to show what it would look like if you did need it. | ||
| Striker user | -u | "admin:Initial1" | As with the email user, we don't need quotes here because our password doesn't have a space in it. It's harmless to use quotes though, so we use them. | ||
| IFN IP address | -i | 10.255.4.1/16,dg=10.255.255.254,dns1=8.8.8.8,dns2=8.8.4.4 | Sets the IP address, default gateway and DNS servers to use on the Internet-Facing Network. | ||
| BCN IP address | -b | 10.20.4.1/16 | Sets the IP address of the Back-Channel Network. | ||
| Boot IP Range | -p | 10.20.10.200:10.20.10.210 | The range of IP addresses we will offer to nodes using this Striker dashboard to install their operating system. | ||
| RHEL Install Media | --rhel-iso | dvd | Tell Striker to setup RHEL as an install target and to use the files on the disc in the DVD drive. | ||
| RHN Credentials | --rhn | "user:secret" | The Red Hat Network user and password needed to register this machine with Red Hat.
|
| Note: In Linux, you and put a ' \' to spread one command over multiple lines. We're doing it this way to make it easier to read only. You can type the whole command on one line. |
Putting it all together, this is what our command will look like:
./striker-installer \
 -c "Alteeve's Niche\!" \
 -n an-striker01.alteeve.ca \
 -m mail.alteeve.ca:587 \
 -e "example@alteeve.ca:Initial1" \
 -u "admin:Initial1" \
 -i 10.255.4.1/16,dg=10.255.255.254,dns1=8.8.8.8,dns2=8.8.4.4 \
 -b 10.20.4.1/16 \
 -p 10.20.10.200:10.20.10.210 \
 --rhel-iso dvd \
 --rhn "user:secret"
Done!
When you press <enter>, the install will start.
Let's Go!
Here is what the install should look like:
 ##############################################################################
 #   ___ _       _ _                                    The Anvil! Dashboard  #
 #  / __| |_ _ _(_) |_____ _ _                                 -=] Installer  #
 #  \__ \  _| '_| | / / -_) '_|                                               #
 #  |___/\__|_| |_|_\_\___|_|                                                 #
 #                                               https://alteeve.ca/w/Striker #
 ##############################################################################

[ Note ] - Will install the latest version from git.

 ##############################################################################
 # [ Warning ] - Please do NOT use a git version in production!               #
 ##############################################################################

Sanity checks complete.

Checking the operating system to ensure it is compatible.
- We're on a RHEL (based) OS, good. Checking version.
- Looks good! You're on: [6.6]
- This OS is RHEL proper.
- RHN credentials given. Attempting to register now.
- [ Note ] Please be patient, this might take a minute...
- Registration was successful.
- Adding 'Optional' channel...
- 'Optional' channel added successfully.
Done.

Backing up some network related system files.
- Backing up: [/etc/udev/rules.d/70-persistent-net.rules]
- Previous backup exists, skipping.
- Backing up: [/etc/sysconfig/network-scripts]
- Previous backup exists, skipping.
Done.

Checking if we need to freeze NetworkManager on the active interface.
- NetworkManager is running, will examine interfaces.
- Freezing interfaces: eth0
- Note: Other interfaces may go down temporarily.
Done

Making sure all network interfaces are up.
- The network interface: [eth1] is down. It must be started for the next stage.
- Checking if: [/etc/sysconfig/network-scripts/ifcfg-eth1] exists.
- Config file exists, changing BOOTPROTO to 'none'.
- Attempting to bring up: [eth1]...
- Checking to see if it is up now.
- The interface: [eth1] is now up!
- The network interface: [eth2] is down. It must be started for the next stage.
- Checking if: [/etc/sysconfig/network-scripts/ifcfg-eth2] exists.
- Config file exists, changing BOOTPROTO to 'none'.
- Attempting to bring up: [eth2]...
- Checking to see if it is up now.
- The interface: [eth2] is now up!
- The network interface: [eth3] is down. It must be started for the next stage.
- Checking if: [/etc/sysconfig/network-scripts/ifcfg-eth3] exists.
- Config file exists, changing BOOTPROTO to 'none'.
- Attempting to bring up: [eth3]...
- Checking to see if it is up now.
- The interface: [eth3] is now up!
Done.

-=] Configuring network to enable access to Anvil! systems.
This is where you now need to unplug each network cable, wait a few seconds and then plug it back in.
Beginning NIC identification...
- Please unplug the interface you want to make:
  [Back-Channel Network, Link 1]
When you unplug the cable, you will see:
- NIC with MAC: [52:54:00:00:7a:51] will become: [bcn-link1]
  (it is currently: [eth0])
- Please plug in all network cables to proceed.
When you plug it back in, it will move on to the next interface. Repeat this for your other (or three other) network interfaces.
- Please unplug the interface you want to make:
  [Back-Channel Network, Link 2]
- NIC with MAC: [52:54:00:a1:77:b7] will become: [bcn-link2]
  (it is currently: [eth1])
- Please plug in all network cables to proceed.
- Please unplug the interface you want to make:
  [Internet-Facing Network, Link 1]
- NIC with MAC: [52:54:00:00:7a:50] will become: [ifn-link1]
  (it is currently: [eth2])
- Please plug in all network cables to proceed.
- Please unplug the interface you want to make:
  [Internet-Facing Network, Link 2]
- NIC with MAC: [52:54:00:a1:77:b8] will become: [ifn-link2]
  (it is currently: [eth3])
- Please plug in all network cables to proceed.
A summary will be shown:
Here is what you selected:
- Interface: [52:54:00:00:7A:51], currently named: [eth0],
  will be renamed to: [bcn-link1]
- Interface: [52:54:00:A1:77:B7], currently named: [eth1],
  will be renamed to: [bcn-link2]
- Interface: [52:54:00:00:7A:50], currently named: [eth2],
  will be renamed to: [ifn-link1]
- Interface: [52:54:00:A1:77:B8], currently named: [eth3],
  will be renamed to: [ifn-link2]

The Back-Channel Network interface will be set to:
- IP:      [10.20.4.1]
- Netmask: [255.255.0.0]

The Internet-Facing Network interface will be set to:
- IP:      [10.255.4.1]
- Netmask: [255.255.0.0]
- Gateway: [10.255.255.254]
- DNS1:    [8.8.8.8]
- DNS2:    [8.8.4.4]

Shall I proceed? [Y/n]
| Note: If you are not happy with this, press 'n' and the network mapping part will start over. If you want to change the command line switches, press 'ctrl' + 'c' to cancel the install entirely. |
If you are happy with the install plan, press '<enter>'.
- Thank you, I will start to work now.
There is no other intervention needed now. The rest of the install will complete automatically, but it might take some time.
Now is a good time to go have a $drink.
Configuring this system's host name.
- Reading in the existing hostname file.
- Writing out the new version.
Done.

-=] Beginning configuration and installation processes now. [=-

Checking if anything needs to be installed.
- The AN!Repo hasn't been added yet, adding it now.
- Added. Clearing yum's cache.
- output: [Loaded plugins: product-id, refresh-packagekit, rhnplugin, security,]
- output: [              : subscription-manager]
- output: [Cleaning repos: InstallMedia an-repo rhel-x86_64-server-6]
- output: [Cleaning up Everything]
- Done!

Checking for OS updates.
| "Final Jeopardy" theme is © 2014 Sony Corporation of America |
-=] Some time and much output later ... [=-
Setting root user's password.
- Output: [Changing password for user root.]
- Output: [passwd: all authentication tokens updated successfully.]
Done!

 ##############################################################################
 # NOTE: Your 'root' user password is now the same as the Striker user's      #
 #       password you just specified. If you want a different password,       #
 #       change it now with 'passwd'!                                         #
 ##############################################################################

Writing the new udev rules file: [/etc/udev/rules.d/70-persistent-net.rules]
Done.

Deleting old network configuration files:
- Deleting file: [/etc/sysconfig/network-scripts/ifcfg-eth0]
- Deleting file: [/etc/sysconfig/network-scripts/ifcfg-eth3]
- Deleting file: [/etc/sysconfig/network-scripts/ifcfg-eth1]
- Deleting file: [/etc/sysconfig/network-scripts/ifcfg-eth2]
Done.

Writing new network configuration files.

[ Warning ] - Please confirm the network settings match what you expect and
              then reboot this machine.

Installation of Striker is complete!
*Ding*
Striker is done!
The output above was truncated as it is thousands of lines long. If you want to see the full output though, you can:
Reboot the system and your new Striker dashboard will be ready to use!
reboot
Broadcast message from root@an-striker01.alteeve.ca
	(/dev/pts/0) at 3:41 ...

The system is going down for reboot NOW!
Using Striker
From here on in, we'll be using a normal web browser.
Self-Signed SSL Certificate
To connect to Striker, open up your favourite web browser and point it at the Striker server (use the IFN or BCN IP address set during the install).
In our case, that means we want to connect to https://10.255.4.1.
| Note: This tutorial is shown using Firefox. The steps to accept a self-signed SSL certificate will be a little different on other browsers. |
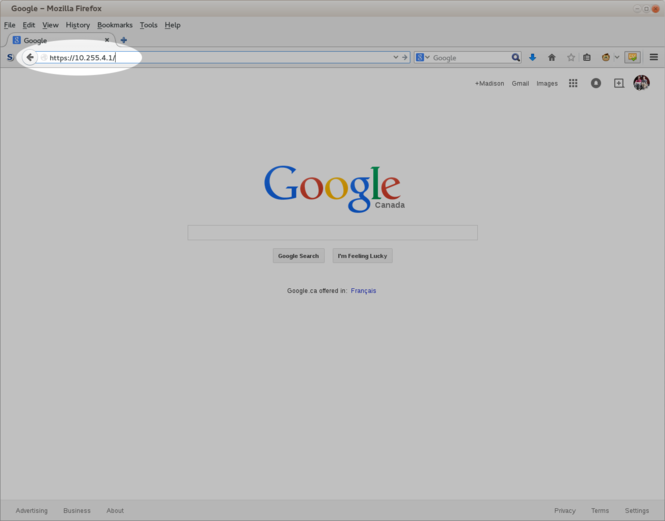
Type the address into your browser and then press '<enter>'.
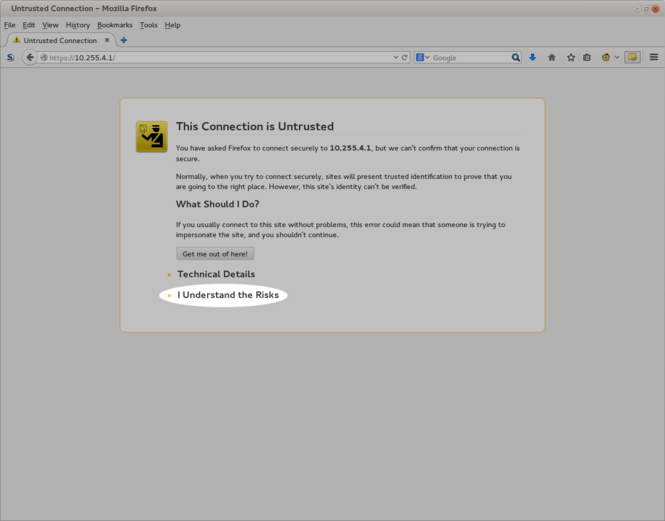
SSL-based security normally requires an independent third party to validate the certificate, which requires a fee.
If you want to do this, here is how to do it.
In our case, we know that the Striker machine is ours, so this isn't really needed. So we need to tell the browser that we trust the certificate.
Click to expand "I Understand the Risks".
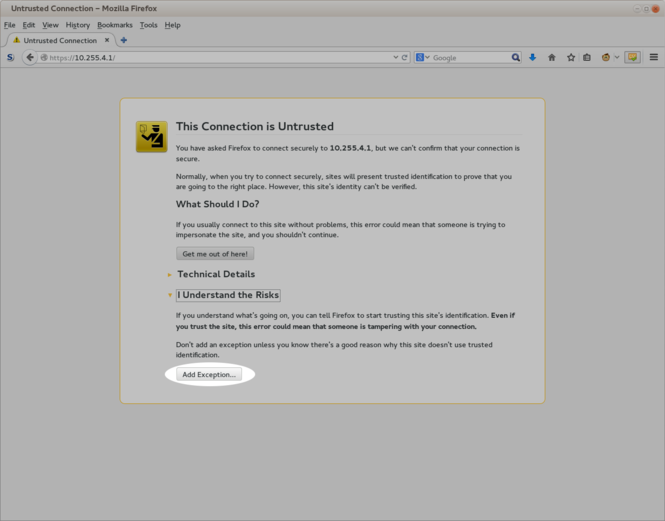
Click on the "Add Exception..." button.
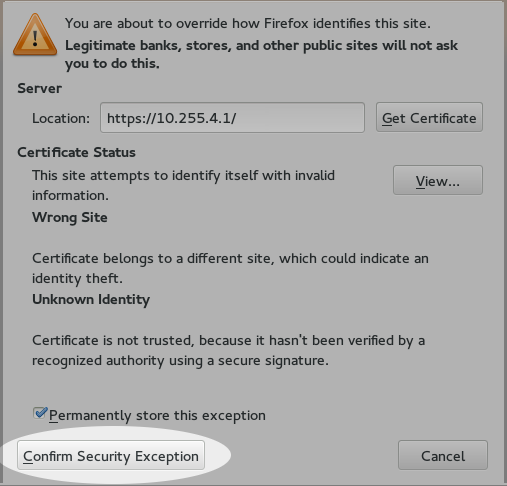
Understandably, the browser is being cautious and is being careful to explain what you are doing. So we need to confirm what we're asking by clicking on "Confirm Security Exception".
That's it, we can now access Striker!
Logging In
When you connect to Striker, a pop-up window will ask your for your user name and password.

The user name and password are the ones use chose during the Striker install.
Enter them and click on "OK".
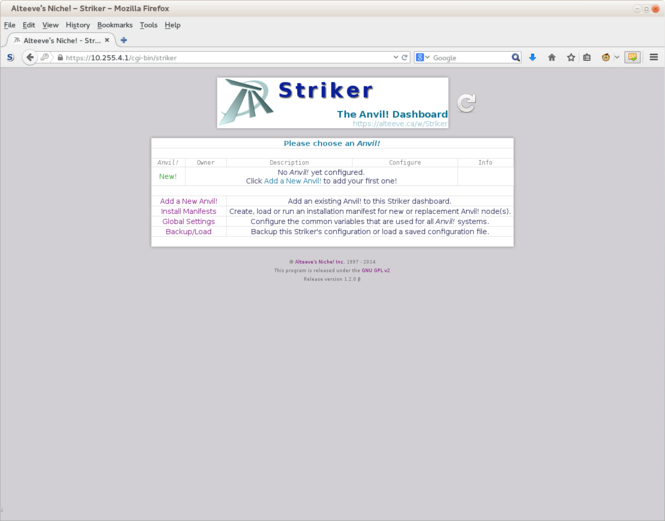
That's in, we're in!
Create an "Install Manifest"
To build a new Anvil!, we need to create an "Install Manifest". This is a simple XML file that Striker will use as a blueprint on how to build up a pair of nodes into your Anvil!. It will also serve as instructions for rebuilding or replacing a node that failed down the road.
Once created, the Install Manifest will be saved for future use. You can also download it for safe keeping.
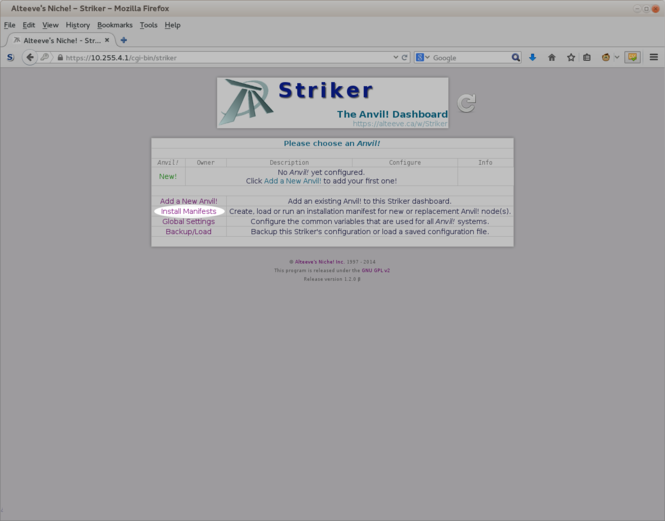
Click on the "Install Manifests" file.
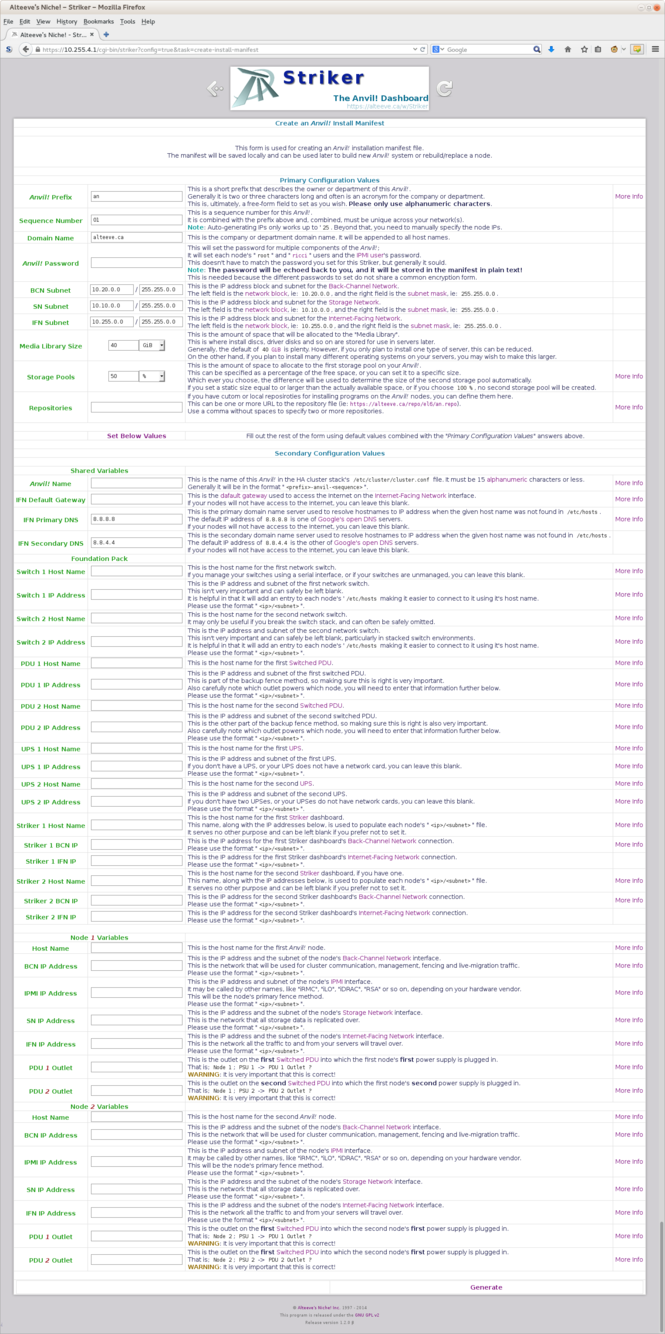
Don't worry, we only need to set the fields in the top, and Striker will auto-fill the rest.
Filling Out the Top Form
There are only a few fields you have to set manually.
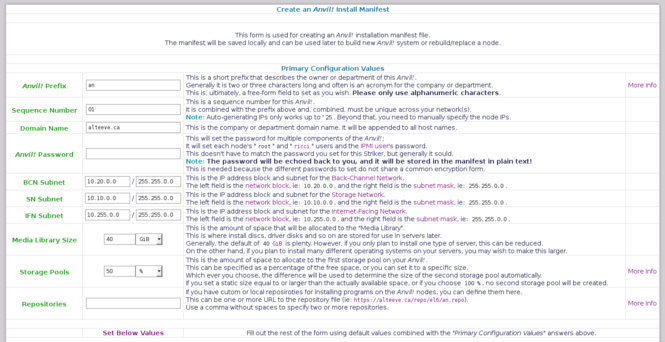
| Warning: The password will be saved in plan-text in the install manifest out of necessity. So you might want to use a unique password. |
A few things you might want to set:
- If you are building your first Anvil!, and if you are following convention, you only need to set the password you want to use.
- If you are building another Anvil!, then increment the "Sequence Number" (ie: use '2' for your second Anvil!, '8' for your eighth, etc.).
- If you're main network, the IFN, isn't using '10.255.0.0/255.255.0.0', then change this to reflect your network.
- If your site has no Internet access, you can create a local repository and then pass the path to the repository file in the 'Repository' field.
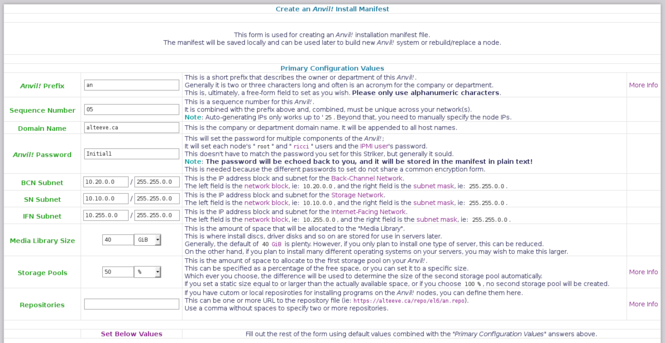
For this tutorial, we will be creating our fifth internally-used Anvil!, so we will set:
- "Sequence Number" to '5'
- "Anvil! Password" to 'Initial1'
Auto-Populating the rest of the Form
Everything else will be left as default values. If you want to know what the other fields are for, read the description to their right. Some also have a "More Info" button that links to the appropriate section of the main tutorial.
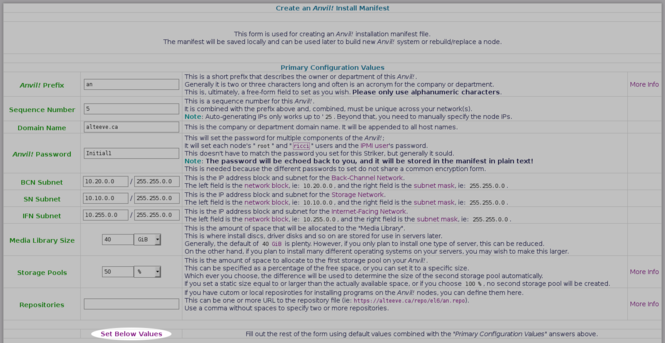
Once ready, click on 'Set Below Values'
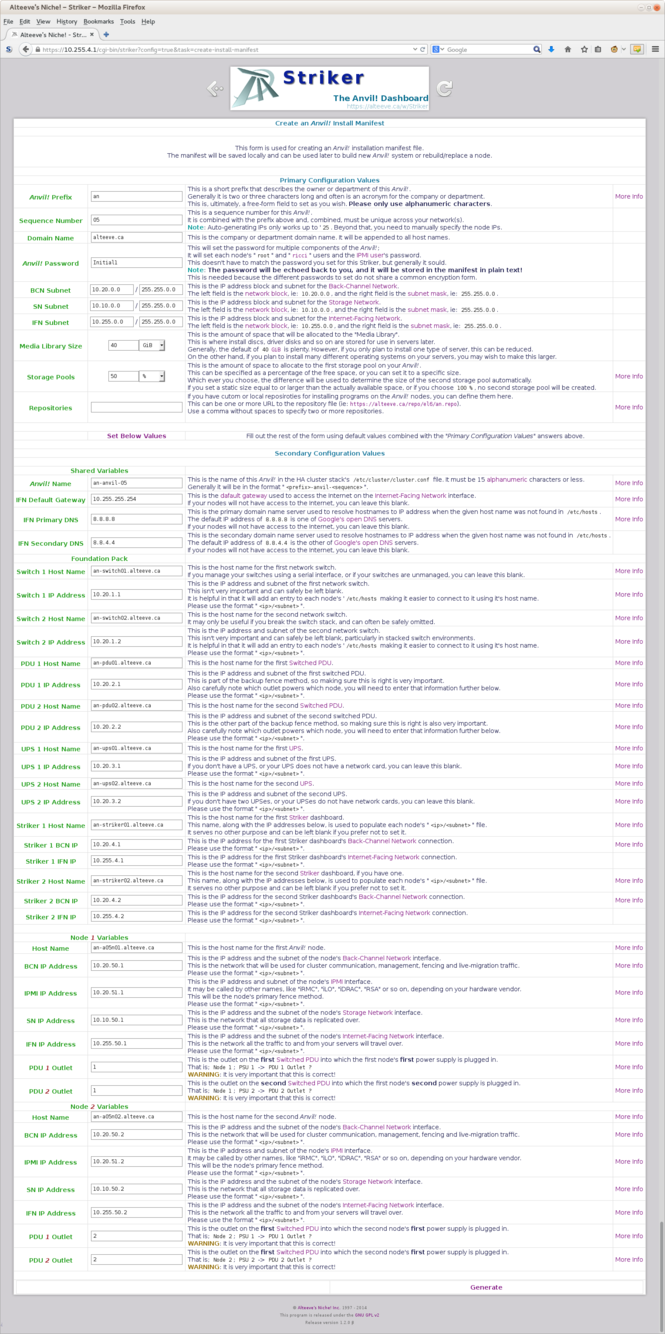
When you do this, Striker will fill out all the fields in the second section of the form.
Review these values, particularly if your IFN is a '/24' (netmask of '255.255.255.0').
| Warning: It is vital that the "PDU X Outlet" assigned to each node' switched PDU correspond to the port numbers you've actually plugged the nodes into! |
Generating the Install Manifest

Once you're happy with the settings, and have updated any you want to tune, click on the "Generate" button at the bottom-right.
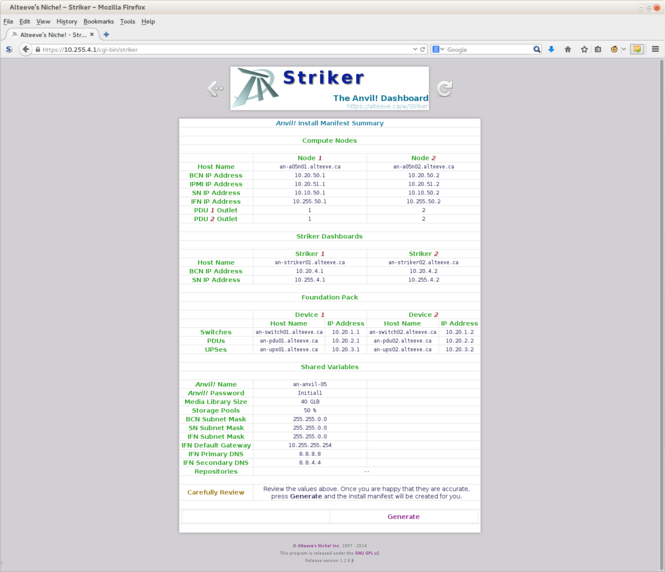
Striker will show you a condensed summary of the install manifest. Please review it carefully to make sure everything is right.

Once you are happy, click on "Generate".
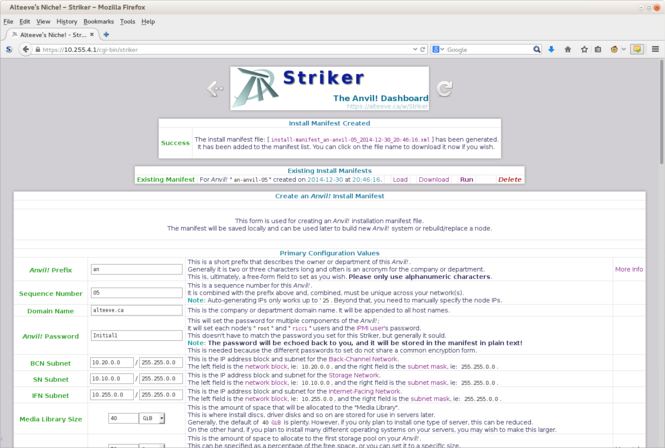
Done!
You can now create a new manifest if you want, download the one you just created or, if you're ready, run the one you just made.
Building an Anvil!
| Warning: Be sure your switched PDUs are configured! The install will fail if it tries to reach the PDUs and can not do so! |
Installing the OS on the Nodes via Striker
If you recall, one of Striker's nice features is acting as a boot target for new Anvil! nodes.
Before we can run our new install manifest, we need to have the nodes running a fresh install. So that is what we will do first.
| Note: How you enable network booting will depend on your hardware. Please consult your vendor's document. |
Building a Node's OS Using Striker
| Warning: This process will completely erase ALL data on your server! Be certain there is nothing on the node you want to save before proceeding! |
If your network has a normal DHCP server, it will be hard to ensure that your new node gets it's IP address (and boot instructions) from Striker.
| Note: The easiest way to deal with this is to unplug the IFN and SN links until after your node has booted. |
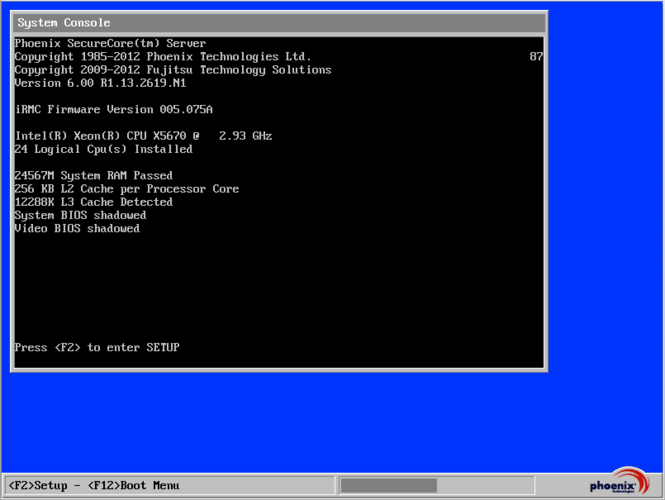
Boot your node and, when prompted, press the key assigned to your server to manually select a boot device.
- On most computers, including Fujitsu servers, this is the <F12> key.
- On HP machines, this is the <F11> key.
This will bring up a menu list of bootable devices (found and enabled in the BIOS).
If you see one or more entries with "IBA GE Slot ####" in them, those are your network cards. (IBA GE is short for "Intel Boot Agent, Gigabit Ethernet)
You will have to experiment to figure out which one is on the BCN, but once you figure it out on one node, you will know the right one to use on the second node, assuming you've cabled the machines the same way (and you really should have!).
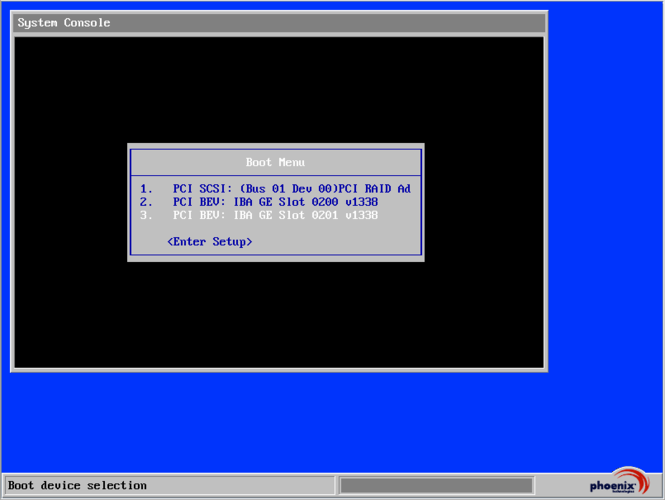
In my case, the "PCI BEV: IBA GE Slot 0201 v1338" was the boot option of one of the interfaces on my node's BCN, so that is what I selected.
Once selected, the node will send out a "DHCP reqest" (a broadcast message sent to the entire network asking if anyone will give it an IP address).
The Striker machine will answer with an offer. If you want to see what this looks like, open a terminal on your Striker dashboard and run:
tail -f -n 0 /var/log/messages
When the request comes in and Striker sends on offer, you should see something like this:
Dec 31 19:16:30 an-striker01 dhcpd: DHCPDISCOVER from 00:1b:21:81:c3:35 via bcn-bond1
Dec 31 19:16:31 an-striker01 dhcpd: DHCPOFFER on 10.20.10.200 to 00:1b:21:81:c3:35 via bcn-bond1
Dec 31 19:16:32 an-striker01 dhcpd: DHCPREQUEST for 10.20.10.200 (10.20.4.1) from 00:1b:21:81:c3:35 via bcn-bond1
Dec 31 19:16:32 an-striker01 dhcpd: DHCPACK on 10.20.10.200 to 00:1b:21:81:c3:35 via bcn-bond1
Dec 31 19:16:32 an-striker01 xinetd[14839]: START: tftp pid=14848 from=10.20.10.200
Dec 31 19:16:32 an-striker01 in.tftpd[14849]: tftp: client does not accept options
The '00:1b:21:81:c3:35' string is the MAC address of the network interface you just booted from.
Pretty cool, eh?
Back to the node...
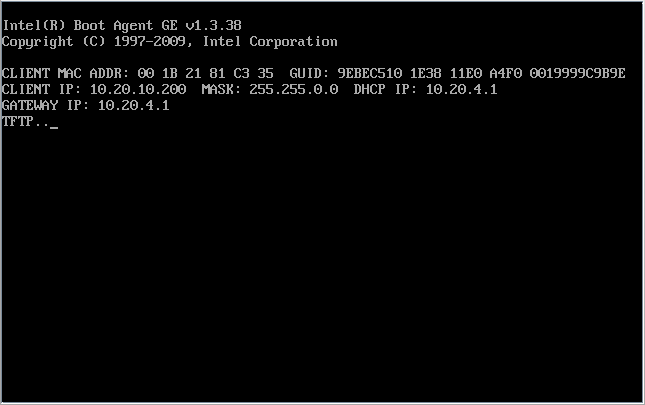
Here we see what the DHCP transaction looks like from the node's side.
- See the "CLIENT IP: 10.20.10.200"? That is the first IP in the range we selected earlier.
- See the "DHCP IP: 10.20.4.1"? That is the IP address of the Striker dashboard, confirming that it was the one who we're booting off of.
- The "TFTP..." shows us that the node is downloading the boot image. There is some more text after that, but it tends to fly by and it isn't as interesting, anyway.
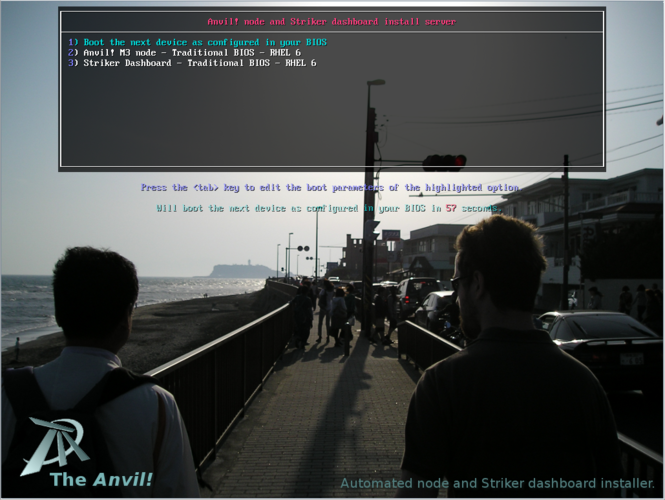
Shortly after, you will see the "Boot Menu".
If you do nothing, after 60 seconds, the menu will close and the node will try to boot off of it's hard drive. If you press the 'down' arrow, it will stop the timer. This is used in case someone sets their node to boot off of the network card all the time, their node will still boot normally, it will just take about a minute longer.
| Note: If you specified both RHEL and CentOS install media, you will see four options in your menu. If you installed CentOS only, then that will be show instead of RHEL. |
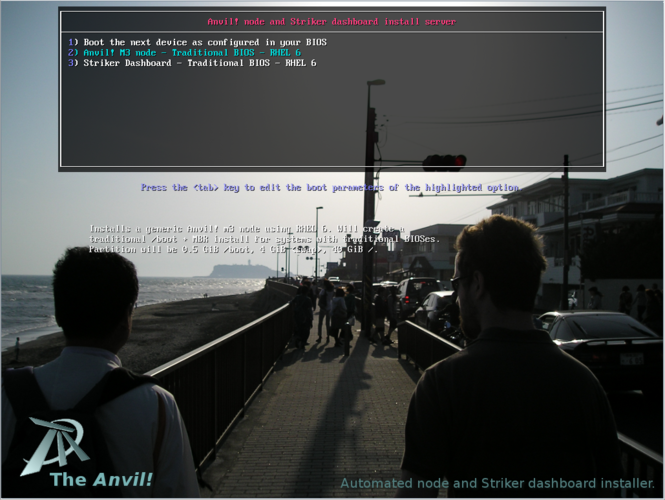
We want to build a RHEL based node, so we're going to select option "2) Anvil! M3 node - Traditional BIOS - RHEL 6".
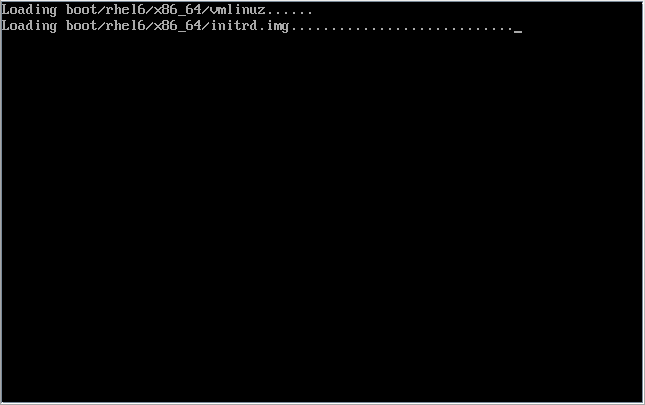
After you press <enter>, you will see a whirl of text go by.
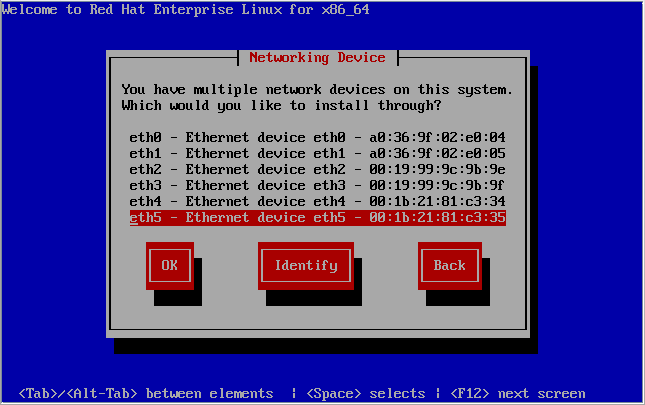
Up until now, we were working with the machine's BIOS, which lives below the software on the machine.
At this stage, the operating system (or rather, it's installer) has taken over. It is separate, so it doesn't know which network card was used to get to this point.
Unfortunately, that means we need to select which NIC to install from.
If you watched Striker's log file, you will recall that it told us the DHCP request came in from "00:1b:21:81:c3:35". Thanks to that, we know exactly which interface to choose; "eth5" in my case.
If you didn't watch the logs, but if you've unplugged the IFN and SN network cards, then this shouldn't be too tedious.
If you don't know which port to use, start with 'eth0' and work your way up. If you select the wrong interface, it will time out and let you choose again.
| Note: If your nodes are effectively identical, then it's likely that the 'ethX' device you end up using on the first node will be the same on the second node, but that is not a guarantee. |
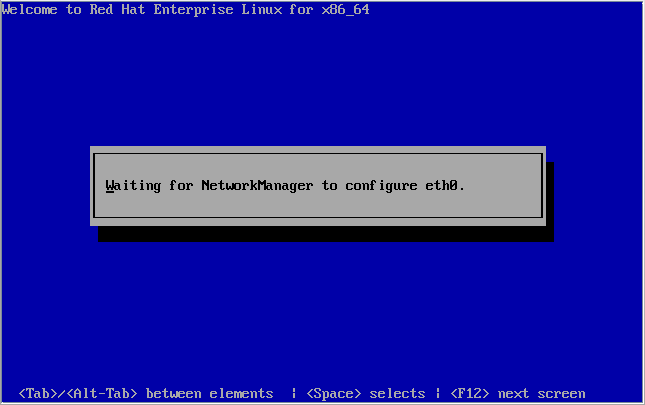
No matter which interface you select, the OS will try to configure 'eth0'. This is normal. Odd, but normal.
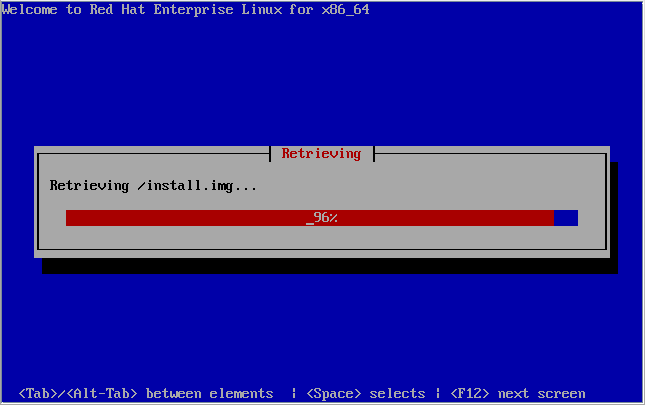
Once you get the right interface, the system will download the "install image". This of it like a specialized small live CD; It gets your system running well enough to install the actual operating system.
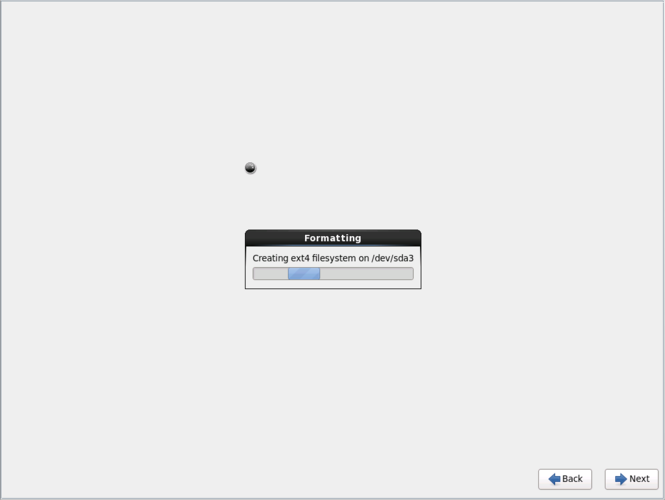
Next, the installer will partition and format the hard drive. If you created a hardware RAID array, it will look like just one big hard drive to the OS.
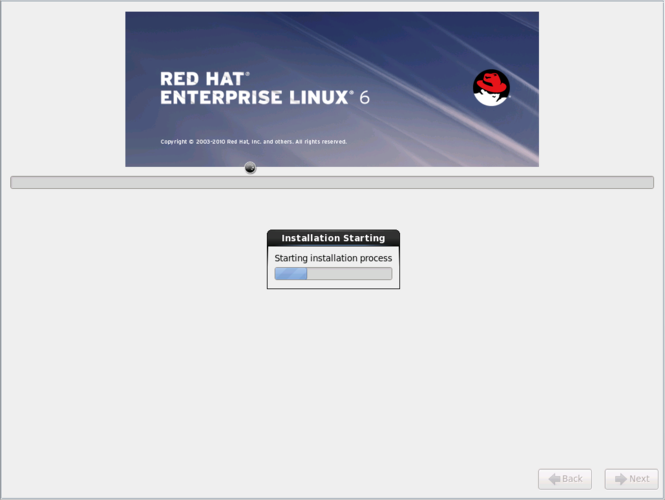
Once the format is done, the install of the OS itself will start.
If you have fast servers, this step won't take very long at all. If you have more modest servers, it might take a little while.
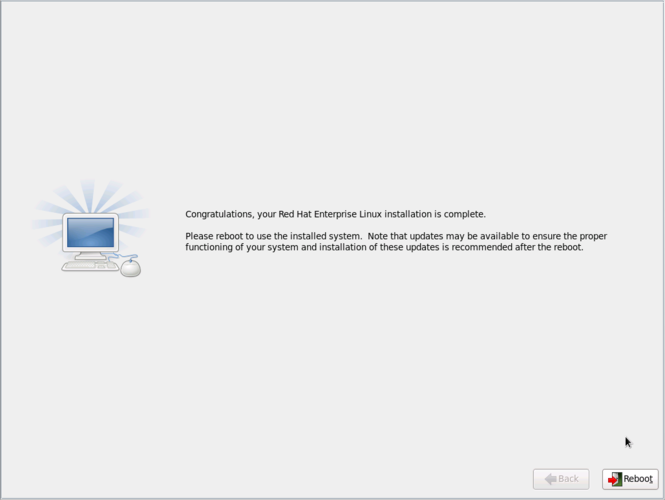
Finally, the install will finish.
It will wait until you tell it to reboot.
| Note: ToDo: Show the user how to disable the dashboard's DHCP server. |
Before you do!
Remember to plug your network cables back in if you unplugged them earlier. Once they're in, click on 'reboot'.
Looking Up the New Node's IP Address
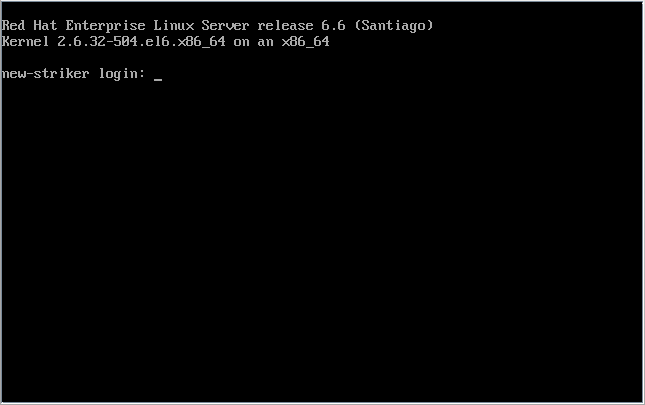
The default user name is 'root' and the default password is 'Initial1'.
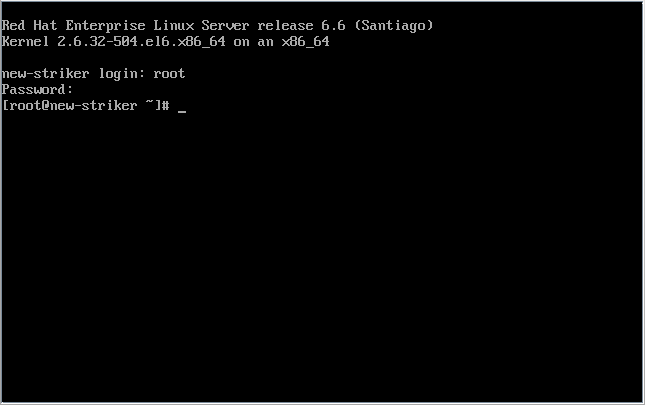
Excellent!
In order for Striker to be able to use the new node, we have to tell it where to find it. To do this, we need to know the node's IP address.
We can look at the IP addresses already assigned to the node using the command:
ifconfig
eth0      Link encap:Ethernet  HWaddr A0:36:9F:02:E0:04
          inet6 addr: fe80::a236:9fff:fe02:e004/64 Scope:Link
          UP BROADCAST RUNNING MULTICAST  MTU:1500  Metric:1
          RX packets:0 errors:0 dropped:0 overruns:0 frame:0
          TX packets:12 errors:0 dropped:0 overruns:0 carrier:0
          collisions:0 txqueuelen:1000
          RX bytes:0 (0.0 b)  TX bytes:2520 (2.4 KiB)
          Memory:ce400000-ce4fffff

lo        Link encap:Local Loopback
          inet addr:127.0.0.1  Mask:255.0.0.0
          inet6 addr: ::1/128 Scope:Host
          UP LOOPBACK RUNNING  MTU:65536  Metric:1
          RX packets:0 errors:0 dropped:0 overruns:0 frame:0
          TX packets:0 errors:0 dropped:0 overruns:0 carrier:0
          collisions:0 txqueuelen:0
          RX bytes:0 (0.0 b)  TX bytes:0 (0.0 b)
| Note: If the text scrolls off your screen, press 'ctrl + PgUp' to scroll up one "page" at a time. |
Depending on how your network is setup, your new node may have not booted with an IP address, as is the case above (note that there is no IP address beside 'eth0').
This is because RHEL6, by default, doesn't enable network interfaces that weren't using during the install.
Thankfully, this is usually easy to fix.
On most servers, the six network cards will be named 'eth0' through 'eth5', as we saw during the install.
You can try this command to see if you get an IP address:
ifup eth1
Determining IP information for eth1... done.
This looks good! Lets take a look at what we got:
ifconfig eth1
eth1      Link encap:Ethernet  HWaddr A0:36:9F:02:E0:05
          inet addr:10.255.1.24  Bcast:10.255.255.255  Mask:255.255.0.0
          inet6 addr: fe80::a236:9fff:fe02:e005/64 Scope:Link
          UP BROADCAST RUNNING MULTICAST  MTU:1500  Metric:1
          RX packets:435 errors:0 dropped:0 overruns:0 frame:0
          TX packets:91 errors:0 dropped:0 overruns:0 carrier:0
          collisions:0 txqueuelen:1000
          RX bytes:33960 (33.1 KiB)  TX bytes:13947 (13.6 KiB)
          Memory:ce500000-ce5fffff
See the part that says 'inet addr:10.255.1.24'? That is telling us that this new node has the IP address '10.255.1.24'.
That's all we need!
Jot this down and lets go back to the Striker installer.
Running the Install Manifest
| Note: Did you remember to install the OS on both nodes? If not, repeat the steps above for the second node. |

When you're ready, click on "Run".
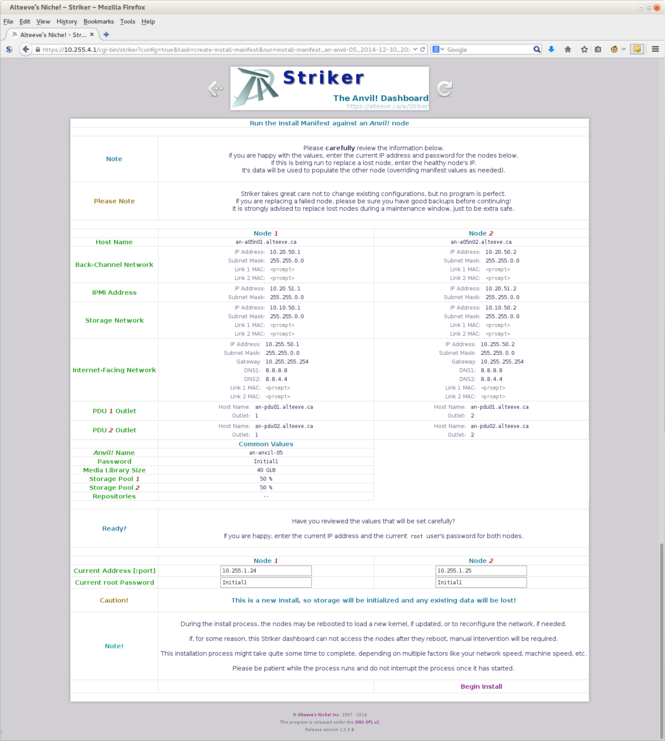
A summary of the install manifest will be show, please review it carefully and be sure you are about to run the correct one.
If you recall, we noted the IP address each new node got after it's operating system was installed. This is where you enter each machine's current IP address and current password, which is usually "Initial1" when installed via Striker.
When ready, click on 'Begin Install'!
Initial hardware scan
Before the install starts, Striker looks to see if there is enough storage to meet the requested space and to see if the network needs to be mapped.
A remap is needed if the install manifest doesn't recognize the physical network interfaces and if the network wasn't previously configured.
In this tutorial, the nodes are totally new so both will be remapped.
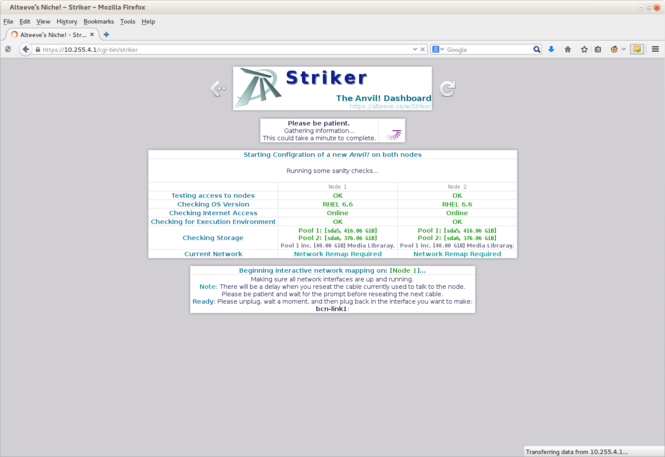
The steps explained;
| Testing access to nodes | This is a simple test to ensure that Striker can log into the two nodes. If this fails, check the IP address and password | ||||
| Checking OS version | The Anvil! is supported on Red Hat Enterprise Linux and CentOS version 6 or newer. This check ensures that one these versions is in use.
| ||||
| Checking Internet access | A check is made to ping the open DNS server at IP address '8.8.8.8' as a test of Internet access. If no access is found, the installer will warn you but it will try to proceed.
| ||||
| Checking for execution environment | The Striker installer copies a couple of small programs written in the "perl" programming language to assist with the configuration of the nodes. This check ensures that perl has been installed and, if not, attempts to install it. | ||||
| Checking storage | This step is one of the more important ones. It examines the existing partitions and/or available free hard space, compares it against the requested storage pool and media library size and tries to determine if the install can proceed safely. If it can, it tells you how the storage will be divided up (if at all). This is where you can confirm that the to-be-created storage pools are, in fact, what you want. | ||||
| Current Network | Here, Striker checks to see if the network has already been configured or not. If not, it checks to see if it recognizes the interfaces already. In this tutorial, it doesn't so it determines that the network on both nodes needs to be "remapped". That is, it needs to determine which physical interface (by MAC address) will be used for which role. |
Remapping the network
Note: If you can not monitor the screen and unplug the network at the same time, the remap order will be:
You can do all these in sequence without watching the screen. Please allow five seconds per step. That is, unplug the cable, count to 5, plug the cable in, count to 5, unplug the next cable. If you get any cables wrong, don't worry. Just proceed by unplugging the rest until all have been unplugged at least once. You will get a chance to re-run the mapping if you don't get it right the first time. |
In order for Striker to map the network, it needs to first make sure all interfaces have been started. It does this by configuring each inactive interface to have no address and then "brings them up" so that the operating system will be able to monitor their state.
Next, Striker asks you to physically unplug, wait a few seconds and then plug back in each network interface.
As you do this, Striker sees the OS report a given interface losing and then restoring it's network link. It knows which MAC address is assigned to each device, and thus can map out how to reconfigure the network.
It might feel a little tedious, but this is the last step you need to do manually.
| Note: All six network interfaces must be plugged into a switch for this stage to complete. The installer will prompt you and then wait if this is not the case. |
Mapping Node 1 - "Back-Channel Network - Link 1"

The first interface to map is the "Back-Channel Network - Link 1". This is the primary BCN link.
Please unplug it, count to 5 and then plug it back in.
Mapping Node 1 - "Back-Channel Network - Link 2"

Notice that it now shows the MAC address and current device name for BCN Link 1? Nice!
The next interface to map is the "Back-Channel Network - Link 2". This is the backup BCN link.
Please unplug it, count to 5 and then plug it back in.
Mapping Node 1 - "Storage Network - Link 1"

Next up is the "Storage Network - Link 1". This is the primary SN link.
Please unplug it, count to 5 and then plug it back in.
Mapping Node 1 - "Storage Network - Link 2"

Next is the "Storage Network - Link 2". This is the backup SN link.
Please unplug it, count to 5 and then plug it back in.
Mapping Node 1 - "Internet-Facing Network - Link 1"

Now we're onto the last network pair with the "Internet-Facing Network - Link 1". This is the primary IFN link.
Please unplug it, count to 5 and then plug it back in.
Mapping Node 1 - "Internet-Facing Network - Link 2"

Last for this node is the "Internet-Facing Network - Link 2". This is the secondary IFN link.
Please unplug it, count to 5 and then plug it back in.
Mapping Node 1 - Done!

This ends the remap of the first node.
Mapping Node 2 - "Back-Channel Network - Link 1"

Now we're on to the second node!
The prompts are going to be in the same order as it was for node 1.
The first interface to map is the "Back-Channel Network - Link 1". This is the primary BCN link.
Please unplug it, count to 5 and then plug it back in.
Mapping Node 2 - "Back-Channel Network - Link 2"

Notice that it now shows the MAC address and current device name for BCN Link 1? Nice!
The next interface to map is the "Back-Channel Network - Link 2". This is the backup BCN link.
Please unplug it, count to 5 and then plug it back in.
Mapping Node 2 - "Storage Network - Link 1"

Next up is the "Storage Network - Link 1". This is the primary SN link.
Please unplug it, count to 5 and then plug it back in.
Mapping Node 2 - "Storage Network - Link 2"

Next is the "Storage Network - Link 2". This is the backup SN link.
Please unplug it, count to 5 and then plug it back in.
Mapping Node 2 - "Internet-Facing Network - Link 1"

Now we're onto the last network pair with the "Internet-Facing Network - Link 1". This is the primary IFN link.
Please unplug it, count to 5 and then plug it back in.
Mapping Node 2 - "Internet-Facing Network - Link 2"

Last for this node is the "Internet-Facing Network - Link 2". This is the secondary IFN link.
Please unplug it, count to 5 and then plug it back in.
Mapping Node 2 - Done!

This ends the remap of the first node.
Final review
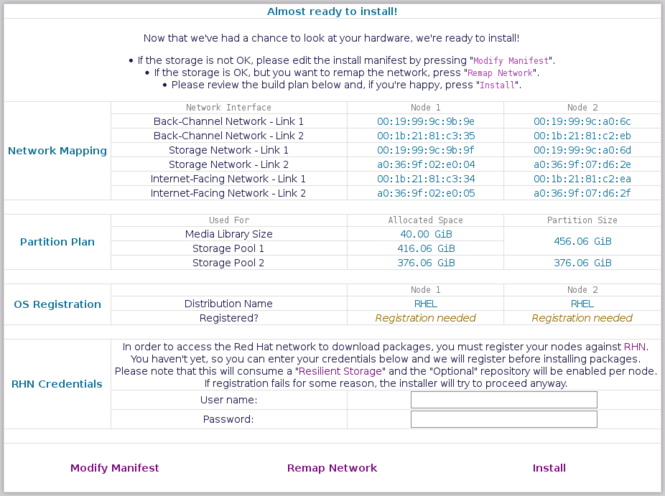
Now that Striker has had a chance to review the hardware it can tell you exactly how it will build your Anvil!.
The main two points to review are the storage layout and the networking.
Optional; Registering with RHN
| Note: CentOS users can ignore this section. |
If Striker detected that you are running RHEL proper, and if it detected that the nodes haven't been registered with Red Hat yet, it will provide an opportunity to register the nodes as part of the install process.
The user name and password are passed to the nodes only (via SSH) and registration works via the 'rhn_register' tool.
If you are unhappy with the planned storage layout
If the storage is not going to be allocated the way you like, you will need to modify the Install Manifest itself.
To do this, click on the 'Modify Manifest' button at the bottom-left.
This will take you back to the same page that you used to create the original manifest. Adjust the storage and then generate a new manifest. After being created, locate it at the top of the page and press 'Run'. The new run should show you your newly configured storage.
If you are unhappy with the planned network mapping
If you mixed up the cables when you were reseating them during the mapping stage, simply click on the 'Remap Network' button at the bottom-center of the page.
The portion of the install that just ran will start over.
Running the install!
If you are happy with the plan, press the 'Install' button at the bottom-right.
There is now nothing more for you to do, so long as nothing fails. If something fails, correct the error and then re-run the install. Striker tries to be smart enough to figure out what part of the install was already completely and pick up where it left off on subsequent runs.
Understanding the output
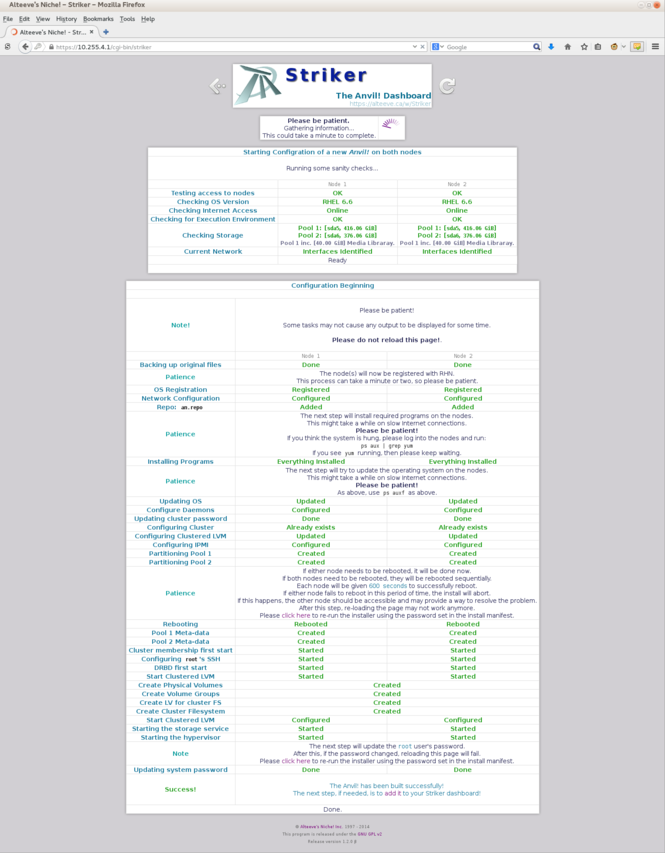
The sanity check runs one more time just the be sure nothing changed. Once done, the install starts.
Below is a table that explains what is happening at each stage:
| Backing up original files | No program is perfect, so Striker makes backups of all files it might change under '/root/'. If Striker sees that backups already exist, it does not copy them again, to help ensure re-runs don't clobber original backups. | ||
| OS Registration | If you are running RHEL and the nodes were not registered with RHN, and if you provided RHN credentials, this is where they will be registered. This process can take a couple of minutes to complete, depending on the speen of your network and the load on the RHN servers. | ||
| Network configuration | Here, the existing network configuration files are removed and new ones are written, if needed, based on the mapping done earlier. When this completes, you will have six interfaces bound into three fault-tolerant bonds with the IFN bond being connected to the node's 'ifn-bridge1' virtual bridge.
| ||
| Repo: 'X' | The an.repo repository, plus any you defined earlier, are added to the nodes and activated at this stage. | ||
| Installing programs |
At this stage, all additional software that is needed for the Anvil! nodes to work is installed. This requires a pretty large download which, depending on the speed of your Internet connection, could take a very long time to complete. Using a local repository can greatly speed this stage up. | ||
| Updating OS |
At this stage, all of the pre-installed programs on the nodes are updated. This requires downloading more packages from the Internet, so it can be slow depending on the speed of your connection. Again, using a local repository can dramatically speed up this stage. | ||
| Configuring daemons | At this stage, all installed daemons are configured so that they start or don't start when the node boots. | ||
| Updating cluster password | The cluster uses it's own password, which in turn Striker uses to create and remove servers from the Anvil!. That password is set here. | ||
| Configuring cluster | Here, the core configuration file for the cluster stack is created and written out. | ||
| Configuring cluster LVM | By default, LVM is not cluster-aware. At this stage, we reconfigure it so that it becomes cluster aware. | ||
| Configure IPMI | Our primary fence method is to use the IPMI baseboard in each node. At this stage, their IPs are assigned and their password is set. | ||
| Partitioning Pool 1 | If needed, the first partition is created on each node for storing the "Media Library" data and for the servers that will eventually run on the first node.
If a partition is created, the node will be scheduled for reboot. | ||
| Partitioning Pool 2 | Again if needed, the second partition is created on each node for storing the servers that will run on node 2.
If a partition is created, the node will be scheduled for reboot. | ||
| Rebooting | If either or both node needs to be rebooted for changed to take effected, that will happen at this stage. | ||
| Pool 1 Meta-data | After the reboot, the first partition will be configured for use in the Anvil!'s replicated storage subsystem, called DRBD. This step configures the storage for pool 1, if needed. | ||
| Pool 2 Meta-data | This stage handles configuring the storage for pool 2, if needed. | ||
| Cluster membership first start | At this stage, communication between the nodes on the BCN is verified. If access is good, the cluster stack's communication and fencing layer will start for the first time. Once started, fencing mechanisms are tested.
| ||
| Configuring root's SSH | Each node needs to record the other's SSH "fingerprint" in order for live-migration of the servers to work. This is ensured at this stage. | ||
| DRBD first start | When both nodes are new, the replicated storage will need to be initialized in order for it to work. This is handled here. If there was existing data, then the replication is simply started. | ||
| Start clustered LVM | The replicated storage is raw and needs to be managed. The Anvil! uses clustered LVM for this. Here we start the daemon the provides this capability.
| ||
| Create Physical Volumes | Here, each replicated storage device that backs our two storage pools is configured for use by clustered LVM as a "Physical Volume" (PV). | ||
| Create Volume Groups | This is the second stage of the LVM configuration. Here, the PVs are assigned to a "Volume Group" (VG). | ||
| Create the LV for cluster FS | The Anvil! uses a small amount of space, 40 GiB by default, for storing server definition files, provision scripts and install media (DVD images). This step carves a small "Logical Volume" (LV) out of the first storage pool's VG. | ||
| Create Clustered Filesystem | The LV from the previous step is, basically, raw storage. This step formats it with the GFS2 filesystem which allows for the data on it to be accessed by both nodes at the same time. | ||
| Configure FS Table
(mislabelled in the screen shot) |
If the cluster filesystem was created, the information about this new filesystem is added the each node's central file system table. | ||
| Starting the storage service | With the storage now configured and running, it is now placed under the cluster's management and control. | ||
| Starting the hypervisor | This enables virtualization layer needed for the Anvil! to host servers. | ||
| Updating system password | This is the last stage of the install! Here, the 'root' password on each node is changed to match that defined in the install manifest. |
Done!
Your Anvil! is now ready to be added to Striker.
| Any questions, feedback, advice, complaints or meanderings are welcome. | |||
| Alteeve's Niche! | Enterprise Support: Alteeve Support |
Community Support | |
| © Alteeve's Niche! Inc. 1997-2024 | Anvil! "Intelligent Availability®" Platform | ||
| legal stuff: All info is provided "As-Is". Do not use anything here unless you are willing and able to take responsibility for your own actions. | |||

