AN!Cluster Tutorial 2: Difference between revisions
| (483 intermediate revisions by 3 users not shown) | |||
| Line 1: | Line 1: | ||
{{howto_header}} | {{howto_header}} | ||
[[image:RN3-m2_01.jpg|thumb|right|400px|A typical ''Anvil!'' build-out]] | |||
This paper has one goal: | |||
* Create an easy to use, fully redundant platform for virtual servers. | |||
Oh, and do have fun! | |||
= What's New? = | = What's New? = | ||
| Line 16: | Line 14: | ||
* Many refinements to the cluster stack that protect against corner cases seen over the last two years. | * Many refinements to the cluster stack that protect against corner cases seen over the last two years. | ||
* Configuration naming convention changes to support the new [[ | * Configuration naming convention changes to support the new [[Striker]] dashboard. | ||
* Addition of the [[AN!CM]] monitoring and alert system. | * Addition of the [[AN!CM]] monitoring and alert system. | ||
* Security improved; [[selinux]] and [[iptables]] now enabled and used. | |||
{{note|1=Changes made on Apr. 3, 2015}} | |||
* New network interface, bond and bridge naming convention used. | |||
* New Anvil and node naming convention. | |||
** ie: <span class="code">an-anvil-05</span> -> <span class="code">an-anvil-05</span>, <span class="code">cn-a05n01</span> -> <span class="code">an-a05n01</span>. | |||
* References to 'AN!CM' now point to 'Striker'. | |||
* Foundation pack host names have been expanded to be more verbose. | |||
** ie: <span class="code">an-s01</span> -> <span class="code">an-switch01</span>, <span class="code">an-m01</span> -> <span class="code">an-striker01</span>. | |||
== A Note on Terminology == | == A Note on Terminology == | ||
In this tutorial, we will use the following terms | In this tutorial, we will use the following terms: | ||
* ''Anvil!'': This is our name for the HA platform as a whole. | * ''Anvil!'': This is our name for the HA platform as a whole. | ||
| Line 28: | Line 36: | ||
* ''Compute Pack'': This describes a pair of nodes that work together to power highly-available servers. | * ''Compute Pack'': This describes a pair of nodes that work together to power highly-available servers. | ||
* ''Foundation Pack'': This describes the switches, [[PDU]]s and [[UPS]]es used to power and connect the nodes. | * ''Foundation Pack'': This describes the switches, [[PDU]]s and [[UPS]]es used to power and connect the nodes. | ||
* '' | * ''Striker Dashboard'': This describes the equipment used for the [[Striker]] management dashboard. | ||
== Why Should I Follow This (Lengthy) Tutorial? == | == Why Should I Follow This (Lengthy) Tutorial? == | ||
Following this tutorial is not the lightest undertaking. It is designed to teach you all the inner details of building an HA platform for | Following this tutorial is not the lightest undertaking. It is designed to teach you all the inner details of building an HA platform for virtual servers. When finished, you will have a detailed and deep understanding of what it takes to build a fully redundant, mostly fault-tolerant high-availability platform. Though lengthy, it is very worthwhile if you want to understand high-availability. | ||
In either case, when finished, you will have the following benefits | In either case, when finished, you will have the following benefits: | ||
* Totally open source. Everything. This guide and all software used is open! | * Totally open source. Everything. This guide and all software used is open! | ||
* You can host | * You can host servers running almost any operating system. | ||
* The HA platform requires no access to the servers and no special software needs to be installed. Your users may well never know that they're on a virtual machine. | * The HA platform requires no access to the servers and no special software needs to be installed. Your users may well never know that they're on a virtual machine. | ||
* Your servers will | * Your servers will operate just like servers installed on bare-iron machines. No special configuration is required. The high-availability components will be hidden behind the scenes. | ||
* The worst failures of core components, such as a mainboard failure in a node, will cause an outage of roughly 30 to 90 seconds. | |||
* Storage is synchronously replicated, guaranteeing that the total destruction of a node will cause no more data loss than a traditional server losing power. | * Storage is synchronously replicated, guaranteeing that the total destruction of a node will cause no more data loss than a traditional server losing power. | ||
* Storage is replicated without the need for a [[SAN]], reducing cost and providing | * Storage is replicated without the need for a [[SAN]], reducing cost and providing total storage redundancy. | ||
* Live-migration of | * Live-migration of servers enables upgrading and node maintenance without downtime. No more weekend maintenance! | ||
* | * AN!CM; The "AN! Cluster Monitor", watches the HA stack is continually. It sends alerts for many events from predictive hardware failure to simple live migration in a single application. | ||
* Most failures are fault-tolerant and will cause no interruption in services at all. | |||
Ask your local | Ask your local VMware or Microsoft Hyper-V sales person what they'd charge for all this. :) | ||
== High-Level Explanation of How HA Clustering Works == | == High-Level Explanation of How HA Clustering Works == | ||
{{note|1=This section is an adaptation of [http://lists.linux-ha.org/pipermail/linux-ha/2013-October/047633.html this post] to the [http://lists.linux-ha.org/mailman/listinfo/linux-ha Linux-HA] mailing list.}} | {{note|1=This section is an adaptation of [http://lists.linux-ha.org/pipermail/linux-ha/2013-October/047633.html this post] to the [http://lists.linux-ha.org/mailman/listinfo/linux-ha Linux-HA] mailing list. If you find this section hard to follow, please don't worry. Each component is explained in the "Concepts" section below.}} | ||
Before digging into the details, it might help to start with a high-level explanation of how HA clustering works. | Before digging into the details, it might help to start with a high-level explanation of how HA clustering works. | ||
[[ | [[Corosync]] uses the [[totem]] protocol for "heartbeat"-like monitoring of the other node's health. A token is passed around to each node, the node does some work (like acknowledge old messages, send new ones), and then it passes the token on to the next node. This goes around and around all the time. Should a node not pass its token on after a short time-out period, the token is declared lost, an error count goes up and a new token is sent. If too many tokens are lost in a row, the node is declared lost. | ||
Once the node is declared lost, the remaining nodes reform a new cluster. If enough nodes are left to form [[ | Once the node is declared lost, the remaining nodes reform a new cluster. If enough nodes are left to form [[quorum]] (simple majority), then the new cluster will continue to provide services. In two-node clusters, like the ones we're building here, quorum is disabled so each node can work on its own. | ||
Corosync itself only cares about who is a cluster member and making sure all members get all [[CPG|messages]]. What happens after the cluster reforms is up to the cluster manager, <span class="code">cman</span>, and the resource group manager, [[rgmanager]]. | |||
The first thing <span class="code">cman</span> does after being notified that a node was lost is initiate a [[ | The first thing <span class="code">cman</span> does after being notified that a node was lost is initiate a [[fence]] against the lost node. This is a process where the lost node is powered off by the healthy node (power fencing), or cut off from the network/storage (fabric fencing). In either case, the idea is to make sure that the lost node is in a known state. If this is skipped, the node could recover later and try to provide cluster services, not having realized that it was removed from the cluster. This could cause problems from confusing switches to corrupting data. | ||
When rgmanager is told that membership has changed because a node died, it looks to see what services might have been lost. Once it knows what was lost, it looks at the rules it's been given and decides what to do. These rules are defined in the <span class="code">[[ | When rgmanager is told that membership has changed because a node died, it looks to see what services might have been lost. Once it knows what was lost, it looks at the rules it's been given and decides what to do. These rules are defined in the <span class="code">[[RHCS v3 cluster.conf|cluster.conf]]'s</span> <span class="code"><rm></span> element. We'll go into detail on this later. | ||
In two-node clusters, there is also a chance of a "split-brain". | In two-node clusters, there is also a chance of a "split-brain". Quorum has to be disabled, so it is possible for both nodes to think the other node is dead and both try to provide the same cluster services. By using fencing, after the nodes break from one another (which could happen with a network failure, for example), neither node will offer services until one of them has fenced the other. The faster node will win and the slower node will shut down (or be isolated). The survivor can then run services safely without risking a split-brain. | ||
Once the dead/slower node has been fenced, <span class="code">rgmanager</span> then decides what to do with the services that had been running on the lost node. Generally, this means | Once the dead/slower node has been fenced, <span class="code">rgmanager</span> then decides what to do with the services that had been running on the lost node. Generally, this means restarting the services locally that had been running on the dead node. The details of this are decided by you when you configure the resources in <span class="code">rgmanager</span>. As we will see with each node's local storage service, the service is not recovered but instead left stopped. | ||
= The Task Ahead = | |||
Before we start, let's take a few minutes to discuss clustering and its complexities. | Before we start, let's take a few minutes to discuss clustering and its complexities. | ||
| Line 83: | Line 90: | ||
Coming back to earth: | Coming back to earth: | ||
Many technologies can be learned by creating a very simple base and then building on it. The classic "Hello, World!" script created when first learning a programming language is an example of this. Unfortunately, there is no real analogue to this in clustering. Even the most basic cluster requires several pieces be in place and working together. If you try to rush by ignoring pieces you think are not important, you will almost certainly waste time. A good example is setting aside [[fencing]], thinking that your test cluster's data isn't important. The cluster software has no concept of "test". It treats everything as critical all the time and ''will'' shut down if anything goes wrong. | Many technologies can be learned by creating a very simple base and then building on it. The classic "Hello, World!" script created when first learning a programming language is an example of this. Unfortunately, there is no real analogue to this in clustering. Even the most basic cluster requires several pieces be in place and working well together. If you try to rush, by ignoring pieces you think are not important, you will almost certainly waste time. A good example is setting aside [[fencing]], thinking that your test cluster's data isn't important. The cluster software has no concept of "test". It treats everything as critical all the time and ''will'' shut down if anything goes wrong. | ||
Take your time, work through these steps, and you will have the foundation cluster sooner than you realize. Clustering is fun '''because''' it is a challenge. | Take your time, work through these steps, and you will have the foundation cluster sooner than you realize. Clustering is fun '''because''' it is a challenge. | ||
| Line 89: | Line 96: | ||
== Technologies We Will Use == | == Technologies We Will Use == | ||
* ''Red Hat Enterprise Linux 6'' ([[EL6]]); You can use a derivative like [[CentOS]] v6. Specifically, we're using 6. | * ''Red Hat Enterprise Linux 6'' ([[EL6]]); You can use a derivative like [[CentOS]] v6. Specifically, we're using 6.5. | ||
* ''Red Hat Cluster Services'' "Stable" version 3. This describes the following core components: | * ''Red Hat Cluster Services'' "Stable" version 3. This describes the following core components: | ||
** ''Corosync''; Provides cluster communications using the [[totem]] protocol. | ** ''Corosync''; Provides cluster communications using the [[totem]] protocol. | ||
| Line 95: | Line 102: | ||
** ''Resource Manager'' (<span class="code">[[rgmanager]]</span>); Manages cluster resources and services. Handles service recovery during failures. | ** ''Resource Manager'' (<span class="code">[[rgmanager]]</span>); Manages cluster resources and services. Handles service recovery during failures. | ||
** ''Clustered Logical Volume Manager'' (<span class="code">[[clvm]]</span>); Cluster-aware (disk) volume manager. Backs [[GFS2]] [[filesystem]]s and [[KVM]] virtual machines. | ** ''Clustered Logical Volume Manager'' (<span class="code">[[clvm]]</span>); Cluster-aware (disk) volume manager. Backs [[GFS2]] [[filesystem]]s and [[KVM]] virtual machines. | ||
** ''Global File | ** ''Global File System'' version 2 (<span class="code">[[gfs2]]</span>); Cluster-aware, concurrently mountable file system. | ||
* ''Distributed Redundant Block Device'' ([[DRBD]]); Keeps shared data synchronized across cluster nodes. | * ''Distributed Redundant Block Device'' ([[DRBD]]); Keeps shared data synchronized across cluster nodes. | ||
* ''KVM''; [[Hypervisor]] that controls and supports virtual machines. | * ''KVM''; [[Hypervisor]] that controls and supports virtual machines. | ||
* Alteeve's Niche! Cluster | * Alteeve's Niche! Cluster Dashboard and Cluster Monitor | ||
== A Note on Hardware == | == A Note on Hardware == | ||
| Line 104: | Line 111: | ||
[[Image:RX300-S7_close-up_01.jpg|thumb|right|500px|RX300 S7]] | [[Image:RX300-S7_close-up_01.jpg|thumb|right|500px|RX300 S7]] | ||
Another new change is that Alteeve's Niche!, after years of experimenting with various hardware | Another new change is that Alteeve's Niche!, after years of experimenting with various hardware, has partnered with [[Fujitsu]]. We chose them because of the unparalleled quality of their equipment. | ||
This tutorial can be used on any manufacturer's hardware, provided it meets the minimum requirements listed below. That said, we strongly recommend readers give Fujitsu's [http://www.fujitsu.com/fts/products/computing/servers/primergy/rack/ RX-line] of servers a close look. We do not get a discount for this recommendation, we genuinely love the quality of their gear. The only technical argument for using Fujitsu hardware is that we do all our cluster stack monitoring software development on Fujitsu RX200 and RX300 servers | This tutorial can be used on any manufacturer's hardware, provided it meets the minimum requirements listed below. That said, we strongly recommend readers give Fujitsu's [http://www.fujitsu.com/fts/products/computing/servers/primergy/rack/ RX-line] of servers a close look. We do not get a discount for this recommendation, we genuinely love the quality of their gear. The only technical argument for using Fujitsu hardware is that we do all our cluster stack monitoring software development on Fujitsu RX200 and RX300 servers, so we can say with confidence that the AN! software components will work well on their kit. | ||
If you use any other hardware vendor and run into any trouble, please don't hesitate to [[Support|contact us]]. We want to make sure that our HA stack works on as many systems as possible and will be happy to help out. Of course, all Alteeve code is open source, so [https://github.com/digimer/an-cdb contributions] are always welcome, too! | If you use any other hardware vendor and run into any trouble, please don't hesitate to [[Support|contact us]]. We want to make sure that our HA stack works on as many systems as possible and will be happy to help out. Of course, all Alteeve code is open source, so [https://github.com/digimer/an-cdb contributions] are always welcome, too! | ||
| Line 114: | Line 121: | ||
The goal of this tutorial is to help you build an HA platform with zero single points of failure. In order to do this, certain minimum technical requirements must be met. | The goal of this tutorial is to help you build an HA platform with zero single points of failure. In order to do this, certain minimum technical requirements must be met. | ||
Bare minimum requirements | Bare minimum requirements: | ||
* Two servers with the following; | * Two servers with the following; | ||
** | ** A CPU with [https://en.wikipedia.org/wiki/Hardware-assisted_virtualization hardware-accelerated virtualization] | ||
** Redundant power supplies | ** Redundant power supplies | ||
** [[IPMI]] or vendor-specific [https://en.wikipedia.org/wiki/Integrated_Remote_Management_Controller out-of-band management], like Fujitsu's iRMC, HP's iLO, Dell's iDRAC, etc | ** [[IPMI]] or vendor-specific [https://en.wikipedia.org/wiki/Integrated_Remote_Management_Controller out-of-band management], like Fujitsu's iRMC, HP's iLO, Dell's iDRAC, etc | ||
** Six network interfaces, 1 Gbit or faster (yes, six!) | ** Six network interfaces, 1 [[Gbit]] or faster (yes, six!) | ||
** 2 [[GiB]] of RAM and 44.5 GiB of storage for the host operating system, plus sufficient RAM and storage for your VMs | ** 2 [[GiB]] of RAM and 44.5 GiB of storage for the host operating system, plus sufficient RAM and storage for your VMs | ||
* Two switched [[PDU]]s; APC-brand recommended but any with a supported [[fence agent]] is fine | * Two switched [[PDU]]s; APC-brand recommended but any with a supported [[fence agent]] is fine | ||
* Two network switches | * Two network switches | ||
== Recommended Hardware; A Little More Detail == | == Recommended Hardware; A Little More Detail == | ||
The previous section | The previous section covered the bare-minimum system requirements for following this tutorial. If you are looking to build an ''Anvil!'' for production, we need to discuss important considerations for selecting hardware. | ||
=== The Most Important Consideration - Storage === | === The Most Important Consideration - Storage === | ||
| Line 133: | Line 140: | ||
There is probably no single consideration more important than choosing the storage you will use. | There is probably no single consideration more important than choosing the storage you will use. | ||
In our years of building Anvil! HA platforms, we've found no single issue more important than storage latency. This is true for all virtualized environments, in fact. | In our years of building ''Anvil!'' HA platforms, we've found no single issue more important than storage latency. This is true for all virtualized environments, in fact. | ||
The problem is this: | The problem is this: | ||
Multiple servers on shared storage can cause particularly random storage access. Traditional hard drives have disks with mechanical read/write heads on the ends of arms that sweep back and forth across the disk surfaces. These platters are broken up into "tracks" and each track is itself cut up into "sectors". | Multiple servers on shared storage can cause particularly random storage access. Traditional hard drives have disks with mechanical read/write heads on the ends of arms that sweep back and forth across the disk surfaces. These platters are broken up into "tracks" and each track is itself cut up into "sectors". When a server needs to read or write data, the hard drive needs to sweep the arm over the track it wants and then wait there for the sector it wants to pass underneath. | ||
This time taken to get the read/write head onto the track and then wait for the sector to pass underneath is called "seek latency". How long this latency actually | This time taken to get the read/write head onto the track and then wait for the sector to pass underneath is called "seek latency". How long this latency actually is depends on a few things: | ||
* How fast are the platters rotating? The faster the platter speed, the less time it takes for a sector to pass under the read/write head. | * How fast are the platters rotating? The faster the platter speed, the less time it takes for a sector to pass under the read/write head. | ||
* How fast the read/write arms can move and how far they have to travel between tracks | * How fast the read/write arms can move and how far do they have to travel between tracks? Highly random read/write requests can cause a lot of head travel and increase seek time. | ||
* How many read/write requests | * How many read/write requests ([[IOPS]]) can your storage handle? If your storage can not process the incoming read/write requests fast enough, your storage can slow down or stall entirely. | ||
When many people think about hard drives, they generally worry about maximum write speeds. For environments with many virtual servers, this is actually far less important than it might seem. Reducing latency to ensure that read/write requests don't back up is far more important. If too many requests back | When many people think about hard drives, they generally worry about maximum write speeds. For environments with many virtual servers, this is actually far less important than it might seem. Reducing latency to ensure that read/write requests don't back up is far more important. This is measured as the storage's [[IOPS]] performance. If too many requests back up in the cache, storage performance can collapse or stall out entirely. | ||
This is particularly problematic when multiple servers try to boot at the same time. If, for example, a node with multiple servers dies, the surviving node will try to start the lost servers at nearly the same time. This causes a sudden dramatic rise in read requests and can cause all servers to hang entirely, a condition called a "boot storm". | This is particularly problematic when multiple servers try to boot at the same time. If, for example, a node with multiple servers dies, the surviving node will try to start the lost servers at nearly the same time. This causes a sudden dramatic rise in read requests and can cause all servers to hang entirely, a condition called a "boot storm". | ||
| Line 151: | Line 158: | ||
Thankfully, this latency problem can be easily dealt with in one of three ways; | Thankfully, this latency problem can be easily dealt with in one of three ways; | ||
# Use solid-state drives. These have no moving parts, so there is | # Use solid-state drives. These have no moving parts, so there is less penalty for highly random read/write requests. | ||
# Use fast platter drives and proper [[RAID]] controllers with [[write-back]] caching. | # Use fast platter drives and proper [[RAID]] controllers with [[write-back]] caching. | ||
# Isolate each server onto dedicated platter drives. | # Isolate each server onto dedicated platter drives. | ||
| Line 162: | Line 169: | ||
!Con | !Con | ||
|- | |- | ||
|Fast drives + Write-back caching | |Fast drives + [[Write-back caching]] | ||
|15,000rpm SAS drives are extremely reliable and the high rotation speeds minimize latency caused by waiting for sectors to pass under the read/write heads. Using multiple drives in [[RAID]] [[TLUG_Talk:_Storage_Technologies_and_Theory#Level_5|level 5]] or [[TLUG_Talk:_Storage_Technologies_and_Theory#Level_6|level 6]] breaks up reads and writes into smaller pieces, allowing requests to be serviced quickly and | |15,000rpm SAS drives are extremely reliable and the high rotation speeds minimize latency caused by waiting for sectors to pass under the read/write heads. Using multiple drives in [[RAID]] [[TLUG_Talk:_Storage_Technologies_and_Theory#Level_5|level 5]] or [[TLUG_Talk:_Storage_Technologies_and_Theory#Level_6|level 6]] breaks up reads and writes into smaller pieces, allowing requests to be serviced quickly and to help keep the read/write buffer empty. Write-back caching allows RAM-like write speeds and the ability to re-order disk access to minimize head movement. | ||
|The main con is the number of disks needed to get effective performance gains from [[TLUG_Talk:_Storage_Technologies_and_Theory#RAID|striping]]. | |The main con is the number of disks needed to get effective performance gains from [[TLUG_Talk:_Storage_Technologies_and_Theory#RAID|striping]]. Alteeve always uses a minimum of six disks, but many entry-level servers support a maximum of 4 drives. You need to account for the number of disks you plan to use when selecting your hardware. | ||
|- | |- | ||
|SSDs | |SSDs | ||
| | |They have no moving parts, so read and write requests do not have to wait for mechanical movements to happen, drastically reducing latency. The minimum number of drives for SSD-based configuration is two. | ||
|Solid state drives use [[NAND]] flash, which can only be written to a finite number of times. All drives in our Anvil! will be written to roughly the same amount, so hitting this write-limit could mean that all drives in both nodes would fail at nearly the same time. Avoiding this requires careful monitoring of the drives and replacing them before their write limits are hit. | |Solid state drives use [[NAND]] flash, which can only be written to a finite number of times. All drives in our ''Anvil!'' will be written to roughly the same amount, so hitting this write-limit could mean that all drives in both nodes would fail at nearly the same time. Avoiding this requires careful monitoring of the drives and replacing them before their write limits are hit. | ||
{{note|1=Enterprise grade SSDs are designed to handle highly random, multi-threaded workloads and come at a significant cost. Consumer-grade SSDs are designed principally for single threaded, large accesses and do not offer the same benefits.}} | |||
|- | |- | ||
|Isolated Storage | |Isolated Storage | ||
|Dedicating hard drives to virtual servers avoids the highly random read/write issues found when multiple servers share the same storage. This allows for the safe use of cheap, inexpensive hard drives. This also means that dedicated hardware RAID controllers with battery-backed cache are not needed. This makes it possible to save a good amount of money in the hardware design. | |Dedicating hard drives to virtual servers avoids the highly random read/write issues found when multiple servers share the same storage. This allows for the safe use of cheap, inexpensive hard drives. This also means that dedicated hardware RAID controllers with battery-backed cache are not needed. This makes it possible to save a good amount of money in the hardware design. | ||
|The obvious down-side to isolated storage is that you significantly limit the number of servers you can host on your Anvil!. If you only need to support one or two servers | |The obvious down-side to isolated storage is that you significantly limit the number of servers you can host on your ''Anvil!''. If you only need to support one or two servers, this should not be an issue. | ||
|} | |} | ||
| Line 180: | Line 188: | ||
* SAS drives are generally aimed at the enterprise environment and are built to much higher quality standards. SAS HDDs have rotational speeds of up to 15,000rpm and can handle far more read/write operations per second. Enterprise SSDs using the SAS interface are also much more reliable than their commercial counterpart. The main downside to SAS drives is their cost. | * SAS drives are generally aimed at the enterprise environment and are built to much higher quality standards. SAS HDDs have rotational speeds of up to 15,000rpm and can handle far more read/write operations per second. Enterprise SSDs using the SAS interface are also much more reliable than their commercial counterpart. The main downside to SAS drives is their cost. | ||
In all production environments, we strongly, strongly recommend SAS-connected drives. For | In all production environments, we strongly, strongly recommend SAS-connected drives. For non-production environments, SATA drives are fine. | ||
==== Extra Security - LSI SafeStore ==== | |||
If security is a particular concern of yours, then you can look at using [https://en.wikipedia.org/wiki/Hardware-based_full_disk_encryption self-encrypting] hard drives along with LSI's [[LSI SafeStore|SafeStore]] option. An example hard drive, which we've tested and validated, would be the Seagate [http://www.seagate.com/internal-hard-drives/enterprise-hard-drives/hdd/enterprise-performance-10K-hdd/ ST1800MM0038] drives. In general, if the drive advertises "[http://www.seagate.com/tech-insights/protect-data-with-seagate-secure-self-encrypting-drives-master-ti/ SED]" support, it should work fine. | |||
RAM is a far simpler topic than storage, thankfully. Here, all you need to do is add up how much RAM you plan to assign to servers, add at least 2 [[GiB]] for the host, and then install that much memory in your nodes. | The provides the ability to: | ||
* Encrypt all data with [https://en.wikipedia.org/wiki/Advanced_Encryption_Standard AES-256] grade encryption without a performance hit. | |||
* Require a pass phrase on boot to decrypt the server's data. | |||
* Protect the contents of the drives while "at rest" (ie: while being shipped somewhere). | |||
* Execute a [https://github.com/digimer/striker/blob/master/tools/anvil-self-destruct self-destruct] sequence. | |||
Obviously, most users won't need this, but it might be useful to some users in sensitive environments like embassies in less than friendly host countries. | |||
=== RAM - Preparing for Degradation === | |||
RAM is a far simpler topic than storage, thankfully. Here, all you need to do is add up how much RAM you plan to assign to servers, add at least 2 [[GiB]] for the host (we recommend 4), and then install that much memory in both of your nodes. | |||
In production, there are two technologies you will want to consider; | In production, there are two technologies you will want to consider; | ||
* [[ECC]], error | * [[ECC]], error-correcting code, provide the ability for RAM to recover from single-[[bit]] errors. If you are familiar with how [[TLUG_Talk:_Storage_Technologies_and_Theory#RAID|parity]] in RAID arrays work, ECC in RAM is the same idea. This is often included in server-class hardware by default. It is highly recommended. | ||
* [http://www.fujitsu.com/global/services/computing/server/sparcenterprise/technology/availability/memory.html Memory Mirroring] is, continuing our storage comparison, [[TLUG_Talk:_Storage_Technologies_and_Theory#Level_1|RAID level 1]] for RAM. All writes to memory go to two different chips. Should one fail, the contents of the RAM can still be read from the surviving module. | * [http://www.fujitsu.com/global/services/computing/server/sparcenterprise/technology/availability/memory.html Memory Mirroring] is, continuing our storage comparison, [[TLUG_Talk:_Storage_Technologies_and_Theory#Level_1|RAID level 1]] for RAM. All writes to memory go to two different chips. Should one fail, the contents of the RAM can still be read from the surviving module. | ||
=== Never Over Provision! === | === Never Over-Provision! === | ||
"Over-provisioning", also called "[https://en.wikipedia.org/wiki/Thin_provisioning | "Over-provisioning", also called "[https://en.wikipedia.org/wiki/Thin_provisioning thin provisioning]" is a concept made popular in many "cloud" technologies. It is a concept that has almost no place in HA environments. | ||
A common example is creating virtual disks of a given apparent size, but which only pull space from real storage as needed. So if you created a "thin" virtual disk that was 80 [[GiB]] large, but only 20 GiB worth of data was used, only 20 GiB from the real storage would be used. | A common example is creating virtual disks of a given apparent size, but which only pull space from real storage as needed. So if you created a "thin" virtual disk that was 80 [[GiB]] large, but only 20 GiB worth of data was used, only 20 GiB from the real storage would be used. | ||
In essence; Over-provisioning is where you allocate more resources to servers than the nodes can actually provide, banking on the hopes that most servers will not use all of the | In essence; Over-provisioning is where you allocate more resources to servers than the nodes can actually provide, banking on the hopes that most servers will not use all of the resources allocated to them. The danger here, and the reason it has almost no place in HA, is that if the servers collectively use more resources than the nodes can provide, something is going to crash. | ||
=== CPU Cores - Possibly Acceptable Over-Provisioning === | === CPU Cores - Possibly Acceptable Over-Provisioning === | ||
| Line 203: | Line 223: | ||
Over provisioning of RAM and storage is never acceptable in an HA environment, as mentioned. Over-allocating CPU cores is possibly acceptable though. | Over provisioning of RAM and storage is never acceptable in an HA environment, as mentioned. Over-allocating CPU cores is possibly acceptable though. | ||
When selecting which CPUs to use in your nodes, the number of cores and the speed of the cores will determine how much computational horse-power you have to allocate to your servers. The main considerations are | When selecting which CPUs to use in your nodes, the number of cores and the speed of the cores will determine how much computational horse-power you have to allocate to your servers. The main considerations are: | ||
* Core speed; Any given "[https://en.wikipedia.org/wiki/Thread_%28computing%29 thread]" can be processed by a single CPU core at a time. The faster the given core is, the faster it can process any given request. Many applications do not support [https://en.wikipedia.org/wiki/Thread_%28computing%29#Multithreading multithreading], meaning that the only way to improve performance is to use faster cores, not more cores. | * Core speed; Any given "[https://en.wikipedia.org/wiki/Thread_%28computing%29 thread]" can be processed by a single CPU core at a time. The faster the given core is, the faster it can process any given request. Many applications do not support [https://en.wikipedia.org/wiki/Thread_%28computing%29#Multithreading multithreading], meaning that the only way to improve performance is to use faster cores, not more cores. | ||
| Line 210: | Line 230: | ||
In processing, each CPU "[https://en.wikipedia.org/wiki/Multi-core_processor core]" can handle one program "[https://en.wikipedia.org/wiki/Thread_%28computing%29 thread]" at a time. Since the earliest days of [https://en.wikipedia.org/wiki/Multitasking multitasking], operating systems have been able to handle threads waiting for a CPU resource to free up. So the risk of over-provisioning CPUs is restricted to performance issues only. | In processing, each CPU "[https://en.wikipedia.org/wiki/Multi-core_processor core]" can handle one program "[https://en.wikipedia.org/wiki/Thread_%28computing%29 thread]" at a time. Since the earliest days of [https://en.wikipedia.org/wiki/Multitasking multitasking], operating systems have been able to handle threads waiting for a CPU resource to free up. So the risk of over-provisioning CPUs is restricted to performance issues only. | ||
If you're building an Anvil! to support multiple servers and it's important that, no matter how busy the other servers are, the performance of each server can not degrade, then you need to be sure you have as many real CPU cores as you plan to assign to servers. | If you're building an ''Anvil!'' to support multiple servers and it's important that, no matter how busy the other servers are, the performance of each server can not degrade, then you need to be sure you have as many real CPU cores as you plan to assign to servers. | ||
So for example, if you plan to have three servers and you plan to allocate each server four virtual CPU cores, you need a minimum of 13 real CPU cores (3 servers x 4 cores each plus at least one core for the node). In this scenario, you will want to choose servers with dual 8-core CPUs, for a total of 16 available real CPU cores. You may choose to buy two 6-core CPUs, for a total of 12 real cores, but you risk congestion still. If all three servers fully utilize their four cores at the same time, the host OS will be left with no available core for | So for example, if you plan to have three servers and you plan to allocate each server four virtual CPU cores, you need a minimum of 13 real CPU cores (3 servers x 4 cores each plus at least one core for the node). In this scenario, you will want to choose servers with dual 8-core CPUs, for a total of 16 available real CPU cores. You may choose to buy two 6-core CPUs, for a total of 12 real cores, but you risk congestion still. If all three servers fully utilize their four cores at the same time, the host OS will be left with no available core for its software, which manages the HA stack. | ||
In many cases, however, risking a performance loss under periods of high CPU load is acceptable. In these cases, allocating more virtual cores than you have real cores is fine. Should the load of the servers climb to a point where all real cores are under 100% utilization, then some applications will slow down as they wait for their turn in the CPU. | In many cases, however, risking a performance loss under periods of high CPU load is acceptable. In these cases, allocating more virtual cores than you have real cores is fine. Should the load of the servers climb to a point where all real cores are under 100% utilization, then some applications will slow down as they wait for their turn in the CPU. | ||
In the end, the decision whether to over-provision CPU cores or not, and if so | In the end, the decision whether to over-provision CPU cores or not, and if so by how much, is up to you, the reader. Remember to consider balancing out faster cores with the number of cores. If your expected load will be short bursts of computationally intense jobs, then few-but-faster cores may be the best solution. | ||
==== A Note on Hyper-Threading ==== | ==== A Note on Hyper-Threading ==== | ||
Intel's [https://en.wikipedia.org/wiki/Hyper-threading hyper-threading] technology can make a CPU appear to the OS to have twice as many real cores than it actually has. For example, a CPU listed as "4c/8t" (four cores, eight threads) will appear to the node as | Intel's [https://en.wikipedia.org/wiki/Hyper-threading hyper-threading] technology can make a CPU appear to the OS to have twice as many real cores than it actually has. For example, a CPU listed as "4c/8t" (four cores, eight threads) will appear to the node as an 8-core CPU. In fact, you only have four cores and the additional four cores are emulated attempts to make more efficient use of the processing of each core. | ||
Simply put, the idea behind this technology is to "slip in" a second thread when the CPU would otherwise be idle. For example, if the CPU core has to wait for memory to be fetched for the currently active thread, instead of sitting idle, a thread in the second core will be worked on. | Simply put, the idea behind this technology is to "slip in" a second thread when the CPU would otherwise be idle. For example, if the CPU core has to wait for memory to be fetched for the currently active thread, instead of sitting idle, a thread in the second core will be worked on. | ||
How much benefit this gives you in the real world is debatable and highly depended on your applications. For the purposes of HA, it's recommended to not count the "HT cores" as real cores. That is to say, when calculating load, treat "4c/8t" CPUs as | How much benefit this gives you in the real world is debatable and highly depended on your applications. For the purposes of HA, it's recommended to not count the "HT cores" as real cores. That is to say, when calculating load, treat "4c/8t" CPUs as a 4-core CPUs. | ||
=== Six Network Interfaces, Seriously? === | === Six Network Interfaces, Seriously? === | ||
| Line 230: | Line 250: | ||
Yes, seriously. | Yes, seriously. | ||
Obviously, you can put everything on a single network card and your HA software will work, but it would be | Obviously, you can put everything on a single network card and your HA software will work, but it would not be advised. | ||
We will go into the network configuration at length later on. For now, here's an overview | We will go into the network configuration at length later on. For now, here's an overview: | ||
* Each network needs two links in order to be fault-tolerant. One link will go to the first network switch and the second link will go to the second network switch. This way, the failure of a network cable, port or switch will not interrupt traffic. | * Each network needs two links in order to be fault-tolerant. One link will go to the first network switch and the second link will go to the second network switch. This way, the failure of a network cable, port or switch will not interrupt traffic. | ||
* There are three main networks in an Anvil!; | * There are three main networks in an ''Anvil!''; | ||
** Back-Channel Network; This is used by the cluster stack and is sensitive to latency. Delaying traffic on this network can cause the nodes | ** Back-Channel Network; This is used by the cluster stack and is sensitive to latency. Delaying traffic on this network can cause the nodes to "partition", breaking the cluster stack. | ||
** Storage Network; All disk writes will travel over this network. As such, it is easy to saturate this network. Sharing this traffic with other services would mean that it's very possible to significantly impact network performance under high disk write loads. For this reason, it is isolated. | ** Storage Network; All disk writes will travel over this network. As such, it is easy to saturate this network. Sharing this traffic with other services would mean that it's very possible to significantly impact network performance under high disk write loads. For this reason, it is isolated. | ||
** Internet-Facing Network; This network carries traffic to and from your servers. By isolating this network, users of your servers will never experience performance loss during storage or cluster high loads. Likewise, if your users place a high load on this network, it will not impact the ability of the Anvil! to function properly. It also isolates untrusted network traffic. | ** Internet-Facing Network; This network carries traffic to and from your servers. By isolating this network, users of your servers will never experience performance loss during storage or cluster high loads. Likewise, if your users place a high load on this network, it will not impact the ability of the ''Anvil!'' to function properly. It also isolates untrusted network traffic. | ||
So, three networks, each using two links for redundancy, means that we need six network interfaces. | So, three networks, each using two links for redundancy, means that we need six network interfaces. It is strongly recommended that you use three separate dual-port network cards. Using a single network card, as we will discuss in detail later, leaves you vulnerable to losing entire networks should the controller fail. | ||
==== A Note on Dedicated IPMI Interfaces ==== | ==== A Note on Dedicated IPMI Interfaces ==== | ||
| Line 248: | Line 268: | ||
Whenever possible, it is recommended that you go with a dedicated IPMI connection. | Whenever possible, it is recommended that you go with a dedicated IPMI connection. | ||
We've found that it rarely, if ever, is possible for a node to talk to | We've found that it rarely, if ever, is possible for a node to talk to its own network interface using a shared physical port. This is not strictly a problem, but it can certainly make testing and diagnostics easier when the node can ping and query its own IPMI interface over the network. | ||
=== Network Switches === | === Network Switches === | ||
The ideal switches to use in HA | The ideal switches to use in HA clusters are [https://en.wikipedia.org/wiki/Stackable_switch stackable] and [https://en.wikipedia.org/wiki/Managed_switch managed] switches in pairs. At the very least, a pair of switches that support [https://en.wikipedia.org/wiki/Virtual_LAN VLANs] is recommended. None of this is strictly required, but here are the reasons they're recommended: | ||
* VLAN allows for totally isolating the [[BCN]], [[SN]] and [[IFN]] traffic. This adds security and reduces broadcast traffic. | * VLAN allows for totally isolating the [[BCN]], [[SN]] and [[IFN]] traffic. This adds security and reduces broadcast traffic. | ||
* | * Managed switches provide a unified interface for configuring both switches at the same time. This drastically simplifies complex configurations, like setting up VLANs that span the physical switches. | ||
* Stacking provides a link between the two switches that effectively makes them work like one. Generally, | * Stacking provides a link between the two switches that effectively makes them work like one. Generally, the bandwidth available in the stack cable is much higher than the bandwidth of individual ports. This provides a high-speed link for all three VLANs in one cable and it allows for multiple links to fail without risking performance degradation. We'll talk more about this later. | ||
Beyond these suggested features, there are a few other things to consider when choosing switches | Beyond these suggested features, there are a few other things to consider when choosing switches: | ||
{|class="wikitable" | {|class="wikitable" | ||
| Line 265: | Line 285: | ||
|- | |- | ||
|[https://en.wikipedia.org/wiki/Maximum_transmission_unit MTU] size | |[https://en.wikipedia.org/wiki/Maximum_transmission_unit MTU] size | ||
|# The default packet size on a network | | | ||
# If you have particularly large chunks of data to transmit, you may want to enable the largest MTU possible. This maximum value is determined by the smallest MTU in your network equipment. If you nice network cards that support traditional 9 [[KiB]] MTU but you have a cheap switch that supports a small jumbo frame, say | # The default packet size on a network is 1500 [[bytes]]. If you build your VLANs in software, you need to account for the extra size needed for the VLAN header. If your switch supports "[https://en.wikipedia.org/wiki/Jumbo_Frames Jumbo Frames]", then there should be no problem. However, some cheap switches do not support jumbo frames, requiring you to reduce the MTU size value for the interfaces on your nodes. | ||
# If you have particularly large chunks of data to transmit, you may want to enable the largest MTU possible. This maximum value is determined by the smallest MTU in your network equipment. If you have nice network cards that support traditional 9 [[KiB]] MTU, but you have a cheap switch that supports a small jumbo frame, say 4 KiB, your effective MTU is 4 [[KiB]]. | |||
|- | |- | ||
|Packets Per Second | |Packets Per Second | ||
| Line 272: | Line 293: | ||
|- | |- | ||
|[[Multicast]] Groups | |[[Multicast]] Groups | ||
|Some fancy switches, like some Cisco hardware, | |Some fancy switches, like some Cisco hardware, don't maintain multicast groups persistently. The cluster software uses multicast for communication, so if your switch drops a multicast group, it will cause your cluster to partition. If you have a managed switch, ensure that persistent multicast groups are enabled. We'll talk more about this later. | ||
|- | |- | ||
|Port speed and count versus Internal Fabric Bandwidth | |Port speed and count versus Internal Fabric Bandwidth | ||
|A switch that has, say, 48 [[Gbps]] ports may not be able to route 48 Gbps. This is a problem similar to over-provisioning we discussed above. If an inexpensive 48 port switch has an internal switch fabric of only 20 Gbps, then it can handle only up to 20 saturated ports at a time. Be sure to review the internal fabric capacity and make sure it's high enough to handle all connected interfaces running full speed. Note, of course, that only one link in a given bond will be active at a time. | |A switch that has, say, 48 [[Gbps]] ports may not be able to route 48 Gbps. This is a problem similar to over-provisioning we discussed above. If an inexpensive 48 port switch has an internal switch fabric of only 20 Gbps, then it can handle only up to 20 saturated ports at a time. Be sure to review the internal fabric capacity and make sure it's high enough to handle all connected interfaces running full speed. Note, of course, that only one link in a given [[network bonding|bond]] will be active at a time. | ||
|- | |- | ||
|Uplink speed | |Uplink speed | ||
|If you have a gigabit switch and you simply link the ports between the two switches, the link speed will be limited to 1 gigabit. Normally, all traffic will be kept on one switch, so this is fine | |If you have a gigabit switch and you simply link the ports between the two switches, the link speed will be limited to 1 gigabit. Normally, all traffic will be kept on one switch, so this is fine. If a single link fails over to the backup switch, then its traffic will bounce up via the uplink cable to the main switch at full speed. However, if a second link fails, both will be sharing the single gigabit uplink, so there is a risk of congestion on the link. If you can't get stacked switches, which generally have 10 Gbps speeds or higher, then look for switches with 10 Gbps dedicated uplink ports and use those for uplinks. | ||
|- | |||
|Uplinks and VLANs | |||
|When using normal ports for uplinks with VLANs defined in the switch, each uplink port will be restricted to the VLAN it is a member of. In this case, you will need one uplink cable per VLAN. | |||
|- | |- | ||
|Port [https://en.wikipedia.org/wiki/Link_aggregation Trunking] | |Port [https://en.wikipedia.org/wiki/Link_aggregation Trunking] | ||
| Line 284: | Line 308: | ||
|} | |} | ||
There are numerous other valid considerations when choosing network switches for your Anvil!. These are the most prescient considerations, though. | There are numerous other valid considerations when choosing network switches for your ''Anvil!''. These are the most prescient considerations, though. | ||
=== Why Switched PDUs? === | === Why Switched PDUs? === | ||
| Line 296: | Line 320: | ||
There is a problem with this though. Actually, two. | There is a problem with this though. Actually, two. | ||
# The IPMI draws | # The IPMI draws its power from the same power source as the server itself. If the host node loses power entirely, IPMI goes down with the host. | ||
# The IPMI BMC has a single network interface and it is a single device. | # The IPMI BMC has a single network interface and it is a single device. | ||
If we relied on IPMI-based fencing alone, we'd have a single point of failure. If the surviving node can not put the lost node into a known state, it will intentionally hang. The logic being that a hung cluster is better than risking corruption or a [[split-brain]]. This means that, with IPMI-based fencing alone, the loss of power to a single node would not be automatically recoverable. | |||
That just will not do! | That just will not do! | ||
| Line 305: | Line 329: | ||
To make fencing redundant, we will use switched [[PDU]]s. Think of these as network-connected power bars. | To make fencing redundant, we will use switched [[PDU]]s. Think of these as network-connected power bars. | ||
Imagine now that one of the nodes blew itself up. The surviving node would try to connect to | Imagine now that one of the nodes blew itself up. The surviving node would try to connect to its IPMI interface and, of course, get no response. Then it would log into both PDUs (one behind either side of the redundant power supplies) and cut the power going to the node. By doing this, we now have a way of putting a lost node into a known state. | ||
So now, no matter how badly things go wrong, we can always recover! | So now, no matter how badly things go wrong, we can always recover! | ||
| Line 311: | Line 335: | ||
=== Network Managed UPSes Are Worth It === | === Network Managed UPSes Are Worth It === | ||
We have found that a surprising number of issues that | We have found that a surprising number of issues that affect service availability are power related. A network-connected smart UPS allows you to monitor the power coming from the building mains. Thanks to this, we've been able to detect far more than simple "lost power" events. We've been able to detect failing transformers and regulators, over and under voltage events and so on. Events that, if caught ahead of time, avoid full power outages. It also protects the rest of your gear that isn't behind a UPS. | ||
So strictly speaking, you don't need network managed UPSes. However, we have found them worth their weight in gold | So strictly speaking, you don't need network managed UPSes. However, we have found them to be [http://www.wolframalpha.com/share/clip?f=d41d8cd98f00b204e9800998ecf8427ebgdg6ijlui worth their weight in gold]. We will, of course, be using them in this tutorial. | ||
=== Dashboard Servers === | === Dashboard Servers === | ||
The Anvil! will be managed by [[ | The ''Anvil!'' will be managed by [[Striker - Cluster Dashboard]], a small little dedicated server. This can be a virtual machine on a laptop or desktop, or a dedicated little server. All that matters is that it can run [[RHEL]] or [[CentOS]] version 6 with a minimal desktop. | ||
Normally, we setup a couple [http://www.asus.com/ca-en/Eee_Box_PCs/EeeBox_PC_EB1033 ASUS EeeBox] machines, for redundancy of course, hanging off the back of a monitor. | Normally, we setup a couple of [http://www.asus.com/ca-en/Eee_Box_PCs/EeeBox_PC_EB1033 ASUS EeeBox] machines, for redundancy of course, hanging off the back of a monitor. Users can connect to the dashboard using a browser from any device and control the servers and nodes easily from it. It also provides [https://en.wikipedia.org/wiki/KVM_switch KVM-like] access to the servers on the ''Anvil!'', allowing them to work on the servers when they can't connect over the network. For this reason, you will probably want to pair up the dashboard machines with a monitor that offers a decent resolution to make it easy to see the desktop of the hosted servers. | ||
== What You Should Know Before Beginning == | == What You Should Know Before Beginning == | ||
| Line 329: | Line 353: | ||
Patience is vastly more important than any pre-existing skill. | Patience is vastly more important than any pre-existing skill. | ||
== A Word | == A Word on Complexity == | ||
Introducing the <span class="code">Fabimer | Introducing the <span class="code">Fabimer principle</span>: | ||
Clustering is not inherently hard, but it is inherently complex. Consider: | Clustering is not inherently hard, but it is inherently complex. Consider: | ||
| Line 338: | Line 362: | ||
** [[RHCS]] uses; <span class="code">cman</span>, <span class="code">corosync</span>, <span class="code">dlm</span>, <span class="code">fenced</span>, <span class="code">rgmanager</span>, and many more smaller apps. | ** [[RHCS]] uses; <span class="code">cman</span>, <span class="code">corosync</span>, <span class="code">dlm</span>, <span class="code">fenced</span>, <span class="code">rgmanager</span>, and many more smaller apps. | ||
** We will be adding <span class="code">DRBD</span>, <span class="code">GFS2</span>, <span class="code">clvmd</span>, <span class="code">libvirtd</span> and <span class="code">KVM</span>. | ** We will be adding <span class="code">DRBD</span>, <span class="code">GFS2</span>, <span class="code">clvmd</span>, <span class="code">libvirtd</span> and <span class="code">KVM</span>. | ||
** Right there, we have <span class="code">N | ** Right there, we have <span class="code">N * 10</span> possible bugs. We'll call this <span class="code">A</span>. | ||
* A cluster has <span class="code">Y</span> nodes. | * A cluster has <span class="code">Y</span> nodes. | ||
** In our case, <span class="code">2</span> nodes, each with <span class="code">3</span> networks across <span class="code">6</span> interfaces bonded into pairs. | ** In our case, <span class="code">2</span> nodes, each with <span class="code">3</span> networks across <span class="code">6</span> interfaces bonded into pairs. | ||
** The network infrastructure (Switches, routers, etc). We will be using two managed switches, adding another layer of complexity. | ** The network infrastructure (Switches, routers, etc). We will be using two managed switches, adding another layer of complexity. | ||
** This gives us another <span class="code">Y | ** This gives us another <span class="code">Y * (2*(3*2))+2</span>, the <span class="code">+2</span> for managed switches. We'll call this <span class="code">B</span>. | ||
* Let's add the human factor. Let's say that a person needs roughly 5 years of cluster experience to be considered an proficient. For each year less than this, add a <span class="code">Z</span> "oops" factor, <span class="code">(5-Z) | * Let's add the human factor. Let's say that a person needs roughly 5 years of cluster experience to be considered an proficient. For each year less than this, add a <span class="code">Z</span> "oops" factor, <span class="code">(5-Z) * 2</span>. We'll call this <span class="code">C</span>. | ||
* So, finally, add up the complexity, using this tutorial's layout, 0-years of experience and managed switches. | * So, finally, add up the complexity, using this tutorial's layout, 0-years of experience and managed switches. | ||
** <span class="code">(N | ** <span class="code">(N * 10) * (Y * (2*(3*2))+2) * ((5-0) * 2) == (A * B * C)</span> == an-unknown-but-big-number. | ||
This isn't meant to scare you away, but it is meant to be a sobering statement. Obviously, those numbers are somewhat artificial, but the point remains. | This isn't meant to scare you away, but it is meant to be a sobering statement. Obviously, those numbers are somewhat artificial, but the point remains. | ||
| Line 367: | Line 391: | ||
* Clustering is easy, but it has a complex web of inter-connectivity. You must grasp this network if you want to be an effective cluster administrator! | * Clustering is easy, but it has a complex web of inter-connectivity. You must grasp this network if you want to be an effective cluster administrator! | ||
== Component; | == Component; Cman == | ||
The <span class="code">cman</span> portion of the the cluster is the '''c'''luster '''man'''ager. In the 3.0 series used in [[EL6]], <span class="code">cman</span> acts mainly as a [[quorum]] provider. That is, is adds up the votes from the cluster members and decides if there is a simple majority. If there is, the cluster is "quorate" and is allowed to provide cluster services. | The <span class="code">cman</span> portion of the the cluster is the '''c'''luster '''man'''ager. In the 3.0 series used in [[EL6]], <span class="code">cman</span> acts mainly as a [[quorum]] provider. That is, is adds up the votes from the cluster members and decides if there is a simple majority. If there is, the cluster is "quorate" and is allowed to provide cluster services. | ||
| Line 373: | Line 397: | ||
The <span class="code">cman</span> service will be used to start and stop all of the components needed to make the cluster operate. | The <span class="code">cman</span> service will be used to start and stop all of the components needed to make the cluster operate. | ||
== Component; | == Component; Corosync == | ||
Corosync is the heart of the cluster. Almost all other cluster compnents operate though this. | Corosync is the heart of the cluster. Almost all other cluster compnents operate though this. | ||
In Red Hat clusters, <span class="code">corosync</span> is configured via the central <span class="code">cluster.conf</span> file. | In Red Hat clusters, <span class="code">corosync</span> is configured via the central <span class="code">cluster.conf</span> file. In other cluster stacks, like pacemaker, it can be configured directly in <span class="code">corosync.conf</span>, but given that we will be building an RHCS cluster, this is not used. We will only use <span class="code">cluster.conf</span>. That said, almost all <span class="code">corosync.conf</span> options are available in <span class="code">cluster.conf</span>. This is important to note as you will see references to both configuration files when searching the Internet. | ||
Corosync sends messages using [[multicast]] messaging by default. Recently, [[unicast]] support has been added, but due to network latency, it is only recommended for use with small clusters of two to four nodes. We will be using [[multicast]] in this tutorial. | Corosync sends messages using [[multicast]] messaging by default. Recently, [[unicast]] support has been added, but due to network latency, it is only recommended for use with small clusters of two to four nodes. We will be using [[multicast]] in this tutorial. | ||
=== A Little History === | === A Little History === | ||
Please see this article for a better discussion on the history of HA: | |||
* [[High-Availability Clustering in the Open Source Ecosystem]] | |||
There were significant changes between [[RHCS]] the old version 2 and version 3 available on [[EL6]], which we are using. | There were significant changes between [[RHCS]] the old version 2 and version 3 available on [[EL6]], which we are using. | ||
| Line 395: | Line 423: | ||
In [[EL6]], <span class="code">corosync</span> is version 1.4. Upstream, however, it's passed version 2. One of the major changes in the 2+ version is that <span class="code">corosync</span> becomes a quorum provider, helping to remove the need for <span class="code">cman</span>. If you experiment with clustering on [[Fedora]], for example, you will find that cman is gone entirely. | In [[EL6]], <span class="code">corosync</span> is version 1.4. Upstream, however, it's passed version 2. One of the major changes in the 2+ version is that <span class="code">corosync</span> becomes a quorum provider, helping to remove the need for <span class="code">cman</span>. If you experiment with clustering on [[Fedora]], for example, you will find that cman is gone entirely. | ||
== Concept; | == Concept; Quorum == | ||
[[Quorum]] is defined as the minimum set of hosts required in order to provide clustered services and is used to prevent [[split-brain]] situations. | [[Quorum]] is defined as the minimum set of hosts required in order to provide clustered services and is used to prevent [[split-brain]] situations. | ||
| Line 403: | Line 431: | ||
The idea behind quorum is that, when a cluster splits into two or more partitions, which ever group of machines has quorum can safely start clustered services knowing that no other lost nodes will try to do the same. | The idea behind quorum is that, when a cluster splits into two or more partitions, which ever group of machines has quorum can safely start clustered services knowing that no other lost nodes will try to do the same. | ||
Take this scenario | Take this scenario: | ||
* You have a cluster of four nodes, each with one vote. | * You have a cluster of four nodes, each with one vote. | ||
| Line 429: | Line 457: | ||
This is provided by <span class="code">corosync</span> using "closed process groups", <span class="code">[[CPG]]</span>. A closed process group is simply a private group of processes in a cluster. Within this closed group, all messages between members are ordered. Delivery, however, is not guaranteed. If a member misses messages, it is up to the member's application to decide what action to take. | This is provided by <span class="code">corosync</span> using "closed process groups", <span class="code">[[CPG]]</span>. A closed process group is simply a private group of processes in a cluster. Within this closed group, all messages between members are ordered. Delivery, however, is not guaranteed. If a member misses messages, it is up to the member's application to decide what action to take. | ||
Let's look at two scenarios showing how locks are handled using CPG | Let's look at two scenarios showing how locks are handled using CPG: | ||
* The cluster starts up cleanly with two members. | * The cluster starts up cleanly with two members. | ||
* Both members are able to start <span class="code">service:foo</span>. | * Both members are able to start <span class="code">service:foo</span>. | ||
* Both want to start it, but need a lock from [[DLM]] to do so. | * Both want to start it, but need a lock from [[DLM]] to do so. | ||
** The <span class="code">an- | ** The <span class="code">an-a05n01</span> member has its totem token, and sends its request for the lock. | ||
** DLM issues a lock for that service to <span class="code">an- | ** DLM issues a lock for that service to <span class="code">an-a05n01</span>. | ||
** The <span class="code">an- | ** The <span class="code">an-a05n02</span> member requests a lock for the same service. | ||
** DLM rejects the lock request. | ** DLM rejects the lock request. | ||
* The <span class="code">an- | * The <span class="code">an-a05n01</span> member successfully starts <span class="code">service:foo</span> and announces this to the CPG members. | ||
* The <span class="code">an- | * The <span class="code">an-a05n02</span> sees that <span class="code">service:foo</span> is now running on <span class="code">an-a05n01</span> and no longer tries to start the service. | ||
* The two members want to write to a common area of the <span class="code">/shared</span> GFS2 partition. | * The two members want to write to a common area of the <span class="code">/shared</span> GFS2 partition. | ||
** The <span class="code">an- | ** The <span class="code">an-a05n02</span> sends a request for a DLM lock against the FS, gets it. | ||
** The <span class="code">an- | ** The <span class="code">an-a05n01</span> sends a request for the same lock, but DLM sees that a lock is pending and rejects the request. | ||
** The <span class="code">an- | ** The <span class="code">an-a05n02</span> member finishes altering the file system, announces the changed over CPG and releases the lock. | ||
** The <span class="code">an- | ** The <span class="code">an-a05n01</span> member updates its view of the filesystem, requests a lock, receives it and proceeds to update the filesystems. | ||
** It completes the changes, annouces the changes over CPG and releases the lock. | ** It completes the changes, annouces the changes over CPG and releases the lock. | ||
| Line 507: | Line 535: | ||
We prefer the term "fencing" because the fundamental goal is to put the target node into a state where it can not effect cluster resources or provide clustered services. This can be accomplished by powering it off, called "power fencing", or by disconnecting it from SAN storage and/or network, a process called "fabric fencing". | We prefer the term "fencing" because the fundamental goal is to put the target node into a state where it can not effect cluster resources or provide clustered services. This can be accomplished by powering it off, called "power fencing", or by disconnecting it from SAN storage and/or network, a process called "fabric fencing". | ||
The term "STONITH", based on | The term "STONITH", based on its acronym, implies power fencing. This is not a big deal, but it is the reason this tutorial sticks with the term "fencing". | ||
== Component; | == Component; Totem == | ||
The <span class="code">[[totem]]</span> protocol defines message passing within the cluster and it is used by <span class="code">corosync</span>. A token is passed around all the nodes in the cluster, and nodes can only send messages while they have the token. A node will keep its messages in memory until it gets the token back with no "not ack" messages. This way, if a node missed a message, it can request it be resent when it gets its token. If a node isn't up, it will simply miss the messages. | The <span class="code">[[totem]]</span> protocol defines message passing within the cluster and it is used by <span class="code">corosync</span>. A token is passed around all the nodes in the cluster, and nodes can only send messages while they have the token. A node will keep its messages in memory until it gets the token back with no "not ack" messages. This way, if a node missed a message, it can request it be resent when it gets its token. If a node isn't up, it will simply miss the messages. | ||
| Line 515: | Line 543: | ||
The <span class="code">totem</span> protocol supports something called '<span class="code">rrp</span>', '''R'''edundant '''R'''ing '''P'''rotocol. Through <span class="code">rrp</span>, you can add a second backup ring on a separate network to take over in the event of a failure in the first ring. In RHCS, these rings are known as "<span class="code">ring 0</span>" and "<span class="code">ring 1</span>". The RRP is being re-introduced in RHCS version 3. Its use is experimental and should only be used with plenty of testing. | The <span class="code">totem</span> protocol supports something called '<span class="code">rrp</span>', '''R'''edundant '''R'''ing '''P'''rotocol. Through <span class="code">rrp</span>, you can add a second backup ring on a separate network to take over in the event of a failure in the first ring. In RHCS, these rings are known as "<span class="code">ring 0</span>" and "<span class="code">ring 1</span>". The RRP is being re-introduced in RHCS version 3. Its use is experimental and should only be used with plenty of testing. | ||
== Component; | == Component; Rgmanager == | ||
When the cluster membership changes, <span class="code">corosync</span> tells the <span class="code">rgmanager</span> that it needs to recheck its services. It will examine what changed and then will start, stop, migrate or recover cluster resources as needed. | When the cluster membership changes, <span class="code">corosync</span> tells the <span class="code">rgmanager</span> that it needs to recheck its services. It will examine what changed and then will start, stop, migrate or recover cluster resources as needed. | ||
| Line 527: | Line 555: | ||
[[Pacemaker]] is also a resource manager, like rgmanager. You can not use both in the same cluster. | [[Pacemaker]] is also a resource manager, like rgmanager. You can not use both in the same cluster. | ||
Back prior to 2008, there were two distinct open-source cluster projects | Back prior to 2008, there were two distinct open-source cluster projects: | ||
* Red Hat's Cluster Service | * Red Hat's Cluster Service | ||
* Linux-HA's Heartbeat | * Linux-HA's Heartbeat | ||
Pacemaker was born out of the Linux-HA project as an advanced resource manager that could use either heartbeat or openais for cluster membership and communication. Unlike RHCS and heartbeat, | Pacemaker was born out of the Linux-HA project as an advanced resource manager that could use either heartbeat or openais for cluster membership and communication. Unlike RHCS and heartbeat, its sole focus was resource management. | ||
In 2008, plans were made to begin the slow process of merging the two independent stacks into one. As mentioned in the corosync overview, it replaced openais and became the default cluster membership and communication layer for both RHCS and Pacemaker. Development of heartbeat was ended, though [http://www.linbit.com/en/company/news/125-linbit-takes-over-heartbeat-maintenance Linbit] continues to maintain the heartbeat code to this day. | In 2008, plans were made to begin the slow process of merging the two independent stacks into one. As mentioned in the corosync overview, it replaced openais and became the default cluster membership and communication layer for both RHCS and Pacemaker. Development of heartbeat was ended, though [http://www.linbit.com/en/company/news/125-linbit-takes-over-heartbeat-maintenance Linbit] continues to maintain the heartbeat code to this day. | ||
| Line 539: | Line 567: | ||
Red Hat introduced pacemaker as "Tech Preview" in [[RHEL]] 6.0. It has been available beside RHCS ever since, though support is not offered yet[https://access.redhat.com/site/documentation/en-US/Red_Hat_Enterprise_Linux/6-Beta/html/Configuring_the_Red_Hat_High_Availability_Add-On_with_Pacemaker/ *]. | Red Hat introduced pacemaker as "Tech Preview" in [[RHEL]] 6.0. It has been available beside RHCS ever since, though support is not offered yet[https://access.redhat.com/site/documentation/en-US/Red_Hat_Enterprise_Linux/6-Beta/html/Configuring_the_Red_Hat_High_Availability_Add-On_with_Pacemaker/ *]. | ||
{{note|1=Pacemaker entered full support with the release of RHEL 6.5. It is also the only available HA stack on RHEL 7 beta. This is a strong indication that, indeed, corosync and pacemaker will be the future HA stack on RHEL.}} | |||
Red Hat has a strict policy of not saying what will happen in the future. That said, the speculation is that Pacemaker will become supported soon and will replace rgmanager entirely in RHEL 7, given that cman and rgmanager no longer exist upstream in Fedora. | Red Hat has a strict policy of not saying what will happen in the future. That said, the speculation is that Pacemaker will become supported soon and will replace rgmanager entirely in RHEL 7, given that cman and rgmanager no longer exist upstream in Fedora. | ||
| Line 546: | Line 576: | ||
We believe that, no matter how promising software looks, stability is king. Pacemaker on other distributions has been stable and supported for a long time. However, on RHEL, it's a recent addition and the developers have been doing a tremendous amount of work on pacemaker and associated tools. For this reason, we feel that on RHEL 6, pacemaker is too much of a moving target at this time. That said, we do intend to switch to pacemaker some time in the next year or two, depending on how the Red Hat stack evolves. | We believe that, no matter how promising software looks, stability is king. Pacemaker on other distributions has been stable and supported for a long time. However, on RHEL, it's a recent addition and the developers have been doing a tremendous amount of work on pacemaker and associated tools. For this reason, we feel that on RHEL 6, pacemaker is too much of a moving target at this time. That said, we do intend to switch to pacemaker some time in the next year or two, depending on how the Red Hat stack evolves. | ||
== Component; | == Component; Qdisk == | ||
{{note|1=<span class="code">qdisk</span> does not work reliably on a DRBD resource, so we will not be using it in this tutorial.}} | {{note|1=<span class="code">qdisk</span> does not work reliably on a DRBD resource, so we will not be using it in this tutorial.}} | ||
| Line 562: | Line 592: | ||
Think of it this way; | Think of it this way; | ||
With traditional software raid, you would take | With traditional software raid, you would take: | ||
* <span class="code">/dev/sda5</span> + <span class="code">/dev/sdb5</span> -> <span class="code">/dev/md0</span> | * <span class="code">/dev/sda5</span> + <span class="code">/dev/sdb5</span> -> <span class="code">/dev/md0</span> | ||
With DRBD, you have this | With DRBD, you have this: | ||
* <span class="code">node1:/dev/sda5</span> + <span class="code">node2:/dev/sda5</span> -> <span class="code">both:/dev/drbd0</span> | * <span class="code">node1:/dev/sda5</span> + <span class="code">node2:/dev/sda5</span> -> <span class="code">both:/dev/drbd0</span> | ||
| Line 571: | Line 603: | ||
The main difference with DRBD is that the <span class="code">/dev/drbd0</span> will always be the same on both nodes. If you write something to node 1, it's instantly available on node 2, and vice versa. Of course, this means that what ever you put on top of DRBD has to be "cluster aware". That is to say, the program or file system using the new <span class="code">/dev/drbd0</span> device has to understand that the contents of the disk might change because of another node. | The main difference with DRBD is that the <span class="code">/dev/drbd0</span> will always be the same on both nodes. If you write something to node 1, it's instantly available on node 2, and vice versa. Of course, this means that what ever you put on top of DRBD has to be "cluster aware". That is to say, the program or file system using the new <span class="code">/dev/drbd0</span> device has to understand that the contents of the disk might change because of another node. | ||
== Component; DLM == | |||
One of the major roles of a cluster is to provide [[DLM|distributed locking]] for clustered storage and resource management. | |||
Whenever a resource, GFS2 filesystem or clustered LVM LV needs a lock, it sends a request to <span class="code">dlm_controld</span> which runs in userspace. This communicates with DLM in kernel. If the lockspace does not yet exist, DLM will create it and then give the lock to the requester. Should a subsequant lock request come in for the same lockspace, it will be rejected. Once the application using the lock is finished with it, it will release the lock. After this, another node may request and receive a lock for the lockspace. | |||
If a node fails, <span class="code">fenced</span> will alert <span class="code">dlm_controld</span> that a fence is pending and new lock requests will block. After a successful fence, <span class="code">fenced</span> will alert DLM that the node is gone and any locks the victim node held are released. At this time, other nodes may request a lock on the lockspaces the lost node held and can perform recovery, like replaying a GFS2 filesystem journal, prior to resuming normal operation. | |||
Note that DLM locks are not used for actually locking the file system. That job is still handled by <span class="code">plock()</span> calls ([[POSIX]] locks). | |||
== Component; Clustered LVM == | == Component; Clustered LVM == | ||
| Line 589: | Line 631: | ||
{{note|1=GFS2 is '''only''' supported when run on top of Clustered LVM [[LV]]s. This is because, in certain error states, <span class="code">gfs2_controld</span> will call <span class="code">dmsetup</span> to disconnect the GFS2 partition from its storage in certain failure states.}} | {{note|1=GFS2 is '''only''' supported when run on top of Clustered LVM [[LV]]s. This is because, in certain error states, <span class="code">gfs2_controld</span> will call <span class="code">dmsetup</span> to disconnect the GFS2 partition from its storage in certain failure states.}} | ||
== Component; KVM == | == Component; KVM == | ||
| Line 608: | Line 640: | ||
= Node Installation = | = Node Installation = | ||
We need a baseline, a minimum system requirement of sorts. I will refer fairly frequently to the specific setup I used. Please don't take this as "the ideal setup" though... Every cluster will have its own needs, and you should plan and purchase for your particular needs. | |||
== Node Host Names == | == Node Host Names == | ||
| Line 618: | Line 648: | ||
We need to decide what naming convention and IP ranges to use for our nodes and their networks. | We need to decide what naming convention and IP ranges to use for our nodes and their networks. | ||
The IP addresses and subnets you decide to use are completely up to you. The host names though need to follow a certain standard, '''if''' you wish to use the [[ | The IP addresses and subnets you decide to use are completely up to you. The host names though need to follow a certain standard, '''if''' you wish to use the [[Striker]] dashboard, as we will do here. Specifically, the node names on your nodes must end in <span class="code">n01</span> for node #1 and <span class="code">n02</span> for node #2. The reason for this will be discussed later. | ||
The node host name convention that we've created is this: | The node host name convention that we've created is this: | ||
*<span class="code">xx-cYYn0{1,2}</span> | *<span class="code">xx-cYYn0{1,2}</span> | ||
** <span class="code">xx</span> is a two or three letter prefix used to denote the company, group or person who owns the Anvil! | ** <span class="code">xx</span> is a two or three letter prefix used to denote the company, group or person who owns the ''Anvil!'' | ||
** <span class="code">cYY</span> is a simple zero-padded sequence number number. | ** <span class="code">cYY</span> is a simple zero-padded sequence number number. | ||
** <span class="code">n0{1,2}</span> indicated the node in the cluster. | ** <span class="code">n0{1,2}</span> indicated the node in the cluster. | ||
In this tutorial, the Anvil! is owned and operated by "Alteeve's Niche!", so the prefix "<span class="code">an</span>" is used. This is the fifth cluster we've got, so the cluster name is <span class="code">an- | In this tutorial, the ''Anvil!'' is owned and operated by "Alteeve's Niche!", so the prefix "<span class="code">an</span>" is used. This is the fifth cluster we've got, so the cluster name is <span class="code">an-anvil-05</span>, so the host name's cluster number is <span class="code">c05</span>. Thus, node #1 is named <span class="code">an-a05n01</span> and node #2 is named <span class="code">an-a05n02</span>. | ||
As we have three distinct networks, we have three network-specific suffixes we apply to these host names which we will map to subnets in <span class="code">/etc/hosts</span> later. | As we have three distinct networks, we have three network-specific suffixes we apply to these host names which we will map to subnets in <span class="code">/etc/hosts</span> later. | ||
| Line 634: | Line 664: | ||
* <span class="code"><hostname>.ifn</span>; Internet-Facing Network host name. | * <span class="code"><hostname>.ifn</span>; Internet-Facing Network host name. | ||
Again, what you use is entirely up to you. Just remember that the node's host name must end in <span class="code">n01</span> and <span class="code">n02</span> for | Again, what you use is entirely up to you. Just remember that the node's host name must end in <span class="code">n01</span> and <span class="code">n02</span> for Striker to work. | ||
== Foundation Pack Host Names == | == Foundation Pack Host Names == | ||
The foundation pack devices, switches, PDUs and UPSes, can support multiple Anvil! platforms. Likewise, the [[ | The foundation pack devices, switches, PDUs and UPSes, can support multiple ''Anvil!'' platforms. Likewise, the [[Striker|dashboard]] servers support multiple ''Anvil!''s as well. For this reason, the <span class="code">cXX</span> portion of the host name does not make sense when choosing host names for these devices. | ||
As always, you are free to choose host names that make sense to you. For this tutorial, the following host names are used; | As always, you are free to choose host names that make sense to you. For this tutorial, the following host names are used; | ||
| Line 651: | Line 681: | ||
|<span class="code">xx-sYY</span> | |<span class="code">xx-sYY</span> | ||
|style="white-space:nowrap;"| | |style="white-space:nowrap;"| | ||
* Switch #1; <span class="code">an- | * Switch #1; <span class="code">an-switch01</span> | ||
* Switch #2; <span class="code">an- | * Switch #2; <span class="code">an-switch02</span> | ||
|The <span class="code">xx</span> prefix is the owner's prefix and <span class="code">YY</span> is a simple sequence number. | |The <span class="code">xx</span> prefix is the owner's prefix and <span class="code">YY</span> is a simple sequence number. | ||
|- | |- | ||
| Line 658: | Line 688: | ||
|<span class="code">xx-pYY</span> | |<span class="code">xx-pYY</span> | ||
|style="white-space:nowrap;"| | |style="white-space:nowrap;"| | ||
* PDU #1; <span class="code">an- | * PDU #1; <span class="code">an-pdu01</span> | ||
* PDU #2; <span class="code">an- | * PDU #2; <span class="code">an-pdu02</span> | ||
|The <span class="code">xx</span> prefix is the owner's prefix and <span class="code">YY</span> is a simple sequence number. | |The <span class="code">xx</span> prefix is the owner's prefix and <span class="code">YY</span> is a simple sequence number. | ||
|- | |- | ||
| Line 665: | Line 695: | ||
|<span class="code">xx-uYY</span> | |<span class="code">xx-uYY</span> | ||
|style="white-space:nowrap;"| | |style="white-space:nowrap;"| | ||
* UPS #1; <span class="code">an- | * UPS #1; <span class="code">an-ups01</span> | ||
* UPS #2; <span class="code">an- | * UPS #2; <span class="code">an-ups02</span> | ||
|The <span class="code">xx</span> prefix is the owner's prefix and <span class="code">YY</span> is a simple sequence number. | |The <span class="code">xx</span> prefix is the owner's prefix and <span class="code">YY</span> is a simple sequence number. | ||
|- | |- | ||
| Line 672: | Line 702: | ||
|<span class="code">xx-mYY</span> | |<span class="code">xx-mYY</span> | ||
|style="white-space:nowrap;"| | |style="white-space:nowrap;"| | ||
* Dashboard #1; <span class="code">an- | * Dashboard #1; <span class="code">an-striker01</span> | ||
* Dashboard #2; <span class="code">an- | * Dashboard #2; <span class="code">an-striker02</span> | ||
|The <span class="code">xx</span> prefix is the owner's prefix and <span class="code">YY</span> is a simple sequence number. Note that the <span class="code">m</span> letter was chosen for historical reasons. The dashboard used to be called "monitoring servers". For consistency with existing dashboards, <span class="code">m</span> has remained. Note also that the dashboards will connect to both the [[BCN]] and [[SN]], so like the nodes, host names with the <span class="code">.bcn</span> and <span class="code">.ifn</span> suffixes will be used. | |The <span class="code">xx</span> prefix is the owner's prefix and <span class="code">YY</span> is a simple sequence number. Note that the <span class="code">m</span> letter was chosen for historical reasons. The dashboard used to be called "monitoring servers". For consistency with existing dashboards, <span class="code">m</span> has remained. Note also that the dashboards will connect to both the [[BCN]] and [[SN]], so like the nodes, host names with the <span class="code">.bcn</span> and <span class="code">.ifn</span> suffixes will be used. | ||
|} | |} | ||
| Line 683: | Line 713: | ||
Beyond being based on [[RHEL]] 6, there are no requirements for how the operating system is installed. This tutorial is written using "minimal" installs, and as such, installation instructions will be provided that will install all needed packages if they aren't already installed on your nodes. | Beyond being based on [[RHEL]] 6, there are no requirements for how the operating system is installed. This tutorial is written using "minimal" installs, and as such, installation instructions will be provided that will install all needed packages if they aren't already installed on your nodes. | ||
== Network Security Considerations == | |||
When building production clusters, you will want to consider two options with regard to network security. | |||
First, the interfaces connected to an untrusted network, like the Internet, should not have an IP address, though the interfaces themselves will need to be up so that virtual machines can route through them to the outside world. Alternatively, anything inbound from the virtual machines or inbound from the untrusted network should be <span class="code">DROP</span>ed by the firewall. | |||
Second, if you can not run the cluster communications or storage traffic on dedicated network connections over isolated subnets, you will need to configure the firewall to block everything except the ports needed by storage and cluster traffic. | |||
{{note|1=As of [[EL6]].2, you can now use [[unicast]] for totem communication instead of multicast. This is '''not''' advised, and should only be used for clusters of two or three nodes on networks where unresolvable [[multicast]] issues exist. If using [[gfs2]], as we do here, using unicast for totem is strongly discouraged.}} | |||
== SELinux Considerations == | |||
There are two important changes needed to make our ''Anvil!'' work with [[SELinux]]. Both are presented in this tutorial when they're first needed. If you do not plan to follow this tutorial linearly, please be sure to read: | |||
* [[#SELinux and apcupsd|SELinux and apcupsd]] | |||
* [[#Solving_vm01-win2008_.22Failure_to_Enable.22_Error|Solving vm01-win2008 "Failure to Enable Error"]] | |||
= Network = | |||
Before we begin, let's take a look at a block diagram of what we're going to build. This will help when trying to see what we'll be talking about. | |||
== A Map! == | |||
== A Map! == | |||
<syntaxhighlight lang="text"> | <syntaxhighlight lang="text"> | ||
Nodes \_/ | Nodes \_/ | ||
____________________________________________________________________________ _____|____ ____________________________________________________________________________ | ____________________________________________________________________________ _____|____ ____________________________________________________________________________ | ||
| an- | | an-a05n01.alteeve.ca | /--------{_Internet_}---------\ | an-a05n02.alteeve.ca | | ||
| Network: | | | | Network: | | | Network: | | | | Network: | | ||
| _________________ _____________________| | _________________________ | |_____________________ _________________ | | | _________________ _____________________| | _________________________ | |_____________________ _________________ | | ||
| Servers: | | | Servers: | ifn_bridge1 |---| ifn_bond1 | | | an-switch01 Switch 1 | | | ifn_bond1 |---| ifn_bridge1 | Servers: | | ||
| _______________________ | 10.255.50.1 | | ____________________| | |____ Internet-Facing ____| | |____________________ | | 10.255.50.2 | ......................... | | | _______________________ | 10.255.50.1 | | ____________________| | |____ Internet-Facing ____| | |____________________ | | 10.255.50.2 | ......................... | | ||
| | [ vm01-win2008 ] | |_________________| || | | | [ vm01-win2008 ] | |_________________| || ifn_link1 =----=_01_] Network [_02_=----= ifn_link1 || |_________________| : [ vm01-win2008 ] : | | ||
| | ____________________| | : | | : : | | || 00:1B:21:81:C3:34 || | |____________________[_24_=-/ || 00:1B:21:81:C2:EA || : : | | : : | : :____________________ : | | | | ____________________| | : | | : : | | || 00:1B:21:81:C3:34 || | |____________________[_24_=-/ || 00:1B:21:81:C2:EA || : : | | : : | : :____________________ : | | ||
| | | NIC 1 =----/ : | | : : | | ||___________________|| | | an- | | | | NIC 1 =----/ : | | : : | | ||___________________|| | | an-switch02 Switch 2 | ||___________________|| : : | | : : | :----= NIC 1 | : | | ||
| | | 10.255.1.1 || : | | : : | | | ____________________| | |____ ____| |____________________ | : : | | : : | :| 10.255.1.1 | : | | | | | 10.255.1.1 || : | | : : | | | ____________________| | |____ ____| |____________________ | : : | | : : | :| 10.255.1.1 | : | | ||
| | | ..:..:..:..:..:.. || : | | : : | | || | | | | ..:..:..:..:..:.. || : | | : : | | || ifn_link2 =----=_01_] VLAN ID 300 [_02_=----= ifn_link2 || : : | | : : | :| ..:..:..:..:..:.. | : | | ||
| | |___________________|| : | | : : | | || A0:36:9F:02:E0:05 || | |____________________[_24_=-\ || A0:36:9F:07:D6:2F || : : | | : : | :|___________________| : | | | | |___________________|| : | | : : | | || A0:36:9F:02:E0:05 || | |____________________[_24_=-\ || A0:36:9F:07:D6:2F || : : | | : : | :|___________________| : | | ||
| | ____ | : | | : : | | ||___________________|| | | ||___________________|| : : | | : : | : ____ : | | | | ____ | : | | : : | | ||___________________|| | | ||___________________|| : : | | : : | : ____ : | | ||
| /--=--[_c:_] | : | | : : | | |_____________________| \-----------------------------/ |_____________________| : : | | : : | : [_c:_]--=--\ | | | /--=--[_c:_] | : | | : : | | |_____________________| \-----------------------------/ |_____________________| : : | | : : | : [_c:_]--=--\ | | ||
| | |_______________________| : | | : : | | _____________________| |_____________________ : : | | : : | :.......................: | | | | | |_______________________| : | | : : | | _____________________| |_____________________ : : | | : : | :.......................: | | | ||
| | : | | : : | | | | | | : | | : : | | | sn_bond1 | _________________________ | sn_bond1 | : : | | : : | | | | ||
| | ......................... : | | : : | | | 10.10.50.1 | | an- | | | ......................... : | | : : | | | 10.10.50.1 | | an-switch01 Switch 1 | | 10.10.50.2 | : : | | : : | _______________________ | | | ||
| | : [ vm02-win2012 ] : : | | : : | | | ____________________| |____ Storage ____| |____________________ | : : | | : : | | [ vm02-win2012 ] | | | | | | : [ vm02-win2012 ] : : | | : : | | | ____________________| |____ Storage ____| |____________________ | : : | | : : | | [ vm02-win2012 ] | | | | ||
| | : ____________________: : | | : : | | || | | | : ____________________: : | | : : | | || sn_link1 =----=_09_] Network [_10_=----= sn_link1 || : : | | : : | |____________________ | | | | ||
| | : | NIC 1 =---: | | : : | | || 00:19:99:9C:9B:9F || |_________________________| || 00:19:99:9C:A0:6D || : : | | : : \---= NIC 1 | | | | | | | : | NIC 1 =---: | | : : | | || 00:19:99:9C:9B:9F || |_________________________| || 00:19:99:9C:A0:6D || : : | | : : \---= NIC 1 | | | | | ||
| | : | 10.255.1.2 |: | | : : | | ||___________________|| | an- | | | : | 10.255.1.2 |: | | : : | | ||___________________|| | an-switch02 Switch 2 | ||___________________|| : : | | : : || 10.255.1.2 | | | | | ||
| | : | ..:..:..:..:..:.. |: | | : : | | | ____________________| |____ ____| |____________________ | : : | | : : || ..:..:..:..:..:.. | | | | | | | : | ..:..:..:..:..:.. |: | | : : | | | ____________________| |____ ____| |____________________ | : : | | : : || ..:..:..:..:..:.. | | | | | ||
| | : |___________________|: | | : : | | || | | | : |___________________|: | | : : | | || sn_link2 =----=_09_] VLAN ID 200 [_10_=----= sn_link2 || : : | | : : ||___________________| | | | | ||
| | : ____ : | | : : | | || A0:36:9F:02:E0:04 || |_________________________| || A0:36:9F:07:D6:2E || : : | | : : | ____ | | | | | | : ____ : | | : : | | || A0:36:9F:02:E0:04 || |_________________________| || A0:36:9F:07:D6:2E || : : | | : : | ____ | | | | ||
| | /--=--[_c:_] : | | : : | | ||___________________|| ||___________________|| : : | | : : | [_c:_]--=--\ | | | | | /--=--[_c:_] : | | : : | | ||___________________|| ||___________________|| : : | | : : | [_c:_]--=--\ | | | ||
| | | :.......................: | | : : | | /--|_____________________| |_____________________|--\ : : | | : : |_______________________| | | | | | | | :.......................: | | : : | | /--|_____________________| |_____________________|--\ : : | | : : |_______________________| | | | | ||
| | | | | : : | | | _____________________| |_____________________ | : : | | : : | | | | | | | | | : : | | | _____________________| |_____________________ | : : | | : : | | | | ||
| | | _______________________ | | : : | | | | | | | | _______________________ | | : : | | | | bcn_bond1 | _________________________ | bcn_bond1 | | : : | | : : ......................... | | | | ||
| | | | [ vm03-win7 ] | | | : : | | | | 10.20.50.1 | | an- | | | | | [ vm03-win7 ] | | | : : | | | | 10.20.50.1 | | an-switch01 Switch 1 | | 10.20.50.2 | | : : | | : : : [ vm02-win2012 ] : | | | | ||
| | | | ____________________| | | : : | | | | ____________________| |____ Back-Channel ____| |____________________ | | : : | | : : :____________________ : | | | | | | | | ____________________| | | : : | | | | ____________________| |____ Back-Channel ____| |____________________ | | : : | | : : :____________________ : | | | | ||
| | | | | NIC 1 =-----/ | : : | | | || | | | | | | NIC 1 =-----/ | : : | | | || bcn_link1 =----=_13_] Network [_14_=----= bcn_link1 || | : : | | : :-----= NIC 1 | : | | | | ||
| | | | | 10.255.1.3 || | : : | | | || 00:19:99:9C:9B:9E || |_________________________| || 00:19:99:9C:A0:6C || | : : | | : :| 10.255.1.3 | : | | | | | | | | | 10.255.1.3 || | : : | | | || 00:19:99:9C:9B:9E || |_________________________| || 00:19:99:9C:A0:6C || | : : | | : :| 10.255.1.3 | : | | | | ||
| | | | | ..:..:..:..:..:.. || | : : | | | ||___________________|| | an- | | | | | | ..:..:..:..:..:.. || | : : | | | ||___________________|| | an-switch02 Switch 2 | ||___________________|| | : : | | : :| ..:..:..:..:..:.. | : | | | | ||
| | | | |___________________|| | : : | | | || | | | | | |___________________|| | : : | | | || bcn_link2 =----=_13_] VLAN ID 100 [_14_=----= bcn_link2 || | : : | | : :|___________________| : | | | | ||
| | | | ____ | | : : | | | || 00:1B:21:81:C3:35 || |_________________________| || 00:1B:21:81:C2:EB || | : : | | : : ____ : | | | | | | | | ____ | | : : | | | || 00:1B:21:81:C3:35 || |_________________________| || 00:1B:21:81:C2:EB || | : : | | : : ____ : | | | | ||
| +--|-=--[_c:_] | | : : | | | ||___________________|| ||___________________|| | : : | | : : [_c:_]--=--|--+ | | | +--|-=--[_c:_] | | : : | | | ||___________________|| ||___________________|| | : : | | : : [_c:_]--=--|--+ | | ||
| Line 860: | Line 851: | ||
| | | Clustered LVM: | | | | | | Clustered LVM: | | | | | | | Clustered LVM: | | | | | | Clustered LVM: | | | | ||
| | | _________________________________ | | | | | | _________________________________ | | | | | | | _________________________________ | | | | | | _________________________________ | | | | ||
| | +--[_/dev/an- | | | +--[_/dev/an-a05n01_vg0/vm02-win2012_]-----+ | | | | +--[_/dev/an-a05n01_vg0/vm02-win2012_]-----+ | | | ||
| | | __________________________________ | | | | | | __________________________________ | | | | | | | __________________________________ | | | | | | __________________________________ | | | | ||
| | +--[_/dev/an- | | | +--[_/dev/an-a05n01_vg0/vm05-freebsd9_]----+ | | | | +--[_/dev/an-a05n01_vg0/vm05-freebsd9_]----+ | | | ||
| | | ___________________________________ | | | | | | ___________________________________ | | | | | | | ___________________________________ | | | | | | ___________________________________ | | | | ||
| | \--[_/dev/an- | | | \--[_/dev/an-a05n01_vg0/vm06-solaris11_]---/ | | | | \--[_/dev/an-a05n01_vg0/vm06-solaris11_]---/ | | | ||
| | | | | | | | | | | | | | | | | | ||
| | _________________________________ | | | | _________________________________ | | | | | _________________________________ | | | | _________________________________ | | | ||
| +-----[_/dev/an- | | +-----[_/dev/an-a05n02_vg0/vm01-win2008_]-------------+ | | +----------[_/dev/an-a05n02_vg0/vm01-win2008_]--------+ | | ||
| | ______________________________ | | | | ______________________________ | | | | | ______________________________ | | | | ______________________________ | | | ||
| +-----[_/dev/an- | | +-----[_/dev/an-a05n02_vg0/vm03-win7_]----------------+ | | +----------[_/dev/an-a05n02_vg0/vm03-win7_]-----------+ | | ||
| | ______________________________ | | | | ______________________________ | | | | | ______________________________ | | | | ______________________________ | | | ||
| +-----[_/dev/an- | | +-----[_/dev/an-a05n02_vg0/vm04-win8_]----------------+ | | +----------[_/dev/an-a05n02_vg0/vm04-win8_]-----------+ | | ||
| | _______________________________ | | | | _______________________________ | | | | | _______________________________ | | | | _______________________________ | | | ||
| +-----[_/dev/an- | | +-----[_/dev/an-a05n02_vg0/vm07-rhel6_]---------------+ | | +----------[_/dev/an-a05n02_vg0/vm07-rhel6_]----------+ | | ||
| | ________________________________ | | | | ________________________________ | | | | | ________________________________ | | | | ________________________________ | | | ||
| \-----[_/dev/an- | | \-----[_/dev/an-a05n02_vg0/vm08-sles11_]--------------+ | | +----------[_/dev/an-a05n02_vg0/vm08-sles11_]---------/ | | ||
| ___________________________ | | | | ___________________________ | | | ___________________________ | | | | ___________________________ | | ||
| /--[_/dev/an- | | /--[_/dev/an-a05n01_vg0/shared_]-------------------/ | | \----------[_/dev/an-a05n01_vg0/shared_]--\ | | ||
| | _________ | _________________________ | ________ | | | | | _________ | _________________________ | ________ | | | ||
| \--[_/shared_] | | an- | | \--[_/shared_] | | an-switch01 Switch 1 | | [_shared_]--/ | | ||
| ____________________| |____ Back-Channel ____| |____________________ | | | ____________________| |____ Back-Channel ____| |____________________ | | ||
| | IPMI =----=_03_] Network [_04_=----= IPMI | | | | | IPMI =----=_03_] Network [_04_=----= IPMI | | | ||
| | 10.20.51.1 || |_________________________| || 10.20.51.2 | | | | | 10.20.51.1 || |_________________________| || 10.20.51.2 | | | ||
| _________ _____ | 00:19:99: | | _________ _____ | 00:19:99:9A:D8:E8 || | an-switch02 Switch 2 | || 00:19:99:9A:B1:78 | _____ _________ | | ||
| {_sensors_}--[_BMC_]--|___________________|| | | ||___________________|--[_BMC_]--{_sensors_} | | | {_sensors_}--[_BMC_]--|___________________|| | | ||___________________|--[_BMC_]--{_sensors_} | | ||
| ______ ______ | | VLAN ID | | ______ ______ | | VLAN ID 100 | | ______ ______ | | ||
| | PSU1 | PSU2 | | |____ ____ ____ ____| | | PSU1 | PSU2 | | | | | PSU1 | PSU2 | | |____ ____ ____ ____| | | PSU1 | PSU2 | | | ||
|____________________________________________________________|______|______|_| |_03_]_[_07_]_[_08_]_[_04_| |_|______|______|____________________________________________________________| | |____________________________________________________________|______|______|_| |_03_]_[_07_]_[_08_]_[_04_| |_|______|______|____________________________________________________________| | ||
| Line 893: | Line 884: | ||
_______________|___ || || __________|________ ________|__________ || || ___|_______________ | _______________|___ || || __________|________ ________|__________ || || ___|_______________ | ||
| UPS 1 | || || | PDU 1 | | PDU 2 | || || | UPS 2 | | | UPS 1 | || || | PDU 1 | | PDU 2 | || || | UPS 2 | | ||
| an- | | an-ups01 | || || | an-pdu01 | | an-pdu02 | || || | an-ups02 | | ||
_______ | 10.20.3.1 | || || | 10.20.2.1 | | 10.20.2.2 | || || | 10.20.3.1 | _______ | _______ | 10.20.3.1 | || || | 10.20.2.1 | | 10.20.2.2 | || || | 10.20.3.1 | _______ | ||
{_Mains_}==| 00:C0:B7:58:3A:5A |=======================||=||==| 00:C0:B7:56:2D:AC | | 00:C0:B7:59:55:7C |==||=||=======================| 00:C0:B7:C8:1C:B4 |=={_Mains_} | {_Mains_}==| 00:C0:B7:58:3A:5A |=======================||=||==| 00:C0:B7:56:2D:AC | | 00:C0:B7:59:55:7C |==||=||=======================| 00:C0:B7:C8:1C:B4 |=={_Mains_} | ||
| Line 911: | Line 902: | ||
{{note|1=There are situations where it is not possible to add additional network cards, blades being a prime example. In these cases it will be up to the admin to decide how to proceed. If there is sufficient bandwidth, you can merge all networks, but it is advised in such cases to isolate IFN traffic from the SN/BCN traffic using [[VLAN]]s.}} | {{note|1=There are situations where it is not possible to add additional network cards, blades being a prime example. In these cases it will be up to the admin to decide how to proceed. If there is sufficient bandwidth, you can merge all networks, but it is advised in such cases to isolate IFN traffic from the SN/BCN traffic using [[VLAN]]s.}} | ||
If you plan to have two or more Anvil! platforms on the same network, then it is recommended that you use the third | If you plan to have two or more ''Anvil!'' platforms on the same network, then it is recommended that you use the third octet of the IP addresses to identify the cluster. We've found the following works well: | ||
In our case, we're building our fifth cluster, so node #1 will always have the final part of | * Third octet is the cluster ID times 10 | ||
* Fourth octet is the node ID. | |||
In our case, we're building our fifth cluster, so node #1 will always have the final part of its IP be <span class="code">x.y.50.1</span> and node #2 will always have the final part of its IP be <span class="code">x.y.50.2</span>. | |||
{|class="wikitable" | {|class="wikitable" | ||
| Line 926: | Line 918: | ||
| | | | ||
* Each node will use <span class="code">10.255.50.x</span> where <span class="code">x</span> matches the node ID. | * Each node will use <span class="code">10.255.50.x</span> where <span class="code">x</span> matches the node ID. | ||
* Servers hosted by the Anvil! will use <span class="code">10.255.1.x</span> where <span class="code">x</span> is the server's sequence number. | * Servers hosted by the ''Anvil!'' will use <span class="code">10.255.1.x</span> where <span class="code">x</span> is the server's sequence number. | ||
* [[ | * [[Striker|Dashboard]] servers will use <span class="code">10.255.4.x</span> where <span class="code">x</span> is the dashboard's sequence number. | ||
|- | |- | ||
|Storage Network ([[SN]]) | |Storage Network ([[SN]]) | ||
| Line 942: | Line 934: | ||
* Switched [[PDU]]s, which we will use as backup fence devices, will use <span class="code">10.20.2.x</span> where <span class="code">x</span> is the PDU's sequence number. | * Switched [[PDU]]s, which we will use as backup fence devices, will use <span class="code">10.20.2.x</span> where <span class="code">x</span> is the PDU's sequence number. | ||
* Network-managed [[UPS]]es with use <span class="code">10.20.3.x</span> where <span class="code">x</span> is the UPS's sequence number. | * Network-managed [[UPS]]es with use <span class="code">10.20.3.x</span> where <span class="code">x</span> is the UPS's sequence number. | ||
* [[ | * [[Striker|Dashboard]] servers will use <span class="code">10.20.4.x</span> where <span class="code">x</span> is the dashboard's sequence number. | ||
|} | |} | ||
We will be using six interfaces, bonded into three pairs of two NICs in Active/Passive (<span class="code">mode=1</span>) configuration. Each link of each bond will be on alternate switches. We will also configure affinity by specifying interfaces <span class="code"> | We will be using six interfaces, bonded into three pairs of two NICs in Active/Passive (<span class="code">mode=1</span>) configuration. Each link of each bond will be on alternate switches. We will also configure affinity by specifying interfaces <span class="code">bcn_link1</span>, <span class="code">sn_link1</span> and <span class="code">ifn_link1</span> as primary for the <span class="code">bcn_bond1</span>, <span class="code">sn_bond1</span> and <span class="code">ifn_bond1</span> interfaces, respectively. This way, when everything is working fine, all traffic is routed through the same switch for maximum performance. | ||
{{note|1=Red Hat supports bonding modes <span class="code">0</span> and <span class="code">2</span> as of [[RHEL]] 6.4. We do not recommend these bonding modes as we've found the most reliable and consistent ability to survive switch failure and recovery with mode <span class="code">1</span> only. If you wish to use a different bonding more, please be sure to test various failure modes extensively!}} | {{note|1=Red Hat supports bonding modes <span class="code">0</span> and <span class="code">2</span> as of [[RHEL]] 6.4. We do not recommend these bonding modes as we've found the most reliable and consistent ability to survive switch failure and recovery with mode <span class="code">1</span> only. If you wish to use a different bonding more, please be sure to test various failure modes extensively!}} | ||
| Line 953: | Line 945: | ||
{{warning|1=If you wish to merge the [[SN]] and [[BCN]] onto one interface, test to ensure that the storage traffic will not block cluster communication. Test by forming your cluster and then pushing your storage to maximum read and write performance for an extended period of time (minimum of several seconds). If the cluster partitions, you will need to do some advanced quality-of-service or other network configuration to ensure reliable delivery of cluster network traffic.}} | {{warning|1=If you wish to merge the [[SN]] and [[BCN]] onto one interface, test to ensure that the storage traffic will not block cluster communication. Test by forming your cluster and then pushing your storage to maximum read and write performance for an extended period of time (minimum of several seconds). If the cluster partitions, you will need to do some advanced quality-of-service or other network configuration to ensure reliable delivery of cluster network traffic.}} | ||
[[image:brocade_icx6610_stock_01.jpg|thumb|right|375px|Brocade [http://www.brocade.com/products/all/switches/product-details/icx-6610-switch/specifications.page ICX6610] switches. Photo by Brocade.]] | |||
In this tutorial, we will use two [http://www.brocade.com/products/all/switches/product-details/icx-6610-switch/specifications.page Brocade ICX6610] switches, stacked. | |||
* Brocade ICX6610 [[Brocade Notes|stack switch configuration]]. | |||
We will be using three [[VLAN]]s to isolate the three networks: | |||
* [[BCN]] will have VLAN ID of <span class="code">100</span>. | |||
* [[SN]] will have VLAN ID number <span class="code">200</span>. | |||
* [[IFN]] will have VLAN ID number <span class="code">300</span>. | |||
* All other unassigned ports will be in the default VLAN ID of <span class="code">1</span>, effectively disabling those ports. | |||
The actual mapping of interfaces to bonds to networks will be: | The actual mapping of interfaces to bonds to networks will be: | ||
| Line 973: | Line 971: | ||
|[[BCN]] | |[[BCN]] | ||
|White | |White | ||
|<span class="code"> | |<span class="code">100</span> | ||
|<span class="code"> | |<span class="code">bcn_link1</span> | ||
|<span class="code"> | |<span class="code">bcn_link2</span> | ||
|<span class="code"> | |<span class="code">bcn_bond1</span> | ||
|<span class="code">10.20.x.y/16</span> | |<span class="code">10.20.x.y/16</span> | ||
|- | |- | ||
|[[SN]] | |[[SN]] | ||
|Green | |Green | ||
|<span class="code"> | |<span class="code">200</span> | ||
|<span class="code"> | |<span class="code">sn_link1</span> | ||
|<span class="code"> | |<span class="code">sn_link2</span> | ||
|<span class="code"> | |<span class="code">sn_bond1</span> | ||
|<span class="code">10.10.x.y/16</span> | |<span class="code">10.10.x.y/16</span> | ||
|- | |- | ||
|[[IFN]] | |[[IFN]] | ||
|Black | |Black | ||
|<span class="code"> | |<span class="code">300</span> | ||
|<span class="code"> | |<span class="code">ifn_link1</span> | ||
|<span class="code"> | |<span class="code">ifn_link2</span> | ||
|<span class="code"> | |<span class="code">ifn_bond1</span> | ||
|<span class="code">10.255.x.y/16</span> | |<span class="code">10.255.x.y/16</span> | ||
|} | |} | ||
=== A Note on STP === | |||
Spanning Tree Protocol, [[STP]], is a protocol used for detecting and protecting against switch loops. Without it, if both ends of the same cable plugged into the same switch or VLAN, or if two cables run between the same pair of switches, a [[broadcast storm]] could cause the switches to hang and traffic would stop routing. | |||
The problem with STP in HA clusters though is that the attempt to detect loops requires blocking all other traffic for a short time. Though this is short, it is usually long enough to cause corosync to think that the peer node has failed, triggering a fence action. | |||
For this reason, we need to disable STP, either globally or at least on the ports used by corosync and drbd. How you actually do this will depend on the make and model of switch you have. | |||
With STP disabled, at least partially, the onus does fall on you to ensure that no one causes a switch loop. Please be sure to inform anyone who might plug things into the cluster's switches about this issue. Ensure that people are careful about what they plug into the switches and that new connections will not trigger a loop. | |||
== Setting Up the Network == | == Setting Up the Network == | ||
| Line 1,007: | Line 1,015: | ||
<syntaxhighlight lang="text"> | <syntaxhighlight lang="text"> | ||
_________________________ | |||
| [ an- | | [ an-a05n01 ] | | ||
| | | ________________| ___________ | ||
| | | | | ___________| | bcn_bond1 | | ||
| | O | | | | O | bcn_link1 =-----------=---.-------=------{ | ||
| | n | | | | n |__________|| /--------=--/ | | ||
| | b | | | b | | |___________| | ||
| | o | | | o ___________| | ___________ | ||
| | a | | | | a | sn_link1 =--|--\ | sn_bond1 | | ||
| | r | | | | r |__________|| | \----=--.--------=------{ | ||
| | d | | | d | | /-----=--/ | | ||
| | | | |________________| | | |___________| | ||
| | | ________________| | | ___________ | ||
| | | | | ___________| | | | ifn_bond1 | | ||
| | P | | | | P | ifn_link1 =--|--|-----=---.-------=------{ | ||
| | C | | | | C |__________|| | | /--=--/ | | ||
| | I | | | I | | | | |___________| | ||
| | e | | | e ___________| | | | | ||
| | | | | | | bcn_link2 =--/ | | | ||
| | 1 | | | | 1 |__________|| | | | ||
| | | | |________________| | | | ||
| | | ________________| | | | ||
| | | | | ___________| | | | ||
| | P | | | | P | sn_link2 =-----/ | | ||
| | C | | | | C |__________|| | | ||
| | I | | | I | | | ||
| | e | | | e ___________| | | ||
| | | | | | | ifn_link2 =--------/ | ||
| | 2 | | | | 2 |__________|| | ||
| | | | |________________| | ||
| | |_________________________| | ||
</syntaxhighlight> | </syntaxhighlight> | ||
Consider the possible failure scenarios | Consider the possible failure scenarios: | ||
* The on-board controllers fail; | * The on-board controllers fail; | ||
** <span class="code"> | ** <span class="code">bcn_bond1</span> falls back onto <span class="code">bcn_link2</span> on the <span class="code">PCIe 1</span> controller. | ||
** <span class="code"> | ** <span class="code">sn_bond1</span> falls back onto <span class="code">sn_link2</span> on the <span class="code">PCIe 2</span> controller. | ||
** <span class="code"> | ** <span class="code">ifn_bond1</span> is unaffected. | ||
* The PCIe #1 controller fails | * The PCIe #1 controller fails | ||
** <span class="code"> | ** <span class="code">bcn_bond1</span> remains on <span class="code">bcn_link1</span> interface but losses its redundancy as <span class="code">bcn_link2</span> is down. | ||
** <span class="code"> | ** <span class="code">sn_bond1</span> is unaffected. | ||
** <span class="code"> | ** <span class="code">ifn_bond1</span> falls back onto <span class="code">ifn_link2</span> on the <span class="code">PCIe 2</span> controller. | ||
* The PCIe #2 controller fails | * The PCIe #2 controller fails | ||
** <span class="code"> | ** <span class="code">bcn_bond1</span> is unaffected. | ||
** <span class="code"> | ** <span class="code">sn_bond1</span> remains on <span class="code">sn_link1</span> interface but losses its redundancy as <span class="code">sn_link2</span> is down. | ||
** <span class="code"> | ** <span class="code">ifn_bond1</span> remains on <span class="code">ifn_link1</span> interface but losses its redundancy as <span class="code">ifn_link2</span> is down. | ||
In all three failure scenarios, no network interruption occurs making for the most robust configuration possible. | In all three failure scenarios, no network interruption occurs making for the most robust configuration possible. | ||
| Line 1,066: | Line 1,075: | ||
We're going to need to install a bunch of programs, and one of those programs is needed before we can reconfigure the network. The <span class="code">bridge-utils</span> has to be installed right away, so now is a good time to just install everything we need. | We're going to need to install a bunch of programs, and one of those programs is needed before we can reconfigure the network. The <span class="code">bridge-utils</span> has to be installed right away, so now is a good time to just install everything we need. | ||
== | == Why so Much Duplication of Commands? == | ||
Most, but '''not''' all, commands will be issues equally on both nodes. At least up until we start configuring the cluster. To make it clear what to run on which node, all commands are defined either beside or under the node name on which to run the command. | |||
This does lead to a lot of duplication, but it's important to make sure it is clear when some command runs only on one node or the other. So please be careful, particularly later on, that you don't accidentally run a command on the wrong node. | |||
== Red Hat Enterprise Linux Specific Steps == | |||
Red Hat's Enterprise Linux is a commercial operating system that includes access to their repositories. This requires purchasing [http://www.redhat.com/products/enterprise-linux/server/ entitlements] and then [https://access.redhat.com/site/documentation/en-US/Red_Hat_Enterprise_Linux/6/html/Deployment_Guide/entitlements.html registering] machines with their [https://rhn.redhat.com Red Hat Network]. | |||
This tutorial uses [[GFS2]], which is provided by their [http://www.redhat.com/products/enterprise-linux-add-ons/resilient-storage/ Resilient Storage Add-On]. The includes the [http://www.redhat.com/products/enterprise-linux-add-ons/high-availability/ High-Availability Add-On] which provides the rest of the HA cluster stack. | |||
Once you've finished your install, you can quickly register your node with RHN and add the resilient storage add-on with the following two commands. | |||
{{note|1=You need to replace <span class="code">$user</span> and <span class="code">$pass</span> with your RHN account details.}} | |||
<syntaxhighlight lang="bash"> | {|class="wikitable" | ||
!<span class="code">an-a05n01</span> | |||
|style="white-space: nowrap;"|<syntaxhighlight lang="bash"> | |||
rhnreg_ks --username "$user" --password "$pass" --force --profilename "an-a05n01.alteeve.ca" | |||
rhn-channel --add --user "$user" --password "$pass" --channel=rhel-x86_64-server-rs-6 | |||
rhn-channel --add --user "$user" --password "$pass" --channel=rhel-x86_64-server-optional-6 | |||
</syntaxhighlight> | </syntaxhighlight> | ||
<syntaxhighlight lang=" | |- | ||
!<span class="code">an-a05n02</span> | |||
|style="white-space: nowrap;"|<syntaxhighlight lang="bash"> | |||
rhnreg_ks --username "$user" --password "$pass" --force --profilename "an-a05n02.alteeve.ca" | |||
rhn-channel --add --user "$user" --password "$pass" --channel=rhel-x86_64-server-rs-6 | |||
rhn-channel --add --user "$user" --password "$pass" --channel=rhel-x86_64-server-optional-6 | |||
</syntaxhighlight> | </syntaxhighlight> | ||
|} | |||
If you get any errors from the above commands, please contact your support representative. They will be able to help sort out any account or entitlement issues. | |||
== Add the Alteeve's Niche! Repo == | |||
If you | We've created a repository with additional RPMs needed to use some of the ''Anvil!'' tools If you want to maintain complete Red Hat compatibility, you can skip this. | ||
{{note|1=If you skip this step, the ''Anvil!'' itself will operate perfectly fine, but the Striker dashboard and some additional tools provided by Alteeve will not work.}} | |||
Download the yum repository configuration file and the GPG key. | |||
== | {|class="wikitable" | ||
!<span class="code">an-a05n01</span> | |||
|style="white-space: nowrap;"|<syntaxhighlight lang="bash"> | |||
curl https://alteeve.ca/an-repo/el6/an-el6.repo > /etc/yum.repos.d/an-el6.repo | |||
</syntaxhighlight> | |||
<syntaxhighlight lang="text"> | |||
% Total % Received % Xferd Average Speed Time Time Time Current | |||
Dload Upload Total Spent Left Speed | |||
124 249 124 249 0 0 1249 0 --:--:-- --:--:-- --:--:-- 17785 | |||
</syntaxhighlight> | |||
<syntaxhighlight lang="bash"> | <syntaxhighlight lang="bash"> | ||
curl https://alteeve.ca/an-repo/el6/Alteeves_Niche_Inc-GPG-KEY > /etc/pki/rpm-gpg/Alteeves_Niche_Inc-GPG-KEY | |||
</syntaxhighlight> | </syntaxhighlight> | ||
<syntaxhighlight lang="text"> | <syntaxhighlight lang="text"> | ||
< | % Total % Received % Xferd Average Speed Time Time Time Current | ||
Dload Upload Total Spent Left Speed | |||
100 3117 100 3117 0 0 12926 0 --:--:-- --:--:-- --:--:-- 179k | |||
</syntaxhighlight> | |||
|- | |||
!<span class="code">an-a05n02</span> | |||
|style="white-space: nowrap;"|<syntaxhighlight lang="bash"> | |||
curl https://alteeve.ca/an-repo/el6/an-el6.repo > /etc/yum.repos.d/an-el6.repo | |||
</syntaxhighlight> | </syntaxhighlight> | ||
<syntaxhighlight lang="text"> | <syntaxhighlight lang="text"> | ||
% Total % Received % Xferd Average Speed Time Time Time Current | |||
Dload Upload Total Spent Left Speed | |||
124 249 124 249 0 0 822 0 --:--:-- --:--:-- --:--:-- 16600 | |||
</syntaxhighlight> | </syntaxhighlight> | ||
<syntaxhighlight lang="bash"> | <syntaxhighlight lang="bash"> | ||
curl https://alteeve.ca/an-repo/el6/Alteeves_Niche_Inc-GPG-KEY > /etc/pki/rpm-gpg/Alteeves_Niche_Inc-GPG-KEY | |||
</syntaxhighlight> | </syntaxhighlight> | ||
<syntaxhighlight lang="text"> | <syntaxhighlight lang="text"> | ||
% Total % Received % Xferd Average Speed Time Time Time Current | |||
Dload Upload Total Spent Left Speed | |||
100 3117 100 3117 0 0 12505 0 --:--:-- --:--:-- --:--:-- 202k | |||
</syntaxhighlight> | </syntaxhighlight> | ||
|} | |||
Verify both downloaded properly: | |||
{|class="wikitable" | |||
!<span class="code">an-a05n01</span> | |||
|style="white-space: nowrap;"|<syntaxhighlight lang="bash"> | |||
cat /etc/yum.repos.d/an-el6.repo | |||
</syntaxhighlight> | |||
<syntaxhighlight lang="text"> | |||
[an-el6-repo] | |||
name=Alteeve's Niche!, Inc. Repository of Enterprise Linux 6 packages used by Anvil! and Striker systems. | |||
baseurl=https://alteeve.ca/an-repo/el6/ | |||
enabled=1 | |||
gpgcheck=1 | |||
protect=1 | |||
gpgkey=file:///etc/pki/rpm-gpg/Alteeves_Niche_Inc-GPG-KEY | |||
</syntaxhighlight> | |||
<syntaxhighlight lang="bash"> | <syntaxhighlight lang="bash"> | ||
cat /etc/pki/rpm-gpg/Alteeves_Niche_Inc-GPG-KEY | |||
</syntaxhighlight> | </syntaxhighlight> | ||
<syntaxhighlight lang="text"> | |||
-----BEGIN PGP PUBLIC KEY BLOCK----- | |||
Version: GnuPG v2.0.14 (GNU/Linux) | |||
mQINBFTBa6kBEAC36WAc8HLciAAx/FmfirLpW8t1AkS39Lc38LyBeKvBTYvSkCXp | |||
anK+QFsko4IkfcWR/eb2EzbmjLfz37QvaT2niYTOIReQP/VW5QwqtWgxMY8H3ja0 | |||
GA4kQzMLjHR4MHs/k6SbUqopueHrXKk16Ok1RUgjZz85t/46OtwtjwDlrFKhSE77 | |||
aUy6sCM4DCqiB99BdHtLsZMcS/ENRTgsXzxNPr629fBo1nqd1OqWr/u5oX9OoOKN | |||
YeSy3YXDtmGk5CUIeJ+i9pNzURDPWhTJgUCdnuqNIfFjo2HPqyWj/my/unK3oM2a | |||
DU3ZIrgz2uaUcG/uPGcsGQNWONLJcEWDhtCf0YoatksGybTVvO09d3Y2Vp+Glmgl | |||
xkiZSHXXe/b7UlD7xnycO6EKTWJpWwrS6pfgAm59SUDCIfkjokBhHlSVwjxyz/v5 | |||
+lg2fpcNgdR3Q08ZtVEgn4lcI0A5XTwO1GYuOZ8icUW9NYM3iJLFuad4ltbCvrdZ | |||
CE5+gW4myiFhY66MDY9SdaVLcJDlQgWU9ZM8hZ1DNyDTQPLVbX2sNXO+Q9tW33HB | |||
+73dJM+9XPXsbDnWtUbnUSdtbJ9q9bT1uC1tZXMDnyFHiZkroJ+kjRRgriRzgmYK | |||
AKNbQSxqkBRJ/VacsL3tMEMOGeRPaBrc5VjPZp0KxTUGdEeOZrOIhVCVqQARAQAB | |||
tCpBbHRlZXZlJ3MgTmljaGUhIEluYy4gPHN1cHBvcnRAYWx0ZWV2ZS5jYT6JAjgE | |||
EwECACIFAlTBa6kCGwMGCwkIBwMCBhUIAgkKCwQWAgMBAh4BAheAAAoJEJrEPxrG | |||
2apbQ6YP/2qyNRRH96A5dJaBJAMg4VolK7qHuZttT2b9YMJMijYF4Mj6hdRvtVwP | |||
tZzyne9hPorQWrOFpqewsrH8TCUp8tc1VWcqJWtd33/9ZOsCmy/4QSM02M3PzzTy | |||
x6Aj8owAx5mTuumgvhrr/gn5kkn35fpnNvZVOJOBOXVN65o2gSoRuyBbU9cxjQRD | |||
4w+r6nJxJWEFocCsMkxRHDT9T/0oXbpPQlmNfyeKSx0FJDwtD4qiIYp+82OJBg+E | |||
5lmfU8DmBx6TuCuabsJxVOV68PQXzmtApZSNif56dGVx+D2kHSaddTpZdV6bMUr6 | |||
BxyZN1vCGJKeEFX+qgcWfgwkqVhs2zm0fLRMMVchRMwAcI5fN9mMzZhi+PQlN7XK | |||
h6nS7kPxn0ajnFzi36GlDF50LssAzJq9+SMT2aTSDhIbNZO6KGW3QSMzP1CGf841 | |||
Busfb45Ar4oWQ3sFsGgJlfEb/NklSUmWDnz8Bt4zydmBmB0WJnxI8bE2bGICvS/D | |||
mJsl41hF/a9nVjX1fGzERyLUb+PPgwDBGcLsyHfxMK7ZtNmO+Wjw8F65DYPDQInI | |||
EVyOEWAW3hGXR0r1I6ubbdzZLzs97hz61XYrDrm7pXyv56N9ytP7AtucUNyfYoT5 | |||
KzrZDOU0EYCa5bT/67ckZsgTlZuwKOj8fAeNBsTN+thg/4grqQfxuQINBFTBa6kB | |||
EADcdNtzMIVbojYmpXZ+3w0rFNwPYZJkV03LVxVCIQ5mUjYB5kiHjeSiUfcP3LLc | |||
UXzomOXiUz/wSSkp6Q42L8CnUtwIwZoXnvhWNYAbR7wWz5HGBXUMxmbUSOutKFYT | |||
6tK13xV4pWoxvBJyxPwjGSm+zAJzTC0fT63vt26xQtVLJrhpRtJD2kEGtEGj19Sy | |||
ATz1nbR+UqZUryoqzteyGygQXYOoFqX9d6/t2pf/9cDuOhRayUJ2Xjonu1DMQ4T/ | |||
ZwJrXDTIsUFPtnR/mQsNaZdskA4+GmXbweFVyvdloWo0Wgw0lZzQJQ+cGUGAw2RC | |||
HDU9shbMcpbaXwoH8UG5Hml1T1I5XZlpUk2R/kDMHnR0LQkRRSjUTPo1GzpSp+v2 | |||
tiOJurYVBZwp5bryYdZYbRZgYh1oW7WxiKrnQQ5FAT58YBXSzFd575ENBp+LX804 | |||
EMh4po3Wknrvpeh7orkX+Wmbggs/IoBvxTme+RLLnCb0WrCl88dsC8Adn7DP88dm | |||
+JpjMpSyXDvvrChSzWhy6aJ1s/MhkbZS3g+GoeianDPmu6vRGbW7vqGmww1gXyBk | |||
vos90/bAuxjewUMa3UCCkswz99U1TvAT1QJZYH8evFznAx92J6zvKr/ttaG8brTV | |||
OqIdcmK6HmFJjwAAKauFkOLe77GwhtQWKU//C3lXC8KWfwARAQABiQIfBBgBAgAJ | |||
BQJUwWupAhsMAAoJEJrEPxrG2apb7T0P/iXCHX7xmLgvjGRYBhyUfTw00va8Dq8J | |||
oRVBsPZjHj0Yx39UWa9q9P1ME9wxOi5U8xLSTREpKFCM4fcMG8xvFF9SGBNPsvMb | |||
ILvr6ylHtfxreUUUemMpTGPrLj7SDfGRi3CaAikcH5+ve1JH0QVIfdoD3O0OZvVT | |||
9VEq9aZW0Falur155PP3e5oSe0mgCvule3Jb8XL9DhsgQw2Eo2vKyA1kXx7p2405 | |||
YVD8SeWCRfv9b2Bq22rbYDOrE4xM+geTqcl0vhYKKfamXUtmJ/zltuYadE/4ZLFJ | |||
fy2neYdj2sGcVBZALq9OPhkeVMktfRmbL64bT9Cgwrl4mNHwqN2WI8YGmhwGTknN | |||
IqHF0ueyrLM0VzTWjJvi48Nt9Co9VUl8ncnmiqvIs0ZpHF3ZqrTwl9Z0IElXuhx6 | |||
YniJ9ntZk3SaEM/Uvl16nk9vz8uFND1B0MwwlLENaEn0Gy3cWaKH85EzEkoiOTXw | |||
j4uQ0h80FuwxO9K+GffVw/VlcKzOTz4LyId6QYpXio+EWrfF5vYQEloqRLCi6ADS | |||
8IdlSGVwGUD9rCagVpVTh/CPcZ3PX830L0LyOZk28/qqdQ4Whu/yb9NpsoF2UfKE | |||
JL2A7GUrmNZFxBbAtAknFbId/ecJYKefPlp3RpiJ1SeZhuaHYsXaOTm6kyLy770A | |||
bZ03smi2aDRO | |||
=5Uwn | |||
-----END PGP PUBLIC KEY BLOCK----- | |||
</syntaxhighlight> | </syntaxhighlight> | ||
<syntaxhighlight lang="bash"> | |- | ||
!<span class="code">an-a05n02</span> | |||
|style="white-space: nowrap;"|<syntaxhighlight lang="bash"> | |||
cat /etc/yum.repos.d/an-el6.repo | |||
</syntaxhighlight> | </syntaxhighlight> | ||
== | <syntaxhighlight lang="text"> | ||
[an-el6-repo] | |||
name=Alteeve's Niche!, Inc. Repository of Enterprise Linux 6 packages used by Anvil! and Striker systems. | |||
baseurl=https://alteeve.ca/an-repo/el6/ | |||
enabled=1 | |||
gpgcheck=1 | |||
protect=1 | |||
gpgkey=file:///etc/pki/rpm-gpg/Alteeves_Niche_Inc-GPG-KEY | |||
</syntaxhighlight> | |||
<syntaxhighlight lang="bash"> | |||
cat /etc/pki/rpm-gpg/Alteeves_Niche_Inc-GPG-KEY | |||
</syntaxhighlight> | |||
<syntaxhighlight lang="text"> | |||
-----BEGIN PGP PUBLIC KEY BLOCK----- | |||
Version: GnuPG v2.0.14 (GNU/Linux) | |||
mQINBFTBa6kBEAC36WAc8HLciAAx/FmfirLpW8t1AkS39Lc38LyBeKvBTYvSkCXp | |||
anK+QFsko4IkfcWR/eb2EzbmjLfz37QvaT2niYTOIReQP/VW5QwqtWgxMY8H3ja0 | |||
GA4kQzMLjHR4MHs/k6SbUqopueHrXKk16Ok1RUgjZz85t/46OtwtjwDlrFKhSE77 | |||
aUy6sCM4DCqiB99BdHtLsZMcS/ENRTgsXzxNPr629fBo1nqd1OqWr/u5oX9OoOKN | |||
YeSy3YXDtmGk5CUIeJ+i9pNzURDPWhTJgUCdnuqNIfFjo2HPqyWj/my/unK3oM2a | |||
DU3ZIrgz2uaUcG/uPGcsGQNWONLJcEWDhtCf0YoatksGybTVvO09d3Y2Vp+Glmgl | |||
xkiZSHXXe/b7UlD7xnycO6EKTWJpWwrS6pfgAm59SUDCIfkjokBhHlSVwjxyz/v5 | |||
+lg2fpcNgdR3Q08ZtVEgn4lcI0A5XTwO1GYuOZ8icUW9NYM3iJLFuad4ltbCvrdZ | |||
CE5+gW4myiFhY66MDY9SdaVLcJDlQgWU9ZM8hZ1DNyDTQPLVbX2sNXO+Q9tW33HB | |||
+73dJM+9XPXsbDnWtUbnUSdtbJ9q9bT1uC1tZXMDnyFHiZkroJ+kjRRgriRzgmYK | |||
AKNbQSxqkBRJ/VacsL3tMEMOGeRPaBrc5VjPZp0KxTUGdEeOZrOIhVCVqQARAQAB | |||
tCpBbHRlZXZlJ3MgTmljaGUhIEluYy4gPHN1cHBvcnRAYWx0ZWV2ZS5jYT6JAjgE | |||
EwECACIFAlTBa6kCGwMGCwkIBwMCBhUIAgkKCwQWAgMBAh4BAheAAAoJEJrEPxrG | |||
2apbQ6YP/2qyNRRH96A5dJaBJAMg4VolK7qHuZttT2b9YMJMijYF4Mj6hdRvtVwP | |||
tZzyne9hPorQWrOFpqewsrH8TCUp8tc1VWcqJWtd33/9ZOsCmy/4QSM02M3PzzTy | |||
x6Aj8owAx5mTuumgvhrr/gn5kkn35fpnNvZVOJOBOXVN65o2gSoRuyBbU9cxjQRD | |||
4w+r6nJxJWEFocCsMkxRHDT9T/0oXbpPQlmNfyeKSx0FJDwtD4qiIYp+82OJBg+E | |||
5lmfU8DmBx6TuCuabsJxVOV68PQXzmtApZSNif56dGVx+D2kHSaddTpZdV6bMUr6 | |||
BxyZN1vCGJKeEFX+qgcWfgwkqVhs2zm0fLRMMVchRMwAcI5fN9mMzZhi+PQlN7XK | |||
h6nS7kPxn0ajnFzi36GlDF50LssAzJq9+SMT2aTSDhIbNZO6KGW3QSMzP1CGf841 | |||
Busfb45Ar4oWQ3sFsGgJlfEb/NklSUmWDnz8Bt4zydmBmB0WJnxI8bE2bGICvS/D | |||
mJsl41hF/a9nVjX1fGzERyLUb+PPgwDBGcLsyHfxMK7ZtNmO+Wjw8F65DYPDQInI | |||
EVyOEWAW3hGXR0r1I6ubbdzZLzs97hz61XYrDrm7pXyv56N9ytP7AtucUNyfYoT5 | |||
KzrZDOU0EYCa5bT/67ckZsgTlZuwKOj8fAeNBsTN+thg/4grqQfxuQINBFTBa6kB | |||
EADcdNtzMIVbojYmpXZ+3w0rFNwPYZJkV03LVxVCIQ5mUjYB5kiHjeSiUfcP3LLc | |||
UXzomOXiUz/wSSkp6Q42L8CnUtwIwZoXnvhWNYAbR7wWz5HGBXUMxmbUSOutKFYT | |||
6tK13xV4pWoxvBJyxPwjGSm+zAJzTC0fT63vt26xQtVLJrhpRtJD2kEGtEGj19Sy | |||
ATz1nbR+UqZUryoqzteyGygQXYOoFqX9d6/t2pf/9cDuOhRayUJ2Xjonu1DMQ4T/ | |||
ZwJrXDTIsUFPtnR/mQsNaZdskA4+GmXbweFVyvdloWo0Wgw0lZzQJQ+cGUGAw2RC | |||
HDU9shbMcpbaXwoH8UG5Hml1T1I5XZlpUk2R/kDMHnR0LQkRRSjUTPo1GzpSp+v2 | |||
tiOJurYVBZwp5bryYdZYbRZgYh1oW7WxiKrnQQ5FAT58YBXSzFd575ENBp+LX804 | |||
EMh4po3Wknrvpeh7orkX+Wmbggs/IoBvxTme+RLLnCb0WrCl88dsC8Adn7DP88dm | |||
+JpjMpSyXDvvrChSzWhy6aJ1s/MhkbZS3g+GoeianDPmu6vRGbW7vqGmww1gXyBk | |||
vos90/bAuxjewUMa3UCCkswz99U1TvAT1QJZYH8evFznAx92J6zvKr/ttaG8brTV | |||
OqIdcmK6HmFJjwAAKauFkOLe77GwhtQWKU//C3lXC8KWfwARAQABiQIfBBgBAgAJ | |||
BQJUwWupAhsMAAoJEJrEPxrG2apb7T0P/iXCHX7xmLgvjGRYBhyUfTw00va8Dq8J | |||
oRVBsPZjHj0Yx39UWa9q9P1ME9wxOi5U8xLSTREpKFCM4fcMG8xvFF9SGBNPsvMb | |||
ILvr6ylHtfxreUUUemMpTGPrLj7SDfGRi3CaAikcH5+ve1JH0QVIfdoD3O0OZvVT | |||
9VEq9aZW0Falur155PP3e5oSe0mgCvule3Jb8XL9DhsgQw2Eo2vKyA1kXx7p2405 | |||
YVD8SeWCRfv9b2Bq22rbYDOrE4xM+geTqcl0vhYKKfamXUtmJ/zltuYadE/4ZLFJ | |||
fy2neYdj2sGcVBZALq9OPhkeVMktfRmbL64bT9Cgwrl4mNHwqN2WI8YGmhwGTknN | |||
IqHF0ueyrLM0VzTWjJvi48Nt9Co9VUl8ncnmiqvIs0ZpHF3ZqrTwl9Z0IElXuhx6 | |||
YniJ9ntZk3SaEM/Uvl16nk9vz8uFND1B0MwwlLENaEn0Gy3cWaKH85EzEkoiOTXw | |||
j4uQ0h80FuwxO9K+GffVw/VlcKzOTz4LyId6QYpXio+EWrfF5vYQEloqRLCi6ADS | |||
8IdlSGVwGUD9rCagVpVTh/CPcZ3PX830L0LyOZk28/qqdQ4Whu/yb9NpsoF2UfKE | |||
JL2A7GUrmNZFxBbAtAknFbId/ecJYKefPlp3RpiJ1SeZhuaHYsXaOTm6kyLy770A | |||
bZ03smi2aDRO | |||
=5Uwn | |||
-----END PGP PUBLIC KEY BLOCK----- | |||
</syntaxhighlight> | |||
|} | |||
Excellent! Now clean the yum repository cache. | |||
<syntaxhighlight lang="bash"> | {|class="wikitable" | ||
!<span class="code">an-a05n01</span> | |||
|style="white-space: nowrap;"|<syntaxhighlight lang="bash"> | |||
yum clean all | |||
</syntaxhighlight> | </syntaxhighlight> | ||
<syntaxhighlight lang="text"> | <syntaxhighlight lang="text"> | ||
Loaded plugins: product-id, rhnplugin, security, subscription-manager | |||
Cleaning repos: an-el6-repo rhel-x86_64-server-6 | |||
Cleaning up Everything | |||
<syntaxhighlight lang="bash"> | </syntaxhighlight> | ||
|- | |||
!<span class="code">an-a05n02</span> | |||
|style="white-space: nowrap;"|<syntaxhighlight lang="bash"> | |||
yum clean all | |||
</syntaxhighlight> | </syntaxhighlight> | ||
<syntaxhighlight lang="text"> | <syntaxhighlight lang="text"> | ||
Loaded plugins: product-id, rhnplugin, security, subscription-manager | |||
Cleaning repos: an-el6-repo rhel-x86_64-server-6 | |||
Cleaning up Everything | |||
</syntaxhighlight> | </syntaxhighlight> | ||
|} | |||
Excellent! Now we can proceed. | |||
== Update the OS == | |||
Before we begin at all, let's update our OS. | |||
<syntaxhighlight lang="bash"> | {|class="wikitable" | ||
!<span class="code">an-a05n01</span> | |||
!<span class="code">an-a05n02</span> | |||
|- | |||
|style="white-space: nowrap;"|<syntaxhighlight lang="bash"> | |||
yum update | |||
</syntaxhighlight> | </syntaxhighlight> | ||
<syntaxhighlight lang="text"> | <syntaxhighlight lang="text"> | ||
<lots of yum output> | |||
</syntaxhighlight> | </syntaxhighlight> | ||
|style="white-space: nowrap;"|<syntaxhighlight lang="bash"> | |||
yum update | |||
<syntaxhighlight lang="bash"> | |||
</syntaxhighlight> | </syntaxhighlight> | ||
<syntaxhighlight lang=" | <syntaxhighlight lang="text"> | ||
<lots of yum output> | |||
</syntaxhighlight> | </syntaxhighlight> | ||
|} | |||
== Installing Required Programs == | |||
This will install all the software needed to run the ''Anvil!'' and configure [[IPMI]] for use as a fence device. This won't cover [[DRBD]] or <span class="code">apcupsd</span> which will be covered in dedicated sections below. | |||
{{note|1=If you plan to install DRBD either from the official, supported LINBIT repository, or if you to prefer to install it from source, remove <span class="code">drbd83-utils</span> and <span class="code">kmod-drbd83</span> from the list of packages below.}} | |||
{|class="wikitable" | |||
!<span class="code">an-a05n01</span> | |||
{|class="wikitable | |style="white-space: nowrap;"|<syntaxhighlight lang="bash"> | ||
! | yum install acpid bridge-utils ccs cman compat-libstdc++-33.i686 corosync \ | ||
cyrus-sasl cyrus-sasl-plain dmidecode drbd83-utils expect \ | |||
fence-agents freeipmi freeipmi-bmc-watchdog freeipmi-ipmidetectd \ | |||
gcc gcc-c++ gd gfs2-utils gpm ipmitool kernel-headers \ | |||
kernel-devel kmod-drbd83 libstdc++.i686 libstdc++-devel.i686 \ | |||
libvirt lvm2-cluster mailx man mlocate ntp OpenIPMI OpenIPMI-libs \ | |||
openssh-clients openssl-devel qemu-kvm qemu-kvm-tools parted \ | |||
pciutils perl perl-DBD-Pg perl-Digest-SHA perl-TermReadKey \ | |||
perl-Test-Simple perl-Time-HiRes perl-Net-SSH2 perl-XML-Simple \ | |||
perl-YAML policycoreutils-python postgresql postfix \ | |||
python-virtinst rgmanager ricci rsync Scanner screen syslinux \ | |||
sysstat vim-enhanced virt-viewer wget | |||
</syntaxhighlight> | |||
<syntaxhighlight lang="text"> | |||
<lots of yum output> | |||
</syntaxhighlight> | |||
|- | |- | ||
!<span class="code">an-a05n02</span> | |||
| | |style="white-space: nowrap;"|<syntaxhighlight lang="bash"> | ||
yum install acpid bridge-utils ccs cman compat-libstdc++-33.i686 corosync \ | |||
cyrus-sasl cyrus-sasl-plain dmidecode drbd83-utils expect \ | |||
fence-agents freeipmi freeipmi-bmc-watchdog freeipmi-ipmidetectd \ | |||
gcc gcc-c++ gd gfs2-utils gpm ipmitool kernel-headers \ | |||
kernel-devel kmod-drbd83 libstdc++.i686 libstdc++-devel.i686 \ | |||
libvirt lvm2-cluster mailx man mlocate ntp OpenIPMI OpenIPMI-libs \ | |||
openssh-clients openssl-devel qemu-kvm qemu-kvm-tools parted \ | |||
pciutils perl perl-DBD-Pg perl-Digest-SHA perl-TermReadKey \ | |||
perl-Test-Simple perl-Time-HiRes perl-Net-SSH2 perl-XML-Simple \ | |||
perl-YAML policycoreutils-python postgresql postfix \ | |||
python-virtinst rgmanager ricci rsync Scanner screen syslinux \ | |||
sysstat vim-enhanced virt-viewer wget | |||
</syntaxhighlight> | |||
<syntaxhighlight lang="text"> | |||
<lots of yum output> | |||
</syntaxhighlight> | |||
|} | |} | ||
= | Before we go any further, we'll want to destroy the default <span class="code">libvirtd</span> bridge. We're going to be creating our own bridge that gives our servers direct access to the outside network. | ||
* If <span class="code">virbr0</span> does '''not''' exist: | |||
{|class="wikitable" | |||
!<span class="code">an-a05n01</span> | |||
|style="white-space: nowrap;"|<syntaxhighlight lang="bash"> | |||
cat /dev/null >/etc/libvirt/qemu/networks/default.xml | |||
</syntaxhighlight> | |||
|- | |||
!<span class="code">an-a05n02</span> | |||
|style="white-space: nowrap;"|<syntaxhighlight lang="bash"> | |||
cat /dev/null >/etc/libvirt/qemu/networks/default.xml | |||
</syntaxhighlight> | |||
|} | |||
< | If you already see <span class="code">virbr0</span> when you run <span class="code">ifconfig</span>, the the <span class="code">libvirtd</span> bridge has already started. You can stop and disable it with the following commands; | ||
</ | |||
* If <span class="code">virbr0</span> '''does''' exist: | |||
<syntaxhighlight lang="bash"> | {|class="wikitable" | ||
!<span class="code">an-a05n01</span> | |||
|style="white-space: nowrap;"|<syntaxhighlight lang="bash"> | |||
virsh net-destroy default | |||
virsh net-autostart default --disable | |||
virsh net-undefine default | |||
/etc/init.d/iptables stop | |||
</syntaxhighlight> | |||
|- | |||
!<span class="code">an-a05n02</span> | |||
|style="white-space: nowrap;"|<syntaxhighlight lang="bash"> | |||
virsh net-destroy default | |||
virsh net-autostart default --disable | |||
virsh net-undefine default | |||
/etc/init.d/iptables stop | |||
</syntaxhighlight> | </syntaxhighlight> | ||
|} | |||
Now <span class="code">virbr0</span> should be gone now and it won't return. | |||
</ | |||
== | == Switch Network Daemons == | ||
The new <span class="code">NetworkManager</span> daemon is much more flexible and is perfect for machines like laptops which move around networks a lot. However, it does this by making a lot of decisions for you and changing the network as it sees fit. As good as this is for laptops and the like, it's not appropriate for servers. We will want to use the traditional <span class="code">network</span> service. | |||
{|class="wikitable" | |||
<syntaxhighlight lang="bash"> | !<span class="code">an-a05n01</span> | ||
!<span class="code">an-a05n02</span> | |||
|- | |||
|style="white-space: nowrap;"|<syntaxhighlight lang="bash"> | |||
yum remove NetworkManager | |||
</syntaxhighlight> | </syntaxhighlight> | ||
<syntaxhighlight lang="bash"> | |style="white-space: nowrap;"|<syntaxhighlight lang="bash"> | ||
yum remove NetworkManager | |||
</syntaxhighlight> | </syntaxhighlight> | ||
|} | |||
= | Now enable <span class="code">network</span> to start with the system. | ||
{|class="wikitable" | |||
!<span class="code">an-a05n01</span> | |||
!<span class="code">an-a05n02</span> | |||
|- | |||
|style="white-space: nowrap;"|<syntaxhighlight lang="bash"> | |||
chkconfig network on | |||
chkconfig --list network | |||
<syntaxhighlight lang="bash"> | |||
</syntaxhighlight> | </syntaxhighlight> | ||
<syntaxhighlight lang=" | <syntaxhighlight lang="text"> | ||
network 0:off 1:off 2:on 3:on 4:on 5:on 6:off | |||
</syntaxhighlight> | </syntaxhighlight> | ||
|style="white-space: nowrap;"|<syntaxhighlight lang="bash"> | |||
chkconfig network on | |||
<syntaxhighlight lang="bash"> | chkconfig --list network | ||
</syntaxhighlight> | </syntaxhighlight> | ||
<syntaxhighlight lang=" | <syntaxhighlight lang="text"> | ||
network 0:off 1:off 2:on 3:on 4:on 5:on 6:off | |||
</syntaxhighlight> | </syntaxhighlight> | ||
|} | |||
== Altering Which Daemons Start on Boot == | |||
Several of the applications we installed above include [[daemon]]s that either start on boot or stay off on boot. Likewise, some daemons remain stopped after they're installed, and we want to start them now. | |||
As we work on each component, we'll discuss in more detail why we want each to either start or stop on boot. For now, let's just make the changes. | |||
We'll use the <span class="code">chkconfig</span> command to make sure the daemons we want to start on boot do so. | |||
{|class="wikitable" | |||
<syntaxhighlight lang="bash"> | !<span class="code">an-a05n01</span> | ||
!<span class="code">an-a05n02</span> | |||
|- | |||
|style="white-space: nowrap;"|<syntaxhighlight lang="bash"> | |||
chkconfig network on | |||
chkconfig ntpd on | |||
chkconfig ricci on | |||
chkconfig modclusterd on | |||
chkconfig ipmi on | |||
chkconfig iptables on | |||
</syntaxhighlight> | </syntaxhighlight> | ||
<syntaxhighlight lang="bash"> | |style="white-space: nowrap;"|<syntaxhighlight lang="bash"> | ||
chkconfig network on | |||
chkconfig ntpd on | |||
chkconfig ricci on | |||
chkconfig modclusterd on | |||
chkconfig ipmi on | |||
chkconfig iptables on | |||
</syntaxhighlight> | </syntaxhighlight> | ||
|} | |||
' | Next, we'll tell the system what daemons to leave off on boot. | ||
<syntaxhighlight lang="bash"> | |||
{|class="wikitable" | |||
!<span class="code">an-a05n01</span> | |||
!<span class="code">an-a05n02</span> | |||
|- | |||
|style="white-space: nowrap;"|<syntaxhighlight lang="bash"> | |||
chkconfig acpid off | |||
chkconfig ip6tables off | |||
chkconfig clvmd off | |||
chkconfig gfs2 off | |||
chkconfig libvirtd off | |||
chkconfig cman off | |||
chkconfig rgmanager off | |||
</syntaxhighlight> | </syntaxhighlight> | ||
<syntaxhighlight lang="bash"> | |style="white-space: nowrap;"|<syntaxhighlight lang="bash"> | ||
chkconfig acpid off | |||
chkconfig ip6tables off | |||
chkconfig clvmd off | |||
chkconfig gfs2 off | |||
chkconfig libvirtd off | |||
chkconfig cman off | |||
chkconfig rgmanager off | |||
</syntaxhighlight> | </syntaxhighlight> | ||
|} | |||
' | Now start the daemons we've installed and want running. | ||
<syntaxhighlight lang="bash"> | |||
{|class="wikitable" | |||
!<span class="code">an-a05n01</span> | |||
!<span class="code">an-a05n02</span> | |||
|- | |||
|style="white-space: nowrap;"|<syntaxhighlight lang="bash"> | |||
/etc/init.d/ntpd start | |||
/etc/init.d/ricci start | |||
/etc/init.d/modclusterd start | |||
/etc/init.d/ipmi start | |||
/etc/init.d/iptables start | |||
</syntaxhighlight> | </syntaxhighlight> | ||
<syntaxhighlight lang="bash"> | |style="white-space: nowrap;"|<syntaxhighlight lang="bash"> | ||
/etc/init.d/ntpd start | |||
/etc/init.d/ricci start | |||
/etc/init.d/modclusterd start | |||
/etc/init.d/ipmi start | |||
/etc/init.d/iptables start | |||
</syntaxhighlight> | </syntaxhighlight> | ||
|} | |||
' | Lastly, stop the daemons we don't want running. | ||
<syntaxhighlight lang="bash"> | |||
{|class="wikitable" | |||
!<span class="code">an-a05n01</span> | |||
!<span class="code">an-a05n02</span> | |||
|- | |||
|style="white-space: nowrap;"|<syntaxhighlight lang="bash"> | |||
/etc/init.d/libvirtd stop | |||
/etc/init.d/acpid stop | |||
/etc/init.d/ip6tables stop | |||
</syntaxhighlight> | </syntaxhighlight> | ||
<syntaxhighlight lang="bash"> | |style="white-space: nowrap;"|<syntaxhighlight lang="bash"> | ||
/etc/init.d/libvirtd stop | |||
/etc/init.d/acpid stop | |||
/etc/init.d/ip6tables stop | |||
</syntaxhighlight> | </syntaxhighlight> | ||
|} | |||
You can verify that the services you want to start will and the ones you don't want to won't using <span class="code">chkconfig</span>. | |||
{|class="wikitable" | |||
<syntaxhighlight lang="bash"> | !<span class="code">an-a05n01</span> | ||
!<span class="code">an-a05n02</span> | |||
|- | |||
|style="white-space: nowrap;"|<syntaxhighlight lang="bash"> | |||
chkconfig --list | |||
</syntaxhighlight> | </syntaxhighlight> | ||
<syntaxhighlight lang=" | <syntaxhighlight lang="text"> | ||
abrt-ccpp 0:off 1:off 2:off 3:on 4:off 5:on 6:off | |||
abrtd 0:off 1:off 2:off 3:on 4:off 5:on 6:off | |||
acpid 0:off 1:off 2:off 3:off 4:off 5:off 6:off | |||
atd 0:off 1:off 2:off 3:on 4:on 5:on 6:off | |||
auditd 0:off 1:off 2:on 3:on 4:on 5:on 6:off | |||
blk-availability 0:off 1:on 2:on 3:on 4:on 5:on 6:off | |||
bmc-watchdog 0:off 1:off 2:off 3:on 4:off 5:on 6:off | |||
cgconfig 0:off 1:off 2:on 3:on 4:on 5:on 6:off | |||
cgred 0:off 1:off 2:off 3:off 4:off 5:off 6:off | |||
clvmd 0:off 1:off 2:off 3:off 4:off 5:off 6:off | |||
cman 0:off 1:off 2:off 3:off 4:off 5:off 6:off | |||
corosync 0:off 1:off 2:off 3:off 4:off 5:off 6:off | |||
cpglockd 0:off 1:off 2:off 3:off 4:off 5:off 6:off | |||
cpuspeed 0:off 1:on 2:on 3:on 4:on 5:on 6:off | |||
crond 0:off 1:off 2:on 3:on 4:on 5:on 6:off | |||
dnsmasq 0:off 1:off 2:off 3:off 4:off 5:off 6:off | |||
drbd 0:off 1:off 2:off 3:off 4:off 5:off 6:off | |||
ebtables 0:off 1:off 2:off 3:off 4:off 5:off 6:off | |||
gfs2 0:off 1:off 2:off 3:off 4:off 5:off 6:off | |||
gpm 0:off 1:off 2:on 3:on 4:on 5:on 6:off | |||
haldaemon 0:off 1:off 2:off 3:on 4:on 5:on 6:off | |||
ip6tables 0:off 1:off 2:off 3:off 4:off 5:off 6:off | |||
ipmi 0:off 1:off 2:on 3:on 4:on 5:on 6:off | |||
ipmidetectd 0:off 1:off 2:off 3:on 4:off 5:on 6:off | |||
ipmievd 0:off 1:off 2:off 3:off 4:off 5:off 6:off | |||
iptables 0:off 1:off 2:on 3:on 4:on 5:on 6:off | |||
irqbalance 0:off 1:off 2:off 3:on 4:on 5:on 6:off | |||
iscsi 0:off 1:off 2:off 3:on 4:on 5:on 6:off | |||
iscsid 0:off 1:off 2:off 3:on 4:on 5:on 6:off | |||
kdump 0:off 1:off 2:off 3:off 4:off 5:off 6:off | |||
ksm 0:off 1:off 2:off 3:on 4:on 5:on 6:off | |||
ksmtuned 0:off 1:off 2:off 3:on 4:on 5:on 6:off | |||
libvirt-guests 0:off 1:off 2:on 3:on 4:on 5:on 6:off | |||
libvirtd 0:off 1:off 2:off 3:off 4:off 5:off 6:off | |||
lvm2-monitor 0:off 1:on 2:on 3:on 4:on 5:on 6:off | |||
mdmonitor 0:off 1:off 2:on 3:on 4:on 5:on 6:off | |||
messagebus 0:off 1:off 2:on 3:on 4:on 5:on 6:off | |||
modclusterd 0:off 1:off 2:on 3:on 4:on 5:on 6:off | |||
netconsole 0:off 1:off 2:off 3:off 4:off 5:off 6:off | |||
netfs 0:off 1:off 2:off 3:on 4:on 5:on 6:off | |||
network 0:off 1:off 2:on 3:on 4:on 5:on 6:off | |||
nfs 0:off 1:off 2:off 3:off 4:off 5:off 6:off | |||
nfslock 0:off 1:off 2:off 3:on 4:on 5:on 6:off | |||
ntpd 0:off 1:off 2:on 3:on 4:on 5:on 6:off | |||
ntpdate 0:off 1:off 2:off 3:off 4:off 5:off 6:off | |||
numad 0:off 1:off 2:off 3:off 4:off 5:off 6:off | |||
oddjobd 0:off 1:off 2:off 3:off 4:off 5:off 6:off | |||
postfix 0:off 1:off 2:on 3:on 4:on 5:on 6:off | |||
psacct 0:off 1:off 2:off 3:off 4:off 5:off 6:off | |||
quota_nld 0:off 1:off 2:off 3:off 4:off 5:off 6:off | |||
radvd 0:off 1:off 2:off 3:off 4:off 5:off 6:off | |||
rdisc 0:off 1:off 2:off 3:off 4:off 5:off 6:off | |||
restorecond 0:off 1:off 2:off 3:off 4:off 5:off 6:off | |||
rgmanager 0:off 1:off 2:off 3:off 4:off 5:off 6:off | |||
rhnsd 0:off 1:off 2:on 3:on 4:on 5:on 6:off | |||
rhsmcertd 0:off 1:off 2:off 3:on 4:on 5:on 6:off | |||
ricci 0:off 1:off 2:on 3:on 4:on 5:on 6:off | |||
rngd 0:off 1:off 2:off 3:off 4:off 5:off 6:off | |||
rpcbind 0:off 1:off 2:on 3:on 4:on 5:on 6:off | |||
rpcgssd 0:off 1:off 2:off 3:on 4:on 5:on 6:off | |||
rpcsvcgssd 0:off 1:off 2:off 3:off 4:off 5:off 6:off | |||
rsyslog 0:off 1:off 2:on 3:on 4:on 5:on 6:off | |||
saslauthd 0:off 1:off 2:off 3:off 4:off 5:off 6:off | |||
smartd 0:off 1:off 2:off 3:off 4:off 5:off 6:off | |||
sshd 0:off 1:off 2:on 3:on 4:on 5:on 6:off | |||
svnserve 0:off 1:off 2:off 3:off 4:off 5:off 6:off | |||
sysstat 0:off 1:on 2:on 3:on 4:on 5:on 6:off | |||
udev-post 0:off 1:on 2:on 3:on 4:on 5:on 6:off | |||
winbind 0:off 1:off 2:off 3:off 4:off 5:off 6:off | |||
</syntaxhighlight> | </syntaxhighlight> | ||
|style="white-space: nowrap;"|<syntaxhighlight lang="bash"> | |||
chkconfig --list | |||
<syntaxhighlight lang="bash"> | |||
</syntaxhighlight> | </syntaxhighlight> | ||
<syntaxhighlight lang="text"> | <syntaxhighlight lang="text"> | ||
abrt-ccpp 0:off 1:off 2:off 3:on 4:off 5:on 6:off | |||
::1 | abrtd 0:off 1:off 2:off 3:on 4:off 5:on 6:off | ||
acpid 0:off 1:off 2:off 3:off 4:off 5:off 6:off | |||
atd 0:off 1:off 2:off 3:on 4:on 5:on 6:off | |||
auditd 0:off 1:off 2:on 3:on 4:on 5:on 6:off | |||
blk-availability 0:off 1:on 2:on 3:on 4:on 5:on 6:off | |||
bmc-watchdog 0:off 1:off 2:off 3:on 4:off 5:on 6:off | |||
cgconfig 0:off 1:off 2:on 3:on 4:on 5:on 6:off | |||
cgred 0:off 1:off 2:off 3:off 4:off 5:off 6:off | |||
clvmd 0:off 1:off 2:off 3:off 4:off 5:off 6:off | |||
cman 0:off 1:off 2:off 3:off 4:off 5:off 6:off | |||
corosync 0:off 1:off 2:off 3:off 4:off 5:off 6:off | |||
cpglockd 0:off 1:off 2:off 3:off 4:off 5:off 6:off | |||
cpuspeed 0:off 1:on 2:on 3:on 4:on 5:on 6:off | |||
crond 0:off 1:off 2:on 3:on 4:on 5:on 6:off | |||
dnsmasq 0:off 1:off 2:off 3:off 4:off 5:off 6:off | |||
drbd 0:off 1:off 2:off 3:off 4:off 5:off 6:off | |||
ebtables 0:off 1:off 2:off 3:off 4:off 5:off 6:off | |||
gfs2 0:off 1:off 2:off 3:off 4:off 5:off 6:off | |||
gpm 0:off 1:off 2:on 3:on 4:on 5:on 6:off | |||
haldaemon 0:off 1:off 2:off 3:on 4:on 5:on 6:off | |||
ip6tables 0:off 1:off 2:off 3:off 4:off 5:off 6:off | |||
ipmi 0:off 1:off 2:on 3:on 4:on 5:on 6:off | |||
ipmidetectd 0:off 1:off 2:off 3:on 4:off 5:on 6:off | |||
ipmievd 0:off 1:off 2:off 3:off 4:off 5:off 6:off | |||
iptables 0:off 1:off 2:on 3:on 4:on 5:on 6:off | |||
irqbalance 0:off 1:off 2:off 3:on 4:on 5:on 6:off | |||
iscsi 0:off 1:off 2:off 3:on 4:on 5:on 6:off | |||
iscsid 0:off 1:off 2:off 3:on 4:on 5:on 6:off | |||
kdump 0:off 1:off 2:off 3:off 4:off 5:off 6:off | |||
ksm 0:off 1:off 2:off 3:on 4:on 5:on 6:off | |||
ksmtuned 0:off 1:off 2:off 3:on 4:on 5:on 6:off | |||
libvirt-guests 0:off 1:off 2:on 3:on 4:on 5:on 6:off | |||
libvirtd 0:off 1:off 2:off 3:off 4:off 5:off 6:off | |||
lvm2-monitor 0:off 1:on 2:on 3:on 4:on 5:on 6:off | |||
mdmonitor 0:off 1:off 2:on 3:on 4:on 5:on 6:off | |||
messagebus 0:off 1:off 2:on 3:on 4:on 5:on 6:off | |||
modclusterd 0:off 1:off 2:on 3:on 4:on 5:on 6:off | |||
netconsole 0:off 1:off 2:off 3:off 4:off 5:off 6:off | |||
netfs 0:off 1:off 2:off 3:on 4:on 5:on 6:off | |||
network 0:off 1:off 2:on 3:on 4:on 5:on 6:off | |||
nfs 0:off 1:off 2:off 3:off 4:off 5:off 6:off | |||
nfslock 0:off 1:off 2:off 3:on 4:on 5:on 6:off | |||
ntpd 0:off 1:off 2:on 3:on 4:on 5:on 6:off | |||
ntpdate 0:off 1:off 2:off 3:off 4:off 5:off 6:off | |||
numad 0:off 1:off 2:off 3:off 4:off 5:off 6:off | |||
oddjobd 0:off 1:off 2:off 3:off 4:off 5:off 6:off | |||
postfix 0:off 1:off 2:on 3:on 4:on 5:on 6:off | |||
psacct 0:off 1:off 2:off 3:off 4:off 5:off 6:off | |||
quota_nld 0:off 1:off 2:off 3:off 4:off 5:off 6:off | |||
radvd 0:off 1:off 2:off 3:off 4:off 5:off 6:off | |||
rdisc 0:off 1:off 2:off 3:off 4:off 5:off 6:off | |||
restorecond 0:off 1:off 2:off 3:off 4:off 5:off 6:off | |||
rgmanager 0:off 1:off 2:off 3:off 4:off 5:off 6:off | |||
rhnsd 0:off 1:off 2:on 3:on 4:on 5:on 6:off | |||
rhsmcertd 0:off 1:off 2:off 3:on 4:on 5:on 6:off | |||
ricci 0:off 1:off 2:on 3:on 4:on 5:on 6:off | |||
rngd 0:off 1:off 2:off 3:off 4:off 5:off 6:off | |||
rpcbind 0:off 1:off 2:on 3:on 4:on 5:on 6:off | |||
rpcgssd 0:off 1:off 2:off 3:on 4:on 5:on 6:off | |||
rpcsvcgssd 0:off 1:off 2:off 3:off 4:off 5:off 6:off | |||
rsyslog 0:off 1:off 2:on 3:on 4:on 5:on 6:off | |||
saslauthd 0:off 1:off 2:off 3:off 4:off 5:off 6:off | |||
smartd 0:off 1:off 2:off 3:off 4:off 5:off 6:off | |||
sshd 0:off 1:off 2:on 3:on 4:on 5:on 6:off | |||
svnserve 0:off 1:off 2:off 3:off 4:off 5:off 6:off | |||
sysstat 0:off 1:on 2:on 3:on 4:on 5:on 6:off | |||
udev-post 0:off 1:on 2:on 3:on 4:on 5:on 6:off | |||
winbind 0:off 1:off 2:off 3:off 4:off 5:off 6:off | |||
</syntaxhighlight> | </syntaxhighlight> | ||
|} | |||
If you did a minimal OS install, or any install without a graphical interface, you will be booting into [https://en.wikipedia.org/wiki/Runlevel#Red_Hat_Linux_and_Fedora run-level] <span class="code">3</span>. If you did install a graphical interface, which is not wise, then your default run-level will either be <span class="code">3</span> or <span class="code">5</span>. You can determine which by looking in <span class="code">/etc/inittab</span>. | |||
Once you know the run-level you're using, look for the daemon you are interested in and the see if it's set to <span class="code">x:on</span> or <span class="code">x:off</span>. That will confirm that the associated daemon is set to start on boot or not, respectively. | |||
== | == Network Security == | ||
The interfaces connected to the [[IFN]] are usually connected to an untrusted network, like the Internet. If you do not need access to the IFN from the nodes themselves, you can increase security by not assigning an IP address to the <span class="code">ifn_bridge1</span> interface which we will configure shortly. The <span class="code">ifn_bridge1</span> bridge device will need to be up so that virtual machines can route through it to the outside world, of course. | |||
If you do decide to assign an IP to the nodes' <span class="code">ifn_bridge1</span>, you will want to restrict inbound access as much as possible. A good policy is to <span class="code">DROP</span> all traffic inbound from the hosted servers, unless you trust them specifically. | |||
We're going to open ports for both Red Hat's high-availability add-on components and LinBit's DRBD software. You can find details here: | |||
* [http://docs.redhat.com/docs/en-US/Red_Hat_Enterprise_Linux/6/html-single/Cluster_Administration/index.html#s1-iptables_firewall-CA RHEL 6 Cluster Configuration, Firewall Setup] | |||
* [http://www.drbd.org/users-guide-8.3/s-prepare-network.html Linbit's DRBD, Firewall Configuration] | |||
Specifically, we'll be <span class="code">ACCEPT</span>ing the ports listed below on both nodes. | |||
{|class="wikitable sortable" | |||
!Component | |||
!Protocol | |||
</ | !Port | ||
< | !Note | ||
|- | |||
|<span class="code">[[dlm]]</span> | |||
|[[TCP]] | |||
|<span class="code">21064</span> | |||
| | |||
|- | |||
|<span class="code">[[drbd]]</span> | |||
|[[TCP]] | |||
| | |<span class="code">7788</span>+ | ||
| | |Each [[DRBD]] resource will use an additional port, generally counting up (ie: <span class="code">r0</span> will use <span class="code">7788</span>, <span class="code">r1</span> will use <span class="code">7789</span>, <span class="code">r2</span> will use <span class="code">7790</span> and so on). | ||
| | |- | ||
| | |<span class="code">[[luci]]</span> | ||
| | |[[TCP]] | ||
| | |<span class="code">8084</span> | ||
| | |''Optional'' web-based configuration tool, not used in this tutorial but documented for reference. | ||
| | |- | ||
| | |<span class="code">[[modclusterd]]</span> | ||
|[[TCP]] | |||
|<span class="code">16851</span> | |||
| | |||
|- | |||
|<span class="code">[[ricci]]</span> | |||
|[[TCP]] | |||
|<span class="code">11111</span> | |||
|Each [[DRBD]] resource will use an additional port, generally counting up (ie: <span class="code">r1</span> will use <span class="code">7790</span>, <span class="code">r2</span> will use <span class="code">7791</span> and so on). | |||
|- | |||
|<span class="code">[[totem]]</span> | |||
|[[UDP]]/[[multicast]] | |||
|<span class="code">5404</span>, <span class="code">5405</span> | |||
|Uses a multicast group for cluster communications | |||
|} | |||
== Configuring iptables == | |||
{{note|1=Configuring <span class="code">iptables</span> is an entire topic on its own. There are many good tutorials on the Internet discussing it, including an [[TLUG Talk: Netfilter|older introduction to <span class="code">iptables</span> tutorial]] hosted here. If you are unfamiliar with <span class="code">iptables</span>, it is well worth taking a break from this tutorial and getting familiar with it, in concept if nothing else.}} | |||
{{note|1=This opens up enough ports for 100 virtual servers. This is entirely arbitrary range, which you probably want to reduce (or possibly increase). This also allows incoming connections from both the [[BCN]] and [[IFN]], which you may want to change. Please look below for the 'remote desktop' rules comment.}} | |||
The first thing we want to do is see what the current firewall policy is. We can do this with <span class="code">iptables-save</span>, a tool designed to backup <span class="code">iptables</span> but also very useful for seeing what configuration is currently in memory. | |||
<syntaxhighlight lang="bash"> | {|class="wikitable" | ||
!<span class="code">an-a05n01</span> | |||
|style="white-space: nowrap;"|<syntaxhighlight lang="bash"> | |||
iptables-save | |||
</syntaxhighlight> | </syntaxhighlight> | ||
<syntaxhighlight lang=" | <syntaxhighlight lang="text"> | ||
# Generated by iptables-save v1.4.7 on Wed Nov 13 15:49:17 2013 | |||
*filter | |||
:INPUT ACCEPT [0:0] | |||
:FORWARD ACCEPT [0:0] | |||
:OUTPUT ACCEPT [440:262242] | |||
-A INPUT -m state --state RELATED,ESTABLISHED -j ACCEPT | |||
-A INPUT -p icmp -j ACCEPT | |||
-A INPUT -i lo -j ACCEPT | |||
-A INPUT -p tcp -m state --state NEW -m tcp --dport 22 -j ACCEPT | |||
-A INPUT -j REJECT --reject-with icmp-host-prohibited | |||
-A FORWARD -j REJECT --reject-with icmp-host-prohibited | |||
COMMIT | |||
# Completed on Wed Nov 13 15:49:17 2013 | |||
</syntaxhighlight> | </syntaxhighlight> | ||
|- | |||
!<span class="code">an-a05n02</span> | |||
|style="white-space: nowrap;"|<syntaxhighlight lang="bash"> | |||
iptables-save | |||
<syntaxhighlight lang="bash"> | |||
</syntaxhighlight> | </syntaxhighlight> | ||
<syntaxhighlight lang="text"> | <syntaxhighlight lang="text"> | ||
----- | # Generated by iptables-save v1.4.7 on Wed Nov 13 15:49:51 2013 | ||
*filter | |||
:INPUT ACCEPT [0:0] | |||
:FORWARD ACCEPT [0:0] | |||
:OUTPUT ACCEPT [336:129880] | |||
-A INPUT -m state --state RELATED,ESTABLISHED -j ACCEPT | |||
-A INPUT -p icmp -j ACCEPT | |||
-A INPUT -i lo -j ACCEPT | |||
-A INPUT -p tcp -m state --state NEW -m tcp --dport 22 -j ACCEPT | |||
-A INPUT -j REJECT --reject-with icmp-host-prohibited | |||
-A FORWARD -j REJECT --reject-with icmp-host-prohibited | |||
COMMIT | |||
# Completed on Wed Nov 13 15:49:51 2013 | |||
</syntaxhighlight> | |||
|} | |||
----- | |||
</syntaxhighlight> | |||
{{note|1=This tutorial will create two DRBD resources. Each resource will use a different [[TCP]] port. By convention, they start at port <span class="code">7788</span> and increment up per resource. So we will be opening ports <span class="code">7788</span> and <span class="code">7789</span>.}} | |||
< | |||
</ | |||
< | |||
</ | |||
Open ports; | |||
{|class="wikitable" | |||
!<span class="code">an-a05n01</span> | |||
|style="white-space: nowrap;"|<syntaxhighlight lang="bash"> | |||
# cman (corosync's totem) | |||
iptables -I INPUT -m state --state NEW -m multiport -p udp -s 10.20.0.0/16 -d 10.20.0.0/16 --dports 5404,5405 -j ACCEPT | |||
iptables -I INPUT -m addrtype --dst-type MULTICAST -m state --state NEW -m multiport -p udp -s 10.20.0.0/16 --dports 5404,5405 -j ACCEPT | |||
# dlm | |||
iptables -I INPUT -m state --state NEW -p tcp -s 10.20.0.0/16 -d 10.20.0.0/16 --dport 21064 -j ACCEPT | |||
# ricci | |||
iptables -I INPUT -m state --state NEW -p tcp -s 10.20.0.0/16 -d 10.20.0.0/16 --dport 11111 -j ACCEPT | |||
# modclusterd | |||
iptables -I INPUT -m state --state NEW -p tcp -s 10.20.0.0/16 -d 10.20.0.0/16 --dport 16851 -j ACCEPT | |||
# multicast (igmp; Internet group management protocol) | |||
iptables -I INPUT -p igmp -j ACCEPT | |||
I | # DRBD resource 0 and 1 - on the SN | ||
iptables -I INPUT -m state --state NEW -p tcp -s 10.10.0.0/16 -d 10.10.0.0/16 --dport 7788 -j ACCEPT | |||
iptables -I INPUT -m state --state NEW -p tcp -s 10.10.0.0/16 -d 10.10.0.0/16 --dport 7789 -j ACCEPT | |||
# KVM live-migration ports on BCN | |||
iptables -I INPUT -p tcp -m tcp -s 10.20.0.0/16 -d 10.20.0.0/16 --dport 49152:49216 -j ACCEPT | |||
# Allow remote desktop access to servers on both the IFN and BCN. This opens 100 ports. If you want | |||
# to change this range, put the range '5900:(5900+VM count)'. | |||
iptables -I INPUT -m state --state NEW -p tcp -s 10.20.0.0/16 -d 10.20.0.0/16 --dport 5900:5999 -j ACCEPT | |||
iptables -I INPUT -m state --state NEW -p tcp -s 10.255.0.0/16 -d 10.255.0.0/16 --dport 5900:5999 -j ACCEPT | |||
# See the new configuration | |||
iptables-save | |||
</syntaxhighlight> | |||
<syntaxhighlight lang="bash"> | <syntaxhighlight lang="bash"> | ||
# Generated by iptables-save v1.4.7 on Tue Mar 25 13:55:54 2014 | |||
*filter | |||
:INPUT ACCEPT [0:0] | |||
:FORWARD ACCEPT [0:0] | |||
:OUTPUT ACCEPT [52:8454] | |||
-A INPUT -s 10.255.0.0/16 -d 10.255.0.0/16 -p tcp -m state --state NEW -m tcp --dport 5900:5999 -j ACCEPT | |||
-A INPUT -s 10.20.0.0/16 -d 10.20.0.0/16 -p tcp -m state --state NEW -m tcp --dport 5900:5999 -j ACCEPT | |||
-A INPUT -s 10.20.0.0/16 -d 10.20.0.0/16 -p tcp -m tcp --dport 49152:49216 -j ACCEPT | |||
-A INPUT -s 10.10.0.0/16 -d 10.10.0.0/16 -p tcp -m state --state NEW -m tcp --dport 7789 -j ACCEPT | |||
-A INPUT -s 10.10.0.0/16 -d 10.10.0.0/16 -p tcp -m state --state NEW -m tcp --dport 7788 -j ACCEPT | |||
-A INPUT -p igmp -j ACCEPT | |||
-A INPUT -s 10.20.0.0/16 -d 10.20.0.0/16 -p tcp -m state --state NEW -m tcp --dport 16851 -j ACCEPT | |||
-A INPUT -s 10.20.0.0/16 -d 10.20.0.0/16 -p tcp -m state --state NEW -m tcp --dport 11111 -j ACCEPT | |||
-A INPUT -s 10.20.0.0/16 -d 10.20.0.0/16 -p tcp -m state --state NEW -m tcp --dport 21064 -j ACCEPT | |||
-A INPUT -s 10.20.0.0/16 -p udp -m addrtype --dst-type MULTICAST -m state --state NEW -m multiport --dports 5404,5405 -j ACCEPT | |||
-A INPUT -s 10.20.0.0/16 -d 10.20.0.0/16 -p udp -m state --state NEW -m multiport --dports 5404,5405 -j ACCEPT | |||
-A INPUT -m state --state RELATED,ESTABLISHED -j ACCEPT | |||
-A INPUT -p icmp -j ACCEPT | |||
-A INPUT -i lo -j ACCEPT | |||
-A INPUT -p tcp -m state --state NEW -m tcp --dport 22 -j ACCEPT | |||
-A INPUT -j REJECT --reject-with icmp-host-prohibited | |||
-A FORWARD -j REJECT --reject-with icmp-host-prohibited | |||
COMMIT | |||
# Completed on Tue Mar 25 13:55:54 2014 | |||
</syntaxhighlight> | </syntaxhighlight> | ||
<syntaxhighlight lang=" | |- | ||
!<span class="code">an-a05n02</span> | |||
|style="white-space: nowrap;"|<syntaxhighlight lang="bash"> | |||
# cman (corosync's totem) | |||
iptables -I INPUT -m state --state NEW -m multiport -p udp -s 10.20.0.0/16 -d 10.20.0.0/16 --dports 5404,5405 -j ACCEPT | |||
iptables -I INPUT -m addrtype --dst-type MULTICAST -m state --state NEW -m multiport -p udp -s 10.20.0.0/16 --dports 5404,5405 -j ACCEPT | |||
# dlm | |||
iptables -I INPUT -m state --state NEW -p tcp -s 10.20.0.0/16 -d 10.20.0.0/16 --dport 21064 -j ACCEPT | |||
# ricci | |||
iptables -I INPUT -m state --state NEW -p tcp -s 10.20.0.0/16 -d 10.20.0.0/16 --dport 11111 -j ACCEPT | |||
# modclusterd | |||
iptables -I INPUT -m state --state NEW -p tcp -s 10.20.0.0/16 -d 10.20.0.0/16 --dport 16851 -j ACCEPT | |||
# multicast (igmp; Internet group management protocol) | |||
iptables -I INPUT -p igmp -j ACCEPT | |||
# DRBD resource 0 and 1 - on the SN | |||
iptables -I INPUT -m state --state NEW -p tcp -s 10.10.0.0/16 -d 10.10.0.0/16 --dport 7788 -j ACCEPT | |||
iptables -I INPUT -m state --state NEW -p tcp -s 10.10.0.0/16 -d 10.10.0.0/16 --dport 7789 -j ACCEPT | |||
I | # KVM live-migration ports on BCN | ||
iptables -I INPUT -p tcp -m tcp -s 10.20.0.0/16 -d 10.20.0.0/16 --dport 49152:49216 -j ACCEPT | |||
# Allow remote desktop access to servers on both the IFN and BCN. This opens 100 ports. If you want | |||
# to change this range, put the range '5900:(5900+VM count)'. | |||
iptables -I INPUT -m state --state NEW -p tcp -s 10.20.0.0/16 -d 10.20.0.0/16 --dport 5900:5999 -j ACCEPT | |||
iptables -I INPUT -m state --state NEW -p tcp -s 10.255.0.0/16 -d 10.255.0.0/16 --dport 5900:5999 -j ACCEPT | |||
# See the new configuration | |||
iptables-save | |||
</syntaxhighlight> | |||
<syntaxhighlight lang="bash"> | <syntaxhighlight lang="bash"> | ||
# Generated by iptables-save v1.4.7 on Tue Mar 25 13:55:54 2014 | |||
*filter | |||
:INPUT ACCEPT [0:0] | |||
:FORWARD ACCEPT [0:0] | |||
:OUTPUT ACCEPT [16:5452] | |||
-A INPUT -s 10.255.0.0/16 -d 10.255.0.0/16 -p tcp -m state --state NEW -m tcp --dport 5900:5999 -j ACCEPT | |||
-A INPUT -s 10.20.0.0/16 -d 10.20.0.0/16 -p tcp -m state --state NEW -m tcp --dport 5900:5999 -j ACCEPT | |||
-A INPUT -s 10.20.0.0/16 -d 10.20.0.0/16 -p tcp -m tcp --dport 49152:49216 -j ACCEPT | |||
-A INPUT -s 10.10.0.0/16 -d 10.10.0.0/16 -p tcp -m state --state NEW -m tcp --dport 7789 -j ACCEPT | |||
-A INPUT -s 10.10.0.0/16 -d 10.10.0.0/16 -p tcp -m state --state NEW -m tcp --dport 7788 -j ACCEPT | |||
-A INPUT -p igmp -j ACCEPT | |||
-A INPUT -s 10.20.0.0/16 -d 10.20.0.0/16 -p tcp -m state --state NEW -m tcp --dport 16851 -j ACCEPT | |||
-A INPUT -s 10.20.0.0/16 -d 10.20.0.0/16 -p tcp -m state --state NEW -m tcp --dport 11111 -j ACCEPT | |||
-A INPUT -s 10.20.0.0/16 -d 10.20.0.0/16 -p tcp -m state --state NEW -m tcp --dport 21064 -j ACCEPT | |||
-A INPUT -s 10.20.0.0/16 -p udp -m addrtype --dst-type MULTICAST -m state --state NEW -m multiport --dports 5404,5405 -j ACCEPT | |||
-A INPUT -s 10.20.0.0/16 -d 10.20.0.0/16 -p udp -m state --state NEW -m multiport --dports 5404,5405 -j ACCEPT | |||
-A INPUT -m state --state RELATED,ESTABLISHED -j ACCEPT | |||
-A INPUT -p icmp -j ACCEPT | |||
-A INPUT -i lo -j ACCEPT | |||
-A INPUT -p tcp -m state --state NEW -m tcp --dport 22 -j ACCEPT | |||
-A INPUT -j REJECT --reject-with icmp-host-prohibited | |||
-A FORWARD -j REJECT --reject-with icmp-host-prohibited | |||
COMMIT | |||
# Completed on Tue Mar 25 13:55:54 2014 | |||
</syntaxhighlight> | </syntaxhighlight> | ||
|} | |||
At this point, the cluster stack should work, but we're not done yet. The changes we made above altered packet filtering in memory, but the configuration has not been saved to disk. This configuration is saved in <span class="code">/etc/sysconfig/iptables</span>. You could pipe the output of <span class="code">iptables-save</span> to it, but the <span class="code">iptables</span> initialization script provides a facility to save the configuration, so we will use it instead. | |||
< | {|class="wikitable" | ||
!<span class="code">an-a05n01</span> | |||
|style="white-space: nowrap;"|<syntaxhighlight lang="bash"> | |||
/etc/init.d/iptables save | |||
</syntaxhighlight> | </syntaxhighlight> | ||
<syntaxhighlight lang="text"> | <syntaxhighlight lang="text"> | ||
iptables: Saving firewall rules to /etc/sysconfig/iptables:[ OK ] | |||
[ | |||
</syntaxhighlight> | </syntaxhighlight> | ||
<syntaxhighlight lang="bash"> | |- | ||
!<span class="code">an-a05n02</span> | |||
|style="white-space: nowrap;"|<syntaxhighlight lang="bash"> | |||
/etc/init.d/iptables save | |||
</syntaxhighlight> | </syntaxhighlight> | ||
<syntaxhighlight lang="text"> | <syntaxhighlight lang="text"> | ||
iptables: Saving firewall rules to /etc/sysconfig/iptables:[ OK ] | |||
</syntaxhighlight> | </syntaxhighlight> | ||
|} | |||
< | Now we're restart <span class="code">iptables</span> and check that the changes stuck. | ||
{|class="wikitable" | |||
!<span class="code">an-a05n01</span> | |||
|style="white-space: nowrap;"|<syntaxhighlight lang="bash"> | |||
/etc/init.d/iptables restart | |||
</syntaxhighlight> | </syntaxhighlight> | ||
<syntaxhighlight lang="text"> | <syntaxhighlight lang="text"> | ||
iptables: Flushing firewall rules: [ OK ] | |||
iptables: Setting chains to policy ACCEPT: filter [ OK ] | |||
[ | iptables: Unloading modules: [ OK ] | ||
iptables: Applying firewall rules: [ OK ] | |||
</syntaxhighlight> | </syntaxhighlight> | ||
<syntaxhighlight lang="bash"> | <syntaxhighlight lang="bash"> | ||
iptables-save | |||
</syntaxhighlight> | </syntaxhighlight> | ||
<syntaxhighlight lang=" | <syntaxhighlight lang="bash"> | ||
# Generated by iptables-save v1.4.7 on Tue Mar 25 14:06:43 2014 | |||
*filter | |||
:INPUT ACCEPT [0:0] | |||
:FORWARD ACCEPT [0:0] | |||
:OUTPUT ACCEPT [41947:617170766] | |||
-A INPUT -s 10.255.0.0/16 -d 10.255.0.0/16 -p tcp -m state --state NEW -m tcp --dport 5900:5999 -j ACCEPT | |||
-A INPUT -s 10.20.0.0/16 -d 10.20.0.0/16 -p tcp -m state --state NEW -m tcp --dport 5900:5999 -j ACCEPT | |||
-A INPUT -s 10.20.0.0/16 -d 10.20.0.0/16 -p tcp -m tcp --dport 49152:49216 -j ACCEPT | |||
-A INPUT -s 10.10.0.0/16 -d 10.10.0.0/16 -p tcp -m state --state NEW -m tcp --dport 7789 -j ACCEPT | |||
-A INPUT -s 10.10.0.0/16 -d 10.10.0.0/16 -p tcp -m state --state NEW -m tcp --dport 7788 -j ACCEPT | |||
-A INPUT -p igmp -j ACCEPT | |||
-A INPUT -s 10.20.0.0/16 -d 10.20.0.0/16 -p tcp -m state --state NEW -m tcp --dport 16851 -j ACCEPT | |||
-A INPUT -s 10.20.0.0/16 -d 10.20.0.0/16 -p tcp -m state --state NEW -m tcp --dport 11111 -j ACCEPT | |||
-A INPUT -s 10.20.0.0/16 -d 10.20.0.0/16 -p tcp -m state --state NEW -m tcp --dport 21064 -j ACCEPT | |||
-A INPUT -s 10.20.0.0/16 -p udp -m addrtype --dst-type MULTICAST -m state --state NEW -m multiport --dports 5404,5405 -j ACCEPT | |||
-A INPUT -s 10.20.0.0/16 -d 10.20.0.0/16 -p udp -m state --state NEW -m multiport --dports 5404,5405 -j ACCEPT | |||
-A INPUT -m state --state RELATED,ESTABLISHED -j ACCEPT | |||
-A INPUT -p icmp -j ACCEPT | |||
-A INPUT -i lo -j ACCEPT | |||
-A INPUT -p tcp -m state --state NEW -m tcp --dport 22 -j ACCEPT | |||
-A INPUT -j REJECT --reject-with icmp-host-prohibited | |||
-A FORWARD -j REJECT --reject-with icmp-host-prohibited | |||
COMMIT | |||
# Completed on Tue Mar 25 14:06:43 2014 | |||
</syntaxhighlight> | </syntaxhighlight> | ||
|- | |||
< | !<span class="code">an-a05n02</span> | ||
|style="white-space: nowrap;"|<syntaxhighlight lang="bash"> | |||
/etc/init.d/iptables restart | |||
</syntaxhighlight> | </syntaxhighlight> | ||
<syntaxhighlight lang="text"> | <syntaxhighlight lang="text"> | ||
iptables: Flushing firewall rules: [ OK ] | |||
iptables: Setting chains to policy ACCEPT: filter [ OK ] | |||
[ | iptables: Unloading modules: [ OK ] | ||
iptables: Applying firewall rules: [ OK ] | |||
</syntaxhighlight> | </syntaxhighlight> | ||
<syntaxhighlight lang="bash"> | <syntaxhighlight lang="bash"> | ||
iptables-save | |||
</syntaxhighlight> | </syntaxhighlight> | ||
<syntaxhighlight lang=" | <syntaxhighlight lang="bash"> | ||
# Generated by iptables-save v1.4.7 on Tue Mar 25 14:07:00 2014 | |||
*filter | |||
:INPUT ACCEPT [0:0] | |||
:FORWARD ACCEPT [0:0] | |||
:OUTPUT ACCEPT [41570:54856696] | |||
-A INPUT -s 10.255.0.0/16 -d 10.255.0.0/16 -p tcp -m state --state NEW -m tcp --dport 5900:5999 -j ACCEPT | |||
-A INPUT -s 10.20.0.0/16 -d 10.20.0.0/16 -p tcp -m state --state NEW -m tcp --dport 5900:5999 -j ACCEPT | |||
-A INPUT -s 10.20.0.0/16 -d 10.20.0.0/16 -p tcp -m tcp --dport 49152:49216 -j ACCEPT | |||
-A INPUT -s 10.10.0.0/16 -d 10.10.0.0/16 -p tcp -m state --state NEW -m tcp --dport 7789 -j ACCEPT | |||
-A INPUT -s 10.10.0.0/16 -d 10.10.0.0/16 -p tcp -m state --state NEW -m tcp --dport 7788 -j ACCEPT | |||
-A INPUT -p igmp -j ACCEPT | |||
-A INPUT -s 10.20.0.0/16 -d 10.20.0.0/16 -p tcp -m state --state NEW -m tcp --dport 16851 -j ACCEPT | |||
-A INPUT -s 10.20.0.0/16 -d 10.20.0.0/16 -p tcp -m state --state NEW -m tcp --dport 11111 -j ACCEPT | |||
-A INPUT -s 10.20.0.0/16 -d 10.20.0.0/16 -p tcp -m state --state NEW -m tcp --dport 21064 -j ACCEPT | |||
-A INPUT -s 10.20.0.0/16 -p udp -m addrtype --dst-type MULTICAST -m state --state NEW -m multiport --dports 5404,5405 -j ACCEPT | |||
-A INPUT -s 10.20.0.0/16 -d 10.20.0.0/16 -p udp -m state --state NEW -m multiport --dports 5404,5405 -j ACCEPT | |||
-A INPUT -m state --state RELATED,ESTABLISHED -j ACCEPT | |||
-A INPUT -p icmp -j ACCEPT | |||
-A INPUT -i lo -j ACCEPT | |||
-A INPUT -p tcp -m state --state NEW -m tcp --dport 22 -j ACCEPT | |||
-A INPUT -j REJECT --reject-with icmp-host-prohibited | |||
-A FORWARD -j REJECT --reject-with icmp-host-prohibited | |||
COMMIT | |||
# Completed on Tue Mar 25 14:07:00 2014 | |||
</syntaxhighlight> | </syntaxhighlight> | ||
|} | |||
Perfect! | |||
< | If you want to enable any other kind of access or otherwise modify the firewall on each node, please do so now. This way, as you proceed with building the ''Anvil!'', you'll hit firewall problems as soon as they arise. | ||
== Mapping Physical Network Interfaces to ethX Device Names == | |||
{{note|1=This process is a little lengthy and it would add a fair amount of length to document the process on both nodes. So for this section, only <span class="code">an-a05n01</span> will be shown. Please repeat this process for both nodes.}} | |||
[[Image:an-a05n01_crappy_back_pic_showing_NIC_names_01.jpg|thumb|500px|right|Awesome quality picture of labelled interfaces.]] | |||
Consistency is the mother of stability. | |||
When you install [[RHEL]], it somewhat randomly assigns an <span class="code">ethX</span> device to each physical network interfaces. Purely technically speaking, this is fine. So long as you know which interface has which device name, you can setup the node's networking. | |||
However! | |||
Consistently assigning the same device names to physical interfaces makes supporting and maintaining nodes a lot easier! | |||
We've got six physical network interfaces, named <span class="code">bcn_link1</span>, <span class="code">bcn_link2</span>, <span class="code">sn_link1</span>, <span class="code">sn_link2</span> and <span class="code">ifn_link1</span>, <span class="code">ifn_link2</span>. As you recall from earlier, we want to make sure that each pair of interfaces for each network spans two physical network cards. | |||
Most servers have at least two on-board network cards labelled "<span class="code">1</span>" and "<span class="code">2</span>". These tend to correspond to lights on the front of the server, so we will start by naming these interfaces <span class="code">bcn_link1</span> and <span class="code">sn_link1</span>, respectively. After that, you are largely free to assign names to interfaces however you see fit. | |||
What matters most of all is that, whatever order you choose, it's consistent across your ''Anvil!'' nodes. | |||
Before we touch anything, let's make a backup of what we have. This way, we have an easy out in case we "oops" a files. | |||
<syntaxhighlight lang="bash"> | |||
mkdir -p /root/backups/ | |||
rsync -av /etc/sysconfig/network-scripts /root/backups/ | |||
</syntaxhighlight> | </syntaxhighlight> | ||
<syntaxhighlight lang="text"> | <syntaxhighlight lang="text"> | ||
sending incremental file list | |||
created directory /root/backups | |||
network-scripts/ | |||
network-scripts/ifcfg-eth0 | |||
network-scripts/ifcfg-eth1 | |||
network-scripts/ifcfg-eth2 | |||
network-scripts/ifcfg-eth3 | |||
network-scripts/ifcfg-eth4 | |||
network-scripts/ifcfg-eth5 | |||
network-scripts/ifcfg-lo | |||
network-scripts/ifdown -> ../../../sbin/ifdown | |||
network-scripts/ifdown-bnep | |||
network-scripts/ifdown-eth | |||
network-scripts/ifdown-ippp | |||
network-scripts/ifdown-ipv6 | |||
network-scripts/ifdown-isdn -> ifdown-ippp | |||
network-scripts/ifdown-post | |||
network-scripts/ifdown-ppp | |||
network-scripts/ifdown-routes | |||
network-scripts/ifdown-sit | |||
network-scripts/ifdown-tunnel | |||
network-scripts/ifup -> ../../../sbin/ifup | |||
network-scripts/ifup-aliases | |||
network-scripts/ifup-bnep | |||
network-scripts/ifup-eth | |||
network-scripts/ifup-ippp | |||
network-scripts/ifup-ipv6 | |||
network-scripts/ifup-isdn -> ifup-ippp | |||
network-scripts/ifup-plip | |||
network-scripts/ifup-plusb | |||
network-scripts/ifup-post | |||
network-scripts/ifup-ppp | |||
network-scripts/ifup-routes | |||
network-scripts/ifup-sit | |||
network-scripts/ifup-tunnel | |||
network-scripts/ifup-wireless | |||
network-scripts/init.ipv6-global | |||
network-scripts/net.hotplug | |||
network-scripts/network-functions | |||
network-scripts/network-functions-ipv6 | |||
sent 134870 bytes received 655 bytes 271050.00 bytes/sec | |||
total size is 132706 speedup is 0.98 | |||
</syntaxhighlight> | </syntaxhighlight> | ||
=== Making Sure All Network Interfaces are Started === | |||
What we're going to do is watch <span class="code">/var/log/messages</span>, unplug each cable and see which interface shows a lost link. This will tell us what ''current'' name is given to a particular physical interface. We'll write the current name down beside the name of the interface we want. Once we've done this to all interfaces, we'll now how we have to move names around. | |||
Before we can pull cables though, we have to tell the system to start all of the interfaces. By default, all but one or two interfaces will be disabled on boot. | |||
Run this to see which interfaces are up; | |||
<syntaxhighlight lang="bash"> | <syntaxhighlight lang="bash"> | ||
ifconfig | |||
</syntaxhighlight> | </syntaxhighlight> | ||
<syntaxhighlight lang="text"> | <syntaxhighlight lang="text"> | ||
eth4 Link encap:Ethernet HWaddr 00:19:99:9C:9B:9E | |||
inet addr:10.255.0.33 Bcast:10.255.255.255 Mask:255.255.0.0 | |||
inet6 addr: fe80::219:99ff:fe9c:9b9e/64 Scope:Link | |||
UP BROADCAST RUNNING MULTICAST MTU:1500 Metric:1 | |||
RX packets:303118 errors:0 dropped:0 overruns:0 frame:0 | |||
TX packets:152952 errors:0 dropped:0 overruns:0 carrier:0 | |||
collisions:0 txqueuelen:1000 | |||
RX bytes:344900765 (328.9 MiB) TX bytes:14424290 (13.7 MiB) | |||
Memory:ce660000-ce680000 | |||
lo Link encap:Local Loopback | |||
inet addr:127.0.0.1 Mask:255.0.0.0 | |||
inet6 addr: ::1/128 Scope:Host | |||
UP LOOPBACK RUNNING MTU:16436 Metric:1 | |||
RX packets:3540 errors:0 dropped:0 overruns:0 frame:0 | |||
TX packets:3540 errors:0 dropped:0 overruns:0 carrier:0 | |||
collisions:0 txqueuelen:0 | |||
RX bytes:2652436 (2.5 MiB) TX bytes:2652436 (2.5 MiB) | |||
</syntaxhighlight> | </syntaxhighlight> | ||
< | In this case, only the interface currently named <span class="code">eth4</span> was started. We'll need to edit the other interface configuration files to tell them to start when the <span class="code">network</span> starts. To do this, we edit the <span class="code">/etc/sysconfig/network-scripts/ifcfg-ethX</span> files and change <span class="code">ONBOOT</span> variable to <span class="code">ONBOOT="yes"</span>. | ||
By default, most interfaces will be set to try and acquire an IP address from a [[DHCP on an RPM-based OS|DHCP]] server, We can see that <span class="code">sn_link2</span> already has an IP address, so to save time, we're going to tell the other interfaces to start without an IP address at all. If we didn't do this, restarting <span class="code">network</span> would take a long time waiting for DHCP requests to time out. | |||
</ | {{note|1=We skip <span class="code">ifcfg-eth4</span> in the next step because it's already up.}} | ||
<syntaxhighlight lang=" | |||
Now we can use <span class="code">sed</span> to edit the files. This is a lot faster and easier than editing each file by hand. | |||
<syntaxhighlight lang="bash"> | |||
# Change eth0 to start on boot with no IP address. | |||
sed -i 's/ONBOOT=.*/ONBOOT="yes"/' /etc/sysconfig/network-scripts/ifcfg-eth0 | |||
sed -i 's/BOOTPROTO=.*/BOOTPROTO="none"/' /etc/sysconfig/network-scripts/ifcfg-eth0 | |||
# Change eth1 to start on boot with no IP address. | |||
sed -i 's/ONBOOT=.*/ONBOOT="yes"/' /etc/sysconfig/network-scripts/ifcfg-eth1 | |||
sed -i 's/BOOTPROTO=.*/BOOTPROTO="none"/' /etc/sysconfig/network-scripts/ifcfg-eth1 | |||
# Change eth2 to start on boot with no IP address. | |||
sed -i 's/ONBOOT=.*/ONBOOT="yes"/' /etc/sysconfig/network-scripts/ifcfg-eth2 | |||
sed -i 's/BOOTPROTO=.*/BOOTPROTO="none"/' /etc/sysconfig/network-scripts/ifcfg-eth2 | |||
# Change eth3 to start on boot with no IP address. | |||
sed -i 's/ONBOOT=.*/ONBOOT="yes"/' /etc/sysconfig/network-scripts/ifcfg-eth3 | |||
sed -i 's/BOOTPROTO=.*/BOOTPROTO="none"/' /etc/sysconfig/network-scripts/ifcfg-eth3 | |||
# Change eth4 to start on boot with no IP address. | |||
sed -i 's/ONBOOT=.*/ONBOOT="yes"/' /etc/sysconfig/network-scripts/ifcfg-eth5 | |||
sed -i 's/BOOTPROTO=.*/BOOTPROTO="none"/' /etc/sysconfig/network-scripts/ifcfg-eth5 | |||
</syntaxhighlight> | </syntaxhighlight> | ||
You can see how the file was changed by using <span class="code">diff</span> to compare the backed up version against the edited one. Let's look at <span class="code">ifcfg-eth0</span> to see this; | |||
<syntaxhighlight lang="bash"> | <syntaxhighlight lang="bash"> | ||
diff -U0 /root/backups/network-scripts/ifcfg-eth0 /etc/sysconfig/network-scripts/ifcfg-eth0 | |||
</syntaxhighlight> | </syntaxhighlight> | ||
<syntaxhighlight lang=" | <syntaxhighlight lang="diff"> | ||
--- /root/backups/network-scripts/eth0 2013-10-28 12:30:07.000000000 -0400 | |||
+++ /etc/sysconfig/network-scripts/eth0_link1 2013-10-28 17:20:38.978458128 -0400 | |||
@@ -2 +2 @@ | |||
-BOOTPROTO="dhcp" | |||
+BOOTPROTO="none" | |||
@@ -5 +5 @@ | |||
-ONBOOT="no" | |||
+ONBOOT="yes" | |||
</syntaxhighlight> | </syntaxhighlight> | ||
Excellent. You can check the other files as well to confirm that they were edited as well, if you wish. Once you are happy with the changes, restart the <span class="code">network</span> initialization script. | |||
{{note|1= You may see <span class="code">[FAILED]</span> while stopping some interfaces, this is not a concern.}} | |||
<syntaxhighlight lang="bash"> | <syntaxhighlight lang="bash"> | ||
/etc/init.d/network restart | |||
</syntaxhighlight> | </syntaxhighlight> | ||
<syntaxhighlight lang="text"> | <syntaxhighlight lang="text"> | ||
Shutting down interface eth0: [ OK ] | |||
Shutting down interface eth1: [ OK ] | |||
Shutting down interface eth2: [ OK ] | |||
Shutting down interface eth3: [ OK ] | |||
Shutting down interface eth4: [ OK ] | |||
Shutting down interface eth5: [ OK ] | |||
Shutting down loopback interface: [ OK ] | |||
Bringing up loopback interface: [ OK ] | |||
Bringing up interface eth0: [ OK ] | |||
Bringing up interface eth1: [ OK ] | |||
Bringing up interface eth2: [ OK ] | |||
Bringing up interface eth3: [ OK ] | |||
Determining IP information for eth4... done. | |||
[ OK ] | |||
Bringing up interface eth5: [ OK ] | |||
</syntaxhighlight> | </syntaxhighlight> | ||
Now we | Now if we look at <span class="code">ifconfig</span> again, we'll see all six interfaces have been started! | ||
<syntaxhighlight lang=" | <syntaxhighlight lang="bash"> | ||
ifconfig | |||
</syntaxhighlight> | </syntaxhighlight> | ||
<syntaxhighlight lang="text"> | <syntaxhighlight lang="text"> | ||
eth0 Link encap:Ethernet HWaddr 00:1B:21:81:C3:34 | |||
inet6 addr: fe80::21b:21ff:fe81:c334/64 Scope:Link | |||
UP BROADCAST RUNNING MULTICAST MTU:1500 Metric:1 | |||
RX packets:2433 errors:0 dropped:0 overruns:0 frame:0 | |||
TX packets:31 errors:0 dropped:0 overruns:0 carrier:0 | |||
collisions:0 txqueuelen:1000 | |||
RX bytes:150042 (146.5 KiB) TX bytes:3066 (2.9 KiB) | |||
Interrupt:24 Memory:ce240000-ce260000 | |||
eth1 Link encap:Ethernet HWaddr 00:1B:21:81:C3:35 | |||
inet6 addr: fe80::21b:21ff:fe81:c335/64 Scope:Link | |||
UP BROADCAST RUNNING MULTICAST MTU:1500 Metric:1 | |||
RX packets:2416 errors:0 dropped:0 overruns:0 frame:0 | |||
TX packets:31 errors:0 dropped:0 overruns:0 carrier:0 | |||
collisions:0 txqueuelen:1000 | |||
RX bytes:148176 (144.7 KiB) TX bytes:3066 (2.9 KiB) | |||
Interrupt:34 Memory:ce2a0000-ce2c0000 | |||
eth2 Link encap:Ethernet HWaddr A0:36:9F:02:E0:04 | |||
inet6 addr: fe80::a236:9fff:fe02:e004/64 Scope:Link | |||
UP BROADCAST RUNNING MULTICAST MTU:1500 Metric:1 | |||
RX packets:3 errors:0 dropped:0 overruns:0 frame:0 | |||
TX packets:36 errors:0 dropped:0 overruns:0 carrier:0 | |||
collisions:0 txqueuelen:1000 | |||
RX bytes:1026 (1.0 KiB) TX bytes:5976 (5.8 KiB) | |||
Memory:ce400000-ce500000 | |||
eth3 Link encap:Ethernet HWaddr A0:36:9F:02:E0:05 | |||
inet6 addr: fe80::a236:9fff:fe02:e005/64 Scope:Link | |||
UP BROADCAST RUNNING MULTICAST MTU:1500 Metric:1 | |||
RX packets:1606 errors:0 dropped:0 overruns:0 frame:0 | |||
TX packets:21 errors:0 dropped:0 overruns:0 carrier:0 | |||
collisions:0 txqueuelen:1000 | |||
RX bytes:98242 (95.9 KiB) TX bytes:2102 (2.0 KiB) | |||
Memory:ce500000-ce600000 | |||
eth4 Link encap:Ethernet HWaddr 00:19:99:9C:9B:9E | |||
inet addr:10.255.0.33 Bcast:10.255.255.255 Mask:255.255.0.0 | |||
inet6 addr: fe80::219:99ff:fe9c:9b9e/64 Scope:Link | |||
UP BROADCAST RUNNING MULTICAST MTU:1500 Metric:1 | |||
RX packets:308572 errors:0 dropped:0 overruns:0 frame:0 | |||
TX packets:153402 errors:0 dropped:0 overruns:0 carrier:0 | |||
collisions:0 txqueuelen:1000 | |||
RX bytes:345254511 (329.2 MiB) TX bytes:14520378 (13.8 MiB) | |||
Memory:ce660000-ce680000 | |||
eth5 Link encap:Ethernet HWaddr 00:19:99:9C:9B:9F | |||
inet6 addr: fe80::219:99ff:fe9c:9b9f/64 Scope:Link | |||
UP BROADCAST RUNNING MULTICAST MTU:1500 Metric:1 | |||
RX packets:6 errors:0 dropped:0 overruns:0 frame:0 | |||
TX packets:23 errors:0 dropped:0 overruns:0 carrier:0 | |||
collisions:0 txqueuelen:1000 | |||
RX bytes:2052 (2.0 KiB) TX bytes:3114 (3.0 KiB) | |||
Memory:ce6c0000-ce6e0000 | |||
lo Link encap:Local Loopback | |||
inet addr:127.0.0.1 Mask:255.0.0.0 | |||
inet6 addr: ::1/128 Scope:Host | |||
UP LOOPBACK RUNNING MTU:16436 Metric:1 | |||
RX packets:3540 errors:0 dropped:0 overruns:0 frame:0 | |||
TX packets:3540 errors:0 dropped:0 overruns:0 carrier:0 | |||
collisions:0 txqueuelen:0 | |||
RX bytes:2652436 (2.5 MiB) TX bytes:2652436 (2.5 MiB) | |||
</syntaxhighlight> | </syntaxhighlight> | ||
Excellent! Now we can start creating the list of what physical interfaces have what current names. | |||
=== Finding Current Names for Physical Interfaces === | |||
Once you know how you want your interfaces, create a little table like this: | |||
{|class="wikitable sortable" | |||
!Have | |||
!Want | |||
|- | |||
| | |||
|<span class="code">bcn_link1</span> | |||
|- | |||
| | |||
|<span class="code">sn_link1</span> | |||
|- | |||
| | |||
|<span class="code">ifn_link1</span> | |||
|- | |||
| | |||
|<span class="code">bcn_link2</span> | |||
|- | |||
| | |||
|<span class="code">sn_link2</span> | |||
|- | |||
| | |||
|<span class="code">ifn_link2</span> | |||
|} | |||
Now we want to use a program called <span class="code">tail</span> to watch the system log file <span class="code">/var/log/messages</span> and print to screen messages as they're written to the log. To do this, run; | |||
<syntaxhighlight lang="bash"> | |||
tail -f -n 0 /var/log/messages | |||
</syntaxhighlight> | |||
When you run this, the cursor will just sit there and nothing will be printed to screen at first. This is fine, this tells us that <span class="code">tail</span> is waiting for new records. We're now going to methodically unplug each network cable, wait a moment and then plug it back in. Each time we do this, we'll write down the interface name that was reported as going down and then coming back up. | |||
The first cable we're going to unplug is the one in the physical interface we want to make <span class="code">bcn_link1</span>. | |||
<syntaxhighlight lang="text"> | |||
Oct 28 17:36:06 an-a05n01 kernel: igb: eth4 NIC Link is Down | |||
Oct 28 17:36:19 an-a05n01 kernel: igb: eth4 NIC Link is Up 1000 Mbps Full Duplex, Flow Control: RX/TX | |||
</syntaxhighlight> | </syntaxhighlight> | ||
Here we see that the physical interface that we ''want'' to be <span class="code">ifn_link1</span> is currently called <span class="code">eth4</span>. So we'll add that to our chart. | |||
< | {|class="wikitable sortable" | ||
!Have | |||
</ | !Want | ||
< | |- | ||
|<span class="code">eth4</span> | |||
</ | |<span class="code">bcn_link1</span> | ||
|- | |||
| | |||
|<span class="code">sn_link1</span> | |||
|- | |||
| | |||
|<span class="code">ifn_link1</span> | |||
|- | |||
| | |||
|<span class="code">bcn_link2</span> | |||
|- | |||
| | |||
|<span class="code">sn_link2</span> | |||
|- | |||
| | |||
|<span class="code">ifn_link2</span> | |||
|} | |||
Now we'll unplug the cable we want to make <span class="code">sn_link1</span>: | |||
<syntaxhighlight lang="text"> | <syntaxhighlight lang="text"> | ||
Oct 28 17:38:01 an-a05n01 kernel: igb: eth5 NIC Link is Down | |||
Oct 28 17:38:04 an-a05n01 kernel: igb: eth5 NIC Link is Up 1000 Mbps Full Duplex, Flow Control: RX/TX | |||
</syntaxhighlight> | </syntaxhighlight> | ||
== | It's currently called <span class="code">eth5</span>, so we'll write that in beside the "Want" column's <span class="code">sn_link1</span> entry. | ||
{|class="wikitable sortable" | |||
!Have | |||
!Want | |||
|- | |||
|<span class="code">eth4</span> | |||
|<span class="code">bcn_link1</span> | |||
|- | |||
|<span class="code">eth5</span> | |||
|<span class="code">sn_link1</span> | |||
|- | |||
| | |||
|<span class="code">ifn_link1</span> | |||
|- | |||
| | |||
|<span class="code">bcn_link2</span> | |||
|- | |||
| | |||
|<span class="code">sn_link2</span> | |||
|- | |||
| | |||
|<span class="code">ifn_link2</span> | |||
|} | |||
Keep doing this for the other four cables. | |||
<syntaxhighlight lang="text"> | <syntaxhighlight lang="text"> | ||
Oct 28 17:39:28 an-a05n01 kernel: e1000e: eth0 NIC Link is Down | |||
Oct 28 17:39:30 an-a05n01 kernel: e1000e: eth0 NIC Link is Up 1000 Mbps Full Duplex, Flow Control: Rx/Tx | |||
Oct 28 17:39:35 an-a05n01 kernel: e1000e: eth1 NIC Link is Down | |||
Oct 28 17:39:37 an-a05n01 kernel: e1000e: eth1 NIC Link is Up 1000 Mbps Full Duplex, Flow Control: Rx/Tx | |||
Oct 28 17:39:40 an-a05n01 kernel: igb: eth2 NIC Link is Down | |||
Oct 28 17:39:43 an-a05n01 kernel: igb: eth2 NIC Link is Up 1000 Mbps Full Duplex, Flow Control: RX/TX | |||
Oct 28 17:39:47 an-a05n01 kernel: igb: eth3 NIC Link is Down | |||
Oct 28 17:39:51 an-a05n01 kernel: igb: eth3 NIC Link is Up 1000 Mbps Full Duplex, Flow Control: RX/TX | |||
</syntaxhighlight> | </syntaxhighlight> | ||
The finished table is this; | |||
== | {|class="wikitable sortable" | ||
!Have | |||
!Want | |||
|- | |||
|<span class="code">eth4</span> | |||
|<span class="code">bcn_link1</span> | |||
|- | |||
|<span class="code">eth5</span> | |||
|<span class="code">sn_link1</span> | |||
|- | |||
|<span class="code">eth0</span> | |||
|<span class="code">ifn_link1</span> | |||
|- | |||
|<span class="code">eth1</span> | |||
|<span class="code">bcn_link2</span> | |||
|- | |||
|<span class="code">eth2</span> | |||
|<span class="code">sn_link2</span> | |||
|- | |||
|<span class="code">eth3</span> | |||
|<span class="code">ifn_link2</span> | |||
|} | |||
Now we know how we want to move the names around! | |||
=== Building the MAC Address List === | |||
{{note|1=This was written before the convertion from <span class="code">ethX</span> to <span class="code">{bcn,sn,ifn}_link{1,2}</span> names were changed. Please rename the <span class="code">ethX</span> file names and <span class="code">DEVICE="ethX"</span> entries to reflect the new names here.}} | |||
Every network interface has a unique [[MAC]] address assigned to it when it is built. Think of this sort of like a globally unique serial number. Because it's guaranteed to be unique, it's a convenient way for the [[operating system]] to create a persistent map between real interfaces and names. If we didn't use these, then each time you rebooted your node, it would possibly mean that the names get juggled. Not very good. | |||
[[RHEL]] uses two files for creating this map: | |||
* <span class="code">/etc/udev/rules.d/70-persistent-net.rules</span> | |||
* <span class="code">/etc/sysconfig/network-scripts/ifcfg-eth*</span> | |||
The | The <span class="code">70-persistent-net.rules</span> can be rebuilt by running a command, so we're not going to worry about it. We'll just delete in a little bit and then recreate it. | ||
The files we care about are the six <span class="code">ifcfg-ethX</span> files. Inside each of these is a variable named <span class="code">HWADDR</span>. The value set here will tell the OS what physical network interface the given file is configuring. We know from the list we created how we want to move the files around. | |||
To recap: | |||
== The | * The <span class="code">HWADDR</span> MAC address in <span class="code">eth4</span> will be moved to <span class="code">bcn_link1</span>. | ||
* The <span class="code">HWADDR</span> MAC address in <span class="code">eth5</span> will be moved to <span class="code">sn_link1</span>. | |||
* The <span class="code">HWADDR</span> MAC address in <span class="code">eth0</span> will be moved to <span class="code">ifn_link1</span>. | |||
* The <span class="code">HWADDR</span> MAC address in <span class="code">eth1</span> will be moved to <span class="code">bcn_link2</span>. | |||
* The <span class="code">HWADDR</span> MAC address in <span class="code">eth2</span> will be moved to <span class="code">sn_link2</span>. | |||
* The <span class="code">HWADDR</span> MAC address in <span class="code">eth3</span> will be moved to <span class="code">ifn_link2</span>. | |||
So lets create a new table. This one we will use to write down the MAC addresses we want to set for each device. | |||
=== | {|class="wikitable sortable" | ||
!Device | |||
!New MAC address | |||
|- | |||
|<span class="code">bcn_link1</span> | |||
|<span class="code"></span> | |||
|- | |||
|<span class="code">sn_link1</span> | |||
|<span class="code"></span> | |||
|- | |||
|<span class="code">ifn_link1</span> | |||
|<span class="code"></span> | |||
|- | |||
|<span class="code">bcn_link2</span> | |||
|<span class="code"></span> | |||
|- | |||
|<span class="code">sn_link2</span> | |||
|<span class="code"></span> | |||
|- | |||
|<span class="code">ifn_link2</span> | |||
|<span class="code"></span> | |||
|} | |||
So we know that the MAC address currently assigned to <span class="code">eth4</span> is the one we want to move to <span class="code">bcn_link1</span>. We can use <span class="code">ifconfig</span> to show the information for the <span class="code">eth4</span> interface only. | |||
<syntaxhighlight lang="bash"> | <syntaxhighlight lang="bash"> | ||
ifconfig | |||
</syntaxhighlight> | </syntaxhighlight> | ||
<syntaxhighlight lang=" | <syntaxhighlight lang="text"> | ||
eth4 Link encap:Ethernet HWaddr 00:19:99:9C:9B:9E | |||
inet addr:10.255.0.33 Bcast:10.255.255.255 Mask:255.255.0.0 | |||
inet6 addr: fe80::219:99ff:fe9c:9b9e/64 Scope:Link | |||
UP BROADCAST RUNNING MULTICAST MTU:1500 Metric:1 | |||
RX packets:315979 errors:0 dropped:0 overruns:0 frame:0 | |||
TX packets:153610 errors:0 dropped:0 overruns:0 carrier:0 | |||
collisions:0 txqueuelen:1000 | |||
RX bytes:345711965 (329.6 MiB) TX bytes:14555290 (13.8 MiB) | |||
Memory:ce660000-ce680000 | |||
</syntaxhighlight> | </syntaxhighlight> | ||
We want the <span class="code">HWaddr</span> value, <span class="code">00:19:99:9C:9B:9E</span>. This will be moved to <span class="code">bcn_link1</span>, so lets write that down. | |||
{|class="wikitable sortable" | |||
!Device | |||
!New MAC address | |||
|- | |||
|<span class="code">bcn_link1</span> | |||
|<span class="code">00:19:99:9C:9B:9E</span> | |||
|- | |||
|<span class="code">sn_link1</span> | |||
|<span class="code"></span> | |||
|- | |||
|<span class="code">ifn_link1</span> | |||
|<span class="code"></span> | |||
|- | |||
|<span class="code">bcn_link2</span> | |||
|<span class="code"></span> | |||
|- | |||
|<span class="code">sn_link2</span> | |||
|<span class="code"></span> | |||
|- | |||
|<span class="code">ifn_link2</span> | |||
|<span class="code"></span> | |||
|} | |||
Next up, we want to move <span class="code">eth5</span> to be the new <span class="code">sn_link1</span>. We can use <span class="code">ifconfig</span> again, but this time we'll do a little [[bash]]-fu to reduce the output to just the MAC address. | |||
== | <syntaxhighlight lang="bash"> | ||
ifconfig eth5 | grep HWaddr | awk '{print $5}' | |||
</syntaxhighlight> | |||
<syntaxhighlight lang="text"> | |||
00:19:99:9C:9B:9F | |||
</syntaxhighlight> | |||
We | This simply reduced the output to just the line with the <span class="code">HWaddr</span> line in it, then it split the line on spaces and printed just the fifth value, which is the MAC address currently assigned to <span class="code">eth5</span>. We'll write this down beside <span class="code">sn_link1</span>. | ||
{|class="wikitable sortable" | |||
!Device | |||
!New MAC address | |||
|- | |||
|<span class="code">bcn_link1</span> | |||
|<span class="code">00:19:99:9C:9B:9E</span> | |||
|- | |||
|<span class="code">sn_link1</span> | |||
|<span class="code">00:19:99:9C:9B:9F</span> | |||
|- | |||
|<span class="code">ifn_link1</span> | |||
|<span class="code"></span> | |||
|- | |||
|<span class="code">bcn_link2</span> | |||
|<span class="code"></span> | |||
|- | |||
|<span class="code">sn_link2</span> | |||
|<span class="code"></span> | |||
|- | |||
|<span class="code">ifn_link2</span> | |||
|<span class="code"></span> | |||
|} | |||
Next up, we want to move the current <span class="code">eth0</span> over to <span class="code">ifn_link1</span>. So lets get the current <span class="code">eth0</span> MAC address and add it to the list as well. | |||
<syntaxhighlight lang=" | <syntaxhighlight lang="bash"> | ||
ifconfig eth0 | grep HWaddr | awk '{print $5}' | |||
< | </syntaxhighlight> | ||
<syntaxhighlight lang="text"> | |||
00:1B:21:81:C3:34 | |||
</syntaxhighlight> | </syntaxhighlight> | ||
Now we want to move <span class="code">eth1</span> to <span class="code">bcn_link2</span>; | |||
== | <syntaxhighlight lang="bash"> | ||
ifconfig eth1 | grep HWaddr | awk '{print $5}' | |||
</syntaxhighlight> | |||
<syntaxhighlight lang="text"> | |||
00:1B:21:81:C3:35 | |||
</syntaxhighlight> | |||
Second to last one is <span class="code">eth2</span>, which will move to <span class="code">sn_link2</span>; | |||
<syntaxhighlight lang="bash"> | |||
ifconfig eth2 | grep HWaddr | awk '{print $5}' | |||
</syntaxhighlight> | |||
<syntaxhighlight lang="text"> | |||
A0:36:9F:02:E0:04 | |||
<syntaxhighlight lang=" | |||
</syntaxhighlight> | </syntaxhighlight> | ||
Finally, <span class="code">eth3</span> moves to <span class="code">ifn_link2</span>; | |||
<syntaxhighlight lang="bash"> | <syntaxhighlight lang="bash"> | ||
ifconfig | ifconfig eth3 | grep HWaddr | awk '{print $5}' | ||
</syntaxhighlight> | </syntaxhighlight> | ||
<syntaxhighlight lang="text"> | <syntaxhighlight lang="text"> | ||
A0:36:9F:02:E0:05 | |||
</syntaxhighlight> | </syntaxhighlight> | ||
Our complete list of new MAC address is; | |||
{|class="wikitable sortable" | |||
!Device | |||
!New MAC address | |||
|- | |||
|<span class="code">bcn_link1</span> | |||
|<span class="code">00:19:99:9C:9B:9E</span> | |||
|- | |||
|<span class="code">sn_link1</span> | |||
|<span class="code">00:19:99:9C:9B:9F</span> | |||
|- | |||
|<span class="code">ifn_link1</span> | |||
|<span class="code">00:1B:21:81:C3:34</span> | |||
|- | |||
|<span class="code">bcn_link2</span> | |||
|<span class="code">00:1B:21:81:C3:35</span> | |||
|- | |||
|<span class="code">sn_link2</span> | |||
|<span class="code">A0:36:9F:02:E0:04</span> | |||
|- | |||
|<span class="code">ifn_link2</span> | |||
|<span class="code">A0:36:9F:02:E0:05</span> | |||
|} | |||
Excellent! Now we're ready. | |||
=== Changing the Interface Device Names === | |||
This is | {{warning|1=This step is best done when you have direct access to the node. The reason is that the following changes require the network to be totally stopped in order to work without a reboot. If you can't get physical access, then when we get to the <span class="code">start_udev</span> step, reboot the node instead.}} | ||
We're about to change which physical interfaces have which device names. If we don't stop the network first, we won't be able to restart them later. If we waited until later, the kernel would see a conflict between what it thinks the MAC-to-name mapping should be compared to what it sees in the configuration. The only way around this is a reboot, which is kind of a waste. So by stopping the network now, we clear the kernel's view of the network and avoid the problem entirely. | |||
So, stop the network. | |||
{|class="wikitable" | |||
!<span class="code">an-a05n01</span> | |||
<syntaxhighlight lang=" | |style="white-space: nowrap;"|<syntaxhighlight lang="bash"> | ||
/etc/init.d/network stop | |||
</syntaxhighlight> | |||
<syntaxhighlight lang="text"> | |||
Shutting down interface eth0: [ OK ] | |||
Shutting down interface eth1: [ OK ] | |||
Shutting down interface eth2: [ OK ] | |||
Shutting down interface eth3: [ OK ] | |||
Shutting down interface eth4: [ OK ] | |||
Shutting down interface eth5: [ OK ] | |||
Shutting down loopback interface: [ OK ] | |||
</syntaxhighlight> | </syntaxhighlight> | ||
|} | |||
We can confirm that it's stopped by running <span class="code">ifconfig</span>. It should return nothing at all. | |||
{|class="wikitable" | |||
!<span class="code">an-a05n01</span> | |||
|style="white-space: nowrap;"|<syntaxhighlight lang="bash"> | |||
ifconfig | |||
</syntaxhighlight> | |||
<syntaxhighlight lang="bash"> | |||
<No output> | |||
</syntaxhighlight> | |||
|} | |||
Good. Next, delete the <span class="code">/etc/udev/rules.d/70-persistent-net.rules</span> file. We'll regenerate it after we're done. | |||
{|class="wikitable" | |||
!<span class="code">an-a05n01</span> | |||
|style="white-space: nowrap;"|<syntaxhighlight lang="bash"> | |||
rm /etc/udev/rules.d/70-persistent-net.rules | |||
</syntaxhighlight> | |||
<syntaxhighlight lang="text"> | |||
rm: remove regular file `/etc/udev/rules.d/70-persistent-net.rules'? y | |||
</syntaxhighlight> | |||
|} | |||
{{note|1=Please rename the <span class="code">ifcfg-ethX</span> files to be called <span class="code">ifcfg-{bcn,sn,ifn}_link{1,2}</span> here!}} | |||
Now we need to edit each of the <span class="code">ifcfg-ethX</span> files and change the <span class="code">HWADDR</span> value to the new addresses we wrote down in our list. Let's start with <span class="code">ifcfg-bcn_link1</span> | |||
{|class="wikitable" | |||
!<span class="code">an-a05n01</span> | |||
|style="white-space: nowrap;"|<syntaxhighlight lang="bash"> | |||
vim /etc/sysconfig/network-scripts/ifcfg-bcn_link1 | |||
</syntaxhighlight> | |||
Change the line: | |||
<syntaxhighlight lang="bash"> | |||
HWADDR="00:1B:21:81:C3:34" | |||
</syntaxhighlight> | |||
To the new value from our list; | |||
<syntaxhighlight lang=" | <syntaxhighlight lang="bash"> | ||
HWADDR="00:19:99:9C:9B:9E" | |||
</syntaxhighlight> | </syntaxhighlight> | ||
|} | |||
Save the file and then move on to <span class="code">ifcfg-sn_link1</span> | |||
{|class="wikitable" | |||
!<span class="code">an-a05n01</span> | |||
|style="white-space: nowrap;"|<syntaxhighlight lang="bash"> | |||
vim /etc/sysconfig/network-scripts/ifcfg-ifn_link1 | |||
</syntaxhighlight> | |||
Change the current <span class="code">HWADDR="00:1B:21:81:C3:35"</span> entry to the new MAC address; | |||
<syntaxhighlight lang="bash"> | |||
HWADDR="00:19:99:9C:9B:9F" | |||
</syntaxhighlight> | |||
|} | |||
Continue editing the other four <span class="code">ifcfg-X</span> files in the same manner. | |||
Once all the files have been edited, we will regenerate the <span class="code">70-persistent-net.rules</span>. | |||
{ | {|class="wikitable" | ||
!<span class="code">an-a05n01</span> | |||
|style="white-space: nowrap;"|<syntaxhighlight lang="bash"> | |||
start_udev | |||
</syntaxhighlight> | |||
<syntaxhighlight lang="text"> | |||
Starting udev: [ OK ] | |||
</syntaxhighlight> | |||
|} | |||
=== Test the New Network Name Mapping === | |||
It's time to start networking again and see if the remapping worked! | |||
{|class="wikitable" | |||
!<span class="code">an-a05n01</span> | |||
<syntaxhighlight lang="bash"> | |style="white-space: nowrap;"|<syntaxhighlight lang="bash"> | ||
/ | /etc/init.d/network start | ||
</syntaxhighlight> | </syntaxhighlight> | ||
<syntaxhighlight lang="text"> | |||
Bringing up loopback interface: [ OK ] | |||
Bringing up interface bcn_link1: [ OK ] | |||
Bringing up interface sn_link1: [ OK ] | |||
Bringing up interface ifn_link1: [ OK ] | |||
Bringing up interface bcn_link2: [ OK ] | |||
Bringing up interface sn_link2: | |||
Determining IP information for sn_link2...PING 10.255.255.254 (10.255.255.254) from 10.255.0.33 sn_link2: 56(84) bytes of data. | |||
--- 10.255.255.254 ping statistics --- | |||
4 packets transmitted, 0 received, +3 errors, 100% packet loss, time 3000ms | |||
pipe 3 | |||
failed. | |||
[FAILED] | |||
Bringing up interface ifn_link2: [ OK ] | |||
</syntaxhighlight> | </syntaxhighlight> | ||
|} | |||
What happened!? | |||
If | If you recall, the old <span class="code">sn_link2</span> device was the interface we moved to <span class="code">ifn_link1</span>. The new <span class="code">sn_link2</span> is not plugged into a network with access to our DHCP server, so it failed to get an IP address. To fix this, we'll disable DHCP on the new <span class="code">sn_link2</span> and enable it on the new <span class="code">ifn_link1</span> (which used to be <span class="code">sn_link2</span>). | ||
<syntaxhighlight lang="bash"> | {|class="wikitable" | ||
/ | !<span class="code">an-a05n01</span> | ||
|style="white-space: nowrap;"|<syntaxhighlight lang="bash"> | |||
sed -i 's/BOOTPROTO.*/BOOTPROTO="none"/' /etc/sysconfig/network-scripts/ifcfg-sn_link2 | |||
sed -i 's/BOOTPROTO.*/BOOTPROTO="dhcp"/' /etc/sysconfig/network-scripts/ifcfg-ifn_link1 | |||
</syntaxhighlight> | </syntaxhighlight> | ||
|} | |||
Now we'll restart the network and this time we should be good. | |||
{|class="wikitable" | |||
!<span class="code">an-a05n01</span> | |||
|style="white-space: nowrap;"|<syntaxhighlight lang="bash"> | |||
/etc/init.d/network restart | |||
</syntaxhighlight> | |||
<syntaxhighlight lang="text"> | <syntaxhighlight lang="text"> | ||
Shutting down interface bcn_link1: [ OK ] | |||
Shutting down interface sn_link1: [ OK ] | |||
Shutting down interface ifn_link1: [ OK ] | |||
Shutting down interface bcn_link2: [ OK ] | |||
Shutting down interface sn_link2: [ OK ] | |||
Shutting down interface ifn_link2: [ OK ] | |||
Shutting down loopback interface: [ OK ] | |||
Bringing up loopback interface: [ OK ] | |||
Bringing up interface bcn_link1: | |||
Determining IP information for bcn_link1... done. | |||
[ OK ] | |||
Bringing up interface sn_link1: [ OK ] | |||
Bringing up interface ifn_link1: [ OK ] | |||
Bringing up interface bcn_link2: [ OK ] | |||
Bringing up interface sn_link2: [ OK ] | |||
Bringing up interface ifn_link2: [ OK ] | |||
</syntaxhighlight> | </syntaxhighlight> | ||
|} | |||
The last step is to again <span class="code">tail</span> the system log and then unplug and plug-in the cables. If everything went well, they should be in the right order now. | |||
==== | {|class="wikitable" | ||
!<span class="code">an-a05n01</span> | |||
|style="white-space: nowrap;"|<syntaxhighlight lang="bash"> | |||
tail -f -n 0 /var/log/messages | |||
</syntaxhighlight> | |||
<syntaxhighlight lang="text"> | |||
Oct 28 18:44:24 an-a05n01 kernel: igb: bcn_link1 NIC Link is Down | |||
Oct 28 18:44:27 an-a05n01 kernel: igb: bcn_link1 NIC Link is Up 1000 Mbps Full Duplex, Flow Control: RX/TX | |||
Oct 28 18:44:31 an-a05n01 kernel: igb: sn_link1 NIC Link is Down | |||
Oct 28 18:44:34 an-a05n01 kernel: igb: sn_link1 NIC Link is Up 1000 Mbps Full Duplex, Flow Control: RX/TX | |||
Oct 28 18:44:35 an-a05n01 kernel: e1000e: ifn_link1 NIC Link is Down | |||
Oct 28 18:44:38 an-a05n01 kernel: e1000e: ifn_link1 NIC Link is Up 1000 Mbps Full Duplex, Flow Control: Rx/Tx | |||
Oct 28 18:44:39 an-a05n01 kernel: e1000e: bcn_link2 NIC Link is Down | |||
Oct 28 18:44:42 an-a05n01 kernel: e1000e: bcn_link2 NIC Link is Up 1000 Mbps Full Duplex, Flow Control: Rx/Tx | |||
Oct 28 18:44:45 an-a05n01 kernel: igb: sn_link2 NIC Link is Down | |||
Oct 28 18:44:49 an-a05n01 kernel: igb: sn_link2 NIC Link is Up 1000 Mbps Full Duplex, Flow Control: RX/TX | |||
Oct 28 18:44:50 an-a05n01 kernel: igb: ifn_link2 NIC Link is Down | |||
Oct 28 18:44:54 an-a05n01 kernel: igb: ifn_link2 NIC Link is Up 1000 Mbps Full Duplex, Flow Control: RX/TX | |||
</syntaxhighlight> | |||
|} | |||
Woohoo! Done! | |||
At this point, I like to refresh the backup. We're going to be making more changes later at it would be nice to not have to redo this step again, should something go wrong. | |||
<syntaxhighlight lang="bash"> | {|class="wikitable" | ||
!<span class="code">an-a05n01</span> | |||
/etc/ | |style="white-space: nowrap;"|<syntaxhighlight lang="bash"> | ||
rsync -av /etc/sysconfig/network-scripts /root/backups/ | |||
</syntaxhighlight> | </syntaxhighlight> | ||
<syntaxhighlight lang="text"> | |||
sending incremental file list | |||
network-scripts/ | |||
network-scripts/ifcfg-bcn_link1 | |||
network-scripts/ifcfg-sn_link1 | |||
network-scripts/ifcfg-ifn_link1 | |||
network-scripts/ifcfg-bcn_link2 | |||
network-scripts/ifcfg-sn_link2 | |||
network-scripts/ifcfg-ifn_link2 | |||
sent 1955 bytes received 130 bytes 4170.00 bytes/sec | |||
total size is 132711 speedup is 63.65 | |||
</syntaxhighlight> | |||
|} | |||
Repeat this process for the other node. Once both nodes have the matching physical interface to device names, we'll be ready to move on to the next step! | |||
== Configuring our Bridge, Bonds and Interfaces == | |||
To setup our network, we will need to edit the <span class="code">ifcfg-{bcn,sn,ifn}_link{1,2}</span>, <span class="code">ifcfg-{bcn,sn,ifn}_bond1</span> and <span class="code">ifcfg-ifn_bridge1</span> scripts. | |||
The <span class="code">ifn_bridge1</span> device is a bridge, like a virtual network switch, which will be used to route network connections between the virtual machines and the outside world, via the [[IFN]]. If you look in the [[#Network|network map]], you will see that the <span class="code">ifn_bridge1</span> virtual interface connects to <span class="code">ifn_bond1</span>, which links to the outside world, and it connects to all servers. Just like a normal switch does. You will also note that the bridge will have the [[IP]] addresses, not the bonded interface <span class="code">ifn_bond1</span>. It will instead be slaved to the <span class="code">ifn_bridge1</span> bridge. | |||
= | The <span class="code">{bcn,sn,ifn}_bond1</span> virtual devices work a lot like the network version of [[TLUG_Talk:_Storage_Technologies_and_Theory#Level_1|RAID level 1]] arrays. They take two real links and turn them into one redundant link. In our case, each link in the bond will go to a different switch, protecting our links for interface, cable, port or entire switch failures. Should any of these fail, the bond will switch to the backup link so quickly that the applications on the nodes will not notice anything happened. | ||
We're going to be editing a lot of files. It's best to lay out what we'll be doing in a chart. So our setup will be: | |||
{|class="wikitable sortable" | |||
!Node | |||
!BCN IP and Device | |||
!SN IP and Device | |||
!IFN IP and Device | |||
|- | |||
|<span class="code">an-a05n01</span> | |||
|<span class="code">10.20.50.1</span> on <span class="code">bcn_bond1</span> | |||
|<span class="code">10.10.50.1</span> on <span class="code">sn_bond1</span> | |||
|<span class="code">10.255.50.1</span> on <span class="code">ifn_bridge1</span> (<span class="code">ifn_bond1</span> slaved) | |||
|- | |||
|<span class="code">an-a05n02</span> | |||
|<span class="code">10.20.50.2</span> on <span class="code">bcn_bond1</span> | |||
|<span class="code">10.10.50.2</span> on <span class="code">sn_bond1</span> | |||
|<span class="code">10.255.50.2</span> on <span class="code">ifn_bridge1</span> (<span class="code">ifn_bond1</span> slaved) | |||
|} | |||
=== Creating New Network Configuration Files === | |||
The new bond and bridge devices we want to create do not exist at all yet. So we will start by <span class="code">touch</span>ing the configuration files we will need. | |||
{ | {|class="wikitable" | ||
!<span class="code">an-a05n01</span> | |||
|style="white-space: nowrap;"|<syntaxhighlight lang="bash"> | |||
touch /etc/sysconfig/network-scripts/ifcfg-{bcn,sn,ifn}_bond1 | |||
{ | touch /etc/sysconfig/network-scripts/ifcfg-ifn_bridge1 | ||
</syntaxhighlight> | |||
|- | |||
!<span class="code">an-a05n02</span> | |||
|style="white-space: nowrap;"|<syntaxhighlight lang="bash"> | |||
touch /etc/sysconfig/network-scripts/ifcfg-{bcn,sn,ifn}_bond1 | |||
touch /etc/sysconfig/network-scripts/ifcfg-ifn_bridge1 | |||
</syntaxhighlight> | </syntaxhighlight> | ||
|} | |||
=== Configuring the Bridge === | |||
We'll start in reverse order, crafting the bridge's script first. | |||
= | {|class="wikitable" | ||
!<span class="code">an-a05n01</span> IFN Bridge: | |||
!<span class="code">an-a05n02</span> IFN Bridge: | |||
|- | |||
|style="white-space: nowrap;"|<syntaxhighlight lang="bash"> | |||
vim /etc/sysconfig/network-scripts/ifcfg-ifn_bridge1 | |||
< | |||
</syntaxhighlight> | </syntaxhighlight> | ||
<syntaxhighlight lang="bash"> | |||
# Internet-Facing Network - Bridge | |||
DEVICE="ifn_bridge1" | |||
TYPE="Bridge" | |||
NM_CONTROLLED="no" | |||
= | BOOTPROTO="none" | ||
IPADDR="10.255.50.1" | |||
NETMASK="255.255.0.0" | |||
GATEWAY="10.255.255.254" | |||
DNS1="8.8.8.8" | |||
DNS2="8.8.4.4" | |||
DEFROUTE="yes" | |||
</syntaxhighlight> | |||
|style="white-space: nowrap;"|<syntaxhighlight lang="bash"> | |||
vim /etc/sysconfig/network-scripts/ifcfg-ifn_bridge1 | |||
</syntaxhighlight> | |||
<syntaxhighlight lang="bash"> | |||
# Internet-Facing Network - Bridge | |||
DEVICE="ifn_bridge1" | |||
TYPE="Bridge" | |||
NM_CONTROLLED="no" | |||
BOOTPROTO="none" | |||
IPADDR="10.255.50.2" | |||
NETMASK="255.255.0.0" | |||
GATEWAY="10.255.255.254" | |||
DNS1="8.8.8.8" | |||
DNS2="8.8.4.4" | |||
DEFROUTE="yes" | |||
</syntaxhighlight> | </syntaxhighlight> | ||
|} | |||
If you have a Red Hat account, you can read up on what the [https://access.redhat.com/site/documentation/en-US/Red_Hat_Enterprise_Linux/6/html/Deployment_Guide/s1-networkscripts-interfaces.html option above] mean, and specifics of [https://access.redhat.com/site/documentation/en-US/Red_Hat_Enterprise_Linux/6/html/Deployment_Guide/s2-networkscripts-interfaces_network-bridge.html bridge] devices. In case you don't though, here is a summary: | |||
=== | {|class="wikitable" | ||
!Variable | |||
!Description | |||
|- | |||
|<span class="code">DEVICE</span> | |||
|This is the actual name given to this device. Generally is matches the file name. In this case, the <span class="code">DEVICE</span> is <span class="code">ifn_bridge1</span> and the file name is <span class="code">ifcfg-ifn_bridge1</span>. This matching of file name to device name is by convention and not strictly required. | |||
|- | |||
|<span class="code">TYPE</span> | |||
|This is either <span class="code">Ethernet</span>, the default, or <span class="code">Bridge</span>, as we use here. Note that these values are '''case-sensitive'''! By setting this here, we're telling the [[OS]] that we're creating a bridge device. | |||
|- | |||
|<span class="code">NM_CONTROLLED</span> | |||
|This can be <span class="code">yes</span>, which is the default, or <span class="code">no</span>, as we set here. This tells [[Network Manager]] that it is not allowed to manage this device. We've removed the <span class="code">NetworkManager</span> package, so this is not strictly needed, but we'll add it just in case it gets installed in the future. | |||
|- | |||
|<span class="code">BOOTPROTO</span> | |||
|This can be either <span class="code">none</span>, which we're using here, <span class="code">dhcp</span> or <span class="code">bootp</span> if you want the interface to get an IP from a DHCP or BOOTP server, respectively. We're setting it to static, so we want this set to <span class="code">none</span>. | |||
|- | |||
|<span class="code">IPADDR</span> | |||
|This is the [[dotted-decimal]] IP address we're assigning to this interface. | |||
|- | |||
|<span class="code">NETMASK</span> | |||
|This is the dotted-decimal [[subnet mask]] for this interface. | |||
|- | |||
|<span class="code">GATEWAY</span> | |||
|This is the IP address the node will contact when we it needs to send traffic to other networks, like the Internet. | |||
|- | |||
|<span class="code">DNS1</span> | |||
|This is the IP address of the primary domain name server to use when the node needs to translate a host or domain name into an IP address which wasn't found in the <span class="code">/etc/hosts</span> file. | |||
|- | |||
|<span class="code">DNS2</span> | |||
|This is the IP address of the backup domain name server, should the primary DNS server specified above fail. | |||
|- | |||
|<span class="code">DEFROUTE</span> | |||
|This can be set to <span class="code">yes</span>, as we've set it here, or <span class="code">no</span>. If two or more interfaces has <span class="code">DEFROUTE</span> set, the interface with this variable set to <span class="code">yes</span> will be used. | |||
|} | |||
=== Creating the Bonded Interfaces === | |||
Next up, we'll can create the three bonding configuration files. This is where two physical network interfaces are tied together to work like a single, highly available network interface. You can think of a bonded interface as being akin to [[TLUG_Talk:_Storage_Technologies_and_Theory#Level_1|RAID level 1]]; A new virtual device is created out of two real devices. | |||
We're going to see a long line called "<span class="code">[http://docs.redhat.com/docs/en-US/Red_Hat_Enterprise_Linux/6/html/Deployment_Guide/sec-Using_Channel_Bonding.html BONDING_OPTS]</span>". Let's look at the meaning of these options before we look at the configuration; | |||
{|class="wikitable" | |||
!Variable | |||
!Description | |||
|- | |||
|<span class="code">mode</span> | |||
|This tells the Linux kernel what kind of bond we're creating here. There are [https://www.kernel.org/doc/Documentation/networking/bonding.txt seven modes] available, each with a numeric value representing them. We're going use the "Active/Passive" mode, known as mode <span class="code">1</span> (<span class="code">active-backup</span>). As of [[RHEL]] 6.4, modes <span class="code">0</span> (<span class="code">balance-rr</span>) and mode <span class="code">2</span> (<span class="code">balance-xor</span>) are supported for use with [[corosync]]. Given the proven reliability of surviving numerous tested failure and recovery tests though, AN! still strongly recommends mode <span class="code">1</span>. | |||
|- | |||
|<span class="code">miimon</span> | |||
|This tells the kernel how often, in milliseconds, to check for unreported link failures. We're using <span class="code">100</span> which tells the bonding driver to check if the network cable has been unplugged or plugged in every 100 milliseconds. Most modern drivers will report link state via their driver, so this option is not strictly required, but it is recommended for extra safety. | |||
|- | |||
|<span class="code">use_carrier</span> | |||
|Setting this to <span class="code">1</span> tells the driver to use the driver to maintain the link state. Some drivers don't support that. If you run into trouble where the link shows as up when it's actually down, get a new network card or try changing this to <span class="code">0</span>. | |||
|- | |||
|<span class="code">updelay</span> | |||
|Setting this to <span class="code">120000</span> tells the driver to delay switching back to the primary interface for 120,000 milliseconds (120 seconds / 2 minutes). This is designed to give the switch connected to the primary interface time to finish booting. Setting this too low may cause the bonding driver to switch back before the network switch is ready to actually move data. Some switches will not provide a link until it is fully booted, so please experiment. | |||
|- | |||
|<span class="code">downdelay</span> | |||
|Setting this to <span class="code">0</span> tells the driver not to wait before changing the state of an interface when the link goes down. That is, when the driver detects a fault, it will switch to the backup interface immediately. This is the default behaviour, but setting this here insures that it is reset when the interface is reset, should the delay be somehow set elsewhere. | |||
|} | |||
The | The first bond we'll configure is for the Back-Channel Network. | ||
{|class="wikitable" | |||
!<span class="code">an-a05n01</span> BCN Bond | |||
|style="white-space: nowrap;"|<syntaxhighlight lang="bash"> | |||
vim /etc/sysconfig/network-scripts/ifcfg-bcn_bond1 | |||
</syntaxhighlight> | |||
<syntaxhighlight lang="bash"> | <syntaxhighlight lang="bash"> | ||
# Back-Channel Network - Bond | |||
DEVICE="bcn_bond1" | |||
NM_CONTROLLED="no" | |||
BOOTPROTO="none" | |||
ONBOOT="yes" | |||
BONDING_OPTS="mode=1 miimon=100 use_carrier=1 updelay=120000 downdelay=0 primary=bcn_link1" | |||
IPADDR="10.20.50.1" | |||
NETMASK="255.255.0.0" | |||
</syntaxhighlight> | |||
|- | |||
!<span class="code">an-a05n02</span> BCN Bond | |||
|style="white-space: nowrap;"|<syntaxhighlight lang="bash"> | |||
vim /etc/sysconfig/network-scripts/ifcfg-bcn_bond1 | |||
</syntaxhighlight> | </syntaxhighlight> | ||
<syntaxhighlight lang=" | <syntaxhighlight lang="bash"> | ||
# Back-Channel Network - Bond | |||
DEVICE="bcn_bond1" | |||
NM_CONTROLLED="no" | |||
BOOTPROTO="none" | |||
ONBOOT="yes" | |||
BONDING_OPTS="mode=1 miimon=100 use_carrier=1 updelay=120000 downdelay=0 primary=bcn_link1" | |||
IPADDR="10.20.50.2" | |||
NETMASK="255.255.0.0" | |||
</syntaxhighlight> | </syntaxhighlight> | ||
|} | |||
Next up is the bond for the Storage Network; | |||
{|class="wikitable" | |||
!<span class="code">an-a05n01</span> SN Bond: | |||
|style="white-space: nowrap;"|<syntaxhighlight lang="bash"> | |||
vim /etc/sysconfig/network-scripts/ifcfg-sn_bond1 | |||
</syntaxhighlight> | |||
<syntaxhighlight lang="bash"> | <syntaxhighlight lang="bash"> | ||
# Storage Network - Bond | |||
DEVICE="sn_bond1" | |||
NM_CONTROLLED="no" | |||
BOOTPROTO="none" | |||
ONBOOT="yes" | |||
BONDING_OPTS="mode=1 miimon=100 use_carrier=1 updelay=120000 downdelay=0 primary=sn_link1" | |||
IPADDR="10.10.50.1" | |||
NETMASK="255.255.0.0" | |||
</syntaxhighlight> | |||
|- | |||
!<span class="code">an-a05n02</span> SN Bond: | |||
|style="white-space: nowrap;"|<syntaxhighlight lang="bash"> | |||
vim /etc/sysconfig/network-scripts/ifcfg-sn_bond1 | |||
</syntaxhighlight> | </syntaxhighlight> | ||
<syntaxhighlight lang=" | <syntaxhighlight lang="bash"> | ||
# Storage Network - Bond | |||
DEVICE="sn_bond1" | |||
NM_CONTROLLED="no" | |||
BOOTPROTO="none" | |||
ONBOOT="yes" | |||
BONDING_OPTS="mode=1 miimon=100 use_carrier=1 updelay=120000 downdelay=0 primary=sn_link1" | |||
IPADDR="10.10.50.2" | |||
NETMASK="255.255.0.0" | |||
</syntaxhighlight> | </syntaxhighlight> | ||
|} | |||
Finally, we setup the bond for the Internet-Facing Network. | |||
Here we see a new option: | |||
* <span class="code">BRIDGE="ifn_bridge1"</span>; This tells the system that this bond is to be connected to the <span class="code">ifn_bridge1</span> bridge when it is started. | |||
{|class="wikitable" | |||
!<span class="code">an-a05n01</span> IFN Bond: | |||
|style="white-space: nowrap;"|<syntaxhighlight lang="bash"> | |||
vim /etc/sysconfig/network-scripts/ifcfg-ifn_bond1 | |||
</syntaxhighlight> | |||
<syntaxhighlight lang="bash"> | <syntaxhighlight lang="bash"> | ||
# Internet-Facing Network - Bond | |||
DEVICE="ifn_bond1" | |||
BRIDGE="ifn_bridge1" | |||
NM_CONTROLLED="no" | |||
BOOTPROTO="none" | |||
ONBOOT="yes" | |||
BONDING_OPTS="mode=1 miimon=100 use_carrier=1 updelay=120000 downdelay=0 primary=ifn_link1" | |||
</syntaxhighlight> | |||
|- | |||
!<span class="code">an-a05n02</span> IFN Bond: | |||
|style="white-space: nowrap;"|<syntaxhighlight lang="bash"> | |||
vim /etc/sysconfig/network-scripts/ifcfg-ifn_bond1 | |||
</syntaxhighlight> | </syntaxhighlight> | ||
<syntaxhighlight lang=" | <syntaxhighlight lang="bash"> | ||
# Internet-Facing Network - Bond | |||
DEVICE="ifn_bond1" | |||
BRIDGE="ifn_bridge1" | |||
NM_CONTROLLED="no" | |||
BOOTPROTO="none" | |||
ONBOOT="yes" | |||
BONDING_OPTS="mode=1 miimon=100 use_carrier=1 updelay=120000 downdelay=0 primary=ifn_link1" | |||
</syntaxhighlight> | </syntaxhighlight> | ||
|} | |||
Done with the bonds! | |||
=== Alter the Interface Configurations === | |||
With the bridge and bonds in place, we can now alter the interface configurations. | |||
We've already edited these back when we were remapping the physical interface to device names. This time, we're going to clean them up, add a comment and slave them to their parent bonds. Note that the only difference between each node's given config file will be the <span class="code">HWADDR</span> variable's value. | |||
* BCN <span class="code">bcn_bond1</span>, Link 1; | |||
{|class="wikitable" | |||
!<span class="code">an-a05n01</span>'s <span class="code">bcn_link1</span> | |||
|style="white-space: nowrap;"|<syntaxhighlight lang="bash"> | |||
vim /etc/sysconfig/network-scripts/ifcfg-bcn_link1 | |||
</syntaxhighlight> | |||
<syntaxhighlight lang="bash"> | <syntaxhighlight lang="bash"> | ||
# Back-Channel Network - Link 1 | |||
HWADDR="00:19:99:9C:9B:9E" | |||
DEVICE="bcn_link1" | |||
NM_CONTROLLED="no" | |||
BOOTPROTO="none" | |||
ONBOOT="yes" | |||
MASTER="bcn_bond1" | |||
SLAVE="yes" | |||
</syntaxhighlight> | |||
|- | |||
!<span class="code">an-a05n02</span>'s <span class="code">bcn_link1</span> | |||
|style="white-space: nowrap;"|<syntaxhighlight lang="bash"> | |||
vim /etc/sysconfig/network-scripts/ifcfg-ifn_link1 | |||
</syntaxhighlight> | </syntaxhighlight> | ||
<syntaxhighlight lang=" | <syntaxhighlight lang="bash"> | ||
# Back-Channel Network - Link 1 | |||
HWADDR="00:19:99:9C:A0:6C" | |||
DEVICE="bcn_link1" | |||
NM_CONTROLLED="no" | |||
BOOTPROTO="none" | |||
ONBOOT="yes" | |||
MASTER="bcn_bond1" | |||
SLAVE="yes" | |||
</syntaxhighlight> | </syntaxhighlight> | ||
|} | |||
* SN <span class="code">sn_bond1</span>, Link 1: | |||
<syntaxhighlight lang=" | {|class="wikitable" | ||
/etc/ | !<span class="code">an-a05n01</span>'s <span class="code">sn_link1</span> | ||
|style="white-space: nowrap;"|<syntaxhighlight lang="bash"> | |||
vim /etc/sysconfig/network-scripts/ifcfg-sn_link1 | |||
</syntaxhighlight> | |||
<syntaxhighlight lang="bash"> | |||
# Storage Network - Link 1 | |||
DEVICE="sn_link1" | |||
HWADDR="00:19:99:9C:9B:9F" | |||
NM_CONTROLLED="no" | |||
BOOTPROTO="none" | |||
ONBOOT="yes" | |||
MASTER="sn_bond1" | |||
SLAVE="yes" | |||
</syntaxhighlight> | </syntaxhighlight> | ||
<syntaxhighlight lang=" | |- | ||
!<span class="code">an-a05n02</span>'s <span class="code">sn_link1</span> | |||
|style="white-space: nowrap;"|<syntaxhighlight lang="bash"> | |||
vim /etc/sysconfig/network-scripts/ifcfg-sn_link1 | |||
</syntaxhighlight> | </syntaxhighlight> | ||
<syntaxhighlight lang="bash"> | <syntaxhighlight lang="bash"> | ||
# Storage Network - Link 1 | |||
DEVICE="sn_link1" | |||
HWADDR="00:19:99:9C:A0:6D" | |||
NM_CONTROLLED="no" | |||
BOOTPROTO="none" | |||
ONBOOT="yes" | |||
MASTER="sn_bond1" | |||
SLAVE="yes" | |||
</syntaxhighlight> | </syntaxhighlight> | ||
|} | |||
* IFN <span class="code">ifn_bond1</span>, Link 1: | |||
<syntaxhighlight lang=" | {|class="wikitable" | ||
/etc/ | !<span class="code">an-a05n01</span>'s <span class="code">ifn_link1</span> | ||
|style="white-space: nowrap;"|<syntaxhighlight lang="bash"> | |||
vim /etc/sysconfig/network-scripts/ifcfg-ifn_link1 | |||
</syntaxhighlight> | |||
<syntaxhighlight lang="bash"> | |||
# Internet-Facing Network - Link 1 | |||
HWADDR="00:1B:21:81:C3:34" | |||
DEVICE="ifn_link1" | |||
NM_CONTROLLED="no" | |||
BOOTPROTO="none" | |||
ONBOOT="yes" | |||
MASTER="ifn_bond1" | |||
SLAVE="yes" | |||
</syntaxhighlight> | |||
|- | |||
!<span class="code">an-a05n02</span>'s <span class="code">ifn_link1</span> | |||
|style="white-space: nowrap;"|<syntaxhighlight lang="bash"> | |||
vim /etc/sysconfig/network-scripts/ifcfg-ifn_link1 | |||
</syntaxhighlight> | </syntaxhighlight> | ||
<syntaxhighlight lang=" | <syntaxhighlight lang="bash"> | ||
# Internet-Facing Network - Link 1 | |||
HWADDR="00:1B:21:81:C2:EA" | |||
DEVICE="ifn_link1" | |||
NM_CONTROLLED="no" | |||
BOOTPROTO="none" | |||
ONBOOT="yes" | |||
MASTER="ifn_bond1" | |||
SLAVE="yes" | |||
</syntaxhighlight> | </syntaxhighlight> | ||
|} | |||
* BCN <span class="code">bcn_bond1</span>, Link 2: | |||
{|class="wikitable" | |||
!<span class="code">an-a05n01</span>'s <span class="code">bcn_link2</span> | |||
|style="white-space: nowrap;"|<syntaxhighlight lang="bash"> | |||
vim /etc/sysconfig/network-scripts/ifcfg-bcn_link2 | |||
</syntaxhighlight> | |||
<syntaxhighlight lang="bash"> | |||
# Back-Channel Network - Link 2 | |||
HWADDR="00:1B:21:81:C3:35" | |||
DEVICE="bcn_link2" | |||
NM_CONTROLLED="no" | |||
BOOTPROTO="none" | |||
ONBOOT="yes" | |||
MASTER="bcn_bond1" | |||
SLAVE="yes" | |||
</syntaxhighlight> | |||
|- | |||
!<span class="code">an-a05n02</span>'s <span class="code">bcn_link2</span> | |||
|style="white-space: nowrap;"|<syntaxhighlight lang="bash"> | |||
vim /etc/sysconfig/network-scripts/ifcfg-bcn_link2 | |||
</syntaxhighlight> | |||
<syntaxhighlight lang="bash"> | <syntaxhighlight lang="bash"> | ||
# Back-Channel Network - Link 2 | |||
HWADDR="00:1B:21:81:C2:EB" | |||
DEVICE="bcn_link2" | |||
NM_CONTROLLED="no" | |||
BOOTPROTO="none" | |||
ONBOOT="yes" | |||
MASTER="bcn_bond1" | |||
SLAVE="yes" | |||
</syntaxhighlight> | </syntaxhighlight> | ||
|} | |||
* SN <span class="code">sn_bond1</span>, Link 2: | |||
{|class="wikitable" | |||
!<span class="code">an-a05n01</span>'s <span class="code">sn_link2</span> | |||
|style="white-space: nowrap;"|<syntaxhighlight lang="bash"> | |||
vim /etc/sysconfig/network-scripts/ifcfg-sn_link2 | |||
</syntaxhighlight> | |||
<syntaxhighlight lang="bash"> | <syntaxhighlight lang="bash"> | ||
/etc/ | # Storage Network - Link 2 | ||
HWADDR="A0:36:9F:02:E0:04" | |||
DEVICE="sn_link2" | |||
NM_CONTROLLED="no" | |||
BOOTPROTO="none" | |||
ONBOOT="yes" | |||
MASTER="sn_bond1" | |||
SLAVE="yes" | |||
</syntaxhighlight> | |||
|- | |||
!<span class="code">an-a05n02</span>'s <span class="code">sn_link2</span> | |||
|style="white-space: nowrap;"|<syntaxhighlight lang="bash"> | |||
vim /etc/sysconfig/network-scripts/ifcfg-sn_link2 | |||
</syntaxhighlight> | </syntaxhighlight> | ||
<syntaxhighlight lang=" | <syntaxhighlight lang="bash"> | ||
# Storage Network - Link 2 | |||
HWADDR="A0:36:9F:07:D6:2E" | |||
DEVICE="sn_link2" | |||
NM_CONTROLLED="no" | |||
BOOTPROTO="none" | |||
ONBOOT="yes" | |||
MASTER="sn_bond1" | |||
SLAVE="yes" | |||
</syntaxhighlight> | </syntaxhighlight> | ||
|} | |||
* IFN <span class="code">ifn_bond1</span>, Link 2: | |||
< | {|class="wikitable" | ||
!<span class="code">an-a05n01</span>'s <span class="code">ifn_link2</span> | |||
|style="white-space: nowrap;"|<syntaxhighlight lang="bash"> | |||
vim /etc/sysconfig/network-scripts/ifcfg-ifn_link2 | |||
</syntaxhighlight> | |||
<syntaxhighlight lang="bash"> | |||
# Internet-Facing Network - Link 2 | |||
HWADDR="A0:36:9F:02:E0:05" | |||
DEVICE="ifn_link2" | |||
NM_CONTROLLED="no" | |||
BOOTPROTO="none" | |||
ONBOOT="yes" | |||
MASTER="ifn_bond1" | |||
SLAVE="yes" | |||
</syntaxhighlight> | |||
|- | |||
!<span class="code">an-a05n02</span>'s <span class="code">ifn_link2</span> | |||
|style="white-space: nowrap;"|<syntaxhighlight lang="bash"> | |||
vim /etc/sysconfig/network-scripts/ifcfg-ifn_link2 | |||
</syntaxhighlight> | |||
<syntaxhighlight lang="bash"> | |||
# Internet-Facing Network - Link 2 | |||
HWADDR="A0:36:9F:07:D6:2F" | |||
DEVICE="ifn_link2" | |||
NM_CONTROLLED="no" | |||
BOOTPROTO="none" | |||
ONBOOT="yes" | |||
MASTER="ifn_bond1" | |||
SLAVE="yes" | |||
</syntaxhighlight> | </syntaxhighlight> | ||
|} | |||
The order of the variables is not really important, from a technical perspective. However, we've found that having the order consistent as possible between configs and nodes goes a long way to simplifying support and problem solving. It certainly helps reduce human error as well. | |||
If we compare the newly updated configs with one of the backups, we'll see a couple interesting things; | |||
<syntaxhighlight lang="bash"> | {|class="wikitable" | ||
!<span class="code">an-a05n01</span>'s <span class="code">bcn_link1</span> | |||
|style="white-space: nowrap;"|<syntaxhighlight lang="bash"> | |||
diff -U0 /root/backups/network-scripts/ifcfg-eth4 /etc/sysconfig/network-scripts/ifcfg-bcn_link1 | |||
</syntaxhighlight> | |||
<syntaxhighlight lang="diff"> | |||
--- /root/backups/network-scripts/ifcfg-eth4 2013-10-28 18:39:59.000000000 -0400 | |||
+++ /etc/sysconfig/network-scripts/ifcfg-bcn_link1 2013-10-29 13:25:03.443343494 -0400 | |||
@@ -1,2 +1 @@ | |||
-DEVICE="eth4" | |||
-BOOTPROTO="dhcp" | |||
+# Back-Channel Network - Link 1 | |||
@@ -4 +3,3 @@ | |||
-NM_CONTROLLED="yes" | |||
+DEVICE="bcn_link1" | |||
+NM_CONTROLLED="no" | |||
+BOOTPROTO="none" | |||
@@ -6,2 +7,2 @@ | |||
-TYPE="Ethernet" | |||
-UUID="ea03dc97-019c-4acc-b4d6-bc42d30d9e36" | |||
+MASTER="bcn_bond1" | |||
+SLAVE="yes" | |||
</syntaxhighlight> | </syntaxhighlight> | ||
<syntaxhighlight lang="text"> | |} | ||
The notable part is that <span class="code">TYPE</span> and <span class="code">UUID</span> where removed. These are not required, so we generally remove them. If you prefer to keep them, that is fine, too. | |||
== Loading the New Network Configuration == | |||
{{warning|1=If you're connected to the nodes over the network and if the current IP was assigned by DHCP (or is otherwise different from the IP set in <span class="code">ifn_bridge1</span>), your network connection will break. You will need to reconnect with the IP address you set.}} | |||
Simply restart the <span class="code">network</span> service. | |||
{|class="wikitable" | |||
!<span class="code">an-a05n01</span> | |||
|style="white-space: nowrap;"|<syntaxhighlight lang="bash"> | |||
/etc/init.d/network restart | |||
</syntaxhighlight> | |||
<syntaxhighlight lang="text"> | |||
Shutting down interface bcn_link1: /etc/sysconfig/network-scripts/ifdown-eth: line 116: /sys/class/net/bcn_bond1/bonding/slaves: No such file or directory | |||
[ OK ] | |||
Shutting down interface sn_link1: /etc/sysconfig/network-scripts/ifdown-eth: line 116: /sys/class/net/sn_bond1/bonding/slaves: No such file or directory | |||
[ OK ] | |||
Shutting down interface ifn_link1: /etc/sysconfig/network-scripts/ifdown-eth: line 116: /sys/class/net/ifn_bond1/bonding/slaves: No such file or directory | |||
[ OK ] | |||
Shutting down interface bcn_link2: /etc/sysconfig/network-scripts/ifdown-eth: line 116: /sys/class/net/bcn_bond1/bonding/slaves: No such file or directory | |||
[ OK ] | |||
Shutting down interface sn_link2: /etc/sysconfig/network-scripts/ifdown-eth: line 116: /sys/class/net/sn_bond1/bonding/slaves: No such file or directory | |||
[ OK ] | |||
Shutting down interface ifn_link2: /etc/sysconfig/network-scripts/ifdown-eth: line 116: /sys/class/net/ifn_bond1/bonding/slaves: No such file or directory | |||
[ OK ] | |||
Shutting down loopback interface: [ OK ] | |||
Bringing up loopback interface: [ OK ] | |||
Bringing up interface bcn_bond1: [ OK ] | |||
Bringing up interface sn_bond1: [ OK ] | |||
Bringing up interface ifn_bond1: [ OK ] | |||
Bringing up interface ifn_bridge1: [ OK ] | |||
</syntaxhighlight> | </syntaxhighlight> | ||
|} | |||
These errors are normal. They're caused because we changed the <span class="code">ifcfg-ethX</span> configuration files to reference bonded interfaces that, at the time we restarted the network, did not yet exist. If you restart the network again, you will see that the errors no longer appear. | |||
=== Verifying the New Network Config === | |||
The first check to make sure everything works is to simply run <span class="code">ifconfig</span> and make sure everything we expect to be there is, in fact, there. | |||
<syntaxhighlight lang="bash"> | {|class="wikitable" | ||
!<span class="code">an-a05n01</span> | |||
!<span class="code">an-a05n02</span> | |||
|- | |||
|style="white-space: nowrap;"|<syntaxhighlight lang="bash"> | |||
ifconfig | |||
</syntaxhighlight> | </syntaxhighlight> | ||
<syntaxhighlight lang="text"> | <syntaxhighlight lang="text"> | ||
bcn_bond1 Link encap:Ethernet HWaddr 00:19:99:9C:9B:9E | |||
inet addr:10.20.50.1 Bcast:10.20.255.255 Mask:255.255.0.0 | |||
inet6 addr: fe80::219:99ff:fe9c:9b9e/64 Scope:Link | |||
UP BROADCAST RUNNING MASTER MULTICAST MTU:1500 Metric:1 | |||
RX packets:821080 errors:0 dropped:0 overruns:0 frame:0 | |||
TX packets:160713 errors:0 dropped:0 overruns:0 carrier:0 | |||
collisions:0 txqueuelen:0 | |||
RX bytes:392278922 (374.1 MiB) TX bytes:15344030 (14.6 MiB) | |||
sn_bond1 Link encap:Ethernet HWaddr 00:19:99:9C:9B:9F | |||
inet addr:10.10.50.1 Bcast:10.10.255.255 Mask:255.255.0.0 | |||
inet6 addr: fe80::219:99ff:fe9c:9b9f/64 Scope:Link | |||
UP BROADCAST RUNNING MASTER MULTICAST MTU:1500 Metric:1 | |||
RX packets:29 errors:0 dropped:0 overruns:0 frame:0 | |||
TX packets:100 errors:0 dropped:0 overruns:0 carrier:0 | |||
collisions:0 txqueuelen:0 | |||
RX bytes:6030 (5.8 KiB) TX bytes:13752 (13.4 KiB) | |||
ifn_bond1 Link encap:Ethernet HWaddr 00:1B:21:81:C3:34 | |||
inet6 addr: fe80::21b:21ff:fe81:c334/64 Scope:Link | |||
UP BROADCAST RUNNING MASTER MULTICAST MTU:1500 Metric:1 | |||
RX packets:512206 errors:0 dropped:0 overruns:0 frame:0 | |||
TX packets:222 errors:0 dropped:0 overruns:0 carrier:0 | |||
collisions:0 txqueuelen:0 | |||
RX bytes:34650974 (33.0 MiB) TX bytes:25375 (24.7 KiB) | |||
bcn_link1 Link encap:Ethernet HWaddr 00:19:99:9C:9B:9E | |||
UP BROADCAST RUNNING SLAVE MULTICAST MTU:1500 Metric:1 | |||
RX packets:570073 errors:0 dropped:0 overruns:0 frame:0 | |||
TX packets:160669 errors:0 dropped:0 overruns:0 carrier:0 | |||
collisions:0 txqueuelen:1000 | |||
RX bytes:377010981 (359.5 MiB) TX bytes:15339986 (14.6 MiB) | |||
Memory:ce660000-ce680000 | |||
sn_link1 Link encap:Ethernet HWaddr 00:19:99:9C:9B:9F | |||
UP BROADCAST RUNNING SLAVE MULTICAST MTU:1500 Metric:1 | |||
RX packets:20 errors:0 dropped:0 overruns:0 frame:0 | |||
TX packets:43 errors:0 dropped:0 overruns:0 carrier:0 | |||
collisions:0 txqueuelen:1000 | |||
RX bytes:4644 (4.5 KiB) TX bytes:4602 (4.4 KiB) | |||
Memory:ce6c0000-ce6e0000 | |||
ifn_link1 Link encap:Ethernet HWaddr 00:1B:21:81:C3:34 | |||
UP BROADCAST RUNNING SLAVE MULTICAST MTU:1500 Metric:1 | |||
RX packets:262105 errors:0 dropped:0 overruns:0 frame:0 | |||
TX packets:188 errors:0 dropped:0 overruns:0 carrier:0 | |||
collisions:0 txqueuelen:1000 | |||
RX bytes:19438941 (18.5 MiB) TX bytes:22295 (21.7 KiB) | |||
Interrupt:24 Memory:ce240000-ce260000 | |||
bcn_link2 Link encap:Ethernet HWaddr 00:19:99:9C:9B:9E | |||
UP BROADCAST RUNNING SLAVE MULTICAST MTU:1500 Metric:1 | |||
RX packets:251007 errors:0 dropped:0 overruns:0 frame:0 | |||
TX packets:44 errors:0 dropped:0 overruns:0 carrier:0 | |||
collisions:0 txqueuelen:1000 | |||
RX bytes:15267941 (14.5 MiB) TX bytes:4044 (3.9 KiB) | |||
Interrupt:34 Memory:ce2a0000-ce2c0000 | |||
sn_link2 Link encap:Ethernet HWaddr 00:19:99:9C:9B:9F | |||
UP BROADCAST RUNNING SLAVE MULTICAST MTU:1500 Metric:1 | |||
RX packets:9 errors:0 dropped:0 overruns:0 frame:0 | |||
TX packets:57 errors:0 dropped:0 overruns:0 carrier:0 | |||
collisions:0 txqueuelen:1000 | |||
RX bytes:1386 (1.3 KiB) TX bytes:9150 (8.9 KiB) | |||
Memory:ce400000-ce500000 | |||
ifn_link2 Link encap:Ethernet HWaddr 00:1B:21:81:C3:34 | |||
UP BROADCAST RUNNING SLAVE MULTICAST MTU:1500 Metric:1 | |||
RX packets:250101 errors:0 dropped:0 overruns:0 frame:0 | |||
TX packets:34 errors:0 dropped:0 overruns:0 carrier:0 | |||
collisions:0 txqueuelen:1000 | |||
RX bytes:15212033 (14.5 MiB) TX bytes:3080 (3.0 KiB) | |||
Memory:ce500000-ce600000 | |||
lo Link encap:Local Loopback | |||
inet addr:127.0.0.1 Mask:255.0.0.0 | |||
inet6 addr: ::1/128 Scope:Host | |||
UP LOOPBACK RUNNING MTU:16436 Metric:1 | |||
RX packets:3543 errors:0 dropped:0 overruns:0 frame:0 | |||
TX packets:3543 errors:0 dropped:0 overruns:0 carrier:0 | |||
collisions:0 txqueuelen:0 | |||
RX bytes:2652772 (2.5 MiB) TX bytes:2652772 (2.5 MiB) | |||
ifn_bridge1 Link encap:Ethernet HWaddr 00:1B:21:81:C3:34 | |||
inet addr:10.255.50.1 Bcast:10.255.255.255 Mask:255.255.0.0 | |||
inet6 addr: fe80::21b:21ff:fe81:c334/64 Scope:Link | |||
UP BROADCAST RUNNING MULTICAST MTU:1500 Metric:1 | |||
RX packets:4425 errors:0 dropped:0 overruns:0 frame:0 | |||
TX packets:127 errors:0 dropped:0 overruns:0 carrier:0 | |||
collisions:0 txqueuelen:0 | |||
RX bytes:225580 (220.2 KiB) TX bytes:17449 (17.0 KiB) | |||
</syntaxhighlight> | |||
|style="white-space: nowrap;"|<syntaxhighlight lang="bash"> | |||
ifconfig | |||
</syntaxhighlight> | |||
<syntaxhighlight lang="text"> | |||
bcn_bond1 Link encap:Ethernet HWaddr 00:19:99:9C:A0:6C | |||
inet addr:10.20.50.2 Bcast:10.20.255.255 Mask:255.255.0.0 | |||
inet6 addr: fe80::219:99ff:fe9c:a06c/64 Scope:Link | |||
UP BROADCAST RUNNING MASTER MULTICAST MTU:1500 Metric:1 | |||
RX packets:485064 errors:0 dropped:0 overruns:0 frame:0 | |||
TX packets:42 errors:0 dropped:0 overruns:0 carrier:0 | |||
collisions:0 txqueuelen:0 | |||
RX bytes:29542689 (28.1 MiB) TX bytes:3060 (2.9 KiB) | |||
sn_bond1 Link encap:Ethernet HWaddr 00:19:99:9C:A0:6D | |||
inet addr:10.10.50.2 Bcast:10.10.255.255 Mask:255.255.0.0 | |||
inet6 addr: fe80::219:99ff:fe9c:a06d/64 Scope:Link | |||
UP BROADCAST RUNNING MASTER MULTICAST MTU:1500 Metric:1 | |||
RX packets:7 errors:0 dropped:0 overruns:0 frame:0 | |||
TX packets:41 errors:0 dropped:0 overruns:0 carrier:0 | |||
collisions:0 txqueuelen:0 | |||
RX bytes:420 (420.0 b) TX bytes:3018 (2.9 KiB) | |||
ifn_bond1 Link encap:Ethernet HWaddr 00:1B:21:81:C2:EA | |||
inet6 addr: fe80::21b:21ff:fe81:c2ea/64 Scope:Link | |||
UP BROADCAST RUNNING PROMISC MASTER MULTICAST MTU:1500 Metric:1 | |||
RX packets:884093 errors:0 dropped:0 overruns:0 frame:0 | |||
TX packets:161539 errors:0 dropped:0 overruns:0 carrier:0 | |||
collisions:0 txqueuelen:0 | |||
RX bytes:414267432 (395.0 MiB) TX bytes:15355495 (14.6 MiB) | |||
bcn_link1 Link encap:Ethernet HWaddr 00:19:99:9C:A0:6C | |||
UP BROADCAST RUNNING SLAVE MULTICAST MTU:1500 Metric:1 | |||
RX packets:242549 errors:0 dropped:0 overruns:0 frame:0 | |||
TX packets:29 errors:0 dropped:0 overruns:0 carrier:0 | |||
collisions:0 txqueuelen:1000 | |||
RX bytes:14772701 (14.0 MiB) TX bytes:2082 (2.0 KiB) | |||
Memory:ce660000-ce680000 | |||
sn_link1 Link encap:Ethernet HWaddr 00:19:99:9C:A0:6D | |||
UP BROADCAST RUNNING SLAVE MULTICAST MTU:1500 Metric:1 | |||
RX packets:3 errors:0 dropped:0 overruns:0 frame:0 | |||
TX packets:28 errors:0 dropped:0 overruns:0 carrier:0 | |||
collisions:0 txqueuelen:1000 | |||
RX bytes:180 (180.0 b) TX bytes:2040 (1.9 KiB) | |||
Memory:ce6c0000-ce6e0000 | |||
ifn_link1 Link encap:Ethernet HWaddr 00:1B:21:81:C2:EA | |||
UP BROADCAST RUNNING SLAVE MULTICAST MTU:1500 Metric:1 | |||
RX packets:641600 errors:0 dropped:0 overruns:0 frame:0 | |||
TX packets:161526 errors:0 dropped:0 overruns:0 carrier:0 | |||
collisions:0 txqueuelen:1000 | |||
RX bytes:399497547 (380.9 MiB) TX bytes:15354517 (14.6 MiB) | |||
Interrupt:24 Memory:ce240000-ce260000 | |||
bcn_link2 Link encap:Ethernet HWaddr 00:19:99:9C:A0:6C | |||
UP BROADCAST RUNNING SLAVE MULTICAST MTU:1500 Metric:1 | |||
RX packets:242515 errors:0 dropped:0 overruns:0 frame:0 | |||
TX packets:13 errors:0 dropped:0 overruns:0 carrier:0 | |||
collisions:0 txqueuelen:1000 | |||
RX bytes:14769988 (14.0 MiB) TX bytes:978 (978.0 b) | |||
Interrupt:34 Memory:ce2a0000-ce2c0000 | |||
sn_link2 Link encap:Ethernet HWaddr 00:19:99:9C:A0:6D | |||
UP BROADCAST RUNNING SLAVE MULTICAST MTU:1500 Metric:1 | |||
RX packets:4 errors:0 dropped:0 overruns:0 frame:0 | |||
TX packets:13 errors:0 dropped:0 overruns:0 carrier:0 | |||
collisions:0 txqueuelen:1000 | |||
RX bytes:240 (240.0 b) TX bytes:978 (978.0 b) | |||
Memory:ce400000-ce500000 | |||
ifn_link2 Link encap:Ethernet HWaddr 00:1B:21:81:C2:EA | |||
UP BROADCAST RUNNING SLAVE MULTICAST MTU:1500 Metric:1 | |||
RX packets:242493 errors:0 dropped:0 overruns:0 frame:0 | |||
TX packets:13 errors:0 dropped:0 overruns:0 carrier:0 | |||
collisions:0 txqueuelen:1000 | |||
RX bytes:14769885 (14.0 MiB) TX bytes:978 (978.0 b) | |||
Memory:ce500000-ce600000 | |||
lo Link encap:Local Loopback | |||
inet addr:127.0.0.1 Mask:255.0.0.0 | |||
inet6 addr: ::1/128 Scope:Host | |||
UP LOOPBACK RUNNING MTU:16436 Metric:1 | |||
RX packets:3545 errors:0 dropped:0 overruns:0 frame:0 | |||
TX packets:3545 errors:0 dropped:0 overruns:0 carrier:0 | |||
collisions:0 txqueuelen:0 | |||
RX bytes:2658626 (2.5 MiB) TX bytes:2658626 (2.5 MiB) | |||
ifn_bridge1 Link encap:Ethernet HWaddr 00:1B:21:81:C2:EA | |||
inet addr:10.255.50.2 Bcast:10.255.255.255 Mask:255.255.0.0 | |||
inet6 addr: fe80::21b:21ff:fe81:c2ea/64 Scope:Link | |||
UP BROADCAST RUNNING MULTICAST MTU:1500 Metric:1 | |||
RX packets:16091 errors:0 dropped:0 overruns:0 frame:0 | |||
TX packets:48 errors:0 dropped:0 overruns:0 carrier:0 | |||
collisions:0 txqueuelen:0 | |||
RX bytes:777873 (759.6 KiB) TX bytes:20304 (19.8 KiB) | |||
</syntaxhighlight> | |||
|} | |||
Excellent, everything is there! | |||
Next up is to verify the bonds. To do this, we can examine special files in the <span class="code">/proc</span> virtual file system. These expose the kernel's view of things as if they were tradition files. So by reading these files, we can see how the bonded interfaces are operating in real time. | |||
There are three, one for each bond. Let's start by looking at <span class="code">bcn_bond1</span>'s <span class="code">/proc/net/bonding/bcn_bond1</span> "file", then we'll look at the other two. | |||
{|class="wikitable" | |||
!<span class="code">an-a05n01</span> | |||
!<span class="code">an-a05n02</span> | |||
|- | |||
|style="white-space: nowrap;"|<syntaxhighlight lang="bash"> | |||
cat /proc/net/bonding/bcn_bond1 | |||
</syntaxhighlight> | |||
<syntaxhighlight lang="text"> | |||
Ethernet Channel Bonding Driver: v3.6.0 (September 26, 2009) | |||
Bonding Mode: fault-tolerance (active-backup) | |||
Primary Slave: bcn_link1 (primary_reselect always) | |||
Currently Active Slave: bcn_link1 | |||
MII Status: up | |||
MII Polling Interval (ms): 100 | |||
Up Delay (ms): 120000 | |||
Down Delay (ms): 0 | |||
Slave Interface: bcn_link1 | |||
MII Status: up | |||
Speed: 1000 Mbps | |||
Duplex: full | |||
Link Failure Count: 0 | |||
Permanent HW addr: 00:19:99:9c:9b:9e | |||
Slave queue ID: 0 | |||
Slave Interface: bcn_link2 | |||
MII Status: up | |||
Speed: 1000 Mbps | |||
Duplex: full | |||
Link Failure Count: 0 | |||
Permanent HW addr: 00:1b:21:81:c3:35 | |||
Slave queue ID: 0 | |||
</syntaxhighlight> | |||
|style="white-space: nowrap;"|<syntaxhighlight lang="bash"> | |||
cat /proc/net/bonding/bcn_bond1 | |||
</syntaxhighlight> | |||
<syntaxhighlight lang="text"> | |||
Ethernet Channel Bonding Driver: v3.6.0 (September 26, 2009) | |||
Bonding Mode: fault-tolerance (active-backup) | |||
Primary Slave: bcn_link1 (primary_reselect always) | |||
Currently Active Slave: bcn_link1 | |||
MII Status: up | |||
MII Polling Interval (ms): 100 | |||
Up Delay (ms): 120000 | |||
Down Delay (ms): 0 | |||
Slave Interface: bcn_link1 | |||
MII Status: up | |||
Speed: 1000 Mbps | |||
Duplex: full | |||
Link Failure Count: 0 | |||
Permanent HW addr: 00:19:99:9c:a0:6c | |||
Slave queue ID: 0 | |||
Slave Interface: bcn_link2 | |||
MII Status: up | |||
Speed: 1000 Mbps | |||
Duplex: full | |||
Link Failure Count: 0 | |||
Permanent HW addr: 00:1b:21:81:c2:eb | |||
Slave queue ID: 0 | |||
</syntaxhighlight> | |||
|} | |||
Let's look at the variables and values we see for <span class="code">an-a05n01</span> above: | |||
* Bond variables; | |||
{|class="wikitable" | |||
!Variable | |||
!Description | |||
|- | |||
|<span class="code">Bonding Mode</span> | |||
|This tells us which bonding mode is currently active. Here we see <span class="code">fault-tolerance (active-backup)</span>, which is exactly what we wanted when we set <span class="code">mode=1</span> in the bond's configuration file. | |||
|- | |||
|<span class="code">Primary Slave</span> | |||
|This tells us that the bond will always use <span class="code">bcn_link1</span> if it is available. Recall that we set a <span class="code">primary</span> interface to ensure that, when everything is working properly, all network traffic goes through the same switch to avoid congestion on the stack/uplink cable. | |||
|- | |||
|<span class="code">Currently Active Slave</span> | |||
|This tells us which interface is being used at this time. If this shows the secondary interface, then either the primary has failed, or the primary has recovered by the <span class="code">updelay</span> timer hasn't yet expired. | |||
|- | |||
|<span class="code">MII Status</span> | |||
|This shows the effective link state of the bond. If either one of the slaved interfaces is active, this will be <span class="code">up</span>. | |||
|- | |||
|<span class="code">MII Polling Interval (ms)</span> | |||
|If you recall, this was set to <span class="code">100</span>ms, which tells the bond driver to verify the link state of the slaved interfaces. | |||
|- | |||
|<span class="code">Up Delay (ms)</span> | |||
|This tells us how long the bond driver will wait before switching to the secondary interface. We want immediate fail-over, so we have this set to <span class="code">0</span>. | |||
|- | |||
|<span class="code">Down Delay (ms)</span> | |||
|This tells us that the bond will wait for two minutes after a slaved interface comes up before it will consider it ready for use. | |||
|} | |||
* Slaved interface variables: | |||
{|class="wikitable" | |||
!Variable | |||
!<span class="code">bcn_link1</span> | |||
!<span class="code">bcn_link2</span> | |||
!Description | |||
|- | |||
|<span class="code">Slave Interface</span> | |||
|<span class="code">bcn_link1</span> | |||
|<span class="code">bcn_link2</span> | |||
|This is the name of the slaved device. The values below this reflect that named interface's state. | |||
|- | |||
|<span class="code">MII Status</span> | |||
|<span class="code">up</span> | |||
|<span class="code">up</span> | |||
|This shows the current link state of the interface. Values you will see are: <span class="code">up</span>, <span class="code">down</span> and <span class="code">going back</span>. The first two are obvious. The third is the link state between when the link comes up and before the <span class="code">updelay</span> timer expires. | |||
|- | |||
|<span class="code">Speed</span> | |||
|<span class="code">1000 Mbps</span> | |||
|<span class="code">1000 Mbps</span> | |||
|This tells you the link speed that the current interface is operating at. If it's ever lower than you expect, look in the switch configuration for statically set speeds. If that's not it, try another network cable. | |||
|- | |||
|<span class="code">Duplex</span> | |||
|<span class="code">full</span> | |||
|<span class="code">full</span> | |||
|This tells you whether the given interface can send and receive network traffic at the same time, <span class="code">full</span>, or not, <span class="code">half</span>. All modern devices should support full duplex, so if you see <span class="code">half</span>, examine your switch and cables. | |||
|- | |||
|<span class="code">Link Failure Count</span> | |||
|<span class="code">0</span> | |||
|<span class="code">0</span> | |||
|When the bond driver starts, this is set to <span class="code">0</span>. Each time the link "fails", which includes an intentional unplugging of the cable, this counter increments. There is no hard in this increasing if the "errors" where intentional or known. It can be useful in detecting flaky connections though, should you find this number to be higher than expected. | |||
|- | |||
|<span class="code">Permanent HW addr</span> | |||
|<span class="code">00:19:99:9c:9b:9e</span> | |||
|<span class="code">00:1b:21:81:c3:35</span> | |||
|This is the real MAC address of the slaved interface. Those who are particularly observant will have noticed that, in the <span class="code">ifconfig</span> output above, both <span class="code">bcn_link1</span> and <span class="code">bcn_link2</span> showed the same MAC address. This is partly how active-passive bonding is able to fail over so extremely quickly. The MAC address of which ever interface is active will appear in <span class="code">ifconfig</span> as the <span class="code">HWaddr</span> address of both bond members. | |||
|- | |||
|<span class="code">Slave queue ID</span> | |||
|<span class="code">0</span> | |||
|<span class="code">0</span> | |||
|In other bonding modes, this can be used to help direct certain traffic down certain slaved interface links. We won't use this so it should always be <span class="code">0</span> | |||
|} | |||
Now lets look at <span class="code">sn_bond1</span>; | |||
{|class="wikitable" | |||
!<span class="code">an-a05n01</span> | |||
!<span class="code">an-a05n02</span> | |||
|- | |||
|style="white-space: nowrap;"|<syntaxhighlight lang="bash"> | |||
cat /proc/net/bonding/sn_bond1 | |||
</syntaxhighlight> | |||
<syntaxhighlight lang="text"> | |||
Ethernet Channel Bonding Driver: v3.6.0 (September 26, 2009) | |||
Bonding Mode: fault-tolerance (active-backup) | |||
Primary Slave: sn_link1 (primary_reselect always) | |||
Currently Active Slave: sn_link1 | |||
MII Status: up | |||
MII Polling Interval (ms): 100 | |||
Up Delay (ms): 120000 | |||
Down Delay (ms): 0 | |||
Slave Interface: sn_link1 | |||
MII Status: up | |||
Speed: 1000 Mbps | |||
Duplex: full | |||
Link Failure Count: 0 | |||
Permanent HW addr: 00:19:99:9c:9b:9f | |||
Slave queue ID: 0 | |||
Slave Interface: sn_link2 | |||
MII Status: up | |||
Speed: 1000 Mbps | |||
Duplex: full | |||
Link Failure Count: 0 | |||
Permanent HW addr: a0:36:9f:02:e0:04 | |||
Slave queue ID: 0 | |||
</syntaxhighlight> | |||
|style="white-space: nowrap;"|<syntaxhighlight lang="bash"> | |||
cat /proc/net/bonding/sn_bond1 | |||
</syntaxhighlight> | |||
<syntaxhighlight lang="text"> | |||
Ethernet Channel Bonding Driver: v3.6.0 (September 26, 2009) | |||
Bonding Mode: fault-tolerance (active-backup) | |||
Primary Slave: sn_link1 (primary_reselect always) | |||
Currently Active Slave: sn_link1 | |||
MII Status: up | |||
MII Polling Interval (ms): 100 | |||
Up Delay (ms): 120000 | |||
Down Delay (ms): 0 | |||
Slave Interface: sn_link1 | |||
MII Status: up | |||
Speed: 1000 Mbps | |||
Duplex: full | |||
Link Failure Count: 0 | |||
Permanent HW addr: 00:19:99:9c:a0:6d | |||
Slave queue ID: 0 | |||
Slave Interface: sn_link2 | |||
MII Status: up | |||
Speed: 1000 Mbps | |||
Duplex: full | |||
Link Failure Count: 0 | |||
Permanent HW addr: a0:36:9f:07:d6:2e | |||
Slave queue ID: 0 | |||
</syntaxhighlight> | </syntaxhighlight> | ||
|} | |||
The last bond is <span class="code">ifn_bond1</span>; | |||
== | {|class="wikitable" | ||
!<span class="code">an-a05n01</span> | |||
!<span class="code">an-a05n02</span> | |||
|- | |||
|style="white-space: nowrap;"|<syntaxhighlight lang="bash"> | |||
cat /proc/net/bonding/ifn_bond1 | |||
</syntaxhighlight> | |||
<syntaxhighlight lang="text"> | |||
Ethernet Channel Bonding Driver: v3.6.0 (September 26, 2009) | |||
Bonding Mode: fault-tolerance (active-backup) | |||
Primary Slave: ifn_link1 (primary_reselect always) | |||
Currently Active Slave: ifn_link1 | |||
MII Status: up | |||
MII Polling Interval (ms): 100 | |||
Up Delay (ms): 120000 | |||
Down Delay (ms): 0 | |||
Slave Interface: ifn_link1 | |||
MII Status: up | |||
Speed: 1000 Mbps | |||
Duplex: full | |||
Link Failure Count: 0 | |||
Permanent HW addr: 00:1b:21:81:c3:34 | |||
Slave queue ID: 0 | |||
Slave Interface: ifn_link2 | |||
MII Status: up | |||
{|class="wikitable" | Speed: 1000 Mbps | ||
! | Duplex: full | ||
! | Link Failure Count: 0 | ||
! | Permanent HW addr: a0:36:9f:02:e0:05 | ||
Slave queue ID: 0 | |||
</syntaxhighlight> | |||
|style="white-space: nowrap;"|<syntaxhighlight lang="bash"> | |||
cat /proc/net/bonding/ifn_bond1 | |||
</syntaxhighlight> | |||
<syntaxhighlight lang="text"> | |||
Ethernet Channel Bonding Driver: v3.6.0 (September 26, 2009) | |||
Bonding Mode: fault-tolerance (active-backup) | |||
Primary Slave: ifn_link1 (primary_reselect always) | |||
Currently Active Slave: ifn_link1 | |||
MII Status: up | |||
MII Polling Interval (ms): 100 | |||
Up Delay (ms): 120000 | |||
Down Delay (ms): 0 | |||
Slave Interface: ifn_link1 | |||
MII Status: up | |||
Speed: 1000 Mbps | |||
Duplex: full | |||
Link Failure Count: 0 | |||
Permanent HW addr: 00:1b:21:81:c2:ea | |||
Slave queue ID: 0 | |||
Slave Interface: ifn_link2 | |||
MII Status: up | |||
Speed: 1000 Mbps | |||
Duplex: full | |||
Link Failure Count: 0 | |||
Permanent HW addr: a0:36:9f:07:d6:2f | |||
Slave queue ID: 0 | |||
</syntaxhighlight> | |||
|} | |||
That covers the bonds! The last thing to look at are the bridges. We can check them using the <span class="code">brctl</span> (bridge control) tool; | |||
{|class="wikitable" | |||
!<span class="code">an-a05n01</span> | |||
!<span class="code">an-a05n02</span> | |||
|- | |||
|style="white-space: nowrap;"|<syntaxhighlight lang="bash"> | |||
brctl show | |||
</syntaxhighlight> | |||
<syntaxhighlight lang="text"> | |||
bridge name bridge id STP enabled interfaces | |||
ifn_bridge1 8000.001b2181c334 no ifn_bond1 | |||
</syntaxhighlight> | |||
|style="white-space: nowrap;"|<syntaxhighlight lang="bash"> | |||
brctl show | |||
</syntaxhighlight> | |||
<syntaxhighlight lang="text"> | |||
bridge name bridge id STP enabled interfaces | |||
ifn_bridge1 8000.001b2181c2ea no ifn_bond1 | |||
</syntaxhighlight> | |||
|} | |||
There are four variables; Let's take a look at them. | |||
{|class="wikitable" | |||
!Variable | |||
!<span class="code">ifn_link1</span> | |||
!<span class="code">ifn_link2</span> | |||
!Description | |||
|- | |- | ||
|<span class="code"> | |<span class="code">bridge name</span> | ||
|<span class="code"> | |<span class="code">ifn_bridge1</span> | ||
|<span | |<span class="code">ifn_bridge1</span> | ||
|This is the device name we set when we created the <span class="code">ifcfg-ifn_bridge1</span> configuration file. | |||
|- | |- | ||
|<span class="code"> | |<span class="code">bridge id</span> | ||
|<span class="code"> | |<span class="code">8000.001b2181c334</span> | ||
|<span | |<span class="code">8000.001b2181c2ea</span> | ||
|This is an automatically create unique ID for the given bridge. | |||
|- | |- | ||
|<span class="code"> | |<span class="code">STP enabled</span> | ||
|<span class="code"> | |<span class="code">no</span> | ||
|<span | |<span class="code">no</span> | ||
|This tells us where [https://en.wikipedia.org/wiki/Spanning_Tree_Protocol spanning tree protocol] is enabled or not. Default is to be disabled, which is fine. If you enable it, it will help protect against loops that can cause broadcast storms and flood your network. Given how difficult it is to accidentally "plug both ends of a cable into the same switch", it's generally safe to leave off. | |||
|- | |- | ||
|<span class="code"> | |<span class="code">interfaces</span> | ||
|<span class="code"> | |<span class="code">ifn_bond1</span> | ||
|<span | |<span class="code">ifn_bond1</span> | ||
|This tells us which network interfaces are "plugged into" the bridge. We don't have any servers yet, so only <span class="code">ifn_bond1</span> is plugged in, which is the link that provides a route out to the real world. Later, when we create our servers, a <span class="code">vnetX</span> file will be created for each server's interface. These are the virtual "network cables" providing a link between the servers and the bridge. | |||
|} | |} | ||
All done! | |||
== | == Adding Everything to /etc/hosts == | ||
If you recall from the [[AN!Cluster Tutorial 2#Network]] section, we've got two nodes, each with three networks and an IPMI interface, two network switches, two switched PDUs and two UPSes. We're also going to create two dashboard servers, each of which will have a connection to the [[BCN]] and the [[IFN]]. | |||
All of these have IP addresses. We want to be able to address them by names, which we can do by adding them to each node's <span class="code">/etc/hosts</span> file. If you prefer to have this centralized, you can always use internal DNS servers instead, but that is outside the scope of this tutorial. | |||
The format of <span class="code">/etc/hosts</span> is <span class="code"><ip_addres> <name>[ <name2> <name...> <nameN>]</span>. We want the short domain and full domain name to resolve to the [[BCN]] IP address on the <span class="code">10.20.0.0/16</span> network. For this, we'll have multiple names on the BCN entry and then a single name for the [[SN]] and [[IFN]] entries. | |||
{|class="wikitable" | |||
!<span class="code">an-a05n01</span> | |||
|style="white-space: nowrap;"|<syntaxhighlight lang="bash"> | |||
vim /etc/hosts | |||
</syntaxhighlight> | |||
<syntaxhighlight lang="bash"> | <syntaxhighlight lang="bash"> | ||
127.0.0.1 localhost localhost.localdomain localhost4 localhost4.localdomain4 | |||
::1 localhost localhost.localdomain localhost6 localhost6.localdomain6 | |||
### Nodes | |||
# an-a05n01 | |||
10.20.50.1 an-a05n01.bcn an-a05n01 an-a05n01.alteeve.ca | |||
10.20.51.1 an-a05n01.ipmi | |||
10.10.50.1 an-a05n01.sn | |||
10.255.50.1 an-a05n01.ifn | |||
# an-a05n02 | |||
10.20.50.2 an-a05n02.bcn an-a05n02 an-a05n02.alteeve.ca | |||
10.20.51.2 an-a05n02.ipmi | |||
10.10.50.2 an-a05n02.sn | |||
10.255.50.2 an-a05n02.ifn | |||
### Foundation Pack | |||
# Network Switches | |||
10.20.1.1 an-switch01 an-switch01.alteeve.ca | |||
10.20.1.2 an-switch02 an-switch02.alteeve.ca # Only accessible when out of the stack | |||
# Switched PDUs | |||
10.20.2.1 an-pdu01 an-pdu01.alteeve.ca | |||
10.20.2.2 an-pdu02 an-pdu02.alteeve.ca | |||
# Network-monitored UPSes | |||
10.20.3.1 an-ups01 an-ups01.alteeve.ca | |||
10.20.3.2 an-ups02 an-ups02.alteeve.ca | |||
### Striker Dashboards | |||
10.20.4.1 an-striker01 an-striker01.alteeve.ca | |||
10.255.4.1 an-striker01.ifn | |||
10.20.4.2 an-striker02 an-striker02.alteeve.ca | |||
10.255.4.2 an-striker02.ifn | |||
</syntaxhighlight> | |||
|- | |||
!<span class="code">an-a05n02</span> | |||
|style="white-space: nowrap;"|<syntaxhighlight lang="bash"> | |||
vim /etc/hosts | |||
</syntaxhighlight> | |||
<syntaxhighlight lang="bash"> | <syntaxhighlight lang="bash"> | ||
127.0.0.1 localhost localhost.localdomain localhost4 localhost4.localdomain4 | |||
::1 localhost localhost.localdomain localhost6 localhost6.localdomain6 | |||
### Nodes | |||
# an-a05n01 | |||
10.20.50.1 an-a05n01.bcn an-a05n01 an-a05n01.alteeve.ca | |||
10.20.51.1 an-a05n01.ipmi | |||
10.10.50.1 an-a05n01.sn | |||
10.255.50.1 an-a05n01.ifn | |||
# an-a05n02 | |||
10.20.50.2 an-a05n02.bcn an-a05n02 an-a05n02.alteeve.ca | |||
10.20.51.2 an-a05n02.ipmi | |||
10.10.50.2 an-a05n02.sn | |||
10.255.50.2 an-a05n02.ifn | |||
### Foundation Pack | |||
# Network Switches | |||
10.20.1.1 an-switch01 an-switch01.alteeve.ca | |||
10.20.1.2 an-switch02 an-switch02.alteeve.ca # Only accessible when out of the stack | |||
# Switched PDUs | |||
10.20.2.1 an-pdu01 an-pdu01.alteeve.ca | |||
10.20.2.2 an-pdu02 an-pdu02.alteeve.ca | |||
# Network-monitored UPSes | |||
10.20.3.1 an-ups01 an-ups01.alteeve.ca | |||
10.20.3.2 an-ups02 an-ups02.alteeve.ca | |||
### Striker Dashboards | |||
10.20.4.1 an-striker01 an-striker01.alteeve.ca | |||
10.255.4.1 an-striker01.ifn | |||
10.20.4.2 an-striker02 an-striker02.alteeve.ca | |||
10.255.4.2 an-striker02.ifn | |||
</syntaxhighlight> | |||
|} | |||
Save this to both nodes and then you can test that the names resolve properly using <span class="code">gethostip -d $name</span>. Lets look at the names we gave to <span class="code">an-a05n01</span> and verify they resolve to the desired IP addresses. | |||
{|class="wikitable" | |||
!<span class="code">an-a05n01</span> | |||
!<span class="code">an-a05n02</span> | |||
|- | |||
|style="white-space: nowrap;"|<syntaxhighlight lang="bash"> | |||
gethostip -d an-a05n01.alteeve.ca | |||
</syntaxhighlight> | |||
<syntaxhighlight lang="bash"> | |||
10.20.50.1 | |||
</syntaxhighlight> | |||
<syntaxhighlight lang="bash"> | |||
gethostip -d an-a05n01 | |||
</syntaxhighlight> | |||
<syntaxhighlight lang="bash"> | |||
10.20.50.1 | |||
</syntaxhighlight> | |||
<syntaxhighlight lang="bash"> | |||
gethostip -d an-a05n01.bcn | |||
</syntaxhighlight> | |||
<syntaxhighlight lang="bash"> | |||
10.20.50.1 | |||
</syntaxhighlight> | |||
<syntaxhighlight lang="bash"> | <syntaxhighlight lang="bash"> | ||
gethostip -d an-a05n01.sn | |||
</syntaxhighlight> | |||
<syntaxhighlight lang="bash"> | |||
10.10.50.1 | |||
</syntaxhighlight> | </syntaxhighlight> | ||
<syntaxhighlight lang="bash"> | |||
gethostip -d an-a05n01.ifn | |||
</syntaxhighlight> | |||
<syntaxhighlight lang="bash"> | |||
10.255.50.1 | |||
</syntaxhighlight> | |||
<syntaxhighlight lang=" | <syntaxhighlight lang="bash"> | ||
gethostip -d an-a05n01.ipmi | |||
</syntaxhighlight> | |||
<syntaxhighlight lang="bash"> | |||
10.20.51.1 | |||
</syntaxhighlight> | </syntaxhighlight> | ||
<syntaxhighlight lang="bash"> | |||
gethostip -d an-a05n02.alteeve.ca | |||
</syntaxhighlight> | |||
<syntaxhighlight lang="bash"> | |||
10.20.50.2 | |||
</syntaxhighlight> | |||
<syntaxhighlight lang="bash"> | |||
gethostip -d an-a05n02 | |||
</syntaxhighlight> | |||
<syntaxhighlight lang="bash"> | |||
10.20.50.2 | |||
</syntaxhighlight> | |||
<syntaxhighlight lang="bash"> | <syntaxhighlight lang="bash"> | ||
gethostip -d an-a05n02.bcn | |||
</syntaxhighlight> | </syntaxhighlight> | ||
<syntaxhighlight lang=" | <syntaxhighlight lang="bash"> | ||
10.20.50.2 | |||
</syntaxhighlight> | </syntaxhighlight> | ||
<syntaxhighlight lang="bash"> | |||
gethostip -d an-a05n02.sn | |||
<syntaxhighlight lang=" | </syntaxhighlight> | ||
<syntaxhighlight lang="bash"> | |||
10.10.50.2 | |||
</syntaxhighlight> | </syntaxhighlight> | ||
<syntaxhighlight lang="bash"> | |||
gethostip -d an-a05n02.ifn | |||
</syntaxhighlight> | |||
<syntaxhighlight lang="bash"> | |||
10.255.50.2 | |||
</syntaxhighlight> | |||
<syntaxhighlight lang="bash"> | |||
gethostip -d an-a05n02.ipmi | |||
</syntaxhighlight> | |||
<syntaxhighlight lang="bash"> | |||
10.20.51.2 | |||
</syntaxhighlight> | |||
|style="white-space: nowrap;"|<syntaxhighlight lang="bash"> | |||
gethostip -d an-a05n01.alteeve.ca | |||
</syntaxhighlight> | |||
<syntaxhighlight lang="bash"> | |||
10.20.50.1 | |||
</syntaxhighlight> | |||
== | <syntaxhighlight lang="bash"> | ||
gethostip -d an-a05n01 | |||
</syntaxhighlight> | |||
<syntaxhighlight lang="bash"> | |||
10.20.50.1 | |||
</syntaxhighlight> | |||
<syntaxhighlight lang="bash"> | |||
gethostip -d an-a05n01.bcn | |||
</syntaxhighlight> | |||
<syntaxhighlight lang="bash"> | |||
10.20.50.1 | |||
</syntaxhighlight> | |||
<syntaxhighlight lang="bash"> | |||
gethostip -d an-a05n01.sn | |||
</syntaxhighlight> | |||
<syntaxhighlight lang="bash"> | |||
10.10.50.1 | |||
</syntaxhighlight> | |||
<syntaxhighlight lang="bash"> | |||
gethostip -d an-a05n01.ifn | |||
</syntaxhighlight> | |||
<syntaxhighlight lang="bash"> | |||
10.255.50.1 | |||
</syntaxhighlight> | |||
<syntaxhighlight lang="bash"> | |||
gethostip -d an-a05n01.ipmi | |||
</syntaxhighlight> | |||
<syntaxhighlight lang="bash"> | |||
10.20.51.1 | |||
</syntaxhighlight> | |||
<syntaxhighlight lang="bash"> | |||
gethostip -d an-a05n02.alteeve.ca | |||
</syntaxhighlight> | |||
<syntaxhighlight lang="bash"> | |||
10.20.50.2 | |||
</syntaxhighlight> | |||
<syntaxhighlight lang="bash"> | |||
gethostip -d an-a05n02 | |||
</syntaxhighlight> | |||
<syntaxhighlight lang="bash"> | |||
10.20.50.2 | |||
</syntaxhighlight> | |||
<syntaxhighlight lang="bash"> | |||
gethostip -d an-a05n02.bcn | |||
</syntaxhighlight> | |||
<syntaxhighlight lang="bash"> | |||
10.20.50.2 | |||
</syntaxhighlight> | |||
== | <syntaxhighlight lang="bash"> | ||
gethostip -d an-a05n02.sn | |||
</syntaxhighlight> | |||
<syntaxhighlight lang="bash"> | |||
10.10.50.2 | |||
</syntaxhighlight> | |||
<syntaxhighlight lang="bash"> | |||
gethostip -d an-a05n02.ifn | |||
</syntaxhighlight> | |||
<syntaxhighlight lang="bash"> | |||
10.255.50.2 | |||
</syntaxhighlight> | |||
<syntaxhighlight lang="bash"> | |||
gethostip -d an-a05n02.ipmi | |||
</syntaxhighlight> | |||
<syntaxhighlight lang="bash"> | |||
10.20.51.2 | |||
</syntaxhighlight> | |||
|} | |||
Excellent! Test resolution of the foundation pack devices and the monitor packs as well. If they all resolve properly, we're ready to move on. | |||
== What is IPMI == | |||
[[IPMI]], short for "Intelligent Platform Management Interface", is a standardized network-attched device built in to many servers. It is a stand-alone device which allows external people and devices the ability to log in and check the state of the host server. It can read the various sensor values, press the power and reset switches, report whether the host node is powered on or not and so forth. | |||
Many companies build on the basic IPMI standard by adding advanced features like remote console access over the network, ability to monitor devices plugged into the server like the RAID controller and its hard drives and so on. Each vendor generally has a name for their implementation of IPMI; | |||
We can | * Fujitsu calls theirs [http://globalsp.ts.fujitsu.com/dmsp/Publications/public/ds-iRMC-S3.pdf iRMC] | ||
* HP calls theirs [https://en.wikipedia.org/wiki/HP_Integrated_Lights-Out iLO] | |||
* Dell calls theirs [https://en.wikipedia.org/wiki/Dell_DRAC DRAC] | |||
* IBM calls their [https://en.wikipedia.org/wiki/Remote_Supervisor_Adapter RSA] | |||
Various other vendors will have different names as well. In most cases though, they will all support the generic IPMI interface and Linux tools. We're going to use these tools to configure each node's IPMI "BMC", Baseboard Management Controller, for use as a fence device. | |||
The idea here is this; | |||
If a node stops responding, the remaining surviving node can't simply assume the peer is off. We'll go into the details of "why not?" later in the fencing section. The remaining node will log into the peer's IPMI BMC and ask it to power off the host. Once off, the surviving node will verify that the power is off, confirming that the peer is certainly no longer alive and offering clustered services. With this known, recovery can safely begin. | |||
We need to assign an IP address to each IPMI BMC and then configure the user name and password to use later when connecting. | |||
We will also use the sensor values reported by the IPMI BMC in our monitoring and alert system. If, for example, a temperate climbs too high or too fast, the alert system will be able to see this and fire off an alert. | |||
=== Reading IPMI Data === | |||
{{note|1=This section walks through configuring IPMI on <span class="code">an-a05n01</span> only. Please repeat for <span class="code">an-a05n02</span>.}} | |||
We installed the needed IPMI tools earlier and we set <span class="code">ipmi</span> to start on boot. Verify that it's running now; | |||
{|class="wikitable" | |||
!<span class="code">an-a05n01</span> | |||
|style="white-space: nowrap;"|<syntaxhighlight lang="bash"> | |||
/etc/init.d/ipmi status | |||
</syntaxhighlight> | |||
<syntaxhighlight lang="text"> | |||
ipmi_msghandler module loaded. | |||
ipmi_si module loaded. | |||
ipmi_devintf module loaded. | |||
/dev/ipmi0 exists. | |||
</syntaxhighlight> | </syntaxhighlight> | ||
|} | |||
This tells us that the <span class="code">ipmi</span> daemon is running and it was able to talk to the BMC. If this failed, <span class="code">/dev/ipmi0</span> would not exist. If this is the case for you, please find what make and model of IPMI BMC is used in your server and look for known issues with that chip. | |||
The first thing we'll check is that we can query IPMI's <span class="code">chassis</span> data: | |||
=== | {|class="wikitable" | ||
!<span class="code">an-a05n01</span> | |||
|style="white-space: nowrap;"|<syntaxhighlight lang="bash"> | |||
ipmitool chassis status | |||
</syntaxhighlight> | |||
<syntaxhighlight lang="text"> | |||
System Power : on | |||
Power Overload : false | |||
Power Interlock : inactive | |||
Main Power Fault : false | |||
Power Control Fault : false | |||
Power Restore Policy : previous | |||
Last Power Event : | |||
Chassis Intrusion : inactive | |||
Front-Panel Lockout : inactive | |||
Drive Fault : false | |||
Cooling/Fan Fault : false | |||
Sleep Button Disable : not allowed | |||
Diag Button Disable : allowed | |||
Reset Button Disable : allowed | |||
Power Button Disable : allowed | |||
Sleep Button Disabled: false | |||
Diag Button Disabled : false | |||
Reset Button Disabled: false | |||
Power Button Disabled: false | |||
</syntaxhighlight> | |||
|} | |||
Excellent! If you get something like this, you're past 90% of the potential problems. | |||
We can check more information on the hosts using <span class="code">mc</span> to query the management controller. | |||
{|class="wikitable" | |||
!<span class="code">an-a05n01</span> | |||
|style="white-space: nowrap;"|<syntaxhighlight lang="bash"> | |||
ipmitool mc info | |||
</syntaxhighlight> | |||
<syntaxhighlight lang="text"> | <syntaxhighlight lang="text"> | ||
Device ID : 2 | |||
Device Revision : 2 | |||
Firmware Revision : 1.1 | |||
IPMI Version : 2.0 | |||
Manufacturer ID : 10368 | |||
Manufacturer Name : Fujitsu Siemens | |||
Product ID : 611 (0x0263) | |||
Product Name : Unknown (0x263) | |||
Device Available : yes | |||
Provides Device SDRs : no | |||
Additional Device Support : | |||
Sensor Device | |||
SDR Repository Device | |||
SEL Device | |||
FRU Inventory Device | |||
IPMB Event Receiver | |||
Bridge | |||
Chassis Device | |||
Aux Firmware Rev Info : | |||
0x05 | |||
0x08 | |||
0x00 | |||
0x41 | |||
</syntaxhighlight> | </syntaxhighlight> | ||
|} | |||
Some servers will report the details of "field replaceable units"; components than can be swapped out as needed. Every server will report different data here, but you can see what our <span class="code">[http://manuals.ts.fujitsu.com/file/10963/rx300s6-ba-en.pdf RX300 S6]</span> returns below. | |||
<syntaxhighlight lang="bash"> | {|class="wikitable" | ||
!<span class="code">an-a05n01</span> | |||
|style="white-space: nowrap;"|<syntaxhighlight lang="bash"> | |||
ipmitool fru print | |||
</syntaxhighlight> | </syntaxhighlight> | ||
<syntaxhighlight lang="text"> | <syntaxhighlight lang="text"> | ||
FRU Device Description : Builtin FRU Device (ID 0) | |||
Device not present (Requested sensor, data, or record not found) | |||
FRU Device Description : Chassis (ID 2) | |||
Chassis Type : Rack Mount Chassis | |||
Chassis Extra : RX300S6R1 | |||
Product Manufacturer : FUJITSU | |||
Product Name : PRIMERGY RX300 S6 | |||
Product Part Number : ABN:K1344-V101-2204 | |||
Product Version : GS01 | |||
Product Serial : xxxxxxxxxx | |||
Product Asset Tag : 15 | |||
Product Extra : 25a978 | |||
Product Extra : 0263 | |||
FRU Device Description : MainBoard (ID 3) | |||
Board Mfg Date : Wed Dec 22 07:36:00 2010 | |||
Board Mfg : FUJITSU | |||
Board Product : D2619 | |||
Board Serial : xxxxxxxx | |||
Board Part Number : S26361-D2619-N15 | |||
Board Extra : WGS10 GS02 | |||
Board Extra : 02 | |||
FRU Device Description : PSU1 (ID 7) | |||
Unknown FRU header version 0x02 | |||
FRU Device Description : PSU2 (ID 8) | |||
Unknown FRU header version 0x02 | |||
</syntaxhighlight> | </syntaxhighlight> | ||
|} | |||
We can | We can check all the sensor value using <span class="code">ipmitool</span> as well. This is actually what the cluster monitor we'll install later does. | ||
{|class="wikitable" | |||
!<span class="code">an-a05n01</span> | |||
|style="white-space: nowrap;"|<syntaxhighlight lang="bash"> | |||
ipmitool sdr list | |||
</syntaxhighlight> | |||
<syntaxhighlight lang="text"> | <syntaxhighlight lang="text"> | ||
Ambient | 27.50 degrees C | ok | |||
........................ | Systemboard | 43 degrees C | ok | ||
CPU1 | 34 degrees C | ok | |||
CPU2 | 37 degrees C | ok | |||
DIMM-1A | 29 degrees C | ok | |||
DIMM-2A | disabled | ns | |||
DIMM-3A | disabled | ns | |||
DIMM-1B | 29 degrees C | ok | |||
DIMM-2B | disabled | ns | |||
DIMM-3B | disabled | ns | |||
DIMM-1C | 29 degrees C | ok | |||
DIMM-2C | disabled | ns | |||
DIMM-3C | disabled | ns | |||
DIMM-1D | 33 degrees C | ok | |||
DIMM-2D | disabled | ns | |||
DIMM-3D | disabled | ns | |||
DIMM-1E | 33 degrees C | ok | |||
DIMM-2E | disabled | ns | |||
DIMM-3E | disabled | ns | |||
DIMM-1F | 33 degrees C | ok | |||
DIMM-2F | disabled | ns | |||
DIMM-3F | disabled | ns | |||
BATT 3.0V | 3.13 Volts | ok | |||
STBY 3.3V | 3.35 Volts | ok | |||
iRMC 1.2V STBY | 1.19 Volts | ok | |||
iRMC 1.8V STBY | 1.80 Volts | ok | |||
LAN 1.0V STBY | 1.01 Volts | ok | |||
LAN 1.8V STBY | 1.81 Volts | ok | |||
MAIN 12V | 12 Volts | ok | |||
MAIN 5.15V | 5.18 Volts | ok | |||
MAIN 3.3V | 3.37 Volts | ok | |||
IOH 1.1V | 1.10 Volts | ok | |||
IOH 1.8V | 1.80 Volts | ok | |||
ICH 1.5V | 1.50 Volts | ok | |||
IOH 1.1V AUX | 1.09 Volts | ok | |||
CPU1 1.8V | 1.80 Volts | ok | |||
CPU2 1.8V | 1.80 Volts | ok | |||
Total Power | 190 Watts | ok | |||
PSU1 Power | 100 Watts | ok | |||
PSU2 Power | 80 Watts | ok | |||
CPU1 Power | 5.50 Watts | ok | |||
CPU2 Power | 4.40 Watts | ok | |||
Fan Power | 15.84 Watts | ok | |||
Memory Power | 8 Watts | ok | |||
HDD Power | 45 Watts | ok | |||
FAN1 SYS | 5340 RPM | ok | |||
FAN2 SYS | 5160 RPM | ok | |||
FAN3 SYS | 4920 RPM | ok | |||
FAN4 SYS | 5160 RPM | ok | |||
FAN5 SYS | 5100 RPM | ok | |||
FAN1 PSU1 | 6360 RPM | ok | |||
FAN2 PSU1 | 6480 RPM | ok | |||
FAN1 PSU2 | 6480 RPM | ok | |||
FAN2 PSU2 | 6240 RPM | ok | |||
I2C1 error ratio | 0 unspecified | ok | |||
I2C2 error ratio | 0 unspecified | ok | |||
I2C3 error ratio | 0 unspecified | ok | |||
I2C4 error ratio | 0 unspecified | ok | |||
I2C5 error ratio | 0 unspecified | ok | |||
I2C6 error ratio | 0 unspecified | ok | |||
SEL Level | 0 unspecified | ok | |||
Ambient | 0x02 | ok | |||
CPU1 | 0x80 | ok | |||
CPU2 | 0x80 | ok | |||
Power Unit | 0x01 | ok | |||
PSU | Not Readable | ns | |||
PSU1 | 0x02 | ok | |||
PSU2 | 0x02 | ok | |||
Fanboard Row 2 | 0x00 | ok | |||
FAN1 SYS | 0x01 | ok | |||
FAN2 SYS | 0x01 | ok | |||
FAN3 SYS | 0x01 | ok | |||
FAN4 SYS | 0x01 | ok | |||
FAN5 SYS | 0x01 | ok | |||
FAN1 PSU1 | 0x01 | ok | |||
FAN2 PSU1 | 0x01 | ok | |||
FAN1 PSU2 | 0x01 | ok | |||
FAN2 PSU2 | 0x01 | ok | |||
FanBoard | 0x02 | ok | |||
DIMM-1A | 0x02 | ok | |||
DIMM-1A | 0x01 | ok | |||
DIMM-2A | 0x01 | ok | |||
DIMM-2A | 0x01 | ok | |||
DIMM-3A | 0x01 | ok | |||
DIMM-3A | 0x01 | ok | |||
DIMM-1B | 0x02 | ok | |||
DIMM-1B | 0x01 | ok | |||
DIMM-2B | 0x01 | ok | |||
DIMM-2B | 0x01 | ok | |||
DIMM-3B | 0x01 | ok | |||
DIMM-3B | 0x01 | ok | |||
DIMM-1C | 0x02 | ok | |||
DIMM-1C | 0x01 | ok | |||
DIMM-2C | 0x01 | ok | |||
DIMM-2C | 0x01 | ok | |||
DIMM-3C | 0x01 | ok | |||
DIMM-3C | 0x01 | ok | |||
DIMM-1D | 0x02 | ok | |||
DIMM-1D | 0x01 | ok | |||
DIMM-2D | 0x01 | ok | |||
DIMM-2D | 0x01 | ok | |||
DIMM-3D | 0x01 | ok | |||
DIMM-3D | 0x01 | ok | |||
DIMM-1E | 0x02 | ok | |||
DIMM-1E | 0x01 | ok | |||
DIMM-2E | 0x01 | ok | |||
DIMM-2E | 0x01 | ok | |||
DIMM-3E | 0x01 | ok | |||
DIMM-3E | 0x01 | ok | |||
DIMM-1F | 0x02 | ok | |||
DIMM-1F | 0x01 | ok | |||
DIMM-2F | 0x01 | ok | |||
DIMM-2F | 0x01 | ok | |||
DIMM-3F | 0x01 | ok | |||
DIMM-3F | 0x01 | ok | |||
DIMM-3A | 0x01 | ok | |||
DIMM-3B | 0x01 | ok | |||
DIMM-3C | 0x01 | ok | |||
DIMM-3D | 0x01 | ok | |||
DIMM-3E | 0x01 | ok | |||
DIMM-3F | 0x01 | ok | |||
Watchdog | 0x00 | ok | |||
iRMC request | 0x00 | ok | |||
I2C1 | 0x02 | ok | |||
I2C2 | 0x02 | ok | |||
I2C3 | 0x02 | ok | |||
I2C4 | 0x02 | ok | |||
I2C5 | 0x02 | ok | |||
I2C6 | 0x02 | ok | |||
Config backup | 0x00 | ok | |||
Total Power | 0x01 | ok | |||
PSU1 Power | 0x01 | ok | |||
PSU2 Power | 0x01 | ok | |||
CPU1 Power | 0x01 | ok | |||
CPU2 Power | 0x01 | ok | |||
Memory Power | 0x01 | ok | |||
Fan Power | 0x01 | ok | |||
HDD Power | 0x01 | ok | |||
Power Level | 0x01 | ok | |||
Power Level | 0x08 | ok | |||
CPU detection | 0x00 | ok | |||
System Mgmt SW | Not Readable | ns | |||
NMI | 0x00 | ok | |||
Local Monitor | 0x02 | ok | |||
Pwr Btn override | 0x00 | ok | |||
System BIOS | Not Readable | ns | |||
iRMC | Not Readable | ns | |||
</syntaxhighlight> | </syntaxhighlight> | ||
|} | |||
You can narrow that call down to just see temperature, power consumption and what not. That's beyond the scope of this tutorial though. The <span class="code">man</span> page for <span class="code">ipmitool</span> is great for seeing all the neat stuff you can do. | |||
=== Finding our IPMI LAN Channel === | |||
Before we can configure it though, we need to find our "LAN channel". Different manufacturers will use different channels, so we need to be able to find the one we're using. | |||
To find it, simply call <span class="code">ipmitool lan print X</span>. Increment <span class="code">X</span>, starting at <span class="code">1</span>, until you get a response. | |||
So first, let's query LAN channel 1. | |||
{|class="wikitable" | |||
!<span class="code">an-a05n01</span> | |||
|style="white-space: nowrap;"|<syntaxhighlight lang="bash"> | |||
ipmitool lan print 1 | |||
</syntaxhighlight> | |||
<syntaxhighlight lang="text"> | <syntaxhighlight lang="text"> | ||
Channel 1 is not a LAN channel | |||
</syntaxhighlight> | </syntaxhighlight> | ||
|} | |||
No luck; Let's try channel 2. | |||
{|class="wikitable" | |||
!<span class="code">an-a05n01</span> | |||
|style="white-space: nowrap;"|<syntaxhighlight lang="bash"> | |||
ipmitool lan print 2 | |||
</syntaxhighlight> | |||
<syntaxhighlight lang="text"> | <syntaxhighlight lang="text"> | ||
Set in Progress : Set Complete | |||
Auth Type Support : NONE MD5 PASSWORD | |||
Auth Type Enable : Callback : NONE MD5 PASSWORD | |||
: User : NONE MD5 PASSWORD | |||
: Operator : NONE MD5 PASSWORD | |||
: Admin : NONE MD5 PASSWORD | |||
: OEM : NONE MD5 PASSWORD | |||
IP Address Source : Static Address | |||
IP Address : 10.20.51.1 | |||
Subnet Mask : 255.255.0.0 | |||
MAC Address : 00:19:99:9a:d8:e8 | |||
SNMP Community String : public | |||
IP Header : TTL=0x40 Flags=0x40 Precedence=0x00 TOS=0x10 | |||
Default Gateway IP : 10.20.255.254 | |||
802.1q VLAN ID : Disabled | |||
802.1q VLAN Priority : 0 | |||
RMCP+ Cipher Suites : 0,1,2,3,6,7,8,17 | |||
Cipher Suite Priv Max : OOOOOOOOXXXXXXX | |||
: X=Cipher Suite Unused | |||
: c=CALLBACK | |||
: u=USER | |||
: o=OPERATOR | |||
: a=ADMIN | |||
: O=OEM | |||
</syntaxhighlight> | </syntaxhighlight> | ||
|} | |||
Found it! So we know that this server uses LAN channel 2. We'll need to use this for the next steps. | |||
=== Reading IPMI Network Info === | |||
Now that we can read our IPMI data, it's time to set some values. | |||
We know that we want to set <span class="code">an-a05n01</span>'s IPMI interface to have the IP <span class="code">10.20.51.1/16</span>. We also need to setup a user on the IPMI BMC so that we can log in from other nodes. | |||
First up, let's set the IP address. Remember to use the LAN channel you found on your server. We don't actually have a gateway on the <span class="code">10.20.0.0/16</span> network, but some devices insist on a default gateway being set. For this reason, we'll always set <span class="code">10.255.255.254</span> as the gateway server. You will want to adjust this (or not use it at all) for your network. | |||
This requires four calls; | |||
# Tell the interface to use a static IP address. | |||
# Set the IP address | |||
# Set the subnet mask | |||
# (optional) Set the default gateway | |||
{|class="wikitable" | |||
!<span class="code">an-a05n01</span> | |||
|style="white-space: nowrap;"|<syntaxhighlight lang="bash"> | |||
ipmitool lan set 2 ipsrc static | |||
ipmitool lan set 2 ipaddr 10.20.51.1 | |||
</syntaxhighlight> | |||
<syntaxhighlight lang="text"> | |||
Setting LAN IP Address to 10.20.51.1 | |||
</syntaxhighlight> | |||
<syntaxhighlight lang="bash"> | <syntaxhighlight lang="bash"> | ||
ipmitool lan set 2 netmask 255.255.0.0 | |||
</syntaxhighlight> | </syntaxhighlight> | ||
<syntaxhighlight lang="text"> | <syntaxhighlight lang="text"> | ||
Setting LAN Subnet Mask to 255.255.0.0 | |||
</syntaxhighlight> | |||
<syntaxhighlight lang="bash"> | |||
ipmitool lan set 2 defgw ipaddr 10.20.255.254 | |||
</syntaxhighlight> | |||
<syntaxhighlight lang="text"> | |||
Setting LAN Default Gateway IP to 10.20.255.254 | |||
</syntaxhighlight> | |||
|} | |||
Now we'll again print the LAN channel information and we should see that the IP address has been set. | |||
{|class="wikitable" | |||
!<span class="code">an-a05n01</span> | |||
|style="white-space: nowrap;"|<syntaxhighlight lang="bash"> | |||
ipmitool lan print 2 | |||
</syntaxhighlight> | |||
<syntaxhighlight lang="text"> | |||
Set in Progress : Set Complete | |||
Auth Type Support : NONE MD5 PASSWORD | |||
Auth Type Enable : Callback : NONE MD5 PASSWORD | |||
: User : NONE MD5 PASSWORD | |||
: Operator : NONE MD5 PASSWORD | |||
: Admin : NONE MD5 PASSWORD | |||
: OEM : NONE MD5 PASSWORD | |||
IP Address Source : Static Address | |||
IP Address : 10.20.51.1 | |||
Subnet Mask : 255.255.0.0 | |||
MAC Address : 00:19:99:9a:d8:e8 | |||
SNMP Community String : public | |||
IP Header : TTL=0x40 Flags=0x40 Precedence=0x00 TOS=0x10 | |||
Default Gateway IP : 10.20.255.254 | |||
802.1q VLAN ID : Disabled | |||
802.1q VLAN Priority : 0 | |||
RMCP+ Cipher Suites : 0,1,2,3,6,7,8,17 | |||
Cipher Suite Priv Max : OOOOOOOOXXXXXXX | |||
: X=Cipher Suite Unused | |||
: c=CALLBACK | |||
: u=USER | |||
: o=OPERATOR | |||
: a=ADMIN | |||
: O=OEM | |||
</syntaxhighlight> | |||
|} | |||
Excellent! | |||
=== Find the IPMI User ID === | |||
Next up is to find the IPMI administrative user name and user ID. We'll record the name for later use in the cluster setup. We'll use the ID to update the user's password. | |||
To see the list of users, run the following. | |||
=== | {|class="wikitable" | ||
!<span class="code">an-a05n01</span> | |||
|style="white-space: nowrap;"|<syntaxhighlight lang="bash"> | |||
ipmitool user list 2 | |||
</syntaxhighlight> | |||
<syntaxhighlight lang="text"> | |||
ID Name Callin Link Auth IPMI Msg Channel Priv Limit | |||
1 true true true Unknown (0x00) | |||
2 admin true true true OEM | |||
</syntaxhighlight> | |||
|} | |||
{{note|1= | {{note|1=If you see an error like "<span class="code">Get User Access command failed (channel 2, user 3): Unknown (0x32)</span>", it is safe to ignore.}} | ||
Normally you should see <span class="code">OEM</span> or <span class="code">ADMINISTRATOR</span> under the <span class="code">Channel Priv Limit</span> column. Above we see that the user named <span class="code">admin</span> with ID <span class="code">2</span> is <span class="code">OEM</span>, so that is the user we will use. | |||
< | {{note|1=The <span class="code">2</span> in the next argument corresponds to the user ID, not the LAN channel!}} | ||
To set the password to <span class="code">secret</span>, run the following command and then enter the word <span class="code">secret</span> twice. | |||
<syntaxhighlight lang="bash"> | {|class="wikitable" | ||
!<span class="code">an-a05n01</span> | |||
|style="white-space: nowrap;"|<syntaxhighlight lang="bash"> | |||
ipmitool user set password 2 | |||
</syntaxhighlight> | </syntaxhighlight> | ||
<syntaxhighlight lang="text"> | <syntaxhighlight lang="text"> | ||
Password for user 2: | |||
Password for user 2: | |||
</syntaxhighlight> | |||
|} | |||
Done! | |||
=== Testing the IPMI Connection From the Peer === | |||
At this point, we've set each node's IPMI BMC network address and <span class="code">admin</span> user's password. Now it's time to make sure it works. | |||
</ | |||
In the example above, we walked through setting up <span class="code">an-a05n01</span>'s IPMI BMC. So here, we will log into <span class="code">an-a05n02</span> and try to connect to <span class="code">an-a05n01.ipmi</span> to make sure everything works. | |||
* From <span class="code">an-a05n02</span> | |||
{|class="wikitable" | |||
!<span class="code">an-a05n02</span> | |||
<syntaxhighlight lang="bash"> | |style="white-space: nowrap;"|<syntaxhighlight lang="bash"> | ||
ipmitool -I lanplus -U admin -P secret -H an-a05n01.ipmi chassis power status | |||
</syntaxhighlight> | </syntaxhighlight> | ||
<syntaxhighlight lang="text"> | <syntaxhighlight lang="text"> | ||
Chassis Power is on | |||
</syntaxhighlight> | </syntaxhighlight> | ||
|} | |||
Excellent! Now let's test from <span class="code">an-a05n01</span> connecting to <span class="code">an-a05n02.ipmi</span>. | |||
{|class="wikitable" | |||
!<span class="code">an-a05n01</span> | |||
|style="white-space: nowrap;"|<syntaxhighlight lang="bash"> | |||
ipmitool -I lanplus -U admin -P secret -H an-a05n02.ipmi chassis power status | |||
</syntaxhighlight> | |||
<syntaxhighlight lang="text"> | |||
Chassis Power is on | |||
</syntaxhighlight> | |||
|} | |||
Woohoo! | |||
== | == Setting up SSH == | ||
Setting up [[SSH]] shared keys will allow your nodes to pass files between one another and execute commands remotely without needing to enter a password. This will be needed later when we want to enable applications like <span class="code">libvirtd</span> and its tools, like <span class="code">virt-manager</span>. | |||
SSH is, on its own, a very big topic. If you are not familiar with SSH, please take some time to learn about it before proceeding. A great first step is the [http://en.wikipedia.org/wiki/Secure_Shell Wikipedia] entry on SSH, as well as the SSH [[man]] page; <span class="code">man ssh</span>. | |||
[[SSH]] can be a bit confusing keeping connections straight in you head. When you connect to a remote machine, you start the connection on your machine as the user you are logged in as. This is the source user. When you call the remote machine, you tell the machine what user you want to log in as. This is the remote user. | |||
=== Create the RSA Keys === | |||
{{note|1=This section covers setting up [[SSH]] for <span class="code">an-a05n01</span>. Please be sure to follow these steps for both nodes.}} | |||
< | You will need to create an SSH key for the <span class="code">root</span> user on each node. Once created, we will need to copy the "public key" into a special file on both nodes to enable connecting to either node without a password. | ||
Lets start with <span class="code">an-a05n01</span> | |||
{|class="wikitable" | |||
!<span class="code">an-a05n01</span> | |||
|style="white-space: nowrap;"|<syntaxhighlight lang="bash"> | |||
# The '4095' is just to screw with brute-forces a bit. :) | |||
ssh-keygen -t rsa -N "" -b 4095 -f ~/.ssh/id_rsa | |||
</syntaxhighlight> | |||
<syntaxhighlight lang="text"> | <syntaxhighlight lang="text"> | ||
Generating public/private rsa key pair. | |||
Created directory '/root/.ssh'. | |||
Your identification has been saved in /root/.ssh/id_rsa. | |||
Your public key has been saved in /root/.ssh/id_rsa.pub. | |||
The key fingerprint is: | |||
1a:cf:8b:69:5e:9b:92:c2:51:0d:49:7f:ce:98:0f:40 root@an-a05n01.alteeve.ca | |||
The key's randomart image is: | |||
+--[ RSA 4095]----+ | |||
| .E. | | |||
| .o. | | |||
| .o. . | | |||
| ...* | | |||
| .. S o | | |||
| . = o | | |||
| . ...+ . | | |||
| o ++ + | | |||
| ++.+ | | |||
+-----------------+ | |||
</syntaxhighlight> | </syntaxhighlight> | ||
|} | |||
This will create two files: the private key called <span class="code">~/.ssh/id_rsa</span> and the public key called <span class="code">~/.ssh/id_rsa.pub</span>. The private '''''must never''''' be group or world readable! That is, it should be set to mode <span class="code">0600</span>. | |||
If you look closely when you created the ssh key, the node's fingerprint is show (<span class="code">1a:cf:8b:69:5e:9b:92:c2:51:0d:49:7f:ce:98:0f:40</span> for <span class="code">an-a05n01</span> above). Make a note of the fingerprint for each machine, and then compare it to the one presented to you when you ssh to a machine for the first time. If you are presented with a fingerprint that doesn't match, you could be facing a "man in the middle" attack. | |||
To look up a fingerprint in the future, you can run the following; | |||
< | {|class="wikitable" | ||
!<span class="code">an-a05n01</span> | |||
|style="white-space: nowrap;"|<syntaxhighlight lang="bash"> | |||
ssh-keygen -l -f ~/.ssh/id_rsa | |||
</syntaxhighlight> | |||
<syntaxhighlight lang="bash"> | |||
4095 1a:cf:8b:69:5e:9b:92:c2:51:0d:49:7f:ce:98:0f:40 /root/.ssh/id_rsa.pub (RSA) | |||
</syntaxhighlight> | </syntaxhighlight> | ||
|} | |||
The two newly generated files should look like; | |||
'''Private key''': | |||
=== | {|class="wikitable" | ||
!<span class="code">an-a05n01</span> | |||
|style="white-space: nowrap;"|<syntaxhighlight lang="bash"> | |||
cat ~/.ssh/id_rsa | |||
</syntaxhighlight> | |||
<syntaxhighlight lang="text"> | |||
-----BEGIN RSA PRIVATE KEY----- | |||
MIIJIwIBAAKCAgBk3o54tw1f0BJ0UOp/OWpLa5VaKDIKKmwe7Um6kcmDVBO8Itbg | |||
7FxXHxX6Xi/CqoqjPEwvpjSgBVSGF5IkSAcAdyKEmqJ0pM3A4Hg+g1JehQLx3k2v | |||
DPfIcTvsIGEkS63XZiOs6t1sPubgjKw9encpYHq4s2Z26Ux/w85FbIMCR3oNroG2 | |||
scU4OJnICosoibsEXheaDzUl8fIpEkIHGVK4iOy2Y2CoxEKw5bE1yBv0KlRKrN9i | |||
jFvoq2eAUG+NtjOxaG9DK3IgITQVd1PDgoBqEvEJK/kdfckGQu47cKGJS8bzgWLD | |||
vXprg9OsXBu/MZSVK1AjvL3pfZEOT/k1B6gWu2ww7hGWVZj2IXnFcRv4TMs+DXg2 | |||
xZm7pWTkPLNxFzqtAZH60jXZmbPAFNDNS7M3Qs6oBCFlvUL00vFNu3uoM2NARG0V | |||
bvLT0zb8dhQDpV2KoGsKUFGsDo773rH7AtBBPEzODgxjTk7rH+0Rt38JLN8T5XeO | |||
RUitX9MS5abjis6DZ5agm8Swd3cpAK7g5yeKdxmUA774i+BlkkH1VdsdBT9RImvc | |||
/OfVly208jpNRisCQgP4FTlEFG9YOeQ416euJ6xX5oP+I6z9f0rMzQEprh0WgT5r | |||
/oIKfjwF3v109rquUZLxrLYb8qkomwWnxPD4VL7GPUU0hzgr+h+xRWI0nQIBIwKC | |||
AgBfGvtb38rIDVM6eC2N5a1dDaoTLTZ+nQbbVMHby0j4KrOFf+8r14pDg7Wi6xcW | |||
oMvbvIJYz+h5nqAmqIJ5+sTF7KuEV0i3HwsjkdB1dIDcxo2/edQ3VV6nC62G3LNc | |||
vGIUO7s8ou4G+XqZNC1eiWkJwV3EFtzzxgZMlAugiuHsNMOJPiKHru0mYUCJaQbd | |||
FCVb46/aZhwrF1IJd51XJoExpav8bFPSUqVHs/7a79/XlZ/uov6BfQYzJURUaRi4 | |||
0Fyf9MCtC7S/NT+8d9KiZRn9nNSiP2c5EDKQ4AUwuqbvKjCccq2T+8syK9Y0y9+l | |||
o8abRhhcNZ0d+gxslIvhiuBOtTTV7Fy6zYyhSkAOzF33kl+jDDm2nNvxjxFU3Lo1 | |||
qSP7n2yedz5QKOvwykmwN/uzn5FWSmKc5GdL/t+yu94zf0eR9pDhkg0u9dXFkim0 | |||
Hq8RsW1vH4aD0BBMiBn34EbnaQaotX7lAUxfTjG0iZ9z8T48NIqPf/66evqUk3bx | |||
VoFS79GkW8yWrXQX6B3oUAtm10aeP9Htz+AQIPdatO9pREIzE6UbEnc2kSrzFcJh | |||
4hmarrQgJq7qzFjgRLBgjiOsdEo5SGLTFh17UIh5k/deeTxLsGSFuBbpz5+jr4tt | |||
0s4wcmamTR8ruURGh+4i/Px6F9QsechnIMKGNthWVxhEawKCAQEA2kCH/FL/A7Ib | |||
fCt0PFvCKWeF1V+PhdzEdkIRvS3OusWP9Z+py6agh3kAFWjOZT16WgYPeftMKYaE | |||
3Wiixfx+99ta0eQiKqozYgB3pg5UWdxsXv30jrTyRuhhEBId2lGV6/eHgGYs48s1 | |||
oCCrljsVmWd+p4uSAplIBewCv7YPsxl3DZJTV6DFRD9mnuqjrqozSM+UsoMPRTPZ | |||
7AyaDxeb63LiWTq6T/gLHptmu8K0SLvDkzA5LeBWKUNFcMHpWODpzjPj5J4Mtulr | |||
R8oLtEy/2ZyWi7n8JuOt+swTsZDN0Qzcpzw9MU1RWs0sqGvTO91bMjc+FYew7wuZ | |||
CEZxX4VxSQKCAQB2ULaKc4Oersq7Z3fQXIynLNT8lZ/AKQaAH/SdLL7IGKWRZ9eA | |||
VOQNnZnThnKMDbDS8GPOpjzfjPDP8L7Y6NOVgc6ETGEdvoXomZv+sqpwx3BWszNK | |||
18FfV0HhLv0MFHAPfMIqPqhhYUDnDAt/yWFViujIIrllmXjH9JGZDdPgzsupPToZ | |||
FKC5UAYeAZwpaX2AROrfACscn99kNsTE7F8HtMQ//iT+M0rHVTzhVBnm1/e3eY1J | |||
9L6WUbCPzBeiNFNC+y9+0nZk0tkgJk+qUPYdnaQL44TtlZMT1iWKg3C6dgrjbbaG | |||
tFZmwh2/hf0Aovycpn/Fm2PKwxved64FnDy1AoIBABK1Evhe4qiLm/SzRHozwC9v | |||
RfxYpebnCYZ6sRA3IFkm4HQjoNbxBnIDDqK/1y0/yKihbwp0oCDRBBL6VxhI167Y | |||
SZz2TBJJGljbd/hKXwBjWb7/0yIsxE84fVkmH9Dia++ngKSbCyl30WV/JKZ6F8tS | |||
A4q0MRYqZUJWDt07fbBEAuPn+IPalJDSO/7+K0l8TYnl6CyO5A0+9WwBFITzZSLP | |||
VTrZJemY6wKfmxdoddpZPKY3VVu0JKRzevsJToP2BWlyKXn+6yWe+pEf8l/pUkXa | |||
OMol4mm7vnSVJkJrf1sPuyRG/e5IdLAC9TMB7YjJ1J3nelmd6pglkMYx7HXm3dMC | |||
ggEAUSFnOl3WmLJfIWuFW60tP28y9lf4g8RcOpmRytzal9Zi510mDtsgCVYgVogU | |||
CEPm9ws9H/z2iqnJsyi9YYm1qFkCo9yaXYn1bEwTMk6gwlzfUWTv+M51+DvVZzYp | |||
3GXJLzD6K5it+aHGGsZuSP8eLAd7DOScYuzlG2XgLm/hvrmwOYkR5U/5Lp1GBfJ5 | |||
tf8xfIcHdFfjDFBeqx49yNyY71dh//66R+ioTivR+ZjBTdXrsQLkinvwZxNxwbCF | |||
PAaffmMZQQVYf6aGQe5ig2q3ZMPeNAm6PIPSkUJi4qNF/DOvseTU7qeLtC1WOi/9 | |||
8c7ZGvXT9TdaXya0BkNwA9jZKwKCAQBUDqjJ7Q/nlxLifyOInW1RbwbUFzh7mdfC | |||
w6362II2gIz0JRg7HQHMwfbY5t+ELi9Rsdn90wlPQ08cK42goKW46Nt30g+AoQ/N | |||
0maLzbrn5BffAtI7XM0a4i3dZ/yjS0/NW39km0YnTe49W6CBBf91fChIfm+jvYna | |||
ihA9x/SgyuBUvQ1bCrMzMM024TxhCkvvKI2MDmJNJHOeqovYFAXiHFGPmftunu1K | |||
oDRUPb6j5gTBhxAV1ZPHKCee7EIFwi/jJ/31oMLEJp5RnAdrW+FitPjQ7hcoRStm | |||
VZAoapBJb37xa1kq/7hHYf2bPVdrcO8AeStpjEh6GbtYmy2pWlFy | |||
-----END RSA PRIVATE KEY----- | |||
</syntaxhighlight> | |||
|} | |||
{{note|1=This is line-wrapped to make it easier to read. Real keys should be a single line.}} | |||
'''Public key''' (single line, but wrapped here to make it more readable): | |||
{|class="wikitable" | |||
!<span class="code">an-a05n01</span> | |||
|style="white-space: nowrap;"|<syntaxhighlight lang="bash"> | |||
cat ~/.ssh/id_rsa.pub | |||
</syntaxhighlight> | |||
<syntaxhighlight lang="text"> | <syntaxhighlight lang="text"> | ||
ssh-rsa AAAAB3NzaC1yc2EAAAABIwAAAgBKYiBxI06RGiar5rt121+tO1crpa9MwL+K5qtlx0IrL7QUDxi+hvdXg3sTS6+R/mnLDE8eS | |||
ulgRX4fHweNbM96wnl2N9mOnODLJftWPbPUHFpTc/0bDRcXq4rB+V+NvXG1i74W1si8Fp/R5wnPmF7yo/ZjN2zXLhwesOVY3Cnmur+O19 | |||
80O4lT7Zl5Q0mALNkriouhD+FzQZnMky8X2MM4dmnYqctCI54jbgD0vN09uUu8KyGycV9BFW7ScfGBEvow4/+8YW+my4bG0SBjJki7eOK | |||
W3fvr58cybXO+UBqLFO7yMe5jf0fClyz6MFn+PRPR37QQy4GIC+4MCaYaiCx2P/K+K/ZxH621Q8nBE9TdNCw6iVqlt5Si3x2UzxOlrYLZ | |||
nvB1BfzY92Rd/RNP5bz17PapaOMLjkx6iIAEDbp2lL5vzGp+1S30SX956sX/4CYWVTg+MAwok9mUcyj60VU+ldlPDuN7UYUi8Wmoa6Jsu | |||
ozstUNBCsUcKzt5FEBy4vOwOMtyu3cD4rQrn3eGXfZ1a4QpLnR2H9y7EnM4nfGdQ/OVjMecAtHUxx3FDltHgiSkQDEF9R4s3z6NLZ2mda | |||
TU9A5zm+1rMW1ZLhGkfna/h2KV9o8ZNx79WyKMheajL4lgi495D7c6fF4GBgX7u7qrdZyCj2cXgrgT4nGwM2Z81Q== root@an-a05n01.alteeve.ca | |||
</syntaxhighlight> | </syntaxhighlight> | ||
|} | |||
Now do the same thing on <span class="code">an-a05n02</span> to generate its key. | |||
<syntaxhighlight lang="bash"> | {|class="wikitable" | ||
!<span class="code">an-a05n01</span> | |||
|style="white-space: nowrap;"|<syntaxhighlight lang="bash"> | |||
ssh-keygen -t rsa -N "" -b 4095 -f ~/.ssh/id_rsa | |||
</syntaxhighlight> | </syntaxhighlight> | ||
<syntaxhighlight lang="text"> | <syntaxhighlight lang="text"> | ||
Generating public/private rsa key pair. | |||
Created directory '/root/.ssh'. | |||
Your identification has been saved in /root/.ssh/id_rsa. | |||
Your public key has been saved in /root/.ssh/id_rsa.pub. | |||
The key fingerprint is: | |||
68:71:fb:87:88:e3:c2:89:49:ad:d0:55:7d:1c:05:b6 root@an-a05n02.alteeve.ca | |||
The key's randomart image is: | |||
+--[ RSA 4095]----+ | |||
| . .++. | | |||
| . ..o. | | |||
| .. ..E | | |||
| . + . | | |||
| . o o S | | |||
|. o .. . o . | | |||
| o = .o . o . | | |||
| + +. . . | | |||
| .. | | |||
+-----------------+ | |||
</syntaxhighlight> | |||
|} | |||
=== Populate known_hosts === | |||
Normally, the first time you try to <span class="code">ssh</span> into a computer, you will be asked to verify that the fingerprint reported by the target server is valid. We just created our nodes, so we can trust that we're connecting to the actual target machine we think we are. | |||
Seeing as we're comfortable with this, we can use a nifty program called <span class="code">ssh-keyscan</span> to read the fingerprint of the target machine and copy the resulting key to the <span class="code">~/.ssh/known_hosts</span> file. We'll need to do this for all variations of the host names for each node. This alone means that we need to add ten fingerprints, five for the five names of each node. | |||
This is somewhat tedious, so we'll do this once on <span class="code">an-a05n01</span> and then copy the populated <span class="code">~/.ssh/known_hosts</span> file over to <span class="code">an-a05n02</span> later. | |||
If you recall from the <span class="code">/etc/hosts</span> section, we've got five possible host names per node. We'll call all of them now. | |||
{|class="wikitable" | |||
!<span class="code">an-a05n01</span> | |||
|style="white-space: nowrap;"|<syntaxhighlight lang="bash"> | |||
ssh-keyscan an-a05n01.alteeve.ca >> ~/.ssh/known_hosts | |||
</syntaxhighlight> | |||
<syntaxhighlight lang="text"> | |||
# an-a05n01.alteeve.ca SSH-2.0-OpenSSH_5.3 | |||
</syntaxhighlight> | </syntaxhighlight> | ||
|} | |||
If you are not familiar with [[bash]] redirections, the <span class="code">>> ~/.ssh/known_hosts</span> file tells the OS, "Take the returned text that would have been printed to screen and instead append it to <span class="code">~/.ssh/known_hosts</span>". In our case, <span class="code">known_hosts</span> didn't exist yet, so it was created. | |||
Now we'll repeat this, once for each host name for either node. | |||
{|class="wikitable" | |||
!<span class="code">an-a05n01</span> | |||
|style="white-space: nowrap;"|<syntaxhighlight lang="bash"> | |||
ssh-keyscan an-a05n01 >> ~/.ssh/known_hosts | |||
</syntaxhighlight> | |||
<syntaxhighlight lang="text"> | |||
# an-a05n01 SSH-2.0-OpenSSH_5.3 | |||
</syntaxhighlight> | |||
<syntaxhighlight lang="bash"> | |||
ssh-keyscan an-a05n01.bcn >> ~/.ssh/known_hosts | |||
</syntaxhighlight> | |||
<syntaxhighlight lang="text"> | <syntaxhighlight lang="text"> | ||
# an-a05n01.bcn SSH-2.0-OpenSSH_5.3 | |||
</syntaxhighlight> | </syntaxhighlight> | ||
<syntaxhighlight lang="bash"> | |||
ssh-keyscan an-a05n01.sn >> ~/.ssh/known_hosts | |||
</syntaxhighlight> | |||
<syntaxhighlight lang="text"> | |||
# an-a05n01.sn SSH-2.0-OpenSSH_5.3 | |||
</syntaxhighlight> | |||
<syntaxhighlight lang="bash"> | |||
ssh-keyscan an-a05n01.ifn >> ~/.ssh/known_hosts | |||
</syntaxhighlight> | |||
<syntaxhighlight lang="text"> | <syntaxhighlight lang="text"> | ||
# an-a05n01.ifn SSH-2.0-OpenSSH_5.3 | |||
</syntaxhighlight> | </syntaxhighlight> | ||
|} | |||
That's all the host names for <span class="code">an-a05n01</span>. Now we'll repeat the steps for <span class="code">an-a05n02</span>. | |||
= | {|class="wikitable" | ||
!<span class="code">an-a05n01</span> | |||
|style="white-space: nowrap;"|<syntaxhighlight lang="bash"> | |||
ssh-keyscan an-a05n02.alteeve.ca >> ~/.ssh/known_hosts | |||
</syntaxhighlight> | |||
<syntaxhighlight lang="text"> | |||
# an-a05n02.alteeve.ca SSH-2.0-OpenSSH_5.3 | |||
</syntaxhighlight> | |||
<syntaxhighlight lang="bash"> | |||
ssh-keyscan an-a05n02 >> ~/.ssh/known_hosts | |||
</syntaxhighlight> | |||
<syntaxhighlight lang="text"> | |||
# an-a05n02 SSH-2.0-OpenSSH_5.3 | |||
</syntaxhighlight> | |||
<syntaxhighlight lang="bash"> | |||
ssh-keyscan an-a05n02.bcn >> ~/.ssh/known_hosts | |||
</syntaxhighlight> | |||
<syntaxhighlight lang="text"> | |||
# an-a05n02.bcn SSH-2.0-OpenSSH_5.3 | |||
</syntaxhighlight> | |||
<syntaxhighlight lang="bash"> | <syntaxhighlight lang="bash"> | ||
ssh-keyscan an-a05n02.sn >> ~/.ssh/known_hosts | |||
</syntaxhighlight> | </syntaxhighlight> | ||
<syntaxhighlight lang="text"> | <syntaxhighlight lang="text"> | ||
# an-a05n02.sn SSH-2.0-OpenSSH_5.3 | |||
</syntaxhighlight> | </syntaxhighlight> | ||
<syntaxhighlight lang="bash"> | <syntaxhighlight lang="bash"> | ||
ssh-keyscan an-a05n02.ifn >> ~/.ssh/known_hosts | |||
</syntaxhighlight> | |||
<syntaxhighlight lang="text"> | |||
# an-a05n02.ifn SSH-2.0-OpenSSH_5.3 | |||
</syntaxhighlight> | </syntaxhighlight> | ||
|} | |||
Done! | Done! | ||
Now we won't get asked to verify the target machine's RSA fingerprint when we try to connect later. More importantly, if the fingerprint ever changes, it will generate a very noisy alert telling us that something nasty, like a fake target having replaced our peer, might have happened. | |||
The last step is to copy this <span class="code">known_hosts</span> file over to <span class="code">an-a05n02</span>, saving us the hassle of running all those commands a second time. | |||
{|class="wikitable" | |||
!<span class="code">an-a05n01</span> | |||
|style="white-space: nowrap;"|<syntaxhighlight lang="bash"> | |||
rsync -av ~/.ssh/known_hosts root@an-a05n02:/root/.ssh/ | |||
</syntaxhighlight> | |||
<syntaxhighlight lang="text"> | |||
Warning: Permanently added the RSA host key for IP address '10.20.50.2' to the list of known hosts. | |||
</syntaxhighlight> | |||
|} | |||
Don't worry about that warning, it's a one time thing. Enter the password for the <span class="code">root</span> user on <span class="code">an-a05n02</span> to continue. | |||
< | {|class="wikitable" | ||
!<span class="code">an-a05n01</span> | |||
|style="white-space: nowrap;"|<syntaxhighlight lang="text"> | |||
root@an-a05n02's password: | |||
</syntaxhighlight> | </syntaxhighlight> | ||
<syntaxhighlight lang="text"> | <syntaxhighlight lang="text"> | ||
sending incremental file list | |||
known_hosts | |||
sent 4817 bytes received 31 bytes 1077.33 bytes/sec | |||
total size is 4738 speedup is 0.98 | |||
</syntaxhighlight> | </syntaxhighlight> | ||
|} | |||
Done! | |||
=== Copy Public Keys to Enable SSH Without a Password === | |||
This | {{note|1=This only disabled the need for passwords when connecting from one node's <span class="code">root</span> use to the other node's <span class="code">root</span> user. It does not remove the need for passwords from any other machines or users!}} | ||
== | In order to enable password-less login, we need to create a file called <span class="code">~/.ssh/authorized_keys</span> and put both nodes' public key in it. We will create the <span class="code">authorized_keys</span> on <span class="code">an-a05n01</span> and then copy it over to <span class="code">an-a05n02</span>. | ||
First, we'll copy the local <span class="code">id_rsa.pub</span> file. This will create the <span class="code">authorized_keys</span> file and add the local public RSA in one step. | |||
On | On <span class="code">an-a05n01</span> | ||
<syntaxhighlight lang="bash"> | {|class="wikitable" | ||
!<span class="code">an-a05n01</span> | |||
|style="white-space: nowrap;"|<syntaxhighlight lang="bash"> | |||
cp ~/.ssh/id_rsa.pub ~/.ssh/authorized_keys | |||
./ | |||
</syntaxhighlight> | </syntaxhighlight> | ||
|} | |||
== | Now we'll use <span class="code">ssh</span> to print the contents of <span class="code">an-a05n02</span>'s public key to screen, but redirect the key to the new <span class="code">authorized_keys</span> file. | ||
{ | {|class="wikitable" | ||
!<span class="code">an-a05n01</span> | |||
|style="white-space: nowrap;"|<syntaxhighlight lang="bash"> | |||
ssh root@an-a05n02 "cat /root/.ssh/id_rsa.pub" >> ~/.ssh/authorized_keys | |||
</syntaxhighlight> | |||
|} | |||
Enter the password for the <span class="code">root</span> user on <span class="code">an-a05n02</span>. | |||
{|class="wikitable" | |||
!<span class="code">an-a05n01</span> | |||
|style="white-space: nowrap;"|<syntaxhighlight lang="text"> | |||
root@an-a05n02's password: | |||
</syntaxhighlight> | |||
|} | |||
Done. Now we can verify that both keys have been added to the <span class="code">authorized_keys</span> file. | |||
< | {|class="wikitable" | ||
!<span class="code">an-a05n01</span> | |||
|style="white-space: nowrap;"|<syntaxhighlight lang="bash"> | |||
cat ~/.ssh/authorized_keys | |||
</syntaxhighlight> | </syntaxhighlight> | ||
<syntaxhighlight lang="text"> | |} | ||
- | |||
I'm truncating the output below to make it more readable. | |||
{|class="wikitable" | |||
!<span class="code">an-a05n01</span> | |||
|style="white-space: nowrap;"|<syntaxhighlight lang="text"> | |||
ssh-rsa <key snipped> root@an-a05n01.alteeve.ca | |||
ssh-rsa <key snipped> root@an-a05n02.alteeve.ca | |||
</syntaxhighlight> | </syntaxhighlight> | ||
|} | |||
Excellent! Now we can copy this to <span class="code">an-a05n02</span> and, with luck, enter the password one last time. | |||
=== | {|class="wikitable" | ||
!<span class="code">an-a05n01</span> | |||
|style="white-space: nowrap;"|<syntaxhighlight lang="bash"> | |||
rsync -av ~/.ssh/authorized_keys root@an-a05n02:/root/.ssh/ | |||
</syntaxhighlight> | |||
<syntaxhighlight lang="text"> | |||
root@an-a05n02's password: | |||
</syntaxhighlight> | |||
<syntaxhighlight lang="text"> | |||
sending incremental file list | |||
authorized_keys | |||
sent 1577 bytes received 31 bytes 643.20 bytes/sec | |||
total size is 1494 speedup is 0.93 | |||
</syntaxhighlight> | |||
|} | |||
Last step is to test connecting from <span class="code">an-a05n01</span> to <span class="code">an-a05n02</span>. We should not get any prompt at all. | |||
{|class="wikitable" | |||
!<span class="code">an-a05n01</span> | |||
|style="white-space: nowrap;"|<syntaxhighlight lang="bash"> | |||
ssh root@an-a05n02 | |||
</syntaxhighlight> | |||
<syntaxhighlight lang="text"> | |||
Last login: Tue Oct 29 14:02:19 2013 from ...cable.user.start.ca | |||
[root@an-a05n02 ~]# | |||
</syntaxhighlight> | |||
|} | |||
Very nice! Just type <span class="code">exit</span> to return to <span class="code">an-a05n01</span>. | |||
{|class="wikitable" | |||
!<span class="code">an-a05n01</span> | |||
<syntaxhighlight lang="bash"> | |style="white-space: nowrap;"|<syntaxhighlight lang="bash"> | ||
exit | |||
</syntaxhighlight> | </syntaxhighlight> | ||
<syntaxhighlight lang="text"> | <syntaxhighlight lang="text"> | ||
- | logout | ||
Connection to an-a05n02 closed. | |||
[root@an-a05n01 ~]# | |||
</syntaxhighlight> | </syntaxhighlight> | ||
|} | |||
You should now be able to use <span class="code">ssh</span> from either node to connect to the other node using any of the host names we set! Note that the physical network you use for the connection will depend on the host name you use. When you used <span class="code">an-a05n02</span> above, you connect using the [[BCN]]. Had you instead used <span class="code">an-a05n02.sn</span>, we would have connected over the [[SN]]. | |||
== | == Setting Up UPS Monitoring == | ||
{{note|1=This section assumes that you are using [http://www.apc.com/site/apc/index.cfm?ISOCountryCode=ca APC] brand UPSes with [http://www.apc.com/products/resource/include/techspec_index.cfm?base_sku=AP9630 AP9630] network management cards. If you use another make or model, please be sure that it uses a network connection, not USB or serial, and that it is supported by <span class="code">[http://www.apcupsd.com/ apcupsd]</span>.}} | |||
We | We always recommend that you have two network-managed [[UPS]]es backing either switched [[PDU]]. This protects your ''Anvil!'' against power outages, of course, but they can also protect against distorted input power, under and over voltage events and other power anomalies. | ||
The reason we recommend network managed UPSes, instead of passive UPSes, is that it allows for monitoring incoming power and alerting on notable events. We have found that power events are the most common issues in production. Being alerted to power events can allow you to deal with issues that might otherwise effect other equipment in your facility that isn't or can't be protected by UPSes. | |||
=== Installing apcupsd === | |||
The <span class="code">apcupsd</span> program is not available in the normal [[RHEL]] or [[CentOS]] repositories. So you can either [[Setup_apcupsd_For_Multiple_Network-Enabled_APC_UPSes_On_EL6#Build_From_Source|build it yourself]] or install a version pre-built by us. In production, it certainly makes sense to build your own as it's most secure. If you wish, you could also [[Setup_apcupsd_For_Multiple_Network-Enabled_APC_UPSes_On_EL6#Installing_on_CentOS|install from ELRepo]]. | |||
For the purpose of this tutorial, we'll download the version from the <span class="code">alteeve.ca</span> servers as it's the simplest option. | |||
{|class="wikitable" | |||
!<span class="code">an-a05n01</span> | |||
!<span class="code">an-a05n02</span> | |||
|- | |||
|style="white-space: nowrap;"|<syntaxhighlight lang="bash"> | |||
rpm -Uvh https://alteeve.ca/files/apcupsd/apcupsd-latest.el6.x86_64.rpm | |||
</syntaxhighlight> | |||
<syntaxhighlight lang="text"> | |||
Retrieving https://alteeve.ca/files/apcupsd/apcupsd-latest.el6.x86_64.rpm | |||
Preparing... ########################################### [100%] | |||
1:apcupsd ########################################### [100%] | |||
</syntaxhighlight> | |||
|} | |||
=== Configuring Apcupsd For Two UPSes === | |||
{{note|1=Much of the credit for this section belongs to <span class="code">apcupsd</span>'s [http://www.apcupsd.org/manual/manual.html#controlling-multiple-upses-on-one-machine project documentation] on the topic. It's been edited somewhat to better suit our needs.}} | |||
= | By default, <span class="code">apcupsd</span> only supports one UPS. The practical side effect of this is that <span class="code">apcupsd</span> will initiate a shut down as soon as the first UPS is low on batteries. This makes no sense if the second UPS is still full or running on AC. | ||
So we're going to make two main changes here; | |||
# Disable the ability for <span class="code">apcupsd</span> to initiate a shut down of the node. | |||
# Configure <span class="code">apcupsd</span> to support two (or more) UPSes. | |||
Before we begin, we will make a backup of the default <span class="code">apcupsd.conf</span> file. Then we're going to rename it and configure it for the first UPS. Once it's configured, we will copy it for the second UPS and change just the variable values that differ. | |||
We | {{note|1=We're going to work on <span class="code">an-a05n01</span>. Once it's configured and working, we'll copy our new configuration to <span class="code">an-a05n02</span>}} | ||
We [[#Foundation_Pack_Host_Names|decided earlier]] to name our UPSes <span class="code">an-ups01</span> and <span class="code">an-ups02</span>. We're going to use these names in the configuration and log file names used for each UPS. So let's backup the original configuration file and then rename it to match our first UPS. | |||
=== | {|class="wikitable" | ||
!<span class="code">an-a05n01</span> | |||
|style="white-space: nowrap;"|<syntaxhighlight lang="bash"> | |||
cp /etc/apcupsd/apcupsd.conf /etc/apcupsd/apcupsd.conf.anvil | |||
mv /etc/apcupsd/apcupsd.conf /etc/apcupsd/apcupsd.an-ups01.conf | |||
ls -lah /etc/apcupsd/ | |||
</syntaxhighlight> | |||
<syntaxhighlight lang="text"> | |||
total 108K | |||
drwxr-xr-x. 3 root root 4.0K Nov 26 17:34 . | |||
drwxr-xr-x. 90 root root 12K Nov 25 17:28 .. | |||
-rwxr--r--. 1 root root 3.9K Mar 4 2013 apccontrol | |||
-rw-r--r--. 1 root root 13K Mar 4 2013 apcupsd.an-ups01.conf | |||
-rw-r--r--. 1 root root 13K Nov 26 15:49 apcupsd.conf.anvil | |||
-rw-r--r--. 1 root root 607 Mar 4 2013 apcupsd.css | |||
-rwxr--r--. 1 root root 460 Mar 4 2013 changeme | |||
-rwxr--r--. 1 root root 487 Mar 4 2013 commfailure | |||
-rwxr--r--. 1 root root 488 Mar 4 2013 commok | |||
-rwxr-xr-x. 1 root root 17K Mar 4 2013 hid-ups | |||
-rw-r--r--. 1 root root 662 Mar 4 2013 hosts.conf | |||
-rwxr-xr-x. 1 root root 626 May 28 2002 make-hiddev | |||
-rw-r--r--. 1 root root 2.3K Mar 4 2013 multimon.conf | |||
-rwxr--r--. 1 root root 455 Mar 4 2013 offbattery | |||
-rwxr--r--. 1 root root 420 Mar 4 2013 onbattery | |||
</syntaxhighlight> | |||
|} | |||
Next up, we're going to create a new directory called <span class="code">/etc/apcupsd/null</span>. We'll copy some of the existing scripts into it and then create a new script that will disabled automatic shut down of the node. We're doing this so that future updates to <span class="code">apcupsd</span> won't replace our scripts. We'll see how we use this shortly. | |||
Once the directory is created, we'll copy the scripts we want. Next, we'll create a new script called <span class="code">doshutdown</span> which will do nothing expect exit with return code <span class="code">99</span>. This return code tells <span class="code">apcupsd</span> that the shut down action has been disabled. | |||
{|class="wikitable" | |||
!<span class="code">an-a05n01</span> | |||
|style="white-space: nowrap;"|<syntaxhighlight lang="bash"> | |||
mkdir /etc/apcupsd/null | |||
cp /etc/apcupsd/apccontrol /etc/apcupsd/null/ | |||
cp /etc/apcupsd/c* /etc/apcupsd/null/ | |||
cp /etc/apcupsd/o* /etc/apcupsd/null/ | |||
echo "exit 99" > /etc/apcupsd/null/doshutdown | |||
chown root:root /etc/apcupsd/null/doshutdown | |||
chmod 744 /etc/apcupsd/null/doshutdown | |||
cat /etc/apcupsd/null/doshutdown | |||
</syntaxhighlight> | |||
<syntaxhighlight lang="text"> | <syntaxhighlight lang="text"> | ||
exit 99 | |||
</syntaxhighlight> | |||
<syntaxhighlight lang="bash"> | |||
ls -lah /etc/apcupsd/null/ | |||
</syntaxhighlight> | </syntaxhighlight> | ||
<syntaxhighlight lang="text"> | <syntaxhighlight lang="text"> | ||
total 36K | |||
drwxr-xr-x. 2 root root 4.0K Nov 26 17:39 . | |||
drwxr-xr-x. 3 root root 4.0K Nov 26 17:34 .. | |||
-rwxr--r--. 1 root root 3.9K Nov 26 17:35 apccontrol | |||
-rwxr--r--. 1 root root 460 Nov 26 17:36 changeme | |||
-rwxr--r--. 1 root root 487 Nov 26 17:36 commfailure | |||
-rwxr--r--. 1 root root 488 Nov 26 17:36 commok | |||
-rwxr--r--. 1 root root 8 Nov 26 17:39 doshutdown | |||
-rwxr--r--. 1 root root 455 Nov 26 17:36 offbattery | |||
-rwxr--r--. 1 root root 420 Nov 26 17:36 onbattery | |||
</syntaxhighlight> | </syntaxhighlight> | ||
|} | |||
Good. Now it's time to change the variables in the configuration file. Before we do though, lets look at the variables we're going to edit, what value we will set them to for <span class="code">an-ups01</span> and what they do. We'll look at the specific variables we need to change in <span class="code">an-ups02</span>'s configuration file later. | |||
{|class="wikitable sortable" | |||
!Variable | |||
!Value for <span class="code">an-ups01</span> | |||
!Description | |||
|- | |||
|style="white-space: nowrap;"|<span class="code">UPSNAME</span> | |||
|style="white-space: nowrap;"|<span class="code">an-ups01</span> | |||
|This is the name to use for this UPS when writing log entries or reporting status information. It should be less than eight characters long. We're going to use the short host name for the UPS. | |||
=== | |- | ||
|style="white-space: nowrap;"|<span class="code">UPSTYPE</span> | |||
|style="white-space: nowrap;"|<span class="code">snmp</span> | |||
|This tells <span class="code">apcupsd</span> that we will communicate with this UPS using [[SNMP]] to talk to the network management card in the UPS. | |||
|- | |||
|style="white-space: nowrap;"|<span class="code">DEVICE</span> | |||
|style="white-space: nowrap;"|<span class="code">an-ups01.alteeve.ca:161:APC_NOTRAP:private</span> | |||
|This is the connection string needed for establishing the SNMP connection to the UPS. It's separated into four sections, each section separated by colons. The first value is the host name or IP address of the UPS. The second section is the [[TCP]] port to connect to, which is <span class="code">161</span> on APC brand UPSes. The third and fourth sections are the vendor name and SNMP community, respectively. We're using the vendor name <span class="code">APC_NOTRAP</span> in order to disable SNMP traps. The community should usually be <span class="code">private</span>, unless you changed it in the network management card itself. | |||
|- | |||
|style="white-space: nowrap;"|<span class="code">POLLTIME</span> | |||
|style="white-space: nowrap;"|<span class="code">30</span> | |||
|This tells <span class="code">apcupsd</span> how often, in seconds, to query the UPS status. The default is once per minute, but we will want twice per minute in order to match the scan frequency of the monitoring and alter system we will use later. | |||
|- | |||
|style="white-space: nowrap;"|<span class="code">SCRIPTDIR</span> | |||
|style="white-space: nowrap;"|<span class="code">/etc/apcupsd/null</span> | |||
|This tells <span class="code">apcupsd</span> to use the scripts in our new <span class="code">null</span> directory instead of the default ones. | |||
|- | |||
|style="white-space: nowrap;"|<span class="code">PWRFAILDIR</span> | |||
|style="white-space: nowrap;"|<span class="code">/etc/apcupsd/null</span> | |||
|Some UPSes need to be powered off themselves when the power is about to run out of the batteries. This is controlled by a file written to this directory which <span class="code">apcupsd</span>'s shut down script looks for. We've disabled shut down, but to be safe and thorough, we will disable this as well by pointing it at our <span class="code">null</span> directory. | |||
|- | |||
|style="white-space: nowrap;"|<span class="code">BATTERYLEVEL</span> | |||
|style="white-space: nowrap;"|<span class="code">0</span> | |||
|This tells <span class="code">apcupsd</span> to initiate a shut down once the UPS reports this percentage left in the batteries. We've disabled automatic shut down, but just the same, we'll set this to <span class="code">0</span>. | |||
|- | |||
|style="white-space: nowrap;"|<span class="code">MINUTES</span> | |||
|style="white-space: nowrap;"|<span class="code">0</span> | |||
|This tells <span class="code">apcupsd</span> to initiate a shut down once the UPS reports this many minutes of run time left in the batteries. We've disabled automatic shut down, but just the same, we'll set this to <span class="code">0</span>. | |||
|- | |||
|style="white-space: nowrap;"|<span class="code">NISPORT</span> | |||
|style="white-space: nowrap;"|<span class="code">3551</span> | |||
|The default value here is fine for <span class="code">an-ups01</span>, but it is important to highlight here. We will use <span class="code">apcaccess</span> to query <span class="code">apcupsd</span>'s data over the network, even though it's on the same machine. Each UPS we monitor will have an <span class="code">apcupsd</span> daemon running and listening on a dedicated [[TCP]] port. The first UPS, <span class="code">an-ups01</span>, will listen on the default port. Which port we specify when using <span class="code">apcaccess</span> later will determine which UPS status information is returned. | |||
|- | |||
|style="white-space: nowrap;"|<span class="code">ANNOY</span> | |||
|style="white-space: nowrap;"|<span class="code">0</span> | |||
|Normally, <span class="code">apcupsd</span> will start "annoying" the users of the system to save their work and log out five minutes (<span class="code">300</span> seconds) before calling the shut down of the server. We're disabling automatic shut down, so this needs to be disabled. | |||
|- | |||
|style="white-space: nowrap;"|<span class="code">EVENTSFILE</span> | |||
|style="white-space: nowrap;"|<span class="code">/var/log/apcupsd.an-ups01.events</span> | |||
|This is where events related to this UPS are recorded. | |||
|} | |||
With this in mind, we'll use <span class="code">sed</span> to edit the file. If you are more comfortable with a text editor, please use that instead. You can refer to the <span class="code">diff</span> at the end of this section to see exactly what changed. | |||
{|class="wikitable" | |||
!<span class="code">an-a05n01</span> | |||
|style="white-space: nowrap;"|<syntaxhighlight lang="bash"> | |||
# Set the name of the UPS and domain once. | |||
ups="an-ups01" | |||
domain="alteeve.ca" | |||
# Configure the UPS name. Note the odd syntax; There are two 'UPSNAME' entries | |||
# in the config and we only want to change the first instance. | |||
sed -i "0,/#UPSNAME/s/^#UPSNAME/UPSNAME/" /etc/apcupsd/apcupsd.${ups}.conf | |||
sed -i "s/^UPSNAME.*/UPSNAME ${ups}/" /etc/apcupsd/apcupsd.${ups}.conf | |||
# Configure the UPS access | |||
sed -i "s/^UPSTYPE.*/UPSTYPE snmp/" /etc/apcupsd/apcupsd.${ups}.conf | |||
sed -i "s/^DEVICE.*/DEVICE ${ups}.${domain}:161:APC_NOTRAP:private/" /etc/apcupsd/apcupsd.${ups}.conf | |||
# Change the poll time. | |||
sed -i "s/^#POLLTIME/POLLTIME/" /etc/apcupsd/apcupsd.${ups}.conf | |||
sed -i "s/^POLLTIME.*/POLLTIME 30/" /etc/apcupsd/apcupsd.${ups}.conf | |||
# Update the script directories | |||
sed -i "s/^SCRIPTDIR.*/SCRIPTDIR \/etc\/apcupsd\/null/" /etc/apcupsd/apcupsd.${ups}.conf | |||
sed -i "s/^PWRFAILDIR.*/PWRFAILDIR \/etc\/apcupsd\/null/" /etc/apcupsd/apcupsd.${ups}.conf | |||
# Change the shut down thresholds and disable the shut down annoy message | |||
sed -i "s/^BATTERYLEVEL .*/BATTERYLEVEL 0/" /etc/apcupsd/apcupsd.${ups}.conf | |||
sed -i "s/^MINUTES .*/MINUTES 0/" /etc/apcupsd/apcupsd.${ups}.conf | |||
sed -i "s/^ANNOY .*/ANNOY 0/" /etc/apcupsd/apcupsd.${ups}.conf | |||
# The NIS port isn't changing, but this makes sure it really is what we want. | |||
sed -i "s/^NISPORT.*/NISPORT 3551/" /etc/apcupsd/apcupsd.${ups}.conf | |||
# Finally, update the event log file name. | |||
sed -i "s/^EVENTSFILE .*/EVENTSFILE \/var\/log\/apcupsd.${ups}.events/" /etc/apcupsd/apcupsd.${ups}.conf | |||
# End with a 'diff' of the updated configuration against the backup we made. | |||
diff -u /etc/apcupsd/apcupsd.conf.anvil /etc/apcupsd/apcupsd.${ups}.conf | |||
</syntaxhighlight> | </syntaxhighlight> | ||
<syntaxhighlight lang=" | <syntaxhighlight lang="diff"> | ||
--- /etc/apcupsd/apcupsd.conf.anvil 2013-11-26 15:49:47.852153374 -0500 | |||
( | +++ /etc/apcupsd/apcupsd.an-ups01.conf 2013-11-26 19:58:17.810278390 -0500 | ||
@@ -12,7 +12,7 @@ | |||
# Use this to give your UPS a name in log files and such. This | |||
# is particulary useful if you have multiple UPSes. This does not | |||
# set the EEPROM. It should be 8 characters or less. | |||
-#UPSNAME | |||
+UPSNAME an-ups01 | |||
# UPSCABLE <cable> | |||
# Defines the type of cable connecting the UPS to your computer. | |||
@@ -76,8 +76,8 @@ | |||
# 3052. If this parameter is empty or missing, the | |||
# default of 3052 will be used. | |||
# | |||
-UPSTYPE apcsmart | |||
-DEVICE /dev/ttyS0 | |||
+UPSTYPE snmp | |||
+DEVICE an-ups01.alteeve.ca:161:APC_NOTRAP:private | |||
# POLLTIME <int> | |||
# Interval (in seconds) at which apcupsd polls the UPS for status. This | |||
@@ -86,7 +86,7 @@ | |||
# will improve apcupsd's responsiveness to certain events at the cost of | |||
# higher CPU utilization. The default of 60 is appropriate for most | |||
# situations. | |||
-#POLLTIME 60 | |||
+POLLTIME 30 | |||
# LOCKFILE <path to lockfile> | |||
# Path for device lock file. Not used on Win32. | |||
@@ -94,14 +94,14 @@ | |||
# SCRIPTDIR <path to script directory> | |||
# Directory in which apccontrol and event scripts are located. | |||
-SCRIPTDIR /etc/apcupsd | |||
+SCRIPTDIR /etc/apcupsd/null | |||
# PWRFAILDIR <path to powerfail directory> | |||
# Directory in which to write the powerfail flag file. This file | |||
# is created when apcupsd initiates a system shutdown and is | |||
# checked in the OS halt scripts to determine if a killpower | |||
# (turning off UPS output power) is required. | |||
-PWRFAILDIR /etc/apcupsd | |||
+PWRFAILDIR /etc/apcupsd/null | |||
# NOLOGINDIR <path to nologin directory> | |||
# Directory in which to write the nologin file. The existence | |||
@@ -132,12 +132,12 @@ | |||
# If during a power failure, the remaining battery percentage | |||
# (as reported by the UPS) is below or equal to BATTERYLEVEL, | |||
# apcupsd will initiate a system shutdown. | |||
-BATTERYLEVEL 5 | |||
+BATTERYLEVEL 0 | |||
# If during a power failure, the remaining runtime in minutes | |||
# (as calculated internally by the UPS) is below or equal to MINUTES, | |||
# apcupsd, will initiate a system shutdown. | |||
-MINUTES 3 | |||
+MINUTES 0 | |||
# If during a power failure, the UPS has run on batteries for TIMEOUT | |||
# many seconds or longer, apcupsd will initiate a system shutdown. | |||
@@ -155,7 +155,7 @@ | |||
# Time in seconds between annoying users to signoff prior to | |||
# system shutdown. 0 disables. | |||
-ANNOY 300 | |||
+ANNOY 0 | |||
# Initial delay after power failure before warning users to get | |||
# off the system. | |||
@@ -203,7 +203,7 @@ | |||
# If you want the last few EVENTS to be available over the network | |||
# by the network information server, you must define an EVENTSFILE. | |||
-EVENTSFILE /var/log/apcupsd.events | |||
+EVENTSFILE /var/log/apcupsd.an-ups01.events | |||
# EVENTSFILEMAX <kilobytes> | |||
# By default, the size of the EVENTSFILE will be not be allowed to exceed | |||
</syntaxhighlight> | </syntaxhighlight> | ||
|} | |||
Now we will copy the <span class="code">an-ups01</span> config file over to the one we'll use for <span class="code">an-ups02</span>. | |||
We're going to change the following variables: | |||
< | {|class="wikitable sortable" | ||
!Variable | |||
</ | !Changed value for <span class="code">an-ups02</span> | ||
< | |- | ||
|style="white-space: nowrap;"|<span class="code">UPSNAME</span> | |||
|style="white-space: nowrap;"|<span class="code">an-ups02</span> | |||
|- | |||
|style="white-space: nowrap;"|<span class="code">DEVICE</span> | |||
|style="white-space: nowrap;"|<span class="code">an-ups02.alteeve.ca:161:APC_NOTRAP:private</span> | |||
|- | |||
|style="white-space: nowrap;"|<span class="code">NISPORT</span> | |||
|style="white-space: nowrap;"|<span class="code">3552</span> | |||
|- | |||
|style="white-space: nowrap;"|<span class="code">EVENTSFILE</span> | |||
|style="white-space: nowrap;"|<span class="code">/var/log/apcupsd.an-ups02.events</span> | |||
|} | |||
We're going to copy the configuration file and then use <span class="code">sed</span> again to make these changes. We'll finish with another <span class="code">diff</span> showing the differences between the two configuration files. | |||
{|class="wikitable" | |||
!<span class="code">an-a05n01</span> | |||
|style="white-space: nowrap;"|<syntaxhighlight lang="bash"> | |||
# Set the name of this UPS. The 'domain' variable should still be set. | |||
ups2="an-ups02" | |||
# Make a copy of the configuration file. | |||
cp /etc/apcupsd/apcupsd.${ups}.conf /etc/apcupsd/apcupsd.${ups2}.conf | |||
# Change the variables | |||
sed -i "s/^UPSNAME.*/UPSNAME ${ups2}/" /etc/apcupsd/apcupsd.${ups2}.conf | |||
sed -i "s/^DEVICE.*/DEVICE ${ups2}.${domain}:161:APC_NOTRAP:private/" /etc/apcupsd/apcupsd.${ups2}.conf | |||
sed -i "s/^NISPORT.*/NISPORT 3552/" /etc/apcupsd/apcupsd.${ups2}.conf | |||
sed -i "s/^EVENTSFILE .*/EVENTSFILE \/var\/log\/apcupsd.${ups2}.events/" /etc/apcupsd/apcupsd.${ups2}.conf | |||
diff -u /etc/apcupsd/apcupsd.${ups2}.conf /etc/apcupsd/apcupsd.${ups}.conf | |||
</syntaxhighlight> | </syntaxhighlight> | ||
<syntaxhighlight lang=" | <syntaxhighlight lang="diff"> | ||
--- /etc/apcupsd/apcupsd.an-ups02.conf 2013-11-26 20:09:18.884783551 -0500 | |||
+++ /etc/apcupsd/apcupsd.an-ups01.conf 2013-11-26 20:13:20.273346652 -0500 | |||
@@ -12,7 +12,7 @@ | |||
# Use this to give your UPS a name in log files and such. This | |||
# is particulary useful if you have multiple UPSes. This does not | |||
# set the EEPROM. It should be 8 characters or less. | |||
-UPSNAME an-ups01 | |||
+UPSNAME an-ups02 | |||
# UPSCABLE <cable> | |||
# Defines the type of cable connecting the UPS to your computer. | |||
@@ -77,7 +77,7 @@ | |||
# default of 3052 will be used. | |||
# | |||
UPSTYPE snmp | |||
-DEVICE an-ups01.alteeve.ca:161:APC_NOTRAP:private | |||
+DEVICE an-ups02.alteeve.ca:161:APC_NOTRAP:private | |||
# POLLTIME <int> | |||
# Interval (in seconds) at which apcupsd polls the UPS for status. This | |||
@@ -199,11 +199,11 @@ | |||
# It is not used unless NETSERVER is on. If you change this port, | |||
# you will need to change the corresponding value in the cgi directory | |||
# and rebuild the cgi programs. | |||
-NISPORT 3551 | |||
+NISPORT 3552 | |||
# If you want the last few EVENTS to be available over the network | |||
# by the network information server, you must define an EVENTSFILE. | |||
-EVENTSFILE /var/log/apcupsd.an-ups01.events | |||
+EVENTSFILE /var/log/apcupsd.an-ups02.events | |||
# EVENTSFILEMAX <kilobytes> | |||
# By default, the size of the EVENTSFILE will be not be allowed to exceed | |||
</syntaxhighlight> | </syntaxhighlight> | ||
|} | |||
We' | The last change that is needed is to update the <span class="code">apcupsd</span> initialization script. We're going to copy a pre-edited one from the <span class="code">alteeve.ca</span> server and then look at the differences. We could edit the file, but it would be a little more complex. So instead, lets look at the differences and then talk about what changed. | ||
<syntaxhighlight lang=" | {|class="wikitable" | ||
!<span class="code">an-a05n01</span> | |||
|style="white-space: nowrap;"|<syntaxhighlight lang="bash"> | |||
mv /etc/init.d/apcupsd /root/apcupsd.init.d.anvil | |||
wget https://alteeve.ca/files/apcupsd/apcupsd -O /etc/init.d/apcupsd | |||
</syntaxhighlight> | </syntaxhighlight> | ||
<syntaxhighlight lang="text"> | <syntaxhighlight lang="text"> | ||
--2013-11-26 20:59:42-- https://alteeve.ca/files/apcupsd/apcupsd | |||
Resolving alteeve.ca... 65.39.153.64 | |||
Connecting to alteeve.ca|65.39.153.64|:443... connected. | |||
HTTP request sent, awaiting response... 200 OK | |||
Length: 1759 (1.7K) [text/plain] | |||
Saving to: `/etc/init.d/apcupsd' | |||
100%[=========================================================================>] 1,759 --.-K/s in 0s | |||
2013-11-26 20:59:42 (5.10 MB/s) - `/etc/init.d/apcupsd' saved [1759/1759] | |||
</syntaxhighlight> | |||
<syntaxhighlight lang="bash"> | |||
chmod 755 /etc/init.d/apcupsd | |||
</syntaxhighlight> | </syntaxhighlight> | ||
<syntaxhighlight lang="text"> | <syntaxhighlight lang="text"> | ||
-rwxr-xr-x. 1 root root 1.8K Aug 19 2012 /etc/init.d/apcupsd | |||
</syntaxhighlight> | |||
<syntaxhighlight lang="bash"> | |||
diff -u /root/apcupsd.init.d.anvil /etc/init.d/apcupsd | |||
</syntaxhighlight> | </syntaxhighlight> | ||
<syntaxhighlight lang=" | <syntaxhighlight lang="diff"> | ||
--- /root/apcupsd.init.d.anvil 2013-03-04 23:32:43.000000000 -0500 | |||
( | +++ /etc/init.d/apcupsd 2012-08-19 18:36:33.000000000 -0400 | ||
@@ -1,7 +1,7 @@ | |||
#! /bin/sh | |||
# | |||
# apcupsd This shell script takes care of starting and stopping | |||
-# the apcupsd UPS monitoring daemon. | |||
+# the apcupsd UPS monitoring daemon. Multi-UPS version. | |||
# | |||
# chkconfig: 2345 60 99 | |||
# description: apcupsd monitors power and takes action if necessary | |||
@@ -15,18 +15,24 @@ | |||
start) | |||
rm -f /etc/apcupsd/powerfail | |||
rm -f /etc/nologin | |||
- echo -n "Starting UPS monitoring:" | |||
- daemon /sbin/apcupsd -f /etc/apcupsd/apcupsd.conf | |||
- RETVAL=$? | |||
- echo | |||
- [ $RETVAL -eq 0 ] && touch /var/lock/subsys/apcupsd | |||
+ for conf in /etc/apcupsd/apcupsd.*.conf ; do | |||
+ inst=`basename $conf` | |||
+ echo -n "Starting UPS monitoring ($inst):" | |||
+ daemon /sbin/apcupsd -f $conf -P /var/run/apcupsd-$inst.pid | |||
+ RETVAL=$? | |||
+ echo | |||
+ [ $RETVAL -eq 0 ] && touch /var/lock/subsys/apcupsd-$inst | |||
+ done | |||
;; | |||
stop) | |||
- echo -n "Shutting down UPS monitoring:" | |||
- killproc apcupsd | |||
- echo | |||
- rm -f $APCPID | |||
- rm -f /var/lock/subsys/apcupsd | |||
+ for conf in /etc/apcupsd/apcupsd.*.conf ; do | |||
+ inst=`basename $conf` | |||
+ echo -n "Shutting down UPS monitoring ($inst):" | |||
+ killproc -p /var/run/apcupsd-$inst.pid apcupsd | |||
+ echo | |||
+ rm -f /var/run/apcupsd-$inst.pid | |||
+ rm -f /var/lock/subsys/apcupsd-$inst | |||
+ done | |||
;; | |||
restart|force-reload) | |||
$0 stop | |||
@@ -38,14 +44,16 @@ | |||
exit 3 | |||
;; | |||
status) | |||
- status apcupsd | |||
- RETVAL=$? | |||
- if [ $RETVAL -eq 0 ] | |||
- then | |||
- /sbin/apcaccess status | |||
- else | |||
- exit $RETVAL | |||
- fi | |||
+ for conf in /etc/apcupsd/apcupsd.*.conf ; do | |||
+ inst=`basename $conf` | |||
+ status -p /var/run/apcupsd-$inst.pid apcupsd-$inst | |||
+ RETVAL=$? | |||
+ if [ $RETVAL -eq 0 ] | |||
+ then | |||
+ NISPORT=`grep ^NISPORT < $conf | sed -e "s/NISPORT *\([0-9]\)/\1/"` | |||
+ /sbin/apcaccess status localhost:$NISPORT | egrep "(STATUS)|(UPSNAME)" | |||
+ fi | |||
+ done | |||
;; | |||
*) | |||
echo "Usage: $0 {start|stop|restart|status}" | |||
</syntaxhighlight> | </syntaxhighlight> | ||
|} | |||
The main change here is that, for each of the <span class="code">start</span>, <span class="code">stop</span> and <span class="code">status</span> calls, we tell the <span class="code">init.d</span> script to loop one for each <span class="code">apcupsd.*.conf</span> file it finds. The original script expected just one configuration file but was otherwise perfect for what we needed. So we shifted the existing calls into our loop. | |||
So all this new script does is repeat what the original did already, once for each configuration file. | |||
Let's copy all of this over to <span class="code">an-a05n02</span> now! | |||
<syntaxhighlight lang=" | {|class="wikitable" | ||
!<span class="code">an-a05n01</span> | |||
|style="white-space: nowrap;"|<syntaxhighlight lang="bash"> | |||
rsync -av /etc/init.d/apcupsd root@an-a05n02:/etc/init.d/ | |||
</syntaxhighlight> | </syntaxhighlight> | ||
<syntaxhighlight lang="text"> | <syntaxhighlight lang="text"> | ||
sending incremental file list | |||
apcupsd | |||
sent 1834 bytes received 43 bytes 3754.00 bytes/sec | |||
total size is 1759 speedup is 0.94 | |||
</syntaxhighlight> | </syntaxhighlight> | ||
<syntaxhighlight lang="bash"> | |||
rsync -av /etc/apcupsd root@an-a05n02:/etc/ | |||
<syntaxhighlight lang=" | |||
</syntaxhighlight> | </syntaxhighlight> | ||
<syntaxhighlight lang="text"> | <syntaxhighlight lang="text"> | ||
sending incremental file list | |||
apcupsd/ | |||
apcupsd/apcupsd.an-ups01.conf | |||
apcupsd/apcupsd.an-ups02.conf | |||
apcupsd/apcupsd.conf.anvil | |||
apcupsd/null/ | |||
apcupsd/null/apccontrol | |||
apcupsd/null/changeme | |||
apcupsd/null/commfailure | |||
apcupsd/null/commok | |||
apcupsd/null/doshutdown | |||
apcupsd/null/offbattery | |||
apcupsd/null/onbattery | |||
sent 44729 bytes received 210 bytes 29959.33 bytes/sec | |||
total size is 70943 speedup is 1.58 | |||
</syntaxhighlight> | </syntaxhighlight> | ||
<syntaxhighlight lang="bash"> | |||
rsync -av /root/apcupsd.init.d.anvil root@an-a05n02:/root/ | |||
<syntaxhighlight lang=" | |||
</syntaxhighlight> | </syntaxhighlight> | ||
<syntaxhighlight lang="text"> | <syntaxhighlight lang="text"> | ||
sending incremental file list | |||
apcupsd.init.d.anvil | |||
sent 1276 bytes received 31 bytes 871.33 bytes/sec | |||
total size is 1188 speedup is 0.91 | |||
</syntaxhighlight> | </syntaxhighlight> | ||
|} | |||
=== SELinux and apcupsd === | |||
{{note|1=This section needs some clean-up.}} | |||
We've got two [[SELinux]] issues to address: | |||
* Allow the second <span class="code">apcupsd</span> daemon to use [[TCP]] and [[UDP]] ports <span class="code">3552</span>. | |||
</ | * Allow both daemons to write to the non-standard log files. | ||
You can see what ports <span class="code">selinux</span> allows various applications to use with <span class="code">semanage port -l</span>. This generates a lot of data, so we're interested just in seeing what ports <span class="code">apcupsd</span> is already allowed to use. So we'll pipe it through <span class="code">grep</span>. | |||
{|class="wikitable" | |||
!<span class="code">an-a05n01</span> | |||
|style="white-space: nowrap;"|<syntaxhighlight lang="bash"> | |||
semanage port -l |grep apcups | |||
</syntaxhighlight> | |||
<syntaxhighlight lang="text"> | <syntaxhighlight lang="text"> | ||
apcupsd_port_t tcp 3551 | |||
apcupsd_port_t udp 3551 | |||
</syntaxhighlight> | |||
|- | |||
!<span class="code">an-a05n02</span> | |||
|style="white-space: nowrap;"|<syntaxhighlight lang="bash"> | |||
semanage port -l |grep apcups | |||
</syntaxhighlight> | </syntaxhighlight> | ||
<syntaxhighlight lang="text"> | <syntaxhighlight lang="text"> | ||
apcupsd_port_t tcp 3551 | |||
apcupsd_port_t udp 3551 | |||
</syntaxhighlight> | </syntaxhighlight> | ||
|} | |||
We see that the <span class="code">apcupsd_port_t</span> context is used for both <span class="code">tcp</span> and <span class="code">udp</span>. With this, we can simply add port <span class="code">3552</span>. | |||
{{note|1=These commands can take a while to run. Please be patient.}} | |||
<syntaxhighlight lang="bash"> | {|class="wikitable" | ||
!<span class="code">an-a05n01</span> | |||
|style="white-space: nowrap;"|<syntaxhighlight lang="bash"> | |||
semanage port -a -t apcupsd_port_t -p tcp 3552 | |||
semanage port -a -t apcupsd_port_t -p udp 3552 | |||
semanage port -l |grep apcups | |||
</syntaxhighlight> | |||
<syntaxhighlight lang="text"> | |||
apcupsd_port_t tcp 3552, 3551 | |||
apcupsd_port_t udp 3552, 3551 | |||
</syntaxhighlight> | |||
|- | |||
!<span class="code">an-a05n02</span> | |||
|style="white-space: nowrap;"|<syntaxhighlight lang="bash"> | |||
semanage port -a -t apcupsd_port_t -p tcp 3552 | |||
semanage port -a -t apcupsd_port_t -p udp 3552 | |||
semanage port -l |grep apcups | |||
</syntaxhighlight> | |||
<syntaxhighlight lang="text"> | |||
apcupsd_port_t tcp 3552, 3551 | |||
apcupsd_port_t udp 3552, 3551 | |||
</syntaxhighlight> | </syntaxhighlight> | ||
|} | |||
Next up, enabling the context for the <span class="code">/var/log/apcupsd.an-ups01.events</span> and <span class="code">/var/log/apcupsd.an-ups02.events</span> log files. | |||
= | These files don't exist until the daemon starts for the first time. We've not started it yet, so the first task is to <span class="code">touch</span> to create these log files. | ||
{|class="wikitable" | |||
!<span class="code">an-a05n01</span> | |||
|style="white-space: nowrap;"|<syntaxhighlight lang="bash"> | |||
touch /var/log/apcupsd.an-ups01.events | |||
touch /var/log/apcupsd.an-ups02.events | |||
</syntaxhighlight> | |||
|- | |||
!<span class="code">an-a05n02</span> | |||
|style="white-space: nowrap;"|<syntaxhighlight lang="bash"> | |||
touch /var/log/apcupsd.an-ups01.events | |||
touch /var/log/apcupsd.an-ups02.events | |||
</syntaxhighlight> | |||
|} | |||
We don't have the default log file to check to see what context to use for our log files, but the <span class="code">[http://mgrepl.fedorapeople.org/man_selinux/Fedora18/apcupsd.html apcupsd_selinux]</span> manual tells us that we need to set the <span class="code">apcupsd_log_t </span> context. | |||
We | |||
{|class="wikitable" | |||
!<span class="code">an-a05n01</span> | |||
|style="white-space: nowrap;"|<syntaxhighlight lang="bash"> | |||
ls -lahZ /var/log/apcupsd.an-ups0* | |||
</syntaxhighlight> | |||
<syntaxhighlight lang="text"> | |||
-rw-r--r--. root root system_u:object_r:var_log_t:s0 /var/log/apcupsd.an-ups01.events | |||
-rw-r--r--. root root system_u:object_r:var_log_t:s0 /var/log/apcupsd.an-ups02.events | |||
</syntaxhighlight> | |||
<syntaxhighlight lang="bash"> | <syntaxhighlight lang="bash"> | ||
semanage fcontext -a -t apcupsd_log_t /var/log/apcupsd.an-ups01.events | |||
semanage fcontext -a -t apcupsd_log_t /var/log/apcupsd.an-ups02.events | |||
restorecon /var/log/apcupsd.an-ups01.events | |||
restorecon /var/log/apcupsd.an-ups02.events | |||
ls -lahZ /var/log/apcupsd.an-ups0* | |||
</syntaxhighlight> | </syntaxhighlight> | ||
<syntaxhighlight lang="text"> | <syntaxhighlight lang="text"> | ||
-rw-r--r--. root root system_u:object_r:apcupsd_log_t:s0 /var/log/apcupsd.an-ups01.events | |||
-rw-r--r--. root root system_u:object_r:apcupsd_log_t:s0 /var/log/apcupsd.an-ups02.events | |||
</syntaxhighlight> | |||
|- | |||
!<span class="code">an-a05n02</span> | |||
|style="white-space: nowrap;"|<syntaxhighlight lang="bash"> | |||
ls -lahZ /var/log/apcupsd.an-ups0* | |||
</syntaxhighlight> | |||
<syntaxhighlight lang="text"> | |||
-rw-r--r--. root root system_u:object_r:var_log_t:s0 /var/log/apcupsd.an-ups01.events | |||
-rw-r--r--. root root system_u:object_r:var_log_t:s0 /var/log/apcupsd.an-ups02.events | |||
</syntaxhighlight> | |||
<syntaxhighlight lang="bash"> | |||
semanage fcontext -a -t apcupsd_log_t /var/log/apcupsd.an-ups01.events | |||
semanage fcontext -a -t apcupsd_log_t /var/log/apcupsd.an-ups02.events | |||
restorecon /var/log/apcupsd.an-ups01.events | |||
restorecon /var/log/apcupsd.an-ups02.events | |||
ls -lahZ /var/log/apcupsd.an-ups0* | |||
</syntaxhighlight> | |||
<syntaxhighlight lang="text"> | |||
-rw-r--r--. root root system_u:object_r:apcupsd_log_t:s0 /var/log/apcupsd.an-ups01.events | |||
-rw-r--r--. root root system_u:object_r:apcupsd_log_t:s0 /var/log/apcupsd.an-ups02.events | |||
</syntaxhighlight> | </syntaxhighlight> | ||
|} | |||
Ok, ready to test! | |||
=== Testing the Multi-UPS apcupds === | |||
If our edits above worked properly, we should now be able to start the <span class="code">apcupsd</span> daemon and query out UPSes. | |||
{|class="wikitable" | |||
!<span class="code">an-a05n01</span> | |||
|style="white-space: nowrap;"|<syntaxhighlight lang="bash"> | |||
/etc/init.d/apcupsd start | |||
</syntaxhighlight> | |||
<syntaxhighlight lang="text"> | <syntaxhighlight lang="text"> | ||
Starting UPS monitoring (apcupsd.an-ups01.conf): [ OK ] | |||
Starting UPS monitoring (apcupsd.an-ups02.conf): [ OK ] | |||
</syntaxhighlight> | |||
|- | |||
!<span class="code">an-a05n02</span> | |||
|style="white-space: nowrap;"|<syntaxhighlight lang="bash"> | |||
/etc/init.d/apcupsd start | |||
</syntaxhighlight> | </syntaxhighlight> | ||
<syntaxhighlight lang="text"> | <syntaxhighlight lang="text"> | ||
Starting UPS monitoring (apcupsd.an-ups01.conf): [ OK ] | |||
Starting UPS monitoring (apcupsd.an-ups02.conf): [ OK ] | |||
</syntaxhighlight> | </syntaxhighlight> | ||
|} | |||
That looks good. Now the real test; Query the status of each UPS! | |||
This generates a fair bit of output, so lets just look at <span class="code">an-a05n01</span> first. | |||
{|class="wikitable" | |||
!<span class="code">an-a05n01</span> | |||
|style="white-space: nowrap;"|<syntaxhighlight lang="bash"> | |||
apcaccess status localhost:3551 | |||
</syntaxhighlight> | |||
<syntaxhighlight lang="text"> | <syntaxhighlight lang="text"> | ||
APC : 001,049,1198 | |||
DATE : 2013-11-26 21:21:20 -0500 | |||
HOSTNAME : an-a05n01.alteeve.ca | |||
VERSION : 3.14.10 (13 September 2011) redhat | |||
UPSNAME : an-ups01 | |||
CABLE : Ethernet Link | |||
DRIVER : SNMP UPS Driver | |||
UPSMODE : Stand Alone | |||
STARTTIME: 2013-11-26 21:18:16 -0500 | |||
MODEL : Smart-UPS 1500 | |||
STATUS : ONLINE | |||
LINEV : 123.0 Volts | |||
LOADPCT : 23.0 Percent Load Capacity | |||
BCHARGE : 100.0 Percent | |||
TIMELEFT : 57.0 Minutes | |||
MBATTCHG : 0 Percent | |||
MINTIMEL : 0 Minutes | |||
MAXTIME : 0 Seconds | |||
MAXLINEV : 123.0 Volts | |||
MINLINEV : 121.0 Volts | |||
OUTPUTV : 123.0 Volts | |||
SENSE : Medium | |||
DWAKE : 1000 Seconds | |||
DSHUTD : 020 Seconds | |||
DLOWBATT : 02 Minutes | |||
LOTRANS : 103.0 Volts | |||
HITRANS : 130.0 Volts | |||
RETPCT : 000.0 Percent | |||
ITEMP : 31.0 C Internal | |||
ALARMDEL : 5 seconds | |||
BATTV : 27.0 Volts | |||
LINEFREQ : 60.0 Hz | |||
LASTXFER : Automatic or explicit self test | |||
NUMXFERS : 0 | |||
TONBATT : 0 seconds | |||
CUMONBATT: 0 seconds | |||
XOFFBATT : N/A | |||
SELFTEST : OK | |||
STESTI : OFF | |||
STATFLAG : 0x07000008 Status Flag | |||
MANDATE : 09/18/2010 | |||
SERIALNO : AS1038232403 | |||
BATTDATE : 09/01/2011 | |||
NOMOUTV : 120 Volts | |||
HUMIDITY : 6519592.0 Percent | |||
AMBTEMP : 6519592.0 C | |||
EXTBATTS : 0 | |||
BADBATTS : 0 | |||
FIRMWARE : UPS 05.0 / COM 02.1 | |||
END APC : 2013-11-26 21:21:29 -0500 | |||
</syntaxhighlight> | |||
<syntaxhighlight lang="bash"> | |||
apcaccess status localhost:3552 | |||
</syntaxhighlight> | |||
<syntaxhighlight lang="text"> | |||
APC : 001,050,1242 | |||
DATE : 2013-11-26 21:21:48 -0500 | |||
HOSTNAME : an-a05n01.alteeve.ca | |||
VERSION : 3.14.10 (13 September 2011) redhat | |||
UPSNAME : APCUPS | |||
CABLE : Ethernet Link | |||
DRIVER : SNMP UPS Driver | |||
UPSMODE : Stand Alone | |||
STARTTIME: 2013-11-26 21:18:16 -0500 | |||
MODEL : Smart-UPS 1500 | |||
STATUS : ONLINE | |||
LINEV : 123.0 Volts | |||
LOADPCT : 22.0 Percent Load Capacity | |||
BCHARGE : 100.0 Percent | |||
TIMELEFT : 58.0 Minutes | |||
MBATTCHG : 0 Percent | |||
MINTIMEL : 0 Minutes | |||
MAXTIME : 0 Seconds | |||
MAXLINEV : 123.0 Volts | |||
MINLINEV : 122.0 Volts | |||
OUTPUTV : 122.0 Volts | |||
SENSE : High | |||
DWAKE : 000 Seconds | |||
DSHUTD : 000 Seconds | |||
DLOWBATT : 02 Minutes | |||
LOTRANS : 106.0 Volts | |||
HITRANS : 127.0 Volts | |||
RETPCT : 31817744.0 Percent | |||
ITEMP : 30.0 C Internal | |||
ALARMDEL : 30 seconds | |||
BATTV : 27.0 Volts | |||
LINEFREQ : 60.0 Hz | |||
LASTXFER : Automatic or explicit self test | |||
NUMXFERS : 0 | |||
TONBATT : 0 seconds | |||
CUMONBATT: 0 seconds | |||
XOFFBATT : N/A | |||
SELFTEST : OK | |||
STESTI : OFF | |||
STATFLAG : 0x07000008 Status Flag | |||
MANDATE : 06/14/2012 | |||
SERIALNO : AS1224213144 | |||
BATTDATE : 10/15/2012 | |||
NOMOUTV : 120 Volts | |||
NOMBATTV : 31817744.0 Volts | |||
HUMIDITY : 6519592.0 Percent | |||
AMBTEMP : 6519592.0 C | |||
EXTBATTS : 31817744 | |||
BADBATTS : 6519592 | |||
FIRMWARE : UPS 08.3 / MCU 14.0 | |||
END APC : 2013-11-26 21:21:57 -0500 | |||
</syntaxhighlight> | |||
|} | |||
If you notice the serial numbers, we see that they differ and match the ones we have on record. This confirms that we're talking to both UPSes! | |||
Before we look at <span class="code">an-a05n02</span>, the keen observer will have noted that some of the sensor values are slightly unrealistic. Some UPSes optionally support environmental sensors and, without them, their values are not realistic at all. Those can be safely ignored and are not used by the monitoring and alert system. | |||
So, let's confirm that the same calls from <span class="code">an-a05n02</span> result in the same values! | |||
{|class="wikitable" | |||
!<span class="code">an-a05n02</span> | |||
|style="white-space: nowrap;"|<syntaxhighlight lang="bash"> | |||
apcaccess status localhost:3551 | |||
</syntaxhighlight> | |||
<syntaxhighlight lang="text"> | |||
APC : 001,049,1198 | |||
DATE : 2013-11-26 22:14:12 -0500 | |||
HOSTNAME : an-a05n02.alteeve.ca | |||
VERSION : 3.14.10 (13 September 2011) redhat | |||
UPSNAME : an-ups01 | |||
CABLE : Ethernet Link | |||
DRIVER : SNMP UPS Driver | |||
UPSMODE : Stand Alone | |||
STARTTIME: 2013-11-26 21:19:30 -0500 | |||
MODEL : Smart-UPS 1500 | |||
STATUS : ONLINE | |||
LINEV : 122.0 Volts | |||
LOADPCT : 23.0 Percent Load Capacity | |||
BCHARGE : 100.0 Percent | |||
TIMELEFT : 57.0 Minutes | |||
MBATTCHG : 0 Percent | |||
MINTIMEL : 0 Minutes | |||
MAXTIME : 0 Seconds | |||
MAXLINEV : 123.0 Volts | |||
MINLINEV : 122.0 Volts | |||
OUTPUTV : 122.0 Volts | |||
SENSE : Medium | |||
DWAKE : 1000 Seconds | |||
DSHUTD : 020 Seconds | |||
DLOWBATT : 02 Minutes | |||
LOTRANS : 103.0 Volts | |||
HITRANS : 130.0 Volts | |||
RETPCT : 000.0 Percent | |||
ITEMP : 31.0 C Internal | |||
ALARMDEL : 5 seconds | |||
BATTV : 27.0 Volts | |||
LINEFREQ : 60.0 Hz | |||
LASTXFER : Automatic or explicit self test | |||
NUMXFERS : 0 | |||
TONBATT : 0 seconds | |||
CUMONBATT: 0 seconds | |||
XOFFBATT : N/A | |||
SELFTEST : OK | |||
STESTI : OFF | |||
STATFLAG : 0x07000008 Status Flag | |||
MANDATE : 09/18/2010 | |||
SERIALNO : AS1038232403 | |||
BATTDATE : 09/01/2011 | |||
NOMOUTV : 120 Volts | |||
HUMIDITY : 6519592.0 Percent | |||
AMBTEMP : 6519592.0 C | |||
EXTBATTS : 0 | |||
BADBATTS : 0 | |||
FIRMWARE : UPS 05.0 / COM 02.1 | |||
END APC : 2013-11-26 22:14:22 -0500 | |||
</syntaxhighlight> | |||
<syntaxhighlight lang="bash"> | <syntaxhighlight lang="bash"> | ||
apcaccess status localhost:3552 | |||
</syntaxhighlight> | </syntaxhighlight> | ||
<syntaxhighlight lang=" | <syntaxhighlight lang="text"> | ||
APC : 001,050,1242 | |||
DATE : 2013-11-26 22:14:11 -0500 | |||
HOSTNAME : an-a05n02.alteeve.ca | |||
VERSION : 3.14.10 (13 September 2011) redhat | |||
UPSNAME : APCUPS | |||
CABLE : Ethernet Link | |||
DRIVER : SNMP UPS Driver | |||
UPSMODE : Stand Alone | |||
STARTTIME: 2013-11-26 21:19:30 -0500 | |||
MODEL : Smart-UPS 1500 | |||
STATUS : ONLINE | |||
LINEV : 123.0 Volts | |||
LOADPCT : 22.0 Percent Load Capacity | |||
BCHARGE : 100.0 Percent | |||
TIMELEFT : 58.0 Minutes | |||
MBATTCHG : 0 Percent | |||
MINTIMEL : 0 Minutes | |||
MAXTIME : 0 Seconds | |||
MAXLINEV : 123.0 Volts | |||
MINLINEV : 122.0 Volts | |||
OUTPUTV : 123.0 Volts | |||
SENSE : High | |||
DWAKE : 000 Seconds | |||
DSHUTD : 000 Seconds | |||
DLOWBATT : 02 Minutes | |||
LOTRANS : 106.0 Volts | |||
HITRANS : 127.0 Volts | |||
RETPCT : 19898384.0 Percent | |||
ITEMP : 30.0 C Internal | |||
ALARMDEL : 30 seconds | |||
BATTV : 27.0 Volts | |||
LINEFREQ : 60.0 Hz | |||
LASTXFER : Automatic or explicit self test | |||
NUMXFERS : 0 | |||
TONBATT : 0 seconds | |||
CUMONBATT: 0 seconds | |||
XOFFBATT : N/A | |||
SELFTEST : OK | |||
STESTI : OFF | |||
STATFLAG : 0x07000008 Status Flag | |||
MANDATE : 06/14/2012 | |||
SERIALNO : AS1224213144 | |||
BATTDATE : 10/15/2012 | |||
NOMOUTV : 120 Volts | |||
NOMBATTV : 19898384.0 Volts | |||
HUMIDITY : 6519592.0 Percent | |||
AMBTEMP : 6519592.0 C | |||
EXTBATTS : 19898384 | |||
BADBATTS : 6519592 | |||
FIRMWARE : UPS 08.3 / MCU 14.0 | |||
END APC : 2013-11-26 22:14:38 -0500 | |||
</syntaxhighlight> | </syntaxhighlight> | ||
|} | |||
=== | Exactly what we wanted! | ||
Later, when we setup the monitoring and alert system, we'll take a closer look at some of the variables and their possible values. | |||
== Monitoring Storage == | |||
At this time, this section covers monitoring LSI-based [[RAID]] controllers. If you have a different RAID controller and wish to contribute, we'd [[Contct us|love to hear from you]]. | |||
=== Monitoring LSI-Based RAID Controllers with MegaCli === | |||
Many tier-1 hardware vendors as well as many mid-tier and in-house brand servers use controllers built by or based on [http://www.lsi.com LSI] [[RAID]] controller cards. | |||
==== Installing MegaCli ==== | |||
In this section, we'll install LSI's <span class="code">MegaCli64</span> command-line tool for monitoring our storage. This is a commercial tool, so you must download it directly from LSI's website and agree to their license agreement. | |||
At the time of writing, you can download it [http://www.lsi.com/support/Pages/download-results.aspx?keyword=latest%20megacli%20for%20linux using this link]. Click on the orange "+" to the right of "''Management Software and Tools''" in the search results page. Click on the "Download" icon and save the file to disk. Extract the <span class="code">MegaCli_Linux.zip</span> file and switch to the <span class="code">/MegaCli_Linux</span> directory. | |||
{{note|1=The | {{note|1=The version of the file name shown below may have changed.}} | ||
Copy the <span class="code">MegaCli-8.07.08-1.noarch.rpm</span> file to your nodes. | |||
<syntaxhighlight lang="bash"> | <syntaxhighlight lang="bash"> | ||
rsync -av MegaCli-8.07.08-1.noarch.rpm root@an-a05n01:/root/ | |||
</syntaxhighlight> | </syntaxhighlight> | ||
<syntaxhighlight lang="text"> | <syntaxhighlight lang="text"> | ||
sending incremental file list | |||
MegaCli-8.07.08-1.noarch.rpm | |||
sent 1552828 bytes received 31 bytes 345079.78 bytes/sec | |||
total size is 1552525 speedup is 1.00 | |||
</syntaxhighlight> | |||
<syntaxhighlight lang="bash"> | |||
rsync -av MegaCli-8.07.08-1.noarch.rpm root@an-a05n02:/root/ | |||
</syntaxhighlight> | |||
<syntaxhighlight lang="text"> | |||
sending incremental file list | |||
MegaCli-8.07.08-1.noarch.rpm | |||
sent 1552828 bytes received 31 bytes 345079.78 bytes/sec | |||
total size is 1552525 speedup is 1.00 | |||
</syntaxhighlight> | |||
Now we can install the program on our nodes. | |||
{|class="wikitable" | |||
!<span class="code">an-a05n01</span> | |||
|style="white-space: nowrap;"|<syntaxhighlight lang="bash"> | |||
rpm -Uvh MegaCli-8.07.08-1.noarch.rpm | |||
</syntaxhighlight> | |||
<syntaxhighlight lang="text"> | |||
Preparing... ########################################### [100%] | |||
1:MegaCli ########################################### [100%] | |||
</syntaxhighlight> | </syntaxhighlight> | ||
|- | |||
!<span class="code">an-a05n02</span> | |||
|style="white-space: nowrap;"|<syntaxhighlight lang="bash"> | |||
<syntaxhighlight lang="bash"> | rpm -Uvh MegaCli-8.07.08-1.noarch.rpm | ||
</syntaxhighlight> | </syntaxhighlight> | ||
<syntaxhighlight lang="text"> | <syntaxhighlight lang="text"> | ||
# | Preparing... ########################################### [100%] | ||
1:MegaCli ########################################### [100%] | |||
</syntaxhighlight> | |||
|} | |||
By default, the <span class="code">MegaCli64</span> binary is saved in <span class="code">/opt/MegaRAID/MegaCli/MegaCli64</span>. This isn't in [[RHEL]]'s default <span class="code">PATH</span>, so we will want to make a symlink to <span class="code">/sbin</span>. This way, we can simply type '<span class="code">MegaCli64</span>' instead of the full path. | |||
{|class="wikitable" | |||
!<span class="code">an-a05n01</span> | |||
|style="white-space: nowrap;"|<syntaxhighlight lang="bash"> | |||
ln -s /opt/MegaRAID/MegaCli/MegaCli64 /sbin/ | |||
ls -lah /sbin/MegaCli64 | |||
</syntaxhighlight> | |||
<syntaxhighlight lang="text"> | |||
lrwxrwxrwx. 1 root root 31 Nov 28 19:28 /sbin/MegaCli64 -> /opt/MegaRAID/MegaCli/MegaCli64 | |||
</syntaxhighlight> | |||
|- | |||
!<span class="code">an-a05n02</span> | |||
|style="white-space: nowrap;"|<syntaxhighlight lang="bash"> | |||
ln -s /opt/MegaRAID/MegaCli/MegaCli64 /sbin/ | |||
ls -lah /sbin/MegaCli64 | |||
</syntaxhighlight> | |||
<syntaxhighlight lang="text"> | |||
lrwxrwxrwx. 1 root root 31 Nov 28 19:28 /sbin/MegaCli64 -> /opt/MegaRAID/MegaCli/MegaCli64 | |||
</syntaxhighlight> | </syntaxhighlight> | ||
|} | |||
Excellent. | |||
==== Checking Storage Health with MegaCli64 ==== | |||
{{warning|1=This tutorial was written using a development server and, as such, has only four drives in each array. All production servers should have a '''minimum''' of six drives to help ensure good storage response time under highly random reads and writes seen in virtualized environments.}} | |||
LSI RAID controllers are designed to work alone or in conjunction with other LSI controllers at the same time. For this reason, <span class="code">MegaCli64</span> supports multiple controllers, virtual disks, physical disks and so on. We're going to be using <span class="code">aAll</span> a lot. This simply tells <span class="code">MegaCli64</span> to show whatever we're asking for from all found adapters. | |||
The program itself is extremely powerful. Trying to cover all the ways that it can be used would require a long tutorial in and of itself. So we're going to just look at some core tasks that we're interested in. If you want to experiment, there is a great [http://mycusthelp.info/LSI/_cs/AnswerDetail.aspx?sSessionID=1081681638QKLFVWIPIZNXQYHDDTNIHQEJKOCZDB&inc=8040&caller=~%2fFindAnswers.aspx%3ftxtCriteria%3dmegacli%26sSessionid%3d1081681638QKLFVWIPIZNXQYHDDTNIHQEJKOCZDB cheat-sheet here]. | |||
Lets start by looking at the logical drive. | |||
<syntaxhighlight lang="bash"> | {|class="wikitable" | ||
!<span class="code">an-a05n01</span> | |||
!<span class="code">an-a05n02</span> | |||
|- | |||
|style="white-space: nowrap;"|<syntaxhighlight lang="bash"> | |||
MegaCli64 LDInfo Lall aAll | |||
</syntaxhighlight> | </syntaxhighlight> | ||
<syntaxhighlight lang="text"> | <syntaxhighlight lang="text"> | ||
Adapter 0 -- Virtual Drive Information: | |||
Virtual Drive: 0 (Target Id: 0) | |||
Name : | |||
RAID Level : Primary-5, Secondary-0, RAID Level Qualifier-3 | |||
Size : 836.625 GB | |||
Sector Size : 512 | |||
Parity Size : 278.875 GB | |||
State : Optimal | |||
Strip Size : 64 KB | |||
Number Of Drives : 4 | |||
Span Depth : 1 | |||
Default Cache Policy: WriteBack, ReadAheadNone, Direct, No Write Cache if Bad BBU | |||
Current Cache Policy: WriteBack, ReadAheadNone, Direct, No Write Cache if Bad BBU | |||
Default Access Policy: Read/Write | |||
Current Access Policy: Read/Write | |||
Disk Cache Policy : Disabled | |||
Encryption Type : None | |||
Bad Blocks Exist: No | |||
Is VD Cached: No | |||
Exit Code: 0x00 | |||
</syntaxhighlight> | |||
|style="white-space: nowrap;"|<syntaxhighlight lang="bash"> | |||
MegaCli64 LDInfo Lall aAll | |||
</syntaxhighlight> | |||
<syntaxhighlight lang="text"> | |||
Adapter 0 -- Virtual Drive Information: | |||
Virtual Drive: 0 (Target Id: 0) | |||
Name : | |||
RAID Level : Primary-5, Secondary-0, RAID Level Qualifier-3 | |||
Size : 836.625 GB | |||
Sector Size : 512 | |||
Parity Size : 278.875 GB | |||
State : Optimal | |||
Strip Size : 64 KB | |||
Number Of Drives : 4 | |||
Span Depth : 1 | |||
Default Cache Policy: WriteBack, ReadAheadNone, Direct, No Write Cache if Bad BBU | |||
Current Cache Policy: WriteBack, ReadAheadNone, Direct, No Write Cache if Bad BBU | |||
Default Access Policy: Read/Write | |||
Current Access Policy: Read/Write | |||
Disk Cache Policy : Disabled | |||
Encryption Type : None | |||
Bad Blocks Exist: No | |||
Is VD Cached: No | |||
Exit Code: 0x00 | |||
</syntaxhighlight> | |||
|} | |||
} | |||
Here we can see that the virtual disk has four real disks in RAID level 5, it is 836.625 [[GB]] in size and it's in [[WriteBack]] caching mode. This is pretty typical, save for the number of disks. | |||
Lets look now at the health of the RAID controller's battery. | |||
< | {|class="wikitable" | ||
!<span class="code">an-a05n01</span> | |||
!<span class="code">an-a05n02</span> | |||
|- | |||
|style="white-space: nowrap;"|<syntaxhighlight lang="bash"> | |||
MegaCli64 AdpBbuCmd aAll | |||
</syntaxhighlight> | </syntaxhighlight> | ||
<syntaxhighlight lang="text"> | <syntaxhighlight lang="text"> | ||
BBU status for Adapter: 0 | |||
BatteryType: iBBU | |||
Voltage: 4083 mV | |||
Current: 0 mA | |||
Temperature: 28 C | |||
Battery State: Optimal | |||
BBU Firmware Status: | |||
Charging Status : None | |||
Voltage : OK | |||
Temperature : OK | |||
Learn Cycle Requested : No | |||
Learn Cycle Active : No | |||
Learn Cycle Status : OK | |||
Learn Cycle Timeout : No | |||
I2c Errors Detected : No | |||
Battery Pack Missing : No | |||
Battery Replacement required : No | |||
Remaining Capacity Low : No | |||
Periodic Learn Required : No | |||
Transparent Learn : No | |||
No space to cache offload : No | |||
Pack is about to fail & should be replaced : No | |||
Cache Offload premium feature required : No | |||
Module microcode update required : No | |||
GasGuageStatus: | |||
Fully Discharged : No | |||
Fully Charged : Yes | |||
Discharging : Yes | |||
Initialized : Yes | |||
Remaining Time Alarm : No | |||
Discharge Terminated : No | |||
Over Temperature : No | |||
Charging Terminated : No | |||
Over Charged : No | |||
Relative State of Charge: 100 % | |||
Charger System State: 49168 | |||
Charger System Ctrl: 0 | |||
Charging current: 0 mA | |||
Absolute state of charge: 74 % | |||
Max Error: 2 % | |||
Battery backup charge time : 0 hours | |||
BBU Capacity Info for Adapter: 0 | |||
Relative State of Charge: 100 % | |||
Absolute State of charge: 74 % | |||
Remaining Capacity: 902 mAh | |||
Full Charge Capacity: 906 mAh | |||
Run time to empty: Battery is not being charged. | |||
Average time to empty: Battery is not being charged. | |||
Estimated Time to full recharge: Battery is not being charged. | |||
Cycle Count: 35 | |||
Max Error = 2 % | |||
Remaining Capacity Alarm = 120 mAh | |||
Remining Time Alarm = 10 Min | |||
BBU Design Info for Adapter: 0 | |||
Date of Manufacture: 10/22, 2010 | |||
Design Capacity: 1215 mAh | |||
Design Voltage: 3700 mV | |||
Specification Info: 33 | |||
Serial Number: 15686 | |||
Pack Stat Configuration: 0x6490 | |||
Manufacture Name: LS1121001A | |||
Firmware Version : | |||
Device Name: 3150301 | |||
Device Chemistry: LION | |||
Battery FRU: N/A | |||
Transparent Learn = 0 | |||
App Data = 0 | |||
BBU Properties for Adapter: 0 | |||
Auto Learn Period: 30 Days | |||
Next Learn time: Wed Dec 18 16:47:41 2013 | |||
Learn Delay Interval:0 Hours | |||
Auto-Learn Mode: Enabled | |||
<syntaxhighlight lang="bash"> | Exit Code: 0x00 | ||
</syntaxhighlight> | |||
|style="white-space: nowrap;"|<syntaxhighlight lang="bash"> | |||
MegaCli64 AdpBbuCmd aAll | |||
</syntaxhighlight> | </syntaxhighlight> | ||
<syntaxhighlight lang="text"> | <syntaxhighlight lang="text"> | ||
BBU status for Adapter: 0 | |||
BatteryType: iBBU | |||
Voltage: 4048 mV | |||
Current: 0 mA | |||
Temperature: 27 C | |||
Battery State: Optimal | |||
BBU Firmware Status: | |||
Charging Status : None | |||
Voltage : OK | |||
Temperature : OK | |||
Learn Cycle Requested : No | |||
Learn Cycle Active : No | |||
Learn Cycle Status : OK | |||
Learn Cycle Timeout : No | |||
I2c Errors Detected : No | |||
Battery Pack Missing : No | |||
Battery Replacement required : No | |||
Remaining Capacity Low : No | |||
Periodic Learn Required : No | |||
Transparent Learn : No | |||
No space to cache offload : No | |||
Pack is about to fail & should be replaced : No | |||
Cache Offload premium feature required : No | |||
Module microcode update required : No | |||
GasGuageStatus: | |||
Fully Discharged : No | |||
Fully Charged : Yes | |||
Discharging : Yes | |||
Initialized : Yes | |||
Remaining Time Alarm : No | |||
Discharge Terminated : No | |||
Over Temperature : No | |||
Charging Terminated : No | |||
Over Charged : No | |||
Relative State of Charge: 98 % | |||
Charger System State: 49168 | |||
Charger System Ctrl: 0 | |||
Charging current: 0 mA | |||
Absolute state of charge: 68 % | |||
Max Error: 2 % | |||
Battery backup charge time : 0 hours | |||
BBU Capacity Info for Adapter: 0 | |||
Relative State of Charge: 98 % | |||
Absolute State of charge: 68 % | |||
Remaining Capacity: 821 mAh | |||
Full Charge Capacity: 841 mAh | |||
Run time to empty: Battery is not being charged. | |||
Average time to empty: Battery is not being charged. | |||
Estimated Time to full recharge: Battery is not being charged. | |||
Cycle Count: 31 | |||
Max Error = 2 % | |||
Remaining Capacity Alarm = 120 mAh | |||
Remining Time Alarm = 10 Min | |||
BBU Design Info for Adapter: 0 | |||
Date of Manufacture: 10/23, 2010 | |||
Design Capacity: 1215 mAh | |||
Design Voltage: 3700 mV | |||
Specification Info: 33 | |||
Serial Number: 18704 | |||
Pack Stat Configuration: 0x64b0 | |||
Manufacture Name: LS1121001A | |||
Firmware Version : | |||
Device Name: 3150301 | |||
Device Chemistry: LION | |||
Battery FRU: N/A | |||
Transparent Learn = 0 | |||
App Data = 0 | |||
BBU Properties for Adapter: 0 | |||
Auto Learn Period: 30 Days | |||
Next Learn time: Mon Dec 23 05:29:33 2013 | |||
Learn Delay Interval:0 Hours | |||
Auto-Learn Mode: Enabled | |||
Exit Code: 0x00 | |||
</syntaxhighlight> | </syntaxhighlight> | ||
|} | |||
Now this gives us quite a bit of data. | |||
The battery's principal job is to protect the data in the data stored in the [[RAM]] module used to buffer writes (and a certain amount of reads) that have not yet been flushed to the physical disks. This is critical because, if this data was lost, the contents of the disk could be corrupted. | |||
This battery is generally used when the node loses power. Depending on whether your node has battery-backed write-cache (BBU) or flash-backed write-cache (FBWC), the battery will be used to store the data in the RAM until power is restored (BBU) or just long enough to copy the data in the cache module to persistent solid-state storage build into the battery or RAID controller. | |||
If your server uses a BBU, then watching the "hold up time". The controller above doesn't provide this because it is a flash-backed controller. If yours in a battery-backed controller, you will see a variable like: | |||
<syntaxhighlight lang="text"> | <syntaxhighlight lang="text"> | ||
Battery backup charge time : 48 hours + | |||
</syntaxhighlight> | </syntaxhighlight> | ||
This tells you that the node can protect the contents of the cache for greater than 48 hours. This means that, so long as power is restored to the server within two days, your data will be protected. Generally, if the hold up time falls below 24 hours, the BBU should be replaced. This happens because, as batteries age, they lose capacity. This is simple chemistry. | |||
Note that periodically, usually once per month, the controller intentionally drains and recharges the controller. This is called a "relearn cycle" (or simply a "learn cycle"). This is a way for the controller to verify the health of the battery. Should a battery fail to recharge, it will be declared dead and need to be replaced. | |||
Note that it is normal for the cache policy to switch from "write-back" to "write-through" once the battery is sufficiently drained. The controller should return to "write-back" mode once the learn cycle completes and the battery charges enough. During this time, the write speed will be reduced because all writes have to read the physical disks instead of just cache, which is slower. | |||
<syntaxhighlight lang="bash"> | Lastly, lets look at the individual drives. | ||
{|class="wikitable" | |||
!<span class="code">an-a05n01</span> | |||
!<span class="code">an-a05n02</span> | |||
|- | |||
|style="white-space: nowrap;"|<syntaxhighlight lang="bash"> | |||
MegaCli64 PDList aAll | |||
</syntaxhighlight> | </syntaxhighlight> | ||
<syntaxhighlight lang="text"> | <syntaxhighlight lang="text"> | ||
Adapter #0 | |||
Enclosure Device ID: 252 | |||
Slot Number: 0 | |||
Drive's position: DiskGroup: 0, Span: 0, Arm: 1 | |||
Enclosure position: N/A | |||
Device Id: 7 | |||
WWN: 5000C50043EE29E0 | |||
Sequence Number: 2 | |||
Media Error Count: 0 | |||
Other Error Count: 0 | |||
Predictive Failure Count: 0 | |||
Last Predictive Failure Event Seq Number: 0 | |||
PD Type: SAS | |||
Raw Size: 279.396 GB [0x22ecb25c Sectors] | |||
Non Coerced Size: 278.896 GB [0x22dcb25c Sectors] | |||
Coerced Size: 278.875 GB [0x22dc0000 Sectors] | |||
Sector Size: 0 | |||
Firmware state: Online, Spun Up | |||
Device Firmware Level: 1703 | |||
Shield Counter: 0 | |||
Successful diagnostics completion on : N/A | |||
SAS Address(0): 0x5000c50043ee29e1 | |||
SAS Address(1): 0x0 | |||
Connected Port Number: 3(path0) | |||
Inquiry Data: SEAGATE ST3300657SS 17036SJ3T7X6 @#87980 | |||
FDE Capable: Not Capable | |||
FDE Enable: Disable | |||
Secured: Unsecured | |||
Locked: Unlocked | |||
Needs EKM Attention: No | |||
Foreign State: None | |||
Device Speed: 6.0Gb/s | |||
Link Speed: 6.0Gb/s | |||
Media Type: Hard Disk Device | |||
Drive: Not Certified | |||
Drive Temperature :39C (102.20 F) | |||
PI Eligibility: No | |||
Drive is formatted for PI information: No | |||
PI: No PI | |||
Port-0 : | |||
Port status: Active | |||
Port's Linkspeed: 6.0Gb/s | |||
Port-1 : | |||
Port status: Active | |||
Port's Linkspeed: Unknown | |||
Drive has flagged a S.M.A.R.T alert : No | |||
Enclosure Device ID: 252 | |||
Slot Number: 1 | |||
Drive's position: DiskGroup: 0, Span: 0, Arm: 2 | |||
Enclosure position: N/A | |||
Device Id: 6 | |||
WWN: 5000C5004310F4B4 | |||
Sequence Number: 2 | |||
Media Error Count: 0 | |||
Other Error Count: 0 | |||
Predictive Failure Count: 0 | |||
Last Predictive Failure Event Seq Number: 0 | |||
PD Type: SAS | |||
Raw Size: 279.396 GB [0x22ecb25c Sectors] | |||
Non Coerced Size: 278.896 GB [0x22dcb25c Sectors] | |||
Coerced Size: 278.875 GB [0x22dc0000 Sectors] | |||
Sector Size: 0 | |||
Firmware state: Online, Spun Up | |||
Device Firmware Level: 1703 | |||
Shield Counter: 0 | |||
Successful diagnostics completion on : N/A | |||
SAS Address(0): 0x5000c5004310f4b5 | |||
SAS Address(1): 0x0 | |||
Connected Port Number: 2(path0) | |||
Inquiry Data: SEAGATE ST3300657SS 17036SJ3CMMC @#87980 | |||
FDE Capable: Not Capable | |||
FDE Enable: Disable | |||
Secured: Unsecured | |||
Locked: Unlocked | |||
Needs EKM Attention: No | |||
Foreign State: None | |||
Device Speed: 6.0Gb/s | |||
Link Speed: 6.0Gb/s | |||
Media Type: Hard Disk Device | |||
Drive: Not Certified | |||
Drive Temperature :42C (107.60 F) | |||
PI Eligibility: No | |||
Drive is formatted for PI information: No | |||
PI: No PI | |||
Port-0 : | |||
Port status: Active | |||
Port's Linkspeed: 6.0Gb/s | |||
Port-1 : | |||
Port status: Active | |||
Port's Linkspeed: Unknown | |||
Drive has flagged a S.M.A.R.T alert : No | |||
Enclosure Device ID: 252 | |||
Slot Number: 2 | |||
Drive's position: DiskGroup: 0, Span: 0, Arm: 0 | |||
Enclosure position: N/A | |||
Device Id: 5 | |||
WWN: 5000C500430189E4 | |||
Sequence Number: 2 | |||
Media Error Count: 0 | |||
Other Error Count: 0 | |||
Predictive Failure Count: 0 | |||
Last Predictive Failure Event Seq Number: 0 | |||
PD Type: SAS | |||
Raw Size: 279.396 GB [0x22ecb25c Sectors] | |||
Non Coerced Size: 278.896 GB [0x22dcb25c Sectors] | |||
Coerced Size: 278.875 GB [0x22dc0000 Sectors] | |||
Sector Size: 0 | |||
Firmware state: Online, Spun Up | |||
Device Firmware Level: 1703 | |||
Shield Counter: 0 | |||
Successful diagnostics completion on : N/A | |||
SAS Address(0): 0x5000c500430189e5 | |||
SAS Address(1): 0x0 | |||
Connected Port Number: 0(path0) | |||
Inquiry Data: SEAGATE ST3300657SS 17036SJ3CD2Z @#87980 | |||
FDE Capable: Not Capable | |||
FDE Enable: Disable | |||
Secured: Unsecured | |||
Locked: Unlocked | |||
Needs EKM Attention: No | |||
Foreign State: None | |||
Device Speed: 6.0Gb/s | |||
Link Speed: 6.0Gb/s | |||
Media Type: Hard Disk Device | |||
Drive: Not Certified | |||
Drive Temperature :39C (102.20 F) | |||
PI Eligibility: No | |||
Drive is formatted for PI information: No | |||
PI: No PI | |||
Port-0 : | |||
Port status: Active | |||
Port's Linkspeed: 6.0Gb/s | |||
Port-1 : | |||
Port status: Active | |||
Port's Linkspeed: Unknown | |||
Drive has flagged a S.M.A.R.T alert : No | |||
Enclosure Device ID: 252 | |||
Slot Number: 6 | |||
Drive's position: DiskGroup: 0, Span: 0, Arm: 3 | |||
Enclosure position: N/A | |||
Device Id: 11 | |||
WWN: 5000CCA00FAEC0BF | |||
Sequence Number: 2 | |||
Media Error Count: 0 | |||
Other Error Count: 0 | |||
Predictive Failure Count: 0 | |||
Last Predictive Failure Event Seq Number: 0 | |||
PD Type: SAS | |||
Raw Size: 419.186 GB [0x3465f870 Sectors] | |||
Non Coerced Size: 418.686 GB [0x3455f870 Sectors] | |||
Coerced Size: 418.656 GB [0x34550000 Sectors] | |||
Sector Size: 0 | |||
Firmware state: Online, Spun Up | |||
Device Firmware Level: A42B | |||
Shield Counter: 0 | |||
Successful diagnostics completion on : N/A | |||
SAS Address(0): 0x5000cca00faec0bd | |||
SAS Address(1): 0x0 | |||
Connected Port Number: 1(path0) | |||
Inquiry Data: HITACHI HUS156045VLS600 A42BJVY33ARM | |||
FDE Capable: Not Capable | |||
FDE Enable: Disable | |||
Secured: Unsecured | |||
Locked: Unlocked | |||
Needs EKM Attention: No | |||
Foreign State: None | |||
Device Speed: 6.0Gb/s | |||
Link Speed: 6.0Gb/s | |||
Media Type: Hard Disk Device | |||
Drive: Not Certified | |||
Drive Temperature :37C (98.60 F) | |||
PI Eligibility: No | |||
Drive is formatted for PI information: No | |||
PI: No PI | |||
Port-0 : | |||
Port status: Active | |||
Port's Linkspeed: 6.0Gb/s | |||
Port-1 : | |||
Port status: Active | |||
Port's Linkspeed: Unknown | |||
Drive has flagged a S.M.A.R.T alert : No | |||
<syntaxhighlight lang="bash"> | Exit Code: 0x00 | ||
</syntaxhighlight> | |||
|style="white-space: nowrap;"|<syntaxhighlight lang="bash"> | |||
MegaCli64 PDList aAll | |||
</syntaxhighlight> | </syntaxhighlight> | ||
<syntaxhighlight lang="text"> | |||
Adapter #0 | |||
Enclosure Device ID: 252 | |||
Slot Number: 0 | |||
Drive's position: DiskGroup: 0, Span: 0, Arm: 0 | |||
Enclosure position: N/A | |||
Device Id: 10 | |||
WWN: 5000C50043112280 | |||
Sequence Number: 2 | |||
Media Error Count: 0 | |||
Other Error Count: 0 | |||
Predictive Failure Count: 0 | |||
Last Predictive Failure Event Seq Number: 0 | |||
PD Type: SAS | |||
Raw Size: 279.396 GB [0x22ecb25c Sectors] | |||
Non Coerced Size: 278.896 GB [0x22dcb25c Sectors] | |||
Coerced Size: 278.875 GB [0x22dc0000 Sectors] | |||
Sector Size: 0 | |||
Firmware state: Online, Spun Up | |||
Device Firmware Level: 1703 | |||
Shield Counter: 0 | |||
Successful diagnostics completion on : N/A | |||
SAS Address(0): 0x5000c50043112281 | |||
SAS Address(1): 0x0 | |||
Connected Port Number: 3(path0) | |||
Inquiry Data: SEAGATE ST3300657SS 17036SJ3DE9Z @#87980 | |||
FDE Capable: Not Capable | |||
FDE Enable: Disable | |||
Secured: Unsecured | |||
Locked: Unlocked | |||
Needs EKM Attention: No | |||
Foreign State: None | |||
Device Speed: 6.0Gb/s | |||
Link Speed: 6.0Gb/s | |||
Media Type: Hard Disk Device | |||
Drive: Not Certified | |||
Drive Temperature :39C (102.20 F) | |||
PI Eligibility: No | |||
Drive is formatted for PI information: No | |||
PI: No PI | |||
Port-0 : | |||
Port status: Active | |||
Port's Linkspeed: 6.0Gb/s | |||
Port-1 : | |||
Port status: Active | |||
Port's Linkspeed: Unknown | |||
Drive has flagged a S.M.A.R.T alert : No | |||
Enclosure Device ID: 252 | |||
Slot Number: 1 | |||
Drive's position: DiskGroup: 0, Span: 0, Arm: 1 | |||
Enclosure position: N/A | |||
Device Id: 9 | |||
WWN: 5000C5004312760C | |||
Sequence Number: 2 | |||
Media Error Count: 0 | |||
Other Error Count: 0 | |||
Predictive Failure Count: 0 | |||
Last Predictive Failure Event Seq Number: 0 | |||
PD Type: SAS | |||
Raw Size: 279.396 GB [0x22ecb25c Sectors] | |||
Non Coerced Size: 278.896 GB [0x22dcb25c Sectors] | |||
Coerced Size: 278.875 GB [0x22dc0000 Sectors] | |||
Sector Size: 0 | |||
Firmware state: Online, Spun Up | |||
Device Firmware Level: 1703 | |||
Shield Counter: 0 | |||
Successful diagnostics completion on : N/A | |||
SAS Address(0): 0x5000c5004312760d | |||
SAS Address(1): 0x0 | |||
Connected Port Number: 2(path0) | |||
Inquiry Data: SEAGATE ST3300657SS 17036SJ3DNG7 @#87980 | |||
FDE Capable: Not Capable | |||
FDE Enable: Disable | |||
Secured: Unsecured | |||
Locked: Unlocked | |||
Needs EKM Attention: No | |||
Foreign State: None | |||
Device Speed: 6.0Gb/s | |||
Link Speed: 6.0Gb/s | |||
Media Type: Hard Disk Device | |||
Drive: Not Certified | |||
Drive Temperature :40C (104.00 F) | |||
PI Eligibility: No | |||
Drive is formatted for PI information: No | |||
PI: No PI | |||
Port-0 : | |||
Port status: Active | |||
Port's Linkspeed: 6.0Gb/s | |||
Port-1 : | |||
Port status: Active | |||
Port's Linkspeed: Unknown | |||
Drive has flagged a S.M.A.R.T alert : No | |||
Enclosure Device ID: 252 | |||
Slot Number: 2 | |||
Drive's position: DiskGroup: 0, Span: 0, Arm: 2 | |||
Enclosure position: N/A | |||
Device Id: 8 | |||
WWN: 5000C50043126B4C | |||
Sequence Number: 2 | |||
Media Error Count: 0 | |||
Other Error Count: 0 | |||
Predictive Failure Count: 0 | |||
Last Predictive Failure Event Seq Number: 0 | |||
PD Type: SAS | |||
Raw Size: 279.396 GB [0x22ecb25c Sectors] | |||
# | Non Coerced Size: 278.896 GB [0x22dcb25c Sectors] | ||
Coerced Size: 278.875 GB [0x22dc0000 Sectors] | |||
Sector Size: 0 | |||
Firmware state: Online, Spun Up | |||
Device Firmware Level: 1703 | |||
Shield Counter: 0 | |||
Successful diagnostics completion on : N/A | |||
SAS Address(0): 0x5000c50043126b4d | |||
SAS Address(1): 0x0 | |||
Connected Port Number: 0(path0) | |||
Inquiry Data: SEAGATE ST3300657SS 17036SJ3E01G @#87980 | |||
FDE Capable: Not Capable | |||
FDE Enable: Disable | |||
Secured: Unsecured | |||
Locked: Unlocked | |||
Needs EKM Attention: No | |||
Foreign State: None | |||
Device Speed: 6.0Gb/s | |||
Link Speed: 6.0Gb/s | |||
Media Type: Hard Disk Device | |||
Drive: Not Certified | |||
Drive Temperature :37C (98.60 F) | |||
PI Eligibility: No | |||
Drive is formatted for PI information: No | |||
PI: No PI | |||
Port-0 : | |||
Port status: Active | |||
Port's Linkspeed: 6.0Gb/s | |||
Port-1 : | |||
Port status: Active | |||
Port's Linkspeed: Unknown | |||
Drive has flagged a S.M.A.R.T alert : No | |||
Enclosure Device ID: 252 | |||
Slot Number: 6 | |||
Drive's position: DiskGroup: 0, Span: 0, Arm: 3 | |||
Enclosure position: N/A | |||
Device Id: 5 | |||
WWN: 5000CCA00F5CA29F | |||
Sequence Number: 2 | |||
Media Error Count: 0 | |||
Other Error Count: 0 | |||
Predictive Failure Count: 0 | |||
Last Predictive Failure Event Seq Number: 0 | |||
PD Type: SAS | |||
Raw Size: 419.186 GB [0x3465f870 Sectors] | |||
Non Coerced Size: 418.686 GB [0x3455f870 Sectors] | |||
Coerced Size: 418.656 GB [0x34550000 Sectors] | |||
Sector Size: 0 | |||
Firmware state: Online, Spun Up | |||
Device Firmware Level: A42B | |||
Shield Counter: 0 | |||
Successful diagnostics completion on : N/A | |||
SAS Address(0): 0x5000cca00f5ca29d | |||
SAS Address(1): 0x0 | |||
Connected Port Number: 1(path0) | |||
Inquiry Data: HITACHI HUS156045VLS600 A42BJVWMYA6L | |||
FDE Capable: Not Capable | |||
FDE Enable: Disable | |||
Secured: Unsecured | |||
Locked: Unlocked | |||
Needs EKM Attention: No | |||
Foreign State: None | |||
Device Speed: 6.0Gb/s | |||
Link Speed: 6.0Gb/s | |||
Media Type: Hard Disk Device | |||
Drive: Not Certified | |||
Drive Temperature :34C (93.20 F) | |||
PI Eligibility: No | |||
Drive is formatted for PI information: No | |||
PI: No PI | |||
Port-0 : | |||
Port status: Active | |||
Port's Linkspeed: 6.0Gb/s | |||
Port-1 : | |||
Port status: Active | |||
Port's Linkspeed: Unknown | |||
Drive has flagged a S.M.A.R.T alert : No | |||
Exit Code: 0x00 | |||
</syntaxhighlight> | </syntaxhighlight> | ||
|} | |||
This shows us two bits of information about each hard drive in the array. The main pieces to watch are: | |||
<syntaxhighlight lang=" | <syntaxhighlight lang="text"> | ||
Media Error Count: 0 | |||
Other Error Count: 0 | |||
Predictive Failure Count: 0 | |||
Drive Temperature :34C (93.20 F) | |||
Drive has flagged a S.M.A.R.T alert : No | |||
</syntaxhighlight> | </syntaxhighlight> | ||
{{note|1=It is normal for <span class="code">Other Error Count</span> to increment by 1 periodically. If it jumps by more than 1, or if it jumps multiple times within a few days, consult your system provider and inquire about replacing the drive.}} | |||
These values show us the overall health of the drive. For most hard drives, the temperature should stay below 55C at all times. Any temperature over 45C should be investigated. All other failure counts should stay at 0, save for the exception mentioned in the note above. | |||
As mentioned, there are many, many other ways to use <span class="code">MegaCli64</span>. If a drive ever fails, you can use it to prepare the drive for removal while the system is running. You can use it to adjust when the learn cycle runs, adjust cache policy and do many other things. It is well worth learning in more depth. However, that is outside the scope of this section. | |||
==== Managing MegaSAS.log ==== | |||
< | Each time <span class="code">MegaCli64</span> runs, it writes to the <span class="code">/root/MegaSAS.log</span> file. Later, we're going to setup a monitoring and alert system that checks the health of each node every 30 seconds. This program calls <span class="code">MegaCli64</span> three times per pass, so the <span class="code">MegaSAS.log</span> file can grow to a decent size. | ||
</ | |||
Lets download <span class="code">/root/archive_megasas.log.sh</span> and make it executable. | |||
<syntaxhighlight lang="bash"> | {|class="wikitable" | ||
!<span class="code">an-a05n01</span> | |||
|style="white-space: nowrap;"|<syntaxhighlight lang="bash"> | |||
cd ~ | |||
wget -c https://raw.github.com/digimer/an-cdb/master/tools/archive_megasas.log.sh | |||
</syntaxhighlight> | </syntaxhighlight> | ||
<syntaxhighlight lang="text"> | |||
--2014-02-24 19:37:58-- https://raw.github.com/digimer/an-cdb/master/tools/archive_megasas.log.sh | |||
Resolving raw.github.com... 199.27.73.133 | |||
Connecting to raw.github.com|199.27.73.133|:443... connected. | |||
HTTP request sent, awaiting response... 200 OK | |||
Length: 814 [text/plain] | |||
Saving to: `archive_megasas.log.sh' | |||
100%[====================================================================>] 814 --.-K/s in 0s | |||
2014-02-24 19:37:59 (27.1 MB/s) - `archive_megasas.log.sh' saved [814/814] | |||
</syntaxhighlight> | |||
<syntaxhighlight lang="bash"> | <syntaxhighlight lang="bash"> | ||
chmod 755 archive_megasas.log.sh | |||
ls -lah archive_megasas.log.sh | |||
</syntaxhighlight> | </syntaxhighlight> | ||
<syntaxhighlight lang=" | <syntaxhighlight lang="text"> | ||
--- | -rwxr-xr-x. 1 root root 814 Feb 24 19:37 archive_megasas.log.sh | ||
</syntaxhighlight> | |||
|- | |||
!<span class="code">an-a05n02</span> | |||
|style="white-space: nowrap;"|<syntaxhighlight lang="bash"> | |||
cd ~ | |||
- | wget -c https://raw.github.com/digimer/an-cdb/master/tools/archive_megasas.log.sh | ||
</syntaxhighlight> | </syntaxhighlight> | ||
<syntaxhighlight lang="text"> | |||
--2014-02-24 19:37:59-- https://raw.github.com/digimer/an-cdb/master/tools/archive_megasas.log.sh | |||
Resolving raw.github.com... 199.27.73.133 | |||
Connecting to raw.github.com|199.27.73.133|:443... connected. | |||
HTTP request sent, awaiting response... 200 OK | |||
Length: 814 [text/plain] | |||
Saving to: `archive_megasas.log.sh' | |||
100%[====================================================================>] 814 --.-K/s in 0s | |||
2014-02-24 19:37:59 (27.3 MB/s) - `archive_megasas.log.sh' saved [814/814] | |||
</syntaxhighlight> | |||
<syntaxhighlight lang="bash"> | <syntaxhighlight lang="bash"> | ||
chmod 755 archive_megasas.log.sh | |||
ls -lah archive_megasas.log.sh | |||
</syntaxhighlight> | </syntaxhighlight> | ||
<syntaxhighlight lang="text"> | <syntaxhighlight lang="text"> | ||
-rwxr-xr-x. 1 root root 814 Feb 24 19:37 archive_megasas.log.sh | |||
</syntaxhighlight> | </syntaxhighlight> | ||
|} | |||
We'll call <span class="code">cronbtab -e</span> to edit the cron table and add three entries for these programs. If you already added <span class="code">/archive_an-cm.log.sh</span>, then simply append the other two. | |||
{|class="wikitable" | |||
!<span class="code">an-a05n01</span> | |||
<syntaxhighlight lang="bash"> | |style="white-space: nowrap;"|<syntaxhighlight lang="bash"> | ||
crontab -e | |||
</syntaxhighlight> | </syntaxhighlight> | ||
<syntaxhighlight lang=" | <syntaxhighlight lang="text"> | ||
*/5 * * * * /root/an-cm >> /var/log/an-cm.log | |||
0 1 * * * /root/archive_megasas.log.sh > /dev/null | |||
0 0 1 * * /root/archive_an-cm.log.sh > /dev/null | |||
</syntaxhighlight> | </syntaxhighlight> | ||
|- | |||
!<span class="code">an-a05n02</span> | |||
|style="white-space: nowrap;"|<syntaxhighlight lang="bash"> | |||
<syntaxhighlight lang="bash"> | crontab -e | ||
</syntaxhighlight> | </syntaxhighlight> | ||
<syntaxhighlight lang="text"> | <syntaxhighlight lang="text"> | ||
*/5 * * * * /root/an-cm >> /var/log/an-cm.log | |||
0 1 * * * /root/archive_megasas.log.sh > /dev/null | |||
0 0 1 * * /root/archive_an-cm.log.sh > /dev/null | |||
</syntaxhighlight> | </syntaxhighlight> | ||
|} | |||
Save and quit. Within five minutes, you should see an email telling you that the monitoring system has started up again. | |||
We | We're done! | ||
= Configuring The Cluster Foundation = | |||
We need to configure the cluster in two stages. This is because we have something of a chicken-and-egg problem: | |||
* We need clustered storage for our virtual machines. | |||
* Our clustered storage needs the cluster for fencing. | |||
Conveniently, clustering has two logical parts: | |||
* Cluster communication and membership. | |||
* Cluster resource management. | |||
== | The first, communication and membership, covers which nodes are part of the cluster and it is responsible for ejecting faulty nodes from the cluster, among other tasks. This is managed by <span class="code">cman</span>. The second part, resource management, is provided by a second tool called <span class="code">rgmanager</span>. It's this second part that we will set aside for later. In short though, it makes sure clustered services, storage and the virtual servers, are always running whenever possible. | ||
== Keeping Time in Sync == | |||
{{note|1=This section is '''only relevant''' to networks that block access to external time sources, called "NTP servers".}} | |||
It is very important that time on both nodes be kept in sync. The way to do this is to setup [[[NTP]], the network time protocol. | |||
Earlier on, we setup <span class="code">ntpd</span> to start on boot. For most people, that is enough and you can skip to the next section. | |||
< | However, some particularly restrictive networks will block access to external time servers. If you're on one of these networks, ask your admin (if you don't know already) what name or IP to use as a time source. Once you have this, you can enter the following command to add it to the name server configuration. We'll use the example time source <span class="code">ntp.example.ca</span>. | ||
</ | |||
First, add the time server to the NTP configuration file by appending the following lines to the end of it. | |||
<syntaxhighlight lang="bash"> | {|class="wikitable" | ||
/etc/ | !<span class="code">an-a05n01</span> | ||
|style="white-space: nowrap;"|<syntaxhighlight lang="bash"> | |||
echo server tntp.example.ca$'\n'restrict ntp.example.ca mask 255.255.255.255 nomodify notrap noquery >> /etc/ntp.conf | |||
</syntaxhighlight> | </syntaxhighlight> | ||
<syntaxhighlight lang=" | |- | ||
!<span class="code">an-a05n02</span> | |||
|style="white-space: nowrap;"|<syntaxhighlight lang="bash"> | |||
echo server tntp.example.ca$'\n'restrict ntp.example.ca mask 255.255.255.255 nomodify notrap noquery >> /etc/ntp.conf | |||
</syntaxhighlight> | </syntaxhighlight> | ||
|} | |||
Restart the <span class="code">ntpd</span> daemon and your nodes should shortly update their times. | |||
<syntaxhighlight lang="bash"> | {|class="wikitable" | ||
/etc/init.d/ | !<span class="code">an-a05n01</span> | ||
|style="white-space: nowrap;"|<syntaxhighlight lang="bash"> | |||
/etc/init.d/ntpd restart | |||
</syntaxhighlight> | </syntaxhighlight> | ||
<syntaxhighlight lang="text"> | <syntaxhighlight lang="text"> | ||
Shutting down ntpd: [ OK ] | |||
Starting ntpd: [ OK ] | |||
</syntaxhighlight> | </syntaxhighlight> | ||
|- | |||
!<span class="code">an-a05n02</span> | |||
|style="white-space: nowrap;"|<syntaxhighlight lang="bash"> | |||
<syntaxhighlight lang="bash"> | /etc/init.d/ntpd restart | ||
/etc/init.d/ | |||
</syntaxhighlight> | </syntaxhighlight> | ||
<syntaxhighlight lang="text"> | <syntaxhighlight lang="text"> | ||
Shutting down ntpd: [ OK ] | |||
Starting ntpd: [ OK ] | |||
</syntaxhighlight> | </syntaxhighlight> | ||
|} | |||
Use the <span class="code">date</span> command on both nodes to ensure the times match. If they don't, give it a few minutes. The <span class="code">ntpd</span> daemon sync every few minutes. | |||
== Alternate Configuration Methods == | |||
In [[Red Hat]] Cluster Services, the heart of the cluster is found in the <span class="code">[[RHCS v3 cluster.conf|/etc/cluster/cluster.conf]]</span> [[XML]] configuration file. | |||
< | There are three main ways of editing this file. Two are already well documented, so I won't bother discussing them, beyond introducing them. The third way is by directly hand-crafting the <span class="code">cluster.conf</span> file. We've found that directly editing configuration files is the best way to learn clustering at a deep level. For this reason, it is the method we'll use here. | ||
</ | |||
The two graphical tools are: | |||
< | * <span class="code">[http://docs.redhat.com/docs/en-US/Red_Hat_Enterprise_Linux/5/html/Cluster_Administration/ch-config-scc-CA.html system-config-cluster]</span>, older GUI tool run directly from one of the cluster nodes. | ||
* [http://docs.redhat.com/docs/en-US/Red_Hat_Enterprise_Linux/5/html/Cluster_Administration/ch-config-conga-CA.html Conga], comprised of the <span class="code">ricci</span> node-side client and the <span class="code">luci</span> web-based server (can be run on machines outside the cluster). | |||
</ | |||
</ | |||
After you've gotten comfortable with HA clustering, you may want to go back and play with these tools. They can certainly be time-savers. | |||
== The First cluster.conf Foundation Configuration == | |||
The very first stage of building the cluster is to create a configuration file that is as minimal as possible. We're going to do this on <span class="code">an-a05n01</span> and, when we're done, copy it over to <span class="code">an-a05n02</span>. | |||
=== | === Name the Cluster and Set the Configuration Version === | ||
The <span class="code">[[RHCS_v3_cluster.conf#cluster.3B_The_Parent_Tag|cluster]]</span> tag is the parent tag for the entire cluster configuration file. | |||
{|class="wikitable" | |||
!<span class="code">an-a05n01</span> | |||
<syntaxhighlight lang="bash"> | |style="white-space: nowrap;"|<syntaxhighlight lang="bash"> | ||
vim /etc/cluster/cluster.conf | |||
</syntaxhighlight> | </syntaxhighlight> | ||
<syntaxhighlight lang=" | <syntaxhighlight lang="xml"> | ||
<?xml version="1.0"?> | |||
<cluster name="an-anvil-05" config_version="1"> | |||
</cluster> | |||
</syntaxhighlight> | </syntaxhighlight> | ||
|} | |||
The <span class="code">cluster</span> element has two attributes that we need to set: | |||
* <span class="code">name=""</span> | |||
* <span class="code">config_version=""</span> | |||
The <span class="code">[[RHCS v3 cluster.conf#name|name]]=""</span> attribute defines the name of the cluster. It must be unique amongst the clusters on your network. It should be descriptive, but you will not want to make it too long, either. You will see this name in the various cluster tools and you will enter in, for example, when creating a [[GFS2]] partition later on. This tutorial uses the cluster name <span class="code">an-anvil-05</span>. | |||
< | |||
</ | |||
The <span class="code">[[RHCS v3 cluster.conf#config_version|config_version]]=""</span> attribute is an integer indicating the version of the configuration file. Whenever you make a change to the <span class="code">cluster.conf</span> file, you will need to increment. If you don't increment this number, then the cluster tools will not know that the file needs to be reloaded. As this is the first version of this configuration file, it will start with <span class="code">1</span>. Note that this tutorial will increment the version after every change, regardless of whether it is explicitly pushed out to the other nodes and reloaded. The reason is to help get into the habit of always increasing this value. | |||
< | |||
</ | |||
< | |||
</ | |||
=== Configuring cman Options === | |||
We are setting up a special kind of cluster, called a 2-Node cluster. | |||
< | This is a special case because traditional [[quorum]] will not be useful. With only two nodes, each having a vote of <span class="code">1</span>, the total votes is <span class="code">2</span>. Quorum needs <span class="code">50% + 1</span>, which means that a single node failure would shut down the cluster, as the remaining node's vote is <span class="code">50%</span> exactly. That kind of defeats the purpose to having a cluster at all. | ||
</ | |||
< | |||
</ | |||
=== | So to account for this special case, there is a special attribute called <span class="code">[[RHCS_v3_cluster.conf#two_node|two_node]]="1"</span>. This tells the cluster manager to continue operating with only one vote. This option requires that the <span class="code">[[RHCS_v3_cluster.conf#expected_votes|expected_votes]]=""</span> attribute be set to <span class="code">1</span>. Normally, <span class="code">expected_votes</span> is set automatically to the total sum of the defined cluster nodes' votes (which itself is a default of <span class="code">1</span>). This is the other half of the "trick", as a single node's vote of <span class="code">1</span> now always provides quorum (that is, <span class="code">1</span> meets the <span class="code">50% + 1</span> requirement). | ||
In short; this disables quorum. | |||
{|class="wikitable" | |||
!<span class="code">an-a05n01</span> | |||
|style="white-space: nowrap;"|<syntaxhighlight lang="xml"> | |||
<?xml version="1.0"?> | |||
< | <cluster name="an-anvil-05" config_version="2"> | ||
<cman expected_votes="1" two_node="1" /> | |||
</cluster> | |||
</syntaxhighlight> | </syntaxhighlight> | ||
|} | |||
Take note of the self-closing <span class="code"><... /></span> tag. This is an [[XML]] syntax that tells the parser not to look for any child or a closing tags. | |||
=== Defining Cluster Nodes === | |||
This example is a little artificial, please don't load it into your cluster as we will need to add a few child tags, but one thing at a time. | |||
This introduces two tags, the later a child tag of the former: | |||
* <span class="code">clusternodes</span> | |||
** <span class="code">clusternode</span> | |||
The first is the parent <span class="code">[[RHCS_v3_cluster.conf#clusternodes.3B_Defining_Cluster_Nodes|clusternodes]]</span> tag, which takes no attributes of its own. Its sole purpose is to contain the <span class="code">[[RHCS_v3_cluster.conf#Tag.3B_clusternode|clusternode]]</span> child tags, of which there will be one per node. | |||
{|class="wikitable" | |||
!<span class="code">an-a05n01</span> | |||
|style="white-space: nowrap;"|<syntaxhighlight lang="xml"> | |||
<?xml version="1.0"?> | |||
<cluster name="an-anvil-05" config_version="3"> | |||
<cman expected_votes="1" two_node="1" /> | |||
<clusternodes> | |||
<clusternode name="an-a05n01.alteeve.ca" nodeid="1" /> | |||
<clusternode name="an-a05n02.alteeve.ca" nodeid="2" /> | |||
</clusternodes> | |||
</cluster> | |||
</syntaxhighlight> | |||
|} | |||
The <span class="code">[[RHCS_v3_cluster.conf#Tag.3B_clusternode|clusternode]]</span> tag defines each cluster node. There are many attributes available, but we will look at just the two required ones. | |||
The <span class="code"> | The first is the <span class="code">[[RHCS_v3_cluster.conf#clusternode.27s_name_attribute|name]]=""</span> attribute. The value '''should''' match the fully qualified domain name, which you can check by running <span class="code">uname -n</span> on each node. This isn't strictly required, mind you, but for simplicity's sake, this is the name we will use. | ||
The cluster decides which network to use for cluster communication by resolving the <span class="code">name="..."</span> value. It will take the returned [[IP]] address and try to match it to one of the IPs on the system. Once it finds a match, that becomes the network the cluster will use. In our case, <span class="code">an-a05n01.alteeve.ca</span> resolves to <span class="code">10.20.50.1</span>, which is used by <span class="code">bcn_bond1</span>. | |||
We can use <span class="code">syslinux</span> with a little [[bash]] magic to verify which interface is going to be used for the cluster communication; | |||
<syntaxhighlight lang="bash"> | {|class="wikitable" | ||
!<span class="code">an-a05n01</span> | |||
|style="white-space: nowrap;"|<syntaxhighlight lang="bash"> | |||
ifconfig |grep -B 1 $(gethostip -d $(uname -n)) | grep HWaddr | awk '{ print $1 }' | |||
</syntaxhighlight> | </syntaxhighlight> | ||
<syntaxhighlight lang="text"> | <syntaxhighlight lang="text"> | ||
bcn_bond1 | |||
</syntaxhighlight> | </syntaxhighlight> | ||
|} | |||
Exactly what we wanted! | |||
Please see the <span class="code">clusternode</span>'s <span class="code">[[RHCS_v3_cluster.conf#name_3|name]]</span> attribute document for details on how name to interface mapping is resolved. | |||
< | The second attribute is <span class="code">[[RHCS_v3_cluster.conf#clusternode.27s_nodeid_attribute|nodeid]]=""</span>. This must be a unique integer amongst the <span class="code"><clusternode ...></span> elements in the cluster. It is what the cluster itself uses to identify the node. | ||
</ | |||
=== Defining Fence Devices === | |||
[[2-Node_Red_Hat_KVM_Cluster_Tutorial#Concept.3B_Fencing|Fencing]] devices are used to forcible eject a node from a cluster if it stops responding. Said another way, fence devices put a node into a known state. | |||
There are many, many devices out there that can be used for fencing. We're going to be using two specific devices: | |||
* IPMI to press and hold the node's power button until the server powers down. | |||
* Switched PDUs to cut the power feeding the node, if the IPMI device fails or can not be contacted. | |||
In the end, any device that can power off or isolate a lost node will do fine for fencing. The setup we will be using here uses very common components and it provides full redundancy, ensuring the ability to fence regardless of what might fail. | |||
In this tutorial, our nodes support [[IPMI]], which we will use as the primary fence device. We also have an [http://www.apc.com/products/resource/include/techspec_index.cfm?base_sku=AP7900 APC] brand switched PDU which will act as a backup fence device. | |||
{{note|1=Not all brands of switched PDUs are supported as fence devices. Before you purchase a fence device, confirm that it is supported.}} | |||
< | All fence devices are contained within the parent <span class="code">[[RHCS_v3_cluster.conf#fencedevices.3B_Defining_Fence_Devices|fencedevices]]</span> tag, which has no attributes of its own. Within this parent tag are one or more <span class="code">[[RHCS_v3_cluster.conf#Tag.3B_fencedevice|fencedevice]]</span> child tags. | ||
</ | |||
< | |||
</ | |||
{|class="wikitable" | |||
!<span class="code">an-a05n01</span> | |||
< | |style="white-space: nowrap;"|<syntaxhighlight lang="xml"> | ||
<?xml version="1.0"?> | |||
<cluster name="an-anvil-05" config_version="4"> | |||
</ | <cman expected_votes="1" two_node="1" /> | ||
< | <clusternodes> | ||
<clusternode name="an-a05n01.alteeve.ca" nodeid="1" /> | |||
/ | <clusternode name="an-a05n02.alteeve.ca" nodeid="2" /> | ||
</clusternodes> | |||
/ | <fencedevices> | ||
<fencedevice name="ipmi_n01" agent="fence_ipmilan" ipaddr="an-a05n01.ipmi" login="admin" passwd="secret" /> | |||
<fencedevice name="ipmi_n02" agent="fence_ipmilan" ipaddr="an-a05n02.ipmi" login="admin" passwd="secret" /> | |||
<fencedevice agent="fence_apc_snmp" ipaddr="an-pdu01.alteeve.ca" name="pdu1" /> | |||
<fencedevice agent="fence_apc_snmp" ipaddr="an-pdu02.alteeve.ca" name="pdu2" /> | |||
</fencedevices> | |||
</cluster> | |||
</syntaxhighlight> | </syntaxhighlight> | ||
|} | |||
In our cluster, each fence device used will have its own <span class="code">[[RHCS_v3_cluster.conf#Tag.3B_fencedevice|fencedevice]]</span> tag. If you are using [[IPMI]], this means you will have a <span class="code">fencedevice</span> entry for each node, as each physical IPMI [[BMC]] is a unique fence device. | |||
Our nodes have two power supplies each. Each power supply is plugged into a different switched PDU, which in turn in plugged into a dedicated UPS. So we have two physical PDUs, requiring two more <span class="code"><fencedevice... /></span> entries. | |||
< | All <span class="code">fencedevice</span> tags share two basic attributes; <span class="code">[[RHCS_v3_cluster.conf#fencedevice.27s_name_attribute|name]]=""</span> and <span class="code">[[RHCS_v3_cluster.conf#fencedevice.27s_agent_attribute|agent]]=""</span>: | ||
</ | |||
* The <span class="code">name</span> attribute must be unique among all the fence devices in your cluster. As we will see in the next step, this name will be used within the <span class="code"><clusternode...></span> tag. | |||
* The <span class="code">agent</span> tag tells the cluster which [[fence agent]] to use when the <span class="code">[[fenced]]</span> daemon needs to communicate with the physical fence device. A fence agent is simple a shell script that acts as a go-between layer between the <span class="code">fenced</span> daemon and the fence hardware. This agent takes the arguments from the daemon, like what port to act on and what action to take, and performs the requested action against the target node. The agent is responsible for ensuring that the execution succeeded and returning an appropriate success or failure exit code. | |||
< | For those curious, the full details are described in the <span class="code">[https://fedorahosted.org/cluster/wiki/FenceAgentAPI FenceAgentAPI]</span>. If you have two or more of the same fence device, like IPMI, then you will use the same fence <span class="code">agent</span> value a corresponding number of times. | ||
</ | |||
< | |||
</ | |||
Beyond these two attributes, each fence agent will have its own subset of attributes. The scope of which is outside this tutorial, though we will see examples for IPMI and a switched PDU. All fence agents have a corresponding man page that will show you what attributes it accepts and how they are used. The two fence agents we will see here have their attributes defines in the following <span class="code">[[man]]</span> pages: | |||
* <span class="code">man fence_ipmilan</span> - IPMI fence agent. | |||
* <span class="code">man fence_apc_snmp</span> - APC-brand switched PDU using [[SNMP]]. | |||
The example above is what this tutorial will use. | |||
=== | === Using the Fence Devices === | ||
Now we have nodes and fence devices defined, we will go back and tie them together. This is done by: | |||
* Defining a <span class="code">[[RHCS_v3_cluster.conf#Tag.3B_fence|fence]]</span> tag containing all fence methods and devices. | |||
** Defining one or more <span class="code">[[RHCS_v3_cluster.conf#Tag.3B_method|method]]</span> tag(s) containing the device call(s) needed for each fence attempt. | |||
< | *** Defining one or more <span class="code">[[RHCS_v3_cluster.conf#Tag.3B_device|device]]</span> tag(s) containing attributes describing how to call the fence device to kill this node. | ||
</ | |||
< | |||
Here is how we implement [[IPMI]] as the primary fence device with the dual APC switched PDUs as the backup method. | |||
{|class="wikitable" | |||
!<span class="code">an-a05n01</span> | |||
|style="white-space: nowrap;"|<syntaxhighlight lang="xml"> | |||
<?xml version="1.0"?> | |||
<cluster name="an-anvil-05" config_version="5"> | |||
<cman expected_votes="1" two_node="1" /> | |||
<clusternodes> | |||
<clusternode name="an-a05n01.alteeve.ca" nodeid="1"> | |||
<fence> | |||
<method name="ipmi"> | |||
<device name="ipmi_n01" action="reboot" delay="15" /> | |||
</method> | |||
<method name="pdu"> | |||
<device name="pdu1" port="1" action="reboot" /> | |||
<device name="pdu2" port="1" action="reboot" /> | |||
</method> | |||
</fence> | |||
</clusternode> | |||
<clusternode name="an-a05n02.alteeve.ca" nodeid="2"> | |||
<fence> | |||
<method name="ipmi"> | |||
<device name="ipmi_n02" action="reboot" /> | |||
</method> | |||
<method name="pdu"> | |||
<device name="pdu1" port="2" action="reboot" /> | |||
<device name="pdu2" port="2" action="reboot" /> | |||
</method> | |||
</fence> | |||
</clusternode> | |||
</clusternodes> | |||
<fencedevices> | |||
<fencedevice name="ipmi_n01" agent="fence_ipmilan" ipaddr="an-a05n01.ipmi" login="admin" passwd="secret" /> | |||
<fencedevice name="ipmi_n02" agent="fence_ipmilan" ipaddr="an-a05n02.ipmi" login="admin" passwd="secret" /> | |||
<fencedevice agent="fence_apc_snmp" ipaddr="an-pdu01.alteeve.ca" name="pdu1" /> | |||
<fencedevice agent="fence_apc_snmp" ipaddr="an-pdu02.alteeve.ca" name="pdu2" /> | |||
</fencedevices> | |||
</cluster> | |||
</syntaxhighlight> | </syntaxhighlight> | ||
|} | |||
First, notice that the <span class="code">[[RHCS_v3_cluster.conf#Tag.3B_fence|fence]]</span> tag has no attributes. It's merely a parent for the <span class="code">[[RHCS_v3_cluster.conf#Tag.3B_method|method]](s)</span> child elements. | |||
{{warning|1=This next few paragraphs are very important! Please read it carefully!}} | |||
=== | The second thing you will notice is that one method, <span class="code">an-a05n01</span>'s <span class="code">ipmi</span> method has a device with an extra argument. The <span class="code">delay="15"</span> is needed because this is a 2-node cluster so quorum is not available. What this means is that, if the network breaks and both nodes are alive, both nodes will try to fence the other at nearly the same time. IPMI devices, being unique per node, can conceivable mean both nodes initiate a power down before either dies. This condition is called a "dual-fence" and leaves your cluster entirely powered down. | ||
There are two ways of dealing with this. The first is to make sure that <span class="code">acpid</span> is turned off. When the power button is pressed when <span class="code">acpid</span> is running, the system will begin a graceful shutdown. The IPMI BMC will continue to hold down the power button and after four seconds, the node should power off. However, this is four seconds where the fence daemon can initiate a fence against the peer. By disabling the <span class="code">acpid</span> daemon, the system will nearly instantly power off when the power button is pressed, drastically reducing the time between a node's power button being pressed and when the node actually shuts off. | |||
The second way to deal with this is to give one of the nodes a head start. That is what the <span class="code">delay="15"</span> does. When <span class="code">an-a05n01</span> goes to fence <span class="code">an-c05b02</span>, it will not see a delay and it will initiate the fence action immediately. Meanwhile, <span class="code">an-a05n02</span> will gather up the information on fencing <span class="code">an-a05n02</span>, see the 15 second delay and wait. After 15 seconds, it will proceed with the fence action as it normally would. | |||
< | The idea here is that <span class="code">an-a05n01</span> will have a 15 second head start in fencing its peer. These configuration changes should help ensure that one node always survives a fence call. | ||
</ | |||
Back to the main fence config! | |||
There are two <span class="code">[[RHCS_v3_cluster.conf#Tag.3B_method|method]]</span> elements per node, one for each fence device, named <span class="code">ipmi</span> and <span class="code">pdu</span>. These names are merely descriptive and can be whatever you feel is most appropriate. | |||
Within each <span class="code">method</span> element is one or more <span class="code">[[RHCS_v3_cluster.conf#Tag.3B_device|device]]</span> tags. For a given method to succeed, all defined <span class="code">device</span> elements must themselves succeed. This is very useful for grouping calls to separate PDUs when dealing with nodes having redundant power supplies, as we have here. | |||
The actual fence <span class="code">[[RHCS_v3_cluster.conf#Tag.3B_device|device]]</span> configuration is the final piece of the puzzle. It is here that you specify per-node configuration options and link these attributes to a given <span class="code">[[RHCS_v3_cluster.conf#Tag.3B_fencedevice|fencedevice]]</span>. Here, we see the link to the <span class="code">fencedevice</span> via the <span class="code">[[RHCS_v3_cluster.conf#device.27s_name_attribute|name]]</span>, <span class="code">ipmi_n01</span> in this example. | |||
== | Note that the PDU definitions needs a <span class="code">port=""</span> attribute where the IPMI fence devices do not. These are the sorts of differences you will find, varying depending on how the fence device agent works. IPMI devices only work on their host, so when you ask an IPMI device to "<span class="code">reboot</span>", it's obvious what the target is. With devices like PDUs, SAN switches and other multi-port devices, this is not the case. Our PDUs have eight ports each, so we need to tell the fence agent which ports we want acted on. In our case, <span class="code">an-a05n01</span>'s power supplies are plugged into port #1 on both PDUs. For <span class="code">an-a05n02</span>, they're plugged into each PDU's port #2. | ||
When a fence call is needed, the fence devices will be called in the order they are found here. If both devices fail, the cluster will go back to the start and try again, looping indefinitely until one device succeeds. | |||
The | {{note|1=It's important to understand why we use IPMI as the primary fence device. The FenceAgentAPI specification suggests, but does not require, that a fence device confirm that the node is off. IPMI can do this, the switched PDU can not. Thus, IPMI won't return a success unless the node is truly off. The PDU, however, will return a success once the power is cut to the requested port. The risk is that a misconfigured node with redundant PSUs may in fact still be running if one of their cords was moved to a different port and the configuration wasn't updated, leading to disastrous consequences.}} | ||
Let's step through an example fence call to help show how the per-cluster and fence device attributes are combined during a fence call: | |||
=== | * The cluster manager decides that a node needs to be fenced. Let's say that the victim is <span class="code">an-a05n02</span>. | ||
* The first <span class="code">method</span> in the <span class="code">fence</span> section under <span class="code">an-a05n02</span> is consulted. Within it there are two <span class="code">method</span> entries, named <span class="code">ipmi</span> and <span class="code">pdu</span>. The IPMI method's <span class="code">device</span> has one attribute while the PDU's <span class="code">device</span> has two attributes; | |||
** <span class="code">port</span>; only found in the PDU <span class="code">method</span>, this tells the cluster that <span class="code">an-a05n02</span> is connected to switched PDU's outlet number <span class="code">2</span>. | |||
** <span class="code">action</span>; Found on both devices, this tells the cluster that the fence action to take is <span class="code">reboot</span>. How this action is actually interpreted depends on the fence device in use, though the name certainly implies that the node will be forced off and then restarted. | |||
* The cluster searches in <span class="code">fencedevices</span> for a <span class="code">fencedevice</span> matching the name <span class="code">ipmi_n02</span>. This fence device has four attributes; | |||
** <span class="code">agent</span>; This tells the cluster to call the <span class="code">fence_ipmilan</span> fence agent script, as we discussed earlier. | |||
** <span class="code">ipaddr</span>; This tells the fence agent where on the network to find this particular IPMI BMC. This is how multiple fence devices of the same type can be used in the cluster. | |||
** <span class="code">login</span>; This is the login user name to use when authenticating against the fence device. | |||
** <span class="code">passwd</span>; This is the password to supply along with the <span class="code">login</span> name when authenticating against the fence device. | |||
* Should the IPMI fence call fail for some reason, the cluster will move on to the second <span class="code">pdu</span> method, repeating the steps above but using the PDU values. | |||
When the cluster calls the fence agent, it does so by initially calling the fence agent script with no arguments. | |||
<syntaxhighlight lang="bash"> | |||
/usr/sbin/fence_ipmilan | |||
</syntaxhighlight> | |||
Then it will pass to that agent the following arguments: | |||
<syntaxhighlight lang=" | <syntaxhighlight lang="bash"> | ||
ipaddr=an-a05n02.ipmi | |||
login=admin | |||
passwd=secret | |||
action=reboot | |||
</syntaxhighlight> | </syntaxhighlight> | ||
As you can see then, the first three arguments are from the <span class="code">fencedevice</span> attributes and the last one is from the <span class="code">device</span> attributes under <span class="code">an-a05n02</span>'s <span class="code">clusternode</span>'s <span class="code">fence</span> tag. | |||
If this method fails, then the PDU will be called in a very similar way, but with an extra argument from the <span class="code">device</span> attributes. | |||
<syntaxhighlight lang=" | <syntaxhighlight lang="bash"> | ||
/usr/sbin/fence_apc_snmp | |||
</syntaxhighlight> | </syntaxhighlight> | ||
Then it will pass to that agent the following arguments: | |||
<syntaxhighlight lang="bash"> | |||
ipaddr=an-pdu02.alteeve.ca | |||
port=2 | |||
action=reboot | |||
</syntaxhighlight> | |||
Should this fail, the cluster will go back and try the IPMI interface again. It will loop through the fence device methods forever until one of the methods succeeds. | |||
Below are snippets from other clusters using different fence device configurations which might help you build your cluster. | |||
=== Giving Nodes More Time to Start and Avoiding "Fence Loops" === | |||
=== | {{note|1=This section also explains why we don't allow <span class="code">cman</span> to start on boot. If we did, we'd risk a "fence loop", where a fenced node boots, tries to contact its peer, times out and fences it. The peer boot, starts <span class="code">cman</span>, times out waiting and fenced the other peer. Not good.}} | ||
Clusters with more than three nodes will have to gain quorum before they can fence other nodes. As we discussed earlier though, this is not the case when using the <span class="code">[[RHCS_v3_cluster.conf#two_node|two_node]]="1"</span> attribute in the <span class="code">[[RHCS_v3_cluster.conf#cman.3B_The_Cluster_Manager|cman]]</span> element. What this means in practice is that if you start the cluster on one node and then wait too long to start the cluster on the second node, the first will fence the second. | |||
The logic behind this is; When the cluster starts, it will try to talk to its fellow node and then fail. With the special <span class="code">two_node="1"</span> attribute set, the cluster knows that it is allowed to start clustered services, but it has no way to say for sure what state the other node is in. It could well be online and hosting services for all it knows. So it has to proceed on the assumption that the other node is alive and using shared resources. Given that, and given that it can not talk to the other node, its only safe option is to fence the other node. Only then can it be confident that it is safe to start providing clustered services. | |||
{|class="wikitable" | |||
!<span class="code">an-a05n01</span> | |||
|style="white-space: nowrap;"|<syntaxhighlight lang="xml"> | |||
<?xml version="1.0"?> | |||
<cluster name="an-anvil-05" config_version="6"> | |||
<cman expected_votes="1" two_node="1" /> | |||
<clusternodes> | |||
<clusternode name="an-a05n01.alteeve.ca" nodeid="1"> | |||
<fence> | |||
<method name="ipmi"> | |||
<device name="ipmi_n01" action="reboot" delay="15" /> | |||
</method> | |||
<method name="pdu"> | |||
<device name="pdu1" port="1" action="reboot" /> | |||
<device name="pdu2" port="1" action="reboot" /> | |||
</method> | |||
</fence> | |||
</clusternode> | |||
<clusternode name="an-a05n02.alteeve.ca" nodeid="2"> | |||
<fence> | |||
<method name="ipmi"> | |||
<device name="ipmi_n02" action="reboot" /> | |||
</method> | |||
<method name="pdu"> | |||
<device name="pdu1" port="2" action="reboot" /> | |||
<device name="pdu2" port="2" action="reboot" /> | |||
</method> | |||
</fence> | |||
</clusternode> | |||
</clusternodes> | |||
<fencedevices> | |||
<fencedevice name="ipmi_n01" agent="fence_ipmilan" ipaddr="an-a05n01.ipmi" login="admin" passwd="secret" /> | |||
<fencedevice name="ipmi_n02" agent="fence_ipmilan" ipaddr="an-a05n02.ipmi" login="admin" passwd="secret" /> | |||
<fencedevice agent="fence_apc_snmp" ipaddr="an-pdu01.alteeve.ca" name="pdu1" /> | |||
<fencedevice agent="fence_apc_snmp" ipaddr="an-pdu02.alteeve.ca" name="pdu2" /> | |||
</fencedevices> | |||
<fence_daemon post_join_delay="30" /> | |||
</cluster> | |||
</syntaxhighlight> | |||
|} | |||
The new tag is <span class="code">[[RHCS_v3_cluster.conf#fence_daemon.3B_Fencing|fence_daemon]]</span>, seen near the bottom if the file above. The change is made using the <span class="code">[[RHCS_v3_cluster.conf#post_join_delay|post_join_delay]]="30"</span> attribute. By default, the cluster will declare the other node dead after just <span class="code">6</span> seconds. The reason is that the larger this value, the slower the start-up of the cluster services will be. During testing and development though, I find this value to be far too short and frequently led to unnecessary fencing. Once your cluster is setup and working, it's not a bad idea to reduce this value to the lowest value with which you are comfortable. | |||
=== Configuring Totem === | |||
There are many attributes for the [[totem]] element. For now though, we're only going to set two of them. We know that cluster communication will be travelling over our private, secured [[BCN]] network, so for the sake of simplicity, we're going to disable encryption. We are also offering network redundancy using the bonding drivers, so we're also going to disable totem's [[redundant ring protocol]]. | |||
{|class="wikitable" | |||
!<span class="code">an-a05n01</span> | |||
<syntaxhighlight lang="xml"> | |style="white-space: nowrap;"|<syntaxhighlight lang="xml"> | ||
<?xml version="1.0"?> | <?xml version="1.0"?> | ||
<cluster name="an- | <cluster name="an-anvil-05" config_version="7"> | ||
<cman expected_votes="1" two_node="1" /> | |||
<clusternodes> | |||
<clusternode name="an-a05n01.alteeve.ca" nodeid="1"> | |||
<fence> | |||
<method name="ipmi"> | |||
<device name="ipmi_n01" action="reboot" delay="15" /> | |||
</method> | |||
<method name="pdu"> | |||
<device name="pdu1" port="1" action="reboot" /> | |||
<device name="pdu2" port="1" action="reboot" /> | |||
</method> | |||
</fence> | |||
</clusternode> | |||
<clusternode name="an-a05n02.alteeve.ca" nodeid="2"> | |||
<fence> | |||
<method name="ipmi"> | |||
<device name="ipmi_n02" action="reboot" /> | |||
</method> | |||
<method name="pdu"> | |||
<device name="pdu1" port="2" action="reboot" /> | |||
<device name="pdu2" port="2" action="reboot" /> | |||
</method> | |||
</fence> | |||
</clusternode> | |||
</clusternodes> | |||
<fencedevices> | |||
<fencedevice name="ipmi_n01" agent="fence_ipmilan" ipaddr="an-a05n01.ipmi" login="admin" passwd="secret" /> | |||
<fencedevice name="ipmi_n02" agent="fence_ipmilan" ipaddr="an-a05n02.ipmi" login="admin" passwd="secret" /> | |||
<fencedevice agent="fence_apc_snmp" ipaddr="an-pdu01.alteeve.ca" name="pdu1" /> | |||
<fencedevice agent="fence_apc_snmp" ipaddr="an-pdu02.alteeve.ca" name="pdu2" /> | |||
</fencedevices> | |||
<fence_daemon post_join_delay="30" /> | |||
<totem rrp_mode="none" secauth="off"/> | |||
</cluster> | </cluster> | ||
</syntaxhighlight> | </syntaxhighlight> | ||
|} | |||
Corosync uses a concept called "token rings" for cluster communication. This is not to be confused with the old token ring network protocol, but the basic concept is the same. A token is passed from node to node, around and around the ring. A node can't send new messages or acknowledge old messages except when it has the token. By default, corosync uses a single "ring". This means that, without network-level fault-tolerance, this ring becomes a single point of failure. | |||
We've got bonded network connections backing our cluster communications, so we inherently have fault-tolerance built in to our network. | |||
For some though, bonded interfaces is not feasible, so starting in RHEL 6.3, "[[RRP|Redundant Ring Protocol]]" was made available as a supported option. This allows you to setup a second network to use as a backup in case the primary ring fails. We don't need this, so we set <span class="code">rrp_mode="none"</span>. If you want to use it, you can now though, but it's outside the scope of this tutorial. | |||
If you wish to explore it further, please take a look at the <span class="code">clusternode</span> element tag called <span class="code"><[[RHCS_v3_cluster.conf#Tag.3B_altname|altname]]...></span>. When <span class="code">altname</span> is used though, then the <span class="code">[[RHCS_v3_cluster.conf#rrp_mode|rrp_mode]]</span> attribute will need to be changed to either <span class="code">active</span> or <span class="code">passive</span> (the details of which are outside the scope of this tutorial). | |||
The <span class="code"> | The second option we're looking at here is the <span class="code">[[RHCS_v3_cluster.conf#secauth|secauth]]="off"</span> attribute. This controls whether the cluster communications are encrypted or not. We can safely disable this because we're working on a known-private network, which yields two benefits; It's simpler to setup and it's a lot faster. If you must encrypt the cluster communications, then you can do so here. The details of which are also outside the scope of this tutorial though. | ||
=== Validating and Pushing the /etc/cluster/cluster.conf File === | |||
One of the most noticeable changes in [[RHCS]] cluster stable 3 is that we no longer have to make a long, cryptic <span class="code">xmllint</span> call to validate our cluster configuration. Now we can simply call <span class="code">ccs_config_validate</span>. | |||
=== | {|class="wikitable" | ||
!<span class="code">an-a05n01</span> | |||
|style="white-space: nowrap;"|<syntaxhighlight lang="bash"> | |||
ccs_config_validate | |||
</syntaxhighlight> | |||
<syntaxhighlight lang="text"> | |||
Configuration validates | |||
</syntaxhighlight> | |||
|} | |||
If there was a problem, you need to go back and fix it. '''DO NOT''' proceed until your configuration validates. Once it does, we're ready to move on! | |||
With it validated, we need to push it to the other node. As the cluster is not running yet, we will push it out using <span class="code">rsync</span>. | |||
{|class="wikitable" | |||
!<span class="code">an-a05n01</span> | |||
|style="white-space: nowrap;"|<syntaxhighlight lang="bash"> | |||
rsync -av /etc/cluster/cluster.conf root@an-a05n02:/etc/cluster/ | |||
</syntaxhighlight> | </syntaxhighlight> | ||
<syntaxhighlight lang="text"> | |||
sending incremental file list | |||
cluster.conf | |||
sent 1393 bytes received 43 bytes 2872.00 bytes/sec | |||
total size is 1313 speedup is 0.91 | |||
</syntaxhighlight> | </syntaxhighlight> | ||
|} | |||
This is the first and only time that we'll need to push the configuration file over manually. | |||
=== Setting up ricci === | |||
Once the cluster is running, we can take advantage of the <span class="code">ricci</span> and <span class="code">modclusterd</span> daemons to push all future updates out automatically. This is why we enabled these two daemons to start on boot earlier on. | |||
This requires setting a password for each node's <span class="code">ricci</span> user first. Setting the password is exactly the same as setting the password on any other system user. | |||
On '''both''' nodes, run: | |||
{|class="wikitable" | |||
!<span class="code">an-a05n01</span> | |||
!<span class="code">an-a05n02</span> | |||
|- | |||
|style="white-space: nowrap;"|<syntaxhighlight lang="bash"> | |||
passwd ricci | |||
= | |||
<syntaxhighlight lang="bash"> | |||
</syntaxhighlight> | </syntaxhighlight> | ||
<syntaxhighlight lang="text"> | <syntaxhighlight lang="text"> | ||
Changing password for user ricci. | |||
New password: | |||
Retype new password: | |||
passwd: all authentication tokens updated successfully. | |||
</syntaxhighlight> | </syntaxhighlight> | ||
|style="white-space: nowrap;"|<syntaxhighlight lang="bash"> | |||
passwd ricci | |||
<syntaxhighlight lang="bash"> | |||
</syntaxhighlight> | </syntaxhighlight> | ||
<syntaxhighlight lang="text"> | <syntaxhighlight lang="text"> | ||
Changing password for user ricci. | |||
New password: | |||
Retype new password: | |||
passwd: all authentication tokens updated successfully. | |||
</syntaxhighlight> | </syntaxhighlight> | ||
|} | |||
Later, when we make the next change to the <span class="code">cluster.conf</span> file, we'll push the changes out using the <span class="code">cman_tool</span> program. The first time this is used on each node, you will need to enter the local and the peer's <span class="code">ricci</span> password. Once entered though, we'll not need to enter the password again. | |||
< | {{note|1=The [[Striker|dashboard]] we will install later expects the <span class="code">ricci</span> password to be the same on both nodes. If you plan to use the dashboard, be sure to set the same password and then make note of it for later!}} | ||
</ | |||
=== Starting the Cluster for the First Time === | |||
It's a good idea to open a second terminal on either node and <span class="code">tail</span> the <span class="code">/var/log/messages</span> [[syslog]] file. All cluster messages will be recorded here and it will help to debug problems if you can watch the logs. To do this, in the new terminal windows run; | |||
<syntaxhighlight lang="bash"> | {|class="wikitable" | ||
!<span class="code">an-a05n01</span> | |||
!<span class="code">an-a05n02</span> | |||
|- | |||
|style="white-space: nowrap;"|<syntaxhighlight lang="bash"> | |||
clear; tail -f -n 0 /var/log/messages | |||
</syntaxhighlight> | </syntaxhighlight> | ||
<syntaxhighlight lang=" | |style="white-space: nowrap;"|<syntaxhighlight lang="bash"> | ||
clear; tail -f -n 0 /var/log/messages | |||
</syntaxhighlight> | </syntaxhighlight> | ||
|} | |||
== | This will clear the screen and start watching for new lines to be written to syslog. When you are done watching syslog, press the <span class="code"><ctrl></span> + <span class="code">c</span> key combination. | ||
How you lay out your terminal windows is, obviously, up to your own preferences. Below is a configuration I have found very useful. | |||
[[Image:2-node-rhcs3_terminal-window-layout_01.png|thumb|center|700px|Terminal window layout for watching 2 nodes. Left windows are used for entering commands and the left windows are used for tailing syslog.]] | |||
With the terminals setup, lets start the cluster! | |||
{{warning|1=If you don't start <span class="code">cman</span> on both nodes within 30 seconds, the slower node will be fenced.}} | |||
</ | |||
On '''both''' nodes, run: | |||
{|class="wikitable" | |||
!<span class="code">an-a05n01</span> | |||
<syntaxhighlight lang="bash"> | !<span class="code">an-a05n02</span> | ||
|- | |||
|style="white-space: nowrap;"|<syntaxhighlight lang="bash"> | |||
/etc/init.d/cman start | |||
</syntaxhighlight> | </syntaxhighlight> | ||
<syntaxhighlight lang="text"> | <syntaxhighlight lang="text"> | ||
Starting cluster: | |||
Checking if cluster has been disabled at boot... [ OK ] | |||
Checking Network Manager... [ OK ] | |||
Global setup... [ OK ] | |||
Loading kernel modules... [ OK ] | |||
Mounting configfs... [ OK ] | |||
Starting cman... [ OK ] | |||
Waiting for quorum... [ OK ] | |||
Starting fenced... [ OK ] | |||
Starting dlm_controld... [ OK ] | |||
Tuning DLM kernel config... [ OK ] | |||
Starting gfs_controld... [ OK ] | |||
Unfencing self... [ OK ] | |||
Joining fence domain... [ OK ] | |||
</syntaxhighlight> | </syntaxhighlight> | ||
|style="white-space: nowrap;"|<syntaxhighlight lang="bash"> | |||
/etc/init.d/cman start | |||
<syntaxhighlight lang="bash"> | |||
/etc/init.d/ | |||
</syntaxhighlight> | </syntaxhighlight> | ||
<syntaxhighlight lang="text"> | <syntaxhighlight lang="text"> | ||
Starting | Starting cluster: | ||
Checking if cluster has been disabled at boot... [ OK ] | |||
Checking Network Manager... [ OK ] | |||
Global setup... [ OK ] | |||
Loading kernel modules... [ OK ] | |||
Mounting configfs... [ OK ] | |||
Starting cman... [ OK ] | |||
Waiting for quorum... [ OK ] | |||
Starting fenced... [ OK ] | |||
Starting dlm_controld... [ OK ] | |||
Tuning DLM kernel config... [ OK ] | |||
Starting gfs_controld... [ OK ] | |||
Unfencing self... [ OK ] | |||
Joining fence domain... [ OK ] | |||
</syntaxhighlight> | </syntaxhighlight> | ||
|} | |||
Here is what you should see in syslog (this taken from <span class="code">an-a05n01</span>): | |||
<syntaxhighlight lang=" | {|class="wikitable" | ||
!<span class="code">an-a05n01</span> | |||
|style="white-space: nowrap;"|<syntaxhighlight lang="text"> | |||
Oct 30 10:46:07 an-a05n01 kernel: DLM (built Sep 14 2013 05:33:35) installed | |||
Oct 30 10:46:07 an-a05n01 corosync[2845]: [MAIN ] Corosync Cluster Engine ('1.4.1'): started and ready to provide service. | |||
Oct 30 10:46:07 an-a05n01 corosync[2845]: [MAIN ] Corosync built-in features: nss dbus rdma snmp | |||
Oct 30 10:46:07 an-a05n01 corosync[2845]: [MAIN ] Successfully read config from /etc/cluster/cluster.conf | |||
Oct 30 10:46:07 an-a05n01 corosync[2845]: [MAIN ] Successfully parsed cman config | |||
Oct 30 10:46:07 an-a05n01 corosync[2845]: [TOTEM ] Initializing transport (UDP/IP Multicast). | |||
Oct 30 10:46:07 an-a05n01 corosync[2845]: [TOTEM ] Initializing transmit/receive security: libtomcrypt SOBER128/SHA1HMAC (mode 0). | |||
Oct 30 10:46:07 an-a05n01 corosync[2845]: [TOTEM ] The network interface [10.20.50.1] is now up. | |||
Oct 30 10:46:08 an-a05n01 corosync[2845]: [QUORUM] Using quorum provider quorum_cman | |||
Oct 30 10:46:08 an-a05n01 corosync[2845]: [SERV ] Service engine loaded: corosync cluster quorum service v0.1 | |||
Oct 30 10:46:08 an-a05n01 corosync[2845]: [CMAN ] CMAN 3.0.12.1 (built Aug 29 2013 07:27:01) started | |||
Oct 30 10:46:08 an-a05n01 corosync[2845]: [SERV ] Service engine loaded: corosync CMAN membership service 2.90 | |||
Oct 30 10:46:08 an-a05n01 corosync[2845]: [SERV ] Service engine loaded: openais checkpoint service B.01.01 | |||
Oct 30 10:46:08 an-a05n01 corosync[2845]: [SERV ] Service engine loaded: corosync extended virtual synchrony service | |||
Oct 30 10:46:08 an-a05n01 corosync[2845]: [SERV ] Service engine loaded: corosync configuration service | |||
Oct 30 10:46:08 an-a05n01 corosync[2845]: [SERV ] Service engine loaded: corosync cluster closed process group service v1.01 | |||
Oct 30 10:46:08 an-a05n01 corosync[2845]: [SERV ] Service engine loaded: corosync cluster config database access v1.01 | |||
Oct 30 10:46:08 an-a05n01 corosync[2845]: [SERV ] Service engine loaded: corosync profile loading service | |||
Oct 30 10:46:08 an-a05n01 corosync[2845]: [QUORUM] Using quorum provider quorum_cman | |||
Oct 30 10:46:08 an-a05n01 corosync[2845]: [SERV ] Service engine loaded: corosync cluster quorum service v0.1 | |||
Oct 30 10:46:08 an-a05n01 corosync[2845]: [MAIN ] Compatibility mode set to whitetank. Using V1 and V2 of the synchronization engine. | |||
Oct 30 10:46:08 an-a05n01 corosync[2845]: [TOTEM ] A processor joined or left the membership and a new membership was formed. | |||
Oct 30 10:46:08 an-a05n01 corosync[2845]: [CMAN ] quorum regained, resuming activity | |||
Oct 30 10:46:08 an-a05n01 corosync[2845]: [QUORUM] This node is within the primary component and will provide service. | |||
Oct 30 10:46:08 an-a05n01 corosync[2845]: [QUORUM] Members[1]: 1 | |||
Oct 30 10:46:08 an-a05n01 corosync[2845]: [QUORUM] Members[1]: 1 | |||
Oct 30 10:46:08 an-a05n01 corosync[2845]: [CPG ] chosen downlist: sender r(0) ip(10.20.50.1) ; members(old:0 left:0) | |||
Oct 30 10:46:08 an-a05n01 corosync[2845]: [MAIN ] Completed service synchronization, ready to provide service. | |||
Oct 30 10:46:08 an-a05n01 corosync[2845]: [TOTEM ] A processor joined or left the membership and a new membership was formed. | |||
Oct 30 10:46:08 an-a05n01 corosync[2845]: [QUORUM] Members[2]: 1 2 | |||
Oct 30 10:46:08 an-a05n01 corosync[2845]: [QUORUM] Members[2]: 1 2 | |||
Oct 30 10:46:08 an-a05n01 corosync[2845]: [CPG ] chosen downlist: sender r(0) ip(10.20.50.1) ; members(old:1 left:0) | |||
Oct 30 10:46:08 an-a05n01 corosync[2845]: [MAIN ] Completed service synchronization, ready to provide service. | |||
Oct 30 10:46:12 an-a05n01 fenced[2902]: fenced 3.0.12.1 started | |||
Oct 30 10:46:12 an-a05n01 dlm_controld[2927]: dlm_controld 3.0.12.1 started | |||
Oct 30 10:46:13 an-a05n01 gfs_controld[2977]: gfs_controld 3.0.12.1 started | |||
</syntaxhighlight> | </syntaxhighlight> | ||
|} | |||
Now to confirm that the cluster is operating properly, we can use <span class="code">cman_tool</span>. | |||
{|class="wikitable" | |||
!<span class="code">an-a05n01</span> | |||
|style="white-space: nowrap;"|<syntaxhighlight lang="bash"> | |||
cman_tool status | |||
</syntaxhighlight> | </syntaxhighlight> | ||
<syntaxhighlight lang="text"> | |||
Version: 6.2.0 | |||
Config Version: 7 | |||
Cluster Name: an-anvil-05 | |||
Cluster Id: 42881 | |||
Cluster Member: Yes | |||
Cluster Generation: 20 | |||
Membership state: Cluster-Member | |||
Nodes: 2 | |||
Expected votes: 1 | |||
Total votes: 2 | |||
Node votes: 1 | |||
Quorum: 1 | |||
Active subsystems: 7 | |||
Flags: 2node | |||
Ports Bound: 0 | |||
Node name: an-a05n01.alteeve.ca | |||
Node ID: 1 | |||
Multicast addresses: 239.192.167.41 | |||
1: | Node addresses: 10.20.50.1 | ||
</syntaxhighlight> | </syntaxhighlight> | ||
|} | |||
We can see that the both nodes are talking because of the <span class="code">Nodes: 2</span> entry. | |||
{{note|1=If you have a managed switch that needs persistent multicast groups set, log into your switches now. We can see above that this cluster is using the multicast group <span class="code">239.192.167.41</span>, so find it in your switch config and ensure it's persistent.}} | |||
< | |||
If you ever want to see the nitty-gritty configuration, you can run <span class="code">corosync-objctl</span>. | |||
<syntaxhighlight lang="bash"> | {|class="wikitable" | ||
!<span class="code">an-a05n01</span> | |||
|style="white-space: nowrap;"|<syntaxhighlight lang="bash"> | |||
corosync-objctl | |||
</syntaxhighlight> | </syntaxhighlight> | ||
<syntaxhighlight lang="text"> | <syntaxhighlight lang="text"> | ||
cluster.name=an-anvil-05 | |||
cluster.config_version=7 | |||
cluster.cman.expected_votes=1 | |||
cluster.cman.two_node=1 | |||
cluster.cman.nodename=an-a05n01.alteeve.ca | |||
cluster.cman.cluster_id=42881 | |||
cluster.clusternodes.clusternode.name=an-a05n01.alteeve.ca | |||
cluster.clusternodes.clusternode.nodeid=1 | |||
cluster.clusternodes.clusternode.fence.method.name=ipmi | |||
cluster.clusternodes.clusternode.fence.method.device.name=ipmi_n01 | |||
cluster.clusternodes.clusternode.fence.method.device.action=reboot | |||
cluster.clusternodes.clusternode.fence.method.device.delay=15 | |||
cluster.clusternodes.clusternode.fence.method.name=pdu | |||
cluster.clusternodes.clusternode.fence.method.device.name=pdu1 | |||
cluster.clusternodes.clusternode.fence.method.device.port=1 | |||
cluster.clusternodes.clusternode.fence.method.device.action=reboot | |||
cluster.clusternodes.clusternode.fence.method.device.name=pdu2 | |||
cluster.clusternodes.clusternode.fence.method.device.port=1 | |||
cluster.clusternodes.clusternode.fence.method.device.action=reboot | |||
cluster.clusternodes.clusternode.name=an-a05n02.alteeve.ca | |||
cluster.clusternodes.clusternode.nodeid=2 | |||
cluster.clusternodes.clusternode.fence.method.name=ipmi | |||
cluster.clusternodes.clusternode.fence.method.device.name=ipmi_n02 | |||
cluster.clusternodes.clusternode.fence.method.device.action=reboot | |||
cluster.clusternodes.clusternode.fence.method.name=pdu | |||
cluster.clusternodes.clusternode.fence.method.device.name=pdu1 | |||
cluster.clusternodes.clusternode.fence.method.device.port=2 | |||
cluster.clusternodes.clusternode.fence.method.device.action=reboot | |||
cluster.clusternodes.clusternode.fence.method.device.name=pdu2 | |||
cluster.clusternodes.clusternode.fence.method.device.port=2 | |||
cluster.clusternodes.clusternode.fence.method.device.action=reboot | |||
cluster.fencedevices.fencedevice.name=ipmi_n01 | |||
cluster.fencedevices.fencedevice.agent=fence_ipmilan | |||
cluster.fencedevices.fencedevice.ipaddr=an-a05n01.ipmi | |||
cluster.fencedevices.fencedevice.login=admin | |||
cluster.fencedevices.fencedevice.passwd=secret | |||
cluster.fencedevices.fencedevice.name=ipmi_n02 | |||
cluster.fencedevices.fencedevice.agent=fence_ipmilan | |||
cluster.fencedevices.fencedevice.ipaddr=an-a05n02.ipmi | |||
cluster.fencedevices.fencedevice.login=admin | |||
cluster.fencedevices.fencedevice.passwd=secret | |||
cluster.fencedevices.fencedevice.agent=fence_apc_snmp | |||
cluster.fencedevices.fencedevice.ipaddr=an-pdu01.alteeve.ca | |||
cluster.fencedevices.fencedevice.name=pdu1 | |||
cluster.fencedevices.fencedevice.agent=fence_apc_snmp | |||
cluster.fencedevices.fencedevice.ipaddr=an-pdu02.alteeve.ca | |||
cluster.fencedevices.fencedevice.name=pdu2 | |||
cluster.fence_daemon.post_join_delay=30 | |||
cluster.totem.rrp_mode=none | |||
cluster.totem.secauth=off | |||
totem.rrp_mode=none | |||
totem.secauth=off | |||
totem.transport=udp | |||
totem.version=2 | |||
totem.nodeid=1 | |||
totem.vsftype=none | |||
totem.token=10000 | |||
totem.join=60 | |||
totem.fail_recv_const=2500 | |||
totem.consensus=2000 | |||
totem.key=an-anvil-05 | |||
totem.interface.ringnumber=0 | |||
totem.interface.bindnetaddr=10.20.50.1 | |||
totem.interface.mcastaddr=239.192.167.41 | |||
totem.interface.mcastport=5405 | |||
libccs.next_handle=7 | |||
libccs.connection.ccs_handle=3 | |||
libccs.connection.config_version=7 | |||
libccs.connection.fullxpath=0 | |||
libccs.connection.ccs_handle=4 | |||
libccs.connection.config_version=7 | |||
libccs.connection.fullxpath=0 | |||
libccs.connection.ccs_handle=5 | |||
libccs.connection.config_version=7 | |||
libccs.connection.fullxpath=0 | |||
logging.timestamp=on | |||
logging.to_logfile=yes | |||
logging.logfile=/var/log/cluster/corosync.log | |||
logging.logfile_priority=info | |||
logging.to_syslog=yes | |||
logging.syslog_facility=local4 | |||
logging.syslog_priority=info | |||
aisexec.user=ais | |||
aisexec.group=ais | |||
service.name=corosync_quorum | |||
service.ver=0 | |||
service.name=corosync_cman | |||
service.ver=0 | |||
quorum.provider=quorum_cman | |||
service.name=openais_ckpt | |||
service.ver=0 | |||
runtime.services.quorum.service_id=12 | |||
runtime.services.cman.service_id=9 | |||
runtime.services.ckpt.service_id=3 | |||
runtime.services.ckpt.0.tx=0 | |||
runtime.services.ckpt.0.rx=0 | |||
runtime.services.ckpt.1.tx=0 | |||
runtime.services.ckpt.1.rx=0 | |||
runtime.services.ckpt.2.tx=0 | |||
runtime.services.ckpt.2.rx=0 | |||
runtime.services.ckpt.3.tx=0 | |||
runtime.services.ckpt.3.rx=0 | |||
runtime.services.ckpt.4.tx=0 | |||
runtime.services.ckpt.4.rx=0 | |||
runtime.services.ckpt.5.tx=0 | |||
runtime.services.ckpt.5.rx=0 | |||
runtime.services.ckpt.6.tx=0 | |||
runtime.services.ckpt.6.rx=0 | |||
runtime.services.ckpt.7.tx=0 | |||
runtime.services.ckpt.7.rx=0 | |||
runtime.services.ckpt.8.tx=0 | |||
runtime.services.ckpt.8.rx=0 | |||
runtime.services.ckpt.9.tx=0 | |||
runtime.services.ckpt.9.rx=0 | |||
runtime.services.ckpt.10.tx=0 | |||
runtime.services.ckpt.10.rx=0 | |||
runtime.services.ckpt.11.tx=2 | |||
runtime.services.ckpt.11.rx=3 | |||
runtime.services.ckpt.12.tx=0 | |||
runtime.services.ckpt.12.rx=0 | |||
runtime.services.ckpt.13.tx=0 | |||
runtime.services.ckpt.13.rx=0 | |||
runtime.services.evs.service_id=0 | |||
runtime.services.evs.0.tx=0 | |||
runtime.services.evs.0.rx=0 | |||
runtime.services.cfg.service_id=7 | |||
runtime.services.cfg.0.tx=0 | |||
runtime.services.cfg.0.rx=0 | |||
runtime.services.cfg.1.tx=0 | |||
runtime.services.cfg.1.rx=0 | |||
runtime.services.cfg.2.tx=0 | |||
runtime.services.cfg.2.rx=0 | |||
runtime.services.cfg.3.tx=0 | |||
runtime.services.cfg.3.rx=0 | |||
runtime.services.cpg.service_id=8 | |||
runtime.services.cpg.0.tx=4 | |||
runtime.services.cpg.0.rx=8 | |||
runtime.services.cpg.1.tx=0 | |||
runtime.services.cpg.1.rx=0 | |||
runtime.services.cpg.2.tx=0 | |||
runtime.services.cpg.2.rx=0 | |||
runtime.services.cpg.3.tx=16 | |||
runtime.services.cpg.3.rx=23 | |||
runtime.services.cpg.4.tx=0 | |||
runtime.services.cpg.4.rx=0 | |||
runtime.services.cpg.5.tx=2 | |||
runtime.services.cpg.5.rx=3 | |||
runtime.services.confdb.service_id=11 | |||
runtime.services.pload.service_id=13 | |||
runtime.services.pload.0.tx=0 | |||
runtime.services.pload.0.rx=0 | |||
runtime.services.pload.1.tx=0 | |||
runtime.services.pload.1.rx=0 | |||
runtime.services.quorum.service_id=12 | |||
runtime.connections.active=6 | |||
runtime.connections.closed=111 | |||
runtime.connections.fenced:CPG:2902:21.service_id=8 | |||
runtime.connections.fenced:CPG:2902:21.client_pid=2902 | |||
runtime.connections.fenced:CPG:2902:21.responses=5 | |||
runtime.connections.fenced:CPG:2902:21.dispatched=9 | |||
runtime.connections.fenced:CPG:2902:21.requests=5 | |||
runtime.connections.fenced:CPG:2902:21.sem_retry_count=0 | |||
runtime.connections.fenced:CPG:2902:21.send_retry_count=0 | |||
runtime.connections.fenced:CPG:2902:21.recv_retry_count=0 | |||
runtime.connections.fenced:CPG:2902:21.flow_control=0 | |||
runtime.connections.fenced:CPG:2902:21.flow_control_count=0 | |||
runtime.connections.fenced:CPG:2902:21.queue_size=0 | |||
runtime.connections.fenced:CPG:2902:21.invalid_request=0 | |||
runtime.connections.fenced:CPG:2902:21.overload=0 | |||
runtime.connections.dlm_controld:CPG:2927:24.service_id=8 | |||
runtime.connections.dlm_controld:CPG:2927:24.client_pid=2927 | |||
runtime.connections.dlm_controld:CPG:2927:24.responses=5 | |||
runtime.connections.dlm_controld:CPG:2927:24.dispatched=8 | |||
runtime.connections.dlm_controld:CPG:2927:24.requests=5 | |||
runtime.connections.dlm_controld:CPG:2927:24.sem_retry_count=0 | |||
runtime.connections.dlm_controld:CPG:2927:24.send_retry_count=0 | |||
runtime.connections.dlm_controld:CPG:2927:24.recv_retry_count=0 | |||
== | runtime.connections.dlm_controld:CPG:2927:24.flow_control=0 | ||
runtime.connections.dlm_controld:CPG:2927:24.flow_control_count=0 | |||
runtime.connections.dlm_controld:CPG:2927:24.queue_size=0 | |||
runtime.connections.dlm_controld:CPG:2927:24.invalid_request=0 | |||
runtime.connections.dlm_controld:CPG:2927:24.overload=0 | |||
runtime.connections.dlm_controld:CKPT:2927:25.service_id=3 | |||
runtime.connections.dlm_controld:CKPT:2927:25.client_pid=2927 | |||
runtime.connections.dlm_controld:CKPT:2927:25.responses=0 | |||
runtime.connections.dlm_controld:CKPT:2927:25.dispatched=0 | |||
runtime.connections.dlm_controld:CKPT:2927:25.requests=0 | |||
runtime.connections.dlm_controld:CKPT:2927:25.sem_retry_count=0 | |||
runtime.connections.dlm_controld:CKPT:2927:25.send_retry_count=0 | |||
runtime.connections.dlm_controld:CKPT:2927:25.recv_retry_count=0 | |||
runtime.connections.dlm_controld:CKPT:2927:25.flow_control=0 | |||
runtime.connections.dlm_controld:CKPT:2927:25.flow_control_count=0 | |||
runtime.connections.dlm_controld:CKPT:2927:25.queue_size=0 | |||
runtime.connections.dlm_controld:CKPT:2927:25.invalid_request=0 | |||
runtime.connections.dlm_controld:CKPT:2927:25.overload=0 | |||
runtime.connections.gfs_controld:CPG:2977:28.service_id=8 | |||
runtime.connections.gfs_controld:CPG:2977:28.client_pid=2977 | |||
runtime.connections.gfs_controld:CPG:2977:28.responses=5 | |||
runtime.connections.gfs_controld:CPG:2977:28.dispatched=8 | |||
runtime.connections.gfs_controld:CPG:2977:28.requests=5 | |||
runtime.connections.gfs_controld:CPG:2977:28.sem_retry_count=0 | |||
runtime.connections.gfs_controld:CPG:2977:28.send_retry_count=0 | |||
runtime.connections.gfs_controld:CPG:2977:28.recv_retry_count=0 | |||
runtime.connections.gfs_controld:CPG:2977:28.flow_control=0 | |||
runtime.connections.gfs_controld:CPG:2977:28.flow_control_count=0 | |||
runtime.connections.gfs_controld:CPG:2977:28.queue_size=0 | |||
runtime.connections.gfs_controld:CPG:2977:28.invalid_request=0 | |||
runtime.connections.gfs_controld:CPG:2977:28.overload=0 | |||
runtime.connections.fenced:CPG:2902:29.service_id=8 | |||
runtime.connections.fenced:CPG:2902:29.client_pid=2902 | |||
runtime.connections.fenced:CPG:2902:29.responses=5 | |||
runtime.connections.fenced:CPG:2902:29.dispatched=8 | |||
runtime.connections.fenced:CPG:2902:29.requests=5 | |||
runtime.connections.fenced:CPG:2902:29.sem_retry_count=0 | |||
runtime.connections.fenced:CPG:2902:29.send_retry_count=0 | |||
runtime.connections.fenced:CPG:2902:29.recv_retry_count=0 | |||
runtime.connections.fenced:CPG:2902:29.flow_control=0 | |||
runtime.connections.fenced:CPG:2902:29.flow_control_count=0 | |||
runtime.connections.fenced:CPG:2902:29.queue_size=0 | |||
runtime.connections.fenced:CPG:2902:29.invalid_request=0 | |||
runtime.connections.fenced:CPG:2902:29.overload=0 | |||
runtime.connections.corosync-objctl:CONFDB:3083:30.service_id=11 | |||
runtime.connections.corosync-objctl:CONFDB:3083:30.client_pid=3083 | |||
runtime.connections.corosync-objctl:CONFDB:3083:30.responses=463 | |||
runtime.connections.corosync-objctl:CONFDB:3083:30.dispatched=0 | |||
runtime.connections.corosync-objctl:CONFDB:3083:30.requests=466 | |||
runtime.connections.corosync-objctl:CONFDB:3083:30.sem_retry_count=0 | |||
runtime.connections.corosync-objctl:CONFDB:3083:30.send_retry_count=0 | |||
runtime.connections.corosync-objctl:CONFDB:3083:30.recv_retry_count=0 | |||
runtime.connections.corosync-objctl:CONFDB:3083:30.flow_control=0 | |||
runtime.connections.corosync-objctl:CONFDB:3083:30.flow_control_count=0 | |||
runtime.connections.corosync-objctl:CONFDB:3083:30.queue_size=0 | |||
runtime.connections.corosync-objctl:CONFDB:3083:30.invalid_request=0 | |||
runtime.connections.corosync-objctl:CONFDB:3083:30.overload=0 | |||
runtime.totem.pg.msg_reserved=1 | |||
runtime.totem.pg.msg_queue_avail=761 | |||
runtime.totem.pg.mrp.srp.orf_token_tx=2 | |||
runtime.totem.pg.mrp.srp.orf_token_rx=437 | |||
runtime.totem.pg.mrp.srp.memb_merge_detect_tx=47 | |||
runtime.totem.pg.mrp.srp.memb_merge_detect_rx=47 | |||
runtime.totem.pg.mrp.srp.memb_join_tx=3 | |||
runtime.totem.pg.mrp.srp.memb_join_rx=5 | |||
runtime.totem.pg.mrp.srp.mcast_tx=46 | |||
runtime.totem.pg.mrp.srp.mcast_retx=0 | |||
runtime.totem.pg.mrp.srp.mcast_rx=57 | |||
runtime.totem.pg.mrp.srp.memb_commit_token_tx=4 | |||
runtime.totem.pg.mrp.srp.memb_commit_token_rx=4 | |||
runtime.totem.pg.mrp.srp.token_hold_cancel_tx=4 | |||
runtime.totem.pg.mrp.srp.token_hold_cancel_rx=8 | |||
runtime.totem.pg.mrp.srp.operational_entered=2 | |||
runtime.totem.pg.mrp.srp.operational_token_lost=0 | |||
runtime.totem.pg.mrp.srp.gather_entered=2 | |||
runtime.totem.pg.mrp.srp.gather_token_lost=0 | |||
runtime.totem.pg.mrp.srp.commit_entered=2 | |||
runtime.totem.pg.mrp.srp.commit_token_lost=0 | |||
runtime.totem.pg.mrp.srp.recovery_entered=2 | |||
runtime.totem.pg.mrp.srp.recovery_token_lost=0 | |||
runtime.totem.pg.mrp.srp.consensus_timeouts=0 | |||
runtime.totem.pg.mrp.srp.mtt_rx_token=835 | |||
runtime.totem.pg.mrp.srp.avg_token_workload=0 | |||
runtime.totem.pg.mrp.srp.avg_backlog_calc=0 | |||
runtime.totem.pg.mrp.srp.rx_msg_dropped=0 | |||
runtime.totem.pg.mrp.srp.continuous_gather=0 | |||
runtime.totem.pg.mrp.srp.continuous_sendmsg_failures=0 | |||
runtime.totem.pg.mrp.srp.firewall_enabled_or_nic_failure=0 | |||
runtime.totem.pg.mrp.srp.members.1.ip=r(0) ip(10.20.50.1) | |||
runtime.totem.pg.mrp.srp.members.1.join_count=1 | |||
runtime.totem.pg.mrp.srp.members.1.status=joined | |||
runtime.totem.pg.mrp.srp.members.2.ip=r(0) ip(10.20.50.2) | |||
runtime.totem.pg.mrp.srp.members.2.join_count=1 | |||
runtime.totem.pg.mrp.srp.members.2.status=joined | |||
runtime.blackbox.dump_flight_data=no | |||
runtime.blackbox.dump_state=no | |||
cman_private.COROSYNC_DEFAULT_CONFIG_IFACE=xmlconfig:cmanpreconfig | |||
</syntaxhighlight> | |||
|} | |||
" | If you want to check what [[DLM]] lockspaces, you can use <span class="code">dlm_tool ls</span> to list lock spaces. Given that we're not running and resources or clustered filesystems though, there won't be any at this time. We'll look at this again later. | ||
== Testing Fencing == | |||
We need to thoroughly test our fence configuration and devices before we proceed. Should the cluster call a fence, and if the fence call fails, the cluster will hang until the fence finally succeeds. This effectively hangs the cluster, by design. The rationale is that, as bad as a hung cluster might be, it's better than risking data corruption. | |||
So if we have problems, we need to find them now. | |||
We need to run two tests from each node against the other node for a total of four tests. | |||
# The first test will verify that <span class="code">fence_ipmilan</span> is working. To do this, we will hang the victim node by sending <span class="code">c</span> to the kernel's "[https://en.wikipedia.org/wiki/Magic_SysRq_key magic SysRq]" key. We do this by running <span class="code">echo c > /proc/sysrq-trigger</span> which immediately and completely hangs the kernel. This does not effect the IPMI BMC, so if we've configured everything properly, the surviving node should be able to use <span class="code">fence_ipmilan</span> to reboot the crashed node. | |||
# Secondly, we will pull the power on the target node. This removes all power from the node, causing the IPMI BMC to also fail. You should see the other node try to fence the target using <span class="code">fence_ipmilan</span>, see it fail and then try again using the second method, the switched PDUs via <span class="code">fence_apc_snmp</span>. If you watch and listen to the PDUs, you should see the power indicator LED light up and hear the mechanical relays close the circuit when the fence completes. | |||
For the second test, you could just physically unplug the cables from the PDUs. We're going to cheat though and use the actual <span class="code">fence_apc_snmp</span> fence handler to manually turn off the target ports. This will help show that the fence agents are really just shell scripts. Used on their own, they do not talk to the cluster in any way. So despite using them to cut the power, the cluster will not know what state the lost node is in, requiring a fence call still. | |||
{|class="wikitable" | |||
!Test | |||
< | !Victim | ||
!Pass? | |||
</ | |- | ||
|<span class="code">echo c > /proc/sysrq-trigger</span> | |||
|<span class="code">an-a05n01</span> | |||
|<span style="color: green;">Yes</span> / <span style="color: red;">No</span> | |||
|- | |||
|<span class="code">fence_apc_snmp -a an-pdu01.alteeve.ca -n 1 -o off</span> | |||
<span class="code">fence_apc_snmp -a an-pdu02.alteeve.ca -n 1 -o off</span> | |||
|<span class="code">an-a05n01</span> | |||
|<span style="color: green;">Yes</span> / <span style="color: red;">No</span> | |||
|- | |||
|<span class="code">echo c > /proc/sysrq-trigger</span> | |||
|<span class="code">an-a05n02</span> | |||
|<span style="color: green;">Yes</span> / <span style="color: red;">No</span> | |||
|- | |||
|<span class="code">fence_apc_snmp -a an-pdu01.alteeve.ca -n 2 -o off</span> | |||
<span class="code">fence_apc_snmp -a an-pdu02.alteeve.ca -n 2 -o off</span> | |||
|<span class="code">an-a05n02</span> | |||
|<span style="color: green;">Yes</span> / <span style="color: red;">No</span> | |||
|} | |||
{{note|1=After the target node powers back up after each test, be sure to restart <span class="code">cman</span>!}} | |||
=== Using Fence_check to Verify our Fencing Config === | |||
In RHEL 6.4, a new tool called <span class="code">fence_check</span> was added to the cluster toolbox. When <span class="code">cman</span> is running, we can call it and it will gather up the data from <span class="code">cluster.conf</span> and then call each defined fence device with the action "<span class="code">status</span>". If everything is configured properly, all fence devices should exit with a return code of <span class="code">0</span> (device/port is <span class="code">on</span>) or <span class="code">2</span> (device/port is <span class="code">off</span>). | |||
If any fence device's agent exits with any other code, something has gone wrong and we need to fix it before proceeding. | |||
We're going to run this tool from both node. So let's start with <span class="code">an-a05n01</span>. | |||
{|class="wikitable" | |||
!<span class="code">an-a05n01</span> | |||
|style="white-space: nowrap;"|<syntaxhighlight lang="bash"> | |||
fence_check | |||
</syntaxhighlight> | |||
<syntaxhighlight lang="text"> | |||
fence_check run at Wed Oct 30 10:56:07 EDT 2013 pid: 3236 | |||
Testing an-a05n01.alteeve.ca method 1: success | |||
Testing an-a05n01.alteeve.ca method 2: success | |||
Testing an-a05n02.alteeve.ca method 1: success | |||
Testing an-a05n02.alteeve.ca method 2: success | |||
</syntaxhighlight> | |||
|} | |||
That is very promising! Now lets run it again on <span class="code">an-a05n02</span>. We want to do this because, for example, if the <span class="code">/etc/hosts</span> file on the second node was bad, a fence may work on the first node but not this node. | |||
{|class="wikitable" | |||
!<span class="code">an-a05n02</span> | |||
|style="white-space: nowrap;"|<syntaxhighlight lang="bash"> | |||
fence_check | |||
</syntaxhighlight> | |||
<syntaxhighlight lang="text"> | |||
fence_check run at Wed Oct 30 10:57:27 EDT 2013 pid: 28127 | |||
Unable to perform fence_check: node is not fence master | |||
</syntaxhighlight> | |||
|} | |||
Well then, that's not what we expected. | |||
Actually, it is. When a cluster starts, one of the nodes in the cluster will be chosen to be the node which performs actual fence calls. This node (the one with the lowest node ID) is the only one that, by default, can run <span class="code">fence_check</span>. | |||
If we look at <span class="code">fence_check</span>'s <span class="code">man</span> page, we see that we can use the <span class="code">-f</span> switch to override this behaviour, but there is an important note: | |||
{|class="wikitable" | |||
!<span class="code">an-a05n02</span> | |||
= | |style="white-space: nowrap;"|<syntaxhighlight lang="bash"> | ||
man fence_check | |||
<syntaxhighlight lang="bash"> | |||
</syntaxhighlight> | </syntaxhighlight> | ||
<syntaxhighlight lang="text"> | <syntaxhighlight lang="text"> | ||
-f Override checks and force execution. DO NOT USE ON PRODUCTION CLUSTERS! | |||
</syntaxhighlight> | </syntaxhighlight> | ||
|} | |||
The reason for this is that, while <span class="code">fence_check</span> is running, should a node fail, it will not be able to fence until the <span class="code">fence_check</span> finishes. In production, this can cause recovery post-failure to take a bit longer than it otherwise would. | |||
Good thing we're testing now, before the cluster is in production! | |||
So lets try again, this time forcing the issue. | |||
{|class="wikitable" | |||
!<span class="code">an-a05n02</span> | |||
<syntaxhighlight lang="bash"> | |style="white-space: nowrap;"|<syntaxhighlight lang="bash"> | ||
fence_check -f | |||
</syntaxhighlight> | </syntaxhighlight> | ||
<syntaxhighlight lang="text"> | <syntaxhighlight lang="text"> | ||
fence_check run at Wed Oct 30 11:02:35 EDT 2013 pid: 28222 | |||
Testing an-a05n01.alteeve.ca method 1: success | |||
Testing an-a05n01.alteeve.ca method 2: success | |||
Testing an-a05n02.alteeve.ca method 1: success | |||
Testing an-a05n02.alteeve.ca method 2: success | |||
</syntaxhighlight> | </syntaxhighlight> | ||
|} | |||
Very nice. | |||
=== Crashing an-a05n01 for the First Time === | |||
{{warning|1=This step will totally crash <span class="code">an-a05n01</span>! If fencing fails for some reason, you may need physical access to the node to recover it.}} | |||
Be sure to <span class="code">tail</span> the <span class="code">/var/log/messages</span> system logs on <span class="code">an-a05n02</span>. Go to <span class="code">an-a05n01</span>'s first terminal and run the following command. | |||
On '''<span class="code">an-a05n01</span>''' run: | |||
{|class="wikitable" | |||
!<span class="code">an-a05n01</span> | |||
|style="white-space: nowrap;"|<syntaxhighlight lang="bash"> | |||
echo c > /proc/sysrq-trigger | |||
</syntaxhighlight> | |||
|} | |||
On '''<span class="code">an-a05n02</span>''''s syslog terminal, you should see the following entries in the log. | |||
{|class="wikitable" | {|class="wikitable" | ||
! | !<span class="code">an-a05n02</span> | ||
|style="white-space: nowrap;"|<syntaxhighlight lang="text"> | |||
Oct 30 11:05:46 an-a05n02 corosync[27783]: [TOTEM ] A processor failed, forming new configuration. | |||
Oct 30 11:05:48 an-a05n02 corosync[27783]: [QUORUM] Members[1]: 2 | |||
Oct 30 11:05:48 an-a05n02 corosync[27783]: [TOTEM ] A processor joined or left the membership and a new membership was formed. | |||
Oct 30 11:05:48 an-a05n02 corosync[27783]: [CPG ] chosen downlist: sender r(0) ip(10.20.50.2) ; members(old:2 left:1) | |||
Oct 30 11:05:48 an-a05n02 corosync[27783]: [MAIN ] Completed service synchronization, ready to provide service. | |||
Oct 30 11:05:48 an-a05n02 kernel: dlm: closing connection to node 1 | |||
Oct 30 11:05:48 an-a05n02 fenced[27840]: fencing node an-a05n01.alteeve.ca | |||
Oct 30 11:06:21 an-a05n02 fenced[27840]: fence an-a05n01.alteeve.ca success | |||
</syntaxhighlight> | |||
| | |||
|} | |} | ||
Excellent! The IPMI-based fencing worked! | |||
But why did it take 33 seconds? | |||
The current <span class="code">fence_ipmilan</span> version works this way for <span class="code">reboot</span> actions; | |||
=== | # Check status | ||
# Call <span class="code">ipmitool ... chassis power off</span> | |||
# Checks status again until the status shows <span class="code">off</span> | |||
# Call <span class="code">ipmitool ... chassis power on</span> | |||
# Checks the status again | |||
If you tried doing these steps directly, you would find that it takes roughly 18 seconds to run. Add this to the <span class="code">delay="15"</span> we set against <span class="code">an-a05n01</span> when using the IPMI fence device and you have the 33 seconds we see here. | |||
= | If you are watching <span class="code">an-a05n01</span>'s display, you should now see it starting to boot back up. | ||
=== Cutting the Power to an-a05n01 === | |||
{{note|1=Remember to start <span class="code">cman</span> once the node boots back up before running this test.}} | |||
As was discussed earlier, IPMI and other out-of-band management interfaces have a fatal flaw as a fence device. Their [[BMC]] draws its power from the same power supply as the node itself. Thus, when the power supply itself fails (for example, if an internal wire shorted against the chassis), fencing via IPMI will fail as well. This makes the power supply a single point of failure, which is what the PDU protects us against. | |||
In case you're wondering how likely failing a redundant PSU is... | |||
== | {| | ||
|[[image:lisa_seelye-cable_fail-2.jpeg|thumb|300px|Cable short 1]] | |||
|[[image:lisa_seelye-cable_fail-3.jpeg|thumb|300px|Cable short 2]] | |||
|[[image:lisa_seelye-cable_fail-4.jpeg|thumb|300px|Cable short 3]] | |||
|- | |||
|colspan="3" style="text-align: center;"|Thanks to my very talented fellow admin, [https://twitter.com/thedoh Lisa Seelye], for this object lesson. | |||
|} | |||
So to simulate a failed power supply, we're going to use <span class="code">an-a05n02</span>'s <span class="code">fence_apc_snmp</span> fence agent to turn off the power to <span class="code">an-a05n01</span>. Given that the node has two power supplies, one plugged in to each PDU, we'll need to make two calls to cut the power. | |||
Alternatively, you could also just unplug the power cables from the PDUs and the fence would still succeed. Once <span class="code">fence_apc_snmp</span> confirms that the requested ports have no power, the fence action succeeds. Whether the nodes restart after the fence is not at all a factor. | |||
<syntaxhighlight lang="bash"> | From '''<span class="code">an-a05n02</span>''', pull the power on <span class="code">an-a05n01</span> with the following two chained calls; | ||
{|class="wikitable" | |||
!<span class="code">an-a05n02</span> | |||
|style="white-space: nowrap;"|<syntaxhighlight lang="bash"> | |||
fence_apc_snmp -a an-pdu01.alteeve.ca -n 1 -o off && fence_apc_snmp -a an-pdu02.alteeve.ca -n 1 -o off | |||
</syntaxhighlight> | </syntaxhighlight> | ||
<syntaxhighlight lang="text"> | <syntaxhighlight lang="text"> | ||
Success: Powered OFF | |||
Success: Powered OFF | |||
</syntaxhighlight> | </syntaxhighlight> | ||
|} | |||
=== | {{warning|1=Verify directly that <span class="code">an-a05n01</span> lost power! If the power cables are in the wrong port, <span class="code">an-a05n01</span> will still be powered on, despite the success message!}} | ||
Back on <span class="code">an-a05n02</span>'s syslog, we should see the following entries; | |||
< | {|class="wikitable" | ||
!<span class="code">an-a05n02</span> | |||
|style="white-space: nowrap;"|<syntaxhighlight lang="text"> | |||
Oct 30 13:31:49 an-a05n02 corosync[27783]: [TOTEM ] A processor failed, forming new configuration. | |||
</ | Oct 30 13:31:51 an-a05n02 corosync[27783]: [QUORUM] Members[1]: 2 | ||
<syntaxhighlight lang="text"> | Oct 30 13:31:51 an-a05n02 corosync[27783]: [TOTEM ] A processor joined or left the membership and a new membership was formed. | ||
Oct 30 13:31:51 an-a05n02 corosync[27783]: [CPG ] chosen downlist: sender r(0) ip(10.20.50.2) ; members(old:2 left:1) | |||
Oct 30 13:31:51 an-a05n02 corosync[27783]: [MAIN ] Completed service synchronization, ready to provide service. | |||
Oct 30 13:31:51 an-a05n02 kernel: dlm: closing connection to node 1 | |||
Oct 30 13:31:51 an-a05n02 fenced[27840]: fencing node an-a05n01.alteeve.ca | |||
Oct 30 13:32:26 an-a05n02 fenced[27840]: fence an-a05n01.alteeve.ca dev 0.0 agent fence_ipmilan result: error from agent | |||
Oct 30 13:32:26 an-a05n02 fenced[27840]: fence an-a05n01.alteeve.ca success | |||
</syntaxhighlight> | </syntaxhighlight> | ||
|} | |||
Hoozah! | |||
Notice that there is an error from the <span class="code">fence_ipmilan</span>? This is exactly what we expected because of the IPMI's BMC lost power and couldn't respond. You will also notice the large delay, despite there not being a <span class="code">delay="15"</span> set for the PDU fence devices for <span class="code">an-a05n01</span>. This was from the initial delay when trying to fence using IPMI. This is why we don't need to specify <span class="code">delay</span> on the PDUs as well. | |||
So now we know that <span class="code">an-a05n01</span> can be fenced successfully from both fence devices. Now we need to run the same tests against <span class="code">an-a05n02</span>! | |||
=== Hanging an-a05n02 === | |||
{{warning|1='''DO NOT ASSUME THAT <span class="code">an-a05n02</span> WILL FENCE PROPERLY JUST BECAUSE <span class="code">an-a05n01</span> PASSED!'''. There are many ways that a fence could fail; Bad password, misconfigured device, plugged into the wrong port on the PDU and so on. Always test all nodes using all methods!}} | |||
{{note|1=Remember to start <span class="code">cman</span> once the node boots back up before running this test.}} | |||
Be sure to be <span class="code">tail</span>ing the <span class="code">/var/log/messages</span> on <span class="code">an-a05n02</span>. Go to <span class="code">an-a05n01</span>'s first terminal and run the following command. | |||
{{note|1=This command will not return and you will lose all ability to talk to this node until it is rebooted.}} | |||
This | |||
On '''<span class="code">an-a05n02</span>''' run: | |||
{ | {|class="wikitable" | ||
!<span class="code">an-a05n02</span> | |||
|style="white-space: nowrap;"|<syntaxhighlight lang="bash"> | |||
echo c > /proc/sysrq-trigger | |||
</syntaxhighlight> | |||
|} | |||
On '''<span class="code">an-a05n01</span>''''s syslog terminal, you should see the following entries in the log. | |||
{|class="wikitable" | |||
!<span class="code">an-a05n01</span> | |||
|style="white-space: nowrap;"|<syntaxhighlight lang="text"> | |||
Oct 30 13:40:29 an-a05n01 corosync[2800]: [TOTEM ] A processor failed, forming new configuration. | |||
Oct 30 13:40:31 an-a05n01 corosync[2800]: [QUORUM] Members[1]: 1 | |||
Oct 30 13:40:31 an-a05n01 corosync[2800]: [TOTEM ] A processor joined or left the membership and a new membership was formed. | |||
Oct 30 13:40:31 an-a05n01 corosync[2800]: [CPG ] chosen downlist: sender r(0) ip(10.20.50.1) ; members(old:2 left:1) | |||
Oct 30 13:40:31 an-a05n01 corosync[2800]: [MAIN ] Completed service synchronization, ready to provide service. | |||
Oct 30 13:40:31 an-a05n01 kernel: dlm: closing connection to node 2 | |||
Oct 30 13:40:31 an-a05n01 fenced[2857]: fencing node an-a05n02.alteeve.ca | |||
Oct 30 13:40:48 an-a05n01 fenced[2857]: fence an-a05n02.alteeve.ca success | |||
</syntaxhighlight> | |||
|} | |||
Again, perfect! | |||
Notice this time that the fence action took 17 seconds, much less that it took to fence <span class="code">an-c01n01</span>. This is because, as you probably guessed, there is no <span class="code">delay</span> set against <span class="code">an-a05n02</span>. So when <span class="code">an-a05n01</span> went to fence it, it proceeded immediately. This tells us that if both nodes try to fence each other at the same time, <span class="code">an-a05n01</span> should be left the winner. | |||
=== Cutting the Power to an-a05n02 === | |||
{{note|1= | {{note|1=Remember to start <span class="code">cman</span> once the node boots back up before running this test.}} | ||
= | Last fence test! Time to yank the power on <span class="code">an-a05n02</span> and make sure its power fencing works. | ||
From '''<span class="code">an-a05n01</span>''', pull the power on <span class="code">an-a05n02</span> with the following call; | |||
{|class="wikitable" | |||
!<span class="code">an-a05n01</span> | |||
<syntaxhighlight lang="bash"> | |style="white-space: nowrap;"|<syntaxhighlight lang="bash"> | ||
fence_apc_snmp -a an-pdu01.alteeve.ca -n 2 -o off && fence_apc_snmp -a an-pdu02.alteeve.ca -n 2 -o off | |||
</syntaxhighlight> | </syntaxhighlight> | ||
<syntaxhighlight lang="text"> | <syntaxhighlight lang="text"> | ||
Success: Powered OFF | |||
Success: Powered OFF | |||
</syntaxhighlight> | </syntaxhighlight> | ||
|} | |||
{{warning|1=Verify directly that <span class="code">an-a05n02</span> lost power! If the power cables are in the wrong port, <span class="code">an-a05n02</span> will still be powered on, despite the success message!}} | |||
On <span class="code">an-a05n01</span>'s syslog, we should see the following entries; | |||
{|class="wikitable" | |||
!<span class="code">an-a05n01</span> | |||
|style="white-space: nowrap;"|<syntaxhighlight lang="text"> | |||
Oct 30 13:44:41 an-a05n01 corosync[2800]: [TOTEM ] A processor failed, forming new configuration. | |||
Oct 30 13:44:43 an-a05n01 corosync[2800]: [QUORUM] Members[1]: 1 | |||
Oct 30 13:44:43 an-a05n01 corosync[2800]: [TOTEM ] A processor joined or left the membership and a new membership was formed. | |||
Oct 30 13:44:43 an-a05n01 corosync[2800]: [CPG ] chosen downlist: sender r(0) ip(10.20.50.1) ; members(old:2 left:1) | |||
Oct 30 13:44:43 an-a05n01 corosync[2800]: [MAIN ] Completed service synchronization, ready to provide service. | |||
Oct 30 13:44:43 an-a05n01 kernel: dlm: closing connection to node 2 | |||
Oct 30 13:44:43 an-a05n01 fenced[2857]: fencing node an-a05n02.alteeve.ca | |||
Oct 30 13:44:47 an-a05n01 ntpd[2298]: synchronized to 66.96.30.35, stratum 2 | |||
Oct 30 13:45:03 an-a05n01 fenced[2857]: fence an-a05n02.alteeve.ca dev 0.0 agent fence_ipmilan result: error from agent | |||
Oct 30 13:45:03 an-a05n01 fenced[2857]: fence an-a05n02.alteeve.ca success | |||
</syntaxhighlight> | |||
|} | |||
Woot! | |||
Only now can we safely say that our fencing is setup and working properly. | |||
= Installing DRBD = | |||
DRBD is an open-source application for real-time, block-level disk replication created and maintained by [http://linbit.com Linbit]. We will use this to keep the data on our cluster consistent between the two nodes. | |||
To install it, we have three choices; | |||
# Purchase a Red Hat blessed, fully supported copy from [http://linbit.com Linbit]. | |||
# Install from the freely available, community maintained [http://elrepo.org/tiki/tiki-index.php ELRepo] repository. | |||
# Install from source files. | |||
We | We will be using the 8.3.x version of DRBD. This tracts the Red Hat and Linbit supported versions, providing the most tested combination and providing a painless path to move to a fully supported version, should you decide to do so down the road. | ||
== Option 1 - Fully Supported by Red Hat and Linbit == | |||
< | {{note|1=This shows how to install on <span class="code">an-a05n01</span>. Please do this again for <span class="code">an-a05n02</span>.}} | ||
</ | |||
< | |||
</ | |||
Red Hat decided to no longer directly support [[DRBD]] in [[EL6]] to narrow down what applications they shipped and focus on improving those components. Given the popularity of DRBD, however, Red Hat struck a deal with [[Linbit]], the authors and maintainers of DRBD. You have the option of purchasing a fully supported version of DRBD that is blessed by Red Hat for use under Red Hat Enterprise Linux 6. | |||
If you are building a fully supported cluster, please [http://www.linbit.com/en/products-services/drbd/drbd-for-high-availability/ contact Linbit] to purchase DRBD. Once done, you will get an email with you login information and, most importantly here, the [[URL]] hash needed to access the official repositories. | |||
First you will need to add an entry in <span class="code">/etc/yum.repo.d/</span> for DRBD, but this needs to be hand-crafted as you must specify the URL hash given to you in the email as part of the repo configuration. | |||
* Log into the [https://my.linbit.com Linbit portal]. | |||
* Click on ''Account''. | |||
* Under ''Your account details'', click on the hash string to the right of ''URL hash:''. | |||
* Click on ''RHEL 6'' (even if you are using CentOS or another [[EL6]] distro. | |||
This will take you to a new page called ''Instructions for using the DRBD package repository''. The details installation instruction are found here. | |||
Lets use the imaginative URL hash of <span class="code">abcdefghijklmnopqrstuvwxyz0123456789ABCD</span> and we're are in fact using <span class="code">x86_64</span> architecture. Given this, we would create the following repository configuration file. | |||
< | {|class="wikitable" | ||
!<span class="code">an-a05n01</span> | |||
|style="white-space: nowrap;"|<syntaxhighlight lang="bash"> | |||
</ | vim /etc/yum.repos.d/linbit.repo | ||
<syntaxhighlight lang=" | </syntaxhighlight> | ||
<syntaxhighlight lang="text"> | |||
[drbd-8] | |||
name=DRBD 8 | |||
baseurl=http://packages.linbit.com/abcdefghijklmnopqrstuvwxyz0123456789ABCD/rhel6/x86_64 | |||
gpgcheck=0 | |||
</syntaxhighlight> | |||
|} | |||
Once this is saved, you can install DRBD using <span class="code">yum</span>; | |||
{|class="wikitable" | |||
!<span class="code">an-a05n01</span> | |||
|style="white-space: nowrap;"|<syntaxhighlight lang="bash"> | |||
yum install drbd kmod-drbd | |||
</syntaxhighlight> | |||
|} | |||
Make sure DRBD doesn't start on boot, as we'll have <span class="code">rgmanager</span> handle it. | |||
{|class="wikitable" | |||
!<span class="code">an-a05n01</span> | |||
|style="white-space: nowrap;"|<syntaxhighlight lang="bash"> | |||
chkconfig drbd off | |||
</syntaxhighlight> | </syntaxhighlight> | ||
|} | |||
Done! | |||
== Option 2 - Install From AN!Repo == | |||
{{note|1=This is the method used for this tutorial.}} | |||
If you didn't remove <span class="code">drbd83-utils</span> and <span class="code">kmod-drbd83</span> in the initial package installation step, then DRBD is already installed. | |||
== Option 3 - Install From Source == | |||
If you do not wish to pay for access to the official DRBD repository and do not feel comfortable adding a public repository, your last option is to install from Linbit's source code. The benefit of this is that you can vet the source before installing it, making it a more secure option. The downside is that you will need to manually install updates and security fixes as they are made available. | |||
On '''Both''' nodes run: | |||
<syntaxhighlight lang="bash"> | {|class="wikitable" | ||
!<span class="code">an-a05n01</span> | |||
!<span class="code">an-a05n02</span> | |||
|- | |||
|style="white-space: nowrap;"|<syntaxhighlight lang="bash"> | |||
yum install flex gcc make kernel-devel | |||
wget -c http://oss.linbit.com/drbd/8.3/drbd-8.3.16.tar.gz | |||
tar -xvzf drbd-8.3.16.tar.gz | |||
cd drbd-8.3.16 | |||
./configure \ | |||
--prefix=/usr \ | |||
--localstatedir=/var \ | |||
--sysconfdir=/etc \ | |||
--with-utils \ | |||
--with-km \ | |||
--with-udev \ | |||
--with-pacemaker \ | |||
--with-rgmanager \ | |||
--with-bashcompletion | |||
make | |||
make install | |||
chkconfig --add drbd | |||
chkconfig drbd off | |||
</syntaxhighlight> | </syntaxhighlight> | ||
<syntaxhighlight lang="text"> | <syntaxhighlight lang="text"> | ||
<significant amount of output> | |||
</syntaxhighlight> | </syntaxhighlight> | ||
|style="white-space: nowrap;"|<syntaxhighlight lang="bash"> | |||
yum install flex gcc make kernel-devel | |||
wget -c http://oss.linbit.com/drbd/8.3/drbd-8.3.16.tar.gz | |||
tar -xvzf drbd-8.3.16.tar.gz | |||
cd drbd-8.3.16 | |||
./configure \ | |||
--prefix=/usr \ | |||
--localstatedir=/var \ | |||
--sysconfdir=/etc \ | |||
--with-utils \ | |||
--with-km \ | |||
--with-udev \ | |||
--with-pacemaker \ | |||
--with-rgmanager \ | |||
--with-bashcompletion | |||
make | |||
make install | |||
chkconfig --add drbd | |||
chkconfig drbd off | |||
</syntaxhighlight> | </syntaxhighlight> | ||
<syntaxhighlight lang="text"> | <syntaxhighlight lang="text"> | ||
<significant amount of output, it's really quite impressive> | |||
</syntaxhighlight> | </syntaxhighlight> | ||
|} | |||
=== | === Hooking DRBD into the Cluster's Fencing === | ||
{{note|1=In older DRBD 8.3 releases, prior to 8.3.16, we needed to download <span class="code">rhcs_fence</span> from [https://raw.github.com/digimer/rhcs_fence/master/rhcs_fence github] as the shipped version had a bug. With the release of 8.3.16, this is no longer the case.}} | |||
< | DRBD is, effectively, a stand-alone application. You can use it on its own without any other software. For this reason, DRBD has its own fencing mechanism to avoid split-brains if the DRBD nodes lose contact with each other. | ||
It would be a replication of effort to setup actual fencing devices in DRBD, so instead we will use a "hook" script called <span class="code">rhcs_fence</span>. When DRBD loses contact with its peer, it will block and then call this script. In turn, this script calls <span class="code">cman</span> and asks it to fence the peer. It then waits for <span class="code">cman</span> to respond with a success or failure. | |||
</ | If the fence succeed, DRBD will resume normal operation, confident that the peer is not doing the same. | ||
< | |||
If the fence fails, DRBD will continue to block and continue to try and fence the peer indefinitely. Thus, if a fence call fails, DRBD will remain blocked and all disk reads and writes will hang. This is by design as it is better to hang than to risk a split-brain, which can lead to data loss and corruption. | |||
By using this script, if the fence configuration ever changes, you only need to update the configuration in <span class="code">cluster.conf</span>, not also in DRBD as well. | |||
</ | |||
=== The "Why" of our Layout - More Safety! === | |||
We will be creating two separate DRBD resources. The reason for this is to minimize the chance of data loss in a [[split-brain]] event. We've got to fairly great lengths to insure that a split-brain never occurs, but it is still possible. So we want a "last line of defence", just in case. | |||
Consider this scenario: | |||
* <span class="code"> | * You have a two-node cluster running two VMs. One is a mirror for a project and the other is an accounting application. Node 1 hosts the mirror, Node 2 hosts the accounting application. | ||
* A partition occurs and both nodes try to fence the other. | |||
* Network access is lost, so both nodes fall back to fencing using PDUs. | |||
* Both nodes have redundant power supplies, and at some point in time, the power cables on the second PDU got reversed. | |||
* The <span class="code">fence_apc_snmp</span> agent succeeds, because the requested outlets were shut off. However, due to the cabling mistake, neither node actually shut down. | |||
* Both nodes proceed to run independently, thinking they are the only node left. | |||
* During this split-brain, the mirror VM downloads over a [[gigabyte]] of updates. Meanwhile, an hour earlier, the accountant updates the books, totalling less than one [[megabyte]] of changes. | |||
At this point, you will need to discard the changed on one of the nodes. So now you have to choose: | |||
* Is the node with the most changes more valid? | |||
* Is the node with the most recent changes more valid? | |||
Neither of these are true, as the node with the older data and smallest amount of changed data is the accounting data which is significantly more valuable. | |||
Now imagine that both VMs have equally valuable data. What then? Which side do you discard? | |||
The approach we will use is to create two separate DRBD resources. Then we will assign our servers into two groups; | |||
< | # VMs normally designed to run on <span class="code">an-a05n01</span>. | ||
# VMs normally designed to run on <span class="code">an-a05n02</span>. | |||
</ | |||
< | |||
</ | |||
Each of these "pools" of servers will have a dedicate DRBD resource behind it. These pools will be managed by clustered LVM, as that provides a very powerful ability to manage DRBD's raw space. | |||
== | Now imagine the above scenario, except this time imagine that the servers running on <span class="code">an-a05n01</span> are on one DRBD resource and the servers running on <span class="code">an-a05n02</span> are on a different resource. Now we can recover from the split brain safely! | ||
* The DRBD resource hosting <span class="code">an-a05n01</span>'s servers can invalidate any changes on <span class="code">an-a05n02</span>. | |||
* The DRBD resource hosting <span class="code">an-a05n02</span>'s servers can invalidate any changes on <span class="code">an-a05n01</span>. | |||
This ability to <span class="code">invalidate</span> on both direction allows us to recover without risking data loss, ''provided'' all the servers were actually running on the same node at the time of the split-brain event. | |||
To summarize, we're going to create the following three resources: | |||
* We'll create a resource called "<span class="code">r0</span>". This resource will back the VMs designed to primarily run on <span class="code">an-a05n01</span>. | |||
* We'll create a second resource called "<span class="code">r1</span>". This resource will back the VMs designed to primarily run on <span class="code">an-a05n02</span>. | |||
== Creating The Partitions For DRBD == | |||
It is possible to use [[LVM]] on the hosts, and simply create [[LV]]s to back our DRBD resources. However, this causes confusion as LVM will see the [[PV]] signatures on both the DRBD backing devices and the DRBD device itself. Getting around this requires editing LVM's <span class="code">filter</span> option, which is somewhat complicated and is outside the scope of this tutorial. We're going to use raw partitions and we recommend you do the same. | |||
On | On our nodes, we created three primary disk partitions: | ||
< | * <span class="code">/dev/sda1</span>; The <span class="code">/boot</span> partition. | ||
* <span class="code">/dev/sda2</span>; The swap partition. | |||
* <span class="code">/dev/sda3</span>; The root <span class="code">/</span> partition. | |||
</ | |||
< | |||
We will create a new extended partition. Then within it we will create two new partitions: | |||
* <span class="code">/dev/sda5</span>; a partition big enough to host the VMs that will normally run on <span class="code">an-a05n01</span> and the <span class="code">/shared</span> clustered file system. | |||
* <span class="code">/dev/sda6</span>; a partition big enough to host the VMs that will normally run on <span class="code">an-a05n02</span>. | |||
=== Block Alignment === | |||
< | We're going to use a program called <span class="code">parted</span> instead of <span class="code">fdisk</span>. With <span class="code">fdisk</span>, we would have to manually ensure that our partitions fell on 64 [[KiB]] boundaries. With <span class="code">parted</span>, we can use the <span class="code">-a opt</span> to tell it to use optimal alignment, saving us a lot of work. This is important for decent performance performance in our servers. This is true for both traditional platter and modern solid-state drives. | ||
</ | |||
< | |||
For performance reasons, we want to ensure that the file systems created within a VM matches the block alignment of the underlying storage stack, clear down to the base partitions on <span class="code">/dev/sda</span> (or what ever your lowest-level block device is). | |||
For those who are curious though, this is why falling on 64 KiB boundaries are important. | |||
Imagine this misaligned scenario; | |||
<syntaxhighlight lang="text"> | |||
Note: Not to scale | |||
==== | ________________________________________________________________ | ||
VM File system |~~~~~|_______|_______|_______|_______|_______|_______|_______|__ | |||
|~~~~~|========================================================== | |||
DRBD Partition |~~~~~|_______|_______|_______|_______|_______|_______|_______|__ | |||
64 KiB block |_______|_______|_______|_______|_______|_______|_______|_______| | |||
512byte sectors |_|_|_|_|_|_|_|_|_|_|_|_|_|_|_|_|_|_|_|_|_|_|_|_|_|_|_|_|_|_|_|_| | |||
</syntaxhighlight> | |||
Now, when the guest wants to write one block worth of data, it actually causes two blocks to be written, causing avoidable disk I/O. That effectively doubles the number of [[IOPS]] needed, a huge waste of disk resources. | |||
<syntaxhighlight lang="text"> | <syntaxhighlight lang="text"> | ||
Note: Not to scale | |||
________________________________________________________________ | |||
VM File system |~~~~~~~|_______|_______|_______|_______|_______|_______|_______| | |||
|~~~~~~~|======================================================== | |||
DRBD Partition |~~~~~~~|_______|_______|_______|_______|_______|_______|_______| | |||
64 KiB block |_______|_______|_______|_______|_______|_______|_______|_______| | |||
512byte sectors |_|_|_|_|_|_|_|_|_|_|_|_|_|_|_|_|_|_|_|_|_|_|_|_|_|_|_|_|_|_|_|_| | |||
</syntaxhighlight> | </syntaxhighlight> | ||
By changing the start cylinder of our partitions to always start on 64 [[KiB]] boundaries, we're sure to keep the guest OS's file system in-line with the DRBD backing device's blocks. Thus, all reads and writes in the guest OS effect a matching number of real blocks, maximizing disk I/O efficiency. | |||
{{note|1=You will want to do this with [[SSD]] drives, too. It's true that the performance will remain about the same, but SSD drives have a limited number of write cycles, and aligning the blocks will minimize block writes.}} | |||
Special thanks to [http://xen.org/community/spotlight/pasi.html Pasi Kärkkäinen] for his patience in explaining to me the importance of disk alignment. He created two images which I used as templates for the [[ASCII]] art images above: | |||
* | * [http://pasik.reaktio.net/virtual-disk-partitions-not-aligned.jpg Virtual Disk Partitions, Not aligned.] | ||
* [http://pasik.reaktio.net/virtual-disk-partitions-aligned.jpg Virtual Disk Partitions, aligned.] | |||
=== Determining Storage Pool Sizes === | |||
Before we can create the DRBD partitions, we first need to know how much space we want to allocate to each node's storage pool. | |||
Before we start though, we need to know how much available storage space we have to play with. Both nodes should have identical storage, but we'll double check now. If they differ, we'll be limited to the size of the smaller one. | |||
{|class="wikitable" | |||
!<span class="code">an-a05n01</span> | |||
!<span class="code">an-a05n02</span> | |||
|- | |||
|style="white-space: nowrap;"|<syntaxhighlight lang="bash"> | |||
parted -a opt /dev/sda "print free" | |||
</syntaxhighlight> | |||
<syntaxhighlight lang="text"> | |||
Model: LSI RAID 5/6 SAS 6G (scsi) | |||
Disk /dev/sda: 898GB | |||
Sector size (logical/physical): 512B/512B | |||
Partition Table: msdos | |||
<syntaxhighlight lang="bash"> | Number Start End Size Type File system Flags | ||
/ | 32.3kB 1049kB 1016kB Free Space | ||
1 1049kB 525MB 524MB primary ext4 boot | |||
2 525MB 43.5GB 42.9GB primary ext4 | |||
3 43.5GB 47.8GB 4295MB primary linux-swap(v1) | |||
47.8GB 898GB 851GB Free Space | |||
</syntaxhighlight> | |||
|style="white-space: nowrap;"|<syntaxhighlight lang="bash"> | |||
parted -a opt /dev/sda "print free" | |||
</syntaxhighlight> | </syntaxhighlight> | ||
<syntaxhighlight lang="text"> | <syntaxhighlight lang="text"> | ||
Model: LSI RAID 5/6 SAS 6G (scsi) | |||
Disk /dev/sda: 898GB | |||
Sector size (logical/physical): 512B/512B | |||
Partition Table: msdos | |||
Number Start End Size Type File system Flags | |||
32.3kB 1049kB 1016kB Free Space | |||
1 1049kB 525MB 524MB primary ext4 boot | |||
2 525MB 43.5GB 42.9GB primary ext4 | |||
3 43.5GB 47.8GB 4295MB primary linux-swap(v1) | |||
47.8GB 898GB 851GB Free Space | |||
</syntaxhighlight> | </syntaxhighlight> | ||
|} | |||
Excellent! Both nodes show the same amount of free space, 851 [[GB]] (note, not [[GiB]]). | |||
We need to carve this up into three chunks of space: | |||
# Space for the <span class="code">/shared</span> partition. Install ISOs, server definition files and the like will be kept here. | |||
# Space for servers designed to run on <span class="code">an-a05n01</span>. | |||
# Space for servers designed to run on <span class="code">an-a05n02</span>. | |||
We're going to install 8 different operating systems. That means we'll need enough space for at least eight different install [[ISO]] images. We'll allocate 40 [[GB]] for this. That leaves 811 GB left for servers. | |||
Choose which node will host what servers is largely a question of distributing CPU load. Of course, each node has to be capable of running all of our servers at the same time. With a little planning though, we can split up servers with expected high CPU load and, when both nodes are up, gain a little performance. | |||
So let's create a table showing the servers we plan to build. We'll put them into two columns, one for servers designed to run on <span class="code">an-a05n01</span> and the others designed to run on <span class="code">an-a05n02</span>. We'll note how much disk space each server will need. Remember, we're trying to split up our servers with the highest expected CPU loads. This, being a tutorial, is going to be a fairly artificial division. You will need to decide for yourself how you want to split up your servers and how much space each needs. | |||
<syntaxhighlight lang="bash"> | {|class="wikitable" | ||
!<span class="code">an-a05n01</span> | |||
!<span class="code">an-a05n02</span> | |||
|- | |||
|<span class="code">vm01-win2008</span> (150 GB) | |||
| | |||
|- | |||
| | |||
|<span class="code">vm02-win2012</span> (150 GB) | |||
|- | |||
|<span class="code">vm03-win7</span> (100 GB) | |||
| | |||
|- | |||
|<span class="code">vm04-win8</span> (100 GB) | |||
| | |||
|- | |||
| | |||
|<span class="code">vm05-freebsd9</span> (50 GB) | |||
|- | |||
| | |||
|<span class="code">vm06-solaris11</span> (100 GB) | |||
|- | |||
|<span class="code">vm07-rhel6</span> (50 GB) | |||
| | |||
|- | |||
|<span class="code">vm08-sles11</span> (100 GB) | |||
| | |||
|- | |||
|Total: 500 GB | |||
|Total: 300 GB | |||
|} | |||
The reason we put <span class="code">/shared</span> on the same DRBD resource (and thus, the same storage pool) as the one that will host <span class="code">an-a05n01</span>'s servers is that it changes relatively rarely. So in the already unlikely event that there is a split-brain event, the chances of something important changing in <span class="code">/shared</span> before the split-brain is resolved is extremely low. So low that the overhead of a third resource is not justified. | |||
So then: | |||
* The first DRBD resource, called <span class="code">r0</span>, will need to have 540 GB of space. | |||
* The second DRBD resource, called <span class="code">r1</span>, will need to have 300 GB of space. | |||
This is a total of 840 GB, leaving about 11 GB unused. What you do with the remaining free space is entirely up to you. You can assign it to one of the servers, leave it as free space in one (or partially on both) storage pools, etc. | |||
It's actually a very common setup to build ''Anvil!'' systems with more storage than is needed. This free space can then be used later for new servers, growing or adding space to existing servers and so on. In our case, we'll give the left over space to the second storage pool and leave it there unassigned. | |||
Now we're ready to create the partitions on each node that will back our DRBD resources! | |||
=== Creating the DRBD Partitions === | |||
Here I will show you the values I entered to create the three partitions I needed on my nodes. | |||
{{note|1=All of the following commands need to be run on both nodes. It's very important that both nodes have identical partitions when you finish!}} | |||
On both nodes, start the <span class="code">parted</span> shell. | |||
{|class="wikitable" | |||
!<span class="code">an-a05n01</span> | |||
!<span class="code">an-a05n02</span> | |||
|- | |||
|style="white-space: nowrap;"|<syntaxhighlight lang="bash"> | |||
parted -a optimal /dev/sda | |||
</syntaxhighlight> | |||
<syntaxhighlight lang="text"> | |||
GNU Parted 2.1 | |||
Using /dev/sda | |||
Welcome to GNU Parted! Type 'help' to view a list of commands. | |||
</syntaxhighlight> | |||
|style="white-space: nowrap;"|<syntaxhighlight lang="bash"> | |||
parted -a optimal /dev/sda | |||
</syntaxhighlight> | </syntaxhighlight> | ||
<syntaxhighlight lang="text"> | <syntaxhighlight lang="text"> | ||
GNU Parted 2.1 | |||
Using /dev/sda | |||
Welcome to GNU Parted! Type 'help' to view a list of commands. | |||
</syntaxhighlight> | </syntaxhighlight> | ||
|} | |||
We're now in the <span class="code">parted</span> console. Before we start, let's take another look at the current disk configuration along with the amount of free space available. | |||
{|class="wikitable" | |||
!<span class="code">an-a05n01</span> | |||
!<span class="code">an-a05n02</span> | |||
|- | |||
|style="white-space: nowrap;"|<syntaxhighlight lang="text"> | |||
print free | |||
</syntaxhighlight> | |||
<syntaxhighlight lang="text"> | |||
Model: LSI RAID 5/6 SAS 6G (scsi) | |||
Disk /dev/sda: 898GB | |||
Sector size (logical/physical): 512B/512B | |||
Partition Table: msdos | |||
<syntaxhighlight lang=" | Number Start End Size Type File system Flags | ||
32.3kB 1049kB 1016kB Free Space | |||
1 1049kB 525MB 524MB primary ext4 boot | |||
2 525MB 43.5GB 42.9GB primary ext4 | |||
3 43.5GB 47.8GB 4295MB primary linux-swap(v1) | |||
47.8GB 898GB 851GB Free Space | |||
</syntaxhighlight> | |||
|style="white-space: nowrap;"|<syntaxhighlight lang="text"> | |||
print free | |||
</syntaxhighlight> | </syntaxhighlight> | ||
<syntaxhighlight lang=" | <syntaxhighlight lang="text"> | ||
Model: LSI RAID 5/6 SAS 6G (scsi) | |||
Disk /dev/sda: 898GB | |||
Sector size (logical/physical): 512B/512B | |||
Partition Table: msdos | |||
Number Start End Size Type File system Flags | |||
32.3kB 1049kB 1016kB Free Space | |||
1 1049kB 525MB 524MB primary ext4 boot | |||
2 525MB 43.5GB 42.9GB primary ext4 | |||
3 43.5GB 47.8GB 4295MB primary linux-swap(v1) | |||
47.8GB 898GB 851GB Free Space | |||
</syntaxhighlight> | </syntaxhighlight> | ||
|} | |||
Before we can create the three DRBD partition, we first need to create an [[extended partition|extended]] partition wherein which we will create the two [[logical partition|logical]] partitions. From the output above, we can see that the free space starts at <span class="code">47.8GB</span>, and that the drive ends at <span class="code">898GB</span>. Knowing this, we can now create the extended partition. | |||
<syntaxhighlight lang=" | {|class="wikitable" | ||
!<span class="code">an-a05n01</span> | |||
|style="white-space: nowrap;"|<syntaxhighlight lang="text"> | |||
mkpart extended 47.8G 898G | |||
</syntaxhighlight> | </syntaxhighlight> | ||
<syntaxhighlight lang="text"> | <syntaxhighlight lang="text"> | ||
Warning: WARNING: the kernel failed to re-read the partition table on /dev/sda (Device or resource busy). | |||
As a result, it may not reflect all of your changes until after reboot. | |||
</syntaxhighlight> | </syntaxhighlight> | ||
|- | |||
!<span class="code">an-a05n02</span> | |||
|style="white-space: nowrap;"|<syntaxhighlight lang="text"> | |||
<syntaxhighlight lang=" | mkpart extended 47.8G 898G | ||
</syntaxhighlight> | </syntaxhighlight> | ||
<syntaxhighlight lang="text"> | <syntaxhighlight lang="text"> | ||
Warning: WARNING: the kernel failed to re-read the partition table on /dev/sda (Device or resource busy). | |||
As a result, it may not reflect all of your changes until after reboot. | |||
</syntaxhighlight> | </syntaxhighlight> | ||
|} | |||
Don't worry about that message, we will reboot when we finish. | |||
So now we can confirm that the new extended partition was create by again printing the partition table and the free space. | |||
{|class="wikitable" | |||
!<span class="code">an-a05n01</span> | |||
!<span class="code">an-a05n02</span> | |||
|- | |||
|style="white-space: nowrap;"|<syntaxhighlight lang="text"> | |||
print free | |||
</syntaxhighlight> | |||
<syntaxhighlight lang="text"> | |||
Model: LSI RAID 5/6 SAS 6G (scsi) | |||
Disk /dev/sda: 898GB | |||
Sector size (logical/physical): 512B/512B | |||
Partition Table: msdos | |||
Number Start End Size Type File system Flags | |||
32.3kB 1049kB 1016kB Free Space | |||
1 1049kB 525MB 524MB primary ext4 boot | |||
2 525MB 43.5GB 42.9GB primary ext4 | |||
3 43.5GB 47.8GB 4295MB primary linux-swap(v1) | |||
4 47.8GB 898GB 851GB extended lba | |||
<syntaxhighlight lang=" | 47.8GB 898GB 851GB Free Space | ||
</syntaxhighlight> | |||
|style="white-space: nowrap;"|<syntaxhighlight lang="text"> | |||
print free | |||
</syntaxhighlight> | </syntaxhighlight> | ||
<syntaxhighlight lang="text"> | <syntaxhighlight lang="text"> | ||
Model: LSI RAID 5/6 SAS 6G (scsi) | |||
Disk /dev/sda: 898GB | |||
Sector size (logical/physical): 512B/512B | |||
Partition Table: msdos | |||
Number Start End Size Type File system Flags | |||
32.3kB 1049kB 1016kB Free Space | |||
1 1049kB 525MB 524MB primary ext4 boot | |||
2 525MB 43.5GB 42.9GB primary ext4 | |||
3 43.5GB 47.8GB 4295MB primary linux-swap(v1) | |||
4 47.8GB 898GB 851GB extended lba | |||
47.8GB 898GB 851GB Free Space | |||
</syntaxhighlight> | </syntaxhighlight> | ||
|} | |||
Perfect. So now we're going to create our two logical partitions. We're going to use the same start position as last time, but the end position will be 540 [[GB]] further in, rounded up to an even ten gigabytes. You can be more precise, if you wish, but we've got a little wiggle room. | |||
If you | If you recall from the section above, this is how much space we determined we would need for the <span class="code">/shared</span> partition and the five servers that will live on <span class="code">an-a05n01</span>. This means that we're going to create a new logical partition that starts at <span class="code">47.8G</span> and ends at <span class="code">590G</span>, for a partition that is roughly 540 GB in size. | ||
{|class="wikitable" | |||
!<span class="code">an-a05n01</span> | |||
|style="white-space: nowrap;"|<syntaxhighlight lang="text"> | |||
mkpart logical 47.8G 590G | |||
<syntaxhighlight lang=" | |||
</syntaxhighlight> | </syntaxhighlight> | ||
<syntaxhighlight lang="text"> | <syntaxhighlight lang="text"> | ||
Warning: WARNING: the kernel failed to re-read the partition table on /dev/sda | |||
(Device or resource busy). As a result, it may not reflect all of your changes | |||
until after reboot. | |||
</syntaxhighlight> | </syntaxhighlight> | ||
|- | |||
!<span class="code">an-a05n02</span> | |||
|style="white-space: nowrap;"|<syntaxhighlight lang="text"> | |||
mkpart logical 47.8G 590G | |||
<syntaxhighlight lang=" | |||
</syntaxhighlight> | </syntaxhighlight> | ||
<syntaxhighlight lang="text"> | <syntaxhighlight lang="text"> | ||
Warning: WARNING: the kernel failed to re-read the partition table on /dev/sda (Device or resource busy). | |||
As a result, it may not reflect all of your changes until after reboot. | |||
WARNING | |||
</syntaxhighlight> | </syntaxhighlight> | ||
|} | |||
We'll check again to see the new partition layout. | |||
{|class="wikitable" | |||
!<span class="code">an-a05n01</span> | |||
!<span class="code">an-a05n02</span> | |||
|- | |||
|style="white-space: nowrap;"|<syntaxhighlight lang="text"> | |||
print free | |||
</syntaxhighlight> | |||
<syntaxhighlight lang="text"> | |||
Model: LSI RAID 5/6 SAS 6G (scsi) | |||
Disk /dev/sda: 898GB | |||
Sector size (logical/physical): 512B/512B | |||
Partition Table: msdos | |||
Number Start End Size Type File system Flags | |||
32.3kB 1049kB 1016kB Free Space | |||
1 1049kB 525MB 524MB primary ext4 boot | |||
2 525MB 43.5GB 42.9GB primary ext4 | |||
3 43.5GB 47.8GB 4295MB primary linux-swap(v1) | |||
4 47.8GB 898GB 851GB extended lba | |||
5 47.8GB 590GB 542GB logical | |||
590GB 898GB 308GB Free Space | |||
</syntaxhighlight> | |||
|} | |||
Again, perfect. Now we have a total of 308 [[GB]] left free. We need 300 GB, so this is enough, as expected. Lets allocate it all to our final partition. | |||
{|class="wikitable" | |||
!<span class="code">an-a05n01</span> | |||
|style="white-space: nowrap;"|<syntaxhighlight lang="text"> | |||
mkpart logical 590G 898G | |||
</syntaxhighlight> | |||
<syntaxhighlight lang="text"> | |||
Warning: WARNING: the kernel failed to re-read the partition table on /dev/sda (Device or resource busy). | |||
As a result, it may not reflect all of your changes until after reboot. | |||
</syntaxhighlight> | |||
|- | |||
!<span class="code">an-a05n02</span> | |||
|style="white-space: nowrap;"|<syntaxhighlight lang="text"> | |||
mkpart logical 590G 898G | |||
</syntaxhighlight> | |||
<syntaxhighlight lang="text"> | |||
Warning: WARNING: the kernel failed to re-read the partition table on /dev/sda (Device or resource busy). | |||
As a result, it may not reflect all of your changes until after reboot. | |||
</syntaxhighlight> | |||
|} | |||
Once again, lets look at the new partition table. | |||
{|class="wikitable" | |||
!<span class="code">an-a05n01</span> | |||
!<span class="code">an-a05n02</span> | |||
|- | |||
|style="white-space: nowrap;"|<syntaxhighlight lang="text"> | |||
print free | |||
</syntaxhighlight> | |||
<syntaxhighlight lang="text"> | |||
Model: LSI RAID 5/6 SAS 6G (scsi) | |||
Disk /dev/sda: 898GB | |||
Sector size (logical/physical): 512B/512B | |||
Partition Table: msdos | |||
Number Start End Size Type File system Flags | |||
32.3kB 1049kB 1016kB Free Space | |||
1 1049kB 525MB 524MB primary ext4 boot | |||
2 525MB 43.5GB 42.9GB primary ext4 | |||
3 43.5GB 47.8GB 4295MB primary linux-swap(v1) | |||
4 47.8GB 898GB 851GB extended lba | |||
5 47.8GB 590GB 542GB logical | |||
6 590GB 898GB 308GB logical | |||
</syntaxhighlight> | |||
|} | |||
Just as we asked for! | |||
Before we finish though, let's be extra careful and do a manual check of our new partitions to ensure that they are, in fact, aligned optimally. There will be no output from the following commands if the partitions are aligned. | |||
==== | {|class="wikitable" | ||
!<span class="code">an-a05n01</span> | |||
!<span class="code">an-a05n02</span> | |||
|- | |||
|style="white-space: nowrap;"|<syntaxhighlight lang="text"> | |||
align-check opt 5 | |||
align-check opt 6 | |||
</syntaxhighlight> | |||
<syntaxhighlight lang="text"> | |||
<no output> | |||
</syntaxhighlight> | |||
|style="white-space: nowrap;"|<syntaxhighlight lang="text"> | |||
align-check opt 5 | |||
align-check opt 6 | |||
</syntaxhighlight> | |||
<syntaxhighlight lang="text"> | |||
<no output> | |||
</syntaxhighlight> | |||
|} | |||
Excellent, we're done! | |||
{ | {|class="wikitable" | ||
!<span class="code">an-a05n01</span> | |||
!<span class="code">an-a05n02</span> | |||
|- | |||
|style="white-space: nowrap;"|<syntaxhighlight lang="text"> | |||
quit | |||
</syntaxhighlight> | |||
<syntaxhighlight lang="text"> | |||
Information: You may need to update /etc/fstab. | |||
</syntaxhighlight> | |||
|style="white-space: nowrap;"|<syntaxhighlight lang="text"> | |||
quit | |||
</syntaxhighlight> | |||
<syntaxhighlight lang="text"> | |||
Information: You may need to update /etc/fstab. | |||
</syntaxhighlight> | |||
|} | |||
Now we need to reboot to make the kernel see the new partition table. If <span class="code">cman</span> is running, stop it '''before''' rebooting. | |||
{|class="wikitable" | |||
!<span class="code">an-a05n01</span> | |||
!<span class="code">an-a05n02</span> | |||
|- | |||
|style="white-space: nowrap;"|<syntaxhighlight lang="text"> | |||
/etc/init.d/cman stop | |||
</syntaxhighlight> | </syntaxhighlight> | ||
<syntaxhighlight lang="text"> | <syntaxhighlight lang="text"> | ||
Stopping cluster: | |||
Leaving fence domain... [ OK ] | |||
Stopping gfs_controld... [ OK ] | |||
Stopping dlm_controld... [ OK ] | |||
Stopping fenced... [ OK ] | |||
Stopping cman... [ OK ] | |||
Waiting for corosync to shutdown: [ OK ] | |||
Unloading kernel modules... [ OK ] | |||
Unmounting configfs... [ OK ] | |||
</syntaxhighlight> | </syntaxhighlight> | ||
<syntaxhighlight lang="bash"> | <syntaxhighlight lang="bash"> | ||
reboot | |||
</syntaxhighlight> | |||
|style="white-space: nowrap;"|<syntaxhighlight lang="text"> | |||
/etc/init.d/cman stop | |||
</syntaxhighlight> | </syntaxhighlight> | ||
<syntaxhighlight lang="text"> | <syntaxhighlight lang="text"> | ||
Stopping cluster: | |||
Leaving fence domain... [ OK ] | |||
Stopping gfs_controld... [ OK ] | |||
Stopping dlm_controld... [ OK ] | |||
Stopping fenced... [ OK ] | |||
Stopping cman... [ OK ] | |||
Waiting for corosync to shutdown: [ OK ] | |||
Unloading kernel modules... [ OK ] | |||
Unmounting configfs... [ OK ] | |||
</syntaxhighlight> | </syntaxhighlight> | ||
<syntaxhighlight lang="bash"> | |||
reboot | |||
</syntaxhighlight> | |||
|} | |||
Once the nodes are back online, remember to start <span class="code">cman</span> again. | |||
== Configuring DRBD == | |||
DRBD is configured in two parts: | |||
* Global and common configuration options | |||
* Resource configurations | |||
We will be creating three separate DRBD resources, so we will create three separate resource configuration files. More on that in a moment. | |||
=== Configuring DRBD Global and Common Options === | |||
As always, we're going to start by making backups. Then we're going to work on <span class="code">an-a05n01</span>. After we finish, we'll copy everything over to <span class="code">an-a05n02</span>. | |||
{|class="wikitable" | |||
!<span class="code">an-a05n01</span> | |||
|style="white-space: nowrap;"|<syntaxhighlight lang="bash"> | |||
rsync -av /etc/drbd.d /root/backups/ | |||
</syntaxhighlight> | |||
<syntaxhighlight lang="text"> | |||
sending incremental file list | |||
drbd.d/ | |||
drbd.d/global_common.conf | |||
sent 1722 bytes received 35 bytes 3514.00 bytes/sec | |||
total size is 1604 speedup is 0.91</syntaxhighlight> | |||
|- | |||
!<span class="code">an-a05n02</span> | |||
|style="white-space: nowrap;"|<syntaxhighlight lang="bash"> | |||
rsync -av /etc/drbd.d /root/backups/ | |||
</syntaxhighlight> | |||
<syntaxhighlight lang="text"> | |||
sending incremental file list | |||
drbd.d/ | |||
drbd.d/global_common.conf | |||
sent 1722 bytes received 35 bytes 3514.00 bytes/sec | |||
total size is 1604 speedup is 0.91</syntaxhighlight> | |||
|} | |||
Now we can begin. | |||
The first file to edit is <span class="code">/etc/drbd.d/global_common.conf</span>. In this file, we will set global configuration options and set default resource configuration options. | |||
We'll talk about the values we're setting here as well as put the explanation of each option in the configuration file itself, as it will be useful to have them should you need to alter the files sometime in the future. | |||
The first addition is in the <span class="code">handlers { }</span> directive. We're going to add the <span class="code">fence-peer</span> option and configure it to use the <span class="code">obliterate-peer.sh</span> script we spoke about earlier in the DRBD section. | |||
{|class="wikitable" | |||
!<span class="code">an-a05n01</span> | |||
|style="white-space: nowrap;"|<syntaxhighlight lang="bash"> | |||
vim /etc/drbd.d/global_common.conf | |||
</syntaxhighlight> | |||
<syntaxhighlight lang="bash"> | <syntaxhighlight lang="bash"> | ||
handlers { | |||
# This script is a wrapper for RHCS's 'fence_node' command line | |||
# tool. It will call a fence against the other node and return | |||
# the appropriate exit code to DRBD. | |||
fence-peer "/usr/lib/drbd/rhcs_fence"; | |||
} | |||
</syntaxhighlight> | </syntaxhighlight> | ||
|} | |||
We're going to add three options to the <span class="code">startup { }</span> directive; We're going to tell DRBD to make both nodes "primary" on start, to wait five minutes on start for its peer to connect and, if the peer never connected last time, to wait onto two minutes. | |||
{|class="wikitable" | |||
!<span class="code">an-a05n01</span> | |||
|style="white-space: nowrap;"|<syntaxhighlight lang="bash"> | |||
startup { | |||
# This tells DRBD to promote both nodes to Primary on start. | |||
become-primary-on both; | |||
# This tells DRBD to wait five minutes for the other node to | |||
# connect. This should be longer than it takes for cman to | |||
# timeout and fence the other node *plus* the amount of time it | |||
# takes the other node to reboot. If you set this too short, | |||
# you could corrupt your data. If you want to be extra safe, do | |||
# not use this at all and DRBD will wait for the other node | |||
# forever. | |||
wfc-timeout 300; | |||
# This tells DRBD to wait for the other node for three minutes | |||
# if the other node was degraded the last time it was seen by | |||
# this node. This is a way to speed up the boot process when | |||
# the other node is out of commission for an extended duration. | |||
degr-wfc-timeout 120; | |||
# Same as above, except this time-out is used if the peer was | |||
# 'Outdated'. | |||
outdated-wfc-timeout 120; | |||
} | |||
</syntaxhighlight> | |||
|} | |||
For the <span class="code">disk { }</span> directive, we're going to configure DRBD's behaviour when a [[split-brain]] is detected. By setting <span class="code">fencing</span> to <span class="code">resource-and-stonith</span>, we're telling DRBD to stop all disk access and call a fence against its peer node rather than proceeding. | |||
{|class="wikitable" | |||
!<span class="code">an-a05n01</span> | |||
|style="white-space: nowrap;"|<syntaxhighlight lang="bash"> | |||
disk { | |||
# This tells DRBD to block IO and fence the remote node (using | |||
# the 'fence-peer' helper) when connection with the other node | |||
# is unexpectedly lost. This is what helps prevent split-brain | |||
# condition and it is incredible important in dual-primary | |||
# setups! | |||
fencing resource-and-stonith; | |||
} | |||
</syntaxhighlight> | |||
|} | |||
In the <span class="code">net { }</span> directive, we're going to tell DRBD that it is allowed to run in dual-primary mode and we're going to configure how it behaves if a split-brain has occurred, despite our best efforts. The recovery (or lack there of) requires three options; What to do when neither node had been primary (<span class="code">after-sb-0pri</span>), what to do if only one node had been primary (<span class="code">after-sb-1pri</span>) and finally, what to do if both nodes had been primary (<span class="code">after-sb-2pri</span>), as will most likely be the case for us. This last instance will be configured to tell DRBD just to drop the connection, which will require human intervention to correct. | |||
At this point, you might be wondering why we won't simply run Primary/Secondary. The reason is because of live-migration. When we push a VM across to the backup node, there is a short period of time where both nodes need to be writeable. | |||
{|class="wikitable" | |||
!<span class="code">an-a05n01</span> | |||
|style="white-space: nowrap;"|<syntaxhighlight lang="bash"> | |||
net { | |||
# This tells DRBD to allow two nodes to be Primary at the same | |||
# time. It is needed when 'become-primary-on both' is set. | |||
allow-two-primaries; | |||
# The following three commands tell DRBD how to react should | |||
# our best efforts fail and a split brain occurs. You can learn | |||
# more about these options by reading the drbd.conf man page. | |||
# NOTE! It is not possible to safely recover from a split brain | |||
# where both nodes were primary. This care requires human | |||
# intervention, so 'disconnect' is the only safe policy. | |||
after-sb-0pri discard-zero-changes; | |||
after-sb-1pri discard-secondary; | |||
after-sb-2pri disconnect; | |||
} | |||
</syntaxhighlight> | </syntaxhighlight> | ||
|} | |||
For the <span class="code">syncer { }</span> directive, we're going to configure how much bandwidth DRBD is allowed to take away from normal replication for use with background synchronization of out-of-sync blocks. | |||
< | {|class="wikitable" | ||
!<span class="code">an-a05n01</span> | |||
</ | |style="white-space: nowrap;"|<syntaxhighlight lang="bash"> | ||
<syntaxhighlight lang=" | syncer { | ||
# This tells DRBD how fast to synchronize out-of-sync blocks. | |||
-- | # The higher this number, the faster an Inconsistent resource | ||
# will get back to UpToDate state. However, the faster this is, | |||
# the more of an impact normal application use of the DRBD | |||
# resource will suffer. We'll set this to 30 MB/sec. | |||
rate 30M; | |||
} | |||
</syntaxhighlight> | </syntaxhighlight> | ||
|} | |||
Save the changes and exit the text editor. Now let's use <span class="code">diff</span> to see the changes we made. | |||
= | {|class="wikitable" | ||
!<span class="code">an-a05n01</span> | |||
|style="white-space: nowrap;"|<syntaxhighlight lang="bash"> | |||
diff -U0 /root/backups/drbd.d/global_common.conf /etc/drbd.d/global_common.conf | |||
</syntaxhighlight> | |||
<syntaxhighlight lang="diff"> | |||
--- /root/backups/drbd.d/global_common.conf 2013-09-27 16:38:33.000000000 -0400 | |||
+++ /etc/drbd.d/global_common.conf 2013-10-31 01:08:13.733823523 -0400 | |||
@@ -22,0 +23,5 @@ | |||
+ | |||
+ # This script is a wrapper for RHCS's 'fence_node' command line | |||
+ # tool. It will call a fence against the other node and return | |||
+ # the appropriate exit code to DRBD. | |||
+ fence-peer "/usr/lib/drbd/rhcs_fence"; | |||
@@ -26,0 +32,22 @@ | |||
+ | |||
+ # This tells DRBD to promote both nodes to Primary on start. | |||
+ become-primary-on both; | |||
+ | |||
+ # This tells DRBD to wait five minutes for the other node to | |||
+ # connect. This should be longer than it takes for cman to | |||
+ # timeout and fence the other node *plus* the amount of time it | |||
+ # takes the other node to reboot. If you set this too short, | |||
+ # you could corrupt your data. If you want to be extra safe, do | |||
+ # not use this at all and DRBD will wait for the other node | |||
+ # forever. | |||
+ wfc-timeout 300; | |||
+ | |||
+ # This tells DRBD to wait for the other node for three minutes | |||
+ # if the other node was degraded the last time it was seen by | |||
+ # this node. This is a way to speed up the boot process when | |||
+ # the other node is out of commission for an extended duration. | |||
+ degr-wfc-timeout 120; | |||
+ | |||
+ # Same as above, except this time-out is used if the peer was | |||
+ # 'Outdated'. | |||
+ outdated-wfc-timeout 120; | |||
@@ -31,0 +59,7 @@ | |||
+ | |||
+ # This tells DRBD to block IO and fence the remote node (using | |||
+ # the 'fence-peer' helper) when connection with the other node | |||
+ # is unexpectedly lost. This is what helps prevent split-brain | |||
+ # condition and it is incredible important in dual-primary | |||
+ # setups! | |||
+ fencing resource-and-stonith; | |||
@@ -37,0 +72,14 @@ | |||
+ | |||
+ # This tells DRBD to allow two nodes to be Primary at the same | |||
+ # time. It is needed when 'become-primary-on both' is set. | |||
+ allow-two-primaries; | |||
+ | |||
+ # The following three commands tell DRBD how to react should | |||
+ # our best efforts fail and a split brain occurs. You can learn | |||
+ # more about these options by reading the drbd.conf man page. | |||
+ # NOTE! It is not possible to safely recover from a split brain | |||
+ # where both nodes were primary. This care requires human | |||
+ # intervention, so 'disconnect' is the only safe policy. | |||
+ after-sb-0pri discard-zero-changes; | |||
+ after-sb-1pri discard-secondary; | |||
+ after-sb-2pri disconnect; | |||
@@ -41,0 +90,7 @@ | |||
+ | |||
+ # This tells DRBD how fast to synchronize out-of-sync blocks. | |||
+ # The higher this number, the faster an Inconsistent resource | |||
+ # will get back to UpToDate state. However, the faster this is, | |||
+ # the more of an impact normal application use of the DRBD | |||
+ # resource will suffer. We'll set this to 30 MB/sec. | |||
+ rate 30M; | |||
</syntaxhighlight> | |||
|} | |||
Done with this file. | |||
== | === Configuring the DRBD Resources === | ||
As mentioned earlier, we are going to create two DRBD resources: | |||
* Resource <span class="code">r0</span>, which will create the device <span class="code">/dev/drbd0</span> and be backed by each node's <span class="code">/dev/sda5</span> partition. It will provide disk space for VMs that will normally run on <span class="code">an-a05n01</span> and provide space for the <span class="code">/shared</span> [[GFS2]] partition. | |||
* Resource <span class="code">r1</span>, which will create the device <span class="code">/dev/drbd1</span> and be backed by each node's <span class="code">/dev/sda6</span> partition. It will provide disk space for VMs that will normally run on <span class="code">an-a05n02</span>. | |||
Each resource configuration will be in its own file saved as <span class="code">/etc/drbd.d/rX.res</span>. The two of them will be pretty much the same. So let's take a look at the first resource, <span class="code">r0.res</span>, then we'll just look at the changes for <span class="code">r1.res</span>. These files won't exist initially so we start by creating them. | |||
{|class="wikitable" | |||
!<span class="code">an-a05n01</span> | |||
|style="white-space: nowrap;"|<syntaxhighlight lang="bash"> | |||
vim /etc/drbd.d/r0.res | |||
</syntaxhighlight> | </syntaxhighlight> | ||
<syntaxhighlight lang="bash"> | |||
# This is the resource used for the shared GFS2 partition and host VMs designed | |||
# to run on an-a05n01. | |||
resource r0 { | |||
# This is the block device path. | |||
device /dev/drbd0; | |||
# We'll use the normal internal meta-disk. This is where DRBD stores | |||
# its state information about the resource. It takes about 32 MB per | |||
# 1 TB of raw space. | |||
meta-disk internal; | |||
# This is the `uname -n` of the first node | |||
on an-a05n01.alteeve.ca { | |||
# The 'address' has to be the IP, not a host name. This is the | |||
# node's SN (sn_bond1) IP. The port number must be unique amoung | |||
# resources. | |||
address 10.10.50.1:7788; | |||
# This is the block device backing this resource on this node. | |||
disk /dev/sda5; | |||
} | |||
# Now the same information again for the second node. | |||
on an-a05n02.alteeve.ca { | |||
address 10.10.50.2:7788; | |||
disk /dev/sda5; | |||
} | |||
} | |||
</syntaxhighlight> | </syntaxhighlight> | ||
|} | |||
Now copy this to <span class="code">r1.res</span> and edit for the <span class="code">an-a05n01</span> VM resource. The main differences are the resource name, <span class="code">r1</span>, the block device, <span class="code">/dev/drbd1</span>, the port, <span class="code">7790</span> and the backing block devices, <span class="code">/dev/sda6</span>. | |||
{|class="wikitable" | |||
!<span class="code">an-a05n01</span> | |||
|style="white-space: nowrap;"|<syntaxhighlight lang="bash"> | |||
cp /etc/drbd.d/r0.res /etc/drbd.d/r1.res | |||
vim /etc/drbd.d/r1.res | |||
</syntaxhighlight> | |||
<syntaxhighlight lang="bash"> | <syntaxhighlight lang="bash"> | ||
# This is the resource used for the VMs designed to run on an-a05n02. | |||
resource r1 { | |||
# This is the block device path. | |||
device /dev/drbd1; | |||
# We'll use the normal internal meta-disk. This is where DRBD stores | |||
# its state information about the resource. It takes about 32 MB per | |||
# 1 TB of raw space. | |||
meta-disk internal; | |||
# This is the `uname -n` of the first node | |||
on an-a05n01.alteeve.ca { | |||
# The 'address' has to be the IP, not a host name. This is the | |||
# node's SN (sn_bond1) IP. The port number must be unique amoung | |||
# resources. | |||
address 10.10.50.1:7789; | |||
# This is the block device backing this resource on this node. | |||
disk /dev/sda6; | |||
} | |||
# Now the same information again for the second node. | |||
on an-a05n02.alteeve.ca { | |||
address 10.10.50.2:7789; | |||
disk /dev/sda6; | |||
} | |||
} | |||
</syntaxhighlight> | |||
|} | |||
It's easiest to see what changed between <span class="code">r0.res</span> and <span class="code">r1.res</span> if we <span class="code">diff</span> them. | |||
{ | {|class="wikitable" | ||
!<span class="code">an-a05n01</span> | |||
|style="white-space: nowrap;"|<syntaxhighlight lang="bash"> | |||
diff -U0 /etc/drbd.d/r0.res /etc/drbd.d/r1.res | |||
</syntaxhighlight> | |||
<syntaxhighlight lang="diff"> | |||
--- /etc/drbd.d/r0.res 2013-10-30 21:26:31.936680235 -0400 | |||
+++ /etc/drbd.d/r1.res 2013-10-30 21:27:42.625006337 -0400 | |||
@@ -1,3 +1,2 @@ | |||
-# This is the resource used for the shared GFS2 partition and host VMs designed | |||
-# to run on an-a05n01. | |||
-resource r0 { | |||
+# This is the resource used for the VMs designed to run on an-a05n02. | |||
+resource r1 { | |||
@@ -5 +4 @@ | |||
- device /dev/drbd0; | |||
+ device /dev/drbd1; | |||
@@ -17 +16 @@ | |||
- address 10.10.50.1:7788; | |||
+ address 10.10.50.1:7789; | |||
@@ -20 +19 @@ | |||
- disk /dev/sda5; | |||
+ disk /dev/sda6; | |||
@@ -24,2 +23,2 @@ | |||
- address 10.10.50.2:7788; | |||
- disk /dev/sda5; | |||
+ address 10.10.50.2:7789; | |||
+ disk /dev/sda6; | |||
</syntaxhighlight> | |||
|} | |||
We can see easily that the resource name, device name and backing partitions changed. We can also see that the IP address used for each resource stayed the same. We split up the network traffic by using different [[TCP]] ports instead. | |||
Now we will do an initial validation of the configuration. This is done by running the following command; | |||
{|class="wikitable" | |||
!<span class="code">an-a05n01</span> | |||
|style="white-space: nowrap;"|<syntaxhighlight lang="bash"> | |||
drbdadm dump | |||
</syntaxhighlight> | </syntaxhighlight> | ||
<syntaxhighlight lang="bash"> | |||
# /etc/drbd.conf | |||
common { | |||
protocol C; | |||
net { | |||
allow-two-primaries; | |||
after-sb-0pri discard-zero-changes; | |||
after-sb-1pri discard-secondary; | |||
after-sb-2pri disconnect; | |||
} | |||
disk { | |||
fencing resource-and-stonith; | |||
} | |||
syncer { | |||
rate 30M; | |||
} | |||
startup { | |||
wfc-timeout 300; | |||
degr-wfc-timeout 120; | |||
outdated-wfc-timeout 120; | |||
become-primary-on both; | |||
} | |||
handlers { | |||
fence-peer /usr/lib/drbd/rhcs_fence; | |||
} | |||
} | |||
# resource r0 on an-a05n01.alteeve.ca: not ignored, not stacked | |||
resource r0 { | |||
on an-a05n01.alteeve.ca { | |||
device /dev/drbd0 minor 0; | |||
disk /dev/sda5; | |||
address ipv4 10.10.50.1:7788; | |||
meta-disk internal; | |||
} | |||
on an-a05n02.alteeve.ca { | |||
device /dev/drbd0 minor 0; | |||
disk /dev/sda5; | |||
address ipv4 10.10.50.2:7788; | |||
meta-disk internal; | |||
} | |||
} | |||
# resource r1 on an-a05n01.alteeve.ca: not ignored, not stacked | |||
resource r1 { | |||
on an-a05n01.alteeve.ca { | |||
device /dev/drbd1 minor 1; | |||
disk /dev/sda6; | |||
address ipv4 10.10.50.1:7789; | |||
meta-disk internal; | |||
} | |||
on an-a05n02.alteeve.ca { | |||
device /dev/drbd1 minor 1; | |||
disk /dev/sda6; | |||
address ipv4 10.10.50.2:7789; | |||
meta-disk internal; | |||
} | |||
} | |||
</syntaxhighlight> | |||
|} | |||
You'll note that the output is formatted differently from the configuration files we created, but the values themselves are the same. If there had of been errors, you would have seen them printed. Fix any problems before proceeding. Once you get a clean dump, copy the configuration over to the other node. | |||
{|class="wikitable" | |||
!<span class="code">an-a05n01</span> | |||
|style="white-space: nowrap;"|<syntaxhighlight lang="bash"> | |||
rsync -av /etc/drbd.d root@an-a05n02:/etc/ | |||
</syntaxhighlight> | |||
<syntaxhighlight lang="text"> | |||
sending incremental file list | |||
drbd.d/ | |||
drbd.d/global_common.conf | |||
drbd.d/r0.res | |||
drbd.d/r1.res | |||
sent 5015 bytes received 91 bytes 10212.00 bytes/sec | |||
total size is 5479 speedup is 1.07 | |||
</syntaxhighlight> | |||
|} | |||
Done! | |||
== Initializing the DRBD Resources == | |||
Now that we have DRBD configured, we need to initialize the DRBD backing devices and then bring up the resources for the first time. | |||
{{note|1=To save a bit of time and typing, the following sections will use a little <span class="code">bash</span> magic. When commands need to be run on both resources, rather than running the same command twice with the different resource names, we will use the short-hand form <span class="code">r{0,1}</span>.}} | |||
On '''both''' nodes, create the new [[DRBD metadata|metadata]] on the backing devices. | |||
Two notes: | |||
* <span class="code"> | * You may need to type <span class="code">yes</span> to confirm the action if any data is seen. | ||
* If DRBD sees an actual file system, it will error and insist that you clear the partition. You can do this by running; <span class="code">dd if=/dev/zero of=/dev/sdaX bs=4M count=1000</span>, where <span class="code">X</span> is the partition you want to clear. This is called "zeroing out" a partition. The <span class="code">dd</span> program does not print its progress. To check the progress, open a new terminal to the node and run '<span class="code">kill -USR1 $(pidof dd)</span>'. | |||
Lets create the meta-data! | |||
{|class="wikitable" | |||
< | !<span class="code">an-a05n01</span> | ||
!<span class="code">an-a05n02</span> | |||
|- | |||
|style="white-space: nowrap;"|<syntaxhighlight lang="bash"> | |||
drbdadm create-md r{0,1} | |||
</syntaxhighlight> | |||
<syntaxhighlight lang="text"> | |||
Writing meta data... | |||
initializing activity log | |||
NOT initialized bitmap | |||
New drbd meta data block successfully created. | |||
success | |||
Writing meta data... | |||
initializing activity log | |||
NOT initialized bitmap | |||
New drbd meta data block successfully created. | |||
success | |||
</syntaxhighlight> | </syntaxhighlight> | ||
|style="white-space: nowrap;"|<syntaxhighlight lang="bash"> | |||
drbdadm create-md r{0,1} | |||
<syntaxhighlight lang="bash"> | |||
</syntaxhighlight> | </syntaxhighlight> | ||
<syntaxhighlight lang="text"> | <syntaxhighlight lang="text"> | ||
Writing meta data... | |||
initializing activity log | |||
NOT initialized bitmap | |||
New drbd meta data block successfully created. | |||
success | |||
Writing meta data... | |||
initializing activity log | |||
NOT initialized bitmap | |||
New drbd meta data block successfully created. | |||
success | |||
</syntaxhighlight> | </syntaxhighlight> | ||
|} | |||
If you get an error like this; | |||
= | <syntaxhighlight lang="text"> | ||
pvs stderr: Skipping volume group an-a05n01-vg0 | |||
pvs stderr: Freeing VG (null) at 0x16efd20. | |||
pvs stderr: Unlocking /var/lock/lvm/P_global | |||
pvs stderr: _undo_flock /var/lock/lvm/P_global | |||
md_offset 542229131264 | |||
al_offset 542229098496 | |||
bm_offset 542212550656 | |||
Found LVM2 physical volume signature | |||
529504444 kB left usable by current configuration | |||
Could not determine the size of the actually used data area. | |||
Device size would be truncated, which | |||
would corrupt data and result in | |||
'access beyond end of device' errors. | |||
If you want me to do this, you need to zero out the first part | |||
of the device (destroy the content). | |||
You should be very sure that you mean it. | |||
Operation refused. | |||
Command 'drbdmeta 0 v08 /dev/sda5 internal create-md' terminated with exit code 40 | |||
drbdadm create-md r0: exited with code 40 | |||
</syntaxhighlight> | </syntaxhighlight> | ||
{{warning|1=The next two commands will irrevocably destroy the data on <span class="code">/dev/sda5</span> and <span class="code">/dev/sda6</span>!}} | |||
Use <span class="code">dd</span> on the backing device to destroy all existing data. | |||
<syntaxhighlight lang="bash"> | |||
dd if=/dev/zero of=/dev/sda5 bs=4M count=1000 | |||
</syntaxhighlight> | |||
<syntaxhighlight lang="text"> | |||
1000+0 records in | |||
1000+0 records out | |||
4194304000 bytes (4.2 GB) copied, 9.04352 s, 464 MB/s | |||
</syntaxhighlight> | </syntaxhighlight> | ||
<syntaxhighlight lang="bash"> | <syntaxhighlight lang="bash"> | ||
dd if=/dev/zero of=/dev/sda6 bs=4M count=1000 | |||
</syntaxhighlight> | </syntaxhighlight> | ||
<syntaxhighlight lang="text"> | <syntaxhighlight lang="text"> | ||
1000+0 records in | |||
1000+0 records out | |||
4194304000 bytes (4.2 GB) copied, 9.83831 s, 426 MB/s | |||
</syntaxhighlight> | </syntaxhighlight> | ||
Try running the <span class="code">create-md</span> commands again, it should work this time. | |||
== Loading the drbd Kernel Module == | |||
Before we can go any further, we'll need to load the <span class="code">drbd</span> kernel module. Normally you won't normally need to do this because the <span class="code">/etc/init.d/drbd</span> initializations script handles this for us. We can't use this yet though because the DRBD resource we defined are not yet setup. | |||
So to load the <span class="code">drbd</span> kernel module, run; | |||
<syntaxhighlight lang="bash"> | {|class="wikitable" | ||
!<span class="code">an-a05n01</span> | |||
|<syntaxhighlight lang="bash"> | |||
modprobe drbd | |||
</syntaxhighlight> | </syntaxhighlight> | ||
Log messages: | |||
<syntaxhighlight lang="text"> | <syntaxhighlight lang="text"> | ||
Oct 30 22:45:45 an-a05n01 kernel: drbd: initialized. Version: 8.3.16 (api:88/proto:86-97) | |||
Oct 30 22:45:45 an-a05n01 kernel: drbd: GIT-hash: a798fa7e274428a357657fb52f0ecf40192c1985 build by phil@Build64R6, 2013-09-27 16:00:43 | |||
Oct 30 22:45:45 an-a05n01 kernel: drbd: registered as block device major 147 | |||
Oct 30 22:45:45 an-a05n01 kernel: drbd: minor_table @ 0xffff8803374420c0 | |||
</syntaxhighlight> | </syntaxhighlight> | ||
<syntaxhighlight lang="bash"> | |- | ||
!<span class="code">an-a05n02</span> | |||
|<syntaxhighlight lang="bash"> | |||
modprobe drbd | |||
</syntaxhighlight> | </syntaxhighlight> | ||
Log messages: | |||
<syntaxhighlight lang="text"> | <syntaxhighlight lang="text"> | ||
Oct 30 22:45:51 an-a05n02 kernel: drbd: initialized. Version: 8.3.16 (api:88/proto:86-97) | |||
Oct 30 22:45:51 an-a05n02 kernel: drbd: GIT-hash: a798fa7e274428a357657fb52f0ecf40192c1985 build by phil@Build64R6, 2013-09-27 16:00:43 | |||
Oct 30 22:45:51 an-a05n02 kernel: drbd: registered as block device major 147 | |||
Oct 30 22:45:51 an-a05n02 kernel: drbd: minor_table @ 0xffff8803387a9ec0 | |||
</syntaxhighlight> | </syntaxhighlight> | ||
|} | |||
Now go back to the terminal windows we were using to watch the cluster start. Kill the <span class="code">tail</span>, if it's still running. We're going to watch the output of <span class="code">cat /proc/drbd</span> so we can keep tabs on the current state of the DRBD resources. We'll do this by using the <span class="code">watch</span> program, which will refresh the output of the <span class="code">cat</span> call every couple of seconds. | |||
{|class="wikitable" | |||
!<span class="code">an-a05n01</span> | |||
<syntaxhighlight lang=" | |<syntaxhighlight lang="bash"> | ||
watch cat /proc/drbd | |||
</syntaxhighlight> | |||
<syntaxhighlight lang="text"> | |||
version: 8.3.16 (api:88/proto:86-97) | |||
GIT-hash: a798fa7e274428a357657fb52f0ecf40192c1985 build by phil@Build64R6, 2013-09-27 16:00:43 | |||
</syntaxhighlight> | |||
|- | |||
!<span class="code">an-a05n02</span> | |||
|<syntaxhighlight lang="bash"> | |||
watch cat /proc/drbd | |||
</syntaxhighlight> | </syntaxhighlight> | ||
<syntaxhighlight lang="text"> | <syntaxhighlight lang="text"> | ||
version: 8.3.16 (api:88/proto:86-97) | |||
GIT-hash: a798fa7e274428a357657fb52f0ecf40192c1985 build by phil@Build64R6, 2013-09-27 16:00:43 | |||
</syntaxhighlight> | </syntaxhighlight> | ||
|} | |||
Back in the first terminal, we need now to <span class="code">attach</span> each resource's backing device, <span class="code">/dev/sda{5,6}</span>, to their respective DRBD resources, <span class="code">r{0,1}</span>. After running the following command, you will see no output on the first terminal, but the second terminal's <span class="code">/proc/drbd</span> should change. | |||
{|class="wikitable" | |||
!<span class="code">an-a05n01</span> | |||
|<syntaxhighlight lang="bash"> | |||
drbdadm attach r{0,1} | |||
</syntaxhighlight> | |||
Output from <span class="code">/proc/drbd</span> | |||
<syntaxhighlight lang="text"> | <syntaxhighlight lang="text"> | ||
version: 8.3.16 (api:88/proto:86-97) | |||
GIT-hash: a798fa7e274428a357657fb52f0ecf40192c1985 build by phil@Build64R6, 2013-09-27 16:00:43 | |||
0: cs:StandAlone ro:Secondary/Unknown ds:Inconsistent/DUnknown r----s | |||
ns:0 nr:0 dw:0 dr:0 al:0 bm:0 lo:0 pe:0 ua:0 ap:0 ep:1 wo:f oos:529504444 | |||
1: cs:StandAlone ro:Secondary/Unknown ds:Inconsistent/DUnknown r----s | |||
ns:0 nr:0 dw:0 dr:0 al:0 bm:0 lo:0 pe:0 ua:0 ap:0 ep:1 wo:f oos:301082612 | |||
</syntaxhighlight> | </syntaxhighlight> | ||
|- | |||
!<span class="code">an-a05n02</span> | |||
|<syntaxhighlight lang="bash"> | |||
<syntaxhighlight lang="bash"> | drbdadm attach r{0,1} | ||
</syntaxhighlight> | </syntaxhighlight> | ||
Output from <span class="code">/proc/drbd</span> | |||
<syntaxhighlight lang="text"> | <syntaxhighlight lang="text"> | ||
version: 8.3.16 (api:88/proto:86-97) | |||
GIT-hash: a798fa7e274428a357657fb52f0ecf40192c1985 build by phil@Build64R6, 2013-09-27 16:00:43 | |||
0: cs:StandAlone ro:Secondary/Unknown ds:Inconsistent/DUnknown r----s | |||
ns:0 nr:0 dw:0 dr:0 al:0 bm:0 lo:0 pe:0 ua:0 ap:0 ep:1 wo:f oos:529504444 | |||
1: cs:StandAlone ro:Secondary/Unknown ds:Inconsistent/DUnknown r----s | |||
ns:0 nr:0 dw:0 dr:0 al:0 bm:0 lo:0 pe:0 ua:0 ap:0 ep:1 wo:f oos:301082612 | |||
</syntaxhighlight> | |||
|} | |||
Take note of the connection state, <span class="code">cs:StandAlone</span>, the current role, <span class="code">ro:Secondary/Unknown</span> and the disk state, <span class="code">ds:Inconsistent/DUnknown</span>. This tells us that our resources are not talking to one another, are not usable because they are in the <span class="code">Secondary</span> state (you can't even read the <span class="code">/dev/drbdX</span> device) and that the backing device does not have an up to date view of the data. | |||
This all makes sense of course, as the resources are brand new. | |||
So the next step is to <span class="code">connect</span> the two nodes together. As before, we won't see any output from the first terminal, but the second terminal will change. | |||
{{note|1=After running the following command on the first node, its connection state will become <span class="code">cs:WFConnection</span> which means that it is '''w'''aiting '''f'''or a '''connection''' from the other node.}} | |||
<syntaxhighlight lang="bash"> | {|class="wikitable" | ||
!<span class="code">an-a05n01</span> | |||
|<syntaxhighlight lang="bash"> | |||
drbdadm connect r{0,1} | |||
</syntaxhighlight> | </syntaxhighlight> | ||
Output from <span class="code">/proc/drbd</span> | |||
<syntaxhighlight lang="text"> | <syntaxhighlight lang="text"> | ||
version: 8.3.16 (api:88/proto:86-97) | |||
GIT-hash: a798fa7e274428a357657fb52f0ecf40192c1985 build by phil@Build64R6, 2013-09-27 16:00:43 | |||
0: cs:Connected ro:Secondary/Secondary ds:Inconsistent/Inconsistent C r----- | |||
ns:0 nr:0 dw:0 dr:0 al:0 bm:0 lo:0 pe:0 ua:0 ap:0 ep:1 wo:f oos:529504444 | |||
1: cs:Connected ro:Secondary/Secondary ds:Inconsistent/Inconsistent C r----- | |||
ns:0 nr:0 dw:0 dr:0 al:0 bm:0 lo:0 pe:0 ua:0 ap:0 ep:1 wo:f oos:301082612 | |||
</syntaxhighlight> | </syntaxhighlight> | ||
|- | |||
!<span class="code">an-a05n02</span> | |||
|<syntaxhighlight lang="bash"> | |||
<syntaxhighlight lang="bash"> | drbdadm connect r{0,1} | ||
</syntaxhighlight> | </syntaxhighlight> | ||
Output from <span class="code">/proc/drbd</span> | |||
<syntaxhighlight lang="text"> | <syntaxhighlight lang="text"> | ||
GIT-hash: a798fa7e274428a357657fb52f0ecf40192c1985 build by phil@Build64R6, 2013-09-27 16:00:43 | |||
0: cs:Connected ro:Secondary/Secondary ds:Inconsistent/Inconsistent C r----- | |||
ns:0 nr:0 dw:0 dr:0 al:0 bm:0 lo:0 pe:0 ua:0 ap:0 ep:1 wo:f oos:529504444 | |||
1: cs:Connected ro:Secondary/Secondary ds:Inconsistent/Inconsistent C r----- | |||
ns:0 nr:0 dw:0 dr:0 al:0 bm:0 lo:0 pe:0 ua:0 ap:0 ep:1 wo:f oos:301082612 | |||
</syntaxhighlight> | |||
|} | |||
We can now see that the two nodes are talking to one another properly as the connection state has changed to <span class="code">cs:Connected</span>. They can see that their peer node is in the same state as they are; <span class="code">Secondary</span>/<span class="code">Inconsistent</span>. | |||
Next step is to synchronize the two nodes. Neither node has any real data, so it's entirely arbitrary which node we choose to use here. We'll use <span class="code">an-a05n01</span> because, well, why not. | |||
</ | |||
{|class="wikitable" | |||
!<span class="code">an-a05n01</span> | |||
<syntaxhighlight lang="bash"> | |<syntaxhighlight lang="bash"> | ||
drbdadm -- --overwrite-data-of-peer primary r{0,1} | |||
</syntaxhighlight> | </syntaxhighlight> | ||
Output from <span class="code">/proc/drbd</span> | |||
<syntaxhighlight lang="text"> | <syntaxhighlight lang="text"> | ||
version: 8.3.16 (api:88/proto:86-97) | |||
GIT-hash: a798fa7e274428a357657fb52f0ecf40192c1985 build by phil@Build64R6, 2013-09-27 16:00:43 | |||
0: cs:SyncSource ro:Primary/Secondary ds:UpToDate/Inconsistent C r----- | |||
ns:11467520 nr:0 dw:0 dr:11468516 al:0 bm:699 lo:0 pe:0 ua:0 ap:0 ep:1 wo:f oos:518036924 | |||
[>....................] sync'ed: 2.2% (505892/517092)M | |||
finish: 7:03:30 speed: 20,372 (13,916) K/sec | |||
1: cs:SyncSource ro:Primary/Secondary ds:UpToDate/Inconsistent C r----- | |||
ns:10833792 nr:0 dw:0 dr:10834788 al:0 bm:661 lo:0 pe:0 ua:0 ap:0 ep:1 wo:f oos:290248820 | |||
[>....................] sync'ed: 3.6% (283444/294024)M | |||
finish: 7:31:03 speed: 10,720 (13,144) K/sec | |||
</syntaxhighlight> | </syntaxhighlight> | ||
<syntaxhighlight lang=" | |- | ||
!<span class="code">an-a05n02</span> | |||
|<syntaxhighlight lang="text"> | |||
# don't run anything here. | |||
</syntaxhighlight> | </syntaxhighlight> | ||
Output from <span class="code">/proc/drbd</span> | |||
<syntaxhighlight lang="text"> | <syntaxhighlight lang="text"> | ||
version: 8.3.16 (api:88/proto:86-97) | |||
GIT-hash: a798fa7e274428a357657fb52f0ecf40192c1985 build by phil@Build64R6, 2013-09-27 16:00:43 | |||
0: cs:SyncTarget ro:Secondary/Primary ds:Inconsistent/UpToDate C r----- | |||
ns:0 nr:11467520 dw:11467520 dr:0 al:0 bm:699 lo:0 pe:0 ua:0 ap:0 ep:1 wo:f oos:518036924 | |||
[>....................] sync'ed: 2.2% (505892/517092)M | |||
finish: 8:42:19 speed: 16,516 (13,796) want: 30,720 K/sec | |||
1: cs:SyncTarget ro:Secondary/Primary ds:Inconsistent/UpToDate C r----- | |||
ns:0 nr:11061120 dw:11061120 dr:0 al:0 bm:675 lo:0 pe:0 ua:0 ap:0 ep:1 wo:f oos:290021492 | |||
[>....................] sync'ed: 3.7% (283224/294024)M | |||
finish: 7:06:46 speed: 11,316 (13,308) want: 30,720 K/sec | |||
</syntaxhighlight> | </syntaxhighlight> | ||
|} | |||
Excellent! This tells us that the data, as garbage as it is, is being sync'ed over to <span class="code">an-a05n02</span>. DRBD doesn't know about data structures, all it cares about is that whatever is on the first node is identical to what is on the other node. This initial synchronization does this. | |||
A few notes: | |||
< | * There is a trick to short-circuit this which we used to use in the old tutorial, but we no longer recommend this. If you ever run an [http://www.drbd.org/users-guide-8.3/s-online-verify.html online verification] of the resource, all the previously unsync'ed blocks will sync. So it's better to do it initially before the cluster is in production. | ||
* If you notice that the sync speed is sitting at <span class="code">250 K/sec</span>, then DRBD isn't honouring the <span class="code">syncer { rate xxM; }</span> value. Run <span class="code">drbdadm adjust all</span> on one node at the sync speed should start to speed up. | |||
</ | * '''Sync speed is NOT replication speed!''' - This is a very common misunderstanding for new DRBD users. The sync speed we see here ''takes away from'' the speed available to applications writing to the DRBD resource. The slower this is, the faster your applications can write to DRBD. Conversely, the higher the sync speed, the slower your applications writing to disk will be. So keep this reasonably low. Generally, a good number is about 30% of the storage or network's fastest speed, whichever is slower. If in doubt, <span class="code">30M</span> is a safe starting value. | ||
< | * If you manually adjust the <span class="code">syncer</span> speed, it will not immediately change in <span class="code">/proc/drbd</span>. It takes a while to change, be patient. | ||
The good thing about DRBD is that we do not have to wait for the resources to be synchronized. So long as one of the resource is <span class="code">UpToDate</span>, both nodes will work. If the <span class="code">Inconsistent</span> node needs to read data, it will simply read it from its peer. | |||
It is worth noting though; If the <span class="code">UpToDate</span> node disconnects or disappears, the <span class="code">Inconsistent</span> node will immediately demote to <span class="code">Secondary</span>, making it unusable. This is the biggest reason for making the synchronization speed as high as we did. The cluster can not be considered redundant until both nodes are <span class="code">UpToDate</span>. | |||
</ | |||
So with this understood, let's get back to work. The resources can synchronize in the background. | |||
In order for a DRBD resource to be usable, it has to be "promoted". Be default, DRBD resources start in the <span class="code">Secondary</span> state. This means that it will receive changes from the peer, but no changes can be made. You can't even look at the contents of a <span class="code">Secondary</span> resource. Why this is requires more time to discuss than we can go into here. | |||
So the next step is to promote both resource on both nodes. | |||
<syntaxhighlight lang="bash"> | {|class="wikitable" | ||
!<span class="code">an-a05n01</span> | |||
|<syntaxhighlight lang="bash"> | |||
drbdadm primary r{0,1} | |||
</syntaxhighlight> | |||
Output from <span class="code">/proc/drbd</span> | |||
<syntaxhighlight lang="text"> | |||
version: 8.3.16 (api:88/proto:86-97) | |||
GIT-hash: a798fa7e274428a357657fb52f0ecf40192c1985 build by phil@Build64R6, 2013-09-27 16:00:43 | |||
0: cs:SyncSource ro:Primary/Primary ds:UpToDate/Inconsistent C r----- | |||
ns:20010808 nr:0 dw:0 dr:20011804 al:0 bm:1221 lo:0 pe:0 ua:0 ap:0 ep:1 wo:f oos:509493692 | |||
[>....................] sync'ed: 3.8% (497552/517092)M | |||
finish: 9:01:50 speed: 15,660 (14,680) K/sec | |||
1: cs:SyncSource ro:Primary/Primary ds:UpToDate/Inconsistent C r----- | |||
ns:18860984 nr:0 dw:0 dr:18861980 al:0 bm:1151 lo:0 pe:0 ua:0 ap:0 ep:1 wo:f oos:282221684 | |||
[>...................] sync'ed: 6.3% (275604/294024)M | |||
finish: 2:31:28 speed: 31,036 (13,836) K/sec | |||
</syntaxhighlight> | |||
|- | |||
!<span class="code">an-a05n02</span> | |||
|<syntaxhighlight lang="bash"> | |||
drbdadm primary r{0,1} | |||
</syntaxhighlight> | </syntaxhighlight> | ||
<syntaxhighlight lang=" | Output from <span class="code">/proc/drbd</span> | ||
<syntaxhighlight lang="text"> | |||
version: 8.3.16 (api:88/proto:86-97) | |||
GIT-hash: a798fa7e274428a357657fb52f0ecf40192c1985 build by phil@Build64R6, 2013-09-27 16:00:43 | |||
0: cs:SyncTarget ro:Primary/Primary ds:Inconsistent/UpToDate C r----- | |||
ns:0 nr:20010808 dw:20010752 dr:608 al:0 bm:1221 lo:0 pe:0 ua:0 ap:0 ep:1 wo:f oos:509493692 | |||
[>....................] sync'ed: 3.8% (497552/517092)M | |||
finish: 11:06:52 speed: 12,724 (14,584) want: 30,720 K/sec | |||
1: cs:SyncTarget ro:Primary/Primary ds:Inconsistent/UpToDate C r----- | |||
ns:0 nr:19152824 dw:19152768 dr:608 al:0 bm:1168 lo:0 pe:0 ua:0 ap:0 ep:1 wo:f oos:281929844 | |||
[>...................] sync'ed: 6.4% (275320/294024)M | |||
finish: 2:27:30 speed: 31,844 (13,956) want: 30,720 K/sec | |||
</syntaxhighlight> | </syntaxhighlight> | ||
|} | |||
Notice how the roles have changed to <span class="code">ro:Primary/Primary</span>? That tells us that DRBD is now ready to be used on both nodes! | |||
At this point, we're done setting up DRBD! | |||
{{note|1=Stopping DRBD while a synchronization is running is fine. When DRBD starts back up, it will pick up where it left off.}} | |||
Eventually, the next day in the case of our cluster, the synchronization will complete. This is what it looks like once it's finished. After this point, all application writes to the DRBD resources will get all the available performance your storage and network have to offer. | |||
= | {|class="wikitable" | ||
!<span class="code">an-a05n01</span> | |||
|<syntaxhighlight lang="bash"> | |||
cat /proc/drbd | |||
</syntaxhighlight> | |||
<syntaxhighlight lang="text"> | |||
version: 8.3.16 (api:88/proto:86-97) | |||
GIT-hash: a798fa7e274428a357657fb52f0ecf40192c1985 build by phil@Build64R6, 2013-09-27 16:00:43 | |||
== | 0: cs:Connected ro:Primary/Primary ds:UpToDate/UpToDate C r----- | ||
ns:413259760 nr:0 dw:20 dr:413261652 al:1 bm:25224 lo:0 pe:0 ua:0 ap:0 ep:1 wo:f oos:0 | |||
1: cs:Connected ro:Primary/Primary ds:UpToDate/UpToDate C r----- | |||
ns:188464424 nr:0 dw:20 dr:188465928 al:1 bm:11504 lo:0 pe:0 ua:0 ap:0 ep:1 wo:f oos:0 | |||
</syntaxhighlight> | |||
|- | |||
!<span class="code">an-a05n02</span> | |||
|<syntaxhighlight lang="bash"> | |||
cat /proc/drbd | |||
</syntaxhighlight> | |||
<syntaxhighlight lang="text"> | |||
version: 8.3.16 (api:88/proto:86-97) | |||
GIT-hash: a798fa7e274428a357657fb52f0ecf40192c1985 build by phil@Build64R6, 2013-09-27 16:00:43 | |||
0: cs:Connected ro:Primary/Primary ds:UpToDate/UpToDate C r----- | |||
ns:0 nr:413259760 dw:413259600 dr:944 al:0 bm:25224 lo:0 pe:0 ua:0 ap:0 ep:1 wo:f oos:0 | |||
1: cs:Connected ro:Primary/Primary ds:UpToDate/UpToDate C r----- | |||
ns:0 nr:188464424 dw:188464264 dr:876 al:0 bm:11504 lo:0 pe:0 ua:0 ap:0 ep:1 wo:f oos:0 | |||
</syntaxhighlight> | |||
|} | |||
In the next section, we're going to start working on <span class="code">clvmd</span>. You will want to stop <span class="code">watch</span>'ing <span class="code">cat /proc/drbd</span> and go back to <span class="code">tail</span>'ing <span class="code">/var/log/messages</span> now. | |||
= Initializing Clustered Storage = | |||
Before we can provision the first virtual machine, we must first create the storage that will back them. This will take a few steps: | |||
* Configuring [[LVM]]'s clustered locking and creating the [[PV]]s, [[VG]]s and [[LV]]s | |||
* Formatting and configuring the shared [[GFS2]] partition. | |||
* Adding storage to the cluster's resource management. | |||
== Clustered Logical Volume Management == | |||
We will assign all three DRBD resources to be managed by clustered LVM. This isn't strictly needed for the [[GFS2]] partition, as it uses DLM directly. However, the flexibility of LVM is very appealing, and will make later growth of the GFS2 partition quite trivial, should the need arise. | |||
The real reason for clustered LVM in our cluster is to provide DLM-backed locking to the partitions, or logical volumes in LVM, that will be used to back our VMs. Of course, the flexibility of LVM managed storage is enough of a win to justify using LVM for our VMs in itself, and shouldn't be ignored here. | |||
=== Configuring Clustered LVM Locking === | |||
=== | {{note|1=We're going to edit the configuration on <span class="code">an-a05n01</span>. When we're done, we'll copy the configuration files to <span class="code">an-a05n02</span>.}} | ||
Before we create the clustered LVM, we need to first make three changes to the LVM configuration: | |||
* We need to filter out the DRBD backing devices so that LVM doesn't see the same signature a second time on the DRBD resource's backing device. | |||
* Switch from local locking to clustered locking. | |||
* Prevent fall-back to local locking when the cluster is not available. | |||
Start by making a backup of <span class="code">lvm.conf</span> and then begin editing it. | |||
<syntaxhighlight lang="bash"> | {|class="wikitable" | ||
!<span class="code">an-a05n01</span> | |||
!<span class="code">an-a05n02</span> | |||
|- | |||
|style="white-space: nowrap;"|<syntaxhighlight lang="bash"> | |||
rsync -av /etc/lvm /root/backups/ | |||
</syntaxhighlight> | </syntaxhighlight> | ||
<syntaxhighlight lang="text"> | <syntaxhighlight lang="text"> | ||
sending incremental file list | |||
lvm/ | |||
lvm/lvm.conf | |||
lvm/archive/ | |||
lvm/backup/ | |||
lvm/cache/ | |||
sent 37728 bytes received 47 bytes 75550.00 bytes/sec | |||
total size is 37554 speedup is 0.99 | |||
</syntaxhighlight> | </syntaxhighlight> | ||
|} | |||
Now we're ready to edit <span class="code">lvm.conf</span>. | |||
{|class="wikitable" | |||
!<span class="code">an-a05n01</span> | |||
<syntaxhighlight lang="bash"> | |style="white-space: nowrap;"|<syntaxhighlight lang="bash"> | ||
vim /etc/lvm/lvm.conf | |||
</syntaxhighlight> | </syntaxhighlight> | ||
|} | |||
The configuration option to filter out the DRBD backing device is, surprisingly, <span class="code">filter = [ ... ]</span>. By default, it is set to allow everything via the <span class="code">"a/.*/"</span> regular expression. We're only using DRBD in our LVM, so we're going to flip that to reject everything ''except'' DRBD by changing the regex to <span class="code">"a|/dev/drbd*|", "r/.*/"</span>. | |||
{|class="wikitable" | |||
!<span class="code">an-a05n01</span> | |||
|style="white-space: nowrap;"|<syntaxhighlight lang="bash"> | |||
# We're only using LVM on DRBD resource. | |||
filter = [ "a|/dev/drbd*|", "r/.*/" ] | |||
</syntaxhighlight> | </syntaxhighlight> | ||
|} | |||
For the locking, we're going to change the <span class="code">locking_type</span> from <span class="code">1</span> (local locking) to <span class="code">3</span>, (clustered locking). This is what tells LVM to use DLM and gives us the "clustered" in <span class="code">clvm</span>. | |||
{|class="wikitable" | |||
!<span class="code">an-a05n01</span> | |||
|style="white-space: nowrap;"|<syntaxhighlight lang="bash"> | |||
locking_type = 3 | |||
</syntaxhighlight> | |||
|} | |||
Lastly, we're also going to disallow fall-back to local locking. Normally, LVM would try to access a clustered LVM [[VG]] using local locking if DLM is not available. We want to prevent any access to the clustered LVM volumes ''except'' when the DLM is itself running. This is done by changing <span class="code">fallback_to_local_locking</span> to <span class="code">0</span>. | |||
<syntaxhighlight lang="bash"> | {|class="wikitable" | ||
!<span class="code">an-a05n01</span> | |||
|style="white-space: nowrap;"|<syntaxhighlight lang="bash"> | |||
fallback_to_local_locking = 0 | |||
</syntaxhighlight> | |||
|} | |||
Save the changes, then lets run a <span class="code">diff</span> against our backup to see a summary of the changes. | |||
{|class="wikitable" | |||
!<span class="code">an-a05n01</span> | |||
|style="white-space: nowrap;"|<syntaxhighlight lang="bash"> | |||
diff -U0 /root/backups/lvm/lvm.conf /etc/lvm/lvm.conf | |||
</syntaxhighlight> | </syntaxhighlight> | ||
<syntaxhighlight lang=" | <syntaxhighlight lang="diff"> | ||
--- /root/backups/lvm/lvm.conf 2013-10-10 09:40:04.000000000 -0400 | |||
+++ /etc/lvm/lvm.conf 2013-10-31 00:21:36.196228144 -0400 | |||
@@ -67,2 +67,2 @@ | |||
- # By default we accept every block device: | |||
- filter = [ "a/.*/" ] | |||
+ # We're only using LVM on DRBD resource. | |||
+ filter = [ "a|/dev/drbd*|", "r/.*/" ] | |||
@@ -408 +408 @@ | |||
- locking_type = 1 | |||
+ locking_type = 3 | |||
@@ -424 +424 @@ | |||
- fallback_to_local_locking = 1 | |||
+ fallback_to_local_locking = 0 | |||
</syntaxhighlight> | </syntaxhighlight> | ||
|} | |||
Perfect! Now copy the modified <span class="code">lvm.conf</span> file to the other node. | |||
<syntaxhighlight lang="bash"> | {|class="wikitable" | ||
!<span class="code">an-a05n01</span> | |||
|style="white-space: nowrap;"|<syntaxhighlight lang="bash"> | |||
rsync -av /etc/lvm/lvm.conf root@an-a05n02:/etc/lvm/ | |||
</syntaxhighlight> | </syntaxhighlight> | ||
<syntaxhighlight lang="text"> | <syntaxhighlight lang="text"> | ||
sending incremental file list | |||
lvm.conf | |||
sent 2399 bytes received 355 bytes 5508.00 bytes/sec | |||
total size is 37569 speedup is 13.64 | |||
</syntaxhighlight> | </syntaxhighlight> | ||
|} | |||
=== Testing the clvmd Daemon === | |||
=== | A little later on, we're going to put clustered LVM under the control of <span class="code">rgmanager</span>. Before we can do that though, we need to start it manually so that we can use it to create the [[LV]] that will back the [[GFS2]] <span class="code">/shared</span> partition. We will also be adding this partition to <span class="code">rgmanager</span>, once it has been created. | ||
Before we start the <span class="code">clvmd</span> daemon, we'll want to ensure that the cluster is running. | |||
{|class="wikitable" | |||
!<span class="code">an-a05n01</span> | |||
|style="white-space: nowrap;"|<syntaxhighlight lang="bash"> | |||
cman_tool nodes | |||
</syntaxhighlight> | |||
<syntaxhighlight lang="bash"> | <syntaxhighlight lang="bash"> | ||
Node Sts Inc Joined Name | |||
1 M 64 2013-10-30 22:40:07 an-a05n01.alteeve.ca | |||
2 M 64 2013-10-30 22:40:07 an-a05n02.alteeve.ca | |||
</syntaxhighlight> | </syntaxhighlight> | ||
|} | |||
It is, and both nodes are members. We can start the <span class="code">clvmd</span> daemon now. | |||
{|class="wikitable" | |||
!<span class="code">an-a05n01</span> | |||
!<span class="code">an-a05n02</span> | |||
|- | |||
|style="white-space: nowrap;"|<syntaxhighlight lang="bash"> | |||
/etc/init.d/clvmd start | |||
<syntaxhighlight lang="bash"> | |||
/etc/init.d/ | |||
</syntaxhighlight> | </syntaxhighlight> | ||
<syntaxhighlight lang="text"> | <syntaxhighlight lang="text"> | ||
Starting clvmd: | |||
Activating VG(s): No volume groups found | |||
[ OK ] | |||
</syntaxhighlight> | </syntaxhighlight> | ||
|style="white-space: nowrap;"|<syntaxhighlight lang="bash"> | |||
<syntaxhighlight lang="bash"> | /etc/init.d/clvmd start | ||
/etc/init.d/ | |||
</syntaxhighlight> | </syntaxhighlight> | ||
<syntaxhighlight lang="text"> | <syntaxhighlight lang="text"> | ||
Starting clvmd: | |||
Activating VG(s): No volume groups found | |||
[ OK ] | |||
</syntaxhighlight> | </syntaxhighlight> | ||
|} | |||
We've not created any volume groups yet, so that complaint about not finding any is expected. | |||
<syntaxhighlight lang="bash"> | We can now use <span class="code">dlm_tool</span> to verify that a [[DLM]] lock space has been created for <span class="code">clvmd</span>. If it has, we're good to go. | ||
{|class="wikitable" | |||
!<span class="code">an-a05n01</span> | |||
!<span class="code">an-a05n02</span> | |||
|- | |||
|style="white-space: nowrap;"|<syntaxhighlight lang="bash"> | |||
dlm_tool ls | |||
</syntaxhighlight> | |||
<syntaxhighlight lang="text"> | |||
dlm lockspaces | |||
name clvmd | |||
id 0x4104eefa | |||
flags 0x00000000 | |||
change member 2 joined 1 remove 0 failed 0 seq 2,2 | |||
members 1 2 | |||
</syntaxhighlight> | |||
|style="white-space: nowrap;"|<syntaxhighlight lang="bash"> | |||
dlm_tool ls | |||
</syntaxhighlight> | </syntaxhighlight> | ||
<syntaxhighlight lang="text"> | <syntaxhighlight lang="text"> | ||
dlm lockspaces | |||
name clvmd | |||
id 0x4104eefa | |||
flags 0x00000000 | |||
change member 2 joined 1 remove 0 failed 0 seq 1,1 | |||
members 1 2 | |||
</syntaxhighlight> | </syntaxhighlight> | ||
|} | |||
Looking good! | |||
=== Initialize our DRBD Resource for use as LVM PVs === | |||
This is the first time we're actually going to use DRBD and clustered LVM, so we need to make sure that both are started. | |||
First, check <span class="code">drbd</span>. | |||
{|class="wikitable" | |||
!<span class="code">an-a05n01</span> | |||
|style="white-space: nowrap;"|<syntaxhighlight lang="bash"> | |||
/etc/init.d/drbd status | |||
</syntaxhighlight> | |||
<syntaxhighlight lang="text"> | |||
drbd driver loaded OK; device status: | |||
version: 8.3.16 (api:88/proto:86-97) | |||
GIT-hash: a798fa7e274428a357657fb52f0ecf40192c1985 build by phil@Build64R6, 2013-09-27 16:00:43 | |||
m:res cs ro ds p mounted fstype | |||
... sync'ed: 19.4% (416880/517092)M | |||
... sync'ed: 32.4% (198972/294024)M | |||
0:r0 SyncSource Primary/Primary UpToDate/Inconsistent C | |||
1:r1 SyncSource Primary/Primary UpToDate/Inconsistent C | |||
</syntaxhighlight> | |||
|- | |||
!<span class="code">an-a05n02</span> | |||
|style="white-space: nowrap;"|<syntaxhighlight lang="bash"> | |||
/etc/init.d/drbd status | |||
</syntaxhighlight> | |||
<syntaxhighlight lang="text"> | |||
drbd driver loaded OK; device status: | |||
version: 8.3.16 (api:88/proto:86-97) | |||
GIT-hash: a798fa7e274428a357657fb52f0ecf40192c1985 build by phil@Build64R6, 2013-09-27 16:00:43 | |||
m:res cs ro ds p mounted fstype | |||
... sync'ed: 19.4% (416880/517092)M | |||
... sync'ed: 32.4% (198956/294024)M | |||
0:r0 SyncTarget Primary/Primary Inconsistent/UpToDate C | |||
1:r1 SyncTarget Primary/Primary Inconsistent/UpToDate C | |||
</syntaxhighlight> | |||
|} | |||
It's up and both resources are <span class="code">Primary/Primary</span>, so we're ready. | |||
Now to check on <span class="code">clvmd</span>. | |||
{|class="wikitable" | |||
!<span class="code">an-a05n01</span> | |||
|style="white-space: nowrap;"|<syntaxhighlight lang="bash"> | |||
/etc/init.d/clvmd status | |||
</syntaxhighlight> | |||
<syntaxhighlight lang="text"> | |||
clvmd (pid 13936) is running... | |||
Clustered Volume Groups: (none) | |||
Active clustered Logical Volumes: (none) | |||
</syntaxhighlight> | |||
|- | |||
!<span class="code">an-a05n02</span> | |||
|style="white-space: nowrap;"|<syntaxhighlight lang="bash"> | |||
/etc/init.d/clvmd status | |||
</syntaxhighlight> | |||
<syntaxhighlight lang="text"> | |||
clvmd (pid 13894) is running... | |||
Clustered Volume Groups: (none) | |||
Active clustered Logical Volumes: (none) | |||
</syntaxhighlight> | |||
|} | |||
It's up and running. As we did earlier, we can also verify with <span class="code">dlm_tool ls</span> if we wish. | |||
Before we can use LVM, clustered or otherwise, we need to initialize one or more raw storage devices called "Physical Volumes". This is done using the <span class="code">pvcreate</span> command. We're going to do this on <span class="code">an-a05n01</span>, then run <span class="code">pvscan</span> on <span class="code">an-a05n02</span>. We should see the newly initialized DRBD resources appear. | |||
First, let's verify that, indeed, we have no existing [[PV]]s. We'll do this with <span class="code">pvscan</span>, a tool that looks at blocks devices for physical volumes it may not yet have seen. | |||
Running <span class="code">pvscan</span> first, we'll see that no [[PV]]s have been created. | |||
= | {|class="wikitable" | ||
!<span class="code">an-a05n01</span> | |||
|style="white-space: nowrap;"|<syntaxhighlight lang="bash"> | |||
pvscan | |||
<syntaxhighlight lang="bash"> | |||
</syntaxhighlight> | </syntaxhighlight> | ||
<syntaxhighlight lang="text"> | <syntaxhighlight lang="text"> | ||
No matching physical volumes found | |||
</syntaxhighlight> | </syntaxhighlight> | ||
|- | |||
!<span class="code">an-a05n02</span> | |||
|style="white-space: nowrap;"|<syntaxhighlight lang="bash"> | |||
<syntaxhighlight lang="bash"> | pvscan | ||
</syntaxhighlight> | </syntaxhighlight> | ||
<syntaxhighlight lang="text"> | <syntaxhighlight lang="text"> | ||
No matching physical volumes found | |||
</syntaxhighlight> | </syntaxhighlight> | ||
|} | |||
Now we'll run <span class="code">pvcreate</span> on <span class="code">an-a05n01</span> against both DRBD devices. This will "sign" the devices and tell LVM that it can use them in [[VG]]s we'll soon create. On the other node, we'll run <span class="code">pvdisplay</span>. If The "clustered" part of <span class="code">clvmd</span> is working, <span class="code">an-a05n02</span> should immediately know about the new PVs without needing another <span class="code">pvscan</span>. | |||
<syntaxhighlight lang="bash"> | {|class="wikitable" | ||
!<span class="code">an-a05n01</span> | |||
|style="white-space: nowrap;"|<syntaxhighlight lang="bash"> | |||
pvcreate /dev/drbd{0,1} | |||
</syntaxhighlight> | </syntaxhighlight> | ||
<syntaxhighlight lang="text"> | <syntaxhighlight lang="text"> | ||
Physical volume "/dev/drbd0" successfully created | |||
Physical volume "/dev/drbd1" successfully created | |||
</syntaxhighlight> | </syntaxhighlight> | ||
<syntaxhighlight lang="bash"> | |- | ||
!<span class="code">an-a05n02</span> | |||
|style="white-space: nowrap;"|<syntaxhighlight lang="bash"> | |||
pvdisplay | |||
</syntaxhighlight> | </syntaxhighlight> | ||
<syntaxhighlight lang="text"> | <syntaxhighlight lang="text"> | ||
"/dev/drbd0" is a new physical volume of "504.97 GiB" | |||
--- NEW Physical volume --- | |||
PV Name /dev/drbd0 | |||
VG Name | |||
PV Size 504.97 GiB | |||
Allocatable NO | |||
PE Size 0 | |||
Total PE 0 | |||
Free PE 0 | |||
Allocated PE 0 | |||
PV UUID w2mbVu-7R3P-6j6t-Jpyd-M3SA-tzZt-kRj6uY | |||
"/dev/drbd1" is a new physical volume of "287.13 GiB" | |||
--- NEW Physical volume --- | |||
PV Name /dev/drbd1 | |||
VG Name | |||
PV Size 287.13 GiB | |||
Allocatable NO | |||
PE Size 0 | |||
Total PE 0 | |||
Free PE 0 | |||
Allocated PE 0 | |||
PV UUID ELfiwP-ZqPT-OMSy-SD26-Jmt0-CTB3-z3CTmP | |||
</syntaxhighlight> | </syntaxhighlight> | ||
|} | |||
If this was normal LVM, <span class="code">an-a05n02</span> would not have seen the new [[PV]]s. Because DRBD replicated the changes and clustered LVM alerted the peer though, it immediately knew about the changes. | |||
Pretty neat! | |||
=== Creating Cluster Volume Groups === | |||
As with initializing the DRBD resource above, we will create our volume groups, called [[VG]]s, on <span class="code">an-a05n01</span> only. As with the PVs, we will again be able to see them on both nodes immediately. | |||
Let's verify that no previously-unseen VGs exist using the <span class="code">vgscan</span> command. | |||
<syntaxhighlight lang="bash"> | {|class="wikitable" | ||
!<span class="code">an-a05n01</span> | |||
|style="white-space: nowrap;"|<syntaxhighlight lang="bash"> | |||
vgscan | |||
</syntaxhighlight> | |||
<syntaxhighlight lang="text"> | |||
Reading all physical volumes. This may take a while... | |||
No volume groups found | |||
</syntaxhighlight> | |||
|- | |||
!<span class="code">an-a05n02</span> | |||
|style="white-space: nowrap;"|<syntaxhighlight lang="bash"> | |||
vgscan | |||
</syntaxhighlight> | </syntaxhighlight> | ||
<syntaxhighlight lang="text"> | <syntaxhighlight lang="text"> | ||
Reading all physical volumes. This may take a while... | |||
No volume groups found | |||
</syntaxhighlight> | </syntaxhighlight> | ||
|} | |||
Now to create the VGs, we'll use the <span class="code">vgcreate</span> command with the <span class="code">-c y</span> switch, which tells LVM to make the VG a clustered VG. Note that when the <span class="code">clvmd</span> daemon is running, <span class="code">-c y</span> is implied. However, it's best to get into the habit of being extra careful and thorough. If there was a problem, like <span class="code">clvmd</span> not being running for example, it will trigger an error and we avoid hassles later. | |||
= | {{note|1=If you plan to use the [[Striker|cluster dashboard]], it is important that the volume group names match those below. If you do not do this, you may have trouble provisioning new servers via the dashboard's user interface.}} | ||
We're going to use the volume group naming convention of: | |||
< | * <span class="code"><node>_vgX</span> | ||
** The <span class="code"><node></span> matches the node that will become home to the servers using this storage pool. | |||
</ | ** The <span class="code">vgX</span> is a simple sequence, starting at <span class="code">0</span>. If you ever need to add space to an existing storage pool, you can create a new DRBD resource, sign it as a PV and either assign it directly to the existing volume group or increment this number and create a second storage pool for the associated node. | ||
< | |||
Earlier, while planning our partition sizes, we decided that <span class="code">/dev/drbd0</span> would back the servers designed to run on <span class="code">an-a05n01</span>. So we'll create a volume group called <span class="code">an-a05n01_vg0</span> that uses the <span class="code">/dev/drbd0</span> physical volume. | |||
Likewise, we decided that <span class="code">/etc/drbd1</span> would be used for the servers designed to run on <span class="code">an-a05n02</span>. So we'll create a volume group called <span class="code">an-a05n02_vg0</span>. | |||
</ | |||
On '''<span class="code">an-a05n01</span>''', create both of our new VGs! | |||
<syntaxhighlight lang="bash"> | {|class="wikitable" | ||
!<span class="code">an-a05n01</span> | |||
|style="white-space: nowrap;"|<syntaxhighlight lang="bash"> | |||
vgcreate -c y an-a05n01_vg0 /dev/drbd0 | |||
vgcreate -c y an-a05n02_vg0 /dev/drbd1 | |||
</syntaxhighlight> | </syntaxhighlight> | ||
<syntaxhighlight lang="text"> | <syntaxhighlight lang="text"> | ||
Clustered volume group "an-a05n01_vg0" successfully created | |||
Clustered volume group "an-a05n02_vg0" successfully created | |||
</syntaxhighlight> | </syntaxhighlight> | ||
<syntaxhighlight lang="bash"> | |- | ||
!<span class="code">an-a05n02</span> | |||
|style="white-space: nowrap;"|<syntaxhighlight lang="bash"> | |||
vgdisplay | |||
</syntaxhighlight> | </syntaxhighlight> | ||
<syntaxhighlight lang="text"> | <syntaxhighlight lang="text"> | ||
--- Volume group --- | |||
VG Name an-a05n02_vg0 | |||
System ID | |||
Format lvm2 | |||
Metadata Areas 1 | |||
Metadata Sequence No 1 | |||
VG Access read/write | |||
VG Status resizable | |||
Clustered yes | |||
Shared no | |||
MAX LV 0 | |||
Cur LV 0 | |||
Open LV 0 | |||
Max PV 0 | |||
Cur PV 1 | |||
Act PV 1 | |||
VG Size 287.13 GiB | |||
PE Size 4.00 MiB | |||
Total PE 73506 | |||
Alloc PE / Size 0 / 0 | |||
Free PE / Size 73506 / 287.13 GiB | |||
VG UUID 1h5Gzk-6UX6-xvUo-GWVH-ZMFM-YLop-dYiC7L | |||
--- Volume group --- | |||
VG Name an-a05n01_vg0 | |||
System ID | |||
Format lvm2 | |||
Metadata Areas 1 | |||
Metadata Sequence No 1 | |||
VG Access read/write | |||
VG Status resizable | |||
Clustered yes | |||
Shared no | |||
MAX LV 0 | |||
Cur LV 0 | |||
Open LV 0 | |||
Max PV 0 | |||
Cur PV 1 | |||
Act PV 1 | |||
VG Size 504.97 GiB | |||
PE Size 4.00 MiB | |||
Total PE 129273 | |||
Alloc PE / Size 0 / 0 | |||
Free PE / Size 129273 / 504.97 GiB | |||
VG UUID TzKBFn-xBVB-e9AP-iL1l-AvQi-mZiV-86KnSF | |||
</syntaxhighlight> | </syntaxhighlight> | ||
|} | |||
Good! Now as a point of note, let's look again at <span class="code">pvdisplay</span> on <span class="code">an-a05n01</span> (we know it will be the same on <span class="code">an-a05n02</span>). | |||
<syntaxhighlight lang="bash"> | {|class="wikitable" | ||
!<span class="code">an-a05n01</span> | |||
|style="white-space: nowrap;"|<syntaxhighlight lang="bash"> | |||
pvdisplay | |||
</syntaxhighlight> | </syntaxhighlight> | ||
<syntaxhighlight lang="text"> | <syntaxhighlight lang="text"> | ||
--- Physical volume --- | |||
PV Name /dev/drbd1 | |||
VG Name an-a05n02_vg0 | |||
PV Size 287.13 GiB / not usable 1.99 MiB | |||
Allocatable yes | |||
PE Size 4.00 MiB | |||
Total PE 73506 | |||
Free PE 73506 | |||
Allocated PE 0 | |||
PV UUID ELfiwP-ZqPT-OMSy-SD26-Jmt0-CTB3-z3CTmP | |||
--- Physical volume --- | |||
PV Name /dev/drbd0 | |||
VG Name an-a05n01_vg0 | |||
PV Size 504.97 GiB / not usable 2.18 MiB | |||
Allocatable yes | |||
PE Size 4.00 MiB | |||
Total PE 129273 | |||
Free PE 129273 | |||
Allocated PE 0 | |||
PV UUID w2mbVu-7R3P-6j6t-Jpyd-M3SA-tzZt-kRj6uY | |||
</syntaxhighlight> | |||
|} | |||
Notice now that <span class="code">VG Name</span> has a value where it didn't before? This shows us that the PV has been allocated to a volume. | |||
That's it for the volume groups! | |||
=== Creating a Logical Volume === | |||
= | The last LVM step, for now, is to create a "logical volume" carved from the <span class="code">an-a05n01_vg0</span> volume group. This will be used in the next step as the volume for our <span class="code">/shared</span> [[GFS2]] partition. | ||
Out of thoroughness, let's scan for any previously unseen logical volumes using <span class="code">lvscan</span>. | |||
<syntaxhighlight lang="bash"> | {|class="wikitable" | ||
!<span class="code">an-a05n01</span> | |||
|style="white-space: nowrap;"|<syntaxhighlight lang="bash"> | |||
lvscan | |||
</syntaxhighlight> | |||
<syntaxhighlight lang="text"> | |||
<nothing> | |||
# nothing printed | |||
</syntaxhighlight> | |||
|- | |||
!<span class="code">an-a05n02</span> | |||
|style="white-space: nowrap;"|<syntaxhighlight lang="bash"> | |||
lvscan | |||
</syntaxhighlight> | </syntaxhighlight> | ||
<syntaxhighlight lang="text"> | <syntaxhighlight lang="text"> | ||
# nothing printed | |||
</syntaxhighlight> | </syntaxhighlight> | ||
|} | |||
None found, as expected. So let's create our 40 [[GB]] logical volume for our <span class="code">/shared</span> [[GFS2]] partition. We'll do this by specifying how large we want the new logical volume to be, what name we want to give it and what volume group to carve the space out of. The resulting logical volume will then be <span class="code">/dev/<vg>/<lv></span>. Here, we're taking space from <span class="code">an-a05n01</span> and we'll call this LV <span class="code">shared</span>, so the resulting volume will be <span class="code">/dev/an-a05n01_vg0/shared</span>. | |||
{|class="wikitable" | |||
!<span class="code">an-a05n01</span> | |||
|style="white-space: nowrap;"|<syntaxhighlight lang="bash"> | |||
lvcreate -L 40G -n shared an-a05n01_vg0 | |||
<syntaxhighlight lang="bash"> | |||
</syntaxhighlight> | </syntaxhighlight> | ||
<syntaxhighlight lang="text"> | <syntaxhighlight lang="text"> | ||
Logical volume "shared" created | |||
</syntaxhighlight> | </syntaxhighlight> | ||
|- | |||
<syntaxhighlight lang="bash"> | !<span class="code">an-a05n02</span> | ||
|style="white-space: nowrap;"|<syntaxhighlight lang="bash"> | |||
lvdisplay | |||
</syntaxhighlight> | </syntaxhighlight> | ||
<syntaxhighlight lang="text"> | <syntaxhighlight lang="text"> | ||
--- Logical volume --- | |||
LV Path /dev/an-a05n01_vg0/shared | |||
LV Name shared | |||
VG Name an-a05n01_vg0 | |||
LV UUID f0w1J0-6aTz-0Bz0-SX57-pstr-g5qu-SAGGSS | |||
LV Write Access read/write | |||
LV Creation host, time an-a05n01.alteeve.ca, 2013-10-31 17:07:50 -0400 | |||
LV Status available | |||
# open 0 | |||
LV Size 40.00 GiB | |||
Current LE 10240 | |||
Segments 1 | |||
Allocation inherit | |||
Read ahead sectors auto | |||
- currently set to 256 | |||
Block device 253:0 | |||
</syntaxhighlight> | </syntaxhighlight> | ||
|} | |||
Perfect. We can now create our GFS2 partition! | |||
== Creating the Shared GFS2 Partition == | |||
{{warning|1=Red Hat '''[https://access.redhat.com/documentation/en-US/Red_Hat_Enterprise_Linux/6/html-single/Global_File_System_2/index.html#s2-selinux-gfs2-gfs2 does NOT]''' support using SELinux and GFS2 together. The principle reason for this is the performance degradation caused by the additional storage overhead required for SELinux to operate. We decided to enable SELinux in the [[Anvil!]] anyway because of how infrequently the partition is changed. In our case, performance is not a concern. However, if you need to be 100% in compliance with what Red Hat supports, you will need to disable SELinux.}} | |||
{{note|1=This section assumes that <span class="code">cman</span>, <span class="code">drbd</span> and <span class="code">clvmd</span> are running.}} | |||
</ | |||
The GFS2-formatted <span class="code">/dev/an-a05n01_vg0/shared</span> partition will be mounted at <span class="code">/shared</span> on both nodes and it will be used for four main purposes: | |||
=== | * <span class="code">/shared/files</span>; Storing files like [[ISO]] images needed when installing server operating systems and mounting "DVDs" into the virtual DVD-ROM drives. | ||
* <span class="code">/shared/provision</span>; Storing short scripts used to call <span class="code">virt-install</span> which handles the creation of new servers. | |||
* <span class="code">/shared/definitions</span>; This is where the [[XML]] definition files which define the virtual hardware backing our servers will be kept. This is the most important directory as the cluster and [[Striker|dashboard]] will look here when starting, migrating and recovering servers. | |||
* <span class="code">/shared/archive</span>; This is used to store old copies of the [[XML]] definition files and provision scripts. | |||
Formatting the logical volume is much like formatting a traditional file system on a traditional partition. There are a few extra arguments needed though. Lets look at them first. | |||
The following switches will be used with our <span class="code">mkfs.gfs2</span> call: | |||
[[ | * <span class="code">-p lock_dlm</span>; This tells GFS2 to use [[DLM]] for its clustered locking. | ||
* <span class="code">-j 2</span>; This tells GFS2 to create two journals. This must match the number of nodes that will try to mount this partition at any one time. | |||
* <span class="code">-t an-anvil-05:shared</span>; This is the lock space name, which must be in the format <span class="code"><cluste_name>:<file-system_name></span>. The <span class="code">cluster_name</span> must match the one in <span class="code">cluster.conf</span>. The <span class="code"><file-system_name></span> has to be unique in the cluster, which is easy for us because we'll only have the one gfs2 file system. | |||
Once we've formatted the partition, we'll use a program called <span class="code">gfs2_tool</span> on <span class="code">an-a05n02</span> to query the new partition's superblock. We're going to use it shortly in some bash magic to pull out the [[UUID]] and feed it into a string formatted for <span class="code">/etc/fstab</span>. More importantly here, it shows us that the second node sees the new file system. | |||
{{note|1=Depending on the size of the new partition, this call could take a while to complete. Please be patient.}} | |||
{|class="wikitable" | |||
!<span class="code">an-a05n01</span> | |||
|class="white-space: nowrap;"|<syntaxhighlight lang="bash"> | |||
mkfs.gfs2 -p lock_dlm -j 2 -t an-anvil-05:shared /dev/an-a05n01_vg0/shared | |||
</syntaxhighlight> | |||
<syntaxhighlight lang="text"> | |||
This will destroy any data on /dev/an-a05n01_vg0/shared. | |||
It appears to contain: symbolic link to `../dm-0' | |||
</syntaxhighlight> | |||
<syntaxhighlight lang="text"> | |||
Are you sure you want to proceed? [y/n] y | |||
</syntaxhighlight> | |||
<syntaxhighlight lang="text"> | |||
Device: /dev/an-a05n01_vg0/shared | |||
Blocksize: 4096 | |||
Device Size 40.00 GB (10485760 blocks) | |||
Filesystem Size: 40.00 GB (10485758 blocks) | |||
Journals: 2 | |||
Resource Groups: 160 | |||
Locking Protocol: "lock_dlm" | |||
Lock Table: "an-anvil-05:shared" | |||
UUID: 774883e8-d0fe-a068-3969-4bb7dc679960 | |||
</syntaxhighlight> | |||
|- | |||
!<span class="code">an-a05n02</span> | |||
|style="white-space: nowrap;"|<syntaxhighlight lang="bash"> | |||
gfs2_tool sb /dev/an-a05n01_vg0/shared all | |||
</syntaxhighlight> | |||
<syntaxhighlight lang="bash"> | |||
mh_magic = 0x01161970 | |||
mh_type = 1 | |||
mh_format = 100 | |||
sb_fs_format = 1801 | |||
sb_multihost_format = 1900 | |||
sb_bsize = 4096 | |||
sb_bsize_shift = 12 | |||
no_formal_ino = 2 | |||
no_addr = 23 | |||
no_formal_ino = 1 | |||
no_addr = 22 | |||
sb_lockproto = lock_dlm | |||
sb_locktable = an-anvil-05:shared | |||
uuid = 774883e8-d0fe-a068-3969-4bb7dc679960 | |||
</syntaxhighlight> | |||
|} | |||
Very nice. | |||
Now, on both nodes, we need to create a mount point for the new file system and then we'll mount it on both nodes. | |||
{|class="wikitable" | |||
!<span class="code">an-a05n01</span> | |||
|class="white-space: nowrap;"|<syntaxhighlight lang="bash"> | |||
mkdir /shared | |||
mount /dev/an-a05n01_vg0/shared /shared/ | |||
df -hP | |||
</syntaxhighlight> | |||
<syntaxhighlight lang="bash"> | <syntaxhighlight lang="bash"> | ||
Filesystem Size Used Avail Use% Mounted on | |||
/dev/sda2 40G 1.7G 36G 5% / | |||
tmpfs 12G 29M 12G 1% /dev/shm | |||
/dev/sda1 485M 51M 409M 12% /boot | |||
/dev/mapper/an--c05n01_vg0-shared 40G 259M 40G 1% /shared | |||
</syntaxhighlight> | |||
|- | |||
!<span class="code">an-a05n02</span> | |||
|style="white-space: nowrap;"|<syntaxhighlight lang="bash"> | |||
mkdir /shared | |||
mount /dev/an-a05n01_vg0/shared /shared/ | |||
df -hP | |||
</syntaxhighlight> | </syntaxhighlight> | ||
<syntaxhighlight lang=" | <syntaxhighlight lang="bash"> | ||
Filesystem Size Used Avail Use% Mounted on | |||
/dev/sda2 40G 1.7G 36G 5% / | |||
tmpfs 12G 26M 12G 1% /dev/shm | |||
/dev/sda1 485M 51M 409M 12% /boot | |||
/dev/mapper/an--c05n01_vg0-shared 40G 259M 40G 1% /shared | |||
</syntaxhighlight> | </syntaxhighlight> | ||
|} | |||
Note that the path under <span class="code">Filesystem</span> is different from what we used when creating the GFS2 partition. This is an effect of [[Device Mapper]], which is used by LVM to create [[symlinks]] to actual block device paths. If we look at our <span class="code">/dev/an-a05n01_vg0/shared</span> device and the device from <span class="code">df</span>, <span class="code">/dev/mapper/an--c05n01_vg0-shared</span>, we'll see that they both point to the same actual block device. | |||
<syntaxhighlight lang="bash"> | {|class="wikitable" | ||
!<span class="code">an-a05n01</span> | |||
|style="white-space: nowrap;"|<syntaxhighlight lang="bash"> | |||
ls -lah /dev/an-a05n01_vg0/shared /dev/mapper/an--c05n01_vg0-shared | |||
</syntaxhighlight> | </syntaxhighlight> | ||
<syntaxhighlight lang="text"> | <syntaxhighlight lang="text"> | ||
lrwxrwxrwx. 1 root root 7 Oct 31 17:07 /dev/an-a05n01_vg0/shared -> ../dm-0 | |||
lrwxrwxrwx. 1 root root 7 Oct 31 17:07 /dev/mapper/an--c05n01_vg0-shared -> ../dm-0 | |||
</syntaxhighlight> | </syntaxhighlight> | ||
|} | |||
Note the <span class="code">l</span> at the beginning of the files' mode? That tells us that these are links. The <span class="code"> -> ../dm-0</span> shows where they point to. If we look at <span class="code">/dev/dm-0</span>, we see its mode line begins with a <span class="code">b</span>, telling us that it is an actual block device. | |||
<syntaxhighlight lang="bash"> | {|class="wikitable" | ||
!<span class="code">an-a05n01</span> | |||
|style="white-space: nowrap;"|<syntaxhighlight lang="bash"> | |||
ls -lah /dev/dm-0 | |||
</syntaxhighlight> | </syntaxhighlight> | ||
<syntaxhighlight lang="text"> | <syntaxhighlight lang="text"> | ||
brw-rw----. 1 root disk 253, 0 Oct 31 17:27 /dev/dm-0 | |||
</syntaxhighlight> | </syntaxhighlight> | ||
<syntaxhighlight lang="bash"> | |} | ||
If you're curious, you can use <span class="code">dmsetup</span> to gather more information about the [[device mapper]] devices. Let's take a look. | |||
{|class="wikitable" | |||
!<span class="code">an-a05n01</span> | |||
|style="white-space: nowrap;"|<syntaxhighlight lang="bash"> | |||
dmsetup info | |||
</syntaxhighlight> | </syntaxhighlight> | ||
<syntaxhighlight lang="text"> | <syntaxhighlight lang="text"> | ||
Name: an--c05n01_vg0-shared | |||
State: ACTIVE | |||
Read Ahead: 256 | |||
Tables present: LIVE | |||
Open count: 1 | |||
Event number: 0 | |||
Major, minor: 253, 0 | |||
Number of targets: 1 | |||
UUID: LVM-TzKBFnxBVBe9APiL1lAvQimZiV86KnSFf0w1J06aTz0Bz0SX57pstrg5quSAGGSS | |||
</syntaxhighlight> | </syntaxhighlight> | ||
|} | |||
Here we see the link back to the LV. | |||
== Adding /shared to /etc/fstab == | |||
{{warning|1=We're going to edit <span class="code">/etc/fstab</span>. Breaking this file may leave your system unbootable! As always, practice on unimportant nodes until you are comfortable with this process.}} | |||
In order for the the <span class="code">/etc/init.d/gfs2</span> initialization script to work, it must be able to find the GFS partition in the file system table, <span class="code">/etc/fstab</span>. The operating system reads this file when it is booting, looking for file systems to mount. As such, this is a critical system file and breaking it can leave a node either unable to boot, or booting into the single user recovery console. | |||
So please proceed carefully. | |||
= | First up, let's backup <span class="code">/etc/fstab</span>. | ||
{|class="wikitable" | |||
!<span class="code">an-a05n01</span> | |||
|style="white-space: nowrap;"|<syntaxhighlight lang="bash"> | |||
rsync -av /etc/fstab /root/backups/ | |||
</syntaxhighlight> | |||
<syntaxhighlight lang="text"> | |||
sending incremental file list | |||
fstab | |||
sent 878 bytes received 31 bytes 1818.00 bytes/sec | |||
total size is 805 speedup is 0.89 | |||
</syntaxhighlight> | |||
|- | |||
!<span class="code">an-a05n02</span> | |||
|style="white-space: nowrap;"|<syntaxhighlight lang="bash"> | |||
rsync -av /etc/fstab /root/backups/ | |||
</syntaxhighlight> | |||
<syntaxhighlight lang="text"> | |||
sending incremental file list | |||
fstab | |||
sent 878 bytes received 31 bytes 1818.00 bytes/sec | |||
total size is 805 speedup is 0.89 | |||
</syntaxhighlight> | |||
|} | |||
Adding a new entry to the <span class="code">fstab</span> requires a particularly crafted line. You can read about this in detail by typing <span class="code">man fstab</span>. In short though, each line is made up of six space-separated values; | |||
=== | # This is the device (by path or by [[UUID]]). We will be using the partition's UUID here. | ||
# This is the mount point for the file system. For this entry, that will be <span class="code">/shared</span>. | |||
# This tells the [[OS]] what file system this partition is. For us, we'll set <span class="code">gfs2</span>. | |||
# These are the mount options. Usually this is <span class="code">default</span> which implies a set of option. We're going to add a couple other options to modify this, which we'll discuss shortly. | |||
# This tells the <span class="code">dump</span> program whether to back this file system up or not. It's not usually used except with <span class="code">[[ext2]]</span> or <span class="code">[[ext3]]</span> file systems. Even then, it's rarely used any more. We will set this to <span class="code">0</span> which disables this. | |||
# This last field sets the order in which boot-time <span class="code">fsck</span> (file system checks) run. This file system is never available at boot, so the only sensible value here is <span class="code">0</span>. | |||
With all this, we can now build our <span class="code">fstab</span> entry. | |||
First, we need to query the file system's UUID. | |||
{|class="wikitable" | |||
!<span class="code">an-a05n01</span> | |||
|style="white-space: nowrap;"|<syntaxhighlight lang="bash"> | |||
gfs2_tool sb /dev/an-a05n01_vg0/shared uuid | |||
</syntaxhighlight> | |||
<syntaxhighlight lang="bash"> | <syntaxhighlight lang="bash"> | ||
current uuid = 774883e8-d0fe-a068-3969-4bb7dc679960 | |||
</syntaxhighlight> | </syntaxhighlight> | ||
|} | |||
We only need the UUID, so let's filter out the parts we don't want by using <span class="code">awk</span>, which splits a line up on spaces. | |||
{|class="wikitable" | |||
!<span class="code">an-a05n01</span> | |||
|style="white-space: nowrap;"|<syntaxhighlight lang="bash"> | |||
gfs2_tool sb /dev/an-a05n01_vg0/shared uuid | awk '{ print $4; }' | |||
</syntaxhighlight> | |||
<syntaxhighlight lang="bash"> | |||
774883e8-d0fe-a068-3969-4bb7dc679960 | |||
</syntaxhighlight> | </syntaxhighlight> | ||
|} | |||
We need to make sure that the UUID is lower-case. It is already, but we can make sure it's always lower case by using <span class="code">sed</span>. | |||
{|class="wikitable" | |||
!<span class="code">an-a05n01</span> | |||
|style="white-space: nowrap;"|<syntaxhighlight lang="bash"> | |||
gfs2_tool sb /dev/an-a05n01_vg0/shared uuid | awk '{ print $4; }' | sed -e "s/\(.*\)/\L\1\E/" | |||
</syntaxhighlight> | |||
<syntaxhighlight lang="bash"> | <syntaxhighlight lang="bash"> | ||
774883e8-d0fe-a068-3969-4bb7dc679960 | |||
</syntaxhighlight> | </syntaxhighlight> | ||
|} | |||
When specifying a device in <span class="code">/etc/fstab</span> but UUID instead of using a device path, we need to prefix the entry with <span class="code">UUID=</span>. We can expand on our <span class="code">sed</span> call to do this. | |||
{|class="wikitable" | |||
!<span class="code">an-a05n01</span> | |||
|style="white-space: nowrap;"|<syntaxhighlight lang="bash"> | |||
gfs2_tool sb /dev/an-a05n01_vg0/shared uuid | awk '{ print $4; }' | sed -e "s/\(.*\)/UUID=\L\1\E/" | |||
</syntaxhighlight> | |||
<syntaxhighlight lang="bash"> | <syntaxhighlight lang="bash"> | ||
UUID=774883e8-d0fe-a068-3969-4bb7dc679960 | |||
</syntaxhighlight> | </syntaxhighlight> | ||
|} | |||
Generally, all but the last two values are separated by tabs. We know that the second field is the mount point for this file system, which is <span class="code">/shared</span> in this case. lets expand the <span class="code">sed</span> call to add a tab followed by the mount point. | |||
{|class="wikitable" | |||
!<span class="code">an-a05n01</span> | |||
|style="white-space: nowrap;"|<syntaxhighlight lang="bash"> | |||
gfs2_tool sb /dev/an-a05n01_vg0/shared uuid | awk '{ print $4; }' | sed -e "s/\(.*\)/UUID=\L\1\E\t\/shared/" | |||
</syntaxhighlight> | |||
<syntaxhighlight lang="bash"> | |||
UUID=774883e8-d0fe-a068-3969-4bb7dc679960 /shared | |||
</syntaxhighlight> | |||
|} | |||
The third entry is the file system type, <span class="code">gfs2</span> in our case. Let's add another tab and the <span class="code">gfs2</span> word. | |||
< | {|class="wikitable" | ||
!<span class="code">an-a05n01</span> | |||
|style="white-space: nowrap;"|<syntaxhighlight lang="bash"> | |||
gfs2_tool sb /dev/an-a05n01_vg0/shared uuid | awk '{ print $4; }' | sed -e "s/\(.*\)/UUID=\L\1\E\t\/shared\tgfs2/" | |||
</syntaxhighlight> | |||
<syntaxhighlight lang="bash"> | |||
UUID=774883e8-d0fe-a068-3969-4bb7dc679960 /shared gfs2 | |||
</syntaxhighlight> | </syntaxhighlight> | ||
|} | |||
Next up are the file system options. GFS2, being a clustered file system, requires cluster locking. Cluster locks are, relative to non-clustered internal locks, fairly slow. So we also want to reduce the number of writes that hit the partition. Normally, every time you look at a file or directory, a field called "access time", or "<span class="code">atime</span>" for short, gets updated. This is actually a write, which would in turn require a DLM lock. Few people care about access times, so we're going to disable it for files and directories as well. We're to append a couple of option to help here; <span class="code">defaults,noatime,nodiratime</span>. Let's add them to our growing <span class="code">sed</span> call. | |||
{|class="wikitable" | |||
!<span class="code">an-a05n01</span> | |||
<syntaxhighlight lang=" | |style="white-space: nowrap;"|<syntaxhighlight lang="bash"> | ||
gfs2_tool sb /dev/an-a05n01_vg0/shared uuid | awk '{ print $4; }' | sed -e "s/\(.*\)/UUID=\L\1\E\t\/shared\tgfs2\tdefaults,noatime,nodiratime/" | |||
</syntaxhighlight> | |||
<syntaxhighlight lang="bash"> | |||
UUID=774883e8-d0fe-a068-3969-4bb7dc679960 /shared gfs2 defaults,noatime,nodiratime | |||
</syntaxhighlight> | |||
|} | |||
All that is left now are the two last options. We're going to separate these with a single space. Let's finish off the <span class="code">fstab</span> with one last addition to our <span class="code">sed</span>. | |||
{|class="wikitable" | |||
!<span class="code">an-a05n01</span> | |||
|style="white-space: nowrap;"|<syntaxhighlight lang="bash"> | |||
gfs2_tool sb /dev/an-a05n01_vg0/shared uuid | awk '{ print $4; }' | sed -e "s/\(.*\)/UUID=\L\1\E\t\/shared\tgfs2\tdefaults,noatime,nodiratime\t0 0/" | |||
</syntaxhighlight> | |||
<syntaxhighlight lang="bash"> | |||
UUID=774883e8-d0fe-a068-3969-4bb7dc679960 /shared gfs2 defaults,noatime,nodiratime 0 0 | |||
--- | |||
</syntaxhighlight> | </syntaxhighlight> | ||
|} | |||
That's it! | |||
Now | Now, we can add it by simply copy and pasting this line into the file directly. Another bash trick though, as we say in the SSH section, is using bash redirection to append the output of one program onto the end of a file. We'll do a <span class="code">diff</span> immediately after to see that the line was appended properly. | ||
{{note|1=Be sure to use two <span class="code">>></span> brackets! A single "<span class="code">></span>" bracket says "overwrite". Two "<span class="code">>></span>" brackets says "append".}} | |||
<syntaxhighlight lang="bash"> | {|class="wikitable" | ||
!<span class="code">an-a05n01</span> | |||
|style="white-space: nowrap;"|<syntaxhighlight lang="bash"> | |||
gfs2_tool sb /dev/an-a05n01_vg0/shared uuid | awk '/uuid =/ { print $4; }' | sed -e "s/\(.*\)/UUID=\L\1\E \/shared\t\tgfs2\tdefaults,noatime,nodiratime\t0 0/" >> /etc/fstab | |||
diff -u /root/backups/fstab /etc/fstab | |||
</syntaxhighlight> | |||
<syntaxhighlight lang="diff"> | |||
--- /root/backups/fstab 2013-10-28 12:30:07.000000000 -0400 | |||
+++ /etc/fstab 2013-11-01 01:17:33.865210115 -0400 | |||
@@ -13,3 +13,4 @@ | |||
devpts /dev/pts devpts gid=5,mode=620 0 0 | |||
sysfs /sys sysfs defaults 0 0 | |||
proc /proc proc defaults 0 0 | |||
+UUID=774883e8-d0fe-a068-3969-4bb7dc679960 /shared gfs2 defaults,noatime,nodiratime 0 0 | |||
</syntaxhighlight> | |||
|- | |||
!<span class="code">an-a05n02</span> | |||
|style="white-space: nowrap;"|<syntaxhighlight lang="bash"> | |||
gfs2_tool sb /dev/an-a05n01_vg0/shared uuid | awk '/uuid =/ { print $4; }' | sed -e "s/\(.*\)/UUID=\L\1\E \/shared\t\tgfs2\tdefaults,noatime,nodiratime\t0 0/" >> /etc/fstab | |||
diff -u /root/backups/fstab /etc/fstab | |||
</syntaxhighlight> | </syntaxhighlight> | ||
<syntaxhighlight lang=" | <syntaxhighlight lang="diff"> | ||
--- /root/backups/fstab 2013-10-28 12:18:04.000000000 -0400 | |||
+++ /etc/fstab 2013-11-01 01:14:39.035500695 -0400 | |||
@@ -13,3 +13,4 @@ | |||
devpts /dev/pts devpts gid=5,mode=620 0 0 | |||
sysfs /sys sysfs defaults 0 0 | |||
proc /proc proc defaults 0 0 | |||
+UUID=774883e8-d0fe-a068-3969-4bb7dc679960 /shared gfs2 defaults,noatime,nodiratime 0 0 | |||
</syntaxhighlight> | </syntaxhighlight> | ||
|} | |||
This looks good. Note that for this <span class="code">diff</span>, we used the <span class="code">-u</span> option. This shows a couple lines on either side of the changes. We see the existing entries above the new one, so we know we didn't accidentally over-write the existing data. | |||
Now we need to make sure that the <span class="code">/etc/init.d/gfs2</span> daemon can see the new partition. If it can, we know the <span class="code">/etc/fstab</span> entry works properly. | |||
{|class="wikitable" | |||
!<span class="code">an-a05n01</span> | |||
|style="white-space: nowrap;"|<syntaxhighlight lang="bash"> | |||
/etc/init.d/gfs2 status | |||
</syntaxhighlight> | |||
<syntaxhighlight lang="text"> | <syntaxhighlight lang="text"> | ||
Configured GFS2 mountpoints: | |||
/shared | |||
Active GFS2 mountpoints: | |||
/shared | |||
</syntaxhighlight> | </syntaxhighlight> | ||
|- | |||
!<span class="code">an-a05n02</span> | |||
|style="white-space: nowrap;"|<syntaxhighlight lang="bash"> | |||
<syntaxhighlight lang="bash"> | /etc/init.d/gfs2 status | ||
</syntaxhighlight> | </syntaxhighlight> | ||
<syntaxhighlight lang="text"> | <syntaxhighlight lang="text"> | ||
Configured GFS2 mountpoints: | |||
/shared | |||
Active GFS2 mountpoints: | |||
/shared | |||
</syntaxhighlight> | |||
|} | |||
That works. | |||
The last test is to create our sub-directories we talked about earlier. We'll do this on <span class="code">an-a05n01</span>, then we will do a simple <span class="code">ls</span> on <span class="code">an-a05n02</span>. If everything is working properly, we should see the new directories immediately. | |||
{|class="wikitable" | |||
!<span class="code">an-a05n01</span> | |||
|style="white-space: nowrap;"|<syntaxhighlight lang="bash"> | |||
mkdir /shared/{definitions,provision,archive,files} | |||
</syntaxhighlight> | </syntaxhighlight> | ||
|- | |||
!<span class="code">an-a05n02</span> | |||
|style="white-space: nowrap;"|<syntaxhighlight lang="bash"> | |||
<syntaxhighlight lang="bash"> | ls -lah /shared/ | ||
</syntaxhighlight> | </syntaxhighlight> | ||
<syntaxhighlight lang="text"> | <syntaxhighlight lang="text"> | ||
total 40K | |||
drwxr-xr-x. 6 root root 3.8K Nov 1 01:23 . | |||
dr-xr-xr-x. 24 root root 4.0K Oct 31 21:02 .. | |||
drwxr-xr-x. 2 root root 3.8K Nov 1 01:23 archive | |||
drwxr-xr-x. 2 root root 3.8K Nov 1 01:23 definitions | |||
drwxr-xr-x. 2 root root 3.8K Nov 1 01:23 files | |||
drwxr-xr-x. 2 root root 3.8K Nov 1 01:23 provision | |||
</syntaxhighlight> | </syntaxhighlight> | ||
|} | |||
Fantastic! | |||
Our clustered storage is complete. The last thing we need to do is to move the clustered storage to <span class="code">rgmanager</span> now. | |||
=== Stopping All Clustered Storage Components === | |||
In the next step, we're going to put <span class="code">gfs2</span>, <span class="code">clvmd</span> and <span class="code">drbd</span> under the cluster's control. Let's stop these daemons now so we can see them be started by <span class="code">rgmanager</span> shortly. | |||
<syntaxhighlight lang="bash"> | {|class="wikitable" | ||
!<span class="code">an-a05n01</span> | |||
|style="white-space: nowrap;"|<syntaxhighlight lang="bash"> | |||
/etc/init.d/gfs2 stop && /etc/init.d/clvmd stop && /etc/init.d/drbd stop | |||
</syntaxhighlight> | </syntaxhighlight> | ||
<syntaxhighlight lang="text"> | <syntaxhighlight lang="text"> | ||
Unmounting GFS2 filesystem (/shared): [ OK ] | |||
Deactivating clustered VG(s): 0 logical volume(s) in volume group "an-a05n02_vg0" now active | |||
0 logical volume(s) in volume group "an-a05n01_vg0" now active | |||
[ OK ] | |||
Signaling clvmd to exit [ OK ] | |||
clvmd terminated [ OK ] | |||
Stopping all DRBD resources: . | |||
</syntaxhighlight> | </syntaxhighlight> | ||
|- | |||
!<span class="code">an-a05n02</span> | |||
|style="white-space: nowrap;"|<syntaxhighlight lang="bash"> | |||
/etc/init.d/gfs2 stop && /etc/init.d/clvmd stop && /etc/init.d/drbd stop | |||
<syntaxhighlight lang="bash"> | |||
</syntaxhighlight> | </syntaxhighlight> | ||
<syntaxhighlight lang="text"> | <syntaxhighlight lang="text"> | ||
Unmounting GFS2 filesystem (/shared): [ OK ] | |||
Deactivating clustered VG(s): 0 logical volume(s) in volume group "an-a05n02_vg0" now active | |||
clvmd not running on node an-a05n01.alteeve.ca | |||
0 logical volume(s) in volume group "an-a05n01_vg0" now active | |||
clvmd not running on node an-a05n01.alteeve.ca | |||
[ OK ] | |||
Signaling clvmd to exit [ OK ] | |||
clvmd terminated [ OK ] | |||
Stopping all DRBD resources: . | |||
</syntaxhighlight> | </syntaxhighlight> | ||
|} | |||
Done. | |||
= Managing Storage In The Cluster = | |||
A little while back, we spoke about how the cluster is split into two components; cluster communication managed by <span class="code">cman</span> and resource management provided by <span class="code">rgmanager</span>. It is the later which we will now begin to configure. | |||
< | In the <span class="code">cluster.conf</span>, the <span class="code">rgmanager</span> component is contained within the <span class="code"><rm /></span> element tags. Within this element are three types of child elements. They are: | ||
</ | |||
< | |||
* Fail-over Domains - <span class="code"><failoverdomains /></span>; | |||
** These are optional constraints which allow for control which nodes, and under what circumstances, services may run. When not used, a service will be allowed to run on any node in the cluster without constraints or ordering. | |||
* Resources - <span class="code"><resources /></span>; | |||
** Within this element, available resources are defined. Simply having a resource here will not put it under cluster control. Rather, it makes it available for use in <span class="code"><service /></span> elements. | |||
* Services - <span class="code"><service /></span>; | |||
** This element contains one or more parallel or series child-elements which are themselves references to <span class="code"><resources /></span> elements. When in parallel, the services will start and stop at the same time. When in series, the services start in order and stop in reverse order. We will also see a specialized type of service that uses the <span class="code"><vm /></span> element name, as you can probably guess, for creating virtual machine services. | |||
We'll look at each of these components in more detail shortly. | |||
== A Note on Daemon Starting == | |||
== | {{note|1=Readers of the old tutorial will notice that <span class="code">libvirtd</span> has been removed. We found that, in rare occasions, bleeding-edge client software, like modern versions of "Virtual Machine Manager" of Fedora workstations, connecting to the <span class="code">libvirtd</span> daemon could cause it to crash. This didn't interfere with the servers, but the cluster would try to fail the storage stack, causing the service to enter a failed state. This left servers running, but it is a mess to clean up that is easily avoided by simply removing <span class="code">libvirtd</span> from the storage stack. To address this, we will monitor the <span class="code">libvirtd</span> as its own service. Should it fail, it will restart without impacting the storage daemons.}} | ||
There are four daemons we will be putting under cluster control: | |||
* <span class="code">drbd</span>; Replicated storage. | |||
* <span class="code">clvmd</span>; Clustered LVM. | |||
* <span class="code">gfs2</span>; Mounts and Unmounts configured GFS2 partition. We will manage this using the <span class="code">clusterfs</span> resource agent. | |||
* <span class="code">libvirtd</span>; Enables access to the KVM hypervisor via the <span class="code">libvirtd</span> suite of tools. | |||
The reason we do not want to start these daemons with the system is so that we can let the cluster do it. This way, should any fail, the cluster will detect the failure and fail the entire service tree. | |||
For example, lets say that <span class="code">drbd</span> failed to start, <span class="code">rgmanager</span> would fail the storage service and give up, rather than continue trying to start <span class="code">clvmd</span> and the rest. | |||
If we had left these daemons to start on boot, the failure of the <span class="code">drbd</span> would not effect the start-up of <span class="code">clvmd</span>, which would then not find its [[PV]]s given that DRBD is down. The system would then try to start the <span class="code">gfs2</span> daemon which would also fail as the [[LV]] backing the partition would not be available. | |||
</ | |||
=== Defining the Resources === | |||
< | {{note|1=All of these edits will be done on <span class="code">an-a05n01</span>. Once we're done and the config has been validated, we'll use the cluster's <span class="code">cman_tool</span> to push the update to <span class="code">an-a05n02</span> and update the running cluster's config.}} | ||
</ | |||
< | |||
</ | |||
Lets start by first defining our clustered resources. | |||
< | As stated before, the addition of these resources does not, in itself, put the defined resources under the cluster's management. Instead, it defines services, like <span class="code">init.d</span> scripts. These can then be used by one or more <span class="code"><service /></span> elements, as we will see shortly. For now, it is enough to know what, until a resource is defined, it can not be used in the cluster. | ||
</ | |||
Given that this is the first component of <span class="code">rgmanager</span> being added to <span class="code">cluster.conf</span>, we will be creating the parent <span class="code"><rm /></span> elements here as well. | |||
Let's take a look at the new section, then discuss the parts. | |||
{|class="wikitable" | |||
!<span class="code">an-a05n01</span> | |||
|style="white-space: nowrap;"|<syntaxhighlight lang="xml"> | |||
<?xml version="1.0"?> | |||
<cluster name="an-anvil-05" config_version="8"> | |||
<cman expected_votes="1" two_node="1" /> | |||
<clusternodes> | |||
<clusternode name="an-a05n01.alteeve.ca" nodeid="1"> | |||
<fence> | |||
<method name="ipmi"> | |||
<device name="ipmi_n01" action="reboot" delay="15" /> | |||
</method> | |||
<method name="pdu"> | |||
<device name="pdu1" port="1" action="reboot" /> | |||
<device name="pdu2" port="1" action="reboot" /> | |||
</method> | |||
</fence> | |||
</clusternode> | |||
<clusternode name="an-a05n02.alteeve.ca" nodeid="2"> | |||
<fence> | |||
<method name="ipmi"> | |||
<device name="ipmi_n02" action="reboot" /> | |||
</method> | |||
<method name="pdu"> | |||
<device name="pdu1" port="2" action="reboot" /> | |||
<device name="pdu2" port="2" action="reboot" /> | |||
</method> | |||
</fence> | |||
</clusternode> | |||
</clusternodes> | |||
<fencedevices> | |||
<fencedevice name="ipmi_n01" agent="fence_ipmilan" ipaddr="an-a05n01.ipmi" login="admin" passwd="secret" /> | |||
<fencedevice name="ipmi_n02" agent="fence_ipmilan" ipaddr="an-a05n02.ipmi" login="admin" passwd="secret" /> | |||
<fencedevice agent="fence_apc_snmp" ipaddr="an-pdu01.alteeve.ca" name="pdu1" /> | |||
<fencedevice agent="fence_apc_snmp" ipaddr="an-pdu02.alteeve.ca" name="pdu2" /> | |||
</fencedevices> | |||
<fence_daemon post_join_delay="30" /> | |||
<totem rrp_mode="none" secauth="off"/> | |||
<rm log_level="5"> | |||
<resources> | |||
<script file="/etc/init.d/drbd" name="drbd"/> | |||
<script file="/etc/init.d/clvmd" name="clvmd"/> | |||
<clusterfs device="/dev/an-a05n01_vg0/shared" force_unmount="1" fstype="gfs2" mountpoint="/shared" name="sharedfs" /> | |||
<script file="/etc/init.d/libvirtd" name="libvirtd"/> | |||
</resources> | |||
</rm> | |||
</cluster> | |||
</syntaxhighlight> | </syntaxhighlight> | ||
|} | |||
First and foremost; Note that we've incremented the configuration version to <span class="code">8</span>. As always, "increment and then edit". | |||
Let's focus on the new section; | |||
{|class="wikitable" | |||
!<span class="code">an-a05n01</span> | |||
<syntaxhighlight lang=" | |style="white-space: nowrap;"|<syntaxhighlight lang="xml"> | ||
<rm log_level="5"> | |||
<resources> | |||
<script file="/etc/init.d/drbd" name="drbd"/> | |||
<script file="/etc/init.d/clvmd" name="clvmd"/> | |||
<clusterfs device="/dev/an-a05n01_vg0/shared" force_unmount="1" fstype="gfs2" mountpoint="/shared" name="sharedfs" /> | |||
<script file="/etc/init.d/libvirtd" name="libvirtd"/> | |||
</resources> | |||
</rm> | |||
</syntaxhighlight> | </syntaxhighlight> | ||
|} | |||
We've added the attribute <span class="code">log_level="5"</span> to the <span class="code"><rm></span> element to cut down on the log entries in <span class="code">/var/log/messages</span>. Every 10 seconds, <span class="code">rgmanager</span> calls <span class="code">/etc/init.d/$foo status</span> on all script services. At the default log, these checks are logged. So without this, every ten seconds, four status messages would be printed to the system log. That can make is difficult when <span class="code">tail</span>'ing the logs when testing or debugging. | |||
< | The <span class="code"><resources>...</resources></span> element contains our four <span class="code"><script .../></span> resources. This is a particular type of resource which specifically handles that starting and stopping of <span class="code">[[init.d]]</span> style scripts. That is, the script must exit with [[LSB]] compliant codes. They must also properly react to being called with the sole argument of <span class="code">start</span>, <span class="code">stop</span> and <span class="code">status</span>. | ||
</ | |||
< | |||
There are many other types of resources which, with the exception of <span class="code"><vm .../></span>, we will not be looking at in this tutorial. Should you be interested in them, please look in <span class="code">/usr/share/cluster</span> for the various scripts (executable files that end with <span class="code">.sh</span>). | |||
Each of our four <span class="code"><script ... /></span> resources have two attributes: | |||
</ | |||
* <span class="code">file="..."</span>; The full path to the script to be managed. | |||
* <span class="code">name="..."</span>; A unique name used to reference this resource later on in the <span class="code"><service /></span> elements. | |||
< | Other resources are more involved, but the <span class="code"><script .../></span> resources are quite simple. | ||
</ | |||
</ | |||
=== Creating Failover Domains === | |||
Fail-over domains are, at their most basic, a collection of one or more nodes in the cluster with a particular set of rules associated with them. Services can then be configured to operate within the context of a given fail-over domain. There are a few key options to be aware of. | |||
Fail-over domains are optional and can be left out of the cluster, generally speaking. However, in our cluster, we will need them for our storage services, as we will later see, so please do not skip this step. | |||
< | * A fail-over domain can be unordered or prioritized. | ||
** When unordered, a service will start on any node in the domain. Should that node later fail, it will restart to another random node in the domain. | |||
</ | ** When prioritized, a service will start on the available node with the highest priority in the domain. Should that node later fail, the service will restart on the available node with the next highest priority. | ||
< | * A fail-over domain can be restricted or unrestricted. | ||
** When restricted, a service is '''only''' allowed to start on, or restart on. a nodes in the domain. When no nodes are available, the service will be stopped. | |||
** When unrestricted, a service will try to start on, or restart on, a node in the domain. However, when no domain members are available, the cluster will pick another available node at random to start the service on. | |||
* A fail-over domain can have a fail-back policy. | |||
** When a domain allows for fail-back and the domain is ordered, and a node with a higher <span class="code">priority</span> (re)joins the cluster, services within the domain will migrate to that higher-priority node. This allows for automated restoration of services on a failed node when it rejoins the cluster. | |||
** When a domain does not allow for fail-back, but is unrestricted, fail-back of services that fell out of the domain will happen anyway. That is to say, <span class="code">nofailback="1"</span> is ignored if a service was running on a node outside of the fail-over domain and a node within the domain joins the cluster. However, once the service is on a node within the domain, the service will '''not''' relocate to a higher-priority node should one join the cluster later. | |||
** When a domain does not allow for fail-back and is restricted, then fail-back of services will never occur. | |||
What we need to do at this stage is to create something of a hack. Let me explain; | |||
As discussed earlier, we need to start a set of local daemons on all nodes. These aren't really clustered resources though as they can only ever run on their host node. They will never be relocated or restarted elsewhere in the cluster as as such, are not highly available. So to work around this desire to "cluster the unclusterable", we're going to create a fail-over domain for each node in the cluster. Each of these domains will have only one of the cluster nodes as members of the domain and the domain will be restricted, unordered and have no fail-back. With this configuration, any service group using it will only ever run on the one node in the domain. | |||
In the next step, we will create a service group, then replicate it once for each node in the cluster. The only difference will be the <span class="code">failoverdomain</span> each is set to use. With our configuration of two nodes then, we will have two fail-over domains, one for each node, and we will define the clustered storage service twice, each one using one of the two fail-over domains. | |||
<syntaxhighlight lang=" | Let's look at the complete updated <span class="code">cluster.conf</span>, then we will focus closer on the new section. | ||
{|class="wikitable" | |||
!<span class="code">an-a05n01</span> | |||
|style="white-space: nowrap;"|<syntaxhighlight lang="xml"> | |||
<?xml version="1.0"?> | |||
<cluster name="an-anvil-05" config_version="9"> | |||
<cman expected_votes="1" two_node="1" /> | |||
<clusternodes> | |||
<clusternode name="an-a05n01.alteeve.ca" nodeid="1"> | |||
<fence> | |||
<method name="ipmi"> | |||
<device name="ipmi_n01" action="reboot" delay="15" /> | |||
</method> | |||
<method name="pdu"> | |||
<device name="pdu1" port="1" action="reboot" /> | |||
<device name="pdu2" port="1" action="reboot" /> | |||
</method> | |||
</fence> | |||
</clusternode> | |||
<clusternode name="an-a05n02.alteeve.ca" nodeid="2"> | |||
<fence> | |||
<method name="ipmi"> | |||
<device name="ipmi_n02" action="reboot" /> | |||
</method> | |||
<method name="pdu"> | |||
<device name="pdu1" port="2" action="reboot" /> | |||
<device name="pdu2" port="2" action="reboot" /> | |||
</method> | |||
</fence> | |||
</clusternode> | |||
</clusternodes> | |||
<fencedevices> | |||
<fencedevice name="ipmi_n01" agent="fence_ipmilan" ipaddr="an-a05n01.ipmi" login="admin" passwd="secret" /> | |||
<fencedevice name="ipmi_n02" agent="fence_ipmilan" ipaddr="an-a05n02.ipmi" login="admin" passwd="secret" /> | |||
<fencedevice agent="fence_apc_snmp" ipaddr="an-pdu01.alteeve.ca" name="pdu1" /> | |||
<fencedevice agent="fence_apc_snmp" ipaddr="an-pdu02.alteeve.ca" name="pdu2" /> | |||
</fencedevices> | |||
<fence_daemon post_join_delay="30" /> | |||
<totem rrp_mode="none" secauth="off"/> | |||
<rm log_level="5"> | |||
<resources> | |||
<script file="/etc/init.d/drbd" name="drbd"/> | |||
<script file="/etc/init.d/clvmd" name="clvmd"/> | |||
<clusterfs device="/dev/an-a05n01_vg0/shared" force_unmount="1" fstype="gfs2" mountpoint="/shared" name="sharedfs" /> | |||
<script file="/etc/init.d/libvirtd" name="libvirtd"/> | |||
</resources> | |||
<failoverdomains> | |||
<failoverdomain name="only_n01" nofailback="1" ordered="0" restricted="1"> | |||
<failoverdomainnode name="an-a05n01.alteeve.ca"/> | |||
</failoverdomain> | |||
<failoverdomain name="only_n02" nofailback="1" ordered="0" restricted="1"> | |||
<failoverdomainnode name="an-a05n02.alteeve.ca"/> | |||
</failoverdomain> | |||
</failoverdomains> | |||
</rm> | |||
</cluster> | |||
</syntaxhighlight> | </syntaxhighlight> | ||
|} | |||
As always, the version was incremented, this time to <span class="code">9</span>. We've also added the new <span class="code"><failoverdomains>...</failoverdomains></span> element. Let's take a closer look at this new element. | |||
{|class="wikitable" | |||
!<span class="code">an-a05n01</span> | |||
|style="white-space: nowrap;"|<syntaxhighlight lang="xml"> | |||
<failoverdomains> | |||
<failoverdomain name="only_n01" nofailback="1" ordered="0" restricted="1"> | |||
<failoverdomainnode name="an-a05n01.alteeve.ca"/> | |||
</failoverdomain> | |||
<failoverdomain name="only_n02" nofailback="1" ordered="0" restricted="1"> | |||
<failoverdomainnode name="an-a05n02.alteeve.ca"/> | |||
</failoverdomain> | |||
</failoverdomains> | |||
</syntaxhighlight> | </syntaxhighlight> | ||
|} | |||
The first thing to note is that there are two <span class="code"><failoverdomain...>...</failoverdomain></span> child elements: | |||
== | * The first has the name <span class="code">only_n01</span> and contains only the node <span class="code">an-a05n01</span> as a member. | ||
* The second is effectively identical, save that the domain's name is <span class="code">only_n02</span> and it contains only the node <span class="code">an-a05n02</span> as a member. | |||
The <span class="code"><failoverdomain ...></span> element has four attributes: | |||
* The <span class="code">name="..."</span> attribute sets the unique name of the domain which we will later use to bind a service to the domain. | |||
* The <span class="code">nofailback="1"</span> attribute tells the cluster to never "fail back" any services in this domain. This seems redundant, given there is only one node, but when combined with <span class="code">restricted="0"</span>, prevents any migration of services. | |||
< | * The <span class="code">ordered="0"</span> this is also somewhat redundant in that there is only one node defined in the domain, but I don't like to leave attributes undefined so I have it here. | ||
* The <span class="code">restricted="1"</span> attribute is key in that it tells the cluster to '''not''' try to restart services within this domain on any other nodes outside of the one defined in the fail-over domain. | |||
</ | |||
< | |||
Each of the <span class="code"><failoverdomain...></span> elements has a single <span class="code"><failoverdomainnode .../></span> child element. This is a very simple element which has, at this time, only one attribute: | |||
* <span class="code">name="..."</span>; The name of the node to include in the fail-over domain. This name must match the corresponding <span class="code"><clusternode name="..."</span> node name. | |||
</ | |||
At this point, we're ready to finally create our clustered storage and <span class="code">libvirtd</span> monitoring services. | |||
=== Creating Clustered Storage and libvirtd Service === | |||
With the resources defined and the fail-over domains created, we can set about creating our services. | |||
Generally speaking, services can have one or more resources within them. When two or more resources exist, then can be put into a dependency tree, they can used in parallel or a combination of parallel and dependent resources. | |||
When you create a service dependency tree, you put each dependent resource as a child element of its parent. The resources are then started in order, starting at the top of the tree and working its way down to the deepest child resource. If at any time one of the resources should fail, the entire service will be declared failed and no attempt will be made to try and start any further child resources. Conversely, stopping the service will cause the deepest child resource to be stopped first. Then the second deepest and on upwards towards the top resource. This is exactly the behaviour we want, as we will see shortly. | |||
When resources are defined in parallel, all defined resources will be started at the same time. Should any one of the resources fail to start, the entire resource will be declared failed. Stopping the service will likewise cause a simultaneous call to stop all resources. | |||
As before, let's take a look at the entire updated <span class="code">cluster.conf</span> file, then we'll focus in on the new service section. | |||
{|class="wikitable" | |||
!<span class="code">an-a05n01</span> | |||
|style="white-space: nowrap;"|<syntaxhighlight lang="xml"> | |||
<?xml version="1.0"?> | |||
<cluster name="an-anvil-05" config_version="10"> | |||
<cman expected_votes="1" two_node="1" /> | |||
<clusternodes> | |||
<clusternode name="an-a05n01.alteeve.ca" nodeid="1"> | |||
</ | <fence> | ||
<method name="ipmi"> | |||
<device name="ipmi_n01" action="reboot" delay="15" /> | |||
</method> | |||
< | <method name="pdu"> | ||
<device name="pdu1" port="1" action="reboot" /> | |||
</ | <device name="pdu2" port="1" action="reboot" /> | ||
< | </method> | ||
</fence> | |||
</ | </clusternode> | ||
<clusternode name="an-a05n02.alteeve.ca" nodeid="2"> | |||
<fence> | |||
<method name="ipmi"> | |||
< | <device name="ipmi_n02" action="reboot" /> | ||
</method> | |||
<method name="pdu"> | |||
<device name="pdu1" port="2" action="reboot" /> | |||
<device name="pdu2" port="2" action="reboot" /> | |||
</method> | |||
</fence> | |||
</clusternode> | |||
</clusternodes> | |||
<fencedevices> | |||
<fencedevice name="ipmi_n01" agent="fence_ipmilan" ipaddr="an-a05n01.ipmi" login="admin" passwd="secret" /> | |||
<fencedevice name="ipmi_n02" agent="fence_ipmilan" ipaddr="an-a05n02.ipmi" login="admin" passwd="secret" /> | |||
<fencedevice agent="fence_apc_snmp" ipaddr="an-pdu01.alteeve.ca" name="pdu1" /> | |||
</ | <fencedevice agent="fence_apc_snmp" ipaddr="an-pdu02.alteeve.ca" name="pdu2" /> | ||
</fencedevices> | |||
<fence_daemon post_join_delay="30" /> | |||
<totem rrp_mode="none" secauth="off"/> | |||
< | <rm log_level="5"> | ||
<resources> | |||
<script file="/etc/init.d/drbd" name="drbd"/> | |||
<script file="/etc/init.d/clvmd" name="clvmd"/> | |||
<clusterfs device="/dev/an-a05n01_vg0/shared" force_unmount="1" fstype="gfs2" mountpoint="/shared" name="sharedfs" /> | |||
<script file="/etc/init.d/libvirtd" name="libvirtd"/> | |||
</resources> | |||
<failoverdomains> | |||
<failoverdomain name="only_n01" nofailback="1" ordered="0" restricted="1"> | |||
<failoverdomainnode name="an-a05n01.alteeve.ca"/> | |||
</failoverdomain> | |||
<failoverdomain name="only_n02" nofailback="1" ordered="0" restricted="1"> | |||
<failoverdomainnode name="an-a05n02.alteeve.ca"/> | |||
</failoverdomain> | |||
</failoverdomains> | |||
<service name="storage_n01" autostart="1" domain="only_n01" exclusive="0" recovery="restart"> | |||
<script ref="drbd"> | |||
<script ref="clvmd"> | |||
<clusterfs ref="sharedfs"/> | |||
</script> | |||
</script> | |||
</service> | |||
<service name="storage_n02" autostart="1" domain="only_n02" exclusive="0" recovery="restart"> | |||
<script ref="drbd"> | |||
<script ref="clvmd"> | |||
<clusterfs ref="sharedfs"/> | |||
</script> | |||
</script> | |||
</service> | |||
<service name="libvirtd_n01" autostart="1" domain="only_n01" exclusive="0" recovery="restart"> | |||
<script ref="libvirtd"/> | |||
</service> | |||
<service name="libvirtd_n02" autostart="1" domain="only_n02" exclusive="0" recovery="restart"> | |||
<script ref="libvirtd"/> | |||
</service> | |||
</rm> | |||
</cluster> | |||
</syntaxhighlight> | </syntaxhighlight> | ||
|} | |||
With the version now at <span class="code">10</span>, we have added four <span class="code"><service...>...</service></span> elements. Two of which contain the storage resources in a service tree configuration. The other two have a single <span class="code">libvirtd</span> resource for managing the hypervisors. | |||
Let's take a closer look. | |||
{|class="wikitable" | |||
!<span class="code">an-a05n01</span> | |||
< | |style="white-space: nowrap;"|<syntaxhighlight lang="xml"> | ||
<failoverdomains> | |||
</ | <failoverdomain name="only_n01" nofailback="1" ordered="0" restricted="1"> | ||
< | <failoverdomainnode name="an-a05n01.alteeve.ca"/> | ||
</failoverdomain> | |||
</ | <failoverdomain name="only_n02" nofailback="1" ordered="0" restricted="1"> | ||
<failoverdomainnode name="an-a05n02.alteeve.ca"/> | |||
</failoverdomain> | |||
</failoverdomains> | |||
< | <service name="storage_n01" autostart="1" domain="only_n01" exclusive="0" recovery="restart"> | ||
<script ref="drbd"> | |||
<script ref="clvmd"> | |||
<clusterfs ref="sharedfs"/> | |||
</script> | |||
</script> | |||
</service> | |||
<service name="storage_n02" autostart="1" domain="only_n02" exclusive="0" recovery="restart"> | |||
<script ref="drbd"> | |||
<script ref="clvmd"> | |||
<clusterfs ref="sharedfs"/> | |||
</script> | |||
</script> | |||
</service> | |||
<service name="libvirtd_n01" autostart="1" domain="only_n01" exclusive="0" recovery="restart"> | |||
<script ref="libvirtd"/> | |||
</service> | |||
<service name="libvirtd_n02" autostart="1" domain="only_n02" exclusive="0" recovery="restart"> | |||
<script ref="libvirtd"/> | |||
</service> | |||
</syntaxhighlight> | </syntaxhighlight> | ||
|} | |||
The <span class="code"><service ...>...</service></span> elements have five attributes each: | |||
< | * The <span class="code">name="..."</span> attribute is a unique name that will be used to identify the service, as we will see later. | ||
* The <span class="code">autostart="1"</span> attribute tells the cluster that, when it starts, it should automatically start this service. | |||
</ | * The <span class="code">domain="..."</span> attribute tells the cluster which fail-over domain this service must run within. The two otherwise identical services each point to a different fail-over domain, as we discussed in the previous section. | ||
< | * The <span class="code">exclusive="0"</span> attribute tells the cluster that a node running this service '''is''' allowed to to have other services running as well. | ||
* The <span class="code">recovery="restart"</span> attribute sets the service recovery policy. As the name implies, the cluster will try to restart this service should it fail. Should the service fail multiple times in a row, it will be disabled. The exact number of failures allowed before disabling is configurable using the optional <span class="code">max_restarts</span> and <span class="code">restart_expire_time</span> attributes, which are not covered here. | |||
{{warning|1=It is a fairly common mistake to interpret <span class="code">exclusive</span> to mean that a service is only allowed to run on one node at a time. This is not the case, please do not use this attribute incorrectly.}} | |||
Within each of the two first two <span class="code"><service ...>...</service></span> attributes are two <span class="code"><script...></span> type resources and a <span class="code">clusterfs</span> type resource. These are configured as a service tree in the order: | |||
</ | |||
* <span class="code">drbd</span> -> <span class="code">clvmd</span> -> <span class="code">clusterfs</span>. | |||
< | The other two <span class="code"><service ...>...</service></span> elements are there to simply monitor the <span class="code">libvirtd</span> daemon on each node. Should it fail for any reason, the cluster will restart the service right away. | ||
</ | |||
< | |||
</ | |||
Each of these <span class="code"><script ...></span> elements has just one attribute; <span class="code">ref="..."</span> which points to a corresponding <span class="code">script</span> resource. | |||
The <span class="code">clusterfs</span> element has five attributes: | |||
</ | |||
* <span class="code">name</span> is the name used to reference this resource in the service tree. | |||
* <span class="code">device</span> is the logical volume we formatted as a <span class="code">gfs2</span> file system. | |||
* <span class="code">force_unmount</span>, when set to <span class="code">1</span>, tells the system to try and kill any processes that might be holding the mount open. This is useful if, for example, you left a terminal window open where you had browsed into <span class="code">/shared</span>. Without it, the service would fail and restart. | |||
* <span class="code">fstype</span> is the file system type. If you do not specify this, the system will try to determine it automatically. To be safe, we will set it. | |||
* <span class="code">mountpoint</span> is where the <span class="code">device</span> should be mounted. | |||
The logic for the storage resource tree is: | |||
* DRBD needs to start so that the bare clustered storage devices become available. | |||
* Clustered LVM must next start so that the logical volumes used by GFS2 and our VMs become available. | |||
* Finally, the GFS2 partition contains the [[XML]] definition files needed to start our servers, host shared files and so on. | |||
From the other direction, we need the stop order to be organized in the reverse order: | |||
* We need the GFS2 partition to unmount first. | |||
* With the GFS2 partition stopped, we can safely say that all LVs are no longer in use and thus <span class="code">clvmd</span> can stop. | |||
* With Clustered LVM now stopped, nothing should be using our DRBD resources any more, so we can safely stop them, too. | |||
All in all, it's a surprisingly simple and effective configuration. | |||
== Validating and Pushing the Changes == | |||
We've made a big change, so it's all the more important that we validate the config before proceeding. | |||
{|class="wikitable" | |||
!<span class="code">an-a05n01</span> | |||
<syntaxhighlight lang="bash"> | |style="white-space: nowrap;"|<syntaxhighlight lang="bash"> | ||
ccs_config_validate | |||
</syntaxhighlight> | </syntaxhighlight> | ||
<syntaxhighlight lang="text"> | <syntaxhighlight lang="text"> | ||
Configuration validates | |||
</syntaxhighlight> | |||
|- | |||
!<span class="code">an-a05n02</span> | |||
|style="white-space: nowrap;"|<syntaxhighlight lang="bash"> | |||
cman_tool version | |||
</syntaxhighlight> | </syntaxhighlight> | ||
<syntaxhighlight lang="text"> | <syntaxhighlight lang="text"> | ||
6.2.0 config 7 | |||
</syntaxhighlight> | </syntaxhighlight> | ||
|} | |||
Good, no errors and we checked that the current cluster configuration version is <span class="code">7</span>. | |||
We need to now tell the cluster to use the new configuration file. Unlike last time, we won't use <span class="code">rsync</span>. Now that the cluster is up and running, we can use it to push out the updated configuration file using <span class="code">cman_tool</span>. This is the first time we've used the cluster to push out an updated <span class="code">cluster.conf</span> file, so we will have to enter the password we set earlier for the <span class="code">ricci</span> user on both nodes. | |||
<syntaxhighlight lang="bash"> | {|class="wikitable" | ||
!<span class="code">an-a05n01</span> | |||
|style="white-space: nowrap;"|<syntaxhighlight lang="bash"> | |||
cman_tool version -r | |||
</syntaxhighlight> | </syntaxhighlight> | ||
<syntaxhighlight lang="text"> | <syntaxhighlight lang="text"> | ||
You have not authenticated to the ricci daemon on an-a05n01.alteeve.ca | |||
</syntaxhighlight> | </syntaxhighlight> | ||
<syntaxhighlight lang="text"> | |||
Password: | |||
<syntaxhighlight lang=" | |||
</syntaxhighlight> | </syntaxhighlight> | ||
<syntaxhighlight lang="text"> | <syntaxhighlight lang="text"> | ||
You have not authenticated to the ricci daemon on an-a05n02.alteeve.ca | |||
</syntaxhighlight> | </syntaxhighlight> | ||
<syntaxhighlight lang="text"> | <syntaxhighlight lang="text"> | ||
Password: | |||
</syntaxhighlight> | </syntaxhighlight> | ||
|- | |||
!<span class="code">an-a05n02</span> | |||
|style="white-space: nowrap;"|<syntaxhighlight lang="bash"> | |||
<syntaxhighlight lang="bash"> | cman_tool version | ||
</syntaxhighlight> | </syntaxhighlight> | ||
<syntaxhighlight lang="text"> | <syntaxhighlight lang="text"> | ||
6.2.0 config 10 | |||
</syntaxhighlight> | |||
|} | |||
As confirmed on <span class="code">an-a05n02</span>, the new configuration loaded properly! Note as well that we had to enter the <span class="code">ricci</span> user's password for both nodes. Once done, you will not have to do that again on <span class="code">an-a05n01</span>. Later, if you push an update from <span class="code">an-a05n02</span>, you will need to enter the passwords once again, but not after that. You authenticate from a node only one time. | |||
If you were watching syslog, you will have seen an entries like the ones below. | |||
{|class="wikitable" | |||
!<span class="code">an-a05n01</span> | |||
<syntaxhighlight lang=" | |style="white-space: nowrap;"|<syntaxhighlight lang="text"> | ||
virsh | Nov 1 17:47:48 an-a05n01 ricci[26853]: Executing '/usr/bin/virsh nodeinfo' | ||
Nov 1 17:47:50 an-a05n01 ricci[26856]: Executing '/usr/libexec/ricci/ricci-worker -f /var/lib/ricci/queue/533317550' | |||
Nov 1 17:47:50 an-a05n01 modcluster: Updating cluster.conf | |||
Nov 1 17:47:50 an-a05n01 corosync[6448]: [QUORUM] Members[2]: 1 2 | |||
</syntaxhighlight> | </syntaxhighlight> | ||
<syntaxhighlight lang="text"> | |- | ||
!<span class="code">an-a05n02</span> | |||
|style="white-space: nowrap;"|<syntaxhighlight lang="text"> | |||
Nov 1 17:47:50 an-a05n02 ricci[26653]: Executing '/usr/bin/virsh nodeinfo' | |||
Nov 1 17:47:50 an-a05n02 ricci[26656]: Executing '/usr/libexec/ricci/ricci-worker -f /var/lib/ricci/queue/15604613' | |||
Nov 1 17:47:50 an-a05n02 modcluster: Updating cluster.conf | |||
Nov 1 17:47:50 an-a05n02 corosync[6404]: [QUORUM] Members[2]: 1 2 | |||
</syntaxhighlight> | </syntaxhighlight> | ||
|} | |||
== Checking the Cluster's Status == | |||
< | Now let's look at a new tool; <span class="code">clustat</span>, '''clu'''ster '''stat'''us. We'll be using <span class="code">clustat</span> extensively from here on out to monitor the status of the cluster members and managed services. It does not manage the cluster in any way, it is simply a status tool. | ||
</ | |||
Let's take a look. | |||
<syntaxhighlight lang="bash"> | {|class="wikitable" | ||
clustat | !<span class="code">an-a05n01</span> | ||
|style="white-space: nowrap;"|<syntaxhighlight lang="bash"> | |||
clustat | |||
</syntaxhighlight> | </syntaxhighlight> | ||
<syntaxhighlight lang="text"> | <syntaxhighlight lang="text"> | ||
Cluster Status for an- | Cluster Status for an-anvil-05 @ Fri Nov 1 18:08:20 2013 | ||
Member Status: Quorate | Member Status: Quorate | ||
Member Name | Member Name ID Status | ||
------ ---- | ------ ---- ---- ------ | ||
an- | an-a05n01.alteeve.ca 1 Online, Local | ||
an- | an-a05n02.alteeve.ca 2 Online | ||
</syntaxhighlight> | </syntaxhighlight> | ||
|- | |||
!<span class="code">an-a05n02</span> | |||
|style="white-space: nowrap;"|<syntaxhighlight lang="bash"> | |||
<syntaxhighlight lang="bash"> | clustat | ||
</syntaxhighlight> | </syntaxhighlight> | ||
<syntaxhighlight lang="text"> | <syntaxhighlight lang="text"> | ||
Cluster Status for an-anvil-05 @ Fri Nov 1 18:08:20 2013 | |||
Cluster Status for an- | |||
Member Status: Quorate | Member Status: Quorate | ||
Member Name | Member Name ID Status | ||
------ ---- | ------ ---- ---- ------ | ||
an- | an-a05n01.alteeve.ca 1 Online | ||
an- | an-a05n02.alteeve.ca 2 Online, Local | ||
</syntaxhighlight> | </syntaxhighlight> | ||
|} | |||
At this point, we're only running the foundation of the cluster, so we can only see which nodes are members. | |||
=== | We'll now start <span class="code">rgmanager</span>. It will read the <span class="code">cluster.conf</span> configuration file and parse the <span class="code"><rm></span> child elements. It will find our four new services and, according to their configuration, start them. | ||
{{warning|1=We've configured the storage services to start automatically. When we start <span class="code">rgmanager</span> now, it will start the storage resources, including DRBD. In turn, DRBD will stop and wait for up to five minutes and wait for its peer. This will cause the first node you start <span class="code">rgmanager</span> on to appear to hang until the other node's <span class="code">rgmanager</span> has started DRBD as well. If the other node doesn't start DRBD, it will be fenced. So be sure to start <span class="code">rgmanager</span> on both nodes at the same time.}} | |||
{|class="wikitable" | |||
!<span class="code">an-a05n01</span> | |||
{ | |style="white-space: nowrap;"|<syntaxhighlight lang="bash"> | ||
/etc/init.d/rgmanager start | |||
</syntaxhighlight> | |||
<syntaxhighlight lang="text"> | |||
Starting Cluster Service Manager: [ OK ] | |||
</syntaxhighlight> | |||
|- | |||
!<span class="code">an-a05n02</span> | |||
<syntaxhighlight lang="bash"> | |style="white-space: nowrap;"|<syntaxhighlight lang="bash"> | ||
/etc/init.d/rgmanager start | |||
</syntaxhighlight> | </syntaxhighlight> | ||
<syntaxhighlight lang="text"> | <syntaxhighlight lang="text"> | ||
Starting Cluster Service Manager: [ OK ] | |||
</syntaxhighlight> | </syntaxhighlight> | ||
|} | |||
Now let's run <span class="code">clustat</span> again, and see what's new. | |||
<syntaxhighlight lang="bash"> | {|class="wikitable" | ||
!<span class="code">an-a05n01</span> | |||
|style="white-space: nowrap;"|<syntaxhighlight lang="bash"> | |||
clustat | clustat | ||
</syntaxhighlight> | </syntaxhighlight> | ||
<syntaxhighlight lang="text"> | <syntaxhighlight lang="text"> | ||
Cluster Status for an- | Cluster Status for an-anvil-05 @ Fri Nov 1 19:04:27 2013 | ||
Member Status: Quorate | Member Status: Quorate | ||
Member Name | Member Name ID Status | ||
------ ---- | ------ ---- ---- ------ | ||
an- | an-a05n01.alteeve.ca 1 Online, Local, rgmanager | ||
an- | an-a05n02.alteeve.ca 2 Online, rgmanager | ||
Service Name | Service Name Owner (Last) State | ||
------- ---- | ------- ---- ----- ------ ----- | ||
service: | service:libvirtd_n01 an-a05n01.alteeve.ca started | ||
service: | service:libvirtd_n02 an-a05n02.alteeve.ca started | ||
service:storage_n01 an-a05n01.alteeve.ca started | |||
service:storage_n02 an-a05n02.alteeve.ca started | |||
</syntaxhighlight> | </syntaxhighlight> | ||
|- | |||
!<span class="code">an-a05n02</span> | |||
|style="white-space: nowrap;"|<syntaxhighlight lang="bash"> | |||
<syntaxhighlight lang="bash"> | |||
clustat | clustat | ||
</syntaxhighlight> | </syntaxhighlight> | ||
<syntaxhighlight lang="text"> | <syntaxhighlight lang="text"> | ||
Cluster Status for an- | Cluster Status for an-anvil-05 @ Fri Nov 1 19:04:27 2013 | ||
Member Status: Quorate | Member Status: Quorate | ||
Member Name | Member Name ID Status | ||
------ ---- | ------ ---- ---- ------ | ||
an- | an-a05n01.alteeve.ca 1 Online, rgmanager | ||
an- | an-a05n02.alteeve.ca 2 Online, Local, rgmanager | ||
Service Name | Service Name Owner (Last) State | ||
------- ---- | ------- ---- ----- ------ ----- | ||
service: | service:libvirtd_n01 an-a05n01.alteeve.ca started | ||
service: | service:libvirtd_n02 an-a05n02.alteeve.ca started | ||
service:storage_n01 an-a05n01.alteeve.ca started | |||
service:storage_n02 an-a05n02.alteeve.ca started | |||
</syntaxhighlight> | </syntaxhighlight> | ||
|} | |||
What we see are two sections; The top section shows the cluster members and the lower part covers the managed resources. | |||
We can see that both members, <span class="code">an-a05n01.alteeve.ca</span> and <span class="code">an-a05n02.alteeve.ca</span> are <span class="code">Online</span>, meaning that <span class="code">cman</span> is running and that they've joined the cluster. It also shows us that both members are running <span class="code">rgmanager</span>. You will always see <span class="code">Local</span> beside the name of the node you ran the actual <span class="code">clustat</span> command from. | |||
<syntaxhighlight lang=" | Under the services, you can see the four new services we created with the <span class="code">service:</span> prefix. We can see that each service is <span class="code">started</span>, meaning that all four of the resources are up and running properly and which node each service is running on. | ||
If we were watching the system log, we will see that, very shortly after starting <span class="code">rgmanager</span>, <span class="code">drbd</span>, then <span class="code">clvmd</span> and then <span class="code">gfs2</span> starts and mounts. Somewhere in there, <span class="code">libvirtd</span> will start. | |||
Lets take a look. | |||
{|class="wikitable" | |||
!<span class="code">an-a05n01</span> | |||
|style="white-space: nowrap;"|<syntaxhighlight lang="text"> | |||
Nov 1 19:04:07 an-a05n01 kernel: dlm: Using TCP for communications | |||
Nov 1 19:04:08 an-a05n01 kernel: dlm: connecting to 2 | |||
Nov 1 19:04:08 an-a05n01 rgmanager[10738]: I am node #1 | |||
Nov 1 19:04:08 an-a05n01 rgmanager[10738]: Resource Group Manager Starting | |||
Nov 1 19:04:10 an-a05n01 rgmanager[10738]: Starting stopped service service:storage_n01 | |||
Nov 1 19:04:10 an-a05n01 rgmanager[10738]: Marking service:storage_n02 as stopped: Restricted domain unavailable | |||
Nov 1 19:04:10 an-a05n01 kernel: drbd: initialized. Version: 8.3.16 (api:88/proto:86-97) | |||
Nov 1 19:04:10 an-a05n01 kernel: drbd: GIT-hash: a798fa7e274428a357657fb52f0ecf40192c1985 build by phil@Build64R6, 2013-09-27 16:00:43 | |||
Nov 1 19:04:10 an-a05n01 kernel: drbd: registered as block device major 147 | |||
Nov 1 19:04:10 an-a05n01 kernel: drbd: minor_table @ 0xffff880638752a80 | |||
Nov 1 19:04:11 an-a05n01 kernel: block drbd0: Starting worker thread (from cqueue [5069]) | |||
Nov 1 19:04:11 an-a05n01 kernel: block drbd0: disk( Diskless -> Attaching ) | |||
Nov 1 19:04:11 an-a05n01 kernel: block drbd0: Found 4 transactions (126 active extents) in activity log. | |||
Nov 1 19:04:11 an-a05n01 kernel: block drbd0: Method to ensure write ordering: flush | |||
Nov 1 19:04:11 an-a05n01 kernel: block drbd0: max BIO size = 131072 | |||
Nov 1 19:04:11 an-a05n01 kernel: block drbd0: drbd_bm_resize called with capacity == 1059008888 | |||
Nov 1 19:04:11 an-a05n01 kernel: block drbd0: resync bitmap: bits=132376111 words=2068377 pages=4040 | |||
Nov 1 19:04:11 an-a05n01 kernel: block drbd0: size = 505 GB (529504444 KB) | |||
Nov 1 19:04:11 an-a05n01 kernel: block drbd0: bitmap READ of 4040 pages took 9 jiffies | |||
Nov 1 19:04:11 an-a05n01 kernel: block drbd0: recounting of set bits took additional 10 jiffies | |||
Nov 1 19:04:11 an-a05n01 kernel: block drbd0: 0 KB (0 bits) marked out-of-sync by on disk bit-map. | |||
Nov 1 19:04:11 an-a05n01 kernel: block drbd0: disk( Attaching -> UpToDate ) pdsk( DUnknown -> Outdated ) | |||
Nov 1 19:04:11 an-a05n01 kernel: block drbd0: attached to UUIDs D62CF91BB06F1B41:AB8866B4CD6A5E71:F1BA98C02D0BA9B9:F1B998C02D0BA9B9 | |||
Nov 1 19:04:11 an-a05n01 kernel: block drbd1: Starting worker thread (from cqueue [5069]) | |||
Nov 1 19:04:11 an-a05n01 kernel: block drbd1: disk( Diskless -> Attaching ) | |||
Nov 1 19:04:11 an-a05n01 kernel: block drbd1: Found 1 transactions (1 active extents) in activity log. | |||
Nov 1 19:04:11 an-a05n01 kernel: block drbd1: Method to ensure write ordering: flush | |||
Nov 1 19:04:11 an-a05n01 kernel: block drbd1: max BIO size = 131072 | |||
Nov 1 19:04:11 an-a05n01 kernel: block drbd1: drbd_bm_resize called with capacity == 602165224 | |||
Nov 1 19:04:11 an-a05n01 kernel: block drbd1: resync bitmap: bits=75270653 words=1176104 pages=2298 | |||
Nov 1 19:04:11 an-a05n01 kernel: block drbd1: size = 287 GB (301082612 KB) | |||
Nov 1 19:04:11 an-a05n01 kernel: block drbd1: bitmap READ of 2298 pages took 6 jiffies | |||
Nov 1 19:04:11 an-a05n01 kernel: block drbd1: recounting of set bits took additional 6 jiffies | |||
Nov 1 19:04:11 an-a05n01 kernel: block drbd1: 0 KB (0 bits) marked out-of-sync by on disk bit-map. | |||
Nov 1 19:04:11 an-a05n01 kernel: block drbd1: disk( Attaching -> UpToDate ) pdsk( DUnknown -> Outdated ) | |||
Nov 1 19:04:11 an-a05n01 kernel: block drbd1: attached to UUIDs FF678525C82359F3:CFC177C83C414547:0EC499BF75166A0D:0EC399BF75166A0D | |||
Nov 1 19:04:11 an-a05n01 kernel: block drbd0: conn( StandAlone -> Unconnected ) | |||
Nov 1 19:04:11 an-a05n01 kernel: block drbd0: Starting receiver thread (from drbd0_worker [12026]) | |||
Nov 1 19:04:11 an-a05n01 kernel: block drbd0: receiver (re)started | |||
Nov 1 19:04:11 an-a05n01 kernel: block drbd0: conn( Unconnected -> WFConnection ) | |||
Nov 1 19:04:11 an-a05n01 kernel: block drbd1: conn( StandAlone -> Unconnected ) | |||
Nov 1 19:04:11 an-a05n01 kernel: block drbd1: Starting receiver thread (from drbd1_worker [12041]) | |||
Nov 1 19:04:11 an-a05n01 kernel: block drbd1: receiver (re)started | |||
Nov 1 19:04:11 an-a05n01 kernel: block drbd1: conn( Unconnected -> WFConnection ) | |||
Nov 1 19:04:11 an-a05n01 rgmanager[10738]: Starting stopped service service:libvirtd_n01 | |||
Nov 1 19:04:11 an-a05n01 rgmanager[10738]: Service service:libvirtd_n01 started | |||
Nov 1 19:04:11 an-a05n01 kernel: lo: Disabled Privacy Extensions | |||
Nov 1 19:04:12 an-a05n01 kernel: block drbd0: Handshake successful: Agreed network protocol version 97 | |||
Nov 1 19:04:12 an-a05n01 kernel: block drbd0: conn( WFConnection -> WFReportParams ) | |||
Nov 1 19:04:12 an-a05n01 kernel: block drbd0: Starting asender thread (from drbd0_receiver [12058]) | |||
Nov 1 19:04:12 an-a05n01 kernel: block drbd0: data-integrity-alg: <not-used> | |||
Nov 1 19:04:12 an-a05n01 kernel: block drbd0: drbd_sync_handshake: | |||
Nov 1 19:04:12 an-a05n01 kernel: block drbd0: self D62CF91BB06F1B40:AB8866B4CD6A5E71:F1BA98C02D0BA9B9:F1B998C02D0BA9B9 bits:0 flags:0 | |||
Nov 1 19:04:12 an-a05n01 kernel: block drbd0: peer AB8866B4CD6A5E70:0000000000000000:F1BA98C02D0BA9B9:F1B998C02D0BA9B9 bits:0 flags:0 | |||
Nov 1 19:04:12 an-a05n01 kernel: block drbd0: uuid_compare()=1 by rule 70 | |||
Nov 1 19:04:12 an-a05n01 kernel: block drbd0: peer( Unknown -> Secondary ) conn( WFReportParams -> WFBitMapS ) pdsk( Outdated -> Consistent ) | |||
Nov 1 19:04:12 an-a05n01 kernel: block drbd1: Handshake successful: Agreed network protocol version 97 | |||
Nov 1 19:04:12 an-a05n01 kernel: block drbd1: conn( WFConnection -> WFReportParams ) | |||
Nov 1 19:04:12 an-a05n01 kernel: block drbd1: Starting asender thread (from drbd1_receiver [12063]) | |||
Nov 1 19:04:12 an-a05n01 kernel: block drbd1: data-integrity-alg: <not-used> | |||
Nov 1 19:04:12 an-a05n01 kernel: block drbd1: drbd_sync_handshake: | |||
Nov 1 19:04:12 an-a05n01 kernel: block drbd1: self FF678525C82359F2:CFC177C83C414547:0EC499BF75166A0D:0EC399BF75166A0D bits:0 flags:0 | |||
Nov 1 19:04:12 an-a05n01 kernel: block drbd1: peer CFC177C83C414546:0000000000000000:0EC499BF75166A0D:0EC399BF75166A0D bits:0 flags:0 | |||
Nov 1 19:04:12 an-a05n01 kernel: block drbd1: uuid_compare()=1 by rule 70 | |||
Nov 1 19:04:12 an-a05n01 kernel: block drbd1: peer( Unknown -> Secondary ) conn( WFReportParams -> WFBitMapS ) pdsk( Outdated -> Consistent ) | |||
Nov 1 19:04:12 an-a05n01 kernel: block drbd0: peer( Secondary -> Primary ) | |||
Nov 1 19:04:12 an-a05n01 kernel: block drbd1: peer( Secondary -> Primary ) | |||
Nov 1 19:04:12 an-a05n01 kernel: block drbd1: helper command: /sbin/drbdadm before-resync-source minor-1 | |||
Nov 1 19:04:12 an-a05n01 kernel: block drbd0: role( Secondary -> Primary ) | |||
Nov 1 19:04:12 an-a05n01 kernel: block drbd1: helper command: /sbin/drbdadm before-resync-source minor-1 exit code 0 (0x0) | |||
Nov 1 19:04:12 an-a05n01 kernel: block drbd1: conn( WFBitMapS -> SyncSource ) pdsk( Consistent -> Inconsistent ) | |||
Nov 1 19:04:12 an-a05n01 kernel: block drbd1: Began resync as SyncSource (will sync 0 KB [0 bits set]). | |||
Nov 1 19:04:12 an-a05n01 kernel: block drbd1: updated sync UUID FF678525C82359F2:CFC277C83C414547:CFC177C83C414547:0EC499BF75166A0D | |||
Nov 1 19:04:12 an-a05n01 kernel: block drbd0: helper command: /sbin/drbdadm before-resync-source minor-0 | |||
Nov 1 19:04:12 an-a05n01 kernel: block drbd1: role( Secondary -> Primary ) | |||
Nov 1 19:04:12 an-a05n01 kernel: block drbd0: helper command: /sbin/drbdadm before-resync-source minor-0 exit code 0 (0x0) | |||
Nov 1 19:04:12 an-a05n01 kernel: block drbd0: conn( WFBitMapS -> SyncSource ) pdsk( Consistent -> Inconsistent ) | |||
Nov 1 19:04:12 an-a05n01 kernel: block drbd0: Began resync as SyncSource (will sync 0 KB [0 bits set]). | |||
Nov 1 19:04:12 an-a05n01 kernel: block drbd0: updated sync UUID D62CF91BB06F1B41:AB8966B4CD6A5E71:AB8866B4CD6A5E71:F1BA98C02D0BA9B9 | |||
Nov 1 19:04:12 an-a05n01 kernel: block drbd1: Resync done (total 1 sec; paused 0 sec; 0 K/sec) | |||
Nov 1 19:04:12 an-a05n01 kernel: block drbd1: updated UUIDs FF678525C82359F3:0000000000000000:CFC277C83C414547:CFC177C83C414547 | |||
Nov 1 19:04:12 an-a05n01 kernel: block drbd1: conn( SyncSource -> Connected ) pdsk( Inconsistent -> UpToDate ) | |||
Nov 1 19:04:12 an-a05n01 kernel: block drbd0: Resync done (total 1 sec; paused 0 sec; 0 K/sec) | |||
Nov 1 19:04:12 an-a05n01 kernel: block drbd0: updated UUIDs D62CF91BB06F1B41:0000000000000000:AB8966B4CD6A5E71:AB8866B4CD6A5E71 | |||
Nov 1 19:04:12 an-a05n01 kernel: block drbd0: conn( SyncSource -> Connected ) pdsk( Inconsistent -> UpToDate ) | |||
Nov 1 19:04:12 an-a05n01 kernel: block drbd1: bitmap WRITE of 2298 pages took 12 jiffies | |||
Nov 1 19:04:12 an-a05n01 kernel: block drbd1: 0 KB (0 bits) marked out-of-sync by on disk bit-map. | |||
Nov 1 19:04:12 an-a05n01 kernel: block drbd0: bitmap WRITE of 4040 pages took 15 jiffies | |||
Nov 1 19:04:12 an-a05n01 kernel: block drbd0: 0 KB (0 bits) marked out-of-sync by on disk bit-map. | |||
Nov 1 19:04:14 an-a05n01 clvmd: Cluster LVM daemon started - connected to CMAN | |||
Nov 1 19:04:14 an-a05n01 kernel: Slow work thread pool: Starting up | |||
Nov 1 19:04:14 an-a05n01 kernel: Slow work thread pool: Ready | |||
Nov 1 19:04:14 an-a05n01 kernel: GFS2 (built Sep 14 2013 05:33:49) installed | |||
Nov 1 19:04:14 an-a05n01 kernel: GFS2: fsid=: Trying to join cluster "lock_dlm", "an-anvil-05:shared" | |||
Nov 1 19:04:14 an-a05n01 kernel: GFS2: fsid=an-anvil-05:shared.1: Joined cluster. Now mounting FS... | |||
Nov 1 19:04:14 an-a05n01 kernel: GFS2: fsid=an-anvil-05:shared.1: jid=1, already locked for use | |||
Nov 1 19:04:14 an-a05n01 kernel: GFS2: fsid=an-anvil-05:shared.1: jid=1: Looking at journal... | |||
Nov 1 19:04:14 an-a05n01 kernel: GFS2: fsid=an-anvil-05:shared.1: jid=1: Done | |||
Nov 1 19:04:14 an-a05n01 rgmanager[10738]: Service service:storage_n01 started | |||
</syntaxhighlight> | </syntaxhighlight> | ||
<syntaxhighlight lang="text"> | |- | ||
!<span class="code">an-a05n02</span> | |||
GIT-hash: | |style="white-space: nowrap;"|<syntaxhighlight lang="text"> | ||
0: | Nov 1 19:04:08 an-a05n02 kernel: dlm: Using TCP for communications | ||
Nov 1 19:04:08 an-a05n02 kernel: dlm: got connection from 1 | |||
1: | Nov 1 19:04:09 an-a05n02 rgmanager[10547]: I am node #2 | ||
Nov 1 19:04:09 an-a05n02 rgmanager[10547]: Resource Group Manager Starting | |||
Nov 1 19:04:11 an-a05n02 rgmanager[10547]: Starting stopped service service:storage_n02 | |||
Nov 1 19:04:11 an-a05n02 kernel: drbd: initialized. Version: 8.3.16 (api:88/proto:86-97) | |||
Nov 1 19:04:11 an-a05n02 kernel: drbd: GIT-hash: a798fa7e274428a357657fb52f0ecf40192c1985 build by phil@Build64R6, 2013-09-27 16:00:43 | |||
Nov 1 19:04:11 an-a05n02 kernel: drbd: registered as block device major 147 | |||
Nov 1 19:04:11 an-a05n02 kernel: drbd: minor_table @ 0xffff880638440280 | |||
Nov 1 19:04:11 an-a05n02 kernel: block drbd0: Starting worker thread (from cqueue [5161]) | |||
Nov 1 19:04:11 an-a05n02 kernel: block drbd0: disk( Diskless -> Attaching ) | |||
Nov 1 19:04:11 an-a05n02 kernel: block drbd0: Found 4 transactions (4 active extents) in activity log. | |||
Nov 1 19:04:11 an-a05n02 kernel: block drbd0: Method to ensure write ordering: flush | |||
Nov 1 19:04:11 an-a05n02 kernel: block drbd0: max BIO size = 131072 | |||
Nov 1 19:04:11 an-a05n02 kernel: block drbd0: drbd_bm_resize called with capacity == 1059008888 | |||
Nov 1 19:04:11 an-a05n02 kernel: block drbd0: resync bitmap: bits=132376111 words=2068377 pages=4040 | |||
Nov 1 19:04:11 an-a05n02 kernel: block drbd0: size = 505 GB (529504444 KB) | |||
Nov 1 19:04:11 an-a05n02 kernel: block drbd0: bitmap READ of 4040 pages took 10 jiffies | |||
Nov 1 19:04:11 an-a05n02 kernel: block drbd0: recounting of set bits took additional 10 jiffies | |||
Nov 1 19:04:11 an-a05n02 kernel: block drbd0: 0 KB (0 bits) marked out-of-sync by on disk bit-map. | |||
Nov 1 19:04:11 an-a05n02 kernel: block drbd0: disk( Attaching -> Outdated ) | |||
Nov 1 19:04:11 an-a05n02 kernel: block drbd0: attached to UUIDs AB8866B4CD6A5E70:0000000000000000:F1BA98C02D0BA9B9:F1B998C02D0BA9B9 | |||
Nov 1 19:04:11 an-a05n02 kernel: block drbd1: Starting worker thread (from cqueue [5161]) | |||
Nov 1 19:04:11 an-a05n02 kernel: block drbd1: disk( Diskless -> Attaching ) | |||
Nov 1 19:04:11 an-a05n02 kernel: block drbd1: No usable activity log found. | |||
Nov 1 19:04:11 an-a05n02 kernel: block drbd1: Method to ensure write ordering: flush | |||
Nov 1 19:04:11 an-a05n02 kernel: block drbd1: max BIO size = 131072 | |||
Nov 1 19:04:11 an-a05n02 kernel: block drbd1: drbd_bm_resize called with capacity == 602165224 | |||
Nov 1 19:04:11 an-a05n02 kernel: block drbd1: resync bitmap: bits=75270653 words=1176104 pages=2298 | |||
Nov 1 19:04:11 an-a05n02 kernel: block drbd1: size = 287 GB (301082612 KB) | |||
Nov 1 19:04:11 an-a05n02 kernel: block drbd1: bitmap READ of 2298 pages took 6 jiffies | |||
Nov 1 19:04:11 an-a05n02 kernel: block drbd1: recounting of set bits took additional 6 jiffies | |||
Nov 1 19:04:11 an-a05n02 kernel: block drbd1: 0 KB (0 bits) marked out-of-sync by on disk bit-map. | |||
Nov 1 19:04:11 an-a05n02 kernel: block drbd1: disk( Attaching -> Outdated ) | |||
Nov 1 19:04:11 an-a05n02 kernel: block drbd1: attached to UUIDs CFC177C83C414546:0000000000000000:0EC499BF75166A0D:0EC399BF75166A0D | |||
Nov 1 19:04:11 an-a05n02 kernel: block drbd0: conn( StandAlone -> Unconnected ) | |||
Nov 1 19:04:11 an-a05n02 kernel: block drbd0: Starting receiver thread (from drbd0_worker [11833]) | |||
Nov 1 19:04:11 an-a05n02 kernel: block drbd0: receiver (re)started | |||
Nov 1 19:04:11 an-a05n02 kernel: block drbd0: conn( Unconnected -> WFConnection ) | |||
Nov 1 19:04:11 an-a05n02 kernel: block drbd1: conn( StandAlone -> Unconnected ) | |||
Nov 1 19:04:11 an-a05n02 kernel: block drbd1: Starting receiver thread (from drbd1_worker [11848]) | |||
Nov 1 19:04:11 an-a05n02 kernel: block drbd1: receiver (re)started | |||
Nov 1 19:04:11 an-a05n02 kernel: block drbd1: conn( Unconnected -> WFConnection ) | |||
Nov 1 19:04:11 an-a05n02 rgmanager[10547]: Starting stopped service service:libvirtd_n02 | |||
Nov 1 19:04:12 an-a05n02 rgmanager[10547]: Service service:libvirtd_n02 started | |||
Nov 1 19:04:12 an-a05n02 kernel: block drbd0: Handshake successful: Agreed network protocol version 97 | |||
Nov 1 19:04:12 an-a05n02 kernel: block drbd0: conn( WFConnection -> WFReportParams ) | |||
Nov 1 19:04:12 an-a05n02 kernel: block drbd0: Starting asender thread (from drbd0_receiver [11865]) | |||
Nov 1 19:04:12 an-a05n02 kernel: block drbd0: data-integrity-alg: <not-used> | |||
Nov 1 19:04:12 an-a05n02 kernel: block drbd0: drbd_sync_handshake: | |||
Nov 1 19:04:12 an-a05n02 kernel: block drbd0: self AB8866B4CD6A5E70:0000000000000000:F1BA98C02D0BA9B9:F1B998C02D0BA9B9 bits:0 flags:0 | |||
Nov 1 19:04:12 an-a05n02 kernel: block drbd0: peer D62CF91BB06F1B40:AB8866B4CD6A5E71:F1BA98C02D0BA9B9:F1B998C02D0BA9B9 bits:0 flags:0 | |||
Nov 1 19:04:12 an-a05n02 kernel: block drbd0: uuid_compare()=-1 by rule 50 | |||
Nov 1 19:04:12 an-a05n02 kernel: block drbd0: peer( Unknown -> Secondary ) conn( WFReportParams -> WFBitMapT ) pdsk( DUnknown -> UpToDate ) | |||
Nov 1 19:04:12 an-a05n02 kernel: block drbd1: Handshake successful: Agreed network protocol version 97 | |||
Nov 1 19:04:12 an-a05n02 kernel: block drbd1: conn( WFConnection -> WFReportParams ) | |||
Nov 1 19:04:12 an-a05n02 kernel: block drbd1: Starting asender thread (from drbd1_receiver [11869]) | |||
Nov 1 19:04:12 an-a05n02 kernel: block drbd1: data-integrity-alg: <not-used> | |||
Nov 1 19:04:12 an-a05n02 kernel: block drbd1: drbd_sync_handshake: | |||
Nov 1 19:04:12 an-a05n02 kernel: block drbd1: self CFC177C83C414546:0000000000000000:0EC499BF75166A0D:0EC399BF75166A0D bits:0 flags:0 | |||
Nov 1 19:04:12 an-a05n02 kernel: block drbd1: peer FF678525C82359F2:CFC177C83C414547:0EC499BF75166A0D:0EC399BF75166A0D bits:0 flags:0 | |||
Nov 1 19:04:12 an-a05n02 kernel: block drbd1: uuid_compare()=-1 by rule 50 | |||
Nov 1 19:04:12 an-a05n02 kernel: block drbd1: peer( Unknown -> Secondary ) conn( WFReportParams -> WFBitMapT ) pdsk( DUnknown -> UpToDate ) | |||
Nov 1 19:04:12 an-a05n02 kernel: block drbd0: role( Secondary -> Primary ) | |||
Nov 1 19:04:12 an-a05n02 kernel: block drbd1: role( Secondary -> Primary ) | |||
Nov 1 19:04:12 an-a05n02 kernel: lo: Disabled Privacy Extensions | |||
Nov 1 19:04:12 an-a05n02 kernel: block drbd1: conn( WFBitMapT -> WFSyncUUID ) | |||
Nov 1 19:04:12 an-a05n02 kernel: block drbd0: conn( WFBitMapT -> WFSyncUUID ) | |||
Nov 1 19:04:12 an-a05n02 kernel: block drbd0: peer( Secondary -> Primary ) | |||
Nov 1 19:04:12 an-a05n02 kernel: block drbd1: updated sync uuid CFC277C83C414547:0000000000000000:0EC499BF75166A0D:0EC399BF75166A0D | |||
Nov 1 19:04:12 an-a05n02 kernel: block drbd1: helper command: /sbin/drbdadm before-resync-target minor-1 | |||
Nov 1 19:04:12 an-a05n02 kernel: block drbd1: helper command: /sbin/drbdadm before-resync-target minor-1 exit code 0 (0x0) | |||
Nov 1 19:04:12 an-a05n02 kernel: block drbd1: conn( WFSyncUUID -> SyncTarget ) disk( Outdated -> Inconsistent ) | |||
Nov 1 19:04:12 an-a05n02 kernel: block drbd1: Began resync as SyncTarget (will sync 0 KB [0 bits set]). | |||
Nov 1 19:04:12 an-a05n02 kernel: block drbd1: peer( Secondary -> Primary ) | |||
Nov 1 19:04:12 an-a05n02 kernel: block drbd0: updated sync uuid AB8966B4CD6A5E71:0000000000000000:F1BA98C02D0BA9B9:F1B998C02D0BA9B9 | |||
Nov 1 19:04:12 an-a05n02 kernel: block drbd0: helper command: /sbin/drbdadm before-resync-target minor-0 | |||
Nov 1 19:04:12 an-a05n02 kernel: block drbd1: Resync done (total 1 sec; paused 0 sec; 0 K/sec) | |||
Nov 1 19:04:12 an-a05n02 kernel: block drbd1: updated UUIDs FF678525C82359F3:0000000000000000:CFC277C83C414547:CFC177C83C414547 | |||
Nov 1 19:04:12 an-a05n02 kernel: block drbd1: conn( SyncTarget -> Connected ) disk( Inconsistent -> UpToDate ) | |||
Nov 1 19:04:12 an-a05n02 kernel: block drbd1: helper command: /sbin/drbdadm after-resync-target minor-1 | |||
Nov 1 19:04:12 an-a05n02 kernel: block drbd0: helper command: /sbin/drbdadm before-resync-target minor-0 exit code 0 (0x0) | |||
Nov 1 19:04:12 an-a05n02 kernel: block drbd0: conn( WFSyncUUID -> SyncTarget ) disk( Outdated -> Inconsistent ) | |||
Nov 1 19:04:12 an-a05n02 kernel: block drbd0: Began resync as SyncTarget (will sync 0 KB [0 bits set]). | |||
Nov 1 19:04:12 an-a05n02 kernel: block drbd1: helper command: /sbin/drbdadm after-resync-target minor-1 exit code 0 (0x0) | |||
Nov 1 19:04:12 an-a05n02 kernel: block drbd0: Resync done (total 1 sec; paused 0 sec; 0 K/sec) | |||
Nov 1 19:04:12 an-a05n02 kernel: block drbd0: updated UUIDs D62CF91BB06F1B41:0000000000000000:AB8966B4CD6A5E71:AB8866B4CD6A5E71 | |||
Nov 1 19:04:12 an-a05n02 kernel: block drbd0: conn( SyncTarget -> Connected ) disk( Inconsistent -> UpToDate ) | |||
Nov 1 19:04:12 an-a05n02 kernel: block drbd0: helper command: /sbin/drbdadm after-resync-target minor-0 | |||
Nov 1 19:04:12 an-a05n02 kernel: block drbd0: helper command: /sbin/drbdadm after-resync-target minor-0 exit code 0 (0x0) | |||
Nov 1 19:04:12 an-a05n02 kernel: block drbd1: bitmap WRITE of 2298 pages took 14 jiffies | |||
Nov 1 19:04:12 an-a05n02 kernel: block drbd1: 0 KB (0 bits) marked out-of-sync by on disk bit-map. | |||
Nov 1 19:04:12 an-a05n02 kernel: block drbd0: bitmap WRITE of 4040 pages took 15 jiffies | |||
Nov 1 19:04:12 an-a05n02 kernel: block drbd0: 0 KB (0 bits) marked out-of-sync by on disk bit-map. | |||
Nov 1 19:04:13 an-a05n02 clvmd: Cluster LVM daemon started - connected to CMAN | |||
Nov 1 19:04:13 an-a05n02 kernel: Slow work thread pool: Starting up | |||
Nov 1 19:04:13 an-a05n02 kernel: Slow work thread pool: Ready | |||
Nov 1 19:04:13 an-a05n02 kernel: GFS2 (built Sep 14 2013 05:33:49) installed | |||
Nov 1 19:04:13 an-a05n02 kernel: GFS2: fsid=: Trying to join cluster "lock_dlm", "an-anvil-05:shared" | |||
Nov 1 19:04:13 an-a05n02 kernel: GFS2: fsid=an-anvil-05:shared.0: Joined cluster. Now mounting FS... | |||
Nov 1 19:04:13 an-a05n02 kernel: GFS2: fsid=an-anvil-05:shared.0: jid=0, already locked for use | |||
Nov 1 19:04:13 an-a05n02 kernel: GFS2: fsid=an-anvil-05:shared.0: jid=0: Looking at journal... | |||
Nov 1 19:04:13 an-a05n02 kernel: GFS2: fsid=an-anvil-05:shared.0: jid=0: Done | |||
Nov 1 19:04:13 an-a05n02 kernel: GFS2: fsid=an-anvil-05:shared.0: jid=1: Trying to acquire journal lock... | |||
Nov 1 19:04:13 an-a05n02 kernel: GFS2: fsid=an-anvil-05:shared.0: jid=1: Looking at journal... | |||
Nov 1 19:04:13 an-a05n02 kernel: GFS2: fsid=an-anvil-05:shared.0: jid=1: Done | |||
Nov 1 19:04:14 an-a05n02 rgmanager[10547]: Service service:storage_n02 started | |||
</syntaxhighlight> | </syntaxhighlight> | ||
|} | |||
Sure enough, we can confirm that everything started properly. | |||
<syntaxhighlight lang="bash"> | DRBD; | ||
{|class="wikitable" | |||
!<span class="code">an-a05n01</span> | |||
|style="white-space: nowrap;"|<syntaxhighlight lang="bash"> | |||
/etc/init.d/drbd status | |||
</syntaxhighlight> | </syntaxhighlight> | ||
<syntaxhighlight lang="text"> | <syntaxhighlight lang="text"> | ||
drbd driver loaded OK; device status: | |||
version: 8.3.16 (api:88/proto:86-97) | |||
GIT-hash: a798fa7e274428a357657fb52f0ecf40192c1985 build by phil@Build64R6, 2013-09-27 16:00:43 | |||
m:res cs ro ds p mounted fstype | |||
0:r0 Connected Primary/Primary UpToDate/UpToDate C | |||
1:r1 Connected Primary/Primary UpToDate/UpToDate C | |||
</syntaxhighlight> | </syntaxhighlight> | ||
<syntaxhighlight lang="bash"> | |- | ||
!<span class="code">an-a05n02</span> | |||
|style="white-space: nowrap;"|<syntaxhighlight lang="bash"> | |||
/etc/init.d/drbd status | |||
</syntaxhighlight> | </syntaxhighlight> | ||
<syntaxhighlight lang="text"> | <syntaxhighlight lang="text"> | ||
drbd driver loaded OK; device status: | |||
version: 8.3.16 (api:88/proto:86-97) | |||
GIT-hash: a798fa7e274428a357657fb52f0ecf40192c1985 build by phil@Build64R6, 2013-09-27 16:00:43 | |||
m:res cs ro ds p mounted fstype | |||
0:r0 Connected Primary/Primary UpToDate/UpToDate C | |||
1:r1 Connected Primary/Primary UpToDate/UpToDate C | |||
</syntaxhighlight> | </syntaxhighlight> | ||
|} | |||
Looks good. Lets look at clustered LVM; | |||
< | {|class="wikitable" | ||
!<span class="code">an-a05n01</span> | |||
</ | |style="white-space: nowrap;"|<syntaxhighlight lang="bash"> | ||
<syntaxhighlight lang=" | /etc/init.d/clvmd status | ||
</syntaxhighlight> | </syntaxhighlight> | ||
<syntaxhighlight lang="text"> | <syntaxhighlight lang="text"> | ||
clvmd (pid 29009) is running... | |||
Clustered Volume Groups: an-a05n02_vg0 an-a05n01_vg0 | |||
Active clustered Logical Volumes: shared | |||
</syntaxhighlight> | </syntaxhighlight> | ||
|- | |||
!<span class="code">an-a05n02</span> | |||
|style="white-space: nowrap;"|<syntaxhighlight lang="bash"> | |||
<syntaxhighlight lang=" | /etc/init.d/clvmd status | ||
</syntaxhighlight> | </syntaxhighlight> | ||
<syntaxhighlight lang="text"> | <syntaxhighlight lang="text"> | ||
clvmd (pid 28801) is running... | |||
Clustered Volume Groups: an-a05n02_vg0 an-a05n01_vg0 | |||
Active clustered Logical Volumes: shared | |||
</syntaxhighlight> | </syntaxhighlight> | ||
|} | |||
Looking good, too. Last service in storage is GFS2; | |||
GFS2; | |||
{|class="wikitable" | |||
!<span class="code">an-a05n01</span> | |||
|style="white-space: nowrap;"|<syntaxhighlight lang="bash"> | |||
/etc/init.d/gfs2 status | |||
<syntaxhighlight lang="bash"> | |||
</syntaxhighlight> | </syntaxhighlight> | ||
<syntaxhighlight lang="text"> | <syntaxhighlight lang="text"> | ||
Configured GFS2 mountpoints: | |||
/shared | |||
Active GFS2 mountpoints: | |||
/shared | |||
</syntaxhighlight> | |||
|- | |||
!<span class="code">an-a05n02</span> | |||
|style="white-space: nowrap;"|<syntaxhighlight lang="bash"> | |||
/etc/init.d/gfs2 status | |||
</syntaxhighlight> | |||
<syntaxhighlight lang="text"> | |||
Configured GFS2 mountpoints: | |||
/shared | |||
Active GFS2 mountpoints: | |||
/shared | |||
</syntaxhighlight> | |||
|} | |||
Finally, our stand-alone service for <span class="code">libvirtd</span>. | |||
{|class="wikitable" | |||
!<span class="code">an-a05n01</span> | |||
|style="white-space: nowrap;"|<syntaxhighlight lang="bash"> | |||
/etc/init.d/libvirtd status | |||
</syntaxhighlight> | |||
<syntaxhighlight lang="text"> | |||
libvirtd (pid 12131) is running... | |||
</syntaxhighlight> | |||
|- | |||
!<span class="code">an-a05n02</span> | |||
|style="white-space: nowrap;"|<syntaxhighlight lang="bash"> | |||
/etc/init.d/libvirtd status | |||
</syntaxhighlight> | |||
<syntaxhighlight lang="text"> | |||
libvirtd (pid 11939) is running... | |||
</syntaxhighlight> | </syntaxhighlight> | ||
|} | |||
Nice, eh? | |||
== Managing Cluster Resources == | |||
Managing services in the cluster is done with a fairly simple tool called <span class="code">clusvcadm</span>. | |||
We're going to look at two commands at this time. | |||
< | {|class="wikitable" | ||
!Command | |||
</ | !Desctiption | ||
|- | |||
|style="white-space: nowrap"|<span class="code">clusvcadm -e <service> -m <node></span> | |||
|Enable the <span class="code"><service></span> on the specified <span class="code"><node></span>. When a <span class="code"><node></span> is not specified, the local node where the command was run is assumed. | |||
|- | |||
|style="white-space: nowrap"|<span class="code">clusvcadm -d <service></span> | |||
|Disable (stop) the <span class="code"><service></span>. | |||
|} | |||
== Stopping Clustered Storage - A Preview to Cold-Stopping the Cluster == | |||
Let's take a look at how we can use <span class="code">clusvcadm</span> to stop our storage services. | |||
{{note|1=Services with the <span class="code">service:</span> prefix can be called with their name alone. As we will see later, other services will need to have the service type prefix included.}} | |||
Before doing any work on an ''Anvil!'', start by confirming the current state of affairs. | |||
{|class="wikitable" | |||
!<span class="code">an-a05n01</span> | |||
|style="white-space: nowrap;"|<syntaxhighlight lang="bash"> | |||
clustat | |||
</syntaxhighlight> | |||
<syntaxhighlight lang="text"> | <syntaxhighlight lang="text"> | ||
Cluster Status for an-anvil-05 @ Fri Nov 1 23:22:44 2013 | |||
Member Status: Quorate | |||
Member Name ID Status | |||
------ ---- ---- ------ | |||
an-a05n01.alteeve.ca 1 Online, Local, rgmanager | |||
an-a05n02.alteeve.ca 2 Online, rgmanager | |||
<syntaxhighlight lang="bash"> | Service Name Owner (Last) State | ||
------- ---- ----- ------ ----- | |||
service:libvirtd_n01 an-a05n01.alteeve.ca started | |||
service:libvirtd_n02 an-a05n02.alteeve.ca started | |||
service:storage_n01 an-a05n01.alteeve.ca started | |||
service:storage_n02 an-a05n02.alteeve.ca started | |||
</syntaxhighlight> | |||
|- | |||
!<span class="code">an-a05n02</span> | |||
|style="white-space: nowrap;"|<syntaxhighlight lang="bash"> | |||
clustat | clustat | ||
</syntaxhighlight> | </syntaxhighlight> | ||
<syntaxhighlight lang="text"> | <syntaxhighlight lang="text"> | ||
Cluster Status for an- | Cluster Status for an-anvil-05 @ Fri Nov 1 23:22:44 2013 | ||
Member Status: Quorate | Member Status: Quorate | ||
Member Name | Member Name ID Status | ||
------ ---- | ------ ---- ---- ------ | ||
an- | an-a05n01.alteeve.ca 1 Online, rgmanager | ||
an- | an-a05n02.alteeve.ca 2 Online, Local, rgmanager | ||
Service Name Owner (Last) State | Service Name Owner (Last) State | ||
------- ---- ----- ------ ----- | |||
service:libvirtd_n01 an-a05n01.alteeve.ca started | |||
service:libvirtd_n02 an-a05n02.alteeve.ca started | |||
service:storage_n01 an-a05n01.alteeve.ca started | |||
service:storage_n02 an-a05n02.alteeve.ca started | |||
</syntaxhighlight> | |||
|} | |||
Everything is running, as expected. Let's stop <span class="code">an-a05n01</span>'s <span class="code">storage_n01</span> service. | |||
On '''<span class="code">an-a05n01</span>''', run: | |||
{|class="wikitable" | |||
!<span class="code">an-a05n01</span> | |||
|style="white-space: nowrap;"|<syntaxhighlight lang="bash"> | |||
clusvcadm -d storage_n01 | |||
</syntaxhighlight> | |||
<syntaxhighlight lang="text"> | |||
Local machine disabling service:storage_n01...Success | |||
</syntaxhighlight> | |||
|} | |||
If we now run <span class="code">clustat</span> now, we should see that <span class="code">storage_n01</span> has stopped. | |||
{|class="wikitable" | |||
!<span class="code">an-a05n01</span> | |||
|style="white-space: nowrap;"|<syntaxhighlight lang="bash"> | |||
clustat | |||
</syntaxhighlight> | |||
<syntaxhighlight lang="text"> | |||
Cluster Status for an-anvil-05 @ Fri Nov 1 23:25:39 2013 | |||
Member Status: Quorate | |||
Member Name ID Status | |||
------ ---- ---- ------ | |||
an-a05n01.alteeve.ca 1 Online, Local, rgmanager | |||
an-a05n02.alteeve.ca 2 Online, rgmanager | |||
Service Name Owner (Last) State | |||
------- ---- ----- ------ ----- | |||
service:libvirtd_n01 an-a05n01.alteeve.ca started | |||
service:libvirtd_n02 an-a05n02.alteeve.ca started | |||
service:storage_n01 (an-a05n01.alteeve.ca) disabled | |||
service:storage_n02 an-a05n02.alteeve.ca started | |||
</syntaxhighlight> | |||
|- | |||
!<span class="code">an-a05n02</span> | |||
|style="white-space: nowrap;"|<syntaxhighlight lang="bash"> | |||
clustat | |||
</syntaxhighlight> | |||
<syntaxhighlight lang="text"> | |||
Cluster Status for an-anvil-05 @ Fri Nov 1 23:25:40 2013 | |||
Member Status: Quorate | |||
Member Name ID Status | |||
------ ---- ---- ------ | |||
an-a05n01.alteeve.ca 1 Online, rgmanager | |||
an-a05n02.alteeve.ca 2 Online, Local, rgmanager | |||
Service Name Owner (Last) State | |||
------- ---- ----- ------ ----- | |||
service:libvirtd_n01 an-a05n01.alteeve.ca started | |||
service:libvirtd_n02 an-a05n02.alteeve.ca started | |||
service:storage_n01 (an-a05n01.alteeve.ca) disabled | |||
service:storage_n02 an-a05n02.alteeve.ca started | |||
</syntaxhighlight> | |||
|} | |||
Notice how <span class="code">service:storage_n01</span> is now in the <span class="code">disabled</span> state? If you check the status of <span class="code">drbd</span> now, you will see that <span class="code">an-a05n01</span> is indeed down. | |||
{|class="wikitable" | |||
!<span class="code">an-a05n01</span> | |||
|style="white-space: nowrap;"|<syntaxhighlight lang="bash"> | |||
/etc/init.d/drbd status | |||
</syntaxhighlight> | |||
<syntaxhighlight lang="text"> | |||
drbd not loaded | |||
</syntaxhighlight> | |||
|- | |||
!<span class="code">an-a05n02</span> | |||
|style="white-space: nowrap;"|<syntaxhighlight lang="bash"> | |||
/etc/init.d/drbd status | |||
</syntaxhighlight> | |||
<syntaxhighlight lang="text"> | |||
drbd driver loaded OK; device status: | |||
version: 8.3.16 (api:88/proto:86-97) | |||
GIT-hash: a798fa7e274428a357657fb52f0ecf40192c1985 build by phil@Build64R6, 2013-09-27 16:00:43 | |||
m:res cs ro ds p mounted fstype | |||
0:r0 WFConnection Primary/Unknown UpToDate/Outdated C | |||
1:r1 WFConnection Primary/Unknown UpToDate/Outdated C | |||
</syntaxhighlight> | |||
|} | |||
You'll find that <span class="code">clvmd</span> and <span class="code">gfs2</span> are stopped as well. | |||
Pretty simple! | |||
== Starting Clustered Storage == | |||
As we saw earlier, the storage and <span class="code">libvirtd</span> services start automatically. It's still important to know how to manually start these services though. So that is what we'll cover here. | |||
The main difference from stopping the service is that we swap the <span class="code">-d</span> switch for the <span class="code">-e</span>, '''e'''nable, switch. We will also add the target cluster member name using the <span class="code">-m</span> switch. We didn't need to use the member switch while stopping because the cluster could tell where the service was running and, thus, which member to contact to stop the service. | |||
Should you omit the member name, the cluster will try to use the local node as the target member. Note though that a target service will start on the node the command was issued on, regardless of the fail-over domain's ordered policy. That is to say, a service will not start on another node in the cluster when the member option is not specified, despite the fail-over configuration set to prefer another node. | |||
As always, start by verifying the current state of the services. | |||
{|class="wikitable" | |||
!<span class="code">an-a05n01</span> | |||
|style="white-space: nowrap;"|<syntaxhighlight lang="bash"> | |||
clustat | |||
</syntaxhighlight> | |||
<syntaxhighlight lang="text"> | |||
Cluster Status for an-anvil-05 @ Fri Nov 1 23:36:32 2013 | |||
Member Status: Quorate | |||
Member Name ID Status | |||
------ ---- ---- ------ | |||
an-a05n01.alteeve.ca 1 Online, Local, rgmanager | |||
an-a05n02.alteeve.ca 2 Online, rgmanager | |||
Service Name Owner (Last) State | |||
------- ---- ----- ------ ----- | |||
service:libvirtd_n01 an-a05n01.alteeve.ca started | |||
service:libvirtd_n02 an-a05n02.alteeve.ca started | |||
service:storage_n01 (an-a05n01.alteeve.ca) disabled | |||
service:storage_n02 an-a05n02.alteeve.ca started | |||
</syntaxhighlight> | |||
|- | |||
!<span class="code">an-a05n02</span> | |||
|style="white-space: nowrap;"|<syntaxhighlight lang="bash"> | |||
clustat | |||
</syntaxhighlight> | |||
<syntaxhighlight lang="text"> | |||
Cluster Status for an-anvil-05 @ Fri Nov 1 23:36:32 2013 | |||
Member Status: Quorate | |||
Member Name ID Status | |||
------ ---- ---- ------ | |||
an-a05n01.alteeve.ca 1 Online, rgmanager | |||
an-a05n02.alteeve.ca 2 Online, Local, rgmanager | |||
Service Name Owner (Last) State | |||
------- ---- ----- ------ ----- | |||
service:libvirtd_n01 an-a05n01.alteeve.ca started | |||
service:libvirtd_n02 an-a05n02.alteeve.ca started | |||
service:storage_n01 (an-a05n01.alteeve.ca) disabled | |||
service:storage_n02 an-a05n02.alteeve.ca started | |||
</syntaxhighlight> | |||
|} | |||
As expected, <span class="code">storage_n01</span> is disabled. Let's start it up. | |||
{|class="wikitable" | |||
!<span class="code">an-a05n01</span> | |||
|style="white-space: nowrap;"|<syntaxhighlight lang="bash"> | |||
clusvcadm -e storage_n01 -m an-a05n01.alteeve.ca | |||
</syntaxhighlight> | |||
<syntaxhighlight lang="text"> | |||
Member an-a05n01.alteeve.ca trying to enable service:storage_n01...Success | |||
service:storage_n01 is now running on an-a05n01.alteeve.ca | |||
</syntaxhighlight> | |||
|} | |||
Verify with another <span class="code">clustat</span> call. | |||
{|class="wikitable" | |||
!<span class="code">an-a05n01</span> | |||
|style="white-space: nowrap;"|<syntaxhighlight lang="bash"> | |||
clustat | |||
</syntaxhighlight> | |||
<syntaxhighlight lang="text"> | |||
Cluster Status for an-anvil-05 @ Fri Nov 1 23:45:20 2013 | |||
Member Status: Quorate | |||
Member Name ID Status | |||
------ ---- ---- ------ | |||
an-a05n01.alteeve.ca 1 Online, Local, rgmanager | |||
an-a05n02.alteeve.ca 2 Online, rgmanager | |||
Service Name Owner (Last) State | |||
------- ---- ----- ------ ----- | |||
service:libvirtd_n01 an-a05n01.alteeve.ca started | |||
service:libvirtd_n02 an-a05n02.alteeve.ca started | |||
service:storage_n01 an-a05n01.alteeve.ca started | |||
service:storage_n02 an-a05n02.alteeve.ca started | |||
</syntaxhighlight> | |||
|- | |||
!<span class="code">an-a05n02</span> | |||
|style="white-space: nowrap;"|<syntaxhighlight lang="bash"> | |||
clustat | |||
</syntaxhighlight> | |||
<syntaxhighlight lang="text"> | |||
Cluster Status for an-anvil-05 @ Fri Nov 1 23:45:20 2013 | |||
Member Status: Quorate | |||
Member Name ID Status | |||
------ ---- ---- ------ | |||
an-a05n01.alteeve.ca 1 Online, rgmanager | |||
an-a05n02.alteeve.ca 2 Online, Local, rgmanager | |||
Service Name Owner (Last) State | |||
------- ---- ----- ------ ----- | |||
service:libvirtd_n01 an-a05n01.alteeve.ca started | |||
service:libvirtd_n02 an-a05n02.alteeve.ca started | |||
service:storage_n01 an-a05n01.alteeve.ca started | |||
service:storage_n02 an-a05n02.alteeve.ca started | |||
</syntaxhighlight> | |||
|} | |||
If we look at DRBD now, it will show as being up and running on both nodes. | |||
{{note|1=If the DRBD status shows the resource still stopped on the node, give it a minute and check again. It can sometimes take a few moments before the resources in the service starts.}} | |||
{|class="wikitable" | |||
!<span class="code">an-a05n01</span> | |||
|style="white-space: nowrap;"|<syntaxhighlight lang="bash"> | |||
/etc/init.d/drbd status | |||
</syntaxhighlight> | |||
<syntaxhighlight lang="text"> | |||
drbd driver loaded OK; device status: | |||
version: 8.3.16 (api:88/proto:86-97) | |||
GIT-hash: a798fa7e274428a357657fb52f0ecf40192c1985 build by phil@Build64R6, 2013-09-27 16:00:43 | |||
m:res cs ro ds p mounted fstype | |||
0:r0 Connected Primary/Primary UpToDate/UpToDate C | |||
1:r1 Connected Primary/Primary UpToDate/UpToDate C | |||
</syntaxhighlight> | |||
|- | |||
!<span class="code">an-a05n02</span> | |||
|style="white-space: nowrap;"|<syntaxhighlight lang="bash"> | |||
/etc/init.d/drbd status | |||
</syntaxhighlight> | |||
<syntaxhighlight lang="text"> | |||
drbd driver loaded OK; device status: | |||
version: 8.3.16 (api:88/proto:86-97) | |||
GIT-hash: a798fa7e274428a357657fb52f0ecf40192c1985 build by phil@Build64R6, 2013-09-27 16:00:43 | |||
m:res cs ro ds p mounted fstype | |||
0:r0 Connected Primary/Primary UpToDate/UpToDate C | |||
1:r1 Connected Primary/Primary UpToDate/UpToDate C | |||
</syntaxhighlight> | |||
|} | |||
Everything is back up and running normally. | |||
= Testing Network Redundancy = | |||
Now that the ''Anvil!'' is up and running, it's time to test the network's fault tolerance capabilities. | |||
We wanted to wait this long because we need to see how our cluster and storage software handles the failure and recovery of various networking components. Had we tested before now, we would have had to rely on simple tests, like ping responses, which do not give us a complete picture of the network's real resiliency. | |||
We will perform the following tests: | |||
* Pull each network cable and confirm that the bond it belongs to failed over to the other interface. | |||
* Kill the primary switch entirely and then recover it. | |||
* Kill the backup switch entirely and then recover it. | |||
During these tests, we will watch the following: | |||
* Watch a special <span class="code">/proc</span> file for each bond to see how its state changes. | |||
* Run a ping flood from each node to the other node, using each of out three networks. | |||
* Watch the cluster membership. | |||
* Watch the status of the DRBD resources. | |||
* Tail the system log files. | |||
The cluster will be formed and the storage services will be running. We do not need to have the servers running, so we will turn them off. If something goes wrong here, it will certainly end up with a node being fenced. No need to risk hurting the servers. Whether they are running or nor will not will have no effect of the tests. | |||
== What we will be Watching == | |||
Before setup for the tests, lets take a minute to look at the various things we'll be monitoring for faults. | |||
=== Understanding '/proc/net/bonding/{bcn,sn,ifn}_bond1' === | |||
When a bond is created, a special <span class="code">[[procfs]]</span> file is created whose name matches the name of the new <span class="code">{bcn,sn,ifn}_bond1</span> devices. We created three bonds; <span class="code">bcn_bond1</span>, <span class="code">sn_bond1</span> and <span class="code">ifn_bond1</span>, so we'll find <span class="code">/proc/net/bonding/bcn_bond1</span>, <span class="code">/proc/net/bonding/sn_bond1</span> and <span class="code">/proc/net/bonding/ifn_bond1</span> respectively. | |||
These look like normal files, and we can read them like files, but they're actually representations of kernel values. Specifically, the health and state of the bond device, its slaves and current performance settings. Lets take a look at <span class="code">bcn_bond1</span> on <span class="code">an-a05n01</span>. | |||
{|class="wikitable" | |||
!<span class="code">an-a05n01</span> | |||
|style="white-space: nowrap;"|<syntaxhighlight lang="bash"> | |||
cat /proc/net/bonding/bcn_bond1 | |||
</syntaxhighlight> | |||
<syntaxhighlight lang="text"> | |||
Ethernet Channel Bonding Driver: v3.6.0 (September 26, 2009) | |||
Bonding Mode: fault-tolerance (active-backup) | |||
Primary Slave: bcn_link1 (primary_reselect always) | |||
Currently Active Slave: bcn_link1 | |||
MII Status: up | |||
MII Polling Interval (ms): 100 | |||
Up Delay (ms): 120000 | |||
Down Delay (ms): 0 | |||
Slave Interface: bcn_link1 | |||
MII Status: up | |||
Speed: 1000 Mbps | |||
Duplex: full | |||
Link Failure Count: 0 | |||
Permanent HW addr: 00:19:99:9c:9b:9e | |||
Slave queue ID: 0 | |||
Slave Interface: bcn_link2 | |||
MII Status: up | |||
Speed: 1000 Mbps | |||
Duplex: full | |||
Link Failure Count: 0 | |||
Permanent HW addr: 00:1b:21:81:c3:35 | |||
Slave queue ID: 0 | |||
</syntaxhighlight> | |||
|} | |||
If you recall from the network setup step, we made <span class="code">bcn_link1</span> the primary interface and <span class="code">bcn_link2</span> the backup interface for <span class="code">bcn_bond1</span>. Indeed, we can see that these two interfaces are indeed slaved to <span class="code">bcn_bond1</span>. | |||
The data here is in three sections: | |||
* The first section shows the state of the overall bond. | |||
{|class="wikitable" | |||
!<span class="code">an-a05n01</span> | |||
|style="white-space: nowrap;"|<syntaxhighlight lang="text"> | |||
Bonding Mode: fault-tolerance (active-backup) | |||
Primary Slave: bcn_link1 (primary_reselect always) | |||
Currently Active Slave: bcn_link1 | |||
MII Status: up | |||
MII Polling Interval (ms): 100 | |||
Up Delay (ms): 120000 | |||
Down Delay (ms): 0 | |||
</syntaxhighlight> | |||
|} | |||
This tells us that we're using the "Active/Backup" bonding mode, that the currently active interface is <span class="code">bcn_link1</span> and that <span class="code">bcn_link1</span> will always be used when both interfaces are healthy, though it will wait two minutes (<span class="code">120,000 ms</span>) after <span class="code">bcn_link1</span> returns before it will be used. It also tells us that it will manually check for a link on the slaved interfaces every 100 ms. | |||
The next two sections cover the two slaved interfaces: | |||
* Information on <span class="code">bcn_link1</span> | |||
{|class="wikitable" | |||
!<span class="code">an-a05n01</span> | |||
|style="white-space: nowrap;"|<syntaxhighlight lang="text"> | |||
Slave Interface: bcn_link1 | |||
MII Status: up | |||
Speed: 1000 Mbps | |||
Duplex: full | |||
Link Failure Count: 0 | |||
Permanent HW addr: 00:19:99:9c:9b:9e | |||
Slave queue ID: 0 | |||
</syntaxhighlight> | |||
|} | |||
We see here that the link (<span class="code">MII Status</span>) is up and running at 1000 [[Mbps]] in full duplex mode. It shows us that it has not seen any failures in this interface since the bond was last started. It also shows us the interfaces real [[MAC]] address. This is important because, from the point of view of <span class="code">ifconfig</span> or <span class="code">ip addr</span>, both slaved interfaces will ''appear'' to have the same MAC address (which depends on the currently active interface). This is a trick done in active-backup (<span class="code">mode=1</span>) bonding to speed up fail-over. The queue ID is used in other bonding modes for routing traffic down certain slaves when possible, we can ignore it here. | |||
* Information on <span class="code">bcn_link2</span>: | |||
{|class="wikitable" | |||
!<span class="code">an-a05n01</span> | |||
|style="white-space: nowrap;"|<syntaxhighlight lang="text"> | |||
Slave Interface: bcn_link2 | |||
MII Status: up | |||
Speed: 1000 Mbps | |||
Duplex: full | |||
Link Failure Count: 0 | |||
Permanent HW addr: 00:1b:21:81:c3:35 | |||
Slave queue ID: 0 | |||
</syntaxhighlight> | |||
|} | |||
The <span class="code">bcn_link2</span> information is more or less the same as the first. This is expected because, usually, the hardware is the same. The only expected differences are the device name and MAC address, of course. | |||
=== Understanding '/etc/init.d/drbd status' === | |||
Earlier, we looked at another <span class="code">[[procfs]]</span> file called <span class="code">/proc/drbd</span> in order to watch the state of our DRBD resources. There is another way we can monitor DRBD using its initialization script. We'll use that method here. | |||
Lets look at <span class="code">an-a05n01</span>. | |||
{|class="wikitable" | |||
!<span class="code">an-a05n01</span> | |||
|style="white-space: nowrap;"|<syntaxhighlight lang="bash"> | |||
/etc/init.d/drbd status | |||
</syntaxhighlight> | |||
<syntaxhighlight lang="text"> | |||
GIT-hash: a798fa7e274428a357657fb52f0ecf40192c1985 build by phil@Build64R6, 2013-09-27 16:00:43 | |||
m:res cs ro ds p mounted fstype | |||
0:r0 Connected Primary/Primary UpToDate/UpToDate C | |||
1:r1 Connected Primary/Primary UpToDate/UpToDate C | |||
</syntaxhighlight> | |||
|} | |||
You will notice that the output is almost exactly the same as <span class="code">cat /proc/drbd</span>'s output, but formatted a little nicer. | |||
=== Understanding 'cman_tool nodes' === | |||
This is a more specific <span class="code">cman_tool</span> call than we've used in the past. Before, we called <span class="code">cman_tool status</span> to get a broad overview of the cluster's state. It can be used in many ways to get more information about specific about the cluster. | |||
If you recall, <span class="code">cman_tool status</span> would show us the simple sum of nodes in the cluster; <span class="code">Nodes: 2</span>. If we want to know more about the nodes, we can use <span class="code">cman_tool nodes</span>. Lets see what that looks like on <span class="code">an-a05n01</span>. | |||
{|class="wikitable" | |||
!<span class="code">an-a05n01</span> | |||
|style="white-space: nowrap;"|<syntaxhighlight lang="bash"> | |||
cman_tool nodes | |||
</syntaxhighlight> | |||
<syntaxhighlight lang="text"> | |||
Node Sts Inc Joined Name | |||
1 M 332 2013-11-27 14:11:01 an-a05n01.alteeve.ca | |||
2 M 340 2013-11-27 14:11:02 an-a05n02.alteeve.ca | |||
</syntaxhighlight> | |||
|} | |||
Slightly more informative. | |||
== Network Testing Terminal Layout == | |||
If you have a decent resolution monitor (or multiple monitors), you should be able to open 18 terminals at once. This is how many are needed to run ping floods, watch the bond status files, watch the system logs, watch DRBD and watch cluster membership all at the same time. This configuration makes it very easy to keep a near real-time, complete view of all network components. | |||
Personally, I have a 1920 x 1080 screen, which is pretty typical these days. I use a 9-point monospace font in my gnome terminals and I disable the menu bar. With that, the layout below fits nicely; | |||
[[Image:2-node_el6-tutorial_network-test_terminal-layout_02.png|thumb|center|1000px|Terminal layout used for HA network testing; Calls running.]] | |||
The details of that are: | |||
{|class="wikitable" | |||
!colspan="3"|Terminal layout for monitoring during network testing. | |||
|- | |||
|style="white-space: nowrap;"|<span class="code">an-a05n01</span>, terminal window @ <span class="code">70 x 10</span><br /> | |||
---- | |||
Watch <span class="code">bcn_bond1</span> | |||
|style="white-space: nowrap;"|<span class="code">an-a05n01</span>, terminal window @ <span class="code">70 x 10</span><br /> | |||
---- | |||
Ping flood <span class="code">an-a05n02.bcn</span> | |||
|style="white-space: nowrap;"|<span class="code">an-a05n01</span>, terminal window @ <span class="code">127 x 10</span><br /> | |||
---- | |||
Watch <span class="code">cman_tool nodes</span> | |||
|- | |||
|style="white-space: nowrap;"|<span class="code">an-a05n01</span>, terminal window @ <span class="code">70 x 10</span><br /> | |||
---- | |||
Watch <span class="code">sn_bond1</span> | |||
|style="white-space: nowrap;"|<span class="code">an-a05n01</span>, terminal window @ <span class="code">70 x 10</span><br /> | |||
---- | |||
Ping flooding <span class="code">an-a05n02.sn</span> | |||
|style="white-space: nowrap;"|<span class="code">an-a05n01</span>, terminal window @ <span class="code">127 x 10</span><br /> | |||
---- | |||
Watching <span class="code">/etc/init.d/drbd status</span> | |||
|- | |||
|style="white-space: nowrap;"|<span class="code">an-a05n01</span>, terminal window @ <span class="code">70 x 10</span><br /> | |||
---- | |||
Watch <span class="code">ifn_bond1</span> | |||
|style="white-space: nowrap;"|<span class="code">an-a05n01</span>, terminal window @ <span class="code">70 x 10</span><br /> | |||
---- | |||
Ping flood <span class="code">an-a05n02.ifn</span> | |||
|style="white-space: nowrap;"|<span class="code">an-a05n01</span>, terminal window @ <span class="code">127 x 10</span><br /> | |||
---- | |||
Watch <span class="code">tail -f -n 0 /var/log/messages</span><br /> | |||
|- | |||
|style="white-space: nowrap;"|<span class="code">an-a05n02</span>, terminal window @ <span class="code">70 x 10</span><br /> | |||
---- | |||
Watch <span class="code">bcn_bond1</span> | |||
|style="white-space: nowrap;"|<span class="code">an-a05n02</span>, terminal window @ <span class="code">70 x 10</span><br /> | |||
---- | |||
Ping flood <span class="code">an-a05n01.bcn</span> | |||
|style="white-space: nowrap;"|<span class="code">an-a05n02</span>, terminal window @ <span class="code">127 x 10</span><br /> | |||
---- | |||
Watch <span class="code">cman_tool nodes</span> | |||
|- | |||
|style="white-space: nowrap;"|<span class="code">an-a05n02</span>, terminal window @ <span class="code">70 x 10</span><br /> | |||
---- | |||
Watch <span class="code">sn_bond1</span> | |||
|style="white-space: nowrap;"|<span class="code">an-a05n02</span>, terminal window @ <span class="code">70 x 10</span><br /> | |||
---- | |||
Ping flooding <span class="code">an-a05n01.sn</span> | |||
|style="white-space: nowrap;"|<span class="code">an-a05n02</span>, terminal window @ <span class="code">127 x 10</span><br /> | |||
---- | |||
Watching <span class="code">/etc/init.d/drbd status</span> | |||
|- | |||
|style="white-space: nowrap;"|<span class="code">an-a05n02</span>, terminal window @ <span class="code">70 x 10</span><br /> | |||
---- | |||
Watch <span class="code">ifn_bond1</span> | |||
|style="white-space: nowrap;"|<span class="code">an-a05n02</span>, terminal window @ <span class="code">70 x 10</span><br /> | |||
---- | |||
Ping flood <span class="code">an-a05n01.ifn</span> | |||
|style="white-space: nowrap;"|<span class="code">an-a05n02</span>, terminal window @ <span class="code">127 x 10</span><br /> | |||
---- | |||
Watch <span class="code">tail -f -n 0 /var/log/messages</span><br /> | |||
|} | |||
The actual commands we will use are: | |||
{|class="wikitable" | |||
!rowspan="10"|<span class="code">an-a05n01</span> | |||
!Task | |||
!Command | |||
|- | |||
|Watch <span class="code">bcn_bond1</span> | |||
|style="white-space: nowrap;"|<span class="code">watch "cat /proc/net/bonding/bcn_bond1 | grep -e Slave -e Status | grep -v queue"</span> | |||
|- | |||
|Watch <span class="code">sn_bond1</span> | |||
|style="white-space: nowrap;"|<span class="code">watch "cat /proc/net/bonding/sn_bond1 | grep -e Slave -e Status | grep -v queue"</span> | |||
|- | |||
|Watch <span class="code">ifn_bond1</span> | |||
|style="white-space: nowrap;"|<span class="code">watch "cat /proc/net/bonding/ifn_bond1 | grep -e Slave -e Status | grep -v queue"</span> | |||
|- | |||
|Ping flood <span class="code">an-a05n02.bcn</span> | |||
|style="white-space: nowrap;"|<span class="code">clear; ping -f an-a05n02.bcn</span> | |||
|- | |||
|Ping flood <span class="code">an-a05n02.sn</span> | |||
|style="white-space: nowrap;"|<span class="code">clear; ping -f an-a05n02.sn</span> | |||
|- | |||
|Ping flood <span class="code">an-a05n02.ifn</span> | |||
|style="white-space: nowrap;"|<span class="code">clear; ping -f an-a05n02.ifn</span> | |||
|- | |||
|Watch cluster membership | |||
|style="white-space: nowrap;"|<span class="code">watch cman_tool nodes</span> | |||
|- | |||
|Watch DRBD resource status | |||
|style="white-space: nowrap;"|<span class="code">watch /etc/init.d/drbd status</span> | |||
|- | |||
|<span class="code">tail</span> system logs | |||
|style="white-space: nowrap;"|<span class="code">clear; tail -f -n 0 /var/log/messages</span> | |||
|- | |||
!rowspan="10"|<span class="code">an-a05n02</span> | |||
!Task | |||
!Command | |||
|- | |||
|Watch <span class="code">bcn_bond1</span> | |||
|style="white-space: nowrap;"|<span class="code">watch "cat /proc/net/bonding/bcn_bond1 | grep -e Slave -e Status | grep -v queue"</span> | |||
|- | |||
|Watch <span class="code">sn_bond1</span> | |||
|style="white-space: nowrap;"|<span class="code">watch "cat /proc/net/bonding/sn_bond1 | grep -e Slave -e Status | grep -v queue"</span> | |||
|- | |||
|Watch <span class="code">ifn_bond1</span> | |||
|style="white-space: nowrap;"|<span class="code">watch "cat /proc/net/bonding/ifn_bond1 | grep -e Slave -e Status | grep -v queue"</span> | |||
|- | |||
|Ping flood <span class="code">an-a05n01.bcn</span> | |||
|style="white-space: nowrap;"|<span class="code">clear; ping -f an-a05n01.bcn</span> | |||
|- | |||
|Ping flood <span class="code">an-a05n01.sn</span> | |||
|style="white-space: nowrap;"|<span class="code">clear; ping -f an-a05n01.sn</span> | |||
|- | |||
|Ping flood <span class="code">an-a05n01.ifn</span> | |||
|style="white-space: nowrap;"|<span class="code">clear; ping -f an-a05n01.ifn</span> | |||
|- | |||
|Watch cluster membership | |||
|style="white-space: nowrap;"|<span class="code">watch cman_tool nodes</span> | |||
|- | |||
|Watch DRBD resource status | |||
|style="white-space: nowrap;"|<span class="code">watch /etc/init.d/drbd status</span> | |||
|- | |||
|<span class="code">tail</span> system logs | |||
|style="white-space: nowrap;"|<span class="code">clear; tail -f -n 0 /var/log/messages</span> | |||
|} | |||
With this, we can keep a real-time overview of the status of all network, drbd and cluster components for both nodes. It may take a little bit to setup, but it will make the following network failure and recovery tests much easier to keep track of. Most importantly, it will allow you to quickly see if any of the tests fail. | |||
== How to Know if the Tests Passed == | |||
Well, the most obvious answer to this question is if the cluster stack blows up or not. | |||
We can be a little more subtle than that though. | |||
We will be watching for: | |||
* Bonds not failing over to or back from their backup links when the primary link fails. | |||
* More than 20 or 30 lost packets across each/all effected bonds fail over or back. Keep in mind that this may sound like a lot of dropped packets, but we're flooding the network with as many pings as the hardware can push out, so 20 to 30 lost packets is actually very low packet loss. | |||
* Corosync declaring the peer node lost and cluster membership changing / node fencing. | |||
* DRBD losing connection to the peer / node fencing. | |||
== Breaking things! == | |||
To document the testing of all failure conditions would add substantially to this tutorial and not add much value. | |||
So instead we will look at sample failures to see what to expect. You can then use them as references for your own testing. | |||
=== Failing a Bond's Primary Interface === | |||
For this test, we will pull <span class="code">bcn_link1</span>'s network cable out of <span class="code">an-a05n01</span>. This will trigger a fail-over to <span class="code">bcn_link2</span> which we will see in <span class="code">an-a05n01</span>'s <span class="code">bcn_bond1</span> file and we will see messages about the failure in the system logs. Both <span class="code">an-a05n01</span> and <span class="code">an-a05n02</span>'s ping flood on the [[BCN]] will show a number of dropped packets. | |||
Assuming all goes well, corosync should not report any errors or react in any way to this test. | |||
So pull the cable and see if you're result match ours. | |||
{|class="wikitable" | |||
!<span class="code">an-a05n01</span> | |||
|style="white-space: nowrap;"| | |||
<span class="code">bcn_bond1</span> data: | |||
<syntaxhighlight lang="text"> | |||
Primary Slave: bcn_link1 (primary_reselect always) | |||
Currently Active Slave: ifn_link2 | |||
MII Status: up | |||
Slave Interface: bcn_link1 | |||
MII Status: down | |||
Slave Interface: bcn_link2 | |||
MII Status: up | |||
</syntaxhighlight> | |||
System log entries: | |||
<syntaxhighlight lang="text"> | |||
Nov 27 19:54:44 an-a05n01 kernel: igb: bcn_link1 NIC Link is Down | |||
Nov 27 19:54:44 an-a05n01 kernel: bonding: bcn_bond1: link status definitely down for interface bcn_link1, disabling it | |||
Nov 27 19:54:44 an-a05n01 kernel: bonding: bcn_bond1: making interface bcn_link2 the new active one. | |||
</syntaxhighlight> | |||
|} | |||
This shows that <span class="code">bcn_link2</span> became the active link and <span class="code">bcn_link1</span> shows as <span class="code">down</span>. | |||
Lets look at the ping flood; | |||
{|class="wikitable" | |||
!<span class="code">an-a05n01</span> | |||
!<span class="code">an-a05n02</span> | |||
|- | |||
|style="white-space: nowrap;"|<syntaxhighlight lang="text"> | |||
PING an-a05n02.bcn (10.20.50.2) 56(84) bytes of data. | |||
.......................... | |||
</syntaxhighlight> | |||
|style="white-space: nowrap;"|<syntaxhighlight lang="text"> | |||
PING an-a05n01.bcn (10.20.50.1) 56(84) bytes of data. | |||
.......................... | |||
</syntaxhighlight> | |||
|} | |||
Exactly in-line with what we expected! If you look at the cluster membership and system logs, you will see that nothing was noticed outside of the bonding driver! | |||
So let's plug the cable back in. | |||
We'll notice that the bond driver will see the link return, change the state of <span class="code">bcn_link1</span> to <span class="code">going back</span> and nothing more will happen at first. After two minutes, <span class="code">bcn_bond1</span> will switch back to using <span class="code">bcn_link1</span> and there will be another short burst of dropped packets. | |||
{|class="wikitable" | |||
!<span class="code">an-a05n01</span> | |||
|style="white-space: nowrap;"| | |||
<span class="code">bcn_bond1</span> data: | |||
<syntaxhighlight lang="text"> | |||
Primary Slave: bcn_link1 (primary_reselect always) | |||
Currently Active Slave: bcn_link2 | |||
MII Status: up | |||
Slave Interface: bcn_link1 | |||
MII Status: going back | |||
Slave Interface: bcn_link2 | |||
MII Status: up | |||
</syntaxhighlight> | |||
System log entries: | |||
<syntaxhighlight lang="text"> | |||
Nov 27 20:02:24 an-a05n01 kernel: igb: bcn_link1 NIC Link is Up 1000 Mbps Full Duplex, Flow Control: RX/TX | |||
Nov 27 20:02:24 an-a05n01 kernel: bonding: bcn_bond1: link status up for interface bcn_link1, enabling it in 120000 ms. | |||
</syntaxhighlight> | |||
|} | |||
Now we wait for two minutes. | |||
Ding! | |||
{|class="wikitable" | |||
!<span class="code">an-a05n01</span> | |||
|style="white-space: nowrap;"| | |||
<span class="code">bcn_bond1</span> data: | |||
<syntaxhighlight lang="text"> | |||
Primary Slave: bcn_link1 (primary_reselect always) | |||
Currently Active Slave: bcn_link1 | |||
MII Status: up | |||
Slave Interface: bcn_link1 | |||
MII Status: up | |||
Slave Interface: bcn_link2 | |||
MII Status: up | |||
</syntaxhighlight> | |||
System log entries: | |||
<syntaxhighlight lang="text"> | |||
Nov 27 20:04:24 an-a05n01 kernel: bcn_bond1: link status definitely up for interface bcn_link1, 1000 Mbps full duplex. | |||
Nov 27 20:04:24 an-a05n01 kernel: bonding: bcn_bond1: making interface bcn_link1 the new active one. | |||
</syntaxhighlight> | |||
|} | |||
Now lets look at the dropped packets when the switch-back happened; | |||
{|class="wikitable" | |||
!<span class="code">an-a05n01</span> | |||
!<span class="code">an-a05n02</span> | |||
|- | |||
|style="white-space: nowrap;"|<syntaxhighlight lang="text"> | |||
PING an-a05n02.bcn (10.20.50.2) 56(84) bytes of data. | |||
. | |||
</syntaxhighlight> | |||
|style="white-space: nowrap;"|<syntaxhighlight lang="text"> | |||
PING an-a05n01.bcn (10.20.50.1) 56(84) bytes of data. | |||
... | |||
</syntaxhighlight> | |||
|} | |||
Notice how <span class="code">an-a05n01</span> didn't lose a packet and <span class="code">an-a05n02</span> only lost a few? The switch was controlled, so no time was lost detecting the link failure. | |||
Success! | |||
{{note|1=Don't be tempted to test only a few links!}} | |||
Repeat this test for all network connections on both nodes. Ensure that each links fails and recovers in the same way. We have a complex network and tests like this help find cabling and configuration issues. These tests have value beyond simply verifying fail-over and recovery. | |||
=== Failing the Network Switches === | |||
Failing and then recovering the primary switch tests a few things: | |||
* Can all the bonds fail over to their backup links at the same time? | |||
* Does the switch handle the loss of the primary switch in the stack properly? | |||
* Does the switch interrupt traffic when it recovers? | |||
Even if you don't have a stacked switch, this test is still very important. We set the <span class="code">updelay</span> to two minutes, but there is a chance that is still not long enough for your switch. This test will expose issues like this. | |||
{{note|1=If you don't have port trunking, be sure to switch your workstation's links or network uplink from the primary to backup switch before proceeding. This will ensure you can monitor the nodes during the test without interruption.}} | |||
Before we start, lets take a look at the current view of thing; | |||
{|class="wikitable" | |||
!rowspan="4"|<span class="code">an-a05n01</span> | |||
|- | |||
|style="white-space: nowrap;"|Watching <span class="code">bcn_bond1</span><br /> | |||
<syntaxhighlight lang="text"> | |||
Primary Slave: bcn_link1 (primary_reselect always) | |||
Currently Active Slave: bcn_link1 | |||
MII Status: up | |||
Slave Interface: bcn_link1 | |||
MII Status: up | |||
Slave Interface: bcn_link2 | |||
MII Status: up | |||
</syntaxhighlight> | |||
|style="white-space: nowrap;"|Ping flooding <span class="code">an-a05n02.bcn</span><br /> | |||
<syntaxhighlight lang="text"> | |||
PING an-a05n02.bcn (10.20.50.2) 56(84) bytes of data. | |||
. | |||
</syntaxhighlight> | |||
|style="white-space: nowrap;"|Watching <span class="code"></span>cman_tool nodes<br /> | |||
<syntaxhighlight lang="text"> | |||
Node Sts Inc Joined Name | |||
1 M 348 2013-12-02 10:05:17 an-a05n01.alteeve.ca | |||
2 M 360 2013-12-02 10:17:45 an-a05n02.alteeve.ca | |||
</syntaxhighlight> | |||
|- | |||
|style="white-space: nowrap;"|Watching <span class="code">sn_bond1</span><br /> | |||
<syntaxhighlight lang="text"> | |||
Primary Slave: sn_link1 (primary_reselect always) | |||
Currently Active Slave: sn_link1 | |||
MII Status: up | |||
Slave Interface: sn_link1 | |||
MII Status: up | |||
Slave Interface: sn_link2 | |||
MII Status: up | |||
</syntaxhighlight> | |||
|style="white-space: nowrap;"|Ping flooding <span class="code">an-a05n02.sn</span><br /> | |||
<syntaxhighlight lang="text"> | |||
PING an-a05n02.sn (10.10.50.2) 56(84) bytes of data. | |||
. | |||
</syntaxhighlight> | |||
|style="white-space: nowrap;"|Watching <span class="code">/etc/init.d/drbd status</span><br /> | |||
<syntaxhighlight lang="text"> | |||
drbd driver loaded OK; device status: | |||
version: 8.3.16 (api:88/proto:86-97) | |||
GIT-hash: a798fa7e274428a357657fb52f0ecf40192c1985 build by phil@Build64R6, 2013-09-27 16:00:43 | |||
m:res cs ro ds p mounted fstype | |||
0:r0 Connected Primary/Primary UpToDate/UpToDate C | |||
1:r1 Connected Primary/Primary UpToDate/UpToDate C | |||
</syntaxhighlight> | |||
|- | |||
|style="white-space: nowrap;"|Watching <span class="code">ifn_bond1</span><br /> | |||
<syntaxhighlight lang="text"> | |||
Primary Slave: ifn_link1 (primary_reselect always) | |||
Currently Active Slave: ifn_link1 | |||
MII Status: up | |||
Slave Interface: ifn_link1 | |||
MII Status: up | |||
Slave Interface: ifn_link2 | |||
MII Status: up | |||
</syntaxhighlight> | |||
|style="white-space: nowrap;"|Ping flooding <span class="code">an-a05n02.ifn</span><br /> | |||
<syntaxhighlight lang="text"> | |||
PING an-a05n02.ifn (10.255.50.2) 56(84) bytes of data. | |||
. | |||
</syntaxhighlight> | |||
|style="white-space: nowrap;"|Watching <span class="code">tail -f -n 0 /var/log/messages</span><br /> | |||
<syntaxhighlight lang="text"> | |||
</syntaxhighlight> | |||
|- | |||
!rowspan="4"|<span class="code">an-a05n02</span> | |||
|- | |||
|style="white-space: nowrap;"|Watching <span class="code">bcn_bond1</span><br /> | |||
<syntaxhighlight lang="text"> | |||
Primary Slave: ifn_link1 (primary_reselect always) | |||
Currently Active Slave: ifn_link1 | |||
MII Status: up | |||
Slave Interface: ifn_link1 | |||
MII Status: up | |||
Slave Interface: ifn_link2 | |||
MII Status: up | |||
</syntaxhighlight> | |||
|style="white-space: nowrap;"|Ping flooding <span class="code">an-a05n01.bcn</span><br /> | |||
<syntaxhighlight lang="text"> | |||
PING an-a05n01.bcn (10.20.50.1) 56(84) bytes of data. | |||
. | |||
</syntaxhighlight> | |||
|style="white-space: nowrap;"|Watching <span class="code"></span>cman_tool nodes<br /> | |||
<syntaxhighlight lang="text"> | |||
Node Sts Inc Joined Name | |||
1 M 360 2013-12-02 10:17:45 an-a05n01.alteeve.ca | |||
2 M 356 2013-12-02 10:17:45 an-a05n02.alteeve.ca | |||
</syntaxhighlight> | |||
|- | |||
|style="white-space: nowrap;"|Watching <span class="code">sn_bond1</span><br /> | |||
<syntaxhighlight lang="text"> | |||
Primary Slave: sn_link1 (primary_reselect always) | |||
Currently Active Slave: sn_link1 | |||
MII Status: up | |||
Slave Interface: sn_link1 | |||
MII Status: up | |||
Slave Interface: sn_link2 | |||
MII Status: up | |||
</syntaxhighlight> | |||
|style="white-space: nowrap;"|Ping flooding <span class="code">an-a05n01.sn</span><br /> | |||
<syntaxhighlight lang="text"> | |||
PING an-a05n01.sn (10.10.50.1) 56(84) bytes of data. | |||
. | |||
</syntaxhighlight> | |||
|style="white-space: nowrap;"|Watching <span class="code">/etc/init.d/drbd status</span><br /> | |||
<syntaxhighlight lang="text"> | |||
drbd driver loaded OK; device status: | |||
version: 8.3.16 (api:88/proto:86-97) | |||
GIT-hash: a798fa7e274428a357657fb52f0ecf40192c1985 build by phil@Build64R6, 2013-09-27 16:00:43 | |||
m:res cs ro ds p mounted fstype | |||
0:r0 Connected Primary/Primary UpToDate/UpToDate C | |||
1:r1 Connected Primary/Primary UpToDate/UpToDate C | |||
</syntaxhighlight> | |||
|- | |||
|style="white-space: nowrap;"|Watching <span class="code">ifn_bond1</span><br /> | |||
<syntaxhighlight lang="text"> | |||
Primary Slave: ifn_link1 (primary_reselect always) | |||
Currently Active Slave: ifn_link1 | |||
MII Status: up | |||
Slave Interface: ifn_link1 | |||
MII Status: up | |||
Slave Interface: ifn_link2 | |||
MII Status: up | |||
</syntaxhighlight> | |||
|style="white-space: nowrap;"|Ping flooding <span class="code">an-a05n01.ifn</span><br /> | |||
<syntaxhighlight lang="text"> | |||
PING an-a05n01.ifn (10.255.50.1) 56(84) bytes of data. | |||
. | |||
</syntaxhighlight> | |||
|style="white-space: nowrap;"|Watching <span class="code">tail -f -n 0 /var/log/messages</span><br /> | |||
<syntaxhighlight lang="text"> | |||
</syntaxhighlight> | |||
|} | |||
So now we will pull the power cable out of the primary switch and wait for things to settle. | |||
{|class="wikitable" | |||
!rowspan="4"|<span class="code">an-a05n01</span> | |||
|- | |||
|style="white-space: nowrap;"|Watching <span class="code">bcn_bond1</span><br /> | |||
<syntaxhighlight lang="text"> | |||
Primary Slave: bcn_link1 (primary_reselect always) | |||
Currently Active Slave: bcn_link2 | |||
MII Status: up | |||
Slave Interface: bcn_link1 | |||
MII Status: down | |||
Slave Interface: bcn_link2 | |||
MII Status: up | |||
</syntaxhighlight> | |||
|style="white-space: nowrap;"|Ping flooding <span class="code">an-a05n02.bcn</span><br /> | |||
<syntaxhighlight lang="text"> | |||
PING an-a05n02.bcn (10.20.50.2) 56(84) bytes of data. | |||
............................. | |||
</syntaxhighlight> | |||
|style="white-space: nowrap;"|Watching <span class="code"></span>cman_tool nodes<br /> | |||
<syntaxhighlight lang="text"> | |||
Node Sts Inc Joined Name | |||
1 M 348 2013-12-02 10:05:17 an-a05n01.alteeve.ca | |||
2 M 360 2013-12-02 10:17:45 an-a05n02.alteeve.ca | |||
</syntaxhighlight> | |||
|- | |||
|style="white-space: nowrap;"|Watching <span class="code">sn_bond1</span><br /> | |||
<syntaxhighlight lang="text"> | |||
Primary Slave: sn_link1 (primary_reselect always) | |||
Currently Active Slave: sn_link2 | |||
MII Status: up | |||
Slave Interface: sn_link1 | |||
MII Status: down | |||
Slave Interface: sn_link2 | |||
MII Status: up | |||
</syntaxhighlight> | |||
|style="white-space: nowrap;"|Ping flooding <span class="code">an-a05n02.sn</span><br /> | |||
<syntaxhighlight lang="text"> | |||
PING an-a05n02.sn (10.10.50.2) 56(84) bytes of data. | |||
................................ | |||
</syntaxhighlight> | |||
|style="white-space: nowrap;"|Watching <span class="code">/etc/init.d/drbd status</span><br /> | |||
<syntaxhighlight lang="text"> | |||
drbd driver loaded OK; device status: | |||
version: 8.3.16 (api:88/proto:86-97) | |||
GIT-hash: a798fa7e274428a357657fb52f0ecf40192c1985 build by phil@Build64R6, 2013-09-27 16:00:43 | |||
m:res cs ro ds p mounted fstype | |||
0:r0 Connected Primary/Primary UpToDate/UpToDate C | |||
1:r1 Connected Primary/Primary UpToDate/UpToDate C | |||
</syntaxhighlight> | |||
|- | |||
|style="white-space: nowrap;"|Watching <span class="code">ifn_bond1</span><br /> | |||
<syntaxhighlight lang="text"> | |||
Primary Slave: ifn_link1 (primary_reselect always) | |||
Currently Active Slave: ifn_link2 | |||
MII Status: up | |||
Slave Interface: ifn_link1 | |||
MII Status: down | |||
Slave Interface: ifn_link2 | |||
MII Status: up | |||
</syntaxhighlight> | |||
|style="white-space: nowrap;"|Ping flooding <span class="code">an-a05n02.ifn</span><br /> | |||
<syntaxhighlight lang="text"> | |||
PING an-a05n02.ifn (10.255.50.2) 56(84) bytes of data. | |||
.............................. | |||
</syntaxhighlight> | |||
|style="white-space: nowrap;"|Watching <span class="code">tail -f -n 0 /var/log/messages</span><br /> | |||
<syntaxhighlight lang="text"> | |||
Dec 2 14:30:33 an-a05n01 kernel: e1000e: bcn_link1 NIC Link is Down | |||
Dec 2 14:30:33 an-a05n01 kernel: igb: ifn_link1 NIC Link is Down | |||
Dec 2 14:30:33 an-a05n01 kernel: igb: sn_link1 NIC Link is Down | |||
Dec 2 14:30:33 an-a05n01 kernel: bonding: sn_bond1: link status definitely down for interface sn_link1, disabling it | |||
Dec 2 14:30:33 an-a05n01 kernel: bonding: sn_bond1: making interface sn_link2 the new active one. | |||
Dec 2 14:30:33 an-a05n01 kernel: bonding: ifn_bond1: link status definitely down for interface ifn_link1, disabling it | |||
Dec 2 14:30:33 an-a05n01 kernel: bonding: ifn_bond1: making interface ifn_link2 the new active one. | |||
Dec 2 14:30:33 an-a05n01 kernel: device ifn_link1 left promiscuous mode | |||
Dec 2 14:30:33 an-a05n01 kernel: device ifn_link2 entered promiscuous mode | |||
Dec 2 14:30:33 an-a05n01 kernel: bonding: bcn_bond1: link status definitely down for interface bcn_link1, disabling it | |||
Dec 2 14:30:33 an-a05n01 kernel: bonding: bcn_bond1: making interface bcn_link2 the new active one. | |||
</syntaxhighlight> | |||
|- | |||
!rowspan="4"|<span class="code">an-a05n02</span> | |||
|- | |||
|style="white-space: nowrap;"|Watching <span class="code">bcn_bond1</span><br /> | |||
<syntaxhighlight lang="text"> | |||
Primary Slave: bcn_link1 (primary_reselect always) | |||
Currently Active Slave: bcn_link2 | |||
MII Status: up | |||
Slave Interface: bcn_link1 | |||
MII Status: down | |||
Slave Interface: bcn_link2 | |||
MII Status: up | |||
</syntaxhighlight> | |||
|style="white-space: nowrap;"|Ping flooding <span class="code">an-a05n01.bcn</span><br /> | |||
<syntaxhighlight lang="text"> | |||
PING an-a05n01.bcn (10.20.50.1) 56(84) bytes of data. | |||
................................ | |||
</syntaxhighlight> | |||
|style="white-space: nowrap;"|Watching <span class="code"></span>cman_tool nodes<br /> | |||
<syntaxhighlight lang="text"> | |||
Node Sts Inc Joined Name | |||
1 M 360 2013-12-02 10:17:45 an-a05n01.alteeve.ca | |||
2 M 356 2013-12-02 10:17:45 an-a05n02.alteeve.ca | |||
</syntaxhighlight> | |||
|- | |||
|style="white-space: nowrap;"|Watching <span class="code">sn_bond1</span><br /> | |||
<syntaxhighlight lang="text"> | |||
Primary Slave: sn_link1 (primary_reselect always) | |||
Currently Active Slave: sn_link2 | |||
MII Status: up | |||
Slave Interface: sn_link1 | |||
MII Status: down | |||
Slave Interface: sn_link2 | |||
MII Status: up | |||
</syntaxhighlight> | |||
|style="white-space: nowrap;"|Ping flooding <span class="code">an-a05n01.sn</span><br /> | |||
<syntaxhighlight lang="text"> | |||
PING an-a05n01.sn (10.10.50.1) 56(84) bytes of data. | |||
............................. | |||
</syntaxhighlight> | |||
|style="white-space: nowrap;"|Watching <span class="code">/etc/init.d/drbd status</span><br /> | |||
<syntaxhighlight lang="text"> | |||
drbd driver loaded OK; device status: | |||
version: 8.3.16 (api:88/proto:86-97) | |||
GIT-hash: a798fa7e274428a357657fb52f0ecf40192c1985 build by phil@Build64R6, 2013-09-27 16:00:43 | |||
m:res cs ro ds p mounted fstype | |||
0:r0 Connected Primary/Primary UpToDate/UpToDate C | |||
1:r1 Connected Primary/Primary UpToDate/UpToDate C | |||
</syntaxhighlight> | |||
|- | |||
|style="white-space: nowrap;"|Watching <span class="code">ifn_bond1</span><br /> | |||
<syntaxhighlight lang="text"> | |||
Primary Slave: ifn_link1 (primary_reselect always) | |||
Currently Active Slave: ifn_link2 | |||
MII Status: up | |||
Slave Interface: ifn_link1 | |||
MII Status: down | |||
Slave Interface: ifn_link2 | |||
MII Status: up | |||
</syntaxhighlight> | |||
|style="white-space: nowrap;"|Ping flooding <span class="code">an-a05n01.ifn</span><br /> | |||
<syntaxhighlight lang="text"> | |||
PING an-a05n01.ifn (10.255.50.1) 56(84) bytes of data. | |||
.................................. | |||
</syntaxhighlight> | |||
|style="white-space: nowrap;"|Watching <span class="code">tail -f -n 0 /var/log/messages</span><br /> | |||
<syntaxhighlight lang="text"> | |||
Dec 2 14:30:33 an-a05n02 kernel: e1000e: bcn_link1 NIC Link is Down | |||
Dec 2 14:30:33 an-a05n02 kernel: igb: ifn_link1 NIC Link is Down | |||
Dec 2 14:30:33 an-a05n02 kernel: igb: sn_link1 NIC Link is Down | |||
Dec 2 14:30:33 an-a05n02 kernel: bonding: bcn_bond1: link status definitely down for interface bcn_link1, disabling it | |||
Dec 2 14:30:33 an-a05n02 kernel: bonding: bcn_bond1: making interface bcn_link2 the new active one. | |||
Dec 2 14:30:33 an-a05n02 kernel: bonding: sn_bond1: link status definitely down for interface sn_link1, disabling it | |||
Dec 2 14:30:33 an-a05n02 kernel: bonding: sn_bond1: making interface sn_link2 the new active one. | |||
Dec 2 14:30:33 an-a05n02 kernel: bonding: ifn_bond1: link status definitely down for interface ifn_link1, disabling it | |||
Dec 2 14:30:33 an-a05n02 kernel: bonding: ifn_bond1: making interface ifn_link2 the new active one. | |||
Dec 2 14:30:33 an-a05n02 kernel: device ifn_link1 left promiscuous mode | |||
Dec 2 14:30:33 an-a05n02 kernel: device ifn_link2 entered promiscuous mode | |||
</syntaxhighlight> | |||
|} | |||
Excellent! All of the bonds failed over to their backup interfaces and the cluster stays stable. Both cluster membership and DRBD continued without interruption! | |||
Now to test recover of the primary switch. If everything was configured properly, the switch will recover, the primary links will wait two minutes before recovering and the actual cut-over will complete with few dropped packets. | |||
{|class="wikitable" | |||
!rowspan="4"|<span class="code">an-a05n01</span> | |||
|- | |||
|style="white-space: nowrap;"|Watching <span class="code">bcn_bond1</span><br /> | |||
<syntaxhighlight lang="text"> | |||
Primary Slave: bcn_link1 (primary_reselect always) | |||
Currently Active Slave: bcn_link1 | |||
MII Status: up | |||
Slave Interface: bcn_link1 | |||
MII Status: up | |||
Slave Interface: bcn_link2 | |||
MII Status: up | |||
</syntaxhighlight> | |||
|style="white-space: nowrap;"|Ping flooding <span class="code">an-a05n02.bcn</span><br /> | |||
<syntaxhighlight lang="text"> | |||
PING an-a05n02.bcn (10.20.50.2) 56(84) bytes of data. | |||
. | |||
</syntaxhighlight> | |||
|style="white-space: nowrap;"|Watching <span class="code"></span>cman_tool nodes<br /> | |||
<syntaxhighlight lang="text"> | |||
Node Sts Inc Joined Name | |||
1 M 348 2013-12-02 10:05:17 an-a05n01.alteeve.ca | |||
2 M 360 2013-12-02 10:17:45 an-a05n02.alteeve.ca | |||
</syntaxhighlight> | |||
|- | |||
|style="white-space: nowrap;"|Watching <span class="code">sn_bond1</span><br /> | |||
<syntaxhighlight lang="text"> | |||
Primary Slave: sn_link1 (primary_reselect always) | |||
Currently Active Slave: sn_link1 | |||
MII Status: up | |||
Slave Interface: sn_link1 | |||
MII Status: up | |||
Slave Interface: sn_link2 | |||
MII Status: up | |||
</syntaxhighlight> | |||
|style="white-space: nowrap;"|Ping flooding <span class="code">an-a05n02.sn</span><br /> | |||
<syntaxhighlight lang="text"> | |||
PING an-a05n02.sn (10.10.50.2) 56(84) bytes of data. | |||
. | |||
</syntaxhighlight> | |||
|style="white-space: nowrap;"|Watching <span class="code">/etc/init.d/drbd status</span><br /> | |||
<syntaxhighlight lang="text"> | |||
drbd driver loaded OK; device status: | |||
version: 8.3.16 (api:88/proto:86-97) | |||
GIT-hash: a798fa7e274428a357657fb52f0ecf40192c1985 build by phil@Build64R6, 2013-09-27 16:00:43 | |||
m:res cs ro ds p mounted fstype | |||
0:r0 Connected Primary/Primary UpToDate/UpToDate C | |||
1:r1 Connected Primary/Primary UpToDate/UpToDate C | |||
</syntaxhighlight> | |||
|- | |||
|style="white-space: nowrap;"|Watching <span class="code">ifn_bond1</span><br /> | |||
<syntaxhighlight lang="text"> | |||
Primary Slave: ifn_link1 (primary_reselect always) | |||
Currently Active Slave: ifn_link1 | |||
MII Status: up | |||
Slave Interface: ifn_link1 | |||
MII Status: up | |||
Slave Interface: ifn_link2 | |||
MII Status: up | |||
</syntaxhighlight> | |||
|style="white-space: nowrap;"|Ping flooding <span class="code">an-a05n02.ifn</span><br /> | |||
<syntaxhighlight lang="text"> | |||
PING an-a05n02.ifn (10.255.50.2) 56(84) bytes of data. | |||
.. | |||
</syntaxhighlight> | |||
|style="white-space: nowrap;"|Watching <span class="code">tail -f -n 0 /var/log/messages</span><br /> | |||
<syntaxhighlight lang="text"> | |||
Dec 2 15:20:51 an-a05n01 kernel: e1000e: ifn_link1 NIC Link is Up 1000 Mbps Full Duplex, Flow Control: Rx/Tx | |||
Dec 2 15:20:51 an-a05n01 kernel: bonding: ifn_bond1: link status up for interface ifn_link1, enabling it in 120000 ms. | |||
Dec 2 15:20:52 an-a05n01 kernel: igb: bcn_link1 NIC Link is Up 1000 Mbps Full Duplex, Flow Control: RX/TX | |||
Dec 2 15:20:52 an-a05n01 kernel: igb: sn_link1 NIC Link is Up 1000 Mbps Full Duplex, Flow Control: RX/TX | |||
Dec 2 15:20:52 an-a05n01 kernel: bonding: sn_bond1: link status up for interface sn_link1, enabling it in 120000 ms. | |||
Dec 2 15:20:52 an-a05n01 kernel: bonding: bcn_bond1: link status up for interface bcn_link1, enabling it in 120000 ms. | |||
Dec 2 15:22:51 an-a05n01 kernel: ifn_bond1: link status definitely up for interface ifn_link1, 1000 Mbps full duplex. | |||
Dec 2 15:22:51 an-a05n01 kernel: bonding: ifn_bond1: making interface ifn_link1 the new active one. | |||
Dec 2 15:22:51 an-a05n01 kernel: device ifn_link2 left promiscuous mode | |||
Dec 2 15:22:51 an-a05n01 kernel: device ifn_link1 entered promiscuous mode | |||
Dec 2 15:22:52 an-a05n01 kernel: sn_bond1: link status definitely up for interface sn_link1, 1000 Mbps full duplex. | |||
Dec 2 15:22:52 an-a05n01 kernel: bonding: sn_bond1: making interface sn_link1 the new active one. | |||
Dec 2 15:22:52 an-a05n01 kernel: bcn_bond1: link status definitely up for interface bcn_link1, 1000 Mbps full duplex. | |||
Dec 2 15:22:52 an-a05n01 kernel: bonding: bcn_bond1: making interface bcn_link1 the new active one. | |||
</syntaxhighlight> | |||
|- | |||
!rowspan="4"|<span class="code">an-a05n02</span> | |||
|- | |||
|style="white-space: nowrap;"|Watching <span class="code">bcn_bond1</span><br /> | |||
<syntaxhighlight lang="text"> | |||
Primary Slave: bcn_link1 (primary_reselect always) | |||
Currently Active Slave: bcn_link1 | |||
MII Status: up | |||
Slave Interface: bcn_link1 | |||
MII Status: up | |||
Slave Interface: bcn_link2 | |||
MII Status: up | |||
</syntaxhighlight> | |||
|style="white-space: nowrap;"|Ping flooding <span class="code">an-a05n01.bcn</span><br /> | |||
<syntaxhighlight lang="text"> | |||
PING an-a05n01.bcn (10.20.50.1) 56(84) bytes of data. | |||
... | |||
</syntaxhighlight> | |||
|style="white-space: nowrap;"|Watching <span class="code"></span>cman_tool nodes<br /> | |||
<syntaxhighlight lang="text"> | |||
Node Sts Inc Joined Name | |||
1 M 360 2013-12-02 10:17:45 an-a05n01.alteeve.ca | |||
2 M 356 2013-12-02 10:17:45 an-a05n02.alteeve.ca | |||
</syntaxhighlight> | |||
|- | |||
|style="white-space: nowrap;"|Watching <span class="code">sn_bond1</span><br /> | |||
<syntaxhighlight lang="text"> | |||
Primary Slave: sn_link1 (primary_reselect always) | |||
Currently Active Slave: sn_link1 | |||
MII Status: up | |||
Slave Interface: sn_link1 | |||
MII Status: up | |||
Slave Interface: sn_link2 | |||
MII Status: up | |||
</syntaxhighlight> | |||
|style="white-space: nowrap;"|Ping flooding <span class="code">an-a05n01.sn</span><br /> | |||
<syntaxhighlight lang="text"> | |||
PING an-a05n01.sn (10.10.50.1) 56(84) bytes of data. | |||
... | |||
</syntaxhighlight> | |||
|style="white-space: nowrap;"|Watching <span class="code">/etc/init.d/drbd status</span><br /> | |||
<syntaxhighlight lang="text"> | |||
drbd driver loaded OK; device status: | |||
version: 8.3.16 (api:88/proto:86-97) | |||
GIT-hash: a798fa7e274428a357657fb52f0ecf40192c1985 build by phil@Build64R6, 2013-09-27 16:00:43 | |||
m:res cs ro ds p mounted fstype | |||
0:r0 Connected Primary/Primary UpToDate/UpToDate C | |||
1:r1 Connected Primary/Primary UpToDate/UpToDate C | |||
</syntaxhighlight> | |||
|- | |||
|style="white-space: nowrap;"|Watching <span class="code">ifn_bond1</span><br /> | |||
<syntaxhighlight lang="text"> | |||
Primary Slave: ifn_link1 (primary_reselect always) | |||
Currently Active Slave: ifn_link1 | |||
MII Status: up | |||
Slave Interface: ifn_link1 | |||
MII Status: up | |||
Slave Interface: ifn_link2 | |||
MII Status: up | |||
</syntaxhighlight> | |||
|style="white-space: nowrap;"|Ping flooding <span class="code">an-a05n01.ifn</span><br /> | |||
<syntaxhighlight lang="text"> | |||
PING an-a05n01.ifn (10.255.50.1) 56(84) bytes of data. | |||
. | |||
</syntaxhighlight> | |||
|style="white-space: nowrap;"|Watching <span class="code">tail -f -n 0 /var/log/messages</span><br /> | |||
<syntaxhighlight lang="text"> | |||
Dec 2 15:20:51 an-a05n02 kernel: e1000e: ifn_link1 NIC Link is Up 1000 Mbps Full Duplex, Flow Control: Rx/Tx | |||
Dec 2 15:20:51 an-a05n02 kernel: bonding: ifn_bond1: link status up for interface ifn_link1, enabling it in 120000 ms. | |||
Dec 2 15:20:52 an-a05n02 kernel: igb: sn_link1 NIC Link is Up 1000 Mbps Full Duplex, Flow Control: RX/TX | |||
Dec 2 15:20:52 an-a05n02 kernel: bonding: sn_bond1: link status up for interface sn_link1, enabling it in 120000 ms. | |||
Dec 2 15:20:52 an-a05n02 kernel: igb: bcn_link1 NIC Link is Up 1000 Mbps Full Duplex, Flow Control: RX/TX | |||
Dec 2 15:20:53 an-a05n02 kernel: bonding: bcn_bond1: link status up for interface bcn_link1, enabling it in 120000 ms. | |||
Dec 2 15:22:51 an-a05n02 kernel: ifn_bond1: link status definitely up for interface ifn_link1, 1000 Mbps full duplex. | |||
Dec 2 15:22:51 an-a05n02 kernel: bonding: ifn_bond1: making interface ifn_link1 the new active one. | |||
Dec 2 15:22:51 an-a05n02 kernel: device ifn_link2 left promiscuous mode | |||
Dec 2 15:22:51 an-a05n02 kernel: device ifn_link1 entered promiscuous mode | |||
Dec 2 15:22:52 an-a05n02 kernel: sn_bond1: link status definitely up for interface sn_link1, 1000 Mbps full duplex. | |||
Dec 2 15:22:52 an-a05n02 kernel: bonding: sn_bond1: making interface sn_link1 the new active one. | |||
Dec 2 15:22:53 an-a05n02 kernel: bcn_bond1: link status definitely up for interface bcn_link1, 1000 Mbps full duplex. | |||
Dec 2 15:22:53 an-a05n02 kernel: bonding: bcn_bond1: making interface bcn_link1 the new active one. | |||
</syntaxhighlight> | |||
|} | |||
Perfect! | |||
{{note|1=Some switches will show a link and then drop the connection a few times as they boot. If your switch is like this, you will see this reflected in the system logs. This should be fine because of the two minute <span class="code">updelay</span> value.}} | |||
Now repeat this test by failing and recovering the backup switch. Do not assume that, because the first switch cycled successfully, the second switch will as well. A bad configuration can easily allow the primary switch to pass this test while the secondary switch would cause a failure. | |||
With the second switch test complete, we can be confident that the networking infrastructure is totally fault tolerant. | |||
= Provisioning Virtual Machines = | |||
Now we're getting to the purpose of our cluster; Provision virtual machines! | |||
We have two steps left: | |||
* Provision our VMs. | |||
* Add the VMs to <span class="code">rgmanager</span>. | |||
"Provisioning" a virtual machine simple means to create it; Assign a collection of emulated hardware, connected to physical devices, to a given virtual machine and begin the process of installing the operating system on it. This tutorial is more about clustering than it is about virtual machine administration, so some experience with managing virtual machines has to be assumed. If you need to brush up, here are some resources: | |||
* [http://www.linux-kvm.org/page/HOWTO KVM project's How-Tos] | |||
* [http://kvm.et.redhat.com/page/FAQ KVM project's FAQ] | |||
* [http://docs.redhat.com/docs/en-US/Red_Hat_Enterprise_Linux/6/html/Hypervisor_Deployment_Guide/index.html Red Hat's Hypervisor Guide] | |||
* [http://docs.redhat.com/docs/en-US/Red_Hat_Enterprise_Linux/6/html/Virtualization_Getting_Started_Guide/index.html Red Hat's Virtualization Guide] | |||
* [http://docs.redhat.com/docs/en-US/Red_Hat_Enterprise_Linux/6/html/Virtualization_Administration_Guide/index.html Red Hat's Virtualization Administration] | |||
* [http://docs.redhat.com/docs/en-US/Red_Hat_Enterprise_Linux/6/html/Virtualization_Host_Configuration_and_Guest_Installation_Guide/index.html Red Hat's Virtualization Host Configuration and Guest Installation Guide] | |||
When you feel comfortable, proceed. | |||
== Before We Begin - Building a Dashboard == | |||
[[Image:An-cdb-splash.png|thumb|right|400px|[[Striker]] dashboard with server "monitor" displayed.]] | |||
One of the biggest advances since the initial tutorial was created was the creation of the [[Striker - Cluster Dashboard]]. | |||
It provides a very easy to use web-based user interface for building, modifying and removing servers on the ''Anvil!'' platform. | |||
It also provides a "[https://en.wikipedia.org/wiki/KVM_switch KVM switch]" style access to the servers you create. This gives you direct access to your servers, just as if you have a physical keyboard, mouse and monitor plugged into a physical server. You can watch the server boot from the virtual, boot into recovery consoles or off of repair "DVDs" and so forth. | |||
The link above covers the dashboard and its use, and includes a link to an installer showing how to setup a dashboard for yourself. Now is a good time to take a break from this tutorial and setup that dashboard. | |||
If you do not wish to build a dashboard, that is fine. It is not required in this tutorial. | |||
If you decide not to though, you will now need to setup "Virtual Machine Manager" on your (Linux) computer in order to get access to the servers we are about to build. You will need this in order to walk through the installation process for your new servers. Of course, once the install is complete, you can switch to another, traditional form of remote access like [[RDP]] on windows servers or [[ssh]] on *nix servers. | |||
If you want to use "Virtual Machine Manager", look for a package from your distribution package manager with a name like <span class="code">virt-manager</span>. Once it is installed, add the connections to your ''Anvil!'' nodes. Once that's done, you're ready to proceed to the next section! | |||
== A Note on the Following Server Installations == | |||
We wanted to show as many different server installations as possible. Obviously, it's unlikely that you will want or need all of the operating we're about to install. Please feel free to skip over the installation of servers that are not interesting to you. | |||
== Provision Planning == | |||
{{note|1=We're going to spend a lot of time provisioning <span class="code">vm01-win2008</span>. If you plan to skip it, please be sure to refer back to it if you run into questions on a later install.}} | |||
If you recall, when we were planning out our partitions, we've already chosen which servers will draw from which storage pools and how big their "hard drives" will be. The last thing to consider is RAM allocation. The servers we're using to write this tutorial are a little modest in the RAM department with only 24 [[GiB]] of RAM. We need to subtract at least 2 GiB for the host nodes, leaving us with a total of 22 GiB. | |||
That needs to be divided up amongst our eight servers. Now, nothing says you have to use it all, of course. It's perfectly fine to leave some RAM unallocated for future use. This is really up to you and your needs. | |||
Let's put together a table with the RAM we plan to allocate and summarizing the logical volume we're going to create for each server. The [[LV]]s will be named after the server they'll be assigned to with the suffix <span class="code">_0</span>. Later, if we add a second "hard drive" to a server, it will have the suffix <span class="code">_1</span> and so on. | |||
{|class="wikitable" | |||
!Server | |||
!RAM (GiB) | |||
!Storage Pool (VG) | |||
!LV name | |||
!LV size | |||
|- | |||
|<span class="code">vm01-win2008</span> | |||
|3 | |||
|<span class="code">an-a05n01</span> | |||
|<span class="code">vm01-win2008_0</span> | |||
|150 GB | |||
|- | |||
|<span class="code">vm02-win2012</span> | |||
|4 | |||
|<span class="code">an-a05n02</span> | |||
|<span class="code">vm02-win2012_0</span> | |||
|150 GB | |||
|- | |||
|<span class="code">vm03-win7</span> | |||
|3 | |||
|<span class="code">an-a05n01</span> | |||
|<span class="code">vm03-win7_0</span> | |||
|100 GB | |||
|- | |||
|<span class="code">vm04-win8</span> | |||
|4 | |||
|<span class="code">an-a05n01</span> | |||
|<span class="code">vm04-win8_0</span> | |||
|100 GB | |||
|- | |||
|<span class="code">vm05-freebsd9</span> | |||
|2 | |||
|<span class="code">an-a05n02</span> | |||
|<span class="code">vm05-freebsd9_0</span> | |||
|50 GB | |||
|- | |||
|<span class="code">vm06-solaris11</span> | |||
|2 | |||
|<span class="code">an-a05n02</span> | |||
|<span class="code">vm06-solaris11_0</span> | |||
|100 GB | |||
|- | |||
|<span class="code">vm07-rhel6</span> | |||
|2 | |||
|<span class="code">an-a05n01</span> | |||
|<span class="code">vm07-rhel6_0</span> | |||
|50 GB | |||
|- | |||
|<span class="code">vm08-sles11</span> | |||
|2 | |||
|<span class="code">an-a05n01</span> | |||
|<span class="code">vm08-sles11_0</span> | |||
|100 GB | |||
|} | |||
If you plan to set static IP addresses for your servers, now would be a good time to select them, too. It's not needed, of course, but it certainly can make things easier to have all the details in one place. | |||
{{Note|1=Not to spoil the surprise, but if you plan to not follow this tutorial exactly, please be sure to read [[#Calculating_Free_Space.3B_Converting_GiB_to_MB|the notes in the <span class="code">vm06-solaris100</span> section]].}} | |||
== Provisioning vm01-win2008 == | |||
[[Image:AN!Cluster_Tutorial_2-vm01-win2008_08.png|thumb|500px|right|View of <span class="code">vm01-win2008</span>'s desktop.]] | |||
Before we can install the OS, we need to copy the installation media and our driver disk, if needed, and put them in the <span class="code">/shared/files</span>. | |||
Windows is licensed software, so you will need to purchase a copy. You can get an [http://www.microsoft.com/en-us/server-cloud/products/windows-server-2012-r2/default.aspx evaluation copy] from Microsoft's website. In either case, downloading a copy of the installation media is an exercise for you, I am afraid. | |||
As for drivers; We're going to use a special kind of emulated [https://en.wikipedia.org/wiki/SCSI SCSI] controller and a special kind of emulated network card for this and our other three windows installs. These are called <span class="code">http://www.linux-kvm.org/page/Virtio</span> devices and they are designed to significantly improve storage and network speeds on [[KVM]] guests. | |||
If you have ever installed windows on a newer server, you're probably already familiar with the process of installing drivers in order to see SCSI and RAID controllers during the boot process. If so, then what we're going to do here will be no different. If you have never done this before, don't worry. It's a fairly simple task. | |||
You can create install media from a physical disk or copy install media using the [[Striker]]'s "Media Connector" function. Of course, you can also copy files to the ''Anvil!'' using standard tools like <span class="code">rsync</span> and <span class="code">wget</span> as well. What ever method you prefer, | |||
In my case, I will <span class="code">rsync</span> the Windows install ISO from another machine on our network to <span class="code">/shared/files</span> via <span class="code">an-a05n01</span>. | |||
<syntaxhighlight lang="bash"> | |||
rsync -av --progress /data0/VMs/files/Windows_Svr_2008_R2_64Bit_SP1.ISO root@10.255.50.1:/shared/files/ | |||
</syntaxhighlight> | |||
<syntaxhighlight lang="text"> | |||
root@10.255.50.1's password: | |||
</syntaxhighlight> | |||
<syntaxhighlight lang="text"> | |||
sending incremental file list | |||
Windows_Svr_2008_R2_64Bit_SP1.ISO | |||
3166720000 100% 65.53MB/s 0:00:46 (xfer#1, to-check=0/1) | |||
sent 3167106674 bytes received 31 bytes 59198256.17 bytes/sec | |||
total size is 3166720000 speedup is 1.00 | |||
</syntaxhighlight> | |||
For <span class="code">virtio</span>, let's use <span class="code">wget</span> to grab the latest version from [https://alt.fedoraproject.org/pub/alt/virtio-win/ their website]. At the time of this writing, the "[https://alt.fedoraproject.org/pub/alt/virtio-win/stable/ stable]" version is <span class="code">0.1-74</span>. | |||
Being conservative when it comes to servers, my preference is to use the "stable" version. | |||
{|class="wikitable" | |||
!<span class="code">an-a05n01</span> | |||
|style="white-space: nowrap;"|<syntaxhighlight lang="bash"> | |||
cd /shared/files/ | |||
wget -c https://fedorapeople.org/groups/virt/virtio-win/direct-downloads/stable-virtio/virtio-win.iso | |||
cd ~ | |||
</syntaxhighlight> | |||
<syntaxhighlight lang="text"> | |||
--2015-09-10 12:24:17-- https://fedorapeople.org/groups/virt/virtio-win/direct-downloads/stable-virtio/virtio-win.iso | |||
Resolving fedorapeople.org... 152.19.134.196, 2610:28:3090:3001:5054:ff:feff:683f | |||
Connecting to fedorapeople.org|152.19.134.196|:443... connected. | |||
HTTP request sent, awaiting response... 301 Moved Permanently | |||
Location: https://fedorapeople.org/groups/virt/virtio-win/direct-downloads/archive-virtio/virtio-win-0.1.102/virtio-win.iso [following] | |||
--2015-09-10 12:24:17-- https://fedorapeople.org/groups/virt/virtio-win/direct-downloads/archive-virtio/virtio-win-0.1.102/virtio-win.iso | |||
Reusing existing connection to fedorapeople.org:443. | |||
HTTP request sent, awaiting response... 301 Moved Permanently | |||
Location: https://fedorapeople.org/groups/virt/virtio-win/direct-downloads/archive-virtio/virtio-win-0.1.102/virtio-win-0.1.102.iso [following] | |||
--2015-09-10 12:24:17-- https://fedorapeople.org/groups/virt/virtio-win/direct-downloads/archive-virtio/virtio-win-0.1.102/virtio-win-0.1.102.iso | |||
Reusing existing connection to fedorapeople.org:443. | |||
HTTP request sent, awaiting response... 200 OK | |||
Length: 160755712 (153M) [application/octet-stream] | |||
Saving to: `virtio-win.iso' | |||
100%[====================================================================>] 160,755,712 1.11M/s in 2m 36s | |||
2015-09-10 12:26:54 (1004 KB/s) - `virtio-win.iso' saved [160755712/160755712] | |||
</syntaxhighlight> | |||
|} | |||
Note that the original file name was <span class="code">virtio-win-0.1.102</span>, but the downloaded file ended up being called <span class="code">virtio-win.iso</span>? Lets fix that so we know down the road the version we have. We'll also make sure the file is world-readable. | |||
{|class="wikitable" | |||
!<span class="code">an-a05n01</span> | |||
|style="white-space: nowrap;"|<syntaxhighlight lang="bash"> | |||
mv /shared/files/virtio-win.iso /shared/files/virtio-win-0.1.102.iso | |||
chmod 644 /shared/files/virtio-win-0.1.102.iso | |||
</syntaxhighlight> | |||
|- | |||
!<span class="code">an-a05n02</span> | |||
|style="white-space: nowrap;"|<syntaxhighlight lang="bash"> | |||
ls -lah /shared/files/ | |||
</syntaxhighlight> | |||
<syntaxhighlight lang="text"> | |||
total 3.1G | |||
drwxr-xr-x. 2 root root 3.8K Nov 2 10:48 . | |||
drwxr-xr-x. 6 root root 3.8K Nov 1 01:23 .. | |||
-rw-r--r-- 1 root root 154M Apr 26 18:25 virtio-win-0.1.102.iso | |||
-rw-rw-r--. 1 qemu qemu 3.0G Oct 14 2011 Windows_Svr_2008_R2_64Bit_SP1.ISO | |||
</syntaxhighlight> | |||
|} | |||
Ok, we're ready! | |||
=== Creating vm01-win2008's Storage === | |||
{{note|1=Earlier, we used <span class="code">parted</span> to examine our free space and create our DRBD partitions. Unfortunately, <span class="code">parted</span> shows sizes in [[GB]] (base 10) where LVM uses [[GiB]] (base 2). If we used LVM's "<span class="code">xxG</span> size notation, it will use more space than we expect, relative to our planning in the <span class="code">parted</span> stage. LVM doesn't allow specifying new LV sizes in [[GB]] instead of [[GiB]], so here we will specify sizes in [[MiB]] to help narrow the differences. You can read more about this issue [[TLUG_Talk:_Storage_Technologies_and_Theory#Capacity.2C_or_A_Lesson_in_Marketing|here]].}} | |||
Creating the <span class="code">vm01-win2008</span>'s "hard drive" is a simple process. Recall that we want a 150 [[GB]] logical volume carved from the <span class="code">an-a05n01_vg0</span> volume group (the "storage pool" for servers designed to run on <span class="code">an-a05n01</span>). Knowing this, the command to create the new LV is below. | |||
{|class="wikitable" | |||
!<span class="code">an-a05n01</span> | |||
|style="white-space: nowrap;"|<syntaxhighlight lang="bash"> | |||
lvcreate -L 150000M -n vm01-win2008_0 /dev/an-a05n01_vg0 | |||
</syntaxhighlight> | |||
<syntaxhighlight lang="text"> | |||
Logical volume "vm01-win2008_0" created | |||
</syntaxhighlight> | |||
|- | |||
!<span class="code">an-a05n02</span> | |||
|style="white-space: nowrap;"|<syntaxhighlight lang="bash"> | |||
lvdisplay /dev/an-a05n01_vg0/vm01-win2008_0 | |||
</syntaxhighlight> | |||
<syntaxhighlight lang="text"> | |||
--- Logical volume --- | |||
LV Path /dev/an-a05n01_vg0/vm01-win2008_0 | |||
LV Name vm01-win2008_0 | |||
VG Name an-a05n01_vg0 | |||
LV UUID bT0zon-H2LN-0jmi-refA-J0QX-zHjT-nEY7YY | |||
LV Write Access read/write | |||
LV Creation host, time an-a05n01.alteeve.ca, 2013-11-02 11:04:44 -0400 | |||
LV Status available | |||
# open 0 | |||
LV Size 146.48 GiB | |||
Current LE 37500 | |||
Segments 1 | |||
Allocation inherit | |||
Read ahead sectors auto | |||
- currently set to 256 | |||
Block device 253:1 | |||
</syntaxhighlight> | |||
|} | |||
Notice how we see <span class="code">146.48</span> [[GiB]]? That is roughly the difference between "150 [[GB]]" and "150 [[GiB]]". | |||
=== Creating vm01-win2008's virt-install Call === | |||
Now with the storage created, we can craft the <span class="code">virt-install</span> command. we'll put this into a file under the <span class="code">/shared/provision/</span> directory for future reference. Let's take a look at the command, then we'll discuss what the switches are for. | |||
{|class="wikitable" | |||
!<span class="code">an-a05n01</span> | |||
|style="white-space: nowrap;"|<syntaxhighlight lang="bash"> | |||
touch /shared/provision/vm01-win2008.sh | |||
chmod 755 /shared/provision/vm01-win2008.sh | |||
vim /shared/provision/vm01-win2008.sh | |||
</syntaxhighlight> | |||
<syntaxhighlight lang="text"> | |||
virt-install --connect qemu:///system \ | |||
--name vm01-win2008 \ | |||
--ram 3072 \ | |||
--arch x86_64 \ | |||
--vcpus 2 \ | |||
--cdrom /shared/files/Windows_Svr_2008_R2_64Bit_SP1.ISO \ | |||
--disk path=/shared/files/virtio-win-0.1-52.iso,device=cdrom --force\ | |||
--os-variant win2k8 \ | |||
--network bridge=ifn_bridge1,model=virtio \ | |||
--disk path=/dev/an-a05n01_vg0/vm01-win2008_0,bus=virtio \ | |||
--graphics spice > /var/log/an-install_vm01-win2008.log & | |||
</syntaxhighlight> | |||
|} | |||
{{note|1=Don't use tabs to indent the lines.}} | |||
Let's break it down; | |||
{|class="wikitable" | |||
!Switch | |||
!Descriptions | |||
|- | |||
|style="white-space: nowrap;"|<span class="code">--connect qemu:///system</span> | |||
|This tells <span class="code">virt-install</span> to use the [[QEMU]] hardware emulator (as opposed to [[Xen]], for example) and to install the server on to local node. | |||
|- | |||
|style="white-space: nowrap;"|<span class="code">--name vm01-win2008</span> | |||
|This sets the name of the server. It is the name we will use in the cluster configuration and whenever we use the <span class="code">libvirtd</span> tools, like <span class="code">virsh</span>. | |||
|- | |||
|style="white-space: nowrap;"|<span class="code">--ram 3072</span> | |||
|This sets the amount of RAM, in [[MiB]], to allocate to this server. Here, we're allocating 3 [[GiB]], which is 3,072 MiB. | |||
|- | |||
|style="white-space: nowrap;"|<span class="code">--arch x86_64</span> | |||
|This sets the emulated CPU's architecture to 64-[[bit]]. This can be used even when you plan to install a 32-bit [[OS]], but not the other way around, of course. | |||
|- | |||
|style="white-space: nowrap;"|<span class="code">--vcpus 2</span> | |||
|This sets the number of CPU cores to allocate to this server. Here, we're allocating two CPUs. | |||
|- | |||
|style="white-space: nowrap;"|<span class="code">--cdrom /shared/files/Windows_Svr_2008_R2_64Bit_SP1.ISO | |||
|This tells the hypervisor to create a cd-rom (dvd-rom) drive and to "insert" the specified ISO as if it was a physical disk. This will be the initial boot device, too. | |||
|- | |||
|style="white-space: nowrap;"|<span class="code">--disk path=/shared/files/virtio-win-0.1-52.iso,device=cdrom --force</span> | |||
|We need to make the <span class="code">virtio</span> drivers available during the install process. This command is similar to the <span class="code">--cdrom</span> above, but crafted as if it was a disk drive with the <span class="code">device=cdrom</span> switch. This helps make sure that the <span class="code">cdrom</span> above is used as the boot drive. Also note the <span class="code">--force</span> option. This is used because, normally, if the ISO was "inserted" into another server's cd-rom, it would refuse to work here. The nature of ISOs ensures they're read-only, so we can safely force two or more servers to use the same ISO at the same time. | |||
|- | |||
|style="white-space: nowrap;"|<span class="code">--os-variant win2k8</span> | |||
|This tweaks the <span class="code">virt-manager</span>'s initial method of running and tunes the hypervisor to try and get the best performance for the server. There are many possible values here for many, many different operating systems. If you run <span class="code">virt-install --os-variant list</span> on your node, you will get a full list of available operating systems. If you can't find your exact operating system, select the one that is the closest match. | |||
|- | |||
|style="white-space: nowrap;"|<span class="code">--network bridge=ifn_bridge1,model=virtio</span> | |||
|This tells the hypervisor that we want to create a network card using the <span class="code">virtio</span> "hardware" and that we want it plugged into the <span class="code">ifn_bridge1</span> bridge. We only need one network card, but if you wanted two or more, simply repeat this command. If you create two or more bridges, you can have different network devices connect to different bridges. | |||
|- | |||
|style="white-space: nowrap;"|<span class="code">--disk path=/dev/an-a05n01_vg0/vm01-win2008_0,bus=virtio</span> | |||
|This tells the hypervisor what logical volume to use for the server's "hard drive". It also tells it to use the <span class="code">virtio</span> emulated SCSI controller. | |||
|- | |||
|style="white-space: nowrap;"|<span class="code">--graphics spice > /var/log/an-install_vm01-win2008.log</span> | |||
|Finally, this tells the hypervisor to use the [http://www.spice-space.org/ spice] emulated video card. It is a bit simplistic to call it simply a "graphics card", but that's close enough for now. Given that this is the last line, we close off the <span class="code">virt-install</span> command with a simple redirection to a log file. Later, if we want to examine the install process, we can review <span class="code">/var/log/an-install_vm01-win2008.log</span> for details on the install process. | |||
|} | |||
=== Initializing vm01-win2008's Install === | |||
On your [[Striker|dashboard]] or workstation, open the "Virtual Machine Manager" and connect to both nodes. | |||
We can install any server from either node. However, we know that each server has a preferred host, so it's sensible to use that host for the installation stage. In the case of <span class="code">vm01-win2008</span>, the preferred host is <span class="code">an-a05n01</span>, so we'll use it to kick off the install. | |||
Once the install begins, the new server should appear in "Virtual Machine Manager". Double-click on it and you will see that the new server is booting off of the install cd-rom. We're installing Windows, so that will begin the install process. | |||
Time to start the install! | |||
{|class="wikitable" | |||
!<span class="code">an-a05n01</span> | |||
|style="white-space: nowrap;"|<syntaxhighlight lang="bash"> | |||
/shared/provision/vm01-win2008.sh | |||
</syntaxhighlight> | |||
<syntaxhighlight lang="text"> | |||
Cannot open display: | |||
Run 'virt-viewer --help' to see a full list of available command line options | |||
</syntaxhighlight> | |||
|} | |||
And it's off! | |||
[[Image:AN!Cluster_Tutorial_2-vm01-win2008_01.png|thumb|900px|center|Installation of <span class="code">vm01-win2008</span> begins!]] | |||
Follow the install process, entering the values you want. When you get to the install target screen, you will see that Windows can't find the hard drive. | |||
[[Image:AN!Cluster_Tutorial_2-vm01-win2008_02.png|thumb|900px|center|The <span class="code">vm01-win2008</span> server doesn't see its hard drive.]] | |||
This was expected because windows 2008 does not natively support <span class="code">virtio</span>. That's why we used two virtual cd-rom drives and "inserted" the <span class="code">virtio</span> driver disk into the second drive. | |||
{{warning|1=Since this tutorial was written, the virtio project has significantly changed the directory structure where drivers are held. The storage drivers are now found in <span class="code">viostor/2k8/amd64/</span>. The trick of loading the other drivers is still possible by loading the "wrong" driver, one at a time, but it is quite a bit easier to now load the network and other drivers after the install completes. To do so, go to "Device Manager" and select the devices with a yellow exclamation mark, choose to update their drivers and tell it to search all subdirectories on the "dvd".}} | |||
Click on "Load Driver" on the bottom right. | |||
[[Image:AN!Cluster_Tutorial_2-vm01-win2008_03.png|thumb|900px|center|The <span class="code">vm01-win2008</span> server's "Load Driver" menu.]] | |||
Click on "Browse". | |||
[[Image:AN!Cluster_Tutorial_2-vm01-win2008_04.png|thumb|900px|center|The <span class="code">vm01-win2008</span> server's "Browse" menu.]] | |||
The driver disk is in the seconds (virtual) cd-rom drive mounted at drive <span class="code">e:</span>. The drivers for Windows 2008 are the same as for Windows 7, so browse to <span class="code">E:\WIN7\AMD64</span> (assuming you are installing the 64-bit version of windows) and click on "OK". | |||
[[Image:AN!Cluster_Tutorial_2-vm01-win2008_05.png|thumb|900px|center|Selecting the network and storage drivers for the <span class="code">vm01-win2008</span> server.]] | |||
{{note|1=If you forget to select the network drivers here, you will have to manually install the drivers for the network card after the install has completed.}} | |||
Press and hold the <span class="code"><control></span> key and click on both the "Red Hat VirtIO Ethernet Adapter" '''and''' the "Red Hat VirtIO SCSI Controller" drivers. By doing this, we won't have to install the network card's drivers later. Click on "Next" and the drivers will be installed. | |||
[[Image:AN!Cluster_Tutorial_2-vm01-win2008_06.png|thumb|900px|center|Now we see the <span class="code">vm01-win2008</span> server's hard drive! Complete the install from here as you normally would.]] | |||
Now you can finish installing Windows 2008 just as you would do so on a bare iron server! | |||
[[Image:AN!Cluster_Tutorial_2-vm01-win2008_07.png|thumb|900px|center|Install of <span class="code">vm01-win2008</span> is complete!]] | |||
What you do from here is entirely up to you and your needs. | |||
{{note|1=If you wish, jump to [[#Making_vm01-win2008_a_Highly_Available_Service|Making vm01-win2008 a Highly Available Service]] now to immediately add <span class="code">vm01-win2008</span> to the cluster manager.}} | |||
== Provisioning vm02-win2012 == | |||
{{note|1=This install references steps taken in the <span class="code">[[vm01-win2008]]</span> install. If you skipped it, you may wish to look at it to get a better idea of some of the steps performed here.}} | |||
[[Image:AN!Cluster_Tutorial_2-vm02-win2012_01.png|thumb|500px|right|View of <span class="code">vm02-win2012</span>'s desktop.]] | |||
Before we can install the OS, we need to copy the installation media and our driver disk, if needed, and put them in the <span class="code">/shared/files</span>. | |||
Windows is licensed software, so you will need to purchase a copy. You can get an [http://www.microsoft.com/en-us/server-cloud/products/windows-server-2012-r2/default.aspx evaluation copy] from Microsoft's website. In either case, downloading a copy of the installation media is an exercise for you, I am afraid. | |||
As for drivers; We're going to use a special kind of emulated [https://en.wikipedia.org/wiki/SCSI SCSI] controller and a special kind of emulated network card for this and our other three windows installs. These are called <span class="code">http://www.linux-kvm.org/page/Virtio</span> devices and they are designed to significantly improve storage and network speeds on [[KVM]] guests. | |||
If you have ever installed windows on a newer server, you're probably already familiar with the process of installing drivers in order to see SCSI and RAID controllers during the boot process. If so, then what we're going to do here will be no different. If you have never done this before, don't worry. It's a fairly simple task. | |||
You can create install media from a physical disk or copy install media using the [[Striker]]'s "Media Connector" function. Of course, you can also copy files to the ''Anvil!'' using standard tools like <span class="code">rsync</span> and <span class="code">wget</span> as well. What ever method you prefer, | |||
In my case, I will <span class="code">rsync</span> the Windows install ISO from another machine on our network to <span class="code">/shared/files</span> via <span class="code">an-a05n01</span>. | |||
<syntaxhighlight lang="bash"> | |||
rsync -av --progress /data0/VMs/files/Windows_2012_R2_64-bit_Preview.iso root@10.255.50.1:/shared/files/ | |||
</syntaxhighlight> | |||
<syntaxhighlight lang="text"> | |||
root@10.255.50.1's password: | |||
</syntaxhighlight> | |||
<syntaxhighlight lang="text"> | |||
sending incremental file list | |||
Windows_2012_R2_64-bit_Preview.iso | |||
4128862208 100% 66.03MB/s 0:00:59 (xfer#1, to-check=0/1) | |||
sent 4129366322 bytes received 31 bytes 65029391.39 bytes/sec | |||
total size is 4128862208 speedup is 1.00 | |||
</syntaxhighlight> | |||
For <span class="code">virtio</span>, we can simply re-use the [[ISO]] we uploaded for <span class="code">vm01-2008</span>. | |||
{{note|1=We've planned to run <span class="code">vm02-win2012</span> on <span class="code">an-a05n02</span>, so we will use that node for the provisioning stage.}} | |||
{|class="wikitable" | |||
!<span class="code">an-a05n02</span> | |||
|style="white-space: nowrap;"|<syntaxhighlight lang="bash"> | |||
ls -lah /shared/files/ | |||
</syntaxhighlight> | |||
<syntaxhighlight lang="text"> | |||
total 6.9G | |||
drwxr-xr-x. 2 root root 3.8K Nov 11 11:28 . | |||
drwxr-xr-x. 6 root root 3.8K Nov 1 01:23 .. | |||
-rw-r--r--. 1 qemu qemu 56M Jan 22 2013 virtio-win-0.1-52.iso | |||
-rw-rw-r--. 1 1000 1000 3.9G Oct 2 22:31 Windows_2012_R2_64-bit_Preview.iso | |||
-rw-rw-r--. 1 qemu qemu 3.0G Oct 14 2011 Windows_Svr_2008_R2_64Bit_SP1.ISO | |||
</syntaxhighlight> | |||
|} | |||
Ok, we're ready! | |||
=== Creating vm02-win2012's Storage === | |||
{{note|1=Earlier, we used <span class="code">parted</span> to examine our free space and create our DRBD partitions. Unfortunately, <span class="code">parted</span> shows sizes in [[GB]] (base 10) where LVM uses [[GiB]] (base 2). If we used LVM's "<span class="code">xxG</span> size notation, it will use more space than we expect, relative to our planning in the <span class="code">parted</span> stage. LVM doesn't allow specifying new LV sizes in [[GB]] instead of [[GiB]], so here we will specify sizes in [[MiB]] to help narrow the differences. You can read more about this issue [[TLUG_Talk:_Storage_Technologies_and_Theory#Capacity.2C_or_A_Lesson_in_Marketing|here]].}} | |||
Creating the <span class="code">vm02-win2012</span>'s "hard drive" is a simple process. Recall that we want a 150 [[GB]] logical volume carved from the <span class="code">an-a05n02_vg0</span> volume group (the "storage pool" for servers designed to run on <span class="code">an-a05n02</span>). Knowing this, the command to create the new LV is below. | |||
{|class="wikitable" | |||
!<span class="code">an-a05n02</span> | |||
|style="white-space: nowrap;"|<syntaxhighlight lang="bash"> | |||
lvcreate -L 150000M -n vm02-win2012_0 /dev/an-a05n02_vg0 | |||
</syntaxhighlight> | |||
<syntaxhighlight lang="text"> | |||
Logical volume "vm02-win2012_0" created | |||
</syntaxhighlight> | |||
|- | |||
!<span class="code">an-a05n01</span> | |||
|style="white-space: nowrap;"|<syntaxhighlight lang="bash"> | |||
lvdisplay /dev/an-a05n02_vg0/vm02-win2012_0 | |||
</syntaxhighlight> | |||
<syntaxhighlight lang="text"> | |||
--- Logical volume --- | |||
LV Path /dev/an-a05n02_vg0/vm02-win2012_0 | |||
LV Name vm02-win2012_0 | |||
VG Name an-a05n02_vg0 | |||
LV UUID Lnyg1f-kNNV-qjfn-P7X3-LxLw-1Uyh-dfNfL0 | |||
LV Write Access read/write | |||
LV Creation host, time an-a05n02.alteeve.ca, 2013-11-11 11:30:55 -0500 | |||
LV Status available | |||
# open 0 | |||
LV Size 146.48 GiB | |||
Current LE 37500 | |||
Segments 1 | |||
Allocation inherit | |||
Read ahead sectors auto | |||
- currently set to 256 | |||
Block device 253:2 | |||
</syntaxhighlight> | |||
|} | |||
Notice how we see <span class="code">146.48</span> [[GiB]]? That is roughly the difference between "150 [[GB]]" and "150 [[GiB]]". | |||
=== Creating vm02-win2012's virt-install Call === | |||
Now with the storage created, we can craft the <span class="code">virt-install</span> command. we'll put this into a file under the <span class="code">/shared/provision/</span> directory for future reference. Let's take a look at the command, then we'll discuss what the switches are for. | |||
{|class="wikitable" | |||
!<span class="code">an-a05n02</span> | |||
|style="white-space: nowrap;"|<syntaxhighlight lang="bash"> | |||
touch /shared/provision/vm02-win2012.sh | |||
chmod 755 /shared/provision/vm02-win2012.sh | |||
vim /shared/provision/vm02-win2012.sh | |||
</syntaxhighlight> | |||
<syntaxhighlight lang="bash"> | |||
virt-install --connect qemu:///system \ | |||
--name vm02-win2012 \ | |||
--ram 4096 \ | |||
--arch x86_64 \ | |||
--vcpus 2 \ | |||
--cdrom /shared/files/Windows_2012_R2_64-bit_Preview.iso \ | |||
--disk path=/shared/files/virtio-win-0.1-52.iso,device=cdrom --force\ | |||
--os-variant win2k8 \ | |||
--network bridge=ifn_bridge1,model=virtio \ | |||
--disk path=/dev/an-a05n02_vg0/vm02-win2012_0,bus=virtio \ | |||
--graphics spice > /var/log/an-install_vm02-win2012.log & | |||
</syntaxhighlight> | |||
|} | |||
{{note|1=Don't use tabs to indent the lines.}} | |||
Let's look at the differences from <span class="code">vm01-win2008</span>; | |||
{|class="wikitable" | |||
!Switch | |||
!Descriptions | |||
|- | |||
|style="white-space: nowrap;"|<span class="code">--name vm02-win2012</span> | |||
|This is the name we're going to use for this server in the cluster and with the <span class="code">libvirtd</span> tools. | |||
|- | |||
|style="white-space: nowrap;"|<span class="code">--ram 4096</span> | |||
|This sets the amount of RAM, in [[MiB]], to allocate to this server. Here, we're allocating 4 [[GiB]], which is 4,096 MiB. | |||
|- | |||
|style="white-space: nowrap;"|<span class="code">--cdrom /shared/files/Windows_2012_R2_64-bit_Preview.iso</span> | |||
|This tells the hypervisor to create a cd-rom (dvd-rom) drive and to "insert" the specified ISO as if it was a physical disk. This will be the initial boot device, too. | |||
|- | |||
|style="white-space: nowrap;"|<span class="code">--disk path=/shared/files/virtio-win-0.1-52.iso,device=cdrom --force</span> | |||
|This is the same as the <span class="code">vm01-win2008</span> provision script, but this is where the <span class="code">--force</span> comes in handy. If this ISO was still "mounted" in <span class="code">vm01-2008</span>'s cd-rom tray, the install would abort without <span class="code">--force</span>. | |||
|- | |||
|style="white-space: nowrap;"|<span class="code">--os-variant win2k8</span> | |||
|This is also the same as the <span class="code">vm01-win2008</span> provision script. At the time of writing, there wasn't an entry for <span class="code">win2012</span>, so we're using the closest match which is <span class="code">win2k8</span>. | |||
|- | |||
|style="white-space: nowrap;"|<span class="code">--disk path=/dev/an-a05n02_vg0/vm02-win2012_0,bus=virtio</span> | |||
|This tells the hypervisor what logical volume to use for the server's "hard drive". It also tells it to use the <span class="code">virtio</span> emulated SCSI controller. | |||
|- | |||
|style="white-space: nowrap;"|<span class="code">--graphics spice > /var/log/an-install_vm02-win2012.log</span> | |||
|We're using a new log file for our bash redirection. Later, if we want to examine the install process, we can review <span class="code">/var/log/an-install_vm02-win2012.log</span> for details on the install process. | |||
|} | |||
=== Initializing vm02-win2012's Install === | |||
On your [[Striker|dashboard]] or workstation, open the "Virtual Machine Manager" and connect to both nodes. | |||
We can install any server from either node. However, we know that each server has a preferred host, so it's sensible to use that host for the installation stage. In the case of <span class="code">vm02-win2012</span>, the preferred host is <span class="code">an-a05n02</span>, so we'll use it to kick off the install. | |||
Once the install begins, the new server should appear in "Virtual Machine Manager". Double-click on it and you will see that the new server is booting off of the install cd-rom. We're installing Windows, so that will begin the install process. | |||
Time to start the install! | |||
{|class="wikitable" | |||
!<span class="code">an-a05n02</span> | |||
|style="white-space: nowrap;"|<syntaxhighlight lang="bash"> | |||
/shared/provision/vm02-win2012.sh | |||
</syntaxhighlight> | |||
<syntaxhighlight lang="text"> | |||
Cannot open display: | |||
Run 'virt-viewer --help' to see a full list of available command line options | |||
</syntaxhighlight> | |||
|} | |||
And it's off! | |||
[[Image:AN!Cluster_Tutorial_2-vm02-win2012_02.png|thumb|900px|center|Installation of <span class="code">vm02-win2012</span> begins!]] | |||
Follow the install process, entering the values you want. When you get to the install target screen, you will see that Windows can't find the hard drive. | |||
[[Image:AN!Cluster_Tutorial_2-vm02-win2012_03.png|thumb|900px|center|The <span class="code">vm02-win2012</span> server doesn't see its hard drive.]] | |||
{{warning|1=Since this tutorial was written, the virtio project has significantly changed the directory structure where drivers are held. The storage drivers are now found in <span class="code">viostor/2k12R2/amd64/</span>. The trick of loading the other drivers is still possible by loading the "wrong" driver, one at a time, but it is quite a bit easier to now load the network and other drivers after the install completes. To do so, go to "Device Manager" and select the devices with a yellow exclamation mark, choose to update their drivers and tell it to search all subdirectories on the "dvd".}} | |||
This was expected because windows 2008 does not natively support <span class="code">virtio</span>. That's why we used two virtual cd-rom drives and "inserted" the <span class="code">virtio</span> driver disk into the second drive. | |||
Click on "Load Driver" on the bottom right. | |||
[[Image:AN!Cluster_Tutorial_2-vm02-win2012_04.png|thumb|900px|center|The <span class="code">vm02-win2012</span> server's "Load Driver" menu.]] | |||
Click on "Browse". | |||
[[Image:AN!Cluster_Tutorial_2-vm02-win2012_05.png|thumb|900px|center|The <span class="code">vm02-win2012</span> server's "Browse" menu.]] | |||
The driver disk is in the seconds (virtual) cd-rom drive mounted at drive <span class="code">e:</span>. The drivers for Windows 2008 are the same as for Windows 7, so browse to <span class="code">E:\WIN8\AMD64</span> (assuming you are installing the 64-bit version of windows) and click on "OK". | |||
[[Image:AN!Cluster_Tutorial_2-vm02-win2012_06.png|thumb|900px|center|Selecting the network and storage drivers for the <span class="code">vm02-win2012</span> server.]] | |||
{{note|1=If you forget to select the network drivers here, you will have to manually install the drivers for the network card after the install has completed.}} | |||
Press and hold the <span class="code"><control></span> key and click on both the "Red Hat VirtIO Ethernet Adapter" '''and''' the "Red Hat VirtIO SCSI Controller" drivers. By doing this, we won't have to install the network card's drivers later. Click on "Next" and the drivers will be installed. | |||
[[Image:AN!Cluster_Tutorial_2-vm02-win2012_07.png|thumb|900px|center|Now we see the <span class="code">vm02-win2012</span> server's hard drive! Complete the install from here as you normally would.]] | |||
Now you can finish installing Windows 2008 just as you would do so on a bare iron server! | |||
[[Image:AN!Cluster_Tutorial_2-vm02-win2012_08.png|thumb|900px|center|Install of <span class="code">vm02-win2012</span> is complete!]] | |||
What you do from here is entirely up to you and your needs. | |||
{{note|1=If you wish, jump to [[#Making_vm02-win2012_a_Highly_Available_Service|Making vm02-win2012 a Highly Available Service]] now to immediately add <span class="code">vm02-win2012</span> to the cluster manager.}} | |||
== Provisioning vm03-win7 == | |||
{{note|1=This install references steps taken in the <span class="code">[[vm01-win2008]]</span> install. If you skipped it, you may wish to look at it to get a better idea of some of the steps performed here.}} | |||
[[Image:AN!Cluster_Tutorial_2-vm03-win7_01.png|thumb|500px|right|View of <span class="code">vm03-win7</span>'s desktop.]] | |||
Before we can install the OS, we need to copy the installation media and our driver disk, if needed, and put them in the <span class="code">/shared/files</span>. | |||
Windows is licensed software, so you will need to purchase a copy. You can get an [http://technet.microsoft.com/en-US/evalcenter/dn407368 evaluation copy] from Microsoft's website. In either case, downloading a copy of the installation media is an exercise for you, I am afraid. | |||
As we did for the previous two servers, we're going to use a special kind of [https://en.wikipedia.org/wiki/SCSI SCSI] controller and a special kind of emulated network card. These are called <span class="code">http://www.linux-kvm.org/page/Virtio</span> devices and they are designed to significantly improve storage and network speeds on [[KVM]] guests. | |||
You can create install media from a physical disk or copy install media using the [[Striker]]'s "Media Connector" function. Of course, you can also copy files to the ''Anvil!'' using standard tools like <span class="code">rsync</span> and <span class="code">wget</span> as well. What ever method you prefer, | |||
In my case, I will <span class="code">rsync</span> the Windows install ISO from another machine on our network to <span class="code">/shared/files</span> via <span class="code">an-a05n01</span>. | |||
<syntaxhighlight lang="bash"> | |||
rsync -av --progress /data0/VMs/files/Windows_7_Pro_SP1_64bit_OEM_English.iso root@10.255.50.1:/shared/files/ | |||
</syntaxhighlight> | |||
<syntaxhighlight lang="text"> | |||
root@10.255.50.1's password: | |||
</syntaxhighlight> | |||
<syntaxhighlight lang="text"> | |||
sending incremental file list | |||
Windows_7_Pro_SP1_64bit_OEM_English.iso | |||
3321233408 100% 83.97MB/s 0:00:37 (xfer#1, to-check=0/1) | |||
sent 3321638948 bytes received 31 bytes 80039493.47 bytes/sec | |||
total size is 3321233408 speedup is 1.00 | |||
</syntaxhighlight> | |||
For <span class="code">virtio</span>, we can simply re-use the [[ISO]] we uploaded for <span class="code">vm01-2008</span>. | |||
{{note|1=We've planned to run <span class="code">vm03-win7</span> on <span class="code">an-a05n01</span>, so we will use that node for the provisioning stage.}} | |||
{|class="wikitable" | |||
!<span class="code">an-a05n01</span> | |||
|style="white-space: nowrap;"|<syntaxhighlight lang="bash"> | |||
ls -lah /shared/files/ | |||
</syntaxhighlight> | |||
<syntaxhighlight lang="text"> | |||
total 10G | |||
drwxr-xr-x. 2 root root 3.8K Nov 12 11:32 . | |||
drwxr-xr-x. 6 root root 3.8K Nov 1 01:23 .. | |||
-rw-r--r--. 1 qemu qemu 56M Jan 22 2013 virtio-win-0.1-52.iso | |||
-rw-rw-r--. 1 qemu qemu 3.9G Oct 2 22:31 Windows_2012_R2_64-bit_Preview.iso | |||
-rw-rw-rw-. 1 qemu qemu 3.1G Jun 8 2011 Windows_7_Pro_SP1_64bit_OEM_English.iso | |||
-rw-rw-r--. 1 qemu qemu 3.0G Oct 14 2011 Windows_Svr_2008_R2_64Bit_SP1.ISO | |||
</syntaxhighlight> | |||
|} | |||
Ok, we're ready! | |||
=== Creating vm03-win7's Storage === | |||
{{note|1=Earlier, we used <span class="code">parted</span> to examine our free space and create our DRBD partitions. Unfortunately, <span class="code">parted</span> shows sizes in [[GB]] (base 10) where LVM uses [[GiB]] (base 2). If we used LVM's "<span class="code">xxG</span> size notation, it will use more space than we expect, relative to our planning in the <span class="code">parted</span> stage. LVM doesn't allow specifying new LV sizes in [[GB]] instead of [[GiB]], so here we will specify sizes in [[MiB]] to help narrow the differences. You can read more about this issue [[TLUG_Talk:_Storage_Technologies_and_Theory#Capacity.2C_or_A_Lesson_in_Marketing|here]].}} | |||
Creating the <span class="code">vm03-win7</span>'s "hard drive" is a simple process. Recall that we want a 100 [[GB]] logical volume carved from the <span class="code">an-a05n01_vg0</span> volume group (the "storage pool" for servers designed to run on <span class="code">an-a05n01</span>). Knowing this, the command to create the new LV is below. | |||
{|class="wikitable" | |||
!<span class="code">an-a05n01</span> | |||
|style="white-space: nowrap;"|<syntaxhighlight lang="bash"> | |||
lvcreate -L 100000M -n vm03-win7_0 /dev/an-a05n01_vg0 | |||
</syntaxhighlight> | |||
<syntaxhighlight lang="text"> | |||
Logical volume "vm03-win7_0" created | |||
</syntaxhighlight> | |||
|- | |||
!<span class="code">an-a05n02</span> | |||
|style="white-space: nowrap;"|<syntaxhighlight lang="bash"> | |||
lvdisplay /dev/an-a05n01_vg0/vm03-win7_0 | |||
</syntaxhighlight> | |||
<syntaxhighlight lang="text"> | |||
--- Logical volume --- | |||
LV Path /dev/an-a05n01_vg0/vm03-win7_0 | |||
LV Name vm03-win7_0 | |||
VG Name an-a05n01_vg0 | |||
LV UUID vgdtEm-aOsU-hatQ-2PxO-BN1e-sGLM-J7NVcn | |||
LV Write Access read/write | |||
LV Creation host, time an-a05n01.alteeve.ca, 2013-11-12 12:08:52 -0500 | |||
LV Status available | |||
# open 0 | |||
LV Size 97.66 GiB | |||
Current LE 25000 | |||
Segments 1 | |||
Allocation inherit | |||
Read ahead sectors auto | |||
- currently set to 256 | |||
Block device 253:3 | |||
</syntaxhighlight> | |||
|} | |||
Notice how we see <span class="code">97.66</span> [[GiB]]? That is roughly the difference between "100 [[GB]]" and "100 [[GiB]]". | |||
=== Creating vm03-win7's virt-install Call === | |||
Now with the storage created, we can craft the <span class="code">virt-install</span> command. we'll put this into a file under the <span class="code">/shared/provision/</span> directory for future reference. Let's take a look at the command, then we'll discuss what the switches are for. | |||
{|class="wikitable" | |||
!<span class="code">an-a05n01</span> | |||
|style="white-space: nowrap;"|<syntaxhighlight lang="bash"> | |||
touch /shared/provision/vm03-win7.sh | |||
chmod 755 /shared/provision/vm03-win7.sh | |||
vim /shared/provision/vm03-win7.sh | |||
</syntaxhighlight> | |||
<syntaxhighlight lang="bash"> | |||
virt-install --connect qemu:///system \ | |||
--name vm03-win7 \ | |||
--ram 3072 \ | |||
--arch x86_64 \ | |||
--vcpus 2 \ | |||
--cdrom /shared/files/Windows_7_Pro_SP1_64bit_OEM_English.iso \ | |||
--disk path=/shared/files/virtio-win-0.1-52.iso,device=cdrom --force\ | |||
--os-variant win7 \ | |||
--network bridge=ifn_bridge1,model=virtio \ | |||
--disk path=/dev/an-a05n01_vg0/vm03-win7_0,bus=virtio \ | |||
--graphics spice > /var/log/an-install_vm03-win7.log & | |||
</syntaxhighlight> | |||
|} | |||
{{note|1=Don't use tabs to indent the lines.}} | |||
Let's look at the differences from <span class="code">vm01-win2008</span>; | |||
{|class="wikitable" | |||
!Switch | |||
!Descriptions | |||
|- | |||
|style="white-space: nowrap;"|<span class="code">--name vm03-win7</span> | |||
|This is the name we're going to use for this server in the cluster and with the <span class="code">libvirtd</span> tools. | |||
|- | |||
|style="white-space: nowrap;"|<span class="code">--ram 3072</span> | |||
|This sets the amount of RAM, in [[MiB]], to allocate to this server. Here, we're allocating 3 [[GiB]], which is 3,072 MiB. | |||
|- | |||
|style="white-space: nowrap;"|<span class="code">--cdrom /shared/files/Windows_7_Pro_SP1_64bit_OEM_English.iso</span> | |||
|This tells the hypervisor to create a cd-rom (dvd-rom) drive and to "insert" the specified ISO as if it was a physical disk. This will be the initial boot device, too. | |||
|- | |||
|style="white-space: nowrap;"|<span class="code">--disk path=/shared/files/virtio-win-0.1-52.iso,device=cdrom --force</span> | |||
|This is the same as the <span class="code">vm01-win2008</span> provision script, but this is where the <span class="code">--force</span> comes in handy. If this ISO was still "mounted" in <span class="code">vm01-2008</span>'s cd-rom tray, the install would abort without <span class="code">--force</span>. | |||
|- | |||
|style="white-space: nowrap;"|<span class="code">--os-variant win7</span> | |||
|This tells the KVM hypervisor to optimize for running Windows 7. | |||
|- | |||
|style="white-space: nowrap;"|<span class="code">--disk path=/dev/an-a05n01_vg0/vm03-win7_0,bus=virtio</span> | |||
|This tells the hypervisor what logical volume to use for the server's "hard drive". It also tells it to use the <span class="code">virtio</span> emulated SCSI controller. | |||
|- | |||
|style="white-space: nowrap;"|<span class="code">--graphics spice > /var/log/an-install_vm03-win7.log</span> | |||
|We're using a new log file for our bash redirection. Later, if we want to examine the install process, we can review <span class="code">/var/log/an-install_vm03-win7.log</span> for details on the install process. | |||
|} | |||
=== Initializing vm03-win7's Install === | |||
On your [[Striker|dashboard]] or workstation, open the "Virtual Machine Manager" and connect to both nodes. | |||
We can install any server from either node. However, we know that each server has a preferred host, so it's sensible to use that host for the installation stage. In the case of <span class="code">vm03-win7</span>, the preferred host is <span class="code">an-a05n01</span>, so we'll use it to kick off the install. | |||
Once the install begins, the new server should appear in "Virtual Machine Manager". Double-click on it and you will see that the new server is booting off of the install cd-rom. We're installing Windows, so that will begin the install process. | |||
Time to start the install! | |||
{|class="wikitable" | |||
!<span class="code">an-a05n01</span> | |||
|style="white-space: nowrap;"|<syntaxhighlight lang="bash"> | |||
/shared/provision/vm03-win7.sh | |||
</syntaxhighlight> | |||
<syntaxhighlight lang="text"> | |||
Cannot open display: | |||
Run 'virt-viewer --help' to see a full list of available command line options | |||
</syntaxhighlight> | |||
|} | |||
And it's off! | |||
[[Image:AN!Cluster_Tutorial_2-vm03-win7_02.png|thumb|900px|center|Installation of <span class="code">vm03-win7</span> begins!]] | |||
{{warning|1=Since this tutorial was written, the virtio project has significantly changed the directory structure where drivers are held. The storage drivers are now found in <span class="code">viostor/w7/amd64/</span>. The trick of loading the other drivers is still possible by loading the "wrong" driver, one at a time, but it is quite a bit easier to now load the network and other drivers after the install completes. To do so, go to "Device Manager" and select the devices with a yellow exclamation mark, choose to update their drivers and tell it to search all subdirectories on the "dvd".}} | |||
Follow the install process, entering the values you want. When you get to the install target screen, you will see that Windows can't find the hard drive. | |||
[[Image:AN!Cluster_Tutorial_2-vm03-win7_03.png|thumb|900px|center|The <span class="code">vm03-win7</span> server doesn't see its hard drive.]] | |||
This was expected because windows 2008 does not natively support <span class="code">virtio</span>. That's why we used two virtual cd-rom drives and "inserted" the <span class="code">virtio</span> driver disk into the second drive. | |||
Click on "Load Driver" on the bottom right. | |||
[[Image:AN!Cluster_Tutorial_2-vm03-win7_04.png|thumb|900px|center|The <span class="code">vm03-win7</span> server's "Load Driver" menu.]] | |||
Click on "Browse". | |||
[[Image:AN!Cluster_Tutorial_2-vm03-win7_05.png|thumb|900px|center|The <span class="code">vm03-win7</span> server's "Browse" menu.]] | |||
The driver disk is in the seconds (virtual) cd-rom drive mounted at drive <span class="code">e:</span>. The drivers for Windows 2008 are the same as for Windows 7, so browse to <span class="code">E:\WIN8\AMD64</span> (assuming you are installing the 64-bit version of windows) and click on "OK". | |||
[[Image:AN!Cluster_Tutorial_2-vm03-win7_06.png|thumb|900px|center|Selecting the network and storage drivers for the <span class="code">vm03-win7</span> server.]] | |||
{{note|1=If you forget to select the network drivers here, you will have to manually install the drivers for the network card after the install has completed.}} | |||
Press and hold the <span class="code"><control></span> key and click on both the "Red Hat VirtIO Ethernet Adapter" '''and''' the "Red Hat VirtIO SCSI Controller" drivers. By doing this, we won't have to install the network card's drivers later. Click on "Next" and the drivers will be installed. | |||
[[Image:AN!Cluster_Tutorial_2-vm03-win7_07.png|thumb|900px|center|Now we see the <span class="code">vm03-win7</span> server's hard drive! Complete the install from here as you normally would.]] | |||
Now you can finish installing Windows 2008 just as you would do so on a bare iron server! | |||
[[Image:AN!Cluster_Tutorial_2-vm03-win7_08.png|thumb|900px|center|Install of <span class="code">vm03-win7</span> is complete!]] | |||
What you do from here is entirely up to you and your needs. | |||
{{note|1=If you wish, jump to [[#Making_vm03-win7_a_Highly_Available_Service|Making vm02-win2012 a Highly Available Service]] now to immediately add <span class="code">vm03-win7</span> to the cluster manager.}} | |||
== Provisioning vm04-win8 == | |||
{{note|1=This install references steps taken in the <span class="code">[[vm01-win2008]]</span> install. If you skipped it, you may wish to look at it to get a better idea of some of the steps performed here.}} | |||
[[Image:AN!Cluster_Tutorial_2-vm04-win8_01.png|thumb|500px|right|View of <span class="code">vm04-win8</span>'s desktop.]] | |||
Our last Microsoft operating system! | |||
As always, we need to copy the installation media and our driver disk into <span class="code">/shared/files</span>. | |||
Windows is licensed software, so you will need to purchase a copy. You can get an [http://technet.microsoft.com/en-US/evalcenter/dn407368 evaluation copy] from Microsoft's website. In either case, downloading a copy of the installation media is an exercise for you, I am afraid. | |||
As we did for the previous three servers, we're going to use a special kind of [https://en.wikipedia.org/wiki/SCSI SCSI] controller and a special kind of emulated network card. These are called <span class="code">http://www.linux-kvm.org/page/Virtio</span> devices and they are designed to significantly improve storage and network speeds on [[KVM]] guests. | |||
You can create install media from a physical disk or copy install media using the [[Striker]]'s "Media Connector" function. Of course, you can also copy files to the ''Anvil!'' using standard tools like <span class="code">rsync</span> and <span class="code">wget</span> as well. What ever method you prefer, | |||
In my case, I will <span class="code">rsync</span> the Windows install ISO from another machine on our network to <span class="code">/shared/files</span> via <span class="code">an-a05n01</span>. | |||
<syntaxhighlight lang="bash"> | |||
rsync -av --progress /data0/VMs/files/Win8.1_Enterprise_64-bit_eval.iso root@10.255.50.1:/shared/files/ | |||
</syntaxhighlight> | |||
<syntaxhighlight lang="text"> | |||
root@10.255.50.1's password: | |||
</syntaxhighlight> | |||
<syntaxhighlight lang="text"> | |||
sending incremental file list | |||
Win8.1_Enterprise_64-bit_eval.iso | |||
3797866496 100% 62.02MB/s 0:00:58 (xfer#1, to-check=0/1) | |||
sent 3798330205 bytes received 31 bytes 60773283.78 bytes/sec | |||
total size is 3797866496 speedup is 1.00 | |||
</syntaxhighlight> | |||
For <span class="code">virtio</span>, we can simply re-use the [[ISO]] we uploaded for <span class="code">vm01-2008</span>. | |||
{{note|1=We've planned to run <span class="code">vm04-win8</span> on <span class="code">an-a05n01</span>, so we will use that node for the provisioning stage.}} | |||
{|class="wikitable" | |||
!<span class="code">an-a05n01</span> | |||
|style="white-space: nowrap;"|<syntaxhighlight lang="bash"> | |||
ls -lah /shared/files/ | |||
</syntaxhighlight> | |||
<syntaxhighlight lang="text"> | |||
total 14G | |||
drwxr-xr-x. 2 root root 3.8K Nov 12 18:12 . | |||
drwxr-xr-x. 6 root root 3.8K Nov 1 01:23 .. | |||
-rw-r--r--. 1 qemu qemu 56M Jan 22 2013 virtio-win-0.1-52.iso | |||
-rw-r--r--. 1 qemu qemu 3.6G Oct 31 01:44 Win8.1_Enterprise_64-bit_eval.iso | |||
-rw-rw-r--. 1 qemu qemu 3.9G Oct 2 22:31 Windows_2012_R2_64-bit_Preview.iso | |||
-rw-rw-rw-. 1 qemu qemu 3.1G Jun 8 2011 Windows_7_Pro_SP1_64bit_OEM_English.iso | |||
-rw-rw-r--. 1 qemu qemu 3.0G Oct 14 2011 Windows_Svr_2008_R2_64Bit_SP1.ISO | |||
</syntaxhighlight> | |||
|} | |||
Ok, we're ready! | |||
=== Creating vm04-win8's Storage === | |||
{{note|1=Earlier, we used <span class="code">parted</span> to examine our free space and create our DRBD partitions. Unfortunately, <span class="code">parted</span> shows sizes in [[GB]] (base 10) where LVM uses [[GiB]] (base 2). If we used LVM's "<span class="code">xxG</span> size notation, it will use more space than we expect, relative to our planning in the <span class="code">parted</span> stage. LVM doesn't allow specifying new LV sizes in [[GB]] instead of [[GiB]], so here we will specify sizes in [[MiB]] to help narrow the differences. You can read more about this issue [[TLUG_Talk:_Storage_Technologies_and_Theory#Capacity.2C_or_A_Lesson_in_Marketing|here]].}} | |||
Creating the <span class="code">vm04-win8</span>'s "hard drive" is a simple process. Recall that we want a 100 [[GB]] logical volume carved from the <span class="code">an-a05n01_vg0</span> volume group (the "storage pool" for servers designed to run on <span class="code">an-a05n01</span>). Knowing this, the command to create the new LV is below. | |||
{|class="wikitable" | |||
!<span class="code">an-a05n01</span> | |||
|style="white-space: nowrap;"|<syntaxhighlight lang="bash"> | |||
lvcreate -L 100000M -n vm04-win8_0 /dev/an-a05n01_vg0 | |||
</syntaxhighlight> | |||
<syntaxhighlight lang="text"> | |||
Logical volume "vm04-win8_0" created | |||
</syntaxhighlight> | |||
|- | |||
!<span class="code">an-a05n02</span> | |||
|style="white-space: nowrap;"|<syntaxhighlight lang="bash"> | |||
lvdisplay /dev/an-a05n01_vg0/vm04-win8_0 | |||
</syntaxhighlight> | |||
<syntaxhighlight lang="text"> | |||
--- Logical volume --- | |||
LV Path /dev/an-a05n01_vg0/vm04-win8_0 | |||
LV Name vm04-win8_0 | |||
VG Name an-a05n01_vg0 | |||
LV UUID WZIGmp-xkyZ-Q6Qs-ovMP-qr1k-9xC2-PmbcUD | |||
LV Write Access read/write | |||
LV Creation host, time an-a05n01.alteeve.ca, 2013-11-12 18:13:53 -0500 | |||
LV Status available | |||
# open 0 | |||
LV Size 97.66 GiB | |||
Current LE 25000 | |||
Segments 1 | |||
Allocation inherit | |||
Read ahead sectors auto | |||
- currently set to 256 | |||
Block device 253:4 | |||
</syntaxhighlight> | |||
|} | |||
Notice how we see <span class="code">97.66</span> [[GiB]]? That is roughly the difference between "100 [[GB]]" and "100 [[GiB]]". | |||
=== Creating vm04-win8's virt-install Call === | |||
Now with the storage created, we can craft the <span class="code">virt-install</span> command. we'll put this into a file under the <span class="code">/shared/provision/</span> directory for future reference. Let's take a look at the command, then we'll discuss what the switches are for. | |||
{|class="wikitable" | |||
!<span class="code">an-a05n01</span> | |||
|style="white-space: nowrap;"|<syntaxhighlight lang="bash"> | |||
touch /shared/provision/vm04-win8.sh | |||
chmod 755 /shared/provision/vm04-win8.sh | |||
vim /shared/provision/vm04-win8.sh | |||
</syntaxhighlight> | |||
<syntaxhighlight lang="bash"> | |||
virt-install --connect qemu:///system \ | |||
--name vm04-win8 \ | |||
--ram 4096 \ | |||
--arch x86_64 \ | |||
--vcpus 2 \ | |||
--cdrom /shared/files/Win8.1_Enterprise_64-bit_eval.iso \ | |||
--disk path=/shared/files/virtio-win-0.1-52.iso,device=cdrom --force\ | |||
--os-variant win7 \ | |||
--network bridge=ifn_bridge1,model=virtio \ | |||
--disk path=/dev/an-a05n01_vg0/vm04-win8_0,bus=virtio \ | |||
--graphics spice > /var/log/an-install_vm04-win8.log & | |||
</syntaxhighlight> | |||
|} | |||
{{note|1=Don't use tabs to indent the lines.}} | |||
Let's look at the differences from <span class="code">vm01-win2008</span>; | |||
{|class="wikitable" | |||
!Switch | |||
!Descriptions | |||
|- | |||
|style="white-space: nowrap;"|<span class="code">--name vm04-win8</span> | |||
|This is the name we're going to use for this server in the cluster and with the <span class="code">libvirtd</span> tools. | |||
|- | |||
|style="white-space: nowrap;"|<span class="code">--ram 4096</span> | |||
|This sets the amount of RAM, in [[MiB]], to allocate to this server. Here, we're allocating 4 [[GiB]], which is 4,096 MiB. | |||
|- | |||
|style="white-space: nowrap;"|<span class="code">--cdrom /shared/files/Win8.1_Enterprise_64-bit_eval.iso</span> | |||
|This tells the hypervisor to create a cd-rom (dvd-rom) drive and to "insert" the specified ISO as if it was a physical disk. This will be the initial boot device, too. | |||
|- | |||
|style="white-space: nowrap;"|<span class="code">--disk path=/shared/files/virtio-win-0.1-52.iso,device=cdrom --force</span> | |||
|This is the same as the <span class="code">vm01-win2008</span> provision script, but this is where the <span class="code">--force</span> comes in handy. If this ISO was still "mounted" in <span class="code">vm01-2008</span>'s cd-rom tray, the install would abort without <span class="code">--force</span>. | |||
|- | |||
|style="white-space: nowrap;"|<span class="code">--os-variant win7</span> | |||
|This tells the KVM hypervisor to optimize for running Windows 7. | |||
|- | |||
|style="white-space: nowrap;"|<span class="code">--disk path=/dev/an-a05n01_vg0/vm04-win8_0,bus=virtio</span> | |||
|This tells the hypervisor what logical volume to use for the server's "hard drive". It also tells it to use the <span class="code">virtio</span> emulated SCSI controller. | |||
|- | |||
|style="white-space: nowrap;"|<span class="code">--graphics spice > /var/log/an-install_vm04-win8.log</span> | |||
|We're using a new log file for our bash redirection. Later, if we want to examine the install process, we can review <span class="code">/var/log/an-install_vm04-win8.log</span> for details on the install process. | |||
|} | |||
=== Initializing vm04-win8's Install === | |||
On your [[Striker|dashboard]] or workstation, open the "Virtual Machine Manager" and connect to both nodes. | |||
We can install any server from either node. However, we know that each server has a preferred host, so it's sensible to use that host for the installation stage. In the case of <span class="code">vm04-win8</span>, the preferred host is <span class="code">an-a05n01</span>, so we'll use it to kick off the install. | |||
Once the install begins, the new server should appear in "Virtual Machine Manager". Double-click on it and you will see that the new server is booting off of the install cd-rom. We're installing Windows, so that will begin the install process. | |||
Time to start the install! | |||
{|class="wikitable" | |||
!<span class="code">an-a05n01</span> | |||
|style="white-space: nowrap;"|<syntaxhighlight lang="bash"> | |||
/shared/provision/vm04-win8.sh | |||
</syntaxhighlight> | |||
<syntaxhighlight lang="text"> | |||
Cannot open display: | |||
Run 'virt-viewer --help' to see a full list of available command line options | |||
</syntaxhighlight> | |||
|} | |||
And it's off! | |||
[[Image:AN!Cluster_Tutorial_2-vm04-win8_02.png|thumb|900px|center|Installation of <span class="code">vm04-win8</span> begins!]] | |||
Follow the install process, entering the values you want. When you get to the install target screen, you will see that Windows can't find the hard drive. | |||
[[Image:AN!Cluster_Tutorial_2-vm04-win8_03.png|thumb|900px|center|The <span class="code">vm04-win8</span> server doesn't see its hard drive.]] | |||
{{warning|1=Since this tutorial was written, the virtio project has significantly changed the directory structure where drivers are held. The storage drivers are now found in <span class="code">viostor/w8/amd64/</span>. The trick of loading the other drivers is still possible by loading the "wrong" driver, one at a time, but it is quite a bit easier to now load the network and other drivers after the install completes. To do so, go to "Device Manager" and select the devices with a yellow exclamation mark, choose to update their drivers and tell it to search all subdirectories on the "dvd".}} | |||
This was expected because Windows 8 does not natively support <span class="code">virtio</span>. That's why we used two virtual cd-rom drives and "inserted" the <span class="code">virtio</span> driver disk into the second drive. | |||
Click on "Load Driver" on the bottom right. | |||
[[Image:AN!Cluster_Tutorial_2-vm04-win8_04.png|thumb|900px|center|The <span class="code">vm04-win8</span> server's "Load Driver" menu.]] | |||
Click on "Browse". | |||
[[Image:AN!Cluster_Tutorial_2-vm04-win8_05.png|thumb|900px|center|The <span class="code">vm04-win8</span> server's "Browse" menu.]] | |||
The driver disk is in the seconds (virtual) cd-rom drive mounted at drive <span class="code">e:</span>. The drivers for Windows 2008 are the same as for Windows 7, so browse to <span class="code">E:\WIN8\AMD64</span> (assuming you are installing the 64-bit version of windows) and click on "OK". | |||
[[Image:AN!Cluster_Tutorial_2-vm04-win8_06.png|thumb|900px|center|Selecting the network and storage drivers for the <span class="code">vm04-win8</span> server.]] | |||
{{note|1=If you forget to select the network drivers here, you will have to manually install the drivers for the network card after the install has completed.}} | |||
Press and hold the <span class="code"><control></span> key and click on both the "Red Hat VirtIO Ethernet Adapter" '''and''' the "Red Hat VirtIO SCSI Controller" drivers. By doing this, we won't have to install the network card's drivers later. Click on "Next" and the drivers will be installed. | |||
[[Image:AN!Cluster_Tutorial_2-vm04-win8_07.png|thumb|900px|center|Now we see the <span class="code">vm04-win8</span> server's hard drive! Complete the install from here as you normally would.]] | |||
Now you can finish installing Windows 2008 just as you would do so on a bare iron server! | |||
[[Image:AN!Cluster_Tutorial_2-vm04-win8_08.png|thumb|900px|center|Install of <span class="code">vm04-win8</span> is complete!]] | |||
What you do from here is entirely up to you and your needs. | |||
{{note|1=If you wish, jump to [[#Making_vm04-win8_a_Highly_Available_Service|Making vm02-win2012 a Highly Available Service]] now to immediately add <span class="code">vm04-win8</span> to the cluster manager.}} | |||
== Provisioning vm05-freebsd9 == | |||
{{note|1=This install references steps taken in the <span class="code">[[vm01-win2008]]</span> install. If you skipped it, you may wish to look at it to get a better idea of some of the steps performed here.}} | |||
[[Image:AN!Cluster_Tutorial_2-vm05-freebsd9_01.png|thumb|500px|right|View of <span class="code">vm05-freebsd9</span>'s desktop.]] | |||
Our first non-Microsft OS! | |||
As always, we need to copy the installation disk into <span class="code">/shared/files</span>. | |||
[http://www.freebsd.org/ FreeBSD] is free software and can be downloaded directly from their website. | |||
{|class="wikitable" | |||
!<span class="code">an-a05n02</span> | |||
|style="white-space: nowrap;"|<syntaxhighlight lang="bash"> | |||
cd /shared/files/ | |||
wget -c ftp://ftp.freebsd.org/pub/FreeBSD/releases/amd64/amd64/ISO-IMAGES/9.2/FreeBSD-9.2-RELEASE-amd64-dvd1.iso | |||
</syntaxhighlight> | |||
<syntaxhighlight lang="text"> | |||
--2013-11-18 15:48:09-- ftp://ftp.freebsd.org/pub/FreeBSD/releases/amd64/amd64/ISO-IMAGES/9.2/FreeBSD-9.2-RELEASE-amd64-dvd1.iso | |||
=> `FreeBSD-9.2-RELEASE-amd64-dvd1.iso' | |||
Resolving ftp.freebsd.org... 204.152.184.73, 2001:4f8:0:2::e | |||
Connecting to ftp.freebsd.org|204.152.184.73|:21... connected. | |||
Logging in as anonymous ... Logged in! | |||
==> SYST ... done. ==> PWD ... done. | |||
==> TYPE I ... done. ==> CWD (1) /pub/FreeBSD/releases/amd64/amd64/ISO-IMAGES/9.2 ... done. | |||
==> SIZE FreeBSD-9.2-RELEASE-amd64-dvd1.iso ... 2554132480 | |||
==> PASV ... done. ==> RETR FreeBSD-9.2-RELEASE-amd64-dvd1.iso ... done. | |||
Length: 2554132480 (2.4G) (unauthoritative) | |||
100%[=============================================================>] 2,554,132,480 465K/s in 45m 9s | |||
2013-11-18 16:33:19 (921 KB/s) - `FreeBSD-9.2-RELEASE-amd64-dvd1.iso' saved [2554132480] | |||
</syntaxhighlight> | |||
|} | |||
{{note|1=We've planned to run <span class="code">vm05-freebsd9</span> on <span class="code">an-a05n02</span>, so we will use that node for the provisioning stage.}} | |||
{|class="wikitable" | |||
!<span class="code">an-a05n02</span> | |||
|style="white-space: nowrap;"|<syntaxhighlight lang="bash"> | |||
ls -lah /shared/files/ | |||
</syntaxhighlight> | |||
<syntaxhighlight lang="text"> | |||
drwxr-xr-x. 2 root root 3.8K Nov 18 15:48 . | |||
drwxr-xr-x. 6 root root 3.8K Nov 18 16:35 .. | |||
-rw-r--r--. 1 root root 2.4G Nov 18 16:33 FreeBSD-9.2-RELEASE-amd64-dvd1.iso | |||
-rw-r--r--. 1 qemu qemu 56M Jan 22 2013 virtio-win-0.1-52.iso | |||
-rw-r--r--. 1 qemu qemu 3.6G Oct 31 01:44 Win8.1_Enterprise_64-bit_eval.iso | |||
-rw-rw-r--. 1 qemu qemu 3.9G Oct 2 22:31 Windows_2012_R2_64-bit_Preview.iso | |||
-rw-rw-rw-. 1 qemu qemu 3.1G Jun 8 2011 Windows_7_Pro_SP1_64bit_OEM_English.iso | |||
-rw-rw-r--. 1 qemu qemu 3.0G Oct 14 2011 Windows_Svr_2008_R2_64Bit_SP1.ISO | |||
</syntaxhighlight> | |||
|} | |||
Ok, we're ready! | |||
=== Creating vm05-freebsd9's Storage === | |||
{{note|1=Earlier, we used <span class="code">parted</span> to examine our free space and create our DRBD partitions. Unfortunately, <span class="code">parted</span> shows sizes in [[GB]] (base 10) where LVM uses [[GiB]] (base 2). If we used LVM's "<span class="code">xxG</span> size notation, it will use more space than we expect, relative to our planning in the <span class="code">parted</span> stage. LVM doesn't allow specifying new LV sizes in [[GB]] instead of [[GiB]], so here we will specify sizes in [[MiB]] to help narrow the differences. You can read more about this issue [[TLUG_Talk:_Storage_Technologies_and_Theory#Capacity.2C_or_A_Lesson_in_Marketing|here]].}} | |||
Creating the <span class="code">vm05-freebsd9</span>'s "hard drive" is a simple process. Recall that we want a 50 [[GB]] logical volume carved from the <span class="code">an-a05n02_vg0</span> volume group (the "storage pool" for servers designed to run on <span class="code">an-a05n02</span>). Knowing this, the command to create the new LV is below. | |||
{|class="wikitable" | |||
!<span class="code">an-a05n01</span> | |||
|style="white-space: nowrap;"|<syntaxhighlight lang="bash"> | |||
lvcreate -L 50000M -n vm05-freebsd9_0 /dev/an-a05n02_vg0 | |||
</syntaxhighlight> | |||
<syntaxhighlight lang="text"> | |||
Logical volume "vm05-freebsd9_0" created | |||
</syntaxhighlight> | |||
|- | |||
!<span class="code">an-a05n02</span> | |||
|style="white-space: nowrap;"|<syntaxhighlight lang="bash"> | |||
lvdisplay /dev/an-a05n02_vg0/vm05-freebsd9_0 | |||
</syntaxhighlight> | |||
<syntaxhighlight lang="text"> | |||
--- Logical volume --- | |||
LV Path /dev/an-a05n02_vg0/vm05-freebsd9_0 | |||
LV Name vm05-freebsd9_0 | |||
VG Name an-a05n02_vg0 | |||
LV UUID ioF6jU-pXEQ-wAhm-1zkB-LTDw-PQPG-1SPdkD | |||
LV Write Access read/write | |||
LV Creation host, time an-a05n01.alteeve.ca, 2013-11-18 16:41:30 -0500 | |||
LV Status available | |||
# open 0 | |||
LV Size 48.83 GiB | |||
Current LE 12500 | |||
Segments 1 | |||
Allocation inherit | |||
Read ahead sectors auto | |||
- currently set to 256 | |||
Block device 253:5 | |||
</syntaxhighlight> | |||
|} | |||
Notice how we see <span class="code">48.83</span> [[GiB]]? That is roughly the difference between "50 [[GB]]" and "50 [[GiB]]". | |||
=== Creating vm05-freebsd9's virt-install Call === | |||
Now with the storage created, we can craft the <span class="code">virt-install</span> command. we'll put this into a file under the <span class="code">/shared/provision/</span> directory for future reference. Let's take a look at the command, then we'll discuss what the switches are for. | |||
{|class="wikitable" | |||
!<span class="code">an-a05n02</span> | |||
|style="white-space: nowrap;"|<syntaxhighlight lang="bash"> | |||
touch /shared/provision/vm05-freebsd9.sh | |||
chmod 755 /shared/provision/vm05-freebsd9.sh | |||
vim /shared/provision/vm05-freebsd9.sh | |||
</syntaxhighlight> | |||
<syntaxhighlight lang="bash"> | |||
virt-install --connect qemu:///system \ | |||
--name vm05-freebsd9 \ | |||
--ram 2048 \ | |||
--arch x86_64 \ | |||
--vcpus 2 \ | |||
--cdrom /shared/files/FreeBSD-9.2-RELEASE-amd64-dvd1.iso \ | |||
--os-variant freebsd8 \ | |||
--network bridge=ifn_bridge1,model=virtio \ | |||
--disk path=/dev/an-a05n02_vg0/vm05-freebsd9_0,bus=virtio \ | |||
--graphics spice > /var/log/an-install_vm05-freebsd9.log & | |||
</syntaxhighlight> | |||
|} | |||
{{note|1=Don't use tabs to indent the lines.}} | |||
Let's look at the differences from <span class="code">vm01-win2008</span>; | |||
{|class="wikitable" | |||
!Switch | |||
!Descriptions | |||
|- | |||
|style="white-space: nowrap;"|<span class="code">--name vm05-freebsd9</span> | |||
|This is the name we're going to use for this server in the cluster and with the <span class="code">libvirtd</span> tools. | |||
|- | |||
|style="white-space: nowrap;"|<span class="code">--ram 4096</span> | |||
|This sets the amount of RAM, in [[MiB]], to allocate to this server. Here, we're allocating 2 [[GiB]], which is 2,048 MiB. | |||
|- | |||
|style="white-space: nowrap;"|<span class="code">--cdrom /shared/files/FreeBSD-9.2-RELEASE-amd64-dvd1.iso</span> | |||
|This tells the hypervisor to create a cd-rom (dvd-rom) drive and to "insert" the specified ISO as if it was a physical disk. This will be the initial boot device, too. | |||
|- | |||
|style="white-space: nowrap;"|<span class="code">--os-variant freebsd8</span> | |||
|This tells the KVM hypervisor to optimize for running FreeBSD 8, which is the closest optimization available. | |||
|- | |||
|style="white-space: nowrap;"|<span class="code">--disk path=/dev/an-a05n02_vg0/vm05-freebsd9_0,bus=virtio</span> | |||
|This tells the hypervisor what logical volume to use for the server's "hard drive". It also tells it to use the <span class="code">virtio</span> emulated SCSI controller. | |||
|- | |||
|style="white-space: nowrap;"|<span class="code">--graphics spice > /var/log/an-install_vm05-freebsd9.log</span> | |||
|We're using a new log file for our bash redirection. Later, if we want to examine the install process, we can review <span class="code">/var/log/an-install_vm05-freebsd9.log</span> for details on the install process. | |||
|} | |||
=== Initializing vm05-freebsd9's Install === | |||
On your [[Striker|dashboard]] or workstation, open the "Virtual Machine Manager" and connect to both nodes. | |||
We can install any server from either node. However, we know that each server has a preferred host, so it's sensible to use that host for the installation stage. In the case of <span class="code">vm05-freebsd9</span>, the preferred host is <span class="code">an-a05n02</span>, so we'll use it to kick off the install. | |||
Once the install begins, the new server should appear in "Virtual Machine Manager". Double-click on it and you will see that the new server is booting off of the install cd-rom. We're installing Windows, so that will begin the install process. | |||
Time to start the install! | |||
{|class="wikitable" | |||
!<span class="code">an-a05n02</span> | |||
|style="white-space: nowrap;"|<syntaxhighlight lang="bash"> | |||
/shared/provision/vm05-freebsd9.sh | |||
</syntaxhighlight> | |||
<syntaxhighlight lang="text"> | |||
Cannot open display: | |||
Run 'virt-viewer --help' to see a full list of available command line options | |||
</syntaxhighlight> | |||
|} | |||
And it's off! | |||
[[Image:AN!Cluster_Tutorial_2-vm05-freebsd9_02.png|thumb|900px|center|Installation of <span class="code">vm05-freebsd9</span> begins!]] | |||
The entire install process for FreeBSD is normal. It has native support for <span class="code">virtio</span>, so the virtual hard drive and network card will "just work". | |||
[[Image:AN!Cluster_Tutorial_2-vm05-freebsd9_03.png|thumb|900px|center|The hard drive for <span class="code">vm05-freebsd9</span> is found without loading drivers.]] | |||
[[Image:AN!Cluster_Tutorial_2-vm05-freebsd9_04.png|thumb|900px|center|The network card for <span class="code">vm05-freebsd9</span> is also found without loading drivers.]] | |||
There is one trick with installing FreeBSD 9 though. The optimization was for <span class="code">freebsd8</span> and one down-side is that FreeBSD won't reboot automatically after the install finishes and tries to reboot. | |||
[[Image:AN!Cluster_Tutorial_2-vm05-freebsd9_05.png|thumb|900px|center|The <span class="code">vm05-freebsd9</span> server stays off after the initial install completes.]] | |||
Obviously, the server is not yet in the cluster so we can't use <span class="code">clusvcadm -e</span>. So instead, we'll use <span class="code">virsh</span> to boot it up. | |||
{|class="wikitable" | |||
!<span class="code">an-a05n02</span> | |||
|style="white-space: nowrap;"|<syntaxhighlight lang="bash"> | |||
virsh start vm05-freebsd9 | |||
</syntaxhighlight> | |||
<syntaxhighlight lang="text"> | |||
Domain vm05-freebsd9 started | |||
</syntaxhighlight> | |||
|} | |||
[[Image:AN!Cluster_Tutorial_2-vm05-freebsd9_06.png|thumb|900px|center|The <span class="code">vm05-freebsd9</span> is back up and running.]] | |||
What you do from here is entirely up to you and your needs. | |||
{{note|1=If you wish, jump to [[#Making_vm05-freebsd9_a_Highly_Available_Service|Making vm05-freebsd9 a Highly Available Service]] now to immediately add <span class="code">vm05-freebsd9</span> to the cluster manager.}} | |||
== Provisioning vm06-solaris11 == | |||
{{note|1=This install references steps taken in the <span class="code">[[vm01-win2008]]</span> install. If you skipped it, you may wish to look at it to get a better idea of some of the steps performed here.}} | |||
[[Image:AN!Cluster_Tutorial_2-vm06-solaris11_01.png|thumb|500px|right|View of <span class="code">vm06-solaris11</span>'s desktop.]] | |||
Oracle's Solaris operating system is a commercial [[UNIX]] product. You can download an [http://www.oracle.com/technetwork/server-storage/solaris11/downloads/index.html?ssSourceSiteId=ocomen evaluation version] from their website. We'll be using the [[x86]] version. | |||
As always, we need to copy the installation disk into <span class="code">/shared/files</span>. | |||
<syntaxhighlight lang="bash"> | |||
rsync -av --progress /data0/VMs/files/sol-11-1111-text-x86.iso root@10.255.50.1:/shared/files/ | |||
</syntaxhighlight> | |||
<syntaxhighlight lang="text"> | |||
root@10.255.50.1's password: | |||
</syntaxhighlight> | |||
<syntaxhighlight lang="text"> | |||
sending incremental file list | |||
sol-11-1111-text-x86.iso | |||
450799616 100% 108.12MB/s 0:00:03 (xfer#1, to-check=0/1) | |||
sent 450854737 bytes received 31 bytes 69362272.00 bytes/sec | |||
total size is 450799616 speedup is 1.00 | |||
</syntaxhighlight> | |||
{{note|1=We've planned to run <span class="code">vm06-solaris11</span> on <span class="code">an-a05n02</span>, so we will use that node for the provisioning stage.}} | |||
{|class="wikitable" | |||
!<span class="code">an-a05n02</span> | |||
|style="white-space: nowrap;"|<syntaxhighlight lang="bash"> | |||
ls -lah /shared/files/ | |||
</syntaxhighlight> | |||
<syntaxhighlight lang="text"> | |||
total 17G | |||
drwxr-xr-x. 2 root root 3.8K Nov 19 17:11 . | |||
drwxr-xr-x. 6 root root 3.8K Nov 19 17:04 .. | |||
-rw-r--r--. 1 qemu qemu 2.4G Nov 18 16:33 FreeBSD-9.2-RELEASE-amd64-dvd1.iso | |||
-rw-rw-r--. 1 root root 430M Sep 28 2012 sol-11-1111-text-x86.iso | |||
-rw-r--r--. 1 qemu qemu 56M Jan 22 2013 virtio-win-0.1-52.iso | |||
-rw-r--r--. 1 qemu qemu 3.6G Oct 31 01:44 Win8.1_Enterprise_64-bit_eval.iso | |||
-rw-rw-r--. 1 qemu qemu 3.9G Oct 2 22:31 Windows_2012_R2_64-bit_Preview.iso | |||
-rw-rw-rw-. 1 qemu qemu 3.1G Jun 8 2011 Windows_7_Pro_SP1_64bit_OEM_English.iso | |||
-rw-rw-r--. 1 qemu qemu 3.0G Oct 14 2011 Windows_Svr_2008_R2_64Bit_SP1.ISO | |||
</syntaxhighlight> | |||
|} | |||
Ok, we're ready! | |||
=== Creating vm06-solaris11's Storage === | |||
{{note|1=Earlier, we used <span class="code">parted</span> to examine our free space and create our DRBD partitions. Unfortunately, <span class="code">parted</span> shows sizes in [[GB]] (base 10) where LVM uses [[GiB]] (base 2). If we used LVM's "<span class="code">xxG</span> size notation, it will use more space than we expect, relative to our planning in the <span class="code">parted</span> stage. LVM doesn't allow specifying new LV sizes in [[GB]] instead of [[GiB]], so here we will specify sizes in [[MiB]] to help narrow the differences. You can read more about this issue [[TLUG_Talk:_Storage_Technologies_and_Theory#Capacity.2C_or_A_Lesson_in_Marketing|here]].}} | |||
Creating the <span class="code">vm06-solaris11</span>'s "hard drive" is a simple process. Recall that we want a 100 [[GB]] logical volume carved from the <span class="code">an-a05n02_vg0</span> volume group (the "storage pool" for servers designed to run on <span class="code">an-a05n02</span>). Knowing this, the command to create the new LV is below. | |||
{|class="wikitable" | |||
!<span class="code">an-a05n01</span> | |||
|style="white-space: nowrap;"|<syntaxhighlight lang="bash"> | |||
lvcreate -L 100000M -n vm06-solaris11_0 /dev/an-a05n02_vg0 | |||
</syntaxhighlight> | |||
<syntaxhighlight lang="text"> | |||
Volume group "an-a05n02_vg0" has insufficient free space (23506 extents): 25000 required. | |||
</syntaxhighlight> | |||
|} | |||
What's this?! | |||
=== Calculating Free Space; Converting GiB to MB === | |||
What we have here is, despite our efforts to mitigate the [[GiB]] versus [[GB]] issue, we ran out of space. | |||
This highlights the need for careful design planning. We weren't careful enough, so now we have to deal with the resources we have left. | |||
Let's figure out how much space is left in the <span class="code">an-a05n02</span> volume group. | |||
{|class="wikitable" | |||
!<span class="code">an-a05n02</span> | |||
|style="white-space: nowrap;"|<syntaxhighlight lang="bash"> | |||
vgdisplay an-a05n02_vg0 | |||
</syntaxhighlight> | |||
<syntaxhighlight lang="text"> | |||
--- Volume group --- | |||
VG Name an-a05n02_vg0 | |||
System ID | |||
Format lvm2 | |||
Metadata Areas 1 | |||
Metadata Sequence No 3 | |||
VG Access read/write | |||
VG Status resizable | |||
Clustered yes | |||
Shared no | |||
MAX LV 0 | |||
Cur LV 2 | |||
Open LV 2 | |||
Max PV 0 | |||
Cur PV 1 | |||
Act PV 1 | |||
VG Size 287.13 GiB | |||
PE Size 4.00 MiB | |||
Total PE 73506 | |||
Alloc PE / Size 50000 / 195.31 GiB | |||
Free PE / Size 23506 / 91.82 GiB | |||
VG UUID 1h5Gzk-6UX6-xvUo-GWVH-ZMFM-YLop-dYiC7L | |||
</syntaxhighlight> | |||
|} | |||
You can see that there is <span class="code">91.82</span> [[GiB]] left (<span class="code">23,506</span> "extents" which are <span class="code">4.00</span> [[MiB]] each). | |||
Knowing this, there are a few ways we could proceed. | |||
# Use the <span class="code">lvcreate -l xx</span> syntax, which says to use <span class="code">xx</span> extents. We have <span class="code">23,506</span> extents free, so we could just do <span class="code">lvcreate -l 23506</span> | |||
# Use the "percentage free" method of defining free space. That would be <span class="code">lvcreate -l 100%FREE</span> which simply uses all remaining free space. | |||
# Calculate the number of [[MB]] in <span class="code">91.82</span> [[GiB]]. | |||
The first two are self-evident, so let's look the 3rd option because math is awesome! | |||
To do this, we need to convert <span class="code">91.82</span> GiB into bytes. We can get close by simply doing <span class="code">(91.82 * (1024 * 1024 * 1024))</span> (x GiB -> MiB -> KiB = bytes), but this gives us <span class="code">98,590,974,279.68</span>... The <span class="code">.82</span> is not precise enough. If we divide this by <span class="code">1,000,000</span> (number of bytes in a [[MB]]), we get <span class="code">98590.97</span>. Round down to <span class="code">98,590</span>. | |||
If we take the extent size times free extent count, we get <span class="code">((23506 * 4) * (1024 * 1024))</span> (extents free * extent size) converted to MiB -> KiB = bytes) which gives us <span class="code">98591309824</span>. Divided by <span class="code">1,000,000</span> to get [[MB]] and we have <span class="code">98591.30</span>, rounded down we get <span class="code">98,591</span> [[MB]]. | |||
Both methods are pretty darn close, and would end up with the same number of extents used. So now, if we wanted to, we could use <span class="code">lvcreate -L 98591M</span> to keep in line with our previous usage of <span class="code">lvcreate</span>. | |||
That was fun! | |||
Now we'll be boring and practical and use <span class="code">lvcreate -l 100%FREE</span> because it's safe. | |||
{|class="wikitable" | |||
!<span class="code">an-a05n01</span> | |||
|style="white-space: nowrap;"|<syntaxhighlight lang="bash"> | |||
lvcreate -l 100%FREE -n vm06-solaris11_0 /dev/an-a05n02_vg0 | |||
</syntaxhighlight> | |||
<syntaxhighlight lang="text"> | |||
Logical volume "vm06-solaris11_0" created | |||
</syntaxhighlight> | |||
|- | |||
!<span class="code">an-a05n02</span> | |||
|style="white-space: nowrap;"|<syntaxhighlight lang="bash"> | |||
lvdisplay /dev/an-a05n02_vg0/vm06-solaris11_0 | |||
</syntaxhighlight> | |||
<syntaxhighlight lang="text"> | |||
--- Logical volume --- | |||
LV Path /dev/an-a05n02_vg0/vm06-solaris11_0 | |||
LV Name vm06-solaris11_0 | |||
VG Name an-a05n02_vg0 | |||
LV UUID 3BQgmu-QHca-0XtE-PRQB-btQc-LmdF-rTVyi5 | |||
LV Write Access read/write | |||
LV Creation host, time an-a05n01.alteeve.ca, 2013-11-19 15:37:29 -0500 | |||
LV Status available | |||
# open 0 | |||
LV Size 91.82 GiB | |||
Current LE 23506 | |||
Segments 1 | |||
Allocation inherit | |||
Read ahead sectors auto | |||
- currently set to 256 | |||
Block device 253:6 | |||
</syntaxhighlight> | |||
|} | |||
So we're a little smaller than we originally planned. A good and simple way to avoid this problem is to plan your storage to have more free space than you think you will need. Storage space is, relatively speaking, fairly cheap. | |||
=== Creating vm06-solaris11's virt-install Call === | |||
{{note|1=Solaris 11 does not support <span class="code">virtio</span>, so we will be emulating a simple <span class="code">scsi</span> storage controller and <span class="code">e1000</span> (Intel 1 Gbps) network card.}} | |||
Now with the storage created, we can craft the <span class="code">virt-install</span> command. we'll put this into a file under the <span class="code">/shared/provision/</span> directory for future reference. Let's take a look at the command, then we'll discuss what the switches are for. | |||
{|class="wikitable" | |||
!<span class="code">an-a05n02</span> | |||
|style="white-space: nowrap;"|<syntaxhighlight lang="bash"> | |||
touch /shared/provision/vm06-solaris11.sh | |||
chmod 755 /shared/provision/vm06-solaris11.sh | |||
vim /shared/provision/vm06-solaris11.sh | |||
</syntaxhighlight> | |||
<syntaxhighlight lang="bash"> | |||
virt-install --connect qemu:///system \ | |||
--name vm06-solaris11 \ | |||
--ram 2048 \ | |||
--arch x86_64 \ | |||
--vcpus 2 \ | |||
--cdrom /shared/files/sol-11-1111-text-x86.iso \ | |||
--os-variant solaris10 \ | |||
--network bridge=ifn_bridge1,model=e1000 \ | |||
--disk path=/dev/an-a05n02_vg0/vm06-solaris11_0 \ | |||
--graphics spice > /var/log/an-install_vm06-solaris11.log & | |||
</syntaxhighlight> | |||
|} | |||
{{note|1=Don't use tabs to indent the lines.}} | |||
Let's look at the differences from <span class="code">vm01-win2008</span>; | |||
{|class="wikitable" | |||
!Switch | |||
!Descriptions | |||
|- | |||
|style="white-space: nowrap;"|<span class="code">--name vm06-solaris11</span> | |||
|This is the name we're going to use for this server in the cluster and with the <span class="code">libvirtd</span> tools. | |||
|- | |||
|style="white-space: nowrap;"|<span class="code">--ram 2048</span> | |||
|This sets the amount of RAM, in [[MiB]], to allocate to this server. Here, we're allocating 2 [[GiB]], which is 2,048 MiB. | |||
|- | |||
|style="white-space: nowrap;"|<span class="code">--cdrom /shared/files/sol-11-1111-text-x86.iso</span> | |||
|This tells the hypervisor to create a cd-rom (dvd-rom) drive and to "insert" the specified ISO as if it was a physical disk. This will be the initial boot device, too. | |||
|- | |||
|style="white-space: nowrap;"|<span class="code">--os-variant solaris10</span> | |||
|This tells the KVM hypervisor to optimize for running Solaris 10, which is the closest optimization available. | |||
|- | |||
|style="white-space: nowrap;"|<span class="code">--disk path=/dev/an-a05n02_vg0/vm06-solaris11_0</span> | |||
|This tells the hypervisor what logical volume to use for the server's "hard drive". It does not specify any <span class="code">bus=</span>, unlike the other servers. | |||
|- | |||
|style="white-space: nowrap;"|<span class="code">--network bridge=ifn_bridge1,model=e1000</span> | |||
|This tells the hypervisor to emulate an Intel gigabit network controller. | |||
|- | |||
|style="white-space: nowrap;"|<span class="code">--graphics spice > /var/log/an-install_vm06-solaris11.log</span> | |||
|We're using a new log file for our bash redirection. Later, if we want to examine the install process, we can review <span class="code">/var/log/an-install_vm06-solaris11.log</span> for details on the install process. | |||
|} | |||
=== Initializing vm06-solaris11's Install === | |||
On your [[Striker|dashboard]] or workstation, open the "Virtual Machine Manager" and connect to both nodes. | |||
We can install any server from either node. However, we know that each server has a preferred host, so it's sensible to use that host for the installation stage. In the case of <span class="code">vm06-solaris11</span>, the preferred host is <span class="code">an-a05n02</span>, so we'll use it to kick off the install. | |||
Once the install begins, the new server should appear in "Virtual Machine Manager". Double-click on it and you will see that the new server is booting off of the install cd-rom. We're installing Windows, so that will begin the install process. | |||
Time to start the install! | |||
{|class="wikitable" | |||
!<span class="code">an-a05n02</span> | |||
|style="white-space: nowrap;"|<syntaxhighlight lang="bash"> | |||
/shared/provision/vm06-solaris11.sh | |||
</syntaxhighlight> | |||
<syntaxhighlight lang="text"> | |||
Cannot open display: | |||
Run 'virt-viewer --help' to see a full list of available command line options | |||
</syntaxhighlight> | |||
|} | |||
And it's off, but with errors! | |||
[[Image:AN!Cluster_Tutorial_2-vm06-solaris11_02.png|thumb|900px|center|Installation of <span class="code">vm06-solaris11</span> begins, but with (harmless) errors.]] | |||
By default, Solaris tries to use the [[uhci]] USB driver which doesn't work. It generates the following error; | |||
<syntaxhighlight lang="text"> | |||
WARNING: /pci@0,0/pci1af4,1100@1,2 (uhci0): No SOF interrupts have been received | |||
, this USB UHCI host controller is unusable | |||
</syntaxhighlight> | |||
This is harmless and can be safely ignored. Once the install is complete, we will disabled [[uhci]] by running <span class="code">rem_drv uhci</span> in the server. | |||
[[Image:AN!Cluster_Tutorial_2-vm06-solaris11_03.png|thumb|900px|center|Configuring <span class="code">vm06-solaris11</span>'s hard drive.]] | |||
[[Image:AN!Cluster_Tutorial_2-vm06-solaris11_04.png|thumb|900px|center|Installation summary for <span class="code">vm06-solaris11</span>.]] | |||
[[Image:AN!Cluster_Tutorial_2-vm06-solaris11_05.png|thumb|900px|center|The <span class="code">vm06-solaris11</span> is done!]] | |||
What you do from here is entirely up to you and your needs. | |||
{{note|1=If you wish, jump to [[#Making_vm06-solaris11_a_Highly_Available_Service|Making vm06-solaris11 a Highly Available Service]] now to immediately add <span class="code">vm06-solaris11</span> to the cluster manager.}} | |||
== Provisioning vm07-rhel6 == | |||
{{note|1=This install references steps taken in the <span class="code">[[vm01-win2008]]</span> install. If you skipped it, you may wish to look at it to get a better idea of some of the steps performed here.}} | |||
[[Image:AN!Cluster_Tutorial_2-vm07-rhel6_01.png|thumb|500px|right|View of <span class="code">vm07-rhel6</span>'s desktop.]] | |||
Red Hat's Enterprise Linux operating system is a commercial [[Linux]] product. You can download an [http://www.redhat.com/products/enterprise-linux/server/download.html evaluation version] from their website. If you prefer a community-supported version, the [http://www.centos.org/modules/tinycontent/index.php?id=30 CentOS] project is a binary-compatible, free-as-in-beer operating system that you can use here instead. | |||
As always, we need to copy the installation disk into <span class="code">/shared/files</span>. | |||
<syntaxhighlight lang="bash"> | |||
rsync -av --progress /data0/VMs/files/rhel-server-6.4-x86_64-dvd.iso root@10.255.50.1:/shared/files/ | |||
</syntaxhighlight> | |||
<syntaxhighlight lang="text"> | |||
root@10.255.50.1's password: | |||
</syntaxhighlight> | |||
<syntaxhighlight lang="text"> | |||
sending incremental file list | |||
rhel-server-6.4-x86_64-dvd.iso | |||
3720347648 100% 65.25MB/s 0:00:54 (xfer#1, to-check=0/1) | |||
sent 3720801890 bytes received 31 bytes 64709598.63 bytes/sec | |||
total size is 3720347648 speedup is 1.00 | |||
</syntaxhighlight> | |||
{{note|1=We've planned to run <span class="code">vm07-rhel6</span> on <span class="code">an-a05n02</span>, so we will use that node for the provisioning stage.}} | |||
{|class="wikitable" | |||
!<span class="code">an-a05n02</span> | |||
|style="white-space: nowrap;"|<syntaxhighlight lang="bash"> | |||
ls -lah /shared/files/ | |||
</syntaxhighlight> | |||
<syntaxhighlight lang="text"> | |||
total 20G | |||
drwxr-xr-x. 2 root root 3.8K Nov 20 16:54 . | |||
drwxr-xr-x. 6 root root 3.8K Nov 20 16:50 .. | |||
-rw-r--r--. 1 qemu qemu 2.4G Nov 18 16:33 FreeBSD-9.2-RELEASE-amd64-dvd1.iso | |||
-rw-rw-r--. 1 1000 1000 3.5G Mar 4 2013 rhel-server-6.4-x86_64-dvd.iso | |||
-rw-rw-r--. 1 qemu qemu 430M Sep 28 2012 sol-11-1111-text-x86.iso | |||
-rw-r--r--. 1 qemu qemu 56M Jan 22 2013 virtio-win-0.1-52.iso | |||
-rw-r--r--. 1 qemu qemu 3.6G Oct 31 01:44 Win8.1_Enterprise_64-bit_eval.iso | |||
-rw-rw-r--. 1 qemu qemu 3.9G Oct 2 22:31 Windows_2012_R2_64-bit_Preview.iso | |||
-rw-rw-rw-. 1 qemu qemu 3.1G Jun 8 2011 Windows_7_Pro_SP1_64bit_OEM_English.iso | |||
-rw-rw-r--. 1 qemu qemu 3.0G Oct 14 2011 Windows_Svr_2008_R2_64Bit_SP1.ISO | |||
</syntaxhighlight> | |||
|} | |||
Ok, we're ready! | |||
=== Creating vm07-rhel6's Storage === | |||
{{note|1=Earlier, we used <span class="code">parted</span> to examine our free space and create our DRBD partitions. Unfortunately, <span class="code">parted</span> shows sizes in [[GB]] (base 10) where LVM uses [[GiB]] (base 2). If we used LVM's "<span class="code">xxG</span> size notation, it will use more space than we expect, relative to our planning in the <span class="code">parted</span> stage. LVM doesn't allow specifying new LV sizes in [[GB]] instead of [[GiB]], so here we will specify sizes in [[MiB]] to help narrow the differences. You can read more about this issue [[TLUG_Talk:_Storage_Technologies_and_Theory#Capacity.2C_or_A_Lesson_in_Marketing|here]].}} | |||
Creating the <span class="code">vm07-rhel6</span>'s "hard drive" is a simple process. Recall that we want a 50 [[GB]] logical volume carved from the <span class="code">an-a05n01_vg0</span> volume group (the "storage pool" for servers designed to run on <span class="code">an-a05n01</span>). Knowing this, the command to create the new LV is below. | |||
{|class="wikitable" | |||
!<span class="code">an-a05n01</span> | |||
|style="white-space: nowrap;"|<syntaxhighlight lang="bash"> | |||
lvcreate -L 50000M -n vm07-rhel6_0 /dev/an-a05n01_vg0 | |||
</syntaxhighlight> | |||
<syntaxhighlight lang="text"> | |||
Logical volume "vm07-rhel6_0" created | |||
</syntaxhighlight> | |||
|- | |||
!<span class="code">an-a05n02</span> | |||
|style="white-space: nowrap;"|<syntaxhighlight lang="bash"> | |||
lvdisplay /dev/an-a05n01_vg0/vm07-rhel6_0 | |||
</syntaxhighlight> | |||
<syntaxhighlight lang="text"> | |||
--- Logical volume --- | |||
LV Path /dev/an-a05n01_vg0/vm07-rhel6_0 | |||
LV Name vm07-rhel6_0 | |||
VG Name an-a05n01_vg0 | |||
LV UUID wBNRrK-N8xL-nJm4-lM0y-a858-ydgC-d0UU04 | |||
LV Write Access read/write | |||
LV Creation host, time an-a05n01.alteeve.ca, 2013-11-20 16:56:22 -0500 | |||
LV Status available | |||
# open 0 | |||
LV Size 48.83 GiB | |||
Current LE 12500 | |||
Segments 1 | |||
Allocation inherit | |||
Read ahead sectors auto | |||
- currently set to 256 | |||
Block device 253:7 | |||
</syntaxhighlight> | |||
|} | |||
Notice how we see <span class="code">48.83</span> [[GiB]]? That is roughly the difference between "50 [[GB]]" and "50 [[GiB]]". | |||
=== Creating vm07-rhel6's virt-install Call === | |||
Now with the storage created, we can craft the <span class="code">virt-install</span> command. we'll put this into a file under the <span class="code">/shared/provision/</span> directory for future reference. Let's take a look at the command, then we'll discuss what the switches are for. | |||
{|class="wikitable" | |||
!<span class="code">an-a05n01</span> | |||
|style="white-space: nowrap;"|<syntaxhighlight lang="bash"> | |||
touch /shared/provision/vm07-rhel6.sh | |||
chmod 755 /shared/provision/vm07-rhel6.sh | |||
vim /shared/provision/vm07-rhel6.sh | |||
</syntaxhighlight> | |||
<syntaxhighlight lang="bash"> | |||
virt-install --connect qemu:///system \ | |||
--name vm07-rhel6 \ | |||
--ram 2048 \ | |||
--arch x86_64 \ | |||
--vcpus 2 \ | |||
--cdrom /shared/files/rhel-server-6.4-x86_64-dvd.iso \ | |||
--os-variant rhel6 \ | |||
--network bridge=ifn_bridge1,model=virtio \ | |||
--disk path=/dev/an-a05n01_vg0/vm07-rhel6_0,bus=virtio \ | |||
--graphics spice > /var/log/an-install_vm07-rhel6.log & | |||
</syntaxhighlight> | |||
|} | |||
{{note|1=Don't use tabs to indent the lines.}} | |||
Let's look at the differences from <span class="code">vm01-win2008</span>; | |||
{|class="wikitable" | |||
!Switch | |||
!Descriptions | |||
|- | |||
|style="white-space: nowrap;"|<span class="code">--name vm07-rhel6</span> | |||
|This is the name we're going to use for this server in the cluster and with the <span class="code">libvirtd</span> tools. | |||
|- | |||
|style="white-space: nowrap;"|<span class="code">--ram 2048</span> | |||
|This sets the amount of RAM, in [[MiB]], to allocate to this server. Here, we're allocating 2 [[GiB]], which is 2,048 MiB. | |||
|- | |||
|style="white-space: nowrap;"|<span class="code">--cdrom /shared/files/rhel-server-6.4-x86_64-dvd.iso</span> | |||
|This tells the hypervisor to create a cd-rom (dvd-rom) drive and to "insert" the specified ISO as if it was a physical disk. This will be the initial boot device, too. | |||
|- | |||
|style="white-space: nowrap;"|<span class="code">--os-variant rhel6</span> | |||
|This tells the KVM hypervisor to optimize for running RHEL 6. | |||
|- | |||
|style="white-space: nowrap;"|<span class="code">--disk path=/dev/an-a05n01_vg0/vm07-rhel6_0,bus=virtio</span> | |||
|This tells the hypervisor what logical volume to use for the server's "hard drive". It does not specify any <span class="code">bus=</span>, unlike the other servers. | |||
|- | |||
|style="white-space: nowrap;"|<span class="code">--graphics spice > /var/log/an-install_vm07-rhel6.log</span> | |||
|We're using a new log file for our bash redirection. Later, if we want to examine the install process, we can review <span class="code">/var/log/an-install_vm07-rhel6.log</span> for details on the install process. | |||
|} | |||
=== Initializing vm07-rhel6's Install === | |||
On your [[Striker|dashboard]] or workstation, open the "Virtual Machine Manager" and connect to both nodes. | |||
We can install any server from either node. However, we know that each server has a preferred host, so it's sensible to use that host for the installation stage. In the case of <span class="code">vm07-rhel6</span>, the preferred host is <span class="code">an-a05n01</span>, so we'll use it to kick off the install. | |||
Once the install begins, the new server should appear in "Virtual Machine Manager". Double-click on it and you will see that the new server is booting off of the install cd-rom. We're installing Windows, so that will begin the install process. | |||
Time to start the install! | |||
{|class="wikitable" | |||
!<span class="code">an-a05n01</span> | |||
|style="white-space: nowrap;"|<syntaxhighlight lang="bash"> | |||
/shared/provision/vm07-rhel6.sh | |||
</syntaxhighlight> | |||
<syntaxhighlight lang="text"> | |||
Cannot open display: | |||
Run 'virt-viewer --help' to see a full list of available command line options | |||
</syntaxhighlight> | |||
|} | |||
And it's off! | |||
[[Image:AN!Cluster_Tutorial_2-vm07-rhel6_02.png|thumb|900px|center|Installation of <span class="code">vm07-rhel6</span> begins!]] | |||
You'll get prompted to check the installation media before starting the install. Given that we don't have a physical disk to scratch, it's safe to skip that. | |||
[[Image:AN!Cluster_Tutorial_2-vm07-rhel6_03.png|thumb|900px|center|No need to check for defects in <span class="code">vm07-rhel6</span>'s installation "disc".]] | |||
It's no surprise that [[RHEL6]] works flawlessly with the <span class="code">virtio</span> drivers. Red Hat did write them, after all. | |||
[[Image:AN!Cluster_Tutorial_2-vm07-rhel6_04.png|thumb|900px|center|Configuring <span class="code">vm07-rhel6</span>'s hard drive.]] | |||
[[Image:AN!Cluster_Tutorial_2-vm07-rhel6_05.png|thumb|900px|center|Performing a <span class="code">Desktop</span> install on <span class="code">vm07-rhel6</span>.]] | |||
As we saw with <span class="code">vm05-freebsd9</span>, the post install reboot doesn't actually reboot. | |||
[[Image:AN!Cluster_Tutorial_2-vm07-rhel6_06.png|thumb|900px|center|After the first stage of the install of <span class="code">vm07-rhel6</span> leaves the server off.]] | |||
Easy enough to boot it back up though. | |||
{|class="wikitable" | |||
!<span class="code">an-a05n01</span> | |||
|style="white-space: nowrap;"|<syntaxhighlight lang="bash"> | |||
virsh start vm07-rhel6 | |||
</syntaxhighlight> | |||
<syntaxhighlight lang="text"> | |||
Domain vm07-rhel6 started | |||
</syntaxhighlight> | |||
|} | |||
[[Image:AN!Cluster_Tutorial_2-vm07-rhel6_07.png|thumb|900px|center|The <span class="code">vm07-rhel6</span> is done!]] | |||
If you did a "Desktop" install, you will get the "First Boot" menus. Once done, you're new server is ready. | |||
{{note|1=If you wish, jump to [[#Making_vm07-rhel6_a_Highly_Available_Service|Making vm07-rhel6 a Highly Available Service]] now to immediately add <span class="code">vm07-rhel6</span> to the cluster manager.}} | |||
=== Making sure RHEL 6 reboots after panic'ing === | |||
It used to be that [[RHEL]] would halt all CPU activity if the kernel panic'ed. This lack of activity could be used to detect a failure in the guest which <span class="code">rgmanager</span> could use to trigger recovery of the guest. Now though, RHEL 6 keeps one of the virtual CPUs after after panic'ing, which the node can not differentiate from a normal load. | |||
To ensure that your RHEL guest recovers after panic'ing, you will need to append the following to <span class="code">/etc/sysctl.conf</span>: | |||
<syntaxhighlight lang="bash"> | |||
# Make the server reboot within 5 seconds of a panic. | |||
kernel.panic = 5 | |||
</syntaxhighlight> | |||
To make the change take immediate effect, run the following: | |||
<syntaxhighlight lang="bash"> | |||
echo 5 > /proc/sys/kernel/panic | |||
sysctl -e kernel.panic | |||
</syntaxhighlight> | |||
<syntaxhighlight lang="text"> | |||
kernel.panic = 5 | |||
</syntaxhighlight> | |||
To verify that the server will reboot post panic, you can send the following command to your server. | |||
{{warning|1=This command will immediately and totally halt your server. It will not recover until it reboots.}} | |||
<syntaxhighlight lang="bash"> | |||
echo c > /proc/sysrq-trigger | |||
</syntaxhighlight> | |||
If things worked properly, the server will reboot five seconds after issuing this command. | |||
== Provisioning vm08-sles11 == | |||
{{note|1=This install references steps taken in the <span class="code">[[vm01-win2008]]</span> install. If you skipped it, you may wish to look at it to get a better idea of some of the steps performed here.}} | |||
[[Image:AN!Cluster_Tutorial_2-vm08-sles11_01.png|thumb|500px|right|View of <span class="code">vm08-sles11</span>'s desktop.]] | |||
The last server in our tutorial! | |||
SUSE's Linux Enterprise Server is a commercial [[Linux]] product. You can download an [https://www.suse.com/products/server/eval.html evaluation version] from their website. | |||
As always, we need to copy the installation disk into <span class="code">/shared/files</span>. | |||
<syntaxhighlight lang="bash"> | |||
rsync -av --progress /data0/VMs/files/SLES-11-SP3-DVD-x86_64-GM-DVD* root@10.255.50.1:/shared/files/ | |||
</syntaxhighlight> | |||
<syntaxhighlight lang="text"> | |||
root@10.255.50.1's password: | |||
</syntaxhighlight> | |||
<syntaxhighlight lang="text"> | |||
SLES-11-SP3-DVD-x86_64-GM-DVD1.iso | |||
3362783232 100% 60.94MB/s 0:00:52 (xfer#1, to-check=1/2) | |||
SLES-11-SP3-DVD-x86_64-GM-DVD2.iso | |||
5311318016 100% 73.66MB/s 0:01:08 (xfer#2, to-check=0/2) | |||
</syntaxhighlight> | |||
{{note|1=We've planned to run <span class="code">vm08-sles11</span> on <span class="code">an-a05n02</span>, so we will use that node for the provisioning stage.}} | |||
{|class="wikitable" | |||
!<span class="code">an-a05n02</span> | |||
|style="white-space: nowrap;"|<syntaxhighlight lang="bash"> | |||
ls -lah /shared/files/ | |||
</syntaxhighlight> | |||
<syntaxhighlight lang="text"> | |||
total 28G | |||
drwxr-xr-x. 2 root root 3.8K Nov 21 01:19 . | |||
drwxr-xr-x. 6 root root 3.8K Nov 21 01:12 .. | |||
-rw-r--r--. 1 qemu qemu 2.4G Nov 18 16:33 FreeBSD-9.2-RELEASE-amd64-dvd1.iso | |||
-rw-rw-r--. 1 qemu qemu 3.5G Mar 4 2013 rhel-server-6.4-x86_64-dvd.iso | |||
-rw-------. 1 1000 1000 3.2G Oct 30 17:52 SLES-11-SP3-DVD-x86_64-GM-DVD1.iso | |||
-rw-------. 1 1000 1000 5.0G Oct 30 18:25 SLES-11-SP3-DVD-x86_64-GM-DVD2.iso | |||
-rw-rw-r--. 1 qemu qemu 430M Sep 28 2012 sol-11-1111-text-x86.iso | |||
-rw-r--r--. 1 qemu qemu 56M Jan 22 2013 virtio-win-0.1-52.iso | |||
-rw-r--r--. 1 qemu qemu 3.6G Oct 31 01:44 Win8.1_Enterprise_64-bit_eval.iso | |||
-rw-rw-r--. 1 qemu qemu 3.9G Oct 2 22:31 Windows_2012_R2_64-bit_Preview.iso | |||
-rw-rw-rw-. 1 qemu qemu 3.1G Jun 8 2011 Windows_7_Pro_SP1_64bit_OEM_English.iso | |||
-rw-rw-r--. 1 qemu qemu 3.0G Oct 14 2011 Windows_Svr_2008_R2_64Bit_SP1.ISO | |||
</syntaxhighlight> | |||
|} | |||
Ok, we're ready! | |||
=== Creating vm08-sles11's Storage === | |||
{{note|1=Earlier, we used <span class="code">parted</span> to examine our free space and create our DRBD partitions. Unfortunately, <span class="code">parted</span> shows sizes in [[GB]] (base 10) where LVM uses [[GiB]] (base 2). If we used LVM's "<span class="code">xxG</span> size notation, it will use more space than we expect, relative to our planning in the <span class="code">parted</span> stage. LVM doesn't allow specifying new LV sizes in [[GB]] instead of [[GiB]], so here we will specify sizes in [[MiB]] to help narrow the differences. You can read more about this issue [[TLUG_Talk:_Storage_Technologies_and_Theory#Capacity.2C_or_A_Lesson_in_Marketing|here]].}} | |||
Creating the <span class="code">vm08-sles11</span>'s "hard drive" is a simple process. Recall that we want a 100 [[GB]] logical volume carved from the <span class="code">an-a05n01_vg0</span> volume group (the "storage pool" for servers designed to run on <span class="code">an-a05n01</span>). Knowing this, the command to create the new LV is below. | |||
{|class="wikitable" | |||
!<span class="code">an-a05n01</span> | |||
|style="white-space: nowrap;"|<syntaxhighlight lang="bash"> | |||
lvcreate -L 100000M -n vm08-sles11_0 /dev/an-a05n01_vg0 | |||
</syntaxhighlight> | |||
<syntaxhighlight lang="text"> | |||
Volume group "an-a05n01_vg0" has insufficient free space (19033 extents): 25000 required. | |||
</syntaxhighlight> | |||
|} | |||
We've run into the same problem that we hit with [[#Calculating_Free_Space.3B_Converting_GiB_to_MB]]. So we've learned our lesson and will switch to the <span class="code">lvcreate -l 100%FREE</span> to use up the free space that remains. | |||
{|class="wikitable" | |||
!<span class="code">an-a05n01</span> | |||
|style="white-space: nowrap;"|<syntaxhighlight lang="bash"> | |||
lvcreate -l 100%FREE -n vm08-sles11_0 /dev/an-a05n01_vg0 | |||
</syntaxhighlight> | |||
<syntaxhighlight lang="text"> | |||
Logical volume "vm08-sles11_0" created | |||
</syntaxhighlight> | |||
|- | |||
!<span class="code">an-a05n02</span> | |||
|style="white-space: nowrap;"|<syntaxhighlight lang="bash"> | |||
lvdisplay /dev/an-a05n01_vg0/vm08-sles11_0 | |||
</syntaxhighlight> | |||
<syntaxhighlight lang="text"> | |||
--- Logical volume --- | |||
LV Path /dev/an-a05n01_vg0/vm08-sles11_0 | |||
LV Name vm08-sles11_0 | |||
VG Name an-a05n01_vg0 | |||
LV UUID 9J9eO1-BhTe-Ee8X-zP5u-UY5S-Y7AB-Ql0hhI | |||
LV Write Access read/write | |||
LV Creation host, time an-a05n01.alteeve.ca, 2013-11-21 01:23:16 -0500 | |||
LV Status available | |||
# open 0 | |||
LV Size 74.35 GiB | |||
Current LE 19033 | |||
Segments 1 | |||
Allocation inherit | |||
Read ahead sectors auto | |||
- currently set to 256 | |||
Block device 253:8 | |||
</syntaxhighlight> | |||
|} | |||
Our compounding error in planning has reduced this server's planned space down to a mere <span class="code">74.35</span> [[GiB]]! | |||
=== Creating vm08-sles11's virt-install Call === | |||
Now with the storage created, we can craft the <span class="code">virt-install</span> command. we'll put this into a file under the <span class="code">/shared/provision/</span> directory for future reference. Let's take a look at the command, then we'll discuss what the switches are for. | |||
{|class="wikitable" | |||
!<span class="code">an-a05n02</span> | |||
|style="white-space: nowrap;"|<syntaxhighlight lang="bash"> | |||
touch /shared/provision/vm08-sles11.sh | |||
chmod 755 /shared/provision/vm08-sles11.sh | |||
vim /shared/provision/vm08-sles11.sh | |||
</syntaxhighlight> | |||
<syntaxhighlight lang="bash"> | |||
virt-install --connect qemu:///system \ | |||
--name vm08-sles11 \ | |||
--ram 2048 \ | |||
--arch x86_64 \ | |||
--vcpus 2 \ | |||
--cdrom /shared/files/SLES-11-SP3-DVD-x86_64-GM-DVD1.iso \ | |||
--disk path=/shared/files/SLES-11-SP3-DVD-x86_64-GM-DVD2.iso,device=cdrom --force \ | |||
--os-variant sles11 \ | |||
--network bridge=ifn_bridge1,model=virtio \ | |||
--disk path=/dev/an-a05n01_vg0/vm08-sles11_0,bus=virtio \ | |||
--graphics spice > /var/log/an-install_vm08-sles11.log & | |||
</syntaxhighlight> | |||
|} | |||
{{note|1=Don't use tabs to indent the lines.}} | |||
Let's look at the differences from <span class="code">vm01-win2008</span>; | |||
{|class="wikitable" | |||
!Switch | |||
!Descriptions | |||
|- | |||
|style="white-space: nowrap;"|<span class="code">--name vm08-sles11</span> | |||
|This is the name we're going to use for this server in the cluster and with the <span class="code">libvirtd</span> tools. | |||
|- | |||
|style="white-space: nowrap;"|<span class="code">--ram 2048</span> | |||
|This sets the amount of RAM, in [[MiB]], to allocate to this server. Here, we're allocating 2 [[GiB]], which is 2,048 MiB. | |||
|- | |||
|style="white-space: nowrap;"|<span class="code">--cdrom /shared/files/SLES-11-SP3-DVD-x86_64-GM-DVD1.iso</span> | |||
|This tells the hypervisor to create a cd-rom (dvd-rom) drive and to "insert" the specified ISO as if it was a physical disk. This will be the initial boot device, too. | |||
|- | |||
|style="white-space: nowrap;"|<span class="code">--disk path=/shared/files/SLES-11-SP3-DVD-x86_64-GM-DVD2.iso,device=cdrom --force</span> | |||
|SLES 11 has two install DVDs. This tells the hypervisor to create a second DVD drive and to insert 'Disc 2' into it. | |||
|- | |||
|style="white-space: nowrap;"|<span class="code">--os-variant sles11</span> | |||
|This tells the KVM hypervisor to optimize for running SLES 11. | |||
|- | |||
|style="white-space: nowrap;"|<span class="code">--disk path=/dev/an-a05n01_vg0/vm08-sles11_0,bus=virtio</span> | |||
|This tells the hypervisor what logical volume to use for the server's "hard drive". It does not specify any <span class="code">bus=</span>, unlike the other servers. | |||
|- | |||
|style="white-space: nowrap;"|<span class="code">--graphics spice > /var/log/an-install_vm08-sles11.log</span> | |||
|We're using a new log file for our bash redirection. Later, if we want to examine the install process, we can review <span class="code">/var/log/an-install_vm08-sles11.log</span> for details on the install process. | |||
|} | |||
=== Initializing vm08-sles11's Install === | |||
On your [[Striker|dashboard]] or workstation, open the "Virtual Machine Manager" and connect to both nodes. | |||
We can install any server from either node. However, we know that each server has a preferred host, so it's sensible to use that host for the installation stage. In the case of <span class="code">vm08-sles11</span>, the preferred host is <span class="code">an-a05n01</span>, so we'll use it to kick off the install. | |||
Once the install begins, the new server should appear in "Virtual Machine Manager". Double-click on it and you will see that the new server is booting off of the install cd-rom. We're installing Windows, so that will begin the install process. | |||
Time to start the install! | |||
{|class="wikitable" | |||
!<span class="code">an-a05n01</span> | |||
|style="white-space: nowrap;"|<syntaxhighlight lang="bash"> | |||
/shared/provision/vm08-sles11.sh | |||
</syntaxhighlight> | |||
<syntaxhighlight lang="text"> | |||
Cannot open display: | |||
Run 'virt-viewer --help' to see a full list of available command line options | |||
</syntaxhighlight> | |||
|} | |||
And it's off! | |||
[[Image:AN!Cluster_Tutorial_2-vm08-sles11_02.png|thumb|900px|center|Installation of <span class="code">vm08-sles11</span> begins!]] | |||
You'll get prompted to check the installation media before starting the install. Given that we don't have a physical disk to scratch, it's safe to skip that. | |||
[[Image:AN!Cluster_Tutorial_2-vm08-sles11_03.png|thumb|900px|center|No need to check for defects in <span class="code">vm08-sles11</span>'s installation "disc".]] | |||
SLES 11 works flawlessly with the <span class="code">virtio</span> drivers. | |||
[[Image:AN!Cluster_Tutorial_2-vm08-sles11_04.png|thumb|900px|center|Install summary for <span class="code">vm08-sles11</span>.]] | |||
As we saw with <span class="code">vm05-freebsd9</span> and <span class="code">vm07-rhel6</span>, the post install reboot doesn't actually reboot. | |||
[[Image:AN!Cluster_Tutorial_2-vm08-sles11_05.png|thumb|900px|center|After the first stage of the install of <span class="code">vm08-sles11</span> leaves the server off.]] | |||
Easy enough to boot it back up though. | |||
{|class="wikitable" | |||
!<span class="code">an-a05n01</span> | |||
|style="white-space: nowrap;"|<syntaxhighlight lang="bash"> | |||
virsh start vm08-sles11 | |||
</syntaxhighlight> | |||
<syntaxhighlight lang="text"> | |||
Domain vm08-sles11 started | |||
</syntaxhighlight> | |||
|} | |||
[[Image:AN!Cluster_Tutorial_2-vm08-sles11_08.png|thumb|900px|center|The <span class="code">vm08-sles11</span> is done!]] | |||
If you did a "Physical Machine" install, you will get the "First Boot" menus. Once done, you're new server is ready. | |||
That is all eight of eight servers built! | |||
{{note|1=If you wish, jump to [[#Making_vm08-sles11_a_Highly_Available_Service|Making vm08-sles11 a Highly Available Service]] now to immediately add <span class="code">vm08-sles11</span> to the cluster manager.}} | |||
Eight of eight servers built! | |||
= Making Our VMs Highly Available Cluster Services = | |||
We're ready to start the final step; Making our VMs highly available cluster services! This involves two main steps: | |||
* Creating two new, ordered fail-over Domains; One with each node as the highest priority. | |||
* Adding our VMs as services, one is each new fail-over domain. | |||
== Creating the Ordered Fail-Over Domains == | |||
We have planned for two VMs, <span class="code">vm01-dev</span> and <span class="code">vm02-web</span> to normally run on <span class="code">an-a05n01</span> while <span class="code">vm03-db</span> and <span class="code">vm04-ms</span> to run on <span class="code">an-a05n02</span>. Of course, should one of the nodes fail, the lost VMs will be restarted on the surviving node. For this, we will use an ordered fail-over domain. | |||
The idea here is that each new fail-over domain will have one node with a higher priority than the other. That is, one will have <span class="code">an-a05n01</span> with the highest priority and the other will have <span class="code">an-a05n02</span> as the highest. This way, VMs that we want to normally run on a given node will be added to the matching fail-over domain. | |||
{{note|1=With 2-node clusters like ours, ordering is arguably useless. It's used here more to introduce the concepts rather than providing any real benefit. If you want to make production clusters unordered, you can. Just remember to run the VMs on the appropriate nodes when both are on-line.}} | |||
Here are the two new domains we will create in <span class="code">/etc/cluster/cluster.conf</span>; | |||
{|class="wikitable" | |||
!<span class="code">an-a05n01</span> | |||
|style="white-space: nowrap;"|<syntaxhighlight lang="xml"> | |||
<failoverdomains> | |||
... | |||
<failoverdomain name="primary_n01" nofailback="1" ordered="1" restricted="1"> | |||
<failoverdomainnode name="an-a05n01.alteeve.ca" priority="1"/> | |||
<failoverdomainnode name="an-a05n02.alteeve.ca" priority="2"/> | |||
</failoverdomain> | |||
<failoverdomain name="primary_n02" nofailback="1" ordered="1" restricted="1"> | |||
<failoverdomainnode name="an-a05n01.alteeve.ca" priority="2"/> | |||
<failoverdomainnode name="an-a05n02.alteeve.ca" priority="1"/> | |||
</failoverdomain> | |||
</failoverdomains> | |||
</syntaxhighlight> | |||
|} | |||
The two major pieces of the puzzle here are the <span class="code"><failoverdomain ...></span>'s <span class="code">ordered="1"</span> attribute and the <span class="code"><failoverdomainnode ...></span>'s <span class="code">priority="x"</span> attributes. The former tells the cluster that there is a preference for which node should be used when both are available. The later, which is the difference between the two new domains, tells the cluster which specific node is preferred. | |||
The first of the new fail-over domains is <span class="code">primary_n01</span>. Any service placed in this domain will prefer to run on <span class="code">an-a05n01</span>, as its priority of <span class="code">1</span> is higher than <span class="code">an-a05n02</span>'s priority of <span class="code">2</span>. The second of the new domains is <span class="code">primary_n02</span> which reverses the preference, making <span class="code">an-a05n02</span> preferred over <span class="code">an-a05n01</span>. | |||
Let's look at the complete <span class="code">cluster.conf</span> with the new domain, and the version updated to <span class="code">11</span> of course. | |||
{|class="wikitable" | |||
!<span class="code">an-a05n01</span> | |||
|style="white-space: nowrap;"|<syntaxhighlight lang="xml"> | |||
<?xml version="1.0"?> | |||
<cluster name="an-anvil-05" config_version="11"> | |||
<cman expected_votes="1" two_node="1" /> | |||
<clusternodes> | |||
<clusternode name="an-a05n01.alteeve.ca" nodeid="1"> | |||
<fence> | |||
<method name="ipmi"> | |||
<device name="ipmi_n01" action="reboot" delay="15" /> | |||
</method> | |||
<method name="pdu"> | |||
<device name="pdu1" port="1" action="reboot" /> | |||
<device name="pdu2" port="1" action="reboot" /> | |||
</method> | |||
</fence> | |||
</clusternode> | |||
<clusternode name="an-a05n02.alteeve.ca" nodeid="2"> | |||
<fence> | |||
<method name="ipmi"> | |||
<device name="ipmi_n02" action="reboot" /> | |||
</method> | |||
<method name="pdu"> | |||
<device name="pdu1" port="2" action="reboot" /> | |||
<device name="pdu2" port="2" action="reboot" /> | |||
</method> | |||
</fence> | |||
</clusternode> | |||
</clusternodes> | |||
<fencedevices> | |||
<fencedevice name="ipmi_n01" agent="fence_ipmilan" ipaddr="an-a05n01.ipmi" login="admin" passwd="secret" /> | |||
<fencedevice name="ipmi_n02" agent="fence_ipmilan" ipaddr="an-a05n02.ipmi" login="admin" passwd="secret" /> | |||
<fencedevice agent="fence_apc_snmp" ipaddr="an-pdu01.alteeve.ca" name="pdu1" /> | |||
<fencedevice agent="fence_apc_snmp" ipaddr="an-pdu02.alteeve.ca" name="pdu2" /> | |||
</fencedevices> | |||
<fence_daemon post_join_delay="30" /> | |||
<totem rrp_mode="none" secauth="off"/> | |||
<rm log_level="5"> | |||
<resources> | |||
<script file="/etc/init.d/drbd" name="drbd"/> | |||
<script file="/etc/init.d/clvmd" name="clvmd"/> | |||
<clusterfs device="/dev/an-a05n01_vg0/shared" force_unmount="1" fstype="gfs2" mountpoint="/shared" name="sharedfs" /> | |||
<script file="/etc/init.d/libvirtd" name="libvirtd"/> | |||
</resources> | |||
<failoverdomains> | |||
<failoverdomain name="only_n01" nofailback="1" ordered="0" restricted="1"> | |||
<failoverdomainnode name="an-a05n01.alteeve.ca"/> | |||
</failoverdomain> | |||
<failoverdomain name="only_n02" nofailback="1" ordered="0" restricted="1"> | |||
<failoverdomainnode name="an-a05n02.alteeve.ca"/> | |||
</failoverdomain> | |||
<failoverdomain name="primary_n01" nofailback="1" ordered="1" restricted="1"> | |||
<failoverdomainnode name="an-a05n01.alteeve.ca" priority="1"/> | |||
<failoverdomainnode name="an-a05n02.alteeve.ca" priority="2"/> | |||
</failoverdomain> | |||
<failoverdomain name="primary_n02" nofailback="1" ordered="1" restricted="1"> | |||
<failoverdomainnode name="an-a05n01.alteeve.ca" priority="2"/> | |||
<failoverdomainnode name="an-a05n02.alteeve.ca" priority="1"/> | |||
</failoverdomain> | |||
</failoverdomains> | |||
<service name="storage_n01" autostart="1" domain="only_n01" exclusive="0" recovery="restart"> | |||
<script ref="drbd"> | |||
<script ref="clvmd"> | |||
<clusterfs ref="sharedfs"/> | |||
</script> | |||
</script> | |||
</service> | |||
<service name="storage_n02" autostart="1" domain="only_n02" exclusive="0" recovery="restart"> | |||
<script ref="drbd"> | |||
<script ref="clvmd"> | |||
<clusterfs ref="sharedfs"/> | |||
</script> | |||
</script> | |||
</service> | |||
<service name="libvirtd_n01" autostart="1" domain="only_n01" exclusive="0" recovery="restart"> | |||
<script ref="libvirtd"/> | |||
</service> | |||
<service name="libvirtd_n02" autostart="1" domain="only_n02" exclusive="0" recovery="restart"> | |||
<script ref="libvirtd"/> | |||
</service> | |||
</rm> | |||
</cluster> | |||
</syntaxhighlight> | |||
|} | |||
Let's validate it now, but we won't bother to push it out just yet. | |||
{|class="wikitable" | |||
!<span class="code">an-a05n01</span> | |||
|style="white-space: nowrap;"|<syntaxhighlight lang="bash"> | |||
ccs_config_validate | |||
</syntaxhighlight> | |||
<syntaxhighlight lang="text"> | |||
Configuration validates | |||
</syntaxhighlight> | |||
<syntaxhighlight lang="bash"> | |||
cman_tool version | |||
</syntaxhighlight> | |||
<syntaxhighlight lang="text"> | |||
6.2.0 config 10 | |||
</syntaxhighlight> | |||
<syntaxhighlight lang="bash"> | |||
cman_tool version -r | |||
cman_tool version | |||
</syntaxhighlight> | |||
<syntaxhighlight lang="text"> | |||
6.2.0 config 11 | |||
</syntaxhighlight> | |||
|- | |||
!<span class="code">an-a05n02</span> | |||
|style="white-space: nowrap;"|<syntaxhighlight lang="bash"> | |||
cman_tool version | |||
</syntaxhighlight> | |||
<syntaxhighlight lang="text"> | |||
6.2.0 config 11 | |||
</syntaxhighlight> | |||
|} | |||
Good, now to create the new VM services! | |||
== Making vm01-win2008 a Highly Available Service == | |||
{{note|1=If you jumped straight here after provisioning the <span class="code">vm01-win2008</span> server, please [[#Making_Our_VMs_Highly_Available_Cluster_Services|jump back]] and be sure you've created the <span class="code">primary_n01</span> and <span class="code">primary_n02</span> fail-over domains.}} | |||
The final piece of the puzzle, and the whole purpose of this exercise is in sight! | |||
We're going to start with <span class="code">[[#Provisioning_vm01-win2008|vm01-win2008]]</span>, as it was the first server we provisioned. | |||
There is a special resource agent for virtual machines which use the <span class="code">vm:</span> service prefix in <span class="code">rgmanager</span>. We will need to create one of these services for each server that will be managed by the ''Anvil!'' platform. | |||
=== Dumping the vm01-win2008 XML Definition File === | |||
In order for the cluster to manage a server, it must know where to find the "definition" file that describes the virtual machine and its hardware. When the server was created with <span class="code">virt-install</span>, it saved this definition file in <span class="code">/etc/libvirt/qemu/vm01-win2008.xml</span>. If this was a single-host setup, that would be fine. | |||
In our case though, there are two reasons we need to move this. | |||
# We want both nodes to be able to see the definition file and we want a single place to make updates. | |||
# Normal <span class="code">libvirtd</span> tools are not cluster-aware, so we don't want them to see our server except when it is running. | |||
To address the first issue, we're going to use a program called <span class="code">virsh</span> to write out the definition file for <span class="code">vm01-win2008</span>. We'll use a simple bash redirection to write this to a file on <span class="code">/shared</span> where both nodes will be able to read it. Also, being stored on our GFS2 partition, any change made to the file will immediately be seen by both nodes. | |||
To address the second issue, we will "<span class="code">undefine</span>" the server. This effectively deletes it from <span class="code">libvirtd</span>, so when a server is off (or running elsewhere), tools like "Virtual Machine Manager" will not see it. This helps avoid problems like a user, unaware that the server is running on another node, starting it on the first. The cluster will still be able to start and stop the server just fine, so there is no worry about losing your new server. The cluster tools, being cluster-aware obviously, are smart enough to not try and boot a server on one node when it's already running on another. | |||
So the first step is to dump the server's definition file. | |||
{{note|1=Recall that we provisioned <span class="code">vm01-win2008</span> on <span class="code">an-a05n01</span>, so we will have to use that node for the next step.}} | |||
First, let's use <span class="code">virsh</span>, a <span class="code">libvirtd</span> tool, to see the server's state. | |||
{|class="wikitable" | |||
!<span class="code">an-a05n01</span> | |||
|style="white-space: nowrap;"|<syntaxhighlight lang="bash"> | |||
virsh list --all | |||
</syntaxhighlight> | |||
<syntaxhighlight lang="text"> | |||
Id Name State | |||
---------------------------------------------------- | |||
1 vm01-win2008 running | |||
</syntaxhighlight> | |||
|} | |||
The <span class="code">--all</span> option is needed to show us servers that are defined but powered off. Normally, <span class="code">virsh list</span> only shows running servers, so it's a good habit to always use <span class="code">--list</span> to be sure you have a complete view of your system. | |||
So we see that <span class="code">vm01-win2008</span> is running. The <span class="code">Id</span> is a simple integer that increments each time a server boots. It changes frequently and you need not worry about it. its principal purpose to be unique among running servers. | |||
So before we <span class="code">undefine</span> the server, we first need to record its definition. We can do that with <span class="code">virsh dumpxml $vm</span>. | |||
{|class="wikitable" | |||
!<span class="code">an-a05n01</span> | |||
|style="white-space: nowrap;"|<syntaxhighlight lang="bash"> | |||
virsh dumpxml vm01-win2008 | |||
</syntaxhighlight> | |||
<syntaxhighlight lang="xml"> | |||
<domain type='kvm' id='1'> | |||
<name>vm01-win2008</name> | |||
<uuid>d06381fc-8033-9768-3a28-b751bcc00716</uuid> | |||
<memory unit='KiB'>3145728</memory> | |||
<currentMemory unit='KiB'>3145728</currentMemory> | |||
<vcpu placement='static'>2</vcpu> | |||
<os> | |||
<type arch='x86_64' machine='rhel6.4.0'>hvm</type> | |||
<boot dev='hd'/> | |||
</os> | |||
<features> | |||
<acpi/> | |||
<apic/> | |||
<pae/> | |||
</features> | |||
<clock offset='localtime'> | |||
<timer name='rtc' tickpolicy='catchup'/> | |||
</clock> | |||
<on_poweroff>destroy</on_poweroff> | |||
<on_reboot>restart</on_reboot> | |||
<on_crash>restart</on_crash> | |||
<devices> | |||
<emulator>/usr/libexec/qemu-kvm</emulator> | |||
<disk type='file' device='cdrom'> | |||
<driver name='qemu' type='raw'/> | |||
<source file='/shared/files/Windows_Svr_2008_R2_64Bit_SP1.ISO'/> | |||
<target dev='hda' bus='ide'/> | |||
<readonly/> | |||
<alias name='ide0-0-0'/> | |||
<address type='drive' controller='0' bus='0' target='0' unit='0'/> | |||
</disk> | |||
<disk type='file' device='cdrom'> | |||
<driver name='qemu' type='raw'/> | |||
<source file='/shared/files/virtio-win-0.1-52.iso'/> | |||
<target dev='hdc' bus='ide'/> | |||
<readonly/> | |||
<alias name='ide0-1-0'/> | |||
<address type='drive' controller='0' bus='1' target='0' unit='0'/> | |||
</disk> | |||
<disk type='block' device='disk'> | |||
<driver name='qemu' type='raw' cache='none' io='native'/> | |||
<source dev='/dev/an-a05n01_vg0/vm01-win2008_0'/> | |||
<target dev='vda' bus='virtio'/> | |||
<alias name='virtio-disk0'/> | |||
<address type='pci' domain='0x0000' bus='0x00' slot='0x04' function='0x0'/> | |||
</disk> | |||
<controller type='usb' index='0'> | |||
<alias name='usb0'/> | |||
<address type='pci' domain='0x0000' bus='0x00' slot='0x01' function='0x2'/> | |||
</controller> | |||
<controller type='ide' index='0'> | |||
<alias name='ide0'/> | |||
<address type='pci' domain='0x0000' bus='0x00' slot='0x01' function='0x1'/> | |||
</controller> | |||
<interface type='bridge'> | |||
<mac address='52:54:00:8e:67:32'/> | |||
<source bridge='ifn_bridge1'/> | |||
<target dev='vnet0'/> | |||
<model type='virtio'/> | |||
<alias name='net0'/> | |||
<address type='pci' domain='0x0000' bus='0x00' slot='0x03' function='0x0'/> | |||
</interface> | |||
<serial type='pty'> | |||
<source path='/dev/pts/3'/> | |||
<target port='0'/> | |||
<alias name='serial0'/> | |||
</serial> | |||
<console type='pty' tty='/dev/pts/3'> | |||
<source path='/dev/pts/3'/> | |||
<target type='serial' port='0'/> | |||
<alias name='serial0'/> | |||
</console> | |||
<input type='tablet' bus='usb'> | |||
<alias name='input0'/> | |||
</input> | |||
<input type='mouse' bus='ps2'/> | |||
<graphics type='spice' port='5900' autoport='yes' listen='127.0.0.1'> | |||
<listen type='address' address='127.0.0.1'/> | |||
</graphics> | |||
<video> | |||
<model type='qxl' ram='65536' vram='65536' heads='1'/> | |||
<alias name='video0'/> | |||
<address type='pci' domain='0x0000' bus='0x00' slot='0x02' function='0x0'/> | |||
</video> | |||
<memballoon model='virtio'> | |||
<alias name='balloon0'/> | |||
<address type='pci' domain='0x0000' bus='0x00' slot='0x05' function='0x0'/> | |||
</memballoon> | |||
</devices> | |||
<seclabel type='dynamic' model='selinux' relabel='yes'> | |||
<label>unconfined_u:system_r:svirt_t:s0:c68,c367</label> | |||
<imagelabel>unconfined_u:object_r:svirt_image_t:s0:c68,c367</imagelabel> | |||
</seclabel> | |||
</domain> | |||
</syntaxhighlight> | |||
|} | |||
That is your server's hardware! | |||
Notice how it shows the mounted cd-roms? You can also see the [[MAC]] address assigned to the network card, the RAM and CPU cores allocated and other details. Pretty awesome! | |||
So let's re-run the <span class="code">dumpxml</span> file, but this time, we'll use a bash redirection to save the output to a file in our <span class="code">/shared/definition</span> directory. | |||
{|class="wikitable" | |||
!<span class="code">an-a05n01</span> | |||
|style="white-space: nowrap;"|<syntaxhighlight lang="bash"> | |||
virsh dumpxml vm01-win2008 > /shared/definitions/vm01-win2008.xml | |||
ls -lah /shared/definitions/vm01-win2008.xml | |||
</syntaxhighlight> | |||
<syntaxhighlight lang="text"> | |||
-rw-r--r--. 1 root root 3.3K Nov 18 11:54 /shared/definitions/vm01-win2008.xml | |||
</syntaxhighlight> | |||
|} | |||
Excellent! Now, as we will see in a moment, the cluster will be able to use this to start, stop, migrate and recover the server. | |||
{{warning|1=Be sure the XML file was written properly! This next step will remove the server from <span class="code">libvirtd</span>. Once done, the <span class="code">/shared/definitions/vm01-win2008.xml</span> will be the only way to boot the server!}} | |||
The last step is to remove <span class="code">vm01-win2008</span> from <span class="code">libvirtd</span>. This will ensure that tools like "Virtual Machine Manager" will not know about our servers except when they are running on the node. | |||
{|class="wikitable" | |||
!<span class="code">an-a05n01</span> | |||
|style="white-space: nowrap;"|<syntaxhighlight lang="bash"> | |||
virsh undefine vm01-win2008 | |||
</syntaxhighlight> | |||
<syntaxhighlight lang="text"> | |||
Domain vm01-win2008 has been undefined | |||
</syntaxhighlight> | |||
|} | |||
Done. | |||
=== Creating the vm:vm01-win2008 Service === | |||
As we discussed earlier, we are now going to create a new service for <span class="code">vm01-win2008</span> using the <span class="code">vm</span> resource agent. | |||
This element will have a child element that tells the cluster to give servers up to 30 minutes to shut down. Normally, the cluster will wait for two minutes after calling <span class="code">disable</span> against a server. For privacy reasons, there is not way for the cluster to know what is happening inside the server. So after the <span class="code">stop</span> timeout expires, the node is considered failed and is forced off. The problem is that windows often queues updates to be installed during the shut down, so it can take a very long time to turn off. We don't want to risk "pulling the plug" on a windows machine that is being updated, of course, so we will tell the cluster to be very patient. | |||
{{note|1=It is a good idea to set your windows servers to download updates but not install them until an admin says to do so. This way, there is less chance of problem because the admin can do a reboot to install the updates during a maintenance window. It also avoids false-decleration of server failure.}} | |||
Lets increment the version to <span class="code">12</span> and take a look at the new entry. | |||
{|class="wikitable" | |||
!<span class="code">an-a05n01</span> | |||
|style="white-space: nowrap;"|<syntaxhighlight lang="xml"> | |||
<rm log_level="5"> | |||
... | |||
<vm name="vm01-win2008" domain="primary_n01" autostart="0" path="/shared/definitions/" exclusive="0" recovery="restart" max_restarts="2" restart_expire_time="600"> | |||
<action name="stop" timeout="30m" /> | |||
</vm> | |||
</rm> | |||
</syntaxhighlight> | |||
|} | |||
Let's look at each of the attributes now; | |||
{|class="wikitable sortable" | |||
!Attribute | |||
!Description | |||
|- | |||
|<span class="code">name</span> | |||
|This must match the name we created the VM with (the <span class="code">--name ...</span> value when we provisioned the VM). In this case, that is <span class="code">vm01-win2008</span>. This is the name that will be passed to the <span class="code">vm.sh</span> resource agent when managing this service, and it will be the <span class="code"><name>.xml</span> used when looking under <span class="code">path=...</span> for the VM's definition file. | |||
|- | |||
|<span class="code">domain</span> | |||
|This tells the cluster to manage the VM using the given fail-over domain. We built <span class="code">vm01-win2008</span> using <span class="code">an-a05n01</span>'s storage pool, so this server will be assigned to the <span class="code">primary_n01</span> domain. | |||
|- | |||
|<span class="code">path</span> | |||
|This tells the cluster where to look for the server's definition file. '''Do not''' include the actual file name, just the path. The cluster takes this path, appends the server's name and then appends <span class="code">.xml</span> in order to find the server's definition file. | |||
|- | |||
|<span class="code">autostart</span> | |||
|This tells the cluster ''not'' to start the server automatically. This is needed because, if this was <span class="code">1</span>, the cluster will try to start the server and the storage at the same time. It takes a few moments for the storage to start, and by the time it did, the server service would have failed. | |||
|- | |||
|<span class="code">exclusive</span> | |||
|As we saw with the storage services, we want to ensure that this service '''is not''' exclusive. If it were, starting the VM would stop storage/<span class="code">libvirtd</span> and prevent other servers from running on the node. This would be a bad thing™. | |||
|- | |||
|<span class="code">recovery</span> | |||
|This tells the ''Anvil!'' what to do when the service fails. We are setting this to <span class="code">restart</span>, so the cluster will try to restart the server on the same node it was on when it failed. The alternative is <span class="code">relocate</span>, which would instead start the server on another node. More about this next. | |||
|- | |||
|<span class="code">max_restarts</span> | |||
|When a server fails, it is possible that it is because there is a subtle problem on the host node itself. So this attribute allows us to set a limit on how many times a server will be allowed to <span class="code">restart</span> before giving up and switching to a <span class="code">relocate</span> policy. We're setting this to <span class="code">2</span>, which means that if a server is restarted twice, the third failure will trigger a <span class="code">relocate</span>. | |||
|- | |||
|<span class="code">restart_expire_time</span> | |||
|If we let the <span class="code">max_restarts</span> failure count increment indefinitely, than a <span class="code">relocate</span> policy becomes inevitable. To account for this, we use this attribute to tell the ''Anvil!'' to "forget" a restart after the defined number of seconds. We're using <span class="code">600</span> seconds (ten minutes). So if a server fails, the failure count increments from <span class="code">0</span> to <span class="code">1</span>. After <span class="code">600</span> seconds though, the restart is "forgotten" and the failure count returns to <span class="code">0</span>. Said another way, a server will have to fail three times in ten minutes to trigger the <span class="code">relocate</span> recovery policy. | |||
|} | |||
So let's take a look at the final, complete <span class="code">cluster.conf</span>; | |||
{|class="wikitable" | |||
!<span class="code">an-a05n01</span> | |||
|style="white-space: nowrap;"|<syntaxhighlight lang="xml"> | |||
<?xml version="1.0"?> | |||
<cluster name="an-anvil-05" config_version="12"> | |||
<cman expected_votes="1" two_node="1" /> | |||
<clusternodes> | |||
<clusternode name="an-a05n01.alteeve.ca" nodeid="1"> | |||
<fence> | |||
<method name="ipmi"> | |||
<device name="ipmi_n01" action="reboot" delay="15" /> | |||
</method> | |||
<method name="pdu"> | |||
<device name="pdu1" port="1" action="reboot" /> | |||
<device name="pdu2" port="1" action="reboot" /> | |||
</method> | |||
</fence> | |||
</clusternode> | |||
<clusternode name="an-a05n02.alteeve.ca" nodeid="2"> | |||
<fence> | |||
<method name="ipmi"> | |||
<device name="ipmi_n02" action="reboot" /> | |||
</method> | |||
<method name="pdu"> | |||
<device name="pdu1" port="2" action="reboot" /> | |||
<device name="pdu2" port="2" action="reboot" /> | |||
</method> | |||
</fence> | |||
</clusternode> | |||
</clusternodes> | |||
<fencedevices> | |||
<fencedevice name="ipmi_n01" agent="fence_ipmilan" ipaddr="an-a05n01.ipmi" login="admin" passwd="secret" /> | |||
<fencedevice name="ipmi_n02" agent="fence_ipmilan" ipaddr="an-a05n02.ipmi" login="admin" passwd="secret" /> | |||
<fencedevice agent="fence_apc_snmp" ipaddr="an-pdu01.alteeve.ca" name="pdu1" /> | |||
<fencedevice agent="fence_apc_snmp" ipaddr="an-pdu02.alteeve.ca" name="pdu2" /> | |||
</fencedevices> | |||
<fence_daemon post_join_delay="30" /> | |||
<totem rrp_mode="none" secauth="off"/> | |||
<rm log_level="5"> | |||
<resources> | |||
<script file="/etc/init.d/drbd" name="drbd"/> | |||
<script file="/etc/init.d/clvmd" name="clvmd"/> | |||
<clusterfs device="/dev/an-a05n01_vg0/shared" force_unmount="1" fstype="gfs2" mountpoint="/shared" name="sharedfs" /> | |||
<script file="/etc/init.d/libvirtd" name="libvirtd"/> | |||
</resources> | |||
<failoverdomains> | |||
<failoverdomain name="only_n01" nofailback="1" ordered="0" restricted="1"> | |||
<failoverdomainnode name="an-a05n01.alteeve.ca"/> | |||
</failoverdomain> | |||
<failoverdomain name="only_n02" nofailback="1" ordered="0" restricted="1"> | |||
<failoverdomainnode name="an-a05n02.alteeve.ca"/> | |||
</failoverdomain> | |||
<failoverdomain name="primary_n01" nofailback="1" ordered="1" restricted="1"> | |||
<failoverdomainnode name="an-a05n01.alteeve.ca" priority="1"/> | |||
<failoverdomainnode name="an-a05n02.alteeve.ca" priority="2"/> | |||
</failoverdomain> | |||
<failoverdomain name="primary_n02" nofailback="1" ordered="1" restricted="1"> | |||
<failoverdomainnode name="an-a05n01.alteeve.ca" priority="2"/> | |||
<failoverdomainnode name="an-a05n02.alteeve.ca" priority="1"/> | |||
</failoverdomain> | |||
</failoverdomains> | |||
<service name="storage_n01" autostart="1" domain="only_n01" exclusive="0" recovery="restart"> | |||
<script ref="drbd"> | |||
<script ref="clvmd"> | |||
<clusterfs ref="sharedfs"/> | |||
</script> | |||
</script> | |||
</service> | |||
<service name="storage_n02" autostart="1" domain="only_n02" exclusive="0" recovery="restart"> | |||
<script ref="drbd"> | |||
<script ref="clvmd"> | |||
<clusterfs ref="sharedfs"/> | |||
</script> | |||
</script> | |||
</service> | |||
<service name="libvirtd_n01" autostart="1" domain="only_n01" exclusive="0" recovery="restart"> | |||
<script ref="libvirtd"/> | |||
</service> | |||
<service name="libvirtd_n02" autostart="1" domain="only_n02" exclusive="0" recovery="restart"> | |||
<script ref="libvirtd"/> | |||
</service> | |||
<vm name="vm01-win2008" domain="primary_n01" autostart="0" path="/shared/definitions/" exclusive="0" recovery="restart" max_restarts="2" restart_expire_time="600"> | |||
<action name="stop" timeout="30m" /> | |||
</vm> | |||
</rm> | |||
</cluster> | |||
</syntaxhighlight> | |||
|} | |||
Now let's activate the new configuration. | |||
{|class="wikitable" | |||
!<span class="code">an-a05n01</span> | |||
|style="white-space: nowrap;"|<syntaxhighlight lang="bash"> | |||
ccs_config_validate | |||
</syntaxhighlight> | |||
<syntaxhighlight lang="text"> | |||
Configuration validates | |||
</syntaxhighlight> | |||
<syntaxhighlight lang="bash"> | |||
cman_tool version | |||
</syntaxhighlight> | |||
<syntaxhighlight lang="text"> | |||
6.2.0 config 11 | |||
</syntaxhighlight> | |||
<syntaxhighlight lang="bash"> | |||
cman_tool version -r | |||
cman_tool version | |||
</syntaxhighlight> | |||
<syntaxhighlight lang="text"> | |||
6.2.0 config 12 | |||
</syntaxhighlight> | |||
|- | |||
!<span class="code">an-a05n02</span> | |||
|style="white-space: nowrap;"|<syntaxhighlight lang="bash"> | |||
cman_tool version | |||
</syntaxhighlight> | |||
<syntaxhighlight lang="text"> | |||
6.2.0 config 12 | |||
</syntaxhighlight> | |||
|} | |||
Let's now take a look at <span class="code">clustat</span> on both nodes. | |||
{|class="wikitable" | |||
!<span class="code">an-a05n01</span> | |||
|style="white-space: nowrap;"|<syntaxhighlight lang="bash"> | |||
clustat | |||
</syntaxhighlight> | |||
<syntaxhighlight lang="text"> | |||
Cluster Status for an-anvil-05 @ Mon Nov 18 12:29:30 2013 | |||
Member Status: Quorate | |||
Member Name ID Status | |||
------ ---- ---- ------ | |||
an-a05n01.alteeve.ca 1 Online, Local, rgmanager | |||
an-a05n02.alteeve.ca 2 Online, rgmanager | |||
Service Name Owner (Last) State | |||
------- ---- ----- ------ ----- | |||
service:libvirtd_n01 an-a05n01.alteeve.ca started | |||
service:libvirtd_n02 an-a05n02.alteeve.ca started | |||
service:storage_n01 an-a05n01.alteeve.ca started | |||
service:storage_n02 an-a05n02.alteeve.ca started | |||
vm:vm01-win2008 (none) disabled | |||
</syntaxhighlight> | |||
|- | |||
!<span class="code">an-a05n02</span> | |||
|style="white-space: nowrap;"|<syntaxhighlight lang="bash"> | |||
clustat | |||
</syntaxhighlight> | |||
<syntaxhighlight lang="text"> | |||
Cluster Status for an-anvil-05 @ Mon Nov 18 12:29:33 2013 | |||
Member Status: Quorate | |||
Member Name ID Status | |||
------ ---- ---- ------ | |||
an-a05n01.alteeve.ca 1 Online, rgmanager | |||
an-a05n02.alteeve.ca 2 Online, Local, rgmanager | |||
Service Name Owner (Last) State | |||
------- ---- ----- ------ ----- | |||
service:libvirtd_n01 an-a05n01.alteeve.ca started | |||
service:libvirtd_n02 an-a05n02.alteeve.ca started | |||
service:storage_n01 an-a05n01.alteeve.ca started | |||
service:storage_n02 an-a05n02.alteeve.ca started | |||
vm:vm01-win2008 (none) disabled | |||
</syntaxhighlight> | |||
|} | |||
Notice that the <span class="code">vm:vm01-win2008</span> is <span class="code">disabled</span>? That is because of <span class="code">autostart="0"</span>. | |||
Thankfully, the cluster is smart enough that we can tell it to start the service and it will see the server is already running and not actually do anything. So we can do this next step safely while the server is running. | |||
The trick, of course, is to be sure to tell the cluster to start the server on the right cluster node. | |||
So let's use <span class="code">virsh</span> once more to verify that <span class="code">vm01-win2008</span> is, in fact, still on <span class="code">an-a05n01</span>. | |||
{|class="wikitable" | |||
!<span class="code">an-a05n01</span> | |||
|style="white-space: nowrap;"|<syntaxhighlight lang="bash"> | |||
virsh list --all | |||
</syntaxhighlight> | |||
<syntaxhighlight lang="text"> | |||
Id Name State | |||
---------------------------------------------------- | |||
1 vm01-win2008 running | |||
</syntaxhighlight> | |||
|- | |||
!<span class="code">an-a05n02</span> | |||
|style="white-space: nowrap;"|<syntaxhighlight lang="bash"> | |||
virsh list --all | |||
</syntaxhighlight> | |||
<syntaxhighlight lang="text"> | |||
Id Name State | |||
---------------------------------------------------- | |||
</syntaxhighlight> | |||
|} | |||
Excellent. So now to tell the cluster to begin managing the server, we're use a program called <span class="code">clusvcadm</span>. It takes two switches in this case: | |||
* <span class="code">-e</span>; "enable" the service | |||
* <span class="code">-m</span>; do the action on the named member. | |||
We can run <span class="code">clusvcadm</span> from any node in the cluster. For now though, lets stick to <span class="code">an-a05n01</span>. | |||
{|class="wikitable" | |||
!<span class="code">an-a05n01</span> | |||
|style="white-space: nowrap;"|<syntaxhighlight lang="bash"> | |||
clusvcadm -e vm:vm01-win2008 -m an-a05n01.alteeve.ca | |||
</syntaxhighlight> | |||
<syntaxhighlight lang="text"> | |||
vm:vm01-win2008 is now running on an-a05n01.alteeve.ca | |||
</syntaxhighlight> | |||
|} | |||
We can confirm with <span class="code">clustat</span> that the server is now under cluster control. | |||
{|class="wikitable" | |||
!<span class="code">an-a05n01</span> | |||
|style="white-space: nowrap;"|<syntaxhighlight lang="bash"> | |||
clustat | |||
</syntaxhighlight> | |||
<syntaxhighlight lang="text"> | |||
Cluster Status for an-anvil-05 @ Mon Nov 18 12:37:40 2013 | |||
Member Status: Quorate | |||
Member Name ID Status | |||
------ ---- ---- ------ | |||
an-a05n01.alteeve.ca 1 Online, Local, rgmanager | |||
an-a05n02.alteeve.ca 2 Online, rgmanager | |||
Service Name Owner (Last) State | |||
------- ---- ----- ------ ----- | |||
service:libvirtd_n01 an-a05n01.alteeve.ca started | |||
service:libvirtd_n02 an-a05n02.alteeve.ca started | |||
service:storage_n01 an-a05n01.alteeve.ca started | |||
service:storage_n02 an-a05n02.alteeve.ca started | |||
vm:vm01-win2008 an-a05n01.alteeve.ca started | |||
</syntaxhighlight> | |||
|- | |||
!<span class="code">an-a05n02</span> | |||
|style="white-space: nowrap;"|<syntaxhighlight lang="bash"> | |||
clustat | |||
</syntaxhighlight> | |||
<syntaxhighlight lang="text"> | |||
Cluster Status for an-anvil-05 @ Mon Nov 18 12:37:40 2013 | |||
Member Status: Quorate | |||
Member Name ID Status | |||
------ ---- ---- ------ | |||
an-a05n01.alteeve.ca 1 Online, rgmanager | |||
an-a05n02.alteeve.ca 2 Online, Local, rgmanager | |||
Service Name Owner (Last) State | |||
------- ---- ----- ------ ----- | |||
service:libvirtd_n01 an-a05n01.alteeve.ca started | |||
service:libvirtd_n02 an-a05n02.alteeve.ca started | |||
service:storage_n01 an-a05n01.alteeve.ca started | |||
service:storage_n02 an-a05n02.alteeve.ca started | |||
vm:vm01-win2008 an-a05n01.alteeve.ca started | |||
</syntaxhighlight> | |||
|} | |||
Looking good! | |||
=== Testing vm01-win2008 Management With clusvcadm === | |||
The first thing we're going to do is disable (gracefully shut down) the server. To do this, we'll send an [[ACPI]] "power button" event to <span class="code">vm01-win2008</span>. Windows 2008 will, like most operating systems, respond to having its "power button pressed" by beginning a graceful shut down. | |||
As always, start by checking the state of things. | |||
{|class="wikitable" | |||
!<span class="code">an-a05n01</span> | |||
|style="white-space: nowrap;"|<syntaxhighlight lang="bash"> | |||
clustat | |||
</syntaxhighlight> | |||
<syntaxhighlight lang="text"> | |||
Cluster Status for an-anvil-05 @ Mon Nov 11 13:36:17 2013 | |||
Member Status: Quorate | |||
Member Name ID Status | |||
------ ---- ---- ------ | |||
an-a05n01.alteeve.ca 1 Online, Local, rgmanager | |||
an-a05n02.alteeve.ca 2 Online, rgmanager | |||
Service Name Owner (Last) State | |||
------- ---- ----- ------ ----- | |||
service:libvirtd_n01 an-a05n01.alteeve.ca started | |||
service:libvirtd_n02 an-a05n02.alteeve.ca started | |||
service:storage_n01 an-a05n01.alteeve.ca started | |||
service:storage_n02 an-a05n02.alteeve.ca started | |||
vm:vm01-win2008 an-a05n01.alteeve.ca started | |||
</syntaxhighlight> | |||
|} | |||
{{warning|1=Windows occasionally ignores ACPI power button events. In other cases, some programs will block the shut-down. In either case, the server will not actually shut down. It's a good habit to connect to the server and make sure it shuts down when you disable the service. If it does not shut down on its own, use the operating system's power off feature.}} | |||
As we expected. So now, "press the server's power button" using <span class="code">clusvcadm</span>. We have to do it this way because, if the server stops any other way, the cluster will treat it as a failure and boot it right back up. | |||
{|class="wikitable" | |||
!<span class="code">an-a05n01</span> | |||
|style="white-space: nowrap;"|<syntaxhighlight lang="bash"> | |||
clusvcadm -d vm:vm01-win2008 | |||
</syntaxhighlight> | |||
<syntaxhighlight lang="text"> | |||
Local machine disabling vm:vm01-win2008...Success | |||
</syntaxhighlight> | |||
|} | |||
If we check <span class="code">clustat</span> again, we'll see that the <span class="code">vm:vm01-win2008</span> service is indeed <span class="code">disabled</span>. | |||
{|class="wikitable" | |||
!<span class="code">an-a05n01</span> | |||
|style="white-space: nowrap;"|<syntaxhighlight lang="bash"> | |||
clustat | |||
</syntaxhighlight> | |||
<syntaxhighlight lang="text"> | |||
Cluster Status for an-anvil-05 @ Mon Nov 11 16:11:30 2013 | |||
Member Status: Quorate | |||
Member Name ID Status | |||
------ ---- ---- ------ | |||
an-a05n01.alteeve.ca 1 Online, Local, rgmanager | |||
an-a05n02.alteeve.ca 2 Online, rgmanager | |||
Service Name Owner (Last) State | |||
------- ---- ----- ------ ----- | |||
service:libvirtd_n01 an-a05n01.alteeve.ca started | |||
service:libvirtd_n02 an-a05n02.alteeve.ca started | |||
service:storage_n01 an-a05n01.alteeve.ca started | |||
service:storage_n02 an-a05n02.alteeve.ca started | |||
vm:vm01-win2008 (an-a05n01.alteeve.ca) disabled | |||
</syntaxhighlight> | |||
|} | |||
Good, it's off. Let's turn it back on now. | |||
Note the <span class="code">-F</span>; That tells rgmanager to start the <span class="code">vm</span> service on the preferred host. It's a nice habit to get into as it will ensure the server always boots on the preferred node, when possible. | |||
{|class="wikitable" | |||
!<span class="code">an-a05n01</span> | |||
|style="white-space: nowrap;"|<syntaxhighlight lang="bash"> | |||
clusvcadm -F -e vm:vm01-win2008 | |||
</syntaxhighlight> | |||
<syntaxhighlight lang="text"> | |||
Local machine trying to enable vm:vm01-win2008...Failure | |||
</syntaxhighlight> | |||
|} | |||
What the deuce!? | |||
=== Solving vm01-win2008 "Failure to Enable" Error === | |||
Let's look at the log file. | |||
{|class="wikitable" | |||
!<span class="code">an-a05n01</span> | |||
|style="white-space: nowrap;"|<syntaxhighlight lang="bash"> | |||
tail /var/log/message | |||
</syntaxhighlight> | |||
<syntaxhighlight lang="text"> | |||
Nov 11 16:16:43 an-a05n01 rgmanager[2921]: start on vm "vm01-win2008" returned 1 (generic error) | |||
Nov 11 16:16:43 an-a05n01 rgmanager[2921]: #68: Failed to start vm:vm01-win2008; return value: 1 | |||
Nov 11 16:16:43 an-a05n01 rgmanager[2921]: Stopping service vm:vm01-win2008 | |||
Nov 11 16:16:43 an-a05n01 rgmanager[2921]: Service vm:vm01-win2008 is recovering | |||
</syntaxhighlight> | |||
|- | |||
!<span class="code">an-a05n02</span> | |||
|style="white-space: nowrap;"|<syntaxhighlight lang="bash"> | |||
tail /var/log/message | |||
</syntaxhighlight> | |||
<syntaxhighlight lang="text"> | |||
Nov 11 16:16:43 an-a05n02 rgmanager[2864]: Recovering failed service vm:vm01-win2008 | |||
Nov 11 16:16:44 an-a05n02 rgmanager[2864]: start on vm "vm01-win2008" returned 1 (generic error) | |||
Nov 11 16:16:44 an-a05n02 rgmanager[2864]: #68: Failed to start vm:vm01-win2008; return value: 1 | |||
Nov 11 16:16:44 an-a05n02 rgmanager[2864]: Stopping service vm:vm01-win2008 | |||
Nov 11 16:16:44 an-a05n02 rgmanager[2864]: Service vm:vm01-win2008 is recovering | |||
</syntaxhighlight> | |||
|} | |||
If we check <span class="code">clustat</span>, we'll see that the server is stuck in <span class="code">recovery</span>. | |||
{|class="wikitable" | |||
!<span class="code">an-a05n01</span> | |||
|style="white-space: nowrap;"|<syntaxhighlight lang="bash"> | |||
clustat | |||
</syntaxhighlight> | |||
<syntaxhighlight lang="text"> | |||
Cluster Status for an-anvil-05 @ Mon Nov 11 16:16:51 2013 | |||
Member Status: Quorate | |||
Member Name ID Status | |||
------ ---- ---- ------ | |||
an-a05n01.alteeve.ca 1 Online, Local, rgmanager | |||
an-a05n02.alteeve.ca 2 Online, rgmanager | |||
Service Name Owner (Last) State | |||
------- ---- ----- ------ ----- | |||
service:libvirtd_n01 an-a05n01.alteeve.ca started | |||
service:libvirtd_n02 an-a05n02.alteeve.ca started | |||
service:storage_n01 an-a05n01.alteeve.ca started | |||
service:storage_n02 an-a05n02.alteeve.ca started | |||
vm:vm01-win2008 none recovering | |||
</syntaxhighlight> | |||
|} | |||
This is why we saw the "<span class="code">start on vm "vm01-win2008" returned 1 (generic error)</span>" message on both nodes. The cluster tried to enable it on the preferred host first, because of the <span class="code">-F</span> switch, that failed so it tried to enable it on the second node and that also failed. | |||
The first step to diagnosing the problem is to disable the service in <span class="code">rgmanager</span> and then manually trying to start the server using <span class="code">virsh</span>. | |||
{|class="wikitable" | |||
!<span class="code">an-a05n01</span> | |||
|style="white-space: nowrap;"|<syntaxhighlight lang="bash"> | |||
clusvcadm -d vm:vm01-win2008 | |||
</syntaxhighlight> | |||
<syntaxhighlight lang="text"> | |||
Local machine disabling vm:vm01-win2008...Success | |||
</syntaxhighlight> | |||
<syntaxhighlight lang="bash"> | |||
clustat | |||
</syntaxhighlight> | |||
<syntaxhighlight lang="text"> | |||
Cluster Status for an-anvil-05 @ Mon Nov 11 16:17:09 2013 | |||
Member Status: Quorate | |||
Member Name ID Status | |||
------ ---- ---- ------ | |||
an-a05n01.alteeve.ca 1 Online, Local, rgmanager | |||
an-a05n02.alteeve.ca 2 Online, rgmanager | |||
Service Name Owner (Last) State | |||
------- ---- ----- ------ ----- | |||
service:libvirtd_n01 an-a05n01.alteeve.ca started | |||
service:libvirtd_n02 an-a05n02.alteeve.ca started | |||
service:storage_n01 an-a05n01.alteeve.ca started | |||
service:storage_n02 an-a05n02.alteeve.ca started | |||
vm:vm01-win2008 (an-a05n02.alteeve.ca) disabled | |||
</syntaxhighlight> | |||
|} | |||
Now the cluster is no longer trying to touch the server. Lets start it manually. As always, verify the state of things. In this case, we'll double-check that the server really didn't start with <span class="code">virsh</span>. | |||
{|class="wikitable" | |||
!<span class="code">an-a05n01</span> | |||
|style="white-space: nowrap;"|<syntaxhighlight lang="bash"> | |||
virsh list --all | |||
</syntaxhighlight> | |||
<syntaxhighlight lang="text"> | |||
Id Name State | |||
---------------------------------------------------- | |||
</syntaxhighlight> | |||
|- | |||
!<span class="code">an-a05n02</span> | |||
|style="white-space: nowrap;"|<syntaxhighlight lang="bash"> | |||
virsh list --all | |||
</syntaxhighlight> | |||
<syntaxhighlight lang="text"> | |||
Id Name State | |||
---------------------------------------------------- | |||
</syntaxhighlight> | |||
|} | |||
It's for sure off, so let's try to start it. As you can see above, the <span class="code">vm01-win2008</span> server is not shown as <span class="code">shut off</span> because we <span class="code">undefine</span>d it. So to start it, we need to use the <span class="code">create</span> option and specify the definition file manually. | |||
{|class="wikitable" | |||
!<span class="code">an-a05n01</span> | |||
|style="white-space: nowrap;"|<syntaxhighlight lang="bash"> | |||
virsh create | |||
</syntaxhighlight> | |||
<syntaxhighlight lang="text"> | |||
Domain vm01-win2008 created from /shared/definitions/vm01-win2008.xml | |||
</syntaxhighlight> | |||
<syntaxhighlight lang="bash"> | |||
virsh list --all | |||
</syntaxhighlight> | |||
<syntaxhighlight lang="text"> | |||
Id Name State | |||
---------------------------------------------------- | |||
10 vm01-win2008 running | |||
</syntaxhighlight> | |||
|} | |||
So now we know that the server itself is fine. Let's shut down the server using <span class="code">virsh</span>. Note that it will take a minute for the server to gracefully shut down. | |||
{|class="wikitable" | |||
!<span class="code">an-a05n01</span> | |||
|style="white-space: nowrap;"|<syntaxhighlight lang="bash"> | |||
virsh shutdown vm01-win2008 | |||
</syntaxhighlight> | |||
<syntaxhighlight lang="text"> | |||
Domain vm01-win2008 is being shutdown | |||
</syntaxhighlight> | |||
<syntaxhighlight lang="bash"> | |||
virsh list --all | |||
</syntaxhighlight> | |||
<syntaxhighlight lang="text"> | |||
Id Name State | |||
---------------------------------------------------- | |||
</syntaxhighlight> | |||
|} | |||
So a likely cause of problems is an [[SELinux]] denial. Let's verify that SELinux is, in fact, <span class="code">enforcing</span>. | |||
{|class="wikitable" | |||
!<span class="code">an-a05n01</span> | |||
|style="white-space: nowrap;"|<syntaxhighlight lang="bash"> | |||
sestatus | |||
</syntaxhighlight> | |||
<syntaxhighlight lang="text"> | |||
SELinux status: enabled | |||
SELinuxfs mount: /selinux | |||
Current mode: enforcing | |||
Mode from config file: enforcing | |||
Policy version: 24 | |||
Policy from config file: targeted | |||
</syntaxhighlight> | |||
|} | |||
It is. So to test, let's temporarily put SELinux into <span class="code">permissive</span> mode and see if <span class="code">clusvcadm</span> starts working. | |||
{|class="wikitable" | |||
!<span class="code">an-a05n01</span> | |||
|style="white-space: nowrap;"|<syntaxhighlight lang="bash"> | |||
setenforce 0 | |||
sestatus | |||
</syntaxhighlight> | |||
<syntaxhighlight lang="text"> | |||
SELinux status: enabled | |||
SELinuxfs mount: /selinux | |||
Current mode: permissive | |||
Mode from config file: enforcing | |||
Policy version: 24 | |||
Policy from config file: targeted | |||
</syntaxhighlight> | |||
<syntaxhighlight lang="bash"> | |||
clusvcadm -F -e vm:vm01-win2008 | |||
</syntaxhighlight> | |||
<syntaxhighlight lang="text"> | |||
Local machine trying to enable vm:vm01-win2008...Success | |||
vm:vm01-win2008 is now running on an-a05n01.alteeve.ca | |||
</syntaxhighlight> | |||
|} | |||
Bingo! So we've SELinux appears to be the problem. | |||
Let's disable <span class="code">vm:vm01-win2008</span>, re-enable SELinux and then try to debug SELinux. | |||
{|class="wikitable" | |||
!<span class="code">an-a05n01</span> | |||
|style="white-space: nowrap;"|<syntaxhighlight lang="bash"> | |||
clusvcadm -d vm:vm01-win2008 | |||
</syntaxhighlight> | |||
<syntaxhighlight lang="text"> | |||
Local machine disabling vm:vm01-win2008...Success | |||
</syntaxhighlight> | |||
<syntaxhighlight lang="bash"> | |||
setenforce 1 | |||
sestatus | |||
</syntaxhighlight> | |||
<syntaxhighlight lang="text"> | |||
SELinux status: enabled | |||
SELinuxfs mount: /selinux | |||
Current mode: enforcing | |||
Mode from config file: enforcing | |||
Policy version: 24 | |||
Policy from config file: targeted | |||
</syntaxhighlight> | |||
|} | |||
Now we're back to where it fails. We will now want to look for errors. SELinux writes log entries to <span class="code">/var/log/audit/audit.log</span>, however, by default, many things are set to not logged (set to <span class="code">dontaudit</span> in SELinux parlance). This includes cluster related issues. So to temporarily enable complete logging, we will use the <span class="code">semodule</span> command to tell it to log all messages. | |||
{|class="wikitable" | |||
!<span class="code">an-a05n01</span> | |||
|style="white-space: nowrap;"|<syntaxhighlight lang="bash"> | |||
semodule -DB | |||
</syntaxhighlight> | |||
<syntaxhighlight lang="text"> | |||
# no output, but it takes a while to complete | |||
</syntaxhighlight> | |||
|} | |||
Now we will <span class="code">tail -f /var/log/audit/audit.log</span> and try again to start the server using <span class="code">clusvcadm</span>. We expect it will fail, but the log messages will be useful. Once it fails, we'll immediately disable it again. | |||
{|class="wikitable" | |||
!<span class="code">an-a05n01</span> | |||
|style="white-space: nowrap;"|<syntaxhighlight lang="bash"> | |||
clusvcadm -F -e vm:vm01-win2008 | |||
</syntaxhighlight> | |||
<syntaxhighlight lang="text"> | |||
Local machine trying to enable vm:vm01-win2008...Failure | |||
</syntaxhighlight> | |||
<syntaxhighlight lang="bash"> | |||
clusvcadm -d vm:vm01-win2008 | |||
</syntaxhighlight> | |||
<syntaxhighlight lang="text"> | |||
Local machine disabling vm:vm01-win2008...Success | |||
</syntaxhighlight> | |||
|} | |||
Looking at <span class="code">audit.log</span>, we see; | |||
<syntaxhighlight lang="text"> | |||
type=AVC msg=audit(1384209306.795:2768): avc: denied { search } for pid=24850 comm="virsh" name="/" dev=dm-0 ino=22 scontext=unconfined_u:system_r:xm_t:s0 tcontext=system_u:object_r:file_t:s0 tclass=dir | |||
</syntaxhighlight> | |||
It's complaining about the device <span class="code">dm-0</span> and specifically about the [[inode]] <span class="code">22</span>. If you recall from when we setup the <span class="code">/shared</span> partition, <span class="code">dm-0</span> was a "device mapper" device. Let's see what this is. | |||
{|class="wikitable" | |||
!<span class="code">an-a05n01</span> | |||
|style="white-space: nowrap;"|<syntaxhighlight lang="bash"> | |||
ls -lah /dev/mapper/ | grep dm-0 | |||
</syntaxhighlight> | |||
<syntaxhighlight lang="text"> | |||
lrwxrwxrwx. 1 root root 7 Nov 3 12:14 an--c05n01_vg0-shared -> ../dm-0 | |||
</syntaxhighlight> | |||
|} | |||
This is the device mapper name for the [[LV]] we created for <span class="code">/shared</span>. Knowing this, let's search <span class="code">/shared</span> for what is at [[inode]] number <span class="code">22</span>. | |||
{|class="wikitable" | |||
!<span class="code">an-a05n01</span> | |||
|style="white-space: nowrap;"|<syntaxhighlight lang="bash"> | |||
find /shared -inum 22 | |||
</syntaxhighlight> | |||
<syntaxhighlight lang="text"> | |||
/shared | |||
</syntaxhighlight> | |||
|} | |||
So inode <span class="code">22</span> is the <span class="code">/shared</span> directory itself. So lets look at the SELinux context using <span class="code">ls</span>'s <span class="code">-Z</span> switch. | |||
{|class="wikitable" | |||
!<span class="code">an-a05n01</span> | |||
|style="white-space: nowrap;"|<syntaxhighlight lang="bash"> | |||
ls -laZ /shared | |||
</syntaxhighlight> | |||
<syntaxhighlight lang="text"> | |||
drwxr-xr-x. root root system_u:object_r:file_t:s0 . | |||
dr-xr-xr-x. root root system_u:object_r:root_t:s0 .. | |||
drwxr-xr-x. root root unconfined_u:object_r:virt_etc_t:s0 archive | |||
drwxr-xr-x. root root unconfined_u:object_r:file_t:s0 definitions | |||
drwxr-xr-x. root root unconfined_u:object_r:file_t:s0 files | |||
drwxr-xr-x. root root unconfined_u:object_r:file_t:s0 provision | |||
</syntaxhighlight> | |||
|} | |||
We can see that the current context on <span class="code">/shared</span> (the <span class="code">.</span> entry above) is <span class="code">system_u:object_r:file_t:s0</span>. This isn't permissive enough, so we need to fix it. The <span class="code">virt_etc_t</span> context should be good enough as it allows reads from files under <span class="code">/shared</span>. | |||
{{note|1=If you use a program other than <span class="code">virsh</span> that tries to manipulate the files in <span class="code">/shared</span>, you may need to use the <span class="code">virt_etc_rw_t</span> context as it allows read/write permissions.}} | |||
We'll need to make this change on '''both''' nodes. We'll use <span class="code">semanage</span> to make the change followed by <span class="code">restorecon</span> to make sure the changes remain in case the file system is ever re-labelled. | |||
{|class="wikitable" | |||
!<span class="code">an-a05n01</span> | |||
|style="white-space: nowrap;"|<syntaxhighlight lang="bash"> | |||
semanage fcontext -a -t virt_etc_t '/shared(/.*)?' | |||
restorecon -r /shared | |||
ls -laZ /shared | |||
</syntaxhighlight> | |||
<syntaxhighlight lang="text"> | |||
drwxr-xr-x. root root system_u:object_r:virt_etc_t:s0 . | |||
dr-xr-xr-x. root root system_u:object_r:root_t:s0 .. | |||
drwxr-xr-x. root root unconfined_u:object_r:virt_etc_t:s0 archive | |||
drwxr-xr-x. root root unconfined_u:object_r:virt_etc_t:s0 definitions | |||
drwxr-xr-x. root root unconfined_u:object_r:virt_etc_t:s0 files | |||
drwxr-xr-x. root root unconfined_u:object_r:virt_etc_t:s0 provision | |||
</syntaxhighlight> | |||
|- | |||
!<span class="code">an-a05n02</span> | |||
|style="white-space: nowrap;"|<syntaxhighlight lang="bash"> | |||
semanage fcontext -a -t virt_etc_t '/shared(/.*)?' | |||
restorecon -r /shared | |||
ls -laZ /shared | |||
</syntaxhighlight> | |||
<syntaxhighlight lang="text"> | |||
drwxr-xr-x. root root system_u:object_r:virt_etc_t:s0 . | |||
dr-xr-xr-x. root root system_u:object_r:root_t:s0 .. | |||
drwxr-xr-x. root root unconfined_u:object_r:virt_etc_t:s0 archive | |||
drwxr-xr-x. root root unconfined_u:object_r:virt_etc_t:s0 definitions | |||
drwxr-xr-x. root root unconfined_u:object_r:virt_etc_t:s0 files | |||
drwxr-xr-x. root root unconfined_u:object_r:virt_etc_t:s0 provision | |||
</syntaxhighlight> | |||
|} | |||
We told SELinux to ignore the <span class="code">dontaudit</span> option earlier. We'll want to undo this so that our logs don't get flooded. | |||
{|class="wikitable" | |||
!<span class="code">an-a05n01</span> | |||
|style="white-space: nowrap;"|<syntaxhighlight lang="bash"> | |||
semodule -B | |||
</syntaxhighlight> | |||
<syntaxhighlight lang="text"> | |||
# No output, but it will take a while to return | |||
</syntaxhighlight> | |||
|} | |||
If all went well, we should now be able to use <span class="code">clusvcadm</span>to <span class="code">enable</span> the <span class="code">vm:vm01-win2008</span> service. | |||
{|class="wikitable" | |||
!<span class="code">an-a05n01</span> | |||
|style="white-space: nowrap;"|<syntaxhighlight lang="bash"> | |||
clusvcadm -F -e vm:vm01-win2008 | |||
</syntaxhighlight> | |||
<syntaxhighlight lang="text"> | |||
Local machine trying to enable vm:vm01-win2008...Success | |||
vm:vm01-win2008 is now running on an-a05n01.alteeve.ca | |||
</syntaxhighlight> | |||
|} | |||
Excellent! | |||
=== Testing vm01-win2008 Live Migration === | |||
One of the most useful features of the ''Anvil!'' is the ability to "push" a running server from one node to another. This can be done without interrupting users, so it allows maintenance of nodes in the middle of work days. Upgrades, maintenance and repairs can be done without scheduling maintenance windows! | |||
As always, lets take a look at where things are right now. | |||
{|class="wikitable" | |||
!<span class="code">an-a05n01</span> | |||
|style="white-space: nowrap;"|<syntaxhighlight lang="bash"> | |||
clustat | |||
</syntaxhighlight> | |||
<syntaxhighlight lang="text"> | |||
Cluster Status for an-anvil-05 @ Thu Nov 14 14:15:09 2013 | |||
Member Status: Quorate | |||
Member Name ID Status | |||
------ ---- ---- ------ | |||
an-a05n01.alteeve.ca 1 Online, Local, rgmanager | |||
an-a05n02.alteeve.ca 2 Online, rgmanager | |||
Service Name Owner (Last) State | |||
------- ---- ----- ------ ----- | |||
service:libvirtd_n01 an-a05n01.alteeve.ca started | |||
service:libvirtd_n02 an-a05n02.alteeve.ca started | |||
service:storage_n01 an-a05n01.alteeve.ca started | |||
service:storage_n02 an-a05n02.alteeve.ca started | |||
vm:vm01-win2008 an-a05n01.alteeve.ca started | |||
</syntaxhighlight> | |||
|} | |||
If we check with <span class="code">virsh</span>, we can confirm that the cluster's view is accurate. | |||
{|class="wikitable" | |||
!<span class="code">an-a05n01</span> | |||
|style="white-space: nowrap;"|<syntaxhighlight lang="bash"> | |||
virsh list --all | |||
</syntaxhighlight> | |||
<syntaxhighlight lang="text"> | |||
Id Name State | |||
---------------------------------------------------- | |||
1 vm01-win2008 running | |||
</syntaxhighlight> | |||
|- | |||
!<span class="code">an-a05n02</span> | |||
|style="white-space: nowrap;"|<syntaxhighlight lang="bash"> | |||
virsh list --all | |||
</syntaxhighlight> | |||
<syntaxhighlight lang="text"> | |||
Id Name State | |||
---------------------------------------------------- | |||
</syntaxhighlight> | |||
|} | |||
Exactly what we expected. | |||
Now, to live-migrate a server, we will use <span class="code">clusvcadm</span> with the <span class="code">-M</span> (note the capitalization). This tells <span class="code">rgmanager</span> to migrate, instead of relocated, the service to the target cluster member. | |||
Seeing as <span class="code">vm01-win2008</span> is currently on <span class="code">an-a05n01</span>, we'll migrate it over to <span class="code">an-a05n02</span>. | |||
{{note|1=If you get an error like <span class="code">Failed; service running on original owner</span>, you may not have your [[#Configuring_iptables|firewall]] configured properly. Alternately, you may have run into [[2-Node_Red_Hat_KVM_Cluster_Tutorial_-_Troubleshooting#.5Bvm.5D_error:_internal_error_Attempt_to_migrate_guest_to_the_same_host_.7Buuid.7D|mainboards with matching UUIDs]].}} | |||
{|class="wikitable" | |||
!<span class="code">an-a05n01</span> | |||
|style="white-space: nowrap;"|<syntaxhighlight lang="bash"> | |||
clusvcadm -M vm:vm01-win2008 -m an-a05n02.alteeve.ca | |||
</syntaxhighlight> | |||
<syntaxhighlight lang="text"> | |||
Trying to migrate vm:vm01-win2008 to an-a05n02.alteeve.ca...Success | |||
</syntaxhighlight> | |||
|- | |||
!<span class="code">an-a05n02</span> | |||
|style="white-space: nowrap;"|<syntaxhighlight lang="bash"> | |||
clustat | |||
</syntaxhighlight> | |||
<syntaxhighlight lang="text"> | |||
Cluster Status for an-anvil-05 @ Thu Nov 14 14:57:30 2013 | |||
Member Status: Quorate | |||
Member Name ID Status | |||
------ ---- ---- ------ | |||
an-a05n01.alteeve.ca 1 Online, rgmanager | |||
an-a05n02.alteeve.ca 2 Online, Local, rgmanager | |||
Service Name Owner (Last) State | |||
------- ---- ----- ------ ----- | |||
service:libvirtd_n01 an-a05n01.alteeve.ca started | |||
service:libvirtd_n02 an-a05n02.alteeve.ca started | |||
service:storage_n01 an-a05n01.alteeve.ca started | |||
service:storage_n02 an-a05n02.alteeve.ca started | |||
vm:vm01-win2008 an-a05n02.alteeve.ca started | |||
</syntaxhighlight> | |||
|} | |||
We can confirm this worked with <span class="code">virsh</span>. | |||
{|class="wikitable" | |||
!<span class="code">an-a05n01</span> | |||
|style="white-space: nowrap;"|<syntaxhighlight lang="bash"> | |||
virsh list --all | |||
</syntaxhighlight> | |||
<syntaxhighlight lang="text"> | |||
Id Name State | |||
---------------------------------------------------- | |||
</syntaxhighlight> | |||
|- | |||
!<span class="code">an-a05n02</span> | |||
|style="white-space: nowrap;"|<syntaxhighlight lang="bash"> | |||
virsh list --all | |||
</syntaxhighlight> | |||
<syntaxhighlight lang="text"> | |||
Id Name State | |||
---------------------------------------------------- | |||
1 vm01-win2008 running | |||
</syntaxhighlight> | |||
|} | |||
If you were logged into the server, you would have noticed than any running appications, including network applications, would have not been effected in any way. | |||
How cool is that? | |||
Now we'll push it back to <span class="code">an-a05n01</span>. | |||
{|class="wikitable" | |||
!<span class="code">an-a05n01</span> | |||
|style="white-space: nowrap;"|<syntaxhighlight lang="bash"> | |||
clusvcadm -M vm:vm01-win2008 -m an-a05n01.alteeve.ca | |||
</syntaxhighlight> | |||
<syntaxhighlight lang="text"> | |||
Trying to migrate vm:vm01-win2008 to an-a05n01.alteeve.ca...Success | |||
</syntaxhighlight> | |||
|- | |||
!<span class="code">an-a05n02</span> | |||
|style="white-space: nowrap;"|<syntaxhighlight lang="bash"> | |||
clustat | |||
</syntaxhighlight> | |||
<syntaxhighlight lang="text"> | |||
Cluster Status for an-anvil-05 @ Thu Nov 14 15:02:28 2013 | |||
Member Status: Quorate | |||
Member Name ID Status | |||
------ ---- ---- ------ | |||
an-a05n01.alteeve.ca 1 Online, rgmanager | |||
an-a05n02.alteeve.ca 2 Online, Local, rgmanager | |||
Service Name Owner (Last) State | |||
------- ---- ----- ------ ----- | |||
service:libvirtd_n01 an-a05n01.alteeve.ca started | |||
service:libvirtd_n02 an-a05n02.alteeve.ca started | |||
service:storage_n01 an-a05n01.alteeve.ca started | |||
service:storage_n02 an-a05n02.alteeve.ca started | |||
vm:vm01-win2008 an-a05n01.alteeve.ca started | |||
</syntaxhighlight> | |||
|} | |||
As always, we can confirm this worked with <span class="code">virsh</span>. | |||
{|class="wikitable" | |||
!<span class="code">an-a05n01</span> | |||
|style="white-space: nowrap;"|<syntaxhighlight lang="bash"> | |||
virsh list --all | |||
</syntaxhighlight> | |||
<syntaxhighlight lang="text"> | |||
Id Name State | |||
---------------------------------------------------- | |||
3 vm01-win2008 running | |||
</syntaxhighlight> | |||
|- | |||
!<span class="code">an-a05n02</span> | |||
|style="white-space: nowrap;"|<syntaxhighlight lang="bash"> | |||
virsh list --all | |||
</syntaxhighlight> | |||
<syntaxhighlight lang="text"> | |||
Id Name State | |||
---------------------------------------------------- | |||
</syntaxhighlight> | |||
|} | |||
Very cool. | |||
== Making vm02-win2012 a Highly Available Service == | |||
{{note|1=If you skipped adding <span class="code">vm01-win2008</span> to the cluster manager, please [[#Making_vm01-win2008_a_Highly_Available_Service|jump back]] and review the steps there. Particularly on creating the new failover domains and SELinux fix.}} | |||
It's time to add <span class="code">[[#Provisioning_vm02-win2012|vm02-win2012]]</span> to the cluster's management. | |||
=== Dumping the vm02-win2012 XML Definition File === | |||
As we did with <span class="code">vm01-win2008</span>, we need to dump <span class="code">vm02-win2012</span>'s [[XML]] definition out to a file in <span class="code">/shared/definitions</span>. | |||
{{note|1=Recall that we provisioned <span class="code">vm02-win2012</span> on <span class="code">an-a05n02</span>, so we will have to use that node for the next step.}} | |||
First, let's use <span class="code">virsh</span> to see the server's state. | |||
{|class="wikitable" | |||
!<span class="code">an-a05n01</span> | |||
|style="white-space: nowrap;"|<syntaxhighlight lang="bash"> | |||
virsh list --all | |||
</syntaxhighlight> | |||
<syntaxhighlight lang="text"> | |||
Id Name State | |||
---------------------------------------------------- | |||
2 vm01-win2008 running | |||
</syntaxhighlight> | |||
|- | |||
!<span class="code">an-a05n02</span> | |||
|style="white-space: nowrap;"|<syntaxhighlight lang="bash"> | |||
virsh list --all | |||
</syntaxhighlight> | |||
<syntaxhighlight lang="text"> | |||
Id Name State | |||
---------------------------------------------------- | |||
1 vm02-win2012 running | |||
</syntaxhighlight> | |||
|} | |||
So we see that <span class="code">vm02-win2012</span> is running on <span class="code">an-a05n02</span>. Recall that the <span class="code">Id</span> is a simple integer that increments each time a server boots. | |||
Now dump the server's XML. | |||
{|class="wikitable" | |||
!<span class="code">an-a05n02</span> | |||
|style="white-space: nowrap;"|<syntaxhighlight lang="bash"> | |||
virsh dumpxml vm02-win2012 > /shared/definitions/vm02-win2012.xml | |||
ls -lah /shared/definitions/vm02-win2012.xml | |||
</syntaxhighlight> | |||
<syntaxhighlight lang="text"> | |||
-rw-r--r--. 1 root root 3.3K Nov 18 13:03 /shared/definitions/vm02-win2012.xml | |||
</syntaxhighlight> | |||
|} | |||
{{warning|1=Be sure the XML file was written properly! This next step will remove the server from <span class="code">libvirtd</span>. Once done, the <span class="code">/shared/definitions/vm02-win2012.xml</span> will be the only way to boot the server!}} | |||
The last step is to remove <span class="code">vm02-win2012</span> from <span class="code">libvirtd</span>. This will ensure that tools like "Virtual Machine Manager" will not know about our servers except when they are running on the node. | |||
{|class="wikitable" | |||
!<span class="code">an-a05n02</span> | |||
|style="white-space: nowrap;"|<syntaxhighlight lang="bash"> | |||
virsh undefine vm02-win2012 | |||
</syntaxhighlight> | |||
<syntaxhighlight lang="text"> | |||
Domain vm02-win2012 has been undefined | |||
</syntaxhighlight> | |||
|} | |||
Done. | |||
=== Creating the vm:vm02-win2012 Service === | |||
As we did for <span class="code">vm01-win2008</span>, we will create a <span class="code">vm</span> service entry for <span class="code">vm02-win2012</span>. This time though, because this server is assigned to <span class="code">an-a05n02</span>, we will use the <span class="code">primary_n02</span> failover domain. | |||
Lets increment the version to <span class="code">13</span> and add the new entry. | |||
{|class="wikitable" | |||
!<span class="code">an-a05n02</span> | |||
|style="white-space: nowrap;"|<syntaxhighlight lang="xml"> | |||
<rm log_level="5"> | |||
... | |||
<vm name="vm02-win2012" domain="primary_n02" autostart="0" path="/shared/definitions/" exclusive="0" recovery="restart" max_restarts="2" restart_expire_time="600"> | |||
<action name="stop" timeout="30m" /> | |||
</vm> | |||
</rm> | |||
</syntaxhighlight> | |||
|} | |||
Making the new <span class="code">cluster.conf</span> as we see it below. | |||
{|class="wikitable" | |||
!<span class="code">an-a05n02</span> | |||
|style="white-space: nowrap;"|<syntaxhighlight lang="xml"> | |||
<?xml version="1.0"?> | |||
<cluster name="an-anvil-05" config_version="13"> | |||
<cman expected_votes="1" two_node="1" /> | |||
<clusternodes> | |||
<clusternode name="an-a05n01.alteeve.ca" nodeid="1"> | |||
<fence> | |||
<method name="ipmi"> | |||
<device name="ipmi_n01" action="reboot" delay="15" /> | |||
</method> | |||
<method name="pdu"> | |||
<device name="pdu1" port="1" action="reboot" /> | |||
<device name="pdu2" port="1" action="reboot" /> | |||
</method> | |||
</fence> | |||
</clusternode> | |||
<clusternode name="an-a05n02.alteeve.ca" nodeid="2"> | |||
<fence> | |||
<method name="ipmi"> | |||
<device name="ipmi_n02" action="reboot" /> | |||
</method> | |||
<method name="pdu"> | |||
<device name="pdu1" port="2" action="reboot" /> | |||
<device name="pdu2" port="2" action="reboot" /> | |||
</method> | |||
</fence> | |||
</clusternode> | |||
</clusternodes> | |||
<fencedevices> | |||
<fencedevice name="ipmi_n01" agent="fence_ipmilan" ipaddr="an-a05n01.ipmi" login="admin" passwd="secret" /> | |||
<fencedevice name="ipmi_n02" agent="fence_ipmilan" ipaddr="an-a05n02.ipmi" login="admin" passwd="secret" /> | |||
<fencedevice agent="fence_apc_snmp" ipaddr="an-pdu01.alteeve.ca" name="pdu1" /> | |||
<fencedevice agent="fence_apc_snmp" ipaddr="an-pdu02.alteeve.ca" name="pdu2" /> | |||
</fencedevices> | |||
<fence_daemon post_join_delay="30" /> | |||
<totem rrp_mode="none" secauth="off"/> | |||
<rm log_level="5"> | |||
<resources> | |||
<script file="/etc/init.d/drbd" name="drbd"/> | |||
<script file="/etc/init.d/clvmd" name="clvmd"/> | |||
<clusterfs device="/dev/an-a05n01_vg0/shared" force_unmount="1" fstype="gfs2" mountpoint="/shared" name="sharedfs" /> | |||
<script file="/etc/init.d/libvirtd" name="libvirtd"/> | |||
</resources> | |||
<failoverdomains> | |||
<failoverdomain name="only_n01" nofailback="1" ordered="0" restricted="1"> | |||
<failoverdomainnode name="an-a05n01.alteeve.ca"/> | |||
</failoverdomain> | |||
<failoverdomain name="only_n02" nofailback="1" ordered="0" restricted="1"> | |||
<failoverdomainnode name="an-a05n02.alteeve.ca"/> | |||
</failoverdomain> | |||
<failoverdomain name="primary_n01" nofailback="1" ordered="1" restricted="1"> | |||
<failoverdomainnode name="an-a05n01.alteeve.ca" priority="1"/> | |||
<failoverdomainnode name="an-a05n02.alteeve.ca" priority="2"/> | |||
</failoverdomain> | |||
<failoverdomain name="primary_n02" nofailback="1" ordered="1" restricted="1"> | |||
<failoverdomainnode name="an-a05n01.alteeve.ca" priority="2"/> | |||
<failoverdomainnode name="an-a05n02.alteeve.ca" priority="1"/> | |||
</failoverdomain> | |||
</failoverdomains> | |||
<service name="storage_n01" autostart="1" domain="only_n01" exclusive="0" recovery="restart"> | |||
<script ref="drbd"> | |||
<script ref="clvmd"> | |||
<clusterfs ref="sharedfs"/> | |||
</script> | |||
</script> | |||
</service> | |||
<service name="storage_n02" autostart="1" domain="only_n02" exclusive="0" recovery="restart"> | |||
<script ref="drbd"> | |||
<script ref="clvmd"> | |||
<clusterfs ref="sharedfs"/> | |||
</script> | |||
</script> | |||
</service> | |||
<service name="libvirtd_n01" autostart="1" domain="only_n01" exclusive="0" recovery="restart"> | |||
<script ref="libvirtd"/> | |||
</service> | |||
<service name="libvirtd_n02" autostart="1" domain="only_n02" exclusive="0" recovery="restart"> | |||
<script ref="libvirtd"/> | |||
</service> | |||
<vm name="vm01-win2008" domain="primary_n01" autostart="0" path="/shared/definitions/" exclusive="0" recovery="restart" max_restarts="2" restart_expire_time="600"> | |||
<action name="stop" timeout="30m" /> | |||
</vm> | |||
<vm name="vm02-win2012" domain="primary_n02" autostart="0" path="/shared/definitions/" exclusive="0" recovery="restart" max_restarts="2" restart_expire_time="600"> | |||
<action name="stop" timeout="30m" /> | |||
</vm> | |||
</rm> | |||
</cluster> | |||
</syntaxhighlight> | |||
|} | |||
Now let's activate the new configuration. | |||
{{note|1=If you've been following along, this will be the first time we've pushed a change to <span class="code">cluster.conf</span> from <span class="code">an-a05n02</span>. So we'll need to enter the <span class="code">ricci</span> user's password on both nodes.}} | |||
{|class="wikitable" | |||
!<span class="code">an-a05n02</span> | |||
|style="white-space: nowrap;"|<syntaxhighlight lang="bash"> | |||
ccs_config_validate | |||
</syntaxhighlight> | |||
<syntaxhighlight lang="text"> | |||
Configuration validates | |||
</syntaxhighlight> | |||
<syntaxhighlight lang="bash"> | |||
cman_tool version | |||
</syntaxhighlight> | |||
<syntaxhighlight lang="text"> | |||
6.2.0 config 12 | |||
</syntaxhighlight> | |||
<syntaxhighlight lang="bash"> | |||
cman_tool version -r | |||
</syntaxhighlight> | |||
<syntaxhighlight lang="text"> | |||
You have not authenticated to the ricci daemon on an-a05n02.alteeve.ca | |||
Password: | |||
</syntaxhighlight> | |||
<syntaxhighlight lang="text"> | |||
You have not authenticated to the ricci daemon on an-a05n01.alteeve.ca | |||
Password: | |||
</syntaxhighlight> | |||
<syntaxhighlight lang="text"> | |||
cman_tool version | |||
</syntaxhighlight> | |||
<syntaxhighlight lang="text"> | |||
6.2.0 config 13 | |||
</syntaxhighlight> | |||
|- | |||
!<span class="code">an-a05n01</span> | |||
|style="white-space: nowrap;"|<syntaxhighlight lang="bash"> | |||
cman_tool version | |||
</syntaxhighlight> | |||
<syntaxhighlight lang="text"> | |||
6.2.0 config 13 | |||
</syntaxhighlight> | |||
|} | |||
Let's take a look at <span class="code">clustat</span> on both nodes now. | |||
{|class="wikitable" | |||
!<span class="code">an-a05n02</span> | |||
|style="white-space: nowrap;"|<syntaxhighlight lang="bash"> | |||
clustat | |||
</syntaxhighlight> | |||
<syntaxhighlight lang="text"> | |||
Cluster Status for an-anvil-05 @ Mon Nov 18 13:08:57 2013 | |||
Member Status: Quorate | |||
Member Name ID Status | |||
------ ---- ---- ------ | |||
an-a05n01.alteeve.ca 1 Online, Local, rgmanager | |||
an-a05n02.alteeve.ca 2 Online, rgmanager | |||
Service Name Owner (Last) State | |||
------- ---- ----- ------ ----- | |||
service:libvirtd_n01 an-a05n01.alteeve.ca started | |||
service:libvirtd_n02 an-a05n02.alteeve.ca started | |||
service:storage_n01 an-a05n01.alteeve.ca started | |||
service:storage_n02 an-a05n02.alteeve.ca started | |||
vm:vm01-win2008 an-a05n01.alteeve.ca started | |||
vm:vm02-win2012 (none) disabled | |||
</syntaxhighlight> | |||
|- | |||
!<span class="code">an-a05n01</span> | |||
|style="white-space: nowrap;"|<syntaxhighlight lang="bash"> | |||
clustat | |||
</syntaxhighlight> | |||
<syntaxhighlight lang="text"> | |||
Cluster Status for an-anvil-05 @ Mon Nov 18 13:09:00 2013 | |||
Member Status: Quorate | |||
Member Name ID Status | |||
------ ---- ---- ------ | |||
an-a05n01.alteeve.ca 1 Online, rgmanager | |||
an-a05n02.alteeve.ca 2 Online, Local, rgmanager | |||
Service Name Owner (Last) State | |||
------- ---- ----- ------ ----- | |||
service:libvirtd_n01 an-a05n01.alteeve.ca started | |||
service:libvirtd_n02 an-a05n02.alteeve.ca started | |||
service:storage_n01 an-a05n01.alteeve.ca started | |||
service:storage_n02 an-a05n02.alteeve.ca started | |||
vm:vm01-win2008 an-a05n01.alteeve.ca started | |||
vm:vm02-win2012 (none) disabled | |||
</syntaxhighlight> | |||
|} | |||
As expected, <span class="code">vm:vm02-win2012</span> is <span class="code">disabled</span>. Verify that it is still running on <span class="code">an-a05n02</span>. | |||
{|class="wikitable" | |||
!<span class="code">an-a05n01</span> | |||
|style="white-space: nowrap;"|<syntaxhighlight lang="bash"> | |||
virsh list --all | |||
</syntaxhighlight> | |||
<syntaxhighlight lang="text"> | |||
Id Name State | |||
---------------------------------------------------- | |||
2 vm01-win2008 running | |||
</syntaxhighlight> | |||
|- | |||
!<span class="code">an-a05n02</span> | |||
|style="white-space: nowrap;"|<syntaxhighlight lang="bash"> | |||
virsh list --all | |||
</syntaxhighlight> | |||
<syntaxhighlight lang="text"> | |||
Id Name State | |||
---------------------------------------------------- | |||
1 vm02-win2012 running | |||
</syntaxhighlight> | |||
|} | |||
Confirmed, <span class="code">vm02-win2012</span> is on <span class="code">an-a05n02</span>. | |||
As we did with <span class="code">vm01-win2008</span>, we'll use <span class="code">clusvcadm</span> to <span class="code">enable</span> the <span class="code">vm:vm02-win2012</span> service on the <span class="code">an-a05n02.alteeve.ca</span> cluster member. | |||
{{note|1=To show that <span class="code">clusvcadm</span> can be used anywhere, we'll use <span class="code">an-a05n01</span> to enable the server on <span class="code">an-a05n02</span>.}} | |||
{|class="wikitable" | |||
!<span class="code">an-a05n01</span> | |||
|style="white-space: nowrap;"|<syntaxhighlight lang="bash"> | |||
clusvcadm -e vm:vm02-win2012 -m an-a05n02.alteeve.ca | |||
</syntaxhighlight> | |||
<syntaxhighlight lang="text"> | |||
</syntaxhighlight> | |||
|- | |||
!<span class="code">an-a05n02</span> | |||
|style="white-space: nowrap;"|<syntaxhighlight lang="bash"> | |||
clustat | |||
</syntaxhighlight> | |||
<syntaxhighlight lang="text"> | |||
Cluster Status for an-anvil-05 @ Mon Nov 18 13:29:12 2013 | |||
Member Status: Quorate | |||
Member Name ID Status | |||
------ ---- ---- ------ | |||
an-a05n01.alteeve.ca 1 Online, rgmanager | |||
an-a05n02.alteeve.ca 2 Online, Local, rgmanager | |||
Service Name Owner (Last) State | |||
------- ---- ----- ------ ----- | |||
service:libvirtd_n01 an-a05n01.alteeve.ca started | |||
service:libvirtd_n02 an-a05n02.alteeve.ca started | |||
service:storage_n01 an-a05n01.alteeve.ca started | |||
service:storage_n02 an-a05n02.alteeve.ca started | |||
vm:vm01-win2008 an-a05n01.alteeve.ca started | |||
vm:vm02-win2012 an-a05n02.alteeve.ca started | |||
</syntaxhighlight> | |||
|} | |||
Done! | |||
Now, should <span class="code">vm02-win2012</span> fail or if <span class="code">an-a05n01</span> should fail, the ''Anvil!'' will recover it automatically. | |||
=== Testing vm02-win2012 Management With clusvcadm === | |||
The first thing we're going to do is disable (gracefully shut down) the server. To do this, we'll send an [[ACPI]] "power button" event to <span class="code">vm02-win2012</span>. Windows 2012 will, like most operating systems, respond to having its "power button pressed" by beginning a graceful shut down. | |||
As always, start by checking the state of things. | |||
{|class="wikitable" | |||
!<span class="code">an-a05n01</span> | |||
|style="white-space: nowrap;"|<syntaxhighlight lang="bash"> | |||
clustat | |||
</syntaxhighlight> | |||
<syntaxhighlight lang="text"> | |||
Cluster Status for an-anvil-05 @ Mon Nov 18 13:35:26 2013 | |||
Member Status: Quorate | |||
Member Name ID Status | |||
------ ---- ---- ------ | |||
an-a05n01.alteeve.ca 1 Online, Local, rgmanager | |||
an-a05n02.alteeve.ca 2 Online, rgmanager | |||
Service Name Owner (Last) State | |||
------- ---- ----- ------ ----- | |||
service:libvirtd_n01 an-a05n01.alteeve.ca started | |||
service:libvirtd_n02 an-a05n02.alteeve.ca started | |||
service:storage_n01 an-a05n01.alteeve.ca started | |||
service:storage_n02 an-a05n02.alteeve.ca started | |||
vm:vm01-win2008 an-a05n01.alteeve.ca started | |||
vm:vm02-win2012 an-a05n02.alteeve.ca started | |||
</syntaxhighlight> | |||
|} | |||
As we expected. | |||
{{note|1=We're flipping to <span class="code">an-a05n02</span>, but we don't have to. The <span class="code">disable</span> command is smart enough to know where the server is running and disable it on the appropriate node.}} | |||
{|class="wikitable" | |||
!<span class="code">an-a05n02</span> | |||
|style="white-space: nowrap;"|<syntaxhighlight lang="bash"> | |||
clusvcadm -d vm:vm02-win2012 | |||
</syntaxhighlight> | |||
<syntaxhighlight lang="text"> | |||
Local machine disabling vm:vm02-win2012...Success | |||
</syntaxhighlight> | |||
|} | |||
If we check <span class="code">clustat</span> again, we'll see that the <span class="code">vm:vm02-win2012</span> service is indeed <span class="code">disabled</span>. | |||
{|class="wikitable" | |||
!<span class="code">an-a05n02</span> | |||
|style="white-space: nowrap;"|<syntaxhighlight lang="bash"> | |||
clustat | |||
</syntaxhighlight> | |||
<syntaxhighlight lang="text"> | |||
Cluster Status for an-anvil-05 @ Mon Nov 18 13:36:01 2013 | |||
Member Status: Quorate | |||
Member Name ID Status | |||
------ ---- ---- ------ | |||
an-a05n01.alteeve.ca 1 Online, rgmanager | |||
an-a05n02.alteeve.ca 2 Online, Local, rgmanager | |||
Service Name Owner (Last) State | |||
------- ---- ----- ------ ----- | |||
service:libvirtd_n01 an-a05n01.alteeve.ca started | |||
service:libvirtd_n02 an-a05n02.alteeve.ca started | |||
service:storage_n01 an-a05n01.alteeve.ca started | |||
service:storage_n02 an-a05n02.alteeve.ca started | |||
vm:vm01-win2008 an-a05n01.alteeve.ca started | |||
vm:vm02-win2012 (an-a05n02.alteeve.ca) disabled | |||
</syntaxhighlight> | |||
|} | |||
Good, it's off. Let's turn it back on now. | |||
{{note|1=We'll go back to <span class="code">an-a05n01</span> so that we can see how the <span class="code">-F</span> switch is, in fact, smart enough to start the server on <span class="code">an-a05n02</span>.}} | |||
{|class="wikitable" | |||
!<span class="code">an-a05n01</span> | |||
|style="white-space: nowrap;"|<syntaxhighlight lang="bash"> | |||
clusvcadm -F -e vm:vm02-win2012 | |||
</syntaxhighlight> | |||
<syntaxhighlight lang="text"> | |||
Local machine trying to enable vm:vm02-win2012...Success | |||
vm:vm02-win2012 is now running on an-a05n02.alteeve.ca | |||
</syntaxhighlight> | |||
|} | |||
The SELinux fix [[#Solving_vm01-win2008_Failure_to_Enable_Error|from before]] worked for this server, too! You can verify this by disabling the server and re-running the above command on <span class="code">an-a05n02</span>. | |||
One last step; Testing live migration! We'll push <span class="code">vm02-win2012</span> over to <span class="code">an-a05n01</span> and then pull it back again. | |||
{|class="wikitable" | |||
!<span class="code">an-a05n01</span> | |||
|style="white-space: nowrap;"|<syntaxhighlight lang="bash"> | |||
clusvcadm -M vm:vm02-win2012 -m an-a05n01.alteeve.ca | |||
</syntaxhighlight> | |||
<syntaxhighlight lang="text"> | |||
Trying to migrate vm:vm02-win2012 to an-a05n01.alteeve.ca...Success | |||
</syntaxhighlight> | |||
|- | |||
!<span class="code">an-a05n02</span> | |||
|style="white-space: nowrap;"|<syntaxhighlight lang="bash"> | |||
clustat | |||
</syntaxhighlight> | |||
<syntaxhighlight lang="text"> | |||
Cluster Status for an-anvil-05 @ Mon Nov 18 15:08:52 2013 | |||
Member Status: Quorate | |||
Member Name ID Status | |||
------ ---- ---- ------ | |||
an-a05n01.alteeve.ca 1 Online, rgmanager | |||
an-a05n02.alteeve.ca 2 Online, Local, rgmanager | |||
Service Name Owner (Last) State | |||
------- ---- ----- ------ ----- | |||
service:libvirtd_n01 an-a05n01.alteeve.ca started | |||
service:libvirtd_n02 an-a05n02.alteeve.ca started | |||
service:storage_n01 an-a05n01.alteeve.ca started | |||
service:storage_n02 an-a05n02.alteeve.ca started | |||
vm:vm01-win2008 an-a05n01.alteeve.ca started | |||
vm:vm02-win2012 an-a05n01.alteeve.ca started | |||
</syntaxhighlight> | |||
|} | |||
If we use <span class="code">virsh</span>, we can confirm that <span class="code">vm03-win7</span> has, in fact, moved over to <span class="code">an-a05n02</span>. | |||
{|class="wikitable" | |||
!<span class="code">an-a05n01</span> | |||
|style="white-space: nowrap;"|<syntaxhighlight lang="bash"> | |||
virsh list --all | |||
</syntaxhighlight> | |||
<syntaxhighlight lang="text"> | |||
[root@an-a05n01 ~]# virsh list --all | |||
Id Name State | |||
---------------------------------------------------- | |||
2 vm01-win2008 running | |||
6 vm02-win2012 running | |||
</syntaxhighlight> | |||
|- | |||
!<span class="code">an-a05n02</span> | |||
|style="white-space: nowrap;"|<syntaxhighlight lang="bash"> | |||
virsh list --all | |||
</syntaxhighlight> | |||
<syntaxhighlight lang="text"> | |||
Id Name State | |||
---------------------------------------------------- | |||
</syntaxhighlight> | |||
|} | |||
If you had a program running or were logged into <span class="code">vm02-win2012</span> over [[RDP]] or similar, you would have noticed no interruptions. | |||
So now we'll pull it back. | |||
{|class="wikitable" | |||
!<span class="code">an-a05n01</span> | |||
|style="white-space: nowrap;"|<syntaxhighlight lang="bash"> | |||
clusvcadm -M vm:vm02-win2012 -m an-a05n02.alteeve.ca | |||
</syntaxhighlight> | |||
<syntaxhighlight lang="text"> | |||
Trying to migrate vm:vm02-win2012 to an-a05n02.alteeve.ca...Success | |||
</syntaxhighlight> | |||
|- | |||
!<span class="code">an-a05n02</span> | |||
|style="white-space: nowrap;"|<syntaxhighlight lang="bash"> | |||
clustat | |||
</syntaxhighlight> | |||
<syntaxhighlight lang="text"> | |||
Cluster Status for an-anvil-05 @ Mon Nov 18 15:13:33 2013 | |||
Member Status: Quorate | |||
Member Name ID Status | |||
------ ---- ---- ------ | |||
an-a05n01.alteeve.ca 1 Online, rgmanager | |||
an-a05n02.alteeve.ca 2 Online, Local, rgmanager | |||
Service Name Owner (Last) State | |||
------- ---- ----- ------ ----- | |||
service:libvirtd_n01 an-a05n01.alteeve.ca started | |||
service:libvirtd_n02 an-a05n02.alteeve.ca started | |||
service:storage_n01 an-a05n01.alteeve.ca started | |||
service:storage_n02 an-a05n02.alteeve.ca started | |||
vm:vm01-win2008 an-a05n01.alteeve.ca started | |||
vm:vm02-win2012 an-a05n02.alteeve.ca started | |||
</syntaxhighlight> | |||
|} | |||
Once again, we'll confirm with <span class="code">virsh</span>. | |||
{|class="wikitable" | |||
!<span class="code">an-a05n01</span> | |||
|style="white-space: nowrap;"|<syntaxhighlight lang="bash"> | |||
virsh list --all | |||
</syntaxhighlight> | |||
<syntaxhighlight lang="text"> | |||
Id Name State | |||
---------------------------------------------------- | |||
2 vm01-win2008 running | |||
</syntaxhighlight> | |||
|- | |||
!<span class="code">an-a05n02</span> | |||
|style="white-space: nowrap;"|<syntaxhighlight lang="bash"> | |||
virsh list --all | |||
</syntaxhighlight> | |||
<syntaxhighlight lang="text"> | |||
Id Name State | |||
---------------------------------------------------- | |||
5 vm02-win2012 running | |||
</syntaxhighlight> | |||
|} | |||
Done! | |||
== Making vm03-win7 a Highly Available Service == | |||
{{note|1=If you skipped adding <span class="code">vm01-win2008</span> to the cluster manager, please [[#Making_vm01-win2008_a_Highly_Available_Service|jump back]] and review the steps there. Particularly on creating the new failover domains and SELinux fix.}} | |||
It's time to add <span class="code">[[#Provisioning_vm03-win7|vm03-win7]]</span> to the cluster's management. | |||
=== Dumping the vm03-win7 XML Definition File === | |||
As we did with the previous servers, we need to dump <span class="code">vm03-win7</span>'s [[XML]] definition out to a file in <span class="code">/shared/definitions</span>. | |||
First, let's use <span class="code">virsh</span> to see the server's state. | |||
{|class="wikitable" | |||
!<span class="code">an-a05n01</span> | |||
|style="white-space: nowrap;"|<syntaxhighlight lang="bash"> | |||
virsh list --all | |||
</syntaxhighlight> | |||
<syntaxhighlight lang="text"> | |||
Id Name State | |||
---------------------------------------------------- | |||
2 vm01-win2008 running | |||
3 vm03-win7 running | |||
</syntaxhighlight> | |||
|- | |||
!<span class="code">an-a05n02</span> | |||
|style="white-space: nowrap;"|<syntaxhighlight lang="bash"> | |||
virsh list --all | |||
</syntaxhighlight> | |||
<syntaxhighlight lang="text"> | |||
Id Name State | |||
---------------------------------------------------- | |||
3 vm02-win2012 running | |||
</syntaxhighlight> | |||
|} | |||
So we see that <span class="code">vm03-win7</span> is running on <span class="code">an-a05n01</span>, which is where we provisioned it. | |||
Now dump the server's XML. | |||
{|class="wikitable" | |||
!<span class="code">an-a05n01</span> | |||
|style="white-space: nowrap;"|<syntaxhighlight lang="bash"> | |||
virsh dumpxml vm03-win7 > /shared/definitions/vm03-win7.xml | |||
ls -lah /shared/definitions/vm03-win7.xml | |||
</syntaxhighlight> | |||
<syntaxhighlight lang="text"> | |||
-rw-r--r--. 1 root root 3.3K Nov 18 14:21 /shared/definitions/vm03-win7.xml | |||
</syntaxhighlight> | |||
|} | |||
{{warning|1=Be sure the XML file was written properly! This next step will remove the server from <span class="code">libvirtd</span>. Once done, the <span class="code">/shared/definitions/vm03-win7.xml</span> will be the only way to boot the server!}} | |||
The last step is, again, to remove <span class="code">vm03-win7</span> from <span class="code">libvirtd</span>. | |||
{|class="wikitable" | |||
!<span class="code">an-a05n02</span> | |||
|style="white-space: nowrap;"|<syntaxhighlight lang="bash"> | |||
virsh undefine vm03-win7 | |||
</syntaxhighlight> | |||
<syntaxhighlight lang="text"> | |||
Domain vm03-win7 has been undefined | |||
</syntaxhighlight> | |||
|} | |||
Done. | |||
=== Creating the vm:vm03-win7 Service === | |||
As we did for <span class="code">vm01-win2008</span>, we will create a <span class="code">vm</span> service entry for <span class="code">vm03-win7</span>. This time though, because this server is assigned to <span class="code">an-a05n02</span>, we will use the <span class="code">primary_n02</span> failover domain. | |||
Lets increment the version to <span class="code">14</span> and add the new entry. | |||
{|class="wikitable" | |||
!<span class="code">an-a05n01</span> | |||
|style="white-space: nowrap;"|<syntaxhighlight lang="xml"> | |||
<rm log_level="5"> | |||
... | |||
<vm name="vm03-win7" domain="primary_n01" autostart="0" path="/shared/definitions/" exclusive="0" recovery="restart" max_restarts="2" restart_expire_time="600"> | |||
<action name="stop" timeout="30m" /> | |||
</vm> | |||
</rm> | |||
</syntaxhighlight> | |||
|} | |||
Making the new <span class="code">cluster.conf</span> as we see it below. | |||
{|class="wikitable" | |||
!<span class="code">an-a05n01</span> | |||
|style="white-space: nowrap;"|<syntaxhighlight lang="xml"> | |||
<?xml version="1.0"?> | |||
<cluster name="an-anvil-05" config_version="14"> | |||
<cman expected_votes="1" two_node="1" /> | |||
<clusternodes> | |||
<clusternode name="an-a05n01.alteeve.ca" nodeid="1"> | |||
<fence> | |||
<method name="ipmi"> | |||
<device name="ipmi_n01" action="reboot" delay="15" /> | |||
</method> | |||
<method name="pdu"> | |||
<device name="pdu1" port="1" action="reboot" /> | |||
<device name="pdu2" port="1" action="reboot" /> | |||
</method> | |||
</fence> | |||
</clusternode> | |||
<clusternode name="an-a05n02.alteeve.ca" nodeid="2"> | |||
<fence> | |||
<method name="ipmi"> | |||
<device name="ipmi_n02" action="reboot" /> | |||
</method> | |||
<method name="pdu"> | |||
<device name="pdu1" port="2" action="reboot" /> | |||
<device name="pdu2" port="2" action="reboot" /> | |||
</method> | |||
</fence> | |||
</clusternode> | |||
</clusternodes> | |||
<fencedevices> | |||
<fencedevice name="ipmi_n01" agent="fence_ipmilan" ipaddr="an-a05n01.ipmi" login="admin" passwd="secret" /> | |||
<fencedevice name="ipmi_n02" agent="fence_ipmilan" ipaddr="an-a05n02.ipmi" login="admin" passwd="secret" /> | |||
<fencedevice agent="fence_apc_snmp" ipaddr="an-pdu01.alteeve.ca" name="pdu1" /> | |||
<fencedevice agent="fence_apc_snmp" ipaddr="an-pdu02.alteeve.ca" name="pdu2" /> | |||
</fencedevices> | |||
<fence_daemon post_join_delay="30" /> | |||
<totem rrp_mode="none" secauth="off"/> | |||
<rm log_level="5"> | |||
<resources> | |||
<script file="/etc/init.d/drbd" name="drbd"/> | |||
<script file="/etc/init.d/clvmd" name="clvmd"/> | |||
<clusterfs device="/dev/an-a05n01_vg0/shared" force_unmount="1" fstype="gfs2" mountpoint="/shared" name="sharedfs" /> | |||
<script file="/etc/init.d/libvirtd" name="libvirtd"/> | |||
</resources> | |||
<failoverdomains> | |||
<failoverdomain name="only_n01" nofailback="1" ordered="0" restricted="1"> | |||
<failoverdomainnode name="an-a05n01.alteeve.ca"/> | |||
</failoverdomain> | |||
<failoverdomain name="only_n02" nofailback="1" ordered="0" restricted="1"> | |||
<failoverdomainnode name="an-a05n02.alteeve.ca"/> | |||
</failoverdomain> | |||
<failoverdomain name="primary_n01" nofailback="1" ordered="1" restricted="1"> | |||
<failoverdomainnode name="an-a05n01.alteeve.ca" priority="1"/> | |||
<failoverdomainnode name="an-a05n02.alteeve.ca" priority="2"/> | |||
</failoverdomain> | |||
<failoverdomain name="primary_n02" nofailback="1" ordered="1" restricted="1"> | |||
<failoverdomainnode name="an-a05n01.alteeve.ca" priority="2"/> | |||
<failoverdomainnode name="an-a05n02.alteeve.ca" priority="1"/> | |||
</failoverdomain> | |||
</failoverdomains> | |||
<service name="storage_n01" autostart="1" domain="only_n01" exclusive="0" recovery="restart"> | |||
<script ref="drbd"> | |||
<script ref="clvmd"> | |||
<clusterfs ref="sharedfs"/> | |||
</script> | |||
</script> | |||
</service> | |||
<service name="storage_n02" autostart="1" domain="only_n02" exclusive="0" recovery="restart"> | |||
<script ref="drbd"> | |||
<script ref="clvmd"> | |||
<clusterfs ref="sharedfs"/> | |||
</script> | |||
</script> | |||
</service> | |||
<service name="libvirtd_n01" autostart="1" domain="only_n01" exclusive="0" recovery="restart"> | |||
<script ref="libvirtd"/> | |||
</service> | |||
<service name="libvirtd_n02" autostart="1" domain="only_n02" exclusive="0" recovery="restart"> | |||
<script ref="libvirtd"/> | |||
</service> | |||
<vm name="vm01-win2008" domain="primary_n01" autostart="0" path="/shared/definitions/" exclusive="0" recovery="restart" max_restarts="2" restart_expire_time="600"> | |||
<action name="stop" timeout="30m" /> | |||
</vm> | |||
<vm name="vm02-win2012" domain="primary_n02" autostart="0" path="/shared/definitions/" exclusive="0" recovery="restart" max_restarts="2" restart_expire_time="600"> | |||
<action name="stop" timeout="30m" /> | |||
</vm> | |||
<vm name="vm03-win7" domain="primary_n01" autostart="0" path="/shared/definitions/" exclusive="0" recovery="restart" max_restarts="2" restart_expire_time="600"> | |||
<action name="stop" timeout="30m" /> | |||
</vm> | |||
</rm> | |||
</cluster> | |||
</syntaxhighlight> | |||
|} | |||
Now let's activate the new configuration. | |||
{|class="wikitable" | |||
!<span class="code">an-a05n01</span> | |||
|style="white-space: nowrap;"|<syntaxhighlight lang="bash"> | |||
ccs_config_validate | |||
</syntaxhighlight> | |||
<syntaxhighlight lang="text"> | |||
Configuration validates | |||
</syntaxhighlight> | |||
<syntaxhighlight lang="bash"> | |||
cman_tool version | |||
</syntaxhighlight> | |||
<syntaxhighlight lang="text"> | |||
6.2.0 config 13 | |||
</syntaxhighlight> | |||
<syntaxhighlight lang="bash"> | |||
cman_tool version -r | |||
cman_tool version | |||
</syntaxhighlight> | |||
<syntaxhighlight lang="text"> | |||
6.2.0 config 14 | |||
</syntaxhighlight> | |||
|- | |||
!<span class="code">an-a05n02</span> | |||
|style="white-space: nowrap;"|<syntaxhighlight lang="bash"> | |||
cman_tool version | |||
</syntaxhighlight> | |||
<syntaxhighlight lang="text"> | |||
6.2.0 config 14 | |||
</syntaxhighlight> | |||
|} | |||
Let's take a look at <span class="code">clustat</span> on both nodes now. | |||
{|class="wikitable" | |||
!<span class="code">an-a05n01</span> | |||
|style="white-space: nowrap;"|<syntaxhighlight lang="bash"> | |||
clustat | |||
</syntaxhighlight> | |||
<syntaxhighlight lang="text"> | |||
Cluster Status for an-anvil-05 @ Mon Nov 18 14:27:17 2013 | |||
Member Status: Quorate | |||
Member Name ID Status | |||
------ ---- ---- ------ | |||
an-a05n01.alteeve.ca 1 Online, Local, rgmanager | |||
an-a05n02.alteeve.ca 2 Online, rgmanager | |||
Service Name Owner (Last) State | |||
------- ---- ----- ------ ----- | |||
service:libvirtd_n01 an-a05n01.alteeve.ca started | |||
service:libvirtd_n02 an-a05n02.alteeve.ca started | |||
service:storage_n01 an-a05n01.alteeve.ca started | |||
service:storage_n02 an-a05n02.alteeve.ca started | |||
vm:vm01-win2008 an-a05n01.alteeve.ca started | |||
vm:vm02-win2012 an-a05n02.alteeve.ca started | |||
vm:vm03-win7 (none) disabled | |||
</syntaxhighlight> | |||
|- | |||
!<span class="code">an-a05n02</span> | |||
|style="white-space: nowrap;"|<syntaxhighlight lang="bash"> | |||
clustat | |||
</syntaxhighlight> | |||
<syntaxhighlight lang="text"> | |||
Cluster Status for an-anvil-05 @ Mon Nov 18 14:27:18 2013 | |||
Member Status: Quorate | |||
Member Name ID Status | |||
------ ---- ---- ------ | |||
an-a05n01.alteeve.ca 1 Online, rgmanager | |||
an-a05n02.alteeve.ca 2 Online, Local, rgmanager | |||
Service Name Owner (Last) State | |||
------- ---- ----- ------ ----- | |||
service:libvirtd_n01 an-a05n01.alteeve.ca started | |||
service:libvirtd_n02 an-a05n02.alteeve.ca started | |||
service:storage_n01 an-a05n01.alteeve.ca started | |||
service:storage_n02 an-a05n02.alteeve.ca started | |||
vm:vm01-win2008 an-a05n01.alteeve.ca started | |||
vm:vm02-win2012 an-a05n02.alteeve.ca started | |||
vm:vm03-win7 (none) disabled | |||
</syntaxhighlight> | |||
|} | |||
As expected, <span class="code">vm:vm03-win7</span> is <span class="code">disabled</span>. Verify that it is still running on <span class="code">an-a05n01</span>. | |||
{|class="wikitable" | |||
!<span class="code">an-a05n01</span> | |||
|style="white-space: nowrap;"|<syntaxhighlight lang="bash"> | |||
virsh list --all | |||
</syntaxhighlight> | |||
<syntaxhighlight lang="text"> | |||
Id Name State | |||
---------------------------------------------------- | |||
2 vm01-win2008 running | |||
3 vm03-win7 running | |||
</syntaxhighlight> | |||
|- | |||
!<span class="code">an-a05n02</span> | |||
|style="white-space: nowrap;"|<syntaxhighlight lang="bash"> | |||
virsh list --all | |||
</syntaxhighlight> | |||
<syntaxhighlight lang="text"> | |||
Id Name State | |||
---------------------------------------------------- | |||
3 vm02-win2012 running | |||
</syntaxhighlight> | |||
|} | |||
Confirmed, <span class="code">vm03-win7</span> is on <span class="code">an-a05n01</span>. | |||
As we did before, we'll use <span class="code">clusvcadm</span> to <span class="code">enable</span> the <span class="code">vm:vm03-win7</span> service on the <span class="code">an-a05n01.alteeve.ca</span> cluster member. | |||
{|class="wikitable" | |||
!<span class="code">an-a05n01</span> | |||
|style="white-space: nowrap;"|<syntaxhighlight lang="bash"> | |||
clusvcadm -e vm:vm03-win7 -m an-a05n01.alteeve.ca | |||
</syntaxhighlight> | |||
<syntaxhighlight lang="text"> | |||
Member an-a05n01.alteeve.ca trying to enable vm:vm03-win7...Success | |||
vm:vm03-win7 is now running on an-a05n01.alteeve.ca | |||
</syntaxhighlight> | |||
|- | |||
!<span class="code">an-a05n02</span> | |||
|style="white-space: nowrap;"|<syntaxhighlight lang="bash"> | |||
clustat | |||
</syntaxhighlight> | |||
<syntaxhighlight lang="text"> | |||
Cluster Status for an-anvil-05 @ Mon Nov 18 14:29:01 2013 | |||
Member Status: Quorate | |||
Member Name ID Status | |||
------ ---- ---- ------ | |||
an-a05n01.alteeve.ca 1 Online, rgmanager | |||
an-a05n02.alteeve.ca 2 Online, Local, rgmanager | |||
Service Name Owner (Last) State | |||
------- ---- ----- ------ ----- | |||
service:libvirtd_n01 an-a05n01.alteeve.ca started | |||
service:libvirtd_n02 an-a05n02.alteeve.ca started | |||
service:storage_n01 an-a05n01.alteeve.ca started | |||
service:storage_n02 an-a05n02.alteeve.ca started | |||
vm:vm01-win2008 an-a05n01.alteeve.ca started | |||
vm:vm02-win2012 an-a05n02.alteeve.ca started | |||
vm:vm03-win7 an-a05n01.alteeve.ca started | |||
</syntaxhighlight> | |||
|} | |||
Done! | |||
Now, should <span class="code">vm03-win7</span> fail or if <span class="code">an-a05n01</span> should fail, the ''Anvil!'' will recover it automatically. | |||
=== Testing vm03-win7 Management With clusvcadm === | |||
The first thing we're going to do is disable (gracefully shut down) the server. To do this, we'll send an [[ACPI]] "power button" event to <span class="code">vm03-win7</span>. Windows 2012 will, like most operating systems, respond to having its "power button pressed" by beginning a graceful shut down. | |||
As always, start by checking the state of things. | |||
{|class="wikitable" | |||
!<span class="code">an-a05n01</span> | |||
|style="white-space: nowrap;"|<syntaxhighlight lang="bash"> | |||
clustat | |||
</syntaxhighlight> | |||
<syntaxhighlight lang="text"> | |||
Cluster Status for an-anvil-05 @ Mon Nov 18 14:29:29 2013 | |||
Member Status: Quorate | |||
Member Name ID Status | |||
------ ---- ---- ------ | |||
an-a05n01.alteeve.ca 1 Online, Local, rgmanager | |||
an-a05n02.alteeve.ca 2 Online, rgmanager | |||
Service Name Owner (Last) State | |||
------- ---- ----- ------ ----- | |||
service:libvirtd_n01 an-a05n01.alteeve.ca started | |||
service:libvirtd_n02 an-a05n02.alteeve.ca started | |||
service:storage_n01 an-a05n01.alteeve.ca started | |||
service:storage_n02 an-a05n02.alteeve.ca started | |||
vm:vm01-win2008 an-a05n01.alteeve.ca started | |||
vm:vm02-win2012 an-a05n02.alteeve.ca started | |||
vm:vm03-win7 an-a05n01.alteeve.ca started | |||
</syntaxhighlight> | |||
|} | |||
As we expected. | |||
{|class="wikitable" | |||
!<span class="code">an-a05n01</span> | |||
|style="white-space: nowrap;"|<syntaxhighlight lang="bash"> | |||
clusvcadm -d vm:vm03-win7 | |||
</syntaxhighlight> | |||
<syntaxhighlight lang="text"> | |||
Local machine disabling vm:vm03-win7...Success | |||
</syntaxhighlight> | |||
|} | |||
If we check <span class="code">clustat</span> again, we'll see that the <span class="code">vm:vm03-win7</span> service is indeed <span class="code">disabled</span>. | |||
{|class="wikitable" | |||
!<span class="code">an-a05n02</span> | |||
|style="white-space: nowrap;"|<syntaxhighlight lang="bash"> | |||
clustat | |||
</syntaxhighlight> | |||
<syntaxhighlight lang="text"> | |||
Cluster Status for an-anvil-05 @ Mon Nov 18 14:30:32 2013 | |||
Member Status: Quorate | |||
Member Name ID Status | |||
------ ---- ---- ------ | |||
an-a05n01.alteeve.ca 1 Online, rgmanager | |||
an-a05n02.alteeve.ca 2 Online, Local, rgmanager | |||
Service Name Owner (Last) State | |||
------- ---- ----- ------ ----- | |||
service:libvirtd_n01 an-a05n01.alteeve.ca started | |||
service:libvirtd_n02 an-a05n02.alteeve.ca started | |||
service:storage_n01 an-a05n01.alteeve.ca started | |||
service:storage_n02 an-a05n02.alteeve.ca started | |||
vm:vm01-win2008 an-a05n01.alteeve.ca started | |||
vm:vm02-win2012 an-a05n02.alteeve.ca started | |||
vm:vm03-win7 (an-a05n01.alteeve.ca) disabled | |||
</syntaxhighlight> | |||
|} | |||
Good, it's off. Let's turn it back on now. | |||
{|class="wikitable" | |||
!<span class="code">an-a05n01</span> | |||
|style="white-space: nowrap;"|<syntaxhighlight lang="bash"> | |||
clusvcadm -F -e vm:vm03-win7 | |||
</syntaxhighlight> | |||
<syntaxhighlight lang="text"> | |||
Local machine trying to enable vm:vm03-win7...Success | |||
vm:vm03-win7 is now running on an-a05n01.alteeve.ca | |||
</syntaxhighlight> | |||
|- | |||
!<span class="code">an-a05n02</span> | |||
|style="white-space: nowrap;"|<syntaxhighlight lang="bash"> | |||
clustat | |||
</syntaxhighlight> | |||
<syntaxhighlight lang="text"> | |||
Cluster Status for an-anvil-05 @ Mon Nov 18 14:43:29 2013 | |||
Member Status: Quorate | |||
Member Name ID Status | |||
------ ---- ---- ------ | |||
an-a05n01.alteeve.ca 1 Online, rgmanager | |||
an-a05n02.alteeve.ca 2 Online, Local, rgmanager | |||
Service Name Owner (Last) State | |||
------- ---- ----- ------ ----- | |||
service:libvirtd_n01 an-a05n01.alteeve.ca started | |||
service:libvirtd_n02 an-a05n02.alteeve.ca started | |||
service:storage_n01 an-a05n01.alteeve.ca started | |||
service:storage_n02 an-a05n02.alteeve.ca started | |||
vm:vm01-win2008 an-a05n01.alteeve.ca started | |||
vm:vm02-win2012 an-a05n02.alteeve.ca started | |||
vm:vm03-win7 an-a05n01.alteeve.ca started | |||
</syntaxhighlight> | |||
|} | |||
One last step; Testing live migration! We'll push <span class="code">vm03-win7</span> over to <span class="code">an-a05n02</span> and then pull it back again. | |||
{|class="wikitable" | |||
!<span class="code">an-a05n01</span> | |||
|style="white-space: nowrap;"|<syntaxhighlight lang="bash"> | |||
clusvcadm -M vm:vm03-win7 -m an-a05n02.alteeve.ca | |||
</syntaxhighlight> | |||
<syntaxhighlight lang="text"> | |||
Trying to migrate vm:vm03-win7 to an-a05n02.alteeve.ca...Success | |||
</syntaxhighlight> | |||
|- | |||
!<span class="code">an-a05n02</span> | |||
|style="white-space: nowrap;"|<syntaxhighlight lang="bash"> | |||
clustat | |||
</syntaxhighlight> | |||
<syntaxhighlight lang="text"> | |||
Cluster Status for an-anvil-05 @ Mon Nov 18 14:56:06 2013 | |||
Member Status: Quorate | |||
Member Name ID Status | |||
------ ---- ---- ------ | |||
an-a05n01.alteeve.ca 1 Online, rgmanager | |||
an-a05n02.alteeve.ca 2 Online, Local, rgmanager | |||
Service Name Owner (Last) State | |||
------- ---- ----- ------ ----- | |||
service:libvirtd_n01 an-a05n01.alteeve.ca started | |||
service:libvirtd_n02 an-a05n02.alteeve.ca started | |||
service:storage_n01 an-a05n01.alteeve.ca started | |||
service:storage_n02 an-a05n02.alteeve.ca started | |||
vm:vm01-win2008 an-a05n01.alteeve.ca started | |||
vm:vm02-win2012 an-a05n02.alteeve.ca started | |||
vm:vm03-win7 an-a05n02.alteeve.ca started | |||
</syntaxhighlight> | |||
|} | |||
If we use <span class="code">virsh</span>, we can confirm that <span class="code">vm03-win7</span> has, in fact, moved over to <span class="code">an-a05n02</span>. | |||
{|class="wikitable" | |||
!<span class="code">an-a05n01</span> | |||
|style="white-space: nowrap;"|<syntaxhighlight lang="bash"> | |||
virsh list --all | |||
</syntaxhighlight> | |||
<syntaxhighlight lang="text"> | |||
Id Name State | |||
---------------------------------------------------- | |||
2 vm01-win2008 running | |||
</syntaxhighlight> | |||
|- | |||
!<span class="code">an-a05n02</span> | |||
|style="white-space: nowrap;"|<syntaxhighlight lang="bash"> | |||
virsh list --all | |||
</syntaxhighlight> | |||
<syntaxhighlight lang="text"> | |||
Id Name State | |||
---------------------------------------------------- | |||
3 vm02-win2012 running | |||
4 vm03-win7 running | |||
</syntaxhighlight> | |||
|} | |||
If you had a program running or were logged into <span class="code">vm03-win7</span> over [[RDP]] or similar, you would have noticed no interruptions. | |||
So now we'll pull it back. | |||
{|class="wikitable" | |||
!<span class="code">an-a05n01</span> | |||
|style="white-space: nowrap;"|<syntaxhighlight lang="bash"> | |||
clusvcadm -M vm:vm03-win7 -m an-a05n01.alteeve.ca | |||
</syntaxhighlight> | |||
<syntaxhighlight lang="text"> | |||
Trying to migrate vm:vm03-win7 to an-a05n01.alteeve.ca...Success | |||
</syntaxhighlight> | |||
|- | |||
!<span class="code">an-a05n02</span> | |||
|style="white-space: nowrap;"|<syntaxhighlight lang="bash"> | |||
clustat | |||
</syntaxhighlight> | |||
<syntaxhighlight lang="text"> | |||
Cluster Status for an-anvil-05 @ Mon Nov 18 14:59:18 2013 | |||
Member Status: Quorate | |||
Member Name ID Status | |||
------ ---- ---- ------ | |||
an-a05n01.alteeve.ca 1 Online, rgmanager | |||
an-a05n02.alteeve.ca 2 Online, Local, rgmanager | |||
Service Name Owner (Last) State | |||
------- ---- ----- ------ ----- | |||
service:libvirtd_n01 an-a05n01.alteeve.ca started | |||
service:libvirtd_n02 an-a05n02.alteeve.ca started | |||
service:storage_n01 an-a05n01.alteeve.ca started | |||
service:storage_n02 an-a05n02.alteeve.ca started | |||
vm:vm01-win2008 an-a05n01.alteeve.ca started | |||
vm:vm02-win2012 an-a05n02.alteeve.ca started | |||
vm:vm03-win7 an-a05n01.alteeve.ca started | |||
</syntaxhighlight> | |||
|} | |||
Once again, we'll confirm with <span class="code">virsh</span>. | |||
{|class="wikitable" | |||
!<span class="code">an-a05n01</span> | |||
|style="white-space: nowrap;"|<syntaxhighlight lang="bash"> | |||
virsh list --all | |||
</syntaxhighlight> | |||
<syntaxhighlight lang="text"> | |||
Id Name State | |||
---------------------------------------------------- | |||
2 vm01-win2008 running | |||
5 vm03-win7 running | |||
</syntaxhighlight> | |||
|- | |||
!<span class="code">an-a05n02</span> | |||
|style="white-space: nowrap;"|<syntaxhighlight lang="bash"> | |||
virsh list --all | |||
</syntaxhighlight> | |||
<syntaxhighlight lang="text"> | |||
Id Name State | |||
---------------------------------------------------- | |||
3 vm02-win2012 running | |||
</syntaxhighlight> | |||
|} | |||
Perfect! | |||
== Making vm04-win8 a Highly Available Service == | |||
{{note|1=If you skipped adding <span class="code">vm01-win2008</span> to the cluster manager, please [[#Making_vm01-win2008_a_Highly_Available_Service|jump back]] and review the steps there. Particularly on creating the new failover domains and SELinux fix.}} | |||
It's time to add <span class="code">[[#Provisioning_vm04-win8|vm04-win8]]</span> to the cluster's management. | |||
=== Dumping the vm04-win8 XML Definition File === | |||
As we did with the previous servers, we need to dump <span class="code">vm04-win8</span>'s [[XML]] definition out to a file in <span class="code">/shared/definitions</span>. | |||
First, let's use <span class="code">virsh</span> to see the server's state. | |||
{|class="wikitable" | |||
!<span class="code">an-a05n01</span> | |||
|style="white-space: nowrap;"|<syntaxhighlight lang="bash"> | |||
virsh list --all | |||
</syntaxhighlight> | |||
<syntaxhighlight lang="text"> | |||
Id Name State | |||
---------------------------------------------------- | |||
2 vm01-win2008 running | |||
5 vm03-win7 running | |||
7 vm04-win8 running | |||
</syntaxhighlight> | |||
|- | |||
!<span class="code">an-a05n02</span> | |||
|style="white-space: nowrap;"|<syntaxhighlight lang="bash"> | |||
virsh list --all | |||
</syntaxhighlight> | |||
<syntaxhighlight lang="text"> | |||
Id Name State | |||
---------------------------------------------------- | |||
5 vm02-win2012 running | |||
</syntaxhighlight> | |||
|} | |||
So we see that <span class="code">vm04-win8</span> is running on <span class="code">an-a05n01</span>, which is where we provisioned it. | |||
Now dump the server's XML. | |||
{|class="wikitable" | |||
!<span class="code">an-a05n01</span> | |||
|style="white-space: nowrap;"|<syntaxhighlight lang="bash"> | |||
virsh dumpxml vm04-win8 > /shared/definitions/vm04-win8.xml | |||
ls -lah /shared/definitions/vm04-win8.xml | |||
</syntaxhighlight> | |||
<syntaxhighlight lang="text"> | |||
-rw-r--r--. 1 root root 3.3K Nov 18 15:24 /shared/definitions/vm04-win8.xml | |||
</syntaxhighlight> | |||
|} | |||
{{warning|1=Be sure the XML file was written properly! This next step will remove the server from <span class="code">libvirtd</span>. Once done, the <span class="code">/shared/definitions/vm04-win8.xml</span> will be the only way to boot the server!}} | |||
The last step is, again, to remove <span class="code">vm04-win8</span> from <span class="code">libvirtd</span>. | |||
{|class="wikitable" | |||
!<span class="code">an-a05n02</span> | |||
|style="white-space: nowrap;"|<syntaxhighlight lang="bash"> | |||
virsh undefine vm04-win8 | |||
</syntaxhighlight> | |||
<syntaxhighlight lang="text"> | |||
Domain vm04-win8 has been undefined | |||
</syntaxhighlight> | |||
|} | |||
Done. | |||
=== Creating the vm:vm04-win8 Service === | |||
As we did for <span class="code">vm01-win2008</span>, we will create a <span class="code">vm</span> service entry for <span class="code">vm04-win8</span>. This server is assigned to <span class="code">an-a05n01</span>, so we will use the <span class="code">primary_n01</span> failover. | |||
Lets increment the version to <span class="code">15</span> and add the new entry. | |||
{|class="wikitable" | |||
!<span class="code">an-a05n01</span> | |||
|style="white-space: nowrap;"|<syntaxhighlight lang="xml"> | |||
<rm log_level="5"> | |||
... | |||
<vm name="vm04-win8" domain="primary_n01" autostart="0" path="/shared/definitions/" exclusive="0" recovery="restart" max_restarts="2" restart_expire_time="600"> | |||
<action name="stop" timeout="30m" /> | |||
</vm> | |||
</rm> | |||
</syntaxhighlight> | |||
|} | |||
Making the new <span class="code">cluster.conf</span> as we see it below. | |||
{|class="wikitable" | |||
!<span class="code">an-a05n01</span> | |||
|style="white-space: nowrap;"|<syntaxhighlight lang="xml"> | |||
<?xml version="1.0"?> | |||
<cluster name="an-anvil-05" config_version="15"> | |||
<cman expected_votes="1" two_node="1" /> | |||
<clusternodes> | |||
<clusternode name="an-a05n01.alteeve.ca" nodeid="1"> | |||
<fence> | |||
<method name="ipmi"> | |||
<device name="ipmi_n01" action="reboot" delay="15" /> | |||
</method> | |||
<method name="pdu"> | |||
<device name="pdu1" port="1" action="reboot" /> | |||
<device name="pdu2" port="1" action="reboot" /> | |||
</method> | |||
</fence> | |||
</clusternode> | |||
<clusternode name="an-a05n02.alteeve.ca" nodeid="2"> | |||
<fence> | |||
<method name="ipmi"> | |||
<device name="ipmi_n02" action="reboot" /> | |||
</method> | |||
<method name="pdu"> | |||
<device name="pdu1" port="2" action="reboot" /> | |||
<device name="pdu2" port="2" action="reboot" /> | |||
</method> | |||
</fence> | |||
</clusternode> | |||
</clusternodes> | |||
<fencedevices> | |||
<fencedevice name="ipmi_n01" agent="fence_ipmilan" ipaddr="an-a05n01.ipmi" login="admin" passwd="secret" /> | |||
<fencedevice name="ipmi_n02" agent="fence_ipmilan" ipaddr="an-a05n02.ipmi" login="admin" passwd="secret" /> | |||
<fencedevice agent="fence_apc_snmp" ipaddr="an-pdu01.alteeve.ca" name="pdu1" /> | |||
<fencedevice agent="fence_apc_snmp" ipaddr="an-pdu02.alteeve.ca" name="pdu2" /> | |||
</fencedevices> | |||
<fence_daemon post_join_delay="30" /> | |||
<totem rrp_mode="none" secauth="off"/> | |||
<rm log_level="5"> | |||
<resources> | |||
<script file="/etc/init.d/drbd" name="drbd"/> | |||
<script file="/etc/init.d/clvmd" name="clvmd"/> | |||
<clusterfs device="/dev/an-a05n01_vg0/shared" force_unmount="1" fstype="gfs2" mountpoint="/shared" name="sharedfs" /> | |||
<script file="/etc/init.d/libvirtd" name="libvirtd"/> | |||
</resources> | |||
<failoverdomains> | |||
<failoverdomain name="only_n01" nofailback="1" ordered="0" restricted="1"> | |||
<failoverdomainnode name="an-a05n01.alteeve.ca"/> | |||
</failoverdomain> | |||
<failoverdomain name="only_n02" nofailback="1" ordered="0" restricted="1"> | |||
<failoverdomainnode name="an-a05n02.alteeve.ca"/> | |||
</failoverdomain> | |||
<failoverdomain name="primary_n01" nofailback="1" ordered="1" restricted="1"> | |||
<failoverdomainnode name="an-a05n01.alteeve.ca" priority="1"/> | |||
<failoverdomainnode name="an-a05n02.alteeve.ca" priority="2"/> | |||
</failoverdomain> | |||
<failoverdomain name="primary_n02" nofailback="1" ordered="1" restricted="1"> | |||
<failoverdomainnode name="an-a05n01.alteeve.ca" priority="2"/> | |||
<failoverdomainnode name="an-a05n02.alteeve.ca" priority="1"/> | |||
</failoverdomain> | |||
</failoverdomains> | |||
<service name="storage_n01" autostart="1" domain="only_n01" exclusive="0" recovery="restart"> | |||
<script ref="drbd"> | |||
<script ref="clvmd"> | |||
<clusterfs ref="sharedfs"/> | |||
</script> | |||
</script> | |||
</service> | |||
<service name="storage_n02" autostart="1" domain="only_n02" exclusive="0" recovery="restart"> | |||
<script ref="drbd"> | |||
<script ref="clvmd"> | |||
<clusterfs ref="sharedfs"/> | |||
</script> | |||
</script> | |||
</service> | |||
<service name="libvirtd_n01" autostart="1" domain="only_n01" exclusive="0" recovery="restart"> | |||
<script ref="libvirtd"/> | |||
</service> | |||
<service name="libvirtd_n02" autostart="1" domain="only_n02" exclusive="0" recovery="restart"> | |||
<script ref="libvirtd"/> | |||
</service> | |||
<vm name="vm01-win2008" domain="primary_n01" autostart="0" path="/shared/definitions/" exclusive="0" recovery="restart" max_restarts="2" restart_expire_time="600"> | |||
<action name="stop" timeout="30m" /> | |||
</vm> | |||
<vm name="vm02-win2012" domain="primary_n02" autostart="0" path="/shared/definitions/" exclusive="0" recovery="restart" max_restarts="2" restart_expire_time="600"> | |||
<action name="stop" timeout="30m" /> | |||
</vm> | |||
<vm name="vm03-win7" domain="primary_n01" autostart="0" path="/shared/definitions/" exclusive="0" recovery="restart" max_restarts="2" restart_expire_time="600"> | |||
<action name="stop" timeout="30m" /> | |||
</vm> | |||
<vm name="vm04-win8" domain="primary_n01" autostart="0" path="/shared/definitions/" exclusive="0" recovery="restart" max_restarts="2" restart_expire_time="600"> | |||
<action name="stop" timeout="30m" /> | |||
</vm> | |||
</rm> | |||
</cluster> | |||
</syntaxhighlight> | |||
|} | |||
Now let's activate the new configuration. | |||
{|class="wikitable" | |||
!<span class="code">an-a05n01</span> | |||
|style="white-space: nowrap;"|<syntaxhighlight lang="bash"> | |||
ccs_config_validate | |||
</syntaxhighlight> | |||
<syntaxhighlight lang="text"> | |||
Configuration validates | |||
</syntaxhighlight> | |||
<syntaxhighlight lang="bash"> | |||
cman_tool version | |||
</syntaxhighlight> | |||
<syntaxhighlight lang="text"> | |||
6.2.0 config 14 | |||
</syntaxhighlight> | |||
<syntaxhighlight lang="bash"> | |||
cman_tool version -r | |||
cman_tool version | |||
</syntaxhighlight> | |||
<syntaxhighlight lang="text"> | |||
6.2.0 config 15 | |||
</syntaxhighlight> | |||
|- | |||
!<span class="code">an-a05n02</span> | |||
|style="white-space: nowrap;"|<syntaxhighlight lang="bash"> | |||
cman_tool version | |||
</syntaxhighlight> | |||
<syntaxhighlight lang="text"> | |||
6.2.0 config 15 | |||
</syntaxhighlight> | |||
|} | |||
Let's take a look at <span class="code">clustat</span> on both nodes now. | |||
{|class="wikitable" | |||
!<span class="code">an-a05n01</span> | |||
|style="white-space: nowrap;"|<syntaxhighlight lang="bash"> | |||
clustat | |||
</syntaxhighlight> | |||
<syntaxhighlight lang="text"> | |||
Cluster Status for an-anvil-05 @ Mon Nov 18 15:25:27 2013 | |||
Member Status: Quorate | |||
Member Name ID Status | |||
------ ---- ---- ------ | |||
an-a05n01.alteeve.ca 1 Online, Local, rgmanager | |||
an-a05n02.alteeve.ca 2 Online, rgmanager | |||
Service Name Owner (Last) State | |||
------- ---- ----- ------ ----- | |||
service:libvirtd_n01 an-a05n01.alteeve.ca started | |||
service:libvirtd_n02 an-a05n02.alteeve.ca started | |||
service:storage_n01 an-a05n01.alteeve.ca started | |||
service:storage_n02 an-a05n02.alteeve.ca started | |||
vm:vm01-win2008 an-a05n01.alteeve.ca started | |||
vm:vm02-win2012 an-a05n02.alteeve.ca started | |||
vm:vm03-win7 an-a05n01.alteeve.ca started | |||
vm:vm04-win8 (none) disabled | |||
</syntaxhighlight> | |||
|- | |||
!<span class="code">an-a05n02</span> | |||
|style="white-space: nowrap;"|<syntaxhighlight lang="bash"> | |||
clustat | |||
</syntaxhighlight> | |||
<syntaxhighlight lang="text"> | |||
Cluster Status for an-anvil-05 @ Mon Nov 18 15:25:27 2013 | |||
Member Status: Quorate | |||
Member Name ID Status | |||
------ ---- ---- ------ | |||
an-a05n01.alteeve.ca 1 Online, rgmanager | |||
an-a05n02.alteeve.ca 2 Online, Local, rgmanager | |||
Service Name Owner (Last) State | |||
------- ---- ----- ------ ----- | |||
service:libvirtd_n01 an-a05n01.alteeve.ca started | |||
service:libvirtd_n02 an-a05n02.alteeve.ca started | |||
service:storage_n01 an-a05n01.alteeve.ca started | |||
service:storage_n02 an-a05n02.alteeve.ca started | |||
vm:vm01-win2008 an-a05n01.alteeve.ca started | |||
vm:vm02-win2012 an-a05n02.alteeve.ca started | |||
vm:vm03-win7 an-a05n01.alteeve.ca started | |||
vm:vm04-win8 (none) disabled | |||
</syntaxhighlight> | |||
|} | |||
As expected, <span class="code">vm:vm04-win8</span> is <span class="code">disabled</span>. Verify that it is still running on <span class="code">an-a05n01</span>. | |||
{|class="wikitable" | |||
!<span class="code">an-a05n01</span> | |||
|style="white-space: nowrap;"|<syntaxhighlight lang="bash"> | |||
virsh list --all | |||
</syntaxhighlight> | |||
<syntaxhighlight lang="text"> | |||
Id Name State | |||
---------------------------------------------------- | |||
2 vm01-win2008 running | |||
5 vm03-win7 running | |||
7 vm04-win8 running | |||
</syntaxhighlight> | |||
|- | |||
!<span class="code">an-a05n02</span> | |||
|style="white-space: nowrap;"|<syntaxhighlight lang="bash"> | |||
virsh list --all | |||
</syntaxhighlight> | |||
<syntaxhighlight lang="text"> | |||
Id Name State | |||
---------------------------------------------------- | |||
5 vm02-win2012 running | |||
</syntaxhighlight> | |||
|} | |||
Confirmed, <span class="code">vm04-win8</span> is on <span class="code">an-a05n01</span>. | |||
As we did before, we'll use <span class="code">clusvcadm</span> to <span class="code">enable</span> the <span class="code">vm:vm04-win8</span> service on the <span class="code">an-a05n01.alteeve.ca</span> cluster member. | |||
{|class="wikitable" | |||
!<span class="code">an-a05n01</span> | |||
|style="white-space: nowrap;"|<syntaxhighlight lang="bash"> | |||
clusvcadm -e vm:vm04-win8 -m an-a05n01.alteeve.ca | |||
</syntaxhighlight> | |||
<syntaxhighlight lang="text"> | |||
Member an-a05n01.alteeve.ca trying to enable vm:vm04-win8...Success | |||
vm:vm04-win8 is now running on an-a05n01.alteeve.ca | |||
</syntaxhighlight> | |||
|- | |||
!<span class="code">an-a05n02</span> | |||
|style="white-space: nowrap;"|<syntaxhighlight lang="bash"> | |||
clustat | |||
</syntaxhighlight> | |||
<syntaxhighlight lang="text"> | |||
Cluster Status for an-anvil-05 @ Mon Nov 18 15:26:26 2013 | |||
Member Status: Quorate | |||
Member Name ID Status | |||
------ ---- ---- ------ | |||
an-a05n01.alteeve.ca 1 Online, rgmanager | |||
an-a05n02.alteeve.ca 2 Online, Local, rgmanager | |||
Service Name Owner (Last) State | |||
------- ---- ----- ------ ----- | |||
service:libvirtd_n01 an-a05n01.alteeve.ca started | |||
service:libvirtd_n02 an-a05n02.alteeve.ca started | |||
service:storage_n01 an-a05n01.alteeve.ca started | |||
service:storage_n02 an-a05n02.alteeve.ca started | |||
vm:vm01-win2008 an-a05n01.alteeve.ca started | |||
vm:vm02-win2012 an-a05n02.alteeve.ca started | |||
vm:vm03-win7 an-a05n01.alteeve.ca started | |||
vm:vm04-win8 an-a05n01.alteeve.ca started | |||
</syntaxhighlight> | |||
|} | |||
Done! | |||
Now, should <span class="code">vm04-win8</span> fail or if <span class="code">an-a05n01</span> should fail, the ''Anvil!'' will recover it automatically. | |||
=== Testing vm04-win8 Management With clusvcadm === | |||
The first thing we're going to do is disable (gracefully shut down) the server. To do this, we'll send an [[ACPI]] "power button" event to <span class="code">vm04-win8</span>. Windows 2012 will, like most operating systems, respond to having its "power button pressed" by beginning a graceful shut down. | |||
As always, start by checking the state of things. | |||
{|class="wikitable" | |||
!<span class="code">an-a05n01</span> | |||
|style="white-space: nowrap;"|<syntaxhighlight lang="bash"> | |||
clustat | |||
</syntaxhighlight> | |||
<syntaxhighlight lang="text"> | |||
Cluster Status for an-anvil-05 @ Mon Nov 18 15:26:39 2013 | |||
Member Status: Quorate | |||
Member Name ID Status | |||
------ ---- ---- ------ | |||
an-a05n01.alteeve.ca 1 Online, Local, rgmanager | |||
an-a05n02.alteeve.ca 2 Online, rgmanager | |||
Service Name Owner (Last) State | |||
------- ---- ----- ------ ----- | |||
service:libvirtd_n01 an-a05n01.alteeve.ca started | |||
service:libvirtd_n02 an-a05n02.alteeve.ca started | |||
service:storage_n01 an-a05n01.alteeve.ca started | |||
service:storage_n02 an-a05n02.alteeve.ca started | |||
vm:vm01-win2008 an-a05n01.alteeve.ca started | |||
vm:vm02-win2012 an-a05n02.alteeve.ca started | |||
vm:vm03-win7 an-a05n01.alteeve.ca started | |||
vm:vm04-win8 an-a05n01.alteeve.ca started | |||
</syntaxhighlight> | |||
|} | |||
As we expected. | |||
{|class="wikitable" | |||
!<span class="code">an-a05n01</span> | |||
|style="white-space: nowrap;"|<syntaxhighlight lang="bash"> | |||
clusvcadm -d vm:vm04-win8 | |||
</syntaxhighlight> | |||
<syntaxhighlight lang="text"> | |||
Local machine disabling vm:vm04-win8...Success | |||
</syntaxhighlight> | |||
|} | |||
If we check <span class="code">clustat</span> again, we'll see that the <span class="code">vm:vm04-win8</span> service is indeed <span class="code">disabled</span>. | |||
{|class="wikitable" | |||
!<span class="code">an-a05n02</span> | |||
|style="white-space: nowrap;"|<syntaxhighlight lang="bash"> | |||
clustat | |||
</syntaxhighlight> | |||
<syntaxhighlight lang="text"> | |||
Cluster Status for an-anvil-05 @ Mon Nov 18 15:32:06 2013 | |||
Member Status: Quorate | |||
Member Name ID Status | |||
------ ---- ---- ------ | |||
an-a05n01.alteeve.ca 1 Online, rgmanager | |||
an-a05n02.alteeve.ca 2 Online, Local, rgmanager | |||
Service Name Owner (Last) State | |||
------- ---- ----- ------ ----- | |||
service:libvirtd_n01 an-a05n01.alteeve.ca started | |||
service:libvirtd_n02 an-a05n02.alteeve.ca started | |||
service:storage_n01 an-a05n01.alteeve.ca started | |||
service:storage_n02 an-a05n02.alteeve.ca started | |||
vm:vm01-win2008 an-a05n01.alteeve.ca started | |||
vm:vm02-win2012 an-a05n02.alteeve.ca started | |||
vm:vm03-win7 an-a05n01.alteeve.ca started | |||
vm:vm04-win8 (an-a05n01.alteeve.ca) disabled | |||
</syntaxhighlight> | |||
|} | |||
Good, it's off. Let's turn it back on now. | |||
{|class="wikitable" | |||
!<span class="code">an-a05n01</span> | |||
|style="white-space: nowrap;"|<syntaxhighlight lang="bash"> | |||
clusvcadm -F -e vm:vm04-win8 | |||
</syntaxhighlight> | |||
<syntaxhighlight lang="text"> | |||
Local machine trying to enable vm:vm04-win8...Success | |||
vm:vm04-win8 is now running on an-a05n01.alteeve.ca | |||
</syntaxhighlight> | |||
|- | |||
!<span class="code">an-a05n02</span> | |||
|style="white-space: nowrap;"|<syntaxhighlight lang="bash"> | |||
clustat | |||
</syntaxhighlight> | |||
<syntaxhighlight lang="text"> | |||
Cluster Status for an-anvil-05 @ Mon Nov 18 15:32:22 2013 | |||
Member Status: Quorate | |||
Member Name ID Status | |||
------ ---- ---- ------ | |||
an-a05n01.alteeve.ca 1 Online, rgmanager | |||
an-a05n02.alteeve.ca 2 Online, Local, rgmanager | |||
Service Name Owner (Last) State | |||
------- ---- ----- ------ ----- | |||
service:libvirtd_n01 an-a05n01.alteeve.ca started | |||
service:libvirtd_n02 an-a05n02.alteeve.ca started | |||
service:storage_n01 an-a05n01.alteeve.ca started | |||
service:storage_n02 an-a05n02.alteeve.ca started | |||
vm:vm01-win2008 an-a05n01.alteeve.ca started | |||
vm:vm02-win2012 an-a05n02.alteeve.ca started | |||
vm:vm03-win7 an-a05n01.alteeve.ca started | |||
vm:vm04-win8 an-a05n01.alteeve.ca started | |||
</syntaxhighlight> | |||
|} | |||
One last step; Testing live migration! We'll push <span class="code">vm04-win8</span> over to <span class="code">an-a05n02</span> and then pull it back again. | |||
{|class="wikitable" | |||
!<span class="code">an-a05n01</span> | |||
|style="white-space: nowrap;"|<syntaxhighlight lang="bash"> | |||
clusvcadm -M vm:vm04-win8 -m an-a05n02.alteeve.ca | |||
</syntaxhighlight> | |||
<syntaxhighlight lang="text"> | |||
Trying to migrate vm:vm04-win8 to an-a05n02.alteeve.ca...Success | |||
</syntaxhighlight> | |||
|- | |||
!<span class="code">an-a05n02</span> | |||
|style="white-space: nowrap;"|<syntaxhighlight lang="bash"> | |||
clustat | |||
</syntaxhighlight> | |||
<syntaxhighlight lang="text"> | |||
Cluster Status for an-anvil-05 @ Mon Nov 18 15:34:15 2013 | |||
Member Status: Quorate | |||
Member Name ID Status | |||
------ ---- ---- ------ | |||
an-a05n01.alteeve.ca 1 Online, rgmanager | |||
an-a05n02.alteeve.ca 2 Online, Local, rgmanager | |||
Service Name Owner (Last) State | |||
------- ---- ----- ------ ----- | |||
service:libvirtd_n01 an-a05n01.alteeve.ca started | |||
service:libvirtd_n02 an-a05n02.alteeve.ca started | |||
service:storage_n01 an-a05n01.alteeve.ca started | |||
service:storage_n02 an-a05n02.alteeve.ca started | |||
vm:vm01-win2008 an-a05n01.alteeve.ca started | |||
vm:vm02-win2012 an-a05n02.alteeve.ca started | |||
vm:vm03-win7 an-a05n01.alteeve.ca started | |||
vm:vm04-win8 an-a05n02.alteeve.ca started | |||
</syntaxhighlight> | |||
|} | |||
If we use <span class="code">virsh</span>, we can confirm that <span class="code">vm04-win8</span> has, in fact, moved over to <span class="code">an-a05n02</span>. | |||
{|class="wikitable" | |||
!<span class="code">an-a05n01</span> | |||
|style="white-space: nowrap;"|<syntaxhighlight lang="bash"> | |||
virsh list --all | |||
</syntaxhighlight> | |||
<syntaxhighlight lang="text"> | |||
Id Name State | |||
---------------------------------------------------- | |||
2 vm01-win2008 running | |||
5 vm03-win7 running | |||
</syntaxhighlight> | |||
|- | |||
!<span class="code">an-a05n02</span> | |||
|style="white-space: nowrap;"|<syntaxhighlight lang="bash"> | |||
virsh list --all | |||
</syntaxhighlight> | |||
<syntaxhighlight lang="text"> | |||
Id Name State | |||
---------------------------------------------------- | |||
5 vm02-win2012 running | |||
7 vm04-win8 running | |||
</syntaxhighlight> | |||
|} | |||
If you had a program running or were logged into <span class="code">vm04-win8</span> over [[RDP]] or similar, you would have noticed no interruptions. | |||
So now we'll pull it back. | |||
{|class="wikitable" | |||
!<span class="code">an-a05n01</span> | |||
|style="white-space: nowrap;"|<syntaxhighlight lang="bash"> | |||
clusvcadm -M vm:vm04-win8 -m an-a05n01.alteeve.ca | |||
</syntaxhighlight> | |||
<syntaxhighlight lang="text"> | |||
Trying to migrate vm:vm04-win8 to an-a05n01.alteeve.ca...Success | |||
</syntaxhighlight> | |||
|- | |||
!<span class="code">an-a05n02</span> | |||
|style="white-space: nowrap;"|<syntaxhighlight lang="bash"> | |||
clustat | |||
</syntaxhighlight> | |||
<syntaxhighlight lang="text"> | |||
Cluster Status for an-anvil-05 @ Mon Nov 18 15:35:11 2013 | |||
Member Status: Quorate | |||
Member Name ID Status | |||
------ ---- ---- ------ | |||
an-a05n01.alteeve.ca 1 Online, rgmanager | |||
an-a05n02.alteeve.ca 2 Online, Local, rgmanager | |||
Service Name Owner (Last) State | |||
------- ---- ----- ------ ----- | |||
service:libvirtd_n01 an-a05n01.alteeve.ca started | |||
service:libvirtd_n02 an-a05n02.alteeve.ca started | |||
service:storage_n01 an-a05n01.alteeve.ca started | |||
service:storage_n02 an-a05n02.alteeve.ca started | |||
vm:vm01-win2008 an-a05n01.alteeve.ca started | |||
vm:vm02-win2012 an-a05n02.alteeve.ca started | |||
vm:vm03-win7 an-a05n01.alteeve.ca started | |||
vm:vm04-win8 an-a05n01.alteeve.ca started | |||
</syntaxhighlight> | |||
|} | |||
Once again, we'll confirm with <span class="code">virsh</span>. | |||
{|class="wikitable" | |||
!<span class="code">an-a05n01</span> | |||
|style="white-space: nowrap;"|<syntaxhighlight lang="bash"> | |||
virsh list --all | |||
</syntaxhighlight> | |||
<syntaxhighlight lang="text"> | |||
Id Name State | |||
---------------------------------------------------- | |||
2 vm01-win2008 running | |||
5 vm03-win7 running | |||
9 vm04-win8 running | |||
</syntaxhighlight> | |||
|- | |||
!<span class="code">an-a05n02</span> | |||
|style="white-space: nowrap;"|<syntaxhighlight lang="bash"> | |||
virsh list --all | |||
</syntaxhighlight> | |||
<syntaxhighlight lang="text"> | |||
Id Name State | |||
---------------------------------------------------- | |||
5 vm02-win2012 running | |||
</syntaxhighlight> | |||
|} | |||
Perfect! | |||
== Making vm05-freebsd9 a Highly Available Service == | |||
{{note|1=If you skipped adding <span class="code">vm01-win2008</span> to the cluster manager, please [[#Making_vm01-win2008_a_Highly_Available_Service|jump back]] and review the steps there. Particularly on creating the new failover domains and SELinux fix.}} | |||
It's time to add <span class="code">[[#Provisioning_vm05-freebsd9|vm05-freebsd9]]</span> to the cluster's management. This will be a little different from the windows installs we've done up until now. | |||
=== Dumping the vm05-freebsd9 XML Definition File === | |||
As we did with the previous servers, we need to dump <span class="code">vm05-freebsd9</span>'s [[XML]] definition out to a file in <span class="code">/shared/definitions</span>. | |||
First, let's use <span class="code">virsh</span> to see the server's state. | |||
{|class="wikitable" | |||
!<span class="code">an-a05n01</span> | |||
|style="white-space: nowrap;"|<syntaxhighlight lang="bash"> | |||
virsh list --all | |||
</syntaxhighlight> | |||
<syntaxhighlight lang="text"> | |||
Id Name State | |||
---------------------------------------------------- | |||
2 vm01-win2008 running | |||
5 vm03-win7 running | |||
9 vm04-win8 running | |||
</syntaxhighlight> | |||
|- | |||
!<span class="code">an-a05n02</span> | |||
|style="white-space: nowrap;"|<syntaxhighlight lang="bash"> | |||
virsh list --all | |||
</syntaxhighlight> | |||
<syntaxhighlight lang="text"> | |||
Id Name State | |||
---------------------------------------------------- | |||
5 vm02-win2012 running | |||
9 vm05-freebsd9 running | |||
</syntaxhighlight> | |||
|} | |||
So we see that <span class="code">vm05-freebsd9</span> is running on <span class="code">an-a05n02</span>, which is where we provisioned it. | |||
Now dump the server's XML. | |||
{|class="wikitable" | |||
!<span class="code">an-a05n02</span> | |||
|style="white-space: nowrap;"|<syntaxhighlight lang="bash"> | |||
virsh dumpxml vm05-freebsd9 > /shared/definitions/vm05-freebsd9.xml | |||
ls -lah /shared/definitions/vm05-freebsd9.xml | |||
</syntaxhighlight> | |||
<syntaxhighlight lang="text"> | |||
-rw-r--r--. 1 root root 2.8K Nov 19 12:29 /shared/definitions/vm05-freebsd9.xml | |||
</syntaxhighlight> | |||
|} | |||
{{warning|1=Be sure the XML file was written properly! This next step will remove the server from <span class="code">libvirtd</span>. Once done, the <span class="code">/shared/definitions/vm05-freebsd9.xml</span> will be the only way to boot the server!}} | |||
The last step is, again, to remove <span class="code">vm05-freebsd9</span> from <span class="code">libvirtd</span>. | |||
{|class="wikitable" | |||
!<span class="code">an-a05n02</span> | |||
|style="white-space: nowrap;"|<syntaxhighlight lang="bash"> | |||
virsh undefine vm05-freebsd9 | |||
</syntaxhighlight> | |||
<syntaxhighlight lang="text"> | |||
Domain vm05-freebsd9 has been undefined | |||
</syntaxhighlight> | |||
|} | |||
Done. | |||
=== Creating the vm:vm05-freebsd9 Service === | |||
As we did for the previous servers, we will create a <span class="code">vm</span> service entry for <span class="code">vm05-freebsd9</span> under the <span class="code">primary_n02</span> failover domain. | |||
Lets increment the version to <span class="code">16</span> and add the new entry. | |||
One major difference this time is that we will not alter the shut down timer. The default of two minutes is fine for non-Microsoft servers. | |||
{|class="wikitable" | |||
!<span class="code">an-a05n02</span> | |||
|style="white-space: nowrap;"|<syntaxhighlight lang="xml"> | |||
<rm log_level="5"> | |||
... | |||
<vm name="vm05-freebsd9" domain="primary_n02" autostart="0" path="/shared/definitions/" exclusive="0" recovery="restart" max_restarts="2" restart_expire_time="600"/> | |||
</rm> | |||
</syntaxhighlight> | |||
|} | |||
Making the new <span class="code">cluster.conf</span> as we see it below. | |||
{|class="wikitable" | |||
!<span class="code">an-a05n02</span> | |||
|style="white-space: nowrap;"|<syntaxhighlight lang="xml"> | |||
<?xml version="1.0"?> | |||
<cluster name="an-anvil-05" config_version="15"> | |||
<cman expected_votes="1" two_node="1" /> | |||
<clusternodes> | |||
<clusternode name="an-a05n01.alteeve.ca" nodeid="1"> | |||
<fence> | |||
<method name="ipmi"> | |||
<device name="ipmi_n01" action="reboot" delay="15" /> | |||
</method> | |||
<method name="pdu"> | |||
<device name="pdu1" port="1" action="reboot" /> | |||
<device name="pdu2" port="1" action="reboot" /> | |||
</method> | |||
</fence> | |||
</clusternode> | |||
<clusternode name="an-a05n02.alteeve.ca" nodeid="2"> | |||
<fence> | |||
<method name="ipmi"> | |||
<device name="ipmi_n02" action="reboot" /> | |||
</method> | |||
<method name="pdu"> | |||
<device name="pdu1" port="2" action="reboot" /> | |||
<device name="pdu2" port="2" action="reboot" /> | |||
</method> | |||
</fence> | |||
</clusternode> | |||
</clusternodes> | |||
<fencedevices> | |||
<fencedevice name="ipmi_n01" agent="fence_ipmilan" ipaddr="an-a05n01.ipmi" login="admin" passwd="secret" /> | |||
<fencedevice name="ipmi_n02" agent="fence_ipmilan" ipaddr="an-a05n02.ipmi" login="admin" passwd="secret" /> | |||
<fencedevice agent="fence_apc_snmp" ipaddr="an-pdu01.alteeve.ca" name="pdu1" /> | |||
<fencedevice agent="fence_apc_snmp" ipaddr="an-pdu02.alteeve.ca" name="pdu2" /> | |||
</fencedevices> | |||
<fence_daemon post_join_delay="30" /> | |||
<totem rrp_mode="none" secauth="off"/> | |||
<rm log_level="5"> | |||
<resources> | |||
<script file="/etc/init.d/drbd" name="drbd"/> | |||
<script file="/etc/init.d/clvmd" name="clvmd"/> | |||
<clusterfs device="/dev/an-a05n01_vg0/shared" force_unmount="1" fstype="gfs2" mountpoint="/shared" name="sharedfs" /> | |||
<script file="/etc/init.d/libvirtd" name="libvirtd"/> | |||
</resources> | |||
<failoverdomains> | |||
<failoverdomain name="only_n01" nofailback="1" ordered="0" restricted="1"> | |||
<failoverdomainnode name="an-a05n01.alteeve.ca"/> | |||
</failoverdomain> | |||
<failoverdomain name="only_n02" nofailback="1" ordered="0" restricted="1"> | |||
<failoverdomainnode name="an-a05n02.alteeve.ca"/> | |||
</failoverdomain> | |||
<failoverdomain name="primary_n01" nofailback="1" ordered="1" restricted="1"> | |||
<failoverdomainnode name="an-a05n01.alteeve.ca" priority="1"/> | |||
<failoverdomainnode name="an-a05n02.alteeve.ca" priority="2"/> | |||
</failoverdomain> | |||
<failoverdomain name="primary_n02" nofailback="1" ordered="1" restricted="1"> | |||
<failoverdomainnode name="an-a05n01.alteeve.ca" priority="2"/> | |||
<failoverdomainnode name="an-a05n02.alteeve.ca" priority="1"/> | |||
</failoverdomain> | |||
</failoverdomains> | |||
<service name="storage_n01" autostart="1" domain="only_n01" exclusive="0" recovery="restart"> | |||
<script ref="drbd"> | |||
<script ref="clvmd"> | |||
<clusterfs ref="sharedfs"/> | |||
</script> | |||
</script> | |||
</service> | |||
<service name="storage_n02" autostart="1" domain="only_n02" exclusive="0" recovery="restart"> | |||
<script ref="drbd"> | |||
<script ref="clvmd"> | |||
<clusterfs ref="sharedfs"/> | |||
</script> | |||
</script> | |||
</service> | |||
<service name="libvirtd_n01" autostart="1" domain="only_n01" exclusive="0" recovery="restart"> | |||
<script ref="libvirtd"/> | |||
</service> | |||
<service name="libvirtd_n02" autostart="1" domain="only_n02" exclusive="0" recovery="restart"> | |||
<script ref="libvirtd"/> | |||
</service> | |||
<vm name="vm01-win2008" domain="primary_n01" autostart="0" path="/shared/definitions/" exclusive="0" recovery="restart" max_restarts="2" restart_expire_time="600"> | |||
<action name="stop" timeout="30m" /> | |||
</vm> | |||
<vm name="vm02-win2012" domain="primary_n02" autostart="0" path="/shared/definitions/" exclusive="0" recovery="restart" max_restarts="2" restart_expire_time="600"> | |||
<action name="stop" timeout="30m" /> | |||
</vm> | |||
<vm name="vm03-win7" domain="primary_n01" autostart="0" path="/shared/definitions/" exclusive="0" recovery="restart" max_restarts="2" restart_expire_time="600"> | |||
<action name="stop" timeout="30m" /> | |||
</vm> | |||
<vm name="vm04-win8" domain="primary_n01" autostart="0" path="/shared/definitions/" exclusive="0" recovery="restart" max_restarts="2" restart_expire_time="600"> | |||
<action name="stop" timeout="30m" /> | |||
</vm> | |||
<vm name="vm05-freebsd9" domain="primary_n02" autostart="0" path="/shared/definitions/" exclusive="0" recovery="restart" max_restarts="2" restart_expire_time="600"/> | |||
</rm> | |||
</cluster> | |||
</syntaxhighlight> | |||
|} | |||
Now let's activate the new configuration. | |||
{|class="wikitable" | |||
!<span class="code">an-a05n02</span> | |||
|style="white-space: nowrap;"|<syntaxhighlight lang="bash"> | |||
ccs_config_validate | |||
</syntaxhighlight> | |||
<syntaxhighlight lang="text"> | |||
Configuration validates | |||
</syntaxhighlight> | |||
<syntaxhighlight lang="bash"> | |||
cman_tool version | |||
</syntaxhighlight> | |||
<syntaxhighlight lang="text"> | |||
6.2.0 config 15 | |||
</syntaxhighlight> | |||
<syntaxhighlight lang="bash"> | |||
cman_tool version -r | |||
cman_tool version | |||
</syntaxhighlight> | |||
<syntaxhighlight lang="text"> | |||
6.2.0 config 16 | |||
</syntaxhighlight> | |||
|- | |||
!<span class="code">an-a05n01</span> | |||
|style="white-space: nowrap;"|<syntaxhighlight lang="bash"> | |||
cman_tool version | |||
</syntaxhighlight> | |||
<syntaxhighlight lang="text"> | |||
6.2.0 config 16 | |||
</syntaxhighlight> | |||
|} | |||
Let's take a look at <span class="code">clustat</span> on both nodes now. | |||
{|class="wikitable" | |||
!<span class="code">an-a05n01</span> | |||
|style="white-space: nowrap;"|<syntaxhighlight lang="bash"> | |||
clustat | |||
</syntaxhighlight> | |||
<syntaxhighlight lang="text"> | |||
Cluster Status for an-anvil-05 @ Tue Nov 19 12:54:26 2013 | |||
Member Status: Quorate | |||
Member Name ID Status | |||
------ ---- ---- ------ | |||
an-a05n01.alteeve.ca 1 Online, Local, rgmanager | |||
an-a05n02.alteeve.ca 2 Online, rgmanager | |||
Service Name Owner (Last) State | |||
------- ---- ----- ------ ----- | |||
service:libvirtd_n01 an-a05n01.alteeve.ca started | |||
service:libvirtd_n02 an-a05n02.alteeve.ca started | |||
service:storage_n01 an-a05n01.alteeve.ca started | |||
service:storage_n02 an-a05n02.alteeve.ca started | |||
vm:vm01-win2008 an-a05n01.alteeve.ca started | |||
vm:vm02-win2012 an-a05n02.alteeve.ca started | |||
vm:vm03-win7 an-a05n01.alteeve.ca started | |||
vm:vm04-win8 an-a05n01.alteeve.ca started | |||
vm:vm05-freebsd9 (none) disabled | |||
</syntaxhighlight> | |||
|- | |||
!<span class="code">an-a05n02</span> | |||
|style="white-space: nowrap;"|<syntaxhighlight lang="bash"> | |||
clustat | |||
</syntaxhighlight> | |||
<syntaxhighlight lang="text"> | |||
Cluster Status for an-anvil-05 @ Tue Nov 19 12:54:27 2013 | |||
Member Status: Quorate | |||
Member Name ID Status | |||
------ ---- ---- ------ | |||
an-a05n01.alteeve.ca 1 Online, rgmanager | |||
an-a05n02.alteeve.ca 2 Online, Local, rgmanager | |||
Service Name Owner (Last) State | |||
------- ---- ----- ------ ----- | |||
service:libvirtd_n01 an-a05n01.alteeve.ca started | |||
service:libvirtd_n02 an-a05n02.alteeve.ca started | |||
service:storage_n01 an-a05n01.alteeve.ca started | |||
service:storage_n02 an-a05n02.alteeve.ca started | |||
vm:vm01-win2008 an-a05n01.alteeve.ca started | |||
vm:vm02-win2012 an-a05n02.alteeve.ca started | |||
vm:vm03-win7 an-a05n01.alteeve.ca started | |||
vm:vm04-win8 an-a05n01.alteeve.ca started | |||
vm:vm05-freebsd9 (none) disabled | |||
</syntaxhighlight> | |||
|} | |||
As expected, <span class="code">vm:vm05-freebsd9</span> is <span class="code">disabled</span>. Verify that it is still running on <span class="code">an-a05n02</span>. | |||
{|class="wikitable" | |||
!<span class="code">an-a05n01</span> | |||
|style="white-space: nowrap;"|<syntaxhighlight lang="bash"> | |||
virsh list --all | |||
</syntaxhighlight> | |||
<syntaxhighlight lang="text"> | |||
Id Name State | |||
---------------------------------------------------- | |||
2 vm01-win2008 running | |||
5 vm03-win7 running | |||
9 vm04-win8 running | |||
</syntaxhighlight> | |||
|- | |||
!<span class="code">an-a05n02</span> | |||
|style="white-space: nowrap;"|<syntaxhighlight lang="bash"> | |||
virsh list --all | |||
</syntaxhighlight> | |||
<syntaxhighlight lang="text"> | |||
Id Name State | |||
---------------------------------------------------- | |||
5 vm02-win2012 running | |||
9 vm05-freebsd9 running | |||
</syntaxhighlight> | |||
|} | |||
Confirmed, <span class="code">vm05-freebsd9</span> is on <span class="code">an-a05n02</span>. | |||
As we did before, we'll use <span class="code">clusvcadm</span> to <span class="code">enable</span> the <span class="code">vm:vm05-freebsd9</span> service on the <span class="code">an-a05n02.alteeve.ca</span> cluster member. | |||
{|class="wikitable" | |||
!<span class="code">an-a05n01</span> | |||
|style="white-space: nowrap;"|<syntaxhighlight lang="bash"> | |||
clusvcadm -e vm:vm05-freebsd9 -m an-a05n02.alteeve.ca | |||
</syntaxhighlight> | |||
<syntaxhighlight lang="text"> | |||
Member an-a05n02.alteeve.ca trying to enable vm:vm05-freebsd9...Success | |||
vm:vm05-freebsd9 is now running on an-a05n02.alteeve.ca | |||
</syntaxhighlight> | |||
|- | |||
!<span class="code">an-a05n02</span> | |||
|style="white-space: nowrap;"|<syntaxhighlight lang="bash"> | |||
clustat | |||
</syntaxhighlight> | |||
<syntaxhighlight lang="text"> | |||
Cluster Status for an-anvil-05 @ Tue Nov 19 12:56:03 2013 | |||
Member Status: Quorate | |||
Member Name ID Status | |||
------ ---- ---- ------ | |||
an-a05n01.alteeve.ca 1 Online, rgmanager | |||
an-a05n02.alteeve.ca 2 Online, Local, rgmanager | |||
Service Name Owner (Last) State | |||
------- ---- ----- ------ ----- | |||
service:libvirtd_n01 an-a05n01.alteeve.ca started | |||
service:libvirtd_n02 an-a05n02.alteeve.ca started | |||
service:storage_n01 an-a05n01.alteeve.ca started | |||
service:storage_n02 an-a05n02.alteeve.ca started | |||
vm:vm01-win2008 an-a05n01.alteeve.ca started | |||
vm:vm02-win2012 an-a05n02.alteeve.ca started | |||
vm:vm03-win7 an-a05n01.alteeve.ca started | |||
vm:vm04-win8 an-a05n01.alteeve.ca started | |||
vm:vm05-freebsd9 an-a05n02.alteeve.ca started | |||
</syntaxhighlight> | |||
|} | |||
Done! | |||
Now, should <span class="code">vm05-freebsd9</span> fail or if <span class="code">an-a05n01</span> should fail, the ''Anvil!'' will recover it automatically. | |||
=== Testing vm05-freebsd9 Management With clusvcadm === | |||
The first thing we're going to do is disable (gracefully shut down) the server. To do this, we'll send an [[ACPI]] "power button" event to <span class="code">vm05-freebsd9</span>. FreeBSD 9 will, like most operating systems, respond to having its "power button pressed" by beginning a graceful shut down. | |||
As always, start by checking the state of things. | |||
{|class="wikitable" | |||
!<span class="code">an-a05n01</span> | |||
|style="white-space: nowrap;"|<syntaxhighlight lang="bash"> | |||
clustat | |||
</syntaxhighlight> | |||
<syntaxhighlight lang="text"> | |||
Cluster Status for an-anvil-05 @ Tue Nov 19 12:57:09 2013 | |||
Member Status: Quorate | |||
Member Name ID Status | |||
------ ---- ---- ------ | |||
an-a05n01.alteeve.ca 1 Online, Local, rgmanager | |||
an-a05n02.alteeve.ca 2 Online, rgmanager | |||
Service Name Owner (Last) State | |||
------- ---- ----- ------ ----- | |||
service:libvirtd_n01 an-a05n01.alteeve.ca started | |||
service:libvirtd_n02 an-a05n02.alteeve.ca started | |||
service:storage_n01 an-a05n01.alteeve.ca started | |||
service:storage_n02 an-a05n02.alteeve.ca started | |||
vm:vm01-win2008 an-a05n01.alteeve.ca started | |||
vm:vm02-win2012 an-a05n02.alteeve.ca started | |||
vm:vm03-win7 an-a05n01.alteeve.ca started | |||
vm:vm04-win8 an-a05n01.alteeve.ca started | |||
vm:vm05-freebsd9 an-a05n02.alteeve.ca started | |||
</syntaxhighlight> | |||
|} | |||
As we expected. | |||
{|class="wikitable" | |||
!<span class="code">an-a05n01</span> | |||
|style="white-space: nowrap;"|<syntaxhighlight lang="bash"> | |||
clusvcadm -d vm:vm05-freebsd9 | |||
</syntaxhighlight> | |||
<syntaxhighlight lang="text"> | |||
Local machine disabling vm:vm05-freebsd9...Success | |||
</syntaxhighlight> | |||
|} | |||
If we check <span class="code">clustat</span> again, we'll see that the <span class="code">vm:vm05-freebsd9</span> service is indeed <span class="code">disabled</span>. | |||
{|class="wikitable" | |||
!<span class="code">an-a05n02</span> | |||
|style="white-space: nowrap;"|<syntaxhighlight lang="bash"> | |||
clustat | |||
</syntaxhighlight> | |||
<syntaxhighlight lang="text"> | |||
Cluster Status for an-anvil-05 @ Tue Nov 19 13:00:17 2013 | |||
Member Status: Quorate | |||
Member Name ID Status | |||
------ ---- ---- ------ | |||
an-a05n01.alteeve.ca 1 Online, rgmanager | |||
an-a05n02.alteeve.ca 2 Online, Local, rgmanager | |||
Service Name Owner (Last) State | |||
------- ---- ----- ------ ----- | |||
service:libvirtd_n01 an-a05n01.alteeve.ca started | |||
service:libvirtd_n02 an-a05n02.alteeve.ca started | |||
service:storage_n01 an-a05n01.alteeve.ca started | |||
service:storage_n02 an-a05n02.alteeve.ca started | |||
vm:vm01-win2008 an-a05n01.alteeve.ca started | |||
vm:vm02-win2012 an-a05n02.alteeve.ca started | |||
vm:vm03-win7 an-a05n01.alteeve.ca started | |||
vm:vm04-win8 an-a05n01.alteeve.ca started | |||
vm:vm05-freebsd9 (an-a05n02.alteeve.ca) disabled | |||
</syntaxhighlight> | |||
|} | |||
Good, it's off. Let's turn it back on now. | |||
{|class="wikitable" | |||
!<span class="code">an-a05n01</span> | |||
|style="white-space: nowrap;"|<syntaxhighlight lang="bash"> | |||
clusvcadm -F -e vm:vm05-freebsd9 | |||
</syntaxhighlight> | |||
<syntaxhighlight lang="text"> | |||
vm:vm05-freebsd9 is now running on an-a05n02.alteeve.ca | |||
</syntaxhighlight> | |||
|- | |||
!<span class="code">an-a05n02</span> | |||
|style="white-space: nowrap;"|<syntaxhighlight lang="bash"> | |||
clustat | |||
</syntaxhighlight> | |||
<syntaxhighlight lang="text"> | |||
Cluster Status for an-anvil-05 @ Tue Nov 19 13:00:51 2013 | |||
Member Status: Quorate | |||
Member Name ID Status | |||
------ ---- ---- ------ | |||
an-a05n01.alteeve.ca 1 Online, rgmanager | |||
an-a05n02.alteeve.ca 2 Online, Local, rgmanager | |||
Service Name Owner (Last) State | |||
------- ---- ----- ------ ----- | |||
service:libvirtd_n01 an-a05n01.alteeve.ca started | |||
service:libvirtd_n02 an-a05n02.alteeve.ca started | |||
service:storage_n01 an-a05n01.alteeve.ca started | |||
service:storage_n02 an-a05n02.alteeve.ca started | |||
vm:vm01-win2008 an-a05n01.alteeve.ca started | |||
vm:vm02-win2012 an-a05n02.alteeve.ca started | |||
vm:vm03-win7 an-a05n01.alteeve.ca started | |||
vm:vm04-win8 an-a05n01.alteeve.ca started | |||
vm:vm05-freebsd9 an-a05n02.alteeve.ca started | |||
</syntaxhighlight> | |||
|} | |||
One last step; Testing live migration! We'll push <span class="code">vm05-freebsd9</span> over to <span class="code">an-a05n01</span> and then pull it back again. | |||
{|class="wikitable" | |||
!<span class="code">an-a05n01</span> | |||
|style="white-space: nowrap;"|<syntaxhighlight lang="bash"> | |||
clusvcadm -M vm:vm05-freebsd9 -m an-a05n01.alteeve.ca | |||
</syntaxhighlight> | |||
<syntaxhighlight lang="text"> | |||
Trying to migrate vm:vm05-freebsd9 to an-a05n01.alteeve.ca...Success | |||
</syntaxhighlight> | |||
|- | |||
!<span class="code">an-a05n02</span> | |||
|style="white-space: nowrap;"|<syntaxhighlight lang="bash"> | |||
clustat | |||
</syntaxhighlight> | |||
<syntaxhighlight lang="text"> | |||
Cluster Status for an-anvil-05 @ Tue Nov 19 13:02:18 2013 | |||
Member Status: Quorate | |||
Member Name ID Status | |||
------ ---- ---- ------ | |||
an-a05n01.alteeve.ca 1 Online, rgmanager | |||
an-a05n02.alteeve.ca 2 Online, Local, rgmanager | |||
Service Name Owner (Last) State | |||
------- ---- ----- ------ ----- | |||
service:libvirtd_n01 an-a05n01.alteeve.ca started | |||
service:libvirtd_n02 an-a05n02.alteeve.ca started | |||
service:storage_n01 an-a05n01.alteeve.ca started | |||
service:storage_n02 an-a05n02.alteeve.ca started | |||
vm:vm01-win2008 an-a05n01.alteeve.ca started | |||
vm:vm02-win2012 an-a05n02.alteeve.ca started | |||
vm:vm03-win7 an-a05n01.alteeve.ca started | |||
vm:vm04-win8 an-a05n01.alteeve.ca started | |||
vm:vm05-freebsd9 an-a05n01.alteeve.ca started | |||
</syntaxhighlight> | |||
|} | |||
If we use <span class="code">virsh</span>, we can confirm that <span class="code">vm05-freebsd9</span> has, in fact, moved over to <span class="code">an-a05n02</span>. | |||
{|class="wikitable" | |||
!<span class="code">an-a05n01</span> | |||
|style="white-space: nowrap;"|<syntaxhighlight lang="bash"> | |||
virsh list --all | |||
</syntaxhighlight> | |||
<syntaxhighlight lang="text"> | |||
Id Name State | |||
---------------------------------------------------- | |||
2 vm01-win2008 running | |||
5 vm03-win7 running | |||
9 vm04-win8 running | |||
10 vm05-freebsd9 running | |||
</syntaxhighlight> | |||
|- | |||
!<span class="code">an-a05n02</span> | |||
|style="white-space: nowrap;"|<syntaxhighlight lang="bash"> | |||
virsh list --all | |||
</syntaxhighlight> | |||
<syntaxhighlight lang="text"> | |||
Id Name State | |||
---------------------------------------------------- | |||
5 vm02-win2012 running | |||
</syntaxhighlight> | |||
|} | |||
If you had a program running or were logged into <span class="code">vm05-freebsd9</span> over [[RDP]] or similar, you would have noticed no interruptions. | |||
So now we'll pull it back. | |||
{|class="wikitable" | |||
!<span class="code">an-a05n01</span> | |||
|style="white-space: nowrap;"|<syntaxhighlight lang="bash"> | |||
clusvcadm -M vm:vm05-freebsd9 -m an-a05n02.alteeve.ca | |||
</syntaxhighlight> | |||
<syntaxhighlight lang="text"> | |||
Trying to migrate vm:vm05-freebsd9 to an-a05n02.alteeve.ca...Success | |||
</syntaxhighlight> | |||
|- | |||
!<span class="code">an-a05n02</span> | |||
|style="white-space: nowrap;"|<syntaxhighlight lang="bash"> | |||
clustat | |||
</syntaxhighlight> | |||
<syntaxhighlight lang="text"> | |||
Cluster Status for an-anvil-05 @ Tue Nov 19 13:03:02 2013 | |||
Member Status: Quorate | |||
Member Name ID Status | |||
------ ---- ---- ------ | |||
an-a05n01.alteeve.ca 1 Online, rgmanager | |||
an-a05n02.alteeve.ca 2 Online, Local, rgmanager | |||
Service Name Owner (Last) State | |||
------- ---- ----- ------ ----- | |||
service:libvirtd_n01 an-a05n01.alteeve.ca started | |||
service:libvirtd_n02 an-a05n02.alteeve.ca started | |||
service:storage_n01 an-a05n01.alteeve.ca started | |||
service:storage_n02 an-a05n02.alteeve.ca started | |||
vm:vm01-win2008 an-a05n01.alteeve.ca started | |||
vm:vm02-win2012 an-a05n02.alteeve.ca started | |||
vm:vm03-win7 an-a05n01.alteeve.ca started | |||
vm:vm04-win8 an-a05n01.alteeve.ca started | |||
vm:vm05-freebsd9 an-a05n02.alteeve.ca started | |||
</syntaxhighlight> | |||
|} | |||
Once again, we'll confirm with <span class="code">virsh</span>. | |||
{|class="wikitable" | |||
!<span class="code">an-a05n01</span> | |||
|style="white-space: nowrap;"|<syntaxhighlight lang="bash"> | |||
virsh list --all | |||
</syntaxhighlight> | |||
<syntaxhighlight lang="text"> | |||
Id Name State | |||
---------------------------------------------------- | |||
2 vm01-win2008 running | |||
5 vm03-win7 running | |||
9 vm04-win8 running | |||
</syntaxhighlight> | |||
|- | |||
!<span class="code">an-a05n02</span> | |||
|style="white-space: nowrap;"|<syntaxhighlight lang="bash"> | |||
virsh list --all | |||
</syntaxhighlight> | |||
<syntaxhighlight lang="text"> | |||
Id Name State | |||
---------------------------------------------------- | |||
5 vm02-win2012 running | |||
11 vm05-freebsd9 running | |||
</syntaxhighlight> | |||
|} | |||
Perfect! | |||
== Making vm06-solaris11 a Highly Available Service == | |||
{{note|1=If you skipped adding <span class="code">vm01-win2008</span> to the cluster manager, please [[#Making_vm01-win2008_a_Highly_Available_Service|jump back]] and review the steps there. Particularly on creating the new failover domains and SELinux fix.}} | |||
It's time to add <span class="code">[[#Provisioning_vm06-solaris11|vm06-solaris11]]</span> to the cluster's management. | |||
=== Dumping the vm06-solaris11 XML Definition File === | |||
As we did with the previous servers, we need to dump <span class="code">vm06-solaris11</span>'s [[XML]] definition out to a file in <span class="code">/shared/definitions</span>. | |||
First, let's use <span class="code">virsh</span> to see the server's state. | |||
{|class="wikitable" | |||
!<span class="code">an-a05n01</span> | |||
|style="white-space: nowrap;"|<syntaxhighlight lang="bash"> | |||
virsh list --all | |||
</syntaxhighlight> | |||
<syntaxhighlight lang="text"> | |||
Id Name State | |||
---------------------------------------------------- | |||
9 vm04-win8 running | |||
14 vm03-win7 running | |||
15 vm01-win2008 running | |||
</syntaxhighlight> | |||
|- | |||
!<span class="code">an-a05n02</span> | |||
|style="white-space: nowrap;"|<syntaxhighlight lang="bash"> | |||
virsh list --all | |||
</syntaxhighlight> | |||
<syntaxhighlight lang="text"> | |||
Id Name State | |||
---------------------------------------------------- | |||
11 vm05-freebsd9 running | |||
16 vm06-solaris11 running | |||
17 vm02-win2012 running | |||
</syntaxhighlight> | |||
|} | |||
So we see that <span class="code">vm06-solaris11</span> is running on <span class="code">an-a05n02</span>, which is where we provisioned it. | |||
Now dump the server's XML. | |||
{|class="wikitable" | |||
!<span class="code">an-a05n02</span> | |||
|style="white-space: nowrap;"|<syntaxhighlight lang="bash"> | |||
virsh dumpxml vm06-solaris11 > /shared/definitions/vm06-solaris11.xml | |||
ls -lah /shared/definitions/vm06-solaris11.xml | |||
</syntaxhighlight> | |||
<syntaxhighlight lang="text"> | |||
-rw-r--r--. 1 root root 2.9K Nov 20 16:05 /shared/definitions/vm06-solaris11.xml | |||
</syntaxhighlight> | |||
|} | |||
{{warning|1=Be sure the XML file was written properly! This next step will remove the server from <span class="code">libvirtd</span>. Once done, the <span class="code">/shared/definitions/vm06-solaris11.xml</span> will be the only way to boot the server!}} | |||
The last step is, again, to remove <span class="code">vm06-solaris11</span> from <span class="code">libvirtd</span>. | |||
{|class="wikitable" | |||
!<span class="code">an-a05n02</span> | |||
|style="white-space: nowrap;"|<syntaxhighlight lang="bash"> | |||
virsh undefine vm06-solaris11 | |||
</syntaxhighlight> | |||
<syntaxhighlight lang="text"> | |||
Domain vm06-solaris11 has been undefined | |||
</syntaxhighlight> | |||
|} | |||
Done. | |||
=== Creating the vm:vm06-solaris11 Service === | |||
As we did for the previous servers, we will create a <span class="code">vm</span> service entry for <span class="code">vm06-solaris11</span> under the <span class="code">primary_n02</span> failover domain. | |||
Lets increment the version to <span class="code">17</span> and add the new entry. | |||
One major difference this time is that we will not alter the shut down timer. The default of two minutes is fine for non-Microsoft servers. | |||
{|class="wikitable" | |||
!<span class="code">an-a05n02</span> | |||
|style="white-space: nowrap;"|<syntaxhighlight lang="xml"> | |||
<rm log_level="5"> | |||
... | |||
<vm name="vm06-solaris11" domain="primary_n02" autostart="0" path="/shared/definitions/" exclusive="0" recovery="restart" max_restarts="2" restart_expire_time="600"/> | |||
</rm> | |||
</syntaxhighlight> | |||
|} | |||
Making the new <span class="code">cluster.conf</span> as we see it below. | |||
{|class="wikitable" | |||
!<span class="code">an-a05n01</span> | |||
|style="white-space: nowrap;"|<syntaxhighlight lang="xml"> | |||
<?xml version="1.0"?> | |||
<cluster name="an-anvil-05" config_version="15"> | |||
<cman expected_votes="1" two_node="1" /> | |||
<clusternodes> | |||
<clusternode name="an-a05n01.alteeve.ca" nodeid="1"> | |||
<fence> | |||
<method name="ipmi"> | |||
<device name="ipmi_n01" action="reboot" delay="15" /> | |||
</method> | |||
<method name="pdu"> | |||
<device name="pdu1" port="1" action="reboot" /> | |||
<device name="pdu2" port="1" action="reboot" /> | |||
</method> | |||
</fence> | |||
</clusternode> | |||
<clusternode name="an-a05n02.alteeve.ca" nodeid="2"> | |||
<fence> | |||
<method name="ipmi"> | |||
<device name="ipmi_n02" action="reboot" /> | |||
</method> | |||
<method name="pdu"> | |||
<device name="pdu1" port="2" action="reboot" /> | |||
<device name="pdu2" port="2" action="reboot" /> | |||
</method> | |||
</fence> | |||
</clusternode> | |||
</clusternodes> | |||
<fencedevices> | |||
<fencedevice name="ipmi_n01" agent="fence_ipmilan" ipaddr="an-a05n01.ipmi" login="admin" passwd="secret" /> | |||
<fencedevice name="ipmi_n02" agent="fence_ipmilan" ipaddr="an-a05n02.ipmi" login="admin" passwd="secret" /> | |||
<fencedevice agent="fence_apc_snmp" ipaddr="an-pdu01.alteeve.ca" name="pdu1" /> | |||
<fencedevice agent="fence_apc_snmp" ipaddr="an-pdu02.alteeve.ca" name="pdu2" /> | |||
</fencedevices> | |||
<fence_daemon post_join_delay="30" /> | |||
<totem rrp_mode="none" secauth="off"/> | |||
<rm log_level="5"> | |||
<resources> | |||
<script file="/etc/init.d/drbd" name="drbd"/> | |||
<script file="/etc/init.d/clvmd" name="clvmd"/> | |||
<clusterfs device="/dev/an-a05n01_vg0/shared" force_unmount="1" fstype="gfs2" mountpoint="/shared" name="sharedfs" /> | |||
<script file="/etc/init.d/libvirtd" name="libvirtd"/> | |||
</resources> | |||
<failoverdomains> | |||
<failoverdomain name="only_n01" nofailback="1" ordered="0" restricted="1"> | |||
<failoverdomainnode name="an-a05n01.alteeve.ca"/> | |||
</failoverdomain> | |||
<failoverdomain name="only_n02" nofailback="1" ordered="0" restricted="1"> | |||
<failoverdomainnode name="an-a05n02.alteeve.ca"/> | |||
</failoverdomain> | |||
<failoverdomain name="primary_n01" nofailback="1" ordered="1" restricted="1"> | |||
<failoverdomainnode name="an-a05n01.alteeve.ca" priority="1"/> | |||
<failoverdomainnode name="an-a05n02.alteeve.ca" priority="2"/> | |||
</failoverdomain> | |||
<failoverdomain name="primary_n02" nofailback="1" ordered="1" restricted="1"> | |||
<failoverdomainnode name="an-a05n01.alteeve.ca" priority="2"/> | |||
<failoverdomainnode name="an-a05n02.alteeve.ca" priority="1"/> | |||
</failoverdomain> | |||
</failoverdomains> | |||
<service name="storage_n01" autostart="1" domain="only_n01" exclusive="0" recovery="restart"> | |||
<script ref="drbd"> | |||
<script ref="clvmd"> | |||
<clusterfs ref="sharedfs"/> | |||
</script> | |||
</script> | |||
</service> | |||
<service name="storage_n02" autostart="1" domain="only_n02" exclusive="0" recovery="restart"> | |||
<script ref="drbd"> | |||
<script ref="clvmd"> | |||
<clusterfs ref="sharedfs"/> | |||
</script> | |||
</script> | |||
</service> | |||
<service name="libvirtd_n01" autostart="1" domain="only_n01" exclusive="0" recovery="restart"> | |||
<script ref="libvirtd"/> | |||
</service> | |||
<service name="libvirtd_n02" autostart="1" domain="only_n02" exclusive="0" recovery="restart"> | |||
<script ref="libvirtd"/> | |||
</service> | |||
<vm name="vm01-win2008" domain="primary_n01" autostart="0" path="/shared/definitions/" exclusive="0" recovery="restart" max_restarts="2" restart_expire_time="600"> | |||
<action name="stop" timeout="30m" /> | |||
</vm> | |||
<vm name="vm02-win2012" domain="primary_n02" autostart="0" path="/shared/definitions/" exclusive="0" recovery="restart" max_restarts="2" restart_expire_time="600"> | |||
<action name="stop" timeout="30m" /> | |||
</vm> | |||
<vm name="vm03-win7" domain="primary_n01" autostart="0" path="/shared/definitions/" exclusive="0" recovery="restart" max_restarts="2" restart_expire_time="600"> | |||
<action name="stop" timeout="30m" /> | |||
</vm> | |||
<vm name="vm04-win8" domain="primary_n01" autostart="0" path="/shared/definitions/" exclusive="0" recovery="restart" max_restarts="2" restart_expire_time="600"> | |||
<action name="stop" timeout="30m" /> | |||
</vm> | |||
<vm name="vm05-freebsd9" domain="primary_n02" autostart="0" path="/shared/definitions/" exclusive="0" recovery="restart" max_restarts="2" restart_expire_time="600"/> | |||
<vm name="vm06-solaris11" domain="primary_n02" autostart="0" path="/shared/definitions/" exclusive="0" recovery="restart" max_restarts="2" restart_expire_time="600"/> | |||
</rm> | |||
</cluster> | |||
</syntaxhighlight> | |||
|} | |||
Now let's activate the new configuration. | |||
{|class="wikitable" | |||
!<span class="code">an-a05n02</span> | |||
|style="white-space: nowrap;"|<syntaxhighlight lang="bash"> | |||
ccs_config_validate | |||
</syntaxhighlight> | |||
<syntaxhighlight lang="text"> | |||
Configuration validates | |||
</syntaxhighlight> | |||
<syntaxhighlight lang="bash"> | |||
cman_tool version | |||
</syntaxhighlight> | |||
<syntaxhighlight lang="text"> | |||
6.2.0 config 16 | |||
</syntaxhighlight> | |||
<syntaxhighlight lang="bash"> | |||
cman_tool version -r | |||
cman_tool version | |||
</syntaxhighlight> | |||
<syntaxhighlight lang="text"> | |||
6.2.0 config 17 | |||
</syntaxhighlight> | |||
|- | |||
!<span class="code">an-a05n01</span> | |||
|style="white-space: nowrap;"|<syntaxhighlight lang="bash"> | |||
cman_tool version | |||
</syntaxhighlight> | |||
<syntaxhighlight lang="text"> | |||
6.2.0 config 17 | |||
</syntaxhighlight> | |||
|} | |||
Let's take a look at <span class="code">clustat</span> on both nodes now. | |||
{|class="wikitable" | |||
!<span class="code">an-a05n01</span> | |||
|style="white-space: nowrap;"|<syntaxhighlight lang="bash"> | |||
clustat | |||
</syntaxhighlight> | |||
<syntaxhighlight lang="text"> | |||
Cluster Status for an-anvil-05 @ Wed Nov 20 16:30:28 2013 | |||
Member Status: Quorate | |||
Member Name ID Status | |||
------ ---- ---- ------ | |||
an-a05n01.alteeve.ca 1 Online, Local, rgmanager | |||
an-a05n02.alteeve.ca 2 Online, rgmanager | |||
Service Name Owner (Last) State | |||
------- ---- ----- ------ ----- | |||
service:libvirtd_n01 an-a05n01.alteeve.ca started | |||
service:libvirtd_n02 an-a05n02.alteeve.ca started | |||
service:storage_n01 an-a05n01.alteeve.ca started | |||
service:storage_n02 an-a05n02.alteeve.ca started | |||
vm:vm01-win2008 an-a05n01.alteeve.ca started | |||
vm:vm02-win2012 an-a05n02.alteeve.ca started | |||
vm:vm03-win7 an-a05n01.alteeve.ca started | |||
vm:vm04-win8 an-a05n01.alteeve.ca started | |||
vm:vm05-freebsd9 an-a05n02.alteeve.ca started | |||
vm:vm06-solaris11 (none) disabled | |||
</syntaxhighlight> | |||
|- | |||
!<span class="code">an-a05n02</span> | |||
|style="white-space: nowrap;"|<syntaxhighlight lang="bash"> | |||
clustat | |||
</syntaxhighlight> | |||
<syntaxhighlight lang="text"> | |||
Cluster Status for an-anvil-05 @ Wed Nov 20 16:30:39 2013 | |||
Member Status: Quorate | |||
Member Name ID Status | |||
------ ---- ---- ------ | |||
an-a05n01.alteeve.ca 1 Online, rgmanager | |||
an-a05n02.alteeve.ca 2 Online, Local, rgmanager | |||
Service Name Owner (Last) State | |||
------- ---- ----- ------ ----- | |||
service:libvirtd_n01 an-a05n01.alteeve.ca started | |||
service:libvirtd_n02 an-a05n02.alteeve.ca started | |||
service:storage_n01 an-a05n01.alteeve.ca started | |||
service:storage_n02 an-a05n02.alteeve.ca started | |||
vm:vm01-win2008 an-a05n01.alteeve.ca started | |||
vm:vm02-win2012 an-a05n02.alteeve.ca started | |||
vm:vm03-win7 an-a05n01.alteeve.ca started | |||
vm:vm04-win8 an-a05n01.alteeve.ca started | |||
vm:vm05-freebsd9 an-a05n02.alteeve.ca started | |||
vm:vm06-solaris11 (none) disabled | |||
</syntaxhighlight> | |||
|} | |||
As expected, <span class="code">vm:vm06-solaris11</span> is <span class="code">disabled</span>. Verify that it is still running on <span class="code">an-a05n02</span>. | |||
{|class="wikitable" | |||
!<span class="code">an-a05n01</span> | |||
|style="white-space: nowrap;"|<syntaxhighlight lang="bash"> | |||
virsh list --all | |||
</syntaxhighlight> | |||
<syntaxhighlight lang="text"> | |||
Id Name State | |||
---------------------------------------------------- | |||
9 vm04-win8 running | |||
14 vm03-win7 running | |||
15 vm01-win2008 running | |||
</syntaxhighlight> | |||
|- | |||
!<span class="code">an-a05n02</span> | |||
|style="white-space: nowrap;"|<syntaxhighlight lang="bash"> | |||
virsh list --all | |||
</syntaxhighlight> | |||
<syntaxhighlight lang="text"> | |||
Id Name State | |||
---------------------------------------------------- | |||
11 vm05-freebsd9 running | |||
16 vm06-solaris11 running | |||
17 vm02-win2012 running | |||
</syntaxhighlight> | |||
|} | |||
Confirmed, <span class="code">vm06-solaris11</span> is on <span class="code">an-a05n02</span>. | |||
As we did before, we'll use <span class="code">clusvcadm</span> to <span class="code">enable</span> the <span class="code">vm:vm06-solaris11</span> service on the <span class="code">an-a05n02.alteeve.ca</span> cluster member. | |||
{|class="wikitable" | |||
!<span class="code">an-a05n01</span> | |||
|style="white-space: nowrap;"|<syntaxhighlight lang="bash"> | |||
clusvcadm -e vm:vm06-solaris11 -m an-a05n02.alteeve.ca | |||
</syntaxhighlight> | |||
<syntaxhighlight lang="text"> | |||
Member an-a05n02.alteeve.ca trying to enable vm:vm06-solaris11...Success | |||
vm:vm06-solaris11 is now running on an-a05n02.alteeve.ca | |||
</syntaxhighlight> | |||
|- | |||
!<span class="code">an-a05n02</span> | |||
|style="white-space: nowrap;"|<syntaxhighlight lang="bash"> | |||
clustat | |||
</syntaxhighlight> | |||
<syntaxhighlight lang="text"> | |||
Cluster Status for an-anvil-05 @ Wed Nov 20 16:31:26 2013 | |||
Member Status: Quorate | |||
Member Name ID Status | |||
------ ---- ---- ------ | |||
an-a05n01.alteeve.ca 1 Online, rgmanager | |||
an-a05n02.alteeve.ca 2 Online, Local, rgmanager | |||
Service Name Owner (Last) State | |||
------- ---- ----- ------ ----- | |||
service:libvirtd_n01 an-a05n01.alteeve.ca started | |||
service:libvirtd_n02 an-a05n02.alteeve.ca started | |||
service:storage_n01 an-a05n01.alteeve.ca started | |||
service:storage_n02 an-a05n02.alteeve.ca started | |||
vm:vm01-win2008 an-a05n01.alteeve.ca started | |||
vm:vm02-win2012 an-a05n02.alteeve.ca started | |||
vm:vm03-win7 an-a05n01.alteeve.ca started | |||
vm:vm04-win8 an-a05n01.alteeve.ca started | |||
vm:vm05-freebsd9 an-a05n02.alteeve.ca started | |||
vm:vm06-solaris11 an-a05n02.alteeve.ca started | |||
</syntaxhighlight> | |||
|} | |||
Done! | |||
Now, should <span class="code">vm06-solaris11</span> fail or if <span class="code">an-a05n01</span> should fail, the ''Anvil!'' will recover it automatically. | |||
=== Testing vm06-solaris11 Management With clusvcadm === | |||
The first thing we're going to do is disable (gracefully shut down) the server. To do this, we'll send an [[ACPI]] "power button" event to <span class="code">vm06-solaris11</span>. FreeBSD 9 will, like most operating systems, respond to having its "power button pressed" by beginning a graceful shut down. | |||
As always, start by checking the state of things. | |||
{|class="wikitable" | |||
!<span class="code">an-a05n01</span> | |||
|style="white-space: nowrap;"|<syntaxhighlight lang="bash"> | |||
clustat | |||
</syntaxhighlight> | |||
<syntaxhighlight lang="text"> | |||
Cluster Status for an-anvil-05 @ Wed Nov 20 16:39:44 2013 | |||
Member Status: Quorate | |||
Member Name ID Status | |||
------ ---- ---- ------ | |||
an-a05n01.alteeve.ca 1 Online, Local, rgmanager | |||
an-a05n02.alteeve.ca 2 Online, rgmanager | |||
Service Name Owner (Last) State | |||
------- ---- ----- ------ ----- | |||
service:libvirtd_n01 an-a05n01.alteeve.ca started | |||
service:libvirtd_n02 an-a05n02.alteeve.ca started | |||
service:storage_n01 an-a05n01.alteeve.ca started | |||
service:storage_n02 an-a05n02.alteeve.ca started | |||
vm:vm01-win2008 an-a05n01.alteeve.ca started | |||
vm:vm02-win2012 an-a05n02.alteeve.ca started | |||
vm:vm03-win7 an-a05n01.alteeve.ca started | |||
vm:vm04-win8 an-a05n01.alteeve.ca started | |||
vm:vm05-freebsd9 an-a05n02.alteeve.ca started | |||
vm:vm06-solaris11 an-a05n02.alteeve.ca started | |||
</syntaxhighlight> | |||
|} | |||
As we expected. | |||
{|class="wikitable" | |||
!<span class="code">an-a05n01</span> | |||
|style="white-space: nowrap;"|<syntaxhighlight lang="bash"> | |||
clusvcadm -d vm:vm06-solaris11 | |||
</syntaxhighlight> | |||
<syntaxhighlight lang="text"> | |||
Local machine disabling vm:vm06-solaris11...Success | |||
</syntaxhighlight> | |||
|} | |||
If we check <span class="code">clustat</span> again, we'll see that the <span class="code">vm:vm06-solaris11</span> service is indeed <span class="code">disabled</span>. | |||
{|class="wikitable" | |||
!<span class="code">an-a05n02</span> | |||
|style="white-space: nowrap;"|<syntaxhighlight lang="bash"> | |||
clustat | |||
</syntaxhighlight> | |||
<syntaxhighlight lang="text"> | |||
Cluster Status for an-anvil-05 @ Wed Nov 20 16:41:38 2013 | |||
Member Status: Quorate | |||
Member Name ID Status | |||
------ ---- ---- ------ | |||
an-a05n01.alteeve.ca 1 Online, rgmanager | |||
an-a05n02.alteeve.ca 2 Online, Local, rgmanager | |||
Service Name Owner (Last) State | |||
------- ---- ----- ------ ----- | |||
service:libvirtd_n01 an-a05n01.alteeve.ca started | |||
service:libvirtd_n02 an-a05n02.alteeve.ca started | |||
service:storage_n01 an-a05n01.alteeve.ca started | |||
service:storage_n02 an-a05n02.alteeve.ca started | |||
vm:vm01-win2008 an-a05n01.alteeve.ca started | |||
vm:vm02-win2012 an-a05n02.alteeve.ca started | |||
vm:vm03-win7 an-a05n01.alteeve.ca started | |||
vm:vm04-win8 an-a05n01.alteeve.ca started | |||
vm:vm05-freebsd9 an-a05n02.alteeve.ca started | |||
vm:vm06-solaris11 (an-a05n02.alteeve.ca) disabled | |||
</syntaxhighlight> | |||
|} | |||
Good, it's off. Let's turn it back on now. | |||
{|class="wikitable" | |||
!<span class="code">an-a05n01</span> | |||
|style="white-space: nowrap;"|<syntaxhighlight lang="bash"> | |||
clusvcadm -F -e vm:vm06-solaris11 | |||
</syntaxhighlight> | |||
<syntaxhighlight lang="text"> | |||
vm:vm06-solaris11 is now running on an-a05n02.alteeve.ca | |||
</syntaxhighlight> | |||
|- | |||
!<span class="code">an-a05n02</span> | |||
|style="white-space: nowrap;"|<syntaxhighlight lang="bash"> | |||
clustat | |||
</syntaxhighlight> | |||
<syntaxhighlight lang="text"> | |||
Cluster Status for an-anvil-05 @ Wed Nov 20 16:41:56 2013 | |||
Member Status: Quorate | |||
Member Name ID Status | |||
------ ---- ---- ------ | |||
an-a05n01.alteeve.ca 1 Online, rgmanager | |||
an-a05n02.alteeve.ca 2 Online, Local, rgmanager | |||
Service Name Owner (Last) State | |||
------- ---- ----- ------ ----- | |||
service:libvirtd_n01 an-a05n01.alteeve.ca started | |||
service:libvirtd_n02 an-a05n02.alteeve.ca started | |||
service:storage_n01 an-a05n01.alteeve.ca started | |||
service:storage_n02 an-a05n02.alteeve.ca started | |||
vm:vm01-win2008 an-a05n01.alteeve.ca started | |||
vm:vm02-win2012 an-a05n02.alteeve.ca started | |||
vm:vm03-win7 an-a05n01.alteeve.ca started | |||
vm:vm04-win8 an-a05n01.alteeve.ca started | |||
vm:vm05-freebsd9 an-a05n02.alteeve.ca started | |||
vm:vm06-solaris11 an-a05n02.alteeve.ca started | |||
</syntaxhighlight> | |||
|} | |||
One last step; Testing live migration! We'll push <span class="code">vm06-solaris11</span> over to <span class="code">an-a05n01</span> and then pull it back again. | |||
{|class="wikitable" | |||
!<span class="code">an-a05n01</span> | |||
|style="white-space: nowrap;"|<syntaxhighlight lang="bash"> | |||
clusvcadm -M vm:vm06-solaris11 -m an-a05n01.alteeve.ca | |||
</syntaxhighlight> | |||
<syntaxhighlight lang="text"> | |||
Trying to migrate vm:vm06-solaris11 to an-a05n01.alteeve.ca...Success | |||
</syntaxhighlight> | |||
|- | |||
!<span class="code">an-a05n02</span> | |||
|style="white-space: nowrap;"|<syntaxhighlight lang="bash"> | |||
clustat | |||
</syntaxhighlight> | |||
<syntaxhighlight lang="text"> | |||
Cluster Status for an-anvil-05 @ Wed Nov 20 16:42:46 2013 | |||
Member Status: Quorate | |||
Member Name ID Status | |||
------ ---- ---- ------ | |||
an-a05n01.alteeve.ca 1 Online, rgmanager | |||
an-a05n02.alteeve.ca 2 Online, Local, rgmanager | |||
Service Name Owner (Last) State | |||
------- ---- ----- ------ ----- | |||
service:libvirtd_n01 an-a05n01.alteeve.ca started | |||
service:libvirtd_n02 an-a05n02.alteeve.ca started | |||
service:storage_n01 an-a05n01.alteeve.ca started | |||
service:storage_n02 an-a05n02.alteeve.ca started | |||
vm:vm01-win2008 an-a05n01.alteeve.ca started | |||
vm:vm02-win2012 an-a05n02.alteeve.ca started | |||
vm:vm03-win7 an-a05n01.alteeve.ca started | |||
vm:vm04-win8 an-a05n01.alteeve.ca started | |||
vm:vm05-freebsd9 an-a05n02.alteeve.ca started | |||
vm:vm06-solaris11 an-a05n01.alteeve.ca started | |||
</syntaxhighlight> | |||
|} | |||
If we use <span class="code">virsh</span>, we can confirm that <span class="code">vm06-solaris11</span> has, in fact, moved over to <span class="code">an-a05n02</span>. | |||
{|class="wikitable" | |||
!<span class="code">an-a05n01</span> | |||
|style="white-space: nowrap;"|<syntaxhighlight lang="bash"> | |||
virsh list --all | |||
</syntaxhighlight> | |||
<syntaxhighlight lang="text"> | |||
Id Name State | |||
---------------------------------------------------- | |||
9 vm04-win8 running | |||
14 vm03-win7 running | |||
15 vm01-win2008 running | |||
16 vm06-solaris11 running | |||
</syntaxhighlight> | |||
|- | |||
!<span class="code">an-a05n02</span> | |||
|style="white-space: nowrap;"|<syntaxhighlight lang="bash"> | |||
virsh list --all | |||
</syntaxhighlight> | |||
<syntaxhighlight lang="text"> | |||
Id Name State | |||
---------------------------------------------------- | |||
11 vm05-freebsd9 running | |||
17 vm02-win2012 running | |||
</syntaxhighlight> | |||
|} | |||
If you had a program running or were logged into <span class="code">vm06-solaris11</span> over [[RDP]] or similar, you would have noticed no interruptions. | |||
So now we'll pull it back. | |||
{|class="wikitable" | |||
!<span class="code">an-a05n01</span> | |||
|style="white-space: nowrap;"|<syntaxhighlight lang="bash"> | |||
clusvcadm -M vm:vm06-solaris11 -m an-a05n02.alteeve.ca | |||
</syntaxhighlight> | |||
<syntaxhighlight lang="text"> | |||
Trying to migrate vm:vm06-solaris11 to an-a05n02.alteeve.ca...Success | |||
</syntaxhighlight> | |||
|- | |||
!<span class="code">an-a05n02</span> | |||
|style="white-space: nowrap;"|<syntaxhighlight lang="bash"> | |||
clustat | |||
</syntaxhighlight> | |||
<syntaxhighlight lang="text"> | |||
Cluster Status for an-anvil-05 @ Wed Nov 20 16:43:35 2013 | |||
Member Status: Quorate | |||
Member Name ID Status | |||
------ ---- ---- ------ | |||
an-a05n01.alteeve.ca 1 Online, rgmanager | |||
an-a05n02.alteeve.ca 2 Online, Local, rgmanager | |||
Service Name Owner (Last) State | |||
------- ---- ----- ------ ----- | |||
service:libvirtd_n01 an-a05n01.alteeve.ca started | |||
service:libvirtd_n02 an-a05n02.alteeve.ca started | |||
service:storage_n01 an-a05n01.alteeve.ca started | |||
service:storage_n02 an-a05n02.alteeve.ca started | |||
vm:vm01-win2008 an-a05n01.alteeve.ca started | |||
vm:vm02-win2012 an-a05n02.alteeve.ca started | |||
vm:vm03-win7 an-a05n01.alteeve.ca started | |||
vm:vm04-win8 an-a05n01.alteeve.ca started | |||
vm:vm05-freebsd9 an-a05n02.alteeve.ca started | |||
vm:vm06-solaris11 an-a05n02.alteeve.ca started | |||
</syntaxhighlight> | |||
|} | |||
Once again, we'll confirm with <span class="code">virsh</span>. | |||
{|class="wikitable" | |||
!<span class="code">an-a05n01</span> | |||
|style="white-space: nowrap;"|<syntaxhighlight lang="bash"> | |||
virsh list --all | |||
</syntaxhighlight> | |||
<syntaxhighlight lang="text"> | |||
Id Name State | |||
---------------------------------------------------- | |||
9 vm04-win8 running | |||
14 vm03-win7 running | |||
15 vm01-win2008 running | |||
</syntaxhighlight> | |||
|- | |||
!<span class="code">an-a05n02</span> | |||
|style="white-space: nowrap;"|<syntaxhighlight lang="bash"> | |||
virsh list --all | |||
</syntaxhighlight> | |||
<syntaxhighlight lang="text"> | |||
Id Name State | |||
---------------------------------------------------- | |||
11 vm05-freebsd9 running | |||
17 vm02-win2012 running | |||
19 vm06-solaris11 running | |||
</syntaxhighlight> | |||
|} | |||
Perfect! | |||
== Making vm07-rhel6 a Highly Available Service == | |||
{{note|1=If you skipped adding <span class="code">vm01-win2008</span> to the cluster manager, please [[#Making_vm01-win2008_a_Highly_Available_Service|jump back]] and review the steps there. Particularly on creating the new failover domains and SELinux fix.}} | |||
It's time to add <span class="code">[[#Provisioning_vm07-rhel6|vm07-rhel6]]</span> to the cluster's management. This will be a little different from the windows installs we've done up until now. | |||
=== Dumping the vm07-rhel6 XML Definition File === | |||
As we did with the previous servers, we need to dump <span class="code">vm07-rhel6</span>'s [[XML]] definition out to a file in <span class="code">/shared/definitions</span>. | |||
First, let's use <span class="code">virsh</span> to see the server's state. | |||
{|class="wikitable" | |||
!<span class="code">an-a05n01</span> | |||
|style="white-space: nowrap;"|<syntaxhighlight lang="bash"> | |||
virsh list --all | |||
</syntaxhighlight> | |||
<syntaxhighlight lang="text"> | |||
Id Name State | |||
---------------------------------------------------- | |||
9 vm04-win8 running | |||
15 vm01-win2008 running | |||
17 vm03-win7 running | |||
19 vm07-rhel6 running | |||
</syntaxhighlight> | |||
|- | |||
!<span class="code">an-a05n02</span> | |||
|style="white-space: nowrap;"|<syntaxhighlight lang="bash"> | |||
virsh list --all | |||
</syntaxhighlight> | |||
<syntaxhighlight lang="text"> | |||
Id Name State | |||
---------------------------------------------------- | |||
11 vm05-freebsd9 running | |||
17 vm02-win2012 running | |||
19 vm06-solaris11 running | |||
</syntaxhighlight> | |||
|} | |||
So we see that <span class="code">vm07-rhel6</span> is running on <span class="code">an-a05n01</span>, which is where we provisioned it. | |||
Now dump the server's XML. | |||
{|class="wikitable" | |||
!<span class="code">an-a05n01</span> | |||
|style="white-space: nowrap;"|<syntaxhighlight lang="bash"> | |||
virsh dumpxml vm07-rhel6 > /shared/definitions/vm07-rhel6.xml | |||
ls -lah /shared/definitions/vm07-rhel6.xml | |||
</syntaxhighlight> | |||
<syntaxhighlight lang="text"> | |||
-rw-r--r--. 1 root root 2.9K Nov 21 00:55 /shared/definitions/vm07-rhel6.xml | |||
</syntaxhighlight> | |||
|} | |||
{{warning|1=Be sure the XML file was written properly! This next step will remove the server from <span class="code">libvirtd</span>. Once done, the <span class="code">/shared/definitions/vm07-rhel6.xml</span> will be the only way to boot the server!}} | |||
The last step is, again, to remove <span class="code">vm07-rhel6</span> from <span class="code">libvirtd</span>. | |||
{|class="wikitable" | |||
!<span class="code">an-a05n01</span> | |||
|style="white-space: nowrap;"|<syntaxhighlight lang="bash"> | |||
virsh undefine vm07-rhel6 | |||
</syntaxhighlight> | |||
<syntaxhighlight lang="text"> | |||
Domain vm07-rhel6 has been undefined | |||
</syntaxhighlight> | |||
|} | |||
Done. | |||
=== Creating the vm:vm07-rhel6 Service === | |||
As we did for the previous servers, we will create a <span class="code">vm</span> service entry for <span class="code">vm07-rhel6</span> under the <span class="code">primary_n01</span> failover domain. | |||
Lets increment the version to <span class="code">18</span> and add the new entry. | |||
One major difference this time is that we will not alter the shut down timer. The default of two minutes is fine for non-Microsoft servers. | |||
{|class="wikitable" | |||
!<span class="code">an-a05n01</span> | |||
|style="white-space: nowrap;"|<syntaxhighlight lang="xml"> | |||
<rm log_level="5"> | |||
... | |||
<vm name="vm07-rhel6" domain="primary_n01" autostart="0" path="/shared/definitions/" exclusive="0" recovery="restart" max_restarts="2" restart_expire_time="600"/> | |||
</rm> | |||
</syntaxhighlight> | |||
|} | |||
Making the new <span class="code">cluster.conf</span> as we see it below. | |||
{|class="wikitable" | |||
!<span class="code">an-a05n01</span> | |||
|style="white-space: nowrap;"|<syntaxhighlight lang="xml"> | |||
<?xml version="1.0"?> | |||
<cluster name="an-anvil-05" config_version="15"> | |||
<cman expected_votes="1" two_node="1" /> | |||
<clusternodes> | |||
<clusternode name="an-a05n01.alteeve.ca" nodeid="1"> | |||
<fence> | |||
<method name="ipmi"> | |||
<device name="ipmi_n01" action="reboot" delay="15" /> | |||
</method> | |||
<method name="pdu"> | |||
<device name="pdu1" port="1" action="reboot" /> | |||
<device name="pdu2" port="1" action="reboot" /> | |||
</method> | |||
</fence> | |||
</clusternode> | |||
<clusternode name="an-a05n02.alteeve.ca" nodeid="2"> | |||
<fence> | |||
<method name="ipmi"> | |||
<device name="ipmi_n02" action="reboot" /> | |||
</method> | |||
<method name="pdu"> | |||
<device name="pdu1" port="2" action="reboot" /> | |||
<device name="pdu2" port="2" action="reboot" /> | |||
</method> | |||
</fence> | |||
</clusternode> | |||
</clusternodes> | |||
<fencedevices> | |||
<fencedevice name="ipmi_n01" agent="fence_ipmilan" ipaddr="an-a05n01.ipmi" login="admin" passwd="secret" /> | |||
<fencedevice name="ipmi_n02" agent="fence_ipmilan" ipaddr="an-a05n02.ipmi" login="admin" passwd="secret" /> | |||
<fencedevice agent="fence_apc_snmp" ipaddr="an-pdu01.alteeve.ca" name="pdu1" /> | |||
<fencedevice agent="fence_apc_snmp" ipaddr="an-pdu02.alteeve.ca" name="pdu2" /> | |||
</fencedevices> | |||
<fence_daemon post_join_delay="30" /> | |||
<totem rrp_mode="none" secauth="off"/> | |||
<rm log_level="5"> | |||
<resources> | |||
<script file="/etc/init.d/drbd" name="drbd"/> | |||
<script file="/etc/init.d/clvmd" name="clvmd"/> | |||
<clusterfs device="/dev/an-a05n01_vg0/shared" force_unmount="1" fstype="gfs2" mountpoint="/shared" name="sharedfs" /> | |||
<script file="/etc/init.d/libvirtd" name="libvirtd"/> | |||
</resources> | |||
<failoverdomains> | |||
<failoverdomain name="only_n01" nofailback="1" ordered="0" restricted="1"> | |||
<failoverdomainnode name="an-a05n01.alteeve.ca"/> | |||
</failoverdomain> | |||
<failoverdomain name="only_n02" nofailback="1" ordered="0" restricted="1"> | |||
<failoverdomainnode name="an-a05n02.alteeve.ca"/> | |||
</failoverdomain> | |||
<failoverdomain name="primary_n01" nofailback="1" ordered="1" restricted="1"> | |||
<failoverdomainnode name="an-a05n01.alteeve.ca" priority="1"/> | |||
<failoverdomainnode name="an-a05n02.alteeve.ca" priority="2"/> | |||
</failoverdomain> | |||
<failoverdomain name="primary_n02" nofailback="1" ordered="1" restricted="1"> | |||
<failoverdomainnode name="an-a05n01.alteeve.ca" priority="2"/> | |||
<failoverdomainnode name="an-a05n02.alteeve.ca" priority="1"/> | |||
</failoverdomain> | |||
</failoverdomains> | |||
<service name="storage_n01" autostart="1" domain="only_n01" exclusive="0" recovery="restart"> | |||
<script ref="drbd"> | |||
<script ref="clvmd"> | |||
<clusterfs ref="sharedfs"/> | |||
</script> | |||
</script> | |||
</service> | |||
<service name="storage_n02" autostart="1" domain="only_n02" exclusive="0" recovery="restart"> | |||
<script ref="drbd"> | |||
<script ref="clvmd"> | |||
<clusterfs ref="sharedfs"/> | |||
</script> | |||
</script> | |||
</service> | |||
<service name="libvirtd_n01" autostart="1" domain="only_n01" exclusive="0" recovery="restart"> | |||
<script ref="libvirtd"/> | |||
</service> | |||
<service name="libvirtd_n02" autostart="1" domain="only_n02" exclusive="0" recovery="restart"> | |||
<script ref="libvirtd"/> | |||
</service> | |||
<vm name="vm01-win2008" domain="primary_n01" autostart="0" path="/shared/definitions/" exclusive="0" recovery="restart" max_restarts="2" restart_expire_time="600"> | |||
<action name="stop" timeout="30m" /> | |||
</vm> | |||
<vm name="vm02-win2012" domain="primary_n02" autostart="0" path="/shared/definitions/" exclusive="0" recovery="restart" max_restarts="2" restart_expire_time="600"> | |||
<action name="stop" timeout="30m" /> | |||
</vm> | |||
<vm name="vm03-win7" domain="primary_n01" autostart="0" path="/shared/definitions/" exclusive="0" recovery="restart" max_restarts="2" restart_expire_time="600"> | |||
<action name="stop" timeout="30m" /> | |||
</vm> | |||
<vm name="vm04-win8" domain="primary_n01" autostart="0" path="/shared/definitions/" exclusive="0" recovery="restart" max_restarts="2" restart_expire_time="600"> | |||
<action name="stop" timeout="30m" /> | |||
</vm> | |||
<vm name="vm05-freebsd9" domain="primary_n02" autostart="0" path="/shared/definitions/" exclusive="0" recovery="restart" max_restarts="2" restart_expire_time="600"/> | |||
<vm name="vm06-solaris11" domain="primary_n02" autostart="0" path="/shared/definitions/" exclusive="0" recovery="restart" max_restarts="2" restart_expire_time="600"/> | |||
<vm name="vm07-rhel6" domain="primary_n01" autostart="0" path="/shared/definitions/" exclusive="0" recovery="restart" max_restarts="2" restart_expire_time="600"/> | |||
</rm> | |||
</cluster> | |||
</syntaxhighlight> | |||
|} | |||
Now let's activate the new configuration. | |||
{|class="wikitable" | |||
!<span class="code">an-a05n01</span> | |||
|style="white-space: nowrap;"|<syntaxhighlight lang="bash"> | |||
ccs_config_validate | |||
</syntaxhighlight> | |||
<syntaxhighlight lang="text"> | |||
Configuration validates | |||
</syntaxhighlight> | |||
<syntaxhighlight lang="bash"> | |||
cman_tool version | |||
</syntaxhighlight> | |||
<syntaxhighlight lang="text"> | |||
6.2.0 config 17 | |||
</syntaxhighlight> | |||
<syntaxhighlight lang="bash"> | |||
cman_tool version -r | |||
cman_tool version | |||
</syntaxhighlight> | |||
<syntaxhighlight lang="text"> | |||
6.2.0 config 18 | |||
</syntaxhighlight> | |||
|- | |||
!<span class="code">an-a05n02</span> | |||
|style="white-space: nowrap;"|<syntaxhighlight lang="bash"> | |||
cman_tool version | |||
</syntaxhighlight> | |||
<syntaxhighlight lang="text"> | |||
6.2.0 config 18 | |||
</syntaxhighlight> | |||
|} | |||
Let's take a look at <span class="code">clustat</span> on both nodes now. | |||
{|class="wikitable" | |||
!<span class="code">an-a05n01</span> | |||
|style="white-space: nowrap;"|<syntaxhighlight lang="bash"> | |||
clustat | |||
</syntaxhighlight> | |||
<syntaxhighlight lang="text"> | |||
Cluster Status for an-anvil-05 @ Thu Nov 21 01:02:41 2013 | |||
Member Status: Quorate | |||
Member Name ID Status | |||
------ ---- ---- ------ | |||
an-a05n01.alteeve.ca 1 Online, Local, rgmanager | |||
an-a05n02.alteeve.ca 2 Online, rgmanager | |||
Service Name Owner (Last) State | |||
------- ---- ----- ------ ----- | |||
service:libvirtd_n01 an-a05n01.alteeve.ca started | |||
service:libvirtd_n02 an-a05n02.alteeve.ca started | |||
service:storage_n01 an-a05n01.alteeve.ca started | |||
service:storage_n02 an-a05n02.alteeve.ca started | |||
vm:vm01-win2008 an-a05n01.alteeve.ca started | |||
vm:vm02-win2012 an-a05n02.alteeve.ca started | |||
vm:vm03-win7 an-a05n01.alteeve.ca started | |||
vm:vm04-win8 an-a05n01.alteeve.ca started | |||
vm:vm05-freebsd9 an-a05n02.alteeve.ca started | |||
vm:vm06-solaris11 an-a05n02.alteeve.ca started | |||
vm:vm07-rhel6 (none) disabled | |||
</syntaxhighlight> | |||
|- | |||
!<span class="code">an-a05n02</span> | |||
|style="white-space: nowrap;"|<syntaxhighlight lang="bash"> | |||
clustat | |||
</syntaxhighlight> | |||
<syntaxhighlight lang="text"> | |||
Cluster Status for an-anvil-05 @ Thu Nov 21 01:02:41 2013 | |||
Member Status: Quorate | |||
Member Name ID Status | |||
------ ---- ---- ------ | |||
an-a05n01.alteeve.ca 1 Online, rgmanager | |||
an-a05n02.alteeve.ca 2 Online, Local, rgmanager | |||
Service Name Owner (Last) State | |||
------- ---- ----- ------ ----- | |||
service:libvirtd_n01 an-a05n01.alteeve.ca started | |||
service:libvirtd_n02 an-a05n02.alteeve.ca started | |||
service:storage_n01 an-a05n01.alteeve.ca started | |||
service:storage_n02 an-a05n02.alteeve.ca started | |||
vm:vm01-win2008 an-a05n01.alteeve.ca started | |||
vm:vm02-win2012 an-a05n02.alteeve.ca started | |||
vm:vm03-win7 an-a05n01.alteeve.ca started | |||
vm:vm04-win8 an-a05n01.alteeve.ca started | |||
vm:vm05-freebsd9 an-a05n02.alteeve.ca started | |||
vm:vm06-solaris11 an-a05n02.alteeve.ca started | |||
vm:vm07-rhel6 (none) disabled | |||
</syntaxhighlight> | |||
|} | |||
As expected, <span class="code">vm:vm07-rhel6</span> is <span class="code">disabled</span>. Verify that it is still running on <span class="code">an-a05n01</span>. | |||
{|class="wikitable" | |||
!<span class="code">an-a05n01</span> | |||
|style="white-space: nowrap;"|<syntaxhighlight lang="bash"> | |||
virsh list --all | |||
</syntaxhighlight> | |||
<syntaxhighlight lang="text"> | |||
Id Name State | |||
---------------------------------------------------- | |||
9 vm04-win8 running | |||
15 vm01-win2008 running | |||
17 vm03-win7 running | |||
19 vm07-rhel6 running | |||
</syntaxhighlight> | |||
|- | |||
!<span class="code">an-a05n02</span> | |||
|style="white-space: nowrap;"|<syntaxhighlight lang="bash"> | |||
virsh list --all | |||
</syntaxhighlight> | |||
<syntaxhighlight lang="text"> | |||
Id Name State | |||
---------------------------------------------------- | |||
11 vm05-freebsd9 running | |||
17 vm02-win2012 running | |||
19 vm06-solaris11 running | |||
</syntaxhighlight> | |||
|} | |||
Confirmed, <span class="code">vm07-rhel6</span> is on <span class="code">an-a05n01</span>. | |||
As we did before, we'll use <span class="code">clusvcadm</span> to <span class="code">enable</span> the <span class="code">vm:vm07-rhel6</span> service on the <span class="code">an-a05n01.alteeve.ca</span> cluster member. | |||
{|class="wikitable" | |||
!<span class="code">an-a05n01</span> | |||
|style="white-space: nowrap;"|<syntaxhighlight lang="bash"> | |||
clusvcadm -e vm:vm07-rhel6 -m an-a05n01.alteeve.ca | |||
</syntaxhighlight> | |||
<syntaxhighlight lang="text"> | |||
Member an-a05n01.alteeve.ca trying to enable vm:vm07-rhel6...Success | |||
vm:vm07-rhel6 is now running on an-a05n01.alteeve.ca | |||
</syntaxhighlight> | |||
|- | |||
!<span class="code">an-a05n02</span> | |||
|style="white-space: nowrap;"|<syntaxhighlight lang="bash"> | |||
clustat | |||
</syntaxhighlight> | |||
<syntaxhighlight lang="text"> | |||
Cluster Status for an-anvil-05 @ Thu Nov 21 01:03:31 2013 | |||
Member Status: Quorate | |||
Member Name ID Status | |||
------ ---- ---- ------ | |||
an-a05n01.alteeve.ca 1 Online, rgmanager | |||
an-a05n02.alteeve.ca 2 Online, Local, rgmanager | |||
Service Name Owner (Last) State | |||
------- ---- ----- ------ ----- | |||
service:libvirtd_n01 an-a05n01.alteeve.ca started | |||
service:libvirtd_n02 an-a05n02.alteeve.ca started | |||
service:storage_n01 an-a05n01.alteeve.ca started | |||
service:storage_n02 an-a05n02.alteeve.ca started | |||
vm:vm01-win2008 an-a05n01.alteeve.ca started | |||
vm:vm02-win2012 an-a05n02.alteeve.ca started | |||
vm:vm03-win7 an-a05n01.alteeve.ca started | |||
vm:vm04-win8 an-a05n01.alteeve.ca started | |||
vm:vm05-freebsd9 an-a05n02.alteeve.ca started | |||
vm:vm06-solaris11 an-a05n02.alteeve.ca started | |||
vm:vm07-rhel6 an-a05n01.alteeve.ca started | |||
</syntaxhighlight> | |||
|} | |||
Done! | |||
Now, should <span class="code">vm07-rhel6</span> fail or if <span class="code">an-a05n01</span> should fail, the ''Anvil!'' will recover it automatically. | |||
=== Testing vm07-rhel6 Management With clusvcadm === | |||
The first thing we're going to do is disable (gracefully shut down) the server. To do this, we'll send an [[ACPI]] "power button" event to <span class="code">vm07-rhel6</span>. FreeBSD 9 will, like most operating systems, respond to having its "power button pressed" by beginning a graceful shut down. | |||
As always, start by checking the state of things. | |||
{|class="wikitable" | |||
!<span class="code">an-a05n01</span> | |||
|style="white-space: nowrap;"|<syntaxhighlight lang="bash"> | |||
clustat | |||
</syntaxhighlight> | |||
<syntaxhighlight lang="text"> | |||
Cluster Status for an-anvil-05 @ Thu Nov 21 01:03:43 2013 | |||
Member Status: Quorate | |||
Member Name ID Status | |||
------ ---- ---- ------ | |||
an-a05n01.alteeve.ca 1 Online, Local, rgmanager | |||
an-a05n02.alteeve.ca 2 Online, rgmanager | |||
Service Name Owner (Last) State | |||
------- ---- ----- ------ ----- | |||
service:libvirtd_n01 an-a05n01.alteeve.ca started | |||
service:libvirtd_n02 an-a05n02.alteeve.ca started | |||
service:storage_n01 an-a05n01.alteeve.ca started | |||
service:storage_n02 an-a05n02.alteeve.ca started | |||
vm:vm01-win2008 an-a05n01.alteeve.ca started | |||
vm:vm02-win2012 an-a05n02.alteeve.ca started | |||
vm:vm03-win7 an-a05n01.alteeve.ca started | |||
vm:vm04-win8 an-a05n01.alteeve.ca started | |||
vm:vm05-freebsd9 an-a05n02.alteeve.ca started | |||
vm:vm06-solaris11 an-a05n02.alteeve.ca started | |||
vm:vm07-rhel6 an-a05n01.alteeve.ca started | |||
</syntaxhighlight> | |||
|} | |||
As we expected. | |||
{{note|1=If you did a "minimal" install, then <span class="code">acpid</span> will not be installed. Without it, the server will not shut down gracefully in the next step. Be sure that <span class="code">acpid</span> is installed and that the <span class="code">acpi</span> daemon is running.}} | |||
{|class="wikitable" | |||
!<span class="code">an-a05n01</span> | |||
|style="white-space: nowrap;"|<syntaxhighlight lang="bash"> | |||
clusvcadm -d vm:vm07-rhel6 | |||
</syntaxhighlight> | |||
<syntaxhighlight lang="text"> | |||
Local machine disabling vm:vm07-rhel6...Success | |||
</syntaxhighlight> | |||
|} | |||
If we check <span class="code">clustat</span> again, we'll see that the <span class="code">vm:vm07-rhel6</span> service is indeed <span class="code">disabled</span>. | |||
{|class="wikitable" | |||
!<span class="code">an-a05n02</span> | |||
|style="white-space: nowrap;"|<syntaxhighlight lang="bash"> | |||
clustat | |||
</syntaxhighlight> | |||
<syntaxhighlight lang="text"> | |||
Cluster Status for an-anvil-05 @ Thu Nov 21 01:05:51 2013 | |||
Member Status: Quorate | |||
Member Name ID Status | |||
------ ---- ---- ------ | |||
an-a05n01.alteeve.ca 1 Online, rgmanager | |||
an-a05n02.alteeve.ca 2 Online, Local, rgmanager | |||
Service Name Owner (Last) State | |||
------- ---- ----- ------ ----- | |||
service:libvirtd_n01 an-a05n01.alteeve.ca started | |||
service:libvirtd_n02 an-a05n02.alteeve.ca started | |||
service:storage_n01 an-a05n01.alteeve.ca started | |||
service:storage_n02 an-a05n02.alteeve.ca started | |||
vm:vm01-win2008 an-a05n01.alteeve.ca started | |||
vm:vm02-win2012 an-a05n02.alteeve.ca started | |||
vm:vm03-win7 an-a05n01.alteeve.ca started | |||
vm:vm04-win8 an-a05n01.alteeve.ca started | |||
vm:vm05-freebsd9 an-a05n02.alteeve.ca started | |||
vm:vm06-solaris11 an-a05n02.alteeve.ca started | |||
vm:vm07-rhel6 (an-a05n01.alteeve.ca) disabled | |||
</syntaxhighlight> | |||
|} | |||
Good, it's off. Let's turn it back on now. | |||
{|class="wikitable" | |||
!<span class="code">an-a05n01</span> | |||
|style="white-space: nowrap;"|<syntaxhighlight lang="bash"> | |||
clusvcadm -F -e vm:vm07-rhel6 | |||
</syntaxhighlight> | |||
<syntaxhighlight lang="text"> | |||
Local machine trying to enable vm:vm07-rhel6...Success | |||
vm:vm07-rhel6 is now running on an-a05n01.alteeve.ca | |||
</syntaxhighlight> | |||
|- | |||
!<span class="code">an-a05n02</span> | |||
|style="white-space: nowrap;"|<syntaxhighlight lang="bash"> | |||
clustat | |||
</syntaxhighlight> | |||
<syntaxhighlight lang="text"> | |||
Cluster Status for an-anvil-05 @ Thu Nov 21 01:06:16 2013 | |||
Member Status: Quorate | |||
Member Name ID Status | |||
------ ---- ---- ------ | |||
an-a05n01.alteeve.ca 1 Online, rgmanager | |||
an-a05n02.alteeve.ca 2 Online, Local, rgmanager | |||
Service Name Owner (Last) State | |||
------- ---- ----- ------ ----- | |||
service:libvirtd_n01 an-a05n01.alteeve.ca started | |||
service:libvirtd_n02 an-a05n02.alteeve.ca started | |||
service:storage_n01 an-a05n01.alteeve.ca started | |||
service:storage_n02 an-a05n02.alteeve.ca started | |||
vm:vm01-win2008 an-a05n01.alteeve.ca started | |||
vm:vm02-win2012 an-a05n02.alteeve.ca started | |||
vm:vm03-win7 an-a05n01.alteeve.ca started | |||
vm:vm04-win8 an-a05n01.alteeve.ca started | |||
vm:vm05-freebsd9 an-a05n02.alteeve.ca started | |||
vm:vm06-solaris11 an-a05n02.alteeve.ca started | |||
vm:vm07-rhel6 an-a05n01.alteeve.ca started | |||
</syntaxhighlight> | |||
|} | |||
One last step; Testing live migration! We'll push <span class="code">vm07-rhel6</span> over to <span class="code">an-a05n01</span> and then pull it back again. | |||
{|class="wikitable" | |||
!<span class="code">an-a05n01</span> | |||
|style="white-space: nowrap;"|<syntaxhighlight lang="bash"> | |||
clusvcadm -M vm:vm07-rhel6 -m an-a05n02.alteeve.ca | |||
</syntaxhighlight> | |||
<syntaxhighlight lang="text"> | |||
Trying to migrate vm:vm07-rhel6 to an-a05n02.alteeve.ca...Success | |||
</syntaxhighlight> | |||
|- | |||
!<span class="code">an-a05n02</span> | |||
|style="white-space: nowrap;"|<syntaxhighlight lang="bash"> | |||
clustat | |||
</syntaxhighlight> | |||
<syntaxhighlight lang="text"> | |||
Cluster Status for an-anvil-05 @ Thu Nov 21 01:07:56 2013 | |||
Member Status: Quorate | |||
Member Name ID Status | |||
------ ---- ---- ------ | |||
an-a05n01.alteeve.ca 1 Online, rgmanager | |||
an-a05n02.alteeve.ca 2 Online, Local, rgmanager | |||
Service Name Owner (Last) State | |||
------- ---- ----- ------ ----- | |||
service:libvirtd_n01 an-a05n01.alteeve.ca started | |||
service:libvirtd_n02 an-a05n02.alteeve.ca started | |||
service:storage_n01 an-a05n01.alteeve.ca started | |||
service:storage_n02 an-a05n02.alteeve.ca started | |||
vm:vm01-win2008 an-a05n01.alteeve.ca started | |||
vm:vm02-win2012 an-a05n02.alteeve.ca started | |||
vm:vm03-win7 an-a05n01.alteeve.ca started | |||
vm:vm04-win8 an-a05n01.alteeve.ca started | |||
vm:vm05-freebsd9 an-a05n02.alteeve.ca started | |||
vm:vm06-solaris11 an-a05n02.alteeve.ca started | |||
vm:vm07-rhel6 an-a05n02.alteeve.ca started | |||
</syntaxhighlight> | |||
|} | |||
If we use <span class="code">virsh</span>, we can confirm that <span class="code">vm07-rhel6</span> has, in fact, moved over to <span class="code">an-a05n02</span>. | |||
{|class="wikitable" | |||
!<span class="code">an-a05n01</span> | |||
|style="white-space: nowrap;"|<syntaxhighlight lang="bash"> | |||
virsh list --all | |||
</syntaxhighlight> | |||
<syntaxhighlight lang="text"> | |||
Id Name State | |||
---------------------------------------------------- | |||
9 vm04-win8 running | |||
15 vm01-win2008 running | |||
17 vm03-win7 running | |||
</syntaxhighlight> | |||
|- | |||
!<span class="code">an-a05n02</span> | |||
|style="white-space: nowrap;"|<syntaxhighlight lang="bash"> | |||
virsh list --all | |||
</syntaxhighlight> | |||
<syntaxhighlight lang="text"> | |||
Id Name State | |||
---------------------------------------------------- | |||
11 vm05-freebsd9 running | |||
17 vm02-win2012 running | |||
19 vm06-solaris11 running | |||
20 vm07-rhel6 running | |||
</syntaxhighlight> | |||
|} | |||
If you had a program running or were logged into <span class="code">vm07-rhel6</span> over [[RDP]] or similar, you would have noticed no interruptions. | |||
So now we'll pull it back. | |||
{|class="wikitable" | |||
!<span class="code">an-a05n01</span> | |||
|style="white-space: nowrap;"|<syntaxhighlight lang="bash"> | |||
clusvcadm -M vm:vm07-rhel6 -m an-a05n01.alteeve.ca | |||
</syntaxhighlight> | |||
<syntaxhighlight lang="text"> | |||
Trying to migrate vm:vm07-rhel6 to an-a05n01.alteeve.ca...Success | |||
</syntaxhighlight> | |||
|- | |||
!<span class="code">an-a05n02</span> | |||
|style="white-space: nowrap;"|<syntaxhighlight lang="bash"> | |||
clustat | |||
</syntaxhighlight> | |||
<syntaxhighlight lang="text"> | |||
Cluster Status for an-anvil-05 @ Thu Nov 21 01:08:49 2013 | |||
Member Status: Quorate | |||
Member Name ID Status | |||
------ ---- ---- ------ | |||
an-a05n01.alteeve.ca 1 Online, rgmanager | |||
an-a05n02.alteeve.ca 2 Online, Local, rgmanager | |||
Service Name Owner (Last) State | |||
------- ---- ----- ------ ----- | |||
service:libvirtd_n01 an-a05n01.alteeve.ca started | |||
service:libvirtd_n02 an-a05n02.alteeve.ca started | |||
service:storage_n01 an-a05n01.alteeve.ca started | |||
service:storage_n02 an-a05n02.alteeve.ca started | |||
vm:vm01-win2008 an-a05n01.alteeve.ca started | |||
vm:vm02-win2012 an-a05n02.alteeve.ca started | |||
vm:vm03-win7 an-a05n01.alteeve.ca started | |||
vm:vm04-win8 an-a05n01.alteeve.ca started | |||
vm:vm05-freebsd9 an-a05n02.alteeve.ca started | |||
vm:vm06-solaris11 an-a05n02.alteeve.ca started | |||
vm:vm07-rhel6 an-a05n01.alteeve.ca started | |||
</syntaxhighlight> | |||
|} | |||
Once again, we'll confirm with <span class="code">virsh</span>. | |||
{|class="wikitable" | |||
!<span class="code">an-a05n01</span> | |||
|style="white-space: nowrap;"|<syntaxhighlight lang="bash"> | |||
virsh list --all | |||
</syntaxhighlight> | |||
<syntaxhighlight lang="text"> | |||
Id Name State | |||
---------------------------------------------------- | |||
9 vm04-win8 running | |||
15 vm01-win2008 running | |||
17 vm03-win7 running | |||
21 vm07-rhel6 running | |||
</syntaxhighlight> | |||
|- | |||
!<span class="code">an-a05n02</span> | |||
|style="white-space: nowrap;"|<syntaxhighlight lang="bash"> | |||
virsh list --all | |||
</syntaxhighlight> | |||
<syntaxhighlight lang="text"> | |||
Id Name State | |||
---------------------------------------------------- | |||
11 vm05-freebsd9 running | |||
17 vm02-win2012 running | |||
19 vm06-solaris11 running | |||
</syntaxhighlight> | |||
|} | |||
Perfect! | |||
== Making vm08-sles11 a Highly Available Service == | |||
{{note|1=If you skipped adding <span class="code">vm01-win2008</span> to the cluster manager, please [[#Making_vm01-win2008_a_Highly_Available_Service|jump back]] and review the steps there. Particularly on creating the new failover domains and SELinux fix.}} | |||
It's time to add our last server, <span class="code">[[#Provisioning_vm08-sles11|vm08-sles11]]</span>, to the cluster's management. | |||
=== Dumping the vm08-sles11 XML Definition File === | |||
As we did with the previous servers, we need to dump <span class="code">vm08-sles11</span>'s [[XML]] definition out to a file in <span class="code">/shared/definitions</span>. | |||
First, let's use <span class="code">virsh</span> to see the server's state. | |||
{|class="wikitable" | |||
!<span class="code">an-a05n01</span> | |||
|style="white-space: nowrap;"|<syntaxhighlight lang="bash"> | |||
virsh list --all | |||
</syntaxhighlight> | |||
<syntaxhighlight lang="text"> | |||
Id Name State | |||
---------------------------------------------------- | |||
9 vm04-win8 running | |||
15 vm01-win2008 running | |||
17 vm03-win7 running | |||
21 vm07-rhel6 running | |||
23 vm08-sles11 running | |||
</syntaxhighlight> | |||
|- | |||
!<span class="code">an-a05n02</span> | |||
|style="white-space: nowrap;"|<syntaxhighlight lang="bash"> | |||
virsh list --all | |||
</syntaxhighlight> | |||
<syntaxhighlight lang="text"> | |||
Id Name State | |||
---------------------------------------------------- | |||
11 vm05-freebsd9 running | |||
17 vm02-win2012 running | |||
19 vm06-solaris11 running | |||
</syntaxhighlight> | |||
|} | |||
So we see that <span class="code">vm08-sles11</span> is running on <span class="code">an-a05n01</span>, which is where we provisioned it. | |||
Now dump the server's XML. | |||
{|class="wikitable" | |||
!<span class="code">an-a05n01</span> | |||
|style="white-space: nowrap;"|<syntaxhighlight lang="bash"> | |||
virsh dumpxml vm08-sles11 > /shared/definitions/vm08-sles11.xml | |||
ls -lah /shared/definitions/vm08-sles11.xml | |||
</syntaxhighlight> | |||
<syntaxhighlight lang="text"> | |||
-rw-r--r--. 1 root root 3.1K Nov 21 02:14 /shared/definitions/vm08-sles11.xml | |||
</syntaxhighlight> | |||
|} | |||
{{warning|1=Be sure the XML file was written properly! This next step will remove the server from <span class="code">libvirtd</span>. Once done, the <span class="code">/shared/definitions/vm08-sles11.xml</span> will be the only way to boot the server!}} | |||
The last step is, again, to remove <span class="code">vm08-sles11</span> from <span class="code">libvirtd</span>. | |||
{|class="wikitable" | |||
!<span class="code">an-a05n01</span> | |||
|style="white-space: nowrap;"|<syntaxhighlight lang="bash"> | |||
virsh undefine vm08-sles11 | |||
</syntaxhighlight> | |||
<syntaxhighlight lang="text"> | |||
Domain vm08-sles11 has been undefined | |||
</syntaxhighlight> | |||
|} | |||
Done. | |||
=== Creating the vm:vm08-sles11 Service === | |||
As we did for the previous servers, we will create a <span class="code">vm</span> service entry for <span class="code">vm08-sles11</span> under the <span class="code">primary_n01</span> failover domain. | |||
Lets increment the version to <span class="code">19</span> and add the new entry. | |||
One major difference this time is that we will not alter the shut down timer. The default of two minutes is fine for non-Microsoft servers. | |||
{|class="wikitable" | |||
!<span class="code">an-a05n01</span> | |||
|style="white-space: nowrap;"|<syntaxhighlight lang="xml"> | |||
<rm log_level="5"> | |||
... | |||
<vm name="vm08-sles11" domain="primary_n01" autostart="0" path="/shared/definitions/" exclusive="0" recovery="restart" max_restarts="2" restart_expire_time="600"/> | |||
</rm> | |||
</syntaxhighlight> | |||
|} | |||
Making the new <span class="code">cluster.conf</span> as we see it below. | |||
{|class="wikitable" | |||
!<span class="code">an-a05n01</span> | |||
|style="white-space: nowrap;"|<syntaxhighlight lang="xml"> | |||
<?xml version="1.0"?> | |||
<cluster name="an-anvil-05" config_version="15"> | |||
<cman expected_votes="1" two_node="1" /> | |||
<clusternodes> | |||
<clusternode name="an-a05n01.alteeve.ca" nodeid="1"> | |||
<fence> | |||
<method name="ipmi"> | |||
<device name="ipmi_n01" action="reboot" delay="15" /> | |||
</method> | |||
<method name="pdu"> | |||
<device name="pdu1" port="1" action="reboot" /> | |||
<device name="pdu2" port="1" action="reboot" /> | |||
</method> | |||
</fence> | |||
</clusternode> | |||
<clusternode name="an-a05n02.alteeve.ca" nodeid="2"> | |||
<fence> | |||
<method name="ipmi"> | |||
<device name="ipmi_n02" action="reboot" /> | |||
</method> | |||
<method name="pdu"> | |||
<device name="pdu1" port="2" action="reboot" /> | |||
<device name="pdu2" port="2" action="reboot" /> | |||
</method> | |||
</fence> | |||
</clusternode> | |||
</clusternodes> | |||
<fencedevices> | |||
<fencedevice name="ipmi_n01" agent="fence_ipmilan" ipaddr="an-a05n01.ipmi" login="admin" passwd="secret" /> | |||
<fencedevice name="ipmi_n02" agent="fence_ipmilan" ipaddr="an-a05n02.ipmi" login="admin" passwd="secret" /> | |||
<fencedevice agent="fence_apc_snmp" ipaddr="an-pdu01.alteeve.ca" name="pdu1" /> | |||
<fencedevice agent="fence_apc_snmp" ipaddr="an-pdu02.alteeve.ca" name="pdu2" /> | |||
</fencedevices> | |||
<fence_daemon post_join_delay="30" /> | |||
<totem rrp_mode="none" secauth="off"/> | |||
<rm log_level="5"> | |||
<resources> | |||
<script file="/etc/init.d/drbd" name="drbd"/> | |||
<script file="/etc/init.d/clvmd" name="clvmd"/> | |||
<clusterfs device="/dev/an-a05n01_vg0/shared" force_unmount="1" fstype="gfs2" mountpoint="/shared" name="sharedfs" /> | |||
<script file="/etc/init.d/libvirtd" name="libvirtd"/> | |||
</resources> | |||
<failoverdomains> | |||
<failoverdomain name="only_n01" nofailback="1" ordered="0" restricted="1"> | |||
<failoverdomainnode name="an-a05n01.alteeve.ca"/> | |||
</failoverdomain> | |||
<failoverdomain name="only_n02" nofailback="1" ordered="0" restricted="1"> | |||
<failoverdomainnode name="an-a05n02.alteeve.ca"/> | |||
</failoverdomain> | |||
<failoverdomain name="primary_n01" nofailback="1" ordered="1" restricted="1"> | |||
<failoverdomainnode name="an-a05n01.alteeve.ca" priority="1"/> | |||
<failoverdomainnode name="an-a05n02.alteeve.ca" priority="2"/> | |||
</failoverdomain> | |||
<failoverdomain name="primary_n02" nofailback="1" ordered="1" restricted="1"> | |||
<failoverdomainnode name="an-a05n01.alteeve.ca" priority="2"/> | |||
<failoverdomainnode name="an-a05n02.alteeve.ca" priority="1"/> | |||
</failoverdomain> | |||
</failoverdomains> | |||
<service name="storage_n01" autostart="1" domain="only_n01" exclusive="0" recovery="restart"> | |||
<script ref="drbd"> | |||
<script ref="clvmd"> | |||
<clusterfs ref="sharedfs"/> | |||
</script> | |||
</script> | |||
</service> | |||
<service name="storage_n02" autostart="1" domain="only_n02" exclusive="0" recovery="restart"> | |||
<script ref="drbd"> | |||
<script ref="clvmd"> | |||
<clusterfs ref="sharedfs"/> | |||
</script> | |||
</script> | |||
</service> | |||
<service name="libvirtd_n01" autostart="1" domain="only_n01" exclusive="0" recovery="restart"> | |||
<script ref="libvirtd"/> | |||
</service> | |||
<service name="libvirtd_n02" autostart="1" domain="only_n02" exclusive="0" recovery="restart"> | |||
<script ref="libvirtd"/> | |||
</service> | |||
<vm name="vm01-win2008" domain="primary_n01" autostart="0" path="/shared/definitions/" exclusive="0" recovery="restart" max_restarts="2" restart_expire_time="600"> | |||
<action name="stop" timeout="30m" /> | |||
</vm> | |||
<vm name="vm02-win2012" domain="primary_n02" autostart="0" path="/shared/definitions/" exclusive="0" recovery="restart" max_restarts="2" restart_expire_time="600"> | |||
<action name="stop" timeout="30m" /> | |||
</vm> | |||
<vm name="vm03-win7" domain="primary_n01" autostart="0" path="/shared/definitions/" exclusive="0" recovery="restart" max_restarts="2" restart_expire_time="600"> | |||
<action name="stop" timeout="30m" /> | |||
</vm> | |||
<vm name="vm04-win8" domain="primary_n01" autostart="0" path="/shared/definitions/" exclusive="0" recovery="restart" max_restarts="2" restart_expire_time="600"> | |||
<action name="stop" timeout="30m" /> | |||
</vm> | |||
<vm name="vm05-freebsd9" domain="primary_n02" autostart="0" path="/shared/definitions/" exclusive="0" recovery="restart" max_restarts="2" restart_expire_time="600"/> | |||
<vm name="vm06-solaris11" domain="primary_n02" autostart="0" path="/shared/definitions/" exclusive="0" recovery="restart" max_restarts="2" restart_expire_time="600"/> | |||
<vm name="vm07-rhel6" domain="primary_n01" autostart="0" path="/shared/definitions/" exclusive="0" recovery="restart" max_restarts="2" restart_expire_time="600"/> | |||
<vm name="vm08-sles11" domain="primary_n01" autostart="0" path="/shared/definitions/" exclusive="0" recovery="restart" max_restarts="2" restart_expire_time="600"/> | |||
</rm> | |||
</cluster> | |||
</syntaxhighlight> | |||
|} | |||
Now let's activate the new configuration. | |||
{|class="wikitable" | |||
!<span class="code">an-a05n01</span> | |||
|style="white-space: nowrap;"|<syntaxhighlight lang="bash"> | |||
ccs_config_validate | |||
</syntaxhighlight> | |||
<syntaxhighlight lang="text"> | |||
Configuration validates | |||
</syntaxhighlight> | |||
<syntaxhighlight lang="bash"> | |||
cman_tool version | |||
</syntaxhighlight> | |||
<syntaxhighlight lang="text"> | |||
6.2.0 config 18 | |||
</syntaxhighlight> | |||
<syntaxhighlight lang="bash"> | |||
cman_tool version -r | |||
cman_tool version | |||
</syntaxhighlight> | |||
<syntaxhighlight lang="text"> | |||
6.2.0 config 19 | |||
</syntaxhighlight> | |||
|- | |||
!<span class="code">an-a05n02</span> | |||
|style="white-space: nowrap;"|<syntaxhighlight lang="bash"> | |||
cman_tool version | |||
</syntaxhighlight> | |||
<syntaxhighlight lang="text"> | |||
6.2.0 config 19 | |||
</syntaxhighlight> | |||
|} | |||
Let's take a look at <span class="code">clustat</span> on both nodes now. | |||
{|class="wikitable" | |||
!<span class="code">an-a05n01</span> | |||
|style="white-space: nowrap;"|<syntaxhighlight lang="bash"> | |||
clustat | |||
</syntaxhighlight> | |||
<syntaxhighlight lang="text"> | |||
Cluster Status for an-anvil-05 @ Thu Nov 21 02:16:43 2013 | |||
Member Status: Quorate | |||
Member Name ID Status | |||
------ ---- ---- ------ | |||
an-a05n01.alteeve.ca 1 Online, Local, rgmanager | |||
an-a05n02.alteeve.ca 2 Online, rgmanager | |||
Service Name Owner (Last) State | |||
------- ---- ----- ------ ----- | |||
service:libvirtd_n01 an-a05n01.alteeve.ca started | |||
service:libvirtd_n02 an-a05n02.alteeve.ca started | |||
service:storage_n01 an-a05n01.alteeve.ca started | |||
service:storage_n02 an-a05n02.alteeve.ca started | |||
vm:vm01-win2008 an-a05n01.alteeve.ca started | |||
vm:vm02-win2012 an-a05n02.alteeve.ca started | |||
vm:vm03-win7 an-a05n01.alteeve.ca started | |||
vm:vm04-win8 an-a05n01.alteeve.ca started | |||
vm:vm05-freebsd9 an-a05n02.alteeve.ca started | |||
vm:vm06-solaris11 an-a05n02.alteeve.ca started | |||
vm:vm07-rhel6 an-a05n01.alteeve.ca started | |||
vm:vm08-sles11 (none) disabled | |||
</syntaxhighlight> | |||
|- | |||
!<span class="code">an-a05n02</span> | |||
|style="white-space: nowrap;"|<syntaxhighlight lang="bash"> | |||
clustat | |||
</syntaxhighlight> | |||
<syntaxhighlight lang="text"> | |||
Cluster Status for an-anvil-05 @ Thu Nov 21 02:16:43 2013 | |||
Member Status: Quorate | |||
Member Name ID Status | |||
------ ---- ---- ------ | |||
an-a05n01.alteeve.ca 1 Online, rgmanager | |||
an-a05n02.alteeve.ca 2 Online, Local, rgmanager | |||
Service Name Owner (Last) State | |||
------- ---- ----- ------ ----- | |||
service:libvirtd_n01 an-a05n01.alteeve.ca started | |||
service:libvirtd_n02 an-a05n02.alteeve.ca started | |||
service:storage_n01 an-a05n01.alteeve.ca started | |||
service:storage_n02 an-a05n02.alteeve.ca started | |||
vm:vm01-win2008 an-a05n01.alteeve.ca started | |||
vm:vm02-win2012 an-a05n02.alteeve.ca started | |||
vm:vm03-win7 an-a05n01.alteeve.ca started | |||
vm:vm04-win8 an-a05n01.alteeve.ca started | |||
vm:vm05-freebsd9 an-a05n02.alteeve.ca started | |||
vm:vm06-solaris11 an-a05n02.alteeve.ca started | |||
vm:vm07-rhel6 an-a05n01.alteeve.ca started | |||
vm:vm08-sles11 (none) disabled | |||
</syntaxhighlight> | |||
|} | |||
As expected, <span class="code">vm:vm08-sles11</span> is <span class="code">disabled</span>. Verify that it is still running on <span class="code">an-a05n01</span>. | |||
{|class="wikitable" | |||
!<span class="code">an-a05n01</span> | |||
|style="white-space: nowrap;"|<syntaxhighlight lang="bash"> | |||
virsh list --all | |||
</syntaxhighlight> | |||
<syntaxhighlight lang="text"> | |||
Id Name State | |||
---------------------------------------------------- | |||
9 vm04-win8 running | |||
15 vm01-win2008 running | |||
17 vm03-win7 running | |||
21 vm07-rhel6 running | |||
23 vm08-sles11 running | |||
</syntaxhighlight> | |||
|- | |||
!<span class="code">an-a05n02</span> | |||
|style="white-space: nowrap;"|<syntaxhighlight lang="bash"> | |||
virsh list --all | |||
</syntaxhighlight> | |||
<syntaxhighlight lang="text"> | |||
Id Name State | |||
---------------------------------------------------- | |||
11 vm05-freebsd9 running | |||
17 vm02-win2012 running | |||
19 vm06-solaris11 running | |||
</syntaxhighlight> | |||
|} | |||
Confirmed, <span class="code">vm08-sles11</span> is on <span class="code">an-a05n01</span>. | |||
As we did before, we'll use <span class="code">clusvcadm</span> to <span class="code">enable</span> the <span class="code">vm:vm08-sles11</span> service on the <span class="code">an-a05n01.alteeve.ca</span> cluster member. | |||
{|class="wikitable" | |||
!<span class="code">an-a05n01</span> | |||
|style="white-space: nowrap;"|<syntaxhighlight lang="bash"> | |||
clusvcadm -e vm:vm08-sles11 -m an-a05n01.alteeve.ca | |||
</syntaxhighlight> | |||
<syntaxhighlight lang="text"> | |||
Member an-a05n01.alteeve.ca trying to enable vm:vm08-sles11...Success | |||
vm:vm08-sles11 is now running on an-a05n01.alteeve.ca | |||
</syntaxhighlight> | |||
|- | |||
!<span class="code">an-a05n02</span> | |||
|style="white-space: nowrap;"|<syntaxhighlight lang="bash"> | |||
clustat | |||
</syntaxhighlight> | |||
<syntaxhighlight lang="text"> | |||
Cluster Status for an-anvil-05 @ Thu Nov 21 02:17:40 2013 | |||
Member Status: Quorate | |||
Member Name ID Status | |||
------ ---- ---- ------ | |||
an-a05n01.alteeve.ca 1 Online, rgmanager | |||
an-a05n02.alteeve.ca 2 Online, Local, rgmanager | |||
Service Name Owner (Last) State | |||
------- ---- ----- ------ ----- | |||
service:libvirtd_n01 an-a05n01.alteeve.ca started | |||
service:libvirtd_n02 an-a05n02.alteeve.ca started | |||
service:storage_n01 an-a05n01.alteeve.ca started | |||
service:storage_n02 an-a05n02.alteeve.ca started | |||
vm:vm01-win2008 an-a05n01.alteeve.ca started | |||
vm:vm02-win2012 an-a05n02.alteeve.ca started | |||
vm:vm03-win7 an-a05n01.alteeve.ca started | |||
vm:vm04-win8 an-a05n01.alteeve.ca started | |||
vm:vm05-freebsd9 an-a05n02.alteeve.ca started | |||
vm:vm06-solaris11 an-a05n02.alteeve.ca started | |||
vm:vm07-rhel6 an-a05n01.alteeve.ca started | |||
vm:vm08-sles11 an-a05n01.alteeve.ca started | |||
</syntaxhighlight> | |||
|} | |||
Done! | |||
Now, should <span class="code">vm08-sles11</span> fail or if <span class="code">an-a05n01</span> should fail, the ''Anvil!'' will recover it automatically. | |||
=== Testing vm08-sles11 Management With clusvcadm === | |||
The first thing we're going to do is disable (gracefully shut down) the server. To do this, we'll send an [[ACPI]] "power button" event to <span class="code">vm08-sles11</span>. FreeBSD 9 will, like most operating systems, respond to having its "power button pressed" by beginning a graceful shut down. | |||
As always, start by checking the state of things. | |||
{|class="wikitable" | |||
!<span class="code">an-a05n01</span> | |||
|style="white-space: nowrap;"|<syntaxhighlight lang="bash"> | |||
clustat | |||
</syntaxhighlight> | |||
<syntaxhighlight lang="text"> | |||
Cluster Status for an-anvil-05 @ Thu Nov 21 02:17:51 2013 | |||
Member Status: Quorate | |||
Member Name ID Status | |||
------ ---- ---- ------ | |||
an-a05n01.alteeve.ca 1 Online, Local, rgmanager | |||
an-a05n02.alteeve.ca 2 Online, rgmanager | |||
Service Name Owner (Last) State | |||
------- ---- ----- ------ ----- | |||
service:libvirtd_n01 an-a05n01.alteeve.ca started | |||
service:libvirtd_n02 an-a05n02.alteeve.ca started | |||
service:storage_n01 an-a05n01.alteeve.ca started | |||
service:storage_n02 an-a05n02.alteeve.ca started | |||
vm:vm01-win2008 an-a05n01.alteeve.ca started | |||
vm:vm02-win2012 an-a05n02.alteeve.ca started | |||
vm:vm03-win7 an-a05n01.alteeve.ca started | |||
vm:vm04-win8 an-a05n01.alteeve.ca started | |||
vm:vm05-freebsd9 an-a05n02.alteeve.ca started | |||
vm:vm06-solaris11 an-a05n02.alteeve.ca started | |||
vm:vm07-rhel6 an-a05n01.alteeve.ca started | |||
vm:vm08-sles11 an-a05n01.alteeve.ca started | |||
</syntaxhighlight> | |||
|} | |||
As we expected. | |||
{|class="wikitable" | |||
!<span class="code">an-a05n01</span> | |||
|style="white-space: nowrap;"|<syntaxhighlight lang="bash"> | |||
clusvcadm -d vm:vm08-sles11 | |||
</syntaxhighlight> | |||
<syntaxhighlight lang="text"> | |||
Local machine disabling vm:vm08-sles11...Success | |||
</syntaxhighlight> | |||
|} | |||
If we check <span class="code">clustat</span> again, we'll see that the <span class="code">vm:vm08-sles11</span> service is indeed <span class="code">disabled</span>. | |||
{|class="wikitable" | |||
!<span class="code">an-a05n02</span> | |||
|style="white-space: nowrap;"|<syntaxhighlight lang="bash"> | |||
clustat | |||
</syntaxhighlight> | |||
<syntaxhighlight lang="text"> | |||
Cluster Status for an-anvil-05 @ Thu Nov 21 02:19:19 2013 | |||
Member Status: Quorate | |||
Member Name ID Status | |||
------ ---- ---- ------ | |||
an-a05n01.alteeve.ca 1 Online, rgmanager | |||
an-a05n02.alteeve.ca 2 Online, Local, rgmanager | |||
Service Name Owner (Last) State | |||
------- ---- ----- ------ ----- | |||
service:libvirtd_n01 an-a05n01.alteeve.ca started | |||
service:libvirtd_n02 an-a05n02.alteeve.ca started | |||
service:storage_n01 an-a05n01.alteeve.ca started | |||
service:storage_n02 an-a05n02.alteeve.ca started | |||
vm:vm01-win2008 an-a05n01.alteeve.ca started | |||
vm:vm02-win2012 an-a05n02.alteeve.ca started | |||
vm:vm03-win7 an-a05n01.alteeve.ca started | |||
vm:vm04-win8 an-a05n01.alteeve.ca started | |||
vm:vm05-freebsd9 an-a05n02.alteeve.ca started | |||
vm:vm06-solaris11 an-a05n02.alteeve.ca started | |||
vm:vm07-rhel6 an-a05n01.alteeve.ca started | |||
vm:vm08-sles11 (an-a05n01.alteeve.ca) disabled | |||
</syntaxhighlight> | |||
|} | |||
Good, it's off. Let's turn it back on now. | |||
{|class="wikitable" | |||
!<span class="code">an-a05n01</span> | |||
|style="white-space: nowrap;"|<syntaxhighlight lang="bash"> | |||
clusvcadm -F -e vm:vm08-sles11 | |||
</syntaxhighlight> | |||
<syntaxhighlight lang="text"> | |||
Local machine trying to enable vm:vm08-sles11...Success | |||
vm:vm08-sles11 is now running on an-a05n01.alteeve.ca | |||
</syntaxhighlight> | |||
|- | |||
!<span class="code">an-a05n02</span> | |||
|style="white-space: nowrap;"|<syntaxhighlight lang="bash"> | |||
clustat | |||
</syntaxhighlight> | |||
<syntaxhighlight lang="text"> | |||
Cluster Status for an-anvil-05 @ Thu Nov 21 02:19:40 2013 | |||
Member Status: Quorate | |||
Member Name ID Status | |||
------ ---- ---- ------ | |||
an-a05n01.alteeve.ca 1 Online, rgmanager | |||
an-a05n02.alteeve.ca 2 Online, Local, rgmanager | |||
Service Name Owner (Last) State | |||
------- ---- ----- ------ ----- | |||
service:libvirtd_n01 an-a05n01.alteeve.ca started | |||
service:libvirtd_n02 an-a05n02.alteeve.ca started | |||
service:storage_n01 an-a05n01.alteeve.ca started | |||
service:storage_n02 an-a05n02.alteeve.ca started | |||
vm:vm01-win2008 an-a05n01.alteeve.ca started | |||
vm:vm02-win2012 an-a05n02.alteeve.ca started | |||
vm:vm03-win7 an-a05n01.alteeve.ca started | |||
vm:vm04-win8 an-a05n01.alteeve.ca started | |||
vm:vm05-freebsd9 an-a05n02.alteeve.ca started | |||
vm:vm06-solaris11 an-a05n02.alteeve.ca started | |||
vm:vm07-rhel6 an-a05n01.alteeve.ca started | |||
vm:vm08-sles11 an-a05n01.alteeve.ca started | |||
</syntaxhighlight> | |||
|} | |||
One last step; Testing live migration! We'll push <span class="code">vm08-sles11</span> over to <span class="code">an-a05n01</span> and then pull it back again. | |||
{|class="wikitable" | |||
!<span class="code">an-a05n01</span> | |||
|style="white-space: nowrap;"|<syntaxhighlight lang="bash"> | |||
clusvcadm -M vm:vm08-sles11 -m an-a05n02.alteeve.ca | |||
</syntaxhighlight> | |||
<syntaxhighlight lang="text"> | |||
Trying to migrate vm:vm08-sles11 to an-a05n02.alteeve.ca...Success | |||
</syntaxhighlight> | |||
|- | |||
!<span class="code">an-a05n02</span> | |||
|style="white-space: nowrap;"|<syntaxhighlight lang="bash"> | |||
clustat | |||
</syntaxhighlight> | |||
<syntaxhighlight lang="text"> | |||
Cluster Status for an-anvil-05 @ Thu Nov 21 02:20:35 2013 | |||
Member Status: Quorate | |||
Member Name ID Status | |||
------ ---- ---- ------ | |||
an-a05n01.alteeve.ca 1 Online, rgmanager | |||
an-a05n02.alteeve.ca 2 Online, Local, rgmanager | |||
Service Name Owner (Last) State | |||
------- ---- ----- ------ ----- | |||
service:libvirtd_n01 an-a05n01.alteeve.ca started | |||
service:libvirtd_n02 an-a05n02.alteeve.ca started | |||
service:storage_n01 an-a05n01.alteeve.ca started | |||
service:storage_n02 an-a05n02.alteeve.ca started | |||
vm:vm01-win2008 an-a05n01.alteeve.ca started | |||
vm:vm02-win2012 an-a05n02.alteeve.ca started | |||
vm:vm03-win7 an-a05n01.alteeve.ca started | |||
vm:vm04-win8 an-a05n01.alteeve.ca started | |||
vm:vm05-freebsd9 an-a05n02.alteeve.ca started | |||
vm:vm06-solaris11 an-a05n02.alteeve.ca started | |||
vm:vm07-rhel6 an-a05n01.alteeve.ca started | |||
vm:vm08-sles11 an-a05n02.alteeve.ca started | |||
</syntaxhighlight> | |||
|} | |||
If we use <span class="code">virsh</span>, we can confirm that <span class="code">vm08-sles11</span> has, in fact, moved over to <span class="code">an-a05n02</span>. | |||
{|class="wikitable" | |||
!<span class="code">an-a05n01</span> | |||
|style="white-space: nowrap;"|<syntaxhighlight lang="bash"> | |||
virsh list --all | |||
</syntaxhighlight> | |||
<syntaxhighlight lang="text"> | |||
Id Name State | |||
---------------------------------------------------- | |||
9 vm04-win8 running | |||
15 vm01-win2008 running | |||
17 vm03-win7 running | |||
21 vm07-rhel6 running | |||
</syntaxhighlight> | |||
|- | |||
!<span class="code">an-a05n02</span> | |||
|style="white-space: nowrap;"|<syntaxhighlight lang="bash"> | |||
virsh list --all | |||
</syntaxhighlight> | |||
<syntaxhighlight lang="text"> | |||
Id Name State | |||
---------------------------------------------------- | |||
11 vm05-freebsd9 running | |||
17 vm02-win2012 running | |||
19 vm06-solaris11 running | |||
21 vm08-sles11 running | |||
</syntaxhighlight> | |||
|} | |||
If you had a program running or were logged into <span class="code">vm08-sles11</span> over [[RDP]] or similar, you would have noticed no interruptions. | |||
So now we'll pull it back. | |||
{|class="wikitable" | |||
!<span class="code">an-a05n01</span> | |||
|style="white-space: nowrap;"|<syntaxhighlight lang="bash"> | |||
clusvcadm -M vm:vm08-sles11 -m an-a05n01.alteeve.ca | |||
</syntaxhighlight> | |||
<syntaxhighlight lang="text"> | |||
Trying to migrate vm:vm08-sles11 to an-a05n01.alteeve.ca...Success | |||
</syntaxhighlight> | |||
|- | |||
!<span class="code">an-a05n02</span> | |||
|style="white-space: nowrap;"|<syntaxhighlight lang="bash"> | |||
clustat | |||
</syntaxhighlight> | |||
<syntaxhighlight lang="text"> | |||
Cluster Status for an-anvil-05 @ Thu Nov 21 02:21:13 2013 | |||
Member Status: Quorate | |||
Member Name ID Status | |||
------ ---- ---- ------ | |||
an-a05n01.alteeve.ca 1 Online, rgmanager | |||
an-a05n02.alteeve.ca 2 Online, Local, rgmanager | |||
Service Name Owner (Last) State | |||
------- ---- ----- ------ ----- | |||
service:libvirtd_n01 an-a05n01.alteeve.ca started | |||
service:libvirtd_n02 an-a05n02.alteeve.ca started | |||
service:storage_n01 an-a05n01.alteeve.ca started | |||
service:storage_n02 an-a05n02.alteeve.ca started | |||
vm:vm01-win2008 an-a05n01.alteeve.ca started | |||
vm:vm02-win2012 an-a05n02.alteeve.ca started | |||
vm:vm03-win7 an-a05n01.alteeve.ca started | |||
vm:vm04-win8 an-a05n01.alteeve.ca started | |||
vm:vm05-freebsd9 an-a05n02.alteeve.ca started | |||
vm:vm06-solaris11 an-a05n02.alteeve.ca started | |||
vm:vm07-rhel6 an-a05n01.alteeve.ca started | |||
vm:vm08-sles11 an-a05n01.alteeve.ca started | |||
</syntaxhighlight> | |||
|} | |||
Once again, we'll confirm with <span class="code">virsh</span>. | |||
{|class="wikitable" | |||
!<span class="code">an-a05n01</span> | |||
|style="white-space: nowrap;"|<syntaxhighlight lang="bash"> | |||
virsh list --all | |||
</syntaxhighlight> | |||
<syntaxhighlight lang="text"> | |||
Id Name State | |||
---------------------------------------------------- | |||
9 vm04-win8 running | |||
15 vm01-win2008 running | |||
17 vm03-win7 running | |||
21 vm07-rhel6 running | |||
25 vm08-sles11 running | |||
</syntaxhighlight> | |||
|- | |||
!<span class="code">an-a05n02</span> | |||
|style="white-space: nowrap;"|<syntaxhighlight lang="bash"> | |||
virsh list --all | |||
</syntaxhighlight> | |||
<syntaxhighlight lang="text"> | |||
Id Name State | |||
---------------------------------------------------- | |||
11 vm05-freebsd9 running | |||
17 vm02-win2012 running | |||
19 vm06-solaris11 running | |||
</syntaxhighlight> | |||
|} | |||
It's really pretty easy, isn't it? | |||
= Setting Up Alerts = | |||
One of the major additions to this second addition is the advent of the new alert system we developed called "AN!CM"; "AN! Cluster Monitor". | |||
== Alert System Overview == | |||
It is hardly fancy, but it does provide, in one package, very careful and detailed monitoring of: | |||
* Incoming power issues via UPS monitoring. | |||
* Network interruptions via <span class="code">bond</span> driver events | |||
* Monitoring of node environmental health via IPMI BMC sensor readings | |||
* Monitoring of all storage components via LSI's MegaCli tool | |||
* Monitoring of the HA cluster stack using Red Hat's tools | |||
In all, over 200 points are monitored every 30 seconds. Most changes are simply logged, but events deemed important (or new events not before seen) trigger email alerts. These alerts are kept as simple and to the point as possibly to minimize the amount of time needed to understand what event triggered the alert. | |||
The alerting system tries to be intelligent about how alerts are triggered. For example, a thermal alert can trigger if it passes a set threshold, of course. At the same time, "early warning" alerts can be triggered is a sudden excessive change in temperature is seen. This allows early reaction to major events like HVAC failures in the server room or DC. | |||
Basic predictive failure analysis is also provided. Examples of this are alerts on distorted incoming power from the building mains. Likewise, a sudden jump in the number of media errors from a disk drive will trigger alerts. In this way, early warning alerts can get out before a component actually fails. This allows for corrective measures or replacement parts to be ordered pre-failure, minimizing risk exposure time. | |||
== AN!CM Requirements == | |||
The alerting system is fairly customized to the ''Anvil!'' build-out. For example, only APC brand UPSes with [http://www.apc.com/products/resource/include/techspec_index.cfm?base_sku=AP9630 AP9630] controllers are supported for UPS monitoring. Likewise, only LSI-brand RAID controllers are currently supported. | |||
That said, AN!CM is an [https://github.com/digimer/an-cdb/tree/master/tools open-source project] (<span class="code">an-cm</span> and <span class="code">an-cm.lib</span>), so contributions are happily accepted. If you need help adapting this to your hardware, please don't hesitate to [[Support|contact us]]. We will be happy to assist however we can. | |||
== Setting Up Your Dashboard == | |||
You can configure a node's monitoring without a dashboard, if you wish. However, [[Striker]] has been designed to use the dashboard systems as the center of the AN! tools. | |||
Please setup a dashboard before proceeding: | |||
* [[Install and Configure Striker]] | |||
Once you're done there, come back here. | |||
== Testing Monitoring == | |||
At this point, <span class="code">/etc/an/an.conf</span>, <span class="code">/root/an-cm</span> and <span class="code">/root/an-cm.lib</span> should be on our nodes. | |||
Before we enable monitoring, lets test it once manually. If things work as expected, you should get two emails: | |||
* First indicating that the alert system has started with an overview of the node's health. | |||
* Second indicating that the alert system has stopped. | |||
{{note|1=The monitoring and alert program generally will not print anything to the screen. When we run the command below, the terminal will appear hung. It is not though. Wait a minute and you should get an email from the node. Once you see that email, press "<span class="code">ctrl</span> + <span class="code">c</span>" to close the program and return to the command prompt.}} | |||
{|class="wikitable" | |||
!<span class="code">an-a05n01</span> | |||
|style="white-space: nowrap;"|<syntaxhighlight lang="bash"> | |||
/root/an-cm | |||
</syntaxhighlight> | |||
After a moment, you should get an email like this: | |||
<syntaxhighlight lang="text"> | |||
Subject: [ AN!CM ] - Alteeve's Niche! - Cluster 05 (Demo Cluster - "Tyson") - an-a05n01 - Cluster Monitor Start | |||
</syntaxhighlight> | |||
<syntaxhighlight lang="text"> | |||
Cluster node's monitor program has started. | |||
Current State: | |||
--[ Cluster Status ]-------------------------------------------------- | |||
Cluster: an-anvil-05 | |||
Quorum: Quorate | |||
Node: an-a05n01.alteeve.ca - Online, Local, rgmanager | |||
Node: an-a05n02.alteeve.ca - Online, rgmanager | |||
Service: libvirtd_n01 -> started on an-a05n01.alteeve.ca | |||
Service: libvirtd_n02 -> started on an-a05n02.alteeve.ca | |||
Service: storage_n01 -> started on an-a05n01.alteeve.ca | |||
Service: storage_n02 -> started on an-a05n02.alteeve.ca | |||
VM: vm01-win2008 -> started on an-a05n01.alteeve.ca | |||
VM: vm02-win2012 -> started on an-a05n02.alteeve.ca | |||
VM: vm03-win7 -> started on an-a05n01.alteeve.ca | |||
VM: vm04-win8 -> started on an-a05n01.alteeve.ca | |||
VM: vm05-freebsd9 -> started on an-a05n02.alteeve.ca | |||
VM: vm06-solaris11 -> started on an-a05n02.alteeve.ca | |||
VM: vm07-rhel6 -> started on an-a05n01.alteeve.ca | |||
VM: vm08-sles11 -> started on an-a05n01.alteeve.ca | |||
--[ Network Status ]-------------------------------------------------- | |||
Bridge: ifn_bridge1, MAC: 00:1B:21:81:C3:34, STP disabled | |||
Links(s): |- ifn_bond1, MAC: 00:1B:21:81:C3:34 | |||
|- vnet0, MAC: FE:54:00:58:06:A9 | |||
|- vnet1, MAC: FE:54:00:8E:67:32 | |||
|- vnet2, MAC: FE:54:00:68:9B:FD | |||
|- vnet3, MAC: FE:54:00:D5:49:4C | |||
\- vnet4, MAC: FE:54:00:8A:6C:52 | |||
Bond: bcn_bond1 -+- bcn_link1 -+-> Back-Channel Network | |||
\- bcn_link2 -/ | |||
Active Slave: bcn_link1 using MAC: 00:19:99:9C:9B:9E | |||
Prefer Slave: bcn_link1 | |||
Reselect: Primary always, after 120000 seconds | |||
Link Check: Every 100 ms | |||
MTU Size: 1500 Bytes | |||
+-------------------+-------------------+ | |||
Slaves | bcn_link1 | bcn_link2 | | |||
+------------+-------------------+-------------------+ | |||
| Link: | Up | Up | | |||
| Speed: | 1000 Mbps FD | 1000 Mbps FD | | |||
| MAC: | 00:19:99:9C:9B:9E | 00:1B:21:81:C3:35 | | |||
| Failures: | 0 | 0 | | |||
+------------+-------------------+-------------------+ | |||
Bond: sn_bond1 -+- sn_link1 -+-> Storage Network | |||
\- sn_link2 -/ | |||
Active Slave: sn_link1 using MAC: 00:19:99:9C:9B:9F | |||
Prefer Slave: sn_link1 | |||
Reselect: Primary always, after 120000 seconds | |||
Link Check: Every 100 ms | |||
MTU Size: 1500 Bytes | |||
+-------------------+-------------------+ | |||
Slaves | sn_link1 | sn_link2 | | |||
+------------+-------------------+-------------------+ | |||
| Link: | Up | Up | | |||
| Speed: | 1000 Mbps FD | 1000 Mbps FD | | |||
| MAC: | 00:19:99:9C:9B:9F | A0:36:9F:02:E0:04 | | |||
| Failures: | 0 | 0 | | |||
+------------+-------------------+-------------------+ | |||
Bond: ifn_bond1 -+- ifn_link1 -+-> Internet-Facing Network | |||
\- ifn_link2 -/ | |||
Active Slave: ifn_link1 using MAC: 00:1B:21:81:C3:34 | |||
Prefer Slave: ifn_link1 | |||
Reselect: Primary always, after 120000 seconds | |||
Link Check: Every 100 ms | |||
MTU Size: 1500 Bytes | |||
+-------------------+-------------------+ | |||
Slaves | ifn_link1 | ifn_link2 | | |||
+------------+-------------------+-------------------+ | |||
| Link: | Up | Up | | |||
| Speed: | 1000 Mbps FD | 1000 Mbps FD | | |||
| MAC: | 00:1B:21:81:C3:34 | A0:36:9F:02:E0:05 | | |||
| Failures: | 0 | 0 | | |||
+------------+-------------------+-------------------+ | |||
--[ Storage Status ]-------------------------------------------------- | |||
Adapter: #0 | |||
Model: RAID Ctrl SAS 6G 5/6 512MB (D2616) | |||
Revision: | |||
Serial #: | |||
Cache: 512MB | |||
BBU: iBBU, pn: LS1121001A, sn: 15686 | |||
- Failing: No | |||
- Charge: 98 %, 73 % of design | |||
- Capacity: No / 906 mAh, 1215 mAh design | |||
- Voltage: 4080 mV, 3700 mV design | |||
- Cycles: 35 | |||
- Hold-Up: 0 hours | |||
- Learn Active: No | |||
- Next Learn: Wed Dec 18 16:47:41 2013 | |||
Array: Virtual Drive 0, Target ID 0 | |||
State: Optimal | |||
Drives: 4 | |||
Usable Size: 836.625 GB | |||
Parity Size: 278.875 GB | |||
Strip Size: 64 KB | |||
RAID Level: Primary-5, Secondary-0, RAID Level Qualifier-3 | |||
Cache Policy: WriteBack, ReadAheadNone, Direct, No Write Cache if Bad BBU | |||
Bad Blocks: No | |||
Drive: 0 | |||
Position: disk group 0, span 0, arm 1 | |||
State: Online, Spun Up | |||
Fault: No | |||
Temp: 39 degrees Celcius | |||
Device: Seagate ST3300657SS, sn: 17036SJ3T7X6 | |||
Media: Hard Disk Device | |||
Interface: SAS, drive: 6.0Gb/s, bus: 6.0Gb/s | |||
Capacity: 278.875 GB | |||
Drive: 1 | |||
Position: disk group 0, span 0, arm 2 | |||
State: Online, Spun Up | |||
Fault: No | |||
Temp: 42 degrees Celcius | |||
Device: Seagate ST3300657SS, sn: 17036SJ3CMMC | |||
Media: Hard Disk Device | |||
Interface: SAS, drive: 6.0Gb/s, bus: 6.0Gb/s | |||
Capacity: 278.875 GB | |||
Drive: 2 | |||
Position: disk group 0, span 0, arm 0 | |||
State: Online, Spun Up | |||
Fault: No | |||
Temp: 40 degrees Celcius | |||
Device: Seagate ST3300657SS, sn: 17036SJ3CD2Z | |||
Media: Hard Disk Device | |||
Interface: SAS, drive: 6.0Gb/s, bus: 6.0Gb/s | |||
Capacity: 278.875 GB | |||
Drive: 6 | |||
Position: disk group 0, span 0, arm 3 | |||
State: Online, Spun Up | |||
Fault: No | |||
Temp: 36 degrees Celcius | |||
Device: HITACHI HUS156045VLS600 A42BJVY33ARM | |||
Media: Hard Disk Device | |||
Interface: SAS, drive: 6.0Gb/s, bus: 6.0Gb/s | |||
Capacity: 418.656 GB | |||
--[ Host Power and Thermal Sensors ]---------------------------------- | |||
+--------+------------+---------------+---------------+ | |||
Power Supplies | Status | Wattage | Fan 1 Speed | Fan 2 Speed | | |||
+---------------+--------+------------+---------------+---------------+ | |||
| PSU 1 | ok | 110 Watts | 6360 RPM | 6480 RPM | | |||
| PSU 2 | ok | 100 Watts | 6480 RPM | 6360 RPM | | |||
+---------------+--------+------------+---------------+---------------+ | |||
+--------------+--------------+--------------+ | |||
Power Levels | State | Voltage | Wattage | | |||
+------------------+--------------+--------------+--------------+ | |||
| BATT 3.0V | ok | 3.14 Volts | -- | | |||
| CPU1 1.8V | ok | 1.80 Volts | -- | | |||
| CPU1 Power | ok | -- | 16.50 Watts | | |||
| CPU2 1.8V | ok | 1.80 Volts | -- | | |||
| CPU2 Power | ok | -- | 18.70 Watts | | |||
| ICH 1.5V | ok | 1.49 Volts | -- | | |||
| IOH 1.1V | ok | 1.10 Volts | -- | | |||
| IOH 1.1V AUX | ok | 1.09 Volts | -- | | |||
| IOH 1.8V | ok | 1.80 Volts | -- | | |||
| iRMC 1.2V STBY | ok | 1.19 Volts | -- | | |||
| iRMC 1.8V STBY | ok | 1.80 Volts | -- | | |||
| LAN 1.0V STBY | ok | 1.01 Volts | -- | | |||
| LAN 1.8V STBY | ok | 1.81 Volts | -- | | |||
| MAIN 12V | ok | 12 Volts | -- | | |||
| MAIN 3.3V | ok | 3.37 Volts | -- | | |||
| MAIN 5.15V | ok | 5.18 Volts | -- | | |||
| PSU1 Power | ok | -- | 110 Watts | | |||
| PSU2 Power | ok | -- | 100 Watts | | |||
| STBY 3.3V | ok | 3.35 Volts | -- | | |||
| Total Power | ok | -- | 210 Watts | | |||
+------------------+--------------+--------------+--------------+ | |||
+-----------+-----------+ | |||
Temperatures | State | Temp (*C) | | |||
+----------------+-----------+-----------+ | |||
| Ambient | ok | 26.50 | | |||
| CPU1 | ok | 37 | | |||
| CPU2 | ok | 41 | | |||
| Systemboard | ok | 45 | | |||
+----------------+-----------+-----------+ | |||
+-----------+-----------+ | |||
Cooling Fans | State | RPMs | | |||
+----------------+-----------+-----------+ | |||
| FAN1 PSU1 | ok | 6360 | | |||
| FAN1 PSU2 | ok | 6480 | | |||
| FAN1 SYS | ok | 4980 | | |||
| FAN2 PSU1 | ok | 6480 | | |||
| FAN2 PSU2 | ok | 6360 | | |||
| FAN2 SYS | ok | 4860 | | |||
| FAN3 SYS | ok | 4560 | | |||
| FAN4 SYS | ok | 4800 | | |||
| FAN5 SYS | ok | 4740 | | |||
+----------------+-----------+-----------+ | |||
--[ UPS Status ]------------------------------------------------------ | |||
Name: an-ups01 | |||
Status: ONLINE Temperature: 31.0 *C | |||
Model: Smart-UPS 1500 Battery Voltage: 27.0 vAC | |||
Serial #: AS1038232403 Battery Charge: 100.0 % | |||
Holdup Time: 52.0 Minutes Current Load: 25.0 % | |||
Self Test: OK Firmware: UPS 05.0 / COM 02.1 | |||
Mains -> 123.0 Volts -> UPS -> 123.0 Volts -> PDU | |||
Name: an-ups02 | |||
Status: ONLINE Temperature: 30.0 *C | |||
Model: Smart-UPS 1500 Battery Voltage: 27.0 vAC | |||
Serial #: AS1224213144 Battery Charge: 100.0 % | |||
Holdup Time: 54.0 Minutes Current Load: 24.0 % | |||
Self Test: OK Firmware: UPS 08.3 / MCU 14.0 | |||
Mains -> 123.0 Volts -> UPS -> 123.0 Volts -> PDU | |||
==[ Source Details ]================================================== | |||
Company: Alteeve's Niche! | |||
Anvil!: sharedfs | |||
Node: an-a05n01.alteeve.ca | |||
Description: | |||
- Cluster 05 (Demo Cluster - "Tyson") | |||
If you have any questions or concerns, please don't hesitate to | |||
contact support. | |||
https://alteeve.ca/w/Support | |||
Alteeve's Niche! | |||
Cluster Monitor | |||
====================================================================== | |||
-- | |||
You received this email because you were listed as a contact for the | |||
Anvil! described in this email. If you do not wish to receive these | |||
emails, please contact your systems administrator. AN!CM runs on | |||
Anvil! nodes directly and are not sent by Alteeve's Niche!. | |||
</syntaxhighlight> | |||
|- | |||
!<span class="code">an-a05n02</span> | |||
|style="white-space: nowrap;"|<syntaxhighlight lang="bash"> | |||
/root/an-cm | |||
</syntaxhighlight> | |||
After a moment, you should get an email like this: | |||
<syntaxhighlight lang="text"> | |||
Subject: [ AN!CM ] - Alteeve's Niche! - Cluster 05 (Demo Cluster - "Tyson") - an-a05n02 - Cluster Monitor Start | |||
</syntaxhighlight> | |||
<syntaxhighlight lang="text"> | |||
Cluster node's monitor program has started. | |||
Current State: | |||
--[ Cluster Status ]-------------------------------------------------- | |||
Cluster: an-anvil-05 | |||
Quorum: Quorate | |||
Node: an-a05n01.alteeve.ca - Online, rgmanager | |||
Node: an-a05n02.alteeve.ca - Online, Local, rgmanager | |||
Service: libvirtd_n01 -> started on an-a05n01.alteeve.ca | |||
Service: libvirtd_n02 -> started on an-a05n02.alteeve.ca | |||
Service: storage_n01 -> started on an-a05n01.alteeve.ca | |||
Service: storage_n02 -> started on an-a05n02.alteeve.ca | |||
VM: vm01-win2008 -> started on an-a05n01.alteeve.ca | |||
VM: vm02-win2012 -> started on an-a05n02.alteeve.ca | |||
VM: vm03-win7 -> started on an-a05n01.alteeve.ca | |||
VM: vm04-win8 -> started on an-a05n01.alteeve.ca | |||
VM: vm05-freebsd9 -> started on an-a05n02.alteeve.ca | |||
VM: vm06-solaris11 -> started on an-a05n02.alteeve.ca | |||
VM: vm07-rhel6 -> started on an-a05n01.alteeve.ca | |||
VM: vm08-sles11 -> started on an-a05n01.alteeve.ca | |||
--[ Network Status ]-------------------------------------------------- | |||
Bridge: ifn_bridge1, MAC: 00:1B:21:81:C2:EA, STP disabled | |||
Links(s): |- ifn_bond1, MAC: 00:1B:21:81:C2:EA | |||
|- vnet0, MAC: FE:54:00:5E:29:1C | |||
|- vnet1, MAC: FE:54:00:29:38:3B | |||
\- vnet2, MAC: FE:54:00:B0:6C:AA | |||
Bond: bcn_bond1 -+- ifn_link1 -+-> Back-Channel Network | |||
\- ifn_link2 -/ | |||
Active Slave: ifn_link1 using MAC: 00:19:99:9C:A0:6C | |||
Prefer Slave: ifn_link1 | |||
Reselect: Primary always, after 120000 seconds | |||
Link Check: Every 100 ms | |||
MTU Size: 1500 Bytes | |||
+-------------------+-------------------+ | |||
Slaves | ifn_link1 | ifn_link2 | | |||
+------------+-------------------+-------------------+ | |||
| Link: | Up | Up | | |||
| Speed: | 1000 Mbps FD | 1000 Mbps FD | | |||
| MAC: | 00:19:99:9C:A0:6C | 00:1B:21:81:C2:EB | | |||
| Failures: | 0 | 0 | | |||
+------------+-------------------+-------------------+ | |||
Bond: sn_bond1 -+- sn_link1 -+-> Storage Network | |||
\- sn_link2 -/ | |||
Active Slave: sn_link1 using MAC: 00:19:99:9C:A0:6D | |||
Prefer Slave: sn_link1 | |||
Reselect: Primary always, after 120000 seconds | |||
Link Check: Every 100 ms | |||
MTU Size: 1500 Bytes | |||
+-------------------+-------------------+ | |||
Slaves | sn_link1 | sn_link2 | | |||
+------------+-------------------+-------------------+ | |||
| Link: | Up | Up | | |||
| Speed: | 1000 Mbps FD | 1000 Mbps FD | | |||
| MAC: | 00:19:99:9C:A0:6D | A0:36:9F:07:D6:2E | | |||
| Failures: | 0 | 0 | | |||
+------------+-------------------+-------------------+ | |||
Bond: ifn_bond1 -+- ifn_link1 -+-> Internet-Facing Network | |||
\- ifn_link2 -/ | |||
Active Slave: ifn_link1 using MAC: 00:1B:21:81:C2:EA | |||
Prefer Slave: ifn_link1 | |||
Reselect: Primary always, after 120000 seconds | |||
Link Check: Every 100 ms | |||
MTU Size: 1500 Bytes | |||
+-------------------+-------------------+ | |||
Slaves | ifn_link1 | ifn_link2 | | |||
+------------+-------------------+-------------------+ | |||
| Link: | Up | Up | | |||
| Speed: | 1000 Mbps FD | 1000 Mbps FD | | |||
| MAC: | 00:1B:21:81:C2:EA | A0:36:9F:07:D6:2F | | |||
| Failures: | 0 | 0 | | |||
+------------+-------------------+-------------------+ | |||
--[ Storage Status ]-------------------------------------------------- | |||
Adapter: #0 | |||
Model: RAID Ctrl SAS 6G 5/6 512MB (D2616) | |||
Revision: | |||
Serial #: | |||
Cache: 512MB | |||
BBU: iBBU, pn: LS1121001A, sn: 18704 | |||
- Failing: No | |||
- Charge: 98 %, 68 % of design | |||
- Capacity: No / 841 mAh, 1215 mAh design | |||
- Voltage: 4058 mV, 3700 mV design | |||
- Cycles: 31 | |||
- Hold-Up: 0 hours | |||
- Learn Active: No | |||
- Next Learn: Mon Dec 23 05:29:33 2013 | |||
Array: Virtual Drive 0, Target ID 0 | |||
State: Optimal | |||
Drives: 4 | |||
Usable Size: 836.625 GB | |||
Parity Size: 278.875 GB | |||
Strip Size: 64 KB | |||
RAID Level: Primary-5, Secondary-0, RAID Level Qualifier-3 | |||
Cache Policy: WriteBack, ReadAheadNone, Direct, No Write Cache if Bad BBU | |||
Bad Blocks: No | |||
Drive: 0 | |||
Position: disk group 0, span 0, arm 0 | |||
State: Online, Spun Up | |||
Fault: No | |||
Temp: 40 degrees Celcius | |||
Device: Seagate ST3300657SS, sn: 17036SJ3DE9Z | |||
Media: Hard Disk Device | |||
Interface: SAS, drive: 6.0Gb/s, bus: 6.0Gb/s | |||
Capacity: 278.875 GB | |||
Drive: 1 | |||
Position: disk group 0, span 0, arm 1 | |||
State: Online, Spun Up | |||
Fault: No | |||
Temp: 40 degrees Celcius | |||
Device: Seagate ST3300657SS, sn: 17036SJ3DNG7 | |||
Media: Hard Disk Device | |||
Interface: SAS, drive: 6.0Gb/s, bus: 6.0Gb/s | |||
Capacity: 278.875 GB | |||
Drive: 2 | |||
Position: disk group 0, span 0, arm 2 | |||
State: Online, Spun Up | |||
Fault: No | |||
Temp: 38 degrees Celcius | |||
Device: Seagate ST3300657SS, sn: 17036SJ3E01G | |||
Media: Hard Disk Device | |||
Interface: SAS, drive: 6.0Gb/s, bus: 6.0Gb/s | |||
Capacity: 278.875 GB | |||
Drive: 6 | |||
Position: disk group 0, span 0, arm 3 | |||
State: Online, Spun Up | |||
Fault: No | |||
Temp: 35 degrees Celcius | |||
Device: HITACHI HUS156045VLS600 A42BJVWMYA6L | |||
Media: Hard Disk Device | |||
Interface: SAS, drive: 6.0Gb/s, bus: 6.0Gb/s | |||
Capacity: 418.656 GB | |||
--[ Host Power and Thermal Sensors ]---------------------------------- | |||
+--------+------------+---------------+---------------+ | |||
Power Supplies | Status | Wattage | Fan 1 Speed | Fan 2 Speed | | |||
+---------------+--------+------------+---------------+---------------+ | |||
| PSU 1 | ok | 90 Watts | 6360 RPM | 6480 RPM | | |||
| PSU 2 | ok | 110 Watts | 6480 RPM | 6360 RPM | | |||
+---------------+--------+------------+---------------+---------------+ | |||
+--------------+--------------+--------------+ | |||
Power Levels | State | Voltage | Wattage | | |||
+------------------+--------------+--------------+--------------+ | |||
| BATT 3.0V | ok | 3.13 Volts | -- | | |||
| CPU1 1.8V | ok | 1.80 Volts | -- | | |||
| CPU1 Power | ok | -- | 17.60 Watts | | |||
| CPU2 1.8V | ok | 1.80 Volts | -- | | |||
| CPU2 Power | ok | -- | 17.60 Watts | | |||
| ICH 1.5V | ok | 1.50 Volts | -- | | |||
| IOH 1.1V | ok | 1.10 Volts | -- | | |||
| IOH 1.1V AUX | ok | 1.09 Volts | -- | | |||
| IOH 1.8V | ok | 1.80 Volts | -- | | |||
| iRMC 1.2V STBY | ok | 1.19 Volts | -- | | |||
| iRMC 1.8V STBY | ok | 1.80 Volts | -- | | |||
| LAN 1.0V STBY | ok | 1.01 Volts | -- | | |||
| LAN 1.8V STBY | ok | 1.81 Volts | -- | | |||
| MAIN 12V | ok | 12.06 Volts | -- | | |||
| MAIN 3.3V | ok | 3.37 Volts | -- | | |||
| MAIN 5.15V | ok | 5.15 Volts | -- | | |||
| PSU1 Power | ok | -- | 90 Watts | | |||
| PSU2 Power | ok | -- | 110 Watts | | |||
| STBY 3.3V | ok | 3.35 Volts | -- | | |||
| Total Power | ok | -- | 200 Watts | | |||
+------------------+--------------+--------------+--------------+ | |||
+-----------+-----------+ | |||
Temperatures | State | Temp (*C) | | |||
+----------------+-----------+-----------+ | |||
| Ambient | ok | 26.50 | | |||
| CPU1 | ok | 33 | | |||
| CPU2 | ok | 39 | | |||
| Systemboard | ok | 43 | | |||
+----------------+-----------+-----------+ | |||
+-----------+-----------+ | |||
Cooling Fans | State | RPMs | | |||
+----------------+-----------+-----------+ | |||
| FAN1 PSU1 | ok | 6360 | | |||
| FAN1 PSU2 | ok | 6480 | | |||
| FAN1 SYS | ok | 4680 | | |||
| FAN2 PSU1 | ok | 6480 | | |||
| FAN2 PSU2 | ok | 6360 | | |||
| FAN2 SYS | ok | 4800 | | |||
| FAN3 SYS | ok | 4680 | | |||
| FAN4 SYS | ok | 4800 | | |||
| FAN5 SYS | ok | 4920 | | |||
+----------------+-----------+-----------+ | |||
--[ UPS Status ]------------------------------------------------------ | |||
Name: an-ups01 | |||
Status: ONLINE Temperature: 31.0 *C | |||
Model: Smart-UPS 1500 Battery Voltage: 27.0 vAC | |||
Serial #: AS1038232403 Battery Charge: 100.0 % | |||
Holdup Time: 51.0 Minutes Current Load: 26.0 % | |||
Self Test: OK Firmware: UPS 05.0 / COM 02.1 | |||
Mains -> 123.0 Volts -> UPS -> 123.0 Volts -> PDU | |||
Name: an-ups02 | |||
Status: ONLINE Temperature: 31.0 *C | |||
Model: Smart-UPS 1500 Battery Voltage: 27.0 vAC | |||
Serial #: AS1224213144 Battery Charge: 100.0 % | |||
Holdup Time: 52.0 Minutes Current Load: 25.0 % | |||
Self Test: OK Firmware: UPS 08.3 / MCU 14.0 | |||
Mains -> 123.0 Volts -> UPS -> 123.0 Volts -> PDU | |||
==[ Source Details ]================================================== | |||
Company: Alteeve's Niche! | |||
Anvil!: an-anvil-05 | |||
Node: an-a05n02.alteeve.ca | |||
Description: | |||
- Cluster 05 (Demo Cluster - "Tyson") | |||
If you have any questions or concerns, please don't hesitate to | |||
contact support. | |||
https://alteeve.ca/w/Support | |||
Alteeve's Niche! | |||
Cluster Monitor | |||
====================================================================== | |||
-- | |||
You received this email because you were listed as a contact for the | |||
Anvil! described in this email. If you do not wish to receive these | |||
emails, please contact your systems administrator. AN!CM runs on | |||
Anvil! nodes directly and are not sent by Alteeve's Niche!. | |||
</syntaxhighlight> | |||
|} | |||
Once you see these emails, you can close the monitoring programs by pressing "<span class="code">ctrl</span> + <span class="code">c</span>". When you do, the terminal will return and you will get another email from each node warning you that the alerting system has stopped. | |||
{|class="wikitable" | |||
!<span class="code">an-a05n01</span> | |||
|style="white-space: nowrap;"|<syntaxhighlight lang="bash"> | |||
<ctrl> + <c> | |||
</syntaxhighlight> | |||
<syntaxhighlight lang="text"> | |||
Process with PID 2480 Exiting on SIGINT. | |||
</syntaxhighlight> | |||
You should then get an email like this: | |||
<syntaxhighlight lang="text"> | |||
Subject: [ AN!CM ] - Alteeve's Niche! - Cluster 05 (Demo Cluster - "Tyson") - an-a05n01 - Cluster Monitor Shutdown | |||
</syntaxhighlight> | |||
<syntaxhighlight lang="text"> | |||
The an-a05n01 cluster node's monitor program has stopped. | |||
It received a SIGINT signal and shut down. | |||
==[ Source Details ]================================================== | |||
Company: Alteeve's Niche! | |||
Anvil!: an-anvil-05 | |||
Node: an-a05n01.alteeve.ca | |||
Description: | |||
- Cluster 05 (Demo Cluster - "Tyson") | |||
If you have any questions or concerns, please don't hesitate to | |||
contact support. | |||
https://alteeve.ca/w/Support | |||
Alteeve's Niche! | |||
Cluster Monitor | |||
====================================================================== | |||
-- | |||
You received this email because you were listed as a contact for the | |||
Anvil! described in this email. If you do not wish to receive these | |||
emails, please contact your systems administrator. AN!CM runs on | |||
Anvil! nodes directly and are not sent by Alteeve's Niche!. | |||
</syntaxhighlight> | |||
|- | |||
!<span class="code">an-a05n02</span> | |||
|style="white-space: nowrap;"|<syntaxhighlight lang="text"> | |||
<ctrl> + <c> | |||
</syntaxhighlight> | |||
<syntaxhighlight lang="text"> | |||
Process with PID 1447 Exiting on SIGINT. | |||
</syntaxhighlight> | |||
You should then get an email like this: | |||
<syntaxhighlight lang="text"> | |||
Subject: [ AN!CM ] - Alteeve's Niche! - Cluster 05 (Demo Cluster - "Tyson") - an-a05n02 - Cluster Monitor Shutdown | |||
</syntaxhighlight> | |||
<syntaxhighlight lang="text"> | |||
The an-a05n02 cluster node's monitor program has stopped. | |||
It received a SIGINT signal and shut down. | |||
==[ Source Details ]================================================== | |||
Company: Alteeve's Niche! | |||
Anvil!: an-anvil-05 | |||
Node: an-a05n02.alteeve.ca | |||
Description: | |||
- Cluster 05 (Demo Cluster - "Tyson") | |||
If you have any questions or concerns, please don't hesitate to | |||
contact support. | |||
https://alteeve.ca/w/Support | |||
Alteeve's Niche! | |||
Cluster Monitor | |||
====================================================================== | |||
-- | |||
You received this email because you were listed as a contact for the | |||
Anvil! described in this email. If you do not wish to receive these | |||
emails, please contact your systems administrator. AN!CM runs on | |||
Anvil! nodes directly and are not sent by Alteeve's Niche!. | |||
</syntaxhighlight> | |||
|} | |||
Perfect! | |||
If you want to see what AN!CM is doing, it writes its log files to <span class="code">/var/log/an-cm.log</span>. There are many events that are logged which do not trigger emails. Sensors like thermometers, fan tachometers and various voltage and wattage sensors will constantly be shifting. These changes are recorded in this log file, should you ever wish to see how things change over time. | |||
Lets take a quick look at what was written to each node's <span class="code">an-cm.log</span> file. | |||
{|class="wikitable" | |||
!<span class="code">an-a05n01</span> | |||
|style="white-space: nowrap;"|<syntaxhighlight lang="bash"> | |||
cat /var/log/an-cm.log | |||
</syntaxhighlight> | |||
<syntaxhighlight lang="text"> | |||
====== | |||
Opening Striker - Cluster Dasboard log at 1386201452 | |||
1386201452 an-cm 5936; RAID 0's Physical Disk 1's "Drive Temperature" has changed; 41 *C -> 42 *C | |||
1386201452 an-cm 6188; Host's "CPU1 Power" has change; ok, 17.60 Watts -> ok, 18.70 Watts. | |||
1386201452 an-cm 6188; Host's "CPU2 Power" has change; ok, 19.80 Watts -> ok, 17.60 Watts. | |||
1386201452 an-cm 6540; UPS an-ups01's line voltage has changed but it is within acceptable range. Currently: [121.0 vAC], minimum is: [103.0 vAC], maximum is: [130.0 vAC] | |||
1386201452 an-cm 6608; UPS an-ups01's "TIMELEFT" has had a state changed; 52.0 Minutes -> 51.0 Minutes | |||
1386201487 an-cm 5668; ** Relearn cycle active **: RAID 0's Battery Backup Unit's "Voltage" has changed; 4081 mV -> 4079 mV | |||
1386201487 an-cm 5936; RAID 0's Physical Disk 1's "Drive Temperature" has changed; 42 *C -> 41 *C | |||
1386201487 an-cm 6188; Host's "CPU2 Power" has change; ok, 17.60 Watts -> ok, 20.90 Watts. | |||
1386201487 an-cm 6234; Host's "FAN1 PSU2" fan speed has change; ok, 6480 RPM -> ok, 6600 RPM. | |||
1386201487 an-cm 6234; Host's "FAN2 SYS" fan speed has change; ok, 5280 RPM -> ok, 5340 RPM. | |||
1386201487 an-cm 6234; Host's "FAN3 SYS" fan speed has change; ok, 4980 RPM -> ok, 5040 RPM. | |||
1386201487 an-cm 6234; Host's "FAN5 SYS" fan speed has change; ok, 5220 RPM -> ok, 5280 RPM. | |||
1386201487 an-cm 6599; UPS an-ups01's load has changed; 26.0 Percent Load Capacity -> 25.0 Percent Load Capacity | |||
1386201487 an-cm 6608; UPS an-ups01's "TIMELEFT" has had a state changed; 51.0 Minutes -> 52.0 Minutes | |||
</syntaxhighlight> | |||
|- | |||
!<span class="code">an-a05n02</span> | |||
|style="white-space: nowrap;"|<syntaxhighlight lang="bash"> | |||
cat /var/log/an-cm.log | |||
</syntaxhighlight> | |||
<syntaxhighlight lang="text"> | |||
====== | |||
Opening Striker - Cluster Dasboard log at 1386201452 | |||
1386201452 an-cm 6188; Host's "CPU1 Power" has change; ok, 15.40 Watts -> ok, 14.30 Watts. | |||
1386201452 an-cm 6188; Host's "CPU2 Power" has change; ok, 15.40 Watts -> ok, 11 Watts. | |||
1386201452 an-cm 6234; Host's "FAN1 SYS" fan speed has change; ok, 4740 RPM -> ok, 4680 RPM. | |||
1386201452 an-cm 6234; Host's "FAN2 PSU2" fan speed has change; ok, 6360 RPM -> ok, 6240 RPM. | |||
1386201452 an-cm 6188; Host's "PSU2 Power" has change; ok, 120 Watts -> ok, 110 Watts. | |||
1386201452 an-cm 6188; Host's "Total Power" has change; ok, 210 Watts -> ok, 200 Watts. | |||
1386201452 an-cm 6540; UPS an-ups01's line voltage has changed but it is within acceptable range. Currently: [121.0 vAC], minimum is: [103.0 vAC], maximum is: [130.0 vAC] | |||
1386201487 an-cm 5668; ** Relearn cycle active **: RAID 0's Battery Backup Unit's "Voltage" has changed; 4060 mV -> 4061 mV | |||
1386201487 an-cm 6385; Host's "BATT 3.0V" voltage has change; ok, 3.14 Volts -> ok, 3.13 Volts. | |||
1386201487 an-cm 6188; Host's "CPU1 Power" has change; ok, 14.30 Watts -> ok, 13.20 Watts. | |||
1386201487 an-cm 6188; Host's "CPU2 Power" has change; ok, 11 Watts -> ok, 13.20 Watts. | |||
1386201487 an-cm 6234; Host's "FAN2 PSU2" fan speed has change; ok, 6240 RPM -> ok, 6360 RPM. | |||
1386201487 an-cm 6234; Host's "FAN5 SYS" fan speed has change; ok, 4860 RPM -> ok, 4920 RPM. | |||
1386201487 an-cm 6385; Host's "IOH 1.8V" voltage has change; ok, 1.80 Volts -> ok, 1.79 Volts. | |||
1386201487 an-cm 6599; UPS an-ups01's load has changed; 26.0 Percent Load Capacity -> 25.0 Percent Load Capacity | |||
1386201487 an-cm 6608; UPS an-ups01's "TIMELEFT" has had a state changed; 51.0 Minutes -> 52.0 Minutes | |||
</syntaxhighlight> | |||
|} | |||
Shortly, we will look at what alerts that trigger emails look like. For now, we're ready to enable monitoring! | |||
== Enabling Monitoring == | |||
Now that we know that monitoring and emailing is working, it is time to enable it. | |||
By design, the monitoring program is designed to exit should it run into any unexpected problems. Obviously, it is quite important that the alert system always run. | |||
The way we ensure this is to use <span class="code">[[crontab]]</span> to start <span class="code">/root/an-cm</span> every five minutes. The first thing that <span class="code">an-cm</span> does is check to see if it is already running. If so, it simply exits, so the alert system won't run more than once. Should it crash or be killed for some reason, however, this will ensure that the alert system is back up within five minutes. | |||
So if you find that you suddenly get an email claiming that the monitoring software has started, be sure to check <span class="code">/var/log/an-cm.log</span> for error messages. | |||
Back to enabling monitoring; | |||
We're going to also enable two log archival scripts; <span class="code">archive_an-cm.log.sh</span> and <span class="code">archive_megasas.log.sh</span>. These prevent the log files generated by <span class="code">an-cm</span> directly and the <span class="code">MegaSAS.log</span> file created by <span class="code">MegaCli64</span> from growing too big. | |||
The <span class="code">/root/archive_megasas.log.sh</span> will run once a day and <span class="code">archive_an-cm.log.sh</span> archival scripts will run once per month. We already downloaded <span class="code">archive_an-cm.log.sh</span>, but we still need to download <span class="code">/root/archive_megasas.log.sh</span>. Both will create up to five archived log files, allowing you to review up to five days and five months, respectively. After that, the oldest log files are removed, effectively capping the amount of disk space these logs will use. | |||
To prevent this log file from getting too big, Striker ships with a tool called <span class="code">[https://github.com/digimer/an-cdb/blob/master/tools/archive_an-cm.log.sh archive_an-cm.log.sh]</span>. This is a very simple bash script that is designed to run once per month to archive and compress the log file. | |||
{|class="wikitable" | |||
!<span class="code">an-a05n01</span> | |||
|style="white-space: nowrap;"|<syntaxhighlight lang="bash"> | |||
wget https://raw.github.com/digimer/an-cdb/master/tools/archive_an-cm.log.sh -O /root/archive_an-cm.log.sh | |||
</syntaxhighlight> | |||
<syntaxhighlight lang="text"> | |||
--2013-11-28 20:42:19-- https://raw.github.com/digimer/an-cdb/master/tools/archive_an-cm.log.sh | |||
Resolving raw.github.com... 199.27.74.133 | |||
Connecting to raw.github.com|199.27.74.133|:443... connected. | |||
HTTP request sent, awaiting response... 200 OK | |||
Length: 984 [text/plain] | |||
Saving to: `/root/archive_an-cm.log.sh' | |||
100%[====================================================================>] 984 --.-K/s in 0s | |||
2013-11-28 20:42:19 (7.86 MB/s) - `/root/archive_an-cm.log.sh' saved [984/984] | |||
</syntaxhighlight> | |||
<syntaxhighlight lang="bash"> | |||
chmod 755 archive_an-cm.log.sh | |||
ls -lah archive_an-cm.log.sh | |||
</syntaxhighlight> | |||
<syntaxhighlight lang="text"> | |||
-rwxr-xr-x. 1 root root 984 Nov 28 20:42 archive_an-cm.log.sh | |||
</syntaxhighlight> | |||
|- | |||
!<span class="code">an-a05n02</span> | |||
|style="white-space: nowrap;"|<syntaxhighlight lang="bash"> | |||
wget https://raw.github.com/digimer/an-cdb/master/tools/archive_an-cm.log.sh -O /root/archive_an-cm.log.sh | |||
</syntaxhighlight> | |||
<syntaxhighlight lang="text"> | |||
--2013-11-28 20:47:53-- https://raw.github.com/digimer/an-cdb/master/tools/archive_an-cm.log.sh | |||
Resolving raw.github.com... 199.27.74.133 | |||
Connecting to raw.github.com|199.27.74.133|:443... connected. | |||
HTTP request sent, awaiting response... 200 OK | |||
Length: 984 [text/plain] | |||
Saving to: `/root/archive_an-cm.log.sh' | |||
100%[====================================================================>] 984 --.-K/s in 0s | |||
2013-11-28 20:47:54 (58.9 MB/s) - `/root/archive_an-cm.log.sh' saved [984/984] | |||
</syntaxhighlight> | |||
<syntaxhighlight lang="bash"> | |||
chmod 755 archive_an-cm.log.sh | |||
ls -lah archive_an-cm.log.sh | |||
</syntaxhighlight> | |||
<syntaxhighlight lang="text"> | |||
-rwxr-xr-x. 1 root root 984 Nov 28 20:47 archive_an-cm.log.sh | |||
</syntaxhighlight> | |||
|} | |||
Now we'll add it to the <span class="code">root</span> user's <span class="code">cron</span> table. We'll set it to run at midnight on the first of each month. | |||
On both nodes; | |||
{|class="wikitable" | |||
!<span class="code">an-a05n01</span> | |||
!<span class="code">an-a05n02</span> | |||
|- | |||
|style="white-space: nowrap;"|<syntaxhighlight lang="bash"> | |||
crontab -e | |||
</syntaxhighlight> | |||
Add the following | |||
<syntaxhighlight lang="text"> | |||
0 0 1 * * /root/archive_an-cm.log.sh > /dev/null | |||
</syntaxhighlight> | |||
|style="white-space: nowrap;"|<syntaxhighlight lang="bash"> | |||
crontab -e | |||
</syntaxhighlight> | |||
Add the following | |||
<syntaxhighlight lang="text"> | |||
0 0 1 * * /root/archive_an-cm.log.sh > /dev/null | |||
</syntaxhighlight> | |||
|} | |||
Confirm the new <span class="code">cron</span> table. | |||
{|class="wikitable" | |||
!<span class="code">an-a05n01</span> | |||
|style="white-space: nowrap;"|<syntaxhighlight lang="bash"> | |||
crontab -l | |||
</syntaxhighlight> | |||
<syntaxhighlight lang="text"> | |||
0 0 1 * * /root/archive_an-cm.log.sh > /dev/null | |||
</syntaxhighlight> | |||
|- | |||
!<span class="code">an-a05n02</span> | |||
|style="white-space: nowrap;"|<syntaxhighlight lang="bash"> | |||
crontab -l | |||
</syntaxhighlight> | |||
<syntaxhighlight lang="text"> | |||
0 0 1 * * /root/archive_an-cm.log.sh > /dev/null | |||
</syntaxhighlight> | |||
|} | |||
Done! | |||
== We're Done! or are We? == | |||
That's it, ladies and gentlemen. Our cluster is completed! In theory now, any failure in the cluster will result in no lost data and, at worst, no more than a minute or two of downtime. | |||
"In theory" just isn't good enough in clustering though. Time to take "theory" and make it a tested, known fact. | |||
= Testing Server Recovery = | |||
You may have thought that we were done. Indeed, the ''Anvil!'' has been built, but we need to do a final round of testing. Thus far, we're tested network redundancy and we have tested our fencing devices. | |||
The last round of testing will be to make sure our servers recover properly. We will test the following; | |||
# Controlled migration and node withdrawal. | |||
## Migrate all servers to one node, then withdraw and power off the other node. | |||
## Restart the node and rejoin it to the cluster. | |||
## Repeat for the other node. | |||
# Controlled, out-of-cluster power-off of a server, ensure it is restarted | |||
# Crashing nodes. | |||
## Ensuring crashed node is fenced. | |||
## Confirm all servers recover on the surviving node. | |||
## Rejoining the recovered node and migrating servers back. | |||
## Crashing the other node, ensuring its servers recover. | |||
== Controlled Migration and Node Withdrawal == | |||
These tests ensure that we will be able to safely pull a node out of service for upgrades, repairs, routine service and OS updates. | |||
We will start with <span class="code">an-a05n01</span>; We will live-migrate all servers over to <span class="code">an-a05n02</span>, stop <span class="code">rgmanager</span> and <span class="code">cman</span> and then power off <span class="code">an-a05n01</span>. We will then power <span class="code">an-a05n01</span> back up and rejoin it to the cluster. Once both DRBD resources are <span class="code">UpToDate</span> again, we will live-migrate the servers back. | |||
Once done, we will repeat the process in order to test taking <span class="code">an-a05n02</span> out, then restarting it and putting it back into production. If all goes well, both nodes will be powered off at one point or another and none of the servers should be interrupted. | |||
=== Withdraw an-a05n01 === | |||
As always, the first step is to check what state the cluster is in. | |||
{|class="wikitable" | |||
!<span class="code">an-a05n01</span> | |||
|style="white-space: nowrap;"|<syntaxhighlight lang="bash"> | |||
clustat | |||
</syntaxhighlight> | |||
<syntaxhighlight lang="text"> | |||
Cluster Status for an-anvil-05 @ Wed Dec 4 21:08:02 2013 | |||
Member Status: Quorate | |||
Member Name ID Status | |||
------ ---- ---- ------ | |||
an-a05n01.alteeve.ca 1 Online, Local, rgmanager | |||
an-a05n02.alteeve.ca 2 Online, rgmanager | |||
Service Name Owner (Last) State | |||
------- ---- ----- ------ ----- | |||
service:libvirtd_n01 an-a05n01.alteeve.ca started | |||
service:libvirtd_n02 an-a05n02.alteeve.ca started | |||
service:storage_n01 an-a05n01.alteeve.ca started | |||
service:storage_n02 an-a05n02.alteeve.ca started | |||
vm:vm01-win2008 an-a05n01.alteeve.ca started | |||
vm:vm02-win2012 an-a05n02.alteeve.ca started | |||
vm:vm03-win7 an-a05n01.alteeve.ca started | |||
vm:vm04-win8 an-a05n01.alteeve.ca started | |||
vm:vm05-freebsd9 an-a05n02.alteeve.ca started | |||
vm:vm06-solaris11 an-a05n02.alteeve.ca started | |||
vm:vm07-rhel6 an-a05n01.alteeve.ca started | |||
vm:vm08-sles11 an-a05n01.alteeve.ca started | |||
</syntaxhighlight> | |||
|} | |||
{{warning|1=Remember; It is not uncommon for live migrations to take several minutes to complete. The hypervisor will slow the migration process if it thinks that is needed to avoid negatively affecting performance inside the server. Please be patient!}} | |||
{{note|1=It's a good idea to be running <span class="code">watch clustat</span> on <span class="code">an-a05n02</span> from this point forward. It will allow you to monitor the changes as they happen.}} | |||
Before we can withdraw <span class="code">an-a05n01</span>, we'll need to live-migrate <span class="code">vm01-win2008</span>, <span class="code">vm03-win7</span>, <span class="code">vm04-win8</span>, <span class="code">vm07-rhel6</span> and <span class="code">vm08-sles11</span> over to <span class="code">an-a05n02</span>. | |||
{|class="wikitable" | |||
!<span class="code">an-a05n01</span> | |||
|style="white-space: nowrap;"|<syntaxhighlight lang="bash"> | |||
clusvcadm -M vm:vm01-win2008 -m an-a05n02.alteeve.ca | |||
</syntaxhighlight> | |||
<syntaxhighlight lang="text"> | |||
Trying to migrate vm:vm01-win2008 to an-a05n02.alteeve.ca...Success | |||
</syntaxhighlight> | |||
|} | |||
What is this? An alert! | |||
You should have just gotten two alerts, one from each node, telling you that <span class="code">vm01-win2008</span> has moved. Lets take a look; | |||
{|class="wikitable" | |||
!<span class="code">an-a05n01</span> | |||
|style="white-space: nowrap;"|<syntaxhighlight lang="text"> | |||
Subject: [ AN!CM ] - Alteeve's Niche! - Cluster 05 (Demo Cluster - "Tyson") - an-a05n01 - State Change! | |||
</syntaxhighlight> | |||
<syntaxhighlight lang="text"> | |||
Changes have been detected in the cluster. If you anticipated this | |||
change then there is no reason for concern. If this change was | |||
unexpected, please feel free to contact support. | |||
---------------------------------------------------------------------- | |||
VM vm01-win2008; State change! | |||
started -> started | |||
an-a05n01.alteeve.ca -> an-a05n02.alteeve.ca | |||
==[ Source Details ]================================================== | |||
Company: Alteeve's Niche! | |||
Anvil!: an-anvil-05 | |||
Node: an-a05n01.alteeve.ca | |||
Description: | |||
- Cluster 05 (Demo Cluster - "Tyson") | |||
If you have any questions or concerns, please don't hesitate to | |||
contact support. | |||
https://alteeve.ca/w/Support | |||
Alteeve's Niche! | |||
Cluster Monitor | |||
====================================================================== | |||
-- | |||
You received this email because you were listed as a contact for the | |||
Anvil! described in this email. If you do not wish to receive these | |||
emails, please contact your systems administrator. AN!CM runs on | |||
Anvil! nodes directly and are not sent by Alteeve's Niche!. | |||
</syntaxhighlight> | |||
|- | |||
!<span class="code">an-a05n02</span> | |||
|style="white-space: nowrap;"|<syntaxhighlight lang="text"> | |||
Subject: [ AN!CM ] - Alteeve's Niche! - Cluster 05 (Demo Cluster - "Tyson") - an-a05n02 - State Change! | |||
</syntaxhighlight> | |||
<syntaxhighlight lang="text"> | |||
Changes have been detected in the cluster. If you anticipated this | |||
change then there is no reason for concern. If this change was | |||
unexpected, please feel free to contact support. | |||
---------------------------------------------------------------------- | |||
VM vm01-win2008; State change! | |||
started -> started | |||
an-a05n01.alteeve.ca -> an-a05n02.alteeve.ca | |||
==[ Source Details ]================================================== | |||
Company: Alteeve's Niche! | |||
Anvil!: an-anvil-05 | |||
Node: an-a05n02.alteeve.ca | |||
Description: | |||
- Cluster 05 (Demo Cluster - "Tyson") | |||
If you have any questions or concerns, please don't hesitate to | |||
contact support. | |||
https://alteeve.ca/w/Support | |||
Alteeve's Niche! | |||
Cluster Monitor | |||
====================================================================== | |||
-- | |||
You received this email because you were listed as a contact for the | |||
Anvil! described in this email. If you do not wish to receive these | |||
emails, please contact your systems administrator. AN!CM runs on | |||
Anvil! nodes directly and are not sent by Alteeve's Niche!. | |||
</syntaxhighlight> | |||
|} | |||
Unlike the long and detailed message from the initial startup, these "state change" emails are much shorter and to the point. It tells you only what has changed, so that you can quickly tell exactly what happened. In this case, we expected this change so there is no need for concern. | |||
Let's migrate the other servers. You will see another pair of alerts like this after each migration. | |||
{|class="wikitable" | |||
!<span class="code">an-a05n01</span> | |||
|style="white-space: nowrap;"|<syntaxhighlight lang="bash"> | |||
clusvcadm -M vm:vm03-win7 -m an-a05n02.alteeve.ca | |||
</syntaxhighlight> | |||
<syntaxhighlight lang="text"> | |||
Trying to migrate vm:vm03-win7 to an-a05n02.alteeve.ca...Success | |||
</syntaxhighlight> | |||
<syntaxhighlight lang="bash"> | |||
clusvcadm -M vm:vm04-win8 -m an-a05n02.alteeve.ca | |||
</syntaxhighlight> | |||
<syntaxhighlight lang="text"> | |||
Trying to migrate vm:vm04-win8 to an-a05n02.alteeve.ca...Success | |||
</syntaxhighlight> | |||
<syntaxhighlight lang="bash"> | |||
clusvcadm -M vm:vm07-rhel6 -m an-a05n02.alteeve.ca | |||
</syntaxhighlight> | |||
<syntaxhighlight lang="text"> | |||
Trying to migrate vm:vm07-rhel6 to an-a05n02.alteeve.ca...Success | |||
</syntaxhighlight> | |||
<syntaxhighlight lang="bash"> | |||
clusvcadm -M vm:vm08-sles11 -m an-a05n02.alteeve.ca | |||
</syntaxhighlight> | |||
<syntaxhighlight lang="text"> | |||
Trying to migrate vm:vm08-sles11 to an-a05n02.alteeve.ca...Success | |||
</syntaxhighlight> | |||
|} | |||
That should be all of them. Verify with <span class="code">clustat</span>. | |||
{|class="wikitable" | |||
!<span class="code">an-a05n01</span> | |||
|style="white-space: nowrap;"|<syntaxhighlight lang="bash"> | |||
clustat | |||
</syntaxhighlight> | |||
<syntaxhighlight lang="text"> | |||
Cluster Status for an-anvil-05 @ Wed Dec 4 21:53:54 2013 | |||
Member Status: Quorate | |||
Member Name ID Status | |||
------ ---- ---- ------ | |||
an-a05n01.alteeve.ca 1 Online, Local, rgmanager | |||
an-a05n02.alteeve.ca 2 Online, rgmanager | |||
Service Name Owner (Last) State | |||
------- ---- ----- ------ ----- | |||
service:libvirtd_n01 an-a05n01.alteeve.ca started | |||
service:libvirtd_n02 an-a05n02.alteeve.ca started | |||
service:storage_n01 an-a05n01.alteeve.ca started | |||
service:storage_n02 an-a05n02.alteeve.ca started | |||
vm:vm01-win2008 an-a05n02.alteeve.ca started | |||
vm:vm02-win2012 an-a05n02.alteeve.ca started | |||
vm:vm03-win7 an-a05n02.alteeve.ca started | |||
vm:vm04-win8 an-a05n02.alteeve.ca started | |||
vm:vm05-freebsd9 an-a05n02.alteeve.ca started | |||
vm:vm06-solaris11 an-a05n02.alteeve.ca started | |||
vm:vm07-rhel6 an-a05n02.alteeve.ca started | |||
vm:vm08-sles11 an-a05n02.alteeve.ca started | |||
</syntaxhighlight> | |||
|} | |||
Good. Now we will stop <span class="code">rgmanager</span> and <span class="code">cman</span>. We'll verify that the node is gone by calling <span class="code">clustat</span> from both nodes. | |||
{|class="wikitable" | |||
!<span class="code">an-a05n01</span> | |||
|style="white-space: nowrap;"|<syntaxhighlight lang="bash"> | |||
/etc/init.d/rgmanager stop | |||
</syntaxhighlight> | |||
<syntaxhighlight lang="text"> | |||
Stopping Cluster Service Manager: [ OK ] | |||
</syntaxhighlight> | |||
<syntaxhighlight lang="bash"> | |||
/etc/init.d/cman stop | |||
</syntaxhighlight> | |||
<syntaxhighlight lang="text"> | |||
Stopping cluster: | |||
Leaving fence domain... [ OK ] | |||
Stopping gfs_controld... [ OK ] | |||
Stopping dlm_controld... [ OK ] | |||
Stopping fenced... [ OK ] | |||
Stopping cman... [ OK ] | |||
Waiting for corosync to shutdown: [ OK ] | |||
Unloading kernel modules... [ OK ] | |||
Unmounting configfs... [ OK ] | |||
</syntaxhighlight> | |||
<syntaxhighlight lang="bash"> | |||
clustat | |||
</syntaxhighlight> | |||
<syntaxhighlight lang="text"> | |||
Could not connect to CMAN: No such file or directory | |||
</syntaxhighlight> | |||
|- | |||
!<span class="code">an-a05n02</span> | |||
|style="white-space: nowrap;"|<syntaxhighlight lang="bash"> | |||
clustat | |||
</syntaxhighlight> | |||
<syntaxhighlight lang="text"> | |||
Cluster Status for an-anvil-05 @ Wed Dec 4 21:56:23 2013 | |||
Member Status: Quorate | |||
Member Name ID Status | |||
------ ---- ---- ------ | |||
an-a05n01.alteeve.ca 1 Offline | |||
an-a05n02.alteeve.ca 2 Online, Local, rgmanager | |||
Service Name Owner (Last) State | |||
------- ---- ----- ------ ----- | ------- ---- ----- ------ ----- | ||
service: | service:libvirtd_n01 (an-a05n01.alteeve.ca) stopped | ||
service: | service:libvirtd_n02 an-a05n02.alteeve.ca started | ||
vm:vm01- | service:storage_n01 (an-a05n01.alteeve.ca) stopped | ||
vm:vm02- | service:storage_n02 an-a05n02.alteeve.ca started | ||
vm:vm03- | vm:vm01-win2008 an-a05n02.alteeve.ca started | ||
vm:vm04- | vm:vm02-win2012 an-a05n02.alteeve.ca started | ||
vm:vm03-win7 an-a05n02.alteeve.ca started | |||
vm:vm04-win8 an-a05n02.alteeve.ca started | |||
vm:vm05-freebsd9 an-a05n02.alteeve.ca started | |||
vm:vm06-solaris11 an-a05n02.alteeve.ca started | |||
vm:vm07-rhel6 an-a05n02.alteeve.ca started | |||
vm:vm08-sles11 an-a05n02.alteeve.ca started | |||
</syntaxhighlight> | |||
|} | |||
Done! | |||
We can now update <span class="code">an-a05n01</span>'s OS or power it off for physical maintenance, repairs or upgrades! | |||
We will power it off now to simulate hardware maintenance. | |||
{|class="wikitable" | |||
!<span class="code">an-a05n01</span> | |||
|style="white-space: nowrap;"|<syntaxhighlight lang="bash"> | |||
poweroff | |||
</syntaxhighlight> | |||
<syntaxhighlight lang="text"> | |||
Broadcast message from root@an-a05n01.alteeve.ca | |||
(/dev/pts/0) at 21:57 ... | |||
The system is going down for power off NOW! | |||
</syntaxhighlight> | |||
|} | |||
=== Load Testing in a Degraded State === | |||
At this point, <span class="code">an-a05n01</span> is powered off. | |||
This is a great time to load test your servers! | |||
This is an effective simulation of a degraded state. Should you lose a node, you will be forced to run on a single node until repairs can be made. You need to be sure that performance on a single node is good enough to maintain full production during this time. | |||
How you load test your servers will be entirely dependent on what they are and what they do. So there is not much we can do in the scope of this tutorial. Once your load tests are done, proceed to the next section. | |||
=== Rejoin an-a05n01 === | |||
So you're load tests are done. Now you're ready to bring <span class="code">an-a05n01</span> back online and rejoin it to the cluster. | |||
We will use the <span class="code">fence_ipmilan</span> fence agent to first verify that <span class="code">an-a05n01</span> is truly off, then we will use it to turn it on. We could certainly use <span class="code">ipmitool</span> directly, of course, but it is an excellent opportunity to practice with <span class="code">fence_ipmilan</span>. | |||
{|class="wikitable" | |||
!<span class="code">an-a05n02</span> | |||
|style="white-space: nowrap;"|<syntaxhighlight lang="bash"> | |||
fence_ipmilan -a an-a05n01.ipmi -l admin -p secret -o status | |||
</syntaxhighlight> | |||
<syntaxhighlight lang="text"> | |||
Getting status of IPMI:an-a05n01.ipmi...Chassis power = Off | |||
Done | |||
</syntaxhighlight> | |||
|} | |||
State confirmed. Let's power it up! | |||
{|class="wikitable" | |||
!<span class="code">an-a05n02</span> | |||
|style="white-space: nowrap;"|<syntaxhighlight lang="bash"> | |||
fence_ipmilan -a an-a05n01.ipmi -l admin -p secret -o on | |||
</syntaxhighlight> | |||
<syntaxhighlight lang="text"> | |||
Powering on machine @ IPMI:an-a05n01.ipmi...Done | |||
</syntaxhighlight> | |||
|} | |||
Most hardware servers take several minutes to boot, so this is a great time to go make a tea or coffee. Once it's booted, within five minutes, you should get an alert email telling you that <span class="code">an-a05n01</span> is up and running. This is an excellent way to know when your break is over. | |||
Once the node is up, log back into and start <span class="code">cman</span> and <span class="code">rgmanager</span>. Watch <span class="code">/etc/init.d/drbd status</span> and wait until both resource are back to <span class="code">UpToDate</span>. Do not proceed until this is the case. | |||
{|class="wikitable" | |||
!<span class="code">an-a05n01</span> | |||
|style="white-space: nowrap;"|<syntaxhighlight lang="bash"> | |||
/etc/init.d/cman start | |||
</syntaxhighlight> | |||
<syntaxhighlight lang="text"> | |||
Starting cluster: | |||
Checking if cluster has been disabled at boot... [ OK ] | |||
Checking Network Manager... [ OK ] | |||
Global setup... [ OK ] | |||
Loading kernel modules... [ OK ] | |||
Mounting configfs... [ OK ] | |||
Starting cman... [ OK ] | |||
Waiting for quorum... [ OK ] | |||
Starting fenced... [ OK ] | |||
Starting dlm_controld... [ OK ] | |||
Tuning DLM kernel config... [ OK ] | |||
Starting gfs_controld... [ OK ] | |||
Unfencing self... [ OK ] | |||
Joining fence domain... [ OK ] | |||
</syntaxhighlight> | |||
<syntaxhighlight lang="bash"> | |||
/etc/init.d/rgmanager start | |||
</syntaxhighlight> | |||
<syntaxhighlight lang="text"> | |||
Starting Cluster Service Manager: [ OK ] | |||
</syntaxhighlight> | |||
<syntaxhighlight lang="bash"> | |||
/etc/init.d/drbd status | |||
</syntaxhighlight> | |||
<syntaxhighlight lang="text"> | |||
drbd driver loaded OK; device status: | |||
version: 8.3.16 (api:88/proto:86-97) | |||
GIT-hash: a798fa7e274428a357657fb52f0ecf40192c1985 build by phil@Build64R6, 2013-09-27 16:00:43 | |||
m:res cs ro ds p mounted fstype | |||
0:r0 Connected Primary/Primary UpToDate/UpToDate C | |||
1:r1 Connected Primary/Primary UpToDate/UpToDate C | |||
</syntaxhighlight> | |||
|- | |||
!<span class="code">an-a05n02</span> | |||
|style="white-space: nowrap;"|<syntaxhighlight lang="bash"> | |||
clustat | |||
</syntaxhighlight> | |||
<syntaxhighlight lang="text"> | |||
Cluster Status for an-anvil-05 @ Wed Dec 4 22:24:58 2013 | |||
Member Status: Quorate | |||
Member Name ID Status | |||
------ ---- ---- ------ | |||
an-a05n01.alteeve.ca 1 Online, rgmanager | |||
an-a05n02.alteeve.ca 2 Online, Local, rgmanager | |||
Service Name Owner (Last) State | |||
------- ---- ----- ------ ----- | |||
service:libvirtd_n01 an-a05n01.alteeve.ca started | |||
service:libvirtd_n02 an-a05n02.alteeve.ca started | |||
service:storage_n01 an-a05n01.alteeve.ca started | |||
service:storage_n02 an-a05n02.alteeve.ca started | |||
vm:vm01-win2008 an-a05n02.alteeve.ca started | |||
vm:vm02-win2012 an-a05n02.alteeve.ca started | |||
vm:vm03-win7 an-a05n02.alteeve.ca started | |||
vm:vm04-win8 an-a05n02.alteeve.ca started | |||
vm:vm05-freebsd9 an-a05n02.alteeve.ca started | |||
vm:vm06-solaris11 an-a05n02.alteeve.ca started | |||
vm:vm07-rhel6 an-a05n02.alteeve.ca started | |||
vm:vm08-sles11 an-a05n02.alteeve.ca started | |||
</syntaxhighlight> | |||
|} | |||
Ready to migrate the servers back! | |||
{|class="wikitable" | |||
!<span class="code">an-a05n01</span> | |||
|style="white-space: nowrap;"|<syntaxhighlight lang="bash"> | |||
clusvcadm -M vm:vm01-win2008 -m an-a05n01.alteeve.ca | |||
</syntaxhighlight> | |||
<syntaxhighlight lang="text"> | |||
Trying to migrate vm:vm01-win2008 to an-a05n01.alteeve.ca...Success | |||
</syntaxhighlight> | |||
<syntaxhighlight lang="bash"> | |||
clusvcadm -M vm:vm03-win7 -m an-a05n01.alteeve.ca | |||
</syntaxhighlight> | |||
<syntaxhighlight lang="text"> | |||
Trying to migrate vm:vm03-win7 to an-a05n01.alteeve.ca...Success | |||
</syntaxhighlight> | |||
<syntaxhighlight lang="bash"> | |||
clusvcadm -M vm:vm04-win8 -m an-a05n01.alteeve.ca | |||
</syntaxhighlight> | |||
<syntaxhighlight lang="text"> | |||
Trying to migrate vm:vm04-win8 to an-a05n01.alteeve.ca...Success | |||
</syntaxhighlight> | |||
<syntaxhighlight lang="bash"> | |||
clusvcadm -M vm:vm07-rhel6 -m an-a05n01.alteeve.ca | |||
</syntaxhighlight> | |||
<syntaxhighlight lang="text"> | |||
Trying to migrate vm:vm07-rhel6 to an-a05n01.alteeve.ca...Success | |||
</syntaxhighlight> | |||
<syntaxhighlight lang="bash"> | |||
clusvcadm -M vm:vm08-sles11 -m an-a05n01.alteeve.ca | |||
</syntaxhighlight> | |||
<syntaxhighlight lang="text"> | |||
Trying to migrate vm:vm08-sles11 to an-a05n01.alteeve.ca...Success | |||
</syntaxhighlight> | |||
<syntaxhighlight lang="bash"> | |||
clustat | |||
</syntaxhighlight> | |||
<syntaxhighlight lang="text"> | |||
Cluster Status for an-anvil-05 @ Wed Dec 4 22:31:15 2013 | |||
Member Status: Quorate | |||
Member Name ID Status | |||
------ ---- ---- ------ | |||
an-a05n01.alteeve.ca 1 Online, Local, rgmanager | |||
an-a05n02.alteeve.ca 2 Online, rgmanager | |||
Service Name Owner (Last) State | |||
------- ---- ----- ------ ----- | |||
service:libvirtd_n01 an-a05n01.alteeve.ca started | |||
service:libvirtd_n02 an-a05n02.alteeve.ca started | |||
service:storage_n01 an-a05n01.alteeve.ca started | |||
service:storage_n02 an-a05n02.alteeve.ca started | |||
vm:vm01-win2008 an-a05n01.alteeve.ca started | |||
vm:vm02-win2012 an-a05n02.alteeve.ca started | |||
vm:vm03-win7 an-a05n01.alteeve.ca started | |||
vm:vm04-win8 an-a05n01.alteeve.ca started | |||
vm:vm05-freebsd9 an-a05n02.alteeve.ca started | |||
vm:vm06-solaris11 an-a05n02.alteeve.ca started | |||
vm:vm07-rhel6 an-a05n01.alteeve.ca started | |||
vm:vm08-sles11 an-a05n01.alteeve.ca started | |||
</syntaxhighlight> | |||
|- | |||
!<span class="code">an-a05n02</span> | |||
|style="white-space: nowrap;"|<syntaxhighlight lang="bash"> | |||
clustat | |||
</syntaxhighlight> | |||
<syntaxhighlight lang="text"> | |||
Cluster Status for an-anvil-05 @ Wed Dec 4 22:31:22 2013 | |||
Member Status: Quorate | |||
Member Name ID Status | |||
------ ---- ---- ------ | |||
an-a05n01.alteeve.ca 1 Online, rgmanager | |||
an-a05n02.alteeve.ca 2 Online, Local, rgmanager | |||
Service Name Owner (Last) State | |||
------- ---- ----- ------ ----- | |||
service:libvirtd_n01 an-a05n01.alteeve.ca started | |||
service:libvirtd_n02 an-a05n02.alteeve.ca started | |||
service:storage_n01 an-a05n01.alteeve.ca started | |||
service:storage_n02 an-a05n02.alteeve.ca started | |||
vm:vm01-win2008 an-a05n01.alteeve.ca started | |||
vm:vm02-win2012 an-a05n02.alteeve.ca started | |||
vm:vm03-win7 an-a05n01.alteeve.ca started | |||
vm:vm04-win8 an-a05n01.alteeve.ca started | |||
vm:vm05-freebsd9 an-a05n02.alteeve.ca started | |||
vm:vm06-solaris11 an-a05n02.alteeve.ca started | |||
vm:vm07-rhel6 an-a05n01.alteeve.ca started | |||
vm:vm08-sles11 an-a05n01.alteeve.ca started | |||
</syntaxhighlight> | |||
|} | |||
All done! | |||
The ''Anvil!'' is once again fully redundant and our servers are back on their preferred hosts. | |||
=== Withdraw an-a05n02 === | |||
Next up; Withdrawing <span class="code">an-a05n02</span>. As always, we will check the state of things. | |||
{|class="wikitable" | |||
!<span class="code">an-a05n01</span> | |||
|style="white-space: nowrap;"|<syntaxhighlight lang="bash"> | |||
clustat | |||
</syntaxhighlight> | |||
<syntaxhighlight lang="text"> | |||
Cluster Status for an-anvil-05 @ Wed Dec 4 22:34:23 2013 | |||
Member Status: Quorate | |||
Member Name ID Status | |||
------ ---- ---- ------ | |||
an-a05n01.alteeve.ca 1 Online, Local, rgmanager | |||
an-a05n02.alteeve.ca 2 Online, rgmanager | |||
Service Name Owner (Last) State | |||
------- ---- ----- ------ ----- | |||
service:libvirtd_n01 an-a05n01.alteeve.ca started | |||
service:libvirtd_n02 an-a05n02.alteeve.ca started | |||
service:storage_n01 an-a05n01.alteeve.ca started | |||
service:storage_n02 an-a05n02.alteeve.ca started | |||
vm:vm01-win2008 an-a05n01.alteeve.ca started | |||
vm:vm02-win2012 an-a05n02.alteeve.ca started | |||
vm:vm03-win7 an-a05n01.alteeve.ca started | |||
vm:vm04-win8 an-a05n01.alteeve.ca started | |||
vm:vm05-freebsd9 an-a05n02.alteeve.ca started | |||
vm:vm06-solaris11 an-a05n02.alteeve.ca started | |||
vm:vm07-rhel6 an-a05n01.alteeve.ca started | |||
vm:vm08-sles11 an-a05n01.alteeve.ca started | |||
</syntaxhighlight> | |||
|} | |||
This time, we will live-migrate <span class="code">vm02-win2012</span>, <span class="code">vm05-freebsd9</span> and <span class="code">vm06-solaris11</span> over to <span class="code">an-a05n01</span>. | |||
{|class="wikitable" | |||
!<span class="code">an-a05n01</span> | |||
|style="white-space: nowrap;"|<syntaxhighlight lang="bash"> | |||
clusvcadm -M vm:vm02-win2012 -m an-a05n01.alteeve.ca | |||
</syntaxhighlight> | |||
<syntaxhighlight lang="text"> | |||
Trying to migrate vm:vm02-win2012 to an-a05n01.alteeve.ca...Success | |||
</syntaxhighlight> | |||
<syntaxhighlight lang="bash"> | |||
clusvcadm -M vm:vm05-freebsd9 -m an-a05n01.alteeve.ca | |||
</syntaxhighlight> | |||
<syntaxhighlight lang="text"> | |||
Trying to migrate vm:vm05-freebsd9 to an-a05n01.alteeve.ca...Success | |||
</syntaxhighlight> | |||
<syntaxhighlight lang="bash"> | |||
clusvcadm -M vm:vm06-solaris11 -m an-a05n01.alteeve.ca | |||
</syntaxhighlight> | |||
<syntaxhighlight lang="text"> | |||
Trying to migrate vm:vm06-solaris11 to an-a05n01.alteeve.ca...Success | |||
</syntaxhighlight> | |||
<syntaxhighlight lang="bash"> | |||
clustat | |||
</syntaxhighlight> | |||
<syntaxhighlight lang="text"> | |||
Cluster Status for an-anvil-05 @ Wed Dec 4 22:37:19 2013 | |||
Member Status: Quorate | |||
Member Name ID Status | |||
------ ---- ---- ------ | |||
an-a05n01.alteeve.ca 1 Online, Local, rgmanager | |||
an-a05n02.alteeve.ca 2 Online, rgmanager | |||
Service Name Owner (Last) State | |||
------- ---- ----- ------ ----- | |||
service:libvirtd_n01 an-a05n01.alteeve.ca started | |||
service:libvirtd_n02 an-a05n02.alteeve.ca started | |||
service:storage_n01 an-a05n01.alteeve.ca started | |||
service:storage_n02 an-a05n02.alteeve.ca started | |||
vm:vm01-win2008 an-a05n01.alteeve.ca started | |||
vm:vm02-win2012 an-a05n01.alteeve.ca started | |||
vm:vm03-win7 an-a05n01.alteeve.ca started | |||
vm:vm04-win8 an-a05n01.alteeve.ca started | |||
vm:vm05-freebsd9 an-a05n01.alteeve.ca started | |||
vm:vm06-solaris11 an-a05n01.alteeve.ca started | |||
vm:vm07-rhel6 an-a05n01.alteeve.ca started | |||
vm:vm08-sles11 an-a05n01.alteeve.ca started | |||
</syntaxhighlight> | |||
|- | |||
!<span class="code">an-a05n02</span> | |||
|style="white-space: nowrap;"|<syntaxhighlight lang="bash"> | |||
clustat | |||
</syntaxhighlight> | |||
<syntaxhighlight lang="text"> | |||
Cluster Status for an-anvil-05 @ Wed Dec 4 22:37:57 2013 | |||
Member Status: Quorate | |||
Member Name ID Status | |||
------ ---- ---- ------ | |||
an-a05n01.alteeve.ca 1 Online, rgmanager | |||
an-a05n02.alteeve.ca 2 Online, Local, rgmanager | |||
Service Name Owner (Last) State | |||
------- ---- ----- ------ ----- | |||
service:libvirtd_n01 an-a05n01.alteeve.ca started | |||
service:libvirtd_n02 an-a05n02.alteeve.ca started | |||
service:storage_n01 an-a05n01.alteeve.ca started | |||
service:storage_n02 an-a05n02.alteeve.ca started | |||
vm:vm01-win2008 an-a05n01.alteeve.ca started | |||
vm:vm02-win2012 an-a05n01.alteeve.ca started | |||
vm:vm03-win7 an-a05n01.alteeve.ca started | |||
vm:vm04-win8 an-a05n01.alteeve.ca started | |||
vm:vm05-freebsd9 an-a05n01.alteeve.ca started | |||
vm:vm06-solaris11 an-a05n01.alteeve.ca started | |||
vm:vm07-rhel6 an-a05n01.alteeve.ca started | |||
vm:vm08-sles11 an-a05n01.alteeve.ca started | |||
</syntaxhighlight> | |||
|} | |||
All servers are off, so now we'll stop <span class="code">rgmanager</span> and <span class="code">cman</span>. | |||
{|class="wikitable" | |||
!<span class="code">an-a05n02</span> | |||
|style="white-space: nowrap;"|<syntaxhighlight lang="bash"> | |||
/etc/init.d/rgmanager stop | |||
</syntaxhighlight> | |||
<syntaxhighlight lang="text"> | |||
Stopping Cluster Service Manager: [ OK ] | |||
</syntaxhighlight> | |||
<syntaxhighlight lang="bash"> | |||
/etc/init.d/cman stop | |||
</syntaxhighlight> | |||
<syntaxhighlight lang="text"> | |||
Stopping cluster: | |||
Leaving fence domain... [ OK ] | |||
Stopping gfs_controld... [ OK ] | |||
Stopping dlm_controld... [ OK ] | |||
Stopping fenced... [ OK ] | |||
Stopping cman... [ OK ] | |||
Waiting for corosync to shutdown: [ OK ] | |||
Unloading kernel modules... [ OK ] | |||
Unmounting configfs... [ OK ] | |||
</syntaxhighlight> | |||
<syntaxhighlight lang="bash"> | |||
clustat | |||
</syntaxhighlight> | |||
<syntaxhighlight lang="text"> | |||
Could not connect to CMAN: No such file or directory | |||
</syntaxhighlight> | |||
|} | |||
Verify that <span class="code">an-a05n01</span> shows <span class="code">an-a05n02</span> as offline now. | |||
{|class="wikitable" | |||
!<span class="code">an-a05n02</span> | |||
|style="white-space: nowrap;"|<syntaxhighlight lang="bash"> | |||
clustat | |||
</syntaxhighlight> | |||
<syntaxhighlight lang="text"> | |||
Cluster Status for an-anvil-05 @ Wed Dec 4 22:41:52 2013 | |||
Member Status: Quorate | |||
Member Name ID Status | |||
------ ---- ---- ------ | |||
an-a05n01.alteeve.ca 1 Online, Local, rgmanager | |||
an-a05n02.alteeve.ca 2 Offline | |||
Service Name Owner (Last) State | |||
------- ---- ----- ------ ----- | |||
service:libvirtd_n01 an-a05n01.alteeve.ca started | |||
service:libvirtd_n02 (an-a05n02.alteeve.ca) stopped | |||
service:storage_n01 an-a05n01.alteeve.ca started | |||
service:storage_n02 (an-a05n02.alteeve.ca) stopped | |||
vm:vm01-win2008 an-a05n01.alteeve.ca started | |||
vm:vm02-win2012 an-a05n01.alteeve.ca started | |||
vm:vm03-win7 an-a05n01.alteeve.ca started | |||
vm:vm04-win8 an-a05n01.alteeve.ca started | |||
vm:vm05-freebsd9 an-a05n01.alteeve.ca started | |||
vm:vm06-solaris11 an-a05n01.alteeve.ca started | |||
vm:vm07-rhel6 an-a05n01.alteeve.ca started | |||
vm:vm08-sles11 an-a05n01.alteeve.ca started | |||
</syntaxhighlight> | |||
|} | |||
As before, we can now do an OS update or power off the node. | |||
We did our single-node load testing already, so this time we will simply reboot <span class="code">an-a05n02</span> to simulate a (very quick) hardware service. | |||
{|class="wikitable" | |||
!<span class="code">an-a05n02</span> | |||
|style="white-space: nowrap;"|<syntaxhighlight lang="bash"> | |||
reboot | |||
</syntaxhighlight> | |||
<syntaxhighlight lang="text"> | |||
Broadcast message from root@an-a05n02.alteeve.ca | |||
(/dev/pts/0) at 22:43 ... | |||
The system is going down for reboot NOW! | |||
</syntaxhighlight> | |||
|} | |||
=== Rejoin an-a05n02 === | |||
As before, we'll verify the current state of things on <span class="code">an-a05n01</span>, log into <span class="code">an-a05n02</span> and start <span class="code">cman</span> and <span class="code">rgmanager</span>. Then we'll watch <span class="code">/etc/init.d/drbd status</span> and wait until both resources are <span class="code">UpToDate</span>. | |||
{|class="wikitable" | |||
!<span class="code">an-a05n01</span> | |||
|style="white-space: nowrap;"|<syntaxhighlight lang="bash"> | |||
clustat | |||
</syntaxhighlight> | |||
<syntaxhighlight lang="text"> | |||
Cluster Status for an-anvil-05 @ Wed Dec 4 22:47:30 2013 | |||
Member Status: Quorate | |||
Member Name ID Status | |||
------ ---- ---- ------ | |||
an-a05n01.alteeve.ca 1 Online, Local, rgmanager | |||
an-a05n02.alteeve.ca 2 Offline | |||
Service Name Owner (Last) State | |||
------- ---- ----- ------ ----- | |||
service:libvirtd_n01 an-a05n01.alteeve.ca started | |||
service:libvirtd_n02 (an-a05n02.alteeve.ca) stopped | |||
service:storage_n01 an-a05n01.alteeve.ca started | |||
service:storage_n02 (an-a05n02.alteeve.ca) stopped | |||
vm:vm01-win2008 an-a05n01.alteeve.ca started | |||
vm:vm02-win2012 an-a05n01.alteeve.ca started | |||
vm:vm03-win7 an-a05n01.alteeve.ca started | |||
vm:vm04-win8 an-a05n01.alteeve.ca started | |||
vm:vm05-freebsd9 an-a05n01.alteeve.ca started | |||
vm:vm06-solaris11 an-a05n01.alteeve.ca started | |||
vm:vm07-rhel6 an-a05n01.alteeve.ca started | |||
vm:vm08-sles11 an-a05n01.alteeve.ca started | |||
</syntaxhighlight> | |||
|- | |||
!<span class="code">an-a05n02</span> | |||
|style="white-space: nowrap;"|<syntaxhighlight lang="bash"> | |||
/etc/init.d/cman start | |||
</syntaxhighlight> | |||
<syntaxhighlight lang="text"> | |||
Starting cluster: | |||
Checking if cluster has been disabled at boot... [ OK ] | |||
Checking Network Manager... [ OK ] | |||
Global setup... [ OK ] | |||
Loading kernel modules... [ OK ] | |||
Mounting configfs... [ OK ] | |||
Starting cman... [ OK ] | |||
Waiting for quorum... [ OK ] | |||
Starting fenced... [ OK ] | |||
Starting dlm_controld... [ OK ] | |||
Tuning DLM kernel config... [ OK ] | |||
Starting gfs_controld... [ OK ] | |||
Unfencing self... [ OK ] | |||
Joining fence domain... [ OK ] | |||
</syntaxhighlight> | |||
<syntaxhighlight lang="bash"> | |||
/etc/init.d/rgmanager start | |||
</syntaxhighlight> | |||
<syntaxhighlight lang="text"> | |||
Starting Cluster Service Manager: [ OK ] | |||
</syntaxhighlight> | |||
<syntaxhighlight lang="bash"> | |||
/etc/init.d/drbd status | |||
</syntaxhighlight> | |||
<syntaxhighlight lang="text"> | |||
drbd driver loaded OK; device status: | |||
version: 8.3.16 (api:88/proto:86-97) | |||
GIT-hash: a798fa7e274428a357657fb52f0ecf40192c1985 build by phil@Build64R6, 2013-09-27 16:00:43 | |||
m:res cs ro ds p mounted fstype | |||
0:r0 Connected Primary/Primary UpToDate/UpToDate C | |||
1:r1 Connected Primary/Primary UpToDate/UpToDate C | |||
</syntaxhighlight> | |||
<syntaxhighlight lang="bash"> | |||
clustat | |||
</syntaxhighlight> | |||
<syntaxhighlight lang="text"> | |||
Cluster Status for an-anvil-05 @ Wed Dec 4 22:50:36 2013 | |||
Member Status: Quorate | |||
Member Name ID Status | |||
------ ---- ---- ------ | |||
an-a05n01.alteeve.ca 1 Online, rgmanager | |||
an-a05n02.alteeve.ca 2 Online, Local, rgmanager | |||
Service Name Owner (Last) State | |||
------- ---- ----- ------ ----- | |||
service:libvirtd_n01 an-a05n01.alteeve.ca started | |||
service:libvirtd_n02 an-a05n02.alteeve.ca started | |||
service:storage_n01 an-a05n01.alteeve.ca started | |||
service:storage_n02 an-a05n02.alteeve.ca started | |||
vm:vm01-win2008 an-a05n01.alteeve.ca started | |||
vm:vm02-win2012 an-a05n01.alteeve.ca started | |||
vm:vm03-win7 an-a05n01.alteeve.ca started | |||
vm:vm04-win8 an-a05n01.alteeve.ca started | |||
vm:vm05-freebsd9 an-a05n01.alteeve.ca started | |||
vm:vm06-solaris11 an-a05n01.alteeve.ca started | |||
vm:vm07-rhel6 an-a05n01.alteeve.ca started | |||
vm:vm08-sles11 an-a05n01.alteeve.ca started | |||
</syntaxhighlight> | |||
|} | |||
Last step; Migrate the servers back. | |||
{|class="wikitable" | |||
!<span class="code">an-a05n01</span> | |||
|style="white-space: nowrap;"|<syntaxhighlight lang="bash"> | |||
clusvcadm -M vm:vm02-win2012 -m an-a05n02.alteeve.ca | |||
</syntaxhighlight> | |||
<syntaxhighlight lang="text"> | |||
Trying to migrate vm:vm02-win2012 to an-a05n02.alteeve.ca...Success | |||
</syntaxhighlight> | |||
<syntaxhighlight lang="bash"> | |||
clusvcadm -M vm:vm05-freebsd9 -m an-a05n02.alteeve.ca | |||
</syntaxhighlight> | |||
<syntaxhighlight lang="text"> | |||
Trying to migrate vm:vm05-freebsd9 to an-a05n02.alteeve.ca...Success | |||
</syntaxhighlight> | |||
<syntaxhighlight lang="bash"> | |||
clusvcadm -M vm:vm06-solaris11 -m an-a05n02.alteeve.ca | |||
</syntaxhighlight> | |||
<syntaxhighlight lang="text"> | |||
Trying to migrate vm:vm06-solaris11 to an-a05n02.alteeve.ca...Success | |||
</syntaxhighlight> | |||
<syntaxhighlight lang="bash"> | |||
clustat | |||
</syntaxhighlight> | |||
<syntaxhighlight lang="text"> | |||
Cluster Status for an-anvil-05 @ Wed Dec 4 22:55:39 2013 | |||
Member Status: Quorate | |||
Member Name ID Status | |||
------ ---- ---- ------ | |||
an-a05n01.alteeve.ca 1 Online, Local, rgmanager | |||
an-a05n02.alteeve.ca 2 Online, rgmanager | |||
Service Name Owner (Last) State | |||
------- ---- ----- ------ ----- | |||
service:libvirtd_n01 an-a05n01.alteeve.ca started | |||
service:libvirtd_n02 an-a05n02.alteeve.ca started | |||
service:storage_n01 an-a05n01.alteeve.ca started | |||
service:storage_n02 an-a05n02.alteeve.ca started | |||
vm:vm01-win2008 an-a05n01.alteeve.ca started | |||
vm:vm02-win2012 an-a05n02.alteeve.ca started | |||
vm:vm03-win7 an-a05n01.alteeve.ca started | |||
vm:vm04-win8 an-a05n01.alteeve.ca started | |||
vm:vm05-freebsd9 an-a05n02.alteeve.ca started | |||
vm:vm06-solaris11 an-a05n02.alteeve.ca started | |||
vm:vm07-rhel6 an-a05n01.alteeve.ca started | |||
vm:vm08-sles11 an-a05n01.alteeve.ca started | |||
</syntaxhighlight> | |||
|- | |||
!<span class="code">an-a05n02</span> | |||
|style="white-space: nowrap;"|<syntaxhighlight lang="bash"> | |||
clustat | |||
</syntaxhighlight> | |||
<syntaxhighlight lang="text"> | |||
Cluster Status for an-anvil-05 @ Wed Dec 4 22:55:42 2013 | |||
Member Status: Quorate | |||
Member Name ID Status | |||
------ ---- ---- ------ | |||
an-a05n01.alteeve.ca 1 Online, rgmanager | |||
an-a05n02.alteeve.ca 2 Online, Local, rgmanager | |||
Service Name Owner (Last) State | |||
------- ---- ----- ------ ----- | |||
service:libvirtd_n01 an-a05n01.alteeve.ca started | |||
service:libvirtd_n02 an-a05n02.alteeve.ca started | |||
service:storage_n01 an-a05n01.alteeve.ca started | |||
service:storage_n02 an-a05n02.alteeve.ca started | |||
vm:vm01-win2008 an-a05n01.alteeve.ca started | |||
vm:vm02-win2012 an-a05n02.alteeve.ca started | |||
vm:vm03-win7 an-a05n01.alteeve.ca started | |||
vm:vm04-win8 an-a05n01.alteeve.ca started | |||
vm:vm05-freebsd9 an-a05n02.alteeve.ca started | |||
vm:vm06-solaris11 an-a05n02.alteeve.ca started | |||
vm:vm07-rhel6 an-a05n01.alteeve.ca started | |||
vm:vm08-sles11 an-a05n01.alteeve.ca started | |||
</syntaxhighlight> | |||
|} | |||
Once again, we're back into a fully redundant state and our servers are running on their preferred nodes! | |||
== Out-of-Cluster Server Power-off == | |||
If a server shuts off, for any reason, the cluster will treat it as a failed service and it will recover it by turning it back on. | |||
There is a catch though... | |||
For privacy reasons, there is no way to look inside a server to determine if it has failed. So detecting a failure is restricted to simply seeing it not do anything any more. Some operating systems, like most or all Microsoft operating systems, go into an infinite loop when they [http://en.wikipedia.org/wiki/Blue_Screen_of_Death blue screen]. To the cluster, it simply looks like the server is really really busy, so it is not treated as failed. | |||
So please make sure, if at all possible, to set your servers to reboot on crash. Most modern operating systems do this already, but consult your server operating system's documentation to verify. | |||
For this test, all we will do is log into a server and turn it off the way you would if it was a bare-iron server. If things work properly, the server should see it as failed and turn it back on within a few seconds. | |||
For this test, we will log into <span class="code">vm03-win7</span>, click on the "Start" icon and then click on ''Shut down''. We will watch the system logs on <span class="code">an-a05n01</span> as that is the node hosting the server. | |||
{|class="wikitable" | |||
!<span class="code">an-a05n01</span> | |||
|style="white-space: nowrap;"|<syntaxhighlight lang="bash"> | |||
clear; tail -f -n 0 /var/log/messages | |||
</syntaxhighlight> | |||
<syntaxhighlight lang="text"> | |||
Dec 5 02:10:16 an-a05n01 kernel: ifn_bridge1: port 3(vnet1) entering disabled state | |||
Dec 5 02:10:16 an-a05n01 kernel: device vnet1 left promiscuous mode | |||
Dec 5 02:10:16 an-a05n01 kernel: ifn_bridge1: port 3(vnet1) entering disabled state | |||
Dec 5 02:10:17 an-a05n01 ntpd[2100]: Deleting interface #19 vnet1, fe80::fc54:ff:fe68:9bfd#123, interface stats: received=0, sent=0, dropped=0, active_time=99 secs | |||
Dec 5 02:10:17 an-a05n01 ntpd[2100]: peers refreshed | |||
Dec 5 02:10:23 an-a05n01 rgmanager[2770]: status on vm "vm03-win7" returned 1 (generic error) | |||
Dec 5 02:10:24 an-a05n01 rgmanager[2770]: Stopping service vm:vm03-win7 | |||
Dec 5 02:10:24 an-a05n01 rgmanager[2770]: Service vm:vm03-win7 is recovering | |||
Dec 5 02:10:24 an-a05n01 rgmanager[2770]: Recovering failed service vm:vm03-win7 | |||
Dec 5 02:10:24 an-a05n01 kernel: device vnet1 entered promiscuous mode | |||
Dec 5 02:10:24 an-a05n01 kernel: ifn_bridge1: port 3(vnet1) entering forwarding state | |||
Dec 5 02:10:25 an-a05n01 rgmanager[2770]: Service vm:vm03-win7 started | |||
Dec 5 02:10:28 an-a05n01 ntpd[2100]: Listen normally on 20 vnet1 fe80::fc54:ff:fe68:9bfd UDP 123 | |||
Dec 5 02:10:28 an-a05n01 ntpd[2100]: peers refreshed | |||
Dec 5 02:10:39 an-a05n01 kernel: ifn_bridge1: port 3(vnet1) entering forwarding state | |||
</syntaxhighlight> | |||
|} | |||
Above we see the hypervisor report that the server shut down at <span class="code">02:10:17</span>. The message "<span class="code">Deleting interface #19 vnet1...</span>" is the virtual network cable <span class="code">vnet1</span> being deleted because the server it was "plugged into" was no longer running. | |||
Six seconds later, at <span class="code">02:10:23</span>, <span class="code">rgmanager</span> realized that the server had failed. If you had been watching <span class="code">clustat</span>, you would have seen the <span class="code">vm:vm03-win7</span> server enter the <span class="code">failed</span> state. Moments later, <span class="code">rgmanager</span> began recovering the server by first disabling it, then starting it back up. | |||
Two seconds after that, eight seconds after the unexpected shut down, <span class="code">vm03-win7</span> was recovered and running again. Three seconds later, a new <span class="code">vnet1</span> was created, reconnecting the server to the network. A this point, recovery is complete! | |||
Probably the easiest test so far. Of course, you will want to repeat this test for all of your servers. | |||
== Crashing Nodes; The Ultimate Test == | |||
Finally, we've reaches the ultimate test. | |||
Most people first look at high-availability to protect against crashed bare-iron servers. As we've seen, there are many other single-points of failure that we had to address and which we've already tested. | |||
In this test, we're going to have all services and servers running. | |||
We will first crash <span class="code">an-a05n01</span> by sending a "<span class="code">c</span>" character to the "magic <span class="code">[http://en.wikipedia.org/wiki/Magic_SysRq_key SysRq Key]</span>, as we did when we first tested our fencing configuration. This will cause <span class="code">an-a05n01</span> to instantly [http://en.wikipedia.org/wiki/Kernel_panic kernel panic], crashing the node and halting all the servers running on it. This will simulate the harshest software crash possible on a node. | |||
Once we've recovered from that, we will crash <span class="code">an-a05n02</span> by cutting the power to it. This will simulate a total destruction of a node. As we saw in our early fence testing, this will cause the [[IPMI]] [[BMC]] under <span class="code">an-a05n02</span> to also fail, forcing the surviving node to fall back to the [[PDU]] based backup fence method. | |||
These tests will also ensure that your ''Anvil!'' does not suffer from a [[boot storm]] when all of the servers from either node reboot at the same time during recovery. This is a very, very important aspect of this test. Should the servers start, but fail to finish booting and become unresponsive, it is likely that your storage was not fast enough to handle the sudden high read load placed on them during recovery. As bad as this is, it is much better to find out now, '''before''' going into production. | |||
=== Crashing an-a05n01 === | |||
{{note|1=''Virtual Machine Manager'' will appear to hang when <span class="code">an-a05n01</span> until the connection is determined to have failed. To watch the recovery of the servers on <span class="code">an-a05n02</span> in real time, please disconnect from <span class="code">an-a05n01</span> first.}} | |||
Once we crash <span class="code">an-a05n01</span>, we should see the following sequence of events: | |||
* Both <span class="code">cman</span> and <span class="code">drbd</span> on <span class="code">an-a05n02</span> will declare <span class="code">an-a05n01</span> lost and will fence it. | |||
* An alert from <span class="code">an-a05n02</span> will arrive indicating the loss of <span class="code">an-a05n01</span>. | |||
* All servers that had been running on <span class="code">an-a05n01</span> will boot on <span class="code">an-a05n02</span>. | |||
* Additional alerts will arrive as the servers are recovered. | |||
* Within five or ten minutes, we will get an alert from <span class="code">an-a05n01</span> saying that the alert system has started, indicating the node is back. | |||
Before we do this, lets see what is on <span class="code">an-a05n01</span> right now. | |||
{|class="wikitable" | |||
!<span class="code">an-a05n01</span> | |||
|style="white-space: nowrap;"|<syntaxhighlight lang="bash"> | |||
clustat | |||
</syntaxhighlight> | |||
<syntaxhighlight lang="text"> | |||
Cluster Status for an-anvil-05 @ Thu Dec 5 11:55:23 2013 | |||
Member Status: Quorate | |||
Member Name ID Status | |||
------ ---- ---- ------ | |||
an-a05n01.alteeve.ca 1 Online, Local, rgmanager | |||
an-a05n02.alteeve.ca 2 Online, rgmanager | |||
Service Name Owner (Last) State | |||
------- ---- ----- ------ ----- | |||
service:libvirtd_n01 an-a05n01.alteeve.ca started | |||
service:libvirtd_n02 an-a05n02.alteeve.ca started | |||
service:storage_n01 an-a05n01.alteeve.ca started | |||
service:storage_n02 an-a05n02.alteeve.ca started | |||
vm:vm01-win2008 an-a05n01.alteeve.ca started | |||
vm:vm02-win2012 an-a05n02.alteeve.ca started | |||
vm:vm03-win7 an-a05n01.alteeve.ca started | |||
vm:vm04-win8 an-a05n01.alteeve.ca started | |||
vm:vm05-freebsd9 an-a05n02.alteeve.ca started | |||
vm:vm06-solaris11 an-a05n02.alteeve.ca started | |||
vm:vm07-rhel6 an-a05n01.alteeve.ca started | |||
vm:vm08-sles11 an-a05n01.alteeve.ca started | |||
</syntaxhighlight> | |||
|} | |||
So this test is going to crash <span class="code">vm01-win2008</span>, <span class="code">vm03-win7</span>, <span class="code">vm04-win8</span>, <span class="code">m07-rhel6</span> and <span class="code">vm08-sles11</span>. This is the majority of our servers, so this recovery will tell us if we're going to have a boot storm or not. If all of them boot without trouble, we will know that our storage is likely fast enough. | |||
Be sure to log into <span class="code">an-a05n02</span> and <span class="code">tail</span> the system logs before proceeding. | |||
Ok, let's do this! | |||
{|class="wikitable" | |||
!<span class="code">an-a05n01</span> | |||
|style="white-space: nowrap;"|<syntaxhighlight lang="bash"> | |||
echo c > /proc/sysrq-trigger | |||
</syntaxhighlight> | |||
<syntaxhighlight lang="text"> | |||
<nothing returned, it's dead> | |||
</syntaxhighlight> | |||
|- | |||
!<span class="code">an-a05n02</span> | |||
|style="white-space: nowrap;"|<syntaxhighlight lang="bash"> | |||
tail -f -n 0 /var/log/messages | |||
</syntaxhighlight> | |||
<syntaxhighlight lang="text"> | |||
Dec 5 12:01:27 an-a05n02 kernel: block drbd1: PingAck did not arrive in time. | |||
Dec 5 12:01:27 an-a05n02 kernel: block drbd1: peer( Primary -> Unknown ) conn( Connected -> NetworkFailure ) pdsk( UpToDate -> DUnknown ) susp( 0 -> 1 ) | |||
Dec 5 12:01:27 an-a05n02 kernel: block drbd1: asender terminated | |||
Dec 5 12:01:27 an-a05n02 kernel: block drbd1: Terminating drbd1_asender | |||
Dec 5 12:01:27 an-a05n02 kernel: block drbd1: Connection closed | |||
Dec 5 12:01:27 an-a05n02 kernel: block drbd1: conn( NetworkFailure -> Unconnected ) | |||
Dec 5 12:01:27 an-a05n02 kernel: block drbd1: receiver terminated | |||
Dec 5 12:01:27 an-a05n02 kernel: block drbd1: helper command: /sbin/drbdadm fence-peer minor-1 | |||
Dec 5 12:01:27 an-a05n02 kernel: block drbd1: Restarting drbd1_receiver | |||
Dec 5 12:01:27 an-a05n02 kernel: block drbd1: receiver (re)started | |||
Dec 5 12:01:27 an-a05n02 kernel: block drbd1: conn( Unconnected -> WFConnection ) | |||
Dec 5 12:01:27 an-a05n02 rhcs_fence: Attempting to fence peer using RHCS from DRBD... | |||
Dec 5 12:01:32 an-a05n02 corosync[2546]: [TOTEM ] A processor failed, forming new configuration. | |||
Dec 5 12:01:32 an-a05n02 kernel: block drbd0: PingAck did not arrive in time. | |||
Dec 5 12:01:32 an-a05n02 kernel: block drbd0: peer( Primary -> Unknown ) conn( Connected -> NetworkFailure ) pdsk( UpToDate -> DUnknown ) susp( 0 -> 1 ) | |||
Dec 5 12:01:32 an-a05n02 kernel: block drbd0: asender terminated | |||
Dec 5 12:01:32 an-a05n02 kernel: block drbd0: Terminating drbd0_asender | |||
Dec 5 12:01:32 an-a05n02 kernel: block drbd0: Connection closed | |||
Dec 5 12:01:32 an-a05n02 kernel: block drbd0: conn( NetworkFailure -> Unconnected ) | |||
Dec 5 12:01:32 an-a05n02 kernel: block drbd0: receiver terminated | |||
Dec 5 12:01:32 an-a05n02 kernel: block drbd0: Restarting drbd0_receiver | |||
Dec 5 12:01:32 an-a05n02 kernel: block drbd0: receiver (re)started | |||
Dec 5 12:01:32 an-a05n02 kernel: block drbd0: conn( Unconnected -> WFConnection ) | |||
Dec 5 12:01:32 an-a05n02 kernel: block drbd0: helper command: /sbin/drbdadm fence-peer minor-0 | |||
Dec 5 12:01:32 an-a05n02 rhcs_fence: Attempting to fence peer using RHCS from DRBD... | |||
Dec 5 12:01:34 an-a05n02 corosync[2546]: [QUORUM] Members[1]: 2 | |||
Dec 5 12:01:34 an-a05n02 corosync[2546]: [TOTEM ] A processor joined or left the membership and a new membership was formed. | |||
Dec 5 12:01:34 an-a05n02 kernel: dlm: closing connection to node 1 | |||
Dec 5 12:01:34 an-a05n02 fenced[2613]: fencing node an-a05n01.alteeve.ca | |||
Dec 5 12:01:34 an-a05n02 corosync[2546]: [CPG ] chosen downlist: sender r(0) ip(10.20.50.2) ; members(old:2 left:1) | |||
Dec 5 12:01:34 an-a05n02 corosync[2546]: [MAIN ] Completed service synchronization, ready to provide service. | |||
Dec 5 12:01:34 an-a05n02 kernel: GFS2: fsid=an-anvil-05:shared.1: jid=0: Trying to acquire journal lock... | |||
Dec 5 12:02:05 an-a05n02 fenced[2613]: fence an-a05n01.alteeve.ca success | |||
Dec 5 12:02:05 an-a05n02 fence_node[2294]: fence an-a05n01.alteeve.ca success | |||
Dec 5 12:02:05 an-a05n02 kernel: block drbd1: helper command: /sbin/drbdadm fence-peer minor-1 exit code 7 (0x700) | |||
Dec 5 12:02:05 an-a05n02 kernel: block drbd1: fence-peer helper returned 7 (peer was stonithed) | |||
Dec 5 12:02:05 an-a05n02 kernel: block drbd1: pdsk( DUnknown -> Outdated ) | |||
Dec 5 12:02:05 an-a05n02 kernel: block drbd1: new current UUID AC7D34993319CF07:96939998C25B00D5:C667A4D09ADAF91B:C666A4D09ADAF91B | |||
Dec 5 12:02:05 an-a05n02 kernel: block drbd1: susp( 1 -> 0 ) | |||
Dec 5 12:02:06 an-a05n02 rgmanager[2785]: Marking service:storage_n01 as stopped: Restricted domain unavailable | |||
Dec 5 12:02:07 an-a05n02 fence_node[2325]: fence an-a05n01.alteeve.ca success | |||
Dec 5 12:02:07 an-a05n02 kernel: block drbd0: helper command: /sbin/drbdadm fence-peer minor-0 exit code 7 (0x700) | |||
Dec 5 12:02:07 an-a05n02 kernel: block drbd0: fence-peer helper returned 7 (peer was stonithed) | |||
Dec 5 12:02:07 an-a05n02 kernel: block drbd0: pdsk( DUnknown -> Outdated ) | |||
Dec 5 12:02:07 an-a05n02 kernel: block drbd0: new current UUID 20CEE1AD5C066F57:BF89350BA62F87D1:EAA52C899C7C1F8D:EAA42C899C7C1F8D | |||
Dec 5 12:02:07 an-a05n02 kernel: block drbd0: susp( 1 -> 0 ) | |||
Dec 5 12:02:07 an-a05n02 kernel: GFS2: fsid=an-anvil-05:shared.1: jid=0: Looking at journal... | |||
Dec 5 12:02:07 an-a05n02 kernel: GFS2: fsid=an-anvil-05:shared.1: jid=0: Acquiring the transaction lock... | |||
Dec 5 12:02:07 an-a05n02 kernel: GFS2: fsid=an-anvil-05:shared.1: jid=0: Replaying journal... | |||
Dec 5 12:02:07 an-a05n02 kernel: GFS2: fsid=an-anvil-05:shared.1: jid=0: Replayed 259 of 476 blocks | |||
Dec 5 12:02:07 an-a05n02 kernel: GFS2: fsid=an-anvil-05:shared.1: jid=0: Found 5 revoke tags | |||
Dec 5 12:02:07 an-a05n02 kernel: GFS2: fsid=an-anvil-05:shared.1: jid=0: Journal replayed in 1s | |||
Dec 5 12:02:07 an-a05n02 kernel: GFS2: fsid=an-anvil-05:shared.1: jid=0: Done | |||
Dec 5 12:02:07 an-a05n02 rgmanager[2785]: Taking over service vm:vm01-win2008 from down member an-a05n01.alteeve.ca | |||
Dec 5 12:02:07 an-a05n02 rgmanager[2785]: Taking over service vm:vm03-win7 from down member an-a05n01.alteeve.ca | |||
Dec 5 12:02:07 an-a05n02 rgmanager[2785]: Taking over service vm:vm04-win8 from down member an-a05n01.alteeve.ca | |||
Dec 5 12:02:07 an-a05n02 kernel: device vnet3 entered promiscuous mode | |||
Dec 5 12:02:07 an-a05n02 kernel: ifn_bridge1: port 5(vnet3) entering forwarding state | |||
Dec 5 12:02:07 an-a05n02 rgmanager[2785]: Taking over service vm:vm07-rhel6 from down member an-a05n01.alteeve.ca | |||
Dec 5 12:02:07 an-a05n02 rgmanager[2785]: Taking over service vm:vm08-sles11 from down member an-a05n01.alteeve.ca | |||
Dec 5 12:02:08 an-a05n02 kernel: device vnet4 entered promiscuous mode | |||
Dec 5 12:02:08 an-a05n02 kernel: ifn_bridge1: port 6(vnet4) entering forwarding state | |||
Dec 5 12:02:08 an-a05n02 rgmanager[2785]: Service vm:vm01-win2008 started | |||
Dec 5 12:02:08 an-a05n02 kernel: device vnet5 entered promiscuous mode | |||
Dec 5 12:02:08 an-a05n02 kernel: ifn_bridge1: port 7(vnet5) entering forwarding state | |||
Dec 5 12:02:09 an-a05n02 kernel: device vnet6 entered promiscuous mode | |||
Dec 5 12:02:09 an-a05n02 kernel: ifn_bridge1: port 8(vnet6) entering forwarding state | |||
Dec 5 12:02:09 an-a05n02 kernel: device vnet7 entered promiscuous mode | |||
Dec 5 12:02:09 an-a05n02 kernel: ifn_bridge1: port 9(vnet7) entering forwarding state | |||
Dec 5 12:02:09 an-a05n02 rgmanager[2785]: Service vm:vm03-win7 started | |||
Dec 5 12:02:10 an-a05n02 rgmanager[2785]: Service vm:vm07-rhel6 started | |||
Dec 5 12:02:10 an-a05n02 rgmanager[2785]: Service vm:vm04-win8 started | |||
Dec 5 12:02:10 an-a05n02 rgmanager[2785]: Service vm:vm08-sles11 started | |||
Dec 5 12:02:12 an-a05n02 ntpd[2084]: Listen normally on 14 vnet3 fe80::fc54:ff:fe8e:6732 UDP 123 | |||
Dec 5 12:02:12 an-a05n02 ntpd[2084]: Listen normally on 15 vnet5 fe80::fc54:ff:fe58:6a9 UDP 123 | |||
Dec 5 12:02:12 an-a05n02 ntpd[2084]: Listen normally on 16 vnet6 fe80::fc54:ff:fe8a:6c52 UDP 123 | |||
Dec 5 12:02:12 an-a05n02 ntpd[2084]: Listen normally on 17 vnet4 fe80::fc54:ff:fe68:9bfd UDP 123 | |||
Dec 5 12:02:12 an-a05n02 ntpd[2084]: Listen normally on 18 vnet7 fe80::fc54:ff:fed5:494c UDP 123 | |||
Dec 5 12:02:12 an-a05n02 ntpd[2084]: peers refreshed | |||
Dec 5 12:02:19 an-a05n02 kernel: kvm: 3933: cpu0 disabled perfctr wrmsr: 0xc1 data 0xabcd | |||
Dec 5 12:02:22 an-a05n02 kernel: ifn_bridge1: port 5(vnet3) entering forwarding state | |||
Dec 5 12:02:23 an-a05n02 kernel: ifn_bridge1: port 6(vnet4) entering forwarding state | |||
Dec 5 12:02:23 an-a05n02 kernel: ifn_bridge1: port 7(vnet5) entering forwarding state | |||
Dec 5 12:02:24 an-a05n02 kernel: ifn_bridge1: port 8(vnet6) entering forwarding state | |||
Dec 5 12:02:24 an-a05n02 kernel: ifn_bridge1: port 9(vnet7) entering forwarding state | |||
</syntaxhighlight> | |||
|} | |||
We see here that, in this case, DRBD caught the failure slightly faster than <span class="code">corosync</span> did. It initiated a fence via <span class="code">rhcs_fence</span>. Next we see <span class="code">cman</span> also call a fence, which succeeded on first try. Shortly after, DRBD recognized the fence succeeded as well. | |||
With the fence actions succeeded, we see DRBD mark the lost resources as <span class="code">Outdated</span>, GFS2 reaps lost locks and cleans up the <span class="code">/shared</span> filesystem. We also see <span class="code">rgmanager</span> mark <span class="code">an-a05n01</span>'s storage as disabled and then begin recovery of the five lost servers. Once they're booted, the last recovery step is "plugging them in" to the bridge. | |||
Lets look at the alerts we received. | |||
The alert system checks for state changes every 30 seconds. So depending on when the loop fires during the failure and recovery process, you may get a couple alerts. That is what happened in my case. | |||
{|class="wikitable" | |||
!<span class="code">an-a05n02</span> | |||
|style="white-space: nowrap;"|<syntaxhighlight lang="text"> | |||
Subject: [ AN!CM ] - Alteeve's Niche! - Cluster 05 (Demo Cluster - "Tyson") - an-a05n02 - State Change! | |||
</syntaxhighlight> | |||
<syntaxhighlight lang="text"> | |||
Changes have been detected in the cluster. If you anticipated this | |||
change then there is no reason for concern. If this change was | |||
unexpected, please feel free to contact support. | |||
---------------------------------------------------------------------- | |||
Node an-a05n01.alteeve.ca; State change! | |||
Online, rgmanager -> Offline | |||
Node an-a05n02.alteeve.ca; State change! | |||
Online, Local, rgmanager -> Online, Local | |||
==[ Source Details ]================================================== | |||
Company: Alteeve's Niche! | |||
Anvil!: an-anvil-05 | |||
Node: an-a05n02.alteeve.ca | |||
Description: | |||
- Cluster 05 (Demo Cluster - "Tyson") | |||
If you have any questions or concerns, please don't hesitate to | |||
contact support. | |||
https://alteeve.ca/w/Support | |||
Alteeve's Niche! | |||
Cluster Monitor | |||
====================================================================== | |||
-- | |||
You received this email because you were listed as a contact for the | |||
Anvil! described in this email. If you do not wish to receive these | |||
emails, please contact your systems administrator. AN!CM runs on | |||
Anvil! nodes directly and are not sent by Alteeve's Niche!. | |||
</syntaxhighlight> | |||
30 seconds later, the next alert arrives. | |||
<syntaxhighlight lang="text"> | |||
Subject: [ AN!CM ] - Alteeve's Niche! - Cluster 05 (Demo Cluster - "Tyson") - an-a05n02 - State Change! | |||
</syntaxhighlight> | |||
<syntaxhighlight lang="text"> | |||
Changes have been detected in the cluster. If you anticipated this | |||
change then there is no reason for concern. If this change was | |||
unexpected, please feel free to contact support. | |||
---------------------------------------------------------------------- | |||
Node an-a05n02.alteeve.ca; State change! | |||
Online, Local -> Online, Local, rgmanager | |||
Service libvirtd_n01; State change! | |||
-- -> started | |||
-- -> an-a05n01.alteeve.ca | |||
Service libvirtd_n02; State change! | |||
-- -> started | |||
-- -> an-a05n02.alteeve.ca | |||
Service storage_n01; State change! | |||
-- -> stopped | |||
-- -> (an-a05n01.alteeve.ca) | |||
Service storage_n02; State change! | |||
-- -> started | |||
-- -> an-a05n02.alteeve.ca | |||
VM vm01-win2008; State change! | |||
-- -> started | |||
-- -> an-a05n02.alteeve.ca | |||
VM vm02-win2012; State change! | |||
-- -> started | |||
-- -> an-a05n02.alteeve.ca | |||
VM vm03-win7; State change! | |||
-- -> started | |||
-- -> an-a05n02.alteeve.ca | |||
VM vm04-win8; State change! | |||
-- -> started | |||
-- -> an-a05n02.alteeve.ca | |||
VM vm05-freebsd9; State change! | |||
-- -> started | |||
-- -> an-a05n02.alteeve.ca | |||
VM vm06-solaris11; State change! | |||
-- -> started | |||
-- -> an-a05n02.alteeve.ca | |||
VM vm07-rhel6; State change! | |||
-- -> started | |||
-- -> an-a05n02.alteeve.ca | |||
VM vm08-sles11; State change! | |||
-- -> started | |||
-- -> an-a05n02.alteeve.ca | |||
==[ Source Details ]================================================== | |||
Company: Alteeve's Niche! | |||
Anvil!: an-anvil-05 | |||
Node: an-a05n02.alteeve.ca | |||
Description: | |||
- Cluster 05 (Demo Cluster - "Tyson") | |||
If you have any questions or concerns, please don't hesitate to | |||
contact support. | |||
https://alteeve.ca/w/Support | |||
Alteeve's Niche! | |||
Cluster Monitor | |||
====================================================================== | |||
-- | |||
You received this email because you were listed as a contact for the | |||
Anvil! described in this email. If you do not wish to receive these | |||
emails, please contact your systems administrator. AN!CM runs on | |||
Anvil! nodes directly and are not sent by Alteeve's Niche!. | |||
</syntaxhighlight> | |||
|} | |||
The first email shows the loss of <span class="code">an-a05n01</span>. The second email shows the recovery of all the servers. The astute reader will notice that <span class="code">an-a05n02</span> showed <span class="code">rgmanager</span> disappear. | |||
This is because there is a time between node loss and fence complete where [[DLM]] stops giving out locks. As we mentioned, <span class="code">rgmanager</span>, <span class="code">clvmd</span> and <span class="code">gfs2</span> all require DLM locks in order to work. So during a pending fence, these programs will appear to hang, which is by design. Once the fence action succeeds, normal operation resumes. In this case, we see <span class="code">rgmanager</span> returned to <span class="code">an-a05n02</span> in the second email alert. | |||
Let's take a look at <span class="code">clustat</span> on <span class="code">an-a05n02</span>. | |||
{|class="wikitable" | |||
!<span class="code">an-a05n02</span> | |||
|style="white-space: nowrap;"|<syntaxhighlight lang="bash"> | |||
clustat | |||
</syntaxhighlight> | |||
<syntaxhighlight lang="text"> | |||
Cluster Status for an-anvil-05 @ Thu Dec 5 12:37:42 2013 | |||
Member Status: Quorate | |||
Member Name ID Status | |||
------ ---- ---- ------ | |||
an-a05n01.alteeve.ca 1 Offline | |||
an-a05n02.alteeve.ca 2 Online, Local, rgmanager | |||
Service Name Owner (Last) State | |||
------- ---- ----- ------ ----- | |||
service:libvirtd_n01 an-a05n01.alteeve.ca started | |||
service:libvirtd_n02 an-a05n02.alteeve.ca started | |||
service:storage_n01 (an-a05n01.alteeve.ca) stopped | |||
service:storage_n02 an-a05n02.alteeve.ca started | |||
vm:vm01-win2008 an-a05n02.alteeve.ca started | |||
vm:vm02-win2012 an-a05n02.alteeve.ca started | |||
vm:vm03-win7 an-a05n02.alteeve.ca started | |||
vm:vm04-win8 an-a05n02.alteeve.ca started | |||
vm:vm05-freebsd9 an-a05n02.alteeve.ca started | |||
vm:vm06-solaris11 an-a05n02.alteeve.ca started | |||
vm:vm07-rhel6 an-a05n02.alteeve.ca started | |||
vm:vm08-sles11 an-a05n02.alteeve.ca started | |||
</syntaxhighlight> | |||
|} | |||
If we look at the timeline, we see that the fault was detected almost immediately at <span class="code">12:01:27</span>. Recovery is completed at <span class="code">12:02:24</span>. The total recovery time was 57 seconds. | |||
Not too shabby! | |||
=== Degraded Mode Load Testing === | |||
{{warning|1=Load-testing your ''Anvil!'' in a degraded state is just as critical as anything else we've done thus far!}} | |||
It is very important that you ensure all of your servers can run well at full load on a single node. All of our work until now is useless if your servers grind during a degraded state. | |||
The two biggest concerns are CPU and storage. | |||
Please be sure to test, as long as needed, all of your applications running at full speed, both CPU and storage. If those tests pass, it's a good idea to then run synthetic benchmarks to find out just how much load your servers can take on the one node before performance degrades. This will be very useful for predicting when additional resource must be added as you grow. | |||
The actual methods used in this step are dependent entirely on your setup, so no further discussion can be had here. | |||
=== Recovering an-a05n01 === | |||
Once <span class="code">an-a05n01</span> recovers from the fence, it will send out the "I've started!" alerts. There might be two emails, depending on the when the alert system started. That was the case in this test. The first alert came up before the bond devices <span class="code">updelay</span> expired. Once that delay passed, a second alert was triggered showing the backup interfaces coming online. | |||
{|class="wikitable" | |||
!<span class="code">an-a05n01</span> | |||
|style="white-space: nowrap;"|<syntaxhighlight lang="text"> | |||
Subject: [ AN!CM ] - Alteeve's Niche! - Cluster 05 (Demo Cluster - "Tyson") - an-a05n01 - Cluster Monitor Start | |||
</syntaxhighlight> | |||
<syntaxhighlight lang="text"> | |||
Cluster node's monitor program has started. | |||
Current State: | |||
--[ Cluster Status ]-------------------------------------------------- | |||
This node is not currently in the cluster. | |||
--[ Network Status ]-------------------------------------------------- | |||
Bridge: ifn_bridge1, MAC: 00:1B:21:81:C3:34, STP disabled | |||
Links(s): \- ifn_bond1 | |||
Bond: bcn_bond1 -+- bcn_link1 -+-> Back-Channel Network | |||
\- bcn_link2 -/ | |||
Active Slave: bcn_link1 using MAC: 00:19:99:9C:9B:9E | |||
Prefer Slave: bcn_link1 | |||
Reselect: Primary always, after 120000 seconds | |||
Link Check: Every 100 ms | |||
MTU Size: 1500 Bytes | |||
+-------------------+-------------------+ | |||
Slaves | bcn_link1 | bcn_link2 | | |||
+------------+-------------------+-------------------+ | |||
| Link: | Up | -- | | |||
| Speed: | 1000 Mbps FD | 1000 Mbps | | |||
| MAC: | 00:19:99:9C:9B:9E | 00:1B:21:81:C3:35 | | |||
| Failures: | 0 | 0 | | |||
+------------+-------------------+-------------------+ | |||
Bond: sn_bond1 -+- sn_link1 -+-> Storage Network | |||
\- sn_link2 -/ | |||
Active Slave: sn_link1 using MAC: 00:19:99:9C:9B:9F | |||
Prefer Slave: sn_link1 | |||
Reselect: Primary always, after 120000 seconds | |||
Link Check: Every 100 ms | |||
MTU Size: 1500 Bytes | |||
+-------------------+-------------------+ | |||
Slaves | sn_link1 | sn_link2 | | |||
+------------+-------------------+-------------------+ | |||
| Link: | Up | -- | | |||
| Speed: | 1000 Mbps FD | 1000 Mbps | | |||
| MAC: | 00:19:99:9C:9B:9F | A0:36:9F:02:E0:04 | | |||
| Failures: | 0 | 0 | | |||
+------------+-------------------+-------------------+ | |||
Bond: ifn_bond1 -+- ifn_link1 -+-> Internet-Facing Network | |||
\- ifn_link2 -/ | |||
Active Slave: ifn_link1 using MAC: 00:1B:21:81:C3:34 | |||
Prefer Slave: ifn_link1 | |||
Reselect: Primary always, after 120000 seconds | |||
Link Check: Every 100 ms | |||
MTU Size: 1500 Bytes | |||
+-------------------+-------------------+ | |||
Slaves | ifn_link1 | ifn_link2 | | |||
+------------+-------------------+-------------------+ | |||
| Link: | Up | -- | | |||
| Speed: | 1000 Mbps FD | 1000 Mbps | | |||
| MAC: | 00:1B:21:81:C3:34 | A0:36:9F:02:E0:05 | | |||
| Failures: | 0 | 0 | | |||
+------------+-------------------+-------------------+ | |||
--[ Storage Status ]-------------------------------------------------- | |||
Adapter: #0 | |||
Model: RAID Ctrl SAS 6G 5/6 512MB (D2616) | |||
Revision: | |||
Serial #: | |||
Cache: 512MB | |||
BBU: iBBU, pn: LS1121001A, sn: 15686 | |||
- Failing: No | |||
- Charge: 95 %, 71 % of design | |||
- Capacity: No / 906 mAh, 1215 mAh design | |||
- Voltage: 4077 mV, 3700 mV design | |||
- Cycles: 35 | |||
- Hold-Up: 0 hours | |||
- Learn Active: No | |||
- Next Learn: Wed Dec 18 16:47:41 2013 | |||
Array: Virtual Drive 0, Target ID 0 | |||
State: Optimal | |||
Drives: 4 | |||
Usable Size: 836.625 GB | |||
Parity Size: 278.875 GB | |||
Strip Size: 64 KB | |||
RAID Level: Primary-5, Secondary-0, RAID Level Qualifier-3 | |||
Cache Policy: WriteBack, ReadAheadNone, Direct, No Write Cache if Bad BBU | |||
Bad Blocks: No | |||
Drive: 0 | |||
Position: disk group 0, span 0, arm 1 | |||
State: Online, Spun Up | |||
Fault: No | |||
Temp: 39 degrees Celcius | |||
Device: Seagate ST3300657SS, sn: 17036SJ3T7X6 | |||
Media: Hard Disk Device | |||
Interface: SAS, drive: 6.0Gb/s, bus: 6.0Gb/s | |||
Capacity: 278.875 GB | |||
Drive: 1 | |||
Position: disk group 0, span 0, arm 2 | |||
State: Online, Spun Up | |||
Fault: No | |||
Temp: 42 degrees Celcius | |||
Device: Seagate ST3300657SS, sn: 17036SJ3CMMC | |||
Media: Hard Disk Device | |||
Interface: SAS, drive: 6.0Gb/s, bus: 6.0Gb/s | |||
Capacity: 278.875 GB | |||
Drive: 2 | |||
Position: disk group 0, span 0, arm 0 | |||
State: Online, Spun Up | |||
Fault: No | |||
Temp: 40 degrees Celcius | |||
Device: Seagate ST3300657SS, sn: 17036SJ3CD2Z | |||
Media: Hard Disk Device | |||
Interface: SAS, drive: 6.0Gb/s, bus: 6.0Gb/s | |||
Capacity: 278.875 GB | |||
Drive: 6 | |||
Position: disk group 0, span 0, arm 3 | |||
State: Online, Spun Up | |||
Fault: No | |||
Temp: 37 degrees Celcius | |||
Device: HITACHI HUS156045VLS600 A42BJVY33ARM | |||
Media: Hard Disk Device | |||
Interface: SAS, drive: 6.0Gb/s, bus: 6.0Gb/s | |||
Capacity: 418.656 GB | |||
--[ Host Power and Thermal Sensors ]---------------------------------- | |||
+--------+------------+---------------+---------------+ | |||
Power Supplies | Status | Wattage | Fan 1 Speed | Fan 2 Speed | | |||
+---------------+--------+------------+---------------+---------------+ | |||
| PSU 1 | ok | 120 Watts | 6360 RPM | 6360 RPM | | |||
| PSU 2 | ok | 110 Watts | 6600 RPM | 6360 RPM | | |||
+---------------+--------+------------+---------------+---------------+ | |||
+--------------+--------------+--------------+ | |||
Power Levels | State | Voltage | Wattage | | |||
+------------------+--------------+--------------+--------------+ | |||
| BATT 3.0V | ok | 3.14 Volts | -- | | |||
| CPU1 1.8V | ok | 1.80 Volts | -- | | |||
| CPU1 Power | ok | -- | 4.40 Watts | | |||
| CPU2 1.8V | ok | 1.80 Volts | -- | | |||
| CPU2 Power | ok | -- | 6.60 Watts | | |||
| ICH 1.5V | ok | 1.49 Volts | -- | | |||
| IOH 1.1V | ok | 1.10 Volts | -- | | |||
| IOH 1.1V AUX | ok | 1.09 Volts | -- | | |||
| IOH 1.8V | ok | 1.80 Volts | -- | | |||
| iRMC 1.2V STBY | ok | 1.19 Volts | -- | | |||
| iRMC 1.8V STBY | ok | 1.80 Volts | -- | | |||
| LAN 1.0V STBY | ok | 1.01 Volts | -- | | |||
| LAN 1.8V STBY | ok | 1.81 Volts | -- | | |||
| MAIN 12V | ok | 12 Volts | -- | | |||
| MAIN 3.3V | ok | 3.37 Volts | -- | | |||
| MAIN 5.15V | ok | 5.18 Volts | -- | | |||
| PSU1 Power | ok | -- | 120 Watts | | |||
| PSU2 Power | ok | -- | 110 Watts | | |||
| STBY 3.3V | ok | 3.35 Volts | -- | | |||
| Total Power | ok | -- | 200 Watts | | |||
+------------------+--------------+--------------+--------------+ | |||
+-----------+-----------+ | |||
Temperatures | State | Temp (*C) | | |||
+----------------+-----------+-----------+ | |||
| Ambient | ok | 26.50 | | |||
| CPU1 | ok | 35 | | |||
| CPU2 | ok | 39 | | |||
| Systemboard | ok | 45 | | |||
+----------------+-----------+-----------+ | |||
+-----------+-----------+ | |||
Cooling Fans | State | RPMs | | |||
+----------------+-----------+-----------+ | |||
| FAN1 PSU1 | ok | 6360 | | |||
| FAN1 PSU2 | ok | 6600 | | |||
| FAN1 SYS | ok | 4980 | | |||
| FAN2 PSU1 | ok | 6360 | | |||
| FAN2 PSU2 | ok | 6360 | | |||
| FAN2 SYS | ok | 4800 | | |||
| FAN3 SYS | ok | 4500 | | |||
| FAN4 SYS | ok | 4800 | | |||
| FAN5 SYS | ok | 4740 | | |||
+----------------+-----------+-----------+ | |||
--[ UPS Status ]------------------------------------------------------ | |||
Name: an-ups01 | |||
Status: ONLINE Temperature: 31.0 *C | |||
Model: Smart-UPS 1500 Battery Voltage: 27.0 vAC | |||
Serial #: AS1038232403 Battery Charge: 100.0 % | |||
Holdup Time: 55.0 Minutes Current Load: 24.0 % | |||
Self Test: OK Firmware: UPS 05.0 / COM 02.1 | |||
Mains -> 120.0 Volts -> UPS -> 120.0 Volts -> PDU | |||
Name: an-ups02 | |||
Status: ONLINE Temperature: 32.0 *C | |||
Model: Smart-UPS 1500 Battery Voltage: 27.0 vAC | |||
Serial #: AS1224213144 Battery Charge: 100.0 % | |||
Holdup Time: 55.0 Minutes Current Load: 24.0 % | |||
Self Test: OK Firmware: UPS 08.3 / MCU 14.0 | |||
Mains -> 122.0 Volts -> UPS -> 122.0 Volts -> PDU | |||
==[ Source Details ]================================================== | |||
Company: Alteeve's Niche! | |||
Anvil!: an-anvil-05 | |||
Node: an-a05n01.alteeve.ca | |||
Description: | |||
- Cluster 05 (Demo Cluster - "Tyson") | |||
If you have any questions or concerns, please don't hesitate to | |||
contact support. | |||
https://alteeve.ca/w/Support | |||
Alteeve's Niche! | |||
Cluster Monitor | |||
====================================================================== | |||
-- | |||
You received this email because you were listed as a contact for the | |||
Anvil! described in this email. If you do not wish to receive these | |||
emails, please contact your systems administrator. AN!CM runs on | |||
Anvil! nodes directly and are not sent by Alteeve's Niche!. | |||
</syntaxhighlight> | |||
<syntaxhighlight lang="text"> | |||
Subject: [ AN!CM ] - Alteeve's Niche! - Cluster 05 (Demo Cluster - "Tyson") - an-a05n01 - State Change! | |||
</syntaxhighlight> | |||
<syntaxhighlight lang="text"> | |||
Changes have been detected in the cluster. If you anticipated this | |||
change then there is no reason for concern. If this change was | |||
unexpected, please feel free to contact support. | |||
---------------------------------------------------------------------- | |||
Bond bcn_bond1 (Back-Channel Network); Second slave bcn_link2's link status has changed! | |||
going back -> up | |||
Bond sn_bond1 (Storage Network); Second slave sn_link2's link status has changed! | |||
going back -> up | |||
Bond ifn_bond1 (Internet-Facing Network); Second slave ifn_link2's link status has changed! | |||
going back -> up | |||
==[ Source Details ]================================================== | |||
Company: Alteeve's Niche! | |||
Anvil!: an-anvil-05 | |||
Node: an-a05n01.alteeve.ca | |||
Description: | |||
- Cluster 05 (Demo Cluster - "Tyson") | |||
If you have any questions or concerns, please don't hesitate to | |||
contact support. | |||
https://alteeve.ca/w/Support | |||
Alteeve's Niche! | |||
Cluster Monitor | |||
====================================================================== | |||
-- | |||
You received this email because you were listed as a contact for the | |||
Anvil! described in this email. If you do not wish to receive these | |||
emails, please contact your systems administrator. AN!CM runs on | |||
Anvil! nodes directly and are not sent by Alteeve's Niche!. | |||
</syntaxhighlight> | |||
|} | |||
Lets check the state of things on <span class="code">an-a05n02</span>. | |||
{|class="wikitable" | |||
!<span class="code">an-a05n01</span> | |||
|style="white-space: nowrap;"|<syntaxhighlight lang="bash"> | |||
clustat | |||
</syntaxhighlight> | |||
<syntaxhighlight lang="text"> | |||
Cluster Status for an-anvil-05 @ Thu Dec 5 13:04:05 2013 | |||
Member Status: Quorate | |||
Member Name ID Status | |||
------ ---- ---- ------ | |||
an-a05n01.alteeve.ca 1 Offline | |||
an-a05n02.alteeve.ca 2 Online, Local, rgmanager | |||
Service Name Owner (Last) State | |||
------- ---- ----- ------ ----- | |||
service:libvirtd_n01 an-a05n01.alteeve.ca started | |||
service:libvirtd_n02 an-a05n02.alteeve.ca started | |||
service:storage_n01 (an-a05n01.alteeve.ca) stopped | |||
service:storage_n02 an-a05n02.alteeve.ca started | |||
vm:vm01-win2008 an-a05n02.alteeve.ca started | |||
vm:vm02-win2012 an-a05n02.alteeve.ca started | |||
vm:vm03-win7 an-a05n02.alteeve.ca started | |||
vm:vm04-win8 an-a05n02.alteeve.ca started | |||
vm:vm05-freebsd9 an-a05n02.alteeve.ca started | |||
vm:vm06-solaris11 an-a05n02.alteeve.ca started | |||
vm:vm07-rhel6 an-a05n02.alteeve.ca started | |||
vm:vm08-sles11 an-a05n02.alteeve.ca started | |||
</syntaxhighlight> | |||
|} | |||
Everything looks good, so lets rejoin <span class="code">an-a05n01</span> now. | |||
{|class="wikitable" | |||
!<span class="code">an-a05n01</span> | |||
|style="white-space: nowrap;"|<syntaxhighlight lang="bash"> | |||
/etc/init.d/cman start | |||
</syntaxhighlight> | |||
<syntaxhighlight lang="text"> | |||
Starting cluster: | |||
Checking if cluster has been disabled at boot... [ OK ] | |||
Checking Network Manager... [ OK ] | |||
Global setup... [ OK ] | |||
Loading kernel modules... [ OK ] | |||
Mounting configfs... [ OK ] | |||
Starting cman... [ OK ] | |||
Waiting for quorum... [ OK ] | |||
Starting fenced... [ OK ] | |||
Starting dlm_controld... [ OK ] | |||
Tuning DLM kernel config... [ OK ] | |||
Starting gfs_controld... [ OK ] | |||
Unfencing self... [ OK ] | |||
Joining fence domain... [ OK ] | |||
</syntaxhighlight> | |||
<syntaxhighlight lang="bash"> | |||
/etc/init.d/rgmanager start | |||
</syntaxhighlight> | |||
<syntaxhighlight lang="text"> | |||
Starting Cluster Service Manager: [ OK ] | |||
</syntaxhighlight> | |||
<syntaxhighlight lang="bash"> | |||
clustat | |||
</syntaxhighlight> | |||
<syntaxhighlight lang="text"> | |||
Cluster Status for an-anvil-05 @ Thu Dec 5 18:20:31 2013 | |||
Member Status: Quorate | |||
Member Name ID Status | |||
------ ---- ---- ------ | |||
an-a05n01.alteeve.ca 1 Online, Local, rgmanager | |||
an-a05n02.alteeve.ca 2 Online, rgmanager | |||
Service Name Owner (Last) State | |||
------- ---- ----- ------ ----- | |||
service:libvirtd_n01 an-a05n01.alteeve.ca started | |||
service:libvirtd_n02 an-a05n02.alteeve.ca started | |||
service:storage_n01 an-a05n01.alteeve.ca started | |||
service:storage_n02 an-a05n02.alteeve.ca started | |||
vm:vm01-win2008 an-a05n02.alteeve.ca started | |||
vm:vm02-win2012 an-a05n02.alteeve.ca started | |||
vm:vm03-win7 an-a05n02.alteeve.ca started | |||
vm:vm04-win8 an-a05n02.alteeve.ca started | |||
vm:vm05-freebsd9 an-a05n02.alteeve.ca started | |||
vm:vm06-solaris11 an-a05n02.alteeve.ca started | |||
vm:vm07-rhel6 an-a05n02.alteeve.ca started | |||
vm:vm08-sles11 an-a05n02.alteeve.ca started | |||
</syntaxhighlight> | |||
|- | |||
!<span class="code">an-a05n02</span> | |||
|style="white-space: nowrap;"|<syntaxhighlight lang="bash"> | |||
clustat | |||
</syntaxhighlight> | |||
<syntaxhighlight lang="text"> | |||
Cluster Status for an-anvil-05 @ Thu Dec 5 18:20:48 2013 | |||
Member Status: Quorate | |||
Member Name ID Status | |||
------ ---- ---- ------ | |||
an-a05n01.alteeve.ca 1 Online, rgmanager | |||
an-a05n02.alteeve.ca 2 Online, Local, rgmanager | |||
Service Name Owner (Last) State | |||
------- ---- ----- ------ ----- | |||
service:libvirtd_n01 an-a05n01.alteeve.ca started | |||
service:libvirtd_n02 an-a05n02.alteeve.ca started | |||
service:storage_n01 an-a05n01.alteeve.ca started | |||
service:storage_n02 an-a05n02.alteeve.ca started | |||
vm:vm01-win2008 an-a05n02.alteeve.ca started | |||
vm:vm02-win2012 an-a05n02.alteeve.ca started | |||
vm:vm03-win7 an-a05n02.alteeve.ca started | |||
vm:vm04-win8 an-a05n02.alteeve.ca started | |||
vm:vm05-freebsd9 an-a05n02.alteeve.ca started | |||
vm:vm06-solaris11 an-a05n02.alteeve.ca started | |||
vm:vm07-rhel6 an-a05n02.alteeve.ca started | |||
vm:vm08-sles11 an-a05n02.alteeve.ca started | |||
</syntaxhighlight> | |||
|} | |||
Now we wait for the DRBD resource to both be <span class="code">UpToDate</span> on both nodes. | |||
{|class="wikitable" | |||
!<span class="code">an-a05n01</span> | |||
|style="white-space: nowrap;"|<syntaxhighlight lang="bash"> | |||
/etc/init.d/drbd status | |||
</syntaxhighlight> | |||
<syntaxhighlight lang="text"> | |||
drbd driver loaded OK; device status: | |||
version: 8.3.16 (api:88/proto:86-97) | |||
GIT-hash: a798fa7e274428a357657fb52f0ecf40192c1985 build by phil@Build64R6, 2013-09-27 16:00:43 | |||
m:res cs ro ds p mounted fstype | |||
... sync'ed: 71.2% (176592/607108)K | |||
0:r0 SyncTarget Primary/Primary Inconsistent/UpToDate C | |||
1:r1 Connected Primary/Primary UpToDate/UpToDate C | |||
</syntaxhighlight> | |||
Wait a bit... | |||
Ding! | |||
<syntaxhighlight lang="bash"> | |||
/etc/init.d/drbd status | |||
</syntaxhighlight> | |||
<syntaxhighlight lang="text"> | |||
drbd driver loaded OK; device status: | |||
version: 8.3.16 (api:88/proto:86-97) | |||
GIT-hash: a798fa7e274428a357657fb52f0ecf40192c1985 build by phil@Build64R6, 2013-09-27 16:00:43 | |||
m:res cs ro ds p mounted fstype | |||
0:r0 Connected Primary/Primary UpToDate/UpToDate C | |||
1:r1 Connected Primary/Primary UpToDate/UpToDate C | |||
</syntaxhighlight> | |||
|} | |||
Last step is to start live-migrating the five servers back. | |||
{|class="wikitable" | |||
!<span class="code">an-a05n01</span> | |||
|style="white-space: nowrap;"|<syntaxhighlight lang="bash"> | |||
clusvcadm -M vm:vm01-win2008 -m an-a05n01.alteeve.ca | |||
</syntaxhighlight> | |||
<syntaxhighlight lang="text"> | |||
Trying to migrate vm:vm01-win2008 to an-a05n01.alteeve.ca...Success | |||
</syntaxhighlight> | |||
<syntaxhighlight lang="bash"> | |||
clusvcadm -M vm:vm03-win7 -m an-a05n01.alteeve.ca | |||
</syntaxhighlight> | |||
<syntaxhighlight lang="text"> | |||
Trying to migrate vm:vm03-win7 to an-a05n01.alteeve.ca...Success | |||
</syntaxhighlight> | |||
<syntaxhighlight lang="bash"> | |||
clusvcadm -M vm:vm04-win8 -m an-a05n01.alteeve.ca | |||
</syntaxhighlight> | |||
<syntaxhighlight lang="text"> | |||
Trying to migrate vm:vm04-win8 to an-a05n01.alteeve.ca...Success | |||
</syntaxhighlight> | |||
<syntaxhighlight lang="bash"> | |||
clusvcadm -M vm:vm07-rhel6 -m an-a05n01.alteeve.ca | |||
</syntaxhighlight> | |||
<syntaxhighlight lang="text"> | |||
Trying to migrate vm:vm07-rhel6 to an-a05n01.alteeve.ca...Success | |||
</syntaxhighlight> | |||
<syntaxhighlight lang="bash"> | |||
clusvcadm -M vm:vm08-sles11 -m an-a05n01.alteeve.ca | |||
</syntaxhighlight> | |||
<syntaxhighlight lang="text"> | |||
Trying to migrate vm:vm08-sles11 to an-a05n01.alteeve.ca...Success | |||
</syntaxhighlight> | |||
<syntaxhighlight lang="bash"> | |||
clustat | |||
</syntaxhighlight> | |||
<syntaxhighlight lang="text"> | |||
Cluster Status for an-anvil-05 @ Thu Dec 5 18:26:41 2013 | |||
Member Status: Quorate | |||
Member Name ID Status | |||
------ ---- ---- ------ | |||
an-a05n01.alteeve.ca 1 Online, Local, rgmanager | |||
an-a05n02.alteeve.ca 2 Online, rgmanager | |||
Service Name Owner (Last) State | |||
------- ---- ----- ------ ----- | |||
service:libvirtd_n01 an-a05n01.alteeve.ca started | |||
service:libvirtd_n02 an-a05n02.alteeve.ca started | |||
service:storage_n01 an-a05n01.alteeve.ca started | |||
service:storage_n02 an-a05n02.alteeve.ca started | |||
vm:vm01-win2008 an-a05n01.alteeve.ca started | |||
vm:vm02-win2012 an-a05n02.alteeve.ca started | |||
vm:vm03-win7 an-a05n01.alteeve.ca started | |||
vm:vm04-win8 an-a05n01.alteeve.ca started | |||
vm:vm05-freebsd9 an-a05n02.alteeve.ca started | |||
vm:vm06-solaris11 an-a05n02.alteeve.ca started | |||
vm:vm07-rhel6 an-a05n01.alteeve.ca started | |||
vm:vm08-sles11 an-a05n01.alteeve.ca started | |||
</syntaxhighlight> | |||
|- | |||
!<span class="code">an-a05n02</span> | |||
|style="white-space: nowrap;"|<syntaxhighlight lang="bash"> | |||
clustat | |||
</syntaxhighlight> | |||
<syntaxhighlight lang="text"> | |||
Cluster Status for an-anvil-05 @ Thu Dec 5 18:26:58 2013 | |||
Member Status: Quorate | |||
Member Name ID Status | |||
------ ---- ---- ------ | |||
an-a05n01.alteeve.ca 1 Online, rgmanager | |||
an-a05n02.alteeve.ca 2 Online, Local, rgmanager | |||
Service Name Owner (Last) State | |||
------- ---- ----- ------ ----- | |||
service:libvirtd_n01 an-a05n01.alteeve.ca started | |||
service:libvirtd_n02 an-a05n02.alteeve.ca started | |||
service:storage_n01 an-a05n01.alteeve.ca started | |||
service:storage_n02 an-a05n02.alteeve.ca started | |||
vm:vm01-win2008 an-a05n01.alteeve.ca started | |||
vm:vm02-win2012 an-a05n02.alteeve.ca started | |||
vm:vm03-win7 an-a05n01.alteeve.ca started | |||
vm:vm04-win8 an-a05n01.alteeve.ca started | |||
vm:vm05-freebsd9 an-a05n02.alteeve.ca started | |||
vm:vm06-solaris11 an-a05n02.alteeve.ca started | |||
vm:vm07-rhel6 an-a05n01.alteeve.ca started | |||
vm:vm08-sles11 an-a05n01.alteeve.ca started | |||
</syntaxhighlight> | |||
|} | |||
Everything is back to normal. | |||
You should see numerous alert emails showing <span class="code">an-a05n01</span> rejoining the cluster and the servers moving back. | |||
=== Crashing an-a05n02 === | |||
Last test! | |||
As mentioned, we're going to cut the power to this node. We could just pull the power cables out and that would be perfectly fine. Downside to that is that it requires getting up, and who wants to do that? | |||
So we'll use the <span class="code">fence_apc_snmp</span> fence agent to call each PDU and turn off outlet #2, which powers <span class="code">an-a05n02</span>. | |||
As we saw in our initial round of fence testing, the initial fence attempt using [[IPMI]] will fail. Then the PDUs should be called and the outlets we turned off will be verified as off, then turned back on. | |||
If your server is set to boot when power is restored, or if you have it set to "<span class="code">Last State</span>", the server should boot automatically. If it stays off, simply call an <span class="code">on</span> action against it using <span class="code">fence_ipmilan</span>. It will be great practice! | |||
So, let's watch the logs, kill the power, and look at the email alerts. | |||
{|class="wikitable" | |||
!<span class="code">an-a05n01</span> | |||
|style="white-space: nowrap;"|<syntaxhighlight lang="bash"> | |||
fence_apc_snmp -a an-pdu01 -n 2 -o off | |||
</syntaxhighlight> | |||
<syntaxhighlight lang="text"> | |||
Success: Powered OFF | |||
</syntaxhighlight> | |||
|} | |||
An alert! | |||
{|class="wikitable" | |||
!<span class="code">an-a05n01</span> | |||
|style="white-space: nowrap;"|<syntaxhighlight lang="text"> | |||
Subject: [ AN!CM ] - Alteeve's Niche! - Cluster 05 (Demo Cluster - "Tyson") - an-a05n02 - Warning! - State Change! | |||
</syntaxhighlight> | |||
<syntaxhighlight lang="text"> | |||
Changes have been detected in the cluster. If you anticipated this | |||
change then there is no reason for concern. If this change was | |||
unexpected, please feel free to contact support. | |||
---------------------------------------------------------------------- | |||
Host's "FAN1 PSU1" fan speed has dropped below the minimum of 500 RPM! | |||
ok, 6360 RPM -> ok, 0 RPM | |||
Host sensor "FAN1 PSU1 State" has change! | |||
ok, 0x01 -> bad!, 0x08 | |||
Host's "FAN2 PSU1" fan speed has dropped below the minimum of 500 RPM! | |||
ok, 6480 RPM -> ok, 0 RPM | |||
Host sensor "FAN2 PSU1 State" has change! | |||
ok, 0x01 -> bad!, 0x08 | |||
Host sensor "Power Unit" has change! | |||
ok, 0x01 -> ok, 0x02 | |||
Host sensor "PSU1 State" has change! | |||
ok, 0x02 -> bad!, 0x08 | |||
==[ Source Details ]================================================== | |||
Company: Alteeve's Niche! | |||
Anvil!: an-anvil-05 | |||
Node: an-a05n02.alteeve.ca | |||
Description: | |||
- Cluster 05 (Demo Cluster - "Tyson") | |||
If you have any questions or concerns, please don't hesitate to | |||
contact support. | |||
https://alteeve.ca/w/Support | |||
Alteeve's Niche! | |||
Cluster Monitor | |||
====================================================================== | |||
-- | |||
You received this email because you were listed as a contact for the | |||
Anvil! described in this email. If you do not wish to receive these | |||
emails, please contact your systems administrator. AN!CM runs on | |||
Anvil! nodes directly and are not sent by Alteeve's Niche!. | |||
</syntaxhighlight> | |||
|} | |||
This is because we took our time killing the second power supply. The node stayed up long enough for a scan to run and it saw all power lost to its primary PSU, so its fans have died as well as the power itself vanishing. If you're in earshot on the node, you can probably hear an audible alarm, too. | |||
Lets finish the job. | |||
{|class="wikitable" | |||
!<span class="code">an-a05n01</span> | |||
|style="white-space: nowrap;"|<syntaxhighlight lang="bash"> | |||
fence_apc_snmp -a an-pdu02 -n 2 -o off | |||
</syntaxhighlight> | |||
<syntaxhighlight lang="text"> | |||
Success: Powered OFF | |||
</syntaxhighlight> | |||
System logs: | |||
<syntaxhighlight lang="text"> | |||
Dec 5 18:38:02 an-a05n01 kernel: block drbd1: PingAck did not arrive in time. | |||
Dec 5 18:38:02 an-a05n01 kernel: block drbd1: peer( Primary -> Unknown ) conn( Connected -> NetworkFailure ) pdsk( UpToDate -> DUnknown ) susp( 0 -> 1 ) | |||
Dec 5 18:38:02 an-a05n01 kernel: block drbd1: asender terminated | |||
Dec 5 18:38:02 an-a05n01 kernel: block drbd1: Terminating drbd1_asender | |||
Dec 5 18:38:02 an-a05n01 kernel: block drbd1: Connection closed | |||
Dec 5 18:38:02 an-a05n01 kernel: block drbd1: conn( NetworkFailure -> Unconnected ) | |||
Dec 5 18:38:02 an-a05n01 kernel: block drbd1: receiver terminated | |||
Dec 5 18:38:02 an-a05n01 kernel: block drbd1: Restarting drbd1_receiver | |||
Dec 5 18:38:02 an-a05n01 kernel: block drbd1: receiver (re)started | |||
Dec 5 18:38:02 an-a05n01 kernel: block drbd1: conn( Unconnected -> WFConnection ) | |||
Dec 5 18:38:02 an-a05n01 kernel: block drbd1: helper command: /sbin/drbdadm fence-peer minor-1 | |||
Dec 5 18:38:02 an-a05n01 rhcs_fence: Attempting to fence peer using RHCS from DRBD... | |||
Dec 5 18:38:02 an-a05n01 kernel: block drbd0: PingAck did not arrive in time. | |||
Dec 5 18:38:02 an-a05n01 kernel: block drbd0: peer( Primary -> Unknown ) conn( Connected -> NetworkFailure ) pdsk( UpToDate -> DUnknown ) susp( 0 -> 1 ) | |||
Dec 5 18:38:02 an-a05n01 kernel: block drbd0: asender terminated | |||
Dec 5 18:38:02 an-a05n01 kernel: block drbd0: Terminating drbd0_asender | |||
Dec 5 18:38:02 an-a05n01 kernel: block drbd0: Connection closed | |||
Dec 5 18:38:02 an-a05n01 kernel: block drbd0: conn( NetworkFailure -> Unconnected ) | |||
Dec 5 18:38:02 an-a05n01 kernel: block drbd0: receiver terminated | |||
Dec 5 18:38:02 an-a05n01 kernel: block drbd0: Restarting drbd0_receiver | |||
Dec 5 18:38:02 an-a05n01 kernel: block drbd0: receiver (re)started | |||
Dec 5 18:38:02 an-a05n01 kernel: block drbd0: conn( Unconnected -> WFConnection ) | |||
Dec 5 18:38:02 an-a05n01 kernel: block drbd0: helper command: /sbin/drbdadm fence-peer minor-0 | |||
Dec 5 18:38:02 an-a05n01 rhcs_fence: Attempting to fence peer using RHCS from DRBD... | |||
Dec 5 18:38:03 an-a05n01 corosync[27890]: [TOTEM ] A processor failed, forming new configuration. | |||
Dec 5 18:38:05 an-a05n01 corosync[27890]: [QUORUM] Members[1]: 1 | |||
Dec 5 18:38:05 an-a05n01 corosync[27890]: [TOTEM ] A processor joined or left the membership and a new membership was formed. | |||
Dec 5 18:38:05 an-a05n01 corosync[27890]: [CPG ] chosen downlist: sender r(0) ip(10.20.50.1) ; members(old:2 left:1) | |||
Dec 5 18:38:05 an-a05n01 corosync[27890]: [MAIN ] Completed service synchronization, ready to provide service. | |||
Dec 5 18:38:05 an-a05n01 kernel: dlm: closing connection to node 2 | |||
Dec 5 18:38:05 an-a05n01 fenced[27962]: fencing node an-a05n02.alteeve.ca | |||
Dec 5 18:38:05 an-a05n01 kernel: GFS2: fsid=an-anvil-05:shared.0: jid=1: Trying to acquire journal lock... | |||
Dec 5 18:38:22 an-a05n01 fence_node[19868]: fence an-a05n02.alteeve.ca success | |||
Dec 5 18:38:22 an-a05n01 kernel: block drbd1: helper command: /sbin/drbdadm fence-peer minor-1 exit code 7 (0x700) | |||
Dec 5 18:38:22 an-a05n01 kernel: block drbd1: fence-peer helper returned 7 (peer was stonithed) | |||
Dec 5 18:38:22 an-a05n01 kernel: block drbd1: pdsk( DUnknown -> Outdated ) | |||
Dec 5 18:38:22 an-a05n01 kernel: block drbd1: new current UUID 982B45395AF5322D:AC7D34993319CF07:96949998C25B00D5:96939998C25B00D5 | |||
Dec 5 18:38:22 an-a05n01 kernel: block drbd1: susp( 1 -> 0 ) | |||
Dec 5 18:38:23 an-a05n01 fence_node[19898]: fence an-a05n02.alteeve.ca success | |||
Dec 5 18:38:23 an-a05n01 kernel: block drbd0: helper command: /sbin/drbdadm fence-peer minor-0 exit code 7 (0x700) | |||
Dec 5 18:38:23 an-a05n01 kernel: block drbd0: fence-peer helper returned 7 (peer was stonithed) | |||
Dec 5 18:38:23 an-a05n01 kernel: block drbd0: pdsk( DUnknown -> Outdated ) | |||
Dec 5 18:38:23 an-a05n01 kernel: block drbd0: new current UUID 46F3B4E245FCFB01:20CEE1AD5C066F57:BF8A350BA62F87D1:BF89350BA62F87D1 | |||
Dec 5 18:38:23 an-a05n01 kernel: block drbd0: susp( 1 -> 0 ) | |||
Dec 5 18:38:26 an-a05n01 fenced[27962]: fence an-a05n02.alteeve.ca dev 0.0 agent fence_ipmilan result: error from agent | |||
Dec 5 18:38:26 an-a05n01 fenced[27962]: fence an-a05n02.alteeve.ca success | |||
Dec 5 18:38:27 an-a05n01 kernel: GFS2: fsid=an-anvil-05:shared.0: jid=1: Looking at journal... | |||
Dec 5 18:38:28 an-a05n01 kernel: GFS2: fsid=an-anvil-05:shared.0: jid=1: Acquiring the transaction lock... | |||
Dec 5 18:38:28 an-a05n01 kernel: GFS2: fsid=an-anvil-05:shared.0: jid=1: Replaying journal... | |||
Dec 5 18:38:28 an-a05n01 kernel: GFS2: fsid=an-anvil-05:shared.0: jid=1: Replayed 3 of 5 blocks | |||
Dec 5 18:38:28 an-a05n01 kernel: GFS2: fsid=an-anvil-05:shared.0: jid=1: Found 12 revoke tags | |||
Dec 5 18:38:28 an-a05n01 kernel: GFS2: fsid=an-anvil-05:shared.0: jid=1: Journal replayed in 1s | |||
Dec 5 18:38:28 an-a05n01 kernel: GFS2: fsid=an-anvil-05:shared.0: jid=1: Done | |||
Dec 5 18:38:28 an-a05n01 rgmanager[28154]: Marking service:storage_n02 as stopped: Restricted domain unavailable | |||
Dec 5 18:38:28 an-a05n01 rgmanager[28154]: Marking service:libvirtd_n02 as stopped: Restricted domain unavailable | |||
Dec 5 18:38:28 an-a05n01 rgmanager[28154]: Taking over service vm:vm02-win2012 from down member an-a05n02.alteeve.ca | |||
Dec 5 18:38:29 an-a05n01 rgmanager[28154]: Taking over service vm:vm05-freebsd9 from down member an-a05n02.alteeve.ca | |||
Dec 5 18:38:29 an-a05n01 kernel: device vnet5 entered promiscuous mode | |||
Dec 5 18:38:29 an-a05n01 kernel: ifn_bridge1: port 7(vnet5) entering forwarding state | |||
Dec 5 18:38:29 an-a05n01 rgmanager[28154]: Taking over service vm:vm06-solaris11 from down member an-a05n02.alteeve.ca | |||
Dec 5 18:38:29 an-a05n01 rgmanager[28154]: Service vm:vm02-win2012 started | |||
Dec 5 18:38:29 an-a05n01 kernel: device vnet6 entered promiscuous mode | |||
Dec 5 18:38:29 an-a05n01 kernel: ifn_bridge1: port 8(vnet6) entering forwarding state | |||
Dec 5 18:38:30 an-a05n01 kernel: device vnet7 entered promiscuous mode | |||
Dec 5 18:38:30 an-a05n01 kernel: ifn_bridge1: port 9(vnet7) entering forwarding state | |||
Dec 5 18:38:30 an-a05n01 rgmanager[28154]: Service vm:vm06-solaris11 started | |||
Dec 5 18:38:31 an-a05n01 rgmanager[28154]: Service vm:vm05-freebsd9 started | |||
Dec 5 18:38:33 an-a05n01 ntpd[2182]: Listen normally on 16 vnet6 fe80::fc54:ff:feb0:6caa UDP 123 | |||
Dec 5 18:38:33 an-a05n01 ntpd[2182]: Listen normally on 17 vnet7 fe80::fc54:ff:fe29:383b UDP 123 | |||
Dec 5 18:38:33 an-a05n01 ntpd[2182]: Listen normally on 18 vnet5 fe80::fc54:ff:fe5e:291c UDP 123 | |||
Dec 5 18:38:33 an-a05n01 ntpd[2182]: peers refreshed | |||
Dec 5 18:38:44 an-a05n01 kernel: ifn_bridge1: port 7(vnet5) entering forwarding state | |||
Dec 5 18:38:44 an-a05n01 kernel: ifn_bridge1: port 8(vnet6) entering forwarding state | |||
Dec 5 18:38:45 an-a05n01 kernel: ifn_bridge1: port 9(vnet7) entering forwarding state | |||
</syntaxhighlight> | |||
|} | |||
We see here that the log entries are almost the same as we saw when <span class="code">an-a05n01</span> was crashed. The main difference is that the first fence attempt failed, as expected. | |||
Lets look at the timeline; | |||
{|class="wikitable" | |||
!Time | |||
!Event | |||
|- | |||
|<span class="code">18:38:02</span> | |||
|DRBD detects the failure and initiates a fence. | |||
|- | |||
|<span class="code">18:38:03</span> | |||
|Corosync detects the failure, reforms the cluster. | |||
|- | |||
|<span class="code">18:38:05</span> | |||
|[[DLM]] blocks. | |||
|- | |||
|<span class="code">18:38:22</span> | |||
|DRBD-called fence succeeds. We do not see the failed IPMI attempt in the log. | |||
|- | |||
|<span class="code">18:38:26</span> | |||
|The <span class="code">cman</span> initiated [[IPMI]] call fails, the [[PDU]]-based fence succeeds. | |||
|- | |||
|<span class="code">18:38:27</span> | |||
|GFS2 cleans up <span class="code">/shared</span>. | |||
|- | |||
|<span class="code">18:38:28</span> | |||
|<span class="code">rgmanager</span> begins recovery, boots lost servers. | |||
|- | |||
|<span class="code">18:38:44</span> | |||
|The <span class="code">vnetX</span> interfaces link the recovered servers to the bridge. Recovery is complete. | |||
|} | |||
In this case, recovery took 42 seconds, actually faster than the recovery of <span class="code">an-a05n01</span>. This shows the difference in timings to detect losses. Normally, this is a little slower because of the time taken to declare the <span class="code">IPMI</span> fence method "failed". | |||
Lets look again at the alerts from <span class="code">an-a05n02</span> triggered by the failure of <span class="code">an-a05n02</span>. | |||
{|class="wikitable" | |||
!<span class="code">an-a05n01</span> | |||
|style="white-space: nowrap;"|<syntaxhighlight lang="text"> | |||
Subject: [ AN!CM ] - Alteeve's Niche! - Cluster 05 (Demo Cluster - "Tyson") - an-a05n01 - State Change! | |||
</syntaxhighlight> | |||
<syntaxhighlight lang="text"> | |||
Changes have been detected in the cluster. If you anticipated this | |||
change then there is no reason for concern. If this change was | |||
unexpected, please feel free to contact support. | |||
---------------------------------------------------------------------- | |||
Node an-a05n02.alteeve.ca; State change! | |||
Online, rgmanager -> Offline | |||
==[ Source Details ]================================================== | |||
Company: Alteeve's Niche! | |||
Anvil!: an-anvil-05 | |||
Node: an-a05n01.alteeve.ca | |||
Description: | |||
- Cluster 05 (Demo Cluster - "Tyson") | |||
If you have any questions or concerns, please don't hesitate to | |||
contact support. | |||
https://alteeve.ca/w/Support | |||
Alteeve's Niche! | |||
Cluster Monitor | |||
====================================================================== | |||
-- | |||
You received this email because you were listed as a contact for the | |||
Anvil! described in this email. If you do not wish to receive these | |||
emails, please contact your systems administrator. AN!CM runs on | |||
Anvil! nodes directly and are not sent by Alteeve's Niche!. | |||
</syntaxhighlight> | |||
Half a minute later; | |||
<syntaxhighlight lang="text"> | |||
Subject: [ AN!CM ] - Alteeve's Niche! - Cluster 05 (Demo Cluster - "Tyson") - an-a05n01 - State Change! | |||
</syntaxhighlight> | |||
<syntaxhighlight lang="text"> | |||
Changes have been detected in the cluster. If you anticipated this | |||
change then there is no reason for concern. If this change was | |||
unexpected, please feel free to contact support. | |||
---------------------------------------------------------------------- | |||
Service libvirtd_n02; State change! | |||
started -> stopped | |||
an-a05n02.alteeve.ca -> (an-a05n02.alteeve.ca) | |||
Service storage_n02; State change! | |||
started -> stopped | |||
an-a05n02.alteeve.ca -> (an-a05n02.alteeve.ca) | |||
VM vm02-win2012; State change! | |||
started -> started | |||
an-a05n02.alteeve.ca -> an-a05n01.alteeve.ca | |||
VM vm05-freebsd9; State change! | |||
started -> started | |||
an-a05n02.alteeve.ca -> an-a05n01.alteeve.ca | |||
VM vm06-solaris11; State change! | |||
started -> started | |||
an-a05n02.alteeve.ca -> an-a05n01.alteeve.ca | |||
==[ Source Details ]================================================== | |||
Company: Alteeve's Niche! | |||
Anvil!: an-anvil-05 | |||
Node: an-a05n01.alteeve.ca | |||
Description: | |||
- Cluster 05 (Demo Cluster - "Tyson") | |||
If you have any questions or concerns, please don't hesitate to | |||
contact support. | |||
https://alteeve.ca/w/Support | |||
Alteeve's Niche! | |||
Cluster Monitor | |||
====================================================================== | |||
-- | |||
You received this email because you were listed as a contact for the | |||
Anvil! described in this email. If you do not wish to receive these | |||
emails, please contact your systems administrator. AN!CM runs on | |||
Anvil! nodes directly and are not sent by Alteeve's Niche!. | |||
</syntaxhighlight> | |||
|} | |||
Unlike last time, we didn't see <span class="code">rgmanager</span> disappear. This is because the fence completed, so <span class="code">rgmanager</span> didn't block when the monitoring system checked it. Half a minute later, the servers were already recovered so the alert system saw them move rather than recover. | |||
Let's verify that the servers are indeed back up. | |||
{|class="wikitable" | |||
!<span class="code">an-a05n01</span> | |||
|style="white-space: nowrap;"|<syntaxhighlight lang="bash"> | |||
clustat | |||
</syntaxhighlight> | |||
<syntaxhighlight lang="text"> | |||
Cluster Status for an-anvil-05 @ Thu Dec 5 18:56:04 2013 | |||
Member Status: Quorate | |||
Member Name ID Status | |||
------ ---- ---- ------ | |||
an-a05n01.alteeve.ca 1 Online, Local, rgmanager | |||
an-a05n02.alteeve.ca 2 Offline | |||
Service Name Owner (Last) State | |||
------- ---- ----- ------ ----- | |||
service:libvirtd_n01 an-a05n01.alteeve.ca started | |||
service:libvirtd_n02 (an-a05n02.alteeve.ca) stopped | |||
service:storage_n01 an-a05n01.alteeve.ca started | |||
service:storage_n02 (an-a05n02.alteeve.ca) stopped | |||
vm:vm01-win2008 an-a05n01.alteeve.ca started | |||
vm:vm02-win2012 an-a05n01.alteeve.ca started | |||
vm:vm03-win7 an-a05n01.alteeve.ca started | |||
vm:vm04-win8 an-a05n01.alteeve.ca started | |||
vm:vm05-freebsd9 an-a05n01.alteeve.ca started | |||
vm:vm06-solaris11 an-a05n01.alteeve.ca started | |||
vm:vm07-rhel6 an-a05n01.alteeve.ca started | |||
vm:vm08-sles11 an-a05n01.alteeve.ca started | |||
</syntaxhighlight> | |||
|} | |||
Success! | |||
=== Recovering an-a05n02 === | |||
Once <span class="code">an-a05n02</span> boots up, we'll get the usual "I'm alive!" alert. | |||
{|class="wikitable" | |||
!<span class="code">an-a05n02</span> | |||
|style="white-space: nowrap;"|<syntaxhighlight lang="text"> | |||
Subject: [ AN!CM ] - Alteeve's Niche! - Cluster 05 (Demo Cluster - "Tyson") - an-a05n02 - Cluster Monitor Start | |||
</syntaxhighlight> | |||
<syntaxhighlight lang="text"> | |||
Cluster node's monitor program has started. | |||
Current State: | |||
--[ Cluster Status ]-------------------------------------------------- | |||
This node is not currently in the cluster. | |||
--[ Network Status ]-------------------------------------------------- | |||
Bridge: ifn_bridge1, MAC: 00:1B:21:81:C2:EA, STP disabled | |||
Links(s): \- ifn_bond1 | |||
Bond: bcn_bond1 -+- ifn_link1 -+-> Back-Channel Network | |||
\- ifn_link2 -/ | |||
Active Slave: ifn_link1 using MAC: 00:19:99:9C:A0:6C | |||
Prefer Slave: ifn_link1 | |||
Reselect: Primary always, after 120000 seconds | |||
Link Check: Every 100 ms | |||
MTU Size: 1500 Bytes | |||
+-------------------+-------------------+ | |||
Slaves | ifn_link1 | ifn_link2 | | |||
+------------+-------------------+-------------------+ | |||
| Link: | Up | Up | | |||
| Speed: | 1000 Mbps FD | 1000 Mbps FD | | |||
| MAC: | 00:19:99:9C:A0:6C | 00:1B:21:81:C2:EB | | |||
| Failures: | 0 | 0 | | |||
+------------+-------------------+-------------------+ | |||
Bond: sn_bond1 -+- sn_link1 -+-> Storage Network | |||
\- sn_link2 -/ | |||
Active Slave: sn_link1 using MAC: 00:19:99:9C:A0:6D | |||
Prefer Slave: sn_link1 | |||
Reselect: Primary always, after 120000 seconds | |||
Link Check: Every 100 ms | |||
MTU Size: 1500 Bytes | |||
+-------------------+-------------------+ | |||
Slaves | sn_link1 | sn_link2 | | |||
+------------+-------------------+-------------------+ | |||
| Link: | Up | Up | | |||
| Speed: | 1000 Mbps FD | 1000 Mbps FD | | |||
| MAC: | 00:19:99:9C:A0:6D | A0:36:9F:07:D6:2E | | |||
| Failures: | 0 | 0 | | |||
+------------+-------------------+-------------------+ | |||
Bond: ifn_bond1 -+- ifn_link1 -+-> Internet-Facing Network | |||
\- ifn_link2 -/ | |||
Active Slave: ifn_link1 using MAC: 00:1B:21:81:C2:EA | |||
Prefer Slave: ifn_link1 | |||
Reselect: Primary always, after 120000 seconds | |||
Link Check: Every 100 ms | |||
MTU Size: 1500 Bytes | |||
+-------------------+-------------------+ | |||
Slaves | ifn_link1 | ifn_link2 | | |||
+------------+-------------------+-------------------+ | |||
| Link: | Up | Up | | |||
| Speed: | 1000 Mbps FD | 1000 Mbps FD | | |||
| MAC: | 00:1B:21:81:C2:EA | A0:36:9F:07:D6:2F | | |||
| Failures: | 0 | 0 | | |||
+------------+-------------------+-------------------+ | |||
--[ Storage Status ]-------------------------------------------------- | |||
Adapter: #0 | |||
Model: RAID Ctrl SAS 6G 5/6 512MB (D2616) | |||
Revision: | |||
Serial #: | |||
Cache: 512MB | |||
BBU: iBBU, pn: LS1121001A, sn: 18704 | |||
- Failing: No | |||
- Charge: 95 %, 65 % of design | |||
- Capacity: No / 841 mAh, 1215 mAh design | |||
- Voltage: 4052 mV, 3700 mV design | |||
- Cycles: 31 | |||
- Hold-Up: 0 hours | |||
- Learn Active: No | |||
- Next Learn: Mon Dec 23 05:29:33 2013 | |||
Array: Virtual Drive 0, Target ID 0 | |||
State: Optimal | |||
Drives: 4 | |||
Usable Size: 836.625 GB | |||
Parity Size: 278.875 GB | |||
Strip Size: 64 KB | |||
RAID Level: Primary-5, Secondary-0, RAID Level Qualifier-3 | |||
Cache Policy: WriteBack, ReadAheadNone, Direct, No Write Cache if Bad BBU | |||
Bad Blocks: No | |||
Drive: 0 | |||
Position: disk group 0, span 0, arm 0 | |||
State: Online, Spun Up | |||
Fault: No | |||
Temp: 41 degrees Celcius | |||
Device: Seagate ST3300657SS, sn: 17036SJ3DE9Z | |||
Media: Hard Disk Device | |||
Interface: SAS, drive: 6.0Gb/s, bus: 6.0Gb/s | |||
Capacity: 278.875 GB | |||
Drive: 1 | |||
Position: disk group 0, span 0, arm 1 | |||
State: Online, Spun Up | |||
Fault: No | |||
Temp: 42 degrees Celcius | |||
Device: Seagate ST3300657SS, sn: 17036SJ3DNG7 | |||
Media: Hard Disk Device | |||
Interface: SAS, drive: 6.0Gb/s, bus: 6.0Gb/s | |||
Capacity: 278.875 GB | |||
Drive: 2 | |||
Position: disk group 0, span 0, arm 2 | |||
State: Online, Spun Up | |||
Fault: No | |||
Temp: 39 degrees Celcius | |||
Device: Seagate ST3300657SS, sn: 17036SJ3E01G | |||
Media: Hard Disk Device | |||
Interface: SAS, drive: 6.0Gb/s, bus: 6.0Gb/s | |||
Capacity: 278.875 GB | |||
Drive: 6 | |||
Position: disk group 0, span 0, arm 3 | |||
State: Online, Spun Up | |||
Fault: No | |||
Temp: 38 degrees Celcius | |||
Device: HITACHI HUS156045VLS600 A42BJVWMYA6L | |||
Media: Hard Disk Device | |||
Interface: SAS, drive: 6.0Gb/s, bus: 6.0Gb/s | |||
Capacity: 418.656 GB | |||
--[ Host Power and Thermal Sensors ]---------------------------------- | |||
+--------+------------+---------------+---------------+ | |||
Power Supplies | Status | Wattage | Fan 1 Speed | Fan 2 Speed | | |||
+---------------+--------+------------+---------------+---------------+ | |||
| PSU 1 | ok | 90 Watts | 6360 RPM | 6480 RPM | | |||
| PSU 2 | ok | 100 Watts | 6360 RPM | 6360 RPM | | |||
+---------------+--------+------------+---------------+---------------+ | |||
+--------------+--------------+--------------+ | |||
Power Levels | State | Voltage | Wattage | | |||
+------------------+--------------+--------------+--------------+ | |||
| BATT 3.0V | ok | 3.14 Volts | -- | | |||
| CPU1 1.8V | ok | 1.80 Volts | -- | | |||
| CPU1 Power | ok | -- | 4.40 Watts | | |||
| CPU2 1.8V | ok | 1.80 Volts | -- | | |||
| CPU2 Power | ok | -- | 4.40 Watts | | |||
| ICH 1.5V | ok | 1.50 Volts | -- | | |||
| IOH 1.1V | ok | 1.10 Volts | -- | | |||
| IOH 1.1V AUX | ok | 1.09 Volts | -- | | |||
| IOH 1.8V | ok | 1.80 Volts | -- | | |||
| iRMC 1.2V STBY | ok | 1.19 Volts | -- | | |||
| iRMC 1.8V STBY | ok | 1.80 Volts | -- | | |||
| LAN 1.0V STBY | ok | 1.01 Volts | -- | | |||
| LAN 1.8V STBY | ok | 1.81 Volts | -- | | |||
| MAIN 12V | ok | 12.06 Volts | -- | | |||
| MAIN 3.3V | ok | 3.37 Volts | -- | | |||
| MAIN 5.15V | ok | 5.15 Volts | -- | | |||
| PSU1 Power | ok | -- | 90 Watts | | |||
| PSU2 Power | ok | -- | 100 Watts | | |||
| STBY 3.3V | ok | 3.35 Volts | -- | | |||
| Total Power | ok | -- | 190 Watts | | |||
+------------------+--------------+--------------+--------------+ | |||
+-----------+-----------+ | |||
Temperatures | State | Temp (*C) | | |||
+----------------+-----------+-----------+ | |||
| Ambient | ok | 27 | | |||
| CPU1 | ok | 31 | | |||
| CPU2 | ok | 36 | | |||
| Systemboard | ok | 43 | | |||
+----------------+-----------+-----------+ | |||
+-----------+-----------+ | |||
Cooling Fans | State | RPMs | | |||
+----------------+-----------+-----------+ | |||
| FAN1 PSU1 | ok | 6360 | | |||
| FAN1 PSU2 | ok | 6360 | | |||
| FAN1 SYS | ok | 4920 | | |||
| FAN2 PSU1 | ok | 6480 | | |||
| FAN2 PSU2 | ok | 6360 | | |||
| FAN2 SYS | ok | 5100 | | |||
| FAN3 SYS | ok | 4860 | | |||
| FAN4 SYS | ok | 4980 | | |||
| FAN5 SYS | ok | 5160 | | |||
+----------------+-----------+-----------+ | |||
--[ UPS Status ]------------------------------------------------------ | |||
Name: an-ups01 | |||
Status: ONLINE Temperature: 33.0 *C | |||
Model: Smart-UPS 1500 Battery Voltage: 27.0 vAC | |||
Serial #: AS1038232403 Battery Charge: 100.0 % | |||
Holdup Time: 54.0 Minutes Current Load: 24.0 % | |||
Self Test: OK Firmware: UPS 05.0 / COM 02.1 | |||
Mains -> 122.0 Volts -> UPS -> 122.0 Volts -> PDU | |||
Name: an-ups02 | |||
Status: ONLINE Temperature: 32.0 *C | |||
Model: Smart-UPS 1500 Battery Voltage: 27.0 vAC | |||
Serial #: AS1224213144 Battery Charge: 100.0 % | |||
Holdup Time: 55.0 Minutes Current Load: 24.0 % | |||
Self Test: OK Firmware: UPS 08.3 / MCU 14.0 | |||
Mains -> 122.0 Volts -> UPS -> 122.0 Volts -> PDU | |||
==[ Source Details ]================================================== | |||
Company: Alteeve's Niche! | |||
Anvil!: an-anvil-05 | |||
Node: an-a05n02.alteeve.ca | |||
Description: | |||
- Cluster 05 (Demo Cluster - "Tyson") | |||
If you have any questions or concerns, please don't hesitate to | |||
contact support. | |||
https://alteeve.ca/w/Support | |||
Alteeve's Niche! | |||
Cluster Monitor | |||
====================================================================== | |||
-- | |||
You received this email because you were listed as a contact for the | |||
Anvil! described in this email. If you do not wish to receive these | |||
emails, please contact your systems administrator. AN!CM runs on | |||
Anvil! nodes directly and are not sent by Alteeve's Niche!. | |||
</syntaxhighlight> | |||
|} | |||
Let's log in and double check the state of affairs. | |||
{|class="wikitable" | |||
!<span class="code">an-a05n01</span> | |||
|style="white-space: nowrap;"|<syntaxhighlight lang="bash"> | |||
clustat | |||
</syntaxhighlight> | |||
<syntaxhighlight lang="text"> | |||
Cluster Status for an-anvil-05 @ Thu Dec 5 21:46:35 2013 | |||
Member Status: Quorate | |||
Member Name ID Status | |||
------ ---- ---- ------ | |||
an-a05n01.alteeve.ca 1 Online, Local, rgmanager | |||
an-a05n02.alteeve.ca 2 Offline | |||
Service Name Owner (Last) State | |||
------- ---- ----- ------ ----- | |||
service:libvirtd_n01 an-a05n01.alteeve.ca started | |||
service:libvirtd_n02 (an-a05n02.alteeve.ca) stopped | |||
service:storage_n01 an-a05n01.alteeve.ca started | |||
service:storage_n02 (an-a05n02.alteeve.ca) stopped | |||
vm:vm01-win2008 an-a05n01.alteeve.ca started | |||
vm:vm02-win2012 an-a05n01.alteeve.ca started | |||
vm:vm03-win7 an-a05n01.alteeve.ca started | |||
vm:vm04-win8 an-a05n01.alteeve.ca started | |||
vm:vm05-freebsd9 an-a05n01.alteeve.ca started | |||
vm:vm06-solaris11 an-a05n01.alteeve.ca started | |||
vm:vm07-rhel6 an-a05n01.alteeve.ca started | |||
vm:vm08-sles11 an-a05n01.alteeve.ca started | |||
</syntaxhighlight> | |||
|- | |||
!<span class="code">an-a05n02</span> | |||
|style="white-space: nowrap;"|<syntaxhighlight lang="bash"> | |||
clustat | |||
</syntaxhighlight> | |||
<syntaxhighlight lang="text"> | |||
Could not connect to CMAN: No such file or directory | |||
</syntaxhighlight> | |||
|} | |||
As expected. Time to start <span class="code">cman</span> and <span class="code">rgmanager</span>. | |||
{|class="wikitable" | |||
!<span class="code">an-a05n02</span> | |||
|style="white-space: nowrap;"|<syntaxhighlight lang="bash"> | |||
/etc/init.d/cman start | |||
</syntaxhighlight> | |||
<syntaxhighlight lang="text"> | |||
Starting cluster: | |||
Checking if cluster has been disabled at boot... [ OK ] | |||
Checking Network Manager... [ OK ] | |||
Global setup... [ OK ] | |||
Loading kernel modules... [ OK ] | |||
Mounting configfs... [ OK ] | |||
Starting cman... [ OK ] | |||
Waiting for quorum... [ OK ] | |||
Starting fenced... [ OK ] | |||
Starting dlm_controld... [ OK ] | |||
Tuning DLM kernel config... [ OK ] | |||
Starting gfs_controld... [ OK ] | |||
Unfencing self... [ OK ] | |||
Joining fence domain... [ OK ] | |||
</syntaxhighlight> | |||
<syntaxhighlight lang="bash"> | |||
/etc/init.d/rgmanager start | |||
</syntaxhighlight> | |||
<syntaxhighlight lang="text"> | |||
Starting Cluster Service Manager: [ OK ] | |||
</syntaxhighlight> | |||
|} | |||
Watch the status of the drbd resources and wait until both are <span class="code">UpToDate</span> on both nodes. | |||
{|class="wikitable" | |||
!<span class="code">an-a05n02</span> | |||
|style="white-space: nowrap;"|<syntaxhighlight lang="bash"> | |||
/etc/init.d/drbd status | |||
</syntaxhighlight> | |||
<syntaxhighlight lang="text"> | |||
drbd driver loaded OK; device status: | |||
version: 8.3.16 (api:88/proto:86-97) | |||
GIT-hash: a798fa7e274428a357657fb52f0ecf40192c1985 build by phil@Build64R6, 2013-09-27 16:00:43 | |||
m:res cs ro ds p mounted fstype | |||
... sync'ed: 36.7% (391292/612720)K | |||
... sync'ed: 7.1% (653544/699704)K | |||
0:r0 SyncTarget Primary/Primary Inconsistent/UpToDate C | |||
1:r1 SyncTarget Primary/Primary Inconsistent/UpToDate C | |||
</syntaxhighlight> | |||
Wait a few... | |||
<syntaxhighlight lang="bash"> | |||
/etc/init.d/drbd status | |||
</syntaxhighlight> | |||
<syntaxhighlight lang="text"> | |||
drbd driver loaded OK; device status: | |||
version: 8.3.16 (api:88/proto:86-97) | |||
GIT-hash: a798fa7e274428a357657fb52f0ecf40192c1985 build by phil@Build64R6, 2013-09-27 16:00:43 | |||
m:res cs ro ds p mounted fstype | |||
0:r0 Connected Primary/Primary UpToDate/UpToDate C | |||
1:r1 Connected Primary/Primary UpToDate/UpToDate C | |||
</syntaxhighlight> | |||
|} | |||
Ready. | |||
Verify everything with <span class="code">clustat</span>. | |||
{|class="wikitable" | |||
!<span class="code">an-a05n01</span> | |||
|style="white-space: nowrap;"|<syntaxhighlight lang="bash"> | |||
clustat | |||
</syntaxhighlight> | |||
<syntaxhighlight lang="text"> | |||
Cluster Status for an-anvil-05 @ Thu Dec 5 21:51:43 2013 | |||
Member Status: Quorate | |||
Member Name ID Status | |||
------ ---- ---- ------ | |||
an-a05n01.alteeve.ca 1 Online, Local, rgmanager | |||
an-a05n02.alteeve.ca 2 Online, rgmanager | |||
Service Name Owner (Last) State | |||
------- ---- ----- ------ ----- | |||
service:libvirtd_n01 an-a05n01.alteeve.ca started | |||
service:libvirtd_n02 an-a05n02.alteeve.ca started | |||
service:storage_n01 an-a05n01.alteeve.ca started | |||
service:storage_n02 an-a05n02.alteeve.ca started | |||
vm:vm01-win2008 an-a05n01.alteeve.ca started | |||
vm:vm02-win2012 an-a05n01.alteeve.ca started | |||
vm:vm03-win7 an-a05n01.alteeve.ca started | |||
vm:vm04-win8 an-a05n01.alteeve.ca started | |||
vm:vm05-freebsd9 an-a05n01.alteeve.ca started | |||
vm:vm06-solaris11 an-a05n01.alteeve.ca started | |||
vm:vm07-rhel6 an-a05n01.alteeve.ca started | |||
vm:vm08-sles11 an-a05n01.alteeve.ca started | |||
</syntaxhighlight> | |||
|- | |||
!<span class="code">an-a05n02</span> | |||
|style="white-space: nowrap;"|<syntaxhighlight lang="bash"> | |||
clustat | |||
</syntaxhighlight> | |||
<syntaxhighlight lang="text"> | |||
Cluster Status for an-anvil-05 @ Thu Dec 5 21:51:48 2013 | |||
Member Status: Quorate | |||
Member Name ID Status | |||
------ ---- ---- ------ | |||
an-a05n01.alteeve.ca 1 Online, rgmanager | |||
an-a05n02.alteeve.ca 2 Online, Local, rgmanager | |||
Service Name Owner (Last) State | |||
------- ---- ----- ------ ----- | |||
service:libvirtd_n01 an-a05n01.alteeve.ca started | |||
service:libvirtd_n02 an-a05n02.alteeve.ca started | |||
service:storage_n01 an-a05n01.alteeve.ca started | |||
service:storage_n02 an-a05n02.alteeve.ca started | |||
vm:vm01-win2008 an-a05n01.alteeve.ca started | |||
vm:vm02-win2012 an-a05n01.alteeve.ca started | |||
vm:vm03-win7 an-a05n01.alteeve.ca started | |||
vm:vm04-win8 an-a05n01.alteeve.ca started | |||
vm:vm05-freebsd9 an-a05n01.alteeve.ca started | |||
vm:vm06-solaris11 an-a05n01.alteeve.ca started | |||
vm:vm07-rhel6 an-a05n01.alteeve.ca started | |||
vm:vm08-sles11 an-a05n01.alteeve.ca started | |||
</syntaxhighlight> | |||
|} | |||
Excellent! | |||
Ready to live-migrate the servers back now. | |||
{|class="wikitable" | |||
!<span class="code">an-a05n01</span> | |||
|style="white-space: nowrap;"|<syntaxhighlight lang="bash"> | |||
clusvcadm -M vm:vm02-win2012 -m an-a05n02.alteeve.ca | |||
</syntaxhighlight> | |||
<syntaxhighlight lang="text"> | |||
Trying to migrate vm:vm02-win2012 to an-a05n02.alteeve.ca...Success | |||
</syntaxhighlight> | |||
<syntaxhighlight lang="bash"> | |||
clusvcadm -M vm:vm05-freebsd9 -m an-a05n02.alteeve.ca | |||
</syntaxhighlight> | |||
<syntaxhighlight lang="text"> | |||
Trying to migrate vm:vm05-freebsd9 to an-a05n02.alteeve.ca...Success | |||
</syntaxhighlight> | |||
<syntaxhighlight lang="bash"> | |||
clusvcadm -M vm:vm06-solaris11 -m an-a05n02.alteeve.ca | |||
</syntaxhighlight> | |||
<syntaxhighlight lang="text"> | |||
Trying to migrate vm:vm06-solaris11 to an-a05n02.alteeve.ca...Success | |||
</syntaxhighlight> | |||
<syntaxhighlight lang="bash"> | |||
clustat | |||
</syntaxhighlight> | |||
<syntaxhighlight lang="text"> | |||
Cluster Status for an-anvil-05 @ Thu Dec 5 21:54:33 2013 | |||
Member Status: Quorate | |||
Member Name ID Status | |||
------ ---- ---- ------ | |||
an-a05n01.alteeve.ca 1 Online, Local, rgmanager | |||
an-a05n02.alteeve.ca 2 Online, rgmanager | |||
Service Name Owner (Last) State | |||
------- ---- ----- ------ ----- | |||
service:libvirtd_n01 an-a05n01.alteeve.ca started | |||
service:libvirtd_n02 an-a05n02.alteeve.ca started | |||
service:storage_n01 an-a05n01.alteeve.ca started | |||
service:storage_n02 an-a05n02.alteeve.ca started | |||
vm:vm01-win2008 an-a05n01.alteeve.ca started | |||
vm:vm02-win2012 an-a05n02.alteeve.ca started | |||
vm:vm03-win7 an-a05n01.alteeve.ca started | |||
vm:vm04-win8 an-a05n01.alteeve.ca started | |||
vm:vm05-freebsd9 an-a05n02.alteeve.ca started | |||
vm:vm06-solaris11 an-a05n02.alteeve.ca started | |||
vm:vm07-rhel6 an-a05n01.alteeve.ca started | |||
vm:vm08-sles11 an-a05n01.alteeve.ca started | |||
</syntaxhighlight> | |||
|- | |||
!<span class="code">an-a05n02</span> | |||
|style="white-space: nowrap;"|<syntaxhighlight lang="bash"> | |||
clustat | |||
</syntaxhighlight> | |||
<syntaxhighlight lang="text"> | |||
Cluster Status for an-anvil-05 @ Thu Dec 5 21:54:36 2013 | |||
Member Status: Quorate | |||
Member Name ID Status | |||
------ ---- ---- ------ | |||
an-a05n01.alteeve.ca 1 Online, rgmanager | |||
an-a05n02.alteeve.ca 2 Online, Local, rgmanager | |||
Service Name Owner (Last) State | |||
------- ---- ----- ------ ----- | |||
service:libvirtd_n01 an-a05n01.alteeve.ca started | |||
service:libvirtd_n02 an-a05n02.alteeve.ca started | |||
service:storage_n01 an-a05n01.alteeve.ca started | |||
service:storage_n02 an-a05n02.alteeve.ca started | |||
vm:vm01-win2008 an-a05n01.alteeve.ca started | |||
vm:vm02-win2012 an-a05n02.alteeve.ca started | |||
vm:vm03-win7 an-a05n01.alteeve.ca started | |||
vm:vm04-win8 an-a05n01.alteeve.ca started | |||
vm:vm05-freebsd9 an-a05n02.alteeve.ca started | |||
vm:vm06-solaris11 an-a05n02.alteeve.ca started | |||
vm:vm07-rhel6 an-a05n01.alteeve.ca started | |||
vm:vm08-sles11 an-a05n01.alteeve.ca started | |||
</syntaxhighlight> | |||
|} | |||
That is beautiful. | |||
== Done and Done! == | |||
That, ladies and gentlemen, is all she wrote! | |||
You should now be safely ready to take your ''Anvil!'' into production at this stage. | |||
Happy Clustering! | |||
= Troubleshooting = | |||
Here are some common problems you might run into. | |||
== SELinux Related Problems == | |||
SELinux is a double-edged sword. It can certainly protect you, and it is worth having, but it can cut you, too. Here we cover a couple common issues. | |||
=== Password-less SSH doesn't work, but ~/.ssh/authorized_keys is fine === | |||
If you've double-checked that you've copied your public keys into a target node or server's <span class="code">~/.ssh/authorized_keys</span> file, it could be that the file's context is not correct. To check: | |||
<syntaxhighlight lang="bash"> | <syntaxhighlight lang="bash"> | ||
ls -lahZ /root/.ssh/authorized_keys | |||
</syntaxhighlight> | </syntaxhighlight> | ||
<syntaxhighlight lang="text"> | <syntaxhighlight lang="text"> | ||
-rw-------. root root unconfined_u:object_r:admin_home_t:s0 /root/.ssh/authorized_keys | |||
</syntaxhighlight> | </syntaxhighlight> | ||
Notice how the context is <span class="code">admin_home_t</span>? That should be <span class="code">ssh_home_t</span>. So we need to update the context now. | |||
<syntaxhighlight lang="bash"> | <syntaxhighlight lang="bash"> | ||
semanage fcontext -a -t ssh_home_t /root/.ssh/authorized_keys | |||
restorecon -r /root/.ssh/authorized_keys | |||
ls -lahZ /root/.ssh/authorized_keys | |||
</syntaxhighlight> | </syntaxhighlight> | ||
<syntaxhighlight lang="text"> | <syntaxhighlight lang="text"> | ||
-rw-------. root root unconfined_u:object_r:ssh_home_t:s0 /root/.ssh/authorized_keys | |||
</syntaxhighlight> | </syntaxhighlight> | ||
You should now be able to log in to the target machine without a password. | |||
=== Live-Migration fails with '[vm] error: Unable to read from monitor: Connection reset by peer' === | |||
When trying to migrate a server using the [[Striker|dashboard]], you will see an error like: | |||
<syntaxhighlight lang="text"> | <syntaxhighlight lang="text"> | ||
Trying to migrate vm01-win2008 to an-a05n01.alteeve.ca...Failed; service running on original owner | |||
</syntaxhighlight> | </syntaxhighlight> | ||
< | In <span class="code">/var/log/messages</span> you will see errors like: | ||
</ | |||
<syntaxhighlight lang="text"> | <syntaxhighlight lang="text"> | ||
Mar 17 01:14:05 an-a05n01 rgmanager[8474]: [vm] Migrate vm01-win2008 to an-a05n02.alteeve.ca failed: | |||
Mar 17 01:14:05 an-a05n01 rgmanager[8496]: [vm] error: Unable to read from monitor: Connection reset by peer | |||
Mar 17 01:14:05 an-a05n01 rgmanager[3412]: migrate on vm "vm01-win2008" returned 150 (unspecified) | |||
Mar 17 01:14:05 an-a05n01 rgmanager[3412]: Migration of vm:vm01-win2008 to an-a05n02.alteeve.ca failed; return code 150 | |||
</syntaxhighlight> | </syntaxhighlight> | ||
This can happen for two reasons; | |||
= | # You forgot to [[#Populate_known_hosts|populate <span class="code">/root/.ssh/known_hosts</span>]]. | ||
# The context on <span class="code">/root/.ssh/known_hosts</span> is not correct. | |||
It is usually the second case, so that is what we will address here. | |||
Check to see what context is currently set for <span class="code">known_hosts</span>: | |||
<syntaxhighlight lang="bash"> | <syntaxhighlight lang="bash"> | ||
/ | ls -lahZ /root/.ssh/known_hosts | ||
</syntaxhighlight> | </syntaxhighlight> | ||
<syntaxhighlight lang="text"> | <syntaxhighlight lang="text"> | ||
-rw-r--r--. root root unconfined_u:object_r:admin_home_t:s0 /root/.ssh/known_hosts | |||
</syntaxhighlight> | </syntaxhighlight> | ||
The context on this file needs to be <span class="code">ssh_home_t</span>. To change it, run: | |||
<syntaxhighlight lang="bash"> | <syntaxhighlight lang="bash"> | ||
/ | semanage fcontext -a -t ssh_home_t /root/.ssh/known_hosts | ||
restorecon -r /root/.ssh/known_hosts | |||
ls -lahZ /root/.ssh/known_hosts | |||
</syntaxhighlight> | </syntaxhighlight> | ||
<syntaxhighlight lang="text"> | <syntaxhighlight lang="text"> | ||
-rw-r--r--. root root unconfined_u:object_r:ssh_home_t:s0 /root/.ssh/known_hosts | |||
</syntaxhighlight> | </syntaxhighlight> | ||
You should now be able to live-migrate your servers to the node. | |||
=== Attempting to Live Migrate Fails with 'Host key verification failed.' === | |||
Attempting to Live-Migrate a server from one node to another fails with: | |||
<syntaxhighlight lang="bash"> | <syntaxhighlight lang="bash"> | ||
clusvcadm -M vm:vm02-win2008r2 -m an-a05n01.alteeve.ca | |||
</syntaxhighlight> | </syntaxhighlight> | ||
<syntaxhighlight lang="text"> | <syntaxhighlight lang="text"> | ||
Trying to migrate vm:vm02-win2008r2 to an-a05n01.alteeve.ca...Failed; service running on original owner | |||
</syntaxhighlight> | </syntaxhighlight> | ||
In the system log, we see: | |||
<syntaxhighlight lang="text"> | <syntaxhighlight lang="text"> | ||
Aug 4 19:18:41 an-a05n02 rgmanager[3526]: Migrating vm:vm02-win2008r2 to an-a05n01.alteeve.ca | |||
Aug 4 19:18:41 an-a05n02 rgmanager[10618]: [vm] Migrate vm02-win2008r2 to an-a05n01.alteeve.ca failed: | |||
Aug 4 19:18:41 an-a05n02 rgmanager[10640]: [vm] error: Cannot recv data: Host key verification failed.: Connection reset by peer | |||
Aug 4 19:18:41 an-a05n02 rgmanager[3526]: migrate on vm "vm02-win2008r2" returned 150 (unspecified) | |||
Aug 4 19:18:41 an-a05n02 rgmanager[3526]: Migration of vm:vm02-win2008r2 to an-a05n01.alteeve.ca failed; return code 150 | |||
</syntaxhighlight> | </syntaxhighlight> | ||
This has two causes: | |||
# <span class="code">[[AN!Cluster_Tutorial_2#Populate_known_hosts|/root/.ssh/known_hosts]]</span class="code"> isn't populated. | |||
# The <span class="code">[[selinux]]</span> context is not correct. | |||
< | If you've confirmed that your <span class="code">known_hosts</span> file is correct, then you can verify you've hit an SELinux issue by running <span class="code">setenforce 0</span> on both nodes and trying again. If the migration works, you have an SELinux issue. Re-enable <span class="code">setenforce 1</span> and we'll fix it. | ||
</ | |||
< | |||
</ | |||
If we look at the current context: | |||
<syntaxhighlight lang="bash"> | <syntaxhighlight lang="bash"> | ||
ls -lahZ /root/.ssh | |||
</syntaxhighlight> | </syntaxhighlight> | ||
<syntaxhighlight lang="text"> | <syntaxhighlight lang="text"> | ||
drwx------. root root system_u:object_r:admin_home_t:s0 . | |||
drwxr-xr-x. root root system_u:object_r:admin_home_t:s0 .. | |||
-rw-------. root root unconfined_u:object_r:ssh_home_t:s0 authorized_keys | |||
-rw-------. root root system_u:object_r:admin_home_t:s0 id_rsa | |||
-rw-r--r--. root root system_u:object_r:admin_home_t:s0 id_rsa.pub | |||
-rw-r--r--. root root unconfined_u:object_r:admin_home_t:s0 known_hosts | |||
</syntaxhighlight> | </syntaxhighlight> | ||
< | We see that it is currently <span class="code">admin_home_t</span> on <span class="code">id_rsa</span>, <span class="code">id_rsa.pub</span> and <span class="code">known_hosts</span>, but <span class="code">authorized_keys</span> is fine. We want all of them to be <span class="code">ssh_home_t</span>, so we'll have to fix it. | ||
</ | |||
< | |||
</ | |||
{{note|1=Check both nodes! If one node has a bad context, it's likely the other node is bad, too. Both nodes will need to be fixed for reliable migration.}} | |||
<syntaxhighlight lang="bash"> | <syntaxhighlight lang="bash"> | ||
semanage fcontext -a -t ssh_home_t /root/.ssh/known_hosts | |||
semanage fcontext -a -t ssh_home_t /root/.ssh/id_rsa | |||
semanage fcontext -a -t ssh_home_t /root/.ssh/id_rsa.pub | |||
restorecon -r /root/.ssh/known_hosts | |||
restorecon -r /root/.ssh/id_rsa | |||
restorecon -r /root/.ssh/id_rsa.pub | |||
ls -lahZ /root/.ssh | |||
</syntaxhighlight> | </syntaxhighlight> | ||
<syntaxhighlight lang="text"> | <syntaxhighlight lang="text"> | ||
drwx------. root root system_u:object_r:admin_home_t:s0 . | |||
drwxr-xr-x. root root system_u:object_r:admin_home_t:s0 .. | |||
-rw-------. root root unconfined_u:object_r:ssh_home_t:s0 authorized_keys | |||
-rw-------. root root system_u:object_r:ssh_home_t:s0 id_rsa | |||
-rw-r--r--. root root system_u:object_r:ssh_home_t:s0 id_rsa.pub | |||
-rw-r--r--. root root unconfined_u:object_r:ssh_home_t:s0 known_hosts | |||
</syntaxhighlight> | </syntaxhighlight> | ||
Now we can try migrating again, and this time it should work. | |||
<syntaxhighlight lang="bash"> | <syntaxhighlight lang="bash"> | ||
clusvcadm -M vm:vm02-win2008r2 -m an-a05n01.alteeve.ca | |||
</syntaxhighlight> | </syntaxhighlight> | ||
<syntaxhighlight lang="text"> | <syntaxhighlight lang="text"> | ||
Trying to migrate vm:vm02-win2008r2 to an-a05n01.alteeve.ca...Success | |||
</syntaxhighlight> | </syntaxhighlight> | ||
Fixed! | |||
== Other Tutorials == | |||
These tutorials are not directly related to this one, but might be of use to some. | |||
* [[Anvil! Tutorial 2 - Growing Storage]] | |||
* [[Configuring Brocade Switches]] | |||
* [[Anvil! m2 Tutorial]] | |||
* [[Configuring Network Boot on Fujitsu Primergy]] | |||
* [[Configuring Hardware RAID Arrays on Fujitsu Primergy]] | |||
* [[Encrypted Arrays with LSI SafeStore]] | |||
* [[Configuring an APC AP7900]] | |||
* [[Configuring APC SmartUPS with AP9630 Network Cards]] | |||
* [[Anvil! m2 Tutorial - Installing RHEL/Centos]] | |||
* [[Grow a GFS2 Partition]] | |||
= | == Older Issues From Previous Tutorials == | ||
These links have older troubleshooting issues that probably aren't needed anymore, but you never know. | |||
* [[Managing Drive Failures with Striker]] | |||
* [[2-Node Red Hat KVM Cluster Tutorial - Troubleshooting]] | * [[2-Node Red Hat KVM Cluster Tutorial - Troubleshooting]] | ||
{{footer}} | {{footer}} | ||
Latest revision as of 21:20, 28 May 2016

This paper has one goal:
- Create an easy to use, fully redundant platform for virtual servers.
Oh, and do have fun!
What's New?
In the last two years, we've learned a lot about how to make an even more solid high-availability platform. We've created tools to make monitoring and management of the virtual servers and nodes trivially easy. This updated release of our tutorial brings these advances to you!
- Many refinements to the cluster stack that protect against corner cases seen over the last two years.
- Configuration naming convention changes to support the new Striker dashboard.
- Addition of the AN!CM monitoring and alert system.
- Security improved; selinux and iptables now enabled and used.
| Note: Changes made on Apr. 3, 2015 |
- New network interface, bond and bridge naming convention used.
- New Anvil and node naming convention.
- ie: an-anvil-05 -> an-anvil-05, cn-a05n01 -> an-a05n01.
- References to 'AN!CM' now point to 'Striker'.
- Foundation pack host names have been expanded to be more verbose.
- ie: an-s01 -> an-switch01, an-m01 -> an-striker01.
A Note on Terminology
In this tutorial, we will use the following terms:
- Anvil!: This is our name for the HA platform as a whole.
- Nodes: The physical hardware servers used as members in the cluster and which host the virtual servers.
- Servers: The virtual servers themselves.
- Compute Pack: This describes a pair of nodes that work together to power highly-available servers.
- Foundation Pack: This describes the switches, PDUs and UPSes used to power and connect the nodes.
- Striker Dashboard: This describes the equipment used for the Striker management dashboard.
Why Should I Follow This (Lengthy) Tutorial?
Following this tutorial is not the lightest undertaking. It is designed to teach you all the inner details of building an HA platform for virtual servers. When finished, you will have a detailed and deep understanding of what it takes to build a fully redundant, mostly fault-tolerant high-availability platform. Though lengthy, it is very worthwhile if you want to understand high-availability.
In either case, when finished, you will have the following benefits:
- Totally open source. Everything. This guide and all software used is open!
- You can host servers running almost any operating system.
- The HA platform requires no access to the servers and no special software needs to be installed. Your users may well never know that they're on a virtual machine.
- Your servers will operate just like servers installed on bare-iron machines. No special configuration is required. The high-availability components will be hidden behind the scenes.
- The worst failures of core components, such as a mainboard failure in a node, will cause an outage of roughly 30 to 90 seconds.
- Storage is synchronously replicated, guaranteeing that the total destruction of a node will cause no more data loss than a traditional server losing power.
- Storage is replicated without the need for a SAN, reducing cost and providing total storage redundancy.
- Live-migration of servers enables upgrading and node maintenance without downtime. No more weekend maintenance!
- AN!CM; The "AN! Cluster Monitor", watches the HA stack is continually. It sends alerts for many events from predictive hardware failure to simple live migration in a single application.
- Most failures are fault-tolerant and will cause no interruption in services at all.
Ask your local VMware or Microsoft Hyper-V sales person what they'd charge for all this. :)
High-Level Explanation of How HA Clustering Works
| Note: This section is an adaptation of this post to the Linux-HA mailing list. If you find this section hard to follow, please don't worry. Each component is explained in the "Concepts" section below. |
Before digging into the details, it might help to start with a high-level explanation of how HA clustering works.
Corosync uses the totem protocol for "heartbeat"-like monitoring of the other node's health. A token is passed around to each node, the node does some work (like acknowledge old messages, send new ones), and then it passes the token on to the next node. This goes around and around all the time. Should a node not pass its token on after a short time-out period, the token is declared lost, an error count goes up and a new token is sent. If too many tokens are lost in a row, the node is declared lost.
Once the node is declared lost, the remaining nodes reform a new cluster. If enough nodes are left to form quorum (simple majority), then the new cluster will continue to provide services. In two-node clusters, like the ones we're building here, quorum is disabled so each node can work on its own.
Corosync itself only cares about who is a cluster member and making sure all members get all messages. What happens after the cluster reforms is up to the cluster manager, cman, and the resource group manager, rgmanager.
The first thing cman does after being notified that a node was lost is initiate a fence against the lost node. This is a process where the lost node is powered off by the healthy node (power fencing), or cut off from the network/storage (fabric fencing). In either case, the idea is to make sure that the lost node is in a known state. If this is skipped, the node could recover later and try to provide cluster services, not having realized that it was removed from the cluster. This could cause problems from confusing switches to corrupting data.
When rgmanager is told that membership has changed because a node died, it looks to see what services might have been lost. Once it knows what was lost, it looks at the rules it's been given and decides what to do. These rules are defined in the cluster.conf's <rm> element. We'll go into detail on this later.
In two-node clusters, there is also a chance of a "split-brain". Quorum has to be disabled, so it is possible for both nodes to think the other node is dead and both try to provide the same cluster services. By using fencing, after the nodes break from one another (which could happen with a network failure, for example), neither node will offer services until one of them has fenced the other. The faster node will win and the slower node will shut down (or be isolated). The survivor can then run services safely without risking a split-brain.
Once the dead/slower node has been fenced, rgmanager then decides what to do with the services that had been running on the lost node. Generally, this means restarting the services locally that had been running on the dead node. The details of this are decided by you when you configure the resources in rgmanager. As we will see with each node's local storage service, the service is not recovered but instead left stopped.
The Task Ahead
Before we start, let's take a few minutes to discuss clustering and its complexities.
A Note on Patience
When someone wants to become a pilot, they can't jump into a plane and try to take off. It's not that flying is inherently hard, but it requires a foundation of understanding. Clustering is the same in this regard; there are many different pieces that have to work together just to get off the ground.
You must have patience.
Like a pilot on their first flight, seeing a cluster come to life is a fantastic experience. Don't rush it! Do your homework and you'll be on your way before you know it.
Coming back to earth:
Many technologies can be learned by creating a very simple base and then building on it. The classic "Hello, World!" script created when first learning a programming language is an example of this. Unfortunately, there is no real analogue to this in clustering. Even the most basic cluster requires several pieces be in place and working well together. If you try to rush, by ignoring pieces you think are not important, you will almost certainly waste time. A good example is setting aside fencing, thinking that your test cluster's data isn't important. The cluster software has no concept of "test". It treats everything as critical all the time and will shut down if anything goes wrong.
Take your time, work through these steps, and you will have the foundation cluster sooner than you realize. Clustering is fun because it is a challenge.
Technologies We Will Use
- Red Hat Enterprise Linux 6 (EL6); You can use a derivative like CentOS v6. Specifically, we're using 6.5.
- Red Hat Cluster Services "Stable" version 3. This describes the following core components:
- Corosync; Provides cluster communications using the totem protocol.
- Cluster Manager (cman); Manages the starting, stopping and managing of the cluster.
- Resource Manager (rgmanager); Manages cluster resources and services. Handles service recovery during failures.
- Clustered Logical Volume Manager (clvm); Cluster-aware (disk) volume manager. Backs GFS2 filesystems and KVM virtual machines.
- Global File System version 2 (gfs2); Cluster-aware, concurrently mountable file system.
- Distributed Redundant Block Device (DRBD); Keeps shared data synchronized across cluster nodes.
- KVM; Hypervisor that controls and supports virtual machines.
- Alteeve's Niche! Cluster Dashboard and Cluster Monitor
A Note on Hardware

Another new change is that Alteeve's Niche!, after years of experimenting with various hardware, has partnered with Fujitsu. We chose them because of the unparalleled quality of their equipment.
This tutorial can be used on any manufacturer's hardware, provided it meets the minimum requirements listed below. That said, we strongly recommend readers give Fujitsu's RX-line of servers a close look. We do not get a discount for this recommendation, we genuinely love the quality of their gear. The only technical argument for using Fujitsu hardware is that we do all our cluster stack monitoring software development on Fujitsu RX200 and RX300 servers, so we can say with confidence that the AN! software components will work well on their kit.
If you use any other hardware vendor and run into any trouble, please don't hesitate to contact us. We want to make sure that our HA stack works on as many systems as possible and will be happy to help out. Of course, all Alteeve code is open source, so contributions are always welcome, too!
System Requirements
The goal of this tutorial is to help you build an HA platform with zero single points of failure. In order to do this, certain minimum technical requirements must be met.
Bare minimum requirements:
- Two servers with the following;
- A CPU with hardware-accelerated virtualization
- Redundant power supplies
- IPMI or vendor-specific out-of-band management, like Fujitsu's iRMC, HP's iLO, Dell's iDRAC, etc
- Six network interfaces, 1 Gbit or faster (yes, six!)
- 2 GiB of RAM and 44.5 GiB of storage for the host operating system, plus sufficient RAM and storage for your VMs
- Two switched PDUs; APC-brand recommended but any with a supported fence agent is fine
- Two network switches
Recommended Hardware; A Little More Detail
The previous section covered the bare-minimum system requirements for following this tutorial. If you are looking to build an Anvil! for production, we need to discuss important considerations for selecting hardware.
The Most Important Consideration - Storage
There is probably no single consideration more important than choosing the storage you will use.
In our years of building Anvil! HA platforms, we've found no single issue more important than storage latency. This is true for all virtualized environments, in fact.
The problem is this:
Multiple servers on shared storage can cause particularly random storage access. Traditional hard drives have disks with mechanical read/write heads on the ends of arms that sweep back and forth across the disk surfaces. These platters are broken up into "tracks" and each track is itself cut up into "sectors". When a server needs to read or write data, the hard drive needs to sweep the arm over the track it wants and then wait there for the sector it wants to pass underneath.
This time taken to get the read/write head onto the track and then wait for the sector to pass underneath is called "seek latency". How long this latency actually is depends on a few things:
- How fast are the platters rotating? The faster the platter speed, the less time it takes for a sector to pass under the read/write head.
- How fast the read/write arms can move and how far do they have to travel between tracks? Highly random read/write requests can cause a lot of head travel and increase seek time.
- How many read/write requests (IOPS) can your storage handle? If your storage can not process the incoming read/write requests fast enough, your storage can slow down or stall entirely.
When many people think about hard drives, they generally worry about maximum write speeds. For environments with many virtual servers, this is actually far less important than it might seem. Reducing latency to ensure that read/write requests don't back up is far more important. This is measured as the storage's IOPS performance. If too many requests back up in the cache, storage performance can collapse or stall out entirely.
This is particularly problematic when multiple servers try to boot at the same time. If, for example, a node with multiple servers dies, the surviving node will try to start the lost servers at nearly the same time. This causes a sudden dramatic rise in read requests and can cause all servers to hang entirely, a condition called a "boot storm".
Thankfully, this latency problem can be easily dealt with in one of three ways;
- Use solid-state drives. These have no moving parts, so there is less penalty for highly random read/write requests.
- Use fast platter drives and proper RAID controllers with write-back caching.
- Isolate each server onto dedicated platter drives.
Each of these solutions have benefits and downsides;
| Pro | Con | |||
|---|---|---|---|---|
| Fast drives + Write-back caching | 15,000rpm SAS drives are extremely reliable and the high rotation speeds minimize latency caused by waiting for sectors to pass under the read/write heads. Using multiple drives in RAID level 5 or level 6 breaks up reads and writes into smaller pieces, allowing requests to be serviced quickly and to help keep the read/write buffer empty. Write-back caching allows RAM-like write speeds and the ability to re-order disk access to minimize head movement. | The main con is the number of disks needed to get effective performance gains from striping. Alteeve always uses a minimum of six disks, but many entry-level servers support a maximum of 4 drives. You need to account for the number of disks you plan to use when selecting your hardware. | ||
| SSDs | They have no moving parts, so read and write requests do not have to wait for mechanical movements to happen, drastically reducing latency. The minimum number of drives for SSD-based configuration is two. | Solid state drives use NAND flash, which can only be written to a finite number of times. All drives in our Anvil! will be written to roughly the same amount, so hitting this write-limit could mean that all drives in both nodes would fail at nearly the same time. Avoiding this requires careful monitoring of the drives and replacing them before their write limits are hit.
| ||
| Isolated Storage | Dedicating hard drives to virtual servers avoids the highly random read/write issues found when multiple servers share the same storage. This allows for the safe use of cheap, inexpensive hard drives. This also means that dedicated hardware RAID controllers with battery-backed cache are not needed. This makes it possible to save a good amount of money in the hardware design. | The obvious down-side to isolated storage is that you significantly limit the number of servers you can host on your Anvil!. If you only need to support one or two servers, this should not be an issue. |
The last piece to consider is the interface of the drives used, be they SSDs or traditional HDDs. The two common interface types are SATA and SAS.
- SATA HDD drives generally have a platter speed of 7,200rpm. The SATA interface has limited instruction set and provides minimal health reporting. These are "consumer" grade devices that are far less expensive, and far less reliable, than SAS drives.
- SAS drives are generally aimed at the enterprise environment and are built to much higher quality standards. SAS HDDs have rotational speeds of up to 15,000rpm and can handle far more read/write operations per second. Enterprise SSDs using the SAS interface are also much more reliable than their commercial counterpart. The main downside to SAS drives is their cost.
In all production environments, we strongly, strongly recommend SAS-connected drives. For non-production environments, SATA drives are fine.
Extra Security - LSI SafeStore
If security is a particular concern of yours, then you can look at using self-encrypting hard drives along with LSI's SafeStore option. An example hard drive, which we've tested and validated, would be the Seagate ST1800MM0038 drives. In general, if the drive advertises "SED" support, it should work fine.
The provides the ability to:
- Encrypt all data with AES-256 grade encryption without a performance hit.
- Require a pass phrase on boot to decrypt the server's data.
- Protect the contents of the drives while "at rest" (ie: while being shipped somewhere).
- Execute a self-destruct sequence.
Obviously, most users won't need this, but it might be useful to some users in sensitive environments like embassies in less than friendly host countries.
RAM - Preparing for Degradation
RAM is a far simpler topic than storage, thankfully. Here, all you need to do is add up how much RAM you plan to assign to servers, add at least 2 GiB for the host (we recommend 4), and then install that much memory in both of your nodes.
In production, there are two technologies you will want to consider;
- ECC, error-correcting code, provide the ability for RAM to recover from single-bit errors. If you are familiar with how parity in RAID arrays work, ECC in RAM is the same idea. This is often included in server-class hardware by default. It is highly recommended.
- Memory Mirroring is, continuing our storage comparison, RAID level 1 for RAM. All writes to memory go to two different chips. Should one fail, the contents of the RAM can still be read from the surviving module.
Never Over-Provision!
"Over-provisioning", also called "thin provisioning" is a concept made popular in many "cloud" technologies. It is a concept that has almost no place in HA environments.
A common example is creating virtual disks of a given apparent size, but which only pull space from real storage as needed. So if you created a "thin" virtual disk that was 80 GiB large, but only 20 GiB worth of data was used, only 20 GiB from the real storage would be used.
In essence; Over-provisioning is where you allocate more resources to servers than the nodes can actually provide, banking on the hopes that most servers will not use all of the resources allocated to them. The danger here, and the reason it has almost no place in HA, is that if the servers collectively use more resources than the nodes can provide, something is going to crash.
CPU Cores - Possibly Acceptable Over-Provisioning
Over provisioning of RAM and storage is never acceptable in an HA environment, as mentioned. Over-allocating CPU cores is possibly acceptable though.
When selecting which CPUs to use in your nodes, the number of cores and the speed of the cores will determine how much computational horse-power you have to allocate to your servers. The main considerations are:
- Core speed; Any given "thread" can be processed by a single CPU core at a time. The faster the given core is, the faster it can process any given request. Many applications do not support multithreading, meaning that the only way to improve performance is to use faster cores, not more cores.
- Core count; Some applications support breaking up jobs into many threads, and passing them to multiple CPU cores at the same time for simultaneous processing. This way, the application feels faster to users because each CPU has to do less work to get a job done. Another benefit of multiple cores is that if one application consumes the processing power of a single core, other cores remain available for other applications, preventing processor congestion.
In processing, each CPU "core" can handle one program "thread" at a time. Since the earliest days of multitasking, operating systems have been able to handle threads waiting for a CPU resource to free up. So the risk of over-provisioning CPUs is restricted to performance issues only.
If you're building an Anvil! to support multiple servers and it's important that, no matter how busy the other servers are, the performance of each server can not degrade, then you need to be sure you have as many real CPU cores as you plan to assign to servers.
So for example, if you plan to have three servers and you plan to allocate each server four virtual CPU cores, you need a minimum of 13 real CPU cores (3 servers x 4 cores each plus at least one core for the node). In this scenario, you will want to choose servers with dual 8-core CPUs, for a total of 16 available real CPU cores. You may choose to buy two 6-core CPUs, for a total of 12 real cores, but you risk congestion still. If all three servers fully utilize their four cores at the same time, the host OS will be left with no available core for its software, which manages the HA stack.
In many cases, however, risking a performance loss under periods of high CPU load is acceptable. In these cases, allocating more virtual cores than you have real cores is fine. Should the load of the servers climb to a point where all real cores are under 100% utilization, then some applications will slow down as they wait for their turn in the CPU.
In the end, the decision whether to over-provision CPU cores or not, and if so by how much, is up to you, the reader. Remember to consider balancing out faster cores with the number of cores. If your expected load will be short bursts of computationally intense jobs, then few-but-faster cores may be the best solution.
A Note on Hyper-Threading
Intel's hyper-threading technology can make a CPU appear to the OS to have twice as many real cores than it actually has. For example, a CPU listed as "4c/8t" (four cores, eight threads) will appear to the node as an 8-core CPU. In fact, you only have four cores and the additional four cores are emulated attempts to make more efficient use of the processing of each core.
Simply put, the idea behind this technology is to "slip in" a second thread when the CPU would otherwise be idle. For example, if the CPU core has to wait for memory to be fetched for the currently active thread, instead of sitting idle, a thread in the second core will be worked on.
How much benefit this gives you in the real world is debatable and highly depended on your applications. For the purposes of HA, it's recommended to not count the "HT cores" as real cores. That is to say, when calculating load, treat "4c/8t" CPUs as a 4-core CPUs.
Six Network Interfaces, Seriously?
Yes, seriously.
Obviously, you can put everything on a single network card and your HA software will work, but it would not be advised.
We will go into the network configuration at length later on. For now, here's an overview:
- Each network needs two links in order to be fault-tolerant. One link will go to the first network switch and the second link will go to the second network switch. This way, the failure of a network cable, port or switch will not interrupt traffic.
- There are three main networks in an Anvil!;
- Back-Channel Network; This is used by the cluster stack and is sensitive to latency. Delaying traffic on this network can cause the nodes to "partition", breaking the cluster stack.
- Storage Network; All disk writes will travel over this network. As such, it is easy to saturate this network. Sharing this traffic with other services would mean that it's very possible to significantly impact network performance under high disk write loads. For this reason, it is isolated.
- Internet-Facing Network; This network carries traffic to and from your servers. By isolating this network, users of your servers will never experience performance loss during storage or cluster high loads. Likewise, if your users place a high load on this network, it will not impact the ability of the Anvil! to function properly. It also isolates untrusted network traffic.
So, three networks, each using two links for redundancy, means that we need six network interfaces. It is strongly recommended that you use three separate dual-port network cards. Using a single network card, as we will discuss in detail later, leaves you vulnerable to losing entire networks should the controller fail.
A Note on Dedicated IPMI Interfaces
Some server manufacturers provide access to IPMI using the same physical interface as one of the on-board network cards. Usually these companies provide optional upgrades to break the IPMI connection out to a dedicated network connector.
Whenever possible, it is recommended that you go with a dedicated IPMI connection.
We've found that it rarely, if ever, is possible for a node to talk to its own network interface using a shared physical port. This is not strictly a problem, but it can certainly make testing and diagnostics easier when the node can ping and query its own IPMI interface over the network.
Network Switches
The ideal switches to use in HA clusters are stackable and managed switches in pairs. At the very least, a pair of switches that support VLANs is recommended. None of this is strictly required, but here are the reasons they're recommended:
- VLAN allows for totally isolating the BCN, SN and IFN traffic. This adds security and reduces broadcast traffic.
- Managed switches provide a unified interface for configuring both switches at the same time. This drastically simplifies complex configurations, like setting up VLANs that span the physical switches.
- Stacking provides a link between the two switches that effectively makes them work like one. Generally, the bandwidth available in the stack cable is much higher than the bandwidth of individual ports. This provides a high-speed link for all three VLANs in one cable and it allows for multiple links to fail without risking performance degradation. We'll talk more about this later.
Beyond these suggested features, there are a few other things to consider when choosing switches:
| Feature | Consideration |
|---|---|
| MTU size |
|
| Packets Per Second | This is a measure of how many packets can be routed per second, and generally is a reflection of the switch's processing power and memory. Cheaper switches will not have the ability to route a high number of packets at the same time, potentially causing congestion. |
| Multicast Groups | Some fancy switches, like some Cisco hardware, don't maintain multicast groups persistently. The cluster software uses multicast for communication, so if your switch drops a multicast group, it will cause your cluster to partition. If you have a managed switch, ensure that persistent multicast groups are enabled. We'll talk more about this later. |
| Port speed and count versus Internal Fabric Bandwidth | A switch that has, say, 48 Gbps ports may not be able to route 48 Gbps. This is a problem similar to over-provisioning we discussed above. If an inexpensive 48 port switch has an internal switch fabric of only 20 Gbps, then it can handle only up to 20 saturated ports at a time. Be sure to review the internal fabric capacity and make sure it's high enough to handle all connected interfaces running full speed. Note, of course, that only one link in a given bond will be active at a time. |
| Uplink speed | If you have a gigabit switch and you simply link the ports between the two switches, the link speed will be limited to 1 gigabit. Normally, all traffic will be kept on one switch, so this is fine. If a single link fails over to the backup switch, then its traffic will bounce up via the uplink cable to the main switch at full speed. However, if a second link fails, both will be sharing the single gigabit uplink, so there is a risk of congestion on the link. If you can't get stacked switches, which generally have 10 Gbps speeds or higher, then look for switches with 10 Gbps dedicated uplink ports and use those for uplinks. |
| Uplinks and VLANs | When using normal ports for uplinks with VLANs defined in the switch, each uplink port will be restricted to the VLAN it is a member of. In this case, you will need one uplink cable per VLAN. |
| Port Trunking | If your existing network supports it, choosing a switch with port trunking provides a backup link from the foundation pack switches to the main network. This extends the network redundancy out to the rest of your network. |
There are numerous other valid considerations when choosing network switches for your Anvil!. These are the most prescient considerations, though.
Why Switched PDUs?
We will discuss this in detail later on, but in short, when a node stops responding, we can not simply assume that it is dead. To do so would be to risk a "split-brain" condition which can lead to data divergence, data loss and data corruption.
To deal with this, we need a mechanism of putting a node that is in an unknown state into a known state. A process called "fencing". Many people who build HA platforms use the IPMI interface for this purpose, as will we. The idea here is that, when a node stops responding, the surviving node connects to the lost node's IPMI interface and forces the machine to power off. The IPMI BMC is, effectively, a little computer inside the main computer, so it will work regardless of what state the node itself is in.
Once the node has been confirmed to be off, the services that had been running on it can be restarted on the remaining good node, safe in knowing that the lost peer is not also hosting these services. In our case, these "services" are the shared storage and the virtual servers.
There is a problem with this though. Actually, two.
- The IPMI draws its power from the same power source as the server itself. If the host node loses power entirely, IPMI goes down with the host.
- The IPMI BMC has a single network interface and it is a single device.
If we relied on IPMI-based fencing alone, we'd have a single point of failure. If the surviving node can not put the lost node into a known state, it will intentionally hang. The logic being that a hung cluster is better than risking corruption or a split-brain. This means that, with IPMI-based fencing alone, the loss of power to a single node would not be automatically recoverable.
That just will not do!
To make fencing redundant, we will use switched PDUs. Think of these as network-connected power bars.
Imagine now that one of the nodes blew itself up. The surviving node would try to connect to its IPMI interface and, of course, get no response. Then it would log into both PDUs (one behind either side of the redundant power supplies) and cut the power going to the node. By doing this, we now have a way of putting a lost node into a known state.
So now, no matter how badly things go wrong, we can always recover!
Network Managed UPSes Are Worth It
We have found that a surprising number of issues that affect service availability are power related. A network-connected smart UPS allows you to monitor the power coming from the building mains. Thanks to this, we've been able to detect far more than simple "lost power" events. We've been able to detect failing transformers and regulators, over and under voltage events and so on. Events that, if caught ahead of time, avoid full power outages. It also protects the rest of your gear that isn't behind a UPS.
So strictly speaking, you don't need network managed UPSes. However, we have found them to be worth their weight in gold. We will, of course, be using them in this tutorial.
Dashboard Servers
The Anvil! will be managed by Striker - Cluster Dashboard, a small little dedicated server. This can be a virtual machine on a laptop or desktop, or a dedicated little server. All that matters is that it can run RHEL or CentOS version 6 with a minimal desktop.
Normally, we setup a couple of ASUS EeeBox machines, for redundancy of course, hanging off the back of a monitor. Users can connect to the dashboard using a browser from any device and control the servers and nodes easily from it. It also provides KVM-like access to the servers on the Anvil!, allowing them to work on the servers when they can't connect over the network. For this reason, you will probably want to pair up the dashboard machines with a monitor that offers a decent resolution to make it easy to see the desktop of the hosted servers.
What You Should Know Before Beginning
It is assumed that you are familiar with Linux systems administration, specifically Red Hat Enterprise Linux and its derivatives. You will need to have somewhat advanced networking experience as well. You should be comfortable working in a terminal (directly or over ssh). Familiarity with XML will help, but is not terribly required as its use here is pretty self-evident.
If you feel a little out of depth at times, don't hesitate to set this tutorial aside. Browse over to the components you feel the need to study more, then return and continue on. Finally, and perhaps most importantly, you must have patience! If you have a manager asking you to "go live" with a cluster in a month, tell him or her that it simply won't happen. If you rush, you will skip important points and you will fail.
Patience is vastly more important than any pre-existing skill.
A Word on Complexity
Introducing the Fabimer principle:
Clustering is not inherently hard, but it is inherently complex. Consider:
- Any given program has N bugs.
- RHCS uses; cman, corosync, dlm, fenced, rgmanager, and many more smaller apps.
- We will be adding DRBD, GFS2, clvmd, libvirtd and KVM.
- Right there, we have N * 10 possible bugs. We'll call this A.
- A cluster has Y nodes.
- In our case, 2 nodes, each with 3 networks across 6 interfaces bonded into pairs.
- The network infrastructure (Switches, routers, etc). We will be using two managed switches, adding another layer of complexity.
- This gives us another Y * (2*(3*2))+2, the +2 for managed switches. We'll call this B.
- Let's add the human factor. Let's say that a person needs roughly 5 years of cluster experience to be considered an proficient. For each year less than this, add a Z "oops" factor, (5-Z) * 2. We'll call this C.
- So, finally, add up the complexity, using this tutorial's layout, 0-years of experience and managed switches.
- (N * 10) * (Y * (2*(3*2))+2) * ((5-0) * 2) == (A * B * C) == an-unknown-but-big-number.
This isn't meant to scare you away, but it is meant to be a sobering statement. Obviously, those numbers are somewhat artificial, but the point remains.
Any one piece is easy to understand, thus, clustering is inherently easy. However, given the large number of variables, you must really understand all the pieces and how they work together. DO NOT think that you will have this mastered and working in a month. Certainly don't try to sell clusters as a service without a lot of internal testing.
Clustering is kind of like chess. The rules are pretty straight forward, but the complexity can take some time to master.
Overview of Components
When looking at a cluster, there is a tendency to want to dive right into the configuration file. That is not very useful in clustering.
- When you look at the configuration file, it is quite short.
Clustering isn't like most applications or technologies. Most of us learn by taking something such as a configuration file, and tweaking it to see what happens. I tried that with clustering and learned only what it was like to bang my head against the wall.
- Understanding the parts and how they work together is critical.
You will find that the discussion on the components of clustering, and how those components and concepts interact, will be much longer than the initial configuration. It is true that we could talk very briefly about the actual syntax, but it would be a disservice. Please don't rush through the next section, or worse, skip it and go right to the configuration. You will waste far more time than you will save.
- Clustering is easy, but it has a complex web of inter-connectivity. You must grasp this network if you want to be an effective cluster administrator!
Component; Cman
The cman portion of the the cluster is the cluster manager. In the 3.0 series used in EL6, cman acts mainly as a quorum provider. That is, is adds up the votes from the cluster members and decides if there is a simple majority. If there is, the cluster is "quorate" and is allowed to provide cluster services.
The cman service will be used to start and stop all of the components needed to make the cluster operate.
Component; Corosync
Corosync is the heart of the cluster. Almost all other cluster compnents operate though this.
In Red Hat clusters, corosync is configured via the central cluster.conf file. In other cluster stacks, like pacemaker, it can be configured directly in corosync.conf, but given that we will be building an RHCS cluster, this is not used. We will only use cluster.conf. That said, almost all corosync.conf options are available in cluster.conf. This is important to note as you will see references to both configuration files when searching the Internet.
Corosync sends messages using multicast messaging by default. Recently, unicast support has been added, but due to network latency, it is only recommended for use with small clusters of two to four nodes. We will be using multicast in this tutorial.
A Little History
Please see this article for a better discussion on the history of HA:
There were significant changes between RHCS the old version 2 and version 3 available on EL6, which we are using.
In the RHCS version 2, there was a component called openais which provided totem. The OpenAIS project was designed to be the heart of the cluster and was based around the Service Availability Forum's Application Interface Specification. AIS is an open API designed to provide inter-operable high availability services.
In 2008, it was decided that the AIS specification was overkill for most clustered applications being developed in the open source community. At that point, OpenAIS was split in to two projects: Corosync and OpenAIS. The former, Corosync, provides totem, cluster membership, messaging, and basic APIs for use by clustered applications, while the OpenAIS project became an optional add-on to corosync for users who want the full AIS API.
You will see a lot of references to OpenAIS while searching the web for information on clustering. Understanding its evolution will hopefully help you avoid confusion.
The Future of Corosync
In EL6, corosync is version 1.4. Upstream, however, it's passed version 2. One of the major changes in the 2+ version is that corosync becomes a quorum provider, helping to remove the need for cman. If you experiment with clustering on Fedora, for example, you will find that cman is gone entirely.
Concept; Quorum
Quorum is defined as the minimum set of hosts required in order to provide clustered services and is used to prevent split-brain situations.
The quorum algorithm used by the RHCS cluster is called "simple majority quorum", which means that more than half of the hosts must be online and communicating in order to provide service. While simple majority quorum is a very common quorum algorithm, other quorum algorithms exist (grid quorum, YKD Dyanamic Linear Voting, etc.).
The idea behind quorum is that, when a cluster splits into two or more partitions, which ever group of machines has quorum can safely start clustered services knowing that no other lost nodes will try to do the same.
Take this scenario:
- You have a cluster of four nodes, each with one vote.
- The cluster's expected_votes is 4. A clear majority, in this case, is 3 because (4/2)+1, rounded down, is 3.
- Now imagine that there is a failure in the network equipment and one of the nodes disconnects from the rest of the cluster.
- You now have two partitions; One partition contains three machines and the other partition has one.
- The three machines will have quorum, and the other machine will lose quorum.
- The partition with quorum will reconfigure and continue to provide cluster services.
- The partition without quorum will withdraw from the cluster and shut down all cluster services.
When the cluster reconfigures and the partition wins quorum, it will fence the node(s) in the partition without quorum. Once the fencing has been confirmed successful, the partition with quorum will begin accessing clustered resources, like shared filesystems.
This also helps explain why an even 50% is not enough to have quorum, a common question for people new to clustering. Using the above scenario, imagine if the split were 2 and 2 nodes. Because either can't be sure what the other would do, neither can safely proceed. If we allowed an even 50% to have quorum, both partition might try to take over the clustered services and disaster would soon follow.
There is one, and only one except to this rule.
In the case of a two node cluster, as we will be building here, any failure results in a 50/50 split. If we enforced quorum in a two-node cluster, there would never be high availability because and failure would cause both nodes to withdraw. The risk with this exception is that we now place the entire safety of the cluster on fencing, a concept we will cover in a second. Fencing is a second line of defense and something we are loath to rely on alone.
Even in a two-node cluster though, proper quorum can be maintained by using a quorum disk, called a qdisk. Unfortunately, qdisk on a DRBD resource comes with its own problems, so we will not be able to use it here.
Concept; Virtual Synchrony
Many cluster operations, like distributed locking and so on, have to occur in the same order across all nodes. This concept is called "virtual synchrony".
This is provided by corosync using "closed process groups", CPG. A closed process group is simply a private group of processes in a cluster. Within this closed group, all messages between members are ordered. Delivery, however, is not guaranteed. If a member misses messages, it is up to the member's application to decide what action to take.
Let's look at two scenarios showing how locks are handled using CPG:
- The cluster starts up cleanly with two members.
- Both members are able to start service:foo.
- Both want to start it, but need a lock from DLM to do so.
- The an-a05n01 member has its totem token, and sends its request for the lock.
- DLM issues a lock for that service to an-a05n01.
- The an-a05n02 member requests a lock for the same service.
- DLM rejects the lock request.
- The an-a05n01 member successfully starts service:foo and announces this to the CPG members.
- The an-a05n02 sees that service:foo is now running on an-a05n01 and no longer tries to start the service.
- The two members want to write to a common area of the /shared GFS2 partition.
- The an-a05n02 sends a request for a DLM lock against the FS, gets it.
- The an-a05n01 sends a request for the same lock, but DLM sees that a lock is pending and rejects the request.
- The an-a05n02 member finishes altering the file system, announces the changed over CPG and releases the lock.
- The an-a05n01 member updates its view of the filesystem, requests a lock, receives it and proceeds to update the filesystems.
- It completes the changes, annouces the changes over CPG and releases the lock.
Messages can only be sent to the members of the CPG while the node has a totem token from corosync.
Concept; Fencing
| Warning: DO NOT BUILD A CLUSTER WITHOUT PROPER, WORKING AND TESTED FENCING. |

Fencing is a absolutely critical part of clustering. Without fully working fence devices, your cluster will fail.
Sorry, I promise that this will be the only time that I speak so strongly. Fencing really is critical, and explaining the need for fencing is nearly a weekly event.
So then, let's discuss fencing.
When a node stops responding, an internal timeout and counter start ticking away. During this time, no DLM locks are allowed to be issued. Anything using DLM, including rgmanager, clvmd and gfs2, are effectively hung. The hung node is detected using a totem token timeout. That is, if a token is not received from a node within a period of time, it is considered lost and a new token is sent. After a certain number of lost tokens, the cluster declares the node dead. The remaining nodes reconfigure into a new cluster and, if they have quorum (or if quorum is ignored), a fence call against the silent node is made.
The fence daemon will look at the cluster configuration and get the fence devices configured for the dead node. Then, one at a time and in the order that they appear in the configuration, the fence daemon will call those fence devices, via their fence agents, passing to the fence agent any configured arguments like username, password, port number and so on. If the first fence agent returns a failure, the next fence agent will be called. If the second fails, the third will be called, then the forth and so on. Once the last (or perhaps only) fence device fails, the fence daemon will retry again, starting back at the start of the list. It will do this indefinitely until one of the fence devices succeeds.
Here's the flow, in point form:
- The totem token moves around the cluster members. As each member gets the token, it sends sequenced messages to the CPG members.
- The token is passed from one node to the next, in order and continuously during normal operation.
- Suddenly, one node stops responding.
- A timeout starts (~238ms by default), and each time the timeout is hit, and error counter increments and a replacement token is created.
- The silent node responds before the failure counter reaches the limit.
- The failure counter is reset to 0
- The cluster operates normally again.
- Again, one node stops responding.
- Again, the timeout begins. As each totem token times out, a new packet is sent and the error count increments.
- The error counts exceed the limit (4 errors is the default); Roughly one second has passed (238ms * 4 plus some overhead).
- The node is declared dead.
- The cluster checks which members it still has, and if that provides enough votes for quorum.
- If there are too few votes for quorum, the cluster software freezes and the node(s) withdraw from the cluster.
- If there are enough votes for quorum, the silent node is declared dead.
- corosync calls fenced, telling it to fence the node.
- The fenced daemon notifies DLM and locks are blocked.
- Which fence device(s) to use, that is, what fence_agent to call and what arguments to pass, is gathered.
- For each configured fence device:
- The agent is called and fenced waits for the fence_agent to exit.
- The fence_agent's exit code is examined. If it's a success, recovery starts. If it failed, the next configured fence agent is called.
- If all (or the only) configured fence fails, fenced will start over.
- fenced will wait and loop forever until a fence agent succeeds. During this time, the cluster is effectively hung.
- Once a fence_agent succeeds, fenced notifies DLM and lost locks are recovered.
- GFS2 partitions recover using their journal.
- Lost cluster resources are recovered as per rgmanager's configuration (including file system recovery as needed).
- Normal cluster operation is restored, minus the lost node.
This skipped a few key things, but the general flow of logic should be there.
This is why fencing is so important. Without a properly configured and tested fence device or devices, the cluster will never successfully fence and the cluster will remain hung until a human can intervene.
Is "Fencing" the same as STONITH?
Yes.
In the old days, there were two distinct open-source HA clustering stacks. The Linux-HA's project used the term "STONITH", an acronym for "Shoot The Other Node In The Head", for fencing. Red Hat's cluster stack used the term "fencing" for the same concept.
We prefer the term "fencing" because the fundamental goal is to put the target node into a state where it can not effect cluster resources or provide clustered services. This can be accomplished by powering it off, called "power fencing", or by disconnecting it from SAN storage and/or network, a process called "fabric fencing".
The term "STONITH", based on its acronym, implies power fencing. This is not a big deal, but it is the reason this tutorial sticks with the term "fencing".
Component; Totem
The totem protocol defines message passing within the cluster and it is used by corosync. A token is passed around all the nodes in the cluster, and nodes can only send messages while they have the token. A node will keep its messages in memory until it gets the token back with no "not ack" messages. This way, if a node missed a message, it can request it be resent when it gets its token. If a node isn't up, it will simply miss the messages.
The totem protocol supports something called 'rrp', Redundant Ring Protocol. Through rrp, you can add a second backup ring on a separate network to take over in the event of a failure in the first ring. In RHCS, these rings are known as "ring 0" and "ring 1". The RRP is being re-introduced in RHCS version 3. Its use is experimental and should only be used with plenty of testing.
Component; Rgmanager
When the cluster membership changes, corosync tells the rgmanager that it needs to recheck its services. It will examine what changed and then will start, stop, migrate or recover cluster resources as needed.
Within rgmanager, one or more resources are brought together as a service. This service is then optionally assigned to a failover domain, an subset of nodes that can have preferential ordering.
The rgmanager daemon runs separately from the cluster manager, cman. This means that, to fully start the cluster, we need to start both cman and then rgmanager.
What about Pacemaker?
Pacemaker is also a resource manager, like rgmanager. You can not use both in the same cluster.
Back prior to 2008, there were two distinct open-source cluster projects:
- Red Hat's Cluster Service
- Linux-HA's Heartbeat
Pacemaker was born out of the Linux-HA project as an advanced resource manager that could use either heartbeat or openais for cluster membership and communication. Unlike RHCS and heartbeat, its sole focus was resource management.
In 2008, plans were made to begin the slow process of merging the two independent stacks into one. As mentioned in the corosync overview, it replaced openais and became the default cluster membership and communication layer for both RHCS and Pacemaker. Development of heartbeat was ended, though Linbit continues to maintain the heartbeat code to this day.
The fence and resource agents, software that acts as a glue between the cluster and the devices and resource they manage, were merged next. You can now use the same set of agents on both pacemaker and RHCS.
Red Hat introduced pacemaker as "Tech Preview" in RHEL 6.0. It has been available beside RHCS ever since, though support is not offered yet*.
| Note: Pacemaker entered full support with the release of RHEL 6.5. It is also the only available HA stack on RHEL 7 beta. This is a strong indication that, indeed, corosync and pacemaker will be the future HA stack on RHEL. |
Red Hat has a strict policy of not saying what will happen in the future. That said, the speculation is that Pacemaker will become supported soon and will replace rgmanager entirely in RHEL 7, given that cman and rgmanager no longer exist upstream in Fedora.
So why don't we use pacemaker here?
We believe that, no matter how promising software looks, stability is king. Pacemaker on other distributions has been stable and supported for a long time. However, on RHEL, it's a recent addition and the developers have been doing a tremendous amount of work on pacemaker and associated tools. For this reason, we feel that on RHEL 6, pacemaker is too much of a moving target at this time. That said, we do intend to switch to pacemaker some time in the next year or two, depending on how the Red Hat stack evolves.
Component; Qdisk
| Note: qdisk does not work reliably on a DRBD resource, so we will not be using it in this tutorial. |
A Quorum disk, known as a qdisk is small partition on SAN storage used to enhance quorum. It generally carries enough votes to allow even a single node to take quorum during a cluster partition. It does this by using configured heuristics, that is custom tests, to decided which node or partition is best suited for providing clustered services during a cluster reconfiguration. These heuristics can be simple, like testing which partition has access to a given router, or they can be as complex as the administrator wishes using custom scripts.
Though we won't be using it here, it is well worth knowing about when you move to a cluster with SAN storage.
Component; DRBD
DRBD; Distributed Replicating Block Device, is a technology that takes raw storage from two nodes and keeps their data synchronized in real time. It is sometimes described as "network RAID Level 1", and that is conceptually accurate. In this tutorial's cluster, DRBD will be used to provide that back-end storage as a cost-effective alternative to a traditional SAN device.
DRBD is, fundamentally, a raw block device. If you've ever used mdadm to create a software RAID array, then you will be familiar with this.
Think of it this way;
With traditional software raid, you would take:
- /dev/sda5 + /dev/sdb5 -> /dev/md0
With DRBD, you have this:
- node1:/dev/sda5 + node2:/dev/sda5 -> both:/dev/drbd0
In both cases, as soon as you create the new md0 or drbd0 device, you pretend like the member devices no longer exist. You format a filesystem onto /dev/md0, use /dev/drbd0 as an LVM physical volume, and so on.
The main difference with DRBD is that the /dev/drbd0 will always be the same on both nodes. If you write something to node 1, it's instantly available on node 2, and vice versa. Of course, this means that what ever you put on top of DRBD has to be "cluster aware". That is to say, the program or file system using the new /dev/drbd0 device has to understand that the contents of the disk might change because of another node.
Component; DLM
One of the major roles of a cluster is to provide distributed locking for clustered storage and resource management.
Whenever a resource, GFS2 filesystem or clustered LVM LV needs a lock, it sends a request to dlm_controld which runs in userspace. This communicates with DLM in kernel. If the lockspace does not yet exist, DLM will create it and then give the lock to the requester. Should a subsequant lock request come in for the same lockspace, it will be rejected. Once the application using the lock is finished with it, it will release the lock. After this, another node may request and receive a lock for the lockspace.
If a node fails, fenced will alert dlm_controld that a fence is pending and new lock requests will block. After a successful fence, fenced will alert DLM that the node is gone and any locks the victim node held are released. At this time, other nodes may request a lock on the lockspaces the lost node held and can perform recovery, like replaying a GFS2 filesystem journal, prior to resuming normal operation.
Note that DLM locks are not used for actually locking the file system. That job is still handled by plock() calls (POSIX locks).
Component; Clustered LVM
With DRBD providing the raw storage for the cluster, we must next consider partitions. This is where Clustered LVM, known as CLVM, comes into play.
CLVM is ideal in that by using DLM, the distributed lock manager. It won't allow access to cluster members outside of corosync's closed process group, which, in turn, requires quorum.
It is ideal because it can take one or more raw devices, known as "physical volumes", or simple as PVs, and combine their raw space into one or more "volume groups", known as VGs. These volume groups then act just like a typical hard drive and can be "partitioned" into one or more "logical volumes", known as LVs. These LVs are where KVM's virtual machine guests will exist and where we will create our GFS2 clustered file system.
LVM is particularly attractive because of how flexible it is. We can easily add new physical volumes later, and then grow an existing volume group to use the new space. This new space can then be given to existing logical volumes, or entirely new logical volumes can be created. This can all be done while the cluster is online offering an upgrade path with no down time.
Component; GFS2
With DRBD providing the clusters raw storage space, and Clustered LVM providing the logical partitions, we can now look at the clustered file system. This is the role of the Global File System version 2, known simply as GFS2.
It works much like standard filesystem, with user-land tools like mkfs.gfs2, fsck.gfs2 and so on. The major difference is that it and clvmd use the cluster's distributed locking mechanism provided by the dlm_controld daemon. Once formatted, the GFS2-formatted partition can be mounted and used by any node in the cluster's closed process group. All nodes can then safely read from and write to the data on the partition simultaneously.
| Note: GFS2 is only supported when run on top of Clustered LVM LVs. This is because, in certain error states, gfs2_controld will call dmsetup to disconnect the GFS2 partition from its storage in certain failure states. |
Component; KVM
Two of the most popular open-source virtualization platforms available in the Linux world today and Xen and KVM. The former is maintained by Citrix and the other by Redhat. It would be difficult to say which is "better", as they're both very good. Xen can be argued to be more mature where KVM is the "official" solution supported by Red Hat in EL6.
We will be using the KVM hypervisor within which our highly-available virtual machine guests will reside. It is a type-1 hypervisor, which means that the host operating system runs directly on the bare hardware. Contrasted against Xen, which is a type-2 hypervisor where even the installed OS is itself just another virtual machine.
Node Installation
We need a baseline, a minimum system requirement of sorts. I will refer fairly frequently to the specific setup I used. Please don't take this as "the ideal setup" though... Every cluster will have its own needs, and you should plan and purchase for your particular needs.
Node Host Names
Before we begin, let
We need to decide what naming convention and IP ranges to use for our nodes and their networks.
The IP addresses and subnets you decide to use are completely up to you. The host names though need to follow a certain standard, if you wish to use the Striker dashboard, as we will do here. Specifically, the node names on your nodes must end in n01 for node #1 and n02 for node #2. The reason for this will be discussed later.
The node host name convention that we've created is this:
- xx-cYYn0{1,2}
- xx is a two or three letter prefix used to denote the company, group or person who owns the Anvil!
- cYY is a simple zero-padded sequence number number.
- n0{1,2} indicated the node in the cluster.
In this tutorial, the Anvil! is owned and operated by "Alteeve's Niche!", so the prefix "an" is used. This is the fifth cluster we've got, so the cluster name is an-anvil-05, so the host name's cluster number is c05. Thus, node #1 is named an-a05n01 and node #2 is named an-a05n02.
As we have three distinct networks, we have three network-specific suffixes we apply to these host names which we will map to subnets in /etc/hosts later.
- <hostname>.bcn; Back-Channel Network host name.
- <hostname>.sn; Storage Network hostname.
- <hostname>.ifn; Internet-Facing Network host name.
Again, what you use is entirely up to you. Just remember that the node's host name must end in n01 and n02 for Striker to work.
Foundation Pack Host Names
The foundation pack devices, switches, PDUs and UPSes, can support multiple Anvil! platforms. Likewise, the dashboard servers support multiple Anvil!s as well. For this reason, the cXX portion of the host name does not make sense when choosing host names for these devices.
As always, you are free to choose host names that make sense to you. For this tutorial, the following host names are used;
| Device | Host name | Examples | Note |
|---|---|---|---|
| Network Switches | xx-sYY |
|
The xx prefix is the owner's prefix and YY is a simple sequence number. |
| Switched PDUs | xx-pYY |
|
The xx prefix is the owner's prefix and YY is a simple sequence number. |
| Network Managed UPSes | xx-uYY |
|
The xx prefix is the owner's prefix and YY is a simple sequence number. |
| Dashboard Servers | xx-mYY |
|
The xx prefix is the owner's prefix and YY is a simple sequence number. Note that the m letter was chosen for historical reasons. The dashboard used to be called "monitoring servers". For consistency with existing dashboards, m has remained. Note also that the dashboards will connect to both the BCN and SN, so like the nodes, host names with the .bcn and .ifn suffixes will be used. |
OS Installation
| Warning: EL6.1 shipped with a version of corosync that had a token retransmit bug. On slower systems, there would be a form of race condition which would cause totem tokens the be retransmitted and cause significant performance problems. This has been resolved in EL6.2 so please be sure to upgrade. |
Beyond being based on RHEL 6, there are no requirements for how the operating system is installed. This tutorial is written using "minimal" installs, and as such, installation instructions will be provided that will install all needed packages if they aren't already installed on your nodes.
Network Security Considerations
When building production clusters, you will want to consider two options with regard to network security.
First, the interfaces connected to an untrusted network, like the Internet, should not have an IP address, though the interfaces themselves will need to be up so that virtual machines can route through them to the outside world. Alternatively, anything inbound from the virtual machines or inbound from the untrusted network should be DROPed by the firewall.
Second, if you can not run the cluster communications or storage traffic on dedicated network connections over isolated subnets, you will need to configure the firewall to block everything except the ports needed by storage and cluster traffic.
| Note: As of EL6.2, you can now use unicast for totem communication instead of multicast. This is not advised, and should only be used for clusters of two or three nodes on networks where unresolvable multicast issues exist. If using gfs2, as we do here, using unicast for totem is strongly discouraged. |
SELinux Considerations
There are two important changes needed to make our Anvil! work with SELinux. Both are presented in this tutorial when they're first needed. If you do not plan to follow this tutorial linearly, please be sure to read:
Network
Before we begin, let's take a look at a block diagram of what we're going to build. This will help when trying to see what we'll be talking about.
A Map!
Nodes \_/
____________________________________________________________________________ _____|____ ____________________________________________________________________________
| an-a05n01.alteeve.ca | /--------{_Internet_}---------\ | an-a05n02.alteeve.ca |
| Network: | | | | Network: |
| _________________ _____________________| | _________________________ | |_____________________ _________________ |
| Servers: | ifn_bridge1 |---| ifn_bond1 | | | an-switch01 Switch 1 | | | ifn_bond1 |---| ifn_bridge1 | Servers: |
| _______________________ | 10.255.50.1 | | ____________________| | |____ Internet-Facing ____| | |____________________ | | 10.255.50.2 | ......................... |
| | [ vm01-win2008 ] | |_________________| || ifn_link1 =----=_01_] Network [_02_=----= ifn_link1 || |_________________| : [ vm01-win2008 ] : |
| | ____________________| | : | | : : | | || 00:1B:21:81:C3:34 || | |____________________[_24_=-/ || 00:1B:21:81:C2:EA || : : | | : : | : :____________________ : |
| | | NIC 1 =----/ : | | : : | | ||___________________|| | | an-switch02 Switch 2 | ||___________________|| : : | | : : | :----= NIC 1 | : |
| | | 10.255.1.1 || : | | : : | | | ____________________| | |____ ____| |____________________ | : : | | : : | :| 10.255.1.1 | : |
| | | ..:..:..:..:..:.. || : | | : : | | || ifn_link2 =----=_01_] VLAN ID 300 [_02_=----= ifn_link2 || : : | | : : | :| ..:..:..:..:..:.. | : |
| | |___________________|| : | | : : | | || A0:36:9F:02:E0:05 || | |____________________[_24_=-\ || A0:36:9F:07:D6:2F || : : | | : : | :|___________________| : |
| | ____ | : | | : : | | ||___________________|| | | ||___________________|| : : | | : : | : ____ : |
| /--=--[_c:_] | : | | : : | | |_____________________| \-----------------------------/ |_____________________| : : | | : : | : [_c:_]--=--\ |
| | |_______________________| : | | : : | | _____________________| |_____________________ : : | | : : | :.......................: | |
| | : | | : : | | | sn_bond1 | _________________________ | sn_bond1 | : : | | : : | | |
| | ......................... : | | : : | | | 10.10.50.1 | | an-switch01 Switch 1 | | 10.10.50.2 | : : | | : : | _______________________ | |
| | : [ vm02-win2012 ] : : | | : : | | | ____________________| |____ Storage ____| |____________________ | : : | | : : | | [ vm02-win2012 ] | | |
| | : ____________________: : | | : : | | || sn_link1 =----=_09_] Network [_10_=----= sn_link1 || : : | | : : | |____________________ | | |
| | : | NIC 1 =---: | | : : | | || 00:19:99:9C:9B:9F || |_________________________| || 00:19:99:9C:A0:6D || : : | | : : \---= NIC 1 | | | |
| | : | 10.255.1.2 |: | | : : | | ||___________________|| | an-switch02 Switch 2 | ||___________________|| : : | | : : || 10.255.1.2 | | | |
| | : | ..:..:..:..:..:.. |: | | : : | | | ____________________| |____ ____| |____________________ | : : | | : : || ..:..:..:..:..:.. | | | |
| | : |___________________|: | | : : | | || sn_link2 =----=_09_] VLAN ID 200 [_10_=----= sn_link2 || : : | | : : ||___________________| | | |
| | : ____ : | | : : | | || A0:36:9F:02:E0:04 || |_________________________| || A0:36:9F:07:D6:2E || : : | | : : | ____ | | |
| | /--=--[_c:_] : | | : : | | ||___________________|| ||___________________|| : : | | : : | [_c:_]--=--\ | |
| | | :.......................: | | : : | | /--|_____________________| |_____________________|--\ : : | | : : |_______________________| | | |
| | | | | : : | | | _____________________| |_____________________ | : : | | : : | | |
| | | _______________________ | | : : | | | | bcn_bond1 | _________________________ | bcn_bond1 | | : : | | : : ......................... | | |
| | | | [ vm03-win7 ] | | | : : | | | | 10.20.50.1 | | an-switch01 Switch 1 | | 10.20.50.2 | | : : | | : : : [ vm02-win2012 ] : | | |
| | | | ____________________| | | : : | | | | ____________________| |____ Back-Channel ____| |____________________ | | : : | | : : :____________________ : | | |
| | | | | NIC 1 =-----/ | : : | | | || bcn_link1 =----=_13_] Network [_14_=----= bcn_link1 || | : : | | : :-----= NIC 1 | : | | |
| | | | | 10.255.1.3 || | : : | | | || 00:19:99:9C:9B:9E || |_________________________| || 00:19:99:9C:A0:6C || | : : | | : :| 10.255.1.3 | : | | |
| | | | | ..:..:..:..:..:.. || | : : | | | ||___________________|| | an-switch02 Switch 2 | ||___________________|| | : : | | : :| ..:..:..:..:..:.. | : | | |
| | | | |___________________|| | : : | | | || bcn_link2 =----=_13_] VLAN ID 100 [_14_=----= bcn_link2 || | : : | | : :|___________________| : | | |
| | | | ____ | | : : | | | || 00:1B:21:81:C3:35 || |_________________________| || 00:1B:21:81:C2:EB || | : : | | : : ____ : | | |
| +--|-=--[_c:_] | | : : | | | ||___________________|| ||___________________|| | : : | | : : [_c:_]--=--|--+ |
| | | |_______________________| | : : | | | |_____________________| |_____________________| | : : | | : :.......................: | | |
| | | | : : | | | | | | : : | | : | | |
| | | _______________________ | : : | | | | | | : : | | : ......................... | | |
| | | | [ vm04-win8 ] | | : : | | \ | | / : : | | : : [ vm04-win8 ] : | | |
| | | | ____________________| | : : | | \ | | / : : | | : :____________________ : | | |
| | | | | NIC 1 =-------/ : : | | | | | | : : | | :-------= NIC 1 | : | | |
| | | | | 10.255.1.4 || : : | | | | | | : : | | :| 10.255.1.4 | : | | |
| | | | | ..:..:..:..:..:.. || : : | | | | | | : : | | :| ..:..:..:..:..:.. | : | | |
| | | | |___________________|| : : | | | | | | : : | | :|___________________| : | | |
| | | | ____ | : : | | | | | | : : | | : ____ : | | |
| +--|-=--[_c:_] | : : | | | | | | : : | | : [_c:_]--=--|--+ |
| | | |_______________________| : : | | | | | | : : | | :.......................: | | |
| | | : : | | | | | | : : | | | | |
| | | ......................... : : | | | | | | : : | | _______________________ | | |
| | | : [ vm05-freebsd9 ] : : : | | | | | | : : | | | [ vm05-freebsd9 ] | | | |
| | | : ____________________: : : | | | | | | : : | | |____________________ | | | |
| | | : | em0 =---------: : | | | | | | : : | \---------= em0 | | | | |
| | | : | 10.255.1.5 |: : | | | | | | : : | || 10.255.1.5 | | | | |
| | | : | ..:..:..:..:..:.. |: : | | | | | | : : | || ..:..:..:..:..:.. | | | | |
| | | : |___________________|: : | | | | | | : : | ||___________________| | | | |
| | | : ______ : : | | | | | | : : | | ______ | | | |
| | +--=--[_ada0_] : : | | | | | | : : | | [_ada0_]--=--+ | |
| | | :.......................: : | | | | | | : : | |_______________________| | | |
| | | : | | | | | | : : | | | |
| | | ......................... : | | | | | | : : | _______________________ | | |
| | | : [ vm06-solaris11 ] : : | | | | | | : : | | [ vm06-solaris11 ] | | | |
| | | : ____________________: : | | | | | | : : | |____________________ | | | |
| | | : | net0 =-----------: | | | | | | : : \-----------= net0 | | | | |
| | | : | 10.255.1.6 |: | | | | | | : : || 10.255.1.6 | | | | |
| | | : | ..:..:..:..:..:.. |: | | | | | | : : || ..:..:..:..:..:.. | | | | |
| | | : |___________________|: | | | | | | : : ||___________________| | | | |
| | | : ______ : | | | | | | : : | ______ | | | |
| | +--=--[_c3d0_] : | | | | | | : : | [_c3d0_]--=--+ | |
| | | :.......................: | | | | | | : : |_______________________| | | |
| | | | | | | | | : : | | |
| | | _______________________ | | | | | | : : ......................... | | |
| | | | [ vm07-rhel6 ] | | | | | | | : : : [ vm07-rhel6 ] : | | |
| | | | ____________________| | | | | | | : : :____________________ : | | |
| | | | | eth0 =-------------/ | | | | | : :-------------= eth0 | : | | |
| | | | | 10.255.1.7 || | | | | | : :| 10.255.1.7 | : | | |
| | | | | ..:..:..:..:..:.. || | | | | | : :| ..:..:..:..:..:.. | : | | |
| | | | |___________________|| | | | | | : :|___________________| : | | |
| | | | _____ | | | | | | : : _____ : | | |
| +--|--=--[_vda_] | | | | | | : : [_vda_]--=--|--+ |
| | | |_______________________| | | | | | : :.......................: | | |
| | | | | | | | : | | |
| | | _______________________ | | | | | : ......................... | | |
| | | | [ vm08-sles11 ] | | | | | | : : [ vm08-sles11 ] : | | |
| | | | ____________________| | | | | | : :____________________ : | | |
| | | | | eth0 =---------------/ | | | | :---------------= eth0 | : | | |
| | | | | 10.255.1.8 || | | | | :| 10.255.1.8 | : | | |
| | | | | ..:..:..:..:..:.. || | | | | :| ..:..:..:..:..:.. | : | | |
| | | | |___________________|| | | | | :|___________________| : | | |
| | | | _____ | | | | | : _____ : | | |
| +--|--=--[_vda_] | | | | | : [_vda_]--=--|--+ |
| | | |_______________________| | | | | :.......................: | | |
| | | | | | | | | |
| | | | | | | | | |
| | | | | | | | | |
| | | Storage: | | | | Storage: | | |
| | | __________ | | | | __________ | | |
| | | [_/dev/sda_] | | | | [_/dev/sda_] | | |
| | | | ___________ _______ | | | | _______ ___________ | | | |
| | | +--[_/dev/sda1_]--[_/boot_] | | | | [_/boot_]--[_/dev/sda1_]--+ | | |
| | | | ___________ ________ | | | | ________ ___________ | | | |
| | | +--[_/dev/sda2_]--[_<swap>_] | | | | [_<swap>_]--[_/dev/sda2_]--+ | | |
| | | | ___________ ___ | | | | ___ ___________ | | | |
| | | +--[_/dev/sda3_]--[_/_] | | | | [_/_]--[_/dev/sda3_]--+ | | |
| | | | ___________ ____ ____________ | | | | ____________ ____ ___________ | | | |
| | | +--[_/dev/sda5_]--[_r0_]--[_/dev/drbd0_]--+ | | +--[_/dev/drbd0_]--[_r0_]--[_/dev/sda5_]--+ | | |
| | | | | | | | | | | | | |
| | | | \----|--\ | | /--|----/ | | | |
| | | | ___________ ____ ____________ | | | | | | ____________ ____ ___________ | | | |
| | | \--[_/dev/sda6_]--[_r1_]--[_/dev/drbd1_]--/ | | | | \--[_/dev/drbd1_]--[_r1_]--[_/dev/sda6_]--/ | | |
| | | | | | | | | | | |
| | | Clustered LVM: | | | | | | Clustered LVM: | | |
| | | _________________________________ | | | | | | _________________________________ | | |
| | +--[_/dev/an-a05n01_vg0/vm02-win2012_]-----+ | | | | +--[_/dev/an-a05n01_vg0/vm02-win2012_]-----+ | |
| | | __________________________________ | | | | | | __________________________________ | | |
| | +--[_/dev/an-a05n01_vg0/vm05-freebsd9_]----+ | | | | +--[_/dev/an-a05n01_vg0/vm05-freebsd9_]----+ | |
| | | ___________________________________ | | | | | | ___________________________________ | | |
| | \--[_/dev/an-a05n01_vg0/vm06-solaris11_]---/ | | | | \--[_/dev/an-a05n01_vg0/vm06-solaris11_]---/ | |
| | | | | | | |
| | _________________________________ | | | | _________________________________ | |
| +-----[_/dev/an-a05n02_vg0/vm01-win2008_]-------------+ | | +----------[_/dev/an-a05n02_vg0/vm01-win2008_]--------+ |
| | ______________________________ | | | | ______________________________ | |
| +-----[_/dev/an-a05n02_vg0/vm03-win7_]----------------+ | | +----------[_/dev/an-a05n02_vg0/vm03-win7_]-----------+ |
| | ______________________________ | | | | ______________________________ | |
| +-----[_/dev/an-a05n02_vg0/vm04-win8_]----------------+ | | +----------[_/dev/an-a05n02_vg0/vm04-win8_]-----------+ |
| | _______________________________ | | | | _______________________________ | |
| +-----[_/dev/an-a05n02_vg0/vm07-rhel6_]---------------+ | | +----------[_/dev/an-a05n02_vg0/vm07-rhel6_]----------+ |
| | ________________________________ | | | | ________________________________ | |
| \-----[_/dev/an-a05n02_vg0/vm08-sles11_]--------------+ | | +----------[_/dev/an-a05n02_vg0/vm08-sles11_]---------/ |
| ___________________________ | | | | ___________________________ |
| /--[_/dev/an-a05n01_vg0/shared_]-------------------/ | | \----------[_/dev/an-a05n01_vg0/shared_]--\ |
| | _________ | _________________________ | ________ | |
| \--[_/shared_] | | an-switch01 Switch 1 | | [_shared_]--/ |
| ____________________| |____ Back-Channel ____| |____________________ |
| | IPMI =----=_03_] Network [_04_=----= IPMI | |
| | 10.20.51.1 || |_________________________| || 10.20.51.2 | |
| _________ _____ | 00:19:99:9A:D8:E8 || | an-switch02 Switch 2 | || 00:19:99:9A:B1:78 | _____ _________ |
| {_sensors_}--[_BMC_]--|___________________|| | | ||___________________|--[_BMC_]--{_sensors_} |
| ______ ______ | | VLAN ID 100 | | ______ ______ |
| | PSU1 | PSU2 | | |____ ____ ____ ____| | | PSU1 | PSU2 | |
|____________________________________________________________|______|______|_| |_03_]_[_07_]_[_08_]_[_04_| |_|______|______|____________________________________________________________|
|| || | | | | || ||
/---------------------------||-||-------------|------/ \-------|-------------||-||---------------------------\
| || || | | || || |
_______________|___ || || __________|________ ________|__________ || || ___|_______________
| UPS 1 | || || | PDU 1 | | PDU 2 | || || | UPS 2 |
| an-ups01 | || || | an-pdu01 | | an-pdu02 | || || | an-ups02 |
_______ | 10.20.3.1 | || || | 10.20.2.1 | | 10.20.2.2 | || || | 10.20.3.1 | _______
{_Mains_}==| 00:C0:B7:58:3A:5A |=======================||=||==| 00:C0:B7:56:2D:AC | | 00:C0:B7:59:55:7C |==||=||=======================| 00:C0:B7:C8:1C:B4 |=={_Mains_}
|___________________| || || |___________________| |___________________| || || |___________________|
|| || || || || || || ||
|| \\===[ Port 1 ]====// || || \\====[ Port 2 ]===// ||
\\======[ Port 1 ]=======||=====// ||
\\==============[ Port 2 ]======//

Subnets
The cluster will use three separate /16 (255.255.0.0) networks;
| Note: There are situations where it is not possible to add additional network cards, blades being a prime example. In these cases it will be up to the admin to decide how to proceed. If there is sufficient bandwidth, you can merge all networks, but it is advised in such cases to isolate IFN traffic from the SN/BCN traffic using VLANs. |
If you plan to have two or more Anvil! platforms on the same network, then it is recommended that you use the third octet of the IP addresses to identify the cluster. We've found the following works well:
- Third octet is the cluster ID times 10
- Fourth octet is the node ID.
In our case, we're building our fifth cluster, so node #1 will always have the final part of its IP be x.y.50.1 and node #2 will always have the final part of its IP be x.y.50.2.
| Purpose | Subnet | Notes |
|---|---|---|
| Internet-Facing Network (IFN) | 10.255.50.0/16 |
|
| Storage Network (SN) | 10.10.50.x/16 |
|
| Back-Channel Network (BCN) | 10.20.50.0/16 |
|
We will be using six interfaces, bonded into three pairs of two NICs in Active/Passive (mode=1) configuration. Each link of each bond will be on alternate switches. We will also configure affinity by specifying interfaces bcn_link1, sn_link1 and ifn_link1 as primary for the bcn_bond1, sn_bond1 and ifn_bond1 interfaces, respectively. This way, when everything is working fine, all traffic is routed through the same switch for maximum performance.
| Note: Red Hat supports bonding modes 0 and 2 as of RHEL 6.4. We do not recommend these bonding modes as we've found the most reliable and consistent ability to survive switch failure and recovery with mode 1 only. If you wish to use a different bonding more, please be sure to test various failure modes extensively! |
If you can not install six interfaces in your server, then four interfaces will do with the SN and BCN networks merged.
| Warning: If you wish to merge the SN and BCN onto one interface, test to ensure that the storage traffic will not block cluster communication. Test by forming your cluster and then pushing your storage to maximum read and write performance for an extended period of time (minimum of several seconds). If the cluster partitions, you will need to do some advanced quality-of-service or other network configuration to ensure reliable delivery of cluster network traffic. |

In this tutorial, we will use two Brocade ICX6610 switches, stacked.
- Brocade ICX6610 stack switch configuration.
We will be using three VLANs to isolate the three networks:
- BCN will have VLAN ID of 100.
- SN will have VLAN ID number 200.
- IFN will have VLAN ID number 300.
- All other unassigned ports will be in the default VLAN ID of 1, effectively disabling those ports.
The actual mapping of interfaces to bonds to networks will be:
| Subnet | Cable Colour | VLAN ID | Link 1 | Link 2 | Bond | IP |
|---|---|---|---|---|---|---|
| BCN | White | 100 | bcn_link1 | bcn_link2 | bcn_bond1 | 10.20.x.y/16 |
| SN | Green | 200 | sn_link1 | sn_link2 | sn_bond1 | 10.10.x.y/16 |
| IFN | Black | 300 | ifn_link1 | ifn_link2 | ifn_bond1 | 10.255.x.y/16 |
A Note on STP
Spanning Tree Protocol, STP, is a protocol used for detecting and protecting against switch loops. Without it, if both ends of the same cable plugged into the same switch or VLAN, or if two cables run between the same pair of switches, a broadcast storm could cause the switches to hang and traffic would stop routing.
The problem with STP in HA clusters though is that the attempt to detect loops requires blocking all other traffic for a short time. Though this is short, it is usually long enough to cause corosync to think that the peer node has failed, triggering a fence action.
For this reason, we need to disable STP, either globally or at least on the ports used by corosync and drbd. How you actually do this will depend on the make and model of switch you have.
With STP disabled, at least partially, the onus does fall on you to ensure that no one causes a switch loop. Please be sure to inform anyone who might plug things into the cluster's switches about this issue. Ensure that people are careful about what they plug into the switches and that new connections will not trigger a loop.
Setting Up the Network
| Warning: The following steps can easily get confusing, given how many files we need to edit. Losing access to your server's network is a very real possibility! Do not continue without direct access to your servers! If you have out-of-band access via iKVM, console redirection or similar, be sure to test that it is working before proceeding. |
Planning The Use of Physical Interfaces
In production clusters, I generally intentionally get three separate dual-port controllers (two on-board interfaces plus two separate dual-port PCIe cards). I then ensure that no bond uses two interfaces on the same physical board. Thus, should a card or its bus interface fail, none of the bonds will fail completely.
Lets take a look at an example layout;
_________________________
| [ an-a05n01 ] |
| ________________| ___________
| | ___________| | bcn_bond1 |
| | O | bcn_link1 =-----------=---.-------=------{
| | n |__________|| /--------=--/ |
| | b | | |___________|
| | o ___________| | ___________
| | a | sn_link1 =--|--\ | sn_bond1 |
| | r |__________|| | \----=--.--------=------{
| | d | | /-----=--/ |
| |________________| | | |___________|
| ________________| | | ___________
| | ___________| | | | ifn_bond1 |
| | P | ifn_link1 =--|--|-----=---.-------=------{
| | C |__________|| | | /--=--/ |
| | I | | | | |___________|
| | e ___________| | | |
| | | bcn_link2 =--/ | |
| | 1 |__________|| | |
| |________________| | |
| ________________| | |
| | ___________| | |
| | P | sn_link2 =-----/ |
| | C |__________|| |
| | I | |
| | e ___________| |
| | | ifn_link2 =--------/
| | 2 |__________||
| |________________|
|_________________________|
Consider the possible failure scenarios:
- The on-board controllers fail;
- bcn_bond1 falls back onto bcn_link2 on the PCIe 1 controller.
- sn_bond1 falls back onto sn_link2 on the PCIe 2 controller.
- ifn_bond1 is unaffected.
- The PCIe #1 controller fails
- bcn_bond1 remains on bcn_link1 interface but losses its redundancy as bcn_link2 is down.
- sn_bond1 is unaffected.
- ifn_bond1 falls back onto ifn_link2 on the PCIe 2 controller.
- The PCIe #2 controller fails
- bcn_bond1 is unaffected.
- sn_bond1 remains on sn_link1 interface but losses its redundancy as sn_link2 is down.
- ifn_bond1 remains on ifn_link1 interface but losses its redundancy as ifn_link2 is down.
In all three failure scenarios, no network interruption occurs making for the most robust configuration possible.
Connecting Fence Devices
As we will see soon, each node can be fenced either by calling its IPMI interface or by calling the PDU and cutting the node's power. Each of these methods are inherently single points of failure as each has only one network connection. To work around this concern, we will connect all IPMI interfaces to one switch and the PDUs to the secondary switch. This way, should a switch fail, only one of the two fence devices will fail and fencing in general will still be possible via the alternate fence device.
By convention, we always connect the IPMI interfaces to the primary switch and the PDUs to the second switch.
Let's Build!
We're going to need to install a bunch of programs, and one of those programs is needed before we can reconfigure the network. The bridge-utils has to be installed right away, so now is a good time to just install everything we need.
Why so Much Duplication of Commands?
Most, but not all, commands will be issues equally on both nodes. At least up until we start configuring the cluster. To make it clear what to run on which node, all commands are defined either beside or under the node name on which to run the command.
This does lead to a lot of duplication, but it's important to make sure it is clear when some command runs only on one node or the other. So please be careful, particularly later on, that you don't accidentally run a command on the wrong node.
Red Hat Enterprise Linux Specific Steps
Red Hat's Enterprise Linux is a commercial operating system that includes access to their repositories. This requires purchasing entitlements and then registering machines with their Red Hat Network.
This tutorial uses GFS2, which is provided by their Resilient Storage Add-On. The includes the High-Availability Add-On which provides the rest of the HA cluster stack.
Once you've finished your install, you can quickly register your node with RHN and add the resilient storage add-on with the following two commands.
| Note: You need to replace $user and $pass with your RHN account details. |
| an-a05n01 | rhnreg_ks --username "$user" --password "$pass" --force --profilename "an-a05n01.alteeve.ca"
rhn-channel --add --user "$user" --password "$pass" --channel=rhel-x86_64-server-rs-6
rhn-channel --add --user "$user" --password "$pass" --channel=rhel-x86_64-server-optional-6
|
|---|---|
| an-a05n02 | rhnreg_ks --username "$user" --password "$pass" --force --profilename "an-a05n02.alteeve.ca"
rhn-channel --add --user "$user" --password "$pass" --channel=rhel-x86_64-server-rs-6
rhn-channel --add --user "$user" --password "$pass" --channel=rhel-x86_64-server-optional-6
|
If you get any errors from the above commands, please contact your support representative. They will be able to help sort out any account or entitlement issues.
Add the Alteeve's Niche! Repo
We've created a repository with additional RPMs needed to use some of the Anvil! tools If you want to maintain complete Red Hat compatibility, you can skip this.
| Note: If you skip this step, the Anvil! itself will operate perfectly fine, but the Striker dashboard and some additional tools provided by Alteeve will not work. |
Download the yum repository configuration file and the GPG key.
| an-a05n01 | curl https://alteeve.ca/an-repo/el6/an-el6.repo > /etc/yum.repos.d/an-el6.repo
% Total % Received % Xferd Average Speed Time Time Time Current
Dload Upload Total Spent Left Speed
124 249 124 249 0 0 1249 0 --:--:-- --:--:-- --:--:-- 17785
curl https://alteeve.ca/an-repo/el6/Alteeves_Niche_Inc-GPG-KEY > /etc/pki/rpm-gpg/Alteeves_Niche_Inc-GPG-KEY
% Total % Received % Xferd Average Speed Time Time Time Current
Dload Upload Total Spent Left Speed
100 3117 100 3117 0 0 12926 0 --:--:-- --:--:-- --:--:-- 179k
|
|---|---|
| an-a05n02 | curl https://alteeve.ca/an-repo/el6/an-el6.repo > /etc/yum.repos.d/an-el6.repo
% Total % Received % Xferd Average Speed Time Time Time Current
Dload Upload Total Spent Left Speed
124 249 124 249 0 0 822 0 --:--:-- --:--:-- --:--:-- 16600
curl https://alteeve.ca/an-repo/el6/Alteeves_Niche_Inc-GPG-KEY > /etc/pki/rpm-gpg/Alteeves_Niche_Inc-GPG-KEY
% Total % Received % Xferd Average Speed Time Time Time Current
Dload Upload Total Spent Left Speed
100 3117 100 3117 0 0 12505 0 --:--:-- --:--:-- --:--:-- 202k
|
Verify both downloaded properly:
| an-a05n01 | cat /etc/yum.repos.d/an-el6.repo
[an-el6-repo]
name=Alteeve's Niche!, Inc. Repository of Enterprise Linux 6 packages used by Anvil! and Striker systems.
baseurl=https://alteeve.ca/an-repo/el6/
enabled=1
gpgcheck=1
protect=1
gpgkey=file:///etc/pki/rpm-gpg/Alteeves_Niche_Inc-GPG-KEY
cat /etc/pki/rpm-gpg/Alteeves_Niche_Inc-GPG-KEY
-----BEGIN PGP PUBLIC KEY BLOCK-----
Version: GnuPG v2.0.14 (GNU/Linux)
mQINBFTBa6kBEAC36WAc8HLciAAx/FmfirLpW8t1AkS39Lc38LyBeKvBTYvSkCXp
anK+QFsko4IkfcWR/eb2EzbmjLfz37QvaT2niYTOIReQP/VW5QwqtWgxMY8H3ja0
GA4kQzMLjHR4MHs/k6SbUqopueHrXKk16Ok1RUgjZz85t/46OtwtjwDlrFKhSE77
aUy6sCM4DCqiB99BdHtLsZMcS/ENRTgsXzxNPr629fBo1nqd1OqWr/u5oX9OoOKN
YeSy3YXDtmGk5CUIeJ+i9pNzURDPWhTJgUCdnuqNIfFjo2HPqyWj/my/unK3oM2a
DU3ZIrgz2uaUcG/uPGcsGQNWONLJcEWDhtCf0YoatksGybTVvO09d3Y2Vp+Glmgl
xkiZSHXXe/b7UlD7xnycO6EKTWJpWwrS6pfgAm59SUDCIfkjokBhHlSVwjxyz/v5
+lg2fpcNgdR3Q08ZtVEgn4lcI0A5XTwO1GYuOZ8icUW9NYM3iJLFuad4ltbCvrdZ
CE5+gW4myiFhY66MDY9SdaVLcJDlQgWU9ZM8hZ1DNyDTQPLVbX2sNXO+Q9tW33HB
+73dJM+9XPXsbDnWtUbnUSdtbJ9q9bT1uC1tZXMDnyFHiZkroJ+kjRRgriRzgmYK
AKNbQSxqkBRJ/VacsL3tMEMOGeRPaBrc5VjPZp0KxTUGdEeOZrOIhVCVqQARAQAB
tCpBbHRlZXZlJ3MgTmljaGUhIEluYy4gPHN1cHBvcnRAYWx0ZWV2ZS5jYT6JAjgE
EwECACIFAlTBa6kCGwMGCwkIBwMCBhUIAgkKCwQWAgMBAh4BAheAAAoJEJrEPxrG
2apbQ6YP/2qyNRRH96A5dJaBJAMg4VolK7qHuZttT2b9YMJMijYF4Mj6hdRvtVwP
tZzyne9hPorQWrOFpqewsrH8TCUp8tc1VWcqJWtd33/9ZOsCmy/4QSM02M3PzzTy
x6Aj8owAx5mTuumgvhrr/gn5kkn35fpnNvZVOJOBOXVN65o2gSoRuyBbU9cxjQRD
4w+r6nJxJWEFocCsMkxRHDT9T/0oXbpPQlmNfyeKSx0FJDwtD4qiIYp+82OJBg+E
5lmfU8DmBx6TuCuabsJxVOV68PQXzmtApZSNif56dGVx+D2kHSaddTpZdV6bMUr6
BxyZN1vCGJKeEFX+qgcWfgwkqVhs2zm0fLRMMVchRMwAcI5fN9mMzZhi+PQlN7XK
h6nS7kPxn0ajnFzi36GlDF50LssAzJq9+SMT2aTSDhIbNZO6KGW3QSMzP1CGf841
Busfb45Ar4oWQ3sFsGgJlfEb/NklSUmWDnz8Bt4zydmBmB0WJnxI8bE2bGICvS/D
mJsl41hF/a9nVjX1fGzERyLUb+PPgwDBGcLsyHfxMK7ZtNmO+Wjw8F65DYPDQInI
EVyOEWAW3hGXR0r1I6ubbdzZLzs97hz61XYrDrm7pXyv56N9ytP7AtucUNyfYoT5
KzrZDOU0EYCa5bT/67ckZsgTlZuwKOj8fAeNBsTN+thg/4grqQfxuQINBFTBa6kB
EADcdNtzMIVbojYmpXZ+3w0rFNwPYZJkV03LVxVCIQ5mUjYB5kiHjeSiUfcP3LLc
UXzomOXiUz/wSSkp6Q42L8CnUtwIwZoXnvhWNYAbR7wWz5HGBXUMxmbUSOutKFYT
6tK13xV4pWoxvBJyxPwjGSm+zAJzTC0fT63vt26xQtVLJrhpRtJD2kEGtEGj19Sy
ATz1nbR+UqZUryoqzteyGygQXYOoFqX9d6/t2pf/9cDuOhRayUJ2Xjonu1DMQ4T/
ZwJrXDTIsUFPtnR/mQsNaZdskA4+GmXbweFVyvdloWo0Wgw0lZzQJQ+cGUGAw2RC
HDU9shbMcpbaXwoH8UG5Hml1T1I5XZlpUk2R/kDMHnR0LQkRRSjUTPo1GzpSp+v2
tiOJurYVBZwp5bryYdZYbRZgYh1oW7WxiKrnQQ5FAT58YBXSzFd575ENBp+LX804
EMh4po3Wknrvpeh7orkX+Wmbggs/IoBvxTme+RLLnCb0WrCl88dsC8Adn7DP88dm
+JpjMpSyXDvvrChSzWhy6aJ1s/MhkbZS3g+GoeianDPmu6vRGbW7vqGmww1gXyBk
vos90/bAuxjewUMa3UCCkswz99U1TvAT1QJZYH8evFznAx92J6zvKr/ttaG8brTV
OqIdcmK6HmFJjwAAKauFkOLe77GwhtQWKU//C3lXC8KWfwARAQABiQIfBBgBAgAJ
BQJUwWupAhsMAAoJEJrEPxrG2apb7T0P/iXCHX7xmLgvjGRYBhyUfTw00va8Dq8J
oRVBsPZjHj0Yx39UWa9q9P1ME9wxOi5U8xLSTREpKFCM4fcMG8xvFF9SGBNPsvMb
ILvr6ylHtfxreUUUemMpTGPrLj7SDfGRi3CaAikcH5+ve1JH0QVIfdoD3O0OZvVT
9VEq9aZW0Falur155PP3e5oSe0mgCvule3Jb8XL9DhsgQw2Eo2vKyA1kXx7p2405
YVD8SeWCRfv9b2Bq22rbYDOrE4xM+geTqcl0vhYKKfamXUtmJ/zltuYadE/4ZLFJ
fy2neYdj2sGcVBZALq9OPhkeVMktfRmbL64bT9Cgwrl4mNHwqN2WI8YGmhwGTknN
IqHF0ueyrLM0VzTWjJvi48Nt9Co9VUl8ncnmiqvIs0ZpHF3ZqrTwl9Z0IElXuhx6
YniJ9ntZk3SaEM/Uvl16nk9vz8uFND1B0MwwlLENaEn0Gy3cWaKH85EzEkoiOTXw
j4uQ0h80FuwxO9K+GffVw/VlcKzOTz4LyId6QYpXio+EWrfF5vYQEloqRLCi6ADS
8IdlSGVwGUD9rCagVpVTh/CPcZ3PX830L0LyOZk28/qqdQ4Whu/yb9NpsoF2UfKE
JL2A7GUrmNZFxBbAtAknFbId/ecJYKefPlp3RpiJ1SeZhuaHYsXaOTm6kyLy770A
bZ03smi2aDRO
=5Uwn
-----END PGP PUBLIC KEY BLOCK-----
|
|---|---|
| an-a05n02 | cat /etc/yum.repos.d/an-el6.repo
[an-el6-repo]
name=Alteeve's Niche!, Inc. Repository of Enterprise Linux 6 packages used by Anvil! and Striker systems.
baseurl=https://alteeve.ca/an-repo/el6/
enabled=1
gpgcheck=1
protect=1
gpgkey=file:///etc/pki/rpm-gpg/Alteeves_Niche_Inc-GPG-KEY
cat /etc/pki/rpm-gpg/Alteeves_Niche_Inc-GPG-KEY
-----BEGIN PGP PUBLIC KEY BLOCK-----
Version: GnuPG v2.0.14 (GNU/Linux)
mQINBFTBa6kBEAC36WAc8HLciAAx/FmfirLpW8t1AkS39Lc38LyBeKvBTYvSkCXp
anK+QFsko4IkfcWR/eb2EzbmjLfz37QvaT2niYTOIReQP/VW5QwqtWgxMY8H3ja0
GA4kQzMLjHR4MHs/k6SbUqopueHrXKk16Ok1RUgjZz85t/46OtwtjwDlrFKhSE77
aUy6sCM4DCqiB99BdHtLsZMcS/ENRTgsXzxNPr629fBo1nqd1OqWr/u5oX9OoOKN
YeSy3YXDtmGk5CUIeJ+i9pNzURDPWhTJgUCdnuqNIfFjo2HPqyWj/my/unK3oM2a
DU3ZIrgz2uaUcG/uPGcsGQNWONLJcEWDhtCf0YoatksGybTVvO09d3Y2Vp+Glmgl
xkiZSHXXe/b7UlD7xnycO6EKTWJpWwrS6pfgAm59SUDCIfkjokBhHlSVwjxyz/v5
+lg2fpcNgdR3Q08ZtVEgn4lcI0A5XTwO1GYuOZ8icUW9NYM3iJLFuad4ltbCvrdZ
CE5+gW4myiFhY66MDY9SdaVLcJDlQgWU9ZM8hZ1DNyDTQPLVbX2sNXO+Q9tW33HB
+73dJM+9XPXsbDnWtUbnUSdtbJ9q9bT1uC1tZXMDnyFHiZkroJ+kjRRgriRzgmYK
AKNbQSxqkBRJ/VacsL3tMEMOGeRPaBrc5VjPZp0KxTUGdEeOZrOIhVCVqQARAQAB
tCpBbHRlZXZlJ3MgTmljaGUhIEluYy4gPHN1cHBvcnRAYWx0ZWV2ZS5jYT6JAjgE
EwECACIFAlTBa6kCGwMGCwkIBwMCBhUIAgkKCwQWAgMBAh4BAheAAAoJEJrEPxrG
2apbQ6YP/2qyNRRH96A5dJaBJAMg4VolK7qHuZttT2b9YMJMijYF4Mj6hdRvtVwP
tZzyne9hPorQWrOFpqewsrH8TCUp8tc1VWcqJWtd33/9ZOsCmy/4QSM02M3PzzTy
x6Aj8owAx5mTuumgvhrr/gn5kkn35fpnNvZVOJOBOXVN65o2gSoRuyBbU9cxjQRD
4w+r6nJxJWEFocCsMkxRHDT9T/0oXbpPQlmNfyeKSx0FJDwtD4qiIYp+82OJBg+E
5lmfU8DmBx6TuCuabsJxVOV68PQXzmtApZSNif56dGVx+D2kHSaddTpZdV6bMUr6
BxyZN1vCGJKeEFX+qgcWfgwkqVhs2zm0fLRMMVchRMwAcI5fN9mMzZhi+PQlN7XK
h6nS7kPxn0ajnFzi36GlDF50LssAzJq9+SMT2aTSDhIbNZO6KGW3QSMzP1CGf841
Busfb45Ar4oWQ3sFsGgJlfEb/NklSUmWDnz8Bt4zydmBmB0WJnxI8bE2bGICvS/D
mJsl41hF/a9nVjX1fGzERyLUb+PPgwDBGcLsyHfxMK7ZtNmO+Wjw8F65DYPDQInI
EVyOEWAW3hGXR0r1I6ubbdzZLzs97hz61XYrDrm7pXyv56N9ytP7AtucUNyfYoT5
KzrZDOU0EYCa5bT/67ckZsgTlZuwKOj8fAeNBsTN+thg/4grqQfxuQINBFTBa6kB
EADcdNtzMIVbojYmpXZ+3w0rFNwPYZJkV03LVxVCIQ5mUjYB5kiHjeSiUfcP3LLc
UXzomOXiUz/wSSkp6Q42L8CnUtwIwZoXnvhWNYAbR7wWz5HGBXUMxmbUSOutKFYT
6tK13xV4pWoxvBJyxPwjGSm+zAJzTC0fT63vt26xQtVLJrhpRtJD2kEGtEGj19Sy
ATz1nbR+UqZUryoqzteyGygQXYOoFqX9d6/t2pf/9cDuOhRayUJ2Xjonu1DMQ4T/
ZwJrXDTIsUFPtnR/mQsNaZdskA4+GmXbweFVyvdloWo0Wgw0lZzQJQ+cGUGAw2RC
HDU9shbMcpbaXwoH8UG5Hml1T1I5XZlpUk2R/kDMHnR0LQkRRSjUTPo1GzpSp+v2
tiOJurYVBZwp5bryYdZYbRZgYh1oW7WxiKrnQQ5FAT58YBXSzFd575ENBp+LX804
EMh4po3Wknrvpeh7orkX+Wmbggs/IoBvxTme+RLLnCb0WrCl88dsC8Adn7DP88dm
+JpjMpSyXDvvrChSzWhy6aJ1s/MhkbZS3g+GoeianDPmu6vRGbW7vqGmww1gXyBk
vos90/bAuxjewUMa3UCCkswz99U1TvAT1QJZYH8evFznAx92J6zvKr/ttaG8brTV
OqIdcmK6HmFJjwAAKauFkOLe77GwhtQWKU//C3lXC8KWfwARAQABiQIfBBgBAgAJ
BQJUwWupAhsMAAoJEJrEPxrG2apb7T0P/iXCHX7xmLgvjGRYBhyUfTw00va8Dq8J
oRVBsPZjHj0Yx39UWa9q9P1ME9wxOi5U8xLSTREpKFCM4fcMG8xvFF9SGBNPsvMb
ILvr6ylHtfxreUUUemMpTGPrLj7SDfGRi3CaAikcH5+ve1JH0QVIfdoD3O0OZvVT
9VEq9aZW0Falur155PP3e5oSe0mgCvule3Jb8XL9DhsgQw2Eo2vKyA1kXx7p2405
YVD8SeWCRfv9b2Bq22rbYDOrE4xM+geTqcl0vhYKKfamXUtmJ/zltuYadE/4ZLFJ
fy2neYdj2sGcVBZALq9OPhkeVMktfRmbL64bT9Cgwrl4mNHwqN2WI8YGmhwGTknN
IqHF0ueyrLM0VzTWjJvi48Nt9Co9VUl8ncnmiqvIs0ZpHF3ZqrTwl9Z0IElXuhx6
YniJ9ntZk3SaEM/Uvl16nk9vz8uFND1B0MwwlLENaEn0Gy3cWaKH85EzEkoiOTXw
j4uQ0h80FuwxO9K+GffVw/VlcKzOTz4LyId6QYpXio+EWrfF5vYQEloqRLCi6ADS
8IdlSGVwGUD9rCagVpVTh/CPcZ3PX830L0LyOZk28/qqdQ4Whu/yb9NpsoF2UfKE
JL2A7GUrmNZFxBbAtAknFbId/ecJYKefPlp3RpiJ1SeZhuaHYsXaOTm6kyLy770A
bZ03smi2aDRO
=5Uwn
-----END PGP PUBLIC KEY BLOCK-----
|
Excellent! Now clean the yum repository cache.
| an-a05n01 | yum clean all
Loaded plugins: product-id, rhnplugin, security, subscription-manager
Cleaning repos: an-el6-repo rhel-x86_64-server-6
Cleaning up Everything
|
|---|---|
| an-a05n02 | yum clean all
Loaded plugins: product-id, rhnplugin, security, subscription-manager
Cleaning repos: an-el6-repo rhel-x86_64-server-6
Cleaning up Everything
|
Excellent! Now we can proceed.
Update the OS
Before we begin at all, let's update our OS.
| an-a05n01 | an-a05n02 |
|---|---|
yum update
<lots of yum output>
|
yum update
<lots of yum output>
|
Installing Required Programs
This will install all the software needed to run the Anvil! and configure IPMI for use as a fence device. This won't cover DRBD or apcupsd which will be covered in dedicated sections below.
| Note: If you plan to install DRBD either from the official, supported LINBIT repository, or if you to prefer to install it from source, remove drbd83-utils and kmod-drbd83 from the list of packages below. |
| an-a05n01 | yum install acpid bridge-utils ccs cman compat-libstdc++-33.i686 corosync \
cyrus-sasl cyrus-sasl-plain dmidecode drbd83-utils expect \
fence-agents freeipmi freeipmi-bmc-watchdog freeipmi-ipmidetectd \
gcc gcc-c++ gd gfs2-utils gpm ipmitool kernel-headers \
kernel-devel kmod-drbd83 libstdc++.i686 libstdc++-devel.i686 \
libvirt lvm2-cluster mailx man mlocate ntp OpenIPMI OpenIPMI-libs \
openssh-clients openssl-devel qemu-kvm qemu-kvm-tools parted \
pciutils perl perl-DBD-Pg perl-Digest-SHA perl-TermReadKey \
perl-Test-Simple perl-Time-HiRes perl-Net-SSH2 perl-XML-Simple \
perl-YAML policycoreutils-python postgresql postfix \
python-virtinst rgmanager ricci rsync Scanner screen syslinux \
sysstat vim-enhanced virt-viewer wget
<lots of yum output>
|
|---|---|
| an-a05n02 | yum install acpid bridge-utils ccs cman compat-libstdc++-33.i686 corosync \
cyrus-sasl cyrus-sasl-plain dmidecode drbd83-utils expect \
fence-agents freeipmi freeipmi-bmc-watchdog freeipmi-ipmidetectd \
gcc gcc-c++ gd gfs2-utils gpm ipmitool kernel-headers \
kernel-devel kmod-drbd83 libstdc++.i686 libstdc++-devel.i686 \
libvirt lvm2-cluster mailx man mlocate ntp OpenIPMI OpenIPMI-libs \
openssh-clients openssl-devel qemu-kvm qemu-kvm-tools parted \
pciutils perl perl-DBD-Pg perl-Digest-SHA perl-TermReadKey \
perl-Test-Simple perl-Time-HiRes perl-Net-SSH2 perl-XML-Simple \
perl-YAML policycoreutils-python postgresql postfix \
python-virtinst rgmanager ricci rsync Scanner screen syslinux \
sysstat vim-enhanced virt-viewer wget
<lots of yum output>
|
Before we go any further, we'll want to destroy the default libvirtd bridge. We're going to be creating our own bridge that gives our servers direct access to the outside network.
- If virbr0 does not exist:
| an-a05n01 | cat /dev/null >/etc/libvirt/qemu/networks/default.xml
|
|---|---|
| an-a05n02 | cat /dev/null >/etc/libvirt/qemu/networks/default.xml
|
If you already see virbr0 when you run ifconfig, the the libvirtd bridge has already started. You can stop and disable it with the following commands;
- If virbr0 does exist:
| an-a05n01 | virsh net-destroy default
virsh net-autostart default --disable
virsh net-undefine default
/etc/init.d/iptables stop
|
|---|---|
| an-a05n02 | virsh net-destroy default
virsh net-autostart default --disable
virsh net-undefine default
/etc/init.d/iptables stop
|
Now virbr0 should be gone now and it won't return.
Switch Network Daemons
The new NetworkManager daemon is much more flexible and is perfect for machines like laptops which move around networks a lot. However, it does this by making a lot of decisions for you and changing the network as it sees fit. As good as this is for laptops and the like, it's not appropriate for servers. We will want to use the traditional network service.
| an-a05n01 | an-a05n02 |
|---|---|
yum remove NetworkManager
|
yum remove NetworkManager
|
Now enable network to start with the system.
| an-a05n01 | an-a05n02 |
|---|---|
chkconfig network on
chkconfig --list network
network 0:off 1:off 2:on 3:on 4:on 5:on 6:off
|
chkconfig network on
chkconfig --list network
network 0:off 1:off 2:on 3:on 4:on 5:on 6:off
|
Altering Which Daemons Start on Boot
Several of the applications we installed above include daemons that either start on boot or stay off on boot. Likewise, some daemons remain stopped after they're installed, and we want to start them now.
As we work on each component, we'll discuss in more detail why we want each to either start or stop on boot. For now, let's just make the changes.
We'll use the chkconfig command to make sure the daemons we want to start on boot do so.
| an-a05n01 | an-a05n02 |
|---|---|
chkconfig network on
chkconfig ntpd on
chkconfig ricci on
chkconfig modclusterd on
chkconfig ipmi on
chkconfig iptables on
|
chkconfig network on
chkconfig ntpd on
chkconfig ricci on
chkconfig modclusterd on
chkconfig ipmi on
chkconfig iptables on
|
Next, we'll tell the system what daemons to leave off on boot.
| an-a05n01 | an-a05n02 |
|---|---|
chkconfig acpid off
chkconfig ip6tables off
chkconfig clvmd off
chkconfig gfs2 off
chkconfig libvirtd off
chkconfig cman off
chkconfig rgmanager off
|
chkconfig acpid off
chkconfig ip6tables off
chkconfig clvmd off
chkconfig gfs2 off
chkconfig libvirtd off
chkconfig cman off
chkconfig rgmanager off
|
Now start the daemons we've installed and want running.
| an-a05n01 | an-a05n02 |
|---|---|
/etc/init.d/ntpd start
/etc/init.d/ricci start
/etc/init.d/modclusterd start
/etc/init.d/ipmi start
/etc/init.d/iptables start
|
/etc/init.d/ntpd start
/etc/init.d/ricci start
/etc/init.d/modclusterd start
/etc/init.d/ipmi start
/etc/init.d/iptables start
|
Lastly, stop the daemons we don't want running.
| an-a05n01 | an-a05n02 |
|---|---|
/etc/init.d/libvirtd stop
/etc/init.d/acpid stop
/etc/init.d/ip6tables stop
|
/etc/init.d/libvirtd stop
/etc/init.d/acpid stop
/etc/init.d/ip6tables stop
|
You can verify that the services you want to start will and the ones you don't want to won't using chkconfig.
| an-a05n01 | an-a05n02 |
|---|---|
chkconfig --list
abrt-ccpp 0:off 1:off 2:off 3:on 4:off 5:on 6:off
abrtd 0:off 1:off 2:off 3:on 4:off 5:on 6:off
acpid 0:off 1:off 2:off 3:off 4:off 5:off 6:off
atd 0:off 1:off 2:off 3:on 4:on 5:on 6:off
auditd 0:off 1:off 2:on 3:on 4:on 5:on 6:off
blk-availability 0:off 1:on 2:on 3:on 4:on 5:on 6:off
bmc-watchdog 0:off 1:off 2:off 3:on 4:off 5:on 6:off
cgconfig 0:off 1:off 2:on 3:on 4:on 5:on 6:off
cgred 0:off 1:off 2:off 3:off 4:off 5:off 6:off
clvmd 0:off 1:off 2:off 3:off 4:off 5:off 6:off
cman 0:off 1:off 2:off 3:off 4:off 5:off 6:off
corosync 0:off 1:off 2:off 3:off 4:off 5:off 6:off
cpglockd 0:off 1:off 2:off 3:off 4:off 5:off 6:off
cpuspeed 0:off 1:on 2:on 3:on 4:on 5:on 6:off
crond 0:off 1:off 2:on 3:on 4:on 5:on 6:off
dnsmasq 0:off 1:off 2:off 3:off 4:off 5:off 6:off
drbd 0:off 1:off 2:off 3:off 4:off 5:off 6:off
ebtables 0:off 1:off 2:off 3:off 4:off 5:off 6:off
gfs2 0:off 1:off 2:off 3:off 4:off 5:off 6:off
gpm 0:off 1:off 2:on 3:on 4:on 5:on 6:off
haldaemon 0:off 1:off 2:off 3:on 4:on 5:on 6:off
ip6tables 0:off 1:off 2:off 3:off 4:off 5:off 6:off
ipmi 0:off 1:off 2:on 3:on 4:on 5:on 6:off
ipmidetectd 0:off 1:off 2:off 3:on 4:off 5:on 6:off
ipmievd 0:off 1:off 2:off 3:off 4:off 5:off 6:off
iptables 0:off 1:off 2:on 3:on 4:on 5:on 6:off
irqbalance 0:off 1:off 2:off 3:on 4:on 5:on 6:off
iscsi 0:off 1:off 2:off 3:on 4:on 5:on 6:off
iscsid 0:off 1:off 2:off 3:on 4:on 5:on 6:off
kdump 0:off 1:off 2:off 3:off 4:off 5:off 6:off
ksm 0:off 1:off 2:off 3:on 4:on 5:on 6:off
ksmtuned 0:off 1:off 2:off 3:on 4:on 5:on 6:off
libvirt-guests 0:off 1:off 2:on 3:on 4:on 5:on 6:off
libvirtd 0:off 1:off 2:off 3:off 4:off 5:off 6:off
lvm2-monitor 0:off 1:on 2:on 3:on 4:on 5:on 6:off
mdmonitor 0:off 1:off 2:on 3:on 4:on 5:on 6:off
messagebus 0:off 1:off 2:on 3:on 4:on 5:on 6:off
modclusterd 0:off 1:off 2:on 3:on 4:on 5:on 6:off
netconsole 0:off 1:off 2:off 3:off 4:off 5:off 6:off
netfs 0:off 1:off 2:off 3:on 4:on 5:on 6:off
network 0:off 1:off 2:on 3:on 4:on 5:on 6:off
nfs 0:off 1:off 2:off 3:off 4:off 5:off 6:off
nfslock 0:off 1:off 2:off 3:on 4:on 5:on 6:off
ntpd 0:off 1:off 2:on 3:on 4:on 5:on 6:off
ntpdate 0:off 1:off 2:off 3:off 4:off 5:off 6:off
numad 0:off 1:off 2:off 3:off 4:off 5:off 6:off
oddjobd 0:off 1:off 2:off 3:off 4:off 5:off 6:off
postfix 0:off 1:off 2:on 3:on 4:on 5:on 6:off
psacct 0:off 1:off 2:off 3:off 4:off 5:off 6:off
quota_nld 0:off 1:off 2:off 3:off 4:off 5:off 6:off
radvd 0:off 1:off 2:off 3:off 4:off 5:off 6:off
rdisc 0:off 1:off 2:off 3:off 4:off 5:off 6:off
restorecond 0:off 1:off 2:off 3:off 4:off 5:off 6:off
rgmanager 0:off 1:off 2:off 3:off 4:off 5:off 6:off
rhnsd 0:off 1:off 2:on 3:on 4:on 5:on 6:off
rhsmcertd 0:off 1:off 2:off 3:on 4:on 5:on 6:off
ricci 0:off 1:off 2:on 3:on 4:on 5:on 6:off
rngd 0:off 1:off 2:off 3:off 4:off 5:off 6:off
rpcbind 0:off 1:off 2:on 3:on 4:on 5:on 6:off
rpcgssd 0:off 1:off 2:off 3:on 4:on 5:on 6:off
rpcsvcgssd 0:off 1:off 2:off 3:off 4:off 5:off 6:off
rsyslog 0:off 1:off 2:on 3:on 4:on 5:on 6:off
saslauthd 0:off 1:off 2:off 3:off 4:off 5:off 6:off
smartd 0:off 1:off 2:off 3:off 4:off 5:off 6:off
sshd 0:off 1:off 2:on 3:on 4:on 5:on 6:off
svnserve 0:off 1:off 2:off 3:off 4:off 5:off 6:off
sysstat 0:off 1:on 2:on 3:on 4:on 5:on 6:off
udev-post 0:off 1:on 2:on 3:on 4:on 5:on 6:off
winbind 0:off 1:off 2:off 3:off 4:off 5:off 6:off
|
If you did a minimal OS install, or any install without a graphical interface, you will be booting into run-level 3. If you did install a graphical interface, which is not wise, then your default run-level will either be 3 or 5. You can determine which by looking in /etc/inittab.
Once you know the run-level you're using, look for the daemon you are interested in and the see if it's set to x:on or x:off. That will confirm that the associated daemon is set to start on boot or not, respectively.
Network Security
The interfaces connected to the IFN are usually connected to an untrusted network, like the Internet. If you do not need access to the IFN from the nodes themselves, you can increase security by not assigning an IP address to the ifn_bridge1 interface which we will configure shortly. The ifn_bridge1 bridge device will need to be up so that virtual machines can route through it to the outside world, of course.
If you do decide to assign an IP to the nodes' ifn_bridge1, you will want to restrict inbound access as much as possible. A good policy is to DROP all traffic inbound from the hosted servers, unless you trust them specifically.
We're going to open ports for both Red Hat's high-availability add-on components and LinBit's DRBD software. You can find details here:
Specifically, we'll be ACCEPTing the ports listed below on both nodes.
| Component | Protocol | Port | Note |
|---|---|---|---|
| dlm | TCP | 21064 | |
| drbd | TCP | 7788+ | Each DRBD resource will use an additional port, generally counting up (ie: r0 will use 7788, r1 will use 7789, r2 will use 7790 and so on). |
| luci | TCP | 8084 | Optional web-based configuration tool, not used in this tutorial but documented for reference. |
| modclusterd | TCP | 16851 | |
| ricci | TCP | 11111 | Each DRBD resource will use an additional port, generally counting up (ie: r1 will use 7790, r2 will use 7791 and so on). |
| totem | UDP/multicast | 5404, 5405 | Uses a multicast group for cluster communications |
Configuring iptables
| Note: Configuring iptables is an entire topic on its own. There are many good tutorials on the Internet discussing it, including an older introduction to iptables tutorial hosted here. If you are unfamiliar with iptables, it is well worth taking a break from this tutorial and getting familiar with it, in concept if nothing else. |
| Note: This opens up enough ports for 100 virtual servers. This is entirely arbitrary range, which you probably want to reduce (or possibly increase). This also allows incoming connections from both the BCN and IFN, which you may want to change. Please look below for the 'remote desktop' rules comment. |
The first thing we want to do is see what the current firewall policy is. We can do this with iptables-save, a tool designed to backup iptables but also very useful for seeing what configuration is currently in memory.
| an-a05n01 | iptables-save
# Generated by iptables-save v1.4.7 on Wed Nov 13 15:49:17 2013
*filter
:INPUT ACCEPT [0:0]
:FORWARD ACCEPT [0:0]
:OUTPUT ACCEPT [440:262242]
-A INPUT -m state --state RELATED,ESTABLISHED -j ACCEPT
-A INPUT -p icmp -j ACCEPT
-A INPUT -i lo -j ACCEPT
-A INPUT -p tcp -m state --state NEW -m tcp --dport 22 -j ACCEPT
-A INPUT -j REJECT --reject-with icmp-host-prohibited
-A FORWARD -j REJECT --reject-with icmp-host-prohibited
COMMIT
# Completed on Wed Nov 13 15:49:17 2013
|
|---|---|
| an-a05n02 | iptables-save
# Generated by iptables-save v1.4.7 on Wed Nov 13 15:49:51 2013
*filter
:INPUT ACCEPT [0:0]
:FORWARD ACCEPT [0:0]
:OUTPUT ACCEPT [336:129880]
-A INPUT -m state --state RELATED,ESTABLISHED -j ACCEPT
-A INPUT -p icmp -j ACCEPT
-A INPUT -i lo -j ACCEPT
-A INPUT -p tcp -m state --state NEW -m tcp --dport 22 -j ACCEPT
-A INPUT -j REJECT --reject-with icmp-host-prohibited
-A FORWARD -j REJECT --reject-with icmp-host-prohibited
COMMIT
# Completed on Wed Nov 13 15:49:51 2013
|
| Note: This tutorial will create two DRBD resources. Each resource will use a different TCP port. By convention, they start at port 7788 and increment up per resource. So we will be opening ports 7788 and 7789. |
Open ports;
| an-a05n01 | # cman (corosync's totem)
iptables -I INPUT -m state --state NEW -m multiport -p udp -s 10.20.0.0/16 -d 10.20.0.0/16 --dports 5404,5405 -j ACCEPT
iptables -I INPUT -m addrtype --dst-type MULTICAST -m state --state NEW -m multiport -p udp -s 10.20.0.0/16 --dports 5404,5405 -j ACCEPT
# dlm
iptables -I INPUT -m state --state NEW -p tcp -s 10.20.0.0/16 -d 10.20.0.0/16 --dport 21064 -j ACCEPT
# ricci
iptables -I INPUT -m state --state NEW -p tcp -s 10.20.0.0/16 -d 10.20.0.0/16 --dport 11111 -j ACCEPT
# modclusterd
iptables -I INPUT -m state --state NEW -p tcp -s 10.20.0.0/16 -d 10.20.0.0/16 --dport 16851 -j ACCEPT
# multicast (igmp; Internet group management protocol)
iptables -I INPUT -p igmp -j ACCEPT
# DRBD resource 0 and 1 - on the SN
iptables -I INPUT -m state --state NEW -p tcp -s 10.10.0.0/16 -d 10.10.0.0/16 --dport 7788 -j ACCEPT
iptables -I INPUT -m state --state NEW -p tcp -s 10.10.0.0/16 -d 10.10.0.0/16 --dport 7789 -j ACCEPT
# KVM live-migration ports on BCN
iptables -I INPUT -p tcp -m tcp -s 10.20.0.0/16 -d 10.20.0.0/16 --dport 49152:49216 -j ACCEPT
# Allow remote desktop access to servers on both the IFN and BCN. This opens 100 ports. If you want
# to change this range, put the range '5900:(5900+VM count)'.
iptables -I INPUT -m state --state NEW -p tcp -s 10.20.0.0/16 -d 10.20.0.0/16 --dport 5900:5999 -j ACCEPT
iptables -I INPUT -m state --state NEW -p tcp -s 10.255.0.0/16 -d 10.255.0.0/16 --dport 5900:5999 -j ACCEPT
# See the new configuration
iptables-save
# Generated by iptables-save v1.4.7 on Tue Mar 25 13:55:54 2014
*filter
:INPUT ACCEPT [0:0]
:FORWARD ACCEPT [0:0]
:OUTPUT ACCEPT [52:8454]
-A INPUT -s 10.255.0.0/16 -d 10.255.0.0/16 -p tcp -m state --state NEW -m tcp --dport 5900:5999 -j ACCEPT
-A INPUT -s 10.20.0.0/16 -d 10.20.0.0/16 -p tcp -m state --state NEW -m tcp --dport 5900:5999 -j ACCEPT
-A INPUT -s 10.20.0.0/16 -d 10.20.0.0/16 -p tcp -m tcp --dport 49152:49216 -j ACCEPT
-A INPUT -s 10.10.0.0/16 -d 10.10.0.0/16 -p tcp -m state --state NEW -m tcp --dport 7789 -j ACCEPT
-A INPUT -s 10.10.0.0/16 -d 10.10.0.0/16 -p tcp -m state --state NEW -m tcp --dport 7788 -j ACCEPT
-A INPUT -p igmp -j ACCEPT
-A INPUT -s 10.20.0.0/16 -d 10.20.0.0/16 -p tcp -m state --state NEW -m tcp --dport 16851 -j ACCEPT
-A INPUT -s 10.20.0.0/16 -d 10.20.0.0/16 -p tcp -m state --state NEW -m tcp --dport 11111 -j ACCEPT
-A INPUT -s 10.20.0.0/16 -d 10.20.0.0/16 -p tcp -m state --state NEW -m tcp --dport 21064 -j ACCEPT
-A INPUT -s 10.20.0.0/16 -p udp -m addrtype --dst-type MULTICAST -m state --state NEW -m multiport --dports 5404,5405 -j ACCEPT
-A INPUT -s 10.20.0.0/16 -d 10.20.0.0/16 -p udp -m state --state NEW -m multiport --dports 5404,5405 -j ACCEPT
-A INPUT -m state --state RELATED,ESTABLISHED -j ACCEPT
-A INPUT -p icmp -j ACCEPT
-A INPUT -i lo -j ACCEPT
-A INPUT -p tcp -m state --state NEW -m tcp --dport 22 -j ACCEPT
-A INPUT -j REJECT --reject-with icmp-host-prohibited
-A FORWARD -j REJECT --reject-with icmp-host-prohibited
COMMIT
# Completed on Tue Mar 25 13:55:54 2014
|
|---|---|
| an-a05n02 | # cman (corosync's totem)
iptables -I INPUT -m state --state NEW -m multiport -p udp -s 10.20.0.0/16 -d 10.20.0.0/16 --dports 5404,5405 -j ACCEPT
iptables -I INPUT -m addrtype --dst-type MULTICAST -m state --state NEW -m multiport -p udp -s 10.20.0.0/16 --dports 5404,5405 -j ACCEPT
# dlm
iptables -I INPUT -m state --state NEW -p tcp -s 10.20.0.0/16 -d 10.20.0.0/16 --dport 21064 -j ACCEPT
# ricci
iptables -I INPUT -m state --state NEW -p tcp -s 10.20.0.0/16 -d 10.20.0.0/16 --dport 11111 -j ACCEPT
# modclusterd
iptables -I INPUT -m state --state NEW -p tcp -s 10.20.0.0/16 -d 10.20.0.0/16 --dport 16851 -j ACCEPT
# multicast (igmp; Internet group management protocol)
iptables -I INPUT -p igmp -j ACCEPT
# DRBD resource 0 and 1 - on the SN
iptables -I INPUT -m state --state NEW -p tcp -s 10.10.0.0/16 -d 10.10.0.0/16 --dport 7788 -j ACCEPT
iptables -I INPUT -m state --state NEW -p tcp -s 10.10.0.0/16 -d 10.10.0.0/16 --dport 7789 -j ACCEPT
# KVM live-migration ports on BCN
iptables -I INPUT -p tcp -m tcp -s 10.20.0.0/16 -d 10.20.0.0/16 --dport 49152:49216 -j ACCEPT
# Allow remote desktop access to servers on both the IFN and BCN. This opens 100 ports. If you want
# to change this range, put the range '5900:(5900+VM count)'.
iptables -I INPUT -m state --state NEW -p tcp -s 10.20.0.0/16 -d 10.20.0.0/16 --dport 5900:5999 -j ACCEPT
iptables -I INPUT -m state --state NEW -p tcp -s 10.255.0.0/16 -d 10.255.0.0/16 --dport 5900:5999 -j ACCEPT
# See the new configuration
iptables-save
# Generated by iptables-save v1.4.7 on Tue Mar 25 13:55:54 2014
*filter
:INPUT ACCEPT [0:0]
:FORWARD ACCEPT [0:0]
:OUTPUT ACCEPT [16:5452]
-A INPUT -s 10.255.0.0/16 -d 10.255.0.0/16 -p tcp -m state --state NEW -m tcp --dport 5900:5999 -j ACCEPT
-A INPUT -s 10.20.0.0/16 -d 10.20.0.0/16 -p tcp -m state --state NEW -m tcp --dport 5900:5999 -j ACCEPT
-A INPUT -s 10.20.0.0/16 -d 10.20.0.0/16 -p tcp -m tcp --dport 49152:49216 -j ACCEPT
-A INPUT -s 10.10.0.0/16 -d 10.10.0.0/16 -p tcp -m state --state NEW -m tcp --dport 7789 -j ACCEPT
-A INPUT -s 10.10.0.0/16 -d 10.10.0.0/16 -p tcp -m state --state NEW -m tcp --dport 7788 -j ACCEPT
-A INPUT -p igmp -j ACCEPT
-A INPUT -s 10.20.0.0/16 -d 10.20.0.0/16 -p tcp -m state --state NEW -m tcp --dport 16851 -j ACCEPT
-A INPUT -s 10.20.0.0/16 -d 10.20.0.0/16 -p tcp -m state --state NEW -m tcp --dport 11111 -j ACCEPT
-A INPUT -s 10.20.0.0/16 -d 10.20.0.0/16 -p tcp -m state --state NEW -m tcp --dport 21064 -j ACCEPT
-A INPUT -s 10.20.0.0/16 -p udp -m addrtype --dst-type MULTICAST -m state --state NEW -m multiport --dports 5404,5405 -j ACCEPT
-A INPUT -s 10.20.0.0/16 -d 10.20.0.0/16 -p udp -m state --state NEW -m multiport --dports 5404,5405 -j ACCEPT
-A INPUT -m state --state RELATED,ESTABLISHED -j ACCEPT
-A INPUT -p icmp -j ACCEPT
-A INPUT -i lo -j ACCEPT
-A INPUT -p tcp -m state --state NEW -m tcp --dport 22 -j ACCEPT
-A INPUT -j REJECT --reject-with icmp-host-prohibited
-A FORWARD -j REJECT --reject-with icmp-host-prohibited
COMMIT
# Completed on Tue Mar 25 13:55:54 2014
|
At this point, the cluster stack should work, but we're not done yet. The changes we made above altered packet filtering in memory, but the configuration has not been saved to disk. This configuration is saved in /etc/sysconfig/iptables. You could pipe the output of iptables-save to it, but the iptables initialization script provides a facility to save the configuration, so we will use it instead.
| an-a05n01 | /etc/init.d/iptables save
iptables: Saving firewall rules to /etc/sysconfig/iptables:[ OK ]
|
|---|---|
| an-a05n02 | /etc/init.d/iptables save
iptables: Saving firewall rules to /etc/sysconfig/iptables:[ OK ]
|
Now we're restart iptables and check that the changes stuck.
| an-a05n01 | /etc/init.d/iptables restart
iptables: Flushing firewall rules: [ OK ]
iptables: Setting chains to policy ACCEPT: filter [ OK ]
iptables: Unloading modules: [ OK ]
iptables: Applying firewall rules: [ OK ]
iptables-save
# Generated by iptables-save v1.4.7 on Tue Mar 25 14:06:43 2014
*filter
:INPUT ACCEPT [0:0]
:FORWARD ACCEPT [0:0]
:OUTPUT ACCEPT [41947:617170766]
-A INPUT -s 10.255.0.0/16 -d 10.255.0.0/16 -p tcp -m state --state NEW -m tcp --dport 5900:5999 -j ACCEPT
-A INPUT -s 10.20.0.0/16 -d 10.20.0.0/16 -p tcp -m state --state NEW -m tcp --dport 5900:5999 -j ACCEPT
-A INPUT -s 10.20.0.0/16 -d 10.20.0.0/16 -p tcp -m tcp --dport 49152:49216 -j ACCEPT
-A INPUT -s 10.10.0.0/16 -d 10.10.0.0/16 -p tcp -m state --state NEW -m tcp --dport 7789 -j ACCEPT
-A INPUT -s 10.10.0.0/16 -d 10.10.0.0/16 -p tcp -m state --state NEW -m tcp --dport 7788 -j ACCEPT
-A INPUT -p igmp -j ACCEPT
-A INPUT -s 10.20.0.0/16 -d 10.20.0.0/16 -p tcp -m state --state NEW -m tcp --dport 16851 -j ACCEPT
-A INPUT -s 10.20.0.0/16 -d 10.20.0.0/16 -p tcp -m state --state NEW -m tcp --dport 11111 -j ACCEPT
-A INPUT -s 10.20.0.0/16 -d 10.20.0.0/16 -p tcp -m state --state NEW -m tcp --dport 21064 -j ACCEPT
-A INPUT -s 10.20.0.0/16 -p udp -m addrtype --dst-type MULTICAST -m state --state NEW -m multiport --dports 5404,5405 -j ACCEPT
-A INPUT -s 10.20.0.0/16 -d 10.20.0.0/16 -p udp -m state --state NEW -m multiport --dports 5404,5405 -j ACCEPT
-A INPUT -m state --state RELATED,ESTABLISHED -j ACCEPT
-A INPUT -p icmp -j ACCEPT
-A INPUT -i lo -j ACCEPT
-A INPUT -p tcp -m state --state NEW -m tcp --dport 22 -j ACCEPT
-A INPUT -j REJECT --reject-with icmp-host-prohibited
-A FORWARD -j REJECT --reject-with icmp-host-prohibited
COMMIT
# Completed on Tue Mar 25 14:06:43 2014
|
|---|---|
| an-a05n02 | /etc/init.d/iptables restart
iptables: Flushing firewall rules: [ OK ]
iptables: Setting chains to policy ACCEPT: filter [ OK ]
iptables: Unloading modules: [ OK ]
iptables: Applying firewall rules: [ OK ]
iptables-save
# Generated by iptables-save v1.4.7 on Tue Mar 25 14:07:00 2014
*filter
:INPUT ACCEPT [0:0]
:FORWARD ACCEPT [0:0]
:OUTPUT ACCEPT [41570:54856696]
-A INPUT -s 10.255.0.0/16 -d 10.255.0.0/16 -p tcp -m state --state NEW -m tcp --dport 5900:5999 -j ACCEPT
-A INPUT -s 10.20.0.0/16 -d 10.20.0.0/16 -p tcp -m state --state NEW -m tcp --dport 5900:5999 -j ACCEPT
-A INPUT -s 10.20.0.0/16 -d 10.20.0.0/16 -p tcp -m tcp --dport 49152:49216 -j ACCEPT
-A INPUT -s 10.10.0.0/16 -d 10.10.0.0/16 -p tcp -m state --state NEW -m tcp --dport 7789 -j ACCEPT
-A INPUT -s 10.10.0.0/16 -d 10.10.0.0/16 -p tcp -m state --state NEW -m tcp --dport 7788 -j ACCEPT
-A INPUT -p igmp -j ACCEPT
-A INPUT -s 10.20.0.0/16 -d 10.20.0.0/16 -p tcp -m state --state NEW -m tcp --dport 16851 -j ACCEPT
-A INPUT -s 10.20.0.0/16 -d 10.20.0.0/16 -p tcp -m state --state NEW -m tcp --dport 11111 -j ACCEPT
-A INPUT -s 10.20.0.0/16 -d 10.20.0.0/16 -p tcp -m state --state NEW -m tcp --dport 21064 -j ACCEPT
-A INPUT -s 10.20.0.0/16 -p udp -m addrtype --dst-type MULTICAST -m state --state NEW -m multiport --dports 5404,5405 -j ACCEPT
-A INPUT -s 10.20.0.0/16 -d 10.20.0.0/16 -p udp -m state --state NEW -m multiport --dports 5404,5405 -j ACCEPT
-A INPUT -m state --state RELATED,ESTABLISHED -j ACCEPT
-A INPUT -p icmp -j ACCEPT
-A INPUT -i lo -j ACCEPT
-A INPUT -p tcp -m state --state NEW -m tcp --dport 22 -j ACCEPT
-A INPUT -j REJECT --reject-with icmp-host-prohibited
-A FORWARD -j REJECT --reject-with icmp-host-prohibited
COMMIT
# Completed on Tue Mar 25 14:07:00 2014
|
Perfect!
If you want to enable any other kind of access or otherwise modify the firewall on each node, please do so now. This way, as you proceed with building the Anvil!, you'll hit firewall problems as soon as they arise.
Mapping Physical Network Interfaces to ethX Device Names
| Note: This process is a little lengthy and it would add a fair amount of length to document the process on both nodes. So for this section, only an-a05n01 will be shown. Please repeat this process for both nodes. |
Consistency is the mother of stability.
When you install RHEL, it somewhat randomly assigns an ethX device to each physical network interfaces. Purely technically speaking, this is fine. So long as you know which interface has which device name, you can setup the node's networking.
However!
Consistently assigning the same device names to physical interfaces makes supporting and maintaining nodes a lot easier!
We've got six physical network interfaces, named bcn_link1, bcn_link2, sn_link1, sn_link2 and ifn_link1, ifn_link2. As you recall from earlier, we want to make sure that each pair of interfaces for each network spans two physical network cards.
Most servers have at least two on-board network cards labelled "1" and "2". These tend to correspond to lights on the front of the server, so we will start by naming these interfaces bcn_link1 and sn_link1, respectively. After that, you are largely free to assign names to interfaces however you see fit.
What matters most of all is that, whatever order you choose, it's consistent across your Anvil! nodes.
Before we touch anything, let's make a backup of what we have. This way, we have an easy out in case we "oops" a files.
mkdir -p /root/backups/
rsync -av /etc/sysconfig/network-scripts /root/backups/
sending incremental file list
created directory /root/backups
network-scripts/
network-scripts/ifcfg-eth0
network-scripts/ifcfg-eth1
network-scripts/ifcfg-eth2
network-scripts/ifcfg-eth3
network-scripts/ifcfg-eth4
network-scripts/ifcfg-eth5
network-scripts/ifcfg-lo
network-scripts/ifdown -> ../../../sbin/ifdown
network-scripts/ifdown-bnep
network-scripts/ifdown-eth
network-scripts/ifdown-ippp
network-scripts/ifdown-ipv6
network-scripts/ifdown-isdn -> ifdown-ippp
network-scripts/ifdown-post
network-scripts/ifdown-ppp
network-scripts/ifdown-routes
network-scripts/ifdown-sit
network-scripts/ifdown-tunnel
network-scripts/ifup -> ../../../sbin/ifup
network-scripts/ifup-aliases
network-scripts/ifup-bnep
network-scripts/ifup-eth
network-scripts/ifup-ippp
network-scripts/ifup-ipv6
network-scripts/ifup-isdn -> ifup-ippp
network-scripts/ifup-plip
network-scripts/ifup-plusb
network-scripts/ifup-post
network-scripts/ifup-ppp
network-scripts/ifup-routes
network-scripts/ifup-sit
network-scripts/ifup-tunnel
network-scripts/ifup-wireless
network-scripts/init.ipv6-global
network-scripts/net.hotplug
network-scripts/network-functions
network-scripts/network-functions-ipv6
sent 134870 bytes received 655 bytes 271050.00 bytes/sec
total size is 132706 speedup is 0.98
Making Sure All Network Interfaces are Started
What we're going to do is watch /var/log/messages, unplug each cable and see which interface shows a lost link. This will tell us what current name is given to a particular physical interface. We'll write the current name down beside the name of the interface we want. Once we've done this to all interfaces, we'll now how we have to move names around.
Before we can pull cables though, we have to tell the system to start all of the interfaces. By default, all but one or two interfaces will be disabled on boot.
Run this to see which interfaces are up;
ifconfig
eth4 Link encap:Ethernet HWaddr 00:19:99:9C:9B:9E
inet addr:10.255.0.33 Bcast:10.255.255.255 Mask:255.255.0.0
inet6 addr: fe80::219:99ff:fe9c:9b9e/64 Scope:Link
UP BROADCAST RUNNING MULTICAST MTU:1500 Metric:1
RX packets:303118 errors:0 dropped:0 overruns:0 frame:0
TX packets:152952 errors:0 dropped:0 overruns:0 carrier:0
collisions:0 txqueuelen:1000
RX bytes:344900765 (328.9 MiB) TX bytes:14424290 (13.7 MiB)
Memory:ce660000-ce680000
lo Link encap:Local Loopback
inet addr:127.0.0.1 Mask:255.0.0.0
inet6 addr: ::1/128 Scope:Host
UP LOOPBACK RUNNING MTU:16436 Metric:1
RX packets:3540 errors:0 dropped:0 overruns:0 frame:0
TX packets:3540 errors:0 dropped:0 overruns:0 carrier:0
collisions:0 txqueuelen:0
RX bytes:2652436 (2.5 MiB) TX bytes:2652436 (2.5 MiB)
In this case, only the interface currently named eth4 was started. We'll need to edit the other interface configuration files to tell them to start when the network starts. To do this, we edit the /etc/sysconfig/network-scripts/ifcfg-ethX files and change ONBOOT variable to ONBOOT="yes".
By default, most interfaces will be set to try and acquire an IP address from a DHCP server, We can see that sn_link2 already has an IP address, so to save time, we're going to tell the other interfaces to start without an IP address at all. If we didn't do this, restarting network would take a long time waiting for DHCP requests to time out.
| Note: We skip ifcfg-eth4 in the next step because it's already up. |
Now we can use sed to edit the files. This is a lot faster and easier than editing each file by hand.
# Change eth0 to start on boot with no IP address.
sed -i 's/ONBOOT=.*/ONBOOT="yes"/' /etc/sysconfig/network-scripts/ifcfg-eth0
sed -i 's/BOOTPROTO=.*/BOOTPROTO="none"/' /etc/sysconfig/network-scripts/ifcfg-eth0
# Change eth1 to start on boot with no IP address.
sed -i 's/ONBOOT=.*/ONBOOT="yes"/' /etc/sysconfig/network-scripts/ifcfg-eth1
sed -i 's/BOOTPROTO=.*/BOOTPROTO="none"/' /etc/sysconfig/network-scripts/ifcfg-eth1
# Change eth2 to start on boot with no IP address.
sed -i 's/ONBOOT=.*/ONBOOT="yes"/' /etc/sysconfig/network-scripts/ifcfg-eth2
sed -i 's/BOOTPROTO=.*/BOOTPROTO="none"/' /etc/sysconfig/network-scripts/ifcfg-eth2
# Change eth3 to start on boot with no IP address.
sed -i 's/ONBOOT=.*/ONBOOT="yes"/' /etc/sysconfig/network-scripts/ifcfg-eth3
sed -i 's/BOOTPROTO=.*/BOOTPROTO="none"/' /etc/sysconfig/network-scripts/ifcfg-eth3
# Change eth4 to start on boot with no IP address.
sed -i 's/ONBOOT=.*/ONBOOT="yes"/' /etc/sysconfig/network-scripts/ifcfg-eth5
sed -i 's/BOOTPROTO=.*/BOOTPROTO="none"/' /etc/sysconfig/network-scripts/ifcfg-eth5
You can see how the file was changed by using diff to compare the backed up version against the edited one. Let's look at ifcfg-eth0 to see this;
diff -U0 /root/backups/network-scripts/ifcfg-eth0 /etc/sysconfig/network-scripts/ifcfg-eth0
--- /root/backups/network-scripts/eth0 2013-10-28 12:30:07.000000000 -0400
+++ /etc/sysconfig/network-scripts/eth0_link1 2013-10-28 17:20:38.978458128 -0400
@@ -2 +2 @@
-BOOTPROTO="dhcp"
+BOOTPROTO="none"
@@ -5 +5 @@
-ONBOOT="no"
+ONBOOT="yes"
Excellent. You can check the other files as well to confirm that they were edited as well, if you wish. Once you are happy with the changes, restart the network initialization script.
| Note: You may see [FAILED] while stopping some interfaces, this is not a concern. |
/etc/init.d/network restart
Shutting down interface eth0: [ OK ]
Shutting down interface eth1: [ OK ]
Shutting down interface eth2: [ OK ]
Shutting down interface eth3: [ OK ]
Shutting down interface eth4: [ OK ]
Shutting down interface eth5: [ OK ]
Shutting down loopback interface: [ OK ]
Bringing up loopback interface: [ OK ]
Bringing up interface eth0: [ OK ]
Bringing up interface eth1: [ OK ]
Bringing up interface eth2: [ OK ]
Bringing up interface eth3: [ OK ]
Determining IP information for eth4... done.
[ OK ]
Bringing up interface eth5: [ OK ]
Now if we look at ifconfig again, we'll see all six interfaces have been started!
ifconfig
eth0 Link encap:Ethernet HWaddr 00:1B:21:81:C3:34
inet6 addr: fe80::21b:21ff:fe81:c334/64 Scope:Link
UP BROADCAST RUNNING MULTICAST MTU:1500 Metric:1
RX packets:2433 errors:0 dropped:0 overruns:0 frame:0
TX packets:31 errors:0 dropped:0 overruns:0 carrier:0
collisions:0 txqueuelen:1000
RX bytes:150042 (146.5 KiB) TX bytes:3066 (2.9 KiB)
Interrupt:24 Memory:ce240000-ce260000
eth1 Link encap:Ethernet HWaddr 00:1B:21:81:C3:35
inet6 addr: fe80::21b:21ff:fe81:c335/64 Scope:Link
UP BROADCAST RUNNING MULTICAST MTU:1500 Metric:1
RX packets:2416 errors:0 dropped:0 overruns:0 frame:0
TX packets:31 errors:0 dropped:0 overruns:0 carrier:0
collisions:0 txqueuelen:1000
RX bytes:148176 (144.7 KiB) TX bytes:3066 (2.9 KiB)
Interrupt:34 Memory:ce2a0000-ce2c0000
eth2 Link encap:Ethernet HWaddr A0:36:9F:02:E0:04
inet6 addr: fe80::a236:9fff:fe02:e004/64 Scope:Link
UP BROADCAST RUNNING MULTICAST MTU:1500 Metric:1
RX packets:3 errors:0 dropped:0 overruns:0 frame:0
TX packets:36 errors:0 dropped:0 overruns:0 carrier:0
collisions:0 txqueuelen:1000
RX bytes:1026 (1.0 KiB) TX bytes:5976 (5.8 KiB)
Memory:ce400000-ce500000
eth3 Link encap:Ethernet HWaddr A0:36:9F:02:E0:05
inet6 addr: fe80::a236:9fff:fe02:e005/64 Scope:Link
UP BROADCAST RUNNING MULTICAST MTU:1500 Metric:1
RX packets:1606 errors:0 dropped:0 overruns:0 frame:0
TX packets:21 errors:0 dropped:0 overruns:0 carrier:0
collisions:0 txqueuelen:1000
RX bytes:98242 (95.9 KiB) TX bytes:2102 (2.0 KiB)
Memory:ce500000-ce600000
eth4 Link encap:Ethernet HWaddr 00:19:99:9C:9B:9E
inet addr:10.255.0.33 Bcast:10.255.255.255 Mask:255.255.0.0
inet6 addr: fe80::219:99ff:fe9c:9b9e/64 Scope:Link
UP BROADCAST RUNNING MULTICAST MTU:1500 Metric:1
RX packets:308572 errors:0 dropped:0 overruns:0 frame:0
TX packets:153402 errors:0 dropped:0 overruns:0 carrier:0
collisions:0 txqueuelen:1000
RX bytes:345254511 (329.2 MiB) TX bytes:14520378 (13.8 MiB)
Memory:ce660000-ce680000
eth5 Link encap:Ethernet HWaddr 00:19:99:9C:9B:9F
inet6 addr: fe80::219:99ff:fe9c:9b9f/64 Scope:Link
UP BROADCAST RUNNING MULTICAST MTU:1500 Metric:1
RX packets:6 errors:0 dropped:0 overruns:0 frame:0
TX packets:23 errors:0 dropped:0 overruns:0 carrier:0
collisions:0 txqueuelen:1000
RX bytes:2052 (2.0 KiB) TX bytes:3114 (3.0 KiB)
Memory:ce6c0000-ce6e0000
lo Link encap:Local Loopback
inet addr:127.0.0.1 Mask:255.0.0.0
inet6 addr: ::1/128 Scope:Host
UP LOOPBACK RUNNING MTU:16436 Metric:1
RX packets:3540 errors:0 dropped:0 overruns:0 frame:0
TX packets:3540 errors:0 dropped:0 overruns:0 carrier:0
collisions:0 txqueuelen:0
RX bytes:2652436 (2.5 MiB) TX bytes:2652436 (2.5 MiB)
Excellent! Now we can start creating the list of what physical interfaces have what current names.
Finding Current Names for Physical Interfaces
Once you know how you want your interfaces, create a little table like this:
| Have | Want |
|---|---|
| bcn_link1 | |
| sn_link1 | |
| ifn_link1 | |
| bcn_link2 | |
| sn_link2 | |
| ifn_link2 |
Now we want to use a program called tail to watch the system log file /var/log/messages and print to screen messages as they're written to the log. To do this, run;
tail -f -n 0 /var/log/messages
When you run this, the cursor will just sit there and nothing will be printed to screen at first. This is fine, this tells us that tail is waiting for new records. We're now going to methodically unplug each network cable, wait a moment and then plug it back in. Each time we do this, we'll write down the interface name that was reported as going down and then coming back up.
The first cable we're going to unplug is the one in the physical interface we want to make bcn_link1.
Oct 28 17:36:06 an-a05n01 kernel: igb: eth4 NIC Link is Down
Oct 28 17:36:19 an-a05n01 kernel: igb: eth4 NIC Link is Up 1000 Mbps Full Duplex, Flow Control: RX/TX
Here we see that the physical interface that we want to be ifn_link1 is currently called eth4. So we'll add that to our chart.
| Have | Want |
|---|---|
| eth4 | bcn_link1 |
| sn_link1 | |
| ifn_link1 | |
| bcn_link2 | |
| sn_link2 | |
| ifn_link2 |
Now we'll unplug the cable we want to make sn_link1:
Oct 28 17:38:01 an-a05n01 kernel: igb: eth5 NIC Link is Down
Oct 28 17:38:04 an-a05n01 kernel: igb: eth5 NIC Link is Up 1000 Mbps Full Duplex, Flow Control: RX/TX
It's currently called eth5, so we'll write that in beside the "Want" column's sn_link1 entry.
| Have | Want |
|---|---|
| eth4 | bcn_link1 |
| eth5 | sn_link1 |
| ifn_link1 | |
| bcn_link2 | |
| sn_link2 | |
| ifn_link2 |
Keep doing this for the other four cables.
Oct 28 17:39:28 an-a05n01 kernel: e1000e: eth0 NIC Link is Down
Oct 28 17:39:30 an-a05n01 kernel: e1000e: eth0 NIC Link is Up 1000 Mbps Full Duplex, Flow Control: Rx/Tx
Oct 28 17:39:35 an-a05n01 kernel: e1000e: eth1 NIC Link is Down
Oct 28 17:39:37 an-a05n01 kernel: e1000e: eth1 NIC Link is Up 1000 Mbps Full Duplex, Flow Control: Rx/Tx
Oct 28 17:39:40 an-a05n01 kernel: igb: eth2 NIC Link is Down
Oct 28 17:39:43 an-a05n01 kernel: igb: eth2 NIC Link is Up 1000 Mbps Full Duplex, Flow Control: RX/TX
Oct 28 17:39:47 an-a05n01 kernel: igb: eth3 NIC Link is Down
Oct 28 17:39:51 an-a05n01 kernel: igb: eth3 NIC Link is Up 1000 Mbps Full Duplex, Flow Control: RX/TX
The finished table is this;
| Have | Want |
|---|---|
| eth4 | bcn_link1 |
| eth5 | sn_link1 |
| eth0 | ifn_link1 |
| eth1 | bcn_link2 |
| eth2 | sn_link2 |
| eth3 | ifn_link2 |
Now we know how we want to move the names around!
Building the MAC Address List
| Note: This was written before the convertion from ethX to {bcn,sn,ifn}_link{1,2} names were changed. Please rename the ethX file names and DEVICE="ethX" entries to reflect the new names here. |
Every network interface has a unique MAC address assigned to it when it is built. Think of this sort of like a globally unique serial number. Because it's guaranteed to be unique, it's a convenient way for the operating system to create a persistent map between real interfaces and names. If we didn't use these, then each time you rebooted your node, it would possibly mean that the names get juggled. Not very good.
RHEL uses two files for creating this map:
- /etc/udev/rules.d/70-persistent-net.rules
- /etc/sysconfig/network-scripts/ifcfg-eth*
The 70-persistent-net.rules can be rebuilt by running a command, so we're not going to worry about it. We'll just delete in a little bit and then recreate it.
The files we care about are the six ifcfg-ethX files. Inside each of these is a variable named HWADDR. The value set here will tell the OS what physical network interface the given file is configuring. We know from the list we created how we want to move the files around.
To recap:
- The HWADDR MAC address in eth4 will be moved to bcn_link1.
- The HWADDR MAC address in eth5 will be moved to sn_link1.
- The HWADDR MAC address in eth0 will be moved to ifn_link1.
- The HWADDR MAC address in eth1 will be moved to bcn_link2.
- The HWADDR MAC address in eth2 will be moved to sn_link2.
- The HWADDR MAC address in eth3 will be moved to ifn_link2.
So lets create a new table. This one we will use to write down the MAC addresses we want to set for each device.
| Device | New MAC address |
|---|---|
| bcn_link1 | |
| sn_link1 | |
| ifn_link1 | |
| bcn_link2 | |
| sn_link2 | |
| ifn_link2 |
So we know that the MAC address currently assigned to eth4 is the one we want to move to bcn_link1. We can use ifconfig to show the information for the eth4 interface only.
ifconfig
eth4 Link encap:Ethernet HWaddr 00:19:99:9C:9B:9E
inet addr:10.255.0.33 Bcast:10.255.255.255 Mask:255.255.0.0
inet6 addr: fe80::219:99ff:fe9c:9b9e/64 Scope:Link
UP BROADCAST RUNNING MULTICAST MTU:1500 Metric:1
RX packets:315979 errors:0 dropped:0 overruns:0 frame:0
TX packets:153610 errors:0 dropped:0 overruns:0 carrier:0
collisions:0 txqueuelen:1000
RX bytes:345711965 (329.6 MiB) TX bytes:14555290 (13.8 MiB)
Memory:ce660000-ce680000
We want the HWaddr value, 00:19:99:9C:9B:9E. This will be moved to bcn_link1, so lets write that down.
| Device | New MAC address |
|---|---|
| bcn_link1 | 00:19:99:9C:9B:9E |
| sn_link1 | |
| ifn_link1 | |
| bcn_link2 | |
| sn_link2 | |
| ifn_link2 |
Next up, we want to move eth5 to be the new sn_link1. We can use ifconfig again, but this time we'll do a little bash-fu to reduce the output to just the MAC address.
ifconfig eth5 | grep HWaddr | awk '{print $5}'
00:19:99:9C:9B:9F
This simply reduced the output to just the line with the HWaddr line in it, then it split the line on spaces and printed just the fifth value, which is the MAC address currently assigned to eth5. We'll write this down beside sn_link1.
| Device | New MAC address |
|---|---|
| bcn_link1 | 00:19:99:9C:9B:9E |
| sn_link1 | 00:19:99:9C:9B:9F |
| ifn_link1 | |
| bcn_link2 | |
| sn_link2 | |
| ifn_link2 |
Next up, we want to move the current eth0 over to ifn_link1. So lets get the current eth0 MAC address and add it to the list as well.
ifconfig eth0 | grep HWaddr | awk '{print $5}'
00:1B:21:81:C3:34
Now we want to move eth1 to bcn_link2;
ifconfig eth1 | grep HWaddr | awk '{print $5}'
00:1B:21:81:C3:35
Second to last one is eth2, which will move to sn_link2;
ifconfig eth2 | grep HWaddr | awk '{print $5}'
A0:36:9F:02:E0:04
Finally, eth3 moves to ifn_link2;
ifconfig eth3 | grep HWaddr | awk '{print $5}'
A0:36:9F:02:E0:05Our complete list of new MAC address is;
| Device | New MAC address |
|---|---|
| bcn_link1 | 00:19:99:9C:9B:9E |
| sn_link1 | 00:19:99:9C:9B:9F |
| ifn_link1 | 00:1B:21:81:C3:34 |
| bcn_link2 | 00:1B:21:81:C3:35 |
| sn_link2 | A0:36:9F:02:E0:04 |
| ifn_link2 | A0:36:9F:02:E0:05 |
Excellent! Now we're ready.
Changing the Interface Device Names
| Warning: This step is best done when you have direct access to the node. The reason is that the following changes require the network to be totally stopped in order to work without a reboot. If you can't get physical access, then when we get to the start_udev step, reboot the node instead. |
We're about to change which physical interfaces have which device names. If we don't stop the network first, we won't be able to restart them later. If we waited until later, the kernel would see a conflict between what it thinks the MAC-to-name mapping should be compared to what it sees in the configuration. The only way around this is a reboot, which is kind of a waste. So by stopping the network now, we clear the kernel's view of the network and avoid the problem entirely.
So, stop the network.
| an-a05n01 | /etc/init.d/network stopShutting down interface eth0: [ OK ]
Shutting down interface eth1: [ OK ]
Shutting down interface eth2: [ OK ]
Shutting down interface eth3: [ OK ]
Shutting down interface eth4: [ OK ]
Shutting down interface eth5: [ OK ]
Shutting down loopback interface: [ OK ] |
|---|
We can confirm that it's stopped by running ifconfig. It should return nothing at all.
| an-a05n01 | ifconfig<No output> |
|---|
Good. Next, delete the /etc/udev/rules.d/70-persistent-net.rules file. We'll regenerate it after we're done.
| an-a05n01 | rm /etc/udev/rules.d/70-persistent-net.rulesrm: remove regular file `/etc/udev/rules.d/70-persistent-net.rules'? y |
|---|
{{note|1=Please rename the ifcfg-ethX files to be called ifcfg-{bcn,sn,ifn}_link{1,2} here!}}
Now we need to edit each of the ifcfg-ethX files and change the HWADDR value to the new addresses we wrote down in our list. Let's start with ifcfg-bcn_link1
| an-a05n01 | vim /etc/sysconfig/network-scripts/ifcfg-bcn_link1Change the line: HWADDR="00:1B:21:81:C3:34"To the new value from our list; HWADDR="00:19:99:9C:9B:9E" |
|---|
Save the file and then move on to ifcfg-sn_link1
| an-a05n01 | vim /etc/sysconfig/network-scripts/ifcfg-ifn_link1Change the current HWADDR="00:1B:21:81:C3:35" entry to the new MAC address; HWADDR="00:19:99:9C:9B:9F" |
|---|
Continue editing the other four ifcfg-X files in the same manner.
Once all the files have been edited, we will regenerate the 70-persistent-net.rules.
| an-a05n01 | start_udevStarting udev: [ OK ] |
|---|
Test the New Network Name Mapping
It's time to start networking again and see if the remapping worked!
| an-a05n01 | /etc/init.d/network startBringing up loopback interface: [ OK ]
Bringing up interface bcn_link1: [ OK ]
Bringing up interface sn_link1: [ OK ]
Bringing up interface ifn_link1: [ OK ]
Bringing up interface bcn_link2: [ OK ]
Bringing up interface sn_link2:
Determining IP information for sn_link2...PING 10.255.255.254 (10.255.255.254) from 10.255.0.33 sn_link2: 56(84) bytes of data.
--- 10.255.255.254 ping statistics ---
4 packets transmitted, 0 received, +3 errors, 100% packet loss, time 3000ms
pipe 3
failed.
[FAILED]
Bringing up interface ifn_link2: [ OK ] |
|---|
What happened!?
If you recall, the old sn_link2 device was the interface we moved to ifn_link1. The new sn_link2 is not plugged into a network with access to our DHCP server, so it failed to get an IP address. To fix this, we'll disable DHCP on the new sn_link2 and enable it on the new ifn_link1 (which used to be sn_link2).
| an-a05n01 | sed -i 's/BOOTPROTO.*/BOOTPROTO="none"/' /etc/sysconfig/network-scripts/ifcfg-sn_link2
sed -i 's/BOOTPROTO.*/BOOTPROTO="dhcp"/' /etc/sysconfig/network-scripts/ifcfg-ifn_link1 |
|---|
Now we'll restart the network and this time we should be good.
| an-a05n01 | /etc/init.d/network restartShutting down interface bcn_link1: [ OK ]
Shutting down interface sn_link1: [ OK ]
Shutting down interface ifn_link1: [ OK ]
Shutting down interface bcn_link2: [ OK ]
Shutting down interface sn_link2: [ OK ]
Shutting down interface ifn_link2: [ OK ]
Shutting down loopback interface: [ OK ]
Bringing up loopback interface: [ OK ]
Bringing up interface bcn_link1:
Determining IP information for bcn_link1... done.
[ OK ]
Bringing up interface sn_link1: [ OK ]
Bringing up interface ifn_link1: [ OK ]
Bringing up interface bcn_link2: [ OK ]
Bringing up interface sn_link2: [ OK ]
Bringing up interface ifn_link2: [ OK ] |
|---|
The last step is to again tail the system log and then unplug and plug-in the cables. If everything went well, they should be in the right order now.
| an-a05n01 | tail -f -n 0 /var/log/messagesOct 28 18:44:24 an-a05n01 kernel: igb: bcn_link1 NIC Link is Down
Oct 28 18:44:27 an-a05n01 kernel: igb: bcn_link1 NIC Link is Up 1000 Mbps Full Duplex, Flow Control: RX/TX
Oct 28 18:44:31 an-a05n01 kernel: igb: sn_link1 NIC Link is Down
Oct 28 18:44:34 an-a05n01 kernel: igb: sn_link1 NIC Link is Up 1000 Mbps Full Duplex, Flow Control: RX/TX
Oct 28 18:44:35 an-a05n01 kernel: e1000e: ifn_link1 NIC Link is Down
Oct 28 18:44:38 an-a05n01 kernel: e1000e: ifn_link1 NIC Link is Up 1000 Mbps Full Duplex, Flow Control: Rx/Tx
Oct 28 18:44:39 an-a05n01 kernel: e1000e: bcn_link2 NIC Link is Down
Oct 28 18:44:42 an-a05n01 kernel: e1000e: bcn_link2 NIC Link is Up 1000 Mbps Full Duplex, Flow Control: Rx/Tx
Oct 28 18:44:45 an-a05n01 kernel: igb: sn_link2 NIC Link is Down
Oct 28 18:44:49 an-a05n01 kernel: igb: sn_link2 NIC Link is Up 1000 Mbps Full Duplex, Flow Control: RX/TX
Oct 28 18:44:50 an-a05n01 kernel: igb: ifn_link2 NIC Link is Down
Oct 28 18:44:54 an-a05n01 kernel: igb: ifn_link2 NIC Link is Up 1000 Mbps Full Duplex, Flow Control: RX/TX |
|---|
Woohoo! Done!
At this point, I like to refresh the backup. We're going to be making more changes later at it would be nice to not have to redo this step again, should something go wrong.
| an-a05n01 | rsync -av /etc/sysconfig/network-scripts /root/backups/sending incremental file list
network-scripts/
network-scripts/ifcfg-bcn_link1
network-scripts/ifcfg-sn_link1
network-scripts/ifcfg-ifn_link1
network-scripts/ifcfg-bcn_link2
network-scripts/ifcfg-sn_link2
network-scripts/ifcfg-ifn_link2
sent 1955 bytes received 130 bytes 4170.00 bytes/sec
total size is 132711 speedup is 63.65 |
|---|
Repeat this process for the other node. Once both nodes have the matching physical interface to device names, we'll be ready to move on to the next step!
Configuring our Bridge, Bonds and Interfaces
To setup our network, we will need to edit the ifcfg-{bcn,sn,ifn}_link{1,2}, ifcfg-{bcn,sn,ifn}_bond1 and ifcfg-ifn_bridge1 scripts.
The ifn_bridge1 device is a bridge, like a virtual network switch, which will be used to route network connections between the virtual machines and the outside world, via the IFN. If you look in the network map, you will see that the ifn_bridge1 virtual interface connects to ifn_bond1, which links to the outside world, and it connects to all servers. Just like a normal switch does. You will also note that the bridge will have the IP addresses, not the bonded interface ifn_bond1. It will instead be slaved to the ifn_bridge1 bridge.
The {bcn,sn,ifn}_bond1 virtual devices work a lot like the network version of RAID level 1 arrays. They take two real links and turn them into one redundant link. In our case, each link in the bond will go to a different switch, protecting our links for interface, cable, port or entire switch failures. Should any of these fail, the bond will switch to the backup link so quickly that the applications on the nodes will not notice anything happened.
We're going to be editing a lot of files. It's best to lay out what we'll be doing in a chart. So our setup will be:
| Node | BCN IP and Device | SN IP and Device | IFN IP and Device |
|---|---|---|---|
| an-a05n01 | 10.20.50.1 on bcn_bond1 | 10.10.50.1 on sn_bond1 | 10.255.50.1 on ifn_bridge1 (ifn_bond1 slaved) |
| an-a05n02 | 10.20.50.2 on bcn_bond1 | 10.10.50.2 on sn_bond1 | 10.255.50.2 on ifn_bridge1 (ifn_bond1 slaved) |
Creating New Network Configuration Files
The new bond and bridge devices we want to create do not exist at all yet. So we will start by touching the configuration files we will need.
| an-a05n01 | touch /etc/sysconfig/network-scripts/ifcfg-{bcn,sn,ifn}_bond1
touch /etc/sysconfig/network-scripts/ifcfg-ifn_bridge1 |
|---|---|
| an-a05n02 | touch /etc/sysconfig/network-scripts/ifcfg-{bcn,sn,ifn}_bond1
touch /etc/sysconfig/network-scripts/ifcfg-ifn_bridge1 |
Configuring the Bridge
We'll start in reverse order, crafting the bridge's script first.
| an-a05n01 IFN Bridge: | an-a05n02 IFN Bridge: |
|---|---|
vim /etc/sysconfig/network-scripts/ifcfg-ifn_bridge1# Internet-Facing Network - Bridge
DEVICE="ifn_bridge1"
TYPE="Bridge"
NM_CONTROLLED="no"
BOOTPROTO="none"
IPADDR="10.255.50.1"
NETMASK="255.255.0.0"
GATEWAY="10.255.255.254"
DNS1="8.8.8.8"
DNS2="8.8.4.4"
DEFROUTE="yes" |
vim /etc/sysconfig/network-scripts/ifcfg-ifn_bridge1# Internet-Facing Network - Bridge
DEVICE="ifn_bridge1"
TYPE="Bridge"
NM_CONTROLLED="no"
BOOTPROTO="none"
IPADDR="10.255.50.2"
NETMASK="255.255.0.0"
GATEWAY="10.255.255.254"
DNS1="8.8.8.8"
DNS2="8.8.4.4"
DEFROUTE="yes" |
If you have a Red Hat account, you can read up on what the option above mean, and specifics of bridge devices. In case you don't though, here is a summary:
| Variable | Description |
|---|---|
| DEVICE | This is the actual name given to this device. Generally is matches the file name. In this case, the DEVICE is ifn_bridge1 and the file name is ifcfg-ifn_bridge1. This matching of file name to device name is by convention and not strictly required. |
| TYPE | This is either Ethernet, the default, or Bridge, as we use here. Note that these values are case-sensitive! By setting this here, we're telling the OS that we're creating a bridge device. |
| NM_CONTROLLED | This can be yes, which is the default, or no, as we set here. This tells Network Manager that it is not allowed to manage this device. We've removed the NetworkManager package, so this is not strictly needed, but we'll add it just in case it gets installed in the future. |
| BOOTPROTO | This can be either none, which we're using here, dhcp or bootp if you want the interface to get an IP from a DHCP or BOOTP server, respectively. We're setting it to static, so we want this set to none. |
| IPADDR | This is the dotted-decimal IP address we're assigning to this interface. |
| NETMASK | This is the dotted-decimal subnet mask for this interface. |
| GATEWAY | This is the IP address the node will contact when we it needs to send traffic to other networks, like the Internet. |
| DNS1 | This is the IP address of the primary domain name server to use when the node needs to translate a host or domain name into an IP address which wasn't found in the /etc/hosts file. |
| DNS2 | This is the IP address of the backup domain name server, should the primary DNS server specified above fail. |
| DEFROUTE | This can be set to yes, as we've set it here, or no. If two or more interfaces has DEFROUTE set, the interface with this variable set to yes will be used. |
Creating the Bonded Interfaces
Next up, we'll can create the three bonding configuration files. This is where two physical network interfaces are tied together to work like a single, highly available network interface. You can think of a bonded interface as being akin to RAID level 1; A new virtual device is created out of two real devices.
We're going to see a long line called "BONDING_OPTS". Let's look at the meaning of these options before we look at the configuration;
| Variable | Description |
|---|---|
| mode | This tells the Linux kernel what kind of bond we're creating here. There are seven modes available, each with a numeric value representing them. We're going use the "Active/Passive" mode, known as mode 1 (active-backup). As of RHEL 6.4, modes 0 (balance-rr) and mode 2 (balance-xor) are supported for use with corosync. Given the proven reliability of surviving numerous tested failure and recovery tests though, AN! still strongly recommends mode 1. |
| miimon | This tells the kernel how often, in milliseconds, to check for unreported link failures. We're using 100 which tells the bonding driver to check if the network cable has been unplugged or plugged in every 100 milliseconds. Most modern drivers will report link state via their driver, so this option is not strictly required, but it is recommended for extra safety. |
| use_carrier | Setting this to 1 tells the driver to use the driver to maintain the link state. Some drivers don't support that. If you run into trouble where the link shows as up when it's actually down, get a new network card or try changing this to 0. |
| updelay | Setting this to 120000 tells the driver to delay switching back to the primary interface for 120,000 milliseconds (120 seconds / 2 minutes). This is designed to give the switch connected to the primary interface time to finish booting. Setting this too low may cause the bonding driver to switch back before the network switch is ready to actually move data. Some switches will not provide a link until it is fully booted, so please experiment. |
| downdelay | Setting this to 0 tells the driver not to wait before changing the state of an interface when the link goes down. That is, when the driver detects a fault, it will switch to the backup interface immediately. This is the default behaviour, but setting this here insures that it is reset when the interface is reset, should the delay be somehow set elsewhere. |
The first bond we'll configure is for the Back-Channel Network.
| an-a05n01 BCN Bond | vim /etc/sysconfig/network-scripts/ifcfg-bcn_bond1# Back-Channel Network - Bond
DEVICE="bcn_bond1"
NM_CONTROLLED="no"
BOOTPROTO="none"
ONBOOT="yes"
BONDING_OPTS="mode=1 miimon=100 use_carrier=1 updelay=120000 downdelay=0 primary=bcn_link1"
IPADDR="10.20.50.1"
NETMASK="255.255.0.0" |
|---|---|
| an-a05n02 BCN Bond | vim /etc/sysconfig/network-scripts/ifcfg-bcn_bond1# Back-Channel Network - Bond
DEVICE="bcn_bond1"
NM_CONTROLLED="no"
BOOTPROTO="none"
ONBOOT="yes"
BONDING_OPTS="mode=1 miimon=100 use_carrier=1 updelay=120000 downdelay=0 primary=bcn_link1"
IPADDR="10.20.50.2"
NETMASK="255.255.0.0" |
Next up is the bond for the Storage Network;
| an-a05n01 SN Bond: | vim /etc/sysconfig/network-scripts/ifcfg-sn_bond1# Storage Network - Bond
DEVICE="sn_bond1"
NM_CONTROLLED="no"
BOOTPROTO="none"
ONBOOT="yes"
BONDING_OPTS="mode=1 miimon=100 use_carrier=1 updelay=120000 downdelay=0 primary=sn_link1"
IPADDR="10.10.50.1"
NETMASK="255.255.0.0" |
|---|---|
| an-a05n02 SN Bond: | vim /etc/sysconfig/network-scripts/ifcfg-sn_bond1# Storage Network - Bond
DEVICE="sn_bond1"
NM_CONTROLLED="no"
BOOTPROTO="none"
ONBOOT="yes"
BONDING_OPTS="mode=1 miimon=100 use_carrier=1 updelay=120000 downdelay=0 primary=sn_link1"
IPADDR="10.10.50.2"
NETMASK="255.255.0.0" |
Finally, we setup the bond for the Internet-Facing Network.
Here we see a new option:
- BRIDGE="ifn_bridge1"; This tells the system that this bond is to be connected to the ifn_bridge1 bridge when it is started.
| an-a05n01 IFN Bond: | vim /etc/sysconfig/network-scripts/ifcfg-ifn_bond1# Internet-Facing Network - Bond
DEVICE="ifn_bond1"
BRIDGE="ifn_bridge1"
NM_CONTROLLED="no"
BOOTPROTO="none"
ONBOOT="yes"
BONDING_OPTS="mode=1 miimon=100 use_carrier=1 updelay=120000 downdelay=0 primary=ifn_link1" |
|---|---|
| an-a05n02 IFN Bond: | vim /etc/sysconfig/network-scripts/ifcfg-ifn_bond1# Internet-Facing Network - Bond
DEVICE="ifn_bond1"
BRIDGE="ifn_bridge1"
NM_CONTROLLED="no"
BOOTPROTO="none"
ONBOOT="yes"
BONDING_OPTS="mode=1 miimon=100 use_carrier=1 updelay=120000 downdelay=0 primary=ifn_link1" |
Done with the bonds!
Alter the Interface Configurations
With the bridge and bonds in place, we can now alter the interface configurations.
We've already edited these back when we were remapping the physical interface to device names. This time, we're going to clean them up, add a comment and slave them to their parent bonds. Note that the only difference between each node's given config file will be the HWADDR variable's value.
- BCN bcn_bond1, Link 1;
| an-a05n01's bcn_link1 | vim /etc/sysconfig/network-scripts/ifcfg-bcn_link1# Back-Channel Network - Link 1
HWADDR="00:19:99:9C:9B:9E"
DEVICE="bcn_link1"
NM_CONTROLLED="no"
BOOTPROTO="none"
ONBOOT="yes"
MASTER="bcn_bond1"
SLAVE="yes" |
|---|---|
| an-a05n02's bcn_link1 | vim /etc/sysconfig/network-scripts/ifcfg-ifn_link1# Back-Channel Network - Link 1
HWADDR="00:19:99:9C:A0:6C"
DEVICE="bcn_link1"
NM_CONTROLLED="no"
BOOTPROTO="none"
ONBOOT="yes"
MASTER="bcn_bond1"
SLAVE="yes" |
- SN sn_bond1, Link 1:
| an-a05n01's sn_link1 | vim /etc/sysconfig/network-scripts/ifcfg-sn_link1# Storage Network - Link 1
DEVICE="sn_link1"
HWADDR="00:19:99:9C:9B:9F"
NM_CONTROLLED="no"
BOOTPROTO="none"
ONBOOT="yes"
MASTER="sn_bond1"
SLAVE="yes" |
|---|---|
| an-a05n02's sn_link1 | vim /etc/sysconfig/network-scripts/ifcfg-sn_link1# Storage Network - Link 1
DEVICE="sn_link1"
HWADDR="00:19:99:9C:A0:6D"
NM_CONTROLLED="no"
BOOTPROTO="none"
ONBOOT="yes"
MASTER="sn_bond1"
SLAVE="yes" |
- IFN ifn_bond1, Link 1:
| an-a05n01's ifn_link1 | vim /etc/sysconfig/network-scripts/ifcfg-ifn_link1# Internet-Facing Network - Link 1
HWADDR="00:1B:21:81:C3:34"
DEVICE="ifn_link1"
NM_CONTROLLED="no"
BOOTPROTO="none"
ONBOOT="yes"
MASTER="ifn_bond1"
SLAVE="yes" |
|---|---|
| an-a05n02's ifn_link1 | vim /etc/sysconfig/network-scripts/ifcfg-ifn_link1# Internet-Facing Network - Link 1
HWADDR="00:1B:21:81:C2:EA"
DEVICE="ifn_link1"
NM_CONTROLLED="no"
BOOTPROTO="none"
ONBOOT="yes"
MASTER="ifn_bond1"
SLAVE="yes" |
- BCN bcn_bond1, Link 2:
| an-a05n01's bcn_link2 | vim /etc/sysconfig/network-scripts/ifcfg-bcn_link2# Back-Channel Network - Link 2
HWADDR="00:1B:21:81:C3:35"
DEVICE="bcn_link2"
NM_CONTROLLED="no"
BOOTPROTO="none"
ONBOOT="yes"
MASTER="bcn_bond1"
SLAVE="yes" |
|---|---|
| an-a05n02's bcn_link2 | vim /etc/sysconfig/network-scripts/ifcfg-bcn_link2# Back-Channel Network - Link 2
HWADDR="00:1B:21:81:C2:EB"
DEVICE="bcn_link2"
NM_CONTROLLED="no"
BOOTPROTO="none"
ONBOOT="yes"
MASTER="bcn_bond1"
SLAVE="yes" |
- SN sn_bond1, Link 2:
| an-a05n01's sn_link2 | vim /etc/sysconfig/network-scripts/ifcfg-sn_link2# Storage Network - Link 2
HWADDR="A0:36:9F:02:E0:04"
DEVICE="sn_link2"
NM_CONTROLLED="no"
BOOTPROTO="none"
ONBOOT="yes"
MASTER="sn_bond1"
SLAVE="yes" |
|---|---|
| an-a05n02's sn_link2 | vim /etc/sysconfig/network-scripts/ifcfg-sn_link2# Storage Network - Link 2
HWADDR="A0:36:9F:07:D6:2E"
DEVICE="sn_link2"
NM_CONTROLLED="no"
BOOTPROTO="none"
ONBOOT="yes"
MASTER="sn_bond1"
SLAVE="yes" |
- IFN ifn_bond1, Link 2:
| an-a05n01's ifn_link2 | vim /etc/sysconfig/network-scripts/ifcfg-ifn_link2# Internet-Facing Network - Link 2
HWADDR="A0:36:9F:02:E0:05"
DEVICE="ifn_link2"
NM_CONTROLLED="no"
BOOTPROTO="none"
ONBOOT="yes"
MASTER="ifn_bond1"
SLAVE="yes" |
|---|---|
| an-a05n02's ifn_link2 | vim /etc/sysconfig/network-scripts/ifcfg-ifn_link2# Internet-Facing Network - Link 2
HWADDR="A0:36:9F:07:D6:2F"
DEVICE="ifn_link2"
NM_CONTROLLED="no"
BOOTPROTO="none"
ONBOOT="yes"
MASTER="ifn_bond1"
SLAVE="yes" |
The order of the variables is not really important, from a technical perspective. However, we've found that having the order consistent as possible between configs and nodes goes a long way to simplifying support and problem solving. It certainly helps reduce human error as well.
If we compare the newly updated configs with one of the backups, we'll see a couple interesting things;
| an-a05n01's bcn_link1 | diff -U0 /root/backups/network-scripts/ifcfg-eth4 /etc/sysconfig/network-scripts/ifcfg-bcn_link1--- /root/backups/network-scripts/ifcfg-eth4 2013-10-28 18:39:59.000000000 -0400
+++ /etc/sysconfig/network-scripts/ifcfg-bcn_link1 2013-10-29 13:25:03.443343494 -0400
@@ -1,2 +1 @@
-DEVICE="eth4"
-BOOTPROTO="dhcp"
+# Back-Channel Network - Link 1
@@ -4 +3,3 @@
-NM_CONTROLLED="yes"
+DEVICE="bcn_link1"
+NM_CONTROLLED="no"
+BOOTPROTO="none"
@@ -6,2 +7,2 @@
-TYPE="Ethernet"
-UUID="ea03dc97-019c-4acc-b4d6-bc42d30d9e36"
+MASTER="bcn_bond1"
+SLAVE="yes" |
|---|
The notable part is that TYPE and UUID where removed. These are not required, so we generally remove them. If you prefer to keep them, that is fine, too.
Loading the New Network Configuration
| Warning: If you're connected to the nodes over the network and if the current IP was assigned by DHCP (or is otherwise different from the IP set in ifn_bridge1), your network connection will break. You will need to reconnect with the IP address you set. |
Simply restart the network service.
| an-a05n01 | /etc/init.d/network restartShutting down interface bcn_link1: /etc/sysconfig/network-scripts/ifdown-eth: line 116: /sys/class/net/bcn_bond1/bonding/slaves: No such file or directory
[ OK ]
Shutting down interface sn_link1: /etc/sysconfig/network-scripts/ifdown-eth: line 116: /sys/class/net/sn_bond1/bonding/slaves: No such file or directory
[ OK ]
Shutting down interface ifn_link1: /etc/sysconfig/network-scripts/ifdown-eth: line 116: /sys/class/net/ifn_bond1/bonding/slaves: No such file or directory
[ OK ]
Shutting down interface bcn_link2: /etc/sysconfig/network-scripts/ifdown-eth: line 116: /sys/class/net/bcn_bond1/bonding/slaves: No such file or directory
[ OK ]
Shutting down interface sn_link2: /etc/sysconfig/network-scripts/ifdown-eth: line 116: /sys/class/net/sn_bond1/bonding/slaves: No such file or directory
[ OK ]
Shutting down interface ifn_link2: /etc/sysconfig/network-scripts/ifdown-eth: line 116: /sys/class/net/ifn_bond1/bonding/slaves: No such file or directory
[ OK ]
Shutting down loopback interface: [ OK ]
Bringing up loopback interface: [ OK ]
Bringing up interface bcn_bond1: [ OK ]
Bringing up interface sn_bond1: [ OK ]
Bringing up interface ifn_bond1: [ OK ]
Bringing up interface ifn_bridge1: [ OK ] |
|---|
These errors are normal. They're caused because we changed the ifcfg-ethX configuration files to reference bonded interfaces that, at the time we restarted the network, did not yet exist. If you restart the network again, you will see that the errors no longer appear.
Verifying the New Network Config
The first check to make sure everything works is to simply run ifconfig and make sure everything we expect to be there is, in fact, there.
| an-a05n01 | an-a05n02 |
|---|---|
ifconfigbcn_bond1 Link encap:Ethernet HWaddr 00:19:99:9C:9B:9E
inet addr:10.20.50.1 Bcast:10.20.255.255 Mask:255.255.0.0
inet6 addr: fe80::219:99ff:fe9c:9b9e/64 Scope:Link
UP BROADCAST RUNNING MASTER MULTICAST MTU:1500 Metric:1
RX packets:821080 errors:0 dropped:0 overruns:0 frame:0
TX packets:160713 errors:0 dropped:0 overruns:0 carrier:0
collisions:0 txqueuelen:0
RX bytes:392278922 (374.1 MiB) TX bytes:15344030 (14.6 MiB)
sn_bond1 Link encap:Ethernet HWaddr 00:19:99:9C:9B:9F
inet addr:10.10.50.1 Bcast:10.10.255.255 Mask:255.255.0.0
inet6 addr: fe80::219:99ff:fe9c:9b9f/64 Scope:Link
UP BROADCAST RUNNING MASTER MULTICAST MTU:1500 Metric:1
RX packets:29 errors:0 dropped:0 overruns:0 frame:0
TX packets:100 errors:0 dropped:0 overruns:0 carrier:0
collisions:0 txqueuelen:0
RX bytes:6030 (5.8 KiB) TX bytes:13752 (13.4 KiB)
ifn_bond1 Link encap:Ethernet HWaddr 00:1B:21:81:C3:34
inet6 addr: fe80::21b:21ff:fe81:c334/64 Scope:Link
UP BROADCAST RUNNING MASTER MULTICAST MTU:1500 Metric:1
RX packets:512206 errors:0 dropped:0 overruns:0 frame:0
TX packets:222 errors:0 dropped:0 overruns:0 carrier:0
collisions:0 txqueuelen:0
RX bytes:34650974 (33.0 MiB) TX bytes:25375 (24.7 KiB)
bcn_link1 Link encap:Ethernet HWaddr 00:19:99:9C:9B:9E
UP BROADCAST RUNNING SLAVE MULTICAST MTU:1500 Metric:1
RX packets:570073 errors:0 dropped:0 overruns:0 frame:0
TX packets:160669 errors:0 dropped:0 overruns:0 carrier:0
collisions:0 txqueuelen:1000
RX bytes:377010981 (359.5 MiB) TX bytes:15339986 (14.6 MiB)
Memory:ce660000-ce680000
sn_link1 Link encap:Ethernet HWaddr 00:19:99:9C:9B:9F
UP BROADCAST RUNNING SLAVE MULTICAST MTU:1500 Metric:1
RX packets:20 errors:0 dropped:0 overruns:0 frame:0
TX packets:43 errors:0 dropped:0 overruns:0 carrier:0
collisions:0 txqueuelen:1000
RX bytes:4644 (4.5 KiB) TX bytes:4602 (4.4 KiB)
Memory:ce6c0000-ce6e0000
ifn_link1 Link encap:Ethernet HWaddr 00:1B:21:81:C3:34
UP BROADCAST RUNNING SLAVE MULTICAST MTU:1500 Metric:1
RX packets:262105 errors:0 dropped:0 overruns:0 frame:0
TX packets:188 errors:0 dropped:0 overruns:0 carrier:0
collisions:0 txqueuelen:1000
RX bytes:19438941 (18.5 MiB) TX bytes:22295 (21.7 KiB)
Interrupt:24 Memory:ce240000-ce260000
bcn_link2 Link encap:Ethernet HWaddr 00:19:99:9C:9B:9E
UP BROADCAST RUNNING SLAVE MULTICAST MTU:1500 Metric:1
RX packets:251007 errors:0 dropped:0 overruns:0 frame:0
TX packets:44 errors:0 dropped:0 overruns:0 carrier:0
collisions:0 txqueuelen:1000
RX bytes:15267941 (14.5 MiB) TX bytes:4044 (3.9 KiB)
Interrupt:34 Memory:ce2a0000-ce2c0000
sn_link2 Link encap:Ethernet HWaddr 00:19:99:9C:9B:9F
UP BROADCAST RUNNING SLAVE MULTICAST MTU:1500 Metric:1
RX packets:9 errors:0 dropped:0 overruns:0 frame:0
TX packets:57 errors:0 dropped:0 overruns:0 carrier:0
collisions:0 txqueuelen:1000
RX bytes:1386 (1.3 KiB) TX bytes:9150 (8.9 KiB)
Memory:ce400000-ce500000
ifn_link2 Link encap:Ethernet HWaddr 00:1B:21:81:C3:34
UP BROADCAST RUNNING SLAVE MULTICAST MTU:1500 Metric:1
RX packets:250101 errors:0 dropped:0 overruns:0 frame:0
TX packets:34 errors:0 dropped:0 overruns:0 carrier:0
collisions:0 txqueuelen:1000
RX bytes:15212033 (14.5 MiB) TX bytes:3080 (3.0 KiB)
Memory:ce500000-ce600000
lo Link encap:Local Loopback
inet addr:127.0.0.1 Mask:255.0.0.0
inet6 addr: ::1/128 Scope:Host
UP LOOPBACK RUNNING MTU:16436 Metric:1
RX packets:3543 errors:0 dropped:0 overruns:0 frame:0
TX packets:3543 errors:0 dropped:0 overruns:0 carrier:0
collisions:0 txqueuelen:0
RX bytes:2652772 (2.5 MiB) TX bytes:2652772 (2.5 MiB)
ifn_bridge1 Link encap:Ethernet HWaddr 00:1B:21:81:C3:34
inet addr:10.255.50.1 Bcast:10.255.255.255 Mask:255.255.0.0
inet6 addr: fe80::21b:21ff:fe81:c334/64 Scope:Link
UP BROADCAST RUNNING MULTICAST MTU:1500 Metric:1
RX packets:4425 errors:0 dropped:0 overruns:0 frame:0
TX packets:127 errors:0 dropped:0 overruns:0 carrier:0
collisions:0 txqueuelen:0
RX bytes:225580 (220.2 KiB) TX bytes:17449 (17.0 KiB) |
ifconfigbcn_bond1 Link encap:Ethernet HWaddr 00:19:99:9C:A0:6C
inet addr:10.20.50.2 Bcast:10.20.255.255 Mask:255.255.0.0
inet6 addr: fe80::219:99ff:fe9c:a06c/64 Scope:Link
UP BROADCAST RUNNING MASTER MULTICAST MTU:1500 Metric:1
RX packets:485064 errors:0 dropped:0 overruns:0 frame:0
TX packets:42 errors:0 dropped:0 overruns:0 carrier:0
collisions:0 txqueuelen:0
RX bytes:29542689 (28.1 MiB) TX bytes:3060 (2.9 KiB)
sn_bond1 Link encap:Ethernet HWaddr 00:19:99:9C:A0:6D
inet addr:10.10.50.2 Bcast:10.10.255.255 Mask:255.255.0.0
inet6 addr: fe80::219:99ff:fe9c:a06d/64 Scope:Link
UP BROADCAST RUNNING MASTER MULTICAST MTU:1500 Metric:1
RX packets:7 errors:0 dropped:0 overruns:0 frame:0
TX packets:41 errors:0 dropped:0 overruns:0 carrier:0
collisions:0 txqueuelen:0
RX bytes:420 (420.0 b) TX bytes:3018 (2.9 KiB)
ifn_bond1 Link encap:Ethernet HWaddr 00:1B:21:81:C2:EA
inet6 addr: fe80::21b:21ff:fe81:c2ea/64 Scope:Link
UP BROADCAST RUNNING PROMISC MASTER MULTICAST MTU:1500 Metric:1
RX packets:884093 errors:0 dropped:0 overruns:0 frame:0
TX packets:161539 errors:0 dropped:0 overruns:0 carrier:0
collisions:0 txqueuelen:0
RX bytes:414267432 (395.0 MiB) TX bytes:15355495 (14.6 MiB)
bcn_link1 Link encap:Ethernet HWaddr 00:19:99:9C:A0:6C
UP BROADCAST RUNNING SLAVE MULTICAST MTU:1500 Metric:1
RX packets:242549 errors:0 dropped:0 overruns:0 frame:0
TX packets:29 errors:0 dropped:0 overruns:0 carrier:0
collisions:0 txqueuelen:1000
RX bytes:14772701 (14.0 MiB) TX bytes:2082 (2.0 KiB)
Memory:ce660000-ce680000
sn_link1 Link encap:Ethernet HWaddr 00:19:99:9C:A0:6D
UP BROADCAST RUNNING SLAVE MULTICAST MTU:1500 Metric:1
RX packets:3 errors:0 dropped:0 overruns:0 frame:0
TX packets:28 errors:0 dropped:0 overruns:0 carrier:0
collisions:0 txqueuelen:1000
RX bytes:180 (180.0 b) TX bytes:2040 (1.9 KiB)
Memory:ce6c0000-ce6e0000
ifn_link1 Link encap:Ethernet HWaddr 00:1B:21:81:C2:EA
UP BROADCAST RUNNING SLAVE MULTICAST MTU:1500 Metric:1
RX packets:641600 errors:0 dropped:0 overruns:0 frame:0
TX packets:161526 errors:0 dropped:0 overruns:0 carrier:0
collisions:0 txqueuelen:1000
RX bytes:399497547 (380.9 MiB) TX bytes:15354517 (14.6 MiB)
Interrupt:24 Memory:ce240000-ce260000
bcn_link2 Link encap:Ethernet HWaddr 00:19:99:9C:A0:6C
UP BROADCAST RUNNING SLAVE MULTICAST MTU:1500 Metric:1
RX packets:242515 errors:0 dropped:0 overruns:0 frame:0
TX packets:13 errors:0 dropped:0 overruns:0 carrier:0
collisions:0 txqueuelen:1000
RX bytes:14769988 (14.0 MiB) TX bytes:978 (978.0 b)
Interrupt:34 Memory:ce2a0000-ce2c0000
sn_link2 Link encap:Ethernet HWaddr 00:19:99:9C:A0:6D
UP BROADCAST RUNNING SLAVE MULTICAST MTU:1500 Metric:1
RX packets:4 errors:0 dropped:0 overruns:0 frame:0
TX packets:13 errors:0 dropped:0 overruns:0 carrier:0
collisions:0 txqueuelen:1000
RX bytes:240 (240.0 b) TX bytes:978 (978.0 b)
Memory:ce400000-ce500000
ifn_link2 Link encap:Ethernet HWaddr 00:1B:21:81:C2:EA
UP BROADCAST RUNNING SLAVE MULTICAST MTU:1500 Metric:1
RX packets:242493 errors:0 dropped:0 overruns:0 frame:0
TX packets:13 errors:0 dropped:0 overruns:0 carrier:0
collisions:0 txqueuelen:1000
RX bytes:14769885 (14.0 MiB) TX bytes:978 (978.0 b)
Memory:ce500000-ce600000
lo Link encap:Local Loopback
inet addr:127.0.0.1 Mask:255.0.0.0
inet6 addr: ::1/128 Scope:Host
UP LOOPBACK RUNNING MTU:16436 Metric:1
RX packets:3545 errors:0 dropped:0 overruns:0 frame:0
TX packets:3545 errors:0 dropped:0 overruns:0 carrier:0
collisions:0 txqueuelen:0
RX bytes:2658626 (2.5 MiB) TX bytes:2658626 (2.5 MiB)
ifn_bridge1 Link encap:Ethernet HWaddr 00:1B:21:81:C2:EA
inet addr:10.255.50.2 Bcast:10.255.255.255 Mask:255.255.0.0
inet6 addr: fe80::21b:21ff:fe81:c2ea/64 Scope:Link
UP BROADCAST RUNNING MULTICAST MTU:1500 Metric:1
RX packets:16091 errors:0 dropped:0 overruns:0 frame:0
TX packets:48 errors:0 dropped:0 overruns:0 carrier:0
collisions:0 txqueuelen:0
RX bytes:777873 (759.6 KiB) TX bytes:20304 (19.8 KiB) |
Excellent, everything is there!
Next up is to verify the bonds. To do this, we can examine special files in the /proc virtual file system. These expose the kernel's view of things as if they were tradition files. So by reading these files, we can see how the bonded interfaces are operating in real time.
There are three, one for each bond. Let's start by looking at bcn_bond1's /proc/net/bonding/bcn_bond1 "file", then we'll look at the other two.
| an-a05n01 | an-a05n02 |
|---|---|
cat /proc/net/bonding/bcn_bond1Ethernet Channel Bonding Driver: v3.6.0 (September 26, 2009)
Bonding Mode: fault-tolerance (active-backup)
Primary Slave: bcn_link1 (primary_reselect always)
Currently Active Slave: bcn_link1
MII Status: up
MII Polling Interval (ms): 100
Up Delay (ms): 120000
Down Delay (ms): 0
Slave Interface: bcn_link1
MII Status: up
Speed: 1000 Mbps
Duplex: full
Link Failure Count: 0
Permanent HW addr: 00:19:99:9c:9b:9e
Slave queue ID: 0
Slave Interface: bcn_link2
MII Status: up
Speed: 1000 Mbps
Duplex: full
Link Failure Count: 0
Permanent HW addr: 00:1b:21:81:c3:35
Slave queue ID: 0 |
cat /proc/net/bonding/bcn_bond1Ethernet Channel Bonding Driver: v3.6.0 (September 26, 2009)
Bonding Mode: fault-tolerance (active-backup)
Primary Slave: bcn_link1 (primary_reselect always)
Currently Active Slave: bcn_link1
MII Status: up
MII Polling Interval (ms): 100
Up Delay (ms): 120000
Down Delay (ms): 0
Slave Interface: bcn_link1
MII Status: up
Speed: 1000 Mbps
Duplex: full
Link Failure Count: 0
Permanent HW addr: 00:19:99:9c:a0:6c
Slave queue ID: 0
Slave Interface: bcn_link2
MII Status: up
Speed: 1000 Mbps
Duplex: full
Link Failure Count: 0
Permanent HW addr: 00:1b:21:81:c2:eb
Slave queue ID: 0 |
Let's look at the variables and values we see for an-a05n01 above:
- Bond variables;
| Variable | Description |
|---|---|
| Bonding Mode | This tells us which bonding mode is currently active. Here we see fault-tolerance (active-backup), which is exactly what we wanted when we set mode=1 in the bond's configuration file. |
| Primary Slave | This tells us that the bond will always use bcn_link1 if it is available. Recall that we set a primary interface to ensure that, when everything is working properly, all network traffic goes through the same switch to avoid congestion on the stack/uplink cable. |
| Currently Active Slave | This tells us which interface is being used at this time. If this shows the secondary interface, then either the primary has failed, or the primary has recovered by the updelay timer hasn't yet expired. |
| MII Status | This shows the effective link state of the bond. If either one of the slaved interfaces is active, this will be up. |
| MII Polling Interval (ms) | If you recall, this was set to 100ms, which tells the bond driver to verify the link state of the slaved interfaces. |
| Up Delay (ms) | This tells us how long the bond driver will wait before switching to the secondary interface. We want immediate fail-over, so we have this set to 0. |
| Down Delay (ms) | This tells us that the bond will wait for two minutes after a slaved interface comes up before it will consider it ready for use. |
- Slaved interface variables:
| Variable | bcn_link1 | bcn_link2 | Description |
|---|---|---|---|
| Slave Interface | bcn_link1 | bcn_link2 | This is the name of the slaved device. The values below this reflect that named interface's state. |
| MII Status | up | up | This shows the current link state of the interface. Values you will see are: up, down and going back. The first two are obvious. The third is the link state between when the link comes up and before the updelay timer expires. |
| Speed | 1000 Mbps | 1000 Mbps | This tells you the link speed that the current interface is operating at. If it's ever lower than you expect, look in the switch configuration for statically set speeds. If that's not it, try another network cable. |
| Duplex | full | full | This tells you whether the given interface can send and receive network traffic at the same time, full, or not, half. All modern devices should support full duplex, so if you see half, examine your switch and cables. |
| Link Failure Count | 0 | 0 | When the bond driver starts, this is set to 0. Each time the link "fails", which includes an intentional unplugging of the cable, this counter increments. There is no hard in this increasing if the "errors" where intentional or known. It can be useful in detecting flaky connections though, should you find this number to be higher than expected. |
| Permanent HW addr | 00:19:99:9c:9b:9e | 00:1b:21:81:c3:35 | This is the real MAC address of the slaved interface. Those who are particularly observant will have noticed that, in the ifconfig output above, both bcn_link1 and bcn_link2 showed the same MAC address. This is partly how active-passive bonding is able to fail over so extremely quickly. The MAC address of which ever interface is active will appear in ifconfig as the HWaddr address of both bond members. |
| Slave queue ID | 0 | 0 | In other bonding modes, this can be used to help direct certain traffic down certain slaved interface links. We won't use this so it should always be 0 |
Now lets look at sn_bond1;
| an-a05n01 | an-a05n02 |
|---|---|
cat /proc/net/bonding/sn_bond1Ethernet Channel Bonding Driver: v3.6.0 (September 26, 2009)
Bonding Mode: fault-tolerance (active-backup)
Primary Slave: sn_link1 (primary_reselect always)
Currently Active Slave: sn_link1
MII Status: up
MII Polling Interval (ms): 100
Up Delay (ms): 120000
Down Delay (ms): 0
Slave Interface: sn_link1
MII Status: up
Speed: 1000 Mbps
Duplex: full
Link Failure Count: 0
Permanent HW addr: 00:19:99:9c:9b:9f
Slave queue ID: 0
Slave Interface: sn_link2
MII Status: up
Speed: 1000 Mbps
Duplex: full
Link Failure Count: 0
Permanent HW addr: a0:36:9f:02:e0:04
Slave queue ID: 0 |
cat /proc/net/bonding/sn_bond1Ethernet Channel Bonding Driver: v3.6.0 (September 26, 2009)
Bonding Mode: fault-tolerance (active-backup)
Primary Slave: sn_link1 (primary_reselect always)
Currently Active Slave: sn_link1
MII Status: up
MII Polling Interval (ms): 100
Up Delay (ms): 120000
Down Delay (ms): 0
Slave Interface: sn_link1
MII Status: up
Speed: 1000 Mbps
Duplex: full
Link Failure Count: 0
Permanent HW addr: 00:19:99:9c:a0:6d
Slave queue ID: 0
Slave Interface: sn_link2
MII Status: up
Speed: 1000 Mbps
Duplex: full
Link Failure Count: 0
Permanent HW addr: a0:36:9f:07:d6:2e
Slave queue ID: 0 |
The last bond is ifn_bond1;
| an-a05n01 | an-a05n02 |
|---|---|
cat /proc/net/bonding/ifn_bond1Ethernet Channel Bonding Driver: v3.6.0 (September 26, 2009)
Bonding Mode: fault-tolerance (active-backup)
Primary Slave: ifn_link1 (primary_reselect always)
Currently Active Slave: ifn_link1
MII Status: up
MII Polling Interval (ms): 100
Up Delay (ms): 120000
Down Delay (ms): 0
Slave Interface: ifn_link1
MII Status: up
Speed: 1000 Mbps
Duplex: full
Link Failure Count: 0
Permanent HW addr: 00:1b:21:81:c3:34
Slave queue ID: 0
Slave Interface: ifn_link2
MII Status: up
Speed: 1000 Mbps
Duplex: full
Link Failure Count: 0
Permanent HW addr: a0:36:9f:02:e0:05
Slave queue ID: 0 |
cat /proc/net/bonding/ifn_bond1Ethernet Channel Bonding Driver: v3.6.0 (September 26, 2009)
Bonding Mode: fault-tolerance (active-backup)
Primary Slave: ifn_link1 (primary_reselect always)
Currently Active Slave: ifn_link1
MII Status: up
MII Polling Interval (ms): 100
Up Delay (ms): 120000
Down Delay (ms): 0
Slave Interface: ifn_link1
MII Status: up
Speed: 1000 Mbps
Duplex: full
Link Failure Count: 0
Permanent HW addr: 00:1b:21:81:c2:ea
Slave queue ID: 0
Slave Interface: ifn_link2
MII Status: up
Speed: 1000 Mbps
Duplex: full
Link Failure Count: 0
Permanent HW addr: a0:36:9f:07:d6:2f
Slave queue ID: 0 |
That covers the bonds! The last thing to look at are the bridges. We can check them using the brctl (bridge control) tool;
| an-a05n01 | an-a05n02 |
|---|---|
brctl showbridge name bridge id STP enabled interfaces
ifn_bridge1 8000.001b2181c334 no ifn_bond1 |
brctl showbridge name bridge id STP enabled interfaces
ifn_bridge1 8000.001b2181c2ea no ifn_bond1 |
There are four variables; Let's take a look at them.
| Variable | ifn_link1 | ifn_link2 | Description |
|---|---|---|---|
| bridge name | ifn_bridge1 | ifn_bridge1 | This is the device name we set when we created the ifcfg-ifn_bridge1 configuration file. |
| bridge id | 8000.001b2181c334 | 8000.001b2181c2ea | This is an automatically create unique ID for the given bridge. |
| STP enabled | no | no | This tells us where spanning tree protocol is enabled or not. Default is to be disabled, which is fine. If you enable it, it will help protect against loops that can cause broadcast storms and flood your network. Given how difficult it is to accidentally "plug both ends of a cable into the same switch", it's generally safe to leave off. |
| interfaces | ifn_bond1 | ifn_bond1 | This tells us which network interfaces are "plugged into" the bridge. We don't have any servers yet, so only ifn_bond1 is plugged in, which is the link that provides a route out to the real world. Later, when we create our servers, a vnetX file will be created for each server's interface. These are the virtual "network cables" providing a link between the servers and the bridge. |
All done!
Adding Everything to /etc/hosts
If you recall from the AN!Cluster Tutorial 2#Network section, we've got two nodes, each with three networks and an IPMI interface, two network switches, two switched PDUs and two UPSes. We're also going to create two dashboard servers, each of which will have a connection to the BCN and the IFN.
All of these have IP addresses. We want to be able to address them by names, which we can do by adding them to each node's /etc/hosts file. If you prefer to have this centralized, you can always use internal DNS servers instead, but that is outside the scope of this tutorial.
The format of /etc/hosts is <ip_addres> <name>[ <name2> <name...> <nameN>]. We want the short domain and full domain name to resolve to the BCN IP address on the 10.20.0.0/16 network. For this, we'll have multiple names on the BCN entry and then a single name for the SN and IFN entries.
| an-a05n01 | vim /etc/hosts127.0.0.1 localhost localhost.localdomain localhost4 localhost4.localdomain4
::1 localhost localhost.localdomain localhost6 localhost6.localdomain6
### Nodes
# an-a05n01
10.20.50.1 an-a05n01.bcn an-a05n01 an-a05n01.alteeve.ca
10.20.51.1 an-a05n01.ipmi
10.10.50.1 an-a05n01.sn
10.255.50.1 an-a05n01.ifn
# an-a05n02
10.20.50.2 an-a05n02.bcn an-a05n02 an-a05n02.alteeve.ca
10.20.51.2 an-a05n02.ipmi
10.10.50.2 an-a05n02.sn
10.255.50.2 an-a05n02.ifn
### Foundation Pack
# Network Switches
10.20.1.1 an-switch01 an-switch01.alteeve.ca
10.20.1.2 an-switch02 an-switch02.alteeve.ca # Only accessible when out of the stack
# Switched PDUs
10.20.2.1 an-pdu01 an-pdu01.alteeve.ca
10.20.2.2 an-pdu02 an-pdu02.alteeve.ca
# Network-monitored UPSes
10.20.3.1 an-ups01 an-ups01.alteeve.ca
10.20.3.2 an-ups02 an-ups02.alteeve.ca
### Striker Dashboards
10.20.4.1 an-striker01 an-striker01.alteeve.ca
10.255.4.1 an-striker01.ifn
10.20.4.2 an-striker02 an-striker02.alteeve.ca
10.255.4.2 an-striker02.ifn |
|---|---|
| an-a05n02 | vim /etc/hosts127.0.0.1 localhost localhost.localdomain localhost4 localhost4.localdomain4
::1 localhost localhost.localdomain localhost6 localhost6.localdomain6
### Nodes
# an-a05n01
10.20.50.1 an-a05n01.bcn an-a05n01 an-a05n01.alteeve.ca
10.20.51.1 an-a05n01.ipmi
10.10.50.1 an-a05n01.sn
10.255.50.1 an-a05n01.ifn
# an-a05n02
10.20.50.2 an-a05n02.bcn an-a05n02 an-a05n02.alteeve.ca
10.20.51.2 an-a05n02.ipmi
10.10.50.2 an-a05n02.sn
10.255.50.2 an-a05n02.ifn
### Foundation Pack
# Network Switches
10.20.1.1 an-switch01 an-switch01.alteeve.ca
10.20.1.2 an-switch02 an-switch02.alteeve.ca # Only accessible when out of the stack
# Switched PDUs
10.20.2.1 an-pdu01 an-pdu01.alteeve.ca
10.20.2.2 an-pdu02 an-pdu02.alteeve.ca
# Network-monitored UPSes
10.20.3.1 an-ups01 an-ups01.alteeve.ca
10.20.3.2 an-ups02 an-ups02.alteeve.ca
### Striker Dashboards
10.20.4.1 an-striker01 an-striker01.alteeve.ca
10.255.4.1 an-striker01.ifn
10.20.4.2 an-striker02 an-striker02.alteeve.ca
10.255.4.2 an-striker02.ifn |
Save this to both nodes and then you can test that the names resolve properly using gethostip -d $name. Lets look at the names we gave to an-a05n01 and verify they resolve to the desired IP addresses.
| an-a05n01 | an-a05n02 |
|---|---|
gethostip -d an-a05n01.alteeve.ca10.20.50.1gethostip -d an-a05n0110.20.50.1gethostip -d an-a05n01.bcn10.20.50.1gethostip -d an-a05n01.sn10.10.50.1gethostip -d an-a05n01.ifn10.255.50.1gethostip -d an-a05n01.ipmi10.20.51.1gethostip -d an-a05n02.alteeve.ca10.20.50.2gethostip -d an-a05n0210.20.50.2gethostip -d an-a05n02.bcn10.20.50.2gethostip -d an-a05n02.sn10.10.50.2gethostip -d an-a05n02.ifn10.255.50.2gethostip -d an-a05n02.ipmi10.20.51.2 |
gethostip -d an-a05n01.alteeve.ca10.20.50.1gethostip -d an-a05n0110.20.50.1gethostip -d an-a05n01.bcn10.20.50.1gethostip -d an-a05n01.sn10.10.50.1gethostip -d an-a05n01.ifn10.255.50.1gethostip -d an-a05n01.ipmi10.20.51.1gethostip -d an-a05n02.alteeve.ca10.20.50.2gethostip -d an-a05n0210.20.50.2gethostip -d an-a05n02.bcn10.20.50.2gethostip -d an-a05n02.sn10.10.50.2gethostip -d an-a05n02.ifn10.255.50.2gethostip -d an-a05n02.ipmi10.20.51.2 |
Excellent! Test resolution of the foundation pack devices and the monitor packs as well. If they all resolve properly, we're ready to move on.
What is IPMI
IPMI, short for "Intelligent Platform Management Interface", is a standardized network-attched device built in to many servers. It is a stand-alone device which allows external people and devices the ability to log in and check the state of the host server. It can read the various sensor values, press the power and reset switches, report whether the host node is powered on or not and so forth.
Many companies build on the basic IPMI standard by adding advanced features like remote console access over the network, ability to monitor devices plugged into the server like the RAID controller and its hard drives and so on. Each vendor generally has a name for their implementation of IPMI;
Various other vendors will have different names as well. In most cases though, they will all support the generic IPMI interface and Linux tools. We're going to use these tools to configure each node's IPMI "BMC", Baseboard Management Controller, for use as a fence device.
The idea here is this;
If a node stops responding, the remaining surviving node can't simply assume the peer is off. We'll go into the details of "why not?" later in the fencing section. The remaining node will log into the peer's IPMI BMC and ask it to power off the host. Once off, the surviving node will verify that the power is off, confirming that the peer is certainly no longer alive and offering clustered services. With this known, recovery can safely begin.
We need to assign an IP address to each IPMI BMC and then configure the user name and password to use later when connecting.
We will also use the sensor values reported by the IPMI BMC in our monitoring and alert system. If, for example, a temperate climbs too high or too fast, the alert system will be able to see this and fire off an alert.
Reading IPMI Data
| Note: This section walks through configuring IPMI on an-a05n01 only. Please repeat for an-a05n02. |
We installed the needed IPMI tools earlier and we set ipmi to start on boot. Verify that it's running now;
| an-a05n01 | /etc/init.d/ipmi statusipmi_msghandler module loaded.
ipmi_si module loaded.
ipmi_devintf module loaded.
/dev/ipmi0 exists. |
|---|
This tells us that the ipmi daemon is running and it was able to talk to the BMC. If this failed, /dev/ipmi0 would not exist. If this is the case for you, please find what make and model of IPMI BMC is used in your server and look for known issues with that chip.
The first thing we'll check is that we can query IPMI's chassis data:
| an-a05n01 | ipmitool chassis statusSystem Power : on
Power Overload : false
Power Interlock : inactive
Main Power Fault : false
Power Control Fault : false
Power Restore Policy : previous
Last Power Event :
Chassis Intrusion : inactive
Front-Panel Lockout : inactive
Drive Fault : false
Cooling/Fan Fault : false
Sleep Button Disable : not allowed
Diag Button Disable : allowed
Reset Button Disable : allowed
Power Button Disable : allowed
Sleep Button Disabled: false
Diag Button Disabled : false
Reset Button Disabled: false
Power Button Disabled: false |
|---|
Excellent! If you get something like this, you're past 90% of the potential problems.
We can check more information on the hosts using mc to query the management controller.
| an-a05n01 | ipmitool mc infoDevice ID : 2
Device Revision : 2
Firmware Revision : 1.1
IPMI Version : 2.0
Manufacturer ID : 10368
Manufacturer Name : Fujitsu Siemens
Product ID : 611 (0x0263)
Product Name : Unknown (0x263)
Device Available : yes
Provides Device SDRs : no
Additional Device Support :
Sensor Device
SDR Repository Device
SEL Device
FRU Inventory Device
IPMB Event Receiver
Bridge
Chassis Device
Aux Firmware Rev Info :
0x05
0x08
0x00
0x41 |
|---|
Some servers will report the details of "field replaceable units"; components than can be swapped out as needed. Every server will report different data here, but you can see what our RX300 S6 returns below.
| an-a05n01 | ipmitool fru printFRU Device Description : Builtin FRU Device (ID 0)
Device not present (Requested sensor, data, or record not found)
FRU Device Description : Chassis (ID 2)
Chassis Type : Rack Mount Chassis
Chassis Extra : RX300S6R1
Product Manufacturer : FUJITSU
Product Name : PRIMERGY RX300 S6
Product Part Number : ABN:K1344-V101-2204
Product Version : GS01
Product Serial : xxxxxxxxxx
Product Asset Tag : 15
Product Extra : 25a978
Product Extra : 0263
FRU Device Description : MainBoard (ID 3)
Board Mfg Date : Wed Dec 22 07:36:00 2010
Board Mfg : FUJITSU
Board Product : D2619
Board Serial : xxxxxxxx
Board Part Number : S26361-D2619-N15
Board Extra : WGS10 GS02
Board Extra : 02
FRU Device Description : PSU1 (ID 7)
Unknown FRU header version 0x02
FRU Device Description : PSU2 (ID 8)
Unknown FRU header version 0x02 |
|---|
We can check all the sensor value using ipmitool as well. This is actually what the cluster monitor we'll install later does.
| an-a05n01 | ipmitool sdr listAmbient | 27.50 degrees C | ok
Systemboard | 43 degrees C | ok
CPU1 | 34 degrees C | ok
CPU2 | 37 degrees C | ok
DIMM-1A | 29 degrees C | ok
DIMM-2A | disabled | ns
DIMM-3A | disabled | ns
DIMM-1B | 29 degrees C | ok
DIMM-2B | disabled | ns
DIMM-3B | disabled | ns
DIMM-1C | 29 degrees C | ok
DIMM-2C | disabled | ns
DIMM-3C | disabled | ns
DIMM-1D | 33 degrees C | ok
DIMM-2D | disabled | ns
DIMM-3D | disabled | ns
DIMM-1E | 33 degrees C | ok
DIMM-2E | disabled | ns
DIMM-3E | disabled | ns
DIMM-1F | 33 degrees C | ok
DIMM-2F | disabled | ns
DIMM-3F | disabled | ns
BATT 3.0V | 3.13 Volts | ok
STBY 3.3V | 3.35 Volts | ok
iRMC 1.2V STBY | 1.19 Volts | ok
iRMC 1.8V STBY | 1.80 Volts | ok
LAN 1.0V STBY | 1.01 Volts | ok
LAN 1.8V STBY | 1.81 Volts | ok
MAIN 12V | 12 Volts | ok
MAIN 5.15V | 5.18 Volts | ok
MAIN 3.3V | 3.37 Volts | ok
IOH 1.1V | 1.10 Volts | ok
IOH 1.8V | 1.80 Volts | ok
ICH 1.5V | 1.50 Volts | ok
IOH 1.1V AUX | 1.09 Volts | ok
CPU1 1.8V | 1.80 Volts | ok
CPU2 1.8V | 1.80 Volts | ok
Total Power | 190 Watts | ok
PSU1 Power | 100 Watts | ok
PSU2 Power | 80 Watts | ok
CPU1 Power | 5.50 Watts | ok
CPU2 Power | 4.40 Watts | ok
Fan Power | 15.84 Watts | ok
Memory Power | 8 Watts | ok
HDD Power | 45 Watts | ok
FAN1 SYS | 5340 RPM | ok
FAN2 SYS | 5160 RPM | ok
FAN3 SYS | 4920 RPM | ok
FAN4 SYS | 5160 RPM | ok
FAN5 SYS | 5100 RPM | ok
FAN1 PSU1 | 6360 RPM | ok
FAN2 PSU1 | 6480 RPM | ok
FAN1 PSU2 | 6480 RPM | ok
FAN2 PSU2 | 6240 RPM | ok
I2C1 error ratio | 0 unspecified | ok
I2C2 error ratio | 0 unspecified | ok
I2C3 error ratio | 0 unspecified | ok
I2C4 error ratio | 0 unspecified | ok
I2C5 error ratio | 0 unspecified | ok
I2C6 error ratio | 0 unspecified | ok
SEL Level | 0 unspecified | ok
Ambient | 0x02 | ok
CPU1 | 0x80 | ok
CPU2 | 0x80 | ok
Power Unit | 0x01 | ok
PSU | Not Readable | ns
PSU1 | 0x02 | ok
PSU2 | 0x02 | ok
Fanboard Row 2 | 0x00 | ok
FAN1 SYS | 0x01 | ok
FAN2 SYS | 0x01 | ok
FAN3 SYS | 0x01 | ok
FAN4 SYS | 0x01 | ok
FAN5 SYS | 0x01 | ok
FAN1 PSU1 | 0x01 | ok
FAN2 PSU1 | 0x01 | ok
FAN1 PSU2 | 0x01 | ok
FAN2 PSU2 | 0x01 | ok
FanBoard | 0x02 | ok
DIMM-1A | 0x02 | ok
DIMM-1A | 0x01 | ok
DIMM-2A | 0x01 | ok
DIMM-2A | 0x01 | ok
DIMM-3A | 0x01 | ok
DIMM-3A | 0x01 | ok
DIMM-1B | 0x02 | ok
DIMM-1B | 0x01 | ok
DIMM-2B | 0x01 | ok
DIMM-2B | 0x01 | ok
DIMM-3B | 0x01 | ok
DIMM-3B | 0x01 | ok
DIMM-1C | 0x02 | ok
DIMM-1C | 0x01 | ok
DIMM-2C | 0x01 | ok
DIMM-2C | 0x01 | ok
DIMM-3C | 0x01 | ok
DIMM-3C | 0x01 | ok
DIMM-1D | 0x02 | ok
DIMM-1D | 0x01 | ok
DIMM-2D | 0x01 | ok
DIMM-2D | 0x01 | ok
DIMM-3D | 0x01 | ok
DIMM-3D | 0x01 | ok
DIMM-1E | 0x02 | ok
DIMM-1E | 0x01 | ok
DIMM-2E | 0x01 | ok
DIMM-2E | 0x01 | ok
DIMM-3E | 0x01 | ok
DIMM-3E | 0x01 | ok
DIMM-1F | 0x02 | ok
DIMM-1F | 0x01 | ok
DIMM-2F | 0x01 | ok
DIMM-2F | 0x01 | ok
DIMM-3F | 0x01 | ok
DIMM-3F | 0x01 | ok
DIMM-3A | 0x01 | ok
DIMM-3B | 0x01 | ok
DIMM-3C | 0x01 | ok
DIMM-3D | 0x01 | ok
DIMM-3E | 0x01 | ok
DIMM-3F | 0x01 | ok
Watchdog | 0x00 | ok
iRMC request | 0x00 | ok
I2C1 | 0x02 | ok
I2C2 | 0x02 | ok
I2C3 | 0x02 | ok
I2C4 | 0x02 | ok
I2C5 | 0x02 | ok
I2C6 | 0x02 | ok
Config backup | 0x00 | ok
Total Power | 0x01 | ok
PSU1 Power | 0x01 | ok
PSU2 Power | 0x01 | ok
CPU1 Power | 0x01 | ok
CPU2 Power | 0x01 | ok
Memory Power | 0x01 | ok
Fan Power | 0x01 | ok
HDD Power | 0x01 | ok
Power Level | 0x01 | ok
Power Level | 0x08 | ok
CPU detection | 0x00 | ok
System Mgmt SW | Not Readable | ns
NMI | 0x00 | ok
Local Monitor | 0x02 | ok
Pwr Btn override | 0x00 | ok
System BIOS | Not Readable | ns
iRMC | Not Readable | ns |
|---|
You can narrow that call down to just see temperature, power consumption and what not. That's beyond the scope of this tutorial though. The man page for ipmitool is great for seeing all the neat stuff you can do.
Finding our IPMI LAN Channel
Before we can configure it though, we need to find our "LAN channel". Different manufacturers will use different channels, so we need to be able to find the one we're using.
To find it, simply call ipmitool lan print X. Increment X, starting at 1, until you get a response.
So first, let's query LAN channel 1.
| an-a05n01 | ipmitool lan print 1Channel 1 is not a LAN channel |
|---|
No luck; Let's try channel 2.
| an-a05n01 | ipmitool lan print 2Set in Progress : Set Complete
Auth Type Support : NONE MD5 PASSWORD
Auth Type Enable : Callback : NONE MD5 PASSWORD
: User : NONE MD5 PASSWORD
: Operator : NONE MD5 PASSWORD
: Admin : NONE MD5 PASSWORD
: OEM : NONE MD5 PASSWORD
IP Address Source : Static Address
IP Address : 10.20.51.1
Subnet Mask : 255.255.0.0
MAC Address : 00:19:99:9a:d8:e8
SNMP Community String : public
IP Header : TTL=0x40 Flags=0x40 Precedence=0x00 TOS=0x10
Default Gateway IP : 10.20.255.254
802.1q VLAN ID : Disabled
802.1q VLAN Priority : 0
RMCP+ Cipher Suites : 0,1,2,3,6,7,8,17
Cipher Suite Priv Max : OOOOOOOOXXXXXXX
: X=Cipher Suite Unused
: c=CALLBACK
: u=USER
: o=OPERATOR
: a=ADMIN
: O=OEM |
|---|
Found it! So we know that this server uses LAN channel 2. We'll need to use this for the next steps.
Reading IPMI Network Info
Now that we can read our IPMI data, it's time to set some values.
We know that we want to set an-a05n01's IPMI interface to have the IP 10.20.51.1/16. We also need to setup a user on the IPMI BMC so that we can log in from other nodes.
First up, let's set the IP address. Remember to use the LAN channel you found on your server. We don't actually have a gateway on the 10.20.0.0/16 network, but some devices insist on a default gateway being set. For this reason, we'll always set 10.255.255.254 as the gateway server. You will want to adjust this (or not use it at all) for your network.
This requires four calls;
- Tell the interface to use a static IP address.
- Set the IP address
- Set the subnet mask
- (optional) Set the default gateway
| an-a05n01 | ipmitool lan set 2 ipsrc static
ipmitool lan set 2 ipaddr 10.20.51.1Setting LAN IP Address to 10.20.51.1ipmitool lan set 2 netmask 255.255.0.0Setting LAN Subnet Mask to 255.255.0.0ipmitool lan set 2 defgw ipaddr 10.20.255.254Setting LAN Default Gateway IP to 10.20.255.254 |
|---|
Now we'll again print the LAN channel information and we should see that the IP address has been set.
| an-a05n01 | ipmitool lan print 2Set in Progress : Set Complete
Auth Type Support : NONE MD5 PASSWORD
Auth Type Enable : Callback : NONE MD5 PASSWORD
: User : NONE MD5 PASSWORD
: Operator : NONE MD5 PASSWORD
: Admin : NONE MD5 PASSWORD
: OEM : NONE MD5 PASSWORD
IP Address Source : Static Address
IP Address : 10.20.51.1
Subnet Mask : 255.255.0.0
MAC Address : 00:19:99:9a:d8:e8
SNMP Community String : public
IP Header : TTL=0x40 Flags=0x40 Precedence=0x00 TOS=0x10
Default Gateway IP : 10.20.255.254
802.1q VLAN ID : Disabled
802.1q VLAN Priority : 0
RMCP+ Cipher Suites : 0,1,2,3,6,7,8,17
Cipher Suite Priv Max : OOOOOOOOXXXXXXX
: X=Cipher Suite Unused
: c=CALLBACK
: u=USER
: o=OPERATOR
: a=ADMIN
: O=OEM |
|---|
Excellent!
Find the IPMI User ID
Next up is to find the IPMI administrative user name and user ID. We'll record the name for later use in the cluster setup. We'll use the ID to update the user's password.
To see the list of users, run the following.
| an-a05n01 | ipmitool user list 2ID Name Callin Link Auth IPMI Msg Channel Priv Limit
1 true true true Unknown (0x00)
2 admin true true true OEM |
|---|
| Note: If you see an error like "Get User Access command failed (channel 2, user 3): Unknown (0x32)", it is safe to ignore. |
Normally you should see OEM or ADMINISTRATOR under the Channel Priv Limit column. Above we see that the user named admin with ID 2 is OEM, so that is the user we will use.
| Note: The 2 in the next argument corresponds to the user ID, not the LAN channel! |
To set the password to secret, run the following command and then enter the word secret twice.
| an-a05n01 | ipmitool user set password 2Password for user 2:
Password for user 2: |
|---|
Done!
Testing the IPMI Connection From the Peer
At this point, we've set each node's IPMI BMC network address and admin user's password. Now it's time to make sure it works.
In the example above, we walked through setting up an-a05n01's IPMI BMC. So here, we will log into an-a05n02 and try to connect to an-a05n01.ipmi to make sure everything works.
- From an-a05n02
| an-a05n02 | ipmitool -I lanplus -U admin -P secret -H an-a05n01.ipmi chassis power statusChassis Power is on |
|---|
Excellent! Now let's test from an-a05n01 connecting to an-a05n02.ipmi.
| an-a05n01 | ipmitool -I lanplus -U admin -P secret -H an-a05n02.ipmi chassis power statusChassis Power is on |
|---|
Woohoo!
Setting up SSH
Setting up SSH shared keys will allow your nodes to pass files between one another and execute commands remotely without needing to enter a password. This will be needed later when we want to enable applications like libvirtd and its tools, like virt-manager.
SSH is, on its own, a very big topic. If you are not familiar with SSH, please take some time to learn about it before proceeding. A great first step is the Wikipedia entry on SSH, as well as the SSH man page; man ssh.
SSH can be a bit confusing keeping connections straight in you head. When you connect to a remote machine, you start the connection on your machine as the user you are logged in as. This is the source user. When you call the remote machine, you tell the machine what user you want to log in as. This is the remote user.
Create the RSA Keys
| Note: This section covers setting up SSH for an-a05n01. Please be sure to follow these steps for both nodes. |
You will need to create an SSH key for the root user on each node. Once created, we will need to copy the "public key" into a special file on both nodes to enable connecting to either node without a password.
Lets start with an-a05n01
| an-a05n01 | # The '4095' is just to screw with brute-forces a bit. :)
ssh-keygen -t rsa -N "" -b 4095 -f ~/.ssh/id_rsaGenerating public/private rsa key pair.
Created directory '/root/.ssh'.
Your identification has been saved in /root/.ssh/id_rsa.
Your public key has been saved in /root/.ssh/id_rsa.pub.
The key fingerprint is:
1a:cf:8b:69:5e:9b:92:c2:51:0d:49:7f:ce:98:0f:40 root@an-a05n01.alteeve.ca
The key's randomart image is:
+--[ RSA 4095]----+
| .E. |
| .o. |
| .o. . |
| ...* |
| .. S o |
| . = o |
| . ...+ . |
| o ++ + |
| ++.+ |
+-----------------+ |
|---|
This will create two files: the private key called ~/.ssh/id_rsa and the public key called ~/.ssh/id_rsa.pub. The private must never be group or world readable! That is, it should be set to mode 0600.
If you look closely when you created the ssh key, the node's fingerprint is show (1a:cf:8b:69:5e:9b:92:c2:51:0d:49:7f:ce:98:0f:40 for an-a05n01 above). Make a note of the fingerprint for each machine, and then compare it to the one presented to you when you ssh to a machine for the first time. If you are presented with a fingerprint that doesn't match, you could be facing a "man in the middle" attack.
To look up a fingerprint in the future, you can run the following;
| an-a05n01 | ssh-keygen -l -f ~/.ssh/id_rsa4095 1a:cf:8b:69:5e:9b:92:c2:51:0d:49:7f:ce:98:0f:40 /root/.ssh/id_rsa.pub (RSA) |
|---|
The two newly generated files should look like;
Private key:
| an-a05n01 | cat ~/.ssh/id_rsa-----BEGIN RSA PRIVATE KEY-----
MIIJIwIBAAKCAgBk3o54tw1f0BJ0UOp/OWpLa5VaKDIKKmwe7Um6kcmDVBO8Itbg
7FxXHxX6Xi/CqoqjPEwvpjSgBVSGF5IkSAcAdyKEmqJ0pM3A4Hg+g1JehQLx3k2v
DPfIcTvsIGEkS63XZiOs6t1sPubgjKw9encpYHq4s2Z26Ux/w85FbIMCR3oNroG2
scU4OJnICosoibsEXheaDzUl8fIpEkIHGVK4iOy2Y2CoxEKw5bE1yBv0KlRKrN9i
jFvoq2eAUG+NtjOxaG9DK3IgITQVd1PDgoBqEvEJK/kdfckGQu47cKGJS8bzgWLD
vXprg9OsXBu/MZSVK1AjvL3pfZEOT/k1B6gWu2ww7hGWVZj2IXnFcRv4TMs+DXg2
xZm7pWTkPLNxFzqtAZH60jXZmbPAFNDNS7M3Qs6oBCFlvUL00vFNu3uoM2NARG0V
bvLT0zb8dhQDpV2KoGsKUFGsDo773rH7AtBBPEzODgxjTk7rH+0Rt38JLN8T5XeO
RUitX9MS5abjis6DZ5agm8Swd3cpAK7g5yeKdxmUA774i+BlkkH1VdsdBT9RImvc
/OfVly208jpNRisCQgP4FTlEFG9YOeQ416euJ6xX5oP+I6z9f0rMzQEprh0WgT5r
/oIKfjwF3v109rquUZLxrLYb8qkomwWnxPD4VL7GPUU0hzgr+h+xRWI0nQIBIwKC
AgBfGvtb38rIDVM6eC2N5a1dDaoTLTZ+nQbbVMHby0j4KrOFf+8r14pDg7Wi6xcW
oMvbvIJYz+h5nqAmqIJ5+sTF7KuEV0i3HwsjkdB1dIDcxo2/edQ3VV6nC62G3LNc
vGIUO7s8ou4G+XqZNC1eiWkJwV3EFtzzxgZMlAugiuHsNMOJPiKHru0mYUCJaQbd
FCVb46/aZhwrF1IJd51XJoExpav8bFPSUqVHs/7a79/XlZ/uov6BfQYzJURUaRi4
0Fyf9MCtC7S/NT+8d9KiZRn9nNSiP2c5EDKQ4AUwuqbvKjCccq2T+8syK9Y0y9+l
o8abRhhcNZ0d+gxslIvhiuBOtTTV7Fy6zYyhSkAOzF33kl+jDDm2nNvxjxFU3Lo1
qSP7n2yedz5QKOvwykmwN/uzn5FWSmKc5GdL/t+yu94zf0eR9pDhkg0u9dXFkim0
Hq8RsW1vH4aD0BBMiBn34EbnaQaotX7lAUxfTjG0iZ9z8T48NIqPf/66evqUk3bx
VoFS79GkW8yWrXQX6B3oUAtm10aeP9Htz+AQIPdatO9pREIzE6UbEnc2kSrzFcJh
4hmarrQgJq7qzFjgRLBgjiOsdEo5SGLTFh17UIh5k/deeTxLsGSFuBbpz5+jr4tt
0s4wcmamTR8ruURGh+4i/Px6F9QsechnIMKGNthWVxhEawKCAQEA2kCH/FL/A7Ib
fCt0PFvCKWeF1V+PhdzEdkIRvS3OusWP9Z+py6agh3kAFWjOZT16WgYPeftMKYaE
3Wiixfx+99ta0eQiKqozYgB3pg5UWdxsXv30jrTyRuhhEBId2lGV6/eHgGYs48s1
oCCrljsVmWd+p4uSAplIBewCv7YPsxl3DZJTV6DFRD9mnuqjrqozSM+UsoMPRTPZ
7AyaDxeb63LiWTq6T/gLHptmu8K0SLvDkzA5LeBWKUNFcMHpWODpzjPj5J4Mtulr
R8oLtEy/2ZyWi7n8JuOt+swTsZDN0Qzcpzw9MU1RWs0sqGvTO91bMjc+FYew7wuZ
CEZxX4VxSQKCAQB2ULaKc4Oersq7Z3fQXIynLNT8lZ/AKQaAH/SdLL7IGKWRZ9eA
VOQNnZnThnKMDbDS8GPOpjzfjPDP8L7Y6NOVgc6ETGEdvoXomZv+sqpwx3BWszNK
18FfV0HhLv0MFHAPfMIqPqhhYUDnDAt/yWFViujIIrllmXjH9JGZDdPgzsupPToZ
FKC5UAYeAZwpaX2AROrfACscn99kNsTE7F8HtMQ//iT+M0rHVTzhVBnm1/e3eY1J
9L6WUbCPzBeiNFNC+y9+0nZk0tkgJk+qUPYdnaQL44TtlZMT1iWKg3C6dgrjbbaG
tFZmwh2/hf0Aovycpn/Fm2PKwxved64FnDy1AoIBABK1Evhe4qiLm/SzRHozwC9v
RfxYpebnCYZ6sRA3IFkm4HQjoNbxBnIDDqK/1y0/yKihbwp0oCDRBBL6VxhI167Y
SZz2TBJJGljbd/hKXwBjWb7/0yIsxE84fVkmH9Dia++ngKSbCyl30WV/JKZ6F8tS
A4q0MRYqZUJWDt07fbBEAuPn+IPalJDSO/7+K0l8TYnl6CyO5A0+9WwBFITzZSLP
VTrZJemY6wKfmxdoddpZPKY3VVu0JKRzevsJToP2BWlyKXn+6yWe+pEf8l/pUkXa
OMol4mm7vnSVJkJrf1sPuyRG/e5IdLAC9TMB7YjJ1J3nelmd6pglkMYx7HXm3dMC
ggEAUSFnOl3WmLJfIWuFW60tP28y9lf4g8RcOpmRytzal9Zi510mDtsgCVYgVogU
CEPm9ws9H/z2iqnJsyi9YYm1qFkCo9yaXYn1bEwTMk6gwlzfUWTv+M51+DvVZzYp
3GXJLzD6K5it+aHGGsZuSP8eLAd7DOScYuzlG2XgLm/hvrmwOYkR5U/5Lp1GBfJ5
tf8xfIcHdFfjDFBeqx49yNyY71dh//66R+ioTivR+ZjBTdXrsQLkinvwZxNxwbCF
PAaffmMZQQVYf6aGQe5ig2q3ZMPeNAm6PIPSkUJi4qNF/DOvseTU7qeLtC1WOi/9
8c7ZGvXT9TdaXya0BkNwA9jZKwKCAQBUDqjJ7Q/nlxLifyOInW1RbwbUFzh7mdfC
w6362II2gIz0JRg7HQHMwfbY5t+ELi9Rsdn90wlPQ08cK42goKW46Nt30g+AoQ/N
0maLzbrn5BffAtI7XM0a4i3dZ/yjS0/NW39km0YnTe49W6CBBf91fChIfm+jvYna
ihA9x/SgyuBUvQ1bCrMzMM024TxhCkvvKI2MDmJNJHOeqovYFAXiHFGPmftunu1K
oDRUPb6j5gTBhxAV1ZPHKCee7EIFwi/jJ/31oMLEJp5RnAdrW+FitPjQ7hcoRStm
VZAoapBJb37xa1kq/7hHYf2bPVdrcO8AeStpjEh6GbtYmy2pWlFy
-----END RSA PRIVATE KEY----- |
|---|
| Note: This is line-wrapped to make it easier to read. Real keys should be a single line. |
Public key (single line, but wrapped here to make it more readable):
| an-a05n01 | cat ~/.ssh/id_rsa.pubssh-rsa AAAAB3NzaC1yc2EAAAABIwAAAgBKYiBxI06RGiar5rt121+tO1crpa9MwL+K5qtlx0IrL7QUDxi+hvdXg3sTS6+R/mnLDE8eS
ulgRX4fHweNbM96wnl2N9mOnODLJftWPbPUHFpTc/0bDRcXq4rB+V+NvXG1i74W1si8Fp/R5wnPmF7yo/ZjN2zXLhwesOVY3Cnmur+O19
80O4lT7Zl5Q0mALNkriouhD+FzQZnMky8X2MM4dmnYqctCI54jbgD0vN09uUu8KyGycV9BFW7ScfGBEvow4/+8YW+my4bG0SBjJki7eOK
W3fvr58cybXO+UBqLFO7yMe5jf0fClyz6MFn+PRPR37QQy4GIC+4MCaYaiCx2P/K+K/ZxH621Q8nBE9TdNCw6iVqlt5Si3x2UzxOlrYLZ
nvB1BfzY92Rd/RNP5bz17PapaOMLjkx6iIAEDbp2lL5vzGp+1S30SX956sX/4CYWVTg+MAwok9mUcyj60VU+ldlPDuN7UYUi8Wmoa6Jsu
ozstUNBCsUcKzt5FEBy4vOwOMtyu3cD4rQrn3eGXfZ1a4QpLnR2H9y7EnM4nfGdQ/OVjMecAtHUxx3FDltHgiSkQDEF9R4s3z6NLZ2mda
TU9A5zm+1rMW1ZLhGkfna/h2KV9o8ZNx79WyKMheajL4lgi495D7c6fF4GBgX7u7qrdZyCj2cXgrgT4nGwM2Z81Q== root@an-a05n01.alteeve.ca |
|---|
Now do the same thing on an-a05n02 to generate its key.
| an-a05n01 | ssh-keygen -t rsa -N "" -b 4095 -f ~/.ssh/id_rsaGenerating public/private rsa key pair.
Created directory '/root/.ssh'.
Your identification has been saved in /root/.ssh/id_rsa.
Your public key has been saved in /root/.ssh/id_rsa.pub.
The key fingerprint is:
68:71:fb:87:88:e3:c2:89:49:ad:d0:55:7d:1c:05:b6 root@an-a05n02.alteeve.ca
The key's randomart image is:
+--[ RSA 4095]----+
| . .++. |
| . ..o. |
| .. ..E |
| . + . |
| . o o S |
|. o .. . o . |
| o = .o . o . |
| + +. . . |
| .. |
+-----------------+ |
|---|
Populate known_hosts
Normally, the first time you try to ssh into a computer, you will be asked to verify that the fingerprint reported by the target server is valid. We just created our nodes, so we can trust that we're connecting to the actual target machine we think we are.
Seeing as we're comfortable with this, we can use a nifty program called ssh-keyscan to read the fingerprint of the target machine and copy the resulting key to the ~/.ssh/known_hosts file. We'll need to do this for all variations of the host names for each node. This alone means that we need to add ten fingerprints, five for the five names of each node.
This is somewhat tedious, so we'll do this once on an-a05n01 and then copy the populated ~/.ssh/known_hosts file over to an-a05n02 later.
If you recall from the /etc/hosts section, we've got five possible host names per node. We'll call all of them now.
| an-a05n01 | ssh-keyscan an-a05n01.alteeve.ca >> ~/.ssh/known_hosts# an-a05n01.alteeve.ca SSH-2.0-OpenSSH_5.3 |
|---|
If you are not familiar with bash redirections, the >> ~/.ssh/known_hosts file tells the OS, "Take the returned text that would have been printed to screen and instead append it to ~/.ssh/known_hosts". In our case, known_hosts didn't exist yet, so it was created.
Now we'll repeat this, once for each host name for either node.
| an-a05n01 | ssh-keyscan an-a05n01 >> ~/.ssh/known_hosts# an-a05n01 SSH-2.0-OpenSSH_5.3ssh-keyscan an-a05n01.bcn >> ~/.ssh/known_hosts# an-a05n01.bcn SSH-2.0-OpenSSH_5.3ssh-keyscan an-a05n01.sn >> ~/.ssh/known_hosts# an-a05n01.sn SSH-2.0-OpenSSH_5.3ssh-keyscan an-a05n01.ifn >> ~/.ssh/known_hosts# an-a05n01.ifn SSH-2.0-OpenSSH_5.3 |
|---|
That's all the host names for an-a05n01. Now we'll repeat the steps for an-a05n02.
| an-a05n01 | ssh-keyscan an-a05n02.alteeve.ca >> ~/.ssh/known_hosts# an-a05n02.alteeve.ca SSH-2.0-OpenSSH_5.3ssh-keyscan an-a05n02 >> ~/.ssh/known_hosts# an-a05n02 SSH-2.0-OpenSSH_5.3ssh-keyscan an-a05n02.bcn >> ~/.ssh/known_hosts# an-a05n02.bcn SSH-2.0-OpenSSH_5.3ssh-keyscan an-a05n02.sn >> ~/.ssh/known_hosts# an-a05n02.sn SSH-2.0-OpenSSH_5.3ssh-keyscan an-a05n02.ifn >> ~/.ssh/known_hosts# an-a05n02.ifn SSH-2.0-OpenSSH_5.3 |
|---|
Done!
Now we won't get asked to verify the target machine's RSA fingerprint when we try to connect later. More importantly, if the fingerprint ever changes, it will generate a very noisy alert telling us that something nasty, like a fake target having replaced our peer, might have happened.
The last step is to copy this known_hosts file over to an-a05n02, saving us the hassle of running all those commands a second time.
| an-a05n01 | rsync -av ~/.ssh/known_hosts root@an-a05n02:/root/.ssh/Warning: Permanently added the RSA host key for IP address '10.20.50.2' to the list of known hosts. |
|---|
Don't worry about that warning, it's a one time thing. Enter the password for the root user on an-a05n02 to continue.
| an-a05n01 | root@an-a05n02's password:sending incremental file list
known_hosts
sent 4817 bytes received 31 bytes 1077.33 bytes/sec
total size is 4738 speedup is 0.98 |
|---|
Done!
Copy Public Keys to Enable SSH Without a Password
| Note: This only disabled the need for passwords when connecting from one node's root use to the other node's root user. It does not remove the need for passwords from any other machines or users! |
In order to enable password-less login, we need to create a file called ~/.ssh/authorized_keys and put both nodes' public key in it. We will create the authorized_keys on an-a05n01 and then copy it over to an-a05n02.
First, we'll copy the local id_rsa.pub file. This will create the authorized_keys file and add the local public RSA in one step.
On an-a05n01
| an-a05n01 | cp ~/.ssh/id_rsa.pub ~/.ssh/authorized_keys |
|---|
Now we'll use ssh to print the contents of an-a05n02's public key to screen, but redirect the key to the new authorized_keys file.
| an-a05n01 | ssh root@an-a05n02 "cat /root/.ssh/id_rsa.pub" >> ~/.ssh/authorized_keys |
|---|
Enter the password for the root user on an-a05n02.
| an-a05n01 | root@an-a05n02's password: |
|---|
Done. Now we can verify that both keys have been added to the authorized_keys file.
| an-a05n01 | cat ~/.ssh/authorized_keys |
|---|
I'm truncating the output below to make it more readable.
| an-a05n01 | ssh-rsa <key snipped> root@an-a05n01.alteeve.ca
ssh-rsa <key snipped> root@an-a05n02.alteeve.ca |
|---|
Excellent! Now we can copy this to an-a05n02 and, with luck, enter the password one last time.
| an-a05n01 | rsync -av ~/.ssh/authorized_keys root@an-a05n02:/root/.ssh/root@an-a05n02's password:sending incremental file list
authorized_keys
sent 1577 bytes received 31 bytes 643.20 bytes/sec
total size is 1494 speedup is 0.93 |
|---|
Last step is to test connecting from an-a05n01 to an-a05n02. We should not get any prompt at all.
| an-a05n01 | ssh root@an-a05n02Last login: Tue Oct 29 14:02:19 2013 from ...cable.user.start.ca
[root@an-a05n02 ~]# |
|---|
Very nice! Just type exit to return to an-a05n01.
| an-a05n01 | exitlogout
Connection to an-a05n02 closed.
[root@an-a05n01 ~]# |
|---|
You should now be able to use ssh from either node to connect to the other node using any of the host names we set! Note that the physical network you use for the connection will depend on the host name you use. When you used an-a05n02 above, you connect using the BCN. Had you instead used an-a05n02.sn, we would have connected over the SN.
Setting Up UPS Monitoring
| Note: This section assumes that you are using APC brand UPSes with AP9630 network management cards. If you use another make or model, please be sure that it uses a network connection, not USB or serial, and that it is supported by apcupsd. |
We always recommend that you have two network-managed UPSes backing either switched PDU. This protects your Anvil! against power outages, of course, but they can also protect against distorted input power, under and over voltage events and other power anomalies.
The reason we recommend network managed UPSes, instead of passive UPSes, is that it allows for monitoring incoming power and alerting on notable events. We have found that power events are the most common issues in production. Being alerted to power events can allow you to deal with issues that might otherwise effect other equipment in your facility that isn't or can't be protected by UPSes.
Installing apcupsd
The apcupsd program is not available in the normal RHEL or CentOS repositories. So you can either build it yourself or install a version pre-built by us. In production, it certainly makes sense to build your own as it's most secure. If you wish, you could also install from ELRepo.
For the purpose of this tutorial, we'll download the version from the alteeve.ca servers as it's the simplest option.
| an-a05n01 | an-a05n02 |
|---|---|
rpm -Uvh https://alteeve.ca/files/apcupsd/apcupsd-latest.el6.x86_64.rpmRetrieving https://alteeve.ca/files/apcupsd/apcupsd-latest.el6.x86_64.rpm
Preparing... ########################################### [100%]
1:apcupsd ########################################### [100%] |
rpm -Uvh https://alteeve.ca/files/apcupsd/apcupsd-latest.el6.x86_64.rpmRetrieving https://alteeve.ca/files/apcupsd/apcupsd-latest.el6.x86_64.rpm
Preparing... ########################################### [100%]
1:apcupsd ########################################### [100%] |
Configuring Apcupsd For Two UPSes
| Note: Much of the credit for this section belongs to apcupsd's project documentation on the topic. It's been edited somewhat to better suit our needs. |
By default, apcupsd only supports one UPS. The practical side effect of this is that apcupsd will initiate a shut down as soon as the first UPS is low on batteries. This makes no sense if the second UPS is still full or running on AC.
So we're going to make two main changes here;
- Disable the ability for apcupsd to initiate a shut down of the node.
- Configure apcupsd to support two (or more) UPSes.
Before we begin, we will make a backup of the default apcupsd.conf file. Then we're going to rename it and configure it for the first UPS. Once it's configured, we will copy it for the second UPS and change just the variable values that differ.
| Note: We're going to work on an-a05n01. Once it's configured and working, we'll copy our new configuration to an-a05n02 |
We decided earlier to name our UPSes an-ups01 and an-ups02. We're going to use these names in the configuration and log file names used for each UPS. So let's backup the original configuration file and then rename it to match our first UPS.
| an-a05n01 | cp /etc/apcupsd/apcupsd.conf /etc/apcupsd/apcupsd.conf.anvil
mv /etc/apcupsd/apcupsd.conf /etc/apcupsd/apcupsd.an-ups01.conf
ls -lah /etc/apcupsd/total 108K
drwxr-xr-x. 3 root root 4.0K Nov 26 17:34 .
drwxr-xr-x. 90 root root 12K Nov 25 17:28 ..
-rwxr--r--. 1 root root 3.9K Mar 4 2013 apccontrol
-rw-r--r--. 1 root root 13K Mar 4 2013 apcupsd.an-ups01.conf
-rw-r--r--. 1 root root 13K Nov 26 15:49 apcupsd.conf.anvil
-rw-r--r--. 1 root root 607 Mar 4 2013 apcupsd.css
-rwxr--r--. 1 root root 460 Mar 4 2013 changeme
-rwxr--r--. 1 root root 487 Mar 4 2013 commfailure
-rwxr--r--. 1 root root 488 Mar 4 2013 commok
-rwxr-xr-x. 1 root root 17K Mar 4 2013 hid-ups
-rw-r--r--. 1 root root 662 Mar 4 2013 hosts.conf
-rwxr-xr-x. 1 root root 626 May 28 2002 make-hiddev
-rw-r--r--. 1 root root 2.3K Mar 4 2013 multimon.conf
-rwxr--r--. 1 root root 455 Mar 4 2013 offbattery
-rwxr--r--. 1 root root 420 Mar 4 2013 onbattery |
|---|
Next up, we're going to create a new directory called /etc/apcupsd/null. We'll copy some of the existing scripts into it and then create a new script that will disabled automatic shut down of the node. We're doing this so that future updates to apcupsd won't replace our scripts. We'll see how we use this shortly.
Once the directory is created, we'll copy the scripts we want. Next, we'll create a new script called doshutdown which will do nothing expect exit with return code 99. This return code tells apcupsd that the shut down action has been disabled.
| an-a05n01 | mkdir /etc/apcupsd/null
cp /etc/apcupsd/apccontrol /etc/apcupsd/null/
cp /etc/apcupsd/c* /etc/apcupsd/null/
cp /etc/apcupsd/o* /etc/apcupsd/null/
echo "exit 99" > /etc/apcupsd/null/doshutdown
chown root:root /etc/apcupsd/null/doshutdown
chmod 744 /etc/apcupsd/null/doshutdown
cat /etc/apcupsd/null/doshutdownexit 99ls -lah /etc/apcupsd/null/total 36K
drwxr-xr-x. 2 root root 4.0K Nov 26 17:39 .
drwxr-xr-x. 3 root root 4.0K Nov 26 17:34 ..
-rwxr--r--. 1 root root 3.9K Nov 26 17:35 apccontrol
-rwxr--r--. 1 root root 460 Nov 26 17:36 changeme
-rwxr--r--. 1 root root 487 Nov 26 17:36 commfailure
-rwxr--r--. 1 root root 488 Nov 26 17:36 commok
-rwxr--r--. 1 root root 8 Nov 26 17:39 doshutdown
-rwxr--r--. 1 root root 455 Nov 26 17:36 offbattery
-rwxr--r--. 1 root root 420 Nov 26 17:36 onbattery |
|---|
Good. Now it's time to change the variables in the configuration file. Before we do though, lets look at the variables we're going to edit, what value we will set them to for an-ups01 and what they do. We'll look at the specific variables we need to change in an-ups02's configuration file later.
| Variable | Value for an-ups01 | Description |
|---|---|---|
| UPSNAME | an-ups01 | This is the name to use for this UPS when writing log entries or reporting status information. It should be less than eight characters long. We're going to use the short host name for the UPS. |
| UPSTYPE | snmp | This tells apcupsd that we will communicate with this UPS using SNMP to talk to the network management card in the UPS. |
| DEVICE | an-ups01.alteeve.ca:161:APC_NOTRAP:private | This is the connection string needed for establishing the SNMP connection to the UPS. It's separated into four sections, each section separated by colons. The first value is the host name or IP address of the UPS. The second section is the TCP port to connect to, which is 161 on APC brand UPSes. The third and fourth sections are the vendor name and SNMP community, respectively. We're using the vendor name APC_NOTRAP in order to disable SNMP traps. The community should usually be private, unless you changed it in the network management card itself. |
| POLLTIME | 30 | This tells apcupsd how often, in seconds, to query the UPS status. The default is once per minute, but we will want twice per minute in order to match the scan frequency of the monitoring and alter system we will use later. |
| SCRIPTDIR | /etc/apcupsd/null | This tells apcupsd to use the scripts in our new null directory instead of the default ones. |
| PWRFAILDIR | /etc/apcupsd/null | Some UPSes need to be powered off themselves when the power is about to run out of the batteries. This is controlled by a file written to this directory which apcupsd's shut down script looks for. We've disabled shut down, but to be safe and thorough, we will disable this as well by pointing it at our null directory. |
| BATTERYLEVEL | 0 | This tells apcupsd to initiate a shut down once the UPS reports this percentage left in the batteries. We've disabled automatic shut down, but just the same, we'll set this to 0. |
| MINUTES | 0 | This tells apcupsd to initiate a shut down once the UPS reports this many minutes of run time left in the batteries. We've disabled automatic shut down, but just the same, we'll set this to 0. |
| NISPORT | 3551 | The default value here is fine for an-ups01, but it is important to highlight here. We will use apcaccess to query apcupsd's data over the network, even though it's on the same machine. Each UPS we monitor will have an apcupsd daemon running and listening on a dedicated TCP port. The first UPS, an-ups01, will listen on the default port. Which port we specify when using apcaccess later will determine which UPS status information is returned. |
| ANNOY | 0 | Normally, apcupsd will start "annoying" the users of the system to save their work and log out five minutes (300 seconds) before calling the shut down of the server. We're disabling automatic shut down, so this needs to be disabled. |
| EVENTSFILE | /var/log/apcupsd.an-ups01.events | This is where events related to this UPS are recorded. |
With this in mind, we'll use sed to edit the file. If you are more comfortable with a text editor, please use that instead. You can refer to the diff at the end of this section to see exactly what changed.
| an-a05n01 | # Set the name of the UPS and domain once.
ups="an-ups01"
domain="alteeve.ca"
# Configure the UPS name. Note the odd syntax; There are two 'UPSNAME' entries
# in the config and we only want to change the first instance.
sed -i "0,/#UPSNAME/s/^#UPSNAME/UPSNAME/" /etc/apcupsd/apcupsd.${ups}.conf
sed -i "s/^UPSNAME.*/UPSNAME ${ups}/" /etc/apcupsd/apcupsd.${ups}.conf
# Configure the UPS access
sed -i "s/^UPSTYPE.*/UPSTYPE snmp/" /etc/apcupsd/apcupsd.${ups}.conf
sed -i "s/^DEVICE.*/DEVICE ${ups}.${domain}:161:APC_NOTRAP:private/" /etc/apcupsd/apcupsd.${ups}.conf
# Change the poll time.
sed -i "s/^#POLLTIME/POLLTIME/" /etc/apcupsd/apcupsd.${ups}.conf
sed -i "s/^POLLTIME.*/POLLTIME 30/" /etc/apcupsd/apcupsd.${ups}.conf
# Update the script directories
sed -i "s/^SCRIPTDIR.*/SCRIPTDIR \/etc\/apcupsd\/null/" /etc/apcupsd/apcupsd.${ups}.conf
sed -i "s/^PWRFAILDIR.*/PWRFAILDIR \/etc\/apcupsd\/null/" /etc/apcupsd/apcupsd.${ups}.conf
# Change the shut down thresholds and disable the shut down annoy message
sed -i "s/^BATTERYLEVEL .*/BATTERYLEVEL 0/" /etc/apcupsd/apcupsd.${ups}.conf
sed -i "s/^MINUTES .*/MINUTES 0/" /etc/apcupsd/apcupsd.${ups}.conf
sed -i "s/^ANNOY .*/ANNOY 0/" /etc/apcupsd/apcupsd.${ups}.conf
# The NIS port isn't changing, but this makes sure it really is what we want.
sed -i "s/^NISPORT.*/NISPORT 3551/" /etc/apcupsd/apcupsd.${ups}.conf
# Finally, update the event log file name.
sed -i "s/^EVENTSFILE .*/EVENTSFILE \/var\/log\/apcupsd.${ups}.events/" /etc/apcupsd/apcupsd.${ups}.conf
# End with a 'diff' of the updated configuration against the backup we made.
diff -u /etc/apcupsd/apcupsd.conf.anvil /etc/apcupsd/apcupsd.${ups}.conf--- /etc/apcupsd/apcupsd.conf.anvil 2013-11-26 15:49:47.852153374 -0500
+++ /etc/apcupsd/apcupsd.an-ups01.conf 2013-11-26 19:58:17.810278390 -0500
@@ -12,7 +12,7 @@
# Use this to give your UPS a name in log files and such. This
# is particulary useful if you have multiple UPSes. This does not
# set the EEPROM. It should be 8 characters or less.
-#UPSNAME
+UPSNAME an-ups01
# UPSCABLE <cable>
# Defines the type of cable connecting the UPS to your computer.
@@ -76,8 +76,8 @@
# 3052. If this parameter is empty or missing, the
# default of 3052 will be used.
#
-UPSTYPE apcsmart
-DEVICE /dev/ttyS0
+UPSTYPE snmp
+DEVICE an-ups01.alteeve.ca:161:APC_NOTRAP:private
# POLLTIME <int>
# Interval (in seconds) at which apcupsd polls the UPS for status. This
@@ -86,7 +86,7 @@
# will improve apcupsd's responsiveness to certain events at the cost of
# higher CPU utilization. The default of 60 is appropriate for most
# situations.
-#POLLTIME 60
+POLLTIME 30
# LOCKFILE <path to lockfile>
# Path for device lock file. Not used on Win32.
@@ -94,14 +94,14 @@
# SCRIPTDIR <path to script directory>
# Directory in which apccontrol and event scripts are located.
-SCRIPTDIR /etc/apcupsd
+SCRIPTDIR /etc/apcupsd/null
# PWRFAILDIR <path to powerfail directory>
# Directory in which to write the powerfail flag file. This file
# is created when apcupsd initiates a system shutdown and is
# checked in the OS halt scripts to determine if a killpower
# (turning off UPS output power) is required.
-PWRFAILDIR /etc/apcupsd
+PWRFAILDIR /etc/apcupsd/null
# NOLOGINDIR <path to nologin directory>
# Directory in which to write the nologin file. The existence
@@ -132,12 +132,12 @@
# If during a power failure, the remaining battery percentage
# (as reported by the UPS) is below or equal to BATTERYLEVEL,
# apcupsd will initiate a system shutdown.
-BATTERYLEVEL 5
+BATTERYLEVEL 0
# If during a power failure, the remaining runtime in minutes
# (as calculated internally by the UPS) is below or equal to MINUTES,
# apcupsd, will initiate a system shutdown.
-MINUTES 3
+MINUTES 0
# If during a power failure, the UPS has run on batteries for TIMEOUT
# many seconds or longer, apcupsd will initiate a system shutdown.
@@ -155,7 +155,7 @@
# Time in seconds between annoying users to signoff prior to
# system shutdown. 0 disables.
-ANNOY 300
+ANNOY 0
# Initial delay after power failure before warning users to get
# off the system.
@@ -203,7 +203,7 @@
# If you want the last few EVENTS to be available over the network
# by the network information server, you must define an EVENTSFILE.
-EVENTSFILE /var/log/apcupsd.events
+EVENTSFILE /var/log/apcupsd.an-ups01.events
# EVENTSFILEMAX <kilobytes>
# By default, the size of the EVENTSFILE will be not be allowed to exceed |
|---|
Now we will copy the an-ups01 config file over to the one we'll use for an-ups02.
We're going to change the following variables:
| Variable | Changed value for an-ups02 |
|---|---|
| UPSNAME | an-ups02 |
| DEVICE | an-ups02.alteeve.ca:161:APC_NOTRAP:private |
| NISPORT | 3552 |
| EVENTSFILE | /var/log/apcupsd.an-ups02.events |
We're going to copy the configuration file and then use sed again to make these changes. We'll finish with another diff showing the differences between the two configuration files.
| an-a05n01 | # Set the name of this UPS. The 'domain' variable should still be set.
ups2="an-ups02"
# Make a copy of the configuration file.
cp /etc/apcupsd/apcupsd.${ups}.conf /etc/apcupsd/apcupsd.${ups2}.conf
# Change the variables
sed -i "s/^UPSNAME.*/UPSNAME ${ups2}/" /etc/apcupsd/apcupsd.${ups2}.conf
sed -i "s/^DEVICE.*/DEVICE ${ups2}.${domain}:161:APC_NOTRAP:private/" /etc/apcupsd/apcupsd.${ups2}.conf
sed -i "s/^NISPORT.*/NISPORT 3552/" /etc/apcupsd/apcupsd.${ups2}.conf
sed -i "s/^EVENTSFILE .*/EVENTSFILE \/var\/log\/apcupsd.${ups2}.events/" /etc/apcupsd/apcupsd.${ups2}.conf
diff -u /etc/apcupsd/apcupsd.${ups2}.conf /etc/apcupsd/apcupsd.${ups}.conf--- /etc/apcupsd/apcupsd.an-ups02.conf 2013-11-26 20:09:18.884783551 -0500
+++ /etc/apcupsd/apcupsd.an-ups01.conf 2013-11-26 20:13:20.273346652 -0500
@@ -12,7 +12,7 @@
# Use this to give your UPS a name in log files and such. This
# is particulary useful if you have multiple UPSes. This does not
# set the EEPROM. It should be 8 characters or less.
-UPSNAME an-ups01
+UPSNAME an-ups02
# UPSCABLE <cable>
# Defines the type of cable connecting the UPS to your computer.
@@ -77,7 +77,7 @@
# default of 3052 will be used.
#
UPSTYPE snmp
-DEVICE an-ups01.alteeve.ca:161:APC_NOTRAP:private
+DEVICE an-ups02.alteeve.ca:161:APC_NOTRAP:private
# POLLTIME <int>
# Interval (in seconds) at which apcupsd polls the UPS for status. This
@@ -199,11 +199,11 @@
# It is not used unless NETSERVER is on. If you change this port,
# you will need to change the corresponding value in the cgi directory
# and rebuild the cgi programs.
-NISPORT 3551
+NISPORT 3552
# If you want the last few EVENTS to be available over the network
# by the network information server, you must define an EVENTSFILE.
-EVENTSFILE /var/log/apcupsd.an-ups01.events
+EVENTSFILE /var/log/apcupsd.an-ups02.events
# EVENTSFILEMAX <kilobytes>
# By default, the size of the EVENTSFILE will be not be allowed to exceed |
|---|
The last change that is needed is to update the apcupsd initialization script. We're going to copy a pre-edited one from the alteeve.ca server and then look at the differences. We could edit the file, but it would be a little more complex. So instead, lets look at the differences and then talk about what changed.
| an-a05n01 | mv /etc/init.d/apcupsd /root/apcupsd.init.d.anvil
wget https://alteeve.ca/files/apcupsd/apcupsd -O /etc/init.d/apcupsd--2013-11-26 20:59:42-- https://alteeve.ca/files/apcupsd/apcupsd
Resolving alteeve.ca... 65.39.153.64
Connecting to alteeve.ca|65.39.153.64|:443... connected.
HTTP request sent, awaiting response... 200 OK
Length: 1759 (1.7K) [text/plain]
Saving to: `/etc/init.d/apcupsd'
100%[=========================================================================>] 1,759 --.-K/s in 0s
2013-11-26 20:59:42 (5.10 MB/s) - `/etc/init.d/apcupsd' saved [1759/1759]chmod 755 /etc/init.d/apcupsd-rwxr-xr-x. 1 root root 1.8K Aug 19 2012 /etc/init.d/apcupsddiff -u /root/apcupsd.init.d.anvil /etc/init.d/apcupsd--- /root/apcupsd.init.d.anvil 2013-03-04 23:32:43.000000000 -0500
+++ /etc/init.d/apcupsd 2012-08-19 18:36:33.000000000 -0400
@@ -1,7 +1,7 @@
#! /bin/sh
#
# apcupsd This shell script takes care of starting and stopping
-# the apcupsd UPS monitoring daemon.
+# the apcupsd UPS monitoring daemon. Multi-UPS version.
#
# chkconfig: 2345 60 99
# description: apcupsd monitors power and takes action if necessary
@@ -15,18 +15,24 @@
start)
rm -f /etc/apcupsd/powerfail
rm -f /etc/nologin
- echo -n "Starting UPS monitoring:"
- daemon /sbin/apcupsd -f /etc/apcupsd/apcupsd.conf
- RETVAL=$?
- echo
- [ $RETVAL -eq 0 ] && touch /var/lock/subsys/apcupsd
+ for conf in /etc/apcupsd/apcupsd.*.conf ; do
+ inst=`basename $conf`
+ echo -n "Starting UPS monitoring ($inst):"
+ daemon /sbin/apcupsd -f $conf -P /var/run/apcupsd-$inst.pid
+ RETVAL=$?
+ echo
+ [ $RETVAL -eq 0 ] && touch /var/lock/subsys/apcupsd-$inst
+ done
;;
stop)
- echo -n "Shutting down UPS monitoring:"
- killproc apcupsd
- echo
- rm -f $APCPID
- rm -f /var/lock/subsys/apcupsd
+ for conf in /etc/apcupsd/apcupsd.*.conf ; do
+ inst=`basename $conf`
+ echo -n "Shutting down UPS monitoring ($inst):"
+ killproc -p /var/run/apcupsd-$inst.pid apcupsd
+ echo
+ rm -f /var/run/apcupsd-$inst.pid
+ rm -f /var/lock/subsys/apcupsd-$inst
+ done
;;
restart|force-reload)
$0 stop
@@ -38,14 +44,16 @@
exit 3
;;
status)
- status apcupsd
- RETVAL=$?
- if [ $RETVAL -eq 0 ]
- then
- /sbin/apcaccess status
- else
- exit $RETVAL
- fi
+ for conf in /etc/apcupsd/apcupsd.*.conf ; do
+ inst=`basename $conf`
+ status -p /var/run/apcupsd-$inst.pid apcupsd-$inst
+ RETVAL=$?
+ if [ $RETVAL -eq 0 ]
+ then
+ NISPORT=`grep ^NISPORT < $conf | sed -e "s/NISPORT *\([0-9]\)/\1/"`
+ /sbin/apcaccess status localhost:$NISPORT | egrep "(STATUS)|(UPSNAME)"
+ fi
+ done
;;
*)
echo "Usage: $0 {start|stop|restart|status}" |
|---|
The main change here is that, for each of the start, stop and status calls, we tell the init.d script to loop one for each apcupsd.*.conf file it finds. The original script expected just one configuration file but was otherwise perfect for what we needed. So we shifted the existing calls into our loop.
So all this new script does is repeat what the original did already, once for each configuration file.
Let's copy all of this over to an-a05n02 now!
| an-a05n01 | rsync -av /etc/init.d/apcupsd root@an-a05n02:/etc/init.d/sending incremental file list
apcupsd
sent 1834 bytes received 43 bytes 3754.00 bytes/sec
total size is 1759 speedup is 0.94rsync -av /etc/apcupsd root@an-a05n02:/etc/sending incremental file list
apcupsd/
apcupsd/apcupsd.an-ups01.conf
apcupsd/apcupsd.an-ups02.conf
apcupsd/apcupsd.conf.anvil
apcupsd/null/
apcupsd/null/apccontrol
apcupsd/null/changeme
apcupsd/null/commfailure
apcupsd/null/commok
apcupsd/null/doshutdown
apcupsd/null/offbattery
apcupsd/null/onbattery
sent 44729 bytes received 210 bytes 29959.33 bytes/sec
total size is 70943 speedup is 1.58rsync -av /root/apcupsd.init.d.anvil root@an-a05n02:/root/sending incremental file list
apcupsd.init.d.anvil
sent 1276 bytes received 31 bytes 871.33 bytes/sec
total size is 1188 speedup is 0.91 |
|---|
SELinux and apcupsd
| Note: This section needs some clean-up. |
We've got two SELinux issues to address:
- Allow the second apcupsd daemon to use TCP and UDP ports 3552.
- Allow both daemons to write to the non-standard log files.
You can see what ports selinux allows various applications to use with semanage port -l. This generates a lot of data, so we're interested just in seeing what ports apcupsd is already allowed to use. So we'll pipe it through grep.
| an-a05n01 | semanage port -l |grep apcupsapcupsd_port_t tcp 3551
apcupsd_port_t udp 3551 |
|---|---|
| an-a05n02 | semanage port -l |grep apcupsapcupsd_port_t tcp 3551
apcupsd_port_t udp 3551 |
We see that the apcupsd_port_t context is used for both tcp and udp. With this, we can simply add port 3552.
| Note: These commands can take a while to run. Please be patient. |
| an-a05n01 | semanage port -a -t apcupsd_port_t -p tcp 3552
semanage port -a -t apcupsd_port_t -p udp 3552
semanage port -l |grep apcupsapcupsd_port_t tcp 3552, 3551
apcupsd_port_t udp 3552, 3551 |
|---|---|
| an-a05n02 | semanage port -a -t apcupsd_port_t -p tcp 3552
semanage port -a -t apcupsd_port_t -p udp 3552
semanage port -l |grep apcupsapcupsd_port_t tcp 3552, 3551
apcupsd_port_t udp 3552, 3551 |
Next up, enabling the context for the /var/log/apcupsd.an-ups01.events and /var/log/apcupsd.an-ups02.events log files.
These files don't exist until the daemon starts for the first time. We've not started it yet, so the first task is to touch to create these log files.
| an-a05n01 | touch /var/log/apcupsd.an-ups01.events
touch /var/log/apcupsd.an-ups02.events |
|---|---|
| an-a05n02 | touch /var/log/apcupsd.an-ups01.events
touch /var/log/apcupsd.an-ups02.events |
We don't have the default log file to check to see what context to use for our log files, but the apcupsd_selinux manual tells us that we need to set the apcupsd_log_t context.
| an-a05n01 | ls -lahZ /var/log/apcupsd.an-ups0*-rw-r--r--. root root system_u:object_r:var_log_t:s0 /var/log/apcupsd.an-ups01.events
-rw-r--r--. root root system_u:object_r:var_log_t:s0 /var/log/apcupsd.an-ups02.eventssemanage fcontext -a -t apcupsd_log_t /var/log/apcupsd.an-ups01.events
semanage fcontext -a -t apcupsd_log_t /var/log/apcupsd.an-ups02.events
restorecon /var/log/apcupsd.an-ups01.events
restorecon /var/log/apcupsd.an-ups02.events
ls -lahZ /var/log/apcupsd.an-ups0*-rw-r--r--. root root system_u:object_r:apcupsd_log_t:s0 /var/log/apcupsd.an-ups01.events
-rw-r--r--. root root system_u:object_r:apcupsd_log_t:s0 /var/log/apcupsd.an-ups02.events |
|---|---|
| an-a05n02 | ls -lahZ /var/log/apcupsd.an-ups0*-rw-r--r--. root root system_u:object_r:var_log_t:s0 /var/log/apcupsd.an-ups01.events
-rw-r--r--. root root system_u:object_r:var_log_t:s0 /var/log/apcupsd.an-ups02.eventssemanage fcontext -a -t apcupsd_log_t /var/log/apcupsd.an-ups01.events
semanage fcontext -a -t apcupsd_log_t /var/log/apcupsd.an-ups02.events
restorecon /var/log/apcupsd.an-ups01.events
restorecon /var/log/apcupsd.an-ups02.events
ls -lahZ /var/log/apcupsd.an-ups0*-rw-r--r--. root root system_u:object_r:apcupsd_log_t:s0 /var/log/apcupsd.an-ups01.events
-rw-r--r--. root root system_u:object_r:apcupsd_log_t:s0 /var/log/apcupsd.an-ups02.events |
Ok, ready to test!
Testing the Multi-UPS apcupds
If our edits above worked properly, we should now be able to start the apcupsd daemon and query out UPSes.
| an-a05n01 | /etc/init.d/apcupsd startStarting UPS monitoring (apcupsd.an-ups01.conf): [ OK ]
Starting UPS monitoring (apcupsd.an-ups02.conf): [ OK ] |
|---|---|
| an-a05n02 | /etc/init.d/apcupsd startStarting UPS monitoring (apcupsd.an-ups01.conf): [ OK ]
Starting UPS monitoring (apcupsd.an-ups02.conf): [ OK ] |
That looks good. Now the real test; Query the status of each UPS!
This generates a fair bit of output, so lets just look at an-a05n01 first.
| an-a05n01 | apcaccess status localhost:3551APC : 001,049,1198
DATE : 2013-11-26 21:21:20 -0500
HOSTNAME : an-a05n01.alteeve.ca
VERSION : 3.14.10 (13 September 2011) redhat
UPSNAME : an-ups01
CABLE : Ethernet Link
DRIVER : SNMP UPS Driver
UPSMODE : Stand Alone
STARTTIME: 2013-11-26 21:18:16 -0500
MODEL : Smart-UPS 1500
STATUS : ONLINE
LINEV : 123.0 Volts
LOADPCT : 23.0 Percent Load Capacity
BCHARGE : 100.0 Percent
TIMELEFT : 57.0 Minutes
MBATTCHG : 0 Percent
MINTIMEL : 0 Minutes
MAXTIME : 0 Seconds
MAXLINEV : 123.0 Volts
MINLINEV : 121.0 Volts
OUTPUTV : 123.0 Volts
SENSE : Medium
DWAKE : 1000 Seconds
DSHUTD : 020 Seconds
DLOWBATT : 02 Minutes
LOTRANS : 103.0 Volts
HITRANS : 130.0 Volts
RETPCT : 000.0 Percent
ITEMP : 31.0 C Internal
ALARMDEL : 5 seconds
BATTV : 27.0 Volts
LINEFREQ : 60.0 Hz
LASTXFER : Automatic or explicit self test
NUMXFERS : 0
TONBATT : 0 seconds
CUMONBATT: 0 seconds
XOFFBATT : N/A
SELFTEST : OK
STESTI : OFF
STATFLAG : 0x07000008 Status Flag
MANDATE : 09/18/2010
SERIALNO : AS1038232403
BATTDATE : 09/01/2011
NOMOUTV : 120 Volts
HUMIDITY : 6519592.0 Percent
AMBTEMP : 6519592.0 C
EXTBATTS : 0
BADBATTS : 0
FIRMWARE : UPS 05.0 / COM 02.1
END APC : 2013-11-26 21:21:29 -0500apcaccess status localhost:3552APC : 001,050,1242
DATE : 2013-11-26 21:21:48 -0500
HOSTNAME : an-a05n01.alteeve.ca
VERSION : 3.14.10 (13 September 2011) redhat
UPSNAME : APCUPS
CABLE : Ethernet Link
DRIVER : SNMP UPS Driver
UPSMODE : Stand Alone
STARTTIME: 2013-11-26 21:18:16 -0500
MODEL : Smart-UPS 1500
STATUS : ONLINE
LINEV : 123.0 Volts
LOADPCT : 22.0 Percent Load Capacity
BCHARGE : 100.0 Percent
TIMELEFT : 58.0 Minutes
MBATTCHG : 0 Percent
MINTIMEL : 0 Minutes
MAXTIME : 0 Seconds
MAXLINEV : 123.0 Volts
MINLINEV : 122.0 Volts
OUTPUTV : 122.0 Volts
SENSE : High
DWAKE : 000 Seconds
DSHUTD : 000 Seconds
DLOWBATT : 02 Minutes
LOTRANS : 106.0 Volts
HITRANS : 127.0 Volts
RETPCT : 31817744.0 Percent
ITEMP : 30.0 C Internal
ALARMDEL : 30 seconds
BATTV : 27.0 Volts
LINEFREQ : 60.0 Hz
LASTXFER : Automatic or explicit self test
NUMXFERS : 0
TONBATT : 0 seconds
CUMONBATT: 0 seconds
XOFFBATT : N/A
SELFTEST : OK
STESTI : OFF
STATFLAG : 0x07000008 Status Flag
MANDATE : 06/14/2012
SERIALNO : AS1224213144
BATTDATE : 10/15/2012
NOMOUTV : 120 Volts
NOMBATTV : 31817744.0 Volts
HUMIDITY : 6519592.0 Percent
AMBTEMP : 6519592.0 C
EXTBATTS : 31817744
BADBATTS : 6519592
FIRMWARE : UPS 08.3 / MCU 14.0
END APC : 2013-11-26 21:21:57 -0500 |
|---|
If you notice the serial numbers, we see that they differ and match the ones we have on record. This confirms that we're talking to both UPSes!
Before we look at an-a05n02, the keen observer will have noted that some of the sensor values are slightly unrealistic. Some UPSes optionally support environmental sensors and, without them, their values are not realistic at all. Those can be safely ignored and are not used by the monitoring and alert system.
So, let's confirm that the same calls from an-a05n02 result in the same values!
| an-a05n02 | apcaccess status localhost:3551APC : 001,049,1198
DATE : 2013-11-26 22:14:12 -0500
HOSTNAME : an-a05n02.alteeve.ca
VERSION : 3.14.10 (13 September 2011) redhat
UPSNAME : an-ups01
CABLE : Ethernet Link
DRIVER : SNMP UPS Driver
UPSMODE : Stand Alone
STARTTIME: 2013-11-26 21:19:30 -0500
MODEL : Smart-UPS 1500
STATUS : ONLINE
LINEV : 122.0 Volts
LOADPCT : 23.0 Percent Load Capacity
BCHARGE : 100.0 Percent
TIMELEFT : 57.0 Minutes
MBATTCHG : 0 Percent
MINTIMEL : 0 Minutes
MAXTIME : 0 Seconds
MAXLINEV : 123.0 Volts
MINLINEV : 122.0 Volts
OUTPUTV : 122.0 Volts
SENSE : Medium
DWAKE : 1000 Seconds
DSHUTD : 020 Seconds
DLOWBATT : 02 Minutes
LOTRANS : 103.0 Volts
HITRANS : 130.0 Volts
RETPCT : 000.0 Percent
ITEMP : 31.0 C Internal
ALARMDEL : 5 seconds
BATTV : 27.0 Volts
LINEFREQ : 60.0 Hz
LASTXFER : Automatic or explicit self test
NUMXFERS : 0
TONBATT : 0 seconds
CUMONBATT: 0 seconds
XOFFBATT : N/A
SELFTEST : OK
STESTI : OFF
STATFLAG : 0x07000008 Status Flag
MANDATE : 09/18/2010
SERIALNO : AS1038232403
BATTDATE : 09/01/2011
NOMOUTV : 120 Volts
HUMIDITY : 6519592.0 Percent
AMBTEMP : 6519592.0 C
EXTBATTS : 0
BADBATTS : 0
FIRMWARE : UPS 05.0 / COM 02.1
END APC : 2013-11-26 22:14:22 -0500apcaccess status localhost:3552APC : 001,050,1242
DATE : 2013-11-26 22:14:11 -0500
HOSTNAME : an-a05n02.alteeve.ca
VERSION : 3.14.10 (13 September 2011) redhat
UPSNAME : APCUPS
CABLE : Ethernet Link
DRIVER : SNMP UPS Driver
UPSMODE : Stand Alone
STARTTIME: 2013-11-26 21:19:30 -0500
MODEL : Smart-UPS 1500
STATUS : ONLINE
LINEV : 123.0 Volts
LOADPCT : 22.0 Percent Load Capacity
BCHARGE : 100.0 Percent
TIMELEFT : 58.0 Minutes
MBATTCHG : 0 Percent
MINTIMEL : 0 Minutes
MAXTIME : 0 Seconds
MAXLINEV : 123.0 Volts
MINLINEV : 122.0 Volts
OUTPUTV : 123.0 Volts
SENSE : High
DWAKE : 000 Seconds
DSHUTD : 000 Seconds
DLOWBATT : 02 Minutes
LOTRANS : 106.0 Volts
HITRANS : 127.0 Volts
RETPCT : 19898384.0 Percent
ITEMP : 30.0 C Internal
ALARMDEL : 30 seconds
BATTV : 27.0 Volts
LINEFREQ : 60.0 Hz
LASTXFER : Automatic or explicit self test
NUMXFERS : 0
TONBATT : 0 seconds
CUMONBATT: 0 seconds
XOFFBATT : N/A
SELFTEST : OK
STESTI : OFF
STATFLAG : 0x07000008 Status Flag
MANDATE : 06/14/2012
SERIALNO : AS1224213144
BATTDATE : 10/15/2012
NOMOUTV : 120 Volts
NOMBATTV : 19898384.0 Volts
HUMIDITY : 6519592.0 Percent
AMBTEMP : 6519592.0 C
EXTBATTS : 19898384
BADBATTS : 6519592
FIRMWARE : UPS 08.3 / MCU 14.0
END APC : 2013-11-26 22:14:38 -0500 |
|---|
Exactly what we wanted!
Later, when we setup the monitoring and alert system, we'll take a closer look at some of the variables and their possible values.
Monitoring Storage
At this time, this section covers monitoring LSI-based RAID controllers. If you have a different RAID controller and wish to contribute, we'd love to hear from you.
Monitoring LSI-Based RAID Controllers with MegaCli
Many tier-1 hardware vendors as well as many mid-tier and in-house brand servers use controllers built by or based on LSI RAID controller cards.
Installing MegaCli
In this section, we'll install LSI's MegaCli64 command-line tool for monitoring our storage. This is a commercial tool, so you must download it directly from LSI's website and agree to their license agreement.
At the time of writing, you can download it using this link. Click on the orange "+" to the right of "Management Software and Tools" in the search results page. Click on the "Download" icon and save the file to disk. Extract the MegaCli_Linux.zip file and switch to the /MegaCli_Linux directory.
| Note: The version of the file name shown below may have changed. |
Copy the MegaCli-8.07.08-1.noarch.rpm file to your nodes.
rsync -av MegaCli-8.07.08-1.noarch.rpm root@an-a05n01:/root/sending incremental file list
MegaCli-8.07.08-1.noarch.rpm
sent 1552828 bytes received 31 bytes 345079.78 bytes/sec
total size is 1552525 speedup is 1.00rsync -av MegaCli-8.07.08-1.noarch.rpm root@an-a05n02:/root/sending incremental file list
MegaCli-8.07.08-1.noarch.rpm
sent 1552828 bytes received 31 bytes 345079.78 bytes/sec
total size is 1552525 speedup is 1.00Now we can install the program on our nodes.
| an-a05n01 | rpm -Uvh MegaCli-8.07.08-1.noarch.rpmPreparing... ########################################### [100%]
1:MegaCli ########################################### [100%] |
|---|---|
| an-a05n02 | rpm -Uvh MegaCli-8.07.08-1.noarch.rpmPreparing... ########################################### [100%]
1:MegaCli ########################################### [100%] |
By default, the MegaCli64 binary is saved in /opt/MegaRAID/MegaCli/MegaCli64. This isn't in RHEL's default PATH, so we will want to make a symlink to /sbin. This way, we can simply type 'MegaCli64' instead of the full path.
| an-a05n01 | ln -s /opt/MegaRAID/MegaCli/MegaCli64 /sbin/
ls -lah /sbin/MegaCli64lrwxrwxrwx. 1 root root 31 Nov 28 19:28 /sbin/MegaCli64 -> /opt/MegaRAID/MegaCli/MegaCli64 |
|---|---|
| an-a05n02 | ln -s /opt/MegaRAID/MegaCli/MegaCli64 /sbin/
ls -lah /sbin/MegaCli64lrwxrwxrwx. 1 root root 31 Nov 28 19:28 /sbin/MegaCli64 -> /opt/MegaRAID/MegaCli/MegaCli64 |
Excellent.
Checking Storage Health with MegaCli64
| Warning: This tutorial was written using a development server and, as such, has only four drives in each array. All production servers should have a minimum of six drives to help ensure good storage response time under highly random reads and writes seen in virtualized environments. |
LSI RAID controllers are designed to work alone or in conjunction with other LSI controllers at the same time. For this reason, MegaCli64 supports multiple controllers, virtual disks, physical disks and so on. We're going to be using aAll a lot. This simply tells MegaCli64 to show whatever we're asking for from all found adapters.
The program itself is extremely powerful. Trying to cover all the ways that it can be used would require a long tutorial in and of itself. So we're going to just look at some core tasks that we're interested in. If you want to experiment, there is a great cheat-sheet here.
Lets start by looking at the logical drive.
| an-a05n01 | an-a05n02 |
|---|---|
MegaCli64 LDInfo Lall aAllAdapter 0 -- Virtual Drive Information:
Virtual Drive: 0 (Target Id: 0)
Name :
RAID Level : Primary-5, Secondary-0, RAID Level Qualifier-3
Size : 836.625 GB
Sector Size : 512
Parity Size : 278.875 GB
State : Optimal
Strip Size : 64 KB
Number Of Drives : 4
Span Depth : 1
Default Cache Policy: WriteBack, ReadAheadNone, Direct, No Write Cache if Bad BBU
Current Cache Policy: WriteBack, ReadAheadNone, Direct, No Write Cache if Bad BBU
Default Access Policy: Read/Write
Current Access Policy: Read/Write
Disk Cache Policy : Disabled
Encryption Type : None
Bad Blocks Exist: No
Is VD Cached: No
Exit Code: 0x00 |
Here we can see that the virtual disk has four real disks in RAID level 5, it is 836.625 GB in size and it's in WriteBack caching mode. This is pretty typical, save for the number of disks.
Lets look now at the health of the RAID controller's battery.
| an-a05n01 | an-a05n02 |
|---|---|
MegaCli64 AdpBbuCmd aAllBBU status for Adapter: 0
BatteryType: iBBU
Voltage: 4083 mV
Current: 0 mA
Temperature: 28 C
Battery State: Optimal
BBU Firmware Status:
Charging Status : None
Voltage : OK
Temperature : OK
Learn Cycle Requested : No
Learn Cycle Active : No
Learn Cycle Status : OK
Learn Cycle Timeout : No
I2c Errors Detected : No
Battery Pack Missing : No
Battery Replacement required : No
Remaining Capacity Low : No
Periodic Learn Required : No
Transparent Learn : No
No space to cache offload : No
Pack is about to fail & should be replaced : No
Cache Offload premium feature required : No
Module microcode update required : No
GasGuageStatus:
Fully Discharged : No
Fully Charged : Yes
Discharging : Yes
Initialized : Yes
Remaining Time Alarm : No
Discharge Terminated : No
Over Temperature : No
Charging Terminated : No
Over Charged : No
Relative State of Charge: 100 %
Charger System State: 49168
Charger System Ctrl: 0
Charging current: 0 mA
Absolute state of charge: 74 %
Max Error: 2 %
Battery backup charge time : 0 hours
BBU Capacity Info for Adapter: 0
Relative State of Charge: 100 %
Absolute State of charge: 74 %
Remaining Capacity: 902 mAh
Full Charge Capacity: 906 mAh
Run time to empty: Battery is not being charged.
Average time to empty: Battery is not being charged.
Estimated Time to full recharge: Battery is not being charged.
Cycle Count: 35
Max Error = 2 %
Remaining Capacity Alarm = 120 mAh
Remining Time Alarm = 10 Min
BBU Design Info for Adapter: 0
Date of Manufacture: 10/22, 2010
Design Capacity: 1215 mAh
Design Voltage: 3700 mV
Specification Info: 33
Serial Number: 15686
Pack Stat Configuration: 0x6490
Manufacture Name: LS1121001A
Firmware Version :
Device Name: 3150301
Device Chemistry: LION
Battery FRU: N/A
Transparent Learn = 0
App Data = 0
BBU Properties for Adapter: 0
Auto Learn Period: 30 Days
Next Learn time: Wed Dec 18 16:47:41 2013
Learn Delay Interval:0 Hours
Auto-Learn Mode: Enabled
Exit Code: 0x00 |
MegaCli64 AdpBbuCmd aAllBBU status for Adapter: 0
BatteryType: iBBU
Voltage: 4048 mV
Current: 0 mA
Temperature: 27 C
Battery State: Optimal
BBU Firmware Status:
Charging Status : None
Voltage : OK
Temperature : OK
Learn Cycle Requested : No
Learn Cycle Active : No
Learn Cycle Status : OK
Learn Cycle Timeout : No
I2c Errors Detected : No
Battery Pack Missing : No
Battery Replacement required : No
Remaining Capacity Low : No
Periodic Learn Required : No
Transparent Learn : No
No space to cache offload : No
Pack is about to fail & should be replaced : No
Cache Offload premium feature required : No
Module microcode update required : No
GasGuageStatus:
Fully Discharged : No
Fully Charged : Yes
Discharging : Yes
Initialized : Yes
Remaining Time Alarm : No
Discharge Terminated : No
Over Temperature : No
Charging Terminated : No
Over Charged : No
Relative State of Charge: 98 %
Charger System State: 49168
Charger System Ctrl: 0
Charging current: 0 mA
Absolute state of charge: 68 %
Max Error: 2 %
Battery backup charge time : 0 hours
BBU Capacity Info for Adapter: 0
Relative State of Charge: 98 %
Absolute State of charge: 68 %
Remaining Capacity: 821 mAh
Full Charge Capacity: 841 mAh
Run time to empty: Battery is not being charged.
Average time to empty: Battery is not being charged.
Estimated Time to full recharge: Battery is not being charged.
Cycle Count: 31
Max Error = 2 %
Remaining Capacity Alarm = 120 mAh
Remining Time Alarm = 10 Min
BBU Design Info for Adapter: 0
Date of Manufacture: 10/23, 2010
Design Capacity: 1215 mAh
Design Voltage: 3700 mV
Specification Info: 33
Serial Number: 18704
Pack Stat Configuration: 0x64b0
Manufacture Name: LS1121001A
Firmware Version :
Device Name: 3150301
Device Chemistry: LION
Battery FRU: N/A
Transparent Learn = 0
App Data = 0
BBU Properties for Adapter: 0
Auto Learn Period: 30 Days
Next Learn time: Mon Dec 23 05:29:33 2013
Learn Delay Interval:0 Hours
Auto-Learn Mode: Enabled
Exit Code: 0x00 |
Now this gives us quite a bit of data.
The battery's principal job is to protect the data in the data stored in the RAM module used to buffer writes (and a certain amount of reads) that have not yet been flushed to the physical disks. This is critical because, if this data was lost, the contents of the disk could be corrupted.
This battery is generally used when the node loses power. Depending on whether your node has battery-backed write-cache (BBU) or flash-backed write-cache (FBWC), the battery will be used to store the data in the RAM until power is restored (BBU) or just long enough to copy the data in the cache module to persistent solid-state storage build into the battery or RAID controller.
If your server uses a BBU, then watching the "hold up time". The controller above doesn't provide this because it is a flash-backed controller. If yours in a battery-backed controller, you will see a variable like:
Battery backup charge time : 48 hours +This tells you that the node can protect the contents of the cache for greater than 48 hours. This means that, so long as power is restored to the server within two days, your data will be protected. Generally, if the hold up time falls below 24 hours, the BBU should be replaced. This happens because, as batteries age, they lose capacity. This is simple chemistry.
Note that periodically, usually once per month, the controller intentionally drains and recharges the controller. This is called a "relearn cycle" (or simply a "learn cycle"). This is a way for the controller to verify the health of the battery. Should a battery fail to recharge, it will be declared dead and need to be replaced.
Note that it is normal for the cache policy to switch from "write-back" to "write-through" once the battery is sufficiently drained. The controller should return to "write-back" mode once the learn cycle completes and the battery charges enough. During this time, the write speed will be reduced because all writes have to read the physical disks instead of just cache, which is slower.
Lastly, lets look at the individual drives.
| an-a05n01 | an-a05n02 |
|---|---|
MegaCli64 PDList aAllAdapter #0
Enclosure Device ID: 252
Slot Number: 0
Drive's position: DiskGroup: 0, Span: 0, Arm: 1
Enclosure position: N/A
Device Id: 7
WWN: 5000C50043EE29E0
Sequence Number: 2
Media Error Count: 0
Other Error Count: 0
Predictive Failure Count: 0
Last Predictive Failure Event Seq Number: 0
PD Type: SAS
Raw Size: 279.396 GB [0x22ecb25c Sectors]
Non Coerced Size: 278.896 GB [0x22dcb25c Sectors]
Coerced Size: 278.875 GB [0x22dc0000 Sectors]
Sector Size: 0
Firmware state: Online, Spun Up
Device Firmware Level: 1703
Shield Counter: 0
Successful diagnostics completion on : N/A
SAS Address(0): 0x5000c50043ee29e1
SAS Address(1): 0x0
Connected Port Number: 3(path0)
Inquiry Data: SEAGATE ST3300657SS 17036SJ3T7X6 @#87980
FDE Capable: Not Capable
FDE Enable: Disable
Secured: Unsecured
Locked: Unlocked
Needs EKM Attention: No
Foreign State: None
Device Speed: 6.0Gb/s
Link Speed: 6.0Gb/s
Media Type: Hard Disk Device
Drive: Not Certified
Drive Temperature :39C (102.20 F)
PI Eligibility: No
Drive is formatted for PI information: No
PI: No PI
Port-0 :
Port status: Active
Port's Linkspeed: 6.0Gb/s
Port-1 :
Port status: Active
Port's Linkspeed: Unknown
Drive has flagged a S.M.A.R.T alert : No
Enclosure Device ID: 252
Slot Number: 1
Drive's position: DiskGroup: 0, Span: 0, Arm: 2
Enclosure position: N/A
Device Id: 6
WWN: 5000C5004310F4B4
Sequence Number: 2
Media Error Count: 0
Other Error Count: 0
Predictive Failure Count: 0
Last Predictive Failure Event Seq Number: 0
PD Type: SAS
Raw Size: 279.396 GB [0x22ecb25c Sectors]
Non Coerced Size: 278.896 GB [0x22dcb25c Sectors]
Coerced Size: 278.875 GB [0x22dc0000 Sectors]
Sector Size: 0
Firmware state: Online, Spun Up
Device Firmware Level: 1703
Shield Counter: 0
Successful diagnostics completion on : N/A
SAS Address(0): 0x5000c5004310f4b5
SAS Address(1): 0x0
Connected Port Number: 2(path0)
Inquiry Data: SEAGATE ST3300657SS 17036SJ3CMMC @#87980
FDE Capable: Not Capable
FDE Enable: Disable
Secured: Unsecured
Locked: Unlocked
Needs EKM Attention: No
Foreign State: None
Device Speed: 6.0Gb/s
Link Speed: 6.0Gb/s
Media Type: Hard Disk Device
Drive: Not Certified
Drive Temperature :42C (107.60 F)
PI Eligibility: No
Drive is formatted for PI information: No
PI: No PI
Port-0 :
Port status: Active
Port's Linkspeed: 6.0Gb/s
Port-1 :
Port status: Active
Port's Linkspeed: Unknown
Drive has flagged a S.M.A.R.T alert : No
Enclosure Device ID: 252
Slot Number: 2
Drive's position: DiskGroup: 0, Span: 0, Arm: 0
Enclosure position: N/A
Device Id: 5
WWN: 5000C500430189E4
Sequence Number: 2
Media Error Count: 0
Other Error Count: 0
Predictive Failure Count: 0
Last Predictive Failure Event Seq Number: 0
PD Type: SAS
Raw Size: 279.396 GB [0x22ecb25c Sectors]
Non Coerced Size: 278.896 GB [0x22dcb25c Sectors]
Coerced Size: 278.875 GB [0x22dc0000 Sectors]
Sector Size: 0
Firmware state: Online, Spun Up
Device Firmware Level: 1703
Shield Counter: 0
Successful diagnostics completion on : N/A
SAS Address(0): 0x5000c500430189e5
SAS Address(1): 0x0
Connected Port Number: 0(path0)
Inquiry Data: SEAGATE ST3300657SS 17036SJ3CD2Z @#87980
FDE Capable: Not Capable
FDE Enable: Disable
Secured: Unsecured
Locked: Unlocked
Needs EKM Attention: No
Foreign State: None
Device Speed: 6.0Gb/s
Link Speed: 6.0Gb/s
Media Type: Hard Disk Device
Drive: Not Certified
Drive Temperature :39C (102.20 F)
PI Eligibility: No
Drive is formatted for PI information: No
PI: No PI
Port-0 :
Port status: Active
Port's Linkspeed: 6.0Gb/s
Port-1 :
Port status: Active
Port's Linkspeed: Unknown
Drive has flagged a S.M.A.R.T alert : No
Enclosure Device ID: 252
Slot Number: 6
Drive's position: DiskGroup: 0, Span: 0, Arm: 3
Enclosure position: N/A
Device Id: 11
WWN: 5000CCA00FAEC0BF
Sequence Number: 2
Media Error Count: 0
Other Error Count: 0
Predictive Failure Count: 0
Last Predictive Failure Event Seq Number: 0
PD Type: SAS
Raw Size: 419.186 GB [0x3465f870 Sectors]
Non Coerced Size: 418.686 GB [0x3455f870 Sectors]
Coerced Size: 418.656 GB [0x34550000 Sectors]
Sector Size: 0
Firmware state: Online, Spun Up
Device Firmware Level: A42B
Shield Counter: 0
Successful diagnostics completion on : N/A
SAS Address(0): 0x5000cca00faec0bd
SAS Address(1): 0x0
Connected Port Number: 1(path0)
Inquiry Data: HITACHI HUS156045VLS600 A42BJVY33ARM
FDE Capable: Not Capable
FDE Enable: Disable
Secured: Unsecured
Locked: Unlocked
Needs EKM Attention: No
Foreign State: None
Device Speed: 6.0Gb/s
Link Speed: 6.0Gb/s
Media Type: Hard Disk Device
Drive: Not Certified
Drive Temperature :37C (98.60 F)
PI Eligibility: No
Drive is formatted for PI information: No
PI: No PI
Port-0 :
Port status: Active
Port's Linkspeed: 6.0Gb/s
Port-1 :
Port status: Active
Port's Linkspeed: Unknown
Drive has flagged a S.M.A.R.T alert : No
Exit Code: 0x00 |
MegaCli64 PDList aAllAdapter #0
Enclosure Device ID: 252
Slot Number: 0
Drive's position: DiskGroup: 0, Span: 0, Arm: 0
Enclosure position: N/A
Device Id: 10
WWN: 5000C50043112280
Sequence Number: 2
Media Error Count: 0
Other Error Count: 0
Predictive Failure Count: 0
Last Predictive Failure Event Seq Number: 0
PD Type: SAS
Raw Size: 279.396 GB [0x22ecb25c Sectors]
Non Coerced Size: 278.896 GB [0x22dcb25c Sectors]
Coerced Size: 278.875 GB [0x22dc0000 Sectors]
Sector Size: 0
Firmware state: Online, Spun Up
Device Firmware Level: 1703
Shield Counter: 0
Successful diagnostics completion on : N/A
SAS Address(0): 0x5000c50043112281
SAS Address(1): 0x0
Connected Port Number: 3(path0)
Inquiry Data: SEAGATE ST3300657SS 17036SJ3DE9Z @#87980
FDE Capable: Not Capable
FDE Enable: Disable
Secured: Unsecured
Locked: Unlocked
Needs EKM Attention: No
Foreign State: None
Device Speed: 6.0Gb/s
Link Speed: 6.0Gb/s
Media Type: Hard Disk Device
Drive: Not Certified
Drive Temperature :39C (102.20 F)
PI Eligibility: No
Drive is formatted for PI information: No
PI: No PI
Port-0 :
Port status: Active
Port's Linkspeed: 6.0Gb/s
Port-1 :
Port status: Active
Port's Linkspeed: Unknown
Drive has flagged a S.M.A.R.T alert : No
Enclosure Device ID: 252
Slot Number: 1
Drive's position: DiskGroup: 0, Span: 0, Arm: 1
Enclosure position: N/A
Device Id: 9
WWN: 5000C5004312760C
Sequence Number: 2
Media Error Count: 0
Other Error Count: 0
Predictive Failure Count: 0
Last Predictive Failure Event Seq Number: 0
PD Type: SAS
Raw Size: 279.396 GB [0x22ecb25c Sectors]
Non Coerced Size: 278.896 GB [0x22dcb25c Sectors]
Coerced Size: 278.875 GB [0x22dc0000 Sectors]
Sector Size: 0
Firmware state: Online, Spun Up
Device Firmware Level: 1703
Shield Counter: 0
Successful diagnostics completion on : N/A
SAS Address(0): 0x5000c5004312760d
SAS Address(1): 0x0
Connected Port Number: 2(path0)
Inquiry Data: SEAGATE ST3300657SS 17036SJ3DNG7 @#87980
FDE Capable: Not Capable
FDE Enable: Disable
Secured: Unsecured
Locked: Unlocked
Needs EKM Attention: No
Foreign State: None
Device Speed: 6.0Gb/s
Link Speed: 6.0Gb/s
Media Type: Hard Disk Device
Drive: Not Certified
Drive Temperature :40C (104.00 F)
PI Eligibility: No
Drive is formatted for PI information: No
PI: No PI
Port-0 :
Port status: Active
Port's Linkspeed: 6.0Gb/s
Port-1 :
Port status: Active
Port's Linkspeed: Unknown
Drive has flagged a S.M.A.R.T alert : No
Enclosure Device ID: 252
Slot Number: 2
Drive's position: DiskGroup: 0, Span: 0, Arm: 2
Enclosure position: N/A
Device Id: 8
WWN: 5000C50043126B4C
Sequence Number: 2
Media Error Count: 0
Other Error Count: 0
Predictive Failure Count: 0
Last Predictive Failure Event Seq Number: 0
PD Type: SAS
Raw Size: 279.396 GB [0x22ecb25c Sectors]
Non Coerced Size: 278.896 GB [0x22dcb25c Sectors]
Coerced Size: 278.875 GB [0x22dc0000 Sectors]
Sector Size: 0
Firmware state: Online, Spun Up
Device Firmware Level: 1703
Shield Counter: 0
Successful diagnostics completion on : N/A
SAS Address(0): 0x5000c50043126b4d
SAS Address(1): 0x0
Connected Port Number: 0(path0)
Inquiry Data: SEAGATE ST3300657SS 17036SJ3E01G @#87980
FDE Capable: Not Capable
FDE Enable: Disable
Secured: Unsecured
Locked: Unlocked
Needs EKM Attention: No
Foreign State: None
Device Speed: 6.0Gb/s
Link Speed: 6.0Gb/s
Media Type: Hard Disk Device
Drive: Not Certified
Drive Temperature :37C (98.60 F)
PI Eligibility: No
Drive is formatted for PI information: No
PI: No PI
Port-0 :
Port status: Active
Port's Linkspeed: 6.0Gb/s
Port-1 :
Port status: Active
Port's Linkspeed: Unknown
Drive has flagged a S.M.A.R.T alert : No
Enclosure Device ID: 252
Slot Number: 6
Drive's position: DiskGroup: 0, Span: 0, Arm: 3
Enclosure position: N/A
Device Id: 5
WWN: 5000CCA00F5CA29F
Sequence Number: 2
Media Error Count: 0
Other Error Count: 0
Predictive Failure Count: 0
Last Predictive Failure Event Seq Number: 0
PD Type: SAS
Raw Size: 419.186 GB [0x3465f870 Sectors]
Non Coerced Size: 418.686 GB [0x3455f870 Sectors]
Coerced Size: 418.656 GB [0x34550000 Sectors]
Sector Size: 0
Firmware state: Online, Spun Up
Device Firmware Level: A42B
Shield Counter: 0
Successful diagnostics completion on : N/A
SAS Address(0): 0x5000cca00f5ca29d
SAS Address(1): 0x0
Connected Port Number: 1(path0)
Inquiry Data: HITACHI HUS156045VLS600 A42BJVWMYA6L
FDE Capable: Not Capable
FDE Enable: Disable
Secured: Unsecured
Locked: Unlocked
Needs EKM Attention: No
Foreign State: None
Device Speed: 6.0Gb/s
Link Speed: 6.0Gb/s
Media Type: Hard Disk Device
Drive: Not Certified
Drive Temperature :34C (93.20 F)
PI Eligibility: No
Drive is formatted for PI information: No
PI: No PI
Port-0 :
Port status: Active
Port's Linkspeed: 6.0Gb/s
Port-1 :
Port status: Active
Port's Linkspeed: Unknown
Drive has flagged a S.M.A.R.T alert : No
Exit Code: 0x00 |
This shows us two bits of information about each hard drive in the array. The main pieces to watch are:
Media Error Count: 0
Other Error Count: 0
Predictive Failure Count: 0
Drive Temperature :34C (93.20 F)
Drive has flagged a S.M.A.R.T alert : No| Note: It is normal for Other Error Count to increment by 1 periodically. If it jumps by more than 1, or if it jumps multiple times within a few days, consult your system provider and inquire about replacing the drive. |
These values show us the overall health of the drive. For most hard drives, the temperature should stay below 55C at all times. Any temperature over 45C should be investigated. All other failure counts should stay at 0, save for the exception mentioned in the note above.
As mentioned, there are many, many other ways to use MegaCli64. If a drive ever fails, you can use it to prepare the drive for removal while the system is running. You can use it to adjust when the learn cycle runs, adjust cache policy and do many other things. It is well worth learning in more depth. However, that is outside the scope of this section.
Managing MegaSAS.log
Each time MegaCli64 runs, it writes to the /root/MegaSAS.log file. Later, we're going to setup a monitoring and alert system that checks the health of each node every 30 seconds. This program calls MegaCli64 three times per pass, so the MegaSAS.log file can grow to a decent size.
Lets download /root/archive_megasas.log.sh and make it executable.
| an-a05n01 | cd ~
wget -c https://raw.github.com/digimer/an-cdb/master/tools/archive_megasas.log.sh--2014-02-24 19:37:58-- https://raw.github.com/digimer/an-cdb/master/tools/archive_megasas.log.sh
Resolving raw.github.com... 199.27.73.133
Connecting to raw.github.com|199.27.73.133|:443... connected.
HTTP request sent, awaiting response... 200 OK
Length: 814 [text/plain]
Saving to: `archive_megasas.log.sh'
100%[====================================================================>] 814 --.-K/s in 0s
2014-02-24 19:37:59 (27.1 MB/s) - `archive_megasas.log.sh' saved [814/814]chmod 755 archive_megasas.log.sh
ls -lah archive_megasas.log.sh-rwxr-xr-x. 1 root root 814 Feb 24 19:37 archive_megasas.log.sh |
|---|---|
| an-a05n02 | cd ~
wget -c https://raw.github.com/digimer/an-cdb/master/tools/archive_megasas.log.sh--2014-02-24 19:37:59-- https://raw.github.com/digimer/an-cdb/master/tools/archive_megasas.log.sh
Resolving raw.github.com... 199.27.73.133
Connecting to raw.github.com|199.27.73.133|:443... connected.
HTTP request sent, awaiting response... 200 OK
Length: 814 [text/plain]
Saving to: `archive_megasas.log.sh'
100%[====================================================================>] 814 --.-K/s in 0s
2014-02-24 19:37:59 (27.3 MB/s) - `archive_megasas.log.sh' saved [814/814]chmod 755 archive_megasas.log.sh
ls -lah archive_megasas.log.sh-rwxr-xr-x. 1 root root 814 Feb 24 19:37 archive_megasas.log.sh |
We'll call cronbtab -e to edit the cron table and add three entries for these programs. If you already added /archive_an-cm.log.sh, then simply append the other two.
| an-a05n01 | crontab -e*/5 * * * * /root/an-cm >> /var/log/an-cm.log
0 1 * * * /root/archive_megasas.log.sh > /dev/null
0 0 1 * * /root/archive_an-cm.log.sh > /dev/null |
|---|---|
| an-a05n02 | crontab -e*/5 * * * * /root/an-cm >> /var/log/an-cm.log
0 1 * * * /root/archive_megasas.log.sh > /dev/null
0 0 1 * * /root/archive_an-cm.log.sh > /dev/null |
Save and quit. Within five minutes, you should see an email telling you that the monitoring system has started up again.
We're done!
Configuring The Cluster Foundation
We need to configure the cluster in two stages. This is because we have something of a chicken-and-egg problem:
- We need clustered storage for our virtual machines.
- Our clustered storage needs the cluster for fencing.
Conveniently, clustering has two logical parts:
- Cluster communication and membership.
- Cluster resource management.
The first, communication and membership, covers which nodes are part of the cluster and it is responsible for ejecting faulty nodes from the cluster, among other tasks. This is managed by cman. The second part, resource management, is provided by a second tool called rgmanager. It's this second part that we will set aside for later. In short though, it makes sure clustered services, storage and the virtual servers, are always running whenever possible.
Keeping Time in Sync
| Note: This section is only relevant to networks that block access to external time sources, called "NTP servers". |
It is very important that time on both nodes be kept in sync. The way to do this is to setup [[[NTP]], the network time protocol.
Earlier on, we setup ntpd to start on boot. For most people, that is enough and you can skip to the next section.
However, some particularly restrictive networks will block access to external time servers. If you're on one of these networks, ask your admin (if you don't know already) what name or IP to use as a time source. Once you have this, you can enter the following command to add it to the name server configuration. We'll use the example time source ntp.example.ca.
First, add the time server to the NTP configuration file by appending the following lines to the end of it.
| an-a05n01 | echo server tntp.example.ca$'\n'restrict ntp.example.ca mask 255.255.255.255 nomodify notrap noquery >> /etc/ntp.conf |
|---|---|
| an-a05n02 | echo server tntp.example.ca$'\n'restrict ntp.example.ca mask 255.255.255.255 nomodify notrap noquery >> /etc/ntp.conf |
Restart the ntpd daemon and your nodes should shortly update their times.
| an-a05n01 | /etc/init.d/ntpd restartShutting down ntpd: [ OK ]
Starting ntpd: [ OK ] |
|---|---|
| an-a05n02 | /etc/init.d/ntpd restartShutting down ntpd: [ OK ]
Starting ntpd: [ OK ] |
Use the date command on both nodes to ensure the times match. If they don't, give it a few minutes. The ntpd daemon sync every few minutes.
Alternate Configuration Methods
In Red Hat Cluster Services, the heart of the cluster is found in the /etc/cluster/cluster.conf XML configuration file.
There are three main ways of editing this file. Two are already well documented, so I won't bother discussing them, beyond introducing them. The third way is by directly hand-crafting the cluster.conf file. We've found that directly editing configuration files is the best way to learn clustering at a deep level. For this reason, it is the method we'll use here.
The two graphical tools are:
- system-config-cluster, older GUI tool run directly from one of the cluster nodes.
- Conga, comprised of the ricci node-side client and the luci web-based server (can be run on machines outside the cluster).
After you've gotten comfortable with HA clustering, you may want to go back and play with these tools. They can certainly be time-savers.
The First cluster.conf Foundation Configuration
The very first stage of building the cluster is to create a configuration file that is as minimal as possible. We're going to do this on an-a05n01 and, when we're done, copy it over to an-a05n02.
Name the Cluster and Set the Configuration Version
The cluster tag is the parent tag for the entire cluster configuration file.
| an-a05n01 | vim /etc/cluster/cluster.conf<?xml version="1.0"?>
<cluster name="an-anvil-05" config_version="1">
</cluster> |
|---|
The cluster element has two attributes that we need to set:
- name=""
- config_version=""
The name="" attribute defines the name of the cluster. It must be unique amongst the clusters on your network. It should be descriptive, but you will not want to make it too long, either. You will see this name in the various cluster tools and you will enter in, for example, when creating a GFS2 partition later on. This tutorial uses the cluster name an-anvil-05.
The config_version="" attribute is an integer indicating the version of the configuration file. Whenever you make a change to the cluster.conf file, you will need to increment. If you don't increment this number, then the cluster tools will not know that the file needs to be reloaded. As this is the first version of this configuration file, it will start with 1. Note that this tutorial will increment the version after every change, regardless of whether it is explicitly pushed out to the other nodes and reloaded. The reason is to help get into the habit of always increasing this value.
Configuring cman Options
We are setting up a special kind of cluster, called a 2-Node cluster.
This is a special case because traditional quorum will not be useful. With only two nodes, each having a vote of 1, the total votes is 2. Quorum needs 50% + 1, which means that a single node failure would shut down the cluster, as the remaining node's vote is 50% exactly. That kind of defeats the purpose to having a cluster at all.
So to account for this special case, there is a special attribute called two_node="1". This tells the cluster manager to continue operating with only one vote. This option requires that the expected_votes="" attribute be set to 1. Normally, expected_votes is set automatically to the total sum of the defined cluster nodes' votes (which itself is a default of 1). This is the other half of the "trick", as a single node's vote of 1 now always provides quorum (that is, 1 meets the 50% + 1 requirement).
In short; this disables quorum.
| an-a05n01 | <?xml version="1.0"?>
<cluster name="an-anvil-05" config_version="2">
<cman expected_votes="1" two_node="1" />
</cluster> |
|---|
Take note of the self-closing <... /> tag. This is an XML syntax that tells the parser not to look for any child or a closing tags.
Defining Cluster Nodes
This example is a little artificial, please don't load it into your cluster as we will need to add a few child tags, but one thing at a time.
This introduces two tags, the later a child tag of the former:
- clusternodes
- clusternode
The first is the parent clusternodes tag, which takes no attributes of its own. Its sole purpose is to contain the clusternode child tags, of which there will be one per node.
| an-a05n01 | <?xml version="1.0"?>
<cluster name="an-anvil-05" config_version="3">
<cman expected_votes="1" two_node="1" />
<clusternodes>
<clusternode name="an-a05n01.alteeve.ca" nodeid="1" />
<clusternode name="an-a05n02.alteeve.ca" nodeid="2" />
</clusternodes>
</cluster> |
|---|
The clusternode tag defines each cluster node. There are many attributes available, but we will look at just the two required ones.
The first is the name="" attribute. The value should match the fully qualified domain name, which you can check by running uname -n on each node. This isn't strictly required, mind you, but for simplicity's sake, this is the name we will use.
The cluster decides which network to use for cluster communication by resolving the name="..." value. It will take the returned IP address and try to match it to one of the IPs on the system. Once it finds a match, that becomes the network the cluster will use. In our case, an-a05n01.alteeve.ca resolves to 10.20.50.1, which is used by bcn_bond1.
We can use syslinux with a little bash magic to verify which interface is going to be used for the cluster communication;
| an-a05n01 | ifconfig |grep -B 1 $(gethostip -d $(uname -n)) | grep HWaddr | awk '{ print $1 }'bcn_bond1 |
|---|
Exactly what we wanted!
Please see the clusternode's name attribute document for details on how name to interface mapping is resolved.
The second attribute is nodeid="". This must be a unique integer amongst the <clusternode ...> elements in the cluster. It is what the cluster itself uses to identify the node.
Defining Fence Devices
Fencing devices are used to forcible eject a node from a cluster if it stops responding. Said another way, fence devices put a node into a known state.
There are many, many devices out there that can be used for fencing. We're going to be using two specific devices:
- IPMI to press and hold the node's power button until the server powers down.
- Switched PDUs to cut the power feeding the node, if the IPMI device fails or can not be contacted.
In the end, any device that can power off or isolate a lost node will do fine for fencing. The setup we will be using here uses very common components and it provides full redundancy, ensuring the ability to fence regardless of what might fail.
In this tutorial, our nodes support IPMI, which we will use as the primary fence device. We also have an APC brand switched PDU which will act as a backup fence device.
| Note: Not all brands of switched PDUs are supported as fence devices. Before you purchase a fence device, confirm that it is supported. |
All fence devices are contained within the parent fencedevices tag, which has no attributes of its own. Within this parent tag are one or more fencedevice child tags.
| an-a05n01 | <?xml version="1.0"?>
<cluster name="an-anvil-05" config_version="4">
<cman expected_votes="1" two_node="1" />
<clusternodes>
<clusternode name="an-a05n01.alteeve.ca" nodeid="1" />
<clusternode name="an-a05n02.alteeve.ca" nodeid="2" />
</clusternodes>
<fencedevices>
<fencedevice name="ipmi_n01" agent="fence_ipmilan" ipaddr="an-a05n01.ipmi" login="admin" passwd="secret" />
<fencedevice name="ipmi_n02" agent="fence_ipmilan" ipaddr="an-a05n02.ipmi" login="admin" passwd="secret" />
<fencedevice agent="fence_apc_snmp" ipaddr="an-pdu01.alteeve.ca" name="pdu1" />
<fencedevice agent="fence_apc_snmp" ipaddr="an-pdu02.alteeve.ca" name="pdu2" />
</fencedevices>
</cluster> |
|---|
In our cluster, each fence device used will have its own fencedevice tag. If you are using IPMI, this means you will have a fencedevice entry for each node, as each physical IPMI BMC is a unique fence device.
Our nodes have two power supplies each. Each power supply is plugged into a different switched PDU, which in turn in plugged into a dedicated UPS. So we have two physical PDUs, requiring two more <fencedevice... /> entries.
All fencedevice tags share two basic attributes; name="" and agent="":
- The name attribute must be unique among all the fence devices in your cluster. As we will see in the next step, this name will be used within the <clusternode...> tag.
- The agent tag tells the cluster which fence agent to use when the fenced daemon needs to communicate with the physical fence device. A fence agent is simple a shell script that acts as a go-between layer between the fenced daemon and the fence hardware. This agent takes the arguments from the daemon, like what port to act on and what action to take, and performs the requested action against the target node. The agent is responsible for ensuring that the execution succeeded and returning an appropriate success or failure exit code.
For those curious, the full details are described in the FenceAgentAPI. If you have two or more of the same fence device, like IPMI, then you will use the same fence agent value a corresponding number of times.
Beyond these two attributes, each fence agent will have its own subset of attributes. The scope of which is outside this tutorial, though we will see examples for IPMI and a switched PDU. All fence agents have a corresponding man page that will show you what attributes it accepts and how they are used. The two fence agents we will see here have their attributes defines in the following man pages:
- man fence_ipmilan - IPMI fence agent.
- man fence_apc_snmp - APC-brand switched PDU using SNMP.
The example above is what this tutorial will use.
Using the Fence Devices
Now we have nodes and fence devices defined, we will go back and tie them together. This is done by:
- Defining a fence tag containing all fence methods and devices.
Here is how we implement IPMI as the primary fence device with the dual APC switched PDUs as the backup method.
| an-a05n01 | <?xml version="1.0"?>
<cluster name="an-anvil-05" config_version="5">
<cman expected_votes="1" two_node="1" />
<clusternodes>
<clusternode name="an-a05n01.alteeve.ca" nodeid="1">
<fence>
<method name="ipmi">
<device name="ipmi_n01" action="reboot" delay="15" />
</method>
<method name="pdu">
<device name="pdu1" port="1" action="reboot" />
<device name="pdu2" port="1" action="reboot" />
</method>
</fence>
</clusternode>
<clusternode name="an-a05n02.alteeve.ca" nodeid="2">
<fence>
<method name="ipmi">
<device name="ipmi_n02" action="reboot" />
</method>
<method name="pdu">
<device name="pdu1" port="2" action="reboot" />
<device name="pdu2" port="2" action="reboot" />
</method>
</fence>
</clusternode>
</clusternodes>
<fencedevices>
<fencedevice name="ipmi_n01" agent="fence_ipmilan" ipaddr="an-a05n01.ipmi" login="admin" passwd="secret" />
<fencedevice name="ipmi_n02" agent="fence_ipmilan" ipaddr="an-a05n02.ipmi" login="admin" passwd="secret" />
<fencedevice agent="fence_apc_snmp" ipaddr="an-pdu01.alteeve.ca" name="pdu1" />
<fencedevice agent="fence_apc_snmp" ipaddr="an-pdu02.alteeve.ca" name="pdu2" />
</fencedevices>
</cluster> |
|---|
First, notice that the fence tag has no attributes. It's merely a parent for the method(s) child elements.
| Warning: This next few paragraphs are very important! Please read it carefully! |
The second thing you will notice is that one method, an-a05n01's ipmi method has a device with an extra argument. The delay="15" is needed because this is a 2-node cluster so quorum is not available. What this means is that, if the network breaks and both nodes are alive, both nodes will try to fence the other at nearly the same time. IPMI devices, being unique per node, can conceivable mean both nodes initiate a power down before either dies. This condition is called a "dual-fence" and leaves your cluster entirely powered down.
There are two ways of dealing with this. The first is to make sure that acpid is turned off. When the power button is pressed when acpid is running, the system will begin a graceful shutdown. The IPMI BMC will continue to hold down the power button and after four seconds, the node should power off. However, this is four seconds where the fence daemon can initiate a fence against the peer. By disabling the acpid daemon, the system will nearly instantly power off when the power button is pressed, drastically reducing the time between a node's power button being pressed and when the node actually shuts off.
The second way to deal with this is to give one of the nodes a head start. That is what the delay="15" does. When an-a05n01 goes to fence an-c05b02, it will not see a delay and it will initiate the fence action immediately. Meanwhile, an-a05n02 will gather up the information on fencing an-a05n02, see the 15 second delay and wait. After 15 seconds, it will proceed with the fence action as it normally would.
The idea here is that an-a05n01 will have a 15 second head start in fencing its peer. These configuration changes should help ensure that one node always survives a fence call.
Back to the main fence config!
There are two method elements per node, one for each fence device, named ipmi and pdu. These names are merely descriptive and can be whatever you feel is most appropriate.
Within each method element is one or more device tags. For a given method to succeed, all defined device elements must themselves succeed. This is very useful for grouping calls to separate PDUs when dealing with nodes having redundant power supplies, as we have here.
The actual fence device configuration is the final piece of the puzzle. It is here that you specify per-node configuration options and link these attributes to a given fencedevice. Here, we see the link to the fencedevice via the name, ipmi_n01 in this example.
Note that the PDU definitions needs a port="" attribute where the IPMI fence devices do not. These are the sorts of differences you will find, varying depending on how the fence device agent works. IPMI devices only work on their host, so when you ask an IPMI device to "reboot", it's obvious what the target is. With devices like PDUs, SAN switches and other multi-port devices, this is not the case. Our PDUs have eight ports each, so we need to tell the fence agent which ports we want acted on. In our case, an-a05n01's power supplies are plugged into port #1 on both PDUs. For an-a05n02, they're plugged into each PDU's port #2.
When a fence call is needed, the fence devices will be called in the order they are found here. If both devices fail, the cluster will go back to the start and try again, looping indefinitely until one device succeeds.
| Note: It's important to understand why we use IPMI as the primary fence device. The FenceAgentAPI specification suggests, but does not require, that a fence device confirm that the node is off. IPMI can do this, the switched PDU can not. Thus, IPMI won't return a success unless the node is truly off. The PDU, however, will return a success once the power is cut to the requested port. The risk is that a misconfigured node with redundant PSUs may in fact still be running if one of their cords was moved to a different port and the configuration wasn't updated, leading to disastrous consequences. |
Let's step through an example fence call to help show how the per-cluster and fence device attributes are combined during a fence call:
- The cluster manager decides that a node needs to be fenced. Let's say that the victim is an-a05n02.
- The first method in the fence section under an-a05n02 is consulted. Within it there are two method entries, named ipmi and pdu. The IPMI method's device has one attribute while the PDU's device has two attributes;
- port; only found in the PDU method, this tells the cluster that an-a05n02 is connected to switched PDU's outlet number 2.
- action; Found on both devices, this tells the cluster that the fence action to take is reboot. How this action is actually interpreted depends on the fence device in use, though the name certainly implies that the node will be forced off and then restarted.
- The cluster searches in fencedevices for a fencedevice matching the name ipmi_n02. This fence device has four attributes;
- agent; This tells the cluster to call the fence_ipmilan fence agent script, as we discussed earlier.
- ipaddr; This tells the fence agent where on the network to find this particular IPMI BMC. This is how multiple fence devices of the same type can be used in the cluster.
- login; This is the login user name to use when authenticating against the fence device.
- passwd; This is the password to supply along with the login name when authenticating against the fence device.
- Should the IPMI fence call fail for some reason, the cluster will move on to the second pdu method, repeating the steps above but using the PDU values.
When the cluster calls the fence agent, it does so by initially calling the fence agent script with no arguments.
/usr/sbin/fence_ipmilanThen it will pass to that agent the following arguments:
ipaddr=an-a05n02.ipmi
login=admin
passwd=secret
action=rebootAs you can see then, the first three arguments are from the fencedevice attributes and the last one is from the device attributes under an-a05n02's clusternode's fence tag.
If this method fails, then the PDU will be called in a very similar way, but with an extra argument from the device attributes.
/usr/sbin/fence_apc_snmpThen it will pass to that agent the following arguments:
ipaddr=an-pdu02.alteeve.ca
port=2
action=rebootShould this fail, the cluster will go back and try the IPMI interface again. It will loop through the fence device methods forever until one of the methods succeeds. Below are snippets from other clusters using different fence device configurations which might help you build your cluster.
Giving Nodes More Time to Start and Avoiding "Fence Loops"
| Note: This section also explains why we don't allow cman to start on boot. If we did, we'd risk a "fence loop", where a fenced node boots, tries to contact its peer, times out and fences it. The peer boot, starts cman, times out waiting and fenced the other peer. Not good. |
Clusters with more than three nodes will have to gain quorum before they can fence other nodes. As we discussed earlier though, this is not the case when using the two_node="1" attribute in the cman element. What this means in practice is that if you start the cluster on one node and then wait too long to start the cluster on the second node, the first will fence the second.
The logic behind this is; When the cluster starts, it will try to talk to its fellow node and then fail. With the special two_node="1" attribute set, the cluster knows that it is allowed to start clustered services, but it has no way to say for sure what state the other node is in. It could well be online and hosting services for all it knows. So it has to proceed on the assumption that the other node is alive and using shared resources. Given that, and given that it can not talk to the other node, its only safe option is to fence the other node. Only then can it be confident that it is safe to start providing clustered services.
| an-a05n01 | <?xml version="1.0"?>
<cluster name="an-anvil-05" config_version="6">
<cman expected_votes="1" two_node="1" />
<clusternodes>
<clusternode name="an-a05n01.alteeve.ca" nodeid="1">
<fence>
<method name="ipmi">
<device name="ipmi_n01" action="reboot" delay="15" />
</method>
<method name="pdu">
<device name="pdu1" port="1" action="reboot" />
<device name="pdu2" port="1" action="reboot" />
</method>
</fence>
</clusternode>
<clusternode name="an-a05n02.alteeve.ca" nodeid="2">
<fence>
<method name="ipmi">
<device name="ipmi_n02" action="reboot" />
</method>
<method name="pdu">
<device name="pdu1" port="2" action="reboot" />
<device name="pdu2" port="2" action="reboot" />
</method>
</fence>
</clusternode>
</clusternodes>
<fencedevices>
<fencedevice name="ipmi_n01" agent="fence_ipmilan" ipaddr="an-a05n01.ipmi" login="admin" passwd="secret" />
<fencedevice name="ipmi_n02" agent="fence_ipmilan" ipaddr="an-a05n02.ipmi" login="admin" passwd="secret" />
<fencedevice agent="fence_apc_snmp" ipaddr="an-pdu01.alteeve.ca" name="pdu1" />
<fencedevice agent="fence_apc_snmp" ipaddr="an-pdu02.alteeve.ca" name="pdu2" />
</fencedevices>
<fence_daemon post_join_delay="30" />
</cluster> |
|---|
The new tag is fence_daemon, seen near the bottom if the file above. The change is made using the post_join_delay="30" attribute. By default, the cluster will declare the other node dead after just 6 seconds. The reason is that the larger this value, the slower the start-up of the cluster services will be. During testing and development though, I find this value to be far too short and frequently led to unnecessary fencing. Once your cluster is setup and working, it's not a bad idea to reduce this value to the lowest value with which you are comfortable.
Configuring Totem
There are many attributes for the totem element. For now though, we're only going to set two of them. We know that cluster communication will be travelling over our private, secured BCN network, so for the sake of simplicity, we're going to disable encryption. We are also offering network redundancy using the bonding drivers, so we're also going to disable totem's redundant ring protocol.
| an-a05n01 | <?xml version="1.0"?>
<cluster name="an-anvil-05" config_version="7">
<cman expected_votes="1" two_node="1" />
<clusternodes>
<clusternode name="an-a05n01.alteeve.ca" nodeid="1">
<fence>
<method name="ipmi">
<device name="ipmi_n01" action="reboot" delay="15" />
</method>
<method name="pdu">
<device name="pdu1" port="1" action="reboot" />
<device name="pdu2" port="1" action="reboot" />
</method>
</fence>
</clusternode>
<clusternode name="an-a05n02.alteeve.ca" nodeid="2">
<fence>
<method name="ipmi">
<device name="ipmi_n02" action="reboot" />
</method>
<method name="pdu">
<device name="pdu1" port="2" action="reboot" />
<device name="pdu2" port="2" action="reboot" />
</method>
</fence>
</clusternode>
</clusternodes>
<fencedevices>
<fencedevice name="ipmi_n01" agent="fence_ipmilan" ipaddr="an-a05n01.ipmi" login="admin" passwd="secret" />
<fencedevice name="ipmi_n02" agent="fence_ipmilan" ipaddr="an-a05n02.ipmi" login="admin" passwd="secret" />
<fencedevice agent="fence_apc_snmp" ipaddr="an-pdu01.alteeve.ca" name="pdu1" />
<fencedevice agent="fence_apc_snmp" ipaddr="an-pdu02.alteeve.ca" name="pdu2" />
</fencedevices>
<fence_daemon post_join_delay="30" />
<totem rrp_mode="none" secauth="off"/>
</cluster> |
|---|
Corosync uses a concept called "token rings" for cluster communication. This is not to be confused with the old token ring network protocol, but the basic concept is the same. A token is passed from node to node, around and around the ring. A node can't send new messages or acknowledge old messages except when it has the token. By default, corosync uses a single "ring". This means that, without network-level fault-tolerance, this ring becomes a single point of failure.
We've got bonded network connections backing our cluster communications, so we inherently have fault-tolerance built in to our network.
For some though, bonded interfaces is not feasible, so starting in RHEL 6.3, "Redundant Ring Protocol" was made available as a supported option. This allows you to setup a second network to use as a backup in case the primary ring fails. We don't need this, so we set rrp_mode="none". If you want to use it, you can now though, but it's outside the scope of this tutorial.
If you wish to explore it further, please take a look at the clusternode element tag called <altname...>. When altname is used though, then the rrp_mode attribute will need to be changed to either active or passive (the details of which are outside the scope of this tutorial).
The second option we're looking at here is the secauth="off" attribute. This controls whether the cluster communications are encrypted or not. We can safely disable this because we're working on a known-private network, which yields two benefits; It's simpler to setup and it's a lot faster. If you must encrypt the cluster communications, then you can do so here. The details of which are also outside the scope of this tutorial though.
Validating and Pushing the /etc/cluster/cluster.conf File
One of the most noticeable changes in RHCS cluster stable 3 is that we no longer have to make a long, cryptic xmllint call to validate our cluster configuration. Now we can simply call ccs_config_validate.
| an-a05n01 | ccs_config_validateConfiguration validates |
|---|
If there was a problem, you need to go back and fix it. DO NOT proceed until your configuration validates. Once it does, we're ready to move on!
With it validated, we need to push it to the other node. As the cluster is not running yet, we will push it out using rsync.
| an-a05n01 | rsync -av /etc/cluster/cluster.conf root@an-a05n02:/etc/cluster/sending incremental file list
cluster.conf
sent 1393 bytes received 43 bytes 2872.00 bytes/sec
total size is 1313 speedup is 0.91 |
|---|
This is the first and only time that we'll need to push the configuration file over manually.
Setting up ricci
Once the cluster is running, we can take advantage of the ricci and modclusterd daemons to push all future updates out automatically. This is why we enabled these two daemons to start on boot earlier on.
This requires setting a password for each node's ricci user first. Setting the password is exactly the same as setting the password on any other system user.
On both nodes, run:
| an-a05n01 | an-a05n02 |
|---|---|
passwd ricciChanging password for user ricci.
New password:
Retype new password:
passwd: all authentication tokens updated successfully. |
passwd ricciChanging password for user ricci.
New password:
Retype new password:
passwd: all authentication tokens updated successfully. |
Later, when we make the next change to the cluster.conf file, we'll push the changes out using the cman_tool program. The first time this is used on each node, you will need to enter the local and the peer's ricci password. Once entered though, we'll not need to enter the password again.
| Note: The dashboard we will install later expects the ricci password to be the same on both nodes. If you plan to use the dashboard, be sure to set the same password and then make note of it for later! |
Starting the Cluster for the First Time
It's a good idea to open a second terminal on either node and tail the /var/log/messages syslog file. All cluster messages will be recorded here and it will help to debug problems if you can watch the logs. To do this, in the new terminal windows run;
| an-a05n01 | an-a05n02 |
|---|---|
clear; tail -f -n 0 /var/log/messages |
clear; tail -f -n 0 /var/log/messages |
This will clear the screen and start watching for new lines to be written to syslog. When you are done watching syslog, press the <ctrl> + c key combination.
How you lay out your terminal windows is, obviously, up to your own preferences. Below is a configuration I have found very useful.

With the terminals setup, lets start the cluster!
| Warning: If you don't start cman on both nodes within 30 seconds, the slower node will be fenced. |
On both nodes, run:
| an-a05n01 | an-a05n02 |
|---|---|
/etc/init.d/cman startStarting cluster:
Checking if cluster has been disabled at boot... [ OK ]
Checking Network Manager... [ OK ]
Global setup... [ OK ]
Loading kernel modules... [ OK ]
Mounting configfs... [ OK ]
Starting cman... [ OK ]
Waiting for quorum... [ OK ]
Starting fenced... [ OK ]
Starting dlm_controld... [ OK ]
Tuning DLM kernel config... [ OK ]
Starting gfs_controld... [ OK ]
Unfencing self... [ OK ]
Joining fence domain... [ OK ] |
Here is what you should see in syslog (this taken from an-a05n01):
| an-a05n01 | Oct 30 10:46:07 an-a05n01 kernel: DLM (built Sep 14 2013 05:33:35) installed
Oct 30 10:46:07 an-a05n01 corosync[2845]: [MAIN ] Corosync Cluster Engine ('1.4.1'): started and ready to provide service.
Oct 30 10:46:07 an-a05n01 corosync[2845]: [MAIN ] Corosync built-in features: nss dbus rdma snmp
Oct 30 10:46:07 an-a05n01 corosync[2845]: [MAIN ] Successfully read config from /etc/cluster/cluster.conf
Oct 30 10:46:07 an-a05n01 corosync[2845]: [MAIN ] Successfully parsed cman config
Oct 30 10:46:07 an-a05n01 corosync[2845]: [TOTEM ] Initializing transport (UDP/IP Multicast).
Oct 30 10:46:07 an-a05n01 corosync[2845]: [TOTEM ] Initializing transmit/receive security: libtomcrypt SOBER128/SHA1HMAC (mode 0).
Oct 30 10:46:07 an-a05n01 corosync[2845]: [TOTEM ] The network interface [10.20.50.1] is now up.
Oct 30 10:46:08 an-a05n01 corosync[2845]: [QUORUM] Using quorum provider quorum_cman
Oct 30 10:46:08 an-a05n01 corosync[2845]: [SERV ] Service engine loaded: corosync cluster quorum service v0.1
Oct 30 10:46:08 an-a05n01 corosync[2845]: [CMAN ] CMAN 3.0.12.1 (built Aug 29 2013 07:27:01) started
Oct 30 10:46:08 an-a05n01 corosync[2845]: [SERV ] Service engine loaded: corosync CMAN membership service 2.90
Oct 30 10:46:08 an-a05n01 corosync[2845]: [SERV ] Service engine loaded: openais checkpoint service B.01.01
Oct 30 10:46:08 an-a05n01 corosync[2845]: [SERV ] Service engine loaded: corosync extended virtual synchrony service
Oct 30 10:46:08 an-a05n01 corosync[2845]: [SERV ] Service engine loaded: corosync configuration service
Oct 30 10:46:08 an-a05n01 corosync[2845]: [SERV ] Service engine loaded: corosync cluster closed process group service v1.01
Oct 30 10:46:08 an-a05n01 corosync[2845]: [SERV ] Service engine loaded: corosync cluster config database access v1.01
Oct 30 10:46:08 an-a05n01 corosync[2845]: [SERV ] Service engine loaded: corosync profile loading service
Oct 30 10:46:08 an-a05n01 corosync[2845]: [QUORUM] Using quorum provider quorum_cman
Oct 30 10:46:08 an-a05n01 corosync[2845]: [SERV ] Service engine loaded: corosync cluster quorum service v0.1
Oct 30 10:46:08 an-a05n01 corosync[2845]: [MAIN ] Compatibility mode set to whitetank. Using V1 and V2 of the synchronization engine.
Oct 30 10:46:08 an-a05n01 corosync[2845]: [TOTEM ] A processor joined or left the membership and a new membership was formed.
Oct 30 10:46:08 an-a05n01 corosync[2845]: [CMAN ] quorum regained, resuming activity
Oct 30 10:46:08 an-a05n01 corosync[2845]: [QUORUM] This node is within the primary component and will provide service.
Oct 30 10:46:08 an-a05n01 corosync[2845]: [QUORUM] Members[1]: 1
Oct 30 10:46:08 an-a05n01 corosync[2845]: [QUORUM] Members[1]: 1
Oct 30 10:46:08 an-a05n01 corosync[2845]: [CPG ] chosen downlist: sender r(0) ip(10.20.50.1) ; members(old:0 left:0)
Oct 30 10:46:08 an-a05n01 corosync[2845]: [MAIN ] Completed service synchronization, ready to provide service.
Oct 30 10:46:08 an-a05n01 corosync[2845]: [TOTEM ] A processor joined or left the membership and a new membership was formed.
Oct 30 10:46:08 an-a05n01 corosync[2845]: [QUORUM] Members[2]: 1 2
Oct 30 10:46:08 an-a05n01 corosync[2845]: [QUORUM] Members[2]: 1 2
Oct 30 10:46:08 an-a05n01 corosync[2845]: [CPG ] chosen downlist: sender r(0) ip(10.20.50.1) ; members(old:1 left:0)
Oct 30 10:46:08 an-a05n01 corosync[2845]: [MAIN ] Completed service synchronization, ready to provide service.
Oct 30 10:46:12 an-a05n01 fenced[2902]: fenced 3.0.12.1 started
Oct 30 10:46:12 an-a05n01 dlm_controld[2927]: dlm_controld 3.0.12.1 started
Oct 30 10:46:13 an-a05n01 gfs_controld[2977]: gfs_controld 3.0.12.1 started |
|---|
Now to confirm that the cluster is operating properly, we can use cman_tool.
| an-a05n01 | cman_tool statusVersion: 6.2.0
Config Version: 7
Cluster Name: an-anvil-05
Cluster Id: 42881
Cluster Member: Yes
Cluster Generation: 20
Membership state: Cluster-Member
Nodes: 2
Expected votes: 1
Total votes: 2
Node votes: 1
Quorum: 1
Active subsystems: 7
Flags: 2node
Ports Bound: 0
Node name: an-a05n01.alteeve.ca
Node ID: 1
Multicast addresses: 239.192.167.41
Node addresses: 10.20.50.1 |
|---|
We can see that the both nodes are talking because of the Nodes: 2 entry.
| Note: If you have a managed switch that needs persistent multicast groups set, log into your switches now. We can see above that this cluster is using the multicast group 239.192.167.41, so find it in your switch config and ensure it's persistent. |
If you ever want to see the nitty-gritty configuration, you can run corosync-objctl.
| an-a05n01 | corosync-objctlcluster.name=an-anvil-05
cluster.config_version=7
cluster.cman.expected_votes=1
cluster.cman.two_node=1
cluster.cman.nodename=an-a05n01.alteeve.ca
cluster.cman.cluster_id=42881
cluster.clusternodes.clusternode.name=an-a05n01.alteeve.ca
cluster.clusternodes.clusternode.nodeid=1
cluster.clusternodes.clusternode.fence.method.name=ipmi
cluster.clusternodes.clusternode.fence.method.device.name=ipmi_n01
cluster.clusternodes.clusternode.fence.method.device.action=reboot
cluster.clusternodes.clusternode.fence.method.device.delay=15
cluster.clusternodes.clusternode.fence.method.name=pdu
cluster.clusternodes.clusternode.fence.method.device.name=pdu1
cluster.clusternodes.clusternode.fence.method.device.port=1
cluster.clusternodes.clusternode.fence.method.device.action=reboot
cluster.clusternodes.clusternode.fence.method.device.name=pdu2
cluster.clusternodes.clusternode.fence.method.device.port=1
cluster.clusternodes.clusternode.fence.method.device.action=reboot
cluster.clusternodes.clusternode.name=an-a05n02.alteeve.ca
cluster.clusternodes.clusternode.nodeid=2
cluster.clusternodes.clusternode.fence.method.name=ipmi
cluster.clusternodes.clusternode.fence.method.device.name=ipmi_n02
cluster.clusternodes.clusternode.fence.method.device.action=reboot
cluster.clusternodes.clusternode.fence.method.name=pdu
cluster.clusternodes.clusternode.fence.method.device.name=pdu1
cluster.clusternodes.clusternode.fence.method.device.port=2
cluster.clusternodes.clusternode.fence.method.device.action=reboot
cluster.clusternodes.clusternode.fence.method.device.name=pdu2
cluster.clusternodes.clusternode.fence.method.device.port=2
cluster.clusternodes.clusternode.fence.method.device.action=reboot
cluster.fencedevices.fencedevice.name=ipmi_n01
cluster.fencedevices.fencedevice.agent=fence_ipmilan
cluster.fencedevices.fencedevice.ipaddr=an-a05n01.ipmi
cluster.fencedevices.fencedevice.login=admin
cluster.fencedevices.fencedevice.passwd=secret
cluster.fencedevices.fencedevice.name=ipmi_n02
cluster.fencedevices.fencedevice.agent=fence_ipmilan
cluster.fencedevices.fencedevice.ipaddr=an-a05n02.ipmi
cluster.fencedevices.fencedevice.login=admin
cluster.fencedevices.fencedevice.passwd=secret
cluster.fencedevices.fencedevice.agent=fence_apc_snmp
cluster.fencedevices.fencedevice.ipaddr=an-pdu01.alteeve.ca
cluster.fencedevices.fencedevice.name=pdu1
cluster.fencedevices.fencedevice.agent=fence_apc_snmp
cluster.fencedevices.fencedevice.ipaddr=an-pdu02.alteeve.ca
cluster.fencedevices.fencedevice.name=pdu2
cluster.fence_daemon.post_join_delay=30
cluster.totem.rrp_mode=none
cluster.totem.secauth=off
totem.rrp_mode=none
totem.secauth=off
totem.transport=udp
totem.version=2
totem.nodeid=1
totem.vsftype=none
totem.token=10000
totem.join=60
totem.fail_recv_const=2500
totem.consensus=2000
totem.key=an-anvil-05
totem.interface.ringnumber=0
totem.interface.bindnetaddr=10.20.50.1
totem.interface.mcastaddr=239.192.167.41
totem.interface.mcastport=5405
libccs.next_handle=7
libccs.connection.ccs_handle=3
libccs.connection.config_version=7
libccs.connection.fullxpath=0
libccs.connection.ccs_handle=4
libccs.connection.config_version=7
libccs.connection.fullxpath=0
libccs.connection.ccs_handle=5
libccs.connection.config_version=7
libccs.connection.fullxpath=0
logging.timestamp=on
logging.to_logfile=yes
logging.logfile=/var/log/cluster/corosync.log
logging.logfile_priority=info
logging.to_syslog=yes
logging.syslog_facility=local4
logging.syslog_priority=info
aisexec.user=ais
aisexec.group=ais
service.name=corosync_quorum
service.ver=0
service.name=corosync_cman
service.ver=0
quorum.provider=quorum_cman
service.name=openais_ckpt
service.ver=0
runtime.services.quorum.service_id=12
runtime.services.cman.service_id=9
runtime.services.ckpt.service_id=3
runtime.services.ckpt.0.tx=0
runtime.services.ckpt.0.rx=0
runtime.services.ckpt.1.tx=0
runtime.services.ckpt.1.rx=0
runtime.services.ckpt.2.tx=0
runtime.services.ckpt.2.rx=0
runtime.services.ckpt.3.tx=0
runtime.services.ckpt.3.rx=0
runtime.services.ckpt.4.tx=0
runtime.services.ckpt.4.rx=0
runtime.services.ckpt.5.tx=0
runtime.services.ckpt.5.rx=0
runtime.services.ckpt.6.tx=0
runtime.services.ckpt.6.rx=0
runtime.services.ckpt.7.tx=0
runtime.services.ckpt.7.rx=0
runtime.services.ckpt.8.tx=0
runtime.services.ckpt.8.rx=0
runtime.services.ckpt.9.tx=0
runtime.services.ckpt.9.rx=0
runtime.services.ckpt.10.tx=0
runtime.services.ckpt.10.rx=0
runtime.services.ckpt.11.tx=2
runtime.services.ckpt.11.rx=3
runtime.services.ckpt.12.tx=0
runtime.services.ckpt.12.rx=0
runtime.services.ckpt.13.tx=0
runtime.services.ckpt.13.rx=0
runtime.services.evs.service_id=0
runtime.services.evs.0.tx=0
runtime.services.evs.0.rx=0
runtime.services.cfg.service_id=7
runtime.services.cfg.0.tx=0
runtime.services.cfg.0.rx=0
runtime.services.cfg.1.tx=0
runtime.services.cfg.1.rx=0
runtime.services.cfg.2.tx=0
runtime.services.cfg.2.rx=0
runtime.services.cfg.3.tx=0
runtime.services.cfg.3.rx=0
runtime.services.cpg.service_id=8
runtime.services.cpg.0.tx=4
runtime.services.cpg.0.rx=8
runtime.services.cpg.1.tx=0
runtime.services.cpg.1.rx=0
runtime.services.cpg.2.tx=0
runtime.services.cpg.2.rx=0
runtime.services.cpg.3.tx=16
runtime.services.cpg.3.rx=23
runtime.services.cpg.4.tx=0
runtime.services.cpg.4.rx=0
runtime.services.cpg.5.tx=2
runtime.services.cpg.5.rx=3
runtime.services.confdb.service_id=11
runtime.services.pload.service_id=13
runtime.services.pload.0.tx=0
runtime.services.pload.0.rx=0
runtime.services.pload.1.tx=0
runtime.services.pload.1.rx=0
runtime.services.quorum.service_id=12
runtime.connections.active=6
runtime.connections.closed=111
runtime.connections.fenced:CPG:2902:21.service_id=8
runtime.connections.fenced:CPG:2902:21.client_pid=2902
runtime.connections.fenced:CPG:2902:21.responses=5
runtime.connections.fenced:CPG:2902:21.dispatched=9
runtime.connections.fenced:CPG:2902:21.requests=5
runtime.connections.fenced:CPG:2902:21.sem_retry_count=0
runtime.connections.fenced:CPG:2902:21.send_retry_count=0
runtime.connections.fenced:CPG:2902:21.recv_retry_count=0
runtime.connections.fenced:CPG:2902:21.flow_control=0
runtime.connections.fenced:CPG:2902:21.flow_control_count=0
runtime.connections.fenced:CPG:2902:21.queue_size=0
runtime.connections.fenced:CPG:2902:21.invalid_request=0
runtime.connections.fenced:CPG:2902:21.overload=0
runtime.connections.dlm_controld:CPG:2927:24.service_id=8
runtime.connections.dlm_controld:CPG:2927:24.client_pid=2927
runtime.connections.dlm_controld:CPG:2927:24.responses=5
runtime.connections.dlm_controld:CPG:2927:24.dispatched=8
runtime.connections.dlm_controld:CPG:2927:24.requests=5
runtime.connections.dlm_controld:CPG:2927:24.sem_retry_count=0
runtime.connections.dlm_controld:CPG:2927:24.send_retry_count=0
runtime.connections.dlm_controld:CPG:2927:24.recv_retry_count=0
runtime.connections.dlm_controld:CPG:2927:24.flow_control=0
runtime.connections.dlm_controld:CPG:2927:24.flow_control_count=0
runtime.connections.dlm_controld:CPG:2927:24.queue_size=0
runtime.connections.dlm_controld:CPG:2927:24.invalid_request=0
runtime.connections.dlm_controld:CPG:2927:24.overload=0
runtime.connections.dlm_controld:CKPT:2927:25.service_id=3
runtime.connections.dlm_controld:CKPT:2927:25.client_pid=2927
runtime.connections.dlm_controld:CKPT:2927:25.responses=0
runtime.connections.dlm_controld:CKPT:2927:25.dispatched=0
runtime.connections.dlm_controld:CKPT:2927:25.requests=0
runtime.connections.dlm_controld:CKPT:2927:25.sem_retry_count=0
runtime.connections.dlm_controld:CKPT:2927:25.send_retry_count=0
runtime.connections.dlm_controld:CKPT:2927:25.recv_retry_count=0
runtime.connections.dlm_controld:CKPT:2927:25.flow_control=0
runtime.connections.dlm_controld:CKPT:2927:25.flow_control_count=0
runtime.connections.dlm_controld:CKPT:2927:25.queue_size=0
runtime.connections.dlm_controld:CKPT:2927:25.invalid_request=0
runtime.connections.dlm_controld:CKPT:2927:25.overload=0
runtime.connections.gfs_controld:CPG:2977:28.service_id=8
runtime.connections.gfs_controld:CPG:2977:28.client_pid=2977
runtime.connections.gfs_controld:CPG:2977:28.responses=5
runtime.connections.gfs_controld:CPG:2977:28.dispatched=8
runtime.connections.gfs_controld:CPG:2977:28.requests=5
runtime.connections.gfs_controld:CPG:2977:28.sem_retry_count=0
runtime.connections.gfs_controld:CPG:2977:28.send_retry_count=0
runtime.connections.gfs_controld:CPG:2977:28.recv_retry_count=0
runtime.connections.gfs_controld:CPG:2977:28.flow_control=0
runtime.connections.gfs_controld:CPG:2977:28.flow_control_count=0
runtime.connections.gfs_controld:CPG:2977:28.queue_size=0
runtime.connections.gfs_controld:CPG:2977:28.invalid_request=0
runtime.connections.gfs_controld:CPG:2977:28.overload=0
runtime.connections.fenced:CPG:2902:29.service_id=8
runtime.connections.fenced:CPG:2902:29.client_pid=2902
runtime.connections.fenced:CPG:2902:29.responses=5
runtime.connections.fenced:CPG:2902:29.dispatched=8
runtime.connections.fenced:CPG:2902:29.requests=5
runtime.connections.fenced:CPG:2902:29.sem_retry_count=0
runtime.connections.fenced:CPG:2902:29.send_retry_count=0
runtime.connections.fenced:CPG:2902:29.recv_retry_count=0
runtime.connections.fenced:CPG:2902:29.flow_control=0
runtime.connections.fenced:CPG:2902:29.flow_control_count=0
runtime.connections.fenced:CPG:2902:29.queue_size=0
runtime.connections.fenced:CPG:2902:29.invalid_request=0
runtime.connections.fenced:CPG:2902:29.overload=0
runtime.connections.corosync-objctl:CONFDB:3083:30.service_id=11
runtime.connections.corosync-objctl:CONFDB:3083:30.client_pid=3083
runtime.connections.corosync-objctl:CONFDB:3083:30.responses=463
runtime.connections.corosync-objctl:CONFDB:3083:30.dispatched=0
runtime.connections.corosync-objctl:CONFDB:3083:30.requests=466
runtime.connections.corosync-objctl:CONFDB:3083:30.sem_retry_count=0
runtime.connections.corosync-objctl:CONFDB:3083:30.send_retry_count=0
runtime.connections.corosync-objctl:CONFDB:3083:30.recv_retry_count=0
runtime.connections.corosync-objctl:CONFDB:3083:30.flow_control=0
runtime.connections.corosync-objctl:CONFDB:3083:30.flow_control_count=0
runtime.connections.corosync-objctl:CONFDB:3083:30.queue_size=0
runtime.connections.corosync-objctl:CONFDB:3083:30.invalid_request=0
runtime.connections.corosync-objctl:CONFDB:3083:30.overload=0
runtime.totem.pg.msg_reserved=1
runtime.totem.pg.msg_queue_avail=761
runtime.totem.pg.mrp.srp.orf_token_tx=2
runtime.totem.pg.mrp.srp.orf_token_rx=437
runtime.totem.pg.mrp.srp.memb_merge_detect_tx=47
runtime.totem.pg.mrp.srp.memb_merge_detect_rx=47
runtime.totem.pg.mrp.srp.memb_join_tx=3
runtime.totem.pg.mrp.srp.memb_join_rx=5
runtime.totem.pg.mrp.srp.mcast_tx=46
runtime.totem.pg.mrp.srp.mcast_retx=0
runtime.totem.pg.mrp.srp.mcast_rx=57
runtime.totem.pg.mrp.srp.memb_commit_token_tx=4
runtime.totem.pg.mrp.srp.memb_commit_token_rx=4
runtime.totem.pg.mrp.srp.token_hold_cancel_tx=4
runtime.totem.pg.mrp.srp.token_hold_cancel_rx=8
runtime.totem.pg.mrp.srp.operational_entered=2
runtime.totem.pg.mrp.srp.operational_token_lost=0
runtime.totem.pg.mrp.srp.gather_entered=2
runtime.totem.pg.mrp.srp.gather_token_lost=0
runtime.totem.pg.mrp.srp.commit_entered=2
runtime.totem.pg.mrp.srp.commit_token_lost=0
runtime.totem.pg.mrp.srp.recovery_entered=2
runtime.totem.pg.mrp.srp.recovery_token_lost=0
runtime.totem.pg.mrp.srp.consensus_timeouts=0
runtime.totem.pg.mrp.srp.mtt_rx_token=835
runtime.totem.pg.mrp.srp.avg_token_workload=0
runtime.totem.pg.mrp.srp.avg_backlog_calc=0
runtime.totem.pg.mrp.srp.rx_msg_dropped=0
runtime.totem.pg.mrp.srp.continuous_gather=0
runtime.totem.pg.mrp.srp.continuous_sendmsg_failures=0
runtime.totem.pg.mrp.srp.firewall_enabled_or_nic_failure=0
runtime.totem.pg.mrp.srp.members.1.ip=r(0) ip(10.20.50.1)
runtime.totem.pg.mrp.srp.members.1.join_count=1
runtime.totem.pg.mrp.srp.members.1.status=joined
runtime.totem.pg.mrp.srp.members.2.ip=r(0) ip(10.20.50.2)
runtime.totem.pg.mrp.srp.members.2.join_count=1
runtime.totem.pg.mrp.srp.members.2.status=joined
runtime.blackbox.dump_flight_data=no
runtime.blackbox.dump_state=no
cman_private.COROSYNC_DEFAULT_CONFIG_IFACE=xmlconfig:cmanpreconfig |
|---|
If you want to check what DLM lockspaces, you can use dlm_tool ls to list lock spaces. Given that we're not running and resources or clustered filesystems though, there won't be any at this time. We'll look at this again later.
Testing Fencing
We need to thoroughly test our fence configuration and devices before we proceed. Should the cluster call a fence, and if the fence call fails, the cluster will hang until the fence finally succeeds. This effectively hangs the cluster, by design. The rationale is that, as bad as a hung cluster might be, it's better than risking data corruption.
So if we have problems, we need to find them now.
We need to run two tests from each node against the other node for a total of four tests.
- The first test will verify that fence_ipmilan is working. To do this, we will hang the victim node by sending c to the kernel's "magic SysRq" key. We do this by running echo c > /proc/sysrq-trigger which immediately and completely hangs the kernel. This does not effect the IPMI BMC, so if we've configured everything properly, the surviving node should be able to use fence_ipmilan to reboot the crashed node.
- Secondly, we will pull the power on the target node. This removes all power from the node, causing the IPMI BMC to also fail. You should see the other node try to fence the target using fence_ipmilan, see it fail and then try again using the second method, the switched PDUs via fence_apc_snmp. If you watch and listen to the PDUs, you should see the power indicator LED light up and hear the mechanical relays close the circuit when the fence completes.
For the second test, you could just physically unplug the cables from the PDUs. We're going to cheat though and use the actual fence_apc_snmp fence handler to manually turn off the target ports. This will help show that the fence agents are really just shell scripts. Used on their own, they do not talk to the cluster in any way. So despite using them to cut the power, the cluster will not know what state the lost node is in, requiring a fence call still.
| Test | Victim | Pass? |
|---|---|---|
| echo c > /proc/sysrq-trigger | an-a05n01 | Yes / No |
| fence_apc_snmp -a an-pdu01.alteeve.ca -n 1 -o off
fence_apc_snmp -a an-pdu02.alteeve.ca -n 1 -o off |
an-a05n01 | Yes / No |
| echo c > /proc/sysrq-trigger | an-a05n02 | Yes / No |
| fence_apc_snmp -a an-pdu01.alteeve.ca -n 2 -o off
fence_apc_snmp -a an-pdu02.alteeve.ca -n 2 -o off |
an-a05n02 | Yes / No |
| Note: After the target node powers back up after each test, be sure to restart cman! |
Using Fence_check to Verify our Fencing Config
In RHEL 6.4, a new tool called fence_check was added to the cluster toolbox. When cman is running, we can call it and it will gather up the data from cluster.conf and then call each defined fence device with the action "status". If everything is configured properly, all fence devices should exit with a return code of 0 (device/port is on) or 2 (device/port is off).
If any fence device's agent exits with any other code, something has gone wrong and we need to fix it before proceeding.
We're going to run this tool from both node. So let's start with an-a05n01.
| an-a05n01 | fence_checkfence_check run at Wed Oct 30 10:56:07 EDT 2013 pid: 3236
Testing an-a05n01.alteeve.ca method 1: success
Testing an-a05n01.alteeve.ca method 2: success
Testing an-a05n02.alteeve.ca method 1: success
Testing an-a05n02.alteeve.ca method 2: success |
|---|
That is very promising! Now lets run it again on an-a05n02. We want to do this because, for example, if the /etc/hosts file on the second node was bad, a fence may work on the first node but not this node.
| an-a05n02 | fence_checkfence_check run at Wed Oct 30 10:57:27 EDT 2013 pid: 28127
Unable to perform fence_check: node is not fence master |
|---|
Well then, that's not what we expected.
Actually, it is. When a cluster starts, one of the nodes in the cluster will be chosen to be the node which performs actual fence calls. This node (the one with the lowest node ID) is the only one that, by default, can run fence_check.
If we look at fence_check's man page, we see that we can use the -f switch to override this behaviour, but there is an important note:
| an-a05n02 | man fence_check -f Override checks and force execution. DO NOT USE ON PRODUCTION CLUSTERS! |
|---|
The reason for this is that, while fence_check is running, should a node fail, it will not be able to fence until the fence_check finishes. In production, this can cause recovery post-failure to take a bit longer than it otherwise would.
Good thing we're testing now, before the cluster is in production!
So lets try again, this time forcing the issue.
| an-a05n02 | fence_check -ffence_check run at Wed Oct 30 11:02:35 EDT 2013 pid: 28222
Testing an-a05n01.alteeve.ca method 1: success
Testing an-a05n01.alteeve.ca method 2: success
Testing an-a05n02.alteeve.ca method 1: success
Testing an-a05n02.alteeve.ca method 2: success |
|---|
Very nice.
Crashing an-a05n01 for the First Time
| Warning: This step will totally crash an-a05n01! If fencing fails for some reason, you may need physical access to the node to recover it. |
Be sure to tail the /var/log/messages system logs on an-a05n02. Go to an-a05n01's first terminal and run the following command.
On an-a05n01 run:
| an-a05n01 | echo c > /proc/sysrq-trigger |
|---|
On an-a05n02's syslog terminal, you should see the following entries in the log.
| an-a05n02 | Oct 30 11:05:46 an-a05n02 corosync[27783]: [TOTEM ] A processor failed, forming new configuration.
Oct 30 11:05:48 an-a05n02 corosync[27783]: [QUORUM] Members[1]: 2
Oct 30 11:05:48 an-a05n02 corosync[27783]: [TOTEM ] A processor joined or left the membership and a new membership was formed.
Oct 30 11:05:48 an-a05n02 corosync[27783]: [CPG ] chosen downlist: sender r(0) ip(10.20.50.2) ; members(old:2 left:1)
Oct 30 11:05:48 an-a05n02 corosync[27783]: [MAIN ] Completed service synchronization, ready to provide service.
Oct 30 11:05:48 an-a05n02 kernel: dlm: closing connection to node 1
Oct 30 11:05:48 an-a05n02 fenced[27840]: fencing node an-a05n01.alteeve.ca
Oct 30 11:06:21 an-a05n02 fenced[27840]: fence an-a05n01.alteeve.ca success |
|---|
Excellent! The IPMI-based fencing worked!
But why did it take 33 seconds?
The current fence_ipmilan version works this way for reboot actions;
- Check status
- Call ipmitool ... chassis power off
- Checks status again until the status shows off
- Call ipmitool ... chassis power on
- Checks the status again
If you tried doing these steps directly, you would find that it takes roughly 18 seconds to run. Add this to the delay="15" we set against an-a05n01 when using the IPMI fence device and you have the 33 seconds we see here.
If you are watching an-a05n01's display, you should now see it starting to boot back up.
Cutting the Power to an-a05n01
| Note: Remember to start cman once the node boots back up before running this test. |
As was discussed earlier, IPMI and other out-of-band management interfaces have a fatal flaw as a fence device. Their BMC draws its power from the same power supply as the node itself. Thus, when the power supply itself fails (for example, if an internal wire shorted against the chassis), fencing via IPMI will fail as well. This makes the power supply a single point of failure, which is what the PDU protects us against.
In case you're wondering how likely failing a redundant PSU is...
 |
 |
 |
| Thanks to my very talented fellow admin, Lisa Seelye, for this object lesson. | ||
So to simulate a failed power supply, we're going to use an-a05n02's fence_apc_snmp fence agent to turn off the power to an-a05n01. Given that the node has two power supplies, one plugged in to each PDU, we'll need to make two calls to cut the power.
Alternatively, you could also just unplug the power cables from the PDUs and the fence would still succeed. Once fence_apc_snmp confirms that the requested ports have no power, the fence action succeeds. Whether the nodes restart after the fence is not at all a factor.
From an-a05n02, pull the power on an-a05n01 with the following two chained calls;
| an-a05n02 | fence_apc_snmp -a an-pdu01.alteeve.ca -n 1 -o off && fence_apc_snmp -a an-pdu02.alteeve.ca -n 1 -o offSuccess: Powered OFF
Success: Powered OFF |
|---|
| Warning: Verify directly that an-a05n01 lost power! If the power cables are in the wrong port, an-a05n01 will still be powered on, despite the success message! |
Back on an-a05n02's syslog, we should see the following entries;
| an-a05n02 | Oct 30 13:31:49 an-a05n02 corosync[27783]: [TOTEM ] A processor failed, forming new configuration.
Oct 30 13:31:51 an-a05n02 corosync[27783]: [QUORUM] Members[1]: 2
Oct 30 13:31:51 an-a05n02 corosync[27783]: [TOTEM ] A processor joined or left the membership and a new membership was formed.
Oct 30 13:31:51 an-a05n02 corosync[27783]: [CPG ] chosen downlist: sender r(0) ip(10.20.50.2) ; members(old:2 left:1)
Oct 30 13:31:51 an-a05n02 corosync[27783]: [MAIN ] Completed service synchronization, ready to provide service.
Oct 30 13:31:51 an-a05n02 kernel: dlm: closing connection to node 1
Oct 30 13:31:51 an-a05n02 fenced[27840]: fencing node an-a05n01.alteeve.ca
Oct 30 13:32:26 an-a05n02 fenced[27840]: fence an-a05n01.alteeve.ca dev 0.0 agent fence_ipmilan result: error from agent
Oct 30 13:32:26 an-a05n02 fenced[27840]: fence an-a05n01.alteeve.ca success |
|---|
Hoozah!
Notice that there is an error from the fence_ipmilan? This is exactly what we expected because of the IPMI's BMC lost power and couldn't respond. You will also notice the large delay, despite there not being a delay="15" set for the PDU fence devices for an-a05n01. This was from the initial delay when trying to fence using IPMI. This is why we don't need to specify delay on the PDUs as well.
So now we know that an-a05n01 can be fenced successfully from both fence devices. Now we need to run the same tests against an-a05n02!
Hanging an-a05n02
| Warning: DO NOT ASSUME THAT an-a05n02 WILL FENCE PROPERLY JUST BECAUSE an-a05n01 PASSED!. There are many ways that a fence could fail; Bad password, misconfigured device, plugged into the wrong port on the PDU and so on. Always test all nodes using all methods! |
| Note: Remember to start cman once the node boots back up before running this test. |
Be sure to be tailing the /var/log/messages on an-a05n02. Go to an-a05n01's first terminal and run the following command.
| Note: This command will not return and you will lose all ability to talk to this node until it is rebooted. |
On an-a05n02 run:
| an-a05n02 | echo c > /proc/sysrq-trigger |
|---|
On an-a05n01's syslog terminal, you should see the following entries in the log.
| an-a05n01 | Oct 30 13:40:29 an-a05n01 corosync[2800]: [TOTEM ] A processor failed, forming new configuration.
Oct 30 13:40:31 an-a05n01 corosync[2800]: [QUORUM] Members[1]: 1
Oct 30 13:40:31 an-a05n01 corosync[2800]: [TOTEM ] A processor joined or left the membership and a new membership was formed.
Oct 30 13:40:31 an-a05n01 corosync[2800]: [CPG ] chosen downlist: sender r(0) ip(10.20.50.1) ; members(old:2 left:1)
Oct 30 13:40:31 an-a05n01 corosync[2800]: [MAIN ] Completed service synchronization, ready to provide service.
Oct 30 13:40:31 an-a05n01 kernel: dlm: closing connection to node 2
Oct 30 13:40:31 an-a05n01 fenced[2857]: fencing node an-a05n02.alteeve.ca
Oct 30 13:40:48 an-a05n01 fenced[2857]: fence an-a05n02.alteeve.ca success |
|---|
Again, perfect!
Notice this time that the fence action took 17 seconds, much less that it took to fence an-c01n01. This is because, as you probably guessed, there is no delay set against an-a05n02. So when an-a05n01 went to fence it, it proceeded immediately. This tells us that if both nodes try to fence each other at the same time, an-a05n01 should be left the winner.
Cutting the Power to an-a05n02
| Note: Remember to start cman once the node boots back up before running this test. |
Last fence test! Time to yank the power on an-a05n02 and make sure its power fencing works.
From an-a05n01, pull the power on an-a05n02 with the following call;
| an-a05n01 | fence_apc_snmp -a an-pdu01.alteeve.ca -n 2 -o off && fence_apc_snmp -a an-pdu02.alteeve.ca -n 2 -o offSuccess: Powered OFF
Success: Powered OFF |
|---|
| Warning: Verify directly that an-a05n02 lost power! If the power cables are in the wrong port, an-a05n02 will still be powered on, despite the success message! |
On an-a05n01's syslog, we should see the following entries;
| an-a05n01 | Oct 30 13:44:41 an-a05n01 corosync[2800]: [TOTEM ] A processor failed, forming new configuration.
Oct 30 13:44:43 an-a05n01 corosync[2800]: [QUORUM] Members[1]: 1
Oct 30 13:44:43 an-a05n01 corosync[2800]: [TOTEM ] A processor joined or left the membership and a new membership was formed.
Oct 30 13:44:43 an-a05n01 corosync[2800]: [CPG ] chosen downlist: sender r(0) ip(10.20.50.1) ; members(old:2 left:1)
Oct 30 13:44:43 an-a05n01 corosync[2800]: [MAIN ] Completed service synchronization, ready to provide service.
Oct 30 13:44:43 an-a05n01 kernel: dlm: closing connection to node 2
Oct 30 13:44:43 an-a05n01 fenced[2857]: fencing node an-a05n02.alteeve.ca
Oct 30 13:44:47 an-a05n01 ntpd[2298]: synchronized to 66.96.30.35, stratum 2
Oct 30 13:45:03 an-a05n01 fenced[2857]: fence an-a05n02.alteeve.ca dev 0.0 agent fence_ipmilan result: error from agent
Oct 30 13:45:03 an-a05n01 fenced[2857]: fence an-a05n02.alteeve.ca success |
|---|
Woot!
Only now can we safely say that our fencing is setup and working properly.
Installing DRBD
DRBD is an open-source application for real-time, block-level disk replication created and maintained by Linbit. We will use this to keep the data on our cluster consistent between the two nodes.
To install it, we have three choices;
- Purchase a Red Hat blessed, fully supported copy from Linbit.
- Install from the freely available, community maintained ELRepo repository.
- Install from source files.
We will be using the 8.3.x version of DRBD. This tracts the Red Hat and Linbit supported versions, providing the most tested combination and providing a painless path to move to a fully supported version, should you decide to do so down the road.
Option 1 - Fully Supported by Red Hat and Linbit
| Note: This shows how to install on an-a05n01. Please do this again for an-a05n02. |
Red Hat decided to no longer directly support DRBD in EL6 to narrow down what applications they shipped and focus on improving those components. Given the popularity of DRBD, however, Red Hat struck a deal with Linbit, the authors and maintainers of DRBD. You have the option of purchasing a fully supported version of DRBD that is blessed by Red Hat for use under Red Hat Enterprise Linux 6.
If you are building a fully supported cluster, please contact Linbit to purchase DRBD. Once done, you will get an email with you login information and, most importantly here, the URL hash needed to access the official repositories.
First you will need to add an entry in /etc/yum.repo.d/ for DRBD, but this needs to be hand-crafted as you must specify the URL hash given to you in the email as part of the repo configuration.
- Log into the Linbit portal.
- Click on Account.
- Under Your account details, click on the hash string to the right of URL hash:.
- Click on RHEL 6 (even if you are using CentOS or another EL6 distro.
This will take you to a new page called Instructions for using the DRBD package repository. The details installation instruction are found here.
Lets use the imaginative URL hash of abcdefghijklmnopqrstuvwxyz0123456789ABCD and we're are in fact using x86_64 architecture. Given this, we would create the following repository configuration file.
| an-a05n01 | vim /etc/yum.repos.d/linbit.repo[drbd-8]
name=DRBD 8
baseurl=http://packages.linbit.com/abcdefghijklmnopqrstuvwxyz0123456789ABCD/rhel6/x86_64
gpgcheck=0 |
|---|
Once this is saved, you can install DRBD using yum;
| an-a05n01 | yum install drbd kmod-drbd |
|---|
Make sure DRBD doesn't start on boot, as we'll have rgmanager handle it.
| an-a05n01 | chkconfig drbd off |
|---|
Done!
Option 2 - Install From AN!Repo
| Note: This is the method used for this tutorial. |
If you didn't remove drbd83-utils and kmod-drbd83 in the initial package installation step, then DRBD is already installed.
Option 3 - Install From Source
If you do not wish to pay for access to the official DRBD repository and do not feel comfortable adding a public repository, your last option is to install from Linbit's source code. The benefit of this is that you can vet the source before installing it, making it a more secure option. The downside is that you will need to manually install updates and security fixes as they are made available.
On Both nodes run:
| an-a05n01 | an-a05n02 |
|---|---|
yum install flex gcc make kernel-devel
wget -c http://oss.linbit.com/drbd/8.3/drbd-8.3.16.tar.gz
tar -xvzf drbd-8.3.16.tar.gz
cd drbd-8.3.16
./configure \
--prefix=/usr \
--localstatedir=/var \
--sysconfdir=/etc \
--with-utils \
--with-km \
--with-udev \
--with-pacemaker \
--with-rgmanager \
--with-bashcompletion
make
make install
chkconfig --add drbd
chkconfig drbd off<significant amount of output> |
yum install flex gcc make kernel-devel
wget -c http://oss.linbit.com/drbd/8.3/drbd-8.3.16.tar.gz
tar -xvzf drbd-8.3.16.tar.gz
cd drbd-8.3.16
./configure \
--prefix=/usr \
--localstatedir=/var \
--sysconfdir=/etc \
--with-utils \
--with-km \
--with-udev \
--with-pacemaker \
--with-rgmanager \
--with-bashcompletion
make
make install
chkconfig --add drbd
chkconfig drbd off<significant amount of output, it's really quite impressive> |
Hooking DRBD into the Cluster's Fencing
| Note: In older DRBD 8.3 releases, prior to 8.3.16, we needed to download rhcs_fence from github as the shipped version had a bug. With the release of 8.3.16, this is no longer the case. |
DRBD is, effectively, a stand-alone application. You can use it on its own without any other software. For this reason, DRBD has its own fencing mechanism to avoid split-brains if the DRBD nodes lose contact with each other.
It would be a replication of effort to setup actual fencing devices in DRBD, so instead we will use a "hook" script called rhcs_fence. When DRBD loses contact with its peer, it will block and then call this script. In turn, this script calls cman and asks it to fence the peer. It then waits for cman to respond with a success or failure.
If the fence succeed, DRBD will resume normal operation, confident that the peer is not doing the same.
If the fence fails, DRBD will continue to block and continue to try and fence the peer indefinitely. Thus, if a fence call fails, DRBD will remain blocked and all disk reads and writes will hang. This is by design as it is better to hang than to risk a split-brain, which can lead to data loss and corruption.
By using this script, if the fence configuration ever changes, you only need to update the configuration in cluster.conf, not also in DRBD as well.
The "Why" of our Layout - More Safety!
We will be creating two separate DRBD resources. The reason for this is to minimize the chance of data loss in a split-brain event. We've got to fairly great lengths to insure that a split-brain never occurs, but it is still possible. So we want a "last line of defence", just in case.
Consider this scenario:
- You have a two-node cluster running two VMs. One is a mirror for a project and the other is an accounting application. Node 1 hosts the mirror, Node 2 hosts the accounting application.
- A partition occurs and both nodes try to fence the other.
- Network access is lost, so both nodes fall back to fencing using PDUs.
- Both nodes have redundant power supplies, and at some point in time, the power cables on the second PDU got reversed.
- The fence_apc_snmp agent succeeds, because the requested outlets were shut off. However, due to the cabling mistake, neither node actually shut down.
- Both nodes proceed to run independently, thinking they are the only node left.
- During this split-brain, the mirror VM downloads over a gigabyte of updates. Meanwhile, an hour earlier, the accountant updates the books, totalling less than one megabyte of changes.
At this point, you will need to discard the changed on one of the nodes. So now you have to choose:
- Is the node with the most changes more valid?
- Is the node with the most recent changes more valid?
Neither of these are true, as the node with the older data and smallest amount of changed data is the accounting data which is significantly more valuable.
Now imagine that both VMs have equally valuable data. What then? Which side do you discard?
The approach we will use is to create two separate DRBD resources. Then we will assign our servers into two groups;
- VMs normally designed to run on an-a05n01.
- VMs normally designed to run on an-a05n02.
Each of these "pools" of servers will have a dedicate DRBD resource behind it. These pools will be managed by clustered LVM, as that provides a very powerful ability to manage DRBD's raw space.
Now imagine the above scenario, except this time imagine that the servers running on an-a05n01 are on one DRBD resource and the servers running on an-a05n02 are on a different resource. Now we can recover from the split brain safely!
- The DRBD resource hosting an-a05n01's servers can invalidate any changes on an-a05n02.
- The DRBD resource hosting an-a05n02's servers can invalidate any changes on an-a05n01.
This ability to invalidate on both direction allows us to recover without risking data loss, provided all the servers were actually running on the same node at the time of the split-brain event.
To summarize, we're going to create the following three resources:
- We'll create a resource called "r0". This resource will back the VMs designed to primarily run on an-a05n01.
- We'll create a second resource called "r1". This resource will back the VMs designed to primarily run on an-a05n02.
Creating The Partitions For DRBD
It is possible to use LVM on the hosts, and simply create LVs to back our DRBD resources. However, this causes confusion as LVM will see the PV signatures on both the DRBD backing devices and the DRBD device itself. Getting around this requires editing LVM's filter option, which is somewhat complicated and is outside the scope of this tutorial. We're going to use raw partitions and we recommend you do the same.
On our nodes, we created three primary disk partitions:
- /dev/sda1; The /boot partition.
- /dev/sda2; The swap partition.
- /dev/sda3; The root / partition.
We will create a new extended partition. Then within it we will create two new partitions:
- /dev/sda5; a partition big enough to host the VMs that will normally run on an-a05n01 and the /shared clustered file system.
- /dev/sda6; a partition big enough to host the VMs that will normally run on an-a05n02.
Block Alignment
We're going to use a program called parted instead of fdisk. With fdisk, we would have to manually ensure that our partitions fell on 64 KiB boundaries. With parted, we can use the -a opt to tell it to use optimal alignment, saving us a lot of work. This is important for decent performance performance in our servers. This is true for both traditional platter and modern solid-state drives.
For performance reasons, we want to ensure that the file systems created within a VM matches the block alignment of the underlying storage stack, clear down to the base partitions on /dev/sda (or what ever your lowest-level block device is).
For those who are curious though, this is why falling on 64 KiB boundaries are important.
Imagine this misaligned scenario;
Note: Not to scale
________________________________________________________________
VM File system |~~~~~|_______|_______|_______|_______|_______|_______|_______|__
|~~~~~|==========================================================
DRBD Partition |~~~~~|_______|_______|_______|_______|_______|_______|_______|__
64 KiB block |_______|_______|_______|_______|_______|_______|_______|_______|
512byte sectors |_|_|_|_|_|_|_|_|_|_|_|_|_|_|_|_|_|_|_|_|_|_|_|_|_|_|_|_|_|_|_|_|Now, when the guest wants to write one block worth of data, it actually causes two blocks to be written, causing avoidable disk I/O. That effectively doubles the number of IOPS needed, a huge waste of disk resources.
Note: Not to scale
________________________________________________________________
VM File system |~~~~~~~|_______|_______|_______|_______|_______|_______|_______|
|~~~~~~~|========================================================
DRBD Partition |~~~~~~~|_______|_______|_______|_______|_______|_______|_______|
64 KiB block |_______|_______|_______|_______|_______|_______|_______|_______|
512byte sectors |_|_|_|_|_|_|_|_|_|_|_|_|_|_|_|_|_|_|_|_|_|_|_|_|_|_|_|_|_|_|_|_|By changing the start cylinder of our partitions to always start on 64 KiB boundaries, we're sure to keep the guest OS's file system in-line with the DRBD backing device's blocks. Thus, all reads and writes in the guest OS effect a matching number of real blocks, maximizing disk I/O efficiency.
| Note: You will want to do this with SSD drives, too. It's true that the performance will remain about the same, but SSD drives have a limited number of write cycles, and aligning the blocks will minimize block writes. |
Special thanks to Pasi Kärkkäinen for his patience in explaining to me the importance of disk alignment. He created two images which I used as templates for the ASCII art images above:
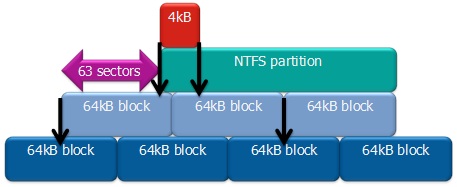
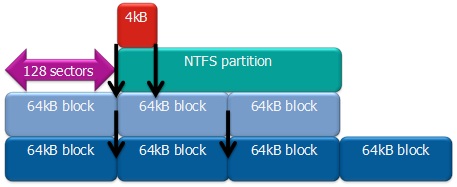
Determining Storage Pool Sizes
Before we can create the DRBD partitions, we first need to know how much space we want to allocate to each node's storage pool.
Before we start though, we need to know how much available storage space we have to play with. Both nodes should have identical storage, but we'll double check now. If they differ, we'll be limited to the size of the smaller one.
| an-a05n01 | an-a05n02 |
|---|---|
parted -a opt /dev/sda "print free"Model: LSI RAID 5/6 SAS 6G (scsi)
Disk /dev/sda: 898GB
Sector size (logical/physical): 512B/512B
Partition Table: msdos
Number Start End Size Type File system Flags
32.3kB 1049kB 1016kB Free Space
1 1049kB 525MB 524MB primary ext4 boot
2 525MB 43.5GB 42.9GB primary ext4
3 43.5GB 47.8GB 4295MB primary linux-swap(v1)
47.8GB 898GB 851GB Free Space |
Excellent! Both nodes show the same amount of free space, 851 GB (note, not GiB).
We need to carve this up into three chunks of space:
- Space for the /shared partition. Install ISOs, server definition files and the like will be kept here.
- Space for servers designed to run on an-a05n01.
- Space for servers designed to run on an-a05n02.
We're going to install 8 different operating systems. That means we'll need enough space for at least eight different install ISO images. We'll allocate 40 GB for this. That leaves 811 GB left for servers.
Choose which node will host what servers is largely a question of distributing CPU load. Of course, each node has to be capable of running all of our servers at the same time. With a little planning though, we can split up servers with expected high CPU load and, when both nodes are up, gain a little performance.
So let's create a table showing the servers we plan to build. We'll put them into two columns, one for servers designed to run on an-a05n01 and the others designed to run on an-a05n02. We'll note how much disk space each server will need. Remember, we're trying to split up our servers with the highest expected CPU loads. This, being a tutorial, is going to be a fairly artificial division. You will need to decide for yourself how you want to split up your servers and how much space each needs.
| an-a05n01 | an-a05n02 |
|---|---|
| vm01-win2008 (150 GB) | |
| vm02-win2012 (150 GB) | |
| vm03-win7 (100 GB) | |
| vm04-win8 (100 GB) | |
| vm05-freebsd9 (50 GB) | |
| vm06-solaris11 (100 GB) | |
| vm07-rhel6 (50 GB) | |
| vm08-sles11 (100 GB) | |
| Total: 500 GB | Total: 300 GB |
The reason we put /shared on the same DRBD resource (and thus, the same storage pool) as the one that will host an-a05n01's servers is that it changes relatively rarely. So in the already unlikely event that there is a split-brain event, the chances of something important changing in /shared before the split-brain is resolved is extremely low. So low that the overhead of a third resource is not justified.
So then:
- The first DRBD resource, called r0, will need to have 540 GB of space.
- The second DRBD resource, called r1, will need to have 300 GB of space.
This is a total of 840 GB, leaving about 11 GB unused. What you do with the remaining free space is entirely up to you. You can assign it to one of the servers, leave it as free space in one (or partially on both) storage pools, etc.
It's actually a very common setup to build Anvil! systems with more storage than is needed. This free space can then be used later for new servers, growing or adding space to existing servers and so on. In our case, we'll give the left over space to the second storage pool and leave it there unassigned.
Now we're ready to create the partitions on each node that will back our DRBD resources!
Creating the DRBD Partitions
Here I will show you the values I entered to create the three partitions I needed on my nodes.
| Note: All of the following commands need to be run on both nodes. It's very important that both nodes have identical partitions when you finish! |
On both nodes, start the parted shell.
| an-a05n01 | an-a05n02 |
|---|---|
parted -a optimal /dev/sdaGNU Parted 2.1
Using /dev/sda
Welcome to GNU Parted! Type 'help' to view a list of commands. |
parted -a optimal /dev/sdaGNU Parted 2.1
Using /dev/sda
Welcome to GNU Parted! Type 'help' to view a list of commands. |
We're now in the parted console. Before we start, let's take another look at the current disk configuration along with the amount of free space available.
| an-a05n01 | an-a05n02 |
|---|---|
print freeModel: LSI RAID 5/6 SAS 6G (scsi)
Disk /dev/sda: 898GB
Sector size (logical/physical): 512B/512B
Partition Table: msdos
Number Start End Size Type File system Flags
32.3kB 1049kB 1016kB Free Space
1 1049kB 525MB 524MB primary ext4 boot
2 525MB 43.5GB 42.9GB primary ext4
3 43.5GB 47.8GB 4295MB primary linux-swap(v1)
47.8GB 898GB 851GB Free Space |
Before we can create the three DRBD partition, we first need to create an extended partition wherein which we will create the two logical partitions. From the output above, we can see that the free space starts at 47.8GB, and that the drive ends at 898GB. Knowing this, we can now create the extended partition.
| an-a05n01 | mkpart extended 47.8G 898GWarning: WARNING: the kernel failed to re-read the partition table on /dev/sda (Device or resource busy).
As a result, it may not reflect all of your changes until after reboot. |
|---|---|
| an-a05n02 | mkpart extended 47.8G 898GWarning: WARNING: the kernel failed to re-read the partition table on /dev/sda (Device or resource busy).
As a result, it may not reflect all of your changes until after reboot. |
Don't worry about that message, we will reboot when we finish.
So now we can confirm that the new extended partition was create by again printing the partition table and the free space.
| an-a05n01 | an-a05n02 |
|---|---|
print freeModel: LSI RAID 5/6 SAS 6G (scsi)
Disk /dev/sda: 898GB
Sector size (logical/physical): 512B/512B
Partition Table: msdos
Number Start End Size Type File system Flags
32.3kB 1049kB 1016kB Free Space
1 1049kB 525MB 524MB primary ext4 boot
2 525MB 43.5GB 42.9GB primary ext4
3 43.5GB 47.8GB 4295MB primary linux-swap(v1)
4 47.8GB 898GB 851GB extended lba
47.8GB 898GB 851GB Free Space |
Perfect. So now we're going to create our two logical partitions. We're going to use the same start position as last time, but the end position will be 540 GB further in, rounded up to an even ten gigabytes. You can be more precise, if you wish, but we've got a little wiggle room.
If you recall from the section above, this is how much space we determined we would need for the /shared partition and the five servers that will live on an-a05n01. This means that we're going to create a new logical partition that starts at 47.8G and ends at 590G, for a partition that is roughly 540 GB in size.
| an-a05n01 | mkpart logical 47.8G 590GWarning: WARNING: the kernel failed to re-read the partition table on /dev/sda
(Device or resource busy). As a result, it may not reflect all of your changes
until after reboot. |
|---|---|
| an-a05n02 | mkpart logical 47.8G 590GWarning: WARNING: the kernel failed to re-read the partition table on /dev/sda (Device or resource busy).
As a result, it may not reflect all of your changes until after reboot. |
We'll check again to see the new partition layout.
| an-a05n01 | an-a05n02 |
|---|---|
print freeModel: LSI RAID 5/6 SAS 6G (scsi)
Disk /dev/sda: 898GB
Sector size (logical/physical): 512B/512B
Partition Table: msdos
Number Start End Size Type File system Flags
32.3kB 1049kB 1016kB Free Space
1 1049kB 525MB 524MB primary ext4 boot
2 525MB 43.5GB 42.9GB primary ext4
3 43.5GB 47.8GB 4295MB primary linux-swap(v1)
4 47.8GB 898GB 851GB extended lba
5 47.8GB 590GB 542GB logical
590GB 898GB 308GB Free Space |
Again, perfect. Now we have a total of 308 GB left free. We need 300 GB, so this is enough, as expected. Lets allocate it all to our final partition.
| an-a05n01 | mkpart logical 590G 898GWarning: WARNING: the kernel failed to re-read the partition table on /dev/sda (Device or resource busy).
As a result, it may not reflect all of your changes until after reboot. |
|---|---|
| an-a05n02 | mkpart logical 590G 898GWarning: WARNING: the kernel failed to re-read the partition table on /dev/sda (Device or resource busy).
As a result, it may not reflect all of your changes until after reboot. |
Once again, lets look at the new partition table.
| an-a05n01 | an-a05n02 |
|---|---|
print freeModel: LSI RAID 5/6 SAS 6G (scsi)
Disk /dev/sda: 898GB
Sector size (logical/physical): 512B/512B
Partition Table: msdos
Number Start End Size Type File system Flags
32.3kB 1049kB 1016kB Free Space
1 1049kB 525MB 524MB primary ext4 boot
2 525MB 43.5GB 42.9GB primary ext4
3 43.5GB 47.8GB 4295MB primary linux-swap(v1)
4 47.8GB 898GB 851GB extended lba
5 47.8GB 590GB 542GB logical
6 590GB 898GB 308GB logical |
Just as we asked for!
Before we finish though, let's be extra careful and do a manual check of our new partitions to ensure that they are, in fact, aligned optimally. There will be no output from the following commands if the partitions are aligned.
| an-a05n01 | an-a05n02 |
|---|---|
align-check opt 5
align-check opt 6<no output> |
align-check opt 5
align-check opt 6<no output> |
Excellent, we're done!
| an-a05n01 | an-a05n02 |
|---|---|
quitInformation: You may need to update /etc/fstab. |
quitInformation: You may need to update /etc/fstab. |
Now we need to reboot to make the kernel see the new partition table. If cman is running, stop it before rebooting.
| an-a05n01 | an-a05n02 |
|---|---|
/etc/init.d/cman stopStopping cluster:
Leaving fence domain... [ OK ]
Stopping gfs_controld... [ OK ]
Stopping dlm_controld... [ OK ]
Stopping fenced... [ OK ]
Stopping cman... [ OK ]
Waiting for corosync to shutdown: [ OK ]
Unloading kernel modules... [ OK ]
Unmounting configfs... [ OK ]reboot |
/etc/init.d/cman stopStopping cluster:
Leaving fence domain... [ OK ]
Stopping gfs_controld... [ OK ]
Stopping dlm_controld... [ OK ]
Stopping fenced... [ OK ]
Stopping cman... [ OK ]
Waiting for corosync to shutdown: [ OK ]
Unloading kernel modules... [ OK ]
Unmounting configfs... [ OK ]reboot |
Once the nodes are back online, remember to start cman again.
Configuring DRBD
DRBD is configured in two parts:
- Global and common configuration options
- Resource configurations
We will be creating three separate DRBD resources, so we will create three separate resource configuration files. More on that in a moment.
Configuring DRBD Global and Common Options
As always, we're going to start by making backups. Then we're going to work on an-a05n01. After we finish, we'll copy everything over to an-a05n02.
| an-a05n01 | rsync -av /etc/drbd.d /root/backups/sending incremental file list
drbd.d/
drbd.d/global_common.conf
sent 1722 bytes received 35 bytes 3514.00 bytes/sec
total size is 1604 speedup is 0.91 |
|---|---|
| an-a05n02 | rsync -av /etc/drbd.d /root/backups/sending incremental file list
drbd.d/
drbd.d/global_common.conf
sent 1722 bytes received 35 bytes 3514.00 bytes/sec
total size is 1604 speedup is 0.91 |
Now we can begin.
The first file to edit is /etc/drbd.d/global_common.conf. In this file, we will set global configuration options and set default resource configuration options.
We'll talk about the values we're setting here as well as put the explanation of each option in the configuration file itself, as it will be useful to have them should you need to alter the files sometime in the future.
The first addition is in the handlers { } directive. We're going to add the fence-peer option and configure it to use the obliterate-peer.sh script we spoke about earlier in the DRBD section.
| an-a05n01 | vim /etc/drbd.d/global_common.conf handlers {
# This script is a wrapper for RHCS's 'fence_node' command line
# tool. It will call a fence against the other node and return
# the appropriate exit code to DRBD.
fence-peer "/usr/lib/drbd/rhcs_fence";
} |
|---|
We're going to add three options to the startup { } directive; We're going to tell DRBD to make both nodes "primary" on start, to wait five minutes on start for its peer to connect and, if the peer never connected last time, to wait onto two minutes.
| an-a05n01 | startup {
# This tells DRBD to promote both nodes to Primary on start.
become-primary-on both;
# This tells DRBD to wait five minutes for the other node to
# connect. This should be longer than it takes for cman to
# timeout and fence the other node *plus* the amount of time it
# takes the other node to reboot. If you set this too short,
# you could corrupt your data. If you want to be extra safe, do
# not use this at all and DRBD will wait for the other node
# forever.
wfc-timeout 300;
# This tells DRBD to wait for the other node for three minutes
# if the other node was degraded the last time it was seen by
# this node. This is a way to speed up the boot process when
# the other node is out of commission for an extended duration.
degr-wfc-timeout 120;
# Same as above, except this time-out is used if the peer was
# 'Outdated'.
outdated-wfc-timeout 120;
} |
|---|
For the disk { } directive, we're going to configure DRBD's behaviour when a split-brain is detected. By setting fencing to resource-and-stonith, we're telling DRBD to stop all disk access and call a fence against its peer node rather than proceeding.
| an-a05n01 | disk {
# This tells DRBD to block IO and fence the remote node (using
# the 'fence-peer' helper) when connection with the other node
# is unexpectedly lost. This is what helps prevent split-brain
# condition and it is incredible important in dual-primary
# setups!
fencing resource-and-stonith;
} |
|---|
In the net { } directive, we're going to tell DRBD that it is allowed to run in dual-primary mode and we're going to configure how it behaves if a split-brain has occurred, despite our best efforts. The recovery (or lack there of) requires three options; What to do when neither node had been primary (after-sb-0pri), what to do if only one node had been primary (after-sb-1pri) and finally, what to do if both nodes had been primary (after-sb-2pri), as will most likely be the case for us. This last instance will be configured to tell DRBD just to drop the connection, which will require human intervention to correct.
At this point, you might be wondering why we won't simply run Primary/Secondary. The reason is because of live-migration. When we push a VM across to the backup node, there is a short period of time where both nodes need to be writeable.
| an-a05n01 | net {
# This tells DRBD to allow two nodes to be Primary at the same
# time. It is needed when 'become-primary-on both' is set.
allow-two-primaries;
# The following three commands tell DRBD how to react should
# our best efforts fail and a split brain occurs. You can learn
# more about these options by reading the drbd.conf man page.
# NOTE! It is not possible to safely recover from a split brain
# where both nodes were primary. This care requires human
# intervention, so 'disconnect' is the only safe policy.
after-sb-0pri discard-zero-changes;
after-sb-1pri discard-secondary;
after-sb-2pri disconnect;
} |
|---|
For the syncer { } directive, we're going to configure how much bandwidth DRBD is allowed to take away from normal replication for use with background synchronization of out-of-sync blocks.
| an-a05n01 | syncer {
# This tells DRBD how fast to synchronize out-of-sync blocks.
# The higher this number, the faster an Inconsistent resource
# will get back to UpToDate state. However, the faster this is,
# the more of an impact normal application use of the DRBD
# resource will suffer. We'll set this to 30 MB/sec.
rate 30M;
} |
|---|
Save the changes and exit the text editor. Now let's use diff to see the changes we made.
| an-a05n01 | diff -U0 /root/backups/drbd.d/global_common.conf /etc/drbd.d/global_common.conf--- /root/backups/drbd.d/global_common.conf 2013-09-27 16:38:33.000000000 -0400
+++ /etc/drbd.d/global_common.conf 2013-10-31 01:08:13.733823523 -0400
@@ -22,0 +23,5 @@
+
+ # This script is a wrapper for RHCS's 'fence_node' command line
+ # tool. It will call a fence against the other node and return
+ # the appropriate exit code to DRBD.
+ fence-peer "/usr/lib/drbd/rhcs_fence";
@@ -26,0 +32,22 @@
+
+ # This tells DRBD to promote both nodes to Primary on start.
+ become-primary-on both;
+
+ # This tells DRBD to wait five minutes for the other node to
+ # connect. This should be longer than it takes for cman to
+ # timeout and fence the other node *plus* the amount of time it
+ # takes the other node to reboot. If you set this too short,
+ # you could corrupt your data. If you want to be extra safe, do
+ # not use this at all and DRBD will wait for the other node
+ # forever.
+ wfc-timeout 300;
+
+ # This tells DRBD to wait for the other node for three minutes
+ # if the other node was degraded the last time it was seen by
+ # this node. This is a way to speed up the boot process when
+ # the other node is out of commission for an extended duration.
+ degr-wfc-timeout 120;
+
+ # Same as above, except this time-out is used if the peer was
+ # 'Outdated'.
+ outdated-wfc-timeout 120;
@@ -31,0 +59,7 @@
+
+ # This tells DRBD to block IO and fence the remote node (using
+ # the 'fence-peer' helper) when connection with the other node
+ # is unexpectedly lost. This is what helps prevent split-brain
+ # condition and it is incredible important in dual-primary
+ # setups!
+ fencing resource-and-stonith;
@@ -37,0 +72,14 @@
+
+ # This tells DRBD to allow two nodes to be Primary at the same
+ # time. It is needed when 'become-primary-on both' is set.
+ allow-two-primaries;
+
+ # The following three commands tell DRBD how to react should
+ # our best efforts fail and a split brain occurs. You can learn
+ # more about these options by reading the drbd.conf man page.
+ # NOTE! It is not possible to safely recover from a split brain
+ # where both nodes were primary. This care requires human
+ # intervention, so 'disconnect' is the only safe policy.
+ after-sb-0pri discard-zero-changes;
+ after-sb-1pri discard-secondary;
+ after-sb-2pri disconnect;
@@ -41,0 +90,7 @@
+
+ # This tells DRBD how fast to synchronize out-of-sync blocks.
+ # The higher this number, the faster an Inconsistent resource
+ # will get back to UpToDate state. However, the faster this is,
+ # the more of an impact normal application use of the DRBD
+ # resource will suffer. We'll set this to 30 MB/sec.
+ rate 30M; |
|---|
Done with this file.
Configuring the DRBD Resources
As mentioned earlier, we are going to create two DRBD resources:
- Resource r0, which will create the device /dev/drbd0 and be backed by each node's /dev/sda5 partition. It will provide disk space for VMs that will normally run on an-a05n01 and provide space for the /shared GFS2 partition.
- Resource r1, which will create the device /dev/drbd1 and be backed by each node's /dev/sda6 partition. It will provide disk space for VMs that will normally run on an-a05n02.
Each resource configuration will be in its own file saved as /etc/drbd.d/rX.res. The two of them will be pretty much the same. So let's take a look at the first resource, r0.res, then we'll just look at the changes for r1.res. These files won't exist initially so we start by creating them.
| an-a05n01 | vim /etc/drbd.d/r0.res# This is the resource used for the shared GFS2 partition and host VMs designed
# to run on an-a05n01.
resource r0 {
# This is the block device path.
device /dev/drbd0;
# We'll use the normal internal meta-disk. This is where DRBD stores
# its state information about the resource. It takes about 32 MB per
# 1 TB of raw space.
meta-disk internal;
# This is the `uname -n` of the first node
on an-a05n01.alteeve.ca {
# The 'address' has to be the IP, not a host name. This is the
# node's SN (sn_bond1) IP. The port number must be unique amoung
# resources.
address 10.10.50.1:7788;
# This is the block device backing this resource on this node.
disk /dev/sda5;
}
# Now the same information again for the second node.
on an-a05n02.alteeve.ca {
address 10.10.50.2:7788;
disk /dev/sda5;
}
} |
|---|
Now copy this to r1.res and edit for the an-a05n01 VM resource. The main differences are the resource name, r1, the block device, /dev/drbd1, the port, 7790 and the backing block devices, /dev/sda6.
| an-a05n01 | cp /etc/drbd.d/r0.res /etc/drbd.d/r1.res
vim /etc/drbd.d/r1.res# This is the resource used for the VMs designed to run on an-a05n02.
resource r1 {
# This is the block device path.
device /dev/drbd1;
# We'll use the normal internal meta-disk. This is where DRBD stores
# its state information about the resource. It takes about 32 MB per
# 1 TB of raw space.
meta-disk internal;
# This is the `uname -n` of the first node
on an-a05n01.alteeve.ca {
# The 'address' has to be the IP, not a host name. This is the
# node's SN (sn_bond1) IP. The port number must be unique amoung
# resources.
address 10.10.50.1:7789;
# This is the block device backing this resource on this node.
disk /dev/sda6;
}
# Now the same information again for the second node.
on an-a05n02.alteeve.ca {
address 10.10.50.2:7789;
disk /dev/sda6;
}
} |
|---|
It's easiest to see what changed between r0.res and r1.res if we diff them.
| an-a05n01 | diff -U0 /etc/drbd.d/r0.res /etc/drbd.d/r1.res--- /etc/drbd.d/r0.res 2013-10-30 21:26:31.936680235 -0400
+++ /etc/drbd.d/r1.res 2013-10-30 21:27:42.625006337 -0400
@@ -1,3 +1,2 @@
-# This is the resource used for the shared GFS2 partition and host VMs designed
-# to run on an-a05n01.
-resource r0 {
+# This is the resource used for the VMs designed to run on an-a05n02.
+resource r1 {
@@ -5 +4 @@
- device /dev/drbd0;
+ device /dev/drbd1;
@@ -17 +16 @@
- address 10.10.50.1:7788;
+ address 10.10.50.1:7789;
@@ -20 +19 @@
- disk /dev/sda5;
+ disk /dev/sda6;
@@ -24,2 +23,2 @@
- address 10.10.50.2:7788;
- disk /dev/sda5;
+ address 10.10.50.2:7789;
+ disk /dev/sda6; |
|---|
We can see easily that the resource name, device name and backing partitions changed. We can also see that the IP address used for each resource stayed the same. We split up the network traffic by using different TCP ports instead.
Now we will do an initial validation of the configuration. This is done by running the following command;
| an-a05n01 | drbdadm dump# /etc/drbd.conf
common {
protocol C;
net {
allow-two-primaries;
after-sb-0pri discard-zero-changes;
after-sb-1pri discard-secondary;
after-sb-2pri disconnect;
}
disk {
fencing resource-and-stonith;
}
syncer {
rate 30M;
}
startup {
wfc-timeout 300;
degr-wfc-timeout 120;
outdated-wfc-timeout 120;
become-primary-on both;
}
handlers {
fence-peer /usr/lib/drbd/rhcs_fence;
}
}
# resource r0 on an-a05n01.alteeve.ca: not ignored, not stacked
resource r0 {
on an-a05n01.alteeve.ca {
device /dev/drbd0 minor 0;
disk /dev/sda5;
address ipv4 10.10.50.1:7788;
meta-disk internal;
}
on an-a05n02.alteeve.ca {
device /dev/drbd0 minor 0;
disk /dev/sda5;
address ipv4 10.10.50.2:7788;
meta-disk internal;
}
}
# resource r1 on an-a05n01.alteeve.ca: not ignored, not stacked
resource r1 {
on an-a05n01.alteeve.ca {
device /dev/drbd1 minor 1;
disk /dev/sda6;
address ipv4 10.10.50.1:7789;
meta-disk internal;
}
on an-a05n02.alteeve.ca {
device /dev/drbd1 minor 1;
disk /dev/sda6;
address ipv4 10.10.50.2:7789;
meta-disk internal;
}
} |
|---|
You'll note that the output is formatted differently from the configuration files we created, but the values themselves are the same. If there had of been errors, you would have seen them printed. Fix any problems before proceeding. Once you get a clean dump, copy the configuration over to the other node.
| an-a05n01 | rsync -av /etc/drbd.d root@an-a05n02:/etc/sending incremental file list
drbd.d/
drbd.d/global_common.conf
drbd.d/r0.res
drbd.d/r1.res
sent 5015 bytes received 91 bytes 10212.00 bytes/sec
total size is 5479 speedup is 1.07 |
|---|
Done!
Initializing the DRBD Resources
Now that we have DRBD configured, we need to initialize the DRBD backing devices and then bring up the resources for the first time.
| Note: To save a bit of time and typing, the following sections will use a little bash magic. When commands need to be run on both resources, rather than running the same command twice with the different resource names, we will use the short-hand form r{0,1}. |
On both nodes, create the new metadata on the backing devices.
Two notes:
- You may need to type yes to confirm the action if any data is seen.
- If DRBD sees an actual file system, it will error and insist that you clear the partition. You can do this by running; dd if=/dev/zero of=/dev/sdaX bs=4M count=1000, where X is the partition you want to clear. This is called "zeroing out" a partition. The dd program does not print its progress. To check the progress, open a new terminal to the node and run 'kill -USR1 $(pidof dd)'.
Lets create the meta-data!
| an-a05n01 | an-a05n02 |
|---|---|
drbdadm create-md r{0,1}Writing meta data...
initializing activity log
NOT initialized bitmap
New drbd meta data block successfully created.
success
Writing meta data...
initializing activity log
NOT initialized bitmap
New drbd meta data block successfully created.
success |
drbdadm create-md r{0,1}Writing meta data...
initializing activity log
NOT initialized bitmap
New drbd meta data block successfully created.
success
Writing meta data...
initializing activity log
NOT initialized bitmap
New drbd meta data block successfully created.
success |
If you get an error like this;
pvs stderr: Skipping volume group an-a05n01-vg0
pvs stderr: Freeing VG (null) at 0x16efd20.
pvs stderr: Unlocking /var/lock/lvm/P_global
pvs stderr: _undo_flock /var/lock/lvm/P_global
md_offset 542229131264
al_offset 542229098496
bm_offset 542212550656
Found LVM2 physical volume signature
529504444 kB left usable by current configuration
Could not determine the size of the actually used data area.
Device size would be truncated, which
would corrupt data and result in
'access beyond end of device' errors.
If you want me to do this, you need to zero out the first part
of the device (destroy the content).
You should be very sure that you mean it.
Operation refused.
Command 'drbdmeta 0 v08 /dev/sda5 internal create-md' terminated with exit code 40
drbdadm create-md r0: exited with code 40| Warning: The next two commands will irrevocably destroy the data on /dev/sda5 and /dev/sda6! |
Use dd on the backing device to destroy all existing data.
dd if=/dev/zero of=/dev/sda5 bs=4M count=10001000+0 records in
1000+0 records out
4194304000 bytes (4.2 GB) copied, 9.04352 s, 464 MB/sdd if=/dev/zero of=/dev/sda6 bs=4M count=10001000+0 records in
1000+0 records out
4194304000 bytes (4.2 GB) copied, 9.83831 s, 426 MB/sTry running the create-md commands again, it should work this time.
Loading the drbd Kernel Module
Before we can go any further, we'll need to load the drbd kernel module. Normally you won't normally need to do this because the /etc/init.d/drbd initializations script handles this for us. We can't use this yet though because the DRBD resource we defined are not yet setup.
So to load the drbd kernel module, run;
| an-a05n01 | modprobe drbdLog messages: Oct 30 22:45:45 an-a05n01 kernel: drbd: initialized. Version: 8.3.16 (api:88/proto:86-97)
Oct 30 22:45:45 an-a05n01 kernel: drbd: GIT-hash: a798fa7e274428a357657fb52f0ecf40192c1985 build by phil@Build64R6, 2013-09-27 16:00:43
Oct 30 22:45:45 an-a05n01 kernel: drbd: registered as block device major 147
Oct 30 22:45:45 an-a05n01 kernel: drbd: minor_table @ 0xffff8803374420c0 |
|---|---|
| an-a05n02 | modprobe drbdLog messages: Oct 30 22:45:51 an-a05n02 kernel: drbd: initialized. Version: 8.3.16 (api:88/proto:86-97)
Oct 30 22:45:51 an-a05n02 kernel: drbd: GIT-hash: a798fa7e274428a357657fb52f0ecf40192c1985 build by phil@Build64R6, 2013-09-27 16:00:43
Oct 30 22:45:51 an-a05n02 kernel: drbd: registered as block device major 147
Oct 30 22:45:51 an-a05n02 kernel: drbd: minor_table @ 0xffff8803387a9ec0 |
Now go back to the terminal windows we were using to watch the cluster start. Kill the tail, if it's still running. We're going to watch the output of cat /proc/drbd so we can keep tabs on the current state of the DRBD resources. We'll do this by using the watch program, which will refresh the output of the cat call every couple of seconds.
| an-a05n01 | watch cat /proc/drbdversion: 8.3.16 (api:88/proto:86-97)
GIT-hash: a798fa7e274428a357657fb52f0ecf40192c1985 build by phil@Build64R6, 2013-09-27 16:00:43 |
|---|---|
| an-a05n02 | watch cat /proc/drbdversion: 8.3.16 (api:88/proto:86-97)
GIT-hash: a798fa7e274428a357657fb52f0ecf40192c1985 build by phil@Build64R6, 2013-09-27 16:00:43 |
Back in the first terminal, we need now to attach each resource's backing device, /dev/sda{5,6}, to their respective DRBD resources, r{0,1}. After running the following command, you will see no output on the first terminal, but the second terminal's /proc/drbd should change.
| an-a05n01 | drbdadm attach r{0,1}Output from /proc/drbd version: 8.3.16 (api:88/proto:86-97)
GIT-hash: a798fa7e274428a357657fb52f0ecf40192c1985 build by phil@Build64R6, 2013-09-27 16:00:43
0: cs:StandAlone ro:Secondary/Unknown ds:Inconsistent/DUnknown r----s
ns:0 nr:0 dw:0 dr:0 al:0 bm:0 lo:0 pe:0 ua:0 ap:0 ep:1 wo:f oos:529504444
1: cs:StandAlone ro:Secondary/Unknown ds:Inconsistent/DUnknown r----s
ns:0 nr:0 dw:0 dr:0 al:0 bm:0 lo:0 pe:0 ua:0 ap:0 ep:1 wo:f oos:301082612 |
|---|---|
| an-a05n02 | drbdadm attach r{0,1}Output from /proc/drbd version: 8.3.16 (api:88/proto:86-97)
GIT-hash: a798fa7e274428a357657fb52f0ecf40192c1985 build by phil@Build64R6, 2013-09-27 16:00:43
0: cs:StandAlone ro:Secondary/Unknown ds:Inconsistent/DUnknown r----s
ns:0 nr:0 dw:0 dr:0 al:0 bm:0 lo:0 pe:0 ua:0 ap:0 ep:1 wo:f oos:529504444
1: cs:StandAlone ro:Secondary/Unknown ds:Inconsistent/DUnknown r----s
ns:0 nr:0 dw:0 dr:0 al:0 bm:0 lo:0 pe:0 ua:0 ap:0 ep:1 wo:f oos:301082612 |
Take note of the connection state, cs:StandAlone, the current role, ro:Secondary/Unknown and the disk state, ds:Inconsistent/DUnknown. This tells us that our resources are not talking to one another, are not usable because they are in the Secondary state (you can't even read the /dev/drbdX device) and that the backing device does not have an up to date view of the data.
This all makes sense of course, as the resources are brand new.
So the next step is to connect the two nodes together. As before, we won't see any output from the first terminal, but the second terminal will change.
| Note: After running the following command on the first node, its connection state will become cs:WFConnection which means that it is waiting for a connection from the other node. |
| an-a05n01 | drbdadm connect r{0,1}Output from /proc/drbd version: 8.3.16 (api:88/proto:86-97)
GIT-hash: a798fa7e274428a357657fb52f0ecf40192c1985 build by phil@Build64R6, 2013-09-27 16:00:43
0: cs:Connected ro:Secondary/Secondary ds:Inconsistent/Inconsistent C r-----
ns:0 nr:0 dw:0 dr:0 al:0 bm:0 lo:0 pe:0 ua:0 ap:0 ep:1 wo:f oos:529504444
1: cs:Connected ro:Secondary/Secondary ds:Inconsistent/Inconsistent C r-----
ns:0 nr:0 dw:0 dr:0 al:0 bm:0 lo:0 pe:0 ua:0 ap:0 ep:1 wo:f oos:301082612 |
|---|---|
| an-a05n02 | drbdadm connect r{0,1}Output from /proc/drbd GIT-hash: a798fa7e274428a357657fb52f0ecf40192c1985 build by phil@Build64R6, 2013-09-27 16:00:43
0: cs:Connected ro:Secondary/Secondary ds:Inconsistent/Inconsistent C r-----
ns:0 nr:0 dw:0 dr:0 al:0 bm:0 lo:0 pe:0 ua:0 ap:0 ep:1 wo:f oos:529504444
1: cs:Connected ro:Secondary/Secondary ds:Inconsistent/Inconsistent C r-----
ns:0 nr:0 dw:0 dr:0 al:0 bm:0 lo:0 pe:0 ua:0 ap:0 ep:1 wo:f oos:301082612 |
We can now see that the two nodes are talking to one another properly as the connection state has changed to cs:Connected. They can see that their peer node is in the same state as they are; Secondary/Inconsistent.
Next step is to synchronize the two nodes. Neither node has any real data, so it's entirely arbitrary which node we choose to use here. We'll use an-a05n01 because, well, why not.
| an-a05n01 | drbdadm -- --overwrite-data-of-peer primary r{0,1}Output from /proc/drbd version: 8.3.16 (api:88/proto:86-97)
GIT-hash: a798fa7e274428a357657fb52f0ecf40192c1985 build by phil@Build64R6, 2013-09-27 16:00:43
0: cs:SyncSource ro:Primary/Secondary ds:UpToDate/Inconsistent C r-----
ns:11467520 nr:0 dw:0 dr:11468516 al:0 bm:699 lo:0 pe:0 ua:0 ap:0 ep:1 wo:f oos:518036924
[>....................] sync'ed: 2.2% (505892/517092)M
finish: 7:03:30 speed: 20,372 (13,916) K/sec
1: cs:SyncSource ro:Primary/Secondary ds:UpToDate/Inconsistent C r-----
ns:10833792 nr:0 dw:0 dr:10834788 al:0 bm:661 lo:0 pe:0 ua:0 ap:0 ep:1 wo:f oos:290248820
[>....................] sync'ed: 3.6% (283444/294024)M
finish: 7:31:03 speed: 10,720 (13,144) K/sec |
|---|---|
| an-a05n02 | # don't run anything here.Output from /proc/drbd version: 8.3.16 (api:88/proto:86-97)
GIT-hash: a798fa7e274428a357657fb52f0ecf40192c1985 build by phil@Build64R6, 2013-09-27 16:00:43
0: cs:SyncTarget ro:Secondary/Primary ds:Inconsistent/UpToDate C r-----
ns:0 nr:11467520 dw:11467520 dr:0 al:0 bm:699 lo:0 pe:0 ua:0 ap:0 ep:1 wo:f oos:518036924
[>....................] sync'ed: 2.2% (505892/517092)M
finish: 8:42:19 speed: 16,516 (13,796) want: 30,720 K/sec
1: cs:SyncTarget ro:Secondary/Primary ds:Inconsistent/UpToDate C r-----
ns:0 nr:11061120 dw:11061120 dr:0 al:0 bm:675 lo:0 pe:0 ua:0 ap:0 ep:1 wo:f oos:290021492
[>....................] sync'ed: 3.7% (283224/294024)M
finish: 7:06:46 speed: 11,316 (13,308) want: 30,720 K/sec |
Excellent! This tells us that the data, as garbage as it is, is being sync'ed over to an-a05n02. DRBD doesn't know about data structures, all it cares about is that whatever is on the first node is identical to what is on the other node. This initial synchronization does this.
A few notes:
- There is a trick to short-circuit this which we used to use in the old tutorial, but we no longer recommend this. If you ever run an online verification of the resource, all the previously unsync'ed blocks will sync. So it's better to do it initially before the cluster is in production.
- If you notice that the sync speed is sitting at 250 K/sec, then DRBD isn't honouring the syncer { rate xxM; } value. Run drbdadm adjust all on one node at the sync speed should start to speed up.
- Sync speed is NOT replication speed! - This is a very common misunderstanding for new DRBD users. The sync speed we see here takes away from the speed available to applications writing to the DRBD resource. The slower this is, the faster your applications can write to DRBD. Conversely, the higher the sync speed, the slower your applications writing to disk will be. So keep this reasonably low. Generally, a good number is about 30% of the storage or network's fastest speed, whichever is slower. If in doubt, 30M is a safe starting value.
- If you manually adjust the syncer speed, it will not immediately change in /proc/drbd. It takes a while to change, be patient.
The good thing about DRBD is that we do not have to wait for the resources to be synchronized. So long as one of the resource is UpToDate, both nodes will work. If the Inconsistent node needs to read data, it will simply read it from its peer.
It is worth noting though; If the UpToDate node disconnects or disappears, the Inconsistent node will immediately demote to Secondary, making it unusable. This is the biggest reason for making the synchronization speed as high as we did. The cluster can not be considered redundant until both nodes are UpToDate.
So with this understood, let's get back to work. The resources can synchronize in the background.
In order for a DRBD resource to be usable, it has to be "promoted". Be default, DRBD resources start in the Secondary state. This means that it will receive changes from the peer, but no changes can be made. You can't even look at the contents of a Secondary resource. Why this is requires more time to discuss than we can go into here.
So the next step is to promote both resource on both nodes.
| an-a05n01 | drbdadm primary r{0,1}Output from /proc/drbd version: 8.3.16 (api:88/proto:86-97)
GIT-hash: a798fa7e274428a357657fb52f0ecf40192c1985 build by phil@Build64R6, 2013-09-27 16:00:43
0: cs:SyncSource ro:Primary/Primary ds:UpToDate/Inconsistent C r-----
ns:20010808 nr:0 dw:0 dr:20011804 al:0 bm:1221 lo:0 pe:0 ua:0 ap:0 ep:1 wo:f oos:509493692
[>....................] sync'ed: 3.8% (497552/517092)M
finish: 9:01:50 speed: 15,660 (14,680) K/sec
1: cs:SyncSource ro:Primary/Primary ds:UpToDate/Inconsistent C r-----
ns:18860984 nr:0 dw:0 dr:18861980 al:0 bm:1151 lo:0 pe:0 ua:0 ap:0 ep:1 wo:f oos:282221684
[>...................] sync'ed: 6.3% (275604/294024)M
finish: 2:31:28 speed: 31,036 (13,836) K/sec |
|---|---|
| an-a05n02 | drbdadm primary r{0,1}Output from /proc/drbd version: 8.3.16 (api:88/proto:86-97)
GIT-hash: a798fa7e274428a357657fb52f0ecf40192c1985 build by phil@Build64R6, 2013-09-27 16:00:43
0: cs:SyncTarget ro:Primary/Primary ds:Inconsistent/UpToDate C r-----
ns:0 nr:20010808 dw:20010752 dr:608 al:0 bm:1221 lo:0 pe:0 ua:0 ap:0 ep:1 wo:f oos:509493692
[>....................] sync'ed: 3.8% (497552/517092)M
finish: 11:06:52 speed: 12,724 (14,584) want: 30,720 K/sec
1: cs:SyncTarget ro:Primary/Primary ds:Inconsistent/UpToDate C r-----
ns:0 nr:19152824 dw:19152768 dr:608 al:0 bm:1168 lo:0 pe:0 ua:0 ap:0 ep:1 wo:f oos:281929844
[>...................] sync'ed: 6.4% (275320/294024)M
finish: 2:27:30 speed: 31,844 (13,956) want: 30,720 K/sec |
Notice how the roles have changed to ro:Primary/Primary? That tells us that DRBD is now ready to be used on both nodes!
At this point, we're done setting up DRBD!
| Note: Stopping DRBD while a synchronization is running is fine. When DRBD starts back up, it will pick up where it left off. |
Eventually, the next day in the case of our cluster, the synchronization will complete. This is what it looks like once it's finished. After this point, all application writes to the DRBD resources will get all the available performance your storage and network have to offer.
| an-a05n01 | cat /proc/drbdversion: 8.3.16 (api:88/proto:86-97)
GIT-hash: a798fa7e274428a357657fb52f0ecf40192c1985 build by phil@Build64R6, 2013-09-27 16:00:43
0: cs:Connected ro:Primary/Primary ds:UpToDate/UpToDate C r-----
ns:413259760 nr:0 dw:20 dr:413261652 al:1 bm:25224 lo:0 pe:0 ua:0 ap:0 ep:1 wo:f oos:0
1: cs:Connected ro:Primary/Primary ds:UpToDate/UpToDate C r-----
ns:188464424 nr:0 dw:20 dr:188465928 al:1 bm:11504 lo:0 pe:0 ua:0 ap:0 ep:1 wo:f oos:0 |
|---|---|
| an-a05n02 | cat /proc/drbdversion: 8.3.16 (api:88/proto:86-97)
GIT-hash: a798fa7e274428a357657fb52f0ecf40192c1985 build by phil@Build64R6, 2013-09-27 16:00:43
0: cs:Connected ro:Primary/Primary ds:UpToDate/UpToDate C r-----
ns:0 nr:413259760 dw:413259600 dr:944 al:0 bm:25224 lo:0 pe:0 ua:0 ap:0 ep:1 wo:f oos:0
1: cs:Connected ro:Primary/Primary ds:UpToDate/UpToDate C r-----
ns:0 nr:188464424 dw:188464264 dr:876 al:0 bm:11504 lo:0 pe:0 ua:0 ap:0 ep:1 wo:f oos:0 |
In the next section, we're going to start working on clvmd. You will want to stop watch'ing cat /proc/drbd and go back to tail'ing /var/log/messages now.
Initializing Clustered Storage
Before we can provision the first virtual machine, we must first create the storage that will back them. This will take a few steps:
- Configuring LVM's clustered locking and creating the PVs, VGs and LVs
- Formatting and configuring the shared GFS2 partition.
- Adding storage to the cluster's resource management.
Clustered Logical Volume Management
We will assign all three DRBD resources to be managed by clustered LVM. This isn't strictly needed for the GFS2 partition, as it uses DLM directly. However, the flexibility of LVM is very appealing, and will make later growth of the GFS2 partition quite trivial, should the need arise.
The real reason for clustered LVM in our cluster is to provide DLM-backed locking to the partitions, or logical volumes in LVM, that will be used to back our VMs. Of course, the flexibility of LVM managed storage is enough of a win to justify using LVM for our VMs in itself, and shouldn't be ignored here.
Configuring Clustered LVM Locking
| Note: We're going to edit the configuration on an-a05n01. When we're done, we'll copy the configuration files to an-a05n02. |
Before we create the clustered LVM, we need to first make three changes to the LVM configuration:
- We need to filter out the DRBD backing devices so that LVM doesn't see the same signature a second time on the DRBD resource's backing device.
- Switch from local locking to clustered locking.
- Prevent fall-back to local locking when the cluster is not available.
Start by making a backup of lvm.conf and then begin editing it.
| an-a05n01 | an-a05n02 |
|---|---|
rsync -av /etc/lvm /root/backups/sending incremental file list
lvm/
lvm/lvm.conf
lvm/archive/
lvm/backup/
lvm/cache/
sent 37728 bytes received 47 bytes 75550.00 bytes/sec
total size is 37554 speedup is 0.99 |
rsync -av /etc/lvm /root/backups/sending incremental file list
lvm/
lvm/lvm.conf
lvm/archive/
lvm/backup/
lvm/cache/
sent 37728 bytes received 47 bytes 75550.00 bytes/sec
total size is 37554 speedup is 0.99 |
Now we're ready to edit lvm.conf.
| an-a05n01 | vim /etc/lvm/lvm.conf |
|---|
The configuration option to filter out the DRBD backing device is, surprisingly, filter = [ ... ]. By default, it is set to allow everything via the "a/.*/" regular expression. We're only using DRBD in our LVM, so we're going to flip that to reject everything except DRBD by changing the regex to "a|/dev/drbd*|", "r/.*/".
| an-a05n01 | # We're only using LVM on DRBD resource.
filter = [ "a|/dev/drbd*|", "r/.*/" ] |
|---|
For the locking, we're going to change the locking_type from 1 (local locking) to 3, (clustered locking). This is what tells LVM to use DLM and gives us the "clustered" in clvm.
| an-a05n01 | locking_type = 3 |
|---|
Lastly, we're also going to disallow fall-back to local locking. Normally, LVM would try to access a clustered LVM VG using local locking if DLM is not available. We want to prevent any access to the clustered LVM volumes except when the DLM is itself running. This is done by changing fallback_to_local_locking to 0.
| an-a05n01 | fallback_to_local_locking = 0 |
|---|
Save the changes, then lets run a diff against our backup to see a summary of the changes.
| an-a05n01 | diff -U0 /root/backups/lvm/lvm.conf /etc/lvm/lvm.conf--- /root/backups/lvm/lvm.conf 2013-10-10 09:40:04.000000000 -0400
+++ /etc/lvm/lvm.conf 2013-10-31 00:21:36.196228144 -0400
@@ -67,2 +67,2 @@
- # By default we accept every block device:
- filter = [ "a/.*/" ]
+ # We're only using LVM on DRBD resource.
+ filter = [ "a|/dev/drbd*|", "r/.*/" ]
@@ -408 +408 @@
- locking_type = 1
+ locking_type = 3
@@ -424 +424 @@
- fallback_to_local_locking = 1
+ fallback_to_local_locking = 0 |
|---|
Perfect! Now copy the modified lvm.conf file to the other node.
| an-a05n01 | rsync -av /etc/lvm/lvm.conf root@an-a05n02:/etc/lvm/sending incremental file list
lvm.conf
sent 2399 bytes received 355 bytes 5508.00 bytes/sec
total size is 37569 speedup is 13.64 |
|---|
Testing the clvmd Daemon
A little later on, we're going to put clustered LVM under the control of rgmanager. Before we can do that though, we need to start it manually so that we can use it to create the LV that will back the GFS2 /shared partition. We will also be adding this partition to rgmanager, once it has been created.
Before we start the clvmd daemon, we'll want to ensure that the cluster is running.
| an-a05n01 | cman_tool nodesNode Sts Inc Joined Name
1 M 64 2013-10-30 22:40:07 an-a05n01.alteeve.ca
2 M 64 2013-10-30 22:40:07 an-a05n02.alteeve.ca |
|---|
It is, and both nodes are members. We can start the clvmd daemon now.
| an-a05n01 | an-a05n02 |
|---|---|
/etc/init.d/clvmd startStarting clvmd:
Activating VG(s): No volume groups found
[ OK ] |
/etc/init.d/clvmd startStarting clvmd:
Activating VG(s): No volume groups found
[ OK ] |
We've not created any volume groups yet, so that complaint about not finding any is expected.
We can now use dlm_tool to verify that a DLM lock space has been created for clvmd. If it has, we're good to go.
| an-a05n01 | an-a05n02 |
|---|---|
dlm_tool lsdlm lockspaces
name clvmd
id 0x4104eefa
flags 0x00000000
change member 2 joined 1 remove 0 failed 0 seq 2,2
members 1 2 |
dlm_tool lsdlm lockspaces
name clvmd
id 0x4104eefa
flags 0x00000000
change member 2 joined 1 remove 0 failed 0 seq 1,1
members 1 2 |
Looking good!
Initialize our DRBD Resource for use as LVM PVs
This is the first time we're actually going to use DRBD and clustered LVM, so we need to make sure that both are started.
First, check drbd.
| an-a05n01 | /etc/init.d/drbd statusdrbd driver loaded OK; device status:
version: 8.3.16 (api:88/proto:86-97)
GIT-hash: a798fa7e274428a357657fb52f0ecf40192c1985 build by phil@Build64R6, 2013-09-27 16:00:43
m:res cs ro ds p mounted fstype
... sync'ed: 19.4% (416880/517092)M
... sync'ed: 32.4% (198972/294024)M
0:r0 SyncSource Primary/Primary UpToDate/Inconsistent C
1:r1 SyncSource Primary/Primary UpToDate/Inconsistent C |
|---|---|
| an-a05n02 | /etc/init.d/drbd statusdrbd driver loaded OK; device status:
version: 8.3.16 (api:88/proto:86-97)
GIT-hash: a798fa7e274428a357657fb52f0ecf40192c1985 build by phil@Build64R6, 2013-09-27 16:00:43
m:res cs ro ds p mounted fstype
... sync'ed: 19.4% (416880/517092)M
... sync'ed: 32.4% (198956/294024)M
0:r0 SyncTarget Primary/Primary Inconsistent/UpToDate C
1:r1 SyncTarget Primary/Primary Inconsistent/UpToDate C |
It's up and both resources are Primary/Primary, so we're ready.
Now to check on clvmd.
| an-a05n01 | /etc/init.d/clvmd statusclvmd (pid 13936) is running...
Clustered Volume Groups: (none)
Active clustered Logical Volumes: (none) |
|---|---|
| an-a05n02 | /etc/init.d/clvmd statusclvmd (pid 13894) is running...
Clustered Volume Groups: (none)
Active clustered Logical Volumes: (none) |
It's up and running. As we did earlier, we can also verify with dlm_tool ls if we wish.
Before we can use LVM, clustered or otherwise, we need to initialize one or more raw storage devices called "Physical Volumes". This is done using the pvcreate command. We're going to do this on an-a05n01, then run pvscan on an-a05n02. We should see the newly initialized DRBD resources appear.
First, let's verify that, indeed, we have no existing PVs. We'll do this with pvscan, a tool that looks at blocks devices for physical volumes it may not yet have seen.
Running pvscan first, we'll see that no PVs have been created.
| an-a05n01 | pvscan No matching physical volumes found |
|---|---|
| an-a05n02 | pvscan No matching physical volumes found |
Now we'll run pvcreate on an-a05n01 against both DRBD devices. This will "sign" the devices and tell LVM that it can use them in VGs we'll soon create. On the other node, we'll run pvdisplay. If The "clustered" part of clvmd is working, an-a05n02 should immediately know about the new PVs without needing another pvscan.
| an-a05n01 | pvcreate /dev/drbd{0,1} Physical volume "/dev/drbd0" successfully created
Physical volume "/dev/drbd1" successfully created |
|---|---|
| an-a05n02 | pvdisplay "/dev/drbd0" is a new physical volume of "504.97 GiB"
--- NEW Physical volume ---
PV Name /dev/drbd0
VG Name
PV Size 504.97 GiB
Allocatable NO
PE Size 0
Total PE 0
Free PE 0
Allocated PE 0
PV UUID w2mbVu-7R3P-6j6t-Jpyd-M3SA-tzZt-kRj6uY
"/dev/drbd1" is a new physical volume of "287.13 GiB"
--- NEW Physical volume ---
PV Name /dev/drbd1
VG Name
PV Size 287.13 GiB
Allocatable NO
PE Size 0
Total PE 0
Free PE 0
Allocated PE 0
PV UUID ELfiwP-ZqPT-OMSy-SD26-Jmt0-CTB3-z3CTmP |
If this was normal LVM, an-a05n02 would not have seen the new PVs. Because DRBD replicated the changes and clustered LVM alerted the peer though, it immediately knew about the changes.
Pretty neat!
Creating Cluster Volume Groups
As with initializing the DRBD resource above, we will create our volume groups, called VGs, on an-a05n01 only. As with the PVs, we will again be able to see them on both nodes immediately.
Let's verify that no previously-unseen VGs exist using the vgscan command.
| an-a05n01 | vgscan Reading all physical volumes. This may take a while...
No volume groups found |
|---|---|
| an-a05n02 | vgscan Reading all physical volumes. This may take a while...
No volume groups found |
Now to create the VGs, we'll use the vgcreate command with the -c y switch, which tells LVM to make the VG a clustered VG. Note that when the clvmd daemon is running, -c y is implied. However, it's best to get into the habit of being extra careful and thorough. If there was a problem, like clvmd not being running for example, it will trigger an error and we avoid hassles later.
| Note: If you plan to use the cluster dashboard, it is important that the volume group names match those below. If you do not do this, you may have trouble provisioning new servers via the dashboard's user interface. |
We're going to use the volume group naming convention of:
- <node>_vgX
- The <node> matches the node that will become home to the servers using this storage pool.
- The vgX is a simple sequence, starting at 0. If you ever need to add space to an existing storage pool, you can create a new DRBD resource, sign it as a PV and either assign it directly to the existing volume group or increment this number and create a second storage pool for the associated node.
Earlier, while planning our partition sizes, we decided that /dev/drbd0 would back the servers designed to run on an-a05n01. So we'll create a volume group called an-a05n01_vg0 that uses the /dev/drbd0 physical volume.
Likewise, we decided that /etc/drbd1 would be used for the servers designed to run on an-a05n02. So we'll create a volume group called an-a05n02_vg0.
On an-a05n01, create both of our new VGs!
| an-a05n01 | vgcreate -c y an-a05n01_vg0 /dev/drbd0
vgcreate -c y an-a05n02_vg0 /dev/drbd1 Clustered volume group "an-a05n01_vg0" successfully created
Clustered volume group "an-a05n02_vg0" successfully created |
|---|---|
| an-a05n02 | vgdisplay --- Volume group ---
VG Name an-a05n02_vg0
System ID
Format lvm2
Metadata Areas 1
Metadata Sequence No 1
VG Access read/write
VG Status resizable
Clustered yes
Shared no
MAX LV 0
Cur LV 0
Open LV 0
Max PV 0
Cur PV 1
Act PV 1
VG Size 287.13 GiB
PE Size 4.00 MiB
Total PE 73506
Alloc PE / Size 0 / 0
Free PE / Size 73506 / 287.13 GiB
VG UUID 1h5Gzk-6UX6-xvUo-GWVH-ZMFM-YLop-dYiC7L
--- Volume group ---
VG Name an-a05n01_vg0
System ID
Format lvm2
Metadata Areas 1
Metadata Sequence No 1
VG Access read/write
VG Status resizable
Clustered yes
Shared no
MAX LV 0
Cur LV 0
Open LV 0
Max PV 0
Cur PV 1
Act PV 1
VG Size 504.97 GiB
PE Size 4.00 MiB
Total PE 129273
Alloc PE / Size 0 / 0
Free PE / Size 129273 / 504.97 GiB
VG UUID TzKBFn-xBVB-e9AP-iL1l-AvQi-mZiV-86KnSF |
Good! Now as a point of note, let's look again at pvdisplay on an-a05n01 (we know it will be the same on an-a05n02).
| an-a05n01 | pvdisplay --- Physical volume ---
PV Name /dev/drbd1
VG Name an-a05n02_vg0
PV Size 287.13 GiB / not usable 1.99 MiB
Allocatable yes
PE Size 4.00 MiB
Total PE 73506
Free PE 73506
Allocated PE 0
PV UUID ELfiwP-ZqPT-OMSy-SD26-Jmt0-CTB3-z3CTmP
--- Physical volume ---
PV Name /dev/drbd0
VG Name an-a05n01_vg0
PV Size 504.97 GiB / not usable 2.18 MiB
Allocatable yes
PE Size 4.00 MiB
Total PE 129273
Free PE 129273
Allocated PE 0
PV UUID w2mbVu-7R3P-6j6t-Jpyd-M3SA-tzZt-kRj6uY |
|---|
Notice now that VG Name has a value where it didn't before? This shows us that the PV has been allocated to a volume.
That's it for the volume groups!
Creating a Logical Volume
The last LVM step, for now, is to create a "logical volume" carved from the an-a05n01_vg0 volume group. This will be used in the next step as the volume for our /shared GFS2 partition.
Out of thoroughness, let's scan for any previously unseen logical volumes using lvscan.
| an-a05n01 | lvscan<nothing>
# nothing printed |
|---|---|
| an-a05n02 | lvscan# nothing printed |
None found, as expected. So let's create our 40 GB logical volume for our /shared GFS2 partition. We'll do this by specifying how large we want the new logical volume to be, what name we want to give it and what volume group to carve the space out of. The resulting logical volume will then be /dev/<vg>/<lv>. Here, we're taking space from an-a05n01 and we'll call this LV shared, so the resulting volume will be /dev/an-a05n01_vg0/shared.
| an-a05n01 | lvcreate -L 40G -n shared an-a05n01_vg0 Logical volume "shared" created |
|---|---|
| an-a05n02 | lvdisplay --- Logical volume ---
LV Path /dev/an-a05n01_vg0/shared
LV Name shared
VG Name an-a05n01_vg0
LV UUID f0w1J0-6aTz-0Bz0-SX57-pstr-g5qu-SAGGSS
LV Write Access read/write
LV Creation host, time an-a05n01.alteeve.ca, 2013-10-31 17:07:50 -0400
LV Status available
# open 0
LV Size 40.00 GiB
Current LE 10240
Segments 1
Allocation inherit
Read ahead sectors auto
- currently set to 256
Block device 253:0 |
Perfect. We can now create our GFS2 partition!
| Warning: Red Hat does NOT support using SELinux and GFS2 together. The principle reason for this is the performance degradation caused by the additional storage overhead required for SELinux to operate. We decided to enable SELinux in the Anvil! anyway because of how infrequently the partition is changed. In our case, performance is not a concern. However, if you need to be 100% in compliance with what Red Hat supports, you will need to disable SELinux. |
| Note: This section assumes that cman, drbd and clvmd are running. |
The GFS2-formatted /dev/an-a05n01_vg0/shared partition will be mounted at /shared on both nodes and it will be used for four main purposes:
- /shared/files; Storing files like ISO images needed when installing server operating systems and mounting "DVDs" into the virtual DVD-ROM drives.
- /shared/provision; Storing short scripts used to call virt-install which handles the creation of new servers.
- /shared/definitions; This is where the XML definition files which define the virtual hardware backing our servers will be kept. This is the most important directory as the cluster and dashboard will look here when starting, migrating and recovering servers.
- /shared/archive; This is used to store old copies of the XML definition files and provision scripts.
Formatting the logical volume is much like formatting a traditional file system on a traditional partition. There are a few extra arguments needed though. Lets look at them first.
The following switches will be used with our mkfs.gfs2 call:
- -p lock_dlm; This tells GFS2 to use DLM for its clustered locking.
- -j 2; This tells GFS2 to create two journals. This must match the number of nodes that will try to mount this partition at any one time.
- -t an-anvil-05:shared; This is the lock space name, which must be in the format <cluste_name>:<file-system_name>. The cluster_name must match the one in cluster.conf. The <file-system_name> has to be unique in the cluster, which is easy for us because we'll only have the one gfs2 file system.
Once we've formatted the partition, we'll use a program called gfs2_tool on an-a05n02 to query the new partition's superblock. We're going to use it shortly in some bash magic to pull out the UUID and feed it into a string formatted for /etc/fstab. More importantly here, it shows us that the second node sees the new file system.
| Note: Depending on the size of the new partition, this call could take a while to complete. Please be patient. |
| an-a05n01 | mkfs.gfs2 -p lock_dlm -j 2 -t an-anvil-05:shared /dev/an-a05n01_vg0/sharedThis will destroy any data on /dev/an-a05n01_vg0/shared.
It appears to contain: symbolic link to `../dm-0'Are you sure you want to proceed? [y/n] yDevice: /dev/an-a05n01_vg0/shared
Blocksize: 4096
Device Size 40.00 GB (10485760 blocks)
Filesystem Size: 40.00 GB (10485758 blocks)
Journals: 2
Resource Groups: 160
Locking Protocol: "lock_dlm"
Lock Table: "an-anvil-05:shared"
UUID: 774883e8-d0fe-a068-3969-4bb7dc679960 |
|---|---|
| an-a05n02 | gfs2_tool sb /dev/an-a05n01_vg0/shared all mh_magic = 0x01161970
mh_type = 1
mh_format = 100
sb_fs_format = 1801
sb_multihost_format = 1900
sb_bsize = 4096
sb_bsize_shift = 12
no_formal_ino = 2
no_addr = 23
no_formal_ino = 1
no_addr = 22
sb_lockproto = lock_dlm
sb_locktable = an-anvil-05:shared
uuid = 774883e8-d0fe-a068-3969-4bb7dc679960 |
Very nice.
Now, on both nodes, we need to create a mount point for the new file system and then we'll mount it on both nodes.
| an-a05n01 | mkdir /shared
mount /dev/an-a05n01_vg0/shared /shared/
df -hPFilesystem Size Used Avail Use% Mounted on
/dev/sda2 40G 1.7G 36G 5% /
tmpfs 12G 29M 12G 1% /dev/shm
/dev/sda1 485M 51M 409M 12% /boot
/dev/mapper/an--c05n01_vg0-shared 40G 259M 40G 1% /shared |
|---|---|
| an-a05n02 | mkdir /shared
mount /dev/an-a05n01_vg0/shared /shared/
df -hPFilesystem Size Used Avail Use% Mounted on
/dev/sda2 40G 1.7G 36G 5% /
tmpfs 12G 26M 12G 1% /dev/shm
/dev/sda1 485M 51M 409M 12% /boot
/dev/mapper/an--c05n01_vg0-shared 40G 259M 40G 1% /shared |
Note that the path under Filesystem is different from what we used when creating the GFS2 partition. This is an effect of Device Mapper, which is used by LVM to create symlinks to actual block device paths. If we look at our /dev/an-a05n01_vg0/shared device and the device from df, /dev/mapper/an--c05n01_vg0-shared, we'll see that they both point to the same actual block device.
| an-a05n01 | ls -lah /dev/an-a05n01_vg0/shared /dev/mapper/an--c05n01_vg0-sharedlrwxrwxrwx. 1 root root 7 Oct 31 17:07 /dev/an-a05n01_vg0/shared -> ../dm-0
lrwxrwxrwx. 1 root root 7 Oct 31 17:07 /dev/mapper/an--c05n01_vg0-shared -> ../dm-0 |
|---|
Note the l at the beginning of the files' mode? That tells us that these are links. The -> ../dm-0 shows where they point to. If we look at /dev/dm-0, we see its mode line begins with a b, telling us that it is an actual block device.
| an-a05n01 | ls -lah /dev/dm-0brw-rw----. 1 root disk 253, 0 Oct 31 17:27 /dev/dm-0 |
|---|
If you're curious, you can use dmsetup to gather more information about the device mapper devices. Let's take a look.
| an-a05n01 | dmsetup infoName: an--c05n01_vg0-shared
State: ACTIVE
Read Ahead: 256
Tables present: LIVE
Open count: 1
Event number: 0
Major, minor: 253, 0
Number of targets: 1
UUID: LVM-TzKBFnxBVBe9APiL1lAvQimZiV86KnSFf0w1J06aTz0Bz0SX57pstrg5quSAGGSS |
|---|
Here we see the link back to the LV.
| Warning: We're going to edit /etc/fstab. Breaking this file may leave your system unbootable! As always, practice on unimportant nodes until you are comfortable with this process. |
In order for the the /etc/init.d/gfs2 initialization script to work, it must be able to find the GFS partition in the file system table, /etc/fstab. The operating system reads this file when it is booting, looking for file systems to mount. As such, this is a critical system file and breaking it can leave a node either unable to boot, or booting into the single user recovery console.
So please proceed carefully.
First up, let's backup /etc/fstab.
| an-a05n01 | rsync -av /etc/fstab /root/backups/sending incremental file list
fstab
sent 878 bytes received 31 bytes 1818.00 bytes/sec
total size is 805 speedup is 0.89 |
|---|---|
| an-a05n02 | rsync -av /etc/fstab /root/backups/sending incremental file list
fstab
sent 878 bytes received 31 bytes 1818.00 bytes/sec
total size is 805 speedup is 0.89 |
Adding a new entry to the fstab requires a particularly crafted line. You can read about this in detail by typing man fstab. In short though, each line is made up of six space-separated values;
- This is the device (by path or by UUID). We will be using the partition's UUID here.
- This is the mount point for the file system. For this entry, that will be /shared.
- This tells the OS what file system this partition is. For us, we'll set gfs2.
- These are the mount options. Usually this is default which implies a set of option. We're going to add a couple other options to modify this, which we'll discuss shortly.
- This tells the dump program whether to back this file system up or not. It's not usually used except with ext2 or ext3 file systems. Even then, it's rarely used any more. We will set this to 0 which disables this.
- This last field sets the order in which boot-time fsck (file system checks) run. This file system is never available at boot, so the only sensible value here is 0.
With all this, we can now build our fstab entry.
First, we need to query the file system's UUID.
| an-a05n01 | gfs2_tool sb /dev/an-a05n01_vg0/shared uuidcurrent uuid = 774883e8-d0fe-a068-3969-4bb7dc679960 |
|---|
We only need the UUID, so let's filter out the parts we don't want by using awk, which splits a line up on spaces.
| an-a05n01 | gfs2_tool sb /dev/an-a05n01_vg0/shared uuid | awk '{ print $4; }'774883e8-d0fe-a068-3969-4bb7dc679960 |
|---|
We need to make sure that the UUID is lower-case. It is already, but we can make sure it's always lower case by using sed.
| an-a05n01 | gfs2_tool sb /dev/an-a05n01_vg0/shared uuid | awk '{ print $4; }' | sed -e "s/\(.*\)/\L\1\E/"774883e8-d0fe-a068-3969-4bb7dc679960 |
|---|
When specifying a device in /etc/fstab but UUID instead of using a device path, we need to prefix the entry with UUID=. We can expand on our sed call to do this.
| an-a05n01 | gfs2_tool sb /dev/an-a05n01_vg0/shared uuid | awk '{ print $4; }' | sed -e "s/\(.*\)/UUID=\L\1\E/"UUID=774883e8-d0fe-a068-3969-4bb7dc679960 |
|---|
Generally, all but the last two values are separated by tabs. We know that the second field is the mount point for this file system, which is /shared in this case. lets expand the sed call to add a tab followed by the mount point.
| an-a05n01 | gfs2_tool sb /dev/an-a05n01_vg0/shared uuid | awk '{ print $4; }' | sed -e "s/\(.*\)/UUID=\L\1\E\t\/shared/"UUID=774883e8-d0fe-a068-3969-4bb7dc679960 /shared |
|---|
The third entry is the file system type, gfs2 in our case. Let's add another tab and the gfs2 word.
| an-a05n01 | gfs2_tool sb /dev/an-a05n01_vg0/shared uuid | awk '{ print $4; }' | sed -e "s/\(.*\)/UUID=\L\1\E\t\/shared\tgfs2/"UUID=774883e8-d0fe-a068-3969-4bb7dc679960 /shared gfs2 |
|---|
Next up are the file system options. GFS2, being a clustered file system, requires cluster locking. Cluster locks are, relative to non-clustered internal locks, fairly slow. So we also want to reduce the number of writes that hit the partition. Normally, every time you look at a file or directory, a field called "access time", or "atime" for short, gets updated. This is actually a write, which would in turn require a DLM lock. Few people care about access times, so we're going to disable it for files and directories as well. We're to append a couple of option to help here; defaults,noatime,nodiratime. Let's add them to our growing sed call.
| an-a05n01 | gfs2_tool sb /dev/an-a05n01_vg0/shared uuid | awk '{ print $4; }' | sed -e "s/\(.*\)/UUID=\L\1\E\t\/shared\tgfs2\tdefaults,noatime,nodiratime/"UUID=774883e8-d0fe-a068-3969-4bb7dc679960 /shared gfs2 defaults,noatime,nodiratime |
|---|
All that is left now are the two last options. We're going to separate these with a single space. Let's finish off the fstab with one last addition to our sed.
| an-a05n01 | gfs2_tool sb /dev/an-a05n01_vg0/shared uuid | awk '{ print $4; }' | sed -e "s/\(.*\)/UUID=\L\1\E\t\/shared\tgfs2\tdefaults,noatime,nodiratime\t0 0/"UUID=774883e8-d0fe-a068-3969-4bb7dc679960 /shared gfs2 defaults,noatime,nodiratime 0 0 |
|---|
That's it!
Now, we can add it by simply copy and pasting this line into the file directly. Another bash trick though, as we say in the SSH section, is using bash redirection to append the output of one program onto the end of a file. We'll do a diff immediately after to see that the line was appended properly.
| Note: Be sure to use two >> brackets! A single ">" bracket says "overwrite". Two ">>" brackets says "append". |
| an-a05n01 | gfs2_tool sb /dev/an-a05n01_vg0/shared uuid | awk '/uuid =/ { print $4; }' | sed -e "s/\(.*\)/UUID=\L\1\E \/shared\t\tgfs2\tdefaults,noatime,nodiratime\t0 0/" >> /etc/fstab
diff -u /root/backups/fstab /etc/fstab--- /root/backups/fstab 2013-10-28 12:30:07.000000000 -0400
+++ /etc/fstab 2013-11-01 01:17:33.865210115 -0400
@@ -13,3 +13,4 @@
devpts /dev/pts devpts gid=5,mode=620 0 0
sysfs /sys sysfs defaults 0 0
proc /proc proc defaults 0 0
+UUID=774883e8-d0fe-a068-3969-4bb7dc679960 /shared gfs2 defaults,noatime,nodiratime 0 0 |
|---|---|
| an-a05n02 | gfs2_tool sb /dev/an-a05n01_vg0/shared uuid | awk '/uuid =/ { print $4; }' | sed -e "s/\(.*\)/UUID=\L\1\E \/shared\t\tgfs2\tdefaults,noatime,nodiratime\t0 0/" >> /etc/fstab
diff -u /root/backups/fstab /etc/fstab--- /root/backups/fstab 2013-10-28 12:18:04.000000000 -0400
+++ /etc/fstab 2013-11-01 01:14:39.035500695 -0400
@@ -13,3 +13,4 @@
devpts /dev/pts devpts gid=5,mode=620 0 0
sysfs /sys sysfs defaults 0 0
proc /proc proc defaults 0 0
+UUID=774883e8-d0fe-a068-3969-4bb7dc679960 /shared gfs2 defaults,noatime,nodiratime 0 0 |
This looks good. Note that for this diff, we used the -u option. This shows a couple lines on either side of the changes. We see the existing entries above the new one, so we know we didn't accidentally over-write the existing data.
Now we need to make sure that the /etc/init.d/gfs2 daemon can see the new partition. If it can, we know the /etc/fstab entry works properly.
| an-a05n01 | /etc/init.d/gfs2 statusConfigured GFS2 mountpoints:
/shared
Active GFS2 mountpoints:
/shared |
|---|---|
| an-a05n02 | /etc/init.d/gfs2 statusConfigured GFS2 mountpoints:
/shared
Active GFS2 mountpoints:
/shared |
That works.
The last test is to create our sub-directories we talked about earlier. We'll do this on an-a05n01, then we will do a simple ls on an-a05n02. If everything is working properly, we should see the new directories immediately.
| an-a05n01 | mkdir /shared/{definitions,provision,archive,files} |
|---|---|
| an-a05n02 | ls -lah /shared/total 40K
drwxr-xr-x. 6 root root 3.8K Nov 1 01:23 .
dr-xr-xr-x. 24 root root 4.0K Oct 31 21:02 ..
drwxr-xr-x. 2 root root 3.8K Nov 1 01:23 archive
drwxr-xr-x. 2 root root 3.8K Nov 1 01:23 definitions
drwxr-xr-x. 2 root root 3.8K Nov 1 01:23 files
drwxr-xr-x. 2 root root 3.8K Nov 1 01:23 provision |
Fantastic!
Our clustered storage is complete. The last thing we need to do is to move the clustered storage to rgmanager now.
Stopping All Clustered Storage Components
In the next step, we're going to put gfs2, clvmd and drbd under the cluster's control. Let's stop these daemons now so we can see them be started by rgmanager shortly.
| an-a05n01 | /etc/init.d/gfs2 stop && /etc/init.d/clvmd stop && /etc/init.d/drbd stopUnmounting GFS2 filesystem (/shared): [ OK ]
Deactivating clustered VG(s): 0 logical volume(s) in volume group "an-a05n02_vg0" now active
0 logical volume(s) in volume group "an-a05n01_vg0" now active
[ OK ]
Signaling clvmd to exit [ OK ]
clvmd terminated [ OK ]
Stopping all DRBD resources: . |
|---|---|
| an-a05n02 | /etc/init.d/gfs2 stop && /etc/init.d/clvmd stop && /etc/init.d/drbd stopUnmounting GFS2 filesystem (/shared): [ OK ]
Deactivating clustered VG(s): 0 logical volume(s) in volume group "an-a05n02_vg0" now active
clvmd not running on node an-a05n01.alteeve.ca
0 logical volume(s) in volume group "an-a05n01_vg0" now active
clvmd not running on node an-a05n01.alteeve.ca
[ OK ]
Signaling clvmd to exit [ OK ]
clvmd terminated [ OK ]
Stopping all DRBD resources: . |
Done.
Managing Storage In The Cluster
A little while back, we spoke about how the cluster is split into two components; cluster communication managed by cman and resource management provided by rgmanager. It is the later which we will now begin to configure.
In the cluster.conf, the rgmanager component is contained within the <rm /> element tags. Within this element are three types of child elements. They are:
- Fail-over Domains - <failoverdomains />;
- These are optional constraints which allow for control which nodes, and under what circumstances, services may run. When not used, a service will be allowed to run on any node in the cluster without constraints or ordering.
- Resources - <resources />;
- Within this element, available resources are defined. Simply having a resource here will not put it under cluster control. Rather, it makes it available for use in <service /> elements.
- Services - <service />;
- This element contains one or more parallel or series child-elements which are themselves references to <resources /> elements. When in parallel, the services will start and stop at the same time. When in series, the services start in order and stop in reverse order. We will also see a specialized type of service that uses the <vm /> element name, as you can probably guess, for creating virtual machine services.
We'll look at each of these components in more detail shortly.
A Note on Daemon Starting
| Note: Readers of the old tutorial will notice that libvirtd has been removed. We found that, in rare occasions, bleeding-edge client software, like modern versions of "Virtual Machine Manager" of Fedora workstations, connecting to the libvirtd daemon could cause it to crash. This didn't interfere with the servers, but the cluster would try to fail the storage stack, causing the service to enter a failed state. This left servers running, but it is a mess to clean up that is easily avoided by simply removing libvirtd from the storage stack. To address this, we will monitor the libvirtd as its own service. Should it fail, it will restart without impacting the storage daemons. |
There are four daemons we will be putting under cluster control:
- drbd; Replicated storage.
- clvmd; Clustered LVM.
- gfs2; Mounts and Unmounts configured GFS2 partition. We will manage this using the clusterfs resource agent.
- libvirtd; Enables access to the KVM hypervisor via the libvirtd suite of tools.
The reason we do not want to start these daemons with the system is so that we can let the cluster do it. This way, should any fail, the cluster will detect the failure and fail the entire service tree.
For example, lets say that drbd failed to start, rgmanager would fail the storage service and give up, rather than continue trying to start clvmd and the rest.
If we had left these daemons to start on boot, the failure of the drbd would not effect the start-up of clvmd, which would then not find its PVs given that DRBD is down. The system would then try to start the gfs2 daemon which would also fail as the LV backing the partition would not be available.
Defining the Resources
| Note: All of these edits will be done on an-a05n01. Once we're done and the config has been validated, we'll use the cluster's cman_tool to push the update to an-a05n02 and update the running cluster's config. |
Lets start by first defining our clustered resources.
As stated before, the addition of these resources does not, in itself, put the defined resources under the cluster's management. Instead, it defines services, like init.d scripts. These can then be used by one or more <service /> elements, as we will see shortly. For now, it is enough to know what, until a resource is defined, it can not be used in the cluster.
Given that this is the first component of rgmanager being added to cluster.conf, we will be creating the parent <rm /> elements here as well.
Let's take a look at the new section, then discuss the parts.
| an-a05n01 | <?xml version="1.0"?>
<cluster name="an-anvil-05" config_version="8">
<cman expected_votes="1" two_node="1" />
<clusternodes>
<clusternode name="an-a05n01.alteeve.ca" nodeid="1">
<fence>
<method name="ipmi">
<device name="ipmi_n01" action="reboot" delay="15" />
</method>
<method name="pdu">
<device name="pdu1" port="1" action="reboot" />
<device name="pdu2" port="1" action="reboot" />
</method>
</fence>
</clusternode>
<clusternode name="an-a05n02.alteeve.ca" nodeid="2">
<fence>
<method name="ipmi">
<device name="ipmi_n02" action="reboot" />
</method>
<method name="pdu">
<device name="pdu1" port="2" action="reboot" />
<device name="pdu2" port="2" action="reboot" />
</method>
</fence>
</clusternode>
</clusternodes>
<fencedevices>
<fencedevice name="ipmi_n01" agent="fence_ipmilan" ipaddr="an-a05n01.ipmi" login="admin" passwd="secret" />
<fencedevice name="ipmi_n02" agent="fence_ipmilan" ipaddr="an-a05n02.ipmi" login="admin" passwd="secret" />
<fencedevice agent="fence_apc_snmp" ipaddr="an-pdu01.alteeve.ca" name="pdu1" />
<fencedevice agent="fence_apc_snmp" ipaddr="an-pdu02.alteeve.ca" name="pdu2" />
</fencedevices>
<fence_daemon post_join_delay="30" />
<totem rrp_mode="none" secauth="off"/>
<rm log_level="5">
<resources>
<script file="/etc/init.d/drbd" name="drbd"/>
<script file="/etc/init.d/clvmd" name="clvmd"/>
<clusterfs device="/dev/an-a05n01_vg0/shared" force_unmount="1" fstype="gfs2" mountpoint="/shared" name="sharedfs" />
<script file="/etc/init.d/libvirtd" name="libvirtd"/>
</resources>
</rm>
</cluster> |
|---|
First and foremost; Note that we've incremented the configuration version to 8. As always, "increment and then edit".
Let's focus on the new section;
| an-a05n01 | <rm log_level="5">
<resources>
<script file="/etc/init.d/drbd" name="drbd"/>
<script file="/etc/init.d/clvmd" name="clvmd"/>
<clusterfs device="/dev/an-a05n01_vg0/shared" force_unmount="1" fstype="gfs2" mountpoint="/shared" name="sharedfs" />
<script file="/etc/init.d/libvirtd" name="libvirtd"/>
</resources>
</rm> |
|---|
We've added the attribute log_level="5" to the <rm> element to cut down on the log entries in /var/log/messages. Every 10 seconds, rgmanager calls /etc/init.d/$foo status on all script services. At the default log, these checks are logged. So without this, every ten seconds, four status messages would be printed to the system log. That can make is difficult when tail'ing the logs when testing or debugging.
The <resources>...</resources> element contains our four <script .../> resources. This is a particular type of resource which specifically handles that starting and stopping of init.d style scripts. That is, the script must exit with LSB compliant codes. They must also properly react to being called with the sole argument of start, stop and status.
There are many other types of resources which, with the exception of <vm .../>, we will not be looking at in this tutorial. Should you be interested in them, please look in /usr/share/cluster for the various scripts (executable files that end with .sh).
Each of our four <script ... /> resources have two attributes:
- file="..."; The full path to the script to be managed.
- name="..."; A unique name used to reference this resource later on in the <service /> elements.
Other resources are more involved, but the <script .../> resources are quite simple.
Creating Failover Domains
Fail-over domains are, at their most basic, a collection of one or more nodes in the cluster with a particular set of rules associated with them. Services can then be configured to operate within the context of a given fail-over domain. There are a few key options to be aware of.
Fail-over domains are optional and can be left out of the cluster, generally speaking. However, in our cluster, we will need them for our storage services, as we will later see, so please do not skip this step.
- A fail-over domain can be unordered or prioritized.
- When unordered, a service will start on any node in the domain. Should that node later fail, it will restart to another random node in the domain.
- When prioritized, a service will start on the available node with the highest priority in the domain. Should that node later fail, the service will restart on the available node with the next highest priority.
- A fail-over domain can be restricted or unrestricted.
- When restricted, a service is only allowed to start on, or restart on. a nodes in the domain. When no nodes are available, the service will be stopped.
- When unrestricted, a service will try to start on, or restart on, a node in the domain. However, when no domain members are available, the cluster will pick another available node at random to start the service on.
- A fail-over domain can have a fail-back policy.
- When a domain allows for fail-back and the domain is ordered, and a node with a higher priority (re)joins the cluster, services within the domain will migrate to that higher-priority node. This allows for automated restoration of services on a failed node when it rejoins the cluster.
- When a domain does not allow for fail-back, but is unrestricted, fail-back of services that fell out of the domain will happen anyway. That is to say, nofailback="1" is ignored if a service was running on a node outside of the fail-over domain and a node within the domain joins the cluster. However, once the service is on a node within the domain, the service will not relocate to a higher-priority node should one join the cluster later.
- When a domain does not allow for fail-back and is restricted, then fail-back of services will never occur.
What we need to do at this stage is to create something of a hack. Let me explain;
As discussed earlier, we need to start a set of local daemons on all nodes. These aren't really clustered resources though as they can only ever run on their host node. They will never be relocated or restarted elsewhere in the cluster as as such, are not highly available. So to work around this desire to "cluster the unclusterable", we're going to create a fail-over domain for each node in the cluster. Each of these domains will have only one of the cluster nodes as members of the domain and the domain will be restricted, unordered and have no fail-back. With this configuration, any service group using it will only ever run on the one node in the domain.
In the next step, we will create a service group, then replicate it once for each node in the cluster. The only difference will be the failoverdomain each is set to use. With our configuration of two nodes then, we will have two fail-over domains, one for each node, and we will define the clustered storage service twice, each one using one of the two fail-over domains.
Let's look at the complete updated cluster.conf, then we will focus closer on the new section.
| an-a05n01 | <?xml version="1.0"?>
<cluster name="an-anvil-05" config_version="9">
<cman expected_votes="1" two_node="1" />
<clusternodes>
<clusternode name="an-a05n01.alteeve.ca" nodeid="1">
<fence>
<method name="ipmi">
<device name="ipmi_n01" action="reboot" delay="15" />
</method>
<method name="pdu">
<device name="pdu1" port="1" action="reboot" />
<device name="pdu2" port="1" action="reboot" />
</method>
</fence>
</clusternode>
<clusternode name="an-a05n02.alteeve.ca" nodeid="2">
<fence>
<method name="ipmi">
<device name="ipmi_n02" action="reboot" />
</method>
<method name="pdu">
<device name="pdu1" port="2" action="reboot" />
<device name="pdu2" port="2" action="reboot" />
</method>
</fence>
</clusternode>
</clusternodes>
<fencedevices>
<fencedevice name="ipmi_n01" agent="fence_ipmilan" ipaddr="an-a05n01.ipmi" login="admin" passwd="secret" />
<fencedevice name="ipmi_n02" agent="fence_ipmilan" ipaddr="an-a05n02.ipmi" login="admin" passwd="secret" />
<fencedevice agent="fence_apc_snmp" ipaddr="an-pdu01.alteeve.ca" name="pdu1" />
<fencedevice agent="fence_apc_snmp" ipaddr="an-pdu02.alteeve.ca" name="pdu2" />
</fencedevices>
<fence_daemon post_join_delay="30" />
<totem rrp_mode="none" secauth="off"/>
<rm log_level="5">
<resources>
<script file="/etc/init.d/drbd" name="drbd"/>
<script file="/etc/init.d/clvmd" name="clvmd"/>
<clusterfs device="/dev/an-a05n01_vg0/shared" force_unmount="1" fstype="gfs2" mountpoint="/shared" name="sharedfs" />
<script file="/etc/init.d/libvirtd" name="libvirtd"/>
</resources>
<failoverdomains>
<failoverdomain name="only_n01" nofailback="1" ordered="0" restricted="1">
<failoverdomainnode name="an-a05n01.alteeve.ca"/>
</failoverdomain>
<failoverdomain name="only_n02" nofailback="1" ordered="0" restricted="1">
<failoverdomainnode name="an-a05n02.alteeve.ca"/>
</failoverdomain>
</failoverdomains>
</rm>
</cluster> |
|---|
As always, the version was incremented, this time to 9. We've also added the new <failoverdomains>...</failoverdomains> element. Let's take a closer look at this new element.
| an-a05n01 | <failoverdomains>
<failoverdomain name="only_n01" nofailback="1" ordered="0" restricted="1">
<failoverdomainnode name="an-a05n01.alteeve.ca"/>
</failoverdomain>
<failoverdomain name="only_n02" nofailback="1" ordered="0" restricted="1">
<failoverdomainnode name="an-a05n02.alteeve.ca"/>
</failoverdomain>
</failoverdomains> |
|---|
The first thing to note is that there are two <failoverdomain...>...</failoverdomain> child elements:
- The first has the name only_n01 and contains only the node an-a05n01 as a member.
- The second is effectively identical, save that the domain's name is only_n02 and it contains only the node an-a05n02 as a member.
The <failoverdomain ...> element has four attributes:
- The name="..." attribute sets the unique name of the domain which we will later use to bind a service to the domain.
- The nofailback="1" attribute tells the cluster to never "fail back" any services in this domain. This seems redundant, given there is only one node, but when combined with restricted="0", prevents any migration of services.
- The ordered="0" this is also somewhat redundant in that there is only one node defined in the domain, but I don't like to leave attributes undefined so I have it here.
- The restricted="1" attribute is key in that it tells the cluster to not try to restart services within this domain on any other nodes outside of the one defined in the fail-over domain.
Each of the <failoverdomain...> elements has a single <failoverdomainnode .../> child element. This is a very simple element which has, at this time, only one attribute:
- name="..."; The name of the node to include in the fail-over domain. This name must match the corresponding <clusternode name="..." node name.
At this point, we're ready to finally create our clustered storage and libvirtd monitoring services.
Creating Clustered Storage and libvirtd Service
With the resources defined and the fail-over domains created, we can set about creating our services.
Generally speaking, services can have one or more resources within them. When two or more resources exist, then can be put into a dependency tree, they can used in parallel or a combination of parallel and dependent resources.
When you create a service dependency tree, you put each dependent resource as a child element of its parent. The resources are then started in order, starting at the top of the tree and working its way down to the deepest child resource. If at any time one of the resources should fail, the entire service will be declared failed and no attempt will be made to try and start any further child resources. Conversely, stopping the service will cause the deepest child resource to be stopped first. Then the second deepest and on upwards towards the top resource. This is exactly the behaviour we want, as we will see shortly.
When resources are defined in parallel, all defined resources will be started at the same time. Should any one of the resources fail to start, the entire resource will be declared failed. Stopping the service will likewise cause a simultaneous call to stop all resources.
As before, let's take a look at the entire updated cluster.conf file, then we'll focus in on the new service section.
| an-a05n01 | <?xml version="1.0"?>
<cluster name="an-anvil-05" config_version="10">
<cman expected_votes="1" two_node="1" />
<clusternodes>
<clusternode name="an-a05n01.alteeve.ca" nodeid="1">
<fence>
<method name="ipmi">
<device name="ipmi_n01" action="reboot" delay="15" />
</method>
<method name="pdu">
<device name="pdu1" port="1" action="reboot" />
<device name="pdu2" port="1" action="reboot" />
</method>
</fence>
</clusternode>
<clusternode name="an-a05n02.alteeve.ca" nodeid="2">
<fence>
<method name="ipmi">
<device name="ipmi_n02" action="reboot" />
</method>
<method name="pdu">
<device name="pdu1" port="2" action="reboot" />
<device name="pdu2" port="2" action="reboot" />
</method>
</fence>
</clusternode>
</clusternodes>
<fencedevices>
<fencedevice name="ipmi_n01" agent="fence_ipmilan" ipaddr="an-a05n01.ipmi" login="admin" passwd="secret" />
<fencedevice name="ipmi_n02" agent="fence_ipmilan" ipaddr="an-a05n02.ipmi" login="admin" passwd="secret" />
<fencedevice agent="fence_apc_snmp" ipaddr="an-pdu01.alteeve.ca" name="pdu1" />
<fencedevice agent="fence_apc_snmp" ipaddr="an-pdu02.alteeve.ca" name="pdu2" />
</fencedevices>
<fence_daemon post_join_delay="30" />
<totem rrp_mode="none" secauth="off"/>
<rm log_level="5">
<resources>
<script file="/etc/init.d/drbd" name="drbd"/>
<script file="/etc/init.d/clvmd" name="clvmd"/>
<clusterfs device="/dev/an-a05n01_vg0/shared" force_unmount="1" fstype="gfs2" mountpoint="/shared" name="sharedfs" />
<script file="/etc/init.d/libvirtd" name="libvirtd"/>
</resources>
<failoverdomains>
<failoverdomain name="only_n01" nofailback="1" ordered="0" restricted="1">
<failoverdomainnode name="an-a05n01.alteeve.ca"/>
</failoverdomain>
<failoverdomain name="only_n02" nofailback="1" ordered="0" restricted="1">
<failoverdomainnode name="an-a05n02.alteeve.ca"/>
</failoverdomain>
</failoverdomains>
<service name="storage_n01" autostart="1" domain="only_n01" exclusive="0" recovery="restart">
<script ref="drbd">
<script ref="clvmd">
<clusterfs ref="sharedfs"/>
</script>
</script>
</service>
<service name="storage_n02" autostart="1" domain="only_n02" exclusive="0" recovery="restart">
<script ref="drbd">
<script ref="clvmd">
<clusterfs ref="sharedfs"/>
</script>
</script>
</service>
<service name="libvirtd_n01" autostart="1" domain="only_n01" exclusive="0" recovery="restart">
<script ref="libvirtd"/>
</service>
<service name="libvirtd_n02" autostart="1" domain="only_n02" exclusive="0" recovery="restart">
<script ref="libvirtd"/>
</service>
</rm>
</cluster> |
|---|
With the version now at 10, we have added four <service...>...</service> elements. Two of which contain the storage resources in a service tree configuration. The other two have a single libvirtd resource for managing the hypervisors.
Let's take a closer look.
| an-a05n01 | <failoverdomains>
<failoverdomain name="only_n01" nofailback="1" ordered="0" restricted="1">
<failoverdomainnode name="an-a05n01.alteeve.ca"/>
</failoverdomain>
<failoverdomain name="only_n02" nofailback="1" ordered="0" restricted="1">
<failoverdomainnode name="an-a05n02.alteeve.ca"/>
</failoverdomain>
</failoverdomains>
<service name="storage_n01" autostart="1" domain="only_n01" exclusive="0" recovery="restart">
<script ref="drbd">
<script ref="clvmd">
<clusterfs ref="sharedfs"/>
</script>
</script>
</service>
<service name="storage_n02" autostart="1" domain="only_n02" exclusive="0" recovery="restart">
<script ref="drbd">
<script ref="clvmd">
<clusterfs ref="sharedfs"/>
</script>
</script>
</service>
<service name="libvirtd_n01" autostart="1" domain="only_n01" exclusive="0" recovery="restart">
<script ref="libvirtd"/>
</service>
<service name="libvirtd_n02" autostart="1" domain="only_n02" exclusive="0" recovery="restart">
<script ref="libvirtd"/>
</service> |
|---|
The <service ...>...</service> elements have five attributes each:
- The name="..." attribute is a unique name that will be used to identify the service, as we will see later.
- The autostart="1" attribute tells the cluster that, when it starts, it should automatically start this service.
- The domain="..." attribute tells the cluster which fail-over domain this service must run within. The two otherwise identical services each point to a different fail-over domain, as we discussed in the previous section.
- The exclusive="0" attribute tells the cluster that a node running this service is allowed to to have other services running as well.
- The recovery="restart" attribute sets the service recovery policy. As the name implies, the cluster will try to restart this service should it fail. Should the service fail multiple times in a row, it will be disabled. The exact number of failures allowed before disabling is configurable using the optional max_restarts and restart_expire_time attributes, which are not covered here.
| Warning: It is a fairly common mistake to interpret exclusive to mean that a service is only allowed to run on one node at a time. This is not the case, please do not use this attribute incorrectly. |
Within each of the two first two <service ...>...</service> attributes are two <script...> type resources and a clusterfs type resource. These are configured as a service tree in the order:
- drbd -> clvmd -> clusterfs.
The other two <service ...>...</service> elements are there to simply monitor the libvirtd daemon on each node. Should it fail for any reason, the cluster will restart the service right away.
Each of these <script ...> elements has just one attribute; ref="..." which points to a corresponding script resource.
The clusterfs element has five attributes:
- name is the name used to reference this resource in the service tree.
- device is the logical volume we formatted as a gfs2 file system.
- force_unmount, when set to 1, tells the system to try and kill any processes that might be holding the mount open. This is useful if, for example, you left a terminal window open where you had browsed into /shared. Without it, the service would fail and restart.
- fstype is the file system type. If you do not specify this, the system will try to determine it automatically. To be safe, we will set it.
- mountpoint is where the device should be mounted.
The logic for the storage resource tree is:
- DRBD needs to start so that the bare clustered storage devices become available.
- Clustered LVM must next start so that the logical volumes used by GFS2 and our VMs become available.
- Finally, the GFS2 partition contains the XML definition files needed to start our servers, host shared files and so on.
From the other direction, we need the stop order to be organized in the reverse order:
- We need the GFS2 partition to unmount first.
- With the GFS2 partition stopped, we can safely say that all LVs are no longer in use and thus clvmd can stop.
- With Clustered LVM now stopped, nothing should be using our DRBD resources any more, so we can safely stop them, too.
All in all, it's a surprisingly simple and effective configuration.
Validating and Pushing the Changes
We've made a big change, so it's all the more important that we validate the config before proceeding.
| an-a05n01 | ccs_config_validateConfiguration validates |
|---|---|
| an-a05n02 | cman_tool version6.2.0 config 7 |
Good, no errors and we checked that the current cluster configuration version is 7.
We need to now tell the cluster to use the new configuration file. Unlike last time, we won't use rsync. Now that the cluster is up and running, we can use it to push out the updated configuration file using cman_tool. This is the first time we've used the cluster to push out an updated cluster.conf file, so we will have to enter the password we set earlier for the ricci user on both nodes.
| an-a05n01 | cman_tool version -rYou have not authenticated to the ricci daemon on an-a05n01.alteeve.caPassword:You have not authenticated to the ricci daemon on an-a05n02.alteeve.caPassword: |
|---|---|
| an-a05n02 | cman_tool version6.2.0 config 10 |
As confirmed on an-a05n02, the new configuration loaded properly! Note as well that we had to enter the ricci user's password for both nodes. Once done, you will not have to do that again on an-a05n01. Later, if you push an update from an-a05n02, you will need to enter the passwords once again, but not after that. You authenticate from a node only one time.
If you were watching syslog, you will have seen an entries like the ones below.
| an-a05n01 | Nov 1 17:47:48 an-a05n01 ricci[26853]: Executing '/usr/bin/virsh nodeinfo'
Nov 1 17:47:50 an-a05n01 ricci[26856]: Executing '/usr/libexec/ricci/ricci-worker -f /var/lib/ricci/queue/533317550'
Nov 1 17:47:50 an-a05n01 modcluster: Updating cluster.conf
Nov 1 17:47:50 an-a05n01 corosync[6448]: [QUORUM] Members[2]: 1 2 |
|---|---|
| an-a05n02 | Nov 1 17:47:50 an-a05n02 ricci[26653]: Executing '/usr/bin/virsh nodeinfo'
Nov 1 17:47:50 an-a05n02 ricci[26656]: Executing '/usr/libexec/ricci/ricci-worker -f /var/lib/ricci/queue/15604613'
Nov 1 17:47:50 an-a05n02 modcluster: Updating cluster.conf
Nov 1 17:47:50 an-a05n02 corosync[6404]: [QUORUM] Members[2]: 1 2 |
Checking the Cluster's Status
Now let's look at a new tool; clustat, cluster status. We'll be using clustat extensively from here on out to monitor the status of the cluster members and managed services. It does not manage the cluster in any way, it is simply a status tool.
Let's take a look.
| an-a05n01 | clustatCluster Status for an-anvil-05 @ Fri Nov 1 18:08:20 2013
Member Status: Quorate
Member Name ID Status
------ ---- ---- ------
an-a05n01.alteeve.ca 1 Online, Local
an-a05n02.alteeve.ca 2 Online |
|---|---|
| an-a05n02 | clustatCluster Status for an-anvil-05 @ Fri Nov 1 18:08:20 2013
Member Status: Quorate
Member Name ID Status
------ ---- ---- ------
an-a05n01.alteeve.ca 1 Online
an-a05n02.alteeve.ca 2 Online, Local |
At this point, we're only running the foundation of the cluster, so we can only see which nodes are members.
We'll now start rgmanager. It will read the cluster.conf configuration file and parse the <rm> child elements. It will find our four new services and, according to their configuration, start them.
| Warning: We've configured the storage services to start automatically. When we start rgmanager now, it will start the storage resources, including DRBD. In turn, DRBD will stop and wait for up to five minutes and wait for its peer. This will cause the first node you start rgmanager on to appear to hang until the other node's rgmanager has started DRBD as well. If the other node doesn't start DRBD, it will be fenced. So be sure to start rgmanager on both nodes at the same time. |
| an-a05n01 | /etc/init.d/rgmanager startStarting Cluster Service Manager: [ OK ] |
|---|---|
| an-a05n02 | /etc/init.d/rgmanager startStarting Cluster Service Manager: [ OK ] |
Now let's run clustat again, and see what's new.
| an-a05n01 | clustatCluster Status for an-anvil-05 @ Fri Nov 1 19:04:27 2013
Member Status: Quorate
Member Name ID Status
------ ---- ---- ------
an-a05n01.alteeve.ca 1 Online, Local, rgmanager
an-a05n02.alteeve.ca 2 Online, rgmanager
Service Name Owner (Last) State
------- ---- ----- ------ -----
service:libvirtd_n01 an-a05n01.alteeve.ca started
service:libvirtd_n02 an-a05n02.alteeve.ca started
service:storage_n01 an-a05n01.alteeve.ca started
service:storage_n02 an-a05n02.alteeve.ca started |
|---|---|
| an-a05n02 | clustatCluster Status for an-anvil-05 @ Fri Nov 1 19:04:27 2013
Member Status: Quorate
Member Name ID Status
------ ---- ---- ------
an-a05n01.alteeve.ca 1 Online, rgmanager
an-a05n02.alteeve.ca 2 Online, Local, rgmanager
Service Name Owner (Last) State
------- ---- ----- ------ -----
service:libvirtd_n01 an-a05n01.alteeve.ca started
service:libvirtd_n02 an-a05n02.alteeve.ca started
service:storage_n01 an-a05n01.alteeve.ca started
service:storage_n02 an-a05n02.alteeve.ca started |
What we see are two sections; The top section shows the cluster members and the lower part covers the managed resources.
We can see that both members, an-a05n01.alteeve.ca and an-a05n02.alteeve.ca are Online, meaning that cman is running and that they've joined the cluster. It also shows us that both members are running rgmanager. You will always see Local beside the name of the node you ran the actual clustat command from.
Under the services, you can see the four new services we created with the service: prefix. We can see that each service is started, meaning that all four of the resources are up and running properly and which node each service is running on.
If we were watching the system log, we will see that, very shortly after starting rgmanager, drbd, then clvmd and then gfs2 starts and mounts. Somewhere in there, libvirtd will start.
Lets take a look.
| an-a05n01 | Nov 1 19:04:07 an-a05n01 kernel: dlm: Using TCP for communications
Nov 1 19:04:08 an-a05n01 kernel: dlm: connecting to 2
Nov 1 19:04:08 an-a05n01 rgmanager[10738]: I am node #1
Nov 1 19:04:08 an-a05n01 rgmanager[10738]: Resource Group Manager Starting
Nov 1 19:04:10 an-a05n01 rgmanager[10738]: Starting stopped service service:storage_n01
Nov 1 19:04:10 an-a05n01 rgmanager[10738]: Marking service:storage_n02 as stopped: Restricted domain unavailable
Nov 1 19:04:10 an-a05n01 kernel: drbd: initialized. Version: 8.3.16 (api:88/proto:86-97)
Nov 1 19:04:10 an-a05n01 kernel: drbd: GIT-hash: a798fa7e274428a357657fb52f0ecf40192c1985 build by phil@Build64R6, 2013-09-27 16:00:43
Nov 1 19:04:10 an-a05n01 kernel: drbd: registered as block device major 147
Nov 1 19:04:10 an-a05n01 kernel: drbd: minor_table @ 0xffff880638752a80
Nov 1 19:04:11 an-a05n01 kernel: block drbd0: Starting worker thread (from cqueue [5069])
Nov 1 19:04:11 an-a05n01 kernel: block drbd0: disk( Diskless -> Attaching )
Nov 1 19:04:11 an-a05n01 kernel: block drbd0: Found 4 transactions (126 active extents) in activity log.
Nov 1 19:04:11 an-a05n01 kernel: block drbd0: Method to ensure write ordering: flush
Nov 1 19:04:11 an-a05n01 kernel: block drbd0: max BIO size = 131072
Nov 1 19:04:11 an-a05n01 kernel: block drbd0: drbd_bm_resize called with capacity == 1059008888
Nov 1 19:04:11 an-a05n01 kernel: block drbd0: resync bitmap: bits=132376111 words=2068377 pages=4040
Nov 1 19:04:11 an-a05n01 kernel: block drbd0: size = 505 GB (529504444 KB)
Nov 1 19:04:11 an-a05n01 kernel: block drbd0: bitmap READ of 4040 pages took 9 jiffies
Nov 1 19:04:11 an-a05n01 kernel: block drbd0: recounting of set bits took additional 10 jiffies
Nov 1 19:04:11 an-a05n01 kernel: block drbd0: 0 KB (0 bits) marked out-of-sync by on disk bit-map.
Nov 1 19:04:11 an-a05n01 kernel: block drbd0: disk( Attaching -> UpToDate ) pdsk( DUnknown -> Outdated )
Nov 1 19:04:11 an-a05n01 kernel: block drbd0: attached to UUIDs D62CF91BB06F1B41:AB8866B4CD6A5E71:F1BA98C02D0BA9B9:F1B998C02D0BA9B9
Nov 1 19:04:11 an-a05n01 kernel: block drbd1: Starting worker thread (from cqueue [5069])
Nov 1 19:04:11 an-a05n01 kernel: block drbd1: disk( Diskless -> Attaching )
Nov 1 19:04:11 an-a05n01 kernel: block drbd1: Found 1 transactions (1 active extents) in activity log.
Nov 1 19:04:11 an-a05n01 kernel: block drbd1: Method to ensure write ordering: flush
Nov 1 19:04:11 an-a05n01 kernel: block drbd1: max BIO size = 131072
Nov 1 19:04:11 an-a05n01 kernel: block drbd1: drbd_bm_resize called with capacity == 602165224
Nov 1 19:04:11 an-a05n01 kernel: block drbd1: resync bitmap: bits=75270653 words=1176104 pages=2298
Nov 1 19:04:11 an-a05n01 kernel: block drbd1: size = 287 GB (301082612 KB)
Nov 1 19:04:11 an-a05n01 kernel: block drbd1: bitmap READ of 2298 pages took 6 jiffies
Nov 1 19:04:11 an-a05n01 kernel: block drbd1: recounting of set bits took additional 6 jiffies
Nov 1 19:04:11 an-a05n01 kernel: block drbd1: 0 KB (0 bits) marked out-of-sync by on disk bit-map.
Nov 1 19:04:11 an-a05n01 kernel: block drbd1: disk( Attaching -> UpToDate ) pdsk( DUnknown -> Outdated )
Nov 1 19:04:11 an-a05n01 kernel: block drbd1: attached to UUIDs FF678525C82359F3:CFC177C83C414547:0EC499BF75166A0D:0EC399BF75166A0D
Nov 1 19:04:11 an-a05n01 kernel: block drbd0: conn( StandAlone -> Unconnected )
Nov 1 19:04:11 an-a05n01 kernel: block drbd0: Starting receiver thread (from drbd0_worker [12026])
Nov 1 19:04:11 an-a05n01 kernel: block drbd0: receiver (re)started
Nov 1 19:04:11 an-a05n01 kernel: block drbd0: conn( Unconnected -> WFConnection )
Nov 1 19:04:11 an-a05n01 kernel: block drbd1: conn( StandAlone -> Unconnected )
Nov 1 19:04:11 an-a05n01 kernel: block drbd1: Starting receiver thread (from drbd1_worker [12041])
Nov 1 19:04:11 an-a05n01 kernel: block drbd1: receiver (re)started
Nov 1 19:04:11 an-a05n01 kernel: block drbd1: conn( Unconnected -> WFConnection )
Nov 1 19:04:11 an-a05n01 rgmanager[10738]: Starting stopped service service:libvirtd_n01
Nov 1 19:04:11 an-a05n01 rgmanager[10738]: Service service:libvirtd_n01 started
Nov 1 19:04:11 an-a05n01 kernel: lo: Disabled Privacy Extensions
Nov 1 19:04:12 an-a05n01 kernel: block drbd0: Handshake successful: Agreed network protocol version 97
Nov 1 19:04:12 an-a05n01 kernel: block drbd0: conn( WFConnection -> WFReportParams )
Nov 1 19:04:12 an-a05n01 kernel: block drbd0: Starting asender thread (from drbd0_receiver [12058])
Nov 1 19:04:12 an-a05n01 kernel: block drbd0: data-integrity-alg: <not-used>
Nov 1 19:04:12 an-a05n01 kernel: block drbd0: drbd_sync_handshake:
Nov 1 19:04:12 an-a05n01 kernel: block drbd0: self D62CF91BB06F1B40:AB8866B4CD6A5E71:F1BA98C02D0BA9B9:F1B998C02D0BA9B9 bits:0 flags:0
Nov 1 19:04:12 an-a05n01 kernel: block drbd0: peer AB8866B4CD6A5E70:0000000000000000:F1BA98C02D0BA9B9:F1B998C02D0BA9B9 bits:0 flags:0
Nov 1 19:04:12 an-a05n01 kernel: block drbd0: uuid_compare()=1 by rule 70
Nov 1 19:04:12 an-a05n01 kernel: block drbd0: peer( Unknown -> Secondary ) conn( WFReportParams -> WFBitMapS ) pdsk( Outdated -> Consistent )
Nov 1 19:04:12 an-a05n01 kernel: block drbd1: Handshake successful: Agreed network protocol version 97
Nov 1 19:04:12 an-a05n01 kernel: block drbd1: conn( WFConnection -> WFReportParams )
Nov 1 19:04:12 an-a05n01 kernel: block drbd1: Starting asender thread (from drbd1_receiver [12063])
Nov 1 19:04:12 an-a05n01 kernel: block drbd1: data-integrity-alg: <not-used>
Nov 1 19:04:12 an-a05n01 kernel: block drbd1: drbd_sync_handshake:
Nov 1 19:04:12 an-a05n01 kernel: block drbd1: self FF678525C82359F2:CFC177C83C414547:0EC499BF75166A0D:0EC399BF75166A0D bits:0 flags:0
Nov 1 19:04:12 an-a05n01 kernel: block drbd1: peer CFC177C83C414546:0000000000000000:0EC499BF75166A0D:0EC399BF75166A0D bits:0 flags:0
Nov 1 19:04:12 an-a05n01 kernel: block drbd1: uuid_compare()=1 by rule 70
Nov 1 19:04:12 an-a05n01 kernel: block drbd1: peer( Unknown -> Secondary ) conn( WFReportParams -> WFBitMapS ) pdsk( Outdated -> Consistent )
Nov 1 19:04:12 an-a05n01 kernel: block drbd0: peer( Secondary -> Primary )
Nov 1 19:04:12 an-a05n01 kernel: block drbd1: peer( Secondary -> Primary )
Nov 1 19:04:12 an-a05n01 kernel: block drbd1: helper command: /sbin/drbdadm before-resync-source minor-1
Nov 1 19:04:12 an-a05n01 kernel: block drbd0: role( Secondary -> Primary )
Nov 1 19:04:12 an-a05n01 kernel: block drbd1: helper command: /sbin/drbdadm before-resync-source minor-1 exit code 0 (0x0)
Nov 1 19:04:12 an-a05n01 kernel: block drbd1: conn( WFBitMapS -> SyncSource ) pdsk( Consistent -> Inconsistent )
Nov 1 19:04:12 an-a05n01 kernel: block drbd1: Began resync as SyncSource (will sync 0 KB [0 bits set]).
Nov 1 19:04:12 an-a05n01 kernel: block drbd1: updated sync UUID FF678525C82359F2:CFC277C83C414547:CFC177C83C414547:0EC499BF75166A0D
Nov 1 19:04:12 an-a05n01 kernel: block drbd0: helper command: /sbin/drbdadm before-resync-source minor-0
Nov 1 19:04:12 an-a05n01 kernel: block drbd1: role( Secondary -> Primary )
Nov 1 19:04:12 an-a05n01 kernel: block drbd0: helper command: /sbin/drbdadm before-resync-source minor-0 exit code 0 (0x0)
Nov 1 19:04:12 an-a05n01 kernel: block drbd0: conn( WFBitMapS -> SyncSource ) pdsk( Consistent -> Inconsistent )
Nov 1 19:04:12 an-a05n01 kernel: block drbd0: Began resync as SyncSource (will sync 0 KB [0 bits set]).
Nov 1 19:04:12 an-a05n01 kernel: block drbd0: updated sync UUID D62CF91BB06F1B41:AB8966B4CD6A5E71:AB8866B4CD6A5E71:F1BA98C02D0BA9B9
Nov 1 19:04:12 an-a05n01 kernel: block drbd1: Resync done (total 1 sec; paused 0 sec; 0 K/sec)
Nov 1 19:04:12 an-a05n01 kernel: block drbd1: updated UUIDs FF678525C82359F3:0000000000000000:CFC277C83C414547:CFC177C83C414547
Nov 1 19:04:12 an-a05n01 kernel: block drbd1: conn( SyncSource -> Connected ) pdsk( Inconsistent -> UpToDate )
Nov 1 19:04:12 an-a05n01 kernel: block drbd0: Resync done (total 1 sec; paused 0 sec; 0 K/sec)
Nov 1 19:04:12 an-a05n01 kernel: block drbd0: updated UUIDs D62CF91BB06F1B41:0000000000000000:AB8966B4CD6A5E71:AB8866B4CD6A5E71
Nov 1 19:04:12 an-a05n01 kernel: block drbd0: conn( SyncSource -> Connected ) pdsk( Inconsistent -> UpToDate )
Nov 1 19:04:12 an-a05n01 kernel: block drbd1: bitmap WRITE of 2298 pages took 12 jiffies
Nov 1 19:04:12 an-a05n01 kernel: block drbd1: 0 KB (0 bits) marked out-of-sync by on disk bit-map.
Nov 1 19:04:12 an-a05n01 kernel: block drbd0: bitmap WRITE of 4040 pages took 15 jiffies
Nov 1 19:04:12 an-a05n01 kernel: block drbd0: 0 KB (0 bits) marked out-of-sync by on disk bit-map.
Nov 1 19:04:14 an-a05n01 clvmd: Cluster LVM daemon started - connected to CMAN
Nov 1 19:04:14 an-a05n01 kernel: Slow work thread pool: Starting up
Nov 1 19:04:14 an-a05n01 kernel: Slow work thread pool: Ready
Nov 1 19:04:14 an-a05n01 kernel: GFS2 (built Sep 14 2013 05:33:49) installed
Nov 1 19:04:14 an-a05n01 kernel: GFS2: fsid=: Trying to join cluster "lock_dlm", "an-anvil-05:shared"
Nov 1 19:04:14 an-a05n01 kernel: GFS2: fsid=an-anvil-05:shared.1: Joined cluster. Now mounting FS...
Nov 1 19:04:14 an-a05n01 kernel: GFS2: fsid=an-anvil-05:shared.1: jid=1, already locked for use
Nov 1 19:04:14 an-a05n01 kernel: GFS2: fsid=an-anvil-05:shared.1: jid=1: Looking at journal...
Nov 1 19:04:14 an-a05n01 kernel: GFS2: fsid=an-anvil-05:shared.1: jid=1: Done
Nov 1 19:04:14 an-a05n01 rgmanager[10738]: Service service:storage_n01 started |
|---|---|
| an-a05n02 | Nov 1 19:04:08 an-a05n02 kernel: dlm: Using TCP for communications
Nov 1 19:04:08 an-a05n02 kernel: dlm: got connection from 1
Nov 1 19:04:09 an-a05n02 rgmanager[10547]: I am node #2
Nov 1 19:04:09 an-a05n02 rgmanager[10547]: Resource Group Manager Starting
Nov 1 19:04:11 an-a05n02 rgmanager[10547]: Starting stopped service service:storage_n02
Nov 1 19:04:11 an-a05n02 kernel: drbd: initialized. Version: 8.3.16 (api:88/proto:86-97)
Nov 1 19:04:11 an-a05n02 kernel: drbd: GIT-hash: a798fa7e274428a357657fb52f0ecf40192c1985 build by phil@Build64R6, 2013-09-27 16:00:43
Nov 1 19:04:11 an-a05n02 kernel: drbd: registered as block device major 147
Nov 1 19:04:11 an-a05n02 kernel: drbd: minor_table @ 0xffff880638440280
Nov 1 19:04:11 an-a05n02 kernel: block drbd0: Starting worker thread (from cqueue [5161])
Nov 1 19:04:11 an-a05n02 kernel: block drbd0: disk( Diskless -> Attaching )
Nov 1 19:04:11 an-a05n02 kernel: block drbd0: Found 4 transactions (4 active extents) in activity log.
Nov 1 19:04:11 an-a05n02 kernel: block drbd0: Method to ensure write ordering: flush
Nov 1 19:04:11 an-a05n02 kernel: block drbd0: max BIO size = 131072
Nov 1 19:04:11 an-a05n02 kernel: block drbd0: drbd_bm_resize called with capacity == 1059008888
Nov 1 19:04:11 an-a05n02 kernel: block drbd0: resync bitmap: bits=132376111 words=2068377 pages=4040
Nov 1 19:04:11 an-a05n02 kernel: block drbd0: size = 505 GB (529504444 KB)
Nov 1 19:04:11 an-a05n02 kernel: block drbd0: bitmap READ of 4040 pages took 10 jiffies
Nov 1 19:04:11 an-a05n02 kernel: block drbd0: recounting of set bits took additional 10 jiffies
Nov 1 19:04:11 an-a05n02 kernel: block drbd0: 0 KB (0 bits) marked out-of-sync by on disk bit-map.
Nov 1 19:04:11 an-a05n02 kernel: block drbd0: disk( Attaching -> Outdated )
Nov 1 19:04:11 an-a05n02 kernel: block drbd0: attached to UUIDs AB8866B4CD6A5E70:0000000000000000:F1BA98C02D0BA9B9:F1B998C02D0BA9B9
Nov 1 19:04:11 an-a05n02 kernel: block drbd1: Starting worker thread (from cqueue [5161])
Nov 1 19:04:11 an-a05n02 kernel: block drbd1: disk( Diskless -> Attaching )
Nov 1 19:04:11 an-a05n02 kernel: block drbd1: No usable activity log found.
Nov 1 19:04:11 an-a05n02 kernel: block drbd1: Method to ensure write ordering: flush
Nov 1 19:04:11 an-a05n02 kernel: block drbd1: max BIO size = 131072
Nov 1 19:04:11 an-a05n02 kernel: block drbd1: drbd_bm_resize called with capacity == 602165224
Nov 1 19:04:11 an-a05n02 kernel: block drbd1: resync bitmap: bits=75270653 words=1176104 pages=2298
Nov 1 19:04:11 an-a05n02 kernel: block drbd1: size = 287 GB (301082612 KB)
Nov 1 19:04:11 an-a05n02 kernel: block drbd1: bitmap READ of 2298 pages took 6 jiffies
Nov 1 19:04:11 an-a05n02 kernel: block drbd1: recounting of set bits took additional 6 jiffies
Nov 1 19:04:11 an-a05n02 kernel: block drbd1: 0 KB (0 bits) marked out-of-sync by on disk bit-map.
Nov 1 19:04:11 an-a05n02 kernel: block drbd1: disk( Attaching -> Outdated )
Nov 1 19:04:11 an-a05n02 kernel: block drbd1: attached to UUIDs CFC177C83C414546:0000000000000000:0EC499BF75166A0D:0EC399BF75166A0D
Nov 1 19:04:11 an-a05n02 kernel: block drbd0: conn( StandAlone -> Unconnected )
Nov 1 19:04:11 an-a05n02 kernel: block drbd0: Starting receiver thread (from drbd0_worker [11833])
Nov 1 19:04:11 an-a05n02 kernel: block drbd0: receiver (re)started
Nov 1 19:04:11 an-a05n02 kernel: block drbd0: conn( Unconnected -> WFConnection )
Nov 1 19:04:11 an-a05n02 kernel: block drbd1: conn( StandAlone -> Unconnected )
Nov 1 19:04:11 an-a05n02 kernel: block drbd1: Starting receiver thread (from drbd1_worker [11848])
Nov 1 19:04:11 an-a05n02 kernel: block drbd1: receiver (re)started
Nov 1 19:04:11 an-a05n02 kernel: block drbd1: conn( Unconnected -> WFConnection )
Nov 1 19:04:11 an-a05n02 rgmanager[10547]: Starting stopped service service:libvirtd_n02
Nov 1 19:04:12 an-a05n02 rgmanager[10547]: Service service:libvirtd_n02 started
Nov 1 19:04:12 an-a05n02 kernel: block drbd0: Handshake successful: Agreed network protocol version 97
Nov 1 19:04:12 an-a05n02 kernel: block drbd0: conn( WFConnection -> WFReportParams )
Nov 1 19:04:12 an-a05n02 kernel: block drbd0: Starting asender thread (from drbd0_receiver [11865])
Nov 1 19:04:12 an-a05n02 kernel: block drbd0: data-integrity-alg: <not-used>
Nov 1 19:04:12 an-a05n02 kernel: block drbd0: drbd_sync_handshake:
Nov 1 19:04:12 an-a05n02 kernel: block drbd0: self AB8866B4CD6A5E70:0000000000000000:F1BA98C02D0BA9B9:F1B998C02D0BA9B9 bits:0 flags:0
Nov 1 19:04:12 an-a05n02 kernel: block drbd0: peer D62CF91BB06F1B40:AB8866B4CD6A5E71:F1BA98C02D0BA9B9:F1B998C02D0BA9B9 bits:0 flags:0
Nov 1 19:04:12 an-a05n02 kernel: block drbd0: uuid_compare()=-1 by rule 50
Nov 1 19:04:12 an-a05n02 kernel: block drbd0: peer( Unknown -> Secondary ) conn( WFReportParams -> WFBitMapT ) pdsk( DUnknown -> UpToDate )
Nov 1 19:04:12 an-a05n02 kernel: block drbd1: Handshake successful: Agreed network protocol version 97
Nov 1 19:04:12 an-a05n02 kernel: block drbd1: conn( WFConnection -> WFReportParams )
Nov 1 19:04:12 an-a05n02 kernel: block drbd1: Starting asender thread (from drbd1_receiver [11869])
Nov 1 19:04:12 an-a05n02 kernel: block drbd1: data-integrity-alg: <not-used>
Nov 1 19:04:12 an-a05n02 kernel: block drbd1: drbd_sync_handshake:
Nov 1 19:04:12 an-a05n02 kernel: block drbd1: self CFC177C83C414546:0000000000000000:0EC499BF75166A0D:0EC399BF75166A0D bits:0 flags:0
Nov 1 19:04:12 an-a05n02 kernel: block drbd1: peer FF678525C82359F2:CFC177C83C414547:0EC499BF75166A0D:0EC399BF75166A0D bits:0 flags:0
Nov 1 19:04:12 an-a05n02 kernel: block drbd1: uuid_compare()=-1 by rule 50
Nov 1 19:04:12 an-a05n02 kernel: block drbd1: peer( Unknown -> Secondary ) conn( WFReportParams -> WFBitMapT ) pdsk( DUnknown -> UpToDate )
Nov 1 19:04:12 an-a05n02 kernel: block drbd0: role( Secondary -> Primary )
Nov 1 19:04:12 an-a05n02 kernel: block drbd1: role( Secondary -> Primary )
Nov 1 19:04:12 an-a05n02 kernel: lo: Disabled Privacy Extensions
Nov 1 19:04:12 an-a05n02 kernel: block drbd1: conn( WFBitMapT -> WFSyncUUID )
Nov 1 19:04:12 an-a05n02 kernel: block drbd0: conn( WFBitMapT -> WFSyncUUID )
Nov 1 19:04:12 an-a05n02 kernel: block drbd0: peer( Secondary -> Primary )
Nov 1 19:04:12 an-a05n02 kernel: block drbd1: updated sync uuid CFC277C83C414547:0000000000000000:0EC499BF75166A0D:0EC399BF75166A0D
Nov 1 19:04:12 an-a05n02 kernel: block drbd1: helper command: /sbin/drbdadm before-resync-target minor-1
Nov 1 19:04:12 an-a05n02 kernel: block drbd1: helper command: /sbin/drbdadm before-resync-target minor-1 exit code 0 (0x0)
Nov 1 19:04:12 an-a05n02 kernel: block drbd1: conn( WFSyncUUID -> SyncTarget ) disk( Outdated -> Inconsistent )
Nov 1 19:04:12 an-a05n02 kernel: block drbd1: Began resync as SyncTarget (will sync 0 KB [0 bits set]).
Nov 1 19:04:12 an-a05n02 kernel: block drbd1: peer( Secondary -> Primary )
Nov 1 19:04:12 an-a05n02 kernel: block drbd0: updated sync uuid AB8966B4CD6A5E71:0000000000000000:F1BA98C02D0BA9B9:F1B998C02D0BA9B9
Nov 1 19:04:12 an-a05n02 kernel: block drbd0: helper command: /sbin/drbdadm before-resync-target minor-0
Nov 1 19:04:12 an-a05n02 kernel: block drbd1: Resync done (total 1 sec; paused 0 sec; 0 K/sec)
Nov 1 19:04:12 an-a05n02 kernel: block drbd1: updated UUIDs FF678525C82359F3:0000000000000000:CFC277C83C414547:CFC177C83C414547
Nov 1 19:04:12 an-a05n02 kernel: block drbd1: conn( SyncTarget -> Connected ) disk( Inconsistent -> UpToDate )
Nov 1 19:04:12 an-a05n02 kernel: block drbd1: helper command: /sbin/drbdadm after-resync-target minor-1
Nov 1 19:04:12 an-a05n02 kernel: block drbd0: helper command: /sbin/drbdadm before-resync-target minor-0 exit code 0 (0x0)
Nov 1 19:04:12 an-a05n02 kernel: block drbd0: conn( WFSyncUUID -> SyncTarget ) disk( Outdated -> Inconsistent )
Nov 1 19:04:12 an-a05n02 kernel: block drbd0: Began resync as SyncTarget (will sync 0 KB [0 bits set]).
Nov 1 19:04:12 an-a05n02 kernel: block drbd1: helper command: /sbin/drbdadm after-resync-target minor-1 exit code 0 (0x0)
Nov 1 19:04:12 an-a05n02 kernel: block drbd0: Resync done (total 1 sec; paused 0 sec; 0 K/sec)
Nov 1 19:04:12 an-a05n02 kernel: block drbd0: updated UUIDs D62CF91BB06F1B41:0000000000000000:AB8966B4CD6A5E71:AB8866B4CD6A5E71
Nov 1 19:04:12 an-a05n02 kernel: block drbd0: conn( SyncTarget -> Connected ) disk( Inconsistent -> UpToDate )
Nov 1 19:04:12 an-a05n02 kernel: block drbd0: helper command: /sbin/drbdadm after-resync-target minor-0
Nov 1 19:04:12 an-a05n02 kernel: block drbd0: helper command: /sbin/drbdadm after-resync-target minor-0 exit code 0 (0x0)
Nov 1 19:04:12 an-a05n02 kernel: block drbd1: bitmap WRITE of 2298 pages took 14 jiffies
Nov 1 19:04:12 an-a05n02 kernel: block drbd1: 0 KB (0 bits) marked out-of-sync by on disk bit-map.
Nov 1 19:04:12 an-a05n02 kernel: block drbd0: bitmap WRITE of 4040 pages took 15 jiffies
Nov 1 19:04:12 an-a05n02 kernel: block drbd0: 0 KB (0 bits) marked out-of-sync by on disk bit-map.
Nov 1 19:04:13 an-a05n02 clvmd: Cluster LVM daemon started - connected to CMAN
Nov 1 19:04:13 an-a05n02 kernel: Slow work thread pool: Starting up
Nov 1 19:04:13 an-a05n02 kernel: Slow work thread pool: Ready
Nov 1 19:04:13 an-a05n02 kernel: GFS2 (built Sep 14 2013 05:33:49) installed
Nov 1 19:04:13 an-a05n02 kernel: GFS2: fsid=: Trying to join cluster "lock_dlm", "an-anvil-05:shared"
Nov 1 19:04:13 an-a05n02 kernel: GFS2: fsid=an-anvil-05:shared.0: Joined cluster. Now mounting FS...
Nov 1 19:04:13 an-a05n02 kernel: GFS2: fsid=an-anvil-05:shared.0: jid=0, already locked for use
Nov 1 19:04:13 an-a05n02 kernel: GFS2: fsid=an-anvil-05:shared.0: jid=0: Looking at journal...
Nov 1 19:04:13 an-a05n02 kernel: GFS2: fsid=an-anvil-05:shared.0: jid=0: Done
Nov 1 19:04:13 an-a05n02 kernel: GFS2: fsid=an-anvil-05:shared.0: jid=1: Trying to acquire journal lock...
Nov 1 19:04:13 an-a05n02 kernel: GFS2: fsid=an-anvil-05:shared.0: jid=1: Looking at journal...
Nov 1 19:04:13 an-a05n02 kernel: GFS2: fsid=an-anvil-05:shared.0: jid=1: Done
Nov 1 19:04:14 an-a05n02 rgmanager[10547]: Service service:storage_n02 started |
Sure enough, we can confirm that everything started properly.
DRBD;
| an-a05n01 | /etc/init.d/drbd statusdrbd driver loaded OK; device status:
version: 8.3.16 (api:88/proto:86-97)
GIT-hash: a798fa7e274428a357657fb52f0ecf40192c1985 build by phil@Build64R6, 2013-09-27 16:00:43
m:res cs ro ds p mounted fstype
0:r0 Connected Primary/Primary UpToDate/UpToDate C
1:r1 Connected Primary/Primary UpToDate/UpToDate C |
|---|---|
| an-a05n02 | /etc/init.d/drbd statusdrbd driver loaded OK; device status:
version: 8.3.16 (api:88/proto:86-97)
GIT-hash: a798fa7e274428a357657fb52f0ecf40192c1985 build by phil@Build64R6, 2013-09-27 16:00:43
m:res cs ro ds p mounted fstype
0:r0 Connected Primary/Primary UpToDate/UpToDate C
1:r1 Connected Primary/Primary UpToDate/UpToDate C |
Looks good. Lets look at clustered LVM;
| an-a05n01 | /etc/init.d/clvmd statusclvmd (pid 29009) is running...
Clustered Volume Groups: an-a05n02_vg0 an-a05n01_vg0
Active clustered Logical Volumes: shared |
|---|---|
| an-a05n02 | /etc/init.d/clvmd statusclvmd (pid 28801) is running...
Clustered Volume Groups: an-a05n02_vg0 an-a05n01_vg0
Active clustered Logical Volumes: shared |
Looking good, too. Last service in storage is GFS2;
GFS2;
| an-a05n01 | /etc/init.d/gfs2 statusConfigured GFS2 mountpoints:
/shared
Active GFS2 mountpoints:
/shared |
|---|---|
| an-a05n02 | /etc/init.d/gfs2 statusConfigured GFS2 mountpoints:
/shared
Active GFS2 mountpoints:
/shared |
Finally, our stand-alone service for libvirtd.
| an-a05n01 | /etc/init.d/libvirtd statuslibvirtd (pid 12131) is running... |
|---|---|
| an-a05n02 | /etc/init.d/libvirtd statuslibvirtd (pid 11939) is running... |
Nice, eh?
Managing Cluster Resources
Managing services in the cluster is done with a fairly simple tool called clusvcadm.
We're going to look at two commands at this time.
| Command | Desctiption |
|---|---|
| clusvcadm -e <service> -m <node> | Enable the <service> on the specified <node>. When a <node> is not specified, the local node where the command was run is assumed. |
| clusvcadm -d <service> | Disable (stop) the <service>. |
Stopping Clustered Storage - A Preview to Cold-Stopping the Cluster
Let's take a look at how we can use clusvcadm to stop our storage services.
| Note: Services with the service: prefix can be called with their name alone. As we will see later, other services will need to have the service type prefix included. |
Before doing any work on an Anvil!, start by confirming the current state of affairs.
| an-a05n01 | clustatCluster Status for an-anvil-05 @ Fri Nov 1 23:22:44 2013
Member Status: Quorate
Member Name ID Status
------ ---- ---- ------
an-a05n01.alteeve.ca 1 Online, Local, rgmanager
an-a05n02.alteeve.ca 2 Online, rgmanager
Service Name Owner (Last) State
------- ---- ----- ------ -----
service:libvirtd_n01 an-a05n01.alteeve.ca started
service:libvirtd_n02 an-a05n02.alteeve.ca started
service:storage_n01 an-a05n01.alteeve.ca started
service:storage_n02 an-a05n02.alteeve.ca started |
|---|---|
| an-a05n02 | clustatCluster Status for an-anvil-05 @ Fri Nov 1 23:22:44 2013
Member Status: Quorate
Member Name ID Status
------ ---- ---- ------
an-a05n01.alteeve.ca 1 Online, rgmanager
an-a05n02.alteeve.ca 2 Online, Local, rgmanager
Service Name Owner (Last) State
------- ---- ----- ------ -----
service:libvirtd_n01 an-a05n01.alteeve.ca started
service:libvirtd_n02 an-a05n02.alteeve.ca started
service:storage_n01 an-a05n01.alteeve.ca started
service:storage_n02 an-a05n02.alteeve.ca started |
Everything is running, as expected. Let's stop an-a05n01's storage_n01 service.
On an-a05n01, run:
| an-a05n01 | clusvcadm -d storage_n01Local machine disabling service:storage_n01...Success |
|---|
If we now run clustat now, we should see that storage_n01 has stopped.
| an-a05n01 | clustatCluster Status for an-anvil-05 @ Fri Nov 1 23:25:39 2013
Member Status: Quorate
Member Name ID Status
------ ---- ---- ------
an-a05n01.alteeve.ca 1 Online, Local, rgmanager
an-a05n02.alteeve.ca 2 Online, rgmanager
Service Name Owner (Last) State
------- ---- ----- ------ -----
service:libvirtd_n01 an-a05n01.alteeve.ca started
service:libvirtd_n02 an-a05n02.alteeve.ca started
service:storage_n01 (an-a05n01.alteeve.ca) disabled
service:storage_n02 an-a05n02.alteeve.ca started |
|---|---|
| an-a05n02 | clustatCluster Status for an-anvil-05 @ Fri Nov 1 23:25:40 2013
Member Status: Quorate
Member Name ID Status
------ ---- ---- ------
an-a05n01.alteeve.ca 1 Online, rgmanager
an-a05n02.alteeve.ca 2 Online, Local, rgmanager
Service Name Owner (Last) State
------- ---- ----- ------ -----
service:libvirtd_n01 an-a05n01.alteeve.ca started
service:libvirtd_n02 an-a05n02.alteeve.ca started
service:storage_n01 (an-a05n01.alteeve.ca) disabled
service:storage_n02 an-a05n02.alteeve.ca started |
Notice how service:storage_n01 is now in the disabled state? If you check the status of drbd now, you will see that an-a05n01 is indeed down.
| an-a05n01 | /etc/init.d/drbd statusdrbd not loaded |
|---|---|
| an-a05n02 | /etc/init.d/drbd statusdrbd driver loaded OK; device status:
version: 8.3.16 (api:88/proto:86-97)
GIT-hash: a798fa7e274428a357657fb52f0ecf40192c1985 build by phil@Build64R6, 2013-09-27 16:00:43
m:res cs ro ds p mounted fstype
0:r0 WFConnection Primary/Unknown UpToDate/Outdated C
1:r1 WFConnection Primary/Unknown UpToDate/Outdated C |
You'll find that clvmd and gfs2 are stopped as well.
Pretty simple!
Starting Clustered Storage
As we saw earlier, the storage and libvirtd services start automatically. It's still important to know how to manually start these services though. So that is what we'll cover here.
The main difference from stopping the service is that we swap the -d switch for the -e, enable, switch. We will also add the target cluster member name using the -m switch. We didn't need to use the member switch while stopping because the cluster could tell where the service was running and, thus, which member to contact to stop the service.
Should you omit the member name, the cluster will try to use the local node as the target member. Note though that a target service will start on the node the command was issued on, regardless of the fail-over domain's ordered policy. That is to say, a service will not start on another node in the cluster when the member option is not specified, despite the fail-over configuration set to prefer another node.
As always, start by verifying the current state of the services.
| an-a05n01 | clustatCluster Status for an-anvil-05 @ Fri Nov 1 23:36:32 2013
Member Status: Quorate
Member Name ID Status
------ ---- ---- ------
an-a05n01.alteeve.ca 1 Online, Local, rgmanager
an-a05n02.alteeve.ca 2 Online, rgmanager
Service Name Owner (Last) State
------- ---- ----- ------ -----
service:libvirtd_n01 an-a05n01.alteeve.ca started
service:libvirtd_n02 an-a05n02.alteeve.ca started
service:storage_n01 (an-a05n01.alteeve.ca) disabled
service:storage_n02 an-a05n02.alteeve.ca started |
|---|---|
| an-a05n02 | clustatCluster Status for an-anvil-05 @ Fri Nov 1 23:36:32 2013
Member Status: Quorate
Member Name ID Status
------ ---- ---- ------
an-a05n01.alteeve.ca 1 Online, rgmanager
an-a05n02.alteeve.ca 2 Online, Local, rgmanager
Service Name Owner (Last) State
------- ---- ----- ------ -----
service:libvirtd_n01 an-a05n01.alteeve.ca started
service:libvirtd_n02 an-a05n02.alteeve.ca started
service:storage_n01 (an-a05n01.alteeve.ca) disabled
service:storage_n02 an-a05n02.alteeve.ca started |
As expected, storage_n01 is disabled. Let's start it up.
| an-a05n01 | clusvcadm -e storage_n01 -m an-a05n01.alteeve.caMember an-a05n01.alteeve.ca trying to enable service:storage_n01...Success
service:storage_n01 is now running on an-a05n01.alteeve.ca |
|---|
Verify with another clustat call.
| an-a05n01 | clustatCluster Status for an-anvil-05 @ Fri Nov 1 23:45:20 2013
Member Status: Quorate
Member Name ID Status
------ ---- ---- ------
an-a05n01.alteeve.ca 1 Online, Local, rgmanager
an-a05n02.alteeve.ca 2 Online, rgmanager
Service Name Owner (Last) State
------- ---- ----- ------ -----
service:libvirtd_n01 an-a05n01.alteeve.ca started
service:libvirtd_n02 an-a05n02.alteeve.ca started
service:storage_n01 an-a05n01.alteeve.ca started
service:storage_n02 an-a05n02.alteeve.ca started |
|---|---|
| an-a05n02 | clustatCluster Status for an-anvil-05 @ Fri Nov 1 23:45:20 2013
Member Status: Quorate
Member Name ID Status
------ ---- ---- ------
an-a05n01.alteeve.ca 1 Online, rgmanager
an-a05n02.alteeve.ca 2 Online, Local, rgmanager
Service Name Owner (Last) State
------- ---- ----- ------ -----
service:libvirtd_n01 an-a05n01.alteeve.ca started
service:libvirtd_n02 an-a05n02.alteeve.ca started
service:storage_n01 an-a05n01.alteeve.ca started
service:storage_n02 an-a05n02.alteeve.ca started |
If we look at DRBD now, it will show as being up and running on both nodes.
| Note: If the DRBD status shows the resource still stopped on the node, give it a minute and check again. It can sometimes take a few moments before the resources in the service starts. |
| an-a05n01 | /etc/init.d/drbd statusdrbd driver loaded OK; device status:
version: 8.3.16 (api:88/proto:86-97)
GIT-hash: a798fa7e274428a357657fb52f0ecf40192c1985 build by phil@Build64R6, 2013-09-27 16:00:43
m:res cs ro ds p mounted fstype
0:r0 Connected Primary/Primary UpToDate/UpToDate C
1:r1 Connected Primary/Primary UpToDate/UpToDate C |
|---|---|
| an-a05n02 | /etc/init.d/drbd statusdrbd driver loaded OK; device status:
version: 8.3.16 (api:88/proto:86-97)
GIT-hash: a798fa7e274428a357657fb52f0ecf40192c1985 build by phil@Build64R6, 2013-09-27 16:00:43
m:res cs ro ds p mounted fstype
0:r0 Connected Primary/Primary UpToDate/UpToDate C
1:r1 Connected Primary/Primary UpToDate/UpToDate C |
Everything is back up and running normally.
Testing Network Redundancy
Now that the Anvil! is up and running, it's time to test the network's fault tolerance capabilities.
We wanted to wait this long because we need to see how our cluster and storage software handles the failure and recovery of various networking components. Had we tested before now, we would have had to rely on simple tests, like ping responses, which do not give us a complete picture of the network's real resiliency.
We will perform the following tests:
- Pull each network cable and confirm that the bond it belongs to failed over to the other interface.
- Kill the primary switch entirely and then recover it.
- Kill the backup switch entirely and then recover it.
During these tests, we will watch the following:
- Watch a special /proc file for each bond to see how its state changes.
- Run a ping flood from each node to the other node, using each of out three networks.
- Watch the cluster membership.
- Watch the status of the DRBD resources.
- Tail the system log files.
The cluster will be formed and the storage services will be running. We do not need to have the servers running, so we will turn them off. If something goes wrong here, it will certainly end up with a node being fenced. No need to risk hurting the servers. Whether they are running or nor will not will have no effect of the tests.
What we will be Watching
Before setup for the tests, lets take a minute to look at the various things we'll be monitoring for faults.
Understanding '/proc/net/bonding/{bcn,sn,ifn}_bond1'
When a bond is created, a special procfs file is created whose name matches the name of the new {bcn,sn,ifn}_bond1 devices. We created three bonds; bcn_bond1, sn_bond1 and ifn_bond1, so we'll find /proc/net/bonding/bcn_bond1, /proc/net/bonding/sn_bond1 and /proc/net/bonding/ifn_bond1 respectively.
These look like normal files, and we can read them like files, but they're actually representations of kernel values. Specifically, the health and state of the bond device, its slaves and current performance settings. Lets take a look at bcn_bond1 on an-a05n01.
| an-a05n01 | cat /proc/net/bonding/bcn_bond1Ethernet Channel Bonding Driver: v3.6.0 (September 26, 2009)
Bonding Mode: fault-tolerance (active-backup)
Primary Slave: bcn_link1 (primary_reselect always)
Currently Active Slave: bcn_link1
MII Status: up
MII Polling Interval (ms): 100
Up Delay (ms): 120000
Down Delay (ms): 0
Slave Interface: bcn_link1
MII Status: up
Speed: 1000 Mbps
Duplex: full
Link Failure Count: 0
Permanent HW addr: 00:19:99:9c:9b:9e
Slave queue ID: 0
Slave Interface: bcn_link2
MII Status: up
Speed: 1000 Mbps
Duplex: full
Link Failure Count: 0
Permanent HW addr: 00:1b:21:81:c3:35
Slave queue ID: 0 |
|---|
If you recall from the network setup step, we made bcn_link1 the primary interface and bcn_link2 the backup interface for bcn_bond1. Indeed, we can see that these two interfaces are indeed slaved to bcn_bond1.
The data here is in three sections:
- The first section shows the state of the overall bond.
| an-a05n01 | Bonding Mode: fault-tolerance (active-backup)
Primary Slave: bcn_link1 (primary_reselect always)
Currently Active Slave: bcn_link1
MII Status: up
MII Polling Interval (ms): 100
Up Delay (ms): 120000
Down Delay (ms): 0 |
|---|
This tells us that we're using the "Active/Backup" bonding mode, that the currently active interface is bcn_link1 and that bcn_link1 will always be used when both interfaces are healthy, though it will wait two minutes (120,000 ms) after bcn_link1 returns before it will be used. It also tells us that it will manually check for a link on the slaved interfaces every 100 ms.
The next two sections cover the two slaved interfaces:
- Information on bcn_link1
| an-a05n01 | Slave Interface: bcn_link1
MII Status: up
Speed: 1000 Mbps
Duplex: full
Link Failure Count: 0
Permanent HW addr: 00:19:99:9c:9b:9e
Slave queue ID: 0 |
|---|
We see here that the link (MII Status) is up and running at 1000 Mbps in full duplex mode. It shows us that it has not seen any failures in this interface since the bond was last started. It also shows us the interfaces real MAC address. This is important because, from the point of view of ifconfig or ip addr, both slaved interfaces will appear to have the same MAC address (which depends on the currently active interface). This is a trick done in active-backup (mode=1) bonding to speed up fail-over. The queue ID is used in other bonding modes for routing traffic down certain slaves when possible, we can ignore it here.
- Information on bcn_link2:
| an-a05n01 | Slave Interface: bcn_link2
MII Status: up
Speed: 1000 Mbps
Duplex: full
Link Failure Count: 0
Permanent HW addr: 00:1b:21:81:c3:35
Slave queue ID: 0 |
|---|
The bcn_link2 information is more or less the same as the first. This is expected because, usually, the hardware is the same. The only expected differences are the device name and MAC address, of course.
Understanding '/etc/init.d/drbd status'
Earlier, we looked at another procfs file called /proc/drbd in order to watch the state of our DRBD resources. There is another way we can monitor DRBD using its initialization script. We'll use that method here.
Lets look at an-a05n01.
| an-a05n01 | /etc/init.d/drbd statusGIT-hash: a798fa7e274428a357657fb52f0ecf40192c1985 build by phil@Build64R6, 2013-09-27 16:00:43
m:res cs ro ds p mounted fstype
0:r0 Connected Primary/Primary UpToDate/UpToDate C
1:r1 Connected Primary/Primary UpToDate/UpToDate C |
|---|
You will notice that the output is almost exactly the same as cat /proc/drbd's output, but formatted a little nicer.
Understanding 'cman_tool nodes'
This is a more specific cman_tool call than we've used in the past. Before, we called cman_tool status to get a broad overview of the cluster's state. It can be used in many ways to get more information about specific about the cluster.
If you recall, cman_tool status would show us the simple sum of nodes in the cluster; Nodes: 2. If we want to know more about the nodes, we can use cman_tool nodes. Lets see what that looks like on an-a05n01.
| an-a05n01 | cman_tool nodesNode Sts Inc Joined Name
1 M 332 2013-11-27 14:11:01 an-a05n01.alteeve.ca
2 M 340 2013-11-27 14:11:02 an-a05n02.alteeve.ca |
|---|
Slightly more informative.
Network Testing Terminal Layout
If you have a decent resolution monitor (or multiple monitors), you should be able to open 18 terminals at once. This is how many are needed to run ping floods, watch the bond status files, watch the system logs, watch DRBD and watch cluster membership all at the same time. This configuration makes it very easy to keep a near real-time, complete view of all network components.
Personally, I have a 1920 x 1080 screen, which is pretty typical these days. I use a 9-point monospace font in my gnome terminals and I disable the menu bar. With that, the layout below fits nicely;

The details of that are:
| Terminal layout for monitoring during network testing. | ||
|---|---|---|
| an-a05n01, terminal window @ 70 x 10 Watch bcn_bond1 |
an-a05n01, terminal window @ 70 x 10 Ping flood an-a05n02.bcn |
an-a05n01, terminal window @ 127 x 10 Watch cman_tool nodes |
| an-a05n01, terminal window @ 70 x 10 Watch sn_bond1 |
an-a05n01, terminal window @ 70 x 10 Ping flooding an-a05n02.sn |
an-a05n01, terminal window @ 127 x 10 Watching /etc/init.d/drbd status |
| an-a05n01, terminal window @ 70 x 10 Watch ifn_bond1 |
an-a05n01, terminal window @ 70 x 10 Ping flood an-a05n02.ifn |
an-a05n01, terminal window @ 127 x 10 Watch tail -f -n 0 /var/log/messages |
| an-a05n02, terminal window @ 70 x 10 Watch bcn_bond1 |
an-a05n02, terminal window @ 70 x 10 Ping flood an-a05n01.bcn |
an-a05n02, terminal window @ 127 x 10 Watch cman_tool nodes |
| an-a05n02, terminal window @ 70 x 10 Watch sn_bond1 |
an-a05n02, terminal window @ 70 x 10 Ping flooding an-a05n01.sn |
an-a05n02, terminal window @ 127 x 10 Watching /etc/init.d/drbd status |
| an-a05n02, terminal window @ 70 x 10 Watch ifn_bond1 |
an-a05n02, terminal window @ 70 x 10 Ping flood an-a05n01.ifn |
an-a05n02, terminal window @ 127 x 10 Watch tail -f -n 0 /var/log/messages |
The actual commands we will use are:
| an-a05n01 | Task | Command |
|---|---|---|
| Watch bcn_bond1 | watch "cat /proc/net/bonding/bcn_bond1 | grep -e Slave -e Status | grep -v queue" | |
| Watch sn_bond1 | watch "cat /proc/net/bonding/sn_bond1 | grep -e Slave -e Status | grep -v queue" | |
| Watch ifn_bond1 | watch "cat /proc/net/bonding/ifn_bond1 | grep -e Slave -e Status | grep -v queue" | |
| Ping flood an-a05n02.bcn | clear; ping -f an-a05n02.bcn | |
| Ping flood an-a05n02.sn | clear; ping -f an-a05n02.sn | |
| Ping flood an-a05n02.ifn | clear; ping -f an-a05n02.ifn | |
| Watch cluster membership | watch cman_tool nodes | |
| Watch DRBD resource status | watch /etc/init.d/drbd status | |
| tail system logs | clear; tail -f -n 0 /var/log/messages | |
| an-a05n02 | Task | Command |
| Watch bcn_bond1 | watch "cat /proc/net/bonding/bcn_bond1 | grep -e Slave -e Status | grep -v queue" | |
| Watch sn_bond1 | watch "cat /proc/net/bonding/sn_bond1 | grep -e Slave -e Status | grep -v queue" | |
| Watch ifn_bond1 | watch "cat /proc/net/bonding/ifn_bond1 | grep -e Slave -e Status | grep -v queue" | |
| Ping flood an-a05n01.bcn | clear; ping -f an-a05n01.bcn | |
| Ping flood an-a05n01.sn | clear; ping -f an-a05n01.sn | |
| Ping flood an-a05n01.ifn | clear; ping -f an-a05n01.ifn | |
| Watch cluster membership | watch cman_tool nodes | |
| Watch DRBD resource status | watch /etc/init.d/drbd status | |
| tail system logs | clear; tail -f -n 0 /var/log/messages |
With this, we can keep a real-time overview of the status of all network, drbd and cluster components for both nodes. It may take a little bit to setup, but it will make the following network failure and recovery tests much easier to keep track of. Most importantly, it will allow you to quickly see if any of the tests fail.
How to Know if the Tests Passed
Well, the most obvious answer to this question is if the cluster stack blows up or not.
We can be a little more subtle than that though.
We will be watching for:
- Bonds not failing over to or back from their backup links when the primary link fails.
- More than 20 or 30 lost packets across each/all effected bonds fail over or back. Keep in mind that this may sound like a lot of dropped packets, but we're flooding the network with as many pings as the hardware can push out, so 20 to 30 lost packets is actually very low packet loss.
- Corosync declaring the peer node lost and cluster membership changing / node fencing.
- DRBD losing connection to the peer / node fencing.
Breaking things!
To document the testing of all failure conditions would add substantially to this tutorial and not add much value.
So instead we will look at sample failures to see what to expect. You can then use them as references for your own testing.
Failing a Bond's Primary Interface
For this test, we will pull bcn_link1's network cable out of an-a05n01. This will trigger a fail-over to bcn_link2 which we will see in an-a05n01's bcn_bond1 file and we will see messages about the failure in the system logs. Both an-a05n01 and an-a05n02's ping flood on the BCN will show a number of dropped packets.
Assuming all goes well, corosync should not report any errors or react in any way to this test.
So pull the cable and see if you're result match ours.
| an-a05n01 |
bcn_bond1 data: Primary Slave: bcn_link1 (primary_reselect always)
Currently Active Slave: ifn_link2
MII Status: up
Slave Interface: bcn_link1
MII Status: down
Slave Interface: bcn_link2
MII Status: upSystem log entries: Nov 27 19:54:44 an-a05n01 kernel: igb: bcn_link1 NIC Link is Down
Nov 27 19:54:44 an-a05n01 kernel: bonding: bcn_bond1: link status definitely down for interface bcn_link1, disabling it
Nov 27 19:54:44 an-a05n01 kernel: bonding: bcn_bond1: making interface bcn_link2 the new active one. |
|---|
This shows that bcn_link2 became the active link and bcn_link1 shows as down.
Lets look at the ping flood;
| an-a05n01 | an-a05n02 |
|---|---|
PING an-a05n02.bcn (10.20.50.2) 56(84) bytes of data.
.......................... |
PING an-a05n01.bcn (10.20.50.1) 56(84) bytes of data.
.......................... |
Exactly in-line with what we expected! If you look at the cluster membership and system logs, you will see that nothing was noticed outside of the bonding driver!
So let's plug the cable back in.
We'll notice that the bond driver will see the link return, change the state of bcn_link1 to going back and nothing more will happen at first. After two minutes, bcn_bond1 will switch back to using bcn_link1 and there will be another short burst of dropped packets.
| an-a05n01 |
bcn_bond1 data: Primary Slave: bcn_link1 (primary_reselect always)
Currently Active Slave: bcn_link2
MII Status: up
Slave Interface: bcn_link1
MII Status: going back
Slave Interface: bcn_link2
MII Status: upSystem log entries: Nov 27 20:02:24 an-a05n01 kernel: igb: bcn_link1 NIC Link is Up 1000 Mbps Full Duplex, Flow Control: RX/TX
Nov 27 20:02:24 an-a05n01 kernel: bonding: bcn_bond1: link status up for interface bcn_link1, enabling it in 120000 ms. |
|---|
Now we wait for two minutes.
Ding!
| an-a05n01 |
bcn_bond1 data: Primary Slave: bcn_link1 (primary_reselect always)
Currently Active Slave: bcn_link1
MII Status: up
Slave Interface: bcn_link1
MII Status: up
Slave Interface: bcn_link2
MII Status: upSystem log entries: Nov 27 20:04:24 an-a05n01 kernel: bcn_bond1: link status definitely up for interface bcn_link1, 1000 Mbps full duplex.
Nov 27 20:04:24 an-a05n01 kernel: bonding: bcn_bond1: making interface bcn_link1 the new active one. |
|---|
Now lets look at the dropped packets when the switch-back happened;
| an-a05n01 | an-a05n02 |
|---|---|
PING an-a05n02.bcn (10.20.50.2) 56(84) bytes of data.
. |
PING an-a05n01.bcn (10.20.50.1) 56(84) bytes of data.
... |
Notice how an-a05n01 didn't lose a packet and an-a05n02 only lost a few? The switch was controlled, so no time was lost detecting the link failure.
Success!
| Note: Don't be tempted to test only a few links! |
Repeat this test for all network connections on both nodes. Ensure that each links fails and recovers in the same way. We have a complex network and tests like this help find cabling and configuration issues. These tests have value beyond simply verifying fail-over and recovery.
Failing the Network Switches
Failing and then recovering the primary switch tests a few things:
- Can all the bonds fail over to their backup links at the same time?
- Does the switch handle the loss of the primary switch in the stack properly?
- Does the switch interrupt traffic when it recovers?
Even if you don't have a stacked switch, this test is still very important. We set the updelay to two minutes, but there is a chance that is still not long enough for your switch. This test will expose issues like this.
| Note: If you don't have port trunking, be sure to switch your workstation's links or network uplink from the primary to backup switch before proceeding. This will ensure you can monitor the nodes during the test without interruption. |
Before we start, lets take a look at the current view of thing;
| an-a05n01 | ||
|---|---|---|
Watching bcn_bond1Primary Slave: bcn_link1 (primary_reselect always)
Currently Active Slave: bcn_link1
MII Status: up
Slave Interface: bcn_link1
MII Status: up
Slave Interface: bcn_link2
MII Status: up |
Ping flooding an-a05n02.bcnPING an-a05n02.bcn (10.20.50.2) 56(84) bytes of data.
. |
Watching cman_tool nodesNode Sts Inc Joined Name
1 M 348 2013-12-02 10:05:17 an-a05n01.alteeve.ca
2 M 360 2013-12-02 10:17:45 an-a05n02.alteeve.ca |
Watching sn_bond1Primary Slave: sn_link1 (primary_reselect always)
Currently Active Slave: sn_link1
MII Status: up
Slave Interface: sn_link1
MII Status: up
Slave Interface: sn_link2
MII Status: up |
Ping flooding an-a05n02.snPING an-a05n02.sn (10.10.50.2) 56(84) bytes of data.
. |
Watching /etc/init.d/drbd statusdrbd driver loaded OK; device status:
version: 8.3.16 (api:88/proto:86-97)
GIT-hash: a798fa7e274428a357657fb52f0ecf40192c1985 build by phil@Build64R6, 2013-09-27 16:00:43
m:res cs ro ds p mounted fstype
0:r0 Connected Primary/Primary UpToDate/UpToDate C
1:r1 Connected Primary/Primary UpToDate/UpToDate C |
Watching ifn_bond1Primary Slave: ifn_link1 (primary_reselect always)
Currently Active Slave: ifn_link1
MII Status: up
Slave Interface: ifn_link1
MII Status: up
Slave Interface: ifn_link2
MII Status: up |
Ping flooding an-a05n02.ifnPING an-a05n02.ifn (10.255.50.2) 56(84) bytes of data.
. |
Watching tail -f -n 0 /var/log/messages |
| an-a05n02 | ||
Watching bcn_bond1Primary Slave: ifn_link1 (primary_reselect always)
Currently Active Slave: ifn_link1
MII Status: up
Slave Interface: ifn_link1
MII Status: up
Slave Interface: ifn_link2
MII Status: up |
Ping flooding an-a05n01.bcnPING an-a05n01.bcn (10.20.50.1) 56(84) bytes of data.
. |
Watching cman_tool nodesNode Sts Inc Joined Name
1 M 360 2013-12-02 10:17:45 an-a05n01.alteeve.ca
2 M 356 2013-12-02 10:17:45 an-a05n02.alteeve.ca |
Watching sn_bond1Primary Slave: sn_link1 (primary_reselect always)
Currently Active Slave: sn_link1
MII Status: up
Slave Interface: sn_link1
MII Status: up
Slave Interface: sn_link2
MII Status: up |
Ping flooding an-a05n01.snPING an-a05n01.sn (10.10.50.1) 56(84) bytes of data.
. |
Watching /etc/init.d/drbd statusdrbd driver loaded OK; device status:
version: 8.3.16 (api:88/proto:86-97)
GIT-hash: a798fa7e274428a357657fb52f0ecf40192c1985 build by phil@Build64R6, 2013-09-27 16:00:43
m:res cs ro ds p mounted fstype
0:r0 Connected Primary/Primary UpToDate/UpToDate C
1:r1 Connected Primary/Primary UpToDate/UpToDate C |
Watching ifn_bond1Primary Slave: ifn_link1 (primary_reselect always)
Currently Active Slave: ifn_link1
MII Status: up
Slave Interface: ifn_link1
MII Status: up
Slave Interface: ifn_link2
MII Status: up |
Ping flooding an-a05n01.ifnPING an-a05n01.ifn (10.255.50.1) 56(84) bytes of data.
. |
Watching tail -f -n 0 /var/log/messages |
So now we will pull the power cable out of the primary switch and wait for things to settle.
| an-a05n01 | ||
|---|---|---|
Watching bcn_bond1Primary Slave: bcn_link1 (primary_reselect always)
Currently Active Slave: bcn_link2
MII Status: up
Slave Interface: bcn_link1
MII Status: down
Slave Interface: bcn_link2
MII Status: up |
Ping flooding an-a05n02.bcnPING an-a05n02.bcn (10.20.50.2) 56(84) bytes of data.
............................. |
Watching cman_tool nodesNode Sts Inc Joined Name
1 M 348 2013-12-02 10:05:17 an-a05n01.alteeve.ca
2 M 360 2013-12-02 10:17:45 an-a05n02.alteeve.ca |
Watching sn_bond1Primary Slave: sn_link1 (primary_reselect always)
Currently Active Slave: sn_link2
MII Status: up
Slave Interface: sn_link1
MII Status: down
Slave Interface: sn_link2
MII Status: up |
Ping flooding an-a05n02.snPING an-a05n02.sn (10.10.50.2) 56(84) bytes of data.
................................ |
Watching /etc/init.d/drbd statusdrbd driver loaded OK; device status:
version: 8.3.16 (api:88/proto:86-97)
GIT-hash: a798fa7e274428a357657fb52f0ecf40192c1985 build by phil@Build64R6, 2013-09-27 16:00:43
m:res cs ro ds p mounted fstype
0:r0 Connected Primary/Primary UpToDate/UpToDate C
1:r1 Connected Primary/Primary UpToDate/UpToDate C |
Watching ifn_bond1Primary Slave: ifn_link1 (primary_reselect always)
Currently Active Slave: ifn_link2
MII Status: up
Slave Interface: ifn_link1
MII Status: down
Slave Interface: ifn_link2
MII Status: up |
Ping flooding an-a05n02.ifnPING an-a05n02.ifn (10.255.50.2) 56(84) bytes of data.
.............................. |
Watching tail -f -n 0 /var/log/messagesDec 2 14:30:33 an-a05n01 kernel: e1000e: bcn_link1 NIC Link is Down
Dec 2 14:30:33 an-a05n01 kernel: igb: ifn_link1 NIC Link is Down
Dec 2 14:30:33 an-a05n01 kernel: igb: sn_link1 NIC Link is Down
Dec 2 14:30:33 an-a05n01 kernel: bonding: sn_bond1: link status definitely down for interface sn_link1, disabling it
Dec 2 14:30:33 an-a05n01 kernel: bonding: sn_bond1: making interface sn_link2 the new active one.
Dec 2 14:30:33 an-a05n01 kernel: bonding: ifn_bond1: link status definitely down for interface ifn_link1, disabling it
Dec 2 14:30:33 an-a05n01 kernel: bonding: ifn_bond1: making interface ifn_link2 the new active one.
Dec 2 14:30:33 an-a05n01 kernel: device ifn_link1 left promiscuous mode
Dec 2 14:30:33 an-a05n01 kernel: device ifn_link2 entered promiscuous mode
Dec 2 14:30:33 an-a05n01 kernel: bonding: bcn_bond1: link status definitely down for interface bcn_link1, disabling it
Dec 2 14:30:33 an-a05n01 kernel: bonding: bcn_bond1: making interface bcn_link2 the new active one. |
| an-a05n02 | ||
Watching bcn_bond1Primary Slave: bcn_link1 (primary_reselect always)
Currently Active Slave: bcn_link2
MII Status: up
Slave Interface: bcn_link1
MII Status: down
Slave Interface: bcn_link2
MII Status: up |
Ping flooding an-a05n01.bcnPING an-a05n01.bcn (10.20.50.1) 56(84) bytes of data.
................................ |
Watching cman_tool nodesNode Sts Inc Joined Name
1 M 360 2013-12-02 10:17:45 an-a05n01.alteeve.ca
2 M 356 2013-12-02 10:17:45 an-a05n02.alteeve.ca |
Watching sn_bond1Primary Slave: sn_link1 (primary_reselect always)
Currently Active Slave: sn_link2
MII Status: up
Slave Interface: sn_link1
MII Status: down
Slave Interface: sn_link2
MII Status: up |
Ping flooding an-a05n01.snPING an-a05n01.sn (10.10.50.1) 56(84) bytes of data.
............................. |
Watching /etc/init.d/drbd statusdrbd driver loaded OK; device status:
version: 8.3.16 (api:88/proto:86-97)
GIT-hash: a798fa7e274428a357657fb52f0ecf40192c1985 build by phil@Build64R6, 2013-09-27 16:00:43
m:res cs ro ds p mounted fstype
0:r0 Connected Primary/Primary UpToDate/UpToDate C
1:r1 Connected Primary/Primary UpToDate/UpToDate C |
Watching ifn_bond1Primary Slave: ifn_link1 (primary_reselect always)
Currently Active Slave: ifn_link2
MII Status: up
Slave Interface: ifn_link1
MII Status: down
Slave Interface: ifn_link2
MII Status: up |
Ping flooding an-a05n01.ifnPING an-a05n01.ifn (10.255.50.1) 56(84) bytes of data.
.................................. |
Watching tail -f -n 0 /var/log/messagesDec 2 14:30:33 an-a05n02 kernel: e1000e: bcn_link1 NIC Link is Down
Dec 2 14:30:33 an-a05n02 kernel: igb: ifn_link1 NIC Link is Down
Dec 2 14:30:33 an-a05n02 kernel: igb: sn_link1 NIC Link is Down
Dec 2 14:30:33 an-a05n02 kernel: bonding: bcn_bond1: link status definitely down for interface bcn_link1, disabling it
Dec 2 14:30:33 an-a05n02 kernel: bonding: bcn_bond1: making interface bcn_link2 the new active one.
Dec 2 14:30:33 an-a05n02 kernel: bonding: sn_bond1: link status definitely down for interface sn_link1, disabling it
Dec 2 14:30:33 an-a05n02 kernel: bonding: sn_bond1: making interface sn_link2 the new active one.
Dec 2 14:30:33 an-a05n02 kernel: bonding: ifn_bond1: link status definitely down for interface ifn_link1, disabling it
Dec 2 14:30:33 an-a05n02 kernel: bonding: ifn_bond1: making interface ifn_link2 the new active one.
Dec 2 14:30:33 an-a05n02 kernel: device ifn_link1 left promiscuous mode
Dec 2 14:30:33 an-a05n02 kernel: device ifn_link2 entered promiscuous mode |
Excellent! All of the bonds failed over to their backup interfaces and the cluster stays stable. Both cluster membership and DRBD continued without interruption!
Now to test recover of the primary switch. If everything was configured properly, the switch will recover, the primary links will wait two minutes before recovering and the actual cut-over will complete with few dropped packets.
| an-a05n01 | ||
|---|---|---|
Watching bcn_bond1Primary Slave: bcn_link1 (primary_reselect always)
Currently Active Slave: bcn_link1
MII Status: up
Slave Interface: bcn_link1
MII Status: up
Slave Interface: bcn_link2
MII Status: up |
Ping flooding an-a05n02.bcnPING an-a05n02.bcn (10.20.50.2) 56(84) bytes of data.
. |
Watching cman_tool nodesNode Sts Inc Joined Name
1 M 348 2013-12-02 10:05:17 an-a05n01.alteeve.ca
2 M 360 2013-12-02 10:17:45 an-a05n02.alteeve.ca |
Watching sn_bond1Primary Slave: sn_link1 (primary_reselect always)
Currently Active Slave: sn_link1
MII Status: up
Slave Interface: sn_link1
MII Status: up
Slave Interface: sn_link2
MII Status: up |
Ping flooding an-a05n02.snPING an-a05n02.sn (10.10.50.2) 56(84) bytes of data.
. |
Watching /etc/init.d/drbd statusdrbd driver loaded OK; device status:
version: 8.3.16 (api:88/proto:86-97)
GIT-hash: a798fa7e274428a357657fb52f0ecf40192c1985 build by phil@Build64R6, 2013-09-27 16:00:43
m:res cs ro ds p mounted fstype
0:r0 Connected Primary/Primary UpToDate/UpToDate C
1:r1 Connected Primary/Primary UpToDate/UpToDate C |
Watching ifn_bond1Primary Slave: ifn_link1 (primary_reselect always)
Currently Active Slave: ifn_link1
MII Status: up
Slave Interface: ifn_link1
MII Status: up
Slave Interface: ifn_link2
MII Status: up |
Ping flooding an-a05n02.ifnPING an-a05n02.ifn (10.255.50.2) 56(84) bytes of data.
.. |
Watching tail -f -n 0 /var/log/messagesDec 2 15:20:51 an-a05n01 kernel: e1000e: ifn_link1 NIC Link is Up 1000 Mbps Full Duplex, Flow Control: Rx/Tx
Dec 2 15:20:51 an-a05n01 kernel: bonding: ifn_bond1: link status up for interface ifn_link1, enabling it in 120000 ms.
Dec 2 15:20:52 an-a05n01 kernel: igb: bcn_link1 NIC Link is Up 1000 Mbps Full Duplex, Flow Control: RX/TX
Dec 2 15:20:52 an-a05n01 kernel: igb: sn_link1 NIC Link is Up 1000 Mbps Full Duplex, Flow Control: RX/TX
Dec 2 15:20:52 an-a05n01 kernel: bonding: sn_bond1: link status up for interface sn_link1, enabling it in 120000 ms.
Dec 2 15:20:52 an-a05n01 kernel: bonding: bcn_bond1: link status up for interface bcn_link1, enabling it in 120000 ms.
Dec 2 15:22:51 an-a05n01 kernel: ifn_bond1: link status definitely up for interface ifn_link1, 1000 Mbps full duplex.
Dec 2 15:22:51 an-a05n01 kernel: bonding: ifn_bond1: making interface ifn_link1 the new active one.
Dec 2 15:22:51 an-a05n01 kernel: device ifn_link2 left promiscuous mode
Dec 2 15:22:51 an-a05n01 kernel: device ifn_link1 entered promiscuous mode
Dec 2 15:22:52 an-a05n01 kernel: sn_bond1: link status definitely up for interface sn_link1, 1000 Mbps full duplex.
Dec 2 15:22:52 an-a05n01 kernel: bonding: sn_bond1: making interface sn_link1 the new active one.
Dec 2 15:22:52 an-a05n01 kernel: bcn_bond1: link status definitely up for interface bcn_link1, 1000 Mbps full duplex.
Dec 2 15:22:52 an-a05n01 kernel: bonding: bcn_bond1: making interface bcn_link1 the new active one. |
| an-a05n02 | ||
Watching bcn_bond1Primary Slave: bcn_link1 (primary_reselect always)
Currently Active Slave: bcn_link1
MII Status: up
Slave Interface: bcn_link1
MII Status: up
Slave Interface: bcn_link2
MII Status: up |
Ping flooding an-a05n01.bcnPING an-a05n01.bcn (10.20.50.1) 56(84) bytes of data.
... |
Watching cman_tool nodesNode Sts Inc Joined Name
1 M 360 2013-12-02 10:17:45 an-a05n01.alteeve.ca
2 M 356 2013-12-02 10:17:45 an-a05n02.alteeve.ca |
Watching sn_bond1Primary Slave: sn_link1 (primary_reselect always)
Currently Active Slave: sn_link1
MII Status: up
Slave Interface: sn_link1
MII Status: up
Slave Interface: sn_link2
MII Status: up |
Ping flooding an-a05n01.snPING an-a05n01.sn (10.10.50.1) 56(84) bytes of data.
... |
Watching /etc/init.d/drbd statusdrbd driver loaded OK; device status:
version: 8.3.16 (api:88/proto:86-97)
GIT-hash: a798fa7e274428a357657fb52f0ecf40192c1985 build by phil@Build64R6, 2013-09-27 16:00:43
m:res cs ro ds p mounted fstype
0:r0 Connected Primary/Primary UpToDate/UpToDate C
1:r1 Connected Primary/Primary UpToDate/UpToDate C |
Watching ifn_bond1Primary Slave: ifn_link1 (primary_reselect always)
Currently Active Slave: ifn_link1
MII Status: up
Slave Interface: ifn_link1
MII Status: up
Slave Interface: ifn_link2
MII Status: up |
Ping flooding an-a05n01.ifnPING an-a05n01.ifn (10.255.50.1) 56(84) bytes of data.
. |
Watching tail -f -n 0 /var/log/messagesDec 2 15:20:51 an-a05n02 kernel: e1000e: ifn_link1 NIC Link is Up 1000 Mbps Full Duplex, Flow Control: Rx/Tx
Dec 2 15:20:51 an-a05n02 kernel: bonding: ifn_bond1: link status up for interface ifn_link1, enabling it in 120000 ms.
Dec 2 15:20:52 an-a05n02 kernel: igb: sn_link1 NIC Link is Up 1000 Mbps Full Duplex, Flow Control: RX/TX
Dec 2 15:20:52 an-a05n02 kernel: bonding: sn_bond1: link status up for interface sn_link1, enabling it in 120000 ms.
Dec 2 15:20:52 an-a05n02 kernel: igb: bcn_link1 NIC Link is Up 1000 Mbps Full Duplex, Flow Control: RX/TX
Dec 2 15:20:53 an-a05n02 kernel: bonding: bcn_bond1: link status up for interface bcn_link1, enabling it in 120000 ms.
Dec 2 15:22:51 an-a05n02 kernel: ifn_bond1: link status definitely up for interface ifn_link1, 1000 Mbps full duplex.
Dec 2 15:22:51 an-a05n02 kernel: bonding: ifn_bond1: making interface ifn_link1 the new active one.
Dec 2 15:22:51 an-a05n02 kernel: device ifn_link2 left promiscuous mode
Dec 2 15:22:51 an-a05n02 kernel: device ifn_link1 entered promiscuous mode
Dec 2 15:22:52 an-a05n02 kernel: sn_bond1: link status definitely up for interface sn_link1, 1000 Mbps full duplex.
Dec 2 15:22:52 an-a05n02 kernel: bonding: sn_bond1: making interface sn_link1 the new active one.
Dec 2 15:22:53 an-a05n02 kernel: bcn_bond1: link status definitely up for interface bcn_link1, 1000 Mbps full duplex.
Dec 2 15:22:53 an-a05n02 kernel: bonding: bcn_bond1: making interface bcn_link1 the new active one. |
Perfect!
| Note: Some switches will show a link and then drop the connection a few times as they boot. If your switch is like this, you will see this reflected in the system logs. This should be fine because of the two minute updelay value. |
Now repeat this test by failing and recovering the backup switch. Do not assume that, because the first switch cycled successfully, the second switch will as well. A bad configuration can easily allow the primary switch to pass this test while the secondary switch would cause a failure.
With the second switch test complete, we can be confident that the networking infrastructure is totally fault tolerant.
Provisioning Virtual Machines
Now we're getting to the purpose of our cluster; Provision virtual machines!
We have two steps left:
- Provision our VMs.
- Add the VMs to rgmanager.
"Provisioning" a virtual machine simple means to create it; Assign a collection of emulated hardware, connected to physical devices, to a given virtual machine and begin the process of installing the operating system on it. This tutorial is more about clustering than it is about virtual machine administration, so some experience with managing virtual machines has to be assumed. If you need to brush up, here are some resources:
- KVM project's How-Tos
- KVM project's FAQ
- Red Hat's Hypervisor Guide
- Red Hat's Virtualization Guide
- Red Hat's Virtualization Administration
- Red Hat's Virtualization Host Configuration and Guest Installation Guide
When you feel comfortable, proceed.
Before We Begin - Building a Dashboard

One of the biggest advances since the initial tutorial was created was the creation of the Striker - Cluster Dashboard.
It provides a very easy to use web-based user interface for building, modifying and removing servers on the Anvil! platform.
It also provides a "KVM switch" style access to the servers you create. This gives you direct access to your servers, just as if you have a physical keyboard, mouse and monitor plugged into a physical server. You can watch the server boot from the virtual, boot into recovery consoles or off of repair "DVDs" and so forth.
The link above covers the dashboard and its use, and includes a link to an installer showing how to setup a dashboard for yourself. Now is a good time to take a break from this tutorial and setup that dashboard.
If you do not wish to build a dashboard, that is fine. It is not required in this tutorial.
If you decide not to though, you will now need to setup "Virtual Machine Manager" on your (Linux) computer in order to get access to the servers we are about to build. You will need this in order to walk through the installation process for your new servers. Of course, once the install is complete, you can switch to another, traditional form of remote access like RDP on windows servers or ssh on *nix servers.
If you want to use "Virtual Machine Manager", look for a package from your distribution package manager with a name like virt-manager. Once it is installed, add the connections to your Anvil! nodes. Once that's done, you're ready to proceed to the next section!
A Note on the Following Server Installations
We wanted to show as many different server installations as possible. Obviously, it's unlikely that you will want or need all of the operating we're about to install. Please feel free to skip over the installation of servers that are not interesting to you.
Provision Planning
| Note: We're going to spend a lot of time provisioning vm01-win2008. If you plan to skip it, please be sure to refer back to it if you run into questions on a later install. |
If you recall, when we were planning out our partitions, we've already chosen which servers will draw from which storage pools and how big their "hard drives" will be. The last thing to consider is RAM allocation. The servers we're using to write this tutorial are a little modest in the RAM department with only 24 GiB of RAM. We need to subtract at least 2 GiB for the host nodes, leaving us with a total of 22 GiB.
That needs to be divided up amongst our eight servers. Now, nothing says you have to use it all, of course. It's perfectly fine to leave some RAM unallocated for future use. This is really up to you and your needs.
Let's put together a table with the RAM we plan to allocate and summarizing the logical volume we're going to create for each server. The LVs will be named after the server they'll be assigned to with the suffix _0. Later, if we add a second "hard drive" to a server, it will have the suffix _1 and so on.
| Server | RAM (GiB) | Storage Pool (VG) | LV name | LV size |
|---|---|---|---|---|
| vm01-win2008 | 3 | an-a05n01 | vm01-win2008_0 | 150 GB |
| vm02-win2012 | 4 | an-a05n02 | vm02-win2012_0 | 150 GB |
| vm03-win7 | 3 | an-a05n01 | vm03-win7_0 | 100 GB |
| vm04-win8 | 4 | an-a05n01 | vm04-win8_0 | 100 GB |
| vm05-freebsd9 | 2 | an-a05n02 | vm05-freebsd9_0 | 50 GB |
| vm06-solaris11 | 2 | an-a05n02 | vm06-solaris11_0 | 100 GB |
| vm07-rhel6 | 2 | an-a05n01 | vm07-rhel6_0 | 50 GB |
| vm08-sles11 | 2 | an-a05n01 | vm08-sles11_0 | 100 GB |
If you plan to set static IP addresses for your servers, now would be a good time to select them, too. It's not needed, of course, but it certainly can make things easier to have all the details in one place.
| Note: Not to spoil the surprise, but if you plan to not follow this tutorial exactly, please be sure to read the notes in the vm06-solaris100 section. |
Provisioning vm01-win2008

Before we can install the OS, we need to copy the installation media and our driver disk, if needed, and put them in the /shared/files.
Windows is licensed software, so you will need to purchase a copy. You can get an evaluation copy from Microsoft's website. In either case, downloading a copy of the installation media is an exercise for you, I am afraid.
As for drivers; We're going to use a special kind of emulated SCSI controller and a special kind of emulated network card for this and our other three windows installs. These are called http://www.linux-kvm.org/page/Virtio devices and they are designed to significantly improve storage and network speeds on KVM guests.
If you have ever installed windows on a newer server, you're probably already familiar with the process of installing drivers in order to see SCSI and RAID controllers during the boot process. If so, then what we're going to do here will be no different. If you have never done this before, don't worry. It's a fairly simple task.
You can create install media from a physical disk or copy install media using the Striker's "Media Connector" function. Of course, you can also copy files to the Anvil! using standard tools like rsync and wget as well. What ever method you prefer,
In my case, I will rsync the Windows install ISO from another machine on our network to /shared/files via an-a05n01.
rsync -av --progress /data0/VMs/files/Windows_Svr_2008_R2_64Bit_SP1.ISO root@10.255.50.1:/shared/files/root@10.255.50.1's password:sending incremental file list
Windows_Svr_2008_R2_64Bit_SP1.ISO
3166720000 100% 65.53MB/s 0:00:46 (xfer#1, to-check=0/1)
sent 3167106674 bytes received 31 bytes 59198256.17 bytes/sec
total size is 3166720000 speedup is 1.00For virtio, let's use wget to grab the latest version from their website. At the time of this writing, the "stable" version is 0.1-74.
Being conservative when it comes to servers, my preference is to use the "stable" version.
| an-a05n01 | cd /shared/files/
wget -c https://fedorapeople.org/groups/virt/virtio-win/direct-downloads/stable-virtio/virtio-win.iso
cd ~--2015-09-10 12:24:17-- https://fedorapeople.org/groups/virt/virtio-win/direct-downloads/stable-virtio/virtio-win.iso
Resolving fedorapeople.org... 152.19.134.196, 2610:28:3090:3001:5054:ff:feff:683f
Connecting to fedorapeople.org|152.19.134.196|:443... connected.
HTTP request sent, awaiting response... 301 Moved Permanently
Location: https://fedorapeople.org/groups/virt/virtio-win/direct-downloads/archive-virtio/virtio-win-0.1.102/virtio-win.iso [following]
--2015-09-10 12:24:17-- https://fedorapeople.org/groups/virt/virtio-win/direct-downloads/archive-virtio/virtio-win-0.1.102/virtio-win.iso
Reusing existing connection to fedorapeople.org:443.
HTTP request sent, awaiting response... 301 Moved Permanently
Location: https://fedorapeople.org/groups/virt/virtio-win/direct-downloads/archive-virtio/virtio-win-0.1.102/virtio-win-0.1.102.iso [following]
--2015-09-10 12:24:17-- https://fedorapeople.org/groups/virt/virtio-win/direct-downloads/archive-virtio/virtio-win-0.1.102/virtio-win-0.1.102.iso
Reusing existing connection to fedorapeople.org:443.
HTTP request sent, awaiting response... 200 OK
Length: 160755712 (153M) [application/octet-stream]
Saving to: `virtio-win.iso'
100%[====================================================================>] 160,755,712 1.11M/s in 2m 36s
2015-09-10 12:26:54 (1004 KB/s) - `virtio-win.iso' saved [160755712/160755712] |
|---|
Note that the original file name was virtio-win-0.1.102, but the downloaded file ended up being called virtio-win.iso? Lets fix that so we know down the road the version we have. We'll also make sure the file is world-readable.
| an-a05n01 | mv /shared/files/virtio-win.iso /shared/files/virtio-win-0.1.102.iso
chmod 644 /shared/files/virtio-win-0.1.102.iso |
|---|---|
| an-a05n02 | ls -lah /shared/files/total 3.1G
drwxr-xr-x. 2 root root 3.8K Nov 2 10:48 .
drwxr-xr-x. 6 root root 3.8K Nov 1 01:23 ..
-rw-r--r-- 1 root root 154M Apr 26 18:25 virtio-win-0.1.102.iso
-rw-rw-r--. 1 qemu qemu 3.0G Oct 14 2011 Windows_Svr_2008_R2_64Bit_SP1.ISO |
Ok, we're ready!
Creating vm01-win2008's Storage
| Note: Earlier, we used parted to examine our free space and create our DRBD partitions. Unfortunately, parted shows sizes in GB (base 10) where LVM uses GiB (base 2). If we used LVM's "xxG size notation, it will use more space than we expect, relative to our planning in the parted stage. LVM doesn't allow specifying new LV sizes in GB instead of GiB, so here we will specify sizes in MiB to help narrow the differences. You can read more about this issue here. |
Creating the vm01-win2008's "hard drive" is a simple process. Recall that we want a 150 GB logical volume carved from the an-a05n01_vg0 volume group (the "storage pool" for servers designed to run on an-a05n01). Knowing this, the command to create the new LV is below.
| an-a05n01 | lvcreate -L 150000M -n vm01-win2008_0 /dev/an-a05n01_vg0 Logical volume "vm01-win2008_0" created |
|---|---|
| an-a05n02 | lvdisplay /dev/an-a05n01_vg0/vm01-win2008_0 --- Logical volume ---
LV Path /dev/an-a05n01_vg0/vm01-win2008_0
LV Name vm01-win2008_0
VG Name an-a05n01_vg0
LV UUID bT0zon-H2LN-0jmi-refA-J0QX-zHjT-nEY7YY
LV Write Access read/write
LV Creation host, time an-a05n01.alteeve.ca, 2013-11-02 11:04:44 -0400
LV Status available
# open 0
LV Size 146.48 GiB
Current LE 37500
Segments 1
Allocation inherit
Read ahead sectors auto
- currently set to 256
Block device 253:1 |
Notice how we see 146.48 GiB? That is roughly the difference between "150 GB" and "150 GiB".
Creating vm01-win2008's virt-install Call
Now with the storage created, we can craft the virt-install command. we'll put this into a file under the /shared/provision/ directory for future reference. Let's take a look at the command, then we'll discuss what the switches are for.
| an-a05n01 | touch /shared/provision/vm01-win2008.sh
chmod 755 /shared/provision/vm01-win2008.sh
vim /shared/provision/vm01-win2008.shvirt-install --connect qemu:///system \
--name vm01-win2008 \
--ram 3072 \
--arch x86_64 \
--vcpus 2 \
--cdrom /shared/files/Windows_Svr_2008_R2_64Bit_SP1.ISO \
--disk path=/shared/files/virtio-win-0.1-52.iso,device=cdrom --force\
--os-variant win2k8 \
--network bridge=ifn_bridge1,model=virtio \
--disk path=/dev/an-a05n01_vg0/vm01-win2008_0,bus=virtio \
--graphics spice > /var/log/an-install_vm01-win2008.log & |
|---|
| Note: Don't use tabs to indent the lines. |
Let's break it down;
| Switch | Descriptions |
|---|---|
| --connect qemu:///system | This tells virt-install to use the QEMU hardware emulator (as opposed to Xen, for example) and to install the server on to local node. |
| --name vm01-win2008 | This sets the name of the server. It is the name we will use in the cluster configuration and whenever we use the libvirtd tools, like virsh. |
| --ram 3072 | This sets the amount of RAM, in MiB, to allocate to this server. Here, we're allocating 3 GiB, which is 3,072 MiB. |
| --arch x86_64 | This sets the emulated CPU's architecture to 64-bit. This can be used even when you plan to install a 32-bit OS, but not the other way around, of course. |
| --vcpus 2 | This sets the number of CPU cores to allocate to this server. Here, we're allocating two CPUs. |
| --cdrom /shared/files/Windows_Svr_2008_R2_64Bit_SP1.ISO | This tells the hypervisor to create a cd-rom (dvd-rom) drive and to "insert" the specified ISO as if it was a physical disk. This will be the initial boot device, too. |
| --disk path=/shared/files/virtio-win-0.1-52.iso,device=cdrom --force | We need to make the virtio drivers available during the install process. This command is similar to the --cdrom above, but crafted as if it was a disk drive with the device=cdrom switch. This helps make sure that the cdrom above is used as the boot drive. Also note the --force option. This is used because, normally, if the ISO was "inserted" into another server's cd-rom, it would refuse to work here. The nature of ISOs ensures they're read-only, so we can safely force two or more servers to use the same ISO at the same time. |
| --os-variant win2k8 | This tweaks the virt-manager's initial method of running and tunes the hypervisor to try and get the best performance for the server. There are many possible values here for many, many different operating systems. If you run virt-install --os-variant list on your node, you will get a full list of available operating systems. If you can't find your exact operating system, select the one that is the closest match. |
| --network bridge=ifn_bridge1,model=virtio | This tells the hypervisor that we want to create a network card using the virtio "hardware" and that we want it plugged into the ifn_bridge1 bridge. We only need one network card, but if you wanted two or more, simply repeat this command. If you create two or more bridges, you can have different network devices connect to different bridges. |
| --disk path=/dev/an-a05n01_vg0/vm01-win2008_0,bus=virtio | This tells the hypervisor what logical volume to use for the server's "hard drive". It also tells it to use the virtio emulated SCSI controller. |
| --graphics spice > /var/log/an-install_vm01-win2008.log | Finally, this tells the hypervisor to use the spice emulated video card. It is a bit simplistic to call it simply a "graphics card", but that's close enough for now. Given that this is the last line, we close off the virt-install command with a simple redirection to a log file. Later, if we want to examine the install process, we can review /var/log/an-install_vm01-win2008.log for details on the install process. |
Initializing vm01-win2008's Install
On your dashboard or workstation, open the "Virtual Machine Manager" and connect to both nodes.
We can install any server from either node. However, we know that each server has a preferred host, so it's sensible to use that host for the installation stage. In the case of vm01-win2008, the preferred host is an-a05n01, so we'll use it to kick off the install.
Once the install begins, the new server should appear in "Virtual Machine Manager". Double-click on it and you will see that the new server is booting off of the install cd-rom. We're installing Windows, so that will begin the install process.
Time to start the install!
| an-a05n01 | /shared/provision/vm01-win2008.sh Cannot open display:
Run 'virt-viewer --help' to see a full list of available command line options |
|---|
And it's off!

Follow the install process, entering the values you want. When you get to the install target screen, you will see that Windows can't find the hard drive.

This was expected because windows 2008 does not natively support virtio. That's why we used two virtual cd-rom drives and "inserted" the virtio driver disk into the second drive.
| Warning: Since this tutorial was written, the virtio project has significantly changed the directory structure where drivers are held. The storage drivers are now found in viostor/2k8/amd64/. The trick of loading the other drivers is still possible by loading the "wrong" driver, one at a time, but it is quite a bit easier to now load the network and other drivers after the install completes. To do so, go to "Device Manager" and select the devices with a yellow exclamation mark, choose to update their drivers and tell it to search all subdirectories on the "dvd". |
Click on "Load Driver" on the bottom right.

Click on "Browse".

The driver disk is in the seconds (virtual) cd-rom drive mounted at drive e:. The drivers for Windows 2008 are the same as for Windows 7, so browse to E:\WIN7\AMD64 (assuming you are installing the 64-bit version of windows) and click on "OK".

| Note: If you forget to select the network drivers here, you will have to manually install the drivers for the network card after the install has completed. |
Press and hold the <control> key and click on both the "Red Hat VirtIO Ethernet Adapter" and the "Red Hat VirtIO SCSI Controller" drivers. By doing this, we won't have to install the network card's drivers later. Click on "Next" and the drivers will be installed.

Now you can finish installing Windows 2008 just as you would do so on a bare iron server!

What you do from here is entirely up to you and your needs.
| Note: If you wish, jump to Making vm01-win2008 a Highly Available Service now to immediately add vm01-win2008 to the cluster manager. |
Provisioning vm02-win2012
| Note: This install references steps taken in the vm01-win2008 install. If you skipped it, you may wish to look at it to get a better idea of some of the steps performed here. |

Before we can install the OS, we need to copy the installation media and our driver disk, if needed, and put them in the /shared/files.
Windows is licensed software, so you will need to purchase a copy. You can get an evaluation copy from Microsoft's website. In either case, downloading a copy of the installation media is an exercise for you, I am afraid.
As for drivers; We're going to use a special kind of emulated SCSI controller and a special kind of emulated network card for this and our other three windows installs. These are called http://www.linux-kvm.org/page/Virtio devices and they are designed to significantly improve storage and network speeds on KVM guests.
If you have ever installed windows on a newer server, you're probably already familiar with the process of installing drivers in order to see SCSI and RAID controllers during the boot process. If so, then what we're going to do here will be no different. If you have never done this before, don't worry. It's a fairly simple task.
You can create install media from a physical disk or copy install media using the Striker's "Media Connector" function. Of course, you can also copy files to the Anvil! using standard tools like rsync and wget as well. What ever method you prefer,
In my case, I will rsync the Windows install ISO from another machine on our network to /shared/files via an-a05n01.
rsync -av --progress /data0/VMs/files/Windows_2012_R2_64-bit_Preview.iso root@10.255.50.1:/shared/files/root@10.255.50.1's password:sending incremental file list
Windows_2012_R2_64-bit_Preview.iso
4128862208 100% 66.03MB/s 0:00:59 (xfer#1, to-check=0/1)
sent 4129366322 bytes received 31 bytes 65029391.39 bytes/sec
total size is 4128862208 speedup is 1.00For virtio, we can simply re-use the ISO we uploaded for vm01-2008.
| Note: We've planned to run vm02-win2012 on an-a05n02, so we will use that node for the provisioning stage. |
| an-a05n02 | ls -lah /shared/files/total 6.9G
drwxr-xr-x. 2 root root 3.8K Nov 11 11:28 .
drwxr-xr-x. 6 root root 3.8K Nov 1 01:23 ..
-rw-r--r--. 1 qemu qemu 56M Jan 22 2013 virtio-win-0.1-52.iso
-rw-rw-r--. 1 1000 1000 3.9G Oct 2 22:31 Windows_2012_R2_64-bit_Preview.iso
-rw-rw-r--. 1 qemu qemu 3.0G Oct 14 2011 Windows_Svr_2008_R2_64Bit_SP1.ISO |
|---|
Ok, we're ready!
Creating vm02-win2012's Storage
| Note: Earlier, we used parted to examine our free space and create our DRBD partitions. Unfortunately, parted shows sizes in GB (base 10) where LVM uses GiB (base 2). If we used LVM's "xxG size notation, it will use more space than we expect, relative to our planning in the parted stage. LVM doesn't allow specifying new LV sizes in GB instead of GiB, so here we will specify sizes in MiB to help narrow the differences. You can read more about this issue here. |
Creating the vm02-win2012's "hard drive" is a simple process. Recall that we want a 150 GB logical volume carved from the an-a05n02_vg0 volume group (the "storage pool" for servers designed to run on an-a05n02). Knowing this, the command to create the new LV is below.
| an-a05n02 | lvcreate -L 150000M -n vm02-win2012_0 /dev/an-a05n02_vg0 Logical volume "vm02-win2012_0" created |
|---|---|
| an-a05n01 | lvdisplay /dev/an-a05n02_vg0/vm02-win2012_0 --- Logical volume ---
LV Path /dev/an-a05n02_vg0/vm02-win2012_0
LV Name vm02-win2012_0
VG Name an-a05n02_vg0
LV UUID Lnyg1f-kNNV-qjfn-P7X3-LxLw-1Uyh-dfNfL0
LV Write Access read/write
LV Creation host, time an-a05n02.alteeve.ca, 2013-11-11 11:30:55 -0500
LV Status available
# open 0
LV Size 146.48 GiB
Current LE 37500
Segments 1
Allocation inherit
Read ahead sectors auto
- currently set to 256
Block device 253:2 |
Notice how we see 146.48 GiB? That is roughly the difference between "150 GB" and "150 GiB".
Creating vm02-win2012's virt-install Call
Now with the storage created, we can craft the virt-install command. we'll put this into a file under the /shared/provision/ directory for future reference. Let's take a look at the command, then we'll discuss what the switches are for.
| an-a05n02 | touch /shared/provision/vm02-win2012.sh
chmod 755 /shared/provision/vm02-win2012.sh
vim /shared/provision/vm02-win2012.shvirt-install --connect qemu:///system \
--name vm02-win2012 \
--ram 4096 \
--arch x86_64 \
--vcpus 2 \
--cdrom /shared/files/Windows_2012_R2_64-bit_Preview.iso \
--disk path=/shared/files/virtio-win-0.1-52.iso,device=cdrom --force\
--os-variant win2k8 \
--network bridge=ifn_bridge1,model=virtio \
--disk path=/dev/an-a05n02_vg0/vm02-win2012_0,bus=virtio \
--graphics spice > /var/log/an-install_vm02-win2012.log & |
|---|
| Note: Don't use tabs to indent the lines. |
Let's look at the differences from vm01-win2008;
| Switch | Descriptions |
|---|---|
| --name vm02-win2012 | This is the name we're going to use for this server in the cluster and with the libvirtd tools. |
| --ram 4096 | This sets the amount of RAM, in MiB, to allocate to this server. Here, we're allocating 4 GiB, which is 4,096 MiB. |
| --cdrom /shared/files/Windows_2012_R2_64-bit_Preview.iso | This tells the hypervisor to create a cd-rom (dvd-rom) drive and to "insert" the specified ISO as if it was a physical disk. This will be the initial boot device, too. |
| --disk path=/shared/files/virtio-win-0.1-52.iso,device=cdrom --force | This is the same as the vm01-win2008 provision script, but this is where the --force comes in handy. If this ISO was still "mounted" in vm01-2008's cd-rom tray, the install would abort without --force. |
| --os-variant win2k8 | This is also the same as the vm01-win2008 provision script. At the time of writing, there wasn't an entry for win2012, so we're using the closest match which is win2k8. |
| --disk path=/dev/an-a05n02_vg0/vm02-win2012_0,bus=virtio | This tells the hypervisor what logical volume to use for the server's "hard drive". It also tells it to use the virtio emulated SCSI controller. |
| --graphics spice > /var/log/an-install_vm02-win2012.log | We're using a new log file for our bash redirection. Later, if we want to examine the install process, we can review /var/log/an-install_vm02-win2012.log for details on the install process. |
Initializing vm02-win2012's Install
On your dashboard or workstation, open the "Virtual Machine Manager" and connect to both nodes.
We can install any server from either node. However, we know that each server has a preferred host, so it's sensible to use that host for the installation stage. In the case of vm02-win2012, the preferred host is an-a05n02, so we'll use it to kick off the install.
Once the install begins, the new server should appear in "Virtual Machine Manager". Double-click on it and you will see that the new server is booting off of the install cd-rom. We're installing Windows, so that will begin the install process.
Time to start the install!
| an-a05n02 | /shared/provision/vm02-win2012.sh Cannot open display:
Run 'virt-viewer --help' to see a full list of available command line options |
|---|
And it's off!

Follow the install process, entering the values you want. When you get to the install target screen, you will see that Windows can't find the hard drive.

| Warning: Since this tutorial was written, the virtio project has significantly changed the directory structure where drivers are held. The storage drivers are now found in viostor/2k12R2/amd64/. The trick of loading the other drivers is still possible by loading the "wrong" driver, one at a time, but it is quite a bit easier to now load the network and other drivers after the install completes. To do so, go to "Device Manager" and select the devices with a yellow exclamation mark, choose to update their drivers and tell it to search all subdirectories on the "dvd". |
This was expected because windows 2008 does not natively support virtio. That's why we used two virtual cd-rom drives and "inserted" the virtio driver disk into the second drive.
Click on "Load Driver" on the bottom right.

Click on "Browse".

The driver disk is in the seconds (virtual) cd-rom drive mounted at drive e:. The drivers for Windows 2008 are the same as for Windows 7, so browse to E:\WIN8\AMD64 (assuming you are installing the 64-bit version of windows) and click on "OK".

| Note: If you forget to select the network drivers here, you will have to manually install the drivers for the network card after the install has completed. |
Press and hold the <control> key and click on both the "Red Hat VirtIO Ethernet Adapter" and the "Red Hat VirtIO SCSI Controller" drivers. By doing this, we won't have to install the network card's drivers later. Click on "Next" and the drivers will be installed.

Now you can finish installing Windows 2008 just as you would do so on a bare iron server!

What you do from here is entirely up to you and your needs.
| Note: If you wish, jump to Making vm02-win2012 a Highly Available Service now to immediately add vm02-win2012 to the cluster manager. |
Provisioning vm03-win7
| Note: This install references steps taken in the vm01-win2008 install. If you skipped it, you may wish to look at it to get a better idea of some of the steps performed here. |

Before we can install the OS, we need to copy the installation media and our driver disk, if needed, and put them in the /shared/files.
Windows is licensed software, so you will need to purchase a copy. You can get an evaluation copy from Microsoft's website. In either case, downloading a copy of the installation media is an exercise for you, I am afraid.
As we did for the previous two servers, we're going to use a special kind of SCSI controller and a special kind of emulated network card. These are called http://www.linux-kvm.org/page/Virtio devices and they are designed to significantly improve storage and network speeds on KVM guests.
You can create install media from a physical disk or copy install media using the Striker's "Media Connector" function. Of course, you can also copy files to the Anvil! using standard tools like rsync and wget as well. What ever method you prefer,
In my case, I will rsync the Windows install ISO from another machine on our network to /shared/files via an-a05n01.
rsync -av --progress /data0/VMs/files/Windows_7_Pro_SP1_64bit_OEM_English.iso root@10.255.50.1:/shared/files/root@10.255.50.1's password:sending incremental file list
Windows_7_Pro_SP1_64bit_OEM_English.iso
3321233408 100% 83.97MB/s 0:00:37 (xfer#1, to-check=0/1)
sent 3321638948 bytes received 31 bytes 80039493.47 bytes/sec
total size is 3321233408 speedup is 1.00For virtio, we can simply re-use the ISO we uploaded for vm01-2008.
| Note: We've planned to run vm03-win7 on an-a05n01, so we will use that node for the provisioning stage. |
| an-a05n01 | ls -lah /shared/files/total 10G
drwxr-xr-x. 2 root root 3.8K Nov 12 11:32 .
drwxr-xr-x. 6 root root 3.8K Nov 1 01:23 ..
-rw-r--r--. 1 qemu qemu 56M Jan 22 2013 virtio-win-0.1-52.iso
-rw-rw-r--. 1 qemu qemu 3.9G Oct 2 22:31 Windows_2012_R2_64-bit_Preview.iso
-rw-rw-rw-. 1 qemu qemu 3.1G Jun 8 2011 Windows_7_Pro_SP1_64bit_OEM_English.iso
-rw-rw-r--. 1 qemu qemu 3.0G Oct 14 2011 Windows_Svr_2008_R2_64Bit_SP1.ISO |
|---|
Ok, we're ready!
Creating vm03-win7's Storage
| Note: Earlier, we used parted to examine our free space and create our DRBD partitions. Unfortunately, parted shows sizes in GB (base 10) where LVM uses GiB (base 2). If we used LVM's "xxG size notation, it will use more space than we expect, relative to our planning in the parted stage. LVM doesn't allow specifying new LV sizes in GB instead of GiB, so here we will specify sizes in MiB to help narrow the differences. You can read more about this issue here. |
Creating the vm03-win7's "hard drive" is a simple process. Recall that we want a 100 GB logical volume carved from the an-a05n01_vg0 volume group (the "storage pool" for servers designed to run on an-a05n01). Knowing this, the command to create the new LV is below.
| an-a05n01 | lvcreate -L 100000M -n vm03-win7_0 /dev/an-a05n01_vg0 Logical volume "vm03-win7_0" created |
|---|---|
| an-a05n02 | lvdisplay /dev/an-a05n01_vg0/vm03-win7_0 --- Logical volume ---
LV Path /dev/an-a05n01_vg0/vm03-win7_0
LV Name vm03-win7_0
VG Name an-a05n01_vg0
LV UUID vgdtEm-aOsU-hatQ-2PxO-BN1e-sGLM-J7NVcn
LV Write Access read/write
LV Creation host, time an-a05n01.alteeve.ca, 2013-11-12 12:08:52 -0500
LV Status available
# open 0
LV Size 97.66 GiB
Current LE 25000
Segments 1
Allocation inherit
Read ahead sectors auto
- currently set to 256
Block device 253:3 |
Notice how we see 97.66 GiB? That is roughly the difference between "100 GB" and "100 GiB".
Creating vm03-win7's virt-install Call
Now with the storage created, we can craft the virt-install command. we'll put this into a file under the /shared/provision/ directory for future reference. Let's take a look at the command, then we'll discuss what the switches are for.
| an-a05n01 | touch /shared/provision/vm03-win7.sh
chmod 755 /shared/provision/vm03-win7.sh
vim /shared/provision/vm03-win7.shvirt-install --connect qemu:///system \
--name vm03-win7 \
--ram 3072 \
--arch x86_64 \
--vcpus 2 \
--cdrom /shared/files/Windows_7_Pro_SP1_64bit_OEM_English.iso \
--disk path=/shared/files/virtio-win-0.1-52.iso,device=cdrom --force\
--os-variant win7 \
--network bridge=ifn_bridge1,model=virtio \
--disk path=/dev/an-a05n01_vg0/vm03-win7_0,bus=virtio \
--graphics spice > /var/log/an-install_vm03-win7.log & |
|---|
| Note: Don't use tabs to indent the lines. |
Let's look at the differences from vm01-win2008;
| Switch | Descriptions |
|---|---|
| --name vm03-win7 | This is the name we're going to use for this server in the cluster and with the libvirtd tools. |
| --ram 3072 | This sets the amount of RAM, in MiB, to allocate to this server. Here, we're allocating 3 GiB, which is 3,072 MiB. |
| --cdrom /shared/files/Windows_7_Pro_SP1_64bit_OEM_English.iso | This tells the hypervisor to create a cd-rom (dvd-rom) drive and to "insert" the specified ISO as if it was a physical disk. This will be the initial boot device, too. |
| --disk path=/shared/files/virtio-win-0.1-52.iso,device=cdrom --force | This is the same as the vm01-win2008 provision script, but this is where the --force comes in handy. If this ISO was still "mounted" in vm01-2008's cd-rom tray, the install would abort without --force. |
| --os-variant win7 | This tells the KVM hypervisor to optimize for running Windows 7. |
| --disk path=/dev/an-a05n01_vg0/vm03-win7_0,bus=virtio | This tells the hypervisor what logical volume to use for the server's "hard drive". It also tells it to use the virtio emulated SCSI controller. |
| --graphics spice > /var/log/an-install_vm03-win7.log | We're using a new log file for our bash redirection. Later, if we want to examine the install process, we can review /var/log/an-install_vm03-win7.log for details on the install process. |
Initializing vm03-win7's Install
On your dashboard or workstation, open the "Virtual Machine Manager" and connect to both nodes.
We can install any server from either node. However, we know that each server has a preferred host, so it's sensible to use that host for the installation stage. In the case of vm03-win7, the preferred host is an-a05n01, so we'll use it to kick off the install.
Once the install begins, the new server should appear in "Virtual Machine Manager". Double-click on it and you will see that the new server is booting off of the install cd-rom. We're installing Windows, so that will begin the install process.
Time to start the install!
| an-a05n01 | /shared/provision/vm03-win7.shCannot open display:
Run 'virt-viewer --help' to see a full list of available command line options |
|---|
And it's off!

| Warning: Since this tutorial was written, the virtio project has significantly changed the directory structure where drivers are held. The storage drivers are now found in viostor/w7/amd64/. The trick of loading the other drivers is still possible by loading the "wrong" driver, one at a time, but it is quite a bit easier to now load the network and other drivers after the install completes. To do so, go to "Device Manager" and select the devices with a yellow exclamation mark, choose to update their drivers and tell it to search all subdirectories on the "dvd". |
Follow the install process, entering the values you want. When you get to the install target screen, you will see that Windows can't find the hard drive.

This was expected because windows 2008 does not natively support virtio. That's why we used two virtual cd-rom drives and "inserted" the virtio driver disk into the second drive.
Click on "Load Driver" on the bottom right.

Click on "Browse".

The driver disk is in the seconds (virtual) cd-rom drive mounted at drive e:. The drivers for Windows 2008 are the same as for Windows 7, so browse to E:\WIN8\AMD64 (assuming you are installing the 64-bit version of windows) and click on "OK".

| Note: If you forget to select the network drivers here, you will have to manually install the drivers for the network card after the install has completed. |
Press and hold the <control> key and click on both the "Red Hat VirtIO Ethernet Adapter" and the "Red Hat VirtIO SCSI Controller" drivers. By doing this, we won't have to install the network card's drivers later. Click on "Next" and the drivers will be installed.

Now you can finish installing Windows 2008 just as you would do so on a bare iron server!

What you do from here is entirely up to you and your needs.
| Note: If you wish, jump to Making vm02-win2012 a Highly Available Service now to immediately add vm03-win7 to the cluster manager. |
Provisioning vm04-win8
| Note: This install references steps taken in the vm01-win2008 install. If you skipped it, you may wish to look at it to get a better idea of some of the steps performed here. |

Our last Microsoft operating system!
As always, we need to copy the installation media and our driver disk into /shared/files.
Windows is licensed software, so you will need to purchase a copy. You can get an evaluation copy from Microsoft's website. In either case, downloading a copy of the installation media is an exercise for you, I am afraid.
As we did for the previous three servers, we're going to use a special kind of SCSI controller and a special kind of emulated network card. These are called http://www.linux-kvm.org/page/Virtio devices and they are designed to significantly improve storage and network speeds on KVM guests.
You can create install media from a physical disk or copy install media using the Striker's "Media Connector" function. Of course, you can also copy files to the Anvil! using standard tools like rsync and wget as well. What ever method you prefer,
In my case, I will rsync the Windows install ISO from another machine on our network to /shared/files via an-a05n01.
rsync -av --progress /data0/VMs/files/Win8.1_Enterprise_64-bit_eval.iso root@10.255.50.1:/shared/files/root@10.255.50.1's password:sending incremental file list
Win8.1_Enterprise_64-bit_eval.iso
3797866496 100% 62.02MB/s 0:00:58 (xfer#1, to-check=0/1)
sent 3798330205 bytes received 31 bytes 60773283.78 bytes/sec
total size is 3797866496 speedup is 1.00For virtio, we can simply re-use the ISO we uploaded for vm01-2008.
| Note: We've planned to run vm04-win8 on an-a05n01, so we will use that node for the provisioning stage. |
| an-a05n01 | ls -lah /shared/files/total 14G
drwxr-xr-x. 2 root root 3.8K Nov 12 18:12 .
drwxr-xr-x. 6 root root 3.8K Nov 1 01:23 ..
-rw-r--r--. 1 qemu qemu 56M Jan 22 2013 virtio-win-0.1-52.iso
-rw-r--r--. 1 qemu qemu 3.6G Oct 31 01:44 Win8.1_Enterprise_64-bit_eval.iso
-rw-rw-r--. 1 qemu qemu 3.9G Oct 2 22:31 Windows_2012_R2_64-bit_Preview.iso
-rw-rw-rw-. 1 qemu qemu 3.1G Jun 8 2011 Windows_7_Pro_SP1_64bit_OEM_English.iso
-rw-rw-r--. 1 qemu qemu 3.0G Oct 14 2011 Windows_Svr_2008_R2_64Bit_SP1.ISO |
|---|
Ok, we're ready!
Creating vm04-win8's Storage
| Note: Earlier, we used parted to examine our free space and create our DRBD partitions. Unfortunately, parted shows sizes in GB (base 10) where LVM uses GiB (base 2). If we used LVM's "xxG size notation, it will use more space than we expect, relative to our planning in the parted stage. LVM doesn't allow specifying new LV sizes in GB instead of GiB, so here we will specify sizes in MiB to help narrow the differences. You can read more about this issue here. |
Creating the vm04-win8's "hard drive" is a simple process. Recall that we want a 100 GB logical volume carved from the an-a05n01_vg0 volume group (the "storage pool" for servers designed to run on an-a05n01). Knowing this, the command to create the new LV is below.
| an-a05n01 | lvcreate -L 100000M -n vm04-win8_0 /dev/an-a05n01_vg0 Logical volume "vm04-win8_0" created |
|---|---|
| an-a05n02 | lvdisplay /dev/an-a05n01_vg0/vm04-win8_0 --- Logical volume ---
LV Path /dev/an-a05n01_vg0/vm04-win8_0
LV Name vm04-win8_0
VG Name an-a05n01_vg0
LV UUID WZIGmp-xkyZ-Q6Qs-ovMP-qr1k-9xC2-PmbcUD
LV Write Access read/write
LV Creation host, time an-a05n01.alteeve.ca, 2013-11-12 18:13:53 -0500
LV Status available
# open 0
LV Size 97.66 GiB
Current LE 25000
Segments 1
Allocation inherit
Read ahead sectors auto
- currently set to 256
Block device 253:4 |
Notice how we see 97.66 GiB? That is roughly the difference between "100 GB" and "100 GiB".
Creating vm04-win8's virt-install Call
Now with the storage created, we can craft the virt-install command. we'll put this into a file under the /shared/provision/ directory for future reference. Let's take a look at the command, then we'll discuss what the switches are for.
| an-a05n01 | touch /shared/provision/vm04-win8.sh
chmod 755 /shared/provision/vm04-win8.sh
vim /shared/provision/vm04-win8.shvirt-install --connect qemu:///system \
--name vm04-win8 \
--ram 4096 \
--arch x86_64 \
--vcpus 2 \
--cdrom /shared/files/Win8.1_Enterprise_64-bit_eval.iso \
--disk path=/shared/files/virtio-win-0.1-52.iso,device=cdrom --force\
--os-variant win7 \
--network bridge=ifn_bridge1,model=virtio \
--disk path=/dev/an-a05n01_vg0/vm04-win8_0,bus=virtio \
--graphics spice > /var/log/an-install_vm04-win8.log & |
|---|
| Note: Don't use tabs to indent the lines. |
Let's look at the differences from vm01-win2008;
| Switch | Descriptions |
|---|---|
| --name vm04-win8 | This is the name we're going to use for this server in the cluster and with the libvirtd tools. |
| --ram 4096 | This sets the amount of RAM, in MiB, to allocate to this server. Here, we're allocating 4 GiB, which is 4,096 MiB. |
| --cdrom /shared/files/Win8.1_Enterprise_64-bit_eval.iso | This tells the hypervisor to create a cd-rom (dvd-rom) drive and to "insert" the specified ISO as if it was a physical disk. This will be the initial boot device, too. |
| --disk path=/shared/files/virtio-win-0.1-52.iso,device=cdrom --force | This is the same as the vm01-win2008 provision script, but this is where the --force comes in handy. If this ISO was still "mounted" in vm01-2008's cd-rom tray, the install would abort without --force. |
| --os-variant win7 | This tells the KVM hypervisor to optimize for running Windows 7. |
| --disk path=/dev/an-a05n01_vg0/vm04-win8_0,bus=virtio | This tells the hypervisor what logical volume to use for the server's "hard drive". It also tells it to use the virtio emulated SCSI controller. |
| --graphics spice > /var/log/an-install_vm04-win8.log | We're using a new log file for our bash redirection. Later, if we want to examine the install process, we can review /var/log/an-install_vm04-win8.log for details on the install process. |
Initializing vm04-win8's Install
On your dashboard or workstation, open the "Virtual Machine Manager" and connect to both nodes.
We can install any server from either node. However, we know that each server has a preferred host, so it's sensible to use that host for the installation stage. In the case of vm04-win8, the preferred host is an-a05n01, so we'll use it to kick off the install.
Once the install begins, the new server should appear in "Virtual Machine Manager". Double-click on it and you will see that the new server is booting off of the install cd-rom. We're installing Windows, so that will begin the install process.
Time to start the install!
| an-a05n01 | /shared/provision/vm04-win8.shCannot open display:
Run 'virt-viewer --help' to see a full list of available command line options |
|---|
And it's off!

Follow the install process, entering the values you want. When you get to the install target screen, you will see that Windows can't find the hard drive.

| Warning: Since this tutorial was written, the virtio project has significantly changed the directory structure where drivers are held. The storage drivers are now found in viostor/w8/amd64/. The trick of loading the other drivers is still possible by loading the "wrong" driver, one at a time, but it is quite a bit easier to now load the network and other drivers after the install completes. To do so, go to "Device Manager" and select the devices with a yellow exclamation mark, choose to update their drivers and tell it to search all subdirectories on the "dvd". |
This was expected because Windows 8 does not natively support virtio. That's why we used two virtual cd-rom drives and "inserted" the virtio driver disk into the second drive.
Click on "Load Driver" on the bottom right.

Click on "Browse".

The driver disk is in the seconds (virtual) cd-rom drive mounted at drive e:. The drivers for Windows 2008 are the same as for Windows 7, so browse to E:\WIN8\AMD64 (assuming you are installing the 64-bit version of windows) and click on "OK".

| Note: If you forget to select the network drivers here, you will have to manually install the drivers for the network card after the install has completed. |
Press and hold the <control> key and click on both the "Red Hat VirtIO Ethernet Adapter" and the "Red Hat VirtIO SCSI Controller" drivers. By doing this, we won't have to install the network card's drivers later. Click on "Next" and the drivers will be installed.

Now you can finish installing Windows 2008 just as you would do so on a bare iron server!

What you do from here is entirely up to you and your needs.
| Note: If you wish, jump to Making vm02-win2012 a Highly Available Service now to immediately add vm04-win8 to the cluster manager. |
Provisioning vm05-freebsd9
| Note: This install references steps taken in the vm01-win2008 install. If you skipped it, you may wish to look at it to get a better idea of some of the steps performed here. |

Our first non-Microsft OS!
As always, we need to copy the installation disk into /shared/files.
FreeBSD is free software and can be downloaded directly from their website.
| an-a05n02 | cd /shared/files/
wget -c ftp://ftp.freebsd.org/pub/FreeBSD/releases/amd64/amd64/ISO-IMAGES/9.2/FreeBSD-9.2-RELEASE-amd64-dvd1.iso--2013-11-18 15:48:09-- ftp://ftp.freebsd.org/pub/FreeBSD/releases/amd64/amd64/ISO-IMAGES/9.2/FreeBSD-9.2-RELEASE-amd64-dvd1.iso
=> `FreeBSD-9.2-RELEASE-amd64-dvd1.iso'
Resolving ftp.freebsd.org... 204.152.184.73, 2001:4f8:0:2::e
Connecting to ftp.freebsd.org|204.152.184.73|:21... connected.
Logging in as anonymous ... Logged in!
==> SYST ... done. ==> PWD ... done.
==> TYPE I ... done. ==> CWD (1) /pub/FreeBSD/releases/amd64/amd64/ISO-IMAGES/9.2 ... done.
==> SIZE FreeBSD-9.2-RELEASE-amd64-dvd1.iso ... 2554132480
==> PASV ... done. ==> RETR FreeBSD-9.2-RELEASE-amd64-dvd1.iso ... done.
Length: 2554132480 (2.4G) (unauthoritative)
100%[=============================================================>] 2,554,132,480 465K/s in 45m 9s
2013-11-18 16:33:19 (921 KB/s) - `FreeBSD-9.2-RELEASE-amd64-dvd1.iso' saved [2554132480] |
|---|
| Note: We've planned to run vm05-freebsd9 on an-a05n02, so we will use that node for the provisioning stage. |
| an-a05n02 | ls -lah /shared/files/drwxr-xr-x. 2 root root 3.8K Nov 18 15:48 .
drwxr-xr-x. 6 root root 3.8K Nov 18 16:35 ..
-rw-r--r--. 1 root root 2.4G Nov 18 16:33 FreeBSD-9.2-RELEASE-amd64-dvd1.iso
-rw-r--r--. 1 qemu qemu 56M Jan 22 2013 virtio-win-0.1-52.iso
-rw-r--r--. 1 qemu qemu 3.6G Oct 31 01:44 Win8.1_Enterprise_64-bit_eval.iso
-rw-rw-r--. 1 qemu qemu 3.9G Oct 2 22:31 Windows_2012_R2_64-bit_Preview.iso
-rw-rw-rw-. 1 qemu qemu 3.1G Jun 8 2011 Windows_7_Pro_SP1_64bit_OEM_English.iso
-rw-rw-r--. 1 qemu qemu 3.0G Oct 14 2011 Windows_Svr_2008_R2_64Bit_SP1.ISO |
|---|
Ok, we're ready!
Creating vm05-freebsd9's Storage
| Note: Earlier, we used parted to examine our free space and create our DRBD partitions. Unfortunately, parted shows sizes in GB (base 10) where LVM uses GiB (base 2). If we used LVM's "xxG size notation, it will use more space than we expect, relative to our planning in the parted stage. LVM doesn't allow specifying new LV sizes in GB instead of GiB, so here we will specify sizes in MiB to help narrow the differences. You can read more about this issue here. |
Creating the vm05-freebsd9's "hard drive" is a simple process. Recall that we want a 50 GB logical volume carved from the an-a05n02_vg0 volume group (the "storage pool" for servers designed to run on an-a05n02). Knowing this, the command to create the new LV is below.
| an-a05n01 | lvcreate -L 50000M -n vm05-freebsd9_0 /dev/an-a05n02_vg0 Logical volume "vm05-freebsd9_0" created |
|---|---|
| an-a05n02 | lvdisplay /dev/an-a05n02_vg0/vm05-freebsd9_0 --- Logical volume ---
LV Path /dev/an-a05n02_vg0/vm05-freebsd9_0
LV Name vm05-freebsd9_0
VG Name an-a05n02_vg0
LV UUID ioF6jU-pXEQ-wAhm-1zkB-LTDw-PQPG-1SPdkD
LV Write Access read/write
LV Creation host, time an-a05n01.alteeve.ca, 2013-11-18 16:41:30 -0500
LV Status available
# open 0
LV Size 48.83 GiB
Current LE 12500
Segments 1
Allocation inherit
Read ahead sectors auto
- currently set to 256
Block device 253:5 |
Notice how we see 48.83 GiB? That is roughly the difference between "50 GB" and "50 GiB".
Creating vm05-freebsd9's virt-install Call
Now with the storage created, we can craft the virt-install command. we'll put this into a file under the /shared/provision/ directory for future reference. Let's take a look at the command, then we'll discuss what the switches are for.
| an-a05n02 | touch /shared/provision/vm05-freebsd9.sh
chmod 755 /shared/provision/vm05-freebsd9.sh
vim /shared/provision/vm05-freebsd9.shvirt-install --connect qemu:///system \
--name vm05-freebsd9 \
--ram 2048 \
--arch x86_64 \
--vcpus 2 \
--cdrom /shared/files/FreeBSD-9.2-RELEASE-amd64-dvd1.iso \
--os-variant freebsd8 \
--network bridge=ifn_bridge1,model=virtio \
--disk path=/dev/an-a05n02_vg0/vm05-freebsd9_0,bus=virtio \
--graphics spice > /var/log/an-install_vm05-freebsd9.log & |
|---|
| Note: Don't use tabs to indent the lines. |
Let's look at the differences from vm01-win2008;
| Switch | Descriptions |
|---|---|
| --name vm05-freebsd9 | This is the name we're going to use for this server in the cluster and with the libvirtd tools. |
| --ram 4096 | This sets the amount of RAM, in MiB, to allocate to this server. Here, we're allocating 2 GiB, which is 2,048 MiB. |
| --cdrom /shared/files/FreeBSD-9.2-RELEASE-amd64-dvd1.iso | This tells the hypervisor to create a cd-rom (dvd-rom) drive and to "insert" the specified ISO as if it was a physical disk. This will be the initial boot device, too. |
| --os-variant freebsd8 | This tells the KVM hypervisor to optimize for running FreeBSD 8, which is the closest optimization available. |
| --disk path=/dev/an-a05n02_vg0/vm05-freebsd9_0,bus=virtio | This tells the hypervisor what logical volume to use for the server's "hard drive". It also tells it to use the virtio emulated SCSI controller. |
| --graphics spice > /var/log/an-install_vm05-freebsd9.log | We're using a new log file for our bash redirection. Later, if we want to examine the install process, we can review /var/log/an-install_vm05-freebsd9.log for details on the install process. |
Initializing vm05-freebsd9's Install
On your dashboard or workstation, open the "Virtual Machine Manager" and connect to both nodes.
We can install any server from either node. However, we know that each server has a preferred host, so it's sensible to use that host for the installation stage. In the case of vm05-freebsd9, the preferred host is an-a05n02, so we'll use it to kick off the install.
Once the install begins, the new server should appear in "Virtual Machine Manager". Double-click on it and you will see that the new server is booting off of the install cd-rom. We're installing Windows, so that will begin the install process.
Time to start the install!
| an-a05n02 | /shared/provision/vm05-freebsd9.shCannot open display:
Run 'virt-viewer --help' to see a full list of available command line options |
|---|
And it's off!

The entire install process for FreeBSD is normal. It has native support for virtio, so the virtual hard drive and network card will "just work".


There is one trick with installing FreeBSD 9 though. The optimization was for freebsd8 and one down-side is that FreeBSD won't reboot automatically after the install finishes and tries to reboot.

Obviously, the server is not yet in the cluster so we can't use clusvcadm -e. So instead, we'll use virsh to boot it up.
| an-a05n02 | virsh start vm05-freebsd9Domain vm05-freebsd9 started |
|---|

What you do from here is entirely up to you and your needs.
| Note: If you wish, jump to Making vm05-freebsd9 a Highly Available Service now to immediately add vm05-freebsd9 to the cluster manager. |
Provisioning vm06-solaris11
| Note: This install references steps taken in the vm01-win2008 install. If you skipped it, you may wish to look at it to get a better idea of some of the steps performed here. |

Oracle's Solaris operating system is a commercial UNIX product. You can download an evaluation version from their website. We'll be using the x86 version.
As always, we need to copy the installation disk into /shared/files.
rsync -av --progress /data0/VMs/files/sol-11-1111-text-x86.iso root@10.255.50.1:/shared/files/root@10.255.50.1's password:sending incremental file list
sol-11-1111-text-x86.iso
450799616 100% 108.12MB/s 0:00:03 (xfer#1, to-check=0/1)
sent 450854737 bytes received 31 bytes 69362272.00 bytes/sec
total size is 450799616 speedup is 1.00| Note: We've planned to run vm06-solaris11 on an-a05n02, so we will use that node for the provisioning stage. |
| an-a05n02 | ls -lah /shared/files/total 17G
drwxr-xr-x. 2 root root 3.8K Nov 19 17:11 .
drwxr-xr-x. 6 root root 3.8K Nov 19 17:04 ..
-rw-r--r--. 1 qemu qemu 2.4G Nov 18 16:33 FreeBSD-9.2-RELEASE-amd64-dvd1.iso
-rw-rw-r--. 1 root root 430M Sep 28 2012 sol-11-1111-text-x86.iso
-rw-r--r--. 1 qemu qemu 56M Jan 22 2013 virtio-win-0.1-52.iso
-rw-r--r--. 1 qemu qemu 3.6G Oct 31 01:44 Win8.1_Enterprise_64-bit_eval.iso
-rw-rw-r--. 1 qemu qemu 3.9G Oct 2 22:31 Windows_2012_R2_64-bit_Preview.iso
-rw-rw-rw-. 1 qemu qemu 3.1G Jun 8 2011 Windows_7_Pro_SP1_64bit_OEM_English.iso
-rw-rw-r--. 1 qemu qemu 3.0G Oct 14 2011 Windows_Svr_2008_R2_64Bit_SP1.ISO |
|---|
Ok, we're ready!
Creating vm06-solaris11's Storage
| Note: Earlier, we used parted to examine our free space and create our DRBD partitions. Unfortunately, parted shows sizes in GB (base 10) where LVM uses GiB (base 2). If we used LVM's "xxG size notation, it will use more space than we expect, relative to our planning in the parted stage. LVM doesn't allow specifying new LV sizes in GB instead of GiB, so here we will specify sizes in MiB to help narrow the differences. You can read more about this issue here. |
Creating the vm06-solaris11's "hard drive" is a simple process. Recall that we want a 100 GB logical volume carved from the an-a05n02_vg0 volume group (the "storage pool" for servers designed to run on an-a05n02). Knowing this, the command to create the new LV is below.
| an-a05n01 | lvcreate -L 100000M -n vm06-solaris11_0 /dev/an-a05n02_vg0 Volume group "an-a05n02_vg0" has insufficient free space (23506 extents): 25000 required. |
|---|
What's this?!
Calculating Free Space; Converting GiB to MB
What we have here is, despite our efforts to mitigate the GiB versus GB issue, we ran out of space.
This highlights the need for careful design planning. We weren't careful enough, so now we have to deal with the resources we have left.
Let's figure out how much space is left in the an-a05n02 volume group.
| an-a05n02 | vgdisplay an-a05n02_vg0 --- Volume group ---
VG Name an-a05n02_vg0
System ID
Format lvm2
Metadata Areas 1
Metadata Sequence No 3
VG Access read/write
VG Status resizable
Clustered yes
Shared no
MAX LV 0
Cur LV 2
Open LV 2
Max PV 0
Cur PV 1
Act PV 1
VG Size 287.13 GiB
PE Size 4.00 MiB
Total PE 73506
Alloc PE / Size 50000 / 195.31 GiB
Free PE / Size 23506 / 91.82 GiB
VG UUID 1h5Gzk-6UX6-xvUo-GWVH-ZMFM-YLop-dYiC7L |
|---|
You can see that there is 91.82 GiB left (23,506 "extents" which are 4.00 MiB each).
Knowing this, there are a few ways we could proceed.
- Use the lvcreate -l xx syntax, which says to use xx extents. We have 23,506 extents free, so we could just do lvcreate -l 23506
- Use the "percentage free" method of defining free space. That would be lvcreate -l 100%FREE which simply uses all remaining free space.
- Calculate the number of MB in 91.82 GiB.
The first two are self-evident, so let's look the 3rd option because math is awesome!
To do this, we need to convert 91.82 GiB into bytes. We can get close by simply doing (91.82 * (1024 * 1024 * 1024)) (x GiB -> MiB -> KiB = bytes), but this gives us 98,590,974,279.68... The .82 is not precise enough. If we divide this by 1,000,000 (number of bytes in a MB), we get 98590.97. Round down to 98,590.
If we take the extent size times free extent count, we get ((23506 * 4) * (1024 * 1024)) (extents free * extent size) converted to MiB -> KiB = bytes) which gives us 98591309824. Divided by 1,000,000 to get MB and we have 98591.30, rounded down we get 98,591 MB.
Both methods are pretty darn close, and would end up with the same number of extents used. So now, if we wanted to, we could use lvcreate -L 98591M to keep in line with our previous usage of lvcreate.
That was fun!
Now we'll be boring and practical and use lvcreate -l 100%FREE because it's safe.
| an-a05n01 | lvcreate -l 100%FREE -n vm06-solaris11_0 /dev/an-a05n02_vg0 Logical volume "vm06-solaris11_0" created |
|---|---|
| an-a05n02 | lvdisplay /dev/an-a05n02_vg0/vm06-solaris11_0 --- Logical volume ---
LV Path /dev/an-a05n02_vg0/vm06-solaris11_0
LV Name vm06-solaris11_0
VG Name an-a05n02_vg0
LV UUID 3BQgmu-QHca-0XtE-PRQB-btQc-LmdF-rTVyi5
LV Write Access read/write
LV Creation host, time an-a05n01.alteeve.ca, 2013-11-19 15:37:29 -0500
LV Status available
# open 0
LV Size 91.82 GiB
Current LE 23506
Segments 1
Allocation inherit
Read ahead sectors auto
- currently set to 256
Block device 253:6 |
So we're a little smaller than we originally planned. A good and simple way to avoid this problem is to plan your storage to have more free space than you think you will need. Storage space is, relatively speaking, fairly cheap.
Creating vm06-solaris11's virt-install Call
| Note: Solaris 11 does not support virtio, so we will be emulating a simple scsi storage controller and e1000 (Intel 1 Gbps) network card. |
Now with the storage created, we can craft the virt-install command. we'll put this into a file under the /shared/provision/ directory for future reference. Let's take a look at the command, then we'll discuss what the switches are for.
| an-a05n02 | touch /shared/provision/vm06-solaris11.sh
chmod 755 /shared/provision/vm06-solaris11.sh
vim /shared/provision/vm06-solaris11.shvirt-install --connect qemu:///system \
--name vm06-solaris11 \
--ram 2048 \
--arch x86_64 \
--vcpus 2 \
--cdrom /shared/files/sol-11-1111-text-x86.iso \
--os-variant solaris10 \
--network bridge=ifn_bridge1,model=e1000 \
--disk path=/dev/an-a05n02_vg0/vm06-solaris11_0 \
--graphics spice > /var/log/an-install_vm06-solaris11.log & |
|---|
| Note: Don't use tabs to indent the lines. |
Let's look at the differences from vm01-win2008;
| Switch | Descriptions |
|---|---|
| --name vm06-solaris11 | This is the name we're going to use for this server in the cluster and with the libvirtd tools. |
| --ram 2048 | This sets the amount of RAM, in MiB, to allocate to this server. Here, we're allocating 2 GiB, which is 2,048 MiB. |
| --cdrom /shared/files/sol-11-1111-text-x86.iso | This tells the hypervisor to create a cd-rom (dvd-rom) drive and to "insert" the specified ISO as if it was a physical disk. This will be the initial boot device, too. |
| --os-variant solaris10 | This tells the KVM hypervisor to optimize for running Solaris 10, which is the closest optimization available. |
| --disk path=/dev/an-a05n02_vg0/vm06-solaris11_0 | This tells the hypervisor what logical volume to use for the server's "hard drive". It does not specify any bus=, unlike the other servers. |
| --network bridge=ifn_bridge1,model=e1000 | This tells the hypervisor to emulate an Intel gigabit network controller. |
| --graphics spice > /var/log/an-install_vm06-solaris11.log | We're using a new log file for our bash redirection. Later, if we want to examine the install process, we can review /var/log/an-install_vm06-solaris11.log for details on the install process. |
Initializing vm06-solaris11's Install
On your dashboard or workstation, open the "Virtual Machine Manager" and connect to both nodes.
We can install any server from either node. However, we know that each server has a preferred host, so it's sensible to use that host for the installation stage. In the case of vm06-solaris11, the preferred host is an-a05n02, so we'll use it to kick off the install.
Once the install begins, the new server should appear in "Virtual Machine Manager". Double-click on it and you will see that the new server is booting off of the install cd-rom. We're installing Windows, so that will begin the install process.
Time to start the install!
| an-a05n02 | /shared/provision/vm06-solaris11.shCannot open display:
Run 'virt-viewer --help' to see a full list of available command line options |
|---|
And it's off, but with errors!

By default, Solaris tries to use the uhci USB driver which doesn't work. It generates the following error;
WARNING: /pci@0,0/pci1af4,1100@1,2 (uhci0): No SOF interrupts have been received
, this USB UHCI host controller is unusableThis is harmless and can be safely ignored. Once the install is complete, we will disabled uhci by running rem_drv uhci in the server.


What you do from here is entirely up to you and your needs.
| Note: If you wish, jump to Making vm06-solaris11 a Highly Available Service now to immediately add vm06-solaris11 to the cluster manager. |
Provisioning vm07-rhel6
| Note: This install references steps taken in the vm01-win2008 install. If you skipped it, you may wish to look at it to get a better idea of some of the steps performed here. |

Red Hat's Enterprise Linux operating system is a commercial Linux product. You can download an evaluation version from their website. If you prefer a community-supported version, the CentOS project is a binary-compatible, free-as-in-beer operating system that you can use here instead.
As always, we need to copy the installation disk into /shared/files.
rsync -av --progress /data0/VMs/files/rhel-server-6.4-x86_64-dvd.iso root@10.255.50.1:/shared/files/root@10.255.50.1's password:sending incremental file list
rhel-server-6.4-x86_64-dvd.iso
3720347648 100% 65.25MB/s 0:00:54 (xfer#1, to-check=0/1)
sent 3720801890 bytes received 31 bytes 64709598.63 bytes/sec
total size is 3720347648 speedup is 1.00| Note: We've planned to run vm07-rhel6 on an-a05n02, so we will use that node for the provisioning stage. |
| an-a05n02 | ls -lah /shared/files/total 20G
drwxr-xr-x. 2 root root 3.8K Nov 20 16:54 .
drwxr-xr-x. 6 root root 3.8K Nov 20 16:50 ..
-rw-r--r--. 1 qemu qemu 2.4G Nov 18 16:33 FreeBSD-9.2-RELEASE-amd64-dvd1.iso
-rw-rw-r--. 1 1000 1000 3.5G Mar 4 2013 rhel-server-6.4-x86_64-dvd.iso
-rw-rw-r--. 1 qemu qemu 430M Sep 28 2012 sol-11-1111-text-x86.iso
-rw-r--r--. 1 qemu qemu 56M Jan 22 2013 virtio-win-0.1-52.iso
-rw-r--r--. 1 qemu qemu 3.6G Oct 31 01:44 Win8.1_Enterprise_64-bit_eval.iso
-rw-rw-r--. 1 qemu qemu 3.9G Oct 2 22:31 Windows_2012_R2_64-bit_Preview.iso
-rw-rw-rw-. 1 qemu qemu 3.1G Jun 8 2011 Windows_7_Pro_SP1_64bit_OEM_English.iso
-rw-rw-r--. 1 qemu qemu 3.0G Oct 14 2011 Windows_Svr_2008_R2_64Bit_SP1.ISO |
|---|
Ok, we're ready!
Creating vm07-rhel6's Storage
| Note: Earlier, we used parted to examine our free space and create our DRBD partitions. Unfortunately, parted shows sizes in GB (base 10) where LVM uses GiB (base 2). If we used LVM's "xxG size notation, it will use more space than we expect, relative to our planning in the parted stage. LVM doesn't allow specifying new LV sizes in GB instead of GiB, so here we will specify sizes in MiB to help narrow the differences. You can read more about this issue here. |
Creating the vm07-rhel6's "hard drive" is a simple process. Recall that we want a 50 GB logical volume carved from the an-a05n01_vg0 volume group (the "storage pool" for servers designed to run on an-a05n01). Knowing this, the command to create the new LV is below.
| an-a05n01 | lvcreate -L 50000M -n vm07-rhel6_0 /dev/an-a05n01_vg0 Logical volume "vm07-rhel6_0" created |
|---|---|
| an-a05n02 | lvdisplay /dev/an-a05n01_vg0/vm07-rhel6_0 --- Logical volume ---
LV Path /dev/an-a05n01_vg0/vm07-rhel6_0
LV Name vm07-rhel6_0
VG Name an-a05n01_vg0
LV UUID wBNRrK-N8xL-nJm4-lM0y-a858-ydgC-d0UU04
LV Write Access read/write
LV Creation host, time an-a05n01.alteeve.ca, 2013-11-20 16:56:22 -0500
LV Status available
# open 0
LV Size 48.83 GiB
Current LE 12500
Segments 1
Allocation inherit
Read ahead sectors auto
- currently set to 256
Block device 253:7 |
Notice how we see 48.83 GiB? That is roughly the difference between "50 GB" and "50 GiB".
Creating vm07-rhel6's virt-install Call
Now with the storage created, we can craft the virt-install command. we'll put this into a file under the /shared/provision/ directory for future reference. Let's take a look at the command, then we'll discuss what the switches are for.
| an-a05n01 | touch /shared/provision/vm07-rhel6.sh
chmod 755 /shared/provision/vm07-rhel6.sh
vim /shared/provision/vm07-rhel6.shvirt-install --connect qemu:///system \
--name vm07-rhel6 \
--ram 2048 \
--arch x86_64 \
--vcpus 2 \
--cdrom /shared/files/rhel-server-6.4-x86_64-dvd.iso \
--os-variant rhel6 \
--network bridge=ifn_bridge1,model=virtio \
--disk path=/dev/an-a05n01_vg0/vm07-rhel6_0,bus=virtio \
--graphics spice > /var/log/an-install_vm07-rhel6.log & |
|---|
| Note: Don't use tabs to indent the lines. |
Let's look at the differences from vm01-win2008;
| Switch | Descriptions |
|---|---|
| --name vm07-rhel6 | This is the name we're going to use for this server in the cluster and with the libvirtd tools. |
| --ram 2048 | This sets the amount of RAM, in MiB, to allocate to this server. Here, we're allocating 2 GiB, which is 2,048 MiB. |
| --cdrom /shared/files/rhel-server-6.4-x86_64-dvd.iso | This tells the hypervisor to create a cd-rom (dvd-rom) drive and to "insert" the specified ISO as if it was a physical disk. This will be the initial boot device, too. |
| --os-variant rhel6 | This tells the KVM hypervisor to optimize for running RHEL 6. |
| --disk path=/dev/an-a05n01_vg0/vm07-rhel6_0,bus=virtio | This tells the hypervisor what logical volume to use for the server's "hard drive". It does not specify any bus=, unlike the other servers. |
| --graphics spice > /var/log/an-install_vm07-rhel6.log | We're using a new log file for our bash redirection. Later, if we want to examine the install process, we can review /var/log/an-install_vm07-rhel6.log for details on the install process. |
Initializing vm07-rhel6's Install
On your dashboard or workstation, open the "Virtual Machine Manager" and connect to both nodes.
We can install any server from either node. However, we know that each server has a preferred host, so it's sensible to use that host for the installation stage. In the case of vm07-rhel6, the preferred host is an-a05n01, so we'll use it to kick off the install.
Once the install begins, the new server should appear in "Virtual Machine Manager". Double-click on it and you will see that the new server is booting off of the install cd-rom. We're installing Windows, so that will begin the install process.
Time to start the install!
| an-a05n01 | /shared/provision/vm07-rhel6.shCannot open display:
Run 'virt-viewer --help' to see a full list of available command line options |
|---|
And it's off!

You'll get prompted to check the installation media before starting the install. Given that we don't have a physical disk to scratch, it's safe to skip that.

It's no surprise that RHEL6 works flawlessly with the virtio drivers. Red Hat did write them, after all.


As we saw with vm05-freebsd9, the post install reboot doesn't actually reboot.

Easy enough to boot it back up though.
| an-a05n01 | virsh start vm07-rhel6Domain vm07-rhel6 started |
|---|

If you did a "Desktop" install, you will get the "First Boot" menus. Once done, you're new server is ready.
| Note: If you wish, jump to Making vm07-rhel6 a Highly Available Service now to immediately add vm07-rhel6 to the cluster manager. |
Making sure RHEL 6 reboots after panic'ing
It used to be that RHEL would halt all CPU activity if the kernel panic'ed. This lack of activity could be used to detect a failure in the guest which rgmanager could use to trigger recovery of the guest. Now though, RHEL 6 keeps one of the virtual CPUs after after panic'ing, which the node can not differentiate from a normal load.
To ensure that your RHEL guest recovers after panic'ing, you will need to append the following to /etc/sysctl.conf:
# Make the server reboot within 5 seconds of a panic.
kernel.panic = 5To make the change take immediate effect, run the following:
echo 5 > /proc/sys/kernel/panic
sysctl -e kernel.panickernel.panic = 5To verify that the server will reboot post panic, you can send the following command to your server.
| Warning: This command will immediately and totally halt your server. It will not recover until it reboots. |
echo c > /proc/sysrq-triggerIf things worked properly, the server will reboot five seconds after issuing this command.
Provisioning vm08-sles11
| Note: This install references steps taken in the vm01-win2008 install. If you skipped it, you may wish to look at it to get a better idea of some of the steps performed here. |

The last server in our tutorial!
SUSE's Linux Enterprise Server is a commercial Linux product. You can download an evaluation version from their website.
As always, we need to copy the installation disk into /shared/files.
rsync -av --progress /data0/VMs/files/SLES-11-SP3-DVD-x86_64-GM-DVD* root@10.255.50.1:/shared/files/root@10.255.50.1's password:SLES-11-SP3-DVD-x86_64-GM-DVD1.iso
3362783232 100% 60.94MB/s 0:00:52 (xfer#1, to-check=1/2)
SLES-11-SP3-DVD-x86_64-GM-DVD2.iso
5311318016 100% 73.66MB/s 0:01:08 (xfer#2, to-check=0/2)| Note: We've planned to run vm08-sles11 on an-a05n02, so we will use that node for the provisioning stage. |
| an-a05n02 | ls -lah /shared/files/total 28G
drwxr-xr-x. 2 root root 3.8K Nov 21 01:19 .
drwxr-xr-x. 6 root root 3.8K Nov 21 01:12 ..
-rw-r--r--. 1 qemu qemu 2.4G Nov 18 16:33 FreeBSD-9.2-RELEASE-amd64-dvd1.iso
-rw-rw-r--. 1 qemu qemu 3.5G Mar 4 2013 rhel-server-6.4-x86_64-dvd.iso
-rw-------. 1 1000 1000 3.2G Oct 30 17:52 SLES-11-SP3-DVD-x86_64-GM-DVD1.iso
-rw-------. 1 1000 1000 5.0G Oct 30 18:25 SLES-11-SP3-DVD-x86_64-GM-DVD2.iso
-rw-rw-r--. 1 qemu qemu 430M Sep 28 2012 sol-11-1111-text-x86.iso
-rw-r--r--. 1 qemu qemu 56M Jan 22 2013 virtio-win-0.1-52.iso
-rw-r--r--. 1 qemu qemu 3.6G Oct 31 01:44 Win8.1_Enterprise_64-bit_eval.iso
-rw-rw-r--. 1 qemu qemu 3.9G Oct 2 22:31 Windows_2012_R2_64-bit_Preview.iso
-rw-rw-rw-. 1 qemu qemu 3.1G Jun 8 2011 Windows_7_Pro_SP1_64bit_OEM_English.iso
-rw-rw-r--. 1 qemu qemu 3.0G Oct 14 2011 Windows_Svr_2008_R2_64Bit_SP1.ISO |
|---|
Ok, we're ready!
Creating vm08-sles11's Storage
| Note: Earlier, we used parted to examine our free space and create our DRBD partitions. Unfortunately, parted shows sizes in GB (base 10) where LVM uses GiB (base 2). If we used LVM's "xxG size notation, it will use more space than we expect, relative to our planning in the parted stage. LVM doesn't allow specifying new LV sizes in GB instead of GiB, so here we will specify sizes in MiB to help narrow the differences. You can read more about this issue here. |
Creating the vm08-sles11's "hard drive" is a simple process. Recall that we want a 100 GB logical volume carved from the an-a05n01_vg0 volume group (the "storage pool" for servers designed to run on an-a05n01). Knowing this, the command to create the new LV is below.
| an-a05n01 | lvcreate -L 100000M -n vm08-sles11_0 /dev/an-a05n01_vg0 Volume group "an-a05n01_vg0" has insufficient free space (19033 extents): 25000 required. |
|---|
We've run into the same problem that we hit with #Calculating_Free_Space.3B_Converting_GiB_to_MB. So we've learned our lesson and will switch to the lvcreate -l 100%FREE to use up the free space that remains.
| an-a05n01 | lvcreate -l 100%FREE -n vm08-sles11_0 /dev/an-a05n01_vg0 Logical volume "vm08-sles11_0" created |
|---|---|
| an-a05n02 | lvdisplay /dev/an-a05n01_vg0/vm08-sles11_0 --- Logical volume ---
LV Path /dev/an-a05n01_vg0/vm08-sles11_0
LV Name vm08-sles11_0
VG Name an-a05n01_vg0
LV UUID 9J9eO1-BhTe-Ee8X-zP5u-UY5S-Y7AB-Ql0hhI
LV Write Access read/write
LV Creation host, time an-a05n01.alteeve.ca, 2013-11-21 01:23:16 -0500
LV Status available
# open 0
LV Size 74.35 GiB
Current LE 19033
Segments 1
Allocation inherit
Read ahead sectors auto
- currently set to 256
Block device 253:8 |
Our compounding error in planning has reduced this server's planned space down to a mere 74.35 GiB!
Creating vm08-sles11's virt-install Call
Now with the storage created, we can craft the virt-install command. we'll put this into a file under the /shared/provision/ directory for future reference. Let's take a look at the command, then we'll discuss what the switches are for.
| an-a05n02 | touch /shared/provision/vm08-sles11.sh
chmod 755 /shared/provision/vm08-sles11.sh
vim /shared/provision/vm08-sles11.shvirt-install --connect qemu:///system \
--name vm08-sles11 \
--ram 2048 \
--arch x86_64 \
--vcpus 2 \
--cdrom /shared/files/SLES-11-SP3-DVD-x86_64-GM-DVD1.iso \
--disk path=/shared/files/SLES-11-SP3-DVD-x86_64-GM-DVD2.iso,device=cdrom --force \
--os-variant sles11 \
--network bridge=ifn_bridge1,model=virtio \
--disk path=/dev/an-a05n01_vg0/vm08-sles11_0,bus=virtio \
--graphics spice > /var/log/an-install_vm08-sles11.log & |
|---|
| Note: Don't use tabs to indent the lines. |
Let's look at the differences from vm01-win2008;
| Switch | Descriptions |
|---|---|
| --name vm08-sles11 | This is the name we're going to use for this server in the cluster and with the libvirtd tools. |
| --ram 2048 | This sets the amount of RAM, in MiB, to allocate to this server. Here, we're allocating 2 GiB, which is 2,048 MiB. |
| --cdrom /shared/files/SLES-11-SP3-DVD-x86_64-GM-DVD1.iso | This tells the hypervisor to create a cd-rom (dvd-rom) drive and to "insert" the specified ISO as if it was a physical disk. This will be the initial boot device, too. |
| --disk path=/shared/files/SLES-11-SP3-DVD-x86_64-GM-DVD2.iso,device=cdrom --force | SLES 11 has two install DVDs. This tells the hypervisor to create a second DVD drive and to insert 'Disc 2' into it. |
| --os-variant sles11 | This tells the KVM hypervisor to optimize for running SLES 11. |
| --disk path=/dev/an-a05n01_vg0/vm08-sles11_0,bus=virtio | This tells the hypervisor what logical volume to use for the server's "hard drive". It does not specify any bus=, unlike the other servers. |
| --graphics spice > /var/log/an-install_vm08-sles11.log | We're using a new log file for our bash redirection. Later, if we want to examine the install process, we can review /var/log/an-install_vm08-sles11.log for details on the install process. |
Initializing vm08-sles11's Install
On your dashboard or workstation, open the "Virtual Machine Manager" and connect to both nodes.
We can install any server from either node. However, we know that each server has a preferred host, so it's sensible to use that host for the installation stage. In the case of vm08-sles11, the preferred host is an-a05n01, so we'll use it to kick off the install.
Once the install begins, the new server should appear in "Virtual Machine Manager". Double-click on it and you will see that the new server is booting off of the install cd-rom. We're installing Windows, so that will begin the install process.
Time to start the install!
| an-a05n01 | /shared/provision/vm08-sles11.shCannot open display:
Run 'virt-viewer --help' to see a full list of available command line options |
|---|
And it's off!

You'll get prompted to check the installation media before starting the install. Given that we don't have a physical disk to scratch, it's safe to skip that.

SLES 11 works flawlessly with the virtio drivers.

As we saw with vm05-freebsd9 and vm07-rhel6, the post install reboot doesn't actually reboot.

Easy enough to boot it back up though.
| an-a05n01 | virsh start vm08-sles11Domain vm08-sles11 started |
|---|

If you did a "Physical Machine" install, you will get the "First Boot" menus. Once done, you're new server is ready.
That is all eight of eight servers built!
| Note: If you wish, jump to Making vm08-sles11 a Highly Available Service now to immediately add vm08-sles11 to the cluster manager. |
Eight of eight servers built!
Making Our VMs Highly Available Cluster Services
We're ready to start the final step; Making our VMs highly available cluster services! This involves two main steps:
- Creating two new, ordered fail-over Domains; One with each node as the highest priority.
- Adding our VMs as services, one is each new fail-over domain.
Creating the Ordered Fail-Over Domains
We have planned for two VMs, vm01-dev and vm02-web to normally run on an-a05n01 while vm03-db and vm04-ms to run on an-a05n02. Of course, should one of the nodes fail, the lost VMs will be restarted on the surviving node. For this, we will use an ordered fail-over domain.
The idea here is that each new fail-over domain will have one node with a higher priority than the other. That is, one will have an-a05n01 with the highest priority and the other will have an-a05n02 as the highest. This way, VMs that we want to normally run on a given node will be added to the matching fail-over domain.
| Note: With 2-node clusters like ours, ordering is arguably useless. It's used here more to introduce the concepts rather than providing any real benefit. If you want to make production clusters unordered, you can. Just remember to run the VMs on the appropriate nodes when both are on-line. |
Here are the two new domains we will create in /etc/cluster/cluster.conf;
| an-a05n01 | <failoverdomains>
...
<failoverdomain name="primary_n01" nofailback="1" ordered="1" restricted="1">
<failoverdomainnode name="an-a05n01.alteeve.ca" priority="1"/>
<failoverdomainnode name="an-a05n02.alteeve.ca" priority="2"/>
</failoverdomain>
<failoverdomain name="primary_n02" nofailback="1" ordered="1" restricted="1">
<failoverdomainnode name="an-a05n01.alteeve.ca" priority="2"/>
<failoverdomainnode name="an-a05n02.alteeve.ca" priority="1"/>
</failoverdomain>
</failoverdomains> |
|---|
The two major pieces of the puzzle here are the <failoverdomain ...>'s ordered="1" attribute and the <failoverdomainnode ...>'s priority="x" attributes. The former tells the cluster that there is a preference for which node should be used when both are available. The later, which is the difference between the two new domains, tells the cluster which specific node is preferred.
The first of the new fail-over domains is primary_n01. Any service placed in this domain will prefer to run on an-a05n01, as its priority of 1 is higher than an-a05n02's priority of 2. The second of the new domains is primary_n02 which reverses the preference, making an-a05n02 preferred over an-a05n01.
Let's look at the complete cluster.conf with the new domain, and the version updated to 11 of course.
| an-a05n01 | <?xml version="1.0"?>
<cluster name="an-anvil-05" config_version="11">
<cman expected_votes="1" two_node="1" />
<clusternodes>
<clusternode name="an-a05n01.alteeve.ca" nodeid="1">
<fence>
<method name="ipmi">
<device name="ipmi_n01" action="reboot" delay="15" />
</method>
<method name="pdu">
<device name="pdu1" port="1" action="reboot" />
<device name="pdu2" port="1" action="reboot" />
</method>
</fence>
</clusternode>
<clusternode name="an-a05n02.alteeve.ca" nodeid="2">
<fence>
<method name="ipmi">
<device name="ipmi_n02" action="reboot" />
</method>
<method name="pdu">
<device name="pdu1" port="2" action="reboot" />
<device name="pdu2" port="2" action="reboot" />
</method>
</fence>
</clusternode>
</clusternodes>
<fencedevices>
<fencedevice name="ipmi_n01" agent="fence_ipmilan" ipaddr="an-a05n01.ipmi" login="admin" passwd="secret" />
<fencedevice name="ipmi_n02" agent="fence_ipmilan" ipaddr="an-a05n02.ipmi" login="admin" passwd="secret" />
<fencedevice agent="fence_apc_snmp" ipaddr="an-pdu01.alteeve.ca" name="pdu1" />
<fencedevice agent="fence_apc_snmp" ipaddr="an-pdu02.alteeve.ca" name="pdu2" />
</fencedevices>
<fence_daemon post_join_delay="30" />
<totem rrp_mode="none" secauth="off"/>
<rm log_level="5">
<resources>
<script file="/etc/init.d/drbd" name="drbd"/>
<script file="/etc/init.d/clvmd" name="clvmd"/>
<clusterfs device="/dev/an-a05n01_vg0/shared" force_unmount="1" fstype="gfs2" mountpoint="/shared" name="sharedfs" />
<script file="/etc/init.d/libvirtd" name="libvirtd"/>
</resources>
<failoverdomains>
<failoverdomain name="only_n01" nofailback="1" ordered="0" restricted="1">
<failoverdomainnode name="an-a05n01.alteeve.ca"/>
</failoverdomain>
<failoverdomain name="only_n02" nofailback="1" ordered="0" restricted="1">
<failoverdomainnode name="an-a05n02.alteeve.ca"/>
</failoverdomain>
<failoverdomain name="primary_n01" nofailback="1" ordered="1" restricted="1">
<failoverdomainnode name="an-a05n01.alteeve.ca" priority="1"/>
<failoverdomainnode name="an-a05n02.alteeve.ca" priority="2"/>
</failoverdomain>
<failoverdomain name="primary_n02" nofailback="1" ordered="1" restricted="1">
<failoverdomainnode name="an-a05n01.alteeve.ca" priority="2"/>
<failoverdomainnode name="an-a05n02.alteeve.ca" priority="1"/>
</failoverdomain>
</failoverdomains>
<service name="storage_n01" autostart="1" domain="only_n01" exclusive="0" recovery="restart">
<script ref="drbd">
<script ref="clvmd">
<clusterfs ref="sharedfs"/>
</script>
</script>
</service>
<service name="storage_n02" autostart="1" domain="only_n02" exclusive="0" recovery="restart">
<script ref="drbd">
<script ref="clvmd">
<clusterfs ref="sharedfs"/>
</script>
</script>
</service>
<service name="libvirtd_n01" autostart="1" domain="only_n01" exclusive="0" recovery="restart">
<script ref="libvirtd"/>
</service>
<service name="libvirtd_n02" autostart="1" domain="only_n02" exclusive="0" recovery="restart">
<script ref="libvirtd"/>
</service>
</rm>
</cluster> |
|---|
Let's validate it now, but we won't bother to push it out just yet.
| an-a05n01 | ccs_config_validateConfiguration validatescman_tool version6.2.0 config 10cman_tool version -r
cman_tool version6.2.0 config 11 |
|---|---|
| an-a05n02 | cman_tool version6.2.0 config 11 |
Good, now to create the new VM services!
Making vm01-win2008 a Highly Available Service
| Note: If you jumped straight here after provisioning the vm01-win2008 server, please jump back and be sure you've created the primary_n01 and primary_n02 fail-over domains. |
The final piece of the puzzle, and the whole purpose of this exercise is in sight!
We're going to start with vm01-win2008, as it was the first server we provisioned.
There is a special resource agent for virtual machines which use the vm: service prefix in rgmanager. We will need to create one of these services for each server that will be managed by the Anvil! platform.
Dumping the vm01-win2008 XML Definition File
In order for the cluster to manage a server, it must know where to find the "definition" file that describes the virtual machine and its hardware. When the server was created with virt-install, it saved this definition file in /etc/libvirt/qemu/vm01-win2008.xml. If this was a single-host setup, that would be fine.
In our case though, there are two reasons we need to move this.
- We want both nodes to be able to see the definition file and we want a single place to make updates.
- Normal libvirtd tools are not cluster-aware, so we don't want them to see our server except when it is running.
To address the first issue, we're going to use a program called virsh to write out the definition file for vm01-win2008. We'll use a simple bash redirection to write this to a file on /shared where both nodes will be able to read it. Also, being stored on our GFS2 partition, any change made to the file will immediately be seen by both nodes.
To address the second issue, we will "undefine" the server. This effectively deletes it from libvirtd, so when a server is off (or running elsewhere), tools like "Virtual Machine Manager" will not see it. This helps avoid problems like a user, unaware that the server is running on another node, starting it on the first. The cluster will still be able to start and stop the server just fine, so there is no worry about losing your new server. The cluster tools, being cluster-aware obviously, are smart enough to not try and boot a server on one node when it's already running on another.
So the first step is to dump the server's definition file.
| Note: Recall that we provisioned vm01-win2008 on an-a05n01, so we will have to use that node for the next step. |
First, let's use virsh, a libvirtd tool, to see the server's state.
| an-a05n01 | virsh list --all Id Name State
----------------------------------------------------
1 vm01-win2008 running |
|---|
The --all option is needed to show us servers that are defined but powered off. Normally, virsh list only shows running servers, so it's a good habit to always use --list to be sure you have a complete view of your system.
So we see that vm01-win2008 is running. The Id is a simple integer that increments each time a server boots. It changes frequently and you need not worry about it. its principal purpose to be unique among running servers.
So before we undefine the server, we first need to record its definition. We can do that with virsh dumpxml $vm.
| an-a05n01 | virsh dumpxml vm01-win2008<domain type='kvm' id='1'>
<name>vm01-win2008</name>
<uuid>d06381fc-8033-9768-3a28-b751bcc00716</uuid>
<memory unit='KiB'>3145728</memory>
<currentMemory unit='KiB'>3145728</currentMemory>
<vcpu placement='static'>2</vcpu>
<os>
<type arch='x86_64' machine='rhel6.4.0'>hvm</type>
<boot dev='hd'/>
</os>
<features>
<acpi/>
<apic/>
<pae/>
</features>
<clock offset='localtime'>
<timer name='rtc' tickpolicy='catchup'/>
</clock>
<on_poweroff>destroy</on_poweroff>
<on_reboot>restart</on_reboot>
<on_crash>restart</on_crash>
<devices>
<emulator>/usr/libexec/qemu-kvm</emulator>
<disk type='file' device='cdrom'>
<driver name='qemu' type='raw'/>
<source file='/shared/files/Windows_Svr_2008_R2_64Bit_SP1.ISO'/>
<target dev='hda' bus='ide'/>
<readonly/>
<alias name='ide0-0-0'/>
<address type='drive' controller='0' bus='0' target='0' unit='0'/>
</disk>
<disk type='file' device='cdrom'>
<driver name='qemu' type='raw'/>
<source file='/shared/files/virtio-win-0.1-52.iso'/>
<target dev='hdc' bus='ide'/>
<readonly/>
<alias name='ide0-1-0'/>
<address type='drive' controller='0' bus='1' target='0' unit='0'/>
</disk>
<disk type='block' device='disk'>
<driver name='qemu' type='raw' cache='none' io='native'/>
<source dev='/dev/an-a05n01_vg0/vm01-win2008_0'/>
<target dev='vda' bus='virtio'/>
<alias name='virtio-disk0'/>
<address type='pci' domain='0x0000' bus='0x00' slot='0x04' function='0x0'/>
</disk>
<controller type='usb' index='0'>
<alias name='usb0'/>
<address type='pci' domain='0x0000' bus='0x00' slot='0x01' function='0x2'/>
</controller>
<controller type='ide' index='0'>
<alias name='ide0'/>
<address type='pci' domain='0x0000' bus='0x00' slot='0x01' function='0x1'/>
</controller>
<interface type='bridge'>
<mac address='52:54:00:8e:67:32'/>
<source bridge='ifn_bridge1'/>
<target dev='vnet0'/>
<model type='virtio'/>
<alias name='net0'/>
<address type='pci' domain='0x0000' bus='0x00' slot='0x03' function='0x0'/>
</interface>
<serial type='pty'>
<source path='/dev/pts/3'/>
<target port='0'/>
<alias name='serial0'/>
</serial>
<console type='pty' tty='/dev/pts/3'>
<source path='/dev/pts/3'/>
<target type='serial' port='0'/>
<alias name='serial0'/>
</console>
<input type='tablet' bus='usb'>
<alias name='input0'/>
</input>
<input type='mouse' bus='ps2'/>
<graphics type='spice' port='5900' autoport='yes' listen='127.0.0.1'>
<listen type='address' address='127.0.0.1'/>
</graphics>
<video>
<model type='qxl' ram='65536' vram='65536' heads='1'/>
<alias name='video0'/>
<address type='pci' domain='0x0000' bus='0x00' slot='0x02' function='0x0'/>
</video>
<memballoon model='virtio'>
<alias name='balloon0'/>
<address type='pci' domain='0x0000' bus='0x00' slot='0x05' function='0x0'/>
</memballoon>
</devices>
<seclabel type='dynamic' model='selinux' relabel='yes'>
<label>unconfined_u:system_r:svirt_t:s0:c68,c367</label>
<imagelabel>unconfined_u:object_r:svirt_image_t:s0:c68,c367</imagelabel>
</seclabel>
</domain> |
|---|
That is your server's hardware!
Notice how it shows the mounted cd-roms? You can also see the MAC address assigned to the network card, the RAM and CPU cores allocated and other details. Pretty awesome!
So let's re-run the dumpxml file, but this time, we'll use a bash redirection to save the output to a file in our /shared/definition directory.
| an-a05n01 | virsh dumpxml vm01-win2008 > /shared/definitions/vm01-win2008.xml
ls -lah /shared/definitions/vm01-win2008.xml-rw-r--r--. 1 root root 3.3K Nov 18 11:54 /shared/definitions/vm01-win2008.xml |
|---|
Excellent! Now, as we will see in a moment, the cluster will be able to use this to start, stop, migrate and recover the server.
| Warning: Be sure the XML file was written properly! This next step will remove the server from libvirtd. Once done, the /shared/definitions/vm01-win2008.xml will be the only way to boot the server! |
The last step is to remove vm01-win2008 from libvirtd. This will ensure that tools like "Virtual Machine Manager" will not know about our servers except when they are running on the node.
| an-a05n01 | virsh undefine vm01-win2008Domain vm01-win2008 has been undefined |
|---|
Done.
Creating the vm:vm01-win2008 Service
As we discussed earlier, we are now going to create a new service for vm01-win2008 using the vm resource agent.
This element will have a child element that tells the cluster to give servers up to 30 minutes to shut down. Normally, the cluster will wait for two minutes after calling disable against a server. For privacy reasons, there is not way for the cluster to know what is happening inside the server. So after the stop timeout expires, the node is considered failed and is forced off. The problem is that windows often queues updates to be installed during the shut down, so it can take a very long time to turn off. We don't want to risk "pulling the plug" on a windows machine that is being updated, of course, so we will tell the cluster to be very patient.
| Note: It is a good idea to set your windows servers to download updates but not install them until an admin says to do so. This way, there is less chance of problem because the admin can do a reboot to install the updates during a maintenance window. It also avoids false-decleration of server failure. |
Lets increment the version to 12 and take a look at the new entry.
| an-a05n01 | <rm log_level="5">
...
<vm name="vm01-win2008" domain="primary_n01" autostart="0" path="/shared/definitions/" exclusive="0" recovery="restart" max_restarts="2" restart_expire_time="600">
<action name="stop" timeout="30m" />
</vm>
</rm> |
|---|
Let's look at each of the attributes now;
| Attribute | Description |
|---|---|
| name | This must match the name we created the VM with (the --name ... value when we provisioned the VM). In this case, that is vm01-win2008. This is the name that will be passed to the vm.sh resource agent when managing this service, and it will be the <name>.xml used when looking under path=... for the VM's definition file. |
| domain | This tells the cluster to manage the VM using the given fail-over domain. We built vm01-win2008 using an-a05n01's storage pool, so this server will be assigned to the primary_n01 domain. |
| path | This tells the cluster where to look for the server's definition file. Do not include the actual file name, just the path. The cluster takes this path, appends the server's name and then appends .xml in order to find the server's definition file. |
| autostart | This tells the cluster not to start the server automatically. This is needed because, if this was 1, the cluster will try to start the server and the storage at the same time. It takes a few moments for the storage to start, and by the time it did, the server service would have failed. |
| exclusive | As we saw with the storage services, we want to ensure that this service is not exclusive. If it were, starting the VM would stop storage/libvirtd and prevent other servers from running on the node. This would be a bad thing™. |
| recovery | This tells the Anvil! what to do when the service fails. We are setting this to restart, so the cluster will try to restart the server on the same node it was on when it failed. The alternative is relocate, which would instead start the server on another node. More about this next. |
| max_restarts | When a server fails, it is possible that it is because there is a subtle problem on the host node itself. So this attribute allows us to set a limit on how many times a server will be allowed to restart before giving up and switching to a relocate policy. We're setting this to 2, which means that if a server is restarted twice, the third failure will trigger a relocate. |
| restart_expire_time | If we let the max_restarts failure count increment indefinitely, than a relocate policy becomes inevitable. To account for this, we use this attribute to tell the Anvil! to "forget" a restart after the defined number of seconds. We're using 600 seconds (ten minutes). So if a server fails, the failure count increments from 0 to 1. After 600 seconds though, the restart is "forgotten" and the failure count returns to 0. Said another way, a server will have to fail three times in ten minutes to trigger the relocate recovery policy. |
So let's take a look at the final, complete cluster.conf;
| an-a05n01 | <?xml version="1.0"?>
<cluster name="an-anvil-05" config_version="12">
<cman expected_votes="1" two_node="1" />
<clusternodes>
<clusternode name="an-a05n01.alteeve.ca" nodeid="1">
<fence>
<method name="ipmi">
<device name="ipmi_n01" action="reboot" delay="15" />
</method>
<method name="pdu">
<device name="pdu1" port="1" action="reboot" />
<device name="pdu2" port="1" action="reboot" />
</method>
</fence>
</clusternode>
<clusternode name="an-a05n02.alteeve.ca" nodeid="2">
<fence>
<method name="ipmi">
<device name="ipmi_n02" action="reboot" />
</method>
<method name="pdu">
<device name="pdu1" port="2" action="reboot" />
<device name="pdu2" port="2" action="reboot" />
</method>
</fence>
</clusternode>
</clusternodes>
<fencedevices>
<fencedevice name="ipmi_n01" agent="fence_ipmilan" ipaddr="an-a05n01.ipmi" login="admin" passwd="secret" />
<fencedevice name="ipmi_n02" agent="fence_ipmilan" ipaddr="an-a05n02.ipmi" login="admin" passwd="secret" />
<fencedevice agent="fence_apc_snmp" ipaddr="an-pdu01.alteeve.ca" name="pdu1" />
<fencedevice agent="fence_apc_snmp" ipaddr="an-pdu02.alteeve.ca" name="pdu2" />
</fencedevices>
<fence_daemon post_join_delay="30" />
<totem rrp_mode="none" secauth="off"/>
<rm log_level="5">
<resources>
<script file="/etc/init.d/drbd" name="drbd"/>
<script file="/etc/init.d/clvmd" name="clvmd"/>
<clusterfs device="/dev/an-a05n01_vg0/shared" force_unmount="1" fstype="gfs2" mountpoint="/shared" name="sharedfs" />
<script file="/etc/init.d/libvirtd" name="libvirtd"/>
</resources>
<failoverdomains>
<failoverdomain name="only_n01" nofailback="1" ordered="0" restricted="1">
<failoverdomainnode name="an-a05n01.alteeve.ca"/>
</failoverdomain>
<failoverdomain name="only_n02" nofailback="1" ordered="0" restricted="1">
<failoverdomainnode name="an-a05n02.alteeve.ca"/>
</failoverdomain>
<failoverdomain name="primary_n01" nofailback="1" ordered="1" restricted="1">
<failoverdomainnode name="an-a05n01.alteeve.ca" priority="1"/>
<failoverdomainnode name="an-a05n02.alteeve.ca" priority="2"/>
</failoverdomain>
<failoverdomain name="primary_n02" nofailback="1" ordered="1" restricted="1">
<failoverdomainnode name="an-a05n01.alteeve.ca" priority="2"/>
<failoverdomainnode name="an-a05n02.alteeve.ca" priority="1"/>
</failoverdomain>
</failoverdomains>
<service name="storage_n01" autostart="1" domain="only_n01" exclusive="0" recovery="restart">
<script ref="drbd">
<script ref="clvmd">
<clusterfs ref="sharedfs"/>
</script>
</script>
</service>
<service name="storage_n02" autostart="1" domain="only_n02" exclusive="0" recovery="restart">
<script ref="drbd">
<script ref="clvmd">
<clusterfs ref="sharedfs"/>
</script>
</script>
</service>
<service name="libvirtd_n01" autostart="1" domain="only_n01" exclusive="0" recovery="restart">
<script ref="libvirtd"/>
</service>
<service name="libvirtd_n02" autostart="1" domain="only_n02" exclusive="0" recovery="restart">
<script ref="libvirtd"/>
</service>
<vm name="vm01-win2008" domain="primary_n01" autostart="0" path="/shared/definitions/" exclusive="0" recovery="restart" max_restarts="2" restart_expire_time="600">
<action name="stop" timeout="30m" />
</vm>
</rm>
</cluster> |
|---|
Now let's activate the new configuration.
| an-a05n01 | ccs_config_validateConfiguration validatescman_tool version6.2.0 config 11cman_tool version -r
cman_tool version6.2.0 config 12 |
|---|---|
| an-a05n02 | cman_tool version6.2.0 config 12 |
Let's now take a look at clustat on both nodes.
| an-a05n01 | clustatCluster Status for an-anvil-05 @ Mon Nov 18 12:29:30 2013
Member Status: Quorate
Member Name ID Status
------ ---- ---- ------
an-a05n01.alteeve.ca 1 Online, Local, rgmanager
an-a05n02.alteeve.ca 2 Online, rgmanager
Service Name Owner (Last) State
------- ---- ----- ------ -----
service:libvirtd_n01 an-a05n01.alteeve.ca started
service:libvirtd_n02 an-a05n02.alteeve.ca started
service:storage_n01 an-a05n01.alteeve.ca started
service:storage_n02 an-a05n02.alteeve.ca started
vm:vm01-win2008 (none) disabled |
|---|---|
| an-a05n02 | clustatCluster Status for an-anvil-05 @ Mon Nov 18 12:29:33 2013
Member Status: Quorate
Member Name ID Status
------ ---- ---- ------
an-a05n01.alteeve.ca 1 Online, rgmanager
an-a05n02.alteeve.ca 2 Online, Local, rgmanager
Service Name Owner (Last) State
------- ---- ----- ------ -----
service:libvirtd_n01 an-a05n01.alteeve.ca started
service:libvirtd_n02 an-a05n02.alteeve.ca started
service:storage_n01 an-a05n01.alteeve.ca started
service:storage_n02 an-a05n02.alteeve.ca started
vm:vm01-win2008 (none) disabled |
Notice that the vm:vm01-win2008 is disabled? That is because of autostart="0".
Thankfully, the cluster is smart enough that we can tell it to start the service and it will see the server is already running and not actually do anything. So we can do this next step safely while the server is running.
The trick, of course, is to be sure to tell the cluster to start the server on the right cluster node.
So let's use virsh once more to verify that vm01-win2008 is, in fact, still on an-a05n01.
| an-a05n01 | virsh list --all Id Name State
----------------------------------------------------
1 vm01-win2008 running |
|---|---|
| an-a05n02 | virsh list --all Id Name State
---------------------------------------------------- |
Excellent. So now to tell the cluster to begin managing the server, we're use a program called clusvcadm. It takes two switches in this case:
- -e; "enable" the service
- -m; do the action on the named member.
We can run clusvcadm from any node in the cluster. For now though, lets stick to an-a05n01.
| an-a05n01 | clusvcadm -e vm:vm01-win2008 -m an-a05n01.alteeve.cavm:vm01-win2008 is now running on an-a05n01.alteeve.ca |
|---|
We can confirm with clustat that the server is now under cluster control.
| an-a05n01 | clustatCluster Status for an-anvil-05 @ Mon Nov 18 12:37:40 2013
Member Status: Quorate
Member Name ID Status
------ ---- ---- ------
an-a05n01.alteeve.ca 1 Online, Local, rgmanager
an-a05n02.alteeve.ca 2 Online, rgmanager
Service Name Owner (Last) State
------- ---- ----- ------ -----
service:libvirtd_n01 an-a05n01.alteeve.ca started
service:libvirtd_n02 an-a05n02.alteeve.ca started
service:storage_n01 an-a05n01.alteeve.ca started
service:storage_n02 an-a05n02.alteeve.ca started
vm:vm01-win2008 an-a05n01.alteeve.ca started |
|---|---|
| an-a05n02 | clustatCluster Status for an-anvil-05 @ Mon Nov 18 12:37:40 2013
Member Status: Quorate
Member Name ID Status
------ ---- ---- ------
an-a05n01.alteeve.ca 1 Online, rgmanager
an-a05n02.alteeve.ca 2 Online, Local, rgmanager
Service Name Owner (Last) State
------- ---- ----- ------ -----
service:libvirtd_n01 an-a05n01.alteeve.ca started
service:libvirtd_n02 an-a05n02.alteeve.ca started
service:storage_n01 an-a05n01.alteeve.ca started
service:storage_n02 an-a05n02.alteeve.ca started
vm:vm01-win2008 an-a05n01.alteeve.ca started |
Looking good!
Testing vm01-win2008 Management With clusvcadm
The first thing we're going to do is disable (gracefully shut down) the server. To do this, we'll send an ACPI "power button" event to vm01-win2008. Windows 2008 will, like most operating systems, respond to having its "power button pressed" by beginning a graceful shut down.
As always, start by checking the state of things.
| an-a05n01 | clustatCluster Status for an-anvil-05 @ Mon Nov 11 13:36:17 2013
Member Status: Quorate
Member Name ID Status
------ ---- ---- ------
an-a05n01.alteeve.ca 1 Online, Local, rgmanager
an-a05n02.alteeve.ca 2 Online, rgmanager
Service Name Owner (Last) State
------- ---- ----- ------ -----
service:libvirtd_n01 an-a05n01.alteeve.ca started
service:libvirtd_n02 an-a05n02.alteeve.ca started
service:storage_n01 an-a05n01.alteeve.ca started
service:storage_n02 an-a05n02.alteeve.ca started
vm:vm01-win2008 an-a05n01.alteeve.ca started |
|---|
| Warning: Windows occasionally ignores ACPI power button events. In other cases, some programs will block the shut-down. In either case, the server will not actually shut down. It's a good habit to connect to the server and make sure it shuts down when you disable the service. If it does not shut down on its own, use the operating system's power off feature. |
As we expected. So now, "press the server's power button" using clusvcadm. We have to do it this way because, if the server stops any other way, the cluster will treat it as a failure and boot it right back up.
| an-a05n01 | clusvcadm -d vm:vm01-win2008Local machine disabling vm:vm01-win2008...Success |
|---|
If we check clustat again, we'll see that the vm:vm01-win2008 service is indeed disabled.
| an-a05n01 | clustatCluster Status for an-anvil-05 @ Mon Nov 11 16:11:30 2013
Member Status: Quorate
Member Name ID Status
------ ---- ---- ------
an-a05n01.alteeve.ca 1 Online, Local, rgmanager
an-a05n02.alteeve.ca 2 Online, rgmanager
Service Name Owner (Last) State
------- ---- ----- ------ -----
service:libvirtd_n01 an-a05n01.alteeve.ca started
service:libvirtd_n02 an-a05n02.alteeve.ca started
service:storage_n01 an-a05n01.alteeve.ca started
service:storage_n02 an-a05n02.alteeve.ca started
vm:vm01-win2008 (an-a05n01.alteeve.ca) disabled |
|---|
Good, it's off. Let's turn it back on now.
Note the -F; That tells rgmanager to start the vm service on the preferred host. It's a nice habit to get into as it will ensure the server always boots on the preferred node, when possible.
| an-a05n01 | clusvcadm -F -e vm:vm01-win2008Local machine trying to enable vm:vm01-win2008...Failure |
|---|
What the deuce!?
Solving vm01-win2008 "Failure to Enable" Error
Let's look at the log file.
| an-a05n01 | tail /var/log/messageNov 11 16:16:43 an-a05n01 rgmanager[2921]: start on vm "vm01-win2008" returned 1 (generic error)
Nov 11 16:16:43 an-a05n01 rgmanager[2921]: #68: Failed to start vm:vm01-win2008; return value: 1
Nov 11 16:16:43 an-a05n01 rgmanager[2921]: Stopping service vm:vm01-win2008
Nov 11 16:16:43 an-a05n01 rgmanager[2921]: Service vm:vm01-win2008 is recovering |
|---|---|
| an-a05n02 | tail /var/log/messageNov 11 16:16:43 an-a05n02 rgmanager[2864]: Recovering failed service vm:vm01-win2008
Nov 11 16:16:44 an-a05n02 rgmanager[2864]: start on vm "vm01-win2008" returned 1 (generic error)
Nov 11 16:16:44 an-a05n02 rgmanager[2864]: #68: Failed to start vm:vm01-win2008; return value: 1
Nov 11 16:16:44 an-a05n02 rgmanager[2864]: Stopping service vm:vm01-win2008
Nov 11 16:16:44 an-a05n02 rgmanager[2864]: Service vm:vm01-win2008 is recovering |
If we check clustat, we'll see that the server is stuck in recovery.
| an-a05n01 | clustatCluster Status for an-anvil-05 @ Mon Nov 11 16:16:51 2013
Member Status: Quorate
Member Name ID Status
------ ---- ---- ------
an-a05n01.alteeve.ca 1 Online, Local, rgmanager
an-a05n02.alteeve.ca 2 Online, rgmanager
Service Name Owner (Last) State
------- ---- ----- ------ -----
service:libvirtd_n01 an-a05n01.alteeve.ca started
service:libvirtd_n02 an-a05n02.alteeve.ca started
service:storage_n01 an-a05n01.alteeve.ca started
service:storage_n02 an-a05n02.alteeve.ca started
vm:vm01-win2008 none recovering |
|---|
This is why we saw the "start on vm "vm01-win2008" returned 1 (generic error)" message on both nodes. The cluster tried to enable it on the preferred host first, because of the -F switch, that failed so it tried to enable it on the second node and that also failed.
The first step to diagnosing the problem is to disable the service in rgmanager and then manually trying to start the server using virsh.
| an-a05n01 | clusvcadm -d vm:vm01-win2008Local machine disabling vm:vm01-win2008...SuccessclustatCluster Status for an-anvil-05 @ Mon Nov 11 16:17:09 2013
Member Status: Quorate
Member Name ID Status
------ ---- ---- ------
an-a05n01.alteeve.ca 1 Online, Local, rgmanager
an-a05n02.alteeve.ca 2 Online, rgmanager
Service Name Owner (Last) State
------- ---- ----- ------ -----
service:libvirtd_n01 an-a05n01.alteeve.ca started
service:libvirtd_n02 an-a05n02.alteeve.ca started
service:storage_n01 an-a05n01.alteeve.ca started
service:storage_n02 an-a05n02.alteeve.ca started
vm:vm01-win2008 (an-a05n02.alteeve.ca) disabled |
|---|
Now the cluster is no longer trying to touch the server. Lets start it manually. As always, verify the state of things. In this case, we'll double-check that the server really didn't start with virsh.
| an-a05n01 | virsh list --all Id Name State
---------------------------------------------------- |
|---|---|
| an-a05n02 | virsh list --all Id Name State
---------------------------------------------------- |
It's for sure off, so let's try to start it. As you can see above, the vm01-win2008 server is not shown as shut off because we undefined it. So to start it, we need to use the create option and specify the definition file manually.
| an-a05n01 | virsh createDomain vm01-win2008 created from /shared/definitions/vm01-win2008.xmlvirsh list --all Id Name State
----------------------------------------------------
10 vm01-win2008 running |
|---|
So now we know that the server itself is fine. Let's shut down the server using virsh. Note that it will take a minute for the server to gracefully shut down.
| an-a05n01 | virsh shutdown vm01-win2008Domain vm01-win2008 is being shutdownvirsh list --all Id Name State
---------------------------------------------------- |
|---|
So a likely cause of problems is an SELinux denial. Let's verify that SELinux is, in fact, enforcing.
| an-a05n01 | sestatusSELinux status: enabled
SELinuxfs mount: /selinux
Current mode: enforcing
Mode from config file: enforcing
Policy version: 24
Policy from config file: targeted |
|---|
It is. So to test, let's temporarily put SELinux into permissive mode and see if clusvcadm starts working.
| an-a05n01 | setenforce 0
sestatusSELinux status: enabled
SELinuxfs mount: /selinux
Current mode: permissive
Mode from config file: enforcing
Policy version: 24
Policy from config file: targetedclusvcadm -F -e vm:vm01-win2008Local machine trying to enable vm:vm01-win2008...Success
vm:vm01-win2008 is now running on an-a05n01.alteeve.ca |
|---|
Bingo! So we've SELinux appears to be the problem.
Let's disable vm:vm01-win2008, re-enable SELinux and then try to debug SELinux.
| an-a05n01 | clusvcadm -d vm:vm01-win2008Local machine disabling vm:vm01-win2008...Successsetenforce 1
sestatusSELinux status: enabled
SELinuxfs mount: /selinux
Current mode: enforcing
Mode from config file: enforcing
Policy version: 24
Policy from config file: targeted |
|---|
Now we're back to where it fails. We will now want to look for errors. SELinux writes log entries to /var/log/audit/audit.log, however, by default, many things are set to not logged (set to dontaudit in SELinux parlance). This includes cluster related issues. So to temporarily enable complete logging, we will use the semodule command to tell it to log all messages.
| an-a05n01 | semodule -DB# no output, but it takes a while to complete |
|---|
Now we will tail -f /var/log/audit/audit.log and try again to start the server using clusvcadm. We expect it will fail, but the log messages will be useful. Once it fails, we'll immediately disable it again.
| an-a05n01 | clusvcadm -F -e vm:vm01-win2008Local machine trying to enable vm:vm01-win2008...Failureclusvcadm -d vm:vm01-win2008Local machine disabling vm:vm01-win2008...Success |
|---|
Looking at audit.log, we see;
type=AVC msg=audit(1384209306.795:2768): avc: denied { search } for pid=24850 comm="virsh" name="/" dev=dm-0 ino=22 scontext=unconfined_u:system_r:xm_t:s0 tcontext=system_u:object_r:file_t:s0 tclass=dirIt's complaining about the device dm-0 and specifically about the inode 22. If you recall from when we setup the /shared partition, dm-0 was a "device mapper" device. Let's see what this is.
| an-a05n01 | ls -lah /dev/mapper/ | grep dm-0lrwxrwxrwx. 1 root root 7 Nov 3 12:14 an--c05n01_vg0-shared -> ../dm-0 |
|---|
This is the device mapper name for the LV we created for /shared. Knowing this, let's search /shared for what is at inode number 22.
| an-a05n01 | find /shared -inum 22/shared |
|---|
So inode 22 is the /shared directory itself. So lets look at the SELinux context using ls's -Z switch.
| an-a05n01 | ls -laZ /shareddrwxr-xr-x. root root system_u:object_r:file_t:s0 .
dr-xr-xr-x. root root system_u:object_r:root_t:s0 ..
drwxr-xr-x. root root unconfined_u:object_r:virt_etc_t:s0 archive
drwxr-xr-x. root root unconfined_u:object_r:file_t:s0 definitions
drwxr-xr-x. root root unconfined_u:object_r:file_t:s0 files
drwxr-xr-x. root root unconfined_u:object_r:file_t:s0 provision |
|---|
We can see that the current context on /shared (the . entry above) is system_u:object_r:file_t:s0. This isn't permissive enough, so we need to fix it. The virt_etc_t context should be good enough as it allows reads from files under /shared.
| Note: If you use a program other than virsh that tries to manipulate the files in /shared, you may need to use the virt_etc_rw_t context as it allows read/write permissions. |
We'll need to make this change on both nodes. We'll use semanage to make the change followed by restorecon to make sure the changes remain in case the file system is ever re-labelled.
| an-a05n01 | semanage fcontext -a -t virt_etc_t '/shared(/.*)?'
restorecon -r /shared
ls -laZ /shareddrwxr-xr-x. root root system_u:object_r:virt_etc_t:s0 .
dr-xr-xr-x. root root system_u:object_r:root_t:s0 ..
drwxr-xr-x. root root unconfined_u:object_r:virt_etc_t:s0 archive
drwxr-xr-x. root root unconfined_u:object_r:virt_etc_t:s0 definitions
drwxr-xr-x. root root unconfined_u:object_r:virt_etc_t:s0 files
drwxr-xr-x. root root unconfined_u:object_r:virt_etc_t:s0 provision |
|---|---|
| an-a05n02 | semanage fcontext -a -t virt_etc_t '/shared(/.*)?'
restorecon -r /shared
ls -laZ /shareddrwxr-xr-x. root root system_u:object_r:virt_etc_t:s0 .
dr-xr-xr-x. root root system_u:object_r:root_t:s0 ..
drwxr-xr-x. root root unconfined_u:object_r:virt_etc_t:s0 archive
drwxr-xr-x. root root unconfined_u:object_r:virt_etc_t:s0 definitions
drwxr-xr-x. root root unconfined_u:object_r:virt_etc_t:s0 files
drwxr-xr-x. root root unconfined_u:object_r:virt_etc_t:s0 provision |
We told SELinux to ignore the dontaudit option earlier. We'll want to undo this so that our logs don't get flooded.
| an-a05n01 | semodule -B# No output, but it will take a while to return |
|---|
If all went well, we should now be able to use clusvcadmto enable the vm:vm01-win2008 service.
| an-a05n01 | clusvcadm -F -e vm:vm01-win2008Local machine trying to enable vm:vm01-win2008...Success
vm:vm01-win2008 is now running on an-a05n01.alteeve.ca |
|---|
Excellent!
Testing vm01-win2008 Live Migration
One of the most useful features of the Anvil! is the ability to "push" a running server from one node to another. This can be done without interrupting users, so it allows maintenance of nodes in the middle of work days. Upgrades, maintenance and repairs can be done without scheduling maintenance windows!
As always, lets take a look at where things are right now.
| an-a05n01 | clustatCluster Status for an-anvil-05 @ Thu Nov 14 14:15:09 2013
Member Status: Quorate
Member Name ID Status
------ ---- ---- ------
an-a05n01.alteeve.ca 1 Online, Local, rgmanager
an-a05n02.alteeve.ca 2 Online, rgmanager
Service Name Owner (Last) State
------- ---- ----- ------ -----
service:libvirtd_n01 an-a05n01.alteeve.ca started
service:libvirtd_n02 an-a05n02.alteeve.ca started
service:storage_n01 an-a05n01.alteeve.ca started
service:storage_n02 an-a05n02.alteeve.ca started
vm:vm01-win2008 an-a05n01.alteeve.ca started |
|---|
If we check with virsh, we can confirm that the cluster's view is accurate.
| an-a05n01 | virsh list --all Id Name State
----------------------------------------------------
1 vm01-win2008 running |
|---|---|
| an-a05n02 | virsh list --all Id Name State
---------------------------------------------------- |
Exactly what we expected.
Now, to live-migrate a server, we will use clusvcadm with the -M (note the capitalization). This tells rgmanager to migrate, instead of relocated, the service to the target cluster member.
Seeing as vm01-win2008 is currently on an-a05n01, we'll migrate it over to an-a05n02.
| Note: If you get an error like Failed; service running on original owner, you may not have your firewall configured properly. Alternately, you may have run into mainboards with matching UUIDs. |
| an-a05n01 | clusvcadm -M vm:vm01-win2008 -m an-a05n02.alteeve.caTrying to migrate vm:vm01-win2008 to an-a05n02.alteeve.ca...Success |
|---|---|
| an-a05n02 | clustatCluster Status for an-anvil-05 @ Thu Nov 14 14:57:30 2013
Member Status: Quorate
Member Name ID Status
------ ---- ---- ------
an-a05n01.alteeve.ca 1 Online, rgmanager
an-a05n02.alteeve.ca 2 Online, Local, rgmanager
Service Name Owner (Last) State
------- ---- ----- ------ -----
service:libvirtd_n01 an-a05n01.alteeve.ca started
service:libvirtd_n02 an-a05n02.alteeve.ca started
service:storage_n01 an-a05n01.alteeve.ca started
service:storage_n02 an-a05n02.alteeve.ca started
vm:vm01-win2008 an-a05n02.alteeve.ca started |
We can confirm this worked with virsh.
| an-a05n01 | virsh list --all Id Name State
---------------------------------------------------- |
|---|---|
| an-a05n02 | virsh list --all Id Name State
----------------------------------------------------
1 vm01-win2008 running |
If you were logged into the server, you would have noticed than any running appications, including network applications, would have not been effected in any way.
How cool is that?
Now we'll push it back to an-a05n01.
| an-a05n01 | clusvcadm -M vm:vm01-win2008 -m an-a05n01.alteeve.caTrying to migrate vm:vm01-win2008 to an-a05n01.alteeve.ca...Success |
|---|---|
| an-a05n02 | clustatCluster Status for an-anvil-05 @ Thu Nov 14 15:02:28 2013
Member Status: Quorate
Member Name ID Status
------ ---- ---- ------
an-a05n01.alteeve.ca 1 Online, rgmanager
an-a05n02.alteeve.ca 2 Online, Local, rgmanager
Service Name Owner (Last) State
------- ---- ----- ------ -----
service:libvirtd_n01 an-a05n01.alteeve.ca started
service:libvirtd_n02 an-a05n02.alteeve.ca started
service:storage_n01 an-a05n01.alteeve.ca started
service:storage_n02 an-a05n02.alteeve.ca started
vm:vm01-win2008 an-a05n01.alteeve.ca started |
As always, we can confirm this worked with virsh.
| an-a05n01 | virsh list --all Id Name State
----------------------------------------------------
3 vm01-win2008 running |
|---|---|
| an-a05n02 | virsh list --all Id Name State
---------------------------------------------------- |
Very cool.
Making vm02-win2012 a Highly Available Service
| Note: If you skipped adding vm01-win2008 to the cluster manager, please jump back and review the steps there. Particularly on creating the new failover domains and SELinux fix. |
It's time to add vm02-win2012 to the cluster's management.
Dumping the vm02-win2012 XML Definition File
As we did with vm01-win2008, we need to dump vm02-win2012's XML definition out to a file in /shared/definitions.
| Note: Recall that we provisioned vm02-win2012 on an-a05n02, so we will have to use that node for the next step. |
First, let's use virsh to see the server's state.
| an-a05n01 | virsh list --all Id Name State
----------------------------------------------------
2 vm01-win2008 running |
|---|---|
| an-a05n02 | virsh list --all Id Name State
----------------------------------------------------
1 vm02-win2012 running |
So we see that vm02-win2012 is running on an-a05n02. Recall that the Id is a simple integer that increments each time a server boots.
Now dump the server's XML.
| an-a05n02 | virsh dumpxml vm02-win2012 > /shared/definitions/vm02-win2012.xml
ls -lah /shared/definitions/vm02-win2012.xml-rw-r--r--. 1 root root 3.3K Nov 18 13:03 /shared/definitions/vm02-win2012.xml |
|---|
| Warning: Be sure the XML file was written properly! This next step will remove the server from libvirtd. Once done, the /shared/definitions/vm02-win2012.xml will be the only way to boot the server! |
The last step is to remove vm02-win2012 from libvirtd. This will ensure that tools like "Virtual Machine Manager" will not know about our servers except when they are running on the node.
| an-a05n02 | virsh undefine vm02-win2012Domain vm02-win2012 has been undefined |
|---|
Done.
Creating the vm:vm02-win2012 Service
As we did for vm01-win2008, we will create a vm service entry for vm02-win2012. This time though, because this server is assigned to an-a05n02, we will use the primary_n02 failover domain.
Lets increment the version to 13 and add the new entry.
| an-a05n02 | <rm log_level="5">
...
<vm name="vm02-win2012" domain="primary_n02" autostart="0" path="/shared/definitions/" exclusive="0" recovery="restart" max_restarts="2" restart_expire_time="600">
<action name="stop" timeout="30m" />
</vm>
</rm> |
|---|
Making the new cluster.conf as we see it below.
| an-a05n02 | <?xml version="1.0"?>
<cluster name="an-anvil-05" config_version="13">
<cman expected_votes="1" two_node="1" />
<clusternodes>
<clusternode name="an-a05n01.alteeve.ca" nodeid="1">
<fence>
<method name="ipmi">
<device name="ipmi_n01" action="reboot" delay="15" />
</method>
<method name="pdu">
<device name="pdu1" port="1" action="reboot" />
<device name="pdu2" port="1" action="reboot" />
</method>
</fence>
</clusternode>
<clusternode name="an-a05n02.alteeve.ca" nodeid="2">
<fence>
<method name="ipmi">
<device name="ipmi_n02" action="reboot" />
</method>
<method name="pdu">
<device name="pdu1" port="2" action="reboot" />
<device name="pdu2" port="2" action="reboot" />
</method>
</fence>
</clusternode>
</clusternodes>
<fencedevices>
<fencedevice name="ipmi_n01" agent="fence_ipmilan" ipaddr="an-a05n01.ipmi" login="admin" passwd="secret" />
<fencedevice name="ipmi_n02" agent="fence_ipmilan" ipaddr="an-a05n02.ipmi" login="admin" passwd="secret" />
<fencedevice agent="fence_apc_snmp" ipaddr="an-pdu01.alteeve.ca" name="pdu1" />
<fencedevice agent="fence_apc_snmp" ipaddr="an-pdu02.alteeve.ca" name="pdu2" />
</fencedevices>
<fence_daemon post_join_delay="30" />
<totem rrp_mode="none" secauth="off"/>
<rm log_level="5">
<resources>
<script file="/etc/init.d/drbd" name="drbd"/>
<script file="/etc/init.d/clvmd" name="clvmd"/>
<clusterfs device="/dev/an-a05n01_vg0/shared" force_unmount="1" fstype="gfs2" mountpoint="/shared" name="sharedfs" />
<script file="/etc/init.d/libvirtd" name="libvirtd"/>
</resources>
<failoverdomains>
<failoverdomain name="only_n01" nofailback="1" ordered="0" restricted="1">
<failoverdomainnode name="an-a05n01.alteeve.ca"/>
</failoverdomain>
<failoverdomain name="only_n02" nofailback="1" ordered="0" restricted="1">
<failoverdomainnode name="an-a05n02.alteeve.ca"/>
</failoverdomain>
<failoverdomain name="primary_n01" nofailback="1" ordered="1" restricted="1">
<failoverdomainnode name="an-a05n01.alteeve.ca" priority="1"/>
<failoverdomainnode name="an-a05n02.alteeve.ca" priority="2"/>
</failoverdomain>
<failoverdomain name="primary_n02" nofailback="1" ordered="1" restricted="1">
<failoverdomainnode name="an-a05n01.alteeve.ca" priority="2"/>
<failoverdomainnode name="an-a05n02.alteeve.ca" priority="1"/>
</failoverdomain>
</failoverdomains>
<service name="storage_n01" autostart="1" domain="only_n01" exclusive="0" recovery="restart">
<script ref="drbd">
<script ref="clvmd">
<clusterfs ref="sharedfs"/>
</script>
</script>
</service>
<service name="storage_n02" autostart="1" domain="only_n02" exclusive="0" recovery="restart">
<script ref="drbd">
<script ref="clvmd">
<clusterfs ref="sharedfs"/>
</script>
</script>
</service>
<service name="libvirtd_n01" autostart="1" domain="only_n01" exclusive="0" recovery="restart">
<script ref="libvirtd"/>
</service>
<service name="libvirtd_n02" autostart="1" domain="only_n02" exclusive="0" recovery="restart">
<script ref="libvirtd"/>
</service>
<vm name="vm01-win2008" domain="primary_n01" autostart="0" path="/shared/definitions/" exclusive="0" recovery="restart" max_restarts="2" restart_expire_time="600">
<action name="stop" timeout="30m" />
</vm>
<vm name="vm02-win2012" domain="primary_n02" autostart="0" path="/shared/definitions/" exclusive="0" recovery="restart" max_restarts="2" restart_expire_time="600">
<action name="stop" timeout="30m" />
</vm>
</rm>
</cluster> |
|---|
Now let's activate the new configuration.
| Note: If you've been following along, this will be the first time we've pushed a change to cluster.conf from an-a05n02. So we'll need to enter the ricci user's password on both nodes. |
| an-a05n02 | ccs_config_validateConfiguration validatescman_tool version6.2.0 config 12cman_tool version -rYou have not authenticated to the ricci daemon on an-a05n02.alteeve.ca
Password:You have not authenticated to the ricci daemon on an-a05n01.alteeve.ca
Password:cman_tool version6.2.0 config 13 |
|---|---|
| an-a05n01 | cman_tool version6.2.0 config 13 |
Let's take a look at clustat on both nodes now.
| an-a05n02 | clustatCluster Status for an-anvil-05 @ Mon Nov 18 13:08:57 2013
Member Status: Quorate
Member Name ID Status
------ ---- ---- ------
an-a05n01.alteeve.ca 1 Online, Local, rgmanager
an-a05n02.alteeve.ca 2 Online, rgmanager
Service Name Owner (Last) State
------- ---- ----- ------ -----
service:libvirtd_n01 an-a05n01.alteeve.ca started
service:libvirtd_n02 an-a05n02.alteeve.ca started
service:storage_n01 an-a05n01.alteeve.ca started
service:storage_n02 an-a05n02.alteeve.ca started
vm:vm01-win2008 an-a05n01.alteeve.ca started
vm:vm02-win2012 (none) disabled |
|---|---|
| an-a05n01 | clustatCluster Status for an-anvil-05 @ Mon Nov 18 13:09:00 2013
Member Status: Quorate
Member Name ID Status
------ ---- ---- ------
an-a05n01.alteeve.ca 1 Online, rgmanager
an-a05n02.alteeve.ca 2 Online, Local, rgmanager
Service Name Owner (Last) State
------- ---- ----- ------ -----
service:libvirtd_n01 an-a05n01.alteeve.ca started
service:libvirtd_n02 an-a05n02.alteeve.ca started
service:storage_n01 an-a05n01.alteeve.ca started
service:storage_n02 an-a05n02.alteeve.ca started
vm:vm01-win2008 an-a05n01.alteeve.ca started
vm:vm02-win2012 (none) disabled |
As expected, vm:vm02-win2012 is disabled. Verify that it is still running on an-a05n02.
| an-a05n01 | virsh list --all Id Name State
----------------------------------------------------
2 vm01-win2008 running |
|---|---|
| an-a05n02 | virsh list --all Id Name State
----------------------------------------------------
1 vm02-win2012 running |
Confirmed, vm02-win2012 is on an-a05n02.
As we did with vm01-win2008, we'll use clusvcadm to enable the vm:vm02-win2012 service on the an-a05n02.alteeve.ca cluster member.
| Note: To show that clusvcadm can be used anywhere, we'll use an-a05n01 to enable the server on an-a05n02. |
| an-a05n01 | clusvcadm -e vm:vm02-win2012 -m an-a05n02.alteeve.ca |
|---|---|
| an-a05n02 | clustatCluster Status for an-anvil-05 @ Mon Nov 18 13:29:12 2013
Member Status: Quorate
Member Name ID Status
------ ---- ---- ------
an-a05n01.alteeve.ca 1 Online, rgmanager
an-a05n02.alteeve.ca 2 Online, Local, rgmanager
Service Name Owner (Last) State
------- ---- ----- ------ -----
service:libvirtd_n01 an-a05n01.alteeve.ca started
service:libvirtd_n02 an-a05n02.alteeve.ca started
service:storage_n01 an-a05n01.alteeve.ca started
service:storage_n02 an-a05n02.alteeve.ca started
vm:vm01-win2008 an-a05n01.alteeve.ca started
vm:vm02-win2012 an-a05n02.alteeve.ca started |
Done!
Now, should vm02-win2012 fail or if an-a05n01 should fail, the Anvil! will recover it automatically.
Testing vm02-win2012 Management With clusvcadm
The first thing we're going to do is disable (gracefully shut down) the server. To do this, we'll send an ACPI "power button" event to vm02-win2012. Windows 2012 will, like most operating systems, respond to having its "power button pressed" by beginning a graceful shut down.
As always, start by checking the state of things.
| an-a05n01 | clustatCluster Status for an-anvil-05 @ Mon Nov 18 13:35:26 2013
Member Status: Quorate
Member Name ID Status
------ ---- ---- ------
an-a05n01.alteeve.ca 1 Online, Local, rgmanager
an-a05n02.alteeve.ca 2 Online, rgmanager
Service Name Owner (Last) State
------- ---- ----- ------ -----
service:libvirtd_n01 an-a05n01.alteeve.ca started
service:libvirtd_n02 an-a05n02.alteeve.ca started
service:storage_n01 an-a05n01.alteeve.ca started
service:storage_n02 an-a05n02.alteeve.ca started
vm:vm01-win2008 an-a05n01.alteeve.ca started
vm:vm02-win2012 an-a05n02.alteeve.ca started |
|---|
As we expected.
| Note: We're flipping to an-a05n02, but we don't have to. The disable command is smart enough to know where the server is running and disable it on the appropriate node. |
| an-a05n02 | clusvcadm -d vm:vm02-win2012Local machine disabling vm:vm02-win2012...Success |
|---|
If we check clustat again, we'll see that the vm:vm02-win2012 service is indeed disabled.
| an-a05n02 | clustatCluster Status for an-anvil-05 @ Mon Nov 18 13:36:01 2013
Member Status: Quorate
Member Name ID Status
------ ---- ---- ------
an-a05n01.alteeve.ca 1 Online, rgmanager
an-a05n02.alteeve.ca 2 Online, Local, rgmanager
Service Name Owner (Last) State
------- ---- ----- ------ -----
service:libvirtd_n01 an-a05n01.alteeve.ca started
service:libvirtd_n02 an-a05n02.alteeve.ca started
service:storage_n01 an-a05n01.alteeve.ca started
service:storage_n02 an-a05n02.alteeve.ca started
vm:vm01-win2008 an-a05n01.alteeve.ca started
vm:vm02-win2012 (an-a05n02.alteeve.ca) disabled |
|---|
Good, it's off. Let's turn it back on now.
| Note: We'll go back to an-a05n01 so that we can see how the -F switch is, in fact, smart enough to start the server on an-a05n02. |
| an-a05n01 | clusvcadm -F -e vm:vm02-win2012Local machine trying to enable vm:vm02-win2012...Success
vm:vm02-win2012 is now running on an-a05n02.alteeve.ca |
|---|
The SELinux fix from before worked for this server, too! You can verify this by disabling the server and re-running the above command on an-a05n02.
One last step; Testing live migration! We'll push vm02-win2012 over to an-a05n01 and then pull it back again.
| an-a05n01 | clusvcadm -M vm:vm02-win2012 -m an-a05n01.alteeve.caTrying to migrate vm:vm02-win2012 to an-a05n01.alteeve.ca...Success |
|---|---|
| an-a05n02 | clustatCluster Status for an-anvil-05 @ Mon Nov 18 15:08:52 2013
Member Status: Quorate
Member Name ID Status
------ ---- ---- ------
an-a05n01.alteeve.ca 1 Online, rgmanager
an-a05n02.alteeve.ca 2 Online, Local, rgmanager
Service Name Owner (Last) State
------- ---- ----- ------ -----
service:libvirtd_n01 an-a05n01.alteeve.ca started
service:libvirtd_n02 an-a05n02.alteeve.ca started
service:storage_n01 an-a05n01.alteeve.ca started
service:storage_n02 an-a05n02.alteeve.ca started
vm:vm01-win2008 an-a05n01.alteeve.ca started
vm:vm02-win2012 an-a05n01.alteeve.ca started |
If we use virsh, we can confirm that vm03-win7 has, in fact, moved over to an-a05n02.
| an-a05n01 | virsh list --all[root@an-a05n01 ~]# virsh list --all
Id Name State
----------------------------------------------------
2 vm01-win2008 running
6 vm02-win2012 running |
|---|---|
| an-a05n02 | virsh list --all Id Name State
---------------------------------------------------- |
If you had a program running or were logged into vm02-win2012 over RDP or similar, you would have noticed no interruptions.
So now we'll pull it back.
| an-a05n01 | clusvcadm -M vm:vm02-win2012 -m an-a05n02.alteeve.caTrying to migrate vm:vm02-win2012 to an-a05n02.alteeve.ca...Success |
|---|---|
| an-a05n02 | clustatCluster Status for an-anvil-05 @ Mon Nov 18 15:13:33 2013
Member Status: Quorate
Member Name ID Status
------ ---- ---- ------
an-a05n01.alteeve.ca 1 Online, rgmanager
an-a05n02.alteeve.ca 2 Online, Local, rgmanager
Service Name Owner (Last) State
------- ---- ----- ------ -----
service:libvirtd_n01 an-a05n01.alteeve.ca started
service:libvirtd_n02 an-a05n02.alteeve.ca started
service:storage_n01 an-a05n01.alteeve.ca started
service:storage_n02 an-a05n02.alteeve.ca started
vm:vm01-win2008 an-a05n01.alteeve.ca started
vm:vm02-win2012 an-a05n02.alteeve.ca started |
Once again, we'll confirm with virsh.
| an-a05n01 | virsh list --all Id Name State
----------------------------------------------------
2 vm01-win2008 running |
|---|---|
| an-a05n02 | virsh list --all Id Name State
----------------------------------------------------
5 vm02-win2012 running |
Done!
Making vm03-win7 a Highly Available Service
| Note: If you skipped adding vm01-win2008 to the cluster manager, please jump back and review the steps there. Particularly on creating the new failover domains and SELinux fix. |
It's time to add vm03-win7 to the cluster's management.
Dumping the vm03-win7 XML Definition File
As we did with the previous servers, we need to dump vm03-win7's XML definition out to a file in /shared/definitions.
First, let's use virsh to see the server's state.
| an-a05n01 | virsh list --all Id Name State
----------------------------------------------------
2 vm01-win2008 running
3 vm03-win7 running |
|---|---|
| an-a05n02 | virsh list --all Id Name State
----------------------------------------------------
3 vm02-win2012 running |
So we see that vm03-win7 is running on an-a05n01, which is where we provisioned it.
Now dump the server's XML.
| an-a05n01 | virsh dumpxml vm03-win7 > /shared/definitions/vm03-win7.xml
ls -lah /shared/definitions/vm03-win7.xml-rw-r--r--. 1 root root 3.3K Nov 18 14:21 /shared/definitions/vm03-win7.xml |
|---|
| Warning: Be sure the XML file was written properly! This next step will remove the server from libvirtd. Once done, the /shared/definitions/vm03-win7.xml will be the only way to boot the server! |
The last step is, again, to remove vm03-win7 from libvirtd.
| an-a05n02 | virsh undefine vm03-win7Domain vm03-win7 has been undefined |
|---|
Done.
Creating the vm:vm03-win7 Service
As we did for vm01-win2008, we will create a vm service entry for vm03-win7. This time though, because this server is assigned to an-a05n02, we will use the primary_n02 failover domain.
Lets increment the version to 14 and add the new entry.
| an-a05n01 | <rm log_level="5">
...
<vm name="vm03-win7" domain="primary_n01" autostart="0" path="/shared/definitions/" exclusive="0" recovery="restart" max_restarts="2" restart_expire_time="600">
<action name="stop" timeout="30m" />
</vm>
</rm> |
|---|
Making the new cluster.conf as we see it below.
| an-a05n01 | <?xml version="1.0"?>
<cluster name="an-anvil-05" config_version="14">
<cman expected_votes="1" two_node="1" />
<clusternodes>
<clusternode name="an-a05n01.alteeve.ca" nodeid="1">
<fence>
<method name="ipmi">
<device name="ipmi_n01" action="reboot" delay="15" />
</method>
<method name="pdu">
<device name="pdu1" port="1" action="reboot" />
<device name="pdu2" port="1" action="reboot" />
</method>
</fence>
</clusternode>
<clusternode name="an-a05n02.alteeve.ca" nodeid="2">
<fence>
<method name="ipmi">
<device name="ipmi_n02" action="reboot" />
</method>
<method name="pdu">
<device name="pdu1" port="2" action="reboot" />
<device name="pdu2" port="2" action="reboot" />
</method>
</fence>
</clusternode>
</clusternodes>
<fencedevices>
<fencedevice name="ipmi_n01" agent="fence_ipmilan" ipaddr="an-a05n01.ipmi" login="admin" passwd="secret" />
<fencedevice name="ipmi_n02" agent="fence_ipmilan" ipaddr="an-a05n02.ipmi" login="admin" passwd="secret" />
<fencedevice agent="fence_apc_snmp" ipaddr="an-pdu01.alteeve.ca" name="pdu1" />
<fencedevice agent="fence_apc_snmp" ipaddr="an-pdu02.alteeve.ca" name="pdu2" />
</fencedevices>
<fence_daemon post_join_delay="30" />
<totem rrp_mode="none" secauth="off"/>
<rm log_level="5">
<resources>
<script file="/etc/init.d/drbd" name="drbd"/>
<script file="/etc/init.d/clvmd" name="clvmd"/>
<clusterfs device="/dev/an-a05n01_vg0/shared" force_unmount="1" fstype="gfs2" mountpoint="/shared" name="sharedfs" />
<script file="/etc/init.d/libvirtd" name="libvirtd"/>
</resources>
<failoverdomains>
<failoverdomain name="only_n01" nofailback="1" ordered="0" restricted="1">
<failoverdomainnode name="an-a05n01.alteeve.ca"/>
</failoverdomain>
<failoverdomain name="only_n02" nofailback="1" ordered="0" restricted="1">
<failoverdomainnode name="an-a05n02.alteeve.ca"/>
</failoverdomain>
<failoverdomain name="primary_n01" nofailback="1" ordered="1" restricted="1">
<failoverdomainnode name="an-a05n01.alteeve.ca" priority="1"/>
<failoverdomainnode name="an-a05n02.alteeve.ca" priority="2"/>
</failoverdomain>
<failoverdomain name="primary_n02" nofailback="1" ordered="1" restricted="1">
<failoverdomainnode name="an-a05n01.alteeve.ca" priority="2"/>
<failoverdomainnode name="an-a05n02.alteeve.ca" priority="1"/>
</failoverdomain>
</failoverdomains>
<service name="storage_n01" autostart="1" domain="only_n01" exclusive="0" recovery="restart">
<script ref="drbd">
<script ref="clvmd">
<clusterfs ref="sharedfs"/>
</script>
</script>
</service>
<service name="storage_n02" autostart="1" domain="only_n02" exclusive="0" recovery="restart">
<script ref="drbd">
<script ref="clvmd">
<clusterfs ref="sharedfs"/>
</script>
</script>
</service>
<service name="libvirtd_n01" autostart="1" domain="only_n01" exclusive="0" recovery="restart">
<script ref="libvirtd"/>
</service>
<service name="libvirtd_n02" autostart="1" domain="only_n02" exclusive="0" recovery="restart">
<script ref="libvirtd"/>
</service>
<vm name="vm01-win2008" domain="primary_n01" autostart="0" path="/shared/definitions/" exclusive="0" recovery="restart" max_restarts="2" restart_expire_time="600">
<action name="stop" timeout="30m" />
</vm>
<vm name="vm02-win2012" domain="primary_n02" autostart="0" path="/shared/definitions/" exclusive="0" recovery="restart" max_restarts="2" restart_expire_time="600">
<action name="stop" timeout="30m" />
</vm>
<vm name="vm03-win7" domain="primary_n01" autostart="0" path="/shared/definitions/" exclusive="0" recovery="restart" max_restarts="2" restart_expire_time="600">
<action name="stop" timeout="30m" />
</vm>
</rm>
</cluster> |
|---|
Now let's activate the new configuration.
| an-a05n01 | ccs_config_validateConfiguration validatescman_tool version6.2.0 config 13cman_tool version -r
cman_tool version6.2.0 config 14 |
|---|---|
| an-a05n02 | cman_tool version6.2.0 config 14 |
Let's take a look at clustat on both nodes now.
| an-a05n01 | clustatCluster Status for an-anvil-05 @ Mon Nov 18 14:27:17 2013
Member Status: Quorate
Member Name ID Status
------ ---- ---- ------
an-a05n01.alteeve.ca 1 Online, Local, rgmanager
an-a05n02.alteeve.ca 2 Online, rgmanager
Service Name Owner (Last) State
------- ---- ----- ------ -----
service:libvirtd_n01 an-a05n01.alteeve.ca started
service:libvirtd_n02 an-a05n02.alteeve.ca started
service:storage_n01 an-a05n01.alteeve.ca started
service:storage_n02 an-a05n02.alteeve.ca started
vm:vm01-win2008 an-a05n01.alteeve.ca started
vm:vm02-win2012 an-a05n02.alteeve.ca started
vm:vm03-win7 (none) disabled |
|---|---|
| an-a05n02 | clustatCluster Status for an-anvil-05 @ Mon Nov 18 14:27:18 2013
Member Status: Quorate
Member Name ID Status
------ ---- ---- ------
an-a05n01.alteeve.ca 1 Online, rgmanager
an-a05n02.alteeve.ca 2 Online, Local, rgmanager
Service Name Owner (Last) State
------- ---- ----- ------ -----
service:libvirtd_n01 an-a05n01.alteeve.ca started
service:libvirtd_n02 an-a05n02.alteeve.ca started
service:storage_n01 an-a05n01.alteeve.ca started
service:storage_n02 an-a05n02.alteeve.ca started
vm:vm01-win2008 an-a05n01.alteeve.ca started
vm:vm02-win2012 an-a05n02.alteeve.ca started
vm:vm03-win7 (none) disabled |
As expected, vm:vm03-win7 is disabled. Verify that it is still running on an-a05n01.
| an-a05n01 | virsh list --all Id Name State
----------------------------------------------------
2 vm01-win2008 running
3 vm03-win7 running |
|---|---|
| an-a05n02 | virsh list --all Id Name State
----------------------------------------------------
3 vm02-win2012 running |
Confirmed, vm03-win7 is on an-a05n01.
As we did before, we'll use clusvcadm to enable the vm:vm03-win7 service on the an-a05n01.alteeve.ca cluster member.
| an-a05n01 | clusvcadm -e vm:vm03-win7 -m an-a05n01.alteeve.caMember an-a05n01.alteeve.ca trying to enable vm:vm03-win7...Success
vm:vm03-win7 is now running on an-a05n01.alteeve.ca |
|---|---|
| an-a05n02 | clustatCluster Status for an-anvil-05 @ Mon Nov 18 14:29:01 2013
Member Status: Quorate
Member Name ID Status
------ ---- ---- ------
an-a05n01.alteeve.ca 1 Online, rgmanager
an-a05n02.alteeve.ca 2 Online, Local, rgmanager
Service Name Owner (Last) State
------- ---- ----- ------ -----
service:libvirtd_n01 an-a05n01.alteeve.ca started
service:libvirtd_n02 an-a05n02.alteeve.ca started
service:storage_n01 an-a05n01.alteeve.ca started
service:storage_n02 an-a05n02.alteeve.ca started
vm:vm01-win2008 an-a05n01.alteeve.ca started
vm:vm02-win2012 an-a05n02.alteeve.ca started
vm:vm03-win7 an-a05n01.alteeve.ca started |
Done!
Now, should vm03-win7 fail or if an-a05n01 should fail, the Anvil! will recover it automatically.
Testing vm03-win7 Management With clusvcadm
The first thing we're going to do is disable (gracefully shut down) the server. To do this, we'll send an ACPI "power button" event to vm03-win7. Windows 2012 will, like most operating systems, respond to having its "power button pressed" by beginning a graceful shut down.
As always, start by checking the state of things.
| an-a05n01 | clustatCluster Status for an-anvil-05 @ Mon Nov 18 14:29:29 2013
Member Status: Quorate
Member Name ID Status
------ ---- ---- ------
an-a05n01.alteeve.ca 1 Online, Local, rgmanager
an-a05n02.alteeve.ca 2 Online, rgmanager
Service Name Owner (Last) State
------- ---- ----- ------ -----
service:libvirtd_n01 an-a05n01.alteeve.ca started
service:libvirtd_n02 an-a05n02.alteeve.ca started
service:storage_n01 an-a05n01.alteeve.ca started
service:storage_n02 an-a05n02.alteeve.ca started
vm:vm01-win2008 an-a05n01.alteeve.ca started
vm:vm02-win2012 an-a05n02.alteeve.ca started
vm:vm03-win7 an-a05n01.alteeve.ca started |
|---|
As we expected.
| an-a05n01 | clusvcadm -d vm:vm03-win7Local machine disabling vm:vm03-win7...Success |
|---|
If we check clustat again, we'll see that the vm:vm03-win7 service is indeed disabled.
| an-a05n02 | clustatCluster Status for an-anvil-05 @ Mon Nov 18 14:30:32 2013
Member Status: Quorate
Member Name ID Status
------ ---- ---- ------
an-a05n01.alteeve.ca 1 Online, rgmanager
an-a05n02.alteeve.ca 2 Online, Local, rgmanager
Service Name Owner (Last) State
------- ---- ----- ------ -----
service:libvirtd_n01 an-a05n01.alteeve.ca started
service:libvirtd_n02 an-a05n02.alteeve.ca started
service:storage_n01 an-a05n01.alteeve.ca started
service:storage_n02 an-a05n02.alteeve.ca started
vm:vm01-win2008 an-a05n01.alteeve.ca started
vm:vm02-win2012 an-a05n02.alteeve.ca started
vm:vm03-win7 (an-a05n01.alteeve.ca) disabled |
|---|
Good, it's off. Let's turn it back on now.
| an-a05n01 | clusvcadm -F -e vm:vm03-win7Local machine trying to enable vm:vm03-win7...Success
vm:vm03-win7 is now running on an-a05n01.alteeve.ca |
|---|---|
| an-a05n02 | clustatCluster Status for an-anvil-05 @ Mon Nov 18 14:43:29 2013
Member Status: Quorate
Member Name ID Status
------ ---- ---- ------
an-a05n01.alteeve.ca 1 Online, rgmanager
an-a05n02.alteeve.ca 2 Online, Local, rgmanager
Service Name Owner (Last) State
------- ---- ----- ------ -----
service:libvirtd_n01 an-a05n01.alteeve.ca started
service:libvirtd_n02 an-a05n02.alteeve.ca started
service:storage_n01 an-a05n01.alteeve.ca started
service:storage_n02 an-a05n02.alteeve.ca started
vm:vm01-win2008 an-a05n01.alteeve.ca started
vm:vm02-win2012 an-a05n02.alteeve.ca started
vm:vm03-win7 an-a05n01.alteeve.ca started |
One last step; Testing live migration! We'll push vm03-win7 over to an-a05n02 and then pull it back again.
| an-a05n01 | clusvcadm -M vm:vm03-win7 -m an-a05n02.alteeve.caTrying to migrate vm:vm03-win7 to an-a05n02.alteeve.ca...Success |
|---|---|
| an-a05n02 | clustatCluster Status for an-anvil-05 @ Mon Nov 18 14:56:06 2013
Member Status: Quorate
Member Name ID Status
------ ---- ---- ------
an-a05n01.alteeve.ca 1 Online, rgmanager
an-a05n02.alteeve.ca 2 Online, Local, rgmanager
Service Name Owner (Last) State
------- ---- ----- ------ -----
service:libvirtd_n01 an-a05n01.alteeve.ca started
service:libvirtd_n02 an-a05n02.alteeve.ca started
service:storage_n01 an-a05n01.alteeve.ca started
service:storage_n02 an-a05n02.alteeve.ca started
vm:vm01-win2008 an-a05n01.alteeve.ca started
vm:vm02-win2012 an-a05n02.alteeve.ca started
vm:vm03-win7 an-a05n02.alteeve.ca started |
If we use virsh, we can confirm that vm03-win7 has, in fact, moved over to an-a05n02.
| an-a05n01 | virsh list --all Id Name State
----------------------------------------------------
2 vm01-win2008 running |
|---|---|
| an-a05n02 | virsh list --all Id Name State
----------------------------------------------------
3 vm02-win2012 running
4 vm03-win7 running |
If you had a program running or were logged into vm03-win7 over RDP or similar, you would have noticed no interruptions.
So now we'll pull it back.
| an-a05n01 | clusvcadm -M vm:vm03-win7 -m an-a05n01.alteeve.caTrying to migrate vm:vm03-win7 to an-a05n01.alteeve.ca...Success |
|---|---|
| an-a05n02 | clustatCluster Status for an-anvil-05 @ Mon Nov 18 14:59:18 2013
Member Status: Quorate
Member Name ID Status
------ ---- ---- ------
an-a05n01.alteeve.ca 1 Online, rgmanager
an-a05n02.alteeve.ca 2 Online, Local, rgmanager
Service Name Owner (Last) State
------- ---- ----- ------ -----
service:libvirtd_n01 an-a05n01.alteeve.ca started
service:libvirtd_n02 an-a05n02.alteeve.ca started
service:storage_n01 an-a05n01.alteeve.ca started
service:storage_n02 an-a05n02.alteeve.ca started
vm:vm01-win2008 an-a05n01.alteeve.ca started
vm:vm02-win2012 an-a05n02.alteeve.ca started
vm:vm03-win7 an-a05n01.alteeve.ca started |
Once again, we'll confirm with virsh.
| an-a05n01 | virsh list --all Id Name State
----------------------------------------------------
2 vm01-win2008 running
5 vm03-win7 running |
|---|---|
| an-a05n02 | virsh list --all Id Name State
----------------------------------------------------
3 vm02-win2012 running |
Perfect!
Making vm04-win8 a Highly Available Service
| Note: If you skipped adding vm01-win2008 to the cluster manager, please jump back and review the steps there. Particularly on creating the new failover domains and SELinux fix. |
It's time to add vm04-win8 to the cluster's management.
Dumping the vm04-win8 XML Definition File
As we did with the previous servers, we need to dump vm04-win8's XML definition out to a file in /shared/definitions.
First, let's use virsh to see the server's state.
| an-a05n01 | virsh list --all Id Name State
----------------------------------------------------
2 vm01-win2008 running
5 vm03-win7 running
7 vm04-win8 running |
|---|---|
| an-a05n02 | virsh list --all Id Name State
----------------------------------------------------
5 vm02-win2012 running |
So we see that vm04-win8 is running on an-a05n01, which is where we provisioned it.
Now dump the server's XML.
| an-a05n01 | virsh dumpxml vm04-win8 > /shared/definitions/vm04-win8.xml
ls -lah /shared/definitions/vm04-win8.xml-rw-r--r--. 1 root root 3.3K Nov 18 15:24 /shared/definitions/vm04-win8.xml |
|---|
| Warning: Be sure the XML file was written properly! This next step will remove the server from libvirtd. Once done, the /shared/definitions/vm04-win8.xml will be the only way to boot the server! |
The last step is, again, to remove vm04-win8 from libvirtd.
| an-a05n02 | virsh undefine vm04-win8Domain vm04-win8 has been undefined |
|---|
Done.
Creating the vm:vm04-win8 Service
As we did for vm01-win2008, we will create a vm service entry for vm04-win8. This server is assigned to an-a05n01, so we will use the primary_n01 failover.
Lets increment the version to 15 and add the new entry.
| an-a05n01 | <rm log_level="5">
...
<vm name="vm04-win8" domain="primary_n01" autostart="0" path="/shared/definitions/" exclusive="0" recovery="restart" max_restarts="2" restart_expire_time="600">
<action name="stop" timeout="30m" />
</vm>
</rm> |
|---|
Making the new cluster.conf as we see it below.
| an-a05n01 | <?xml version="1.0"?>
<cluster name="an-anvil-05" config_version="15">
<cman expected_votes="1" two_node="1" />
<clusternodes>
<clusternode name="an-a05n01.alteeve.ca" nodeid="1">
<fence>
<method name="ipmi">
<device name="ipmi_n01" action="reboot" delay="15" />
</method>
<method name="pdu">
<device name="pdu1" port="1" action="reboot" />
<device name="pdu2" port="1" action="reboot" />
</method>
</fence>
</clusternode>
<clusternode name="an-a05n02.alteeve.ca" nodeid="2">
<fence>
<method name="ipmi">
<device name="ipmi_n02" action="reboot" />
</method>
<method name="pdu">
<device name="pdu1" port="2" action="reboot" />
<device name="pdu2" port="2" action="reboot" />
</method>
</fence>
</clusternode>
</clusternodes>
<fencedevices>
<fencedevice name="ipmi_n01" agent="fence_ipmilan" ipaddr="an-a05n01.ipmi" login="admin" passwd="secret" />
<fencedevice name="ipmi_n02" agent="fence_ipmilan" ipaddr="an-a05n02.ipmi" login="admin" passwd="secret" />
<fencedevice agent="fence_apc_snmp" ipaddr="an-pdu01.alteeve.ca" name="pdu1" />
<fencedevice agent="fence_apc_snmp" ipaddr="an-pdu02.alteeve.ca" name="pdu2" />
</fencedevices>
<fence_daemon post_join_delay="30" />
<totem rrp_mode="none" secauth="off"/>
<rm log_level="5">
<resources>
<script file="/etc/init.d/drbd" name="drbd"/>
<script file="/etc/init.d/clvmd" name="clvmd"/>
<clusterfs device="/dev/an-a05n01_vg0/shared" force_unmount="1" fstype="gfs2" mountpoint="/shared" name="sharedfs" />
<script file="/etc/init.d/libvirtd" name="libvirtd"/>
</resources>
<failoverdomains>
<failoverdomain name="only_n01" nofailback="1" ordered="0" restricted="1">
<failoverdomainnode name="an-a05n01.alteeve.ca"/>
</failoverdomain>
<failoverdomain name="only_n02" nofailback="1" ordered="0" restricted="1">
<failoverdomainnode name="an-a05n02.alteeve.ca"/>
</failoverdomain>
<failoverdomain name="primary_n01" nofailback="1" ordered="1" restricted="1">
<failoverdomainnode name="an-a05n01.alteeve.ca" priority="1"/>
<failoverdomainnode name="an-a05n02.alteeve.ca" priority="2"/>
</failoverdomain>
<failoverdomain name="primary_n02" nofailback="1" ordered="1" restricted="1">
<failoverdomainnode name="an-a05n01.alteeve.ca" priority="2"/>
<failoverdomainnode name="an-a05n02.alteeve.ca" priority="1"/>
</failoverdomain>
</failoverdomains>
<service name="storage_n01" autostart="1" domain="only_n01" exclusive="0" recovery="restart">
<script ref="drbd">
<script ref="clvmd">
<clusterfs ref="sharedfs"/>
</script>
</script>
</service>
<service name="storage_n02" autostart="1" domain="only_n02" exclusive="0" recovery="restart">
<script ref="drbd">
<script ref="clvmd">
<clusterfs ref="sharedfs"/>
</script>
</script>
</service>
<service name="libvirtd_n01" autostart="1" domain="only_n01" exclusive="0" recovery="restart">
<script ref="libvirtd"/>
</service>
<service name="libvirtd_n02" autostart="1" domain="only_n02" exclusive="0" recovery="restart">
<script ref="libvirtd"/>
</service>
<vm name="vm01-win2008" domain="primary_n01" autostart="0" path="/shared/definitions/" exclusive="0" recovery="restart" max_restarts="2" restart_expire_time="600">
<action name="stop" timeout="30m" />
</vm>
<vm name="vm02-win2012" domain="primary_n02" autostart="0" path="/shared/definitions/" exclusive="0" recovery="restart" max_restarts="2" restart_expire_time="600">
<action name="stop" timeout="30m" />
</vm>
<vm name="vm03-win7" domain="primary_n01" autostart="0" path="/shared/definitions/" exclusive="0" recovery="restart" max_restarts="2" restart_expire_time="600">
<action name="stop" timeout="30m" />
</vm>
<vm name="vm04-win8" domain="primary_n01" autostart="0" path="/shared/definitions/" exclusive="0" recovery="restart" max_restarts="2" restart_expire_time="600">
<action name="stop" timeout="30m" />
</vm>
</rm>
</cluster> |
|---|
Now let's activate the new configuration.
| an-a05n01 | ccs_config_validateConfiguration validatescman_tool version6.2.0 config 14cman_tool version -r
cman_tool version6.2.0 config 15 |
|---|---|
| an-a05n02 | cman_tool version6.2.0 config 15 |
Let's take a look at clustat on both nodes now.
| an-a05n01 | clustatCluster Status for an-anvil-05 @ Mon Nov 18 15:25:27 2013
Member Status: Quorate
Member Name ID Status
------ ---- ---- ------
an-a05n01.alteeve.ca 1 Online, Local, rgmanager
an-a05n02.alteeve.ca 2 Online, rgmanager
Service Name Owner (Last) State
------- ---- ----- ------ -----
service:libvirtd_n01 an-a05n01.alteeve.ca started
service:libvirtd_n02 an-a05n02.alteeve.ca started
service:storage_n01 an-a05n01.alteeve.ca started
service:storage_n02 an-a05n02.alteeve.ca started
vm:vm01-win2008 an-a05n01.alteeve.ca started
vm:vm02-win2012 an-a05n02.alteeve.ca started
vm:vm03-win7 an-a05n01.alteeve.ca started
vm:vm04-win8 (none) disabled |
|---|---|
| an-a05n02 | clustatCluster Status for an-anvil-05 @ Mon Nov 18 15:25:27 2013
Member Status: Quorate
Member Name ID Status
------ ---- ---- ------
an-a05n01.alteeve.ca 1 Online, rgmanager
an-a05n02.alteeve.ca 2 Online, Local, rgmanager
Service Name Owner (Last) State
------- ---- ----- ------ -----
service:libvirtd_n01 an-a05n01.alteeve.ca started
service:libvirtd_n02 an-a05n02.alteeve.ca started
service:storage_n01 an-a05n01.alteeve.ca started
service:storage_n02 an-a05n02.alteeve.ca started
vm:vm01-win2008 an-a05n01.alteeve.ca started
vm:vm02-win2012 an-a05n02.alteeve.ca started
vm:vm03-win7 an-a05n01.alteeve.ca started
vm:vm04-win8 (none) disabled |
As expected, vm:vm04-win8 is disabled. Verify that it is still running on an-a05n01.
| an-a05n01 | virsh list --all Id Name State
----------------------------------------------------
2 vm01-win2008 running
5 vm03-win7 running
7 vm04-win8 running |
|---|---|
| an-a05n02 | virsh list --all Id Name State
----------------------------------------------------
5 vm02-win2012 running |
Confirmed, vm04-win8 is on an-a05n01.
As we did before, we'll use clusvcadm to enable the vm:vm04-win8 service on the an-a05n01.alteeve.ca cluster member.
| an-a05n01 | clusvcadm -e vm:vm04-win8 -m an-a05n01.alteeve.caMember an-a05n01.alteeve.ca trying to enable vm:vm04-win8...Success
vm:vm04-win8 is now running on an-a05n01.alteeve.ca |
|---|---|
| an-a05n02 | clustatCluster Status for an-anvil-05 @ Mon Nov 18 15:26:26 2013
Member Status: Quorate
Member Name ID Status
------ ---- ---- ------
an-a05n01.alteeve.ca 1 Online, rgmanager
an-a05n02.alteeve.ca 2 Online, Local, rgmanager
Service Name Owner (Last) State
------- ---- ----- ------ -----
service:libvirtd_n01 an-a05n01.alteeve.ca started
service:libvirtd_n02 an-a05n02.alteeve.ca started
service:storage_n01 an-a05n01.alteeve.ca started
service:storage_n02 an-a05n02.alteeve.ca started
vm:vm01-win2008 an-a05n01.alteeve.ca started
vm:vm02-win2012 an-a05n02.alteeve.ca started
vm:vm03-win7 an-a05n01.alteeve.ca started
vm:vm04-win8 an-a05n01.alteeve.ca started |
Done!
Now, should vm04-win8 fail or if an-a05n01 should fail, the Anvil! will recover it automatically.
Testing vm04-win8 Management With clusvcadm
The first thing we're going to do is disable (gracefully shut down) the server. To do this, we'll send an ACPI "power button" event to vm04-win8. Windows 2012 will, like most operating systems, respond to having its "power button pressed" by beginning a graceful shut down.
As always, start by checking the state of things.
| an-a05n01 | clustatCluster Status for an-anvil-05 @ Mon Nov 18 15:26:39 2013
Member Status: Quorate
Member Name ID Status
------ ---- ---- ------
an-a05n01.alteeve.ca 1 Online, Local, rgmanager
an-a05n02.alteeve.ca 2 Online, rgmanager
Service Name Owner (Last) State
------- ---- ----- ------ -----
service:libvirtd_n01 an-a05n01.alteeve.ca started
service:libvirtd_n02 an-a05n02.alteeve.ca started
service:storage_n01 an-a05n01.alteeve.ca started
service:storage_n02 an-a05n02.alteeve.ca started
vm:vm01-win2008 an-a05n01.alteeve.ca started
vm:vm02-win2012 an-a05n02.alteeve.ca started
vm:vm03-win7 an-a05n01.alteeve.ca started
vm:vm04-win8 an-a05n01.alteeve.ca started |
|---|
As we expected.
| an-a05n01 | clusvcadm -d vm:vm04-win8Local machine disabling vm:vm04-win8...Success |
|---|
If we check clustat again, we'll see that the vm:vm04-win8 service is indeed disabled.
| an-a05n02 | clustatCluster Status for an-anvil-05 @ Mon Nov 18 15:32:06 2013
Member Status: Quorate
Member Name ID Status
------ ---- ---- ------
an-a05n01.alteeve.ca 1 Online, rgmanager
an-a05n02.alteeve.ca 2 Online, Local, rgmanager
Service Name Owner (Last) State
------- ---- ----- ------ -----
service:libvirtd_n01 an-a05n01.alteeve.ca started
service:libvirtd_n02 an-a05n02.alteeve.ca started
service:storage_n01 an-a05n01.alteeve.ca started
service:storage_n02 an-a05n02.alteeve.ca started
vm:vm01-win2008 an-a05n01.alteeve.ca started
vm:vm02-win2012 an-a05n02.alteeve.ca started
vm:vm03-win7 an-a05n01.alteeve.ca started
vm:vm04-win8 (an-a05n01.alteeve.ca) disabled |
|---|
Good, it's off. Let's turn it back on now.
| an-a05n01 | clusvcadm -F -e vm:vm04-win8Local machine trying to enable vm:vm04-win8...Success
vm:vm04-win8 is now running on an-a05n01.alteeve.ca |
|---|---|
| an-a05n02 | clustatCluster Status for an-anvil-05 @ Mon Nov 18 15:32:22 2013
Member Status: Quorate
Member Name ID Status
------ ---- ---- ------
an-a05n01.alteeve.ca 1 Online, rgmanager
an-a05n02.alteeve.ca 2 Online, Local, rgmanager
Service Name Owner (Last) State
------- ---- ----- ------ -----
service:libvirtd_n01 an-a05n01.alteeve.ca started
service:libvirtd_n02 an-a05n02.alteeve.ca started
service:storage_n01 an-a05n01.alteeve.ca started
service:storage_n02 an-a05n02.alteeve.ca started
vm:vm01-win2008 an-a05n01.alteeve.ca started
vm:vm02-win2012 an-a05n02.alteeve.ca started
vm:vm03-win7 an-a05n01.alteeve.ca started
vm:vm04-win8 an-a05n01.alteeve.ca started |
One last step; Testing live migration! We'll push vm04-win8 over to an-a05n02 and then pull it back again.
| an-a05n01 | clusvcadm -M vm:vm04-win8 -m an-a05n02.alteeve.caTrying to migrate vm:vm04-win8 to an-a05n02.alteeve.ca...Success |
|---|---|
| an-a05n02 | clustatCluster Status for an-anvil-05 @ Mon Nov 18 15:34:15 2013
Member Status: Quorate
Member Name ID Status
------ ---- ---- ------
an-a05n01.alteeve.ca 1 Online, rgmanager
an-a05n02.alteeve.ca 2 Online, Local, rgmanager
Service Name Owner (Last) State
------- ---- ----- ------ -----
service:libvirtd_n01 an-a05n01.alteeve.ca started
service:libvirtd_n02 an-a05n02.alteeve.ca started
service:storage_n01 an-a05n01.alteeve.ca started
service:storage_n02 an-a05n02.alteeve.ca started
vm:vm01-win2008 an-a05n01.alteeve.ca started
vm:vm02-win2012 an-a05n02.alteeve.ca started
vm:vm03-win7 an-a05n01.alteeve.ca started
vm:vm04-win8 an-a05n02.alteeve.ca started |
If we use virsh, we can confirm that vm04-win8 has, in fact, moved over to an-a05n02.
| an-a05n01 | virsh list --all Id Name State
----------------------------------------------------
2 vm01-win2008 running
5 vm03-win7 running |
|---|---|
| an-a05n02 | virsh list --all Id Name State
----------------------------------------------------
5 vm02-win2012 running
7 vm04-win8 running |
If you had a program running or were logged into vm04-win8 over RDP or similar, you would have noticed no interruptions.
So now we'll pull it back.
| an-a05n01 | clusvcadm -M vm:vm04-win8 -m an-a05n01.alteeve.caTrying to migrate vm:vm04-win8 to an-a05n01.alteeve.ca...Success |
|---|---|
| an-a05n02 | clustatCluster Status for an-anvil-05 @ Mon Nov 18 15:35:11 2013
Member Status: Quorate
Member Name ID Status
------ ---- ---- ------
an-a05n01.alteeve.ca 1 Online, rgmanager
an-a05n02.alteeve.ca 2 Online, Local, rgmanager
Service Name Owner (Last) State
------- ---- ----- ------ -----
service:libvirtd_n01 an-a05n01.alteeve.ca started
service:libvirtd_n02 an-a05n02.alteeve.ca started
service:storage_n01 an-a05n01.alteeve.ca started
service:storage_n02 an-a05n02.alteeve.ca started
vm:vm01-win2008 an-a05n01.alteeve.ca started
vm:vm02-win2012 an-a05n02.alteeve.ca started
vm:vm03-win7 an-a05n01.alteeve.ca started
vm:vm04-win8 an-a05n01.alteeve.ca started |
Once again, we'll confirm with virsh.
| an-a05n01 | virsh list --all Id Name State
----------------------------------------------------
2 vm01-win2008 running
5 vm03-win7 running
9 vm04-win8 running |
|---|---|
| an-a05n02 | virsh list --all Id Name State
----------------------------------------------------
5 vm02-win2012 running |
Perfect!
Making vm05-freebsd9 a Highly Available Service
| Note: If you skipped adding vm01-win2008 to the cluster manager, please jump back and review the steps there. Particularly on creating the new failover domains and SELinux fix. |
It's time to add vm05-freebsd9 to the cluster's management. This will be a little different from the windows installs we've done up until now.
Dumping the vm05-freebsd9 XML Definition File
As we did with the previous servers, we need to dump vm05-freebsd9's XML definition out to a file in /shared/definitions.
First, let's use virsh to see the server's state.
| an-a05n01 | virsh list --all Id Name State
----------------------------------------------------
2 vm01-win2008 running
5 vm03-win7 running
9 vm04-win8 running |
|---|---|
| an-a05n02 | virsh list --all Id Name State
----------------------------------------------------
5 vm02-win2012 running
9 vm05-freebsd9 running |
So we see that vm05-freebsd9 is running on an-a05n02, which is where we provisioned it.
Now dump the server's XML.
| an-a05n02 | virsh dumpxml vm05-freebsd9 > /shared/definitions/vm05-freebsd9.xml
ls -lah /shared/definitions/vm05-freebsd9.xml-rw-r--r--. 1 root root 2.8K Nov 19 12:29 /shared/definitions/vm05-freebsd9.xml |
|---|
| Warning: Be sure the XML file was written properly! This next step will remove the server from libvirtd. Once done, the /shared/definitions/vm05-freebsd9.xml will be the only way to boot the server! |
The last step is, again, to remove vm05-freebsd9 from libvirtd.
| an-a05n02 | virsh undefine vm05-freebsd9Domain vm05-freebsd9 has been undefined |
|---|
Done.
Creating the vm:vm05-freebsd9 Service
As we did for the previous servers, we will create a vm service entry for vm05-freebsd9 under the primary_n02 failover domain.
Lets increment the version to 16 and add the new entry.
One major difference this time is that we will not alter the shut down timer. The default of two minutes is fine for non-Microsoft servers.
| an-a05n02 | <rm log_level="5">
...
<vm name="vm05-freebsd9" domain="primary_n02" autostart="0" path="/shared/definitions/" exclusive="0" recovery="restart" max_restarts="2" restart_expire_time="600"/>
</rm> |
|---|
Making the new cluster.conf as we see it below.
| an-a05n02 | <?xml version="1.0"?>
<cluster name="an-anvil-05" config_version="15">
<cman expected_votes="1" two_node="1" />
<clusternodes>
<clusternode name="an-a05n01.alteeve.ca" nodeid="1">
<fence>
<method name="ipmi">
<device name="ipmi_n01" action="reboot" delay="15" />
</method>
<method name="pdu">
<device name="pdu1" port="1" action="reboot" />
<device name="pdu2" port="1" action="reboot" />
</method>
</fence>
</clusternode>
<clusternode name="an-a05n02.alteeve.ca" nodeid="2">
<fence>
<method name="ipmi">
<device name="ipmi_n02" action="reboot" />
</method>
<method name="pdu">
<device name="pdu1" port="2" action="reboot" />
<device name="pdu2" port="2" action="reboot" />
</method>
</fence>
</clusternode>
</clusternodes>
<fencedevices>
<fencedevice name="ipmi_n01" agent="fence_ipmilan" ipaddr="an-a05n01.ipmi" login="admin" passwd="secret" />
<fencedevice name="ipmi_n02" agent="fence_ipmilan" ipaddr="an-a05n02.ipmi" login="admin" passwd="secret" />
<fencedevice agent="fence_apc_snmp" ipaddr="an-pdu01.alteeve.ca" name="pdu1" />
<fencedevice agent="fence_apc_snmp" ipaddr="an-pdu02.alteeve.ca" name="pdu2" />
</fencedevices>
<fence_daemon post_join_delay="30" />
<totem rrp_mode="none" secauth="off"/>
<rm log_level="5">
<resources>
<script file="/etc/init.d/drbd" name="drbd"/>
<script file="/etc/init.d/clvmd" name="clvmd"/>
<clusterfs device="/dev/an-a05n01_vg0/shared" force_unmount="1" fstype="gfs2" mountpoint="/shared" name="sharedfs" />
<script file="/etc/init.d/libvirtd" name="libvirtd"/>
</resources>
<failoverdomains>
<failoverdomain name="only_n01" nofailback="1" ordered="0" restricted="1">
<failoverdomainnode name="an-a05n01.alteeve.ca"/>
</failoverdomain>
<failoverdomain name="only_n02" nofailback="1" ordered="0" restricted="1">
<failoverdomainnode name="an-a05n02.alteeve.ca"/>
</failoverdomain>
<failoverdomain name="primary_n01" nofailback="1" ordered="1" restricted="1">
<failoverdomainnode name="an-a05n01.alteeve.ca" priority="1"/>
<failoverdomainnode name="an-a05n02.alteeve.ca" priority="2"/>
</failoverdomain>
<failoverdomain name="primary_n02" nofailback="1" ordered="1" restricted="1">
<failoverdomainnode name="an-a05n01.alteeve.ca" priority="2"/>
<failoverdomainnode name="an-a05n02.alteeve.ca" priority="1"/>
</failoverdomain>
</failoverdomains>
<service name="storage_n01" autostart="1" domain="only_n01" exclusive="0" recovery="restart">
<script ref="drbd">
<script ref="clvmd">
<clusterfs ref="sharedfs"/>
</script>
</script>
</service>
<service name="storage_n02" autostart="1" domain="only_n02" exclusive="0" recovery="restart">
<script ref="drbd">
<script ref="clvmd">
<clusterfs ref="sharedfs"/>
</script>
</script>
</service>
<service name="libvirtd_n01" autostart="1" domain="only_n01" exclusive="0" recovery="restart">
<script ref="libvirtd"/>
</service>
<service name="libvirtd_n02" autostart="1" domain="only_n02" exclusive="0" recovery="restart">
<script ref="libvirtd"/>
</service>
<vm name="vm01-win2008" domain="primary_n01" autostart="0" path="/shared/definitions/" exclusive="0" recovery="restart" max_restarts="2" restart_expire_time="600">
<action name="stop" timeout="30m" />
</vm>
<vm name="vm02-win2012" domain="primary_n02" autostart="0" path="/shared/definitions/" exclusive="0" recovery="restart" max_restarts="2" restart_expire_time="600">
<action name="stop" timeout="30m" />
</vm>
<vm name="vm03-win7" domain="primary_n01" autostart="0" path="/shared/definitions/" exclusive="0" recovery="restart" max_restarts="2" restart_expire_time="600">
<action name="stop" timeout="30m" />
</vm>
<vm name="vm04-win8" domain="primary_n01" autostart="0" path="/shared/definitions/" exclusive="0" recovery="restart" max_restarts="2" restart_expire_time="600">
<action name="stop" timeout="30m" />
</vm>
<vm name="vm05-freebsd9" domain="primary_n02" autostart="0" path="/shared/definitions/" exclusive="0" recovery="restart" max_restarts="2" restart_expire_time="600"/>
</rm>
</cluster> |
|---|
Now let's activate the new configuration.
| an-a05n02 | ccs_config_validateConfiguration validatescman_tool version6.2.0 config 15cman_tool version -r
cman_tool version6.2.0 config 16 |
|---|---|
| an-a05n01 | cman_tool version6.2.0 config 16 |
Let's take a look at clustat on both nodes now.
| an-a05n01 | clustatCluster Status for an-anvil-05 @ Tue Nov 19 12:54:26 2013
Member Status: Quorate
Member Name ID Status
------ ---- ---- ------
an-a05n01.alteeve.ca 1 Online, Local, rgmanager
an-a05n02.alteeve.ca 2 Online, rgmanager
Service Name Owner (Last) State
------- ---- ----- ------ -----
service:libvirtd_n01 an-a05n01.alteeve.ca started
service:libvirtd_n02 an-a05n02.alteeve.ca started
service:storage_n01 an-a05n01.alteeve.ca started
service:storage_n02 an-a05n02.alteeve.ca started
vm:vm01-win2008 an-a05n01.alteeve.ca started
vm:vm02-win2012 an-a05n02.alteeve.ca started
vm:vm03-win7 an-a05n01.alteeve.ca started
vm:vm04-win8 an-a05n01.alteeve.ca started
vm:vm05-freebsd9 (none) disabled |
|---|---|
| an-a05n02 | clustatCluster Status for an-anvil-05 @ Tue Nov 19 12:54:27 2013
Member Status: Quorate
Member Name ID Status
------ ---- ---- ------
an-a05n01.alteeve.ca 1 Online, rgmanager
an-a05n02.alteeve.ca 2 Online, Local, rgmanager
Service Name Owner (Last) State
------- ---- ----- ------ -----
service:libvirtd_n01 an-a05n01.alteeve.ca started
service:libvirtd_n02 an-a05n02.alteeve.ca started
service:storage_n01 an-a05n01.alteeve.ca started
service:storage_n02 an-a05n02.alteeve.ca started
vm:vm01-win2008 an-a05n01.alteeve.ca started
vm:vm02-win2012 an-a05n02.alteeve.ca started
vm:vm03-win7 an-a05n01.alteeve.ca started
vm:vm04-win8 an-a05n01.alteeve.ca started
vm:vm05-freebsd9 (none) disabled |
As expected, vm:vm05-freebsd9 is disabled. Verify that it is still running on an-a05n02.
| an-a05n01 | virsh list --all Id Name State
----------------------------------------------------
2 vm01-win2008 running
5 vm03-win7 running
9 vm04-win8 running |
|---|---|
| an-a05n02 | virsh list --all Id Name State
----------------------------------------------------
5 vm02-win2012 running
9 vm05-freebsd9 running |
Confirmed, vm05-freebsd9 is on an-a05n02.
As we did before, we'll use clusvcadm to enable the vm:vm05-freebsd9 service on the an-a05n02.alteeve.ca cluster member.
| an-a05n01 | clusvcadm -e vm:vm05-freebsd9 -m an-a05n02.alteeve.caMember an-a05n02.alteeve.ca trying to enable vm:vm05-freebsd9...Success
vm:vm05-freebsd9 is now running on an-a05n02.alteeve.ca |
|---|---|
| an-a05n02 | clustatCluster Status for an-anvil-05 @ Tue Nov 19 12:56:03 2013
Member Status: Quorate
Member Name ID Status
------ ---- ---- ------
an-a05n01.alteeve.ca 1 Online, rgmanager
an-a05n02.alteeve.ca 2 Online, Local, rgmanager
Service Name Owner (Last) State
------- ---- ----- ------ -----
service:libvirtd_n01 an-a05n01.alteeve.ca started
service:libvirtd_n02 an-a05n02.alteeve.ca started
service:storage_n01 an-a05n01.alteeve.ca started
service:storage_n02 an-a05n02.alteeve.ca started
vm:vm01-win2008 an-a05n01.alteeve.ca started
vm:vm02-win2012 an-a05n02.alteeve.ca started
vm:vm03-win7 an-a05n01.alteeve.ca started
vm:vm04-win8 an-a05n01.alteeve.ca started
vm:vm05-freebsd9 an-a05n02.alteeve.ca started |
Done!
Now, should vm05-freebsd9 fail or if an-a05n01 should fail, the Anvil! will recover it automatically.
Testing vm05-freebsd9 Management With clusvcadm
The first thing we're going to do is disable (gracefully shut down) the server. To do this, we'll send an ACPI "power button" event to vm05-freebsd9. FreeBSD 9 will, like most operating systems, respond to having its "power button pressed" by beginning a graceful shut down.
As always, start by checking the state of things.
| an-a05n01 | clustatCluster Status for an-anvil-05 @ Tue Nov 19 12:57:09 2013
Member Status: Quorate
Member Name ID Status
------ ---- ---- ------
an-a05n01.alteeve.ca 1 Online, Local, rgmanager
an-a05n02.alteeve.ca 2 Online, rgmanager
Service Name Owner (Last) State
------- ---- ----- ------ -----
service:libvirtd_n01 an-a05n01.alteeve.ca started
service:libvirtd_n02 an-a05n02.alteeve.ca started
service:storage_n01 an-a05n01.alteeve.ca started
service:storage_n02 an-a05n02.alteeve.ca started
vm:vm01-win2008 an-a05n01.alteeve.ca started
vm:vm02-win2012 an-a05n02.alteeve.ca started
vm:vm03-win7 an-a05n01.alteeve.ca started
vm:vm04-win8 an-a05n01.alteeve.ca started
vm:vm05-freebsd9 an-a05n02.alteeve.ca started |
|---|
As we expected.
| an-a05n01 | clusvcadm -d vm:vm05-freebsd9Local machine disabling vm:vm05-freebsd9...Success |
|---|
If we check clustat again, we'll see that the vm:vm05-freebsd9 service is indeed disabled.
| an-a05n02 | clustatCluster Status for an-anvil-05 @ Tue Nov 19 13:00:17 2013
Member Status: Quorate
Member Name ID Status
------ ---- ---- ------
an-a05n01.alteeve.ca 1 Online, rgmanager
an-a05n02.alteeve.ca 2 Online, Local, rgmanager
Service Name Owner (Last) State
------- ---- ----- ------ -----
service:libvirtd_n01 an-a05n01.alteeve.ca started
service:libvirtd_n02 an-a05n02.alteeve.ca started
service:storage_n01 an-a05n01.alteeve.ca started
service:storage_n02 an-a05n02.alteeve.ca started
vm:vm01-win2008 an-a05n01.alteeve.ca started
vm:vm02-win2012 an-a05n02.alteeve.ca started
vm:vm03-win7 an-a05n01.alteeve.ca started
vm:vm04-win8 an-a05n01.alteeve.ca started
vm:vm05-freebsd9 (an-a05n02.alteeve.ca) disabled |
|---|
Good, it's off. Let's turn it back on now.
| an-a05n01 | clusvcadm -F -e vm:vm05-freebsd9vm:vm05-freebsd9 is now running on an-a05n02.alteeve.ca |
|---|---|
| an-a05n02 | clustatCluster Status for an-anvil-05 @ Tue Nov 19 13:00:51 2013
Member Status: Quorate
Member Name ID Status
------ ---- ---- ------
an-a05n01.alteeve.ca 1 Online, rgmanager
an-a05n02.alteeve.ca 2 Online, Local, rgmanager
Service Name Owner (Last) State
------- ---- ----- ------ -----
service:libvirtd_n01 an-a05n01.alteeve.ca started
service:libvirtd_n02 an-a05n02.alteeve.ca started
service:storage_n01 an-a05n01.alteeve.ca started
service:storage_n02 an-a05n02.alteeve.ca started
vm:vm01-win2008 an-a05n01.alteeve.ca started
vm:vm02-win2012 an-a05n02.alteeve.ca started
vm:vm03-win7 an-a05n01.alteeve.ca started
vm:vm04-win8 an-a05n01.alteeve.ca started
vm:vm05-freebsd9 an-a05n02.alteeve.ca started |
One last step; Testing live migration! We'll push vm05-freebsd9 over to an-a05n01 and then pull it back again.
| an-a05n01 | clusvcadm -M vm:vm05-freebsd9 -m an-a05n01.alteeve.caTrying to migrate vm:vm05-freebsd9 to an-a05n01.alteeve.ca...Success |
|---|---|
| an-a05n02 | clustatCluster Status for an-anvil-05 @ Tue Nov 19 13:02:18 2013
Member Status: Quorate
Member Name ID Status
------ ---- ---- ------
an-a05n01.alteeve.ca 1 Online, rgmanager
an-a05n02.alteeve.ca 2 Online, Local, rgmanager
Service Name Owner (Last) State
------- ---- ----- ------ -----
service:libvirtd_n01 an-a05n01.alteeve.ca started
service:libvirtd_n02 an-a05n02.alteeve.ca started
service:storage_n01 an-a05n01.alteeve.ca started
service:storage_n02 an-a05n02.alteeve.ca started
vm:vm01-win2008 an-a05n01.alteeve.ca started
vm:vm02-win2012 an-a05n02.alteeve.ca started
vm:vm03-win7 an-a05n01.alteeve.ca started
vm:vm04-win8 an-a05n01.alteeve.ca started
vm:vm05-freebsd9 an-a05n01.alteeve.ca started |
If we use virsh, we can confirm that vm05-freebsd9 has, in fact, moved over to an-a05n02.
| an-a05n01 | virsh list --all Id Name State
----------------------------------------------------
2 vm01-win2008 running
5 vm03-win7 running
9 vm04-win8 running
10 vm05-freebsd9 running |
|---|---|
| an-a05n02 | virsh list --all Id Name State
----------------------------------------------------
5 vm02-win2012 running |
If you had a program running or were logged into vm05-freebsd9 over RDP or similar, you would have noticed no interruptions.
So now we'll pull it back.
| an-a05n01 | clusvcadm -M vm:vm05-freebsd9 -m an-a05n02.alteeve.caTrying to migrate vm:vm05-freebsd9 to an-a05n02.alteeve.ca...Success |
|---|---|
| an-a05n02 | clustatCluster Status for an-anvil-05 @ Tue Nov 19 13:03:02 2013
Member Status: Quorate
Member Name ID Status
------ ---- ---- ------
an-a05n01.alteeve.ca 1 Online, rgmanager
an-a05n02.alteeve.ca 2 Online, Local, rgmanager
Service Name Owner (Last) State
------- ---- ----- ------ -----
service:libvirtd_n01 an-a05n01.alteeve.ca started
service:libvirtd_n02 an-a05n02.alteeve.ca started
service:storage_n01 an-a05n01.alteeve.ca started
service:storage_n02 an-a05n02.alteeve.ca started
vm:vm01-win2008 an-a05n01.alteeve.ca started
vm:vm02-win2012 an-a05n02.alteeve.ca started
vm:vm03-win7 an-a05n01.alteeve.ca started
vm:vm04-win8 an-a05n01.alteeve.ca started
vm:vm05-freebsd9 an-a05n02.alteeve.ca started |
Once again, we'll confirm with virsh.
| an-a05n01 | virsh list --all Id Name State
----------------------------------------------------
2 vm01-win2008 running
5 vm03-win7 running
9 vm04-win8 running |
|---|---|
| an-a05n02 | virsh list --all Id Name State
----------------------------------------------------
5 vm02-win2012 running
11 vm05-freebsd9 running |
Perfect!
Making vm06-solaris11 a Highly Available Service
| Note: If you skipped adding vm01-win2008 to the cluster manager, please jump back and review the steps there. Particularly on creating the new failover domains and SELinux fix. |
It's time to add vm06-solaris11 to the cluster's management.
Dumping the vm06-solaris11 XML Definition File
As we did with the previous servers, we need to dump vm06-solaris11's XML definition out to a file in /shared/definitions.
First, let's use virsh to see the server's state.
| an-a05n01 | virsh list --all Id Name State
----------------------------------------------------
9 vm04-win8 running
14 vm03-win7 running
15 vm01-win2008 running |
|---|---|
| an-a05n02 | virsh list --all Id Name State
----------------------------------------------------
11 vm05-freebsd9 running
16 vm06-solaris11 running
17 vm02-win2012 running |
So we see that vm06-solaris11 is running on an-a05n02, which is where we provisioned it.
Now dump the server's XML.
| an-a05n02 | virsh dumpxml vm06-solaris11 > /shared/definitions/vm06-solaris11.xml
ls -lah /shared/definitions/vm06-solaris11.xml-rw-r--r--. 1 root root 2.9K Nov 20 16:05 /shared/definitions/vm06-solaris11.xml |
|---|
| Warning: Be sure the XML file was written properly! This next step will remove the server from libvirtd. Once done, the /shared/definitions/vm06-solaris11.xml will be the only way to boot the server! |
The last step is, again, to remove vm06-solaris11 from libvirtd.
| an-a05n02 | virsh undefine vm06-solaris11Domain vm06-solaris11 has been undefined |
|---|
Done.
Creating the vm:vm06-solaris11 Service
As we did for the previous servers, we will create a vm service entry for vm06-solaris11 under the primary_n02 failover domain.
Lets increment the version to 17 and add the new entry.
One major difference this time is that we will not alter the shut down timer. The default of two minutes is fine for non-Microsoft servers.
| an-a05n02 | <rm log_level="5">
...
<vm name="vm06-solaris11" domain="primary_n02" autostart="0" path="/shared/definitions/" exclusive="0" recovery="restart" max_restarts="2" restart_expire_time="600"/>
</rm> |
|---|
Making the new cluster.conf as we see it below.
| an-a05n01 | <?xml version="1.0"?>
<cluster name="an-anvil-05" config_version="15">
<cman expected_votes="1" two_node="1" />
<clusternodes>
<clusternode name="an-a05n01.alteeve.ca" nodeid="1">
<fence>
<method name="ipmi">
<device name="ipmi_n01" action="reboot" delay="15" />
</method>
<method name="pdu">
<device name="pdu1" port="1" action="reboot" />
<device name="pdu2" port="1" action="reboot" />
</method>
</fence>
</clusternode>
<clusternode name="an-a05n02.alteeve.ca" nodeid="2">
<fence>
<method name="ipmi">
<device name="ipmi_n02" action="reboot" />
</method>
<method name="pdu">
<device name="pdu1" port="2" action="reboot" />
<device name="pdu2" port="2" action="reboot" />
</method>
</fence>
</clusternode>
</clusternodes>
<fencedevices>
<fencedevice name="ipmi_n01" agent="fence_ipmilan" ipaddr="an-a05n01.ipmi" login="admin" passwd="secret" />
<fencedevice name="ipmi_n02" agent="fence_ipmilan" ipaddr="an-a05n02.ipmi" login="admin" passwd="secret" />
<fencedevice agent="fence_apc_snmp" ipaddr="an-pdu01.alteeve.ca" name="pdu1" />
<fencedevice agent="fence_apc_snmp" ipaddr="an-pdu02.alteeve.ca" name="pdu2" />
</fencedevices>
<fence_daemon post_join_delay="30" />
<totem rrp_mode="none" secauth="off"/>
<rm log_level="5">
<resources>
<script file="/etc/init.d/drbd" name="drbd"/>
<script file="/etc/init.d/clvmd" name="clvmd"/>
<clusterfs device="/dev/an-a05n01_vg0/shared" force_unmount="1" fstype="gfs2" mountpoint="/shared" name="sharedfs" />
<script file="/etc/init.d/libvirtd" name="libvirtd"/>
</resources>
<failoverdomains>
<failoverdomain name="only_n01" nofailback="1" ordered="0" restricted="1">
<failoverdomainnode name="an-a05n01.alteeve.ca"/>
</failoverdomain>
<failoverdomain name="only_n02" nofailback="1" ordered="0" restricted="1">
<failoverdomainnode name="an-a05n02.alteeve.ca"/>
</failoverdomain>
<failoverdomain name="primary_n01" nofailback="1" ordered="1" restricted="1">
<failoverdomainnode name="an-a05n01.alteeve.ca" priority="1"/>
<failoverdomainnode name="an-a05n02.alteeve.ca" priority="2"/>
</failoverdomain>
<failoverdomain name="primary_n02" nofailback="1" ordered="1" restricted="1">
<failoverdomainnode name="an-a05n01.alteeve.ca" priority="2"/>
<failoverdomainnode name="an-a05n02.alteeve.ca" priority="1"/>
</failoverdomain>
</failoverdomains>
<service name="storage_n01" autostart="1" domain="only_n01" exclusive="0" recovery="restart">
<script ref="drbd">
<script ref="clvmd">
<clusterfs ref="sharedfs"/>
</script>
</script>
</service>
<service name="storage_n02" autostart="1" domain="only_n02" exclusive="0" recovery="restart">
<script ref="drbd">
<script ref="clvmd">
<clusterfs ref="sharedfs"/>
</script>
</script>
</service>
<service name="libvirtd_n01" autostart="1" domain="only_n01" exclusive="0" recovery="restart">
<script ref="libvirtd"/>
</service>
<service name="libvirtd_n02" autostart="1" domain="only_n02" exclusive="0" recovery="restart">
<script ref="libvirtd"/>
</service>
<vm name="vm01-win2008" domain="primary_n01" autostart="0" path="/shared/definitions/" exclusive="0" recovery="restart" max_restarts="2" restart_expire_time="600">
<action name="stop" timeout="30m" />
</vm>
<vm name="vm02-win2012" domain="primary_n02" autostart="0" path="/shared/definitions/" exclusive="0" recovery="restart" max_restarts="2" restart_expire_time="600">
<action name="stop" timeout="30m" />
</vm>
<vm name="vm03-win7" domain="primary_n01" autostart="0" path="/shared/definitions/" exclusive="0" recovery="restart" max_restarts="2" restart_expire_time="600">
<action name="stop" timeout="30m" />
</vm>
<vm name="vm04-win8" domain="primary_n01" autostart="0" path="/shared/definitions/" exclusive="0" recovery="restart" max_restarts="2" restart_expire_time="600">
<action name="stop" timeout="30m" />
</vm>
<vm name="vm05-freebsd9" domain="primary_n02" autostart="0" path="/shared/definitions/" exclusive="0" recovery="restart" max_restarts="2" restart_expire_time="600"/>
<vm name="vm06-solaris11" domain="primary_n02" autostart="0" path="/shared/definitions/" exclusive="0" recovery="restart" max_restarts="2" restart_expire_time="600"/>
</rm>
</cluster> |
|---|
Now let's activate the new configuration.
| an-a05n02 | ccs_config_validateConfiguration validatescman_tool version6.2.0 config 16cman_tool version -r
cman_tool version6.2.0 config 17 |
|---|---|
| an-a05n01 | cman_tool version6.2.0 config 17 |
Let's take a look at clustat on both nodes now.
| an-a05n01 | clustatCluster Status for an-anvil-05 @ Wed Nov 20 16:30:28 2013
Member Status: Quorate
Member Name ID Status
------ ---- ---- ------
an-a05n01.alteeve.ca 1 Online, Local, rgmanager
an-a05n02.alteeve.ca 2 Online, rgmanager
Service Name Owner (Last) State
------- ---- ----- ------ -----
service:libvirtd_n01 an-a05n01.alteeve.ca started
service:libvirtd_n02 an-a05n02.alteeve.ca started
service:storage_n01 an-a05n01.alteeve.ca started
service:storage_n02 an-a05n02.alteeve.ca started
vm:vm01-win2008 an-a05n01.alteeve.ca started
vm:vm02-win2012 an-a05n02.alteeve.ca started
vm:vm03-win7 an-a05n01.alteeve.ca started
vm:vm04-win8 an-a05n01.alteeve.ca started
vm:vm05-freebsd9 an-a05n02.alteeve.ca started
vm:vm06-solaris11 (none) disabled |
|---|---|
| an-a05n02 | clustatCluster Status for an-anvil-05 @ Wed Nov 20 16:30:39 2013
Member Status: Quorate
Member Name ID Status
------ ---- ---- ------
an-a05n01.alteeve.ca 1 Online, rgmanager
an-a05n02.alteeve.ca 2 Online, Local, rgmanager
Service Name Owner (Last) State
------- ---- ----- ------ -----
service:libvirtd_n01 an-a05n01.alteeve.ca started
service:libvirtd_n02 an-a05n02.alteeve.ca started
service:storage_n01 an-a05n01.alteeve.ca started
service:storage_n02 an-a05n02.alteeve.ca started
vm:vm01-win2008 an-a05n01.alteeve.ca started
vm:vm02-win2012 an-a05n02.alteeve.ca started
vm:vm03-win7 an-a05n01.alteeve.ca started
vm:vm04-win8 an-a05n01.alteeve.ca started
vm:vm05-freebsd9 an-a05n02.alteeve.ca started
vm:vm06-solaris11 (none) disabled |
As expected, vm:vm06-solaris11 is disabled. Verify that it is still running on an-a05n02.
| an-a05n01 | virsh list --all Id Name State
----------------------------------------------------
9 vm04-win8 running
14 vm03-win7 running
15 vm01-win2008 running |
|---|---|
| an-a05n02 | virsh list --all Id Name State
----------------------------------------------------
11 vm05-freebsd9 running
16 vm06-solaris11 running
17 vm02-win2012 running |
Confirmed, vm06-solaris11 is on an-a05n02.
As we did before, we'll use clusvcadm to enable the vm:vm06-solaris11 service on the an-a05n02.alteeve.ca cluster member.
| an-a05n01 | clusvcadm -e vm:vm06-solaris11 -m an-a05n02.alteeve.caMember an-a05n02.alteeve.ca trying to enable vm:vm06-solaris11...Success
vm:vm06-solaris11 is now running on an-a05n02.alteeve.ca |
|---|---|
| an-a05n02 | clustatCluster Status for an-anvil-05 @ Wed Nov 20 16:31:26 2013
Member Status: Quorate
Member Name ID Status
------ ---- ---- ------
an-a05n01.alteeve.ca 1 Online, rgmanager
an-a05n02.alteeve.ca 2 Online, Local, rgmanager
Service Name Owner (Last) State
------- ---- ----- ------ -----
service:libvirtd_n01 an-a05n01.alteeve.ca started
service:libvirtd_n02 an-a05n02.alteeve.ca started
service:storage_n01 an-a05n01.alteeve.ca started
service:storage_n02 an-a05n02.alteeve.ca started
vm:vm01-win2008 an-a05n01.alteeve.ca started
vm:vm02-win2012 an-a05n02.alteeve.ca started
vm:vm03-win7 an-a05n01.alteeve.ca started
vm:vm04-win8 an-a05n01.alteeve.ca started
vm:vm05-freebsd9 an-a05n02.alteeve.ca started
vm:vm06-solaris11 an-a05n02.alteeve.ca started |
Done!
Now, should vm06-solaris11 fail or if an-a05n01 should fail, the Anvil! will recover it automatically.
Testing vm06-solaris11 Management With clusvcadm
The first thing we're going to do is disable (gracefully shut down) the server. To do this, we'll send an ACPI "power button" event to vm06-solaris11. FreeBSD 9 will, like most operating systems, respond to having its "power button pressed" by beginning a graceful shut down.
As always, start by checking the state of things.
| an-a05n01 | clustatCluster Status for an-anvil-05 @ Wed Nov 20 16:39:44 2013
Member Status: Quorate
Member Name ID Status
------ ---- ---- ------
an-a05n01.alteeve.ca 1 Online, Local, rgmanager
an-a05n02.alteeve.ca 2 Online, rgmanager
Service Name Owner (Last) State
------- ---- ----- ------ -----
service:libvirtd_n01 an-a05n01.alteeve.ca started
service:libvirtd_n02 an-a05n02.alteeve.ca started
service:storage_n01 an-a05n01.alteeve.ca started
service:storage_n02 an-a05n02.alteeve.ca started
vm:vm01-win2008 an-a05n01.alteeve.ca started
vm:vm02-win2012 an-a05n02.alteeve.ca started
vm:vm03-win7 an-a05n01.alteeve.ca started
vm:vm04-win8 an-a05n01.alteeve.ca started
vm:vm05-freebsd9 an-a05n02.alteeve.ca started
vm:vm06-solaris11 an-a05n02.alteeve.ca started |
|---|
As we expected.
| an-a05n01 | clusvcadm -d vm:vm06-solaris11Local machine disabling vm:vm06-solaris11...Success |
|---|
If we check clustat again, we'll see that the vm:vm06-solaris11 service is indeed disabled.
| an-a05n02 | clustatCluster Status for an-anvil-05 @ Wed Nov 20 16:41:38 2013
Member Status: Quorate
Member Name ID Status
------ ---- ---- ------
an-a05n01.alteeve.ca 1 Online, rgmanager
an-a05n02.alteeve.ca 2 Online, Local, rgmanager
Service Name Owner (Last) State
------- ---- ----- ------ -----
service:libvirtd_n01 an-a05n01.alteeve.ca started
service:libvirtd_n02 an-a05n02.alteeve.ca started
service:storage_n01 an-a05n01.alteeve.ca started
service:storage_n02 an-a05n02.alteeve.ca started
vm:vm01-win2008 an-a05n01.alteeve.ca started
vm:vm02-win2012 an-a05n02.alteeve.ca started
vm:vm03-win7 an-a05n01.alteeve.ca started
vm:vm04-win8 an-a05n01.alteeve.ca started
vm:vm05-freebsd9 an-a05n02.alteeve.ca started
vm:vm06-solaris11 (an-a05n02.alteeve.ca) disabled |
|---|
Good, it's off. Let's turn it back on now.
| an-a05n01 | clusvcadm -F -e vm:vm06-solaris11vm:vm06-solaris11 is now running on an-a05n02.alteeve.ca |
|---|---|
| an-a05n02 | clustatCluster Status for an-anvil-05 @ Wed Nov 20 16:41:56 2013
Member Status: Quorate
Member Name ID Status
------ ---- ---- ------
an-a05n01.alteeve.ca 1 Online, rgmanager
an-a05n02.alteeve.ca 2 Online, Local, rgmanager
Service Name Owner (Last) State
------- ---- ----- ------ -----
service:libvirtd_n01 an-a05n01.alteeve.ca started
service:libvirtd_n02 an-a05n02.alteeve.ca started
service:storage_n01 an-a05n01.alteeve.ca started
service:storage_n02 an-a05n02.alteeve.ca started
vm:vm01-win2008 an-a05n01.alteeve.ca started
vm:vm02-win2012 an-a05n02.alteeve.ca started
vm:vm03-win7 an-a05n01.alteeve.ca started
vm:vm04-win8 an-a05n01.alteeve.ca started
vm:vm05-freebsd9 an-a05n02.alteeve.ca started
vm:vm06-solaris11 an-a05n02.alteeve.ca started |
One last step; Testing live migration! We'll push vm06-solaris11 over to an-a05n01 and then pull it back again.
| an-a05n01 | clusvcadm -M vm:vm06-solaris11 -m an-a05n01.alteeve.caTrying to migrate vm:vm06-solaris11 to an-a05n01.alteeve.ca...Success |
|---|---|
| an-a05n02 | clustatCluster Status for an-anvil-05 @ Wed Nov 20 16:42:46 2013
Member Status: Quorate
Member Name ID Status
------ ---- ---- ------
an-a05n01.alteeve.ca 1 Online, rgmanager
an-a05n02.alteeve.ca 2 Online, Local, rgmanager
Service Name Owner (Last) State
------- ---- ----- ------ -----
service:libvirtd_n01 an-a05n01.alteeve.ca started
service:libvirtd_n02 an-a05n02.alteeve.ca started
service:storage_n01 an-a05n01.alteeve.ca started
service:storage_n02 an-a05n02.alteeve.ca started
vm:vm01-win2008 an-a05n01.alteeve.ca started
vm:vm02-win2012 an-a05n02.alteeve.ca started
vm:vm03-win7 an-a05n01.alteeve.ca started
vm:vm04-win8 an-a05n01.alteeve.ca started
vm:vm05-freebsd9 an-a05n02.alteeve.ca started
vm:vm06-solaris11 an-a05n01.alteeve.ca started |
If we use virsh, we can confirm that vm06-solaris11 has, in fact, moved over to an-a05n02.
| an-a05n01 | virsh list --all Id Name State
----------------------------------------------------
9 vm04-win8 running
14 vm03-win7 running
15 vm01-win2008 running
16 vm06-solaris11 running |
|---|---|
| an-a05n02 | virsh list --all Id Name State
----------------------------------------------------
11 vm05-freebsd9 running
17 vm02-win2012 running |
If you had a program running or were logged into vm06-solaris11 over RDP or similar, you would have noticed no interruptions.
So now we'll pull it back.
| an-a05n01 | clusvcadm -M vm:vm06-solaris11 -m an-a05n02.alteeve.caTrying to migrate vm:vm06-solaris11 to an-a05n02.alteeve.ca...Success |
|---|---|
| an-a05n02 | clustatCluster Status for an-anvil-05 @ Wed Nov 20 16:43:35 2013
Member Status: Quorate
Member Name ID Status
------ ---- ---- ------
an-a05n01.alteeve.ca 1 Online, rgmanager
an-a05n02.alteeve.ca 2 Online, Local, rgmanager
Service Name Owner (Last) State
------- ---- ----- ------ -----
service:libvirtd_n01 an-a05n01.alteeve.ca started
service:libvirtd_n02 an-a05n02.alteeve.ca started
service:storage_n01 an-a05n01.alteeve.ca started
service:storage_n02 an-a05n02.alteeve.ca started
vm:vm01-win2008 an-a05n01.alteeve.ca started
vm:vm02-win2012 an-a05n02.alteeve.ca started
vm:vm03-win7 an-a05n01.alteeve.ca started
vm:vm04-win8 an-a05n01.alteeve.ca started
vm:vm05-freebsd9 an-a05n02.alteeve.ca started
vm:vm06-solaris11 an-a05n02.alteeve.ca started |
Once again, we'll confirm with virsh.
| an-a05n01 | virsh list --all Id Name State
----------------------------------------------------
9 vm04-win8 running
14 vm03-win7 running
15 vm01-win2008 running |
|---|---|
| an-a05n02 | virsh list --all Id Name State
----------------------------------------------------
11 vm05-freebsd9 running
17 vm02-win2012 running
19 vm06-solaris11 running |
Perfect!
Making vm07-rhel6 a Highly Available Service
| Note: If you skipped adding vm01-win2008 to the cluster manager, please jump back and review the steps there. Particularly on creating the new failover domains and SELinux fix. |
It's time to add vm07-rhel6 to the cluster's management. This will be a little different from the windows installs we've done up until now.
Dumping the vm07-rhel6 XML Definition File
As we did with the previous servers, we need to dump vm07-rhel6's XML definition out to a file in /shared/definitions.
First, let's use virsh to see the server's state.
| an-a05n01 | virsh list --all Id Name State
----------------------------------------------------
9 vm04-win8 running
15 vm01-win2008 running
17 vm03-win7 running
19 vm07-rhel6 running |
|---|---|
| an-a05n02 | virsh list --all Id Name State
----------------------------------------------------
11 vm05-freebsd9 running
17 vm02-win2012 running
19 vm06-solaris11 running |
So we see that vm07-rhel6 is running on an-a05n01, which is where we provisioned it.
Now dump the server's XML.
| an-a05n01 | virsh dumpxml vm07-rhel6 > /shared/definitions/vm07-rhel6.xml
ls -lah /shared/definitions/vm07-rhel6.xml-rw-r--r--. 1 root root 2.9K Nov 21 00:55 /shared/definitions/vm07-rhel6.xml |
|---|
| Warning: Be sure the XML file was written properly! This next step will remove the server from libvirtd. Once done, the /shared/definitions/vm07-rhel6.xml will be the only way to boot the server! |
The last step is, again, to remove vm07-rhel6 from libvirtd.
| an-a05n01 | virsh undefine vm07-rhel6Domain vm07-rhel6 has been undefined |
|---|
Done.
Creating the vm:vm07-rhel6 Service
As we did for the previous servers, we will create a vm service entry for vm07-rhel6 under the primary_n01 failover domain.
Lets increment the version to 18 and add the new entry.
One major difference this time is that we will not alter the shut down timer. The default of two minutes is fine for non-Microsoft servers.
| an-a05n01 | <rm log_level="5">
...
<vm name="vm07-rhel6" domain="primary_n01" autostart="0" path="/shared/definitions/" exclusive="0" recovery="restart" max_restarts="2" restart_expire_time="600"/>
</rm> |
|---|
Making the new cluster.conf as we see it below.
| an-a05n01 | <?xml version="1.0"?>
<cluster name="an-anvil-05" config_version="15">
<cman expected_votes="1" two_node="1" />
<clusternodes>
<clusternode name="an-a05n01.alteeve.ca" nodeid="1">
<fence>
<method name="ipmi">
<device name="ipmi_n01" action="reboot" delay="15" />
</method>
<method name="pdu">
<device name="pdu1" port="1" action="reboot" />
<device name="pdu2" port="1" action="reboot" />
</method>
</fence>
</clusternode>
<clusternode name="an-a05n02.alteeve.ca" nodeid="2">
<fence>
<method name="ipmi">
<device name="ipmi_n02" action="reboot" />
</method>
<method name="pdu">
<device name="pdu1" port="2" action="reboot" />
<device name="pdu2" port="2" action="reboot" />
</method>
</fence>
</clusternode>
</clusternodes>
<fencedevices>
<fencedevice name="ipmi_n01" agent="fence_ipmilan" ipaddr="an-a05n01.ipmi" login="admin" passwd="secret" />
<fencedevice name="ipmi_n02" agent="fence_ipmilan" ipaddr="an-a05n02.ipmi" login="admin" passwd="secret" />
<fencedevice agent="fence_apc_snmp" ipaddr="an-pdu01.alteeve.ca" name="pdu1" />
<fencedevice agent="fence_apc_snmp" ipaddr="an-pdu02.alteeve.ca" name="pdu2" />
</fencedevices>
<fence_daemon post_join_delay="30" />
<totem rrp_mode="none" secauth="off"/>
<rm log_level="5">
<resources>
<script file="/etc/init.d/drbd" name="drbd"/>
<script file="/etc/init.d/clvmd" name="clvmd"/>
<clusterfs device="/dev/an-a05n01_vg0/shared" force_unmount="1" fstype="gfs2" mountpoint="/shared" name="sharedfs" />
<script file="/etc/init.d/libvirtd" name="libvirtd"/>
</resources>
<failoverdomains>
<failoverdomain name="only_n01" nofailback="1" ordered="0" restricted="1">
<failoverdomainnode name="an-a05n01.alteeve.ca"/>
</failoverdomain>
<failoverdomain name="only_n02" nofailback="1" ordered="0" restricted="1">
<failoverdomainnode name="an-a05n02.alteeve.ca"/>
</failoverdomain>
<failoverdomain name="primary_n01" nofailback="1" ordered="1" restricted="1">
<failoverdomainnode name="an-a05n01.alteeve.ca" priority="1"/>
<failoverdomainnode name="an-a05n02.alteeve.ca" priority="2"/>
</failoverdomain>
<failoverdomain name="primary_n02" nofailback="1" ordered="1" restricted="1">
<failoverdomainnode name="an-a05n01.alteeve.ca" priority="2"/>
<failoverdomainnode name="an-a05n02.alteeve.ca" priority="1"/>
</failoverdomain>
</failoverdomains>
<service name="storage_n01" autostart="1" domain="only_n01" exclusive="0" recovery="restart">
<script ref="drbd">
<script ref="clvmd">
<clusterfs ref="sharedfs"/>
</script>
</script>
</service>
<service name="storage_n02" autostart="1" domain="only_n02" exclusive="0" recovery="restart">
<script ref="drbd">
<script ref="clvmd">
<clusterfs ref="sharedfs"/>
</script>
</script>
</service>
<service name="libvirtd_n01" autostart="1" domain="only_n01" exclusive="0" recovery="restart">
<script ref="libvirtd"/>
</service>
<service name="libvirtd_n02" autostart="1" domain="only_n02" exclusive="0" recovery="restart">
<script ref="libvirtd"/>
</service>
<vm name="vm01-win2008" domain="primary_n01" autostart="0" path="/shared/definitions/" exclusive="0" recovery="restart" max_restarts="2" restart_expire_time="600">
<action name="stop" timeout="30m" />
</vm>
<vm name="vm02-win2012" domain="primary_n02" autostart="0" path="/shared/definitions/" exclusive="0" recovery="restart" max_restarts="2" restart_expire_time="600">
<action name="stop" timeout="30m" />
</vm>
<vm name="vm03-win7" domain="primary_n01" autostart="0" path="/shared/definitions/" exclusive="0" recovery="restart" max_restarts="2" restart_expire_time="600">
<action name="stop" timeout="30m" />
</vm>
<vm name="vm04-win8" domain="primary_n01" autostart="0" path="/shared/definitions/" exclusive="0" recovery="restart" max_restarts="2" restart_expire_time="600">
<action name="stop" timeout="30m" />
</vm>
<vm name="vm05-freebsd9" domain="primary_n02" autostart="0" path="/shared/definitions/" exclusive="0" recovery="restart" max_restarts="2" restart_expire_time="600"/>
<vm name="vm06-solaris11" domain="primary_n02" autostart="0" path="/shared/definitions/" exclusive="0" recovery="restart" max_restarts="2" restart_expire_time="600"/>
<vm name="vm07-rhel6" domain="primary_n01" autostart="0" path="/shared/definitions/" exclusive="0" recovery="restart" max_restarts="2" restart_expire_time="600"/>
</rm>
</cluster> |
|---|
Now let's activate the new configuration.
| an-a05n01 | ccs_config_validateConfiguration validatescman_tool version6.2.0 config 17cman_tool version -r
cman_tool version6.2.0 config 18 |
|---|---|
| an-a05n02 | cman_tool version6.2.0 config 18 |
Let's take a look at clustat on both nodes now.
| an-a05n01 | clustatCluster Status for an-anvil-05 @ Thu Nov 21 01:02:41 2013
Member Status: Quorate
Member Name ID Status
------ ---- ---- ------
an-a05n01.alteeve.ca 1 Online, Local, rgmanager
an-a05n02.alteeve.ca 2 Online, rgmanager
Service Name Owner (Last) State
------- ---- ----- ------ -----
service:libvirtd_n01 an-a05n01.alteeve.ca started
service:libvirtd_n02 an-a05n02.alteeve.ca started
service:storage_n01 an-a05n01.alteeve.ca started
service:storage_n02 an-a05n02.alteeve.ca started
vm:vm01-win2008 an-a05n01.alteeve.ca started
vm:vm02-win2012 an-a05n02.alteeve.ca started
vm:vm03-win7 an-a05n01.alteeve.ca started
vm:vm04-win8 an-a05n01.alteeve.ca started
vm:vm05-freebsd9 an-a05n02.alteeve.ca started
vm:vm06-solaris11 an-a05n02.alteeve.ca started
vm:vm07-rhel6 (none) disabled |
|---|---|
| an-a05n02 | clustatCluster Status for an-anvil-05 @ Thu Nov 21 01:02:41 2013
Member Status: Quorate
Member Name ID Status
------ ---- ---- ------
an-a05n01.alteeve.ca 1 Online, rgmanager
an-a05n02.alteeve.ca 2 Online, Local, rgmanager
Service Name Owner (Last) State
------- ---- ----- ------ -----
service:libvirtd_n01 an-a05n01.alteeve.ca started
service:libvirtd_n02 an-a05n02.alteeve.ca started
service:storage_n01 an-a05n01.alteeve.ca started
service:storage_n02 an-a05n02.alteeve.ca started
vm:vm01-win2008 an-a05n01.alteeve.ca started
vm:vm02-win2012 an-a05n02.alteeve.ca started
vm:vm03-win7 an-a05n01.alteeve.ca started
vm:vm04-win8 an-a05n01.alteeve.ca started
vm:vm05-freebsd9 an-a05n02.alteeve.ca started
vm:vm06-solaris11 an-a05n02.alteeve.ca started
vm:vm07-rhel6 (none) disabled |
As expected, vm:vm07-rhel6 is disabled. Verify that it is still running on an-a05n01.
| an-a05n01 | virsh list --all Id Name State
----------------------------------------------------
9 vm04-win8 running
15 vm01-win2008 running
17 vm03-win7 running
19 vm07-rhel6 running |
|---|---|
| an-a05n02 | virsh list --all Id Name State
----------------------------------------------------
11 vm05-freebsd9 running
17 vm02-win2012 running
19 vm06-solaris11 running |
Confirmed, vm07-rhel6 is on an-a05n01.
As we did before, we'll use clusvcadm to enable the vm:vm07-rhel6 service on the an-a05n01.alteeve.ca cluster member.
| an-a05n01 | clusvcadm -e vm:vm07-rhel6 -m an-a05n01.alteeve.caMember an-a05n01.alteeve.ca trying to enable vm:vm07-rhel6...Success
vm:vm07-rhel6 is now running on an-a05n01.alteeve.ca |
|---|---|
| an-a05n02 | clustatCluster Status for an-anvil-05 @ Thu Nov 21 01:03:31 2013
Member Status: Quorate
Member Name ID Status
------ ---- ---- ------
an-a05n01.alteeve.ca 1 Online, rgmanager
an-a05n02.alteeve.ca 2 Online, Local, rgmanager
Service Name Owner (Last) State
------- ---- ----- ------ -----
service:libvirtd_n01 an-a05n01.alteeve.ca started
service:libvirtd_n02 an-a05n02.alteeve.ca started
service:storage_n01 an-a05n01.alteeve.ca started
service:storage_n02 an-a05n02.alteeve.ca started
vm:vm01-win2008 an-a05n01.alteeve.ca started
vm:vm02-win2012 an-a05n02.alteeve.ca started
vm:vm03-win7 an-a05n01.alteeve.ca started
vm:vm04-win8 an-a05n01.alteeve.ca started
vm:vm05-freebsd9 an-a05n02.alteeve.ca started
vm:vm06-solaris11 an-a05n02.alteeve.ca started
vm:vm07-rhel6 an-a05n01.alteeve.ca started |
Done!
Now, should vm07-rhel6 fail or if an-a05n01 should fail, the Anvil! will recover it automatically.
Testing vm07-rhel6 Management With clusvcadm
The first thing we're going to do is disable (gracefully shut down) the server. To do this, we'll send an ACPI "power button" event to vm07-rhel6. FreeBSD 9 will, like most operating systems, respond to having its "power button pressed" by beginning a graceful shut down.
As always, start by checking the state of things.
| an-a05n01 | clustatCluster Status for an-anvil-05 @ Thu Nov 21 01:03:43 2013
Member Status: Quorate
Member Name ID Status
------ ---- ---- ------
an-a05n01.alteeve.ca 1 Online, Local, rgmanager
an-a05n02.alteeve.ca 2 Online, rgmanager
Service Name Owner (Last) State
------- ---- ----- ------ -----
service:libvirtd_n01 an-a05n01.alteeve.ca started
service:libvirtd_n02 an-a05n02.alteeve.ca started
service:storage_n01 an-a05n01.alteeve.ca started
service:storage_n02 an-a05n02.alteeve.ca started
vm:vm01-win2008 an-a05n01.alteeve.ca started
vm:vm02-win2012 an-a05n02.alteeve.ca started
vm:vm03-win7 an-a05n01.alteeve.ca started
vm:vm04-win8 an-a05n01.alteeve.ca started
vm:vm05-freebsd9 an-a05n02.alteeve.ca started
vm:vm06-solaris11 an-a05n02.alteeve.ca started
vm:vm07-rhel6 an-a05n01.alteeve.ca started |
|---|
As we expected.
| Note: If you did a "minimal" install, then acpid will not be installed. Without it, the server will not shut down gracefully in the next step. Be sure that acpid is installed and that the acpi daemon is running. |
| an-a05n01 | clusvcadm -d vm:vm07-rhel6Local machine disabling vm:vm07-rhel6...Success |
|---|
If we check clustat again, we'll see that the vm:vm07-rhel6 service is indeed disabled.
| an-a05n02 | clustatCluster Status for an-anvil-05 @ Thu Nov 21 01:05:51 2013
Member Status: Quorate
Member Name ID Status
------ ---- ---- ------
an-a05n01.alteeve.ca 1 Online, rgmanager
an-a05n02.alteeve.ca 2 Online, Local, rgmanager
Service Name Owner (Last) State
------- ---- ----- ------ -----
service:libvirtd_n01 an-a05n01.alteeve.ca started
service:libvirtd_n02 an-a05n02.alteeve.ca started
service:storage_n01 an-a05n01.alteeve.ca started
service:storage_n02 an-a05n02.alteeve.ca started
vm:vm01-win2008 an-a05n01.alteeve.ca started
vm:vm02-win2012 an-a05n02.alteeve.ca started
vm:vm03-win7 an-a05n01.alteeve.ca started
vm:vm04-win8 an-a05n01.alteeve.ca started
vm:vm05-freebsd9 an-a05n02.alteeve.ca started
vm:vm06-solaris11 an-a05n02.alteeve.ca started
vm:vm07-rhel6 (an-a05n01.alteeve.ca) disabled |
|---|
Good, it's off. Let's turn it back on now.
| an-a05n01 | clusvcadm -F -e vm:vm07-rhel6Local machine trying to enable vm:vm07-rhel6...Success
vm:vm07-rhel6 is now running on an-a05n01.alteeve.ca |
|---|---|
| an-a05n02 | clustatCluster Status for an-anvil-05 @ Thu Nov 21 01:06:16 2013
Member Status: Quorate
Member Name ID Status
------ ---- ---- ------
an-a05n01.alteeve.ca 1 Online, rgmanager
an-a05n02.alteeve.ca 2 Online, Local, rgmanager
Service Name Owner (Last) State
------- ---- ----- ------ -----
service:libvirtd_n01 an-a05n01.alteeve.ca started
service:libvirtd_n02 an-a05n02.alteeve.ca started
service:storage_n01 an-a05n01.alteeve.ca started
service:storage_n02 an-a05n02.alteeve.ca started
vm:vm01-win2008 an-a05n01.alteeve.ca started
vm:vm02-win2012 an-a05n02.alteeve.ca started
vm:vm03-win7 an-a05n01.alteeve.ca started
vm:vm04-win8 an-a05n01.alteeve.ca started
vm:vm05-freebsd9 an-a05n02.alteeve.ca started
vm:vm06-solaris11 an-a05n02.alteeve.ca started
vm:vm07-rhel6 an-a05n01.alteeve.ca started |
One last step; Testing live migration! We'll push vm07-rhel6 over to an-a05n01 and then pull it back again.
| an-a05n01 | clusvcadm -M vm:vm07-rhel6 -m an-a05n02.alteeve.caTrying to migrate vm:vm07-rhel6 to an-a05n02.alteeve.ca...Success |
|---|---|
| an-a05n02 | clustatCluster Status for an-anvil-05 @ Thu Nov 21 01:07:56 2013
Member Status: Quorate
Member Name ID Status
------ ---- ---- ------
an-a05n01.alteeve.ca 1 Online, rgmanager
an-a05n02.alteeve.ca 2 Online, Local, rgmanager
Service Name Owner (Last) State
------- ---- ----- ------ -----
service:libvirtd_n01 an-a05n01.alteeve.ca started
service:libvirtd_n02 an-a05n02.alteeve.ca started
service:storage_n01 an-a05n01.alteeve.ca started
service:storage_n02 an-a05n02.alteeve.ca started
vm:vm01-win2008 an-a05n01.alteeve.ca started
vm:vm02-win2012 an-a05n02.alteeve.ca started
vm:vm03-win7 an-a05n01.alteeve.ca started
vm:vm04-win8 an-a05n01.alteeve.ca started
vm:vm05-freebsd9 an-a05n02.alteeve.ca started
vm:vm06-solaris11 an-a05n02.alteeve.ca started
vm:vm07-rhel6 an-a05n02.alteeve.ca started |
If we use virsh, we can confirm that vm07-rhel6 has, in fact, moved over to an-a05n02.
| an-a05n01 | virsh list --all Id Name State
----------------------------------------------------
9 vm04-win8 running
15 vm01-win2008 running
17 vm03-win7 running |
|---|---|
| an-a05n02 | virsh list --all Id Name State
----------------------------------------------------
11 vm05-freebsd9 running
17 vm02-win2012 running
19 vm06-solaris11 running
20 vm07-rhel6 running |
If you had a program running or were logged into vm07-rhel6 over RDP or similar, you would have noticed no interruptions.
So now we'll pull it back.
| an-a05n01 | clusvcadm -M vm:vm07-rhel6 -m an-a05n01.alteeve.caTrying to migrate vm:vm07-rhel6 to an-a05n01.alteeve.ca...Success |
|---|---|
| an-a05n02 | clustatCluster Status for an-anvil-05 @ Thu Nov 21 01:08:49 2013
Member Status: Quorate
Member Name ID Status
------ ---- ---- ------
an-a05n01.alteeve.ca 1 Online, rgmanager
an-a05n02.alteeve.ca 2 Online, Local, rgmanager
Service Name Owner (Last) State
------- ---- ----- ------ -----
service:libvirtd_n01 an-a05n01.alteeve.ca started
service:libvirtd_n02 an-a05n02.alteeve.ca started
service:storage_n01 an-a05n01.alteeve.ca started
service:storage_n02 an-a05n02.alteeve.ca started
vm:vm01-win2008 an-a05n01.alteeve.ca started
vm:vm02-win2012 an-a05n02.alteeve.ca started
vm:vm03-win7 an-a05n01.alteeve.ca started
vm:vm04-win8 an-a05n01.alteeve.ca started
vm:vm05-freebsd9 an-a05n02.alteeve.ca started
vm:vm06-solaris11 an-a05n02.alteeve.ca started
vm:vm07-rhel6 an-a05n01.alteeve.ca started |
Once again, we'll confirm with virsh.
| an-a05n01 | virsh list --all Id Name State
----------------------------------------------------
9 vm04-win8 running
15 vm01-win2008 running
17 vm03-win7 running
21 vm07-rhel6 running |
|---|---|
| an-a05n02 | virsh list --all Id Name State
----------------------------------------------------
11 vm05-freebsd9 running
17 vm02-win2012 running
19 vm06-solaris11 running |
Perfect!
Making vm08-sles11 a Highly Available Service
| Note: If you skipped adding vm01-win2008 to the cluster manager, please jump back and review the steps there. Particularly on creating the new failover domains and SELinux fix. |
It's time to add our last server, vm08-sles11, to the cluster's management.
Dumping the vm08-sles11 XML Definition File
As we did with the previous servers, we need to dump vm08-sles11's XML definition out to a file in /shared/definitions.
First, let's use virsh to see the server's state.
| an-a05n01 | virsh list --all Id Name State
----------------------------------------------------
9 vm04-win8 running
15 vm01-win2008 running
17 vm03-win7 running
21 vm07-rhel6 running
23 vm08-sles11 running |
|---|---|
| an-a05n02 | virsh list --all Id Name State
----------------------------------------------------
11 vm05-freebsd9 running
17 vm02-win2012 running
19 vm06-solaris11 running |
So we see that vm08-sles11 is running on an-a05n01, which is where we provisioned it.
Now dump the server's XML.
| an-a05n01 | virsh dumpxml vm08-sles11 > /shared/definitions/vm08-sles11.xml
ls -lah /shared/definitions/vm08-sles11.xml-rw-r--r--. 1 root root 3.1K Nov 21 02:14 /shared/definitions/vm08-sles11.xml |
|---|
| Warning: Be sure the XML file was written properly! This next step will remove the server from libvirtd. Once done, the /shared/definitions/vm08-sles11.xml will be the only way to boot the server! |
The last step is, again, to remove vm08-sles11 from libvirtd.
| an-a05n01 | virsh undefine vm08-sles11Domain vm08-sles11 has been undefined |
|---|
Done.
Creating the vm:vm08-sles11 Service
As we did for the previous servers, we will create a vm service entry for vm08-sles11 under the primary_n01 failover domain.
Lets increment the version to 19 and add the new entry.
One major difference this time is that we will not alter the shut down timer. The default of two minutes is fine for non-Microsoft servers.
| an-a05n01 | <rm log_level="5">
...
<vm name="vm08-sles11" domain="primary_n01" autostart="0" path="/shared/definitions/" exclusive="0" recovery="restart" max_restarts="2" restart_expire_time="600"/>
</rm> |
|---|
Making the new cluster.conf as we see it below.
| an-a05n01 | <?xml version="1.0"?>
<cluster name="an-anvil-05" config_version="15">
<cman expected_votes="1" two_node="1" />
<clusternodes>
<clusternode name="an-a05n01.alteeve.ca" nodeid="1">
<fence>
<method name="ipmi">
<device name="ipmi_n01" action="reboot" delay="15" />
</method>
<method name="pdu">
<device name="pdu1" port="1" action="reboot" />
<device name="pdu2" port="1" action="reboot" />
</method>
</fence>
</clusternode>
<clusternode name="an-a05n02.alteeve.ca" nodeid="2">
<fence>
<method name="ipmi">
<device name="ipmi_n02" action="reboot" />
</method>
<method name="pdu">
<device name="pdu1" port="2" action="reboot" />
<device name="pdu2" port="2" action="reboot" />
</method>
</fence>
</clusternode>
</clusternodes>
<fencedevices>
<fencedevice name="ipmi_n01" agent="fence_ipmilan" ipaddr="an-a05n01.ipmi" login="admin" passwd="secret" />
<fencedevice name="ipmi_n02" agent="fence_ipmilan" ipaddr="an-a05n02.ipmi" login="admin" passwd="secret" />
<fencedevice agent="fence_apc_snmp" ipaddr="an-pdu01.alteeve.ca" name="pdu1" />
<fencedevice agent="fence_apc_snmp" ipaddr="an-pdu02.alteeve.ca" name="pdu2" />
</fencedevices>
<fence_daemon post_join_delay="30" />
<totem rrp_mode="none" secauth="off"/>
<rm log_level="5">
<resources>
<script file="/etc/init.d/drbd" name="drbd"/>
<script file="/etc/init.d/clvmd" name="clvmd"/>
<clusterfs device="/dev/an-a05n01_vg0/shared" force_unmount="1" fstype="gfs2" mountpoint="/shared" name="sharedfs" />
<script file="/etc/init.d/libvirtd" name="libvirtd"/>
</resources>
<failoverdomains>
<failoverdomain name="only_n01" nofailback="1" ordered="0" restricted="1">
<failoverdomainnode name="an-a05n01.alteeve.ca"/>
</failoverdomain>
<failoverdomain name="only_n02" nofailback="1" ordered="0" restricted="1">
<failoverdomainnode name="an-a05n02.alteeve.ca"/>
</failoverdomain>
<failoverdomain name="primary_n01" nofailback="1" ordered="1" restricted="1">
<failoverdomainnode name="an-a05n01.alteeve.ca" priority="1"/>
<failoverdomainnode name="an-a05n02.alteeve.ca" priority="2"/>
</failoverdomain>
<failoverdomain name="primary_n02" nofailback="1" ordered="1" restricted="1">
<failoverdomainnode name="an-a05n01.alteeve.ca" priority="2"/>
<failoverdomainnode name="an-a05n02.alteeve.ca" priority="1"/>
</failoverdomain>
</failoverdomains>
<service name="storage_n01" autostart="1" domain="only_n01" exclusive="0" recovery="restart">
<script ref="drbd">
<script ref="clvmd">
<clusterfs ref="sharedfs"/>
</script>
</script>
</service>
<service name="storage_n02" autostart="1" domain="only_n02" exclusive="0" recovery="restart">
<script ref="drbd">
<script ref="clvmd">
<clusterfs ref="sharedfs"/>
</script>
</script>
</service>
<service name="libvirtd_n01" autostart="1" domain="only_n01" exclusive="0" recovery="restart">
<script ref="libvirtd"/>
</service>
<service name="libvirtd_n02" autostart="1" domain="only_n02" exclusive="0" recovery="restart">
<script ref="libvirtd"/>
</service>
<vm name="vm01-win2008" domain="primary_n01" autostart="0" path="/shared/definitions/" exclusive="0" recovery="restart" max_restarts="2" restart_expire_time="600">
<action name="stop" timeout="30m" />
</vm>
<vm name="vm02-win2012" domain="primary_n02" autostart="0" path="/shared/definitions/" exclusive="0" recovery="restart" max_restarts="2" restart_expire_time="600">
<action name="stop" timeout="30m" />
</vm>
<vm name="vm03-win7" domain="primary_n01" autostart="0" path="/shared/definitions/" exclusive="0" recovery="restart" max_restarts="2" restart_expire_time="600">
<action name="stop" timeout="30m" />
</vm>
<vm name="vm04-win8" domain="primary_n01" autostart="0" path="/shared/definitions/" exclusive="0" recovery="restart" max_restarts="2" restart_expire_time="600">
<action name="stop" timeout="30m" />
</vm>
<vm name="vm05-freebsd9" domain="primary_n02" autostart="0" path="/shared/definitions/" exclusive="0" recovery="restart" max_restarts="2" restart_expire_time="600"/>
<vm name="vm06-solaris11" domain="primary_n02" autostart="0" path="/shared/definitions/" exclusive="0" recovery="restart" max_restarts="2" restart_expire_time="600"/>
<vm name="vm07-rhel6" domain="primary_n01" autostart="0" path="/shared/definitions/" exclusive="0" recovery="restart" max_restarts="2" restart_expire_time="600"/>
<vm name="vm08-sles11" domain="primary_n01" autostart="0" path="/shared/definitions/" exclusive="0" recovery="restart" max_restarts="2" restart_expire_time="600"/>
</rm>
</cluster> |
|---|
Now let's activate the new configuration.
| an-a05n01 | ccs_config_validateConfiguration validatescman_tool version6.2.0 config 18cman_tool version -r
cman_tool version6.2.0 config 19 |
|---|---|
| an-a05n02 | cman_tool version6.2.0 config 19 |
Let's take a look at clustat on both nodes now.
| an-a05n01 | clustatCluster Status for an-anvil-05 @ Thu Nov 21 02:16:43 2013
Member Status: Quorate
Member Name ID Status
------ ---- ---- ------
an-a05n01.alteeve.ca 1 Online, Local, rgmanager
an-a05n02.alteeve.ca 2 Online, rgmanager
Service Name Owner (Last) State
------- ---- ----- ------ -----
service:libvirtd_n01 an-a05n01.alteeve.ca started
service:libvirtd_n02 an-a05n02.alteeve.ca started
service:storage_n01 an-a05n01.alteeve.ca started
service:storage_n02 an-a05n02.alteeve.ca started
vm:vm01-win2008 an-a05n01.alteeve.ca started
vm:vm02-win2012 an-a05n02.alteeve.ca started
vm:vm03-win7 an-a05n01.alteeve.ca started
vm:vm04-win8 an-a05n01.alteeve.ca started
vm:vm05-freebsd9 an-a05n02.alteeve.ca started
vm:vm06-solaris11 an-a05n02.alteeve.ca started
vm:vm07-rhel6 an-a05n01.alteeve.ca started
vm:vm08-sles11 (none) disabled |
|---|---|
| an-a05n02 | clustatCluster Status for an-anvil-05 @ Thu Nov 21 02:16:43 2013
Member Status: Quorate
Member Name ID Status
------ ---- ---- ------
an-a05n01.alteeve.ca 1 Online, rgmanager
an-a05n02.alteeve.ca 2 Online, Local, rgmanager
Service Name Owner (Last) State
------- ---- ----- ------ -----
service:libvirtd_n01 an-a05n01.alteeve.ca started
service:libvirtd_n02 an-a05n02.alteeve.ca started
service:storage_n01 an-a05n01.alteeve.ca started
service:storage_n02 an-a05n02.alteeve.ca started
vm:vm01-win2008 an-a05n01.alteeve.ca started
vm:vm02-win2012 an-a05n02.alteeve.ca started
vm:vm03-win7 an-a05n01.alteeve.ca started
vm:vm04-win8 an-a05n01.alteeve.ca started
vm:vm05-freebsd9 an-a05n02.alteeve.ca started
vm:vm06-solaris11 an-a05n02.alteeve.ca started
vm:vm07-rhel6 an-a05n01.alteeve.ca started
vm:vm08-sles11 (none) disabled |
As expected, vm:vm08-sles11 is disabled. Verify that it is still running on an-a05n01.
| an-a05n01 | virsh list --all Id Name State
----------------------------------------------------
9 vm04-win8 running
15 vm01-win2008 running
17 vm03-win7 running
21 vm07-rhel6 running
23 vm08-sles11 running |
|---|---|
| an-a05n02 | virsh list --all Id Name State
----------------------------------------------------
11 vm05-freebsd9 running
17 vm02-win2012 running
19 vm06-solaris11 running |
Confirmed, vm08-sles11 is on an-a05n01.
As we did before, we'll use clusvcadm to enable the vm:vm08-sles11 service on the an-a05n01.alteeve.ca cluster member.
| an-a05n01 | clusvcadm -e vm:vm08-sles11 -m an-a05n01.alteeve.caMember an-a05n01.alteeve.ca trying to enable vm:vm08-sles11...Success
vm:vm08-sles11 is now running on an-a05n01.alteeve.ca |
|---|---|
| an-a05n02 | clustatCluster Status for an-anvil-05 @ Thu Nov 21 02:17:40 2013
Member Status: Quorate
Member Name ID Status
------ ---- ---- ------
an-a05n01.alteeve.ca 1 Online, rgmanager
an-a05n02.alteeve.ca 2 Online, Local, rgmanager
Service Name Owner (Last) State
------- ---- ----- ------ -----
service:libvirtd_n01 an-a05n01.alteeve.ca started
service:libvirtd_n02 an-a05n02.alteeve.ca started
service:storage_n01 an-a05n01.alteeve.ca started
service:storage_n02 an-a05n02.alteeve.ca started
vm:vm01-win2008 an-a05n01.alteeve.ca started
vm:vm02-win2012 an-a05n02.alteeve.ca started
vm:vm03-win7 an-a05n01.alteeve.ca started
vm:vm04-win8 an-a05n01.alteeve.ca started
vm:vm05-freebsd9 an-a05n02.alteeve.ca started
vm:vm06-solaris11 an-a05n02.alteeve.ca started
vm:vm07-rhel6 an-a05n01.alteeve.ca started
vm:vm08-sles11 an-a05n01.alteeve.ca started |
Done!
Now, should vm08-sles11 fail or if an-a05n01 should fail, the Anvil! will recover it automatically.
Testing vm08-sles11 Management With clusvcadm
The first thing we're going to do is disable (gracefully shut down) the server. To do this, we'll send an ACPI "power button" event to vm08-sles11. FreeBSD 9 will, like most operating systems, respond to having its "power button pressed" by beginning a graceful shut down.
As always, start by checking the state of things.
| an-a05n01 | clustatCluster Status for an-anvil-05 @ Thu Nov 21 02:17:51 2013
Member Status: Quorate
Member Name ID Status
------ ---- ---- ------
an-a05n01.alteeve.ca 1 Online, Local, rgmanager
an-a05n02.alteeve.ca 2 Online, rgmanager
Service Name Owner (Last) State
------- ---- ----- ------ -----
service:libvirtd_n01 an-a05n01.alteeve.ca started
service:libvirtd_n02 an-a05n02.alteeve.ca started
service:storage_n01 an-a05n01.alteeve.ca started
service:storage_n02 an-a05n02.alteeve.ca started
vm:vm01-win2008 an-a05n01.alteeve.ca started
vm:vm02-win2012 an-a05n02.alteeve.ca started
vm:vm03-win7 an-a05n01.alteeve.ca started
vm:vm04-win8 an-a05n01.alteeve.ca started
vm:vm05-freebsd9 an-a05n02.alteeve.ca started
vm:vm06-solaris11 an-a05n02.alteeve.ca started
vm:vm07-rhel6 an-a05n01.alteeve.ca started
vm:vm08-sles11 an-a05n01.alteeve.ca started |
|---|
As we expected.
| an-a05n01 | clusvcadm -d vm:vm08-sles11Local machine disabling vm:vm08-sles11...Success |
|---|
If we check clustat again, we'll see that the vm:vm08-sles11 service is indeed disabled.
| an-a05n02 | clustatCluster Status for an-anvil-05 @ Thu Nov 21 02:19:19 2013
Member Status: Quorate
Member Name ID Status
------ ---- ---- ------
an-a05n01.alteeve.ca 1 Online, rgmanager
an-a05n02.alteeve.ca 2 Online, Local, rgmanager
Service Name Owner (Last) State
------- ---- ----- ------ -----
service:libvirtd_n01 an-a05n01.alteeve.ca started
service:libvirtd_n02 an-a05n02.alteeve.ca started
service:storage_n01 an-a05n01.alteeve.ca started
service:storage_n02 an-a05n02.alteeve.ca started
vm:vm01-win2008 an-a05n01.alteeve.ca started
vm:vm02-win2012 an-a05n02.alteeve.ca started
vm:vm03-win7 an-a05n01.alteeve.ca started
vm:vm04-win8 an-a05n01.alteeve.ca started
vm:vm05-freebsd9 an-a05n02.alteeve.ca started
vm:vm06-solaris11 an-a05n02.alteeve.ca started
vm:vm07-rhel6 an-a05n01.alteeve.ca started
vm:vm08-sles11 (an-a05n01.alteeve.ca) disabled |
|---|
Good, it's off. Let's turn it back on now.
| an-a05n01 | clusvcadm -F -e vm:vm08-sles11Local machine trying to enable vm:vm08-sles11...Success
vm:vm08-sles11 is now running on an-a05n01.alteeve.ca |
|---|---|
| an-a05n02 | clustatCluster Status for an-anvil-05 @ Thu Nov 21 02:19:40 2013
Member Status: Quorate
Member Name ID Status
------ ---- ---- ------
an-a05n01.alteeve.ca 1 Online, rgmanager
an-a05n02.alteeve.ca 2 Online, Local, rgmanager
Service Name Owner (Last) State
------- ---- ----- ------ -----
service:libvirtd_n01 an-a05n01.alteeve.ca started
service:libvirtd_n02 an-a05n02.alteeve.ca started
service:storage_n01 an-a05n01.alteeve.ca started
service:storage_n02 an-a05n02.alteeve.ca started
vm:vm01-win2008 an-a05n01.alteeve.ca started
vm:vm02-win2012 an-a05n02.alteeve.ca started
vm:vm03-win7 an-a05n01.alteeve.ca started
vm:vm04-win8 an-a05n01.alteeve.ca started
vm:vm05-freebsd9 an-a05n02.alteeve.ca started
vm:vm06-solaris11 an-a05n02.alteeve.ca started
vm:vm07-rhel6 an-a05n01.alteeve.ca started
vm:vm08-sles11 an-a05n01.alteeve.ca started |
One last step; Testing live migration! We'll push vm08-sles11 over to an-a05n01 and then pull it back again.
| an-a05n01 | clusvcadm -M vm:vm08-sles11 -m an-a05n02.alteeve.caTrying to migrate vm:vm08-sles11 to an-a05n02.alteeve.ca...Success |
|---|---|
| an-a05n02 | clustatCluster Status for an-anvil-05 @ Thu Nov 21 02:20:35 2013
Member Status: Quorate
Member Name ID Status
------ ---- ---- ------
an-a05n01.alteeve.ca 1 Online, rgmanager
an-a05n02.alteeve.ca 2 Online, Local, rgmanager
Service Name Owner (Last) State
------- ---- ----- ------ -----
service:libvirtd_n01 an-a05n01.alteeve.ca started
service:libvirtd_n02 an-a05n02.alteeve.ca started
service:storage_n01 an-a05n01.alteeve.ca started
service:storage_n02 an-a05n02.alteeve.ca started
vm:vm01-win2008 an-a05n01.alteeve.ca started
vm:vm02-win2012 an-a05n02.alteeve.ca started
vm:vm03-win7 an-a05n01.alteeve.ca started
vm:vm04-win8 an-a05n01.alteeve.ca started
vm:vm05-freebsd9 an-a05n02.alteeve.ca started
vm:vm06-solaris11 an-a05n02.alteeve.ca started
vm:vm07-rhel6 an-a05n01.alteeve.ca started
vm:vm08-sles11 an-a05n02.alteeve.ca started |
If we use virsh, we can confirm that vm08-sles11 has, in fact, moved over to an-a05n02.
| an-a05n01 | virsh list --all Id Name State
----------------------------------------------------
9 vm04-win8 running
15 vm01-win2008 running
17 vm03-win7 running
21 vm07-rhel6 running |
|---|---|
| an-a05n02 | virsh list --all Id Name State
----------------------------------------------------
11 vm05-freebsd9 running
17 vm02-win2012 running
19 vm06-solaris11 running
21 vm08-sles11 running |
If you had a program running or were logged into vm08-sles11 over RDP or similar, you would have noticed no interruptions.
So now we'll pull it back.
| an-a05n01 | clusvcadm -M vm:vm08-sles11 -m an-a05n01.alteeve.caTrying to migrate vm:vm08-sles11 to an-a05n01.alteeve.ca...Success |
|---|---|
| an-a05n02 | clustatCluster Status for an-anvil-05 @ Thu Nov 21 02:21:13 2013
Member Status: Quorate
Member Name ID Status
------ ---- ---- ------
an-a05n01.alteeve.ca 1 Online, rgmanager
an-a05n02.alteeve.ca 2 Online, Local, rgmanager
Service Name Owner (Last) State
------- ---- ----- ------ -----
service:libvirtd_n01 an-a05n01.alteeve.ca started
service:libvirtd_n02 an-a05n02.alteeve.ca started
service:storage_n01 an-a05n01.alteeve.ca started
service:storage_n02 an-a05n02.alteeve.ca started
vm:vm01-win2008 an-a05n01.alteeve.ca started
vm:vm02-win2012 an-a05n02.alteeve.ca started
vm:vm03-win7 an-a05n01.alteeve.ca started
vm:vm04-win8 an-a05n01.alteeve.ca started
vm:vm05-freebsd9 an-a05n02.alteeve.ca started
vm:vm06-solaris11 an-a05n02.alteeve.ca started
vm:vm07-rhel6 an-a05n01.alteeve.ca started
vm:vm08-sles11 an-a05n01.alteeve.ca started |
Once again, we'll confirm with virsh.
| an-a05n01 | virsh list --all Id Name State
----------------------------------------------------
9 vm04-win8 running
15 vm01-win2008 running
17 vm03-win7 running
21 vm07-rhel6 running
25 vm08-sles11 running |
|---|---|
| an-a05n02 | virsh list --all Id Name State
----------------------------------------------------
11 vm05-freebsd9 running
17 vm02-win2012 running
19 vm06-solaris11 running |
It's really pretty easy, isn't it?
Setting Up Alerts
One of the major additions to this second addition is the advent of the new alert system we developed called "AN!CM"; "AN! Cluster Monitor".
Alert System Overview
It is hardly fancy, but it does provide, in one package, very careful and detailed monitoring of:
- Incoming power issues via UPS monitoring.
- Network interruptions via bond driver events
- Monitoring of node environmental health via IPMI BMC sensor readings
- Monitoring of all storage components via LSI's MegaCli tool
- Monitoring of the HA cluster stack using Red Hat's tools
In all, over 200 points are monitored every 30 seconds. Most changes are simply logged, but events deemed important (or new events not before seen) trigger email alerts. These alerts are kept as simple and to the point as possibly to minimize the amount of time needed to understand what event triggered the alert.
The alerting system tries to be intelligent about how alerts are triggered. For example, a thermal alert can trigger if it passes a set threshold, of course. At the same time, "early warning" alerts can be triggered is a sudden excessive change in temperature is seen. This allows early reaction to major events like HVAC failures in the server room or DC.
Basic predictive failure analysis is also provided. Examples of this are alerts on distorted incoming power from the building mains. Likewise, a sudden jump in the number of media errors from a disk drive will trigger alerts. In this way, early warning alerts can get out before a component actually fails. This allows for corrective measures or replacement parts to be ordered pre-failure, minimizing risk exposure time.
AN!CM Requirements
The alerting system is fairly customized to the Anvil! build-out. For example, only APC brand UPSes with AP9630 controllers are supported for UPS monitoring. Likewise, only LSI-brand RAID controllers are currently supported.
That said, AN!CM is an open-source project (an-cm and an-cm.lib), so contributions are happily accepted. If you need help adapting this to your hardware, please don't hesitate to contact us. We will be happy to assist however we can.
Setting Up Your Dashboard
You can configure a node's monitoring without a dashboard, if you wish. However, Striker has been designed to use the dashboard systems as the center of the AN! tools.
Please setup a dashboard before proceeding:
Once you're done there, come back here.
Testing Monitoring
At this point, /etc/an/an.conf, /root/an-cm and /root/an-cm.lib should be on our nodes.
Before we enable monitoring, lets test it once manually. If things work as expected, you should get two emails:
- First indicating that the alert system has started with an overview of the node's health.
- Second indicating that the alert system has stopped.
| Note: The monitoring and alert program generally will not print anything to the screen. When we run the command below, the terminal will appear hung. It is not though. Wait a minute and you should get an email from the node. Once you see that email, press "ctrl + c" to close the program and return to the command prompt. |
| an-a05n01 | /root/an-cmAfter a moment, you should get an email like this: Subject: [ AN!CM ] - Alteeve's Niche! - Cluster 05 (Demo Cluster - "Tyson") - an-a05n01 - Cluster Monitor StartCluster node's monitor program has started.
Current State:
--[ Cluster Status ]--------------------------------------------------
Cluster: an-anvil-05
Quorum: Quorate
Node: an-a05n01.alteeve.ca - Online, Local, rgmanager
Node: an-a05n02.alteeve.ca - Online, rgmanager
Service: libvirtd_n01 -> started on an-a05n01.alteeve.ca
Service: libvirtd_n02 -> started on an-a05n02.alteeve.ca
Service: storage_n01 -> started on an-a05n01.alteeve.ca
Service: storage_n02 -> started on an-a05n02.alteeve.ca
VM: vm01-win2008 -> started on an-a05n01.alteeve.ca
VM: vm02-win2012 -> started on an-a05n02.alteeve.ca
VM: vm03-win7 -> started on an-a05n01.alteeve.ca
VM: vm04-win8 -> started on an-a05n01.alteeve.ca
VM: vm05-freebsd9 -> started on an-a05n02.alteeve.ca
VM: vm06-solaris11 -> started on an-a05n02.alteeve.ca
VM: vm07-rhel6 -> started on an-a05n01.alteeve.ca
VM: vm08-sles11 -> started on an-a05n01.alteeve.ca
--[ Network Status ]--------------------------------------------------
Bridge: ifn_bridge1, MAC: 00:1B:21:81:C3:34, STP disabled
Links(s): |- ifn_bond1, MAC: 00:1B:21:81:C3:34
|- vnet0, MAC: FE:54:00:58:06:A9
|- vnet1, MAC: FE:54:00:8E:67:32
|- vnet2, MAC: FE:54:00:68:9B:FD
|- vnet3, MAC: FE:54:00:D5:49:4C
\- vnet4, MAC: FE:54:00:8A:6C:52
Bond: bcn_bond1 -+- bcn_link1 -+-> Back-Channel Network
\- bcn_link2 -/
Active Slave: bcn_link1 using MAC: 00:19:99:9C:9B:9E
Prefer Slave: bcn_link1
Reselect: Primary always, after 120000 seconds
Link Check: Every 100 ms
MTU Size: 1500 Bytes
+-------------------+-------------------+
Slaves | bcn_link1 | bcn_link2 |
+------------+-------------------+-------------------+
| Link: | Up | Up |
| Speed: | 1000 Mbps FD | 1000 Mbps FD |
| MAC: | 00:19:99:9C:9B:9E | 00:1B:21:81:C3:35 |
| Failures: | 0 | 0 |
+------------+-------------------+-------------------+
Bond: sn_bond1 -+- sn_link1 -+-> Storage Network
\- sn_link2 -/
Active Slave: sn_link1 using MAC: 00:19:99:9C:9B:9F
Prefer Slave: sn_link1
Reselect: Primary always, after 120000 seconds
Link Check: Every 100 ms
MTU Size: 1500 Bytes
+-------------------+-------------------+
Slaves | sn_link1 | sn_link2 |
+------------+-------------------+-------------------+
| Link: | Up | Up |
| Speed: | 1000 Mbps FD | 1000 Mbps FD |
| MAC: | 00:19:99:9C:9B:9F | A0:36:9F:02:E0:04 |
| Failures: | 0 | 0 |
+------------+-------------------+-------------------+
Bond: ifn_bond1 -+- ifn_link1 -+-> Internet-Facing Network
\- ifn_link2 -/
Active Slave: ifn_link1 using MAC: 00:1B:21:81:C3:34
Prefer Slave: ifn_link1
Reselect: Primary always, after 120000 seconds
Link Check: Every 100 ms
MTU Size: 1500 Bytes
+-------------------+-------------------+
Slaves | ifn_link1 | ifn_link2 |
+------------+-------------------+-------------------+
| Link: | Up | Up |
| Speed: | 1000 Mbps FD | 1000 Mbps FD |
| MAC: | 00:1B:21:81:C3:34 | A0:36:9F:02:E0:05 |
| Failures: | 0 | 0 |
+------------+-------------------+-------------------+
--[ Storage Status ]--------------------------------------------------
Adapter: #0
Model: RAID Ctrl SAS 6G 5/6 512MB (D2616)
Revision:
Serial #:
Cache: 512MB
BBU: iBBU, pn: LS1121001A, sn: 15686
- Failing: No
- Charge: 98 %, 73 % of design
- Capacity: No / 906 mAh, 1215 mAh design
- Voltage: 4080 mV, 3700 mV design
- Cycles: 35
- Hold-Up: 0 hours
- Learn Active: No
- Next Learn: Wed Dec 18 16:47:41 2013
Array: Virtual Drive 0, Target ID 0
State: Optimal
Drives: 4
Usable Size: 836.625 GB
Parity Size: 278.875 GB
Strip Size: 64 KB
RAID Level: Primary-5, Secondary-0, RAID Level Qualifier-3
Cache Policy: WriteBack, ReadAheadNone, Direct, No Write Cache if Bad BBU
Bad Blocks: No
Drive: 0
Position: disk group 0, span 0, arm 1
State: Online, Spun Up
Fault: No
Temp: 39 degrees Celcius
Device: Seagate ST3300657SS, sn: 17036SJ3T7X6
Media: Hard Disk Device
Interface: SAS, drive: 6.0Gb/s, bus: 6.0Gb/s
Capacity: 278.875 GB
Drive: 1
Position: disk group 0, span 0, arm 2
State: Online, Spun Up
Fault: No
Temp: 42 degrees Celcius
Device: Seagate ST3300657SS, sn: 17036SJ3CMMC
Media: Hard Disk Device
Interface: SAS, drive: 6.0Gb/s, bus: 6.0Gb/s
Capacity: 278.875 GB
Drive: 2
Position: disk group 0, span 0, arm 0
State: Online, Spun Up
Fault: No
Temp: 40 degrees Celcius
Device: Seagate ST3300657SS, sn: 17036SJ3CD2Z
Media: Hard Disk Device
Interface: SAS, drive: 6.0Gb/s, bus: 6.0Gb/s
Capacity: 278.875 GB
Drive: 6
Position: disk group 0, span 0, arm 3
State: Online, Spun Up
Fault: No
Temp: 36 degrees Celcius
Device: HITACHI HUS156045VLS600 A42BJVY33ARM
Media: Hard Disk Device
Interface: SAS, drive: 6.0Gb/s, bus: 6.0Gb/s
Capacity: 418.656 GB
--[ Host Power and Thermal Sensors ]----------------------------------
+--------+------------+---------------+---------------+
Power Supplies | Status | Wattage | Fan 1 Speed | Fan 2 Speed |
+---------------+--------+------------+---------------+---------------+
| PSU 1 | ok | 110 Watts | 6360 RPM | 6480 RPM |
| PSU 2 | ok | 100 Watts | 6480 RPM | 6360 RPM |
+---------------+--------+------------+---------------+---------------+
+--------------+--------------+--------------+
Power Levels | State | Voltage | Wattage |
+------------------+--------------+--------------+--------------+
| BATT 3.0V | ok | 3.14 Volts | -- |
| CPU1 1.8V | ok | 1.80 Volts | -- |
| CPU1 Power | ok | -- | 16.50 Watts |
| CPU2 1.8V | ok | 1.80 Volts | -- |
| CPU2 Power | ok | -- | 18.70 Watts |
| ICH 1.5V | ok | 1.49 Volts | -- |
| IOH 1.1V | ok | 1.10 Volts | -- |
| IOH 1.1V AUX | ok | 1.09 Volts | -- |
| IOH 1.8V | ok | 1.80 Volts | -- |
| iRMC 1.2V STBY | ok | 1.19 Volts | -- |
| iRMC 1.8V STBY | ok | 1.80 Volts | -- |
| LAN 1.0V STBY | ok | 1.01 Volts | -- |
| LAN 1.8V STBY | ok | 1.81 Volts | -- |
| MAIN 12V | ok | 12 Volts | -- |
| MAIN 3.3V | ok | 3.37 Volts | -- |
| MAIN 5.15V | ok | 5.18 Volts | -- |
| PSU1 Power | ok | -- | 110 Watts |
| PSU2 Power | ok | -- | 100 Watts |
| STBY 3.3V | ok | 3.35 Volts | -- |
| Total Power | ok | -- | 210 Watts |
+------------------+--------------+--------------+--------------+
+-----------+-----------+
Temperatures | State | Temp (*C) |
+----------------+-----------+-----------+
| Ambient | ok | 26.50 |
| CPU1 | ok | 37 |
| CPU2 | ok | 41 |
| Systemboard | ok | 45 |
+----------------+-----------+-----------+
+-----------+-----------+
Cooling Fans | State | RPMs |
+----------------+-----------+-----------+
| FAN1 PSU1 | ok | 6360 |
| FAN1 PSU2 | ok | 6480 |
| FAN1 SYS | ok | 4980 |
| FAN2 PSU1 | ok | 6480 |
| FAN2 PSU2 | ok | 6360 |
| FAN2 SYS | ok | 4860 |
| FAN3 SYS | ok | 4560 |
| FAN4 SYS | ok | 4800 |
| FAN5 SYS | ok | 4740 |
+----------------+-----------+-----------+
--[ UPS Status ]------------------------------------------------------
Name: an-ups01
Status: ONLINE Temperature: 31.0 *C
Model: Smart-UPS 1500 Battery Voltage: 27.0 vAC
Serial #: AS1038232403 Battery Charge: 100.0 %
Holdup Time: 52.0 Minutes Current Load: 25.0 %
Self Test: OK Firmware: UPS 05.0 / COM 02.1
Mains -> 123.0 Volts -> UPS -> 123.0 Volts -> PDU
Name: an-ups02
Status: ONLINE Temperature: 30.0 *C
Model: Smart-UPS 1500 Battery Voltage: 27.0 vAC
Serial #: AS1224213144 Battery Charge: 100.0 %
Holdup Time: 54.0 Minutes Current Load: 24.0 %
Self Test: OK Firmware: UPS 08.3 / MCU 14.0
Mains -> 123.0 Volts -> UPS -> 123.0 Volts -> PDU
==[ Source Details ]==================================================
Company: Alteeve's Niche!
Anvil!: sharedfs
Node: an-a05n01.alteeve.ca
Description:
- Cluster 05 (Demo Cluster - "Tyson")
If you have any questions or concerns, please don't hesitate to
contact support.
https://alteeve.ca/w/Support
Alteeve's Niche!
Cluster Monitor
======================================================================
--
You received this email because you were listed as a contact for the
Anvil! described in this email. If you do not wish to receive these
emails, please contact your systems administrator. AN!CM runs on
Anvil! nodes directly and are not sent by Alteeve's Niche!. |
|---|---|
| an-a05n02 | /root/an-cmAfter a moment, you should get an email like this: Subject: [ AN!CM ] - Alteeve's Niche! - Cluster 05 (Demo Cluster - "Tyson") - an-a05n02 - Cluster Monitor StartCluster node's monitor program has started.
Current State:
--[ Cluster Status ]--------------------------------------------------
Cluster: an-anvil-05
Quorum: Quorate
Node: an-a05n01.alteeve.ca - Online, rgmanager
Node: an-a05n02.alteeve.ca - Online, Local, rgmanager
Service: libvirtd_n01 -> started on an-a05n01.alteeve.ca
Service: libvirtd_n02 -> started on an-a05n02.alteeve.ca
Service: storage_n01 -> started on an-a05n01.alteeve.ca
Service: storage_n02 -> started on an-a05n02.alteeve.ca
VM: vm01-win2008 -> started on an-a05n01.alteeve.ca
VM: vm02-win2012 -> started on an-a05n02.alteeve.ca
VM: vm03-win7 -> started on an-a05n01.alteeve.ca
VM: vm04-win8 -> started on an-a05n01.alteeve.ca
VM: vm05-freebsd9 -> started on an-a05n02.alteeve.ca
VM: vm06-solaris11 -> started on an-a05n02.alteeve.ca
VM: vm07-rhel6 -> started on an-a05n01.alteeve.ca
VM: vm08-sles11 -> started on an-a05n01.alteeve.ca
--[ Network Status ]--------------------------------------------------
Bridge: ifn_bridge1, MAC: 00:1B:21:81:C2:EA, STP disabled
Links(s): |- ifn_bond1, MAC: 00:1B:21:81:C2:EA
|- vnet0, MAC: FE:54:00:5E:29:1C
|- vnet1, MAC: FE:54:00:29:38:3B
\- vnet2, MAC: FE:54:00:B0:6C:AA
Bond: bcn_bond1 -+- ifn_link1 -+-> Back-Channel Network
\- ifn_link2 -/
Active Slave: ifn_link1 using MAC: 00:19:99:9C:A0:6C
Prefer Slave: ifn_link1
Reselect: Primary always, after 120000 seconds
Link Check: Every 100 ms
MTU Size: 1500 Bytes
+-------------------+-------------------+
Slaves | ifn_link1 | ifn_link2 |
+------------+-------------------+-------------------+
| Link: | Up | Up |
| Speed: | 1000 Mbps FD | 1000 Mbps FD |
| MAC: | 00:19:99:9C:A0:6C | 00:1B:21:81:C2:EB |
| Failures: | 0 | 0 |
+------------+-------------------+-------------------+
Bond: sn_bond1 -+- sn_link1 -+-> Storage Network
\- sn_link2 -/
Active Slave: sn_link1 using MAC: 00:19:99:9C:A0:6D
Prefer Slave: sn_link1
Reselect: Primary always, after 120000 seconds
Link Check: Every 100 ms
MTU Size: 1500 Bytes
+-------------------+-------------------+
Slaves | sn_link1 | sn_link2 |
+------------+-------------------+-------------------+
| Link: | Up | Up |
| Speed: | 1000 Mbps FD | 1000 Mbps FD |
| MAC: | 00:19:99:9C:A0:6D | A0:36:9F:07:D6:2E |
| Failures: | 0 | 0 |
+------------+-------------------+-------------------+
Bond: ifn_bond1 -+- ifn_link1 -+-> Internet-Facing Network
\- ifn_link2 -/
Active Slave: ifn_link1 using MAC: 00:1B:21:81:C2:EA
Prefer Slave: ifn_link1
Reselect: Primary always, after 120000 seconds
Link Check: Every 100 ms
MTU Size: 1500 Bytes
+-------------------+-------------------+
Slaves | ifn_link1 | ifn_link2 |
+------------+-------------------+-------------------+
| Link: | Up | Up |
| Speed: | 1000 Mbps FD | 1000 Mbps FD |
| MAC: | 00:1B:21:81:C2:EA | A0:36:9F:07:D6:2F |
| Failures: | 0 | 0 |
+------------+-------------------+-------------------+
--[ Storage Status ]--------------------------------------------------
Adapter: #0
Model: RAID Ctrl SAS 6G 5/6 512MB (D2616)
Revision:
Serial #:
Cache: 512MB
BBU: iBBU, pn: LS1121001A, sn: 18704
- Failing: No
- Charge: 98 %, 68 % of design
- Capacity: No / 841 mAh, 1215 mAh design
- Voltage: 4058 mV, 3700 mV design
- Cycles: 31
- Hold-Up: 0 hours
- Learn Active: No
- Next Learn: Mon Dec 23 05:29:33 2013
Array: Virtual Drive 0, Target ID 0
State: Optimal
Drives: 4
Usable Size: 836.625 GB
Parity Size: 278.875 GB
Strip Size: 64 KB
RAID Level: Primary-5, Secondary-0, RAID Level Qualifier-3
Cache Policy: WriteBack, ReadAheadNone, Direct, No Write Cache if Bad BBU
Bad Blocks: No
Drive: 0
Position: disk group 0, span 0, arm 0
State: Online, Spun Up
Fault: No
Temp: 40 degrees Celcius
Device: Seagate ST3300657SS, sn: 17036SJ3DE9Z
Media: Hard Disk Device
Interface: SAS, drive: 6.0Gb/s, bus: 6.0Gb/s
Capacity: 278.875 GB
Drive: 1
Position: disk group 0, span 0, arm 1
State: Online, Spun Up
Fault: No
Temp: 40 degrees Celcius
Device: Seagate ST3300657SS, sn: 17036SJ3DNG7
Media: Hard Disk Device
Interface: SAS, drive: 6.0Gb/s, bus: 6.0Gb/s
Capacity: 278.875 GB
Drive: 2
Position: disk group 0, span 0, arm 2
State: Online, Spun Up
Fault: No
Temp: 38 degrees Celcius
Device: Seagate ST3300657SS, sn: 17036SJ3E01G
Media: Hard Disk Device
Interface: SAS, drive: 6.0Gb/s, bus: 6.0Gb/s
Capacity: 278.875 GB
Drive: 6
Position: disk group 0, span 0, arm 3
State: Online, Spun Up
Fault: No
Temp: 35 degrees Celcius
Device: HITACHI HUS156045VLS600 A42BJVWMYA6L
Media: Hard Disk Device
Interface: SAS, drive: 6.0Gb/s, bus: 6.0Gb/s
Capacity: 418.656 GB
--[ Host Power and Thermal Sensors ]----------------------------------
+--------+------------+---------------+---------------+
Power Supplies | Status | Wattage | Fan 1 Speed | Fan 2 Speed |
+---------------+--------+------------+---------------+---------------+
| PSU 1 | ok | 90 Watts | 6360 RPM | 6480 RPM |
| PSU 2 | ok | 110 Watts | 6480 RPM | 6360 RPM |
+---------------+--------+------------+---------------+---------------+
+--------------+--------------+--------------+
Power Levels | State | Voltage | Wattage |
+------------------+--------------+--------------+--------------+
| BATT 3.0V | ok | 3.13 Volts | -- |
| CPU1 1.8V | ok | 1.80 Volts | -- |
| CPU1 Power | ok | -- | 17.60 Watts |
| CPU2 1.8V | ok | 1.80 Volts | -- |
| CPU2 Power | ok | -- | 17.60 Watts |
| ICH 1.5V | ok | 1.50 Volts | -- |
| IOH 1.1V | ok | 1.10 Volts | -- |
| IOH 1.1V AUX | ok | 1.09 Volts | -- |
| IOH 1.8V | ok | 1.80 Volts | -- |
| iRMC 1.2V STBY | ok | 1.19 Volts | -- |
| iRMC 1.8V STBY | ok | 1.80 Volts | -- |
| LAN 1.0V STBY | ok | 1.01 Volts | -- |
| LAN 1.8V STBY | ok | 1.81 Volts | -- |
| MAIN 12V | ok | 12.06 Volts | -- |
| MAIN 3.3V | ok | 3.37 Volts | -- |
| MAIN 5.15V | ok | 5.15 Volts | -- |
| PSU1 Power | ok | -- | 90 Watts |
| PSU2 Power | ok | -- | 110 Watts |
| STBY 3.3V | ok | 3.35 Volts | -- |
| Total Power | ok | -- | 200 Watts |
+------------------+--------------+--------------+--------------+
+-----------+-----------+
Temperatures | State | Temp (*C) |
+----------------+-----------+-----------+
| Ambient | ok | 26.50 |
| CPU1 | ok | 33 |
| CPU2 | ok | 39 |
| Systemboard | ok | 43 |
+----------------+-----------+-----------+
+-----------+-----------+
Cooling Fans | State | RPMs |
+----------------+-----------+-----------+
| FAN1 PSU1 | ok | 6360 |
| FAN1 PSU2 | ok | 6480 |
| FAN1 SYS | ok | 4680 |
| FAN2 PSU1 | ok | 6480 |
| FAN2 PSU2 | ok | 6360 |
| FAN2 SYS | ok | 4800 |
| FAN3 SYS | ok | 4680 |
| FAN4 SYS | ok | 4800 |
| FAN5 SYS | ok | 4920 |
+----------------+-----------+-----------+
--[ UPS Status ]------------------------------------------------------
Name: an-ups01
Status: ONLINE Temperature: 31.0 *C
Model: Smart-UPS 1500 Battery Voltage: 27.0 vAC
Serial #: AS1038232403 Battery Charge: 100.0 %
Holdup Time: 51.0 Minutes Current Load: 26.0 %
Self Test: OK Firmware: UPS 05.0 / COM 02.1
Mains -> 123.0 Volts -> UPS -> 123.0 Volts -> PDU
Name: an-ups02
Status: ONLINE Temperature: 31.0 *C
Model: Smart-UPS 1500 Battery Voltage: 27.0 vAC
Serial #: AS1224213144 Battery Charge: 100.0 %
Holdup Time: 52.0 Minutes Current Load: 25.0 %
Self Test: OK Firmware: UPS 08.3 / MCU 14.0
Mains -> 123.0 Volts -> UPS -> 123.0 Volts -> PDU
==[ Source Details ]==================================================
Company: Alteeve's Niche!
Anvil!: an-anvil-05
Node: an-a05n02.alteeve.ca
Description:
- Cluster 05 (Demo Cluster - "Tyson")
If you have any questions or concerns, please don't hesitate to
contact support.
https://alteeve.ca/w/Support
Alteeve's Niche!
Cluster Monitor
======================================================================
--
You received this email because you were listed as a contact for the
Anvil! described in this email. If you do not wish to receive these
emails, please contact your systems administrator. AN!CM runs on
Anvil! nodes directly and are not sent by Alteeve's Niche!. |
Once you see these emails, you can close the monitoring programs by pressing "ctrl + c". When you do, the terminal will return and you will get another email from each node warning you that the alerting system has stopped.
| an-a05n01 | <ctrl> + <c>Process with PID 2480 Exiting on SIGINT.You should then get an email like this: Subject: [ AN!CM ] - Alteeve's Niche! - Cluster 05 (Demo Cluster - "Tyson") - an-a05n01 - Cluster Monitor ShutdownThe an-a05n01 cluster node's monitor program has stopped.
It received a SIGINT signal and shut down.
==[ Source Details ]==================================================
Company: Alteeve's Niche!
Anvil!: an-anvil-05
Node: an-a05n01.alteeve.ca
Description:
- Cluster 05 (Demo Cluster - "Tyson")
If you have any questions or concerns, please don't hesitate to
contact support.
https://alteeve.ca/w/Support
Alteeve's Niche!
Cluster Monitor
======================================================================
--
You received this email because you were listed as a contact for the
Anvil! described in this email. If you do not wish to receive these
emails, please contact your systems administrator. AN!CM runs on
Anvil! nodes directly and are not sent by Alteeve's Niche!. |
|---|---|
| an-a05n02 | <ctrl> + <c>Process with PID 1447 Exiting on SIGINT.You should then get an email like this: Subject: [ AN!CM ] - Alteeve's Niche! - Cluster 05 (Demo Cluster - "Tyson") - an-a05n02 - Cluster Monitor ShutdownThe an-a05n02 cluster node's monitor program has stopped.
It received a SIGINT signal and shut down.
==[ Source Details ]==================================================
Company: Alteeve's Niche!
Anvil!: an-anvil-05
Node: an-a05n02.alteeve.ca
Description:
- Cluster 05 (Demo Cluster - "Tyson")
If you have any questions or concerns, please don't hesitate to
contact support.
https://alteeve.ca/w/Support
Alteeve's Niche!
Cluster Monitor
======================================================================
--
You received this email because you were listed as a contact for the
Anvil! described in this email. If you do not wish to receive these
emails, please contact your systems administrator. AN!CM runs on
Anvil! nodes directly and are not sent by Alteeve's Niche!. |
Perfect!
If you want to see what AN!CM is doing, it writes its log files to /var/log/an-cm.log. There are many events that are logged which do not trigger emails. Sensors like thermometers, fan tachometers and various voltage and wattage sensors will constantly be shifting. These changes are recorded in this log file, should you ever wish to see how things change over time.
Lets take a quick look at what was written to each node's an-cm.log file.
| an-a05n01 | cat /var/log/an-cm.log======
Opening Striker - Cluster Dasboard log at 1386201452
1386201452 an-cm 5936; RAID 0's Physical Disk 1's "Drive Temperature" has changed; 41 *C -> 42 *C
1386201452 an-cm 6188; Host's "CPU1 Power" has change; ok, 17.60 Watts -> ok, 18.70 Watts.
1386201452 an-cm 6188; Host's "CPU2 Power" has change; ok, 19.80 Watts -> ok, 17.60 Watts.
1386201452 an-cm 6540; UPS an-ups01's line voltage has changed but it is within acceptable range. Currently: [121.0 vAC], minimum is: [103.0 vAC], maximum is: [130.0 vAC]
1386201452 an-cm 6608; UPS an-ups01's "TIMELEFT" has had a state changed; 52.0 Minutes -> 51.0 Minutes
1386201487 an-cm 5668; ** Relearn cycle active **: RAID 0's Battery Backup Unit's "Voltage" has changed; 4081 mV -> 4079 mV
1386201487 an-cm 5936; RAID 0's Physical Disk 1's "Drive Temperature" has changed; 42 *C -> 41 *C
1386201487 an-cm 6188; Host's "CPU2 Power" has change; ok, 17.60 Watts -> ok, 20.90 Watts.
1386201487 an-cm 6234; Host's "FAN1 PSU2" fan speed has change; ok, 6480 RPM -> ok, 6600 RPM.
1386201487 an-cm 6234; Host's "FAN2 SYS" fan speed has change; ok, 5280 RPM -> ok, 5340 RPM.
1386201487 an-cm 6234; Host's "FAN3 SYS" fan speed has change; ok, 4980 RPM -> ok, 5040 RPM.
1386201487 an-cm 6234; Host's "FAN5 SYS" fan speed has change; ok, 5220 RPM -> ok, 5280 RPM.
1386201487 an-cm 6599; UPS an-ups01's load has changed; 26.0 Percent Load Capacity -> 25.0 Percent Load Capacity
1386201487 an-cm 6608; UPS an-ups01's "TIMELEFT" has had a state changed; 51.0 Minutes -> 52.0 Minutes |
|---|---|
| an-a05n02 | cat /var/log/an-cm.log======
Opening Striker - Cluster Dasboard log at 1386201452
1386201452 an-cm 6188; Host's "CPU1 Power" has change; ok, 15.40 Watts -> ok, 14.30 Watts.
1386201452 an-cm 6188; Host's "CPU2 Power" has change; ok, 15.40 Watts -> ok, 11 Watts.
1386201452 an-cm 6234; Host's "FAN1 SYS" fan speed has change; ok, 4740 RPM -> ok, 4680 RPM.
1386201452 an-cm 6234; Host's "FAN2 PSU2" fan speed has change; ok, 6360 RPM -> ok, 6240 RPM.
1386201452 an-cm 6188; Host's "PSU2 Power" has change; ok, 120 Watts -> ok, 110 Watts.
1386201452 an-cm 6188; Host's "Total Power" has change; ok, 210 Watts -> ok, 200 Watts.
1386201452 an-cm 6540; UPS an-ups01's line voltage has changed but it is within acceptable range. Currently: [121.0 vAC], minimum is: [103.0 vAC], maximum is: [130.0 vAC]
1386201487 an-cm 5668; ** Relearn cycle active **: RAID 0's Battery Backup Unit's "Voltage" has changed; 4060 mV -> 4061 mV
1386201487 an-cm 6385; Host's "BATT 3.0V" voltage has change; ok, 3.14 Volts -> ok, 3.13 Volts.
1386201487 an-cm 6188; Host's "CPU1 Power" has change; ok, 14.30 Watts -> ok, 13.20 Watts.
1386201487 an-cm 6188; Host's "CPU2 Power" has change; ok, 11 Watts -> ok, 13.20 Watts.
1386201487 an-cm 6234; Host's "FAN2 PSU2" fan speed has change; ok, 6240 RPM -> ok, 6360 RPM.
1386201487 an-cm 6234; Host's "FAN5 SYS" fan speed has change; ok, 4860 RPM -> ok, 4920 RPM.
1386201487 an-cm 6385; Host's "IOH 1.8V" voltage has change; ok, 1.80 Volts -> ok, 1.79 Volts.
1386201487 an-cm 6599; UPS an-ups01's load has changed; 26.0 Percent Load Capacity -> 25.0 Percent Load Capacity
1386201487 an-cm 6608; UPS an-ups01's "TIMELEFT" has had a state changed; 51.0 Minutes -> 52.0 Minutes |
Shortly, we will look at what alerts that trigger emails look like. For now, we're ready to enable monitoring!
Enabling Monitoring
Now that we know that monitoring and emailing is working, it is time to enable it.
By design, the monitoring program is designed to exit should it run into any unexpected problems. Obviously, it is quite important that the alert system always run.
The way we ensure this is to use crontab to start /root/an-cm every five minutes. The first thing that an-cm does is check to see if it is already running. If so, it simply exits, so the alert system won't run more than once. Should it crash or be killed for some reason, however, this will ensure that the alert system is back up within five minutes.
So if you find that you suddenly get an email claiming that the monitoring software has started, be sure to check /var/log/an-cm.log for error messages.
Back to enabling monitoring;
We're going to also enable two log archival scripts; archive_an-cm.log.sh and archive_megasas.log.sh. These prevent the log files generated by an-cm directly and the MegaSAS.log file created by MegaCli64 from growing too big.
The /root/archive_megasas.log.sh will run once a day and archive_an-cm.log.sh archival scripts will run once per month. We already downloaded archive_an-cm.log.sh, but we still need to download /root/archive_megasas.log.sh. Both will create up to five archived log files, allowing you to review up to five days and five months, respectively. After that, the oldest log files are removed, effectively capping the amount of disk space these logs will use.
To prevent this log file from getting too big, Striker ships with a tool called archive_an-cm.log.sh. This is a very simple bash script that is designed to run once per month to archive and compress the log file.
| an-a05n01 | wget https://raw.github.com/digimer/an-cdb/master/tools/archive_an-cm.log.sh -O /root/archive_an-cm.log.sh--2013-11-28 20:42:19-- https://raw.github.com/digimer/an-cdb/master/tools/archive_an-cm.log.sh
Resolving raw.github.com... 199.27.74.133
Connecting to raw.github.com|199.27.74.133|:443... connected.
HTTP request sent, awaiting response... 200 OK
Length: 984 [text/plain]
Saving to: `/root/archive_an-cm.log.sh'
100%[====================================================================>] 984 --.-K/s in 0s
2013-11-28 20:42:19 (7.86 MB/s) - `/root/archive_an-cm.log.sh' saved [984/984]chmod 755 archive_an-cm.log.sh
ls -lah archive_an-cm.log.sh-rwxr-xr-x. 1 root root 984 Nov 28 20:42 archive_an-cm.log.sh |
|---|---|
| an-a05n02 | wget https://raw.github.com/digimer/an-cdb/master/tools/archive_an-cm.log.sh -O /root/archive_an-cm.log.sh--2013-11-28 20:47:53-- https://raw.github.com/digimer/an-cdb/master/tools/archive_an-cm.log.sh
Resolving raw.github.com... 199.27.74.133
Connecting to raw.github.com|199.27.74.133|:443... connected.
HTTP request sent, awaiting response... 200 OK
Length: 984 [text/plain]
Saving to: `/root/archive_an-cm.log.sh'
100%[====================================================================>] 984 --.-K/s in 0s
2013-11-28 20:47:54 (58.9 MB/s) - `/root/archive_an-cm.log.sh' saved [984/984]chmod 755 archive_an-cm.log.sh
ls -lah archive_an-cm.log.sh-rwxr-xr-x. 1 root root 984 Nov 28 20:47 archive_an-cm.log.sh |
Now we'll add it to the root user's cron table. We'll set it to run at midnight on the first of each month.
On both nodes;
| an-a05n01 | an-a05n02 |
|---|---|
crontab -eAdd the following 0 0 1 * * /root/archive_an-cm.log.sh > /dev/null |
crontab -eAdd the following 0 0 1 * * /root/archive_an-cm.log.sh > /dev/null |
Confirm the new cron table.
| an-a05n01 | crontab -l0 0 1 * * /root/archive_an-cm.log.sh > /dev/null |
|---|---|
| an-a05n02 | crontab -l0 0 1 * * /root/archive_an-cm.log.sh > /dev/null |
Done!
We're Done! or are We?
That's it, ladies and gentlemen. Our cluster is completed! In theory now, any failure in the cluster will result in no lost data and, at worst, no more than a minute or two of downtime.
"In theory" just isn't good enough in clustering though. Time to take "theory" and make it a tested, known fact.
Testing Server Recovery
You may have thought that we were done. Indeed, the Anvil! has been built, but we need to do a final round of testing. Thus far, we're tested network redundancy and we have tested our fencing devices.
The last round of testing will be to make sure our servers recover properly. We will test the following;
- Controlled migration and node withdrawal.
- Migrate all servers to one node, then withdraw and power off the other node.
- Restart the node and rejoin it to the cluster.
- Repeat for the other node.
- Controlled, out-of-cluster power-off of a server, ensure it is restarted
- Crashing nodes.
- Ensuring crashed node is fenced.
- Confirm all servers recover on the surviving node.
- Rejoining the recovered node and migrating servers back.
- Crashing the other node, ensuring its servers recover.
Controlled Migration and Node Withdrawal
These tests ensure that we will be able to safely pull a node out of service for upgrades, repairs, routine service and OS updates.
We will start with an-a05n01; We will live-migrate all servers over to an-a05n02, stop rgmanager and cman and then power off an-a05n01. We will then power an-a05n01 back up and rejoin it to the cluster. Once both DRBD resources are UpToDate again, we will live-migrate the servers back.
Once done, we will repeat the process in order to test taking an-a05n02 out, then restarting it and putting it back into production. If all goes well, both nodes will be powered off at one point or another and none of the servers should be interrupted.
Withdraw an-a05n01
As always, the first step is to check what state the cluster is in.
| an-a05n01 | clustatCluster Status for an-anvil-05 @ Wed Dec 4 21:08:02 2013
Member Status: Quorate
Member Name ID Status
------ ---- ---- ------
an-a05n01.alteeve.ca 1 Online, Local, rgmanager
an-a05n02.alteeve.ca 2 Online, rgmanager
Service Name Owner (Last) State
------- ---- ----- ------ -----
service:libvirtd_n01 an-a05n01.alteeve.ca started
service:libvirtd_n02 an-a05n02.alteeve.ca started
service:storage_n01 an-a05n01.alteeve.ca started
service:storage_n02 an-a05n02.alteeve.ca started
vm:vm01-win2008 an-a05n01.alteeve.ca started
vm:vm02-win2012 an-a05n02.alteeve.ca started
vm:vm03-win7 an-a05n01.alteeve.ca started
vm:vm04-win8 an-a05n01.alteeve.ca started
vm:vm05-freebsd9 an-a05n02.alteeve.ca started
vm:vm06-solaris11 an-a05n02.alteeve.ca started
vm:vm07-rhel6 an-a05n01.alteeve.ca started
vm:vm08-sles11 an-a05n01.alteeve.ca started |
|---|
| Warning: Remember; It is not uncommon for live migrations to take several minutes to complete. The hypervisor will slow the migration process if it thinks that is needed to avoid negatively affecting performance inside the server. Please be patient! |
| Note: It's a good idea to be running watch clustat on an-a05n02 from this point forward. It will allow you to monitor the changes as they happen. |
Before we can withdraw an-a05n01, we'll need to live-migrate vm01-win2008, vm03-win7, vm04-win8, vm07-rhel6 and vm08-sles11 over to an-a05n02.
| an-a05n01 | clusvcadm -M vm:vm01-win2008 -m an-a05n02.alteeve.caTrying to migrate vm:vm01-win2008 to an-a05n02.alteeve.ca...Success |
|---|
What is this? An alert!
You should have just gotten two alerts, one from each node, telling you that vm01-win2008 has moved. Lets take a look;
| an-a05n01 | Subject: [ AN!CM ] - Alteeve's Niche! - Cluster 05 (Demo Cluster - "Tyson") - an-a05n01 - State Change!Changes have been detected in the cluster. If you anticipated this
change then there is no reason for concern. If this change was
unexpected, please feel free to contact support.
----------------------------------------------------------------------
VM vm01-win2008; State change!
started -> started
an-a05n01.alteeve.ca -> an-a05n02.alteeve.ca
==[ Source Details ]==================================================
Company: Alteeve's Niche!
Anvil!: an-anvil-05
Node: an-a05n01.alteeve.ca
Description:
- Cluster 05 (Demo Cluster - "Tyson")
If you have any questions or concerns, please don't hesitate to
contact support.
https://alteeve.ca/w/Support
Alteeve's Niche!
Cluster Monitor
======================================================================
--
You received this email because you were listed as a contact for the
Anvil! described in this email. If you do not wish to receive these
emails, please contact your systems administrator. AN!CM runs on
Anvil! nodes directly and are not sent by Alteeve's Niche!. |
|---|---|
| an-a05n02 | Subject: [ AN!CM ] - Alteeve's Niche! - Cluster 05 (Demo Cluster - "Tyson") - an-a05n02 - State Change!Changes have been detected in the cluster. If you anticipated this
change then there is no reason for concern. If this change was
unexpected, please feel free to contact support.
----------------------------------------------------------------------
VM vm01-win2008; State change!
started -> started
an-a05n01.alteeve.ca -> an-a05n02.alteeve.ca
==[ Source Details ]==================================================
Company: Alteeve's Niche!
Anvil!: an-anvil-05
Node: an-a05n02.alteeve.ca
Description:
- Cluster 05 (Demo Cluster - "Tyson")
If you have any questions or concerns, please don't hesitate to
contact support.
https://alteeve.ca/w/Support
Alteeve's Niche!
Cluster Monitor
======================================================================
--
You received this email because you were listed as a contact for the
Anvil! described in this email. If you do not wish to receive these
emails, please contact your systems administrator. AN!CM runs on
Anvil! nodes directly and are not sent by Alteeve's Niche!. |
Unlike the long and detailed message from the initial startup, these "state change" emails are much shorter and to the point. It tells you only what has changed, so that you can quickly tell exactly what happened. In this case, we expected this change so there is no need for concern.
Let's migrate the other servers. You will see another pair of alerts like this after each migration.
| an-a05n01 | clusvcadm -M vm:vm03-win7 -m an-a05n02.alteeve.caTrying to migrate vm:vm03-win7 to an-a05n02.alteeve.ca...Successclusvcadm -M vm:vm04-win8 -m an-a05n02.alteeve.caTrying to migrate vm:vm04-win8 to an-a05n02.alteeve.ca...Successclusvcadm -M vm:vm07-rhel6 -m an-a05n02.alteeve.caTrying to migrate vm:vm07-rhel6 to an-a05n02.alteeve.ca...Successclusvcadm -M vm:vm08-sles11 -m an-a05n02.alteeve.caTrying to migrate vm:vm08-sles11 to an-a05n02.alteeve.ca...Success |
|---|
That should be all of them. Verify with clustat.
| an-a05n01 | clustatCluster Status for an-anvil-05 @ Wed Dec 4 21:53:54 2013
Member Status: Quorate
Member Name ID Status
------ ---- ---- ------
an-a05n01.alteeve.ca 1 Online, Local, rgmanager
an-a05n02.alteeve.ca 2 Online, rgmanager
Service Name Owner (Last) State
------- ---- ----- ------ -----
service:libvirtd_n01 an-a05n01.alteeve.ca started
service:libvirtd_n02 an-a05n02.alteeve.ca started
service:storage_n01 an-a05n01.alteeve.ca started
service:storage_n02 an-a05n02.alteeve.ca started
vm:vm01-win2008 an-a05n02.alteeve.ca started
vm:vm02-win2012 an-a05n02.alteeve.ca started
vm:vm03-win7 an-a05n02.alteeve.ca started
vm:vm04-win8 an-a05n02.alteeve.ca started
vm:vm05-freebsd9 an-a05n02.alteeve.ca started
vm:vm06-solaris11 an-a05n02.alteeve.ca started
vm:vm07-rhel6 an-a05n02.alteeve.ca started
vm:vm08-sles11 an-a05n02.alteeve.ca started |
|---|
Good. Now we will stop rgmanager and cman. We'll verify that the node is gone by calling clustat from both nodes.
| an-a05n01 | /etc/init.d/rgmanager stopStopping Cluster Service Manager: [ OK ]/etc/init.d/cman stopStopping cluster:
Leaving fence domain... [ OK ]
Stopping gfs_controld... [ OK ]
Stopping dlm_controld... [ OK ]
Stopping fenced... [ OK ]
Stopping cman... [ OK ]
Waiting for corosync to shutdown: [ OK ]
Unloading kernel modules... [ OK ]
Unmounting configfs... [ OK ]clustatCould not connect to CMAN: No such file or directory |
|---|---|
| an-a05n02 | clustatCluster Status for an-anvil-05 @ Wed Dec 4 21:56:23 2013
Member Status: Quorate
Member Name ID Status
------ ---- ---- ------
an-a05n01.alteeve.ca 1 Offline
an-a05n02.alteeve.ca 2 Online, Local, rgmanager
Service Name Owner (Last) State
------- ---- ----- ------ -----
service:libvirtd_n01 (an-a05n01.alteeve.ca) stopped
service:libvirtd_n02 an-a05n02.alteeve.ca started
service:storage_n01 (an-a05n01.alteeve.ca) stopped
service:storage_n02 an-a05n02.alteeve.ca started
vm:vm01-win2008 an-a05n02.alteeve.ca started
vm:vm02-win2012 an-a05n02.alteeve.ca started
vm:vm03-win7 an-a05n02.alteeve.ca started
vm:vm04-win8 an-a05n02.alteeve.ca started
vm:vm05-freebsd9 an-a05n02.alteeve.ca started
vm:vm06-solaris11 an-a05n02.alteeve.ca started
vm:vm07-rhel6 an-a05n02.alteeve.ca started
vm:vm08-sles11 an-a05n02.alteeve.ca started |
Done!
We can now update an-a05n01's OS or power it off for physical maintenance, repairs or upgrades!
We will power it off now to simulate hardware maintenance.
| an-a05n01 | poweroffBroadcast message from root@an-a05n01.alteeve.ca
(/dev/pts/0) at 21:57 ...
The system is going down for power off NOW! |
|---|
Load Testing in a Degraded State
At this point, an-a05n01 is powered off.
This is a great time to load test your servers!
This is an effective simulation of a degraded state. Should you lose a node, you will be forced to run on a single node until repairs can be made. You need to be sure that performance on a single node is good enough to maintain full production during this time.
How you load test your servers will be entirely dependent on what they are and what they do. So there is not much we can do in the scope of this tutorial. Once your load tests are done, proceed to the next section.
Rejoin an-a05n01
So you're load tests are done. Now you're ready to bring an-a05n01 back online and rejoin it to the cluster.
We will use the fence_ipmilan fence agent to first verify that an-a05n01 is truly off, then we will use it to turn it on. We could certainly use ipmitool directly, of course, but it is an excellent opportunity to practice with fence_ipmilan.
| an-a05n02 | fence_ipmilan -a an-a05n01.ipmi -l admin -p secret -o statusGetting status of IPMI:an-a05n01.ipmi...Chassis power = Off
Done |
|---|
State confirmed. Let's power it up!
| an-a05n02 | fence_ipmilan -a an-a05n01.ipmi -l admin -p secret -o onPowering on machine @ IPMI:an-a05n01.ipmi...Done |
|---|
Most hardware servers take several minutes to boot, so this is a great time to go make a tea or coffee. Once it's booted, within five minutes, you should get an alert email telling you that an-a05n01 is up and running. This is an excellent way to know when your break is over.
Once the node is up, log back into and start cman and rgmanager. Watch /etc/init.d/drbd status and wait until both resource are back to UpToDate. Do not proceed until this is the case.
| an-a05n01 | /etc/init.d/cman startStarting cluster:
Checking if cluster has been disabled at boot... [ OK ]
Checking Network Manager... [ OK ]
Global setup... [ OK ]
Loading kernel modules... [ OK ]
Mounting configfs... [ OK ]
Starting cman... [ OK ]
Waiting for quorum... [ OK ]
Starting fenced... [ OK ]
Starting dlm_controld... [ OK ]
Tuning DLM kernel config... [ OK ]
Starting gfs_controld... [ OK ]
Unfencing self... [ OK ]
Joining fence domain... [ OK ]/etc/init.d/rgmanager startStarting Cluster Service Manager: [ OK ]/etc/init.d/drbd statusdrbd driver loaded OK; device status:
version: 8.3.16 (api:88/proto:86-97)
GIT-hash: a798fa7e274428a357657fb52f0ecf40192c1985 build by phil@Build64R6, 2013-09-27 16:00:43
m:res cs ro ds p mounted fstype
0:r0 Connected Primary/Primary UpToDate/UpToDate C
1:r1 Connected Primary/Primary UpToDate/UpToDate C |
|---|---|
| an-a05n02 | clustatCluster Status for an-anvil-05 @ Wed Dec 4 22:24:58 2013
Member Status: Quorate
Member Name ID Status
------ ---- ---- ------
an-a05n01.alteeve.ca 1 Online, rgmanager
an-a05n02.alteeve.ca 2 Online, Local, rgmanager
Service Name Owner (Last) State
------- ---- ----- ------ -----
service:libvirtd_n01 an-a05n01.alteeve.ca started
service:libvirtd_n02 an-a05n02.alteeve.ca started
service:storage_n01 an-a05n01.alteeve.ca started
service:storage_n02 an-a05n02.alteeve.ca started
vm:vm01-win2008 an-a05n02.alteeve.ca started
vm:vm02-win2012 an-a05n02.alteeve.ca started
vm:vm03-win7 an-a05n02.alteeve.ca started
vm:vm04-win8 an-a05n02.alteeve.ca started
vm:vm05-freebsd9 an-a05n02.alteeve.ca started
vm:vm06-solaris11 an-a05n02.alteeve.ca started
vm:vm07-rhel6 an-a05n02.alteeve.ca started
vm:vm08-sles11 an-a05n02.alteeve.ca started |
Ready to migrate the servers back!
| an-a05n01 | clusvcadm -M vm:vm01-win2008 -m an-a05n01.alteeve.caTrying to migrate vm:vm01-win2008 to an-a05n01.alteeve.ca...Successclusvcadm -M vm:vm03-win7 -m an-a05n01.alteeve.caTrying to migrate vm:vm03-win7 to an-a05n01.alteeve.ca...Successclusvcadm -M vm:vm04-win8 -m an-a05n01.alteeve.caTrying to migrate vm:vm04-win8 to an-a05n01.alteeve.ca...Successclusvcadm -M vm:vm07-rhel6 -m an-a05n01.alteeve.caTrying to migrate vm:vm07-rhel6 to an-a05n01.alteeve.ca...Successclusvcadm -M vm:vm08-sles11 -m an-a05n01.alteeve.caTrying to migrate vm:vm08-sles11 to an-a05n01.alteeve.ca...SuccessclustatCluster Status for an-anvil-05 @ Wed Dec 4 22:31:15 2013
Member Status: Quorate
Member Name ID Status
------ ---- ---- ------
an-a05n01.alteeve.ca 1 Online, Local, rgmanager
an-a05n02.alteeve.ca 2 Online, rgmanager
Service Name Owner (Last) State
------- ---- ----- ------ -----
service:libvirtd_n01 an-a05n01.alteeve.ca started
service:libvirtd_n02 an-a05n02.alteeve.ca started
service:storage_n01 an-a05n01.alteeve.ca started
service:storage_n02 an-a05n02.alteeve.ca started
vm:vm01-win2008 an-a05n01.alteeve.ca started
vm:vm02-win2012 an-a05n02.alteeve.ca started
vm:vm03-win7 an-a05n01.alteeve.ca started
vm:vm04-win8 an-a05n01.alteeve.ca started
vm:vm05-freebsd9 an-a05n02.alteeve.ca started
vm:vm06-solaris11 an-a05n02.alteeve.ca started
vm:vm07-rhel6 an-a05n01.alteeve.ca started
vm:vm08-sles11 an-a05n01.alteeve.ca started |
|---|---|
| an-a05n02 | clustatCluster Status for an-anvil-05 @ Wed Dec 4 22:31:22 2013
Member Status: Quorate
Member Name ID Status
------ ---- ---- ------
an-a05n01.alteeve.ca 1 Online, rgmanager
an-a05n02.alteeve.ca 2 Online, Local, rgmanager
Service Name Owner (Last) State
------- ---- ----- ------ -----
service:libvirtd_n01 an-a05n01.alteeve.ca started
service:libvirtd_n02 an-a05n02.alteeve.ca started
service:storage_n01 an-a05n01.alteeve.ca started
service:storage_n02 an-a05n02.alteeve.ca started
vm:vm01-win2008 an-a05n01.alteeve.ca started
vm:vm02-win2012 an-a05n02.alteeve.ca started
vm:vm03-win7 an-a05n01.alteeve.ca started
vm:vm04-win8 an-a05n01.alteeve.ca started
vm:vm05-freebsd9 an-a05n02.alteeve.ca started
vm:vm06-solaris11 an-a05n02.alteeve.ca started
vm:vm07-rhel6 an-a05n01.alteeve.ca started
vm:vm08-sles11 an-a05n01.alteeve.ca started |
All done!
The Anvil! is once again fully redundant and our servers are back on their preferred hosts.
Withdraw an-a05n02
Next up; Withdrawing an-a05n02. As always, we will check the state of things.
| an-a05n01 | clustatCluster Status for an-anvil-05 @ Wed Dec 4 22:34:23 2013
Member Status: Quorate
Member Name ID Status
------ ---- ---- ------
an-a05n01.alteeve.ca 1 Online, Local, rgmanager
an-a05n02.alteeve.ca 2 Online, rgmanager
Service Name Owner (Last) State
------- ---- ----- ------ -----
service:libvirtd_n01 an-a05n01.alteeve.ca started
service:libvirtd_n02 an-a05n02.alteeve.ca started
service:storage_n01 an-a05n01.alteeve.ca started
service:storage_n02 an-a05n02.alteeve.ca started
vm:vm01-win2008 an-a05n01.alteeve.ca started
vm:vm02-win2012 an-a05n02.alteeve.ca started
vm:vm03-win7 an-a05n01.alteeve.ca started
vm:vm04-win8 an-a05n01.alteeve.ca started
vm:vm05-freebsd9 an-a05n02.alteeve.ca started
vm:vm06-solaris11 an-a05n02.alteeve.ca started
vm:vm07-rhel6 an-a05n01.alteeve.ca started
vm:vm08-sles11 an-a05n01.alteeve.ca started |
|---|
This time, we will live-migrate vm02-win2012, vm05-freebsd9 and vm06-solaris11 over to an-a05n01.
| an-a05n01 | clusvcadm -M vm:vm02-win2012 -m an-a05n01.alteeve.caTrying to migrate vm:vm02-win2012 to an-a05n01.alteeve.ca...Successclusvcadm -M vm:vm05-freebsd9 -m an-a05n01.alteeve.caTrying to migrate vm:vm05-freebsd9 to an-a05n01.alteeve.ca...Successclusvcadm -M vm:vm06-solaris11 -m an-a05n01.alteeve.caTrying to migrate vm:vm06-solaris11 to an-a05n01.alteeve.ca...SuccessclustatCluster Status for an-anvil-05 @ Wed Dec 4 22:37:19 2013
Member Status: Quorate
Member Name ID Status
------ ---- ---- ------
an-a05n01.alteeve.ca 1 Online, Local, rgmanager
an-a05n02.alteeve.ca 2 Online, rgmanager
Service Name Owner (Last) State
------- ---- ----- ------ -----
service:libvirtd_n01 an-a05n01.alteeve.ca started
service:libvirtd_n02 an-a05n02.alteeve.ca started
service:storage_n01 an-a05n01.alteeve.ca started
service:storage_n02 an-a05n02.alteeve.ca started
vm:vm01-win2008 an-a05n01.alteeve.ca started
vm:vm02-win2012 an-a05n01.alteeve.ca started
vm:vm03-win7 an-a05n01.alteeve.ca started
vm:vm04-win8 an-a05n01.alteeve.ca started
vm:vm05-freebsd9 an-a05n01.alteeve.ca started
vm:vm06-solaris11 an-a05n01.alteeve.ca started
vm:vm07-rhel6 an-a05n01.alteeve.ca started
vm:vm08-sles11 an-a05n01.alteeve.ca started |
|---|---|
| an-a05n02 | clustatCluster Status for an-anvil-05 @ Wed Dec 4 22:37:57 2013
Member Status: Quorate
Member Name ID Status
------ ---- ---- ------
an-a05n01.alteeve.ca 1 Online, rgmanager
an-a05n02.alteeve.ca 2 Online, Local, rgmanager
Service Name Owner (Last) State
------- ---- ----- ------ -----
service:libvirtd_n01 an-a05n01.alteeve.ca started
service:libvirtd_n02 an-a05n02.alteeve.ca started
service:storage_n01 an-a05n01.alteeve.ca started
service:storage_n02 an-a05n02.alteeve.ca started
vm:vm01-win2008 an-a05n01.alteeve.ca started
vm:vm02-win2012 an-a05n01.alteeve.ca started
vm:vm03-win7 an-a05n01.alteeve.ca started
vm:vm04-win8 an-a05n01.alteeve.ca started
vm:vm05-freebsd9 an-a05n01.alteeve.ca started
vm:vm06-solaris11 an-a05n01.alteeve.ca started
vm:vm07-rhel6 an-a05n01.alteeve.ca started
vm:vm08-sles11 an-a05n01.alteeve.ca started |
All servers are off, so now we'll stop rgmanager and cman.
| an-a05n02 | /etc/init.d/rgmanager stopStopping Cluster Service Manager: [ OK ]/etc/init.d/cman stopStopping cluster:
Leaving fence domain... [ OK ]
Stopping gfs_controld... [ OK ]
Stopping dlm_controld... [ OK ]
Stopping fenced... [ OK ]
Stopping cman... [ OK ]
Waiting for corosync to shutdown: [ OK ]
Unloading kernel modules... [ OK ]
Unmounting configfs... [ OK ]clustatCould not connect to CMAN: No such file or directory |
|---|
Verify that an-a05n01 shows an-a05n02 as offline now.
| an-a05n02 | clustatCluster Status for an-anvil-05 @ Wed Dec 4 22:41:52 2013
Member Status: Quorate
Member Name ID Status
------ ---- ---- ------
an-a05n01.alteeve.ca 1 Online, Local, rgmanager
an-a05n02.alteeve.ca 2 Offline
Service Name Owner (Last) State
------- ---- ----- ------ -----
service:libvirtd_n01 an-a05n01.alteeve.ca started
service:libvirtd_n02 (an-a05n02.alteeve.ca) stopped
service:storage_n01 an-a05n01.alteeve.ca started
service:storage_n02 (an-a05n02.alteeve.ca) stopped
vm:vm01-win2008 an-a05n01.alteeve.ca started
vm:vm02-win2012 an-a05n01.alteeve.ca started
vm:vm03-win7 an-a05n01.alteeve.ca started
vm:vm04-win8 an-a05n01.alteeve.ca started
vm:vm05-freebsd9 an-a05n01.alteeve.ca started
vm:vm06-solaris11 an-a05n01.alteeve.ca started
vm:vm07-rhel6 an-a05n01.alteeve.ca started
vm:vm08-sles11 an-a05n01.alteeve.ca started |
|---|
As before, we can now do an OS update or power off the node.
We did our single-node load testing already, so this time we will simply reboot an-a05n02 to simulate a (very quick) hardware service.
| an-a05n02 | rebootBroadcast message from root@an-a05n02.alteeve.ca
(/dev/pts/0) at 22:43 ...
The system is going down for reboot NOW! |
|---|
Rejoin an-a05n02
As before, we'll verify the current state of things on an-a05n01, log into an-a05n02 and start cman and rgmanager. Then we'll watch /etc/init.d/drbd status and wait until both resources are UpToDate.
| an-a05n01 | clustatCluster Status for an-anvil-05 @ Wed Dec 4 22:47:30 2013
Member Status: Quorate
Member Name ID Status
------ ---- ---- ------
an-a05n01.alteeve.ca 1 Online, Local, rgmanager
an-a05n02.alteeve.ca 2 Offline
Service Name Owner (Last) State
------- ---- ----- ------ -----
service:libvirtd_n01 an-a05n01.alteeve.ca started
service:libvirtd_n02 (an-a05n02.alteeve.ca) stopped
service:storage_n01 an-a05n01.alteeve.ca started
service:storage_n02 (an-a05n02.alteeve.ca) stopped
vm:vm01-win2008 an-a05n01.alteeve.ca started
vm:vm02-win2012 an-a05n01.alteeve.ca started
vm:vm03-win7 an-a05n01.alteeve.ca started
vm:vm04-win8 an-a05n01.alteeve.ca started
vm:vm05-freebsd9 an-a05n01.alteeve.ca started
vm:vm06-solaris11 an-a05n01.alteeve.ca started
vm:vm07-rhel6 an-a05n01.alteeve.ca started
vm:vm08-sles11 an-a05n01.alteeve.ca started |
|---|---|
| an-a05n02 | /etc/init.d/cman startStarting cluster:
Checking if cluster has been disabled at boot... [ OK ]
Checking Network Manager... [ OK ]
Global setup... [ OK ]
Loading kernel modules... [ OK ]
Mounting configfs... [ OK ]
Starting cman... [ OK ]
Waiting for quorum... [ OK ]
Starting fenced... [ OK ]
Starting dlm_controld... [ OK ]
Tuning DLM kernel config... [ OK ]
Starting gfs_controld... [ OK ]
Unfencing self... [ OK ]
Joining fence domain... [ OK ]/etc/init.d/rgmanager startStarting Cluster Service Manager: [ OK ]/etc/init.d/drbd statusdrbd driver loaded OK; device status:
version: 8.3.16 (api:88/proto:86-97)
GIT-hash: a798fa7e274428a357657fb52f0ecf40192c1985 build by phil@Build64R6, 2013-09-27 16:00:43
m:res cs ro ds p mounted fstype
0:r0 Connected Primary/Primary UpToDate/UpToDate C
1:r1 Connected Primary/Primary UpToDate/UpToDate CclustatCluster Status for an-anvil-05 @ Wed Dec 4 22:50:36 2013
Member Status: Quorate
Member Name ID Status
------ ---- ---- ------
an-a05n01.alteeve.ca 1 Online, rgmanager
an-a05n02.alteeve.ca 2 Online, Local, rgmanager
Service Name Owner (Last) State
------- ---- ----- ------ -----
service:libvirtd_n01 an-a05n01.alteeve.ca started
service:libvirtd_n02 an-a05n02.alteeve.ca started
service:storage_n01 an-a05n01.alteeve.ca started
service:storage_n02 an-a05n02.alteeve.ca started
vm:vm01-win2008 an-a05n01.alteeve.ca started
vm:vm02-win2012 an-a05n01.alteeve.ca started
vm:vm03-win7 an-a05n01.alteeve.ca started
vm:vm04-win8 an-a05n01.alteeve.ca started
vm:vm05-freebsd9 an-a05n01.alteeve.ca started
vm:vm06-solaris11 an-a05n01.alteeve.ca started
vm:vm07-rhel6 an-a05n01.alteeve.ca started
vm:vm08-sles11 an-a05n01.alteeve.ca started |
Last step; Migrate the servers back.
| an-a05n01 | clusvcadm -M vm:vm02-win2012 -m an-a05n02.alteeve.caTrying to migrate vm:vm02-win2012 to an-a05n02.alteeve.ca...Successclusvcadm -M vm:vm05-freebsd9 -m an-a05n02.alteeve.caTrying to migrate vm:vm05-freebsd9 to an-a05n02.alteeve.ca...Successclusvcadm -M vm:vm06-solaris11 -m an-a05n02.alteeve.caTrying to migrate vm:vm06-solaris11 to an-a05n02.alteeve.ca...SuccessclustatCluster Status for an-anvil-05 @ Wed Dec 4 22:55:39 2013
Member Status: Quorate
Member Name ID Status
------ ---- ---- ------
an-a05n01.alteeve.ca 1 Online, Local, rgmanager
an-a05n02.alteeve.ca 2 Online, rgmanager
Service Name Owner (Last) State
------- ---- ----- ------ -----
service:libvirtd_n01 an-a05n01.alteeve.ca started
service:libvirtd_n02 an-a05n02.alteeve.ca started
service:storage_n01 an-a05n01.alteeve.ca started
service:storage_n02 an-a05n02.alteeve.ca started
vm:vm01-win2008 an-a05n01.alteeve.ca started
vm:vm02-win2012 an-a05n02.alteeve.ca started
vm:vm03-win7 an-a05n01.alteeve.ca started
vm:vm04-win8 an-a05n01.alteeve.ca started
vm:vm05-freebsd9 an-a05n02.alteeve.ca started
vm:vm06-solaris11 an-a05n02.alteeve.ca started
vm:vm07-rhel6 an-a05n01.alteeve.ca started
vm:vm08-sles11 an-a05n01.alteeve.ca started |
|---|---|
| an-a05n02 | clustatCluster Status for an-anvil-05 @ Wed Dec 4 22:55:42 2013
Member Status: Quorate
Member Name ID Status
------ ---- ---- ------
an-a05n01.alteeve.ca 1 Online, rgmanager
an-a05n02.alteeve.ca 2 Online, Local, rgmanager
Service Name Owner (Last) State
------- ---- ----- ------ -----
service:libvirtd_n01 an-a05n01.alteeve.ca started
service:libvirtd_n02 an-a05n02.alteeve.ca started
service:storage_n01 an-a05n01.alteeve.ca started
service:storage_n02 an-a05n02.alteeve.ca started
vm:vm01-win2008 an-a05n01.alteeve.ca started
vm:vm02-win2012 an-a05n02.alteeve.ca started
vm:vm03-win7 an-a05n01.alteeve.ca started
vm:vm04-win8 an-a05n01.alteeve.ca started
vm:vm05-freebsd9 an-a05n02.alteeve.ca started
vm:vm06-solaris11 an-a05n02.alteeve.ca started
vm:vm07-rhel6 an-a05n01.alteeve.ca started
vm:vm08-sles11 an-a05n01.alteeve.ca started |
Once again, we're back into a fully redundant state and our servers are running on their preferred nodes!
Out-of-Cluster Server Power-off
If a server shuts off, for any reason, the cluster will treat it as a failed service and it will recover it by turning it back on.
There is a catch though...
For privacy reasons, there is no way to look inside a server to determine if it has failed. So detecting a failure is restricted to simply seeing it not do anything any more. Some operating systems, like most or all Microsoft operating systems, go into an infinite loop when they blue screen. To the cluster, it simply looks like the server is really really busy, so it is not treated as failed.
So please make sure, if at all possible, to set your servers to reboot on crash. Most modern operating systems do this already, but consult your server operating system's documentation to verify.
For this test, all we will do is log into a server and turn it off the way you would if it was a bare-iron server. If things work properly, the server should see it as failed and turn it back on within a few seconds.
For this test, we will log into vm03-win7, click on the "Start" icon and then click on Shut down. We will watch the system logs on an-a05n01 as that is the node hosting the server.
| an-a05n01 | clear; tail -f -n 0 /var/log/messagesDec 5 02:10:16 an-a05n01 kernel: ifn_bridge1: port 3(vnet1) entering disabled state
Dec 5 02:10:16 an-a05n01 kernel: device vnet1 left promiscuous mode
Dec 5 02:10:16 an-a05n01 kernel: ifn_bridge1: port 3(vnet1) entering disabled state
Dec 5 02:10:17 an-a05n01 ntpd[2100]: Deleting interface #19 vnet1, fe80::fc54:ff:fe68:9bfd#123, interface stats: received=0, sent=0, dropped=0, active_time=99 secs
Dec 5 02:10:17 an-a05n01 ntpd[2100]: peers refreshed
Dec 5 02:10:23 an-a05n01 rgmanager[2770]: status on vm "vm03-win7" returned 1 (generic error)
Dec 5 02:10:24 an-a05n01 rgmanager[2770]: Stopping service vm:vm03-win7
Dec 5 02:10:24 an-a05n01 rgmanager[2770]: Service vm:vm03-win7 is recovering
Dec 5 02:10:24 an-a05n01 rgmanager[2770]: Recovering failed service vm:vm03-win7
Dec 5 02:10:24 an-a05n01 kernel: device vnet1 entered promiscuous mode
Dec 5 02:10:24 an-a05n01 kernel: ifn_bridge1: port 3(vnet1) entering forwarding state
Dec 5 02:10:25 an-a05n01 rgmanager[2770]: Service vm:vm03-win7 started
Dec 5 02:10:28 an-a05n01 ntpd[2100]: Listen normally on 20 vnet1 fe80::fc54:ff:fe68:9bfd UDP 123
Dec 5 02:10:28 an-a05n01 ntpd[2100]: peers refreshed
Dec 5 02:10:39 an-a05n01 kernel: ifn_bridge1: port 3(vnet1) entering forwarding state |
|---|
Above we see the hypervisor report that the server shut down at 02:10:17. The message "Deleting interface #19 vnet1..." is the virtual network cable vnet1 being deleted because the server it was "plugged into" was no longer running.
Six seconds later, at 02:10:23, rgmanager realized that the server had failed. If you had been watching clustat, you would have seen the vm:vm03-win7 server enter the failed state. Moments later, rgmanager began recovering the server by first disabling it, then starting it back up.
Two seconds after that, eight seconds after the unexpected shut down, vm03-win7 was recovered and running again. Three seconds later, a new vnet1 was created, reconnecting the server to the network. A this point, recovery is complete!
Probably the easiest test so far. Of course, you will want to repeat this test for all of your servers.
Crashing Nodes; The Ultimate Test
Finally, we've reaches the ultimate test.
Most people first look at high-availability to protect against crashed bare-iron servers. As we've seen, there are many other single-points of failure that we had to address and which we've already tested.
In this test, we're going to have all services and servers running.
We will first crash an-a05n01 by sending a "c" character to the "magic SysRq Key, as we did when we first tested our fencing configuration. This will cause an-a05n01 to instantly kernel panic, crashing the node and halting all the servers running on it. This will simulate the harshest software crash possible on a node.
Once we've recovered from that, we will crash an-a05n02 by cutting the power to it. This will simulate a total destruction of a node. As we saw in our early fence testing, this will cause the IPMI BMC under an-a05n02 to also fail, forcing the surviving node to fall back to the PDU based backup fence method.
These tests will also ensure that your Anvil! does not suffer from a boot storm when all of the servers from either node reboot at the same time during recovery. This is a very, very important aspect of this test. Should the servers start, but fail to finish booting and become unresponsive, it is likely that your storage was not fast enough to handle the sudden high read load placed on them during recovery. As bad as this is, it is much better to find out now, before going into production.
Crashing an-a05n01
| Note: Virtual Machine Manager will appear to hang when an-a05n01 until the connection is determined to have failed. To watch the recovery of the servers on an-a05n02 in real time, please disconnect from an-a05n01 first. |
Once we crash an-a05n01, we should see the following sequence of events:
- Both cman and drbd on an-a05n02 will declare an-a05n01 lost and will fence it.
- An alert from an-a05n02 will arrive indicating the loss of an-a05n01.
- All servers that had been running on an-a05n01 will boot on an-a05n02.
- Additional alerts will arrive as the servers are recovered.
- Within five or ten minutes, we will get an alert from an-a05n01 saying that the alert system has started, indicating the node is back.
Before we do this, lets see what is on an-a05n01 right now.
| an-a05n01 | clustatCluster Status for an-anvil-05 @ Thu Dec 5 11:55:23 2013
Member Status: Quorate
Member Name ID Status
------ ---- ---- ------
an-a05n01.alteeve.ca 1 Online, Local, rgmanager
an-a05n02.alteeve.ca 2 Online, rgmanager
Service Name Owner (Last) State
------- ---- ----- ------ -----
service:libvirtd_n01 an-a05n01.alteeve.ca started
service:libvirtd_n02 an-a05n02.alteeve.ca started
service:storage_n01 an-a05n01.alteeve.ca started
service:storage_n02 an-a05n02.alteeve.ca started
vm:vm01-win2008 an-a05n01.alteeve.ca started
vm:vm02-win2012 an-a05n02.alteeve.ca started
vm:vm03-win7 an-a05n01.alteeve.ca started
vm:vm04-win8 an-a05n01.alteeve.ca started
vm:vm05-freebsd9 an-a05n02.alteeve.ca started
vm:vm06-solaris11 an-a05n02.alteeve.ca started
vm:vm07-rhel6 an-a05n01.alteeve.ca started
vm:vm08-sles11 an-a05n01.alteeve.ca started |
|---|
So this test is going to crash vm01-win2008, vm03-win7, vm04-win8, m07-rhel6 and vm08-sles11. This is the majority of our servers, so this recovery will tell us if we're going to have a boot storm or not. If all of them boot without trouble, we will know that our storage is likely fast enough.
Be sure to log into an-a05n02 and tail the system logs before proceeding.
Ok, let's do this!
| an-a05n01 | echo c > /proc/sysrq-trigger<nothing returned, it's dead> |
|---|---|
| an-a05n02 | tail -f -n 0 /var/log/messagesDec 5 12:01:27 an-a05n02 kernel: block drbd1: PingAck did not arrive in time.
Dec 5 12:01:27 an-a05n02 kernel: block drbd1: peer( Primary -> Unknown ) conn( Connected -> NetworkFailure ) pdsk( UpToDate -> DUnknown ) susp( 0 -> 1 )
Dec 5 12:01:27 an-a05n02 kernel: block drbd1: asender terminated
Dec 5 12:01:27 an-a05n02 kernel: block drbd1: Terminating drbd1_asender
Dec 5 12:01:27 an-a05n02 kernel: block drbd1: Connection closed
Dec 5 12:01:27 an-a05n02 kernel: block drbd1: conn( NetworkFailure -> Unconnected )
Dec 5 12:01:27 an-a05n02 kernel: block drbd1: receiver terminated
Dec 5 12:01:27 an-a05n02 kernel: block drbd1: helper command: /sbin/drbdadm fence-peer minor-1
Dec 5 12:01:27 an-a05n02 kernel: block drbd1: Restarting drbd1_receiver
Dec 5 12:01:27 an-a05n02 kernel: block drbd1: receiver (re)started
Dec 5 12:01:27 an-a05n02 kernel: block drbd1: conn( Unconnected -> WFConnection )
Dec 5 12:01:27 an-a05n02 rhcs_fence: Attempting to fence peer using RHCS from DRBD...
Dec 5 12:01:32 an-a05n02 corosync[2546]: [TOTEM ] A processor failed, forming new configuration.
Dec 5 12:01:32 an-a05n02 kernel: block drbd0: PingAck did not arrive in time.
Dec 5 12:01:32 an-a05n02 kernel: block drbd0: peer( Primary -> Unknown ) conn( Connected -> NetworkFailure ) pdsk( UpToDate -> DUnknown ) susp( 0 -> 1 )
Dec 5 12:01:32 an-a05n02 kernel: block drbd0: asender terminated
Dec 5 12:01:32 an-a05n02 kernel: block drbd0: Terminating drbd0_asender
Dec 5 12:01:32 an-a05n02 kernel: block drbd0: Connection closed
Dec 5 12:01:32 an-a05n02 kernel: block drbd0: conn( NetworkFailure -> Unconnected )
Dec 5 12:01:32 an-a05n02 kernel: block drbd0: receiver terminated
Dec 5 12:01:32 an-a05n02 kernel: block drbd0: Restarting drbd0_receiver
Dec 5 12:01:32 an-a05n02 kernel: block drbd0: receiver (re)started
Dec 5 12:01:32 an-a05n02 kernel: block drbd0: conn( Unconnected -> WFConnection )
Dec 5 12:01:32 an-a05n02 kernel: block drbd0: helper command: /sbin/drbdadm fence-peer minor-0
Dec 5 12:01:32 an-a05n02 rhcs_fence: Attempting to fence peer using RHCS from DRBD...
Dec 5 12:01:34 an-a05n02 corosync[2546]: [QUORUM] Members[1]: 2
Dec 5 12:01:34 an-a05n02 corosync[2546]: [TOTEM ] A processor joined or left the membership and a new membership was formed.
Dec 5 12:01:34 an-a05n02 kernel: dlm: closing connection to node 1
Dec 5 12:01:34 an-a05n02 fenced[2613]: fencing node an-a05n01.alteeve.ca
Dec 5 12:01:34 an-a05n02 corosync[2546]: [CPG ] chosen downlist: sender r(0) ip(10.20.50.2) ; members(old:2 left:1)
Dec 5 12:01:34 an-a05n02 corosync[2546]: [MAIN ] Completed service synchronization, ready to provide service.
Dec 5 12:01:34 an-a05n02 kernel: GFS2: fsid=an-anvil-05:shared.1: jid=0: Trying to acquire journal lock...
Dec 5 12:02:05 an-a05n02 fenced[2613]: fence an-a05n01.alteeve.ca success
Dec 5 12:02:05 an-a05n02 fence_node[2294]: fence an-a05n01.alteeve.ca success
Dec 5 12:02:05 an-a05n02 kernel: block drbd1: helper command: /sbin/drbdadm fence-peer minor-1 exit code 7 (0x700)
Dec 5 12:02:05 an-a05n02 kernel: block drbd1: fence-peer helper returned 7 (peer was stonithed)
Dec 5 12:02:05 an-a05n02 kernel: block drbd1: pdsk( DUnknown -> Outdated )
Dec 5 12:02:05 an-a05n02 kernel: block drbd1: new current UUID AC7D34993319CF07:96939998C25B00D5:C667A4D09ADAF91B:C666A4D09ADAF91B
Dec 5 12:02:05 an-a05n02 kernel: block drbd1: susp( 1 -> 0 )
Dec 5 12:02:06 an-a05n02 rgmanager[2785]: Marking service:storage_n01 as stopped: Restricted domain unavailable
Dec 5 12:02:07 an-a05n02 fence_node[2325]: fence an-a05n01.alteeve.ca success
Dec 5 12:02:07 an-a05n02 kernel: block drbd0: helper command: /sbin/drbdadm fence-peer minor-0 exit code 7 (0x700)
Dec 5 12:02:07 an-a05n02 kernel: block drbd0: fence-peer helper returned 7 (peer was stonithed)
Dec 5 12:02:07 an-a05n02 kernel: block drbd0: pdsk( DUnknown -> Outdated )
Dec 5 12:02:07 an-a05n02 kernel: block drbd0: new current UUID 20CEE1AD5C066F57:BF89350BA62F87D1:EAA52C899C7C1F8D:EAA42C899C7C1F8D
Dec 5 12:02:07 an-a05n02 kernel: block drbd0: susp( 1 -> 0 )
Dec 5 12:02:07 an-a05n02 kernel: GFS2: fsid=an-anvil-05:shared.1: jid=0: Looking at journal...
Dec 5 12:02:07 an-a05n02 kernel: GFS2: fsid=an-anvil-05:shared.1: jid=0: Acquiring the transaction lock...
Dec 5 12:02:07 an-a05n02 kernel: GFS2: fsid=an-anvil-05:shared.1: jid=0: Replaying journal...
Dec 5 12:02:07 an-a05n02 kernel: GFS2: fsid=an-anvil-05:shared.1: jid=0: Replayed 259 of 476 blocks
Dec 5 12:02:07 an-a05n02 kernel: GFS2: fsid=an-anvil-05:shared.1: jid=0: Found 5 revoke tags
Dec 5 12:02:07 an-a05n02 kernel: GFS2: fsid=an-anvil-05:shared.1: jid=0: Journal replayed in 1s
Dec 5 12:02:07 an-a05n02 kernel: GFS2: fsid=an-anvil-05:shared.1: jid=0: Done
Dec 5 12:02:07 an-a05n02 rgmanager[2785]: Taking over service vm:vm01-win2008 from down member an-a05n01.alteeve.ca
Dec 5 12:02:07 an-a05n02 rgmanager[2785]: Taking over service vm:vm03-win7 from down member an-a05n01.alteeve.ca
Dec 5 12:02:07 an-a05n02 rgmanager[2785]: Taking over service vm:vm04-win8 from down member an-a05n01.alteeve.ca
Dec 5 12:02:07 an-a05n02 kernel: device vnet3 entered promiscuous mode
Dec 5 12:02:07 an-a05n02 kernel: ifn_bridge1: port 5(vnet3) entering forwarding state
Dec 5 12:02:07 an-a05n02 rgmanager[2785]: Taking over service vm:vm07-rhel6 from down member an-a05n01.alteeve.ca
Dec 5 12:02:07 an-a05n02 rgmanager[2785]: Taking over service vm:vm08-sles11 from down member an-a05n01.alteeve.ca
Dec 5 12:02:08 an-a05n02 kernel: device vnet4 entered promiscuous mode
Dec 5 12:02:08 an-a05n02 kernel: ifn_bridge1: port 6(vnet4) entering forwarding state
Dec 5 12:02:08 an-a05n02 rgmanager[2785]: Service vm:vm01-win2008 started
Dec 5 12:02:08 an-a05n02 kernel: device vnet5 entered promiscuous mode
Dec 5 12:02:08 an-a05n02 kernel: ifn_bridge1: port 7(vnet5) entering forwarding state
Dec 5 12:02:09 an-a05n02 kernel: device vnet6 entered promiscuous mode
Dec 5 12:02:09 an-a05n02 kernel: ifn_bridge1: port 8(vnet6) entering forwarding state
Dec 5 12:02:09 an-a05n02 kernel: device vnet7 entered promiscuous mode
Dec 5 12:02:09 an-a05n02 kernel: ifn_bridge1: port 9(vnet7) entering forwarding state
Dec 5 12:02:09 an-a05n02 rgmanager[2785]: Service vm:vm03-win7 started
Dec 5 12:02:10 an-a05n02 rgmanager[2785]: Service vm:vm07-rhel6 started
Dec 5 12:02:10 an-a05n02 rgmanager[2785]: Service vm:vm04-win8 started
Dec 5 12:02:10 an-a05n02 rgmanager[2785]: Service vm:vm08-sles11 started
Dec 5 12:02:12 an-a05n02 ntpd[2084]: Listen normally on 14 vnet3 fe80::fc54:ff:fe8e:6732 UDP 123
Dec 5 12:02:12 an-a05n02 ntpd[2084]: Listen normally on 15 vnet5 fe80::fc54:ff:fe58:6a9 UDP 123
Dec 5 12:02:12 an-a05n02 ntpd[2084]: Listen normally on 16 vnet6 fe80::fc54:ff:fe8a:6c52 UDP 123
Dec 5 12:02:12 an-a05n02 ntpd[2084]: Listen normally on 17 vnet4 fe80::fc54:ff:fe68:9bfd UDP 123
Dec 5 12:02:12 an-a05n02 ntpd[2084]: Listen normally on 18 vnet7 fe80::fc54:ff:fed5:494c UDP 123
Dec 5 12:02:12 an-a05n02 ntpd[2084]: peers refreshed
Dec 5 12:02:19 an-a05n02 kernel: kvm: 3933: cpu0 disabled perfctr wrmsr: 0xc1 data 0xabcd
Dec 5 12:02:22 an-a05n02 kernel: ifn_bridge1: port 5(vnet3) entering forwarding state
Dec 5 12:02:23 an-a05n02 kernel: ifn_bridge1: port 6(vnet4) entering forwarding state
Dec 5 12:02:23 an-a05n02 kernel: ifn_bridge1: port 7(vnet5) entering forwarding state
Dec 5 12:02:24 an-a05n02 kernel: ifn_bridge1: port 8(vnet6) entering forwarding state
Dec 5 12:02:24 an-a05n02 kernel: ifn_bridge1: port 9(vnet7) entering forwarding state |
We see here that, in this case, DRBD caught the failure slightly faster than corosync did. It initiated a fence via rhcs_fence. Next we see cman also call a fence, which succeeded on first try. Shortly after, DRBD recognized the fence succeeded as well.
With the fence actions succeeded, we see DRBD mark the lost resources as Outdated, GFS2 reaps lost locks and cleans up the /shared filesystem. We also see rgmanager mark an-a05n01's storage as disabled and then begin recovery of the five lost servers. Once they're booted, the last recovery step is "plugging them in" to the bridge.
Lets look at the alerts we received.
The alert system checks for state changes every 30 seconds. So depending on when the loop fires during the failure and recovery process, you may get a couple alerts. That is what happened in my case.
| an-a05n02 | Subject: [ AN!CM ] - Alteeve's Niche! - Cluster 05 (Demo Cluster - "Tyson") - an-a05n02 - State Change!Changes have been detected in the cluster. If you anticipated this
change then there is no reason for concern. If this change was
unexpected, please feel free to contact support.
----------------------------------------------------------------------
Node an-a05n01.alteeve.ca; State change!
Online, rgmanager -> Offline
Node an-a05n02.alteeve.ca; State change!
Online, Local, rgmanager -> Online, Local
==[ Source Details ]==================================================
Company: Alteeve's Niche!
Anvil!: an-anvil-05
Node: an-a05n02.alteeve.ca
Description:
- Cluster 05 (Demo Cluster - "Tyson")
If you have any questions or concerns, please don't hesitate to
contact support.
https://alteeve.ca/w/Support
Alteeve's Niche!
Cluster Monitor
======================================================================
--
You received this email because you were listed as a contact for the
Anvil! described in this email. If you do not wish to receive these
emails, please contact your systems administrator. AN!CM runs on
Anvil! nodes directly and are not sent by Alteeve's Niche!.30 seconds later, the next alert arrives. Subject: [ AN!CM ] - Alteeve's Niche! - Cluster 05 (Demo Cluster - "Tyson") - an-a05n02 - State Change!Changes have been detected in the cluster. If you anticipated this
change then there is no reason for concern. If this change was
unexpected, please feel free to contact support.
----------------------------------------------------------------------
Node an-a05n02.alteeve.ca; State change!
Online, Local -> Online, Local, rgmanager
Service libvirtd_n01; State change!
-- -> started
-- -> an-a05n01.alteeve.ca
Service libvirtd_n02; State change!
-- -> started
-- -> an-a05n02.alteeve.ca
Service storage_n01; State change!
-- -> stopped
-- -> (an-a05n01.alteeve.ca)
Service storage_n02; State change!
-- -> started
-- -> an-a05n02.alteeve.ca
VM vm01-win2008; State change!
-- -> started
-- -> an-a05n02.alteeve.ca
VM vm02-win2012; State change!
-- -> started
-- -> an-a05n02.alteeve.ca
VM vm03-win7; State change!
-- -> started
-- -> an-a05n02.alteeve.ca
VM vm04-win8; State change!
-- -> started
-- -> an-a05n02.alteeve.ca
VM vm05-freebsd9; State change!
-- -> started
-- -> an-a05n02.alteeve.ca
VM vm06-solaris11; State change!
-- -> started
-- -> an-a05n02.alteeve.ca
VM vm07-rhel6; State change!
-- -> started
-- -> an-a05n02.alteeve.ca
VM vm08-sles11; State change!
-- -> started
-- -> an-a05n02.alteeve.ca
==[ Source Details ]==================================================
Company: Alteeve's Niche!
Anvil!: an-anvil-05
Node: an-a05n02.alteeve.ca
Description:
- Cluster 05 (Demo Cluster - "Tyson")
If you have any questions or concerns, please don't hesitate to
contact support.
https://alteeve.ca/w/Support
Alteeve's Niche!
Cluster Monitor
======================================================================
--
You received this email because you were listed as a contact for the
Anvil! described in this email. If you do not wish to receive these
emails, please contact your systems administrator. AN!CM runs on
Anvil! nodes directly and are not sent by Alteeve's Niche!. |
|---|
The first email shows the loss of an-a05n01. The second email shows the recovery of all the servers. The astute reader will notice that an-a05n02 showed rgmanager disappear.
This is because there is a time between node loss and fence complete where DLM stops giving out locks. As we mentioned, rgmanager, clvmd and gfs2 all require DLM locks in order to work. So during a pending fence, these programs will appear to hang, which is by design. Once the fence action succeeds, normal operation resumes. In this case, we see rgmanager returned to an-a05n02 in the second email alert.
Let's take a look at clustat on an-a05n02.
| an-a05n02 | clustatCluster Status for an-anvil-05 @ Thu Dec 5 12:37:42 2013
Member Status: Quorate
Member Name ID Status
------ ---- ---- ------
an-a05n01.alteeve.ca 1 Offline
an-a05n02.alteeve.ca 2 Online, Local, rgmanager
Service Name Owner (Last) State
------- ---- ----- ------ -----
service:libvirtd_n01 an-a05n01.alteeve.ca started
service:libvirtd_n02 an-a05n02.alteeve.ca started
service:storage_n01 (an-a05n01.alteeve.ca) stopped
service:storage_n02 an-a05n02.alteeve.ca started
vm:vm01-win2008 an-a05n02.alteeve.ca started
vm:vm02-win2012 an-a05n02.alteeve.ca started
vm:vm03-win7 an-a05n02.alteeve.ca started
vm:vm04-win8 an-a05n02.alteeve.ca started
vm:vm05-freebsd9 an-a05n02.alteeve.ca started
vm:vm06-solaris11 an-a05n02.alteeve.ca started
vm:vm07-rhel6 an-a05n02.alteeve.ca started
vm:vm08-sles11 an-a05n02.alteeve.ca started |
|---|
If we look at the timeline, we see that the fault was detected almost immediately at 12:01:27. Recovery is completed at 12:02:24. The total recovery time was 57 seconds.
Not too shabby!
Degraded Mode Load Testing
| Warning: Load-testing your Anvil! in a degraded state is just as critical as anything else we've done thus far! |
It is very important that you ensure all of your servers can run well at full load on a single node. All of our work until now is useless if your servers grind during a degraded state.
The two biggest concerns are CPU and storage.
Please be sure to test, as long as needed, all of your applications running at full speed, both CPU and storage. If those tests pass, it's a good idea to then run synthetic benchmarks to find out just how much load your servers can take on the one node before performance degrades. This will be very useful for predicting when additional resource must be added as you grow.
The actual methods used in this step are dependent entirely on your setup, so no further discussion can be had here.
Recovering an-a05n01
Once an-a05n01 recovers from the fence, it will send out the "I've started!" alerts. There might be two emails, depending on the when the alert system started. That was the case in this test. The first alert came up before the bond devices updelay expired. Once that delay passed, a second alert was triggered showing the backup interfaces coming online.
| an-a05n01 | Subject: [ AN!CM ] - Alteeve's Niche! - Cluster 05 (Demo Cluster - "Tyson") - an-a05n01 - Cluster Monitor StartCluster node's monitor program has started.
Current State:
--[ Cluster Status ]--------------------------------------------------
This node is not currently in the cluster.
--[ Network Status ]--------------------------------------------------
Bridge: ifn_bridge1, MAC: 00:1B:21:81:C3:34, STP disabled
Links(s): \- ifn_bond1
Bond: bcn_bond1 -+- bcn_link1 -+-> Back-Channel Network
\- bcn_link2 -/
Active Slave: bcn_link1 using MAC: 00:19:99:9C:9B:9E
Prefer Slave: bcn_link1
Reselect: Primary always, after 120000 seconds
Link Check: Every 100 ms
MTU Size: 1500 Bytes
+-------------------+-------------------+
Slaves | bcn_link1 | bcn_link2 |
+------------+-------------------+-------------------+
| Link: | Up | -- |
| Speed: | 1000 Mbps FD | 1000 Mbps |
| MAC: | 00:19:99:9C:9B:9E | 00:1B:21:81:C3:35 |
| Failures: | 0 | 0 |
+------------+-------------------+-------------------+
Bond: sn_bond1 -+- sn_link1 -+-> Storage Network
\- sn_link2 -/
Active Slave: sn_link1 using MAC: 00:19:99:9C:9B:9F
Prefer Slave: sn_link1
Reselect: Primary always, after 120000 seconds
Link Check: Every 100 ms
MTU Size: 1500 Bytes
+-------------------+-------------------+
Slaves | sn_link1 | sn_link2 |
+------------+-------------------+-------------------+
| Link: | Up | -- |
| Speed: | 1000 Mbps FD | 1000 Mbps |
| MAC: | 00:19:99:9C:9B:9F | A0:36:9F:02:E0:04 |
| Failures: | 0 | 0 |
+------------+-------------------+-------------------+
Bond: ifn_bond1 -+- ifn_link1 -+-> Internet-Facing Network
\- ifn_link2 -/
Active Slave: ifn_link1 using MAC: 00:1B:21:81:C3:34
Prefer Slave: ifn_link1
Reselect: Primary always, after 120000 seconds
Link Check: Every 100 ms
MTU Size: 1500 Bytes
+-------------------+-------------------+
Slaves | ifn_link1 | ifn_link2 |
+------------+-------------------+-------------------+
| Link: | Up | -- |
| Speed: | 1000 Mbps FD | 1000 Mbps |
| MAC: | 00:1B:21:81:C3:34 | A0:36:9F:02:E0:05 |
| Failures: | 0 | 0 |
+------------+-------------------+-------------------+
--[ Storage Status ]--------------------------------------------------
Adapter: #0
Model: RAID Ctrl SAS 6G 5/6 512MB (D2616)
Revision:
Serial #:
Cache: 512MB
BBU: iBBU, pn: LS1121001A, sn: 15686
- Failing: No
- Charge: 95 %, 71 % of design
- Capacity: No / 906 mAh, 1215 mAh design
- Voltage: 4077 mV, 3700 mV design
- Cycles: 35
- Hold-Up: 0 hours
- Learn Active: No
- Next Learn: Wed Dec 18 16:47:41 2013
Array: Virtual Drive 0, Target ID 0
State: Optimal
Drives: 4
Usable Size: 836.625 GB
Parity Size: 278.875 GB
Strip Size: 64 KB
RAID Level: Primary-5, Secondary-0, RAID Level Qualifier-3
Cache Policy: WriteBack, ReadAheadNone, Direct, No Write Cache if Bad BBU
Bad Blocks: No
Drive: 0
Position: disk group 0, span 0, arm 1
State: Online, Spun Up
Fault: No
Temp: 39 degrees Celcius
Device: Seagate ST3300657SS, sn: 17036SJ3T7X6
Media: Hard Disk Device
Interface: SAS, drive: 6.0Gb/s, bus: 6.0Gb/s
Capacity: 278.875 GB
Drive: 1
Position: disk group 0, span 0, arm 2
State: Online, Spun Up
Fault: No
Temp: 42 degrees Celcius
Device: Seagate ST3300657SS, sn: 17036SJ3CMMC
Media: Hard Disk Device
Interface: SAS, drive: 6.0Gb/s, bus: 6.0Gb/s
Capacity: 278.875 GB
Drive: 2
Position: disk group 0, span 0, arm 0
State: Online, Spun Up
Fault: No
Temp: 40 degrees Celcius
Device: Seagate ST3300657SS, sn: 17036SJ3CD2Z
Media: Hard Disk Device
Interface: SAS, drive: 6.0Gb/s, bus: 6.0Gb/s
Capacity: 278.875 GB
Drive: 6
Position: disk group 0, span 0, arm 3
State: Online, Spun Up
Fault: No
Temp: 37 degrees Celcius
Device: HITACHI HUS156045VLS600 A42BJVY33ARM
Media: Hard Disk Device
Interface: SAS, drive: 6.0Gb/s, bus: 6.0Gb/s
Capacity: 418.656 GB
--[ Host Power and Thermal Sensors ]----------------------------------
+--------+------------+---------------+---------------+
Power Supplies | Status | Wattage | Fan 1 Speed | Fan 2 Speed |
+---------------+--------+------------+---------------+---------------+
| PSU 1 | ok | 120 Watts | 6360 RPM | 6360 RPM |
| PSU 2 | ok | 110 Watts | 6600 RPM | 6360 RPM |
+---------------+--------+------------+---------------+---------------+
+--------------+--------------+--------------+
Power Levels | State | Voltage | Wattage |
+------------------+--------------+--------------+--------------+
| BATT 3.0V | ok | 3.14 Volts | -- |
| CPU1 1.8V | ok | 1.80 Volts | -- |
| CPU1 Power | ok | -- | 4.40 Watts |
| CPU2 1.8V | ok | 1.80 Volts | -- |
| CPU2 Power | ok | -- | 6.60 Watts |
| ICH 1.5V | ok | 1.49 Volts | -- |
| IOH 1.1V | ok | 1.10 Volts | -- |
| IOH 1.1V AUX | ok | 1.09 Volts | -- |
| IOH 1.8V | ok | 1.80 Volts | -- |
| iRMC 1.2V STBY | ok | 1.19 Volts | -- |
| iRMC 1.8V STBY | ok | 1.80 Volts | -- |
| LAN 1.0V STBY | ok | 1.01 Volts | -- |
| LAN 1.8V STBY | ok | 1.81 Volts | -- |
| MAIN 12V | ok | 12 Volts | -- |
| MAIN 3.3V | ok | 3.37 Volts | -- |
| MAIN 5.15V | ok | 5.18 Volts | -- |
| PSU1 Power | ok | -- | 120 Watts |
| PSU2 Power | ok | -- | 110 Watts |
| STBY 3.3V | ok | 3.35 Volts | -- |
| Total Power | ok | -- | 200 Watts |
+------------------+--------------+--------------+--------------+
+-----------+-----------+
Temperatures | State | Temp (*C) |
+----------------+-----------+-----------+
| Ambient | ok | 26.50 |
| CPU1 | ok | 35 |
| CPU2 | ok | 39 |
| Systemboard | ok | 45 |
+----------------+-----------+-----------+
+-----------+-----------+
Cooling Fans | State | RPMs |
+----------------+-----------+-----------+
| FAN1 PSU1 | ok | 6360 |
| FAN1 PSU2 | ok | 6600 |
| FAN1 SYS | ok | 4980 |
| FAN2 PSU1 | ok | 6360 |
| FAN2 PSU2 | ok | 6360 |
| FAN2 SYS | ok | 4800 |
| FAN3 SYS | ok | 4500 |
| FAN4 SYS | ok | 4800 |
| FAN5 SYS | ok | 4740 |
+----------------+-----------+-----------+
--[ UPS Status ]------------------------------------------------------
Name: an-ups01
Status: ONLINE Temperature: 31.0 *C
Model: Smart-UPS 1500 Battery Voltage: 27.0 vAC
Serial #: AS1038232403 Battery Charge: 100.0 %
Holdup Time: 55.0 Minutes Current Load: 24.0 %
Self Test: OK Firmware: UPS 05.0 / COM 02.1
Mains -> 120.0 Volts -> UPS -> 120.0 Volts -> PDU
Name: an-ups02
Status: ONLINE Temperature: 32.0 *C
Model: Smart-UPS 1500 Battery Voltage: 27.0 vAC
Serial #: AS1224213144 Battery Charge: 100.0 %
Holdup Time: 55.0 Minutes Current Load: 24.0 %
Self Test: OK Firmware: UPS 08.3 / MCU 14.0
Mains -> 122.0 Volts -> UPS -> 122.0 Volts -> PDU
==[ Source Details ]==================================================
Company: Alteeve's Niche!
Anvil!: an-anvil-05
Node: an-a05n01.alteeve.ca
Description:
- Cluster 05 (Demo Cluster - "Tyson")
If you have any questions or concerns, please don't hesitate to
contact support.
https://alteeve.ca/w/Support
Alteeve's Niche!
Cluster Monitor
======================================================================
--
You received this email because you were listed as a contact for the
Anvil! described in this email. If you do not wish to receive these
emails, please contact your systems administrator. AN!CM runs on
Anvil! nodes directly and are not sent by Alteeve's Niche!.Subject: [ AN!CM ] - Alteeve's Niche! - Cluster 05 (Demo Cluster - "Tyson") - an-a05n01 - State Change!Changes have been detected in the cluster. If you anticipated this
change then there is no reason for concern. If this change was
unexpected, please feel free to contact support.
----------------------------------------------------------------------
Bond bcn_bond1 (Back-Channel Network); Second slave bcn_link2's link status has changed!
going back -> up
Bond sn_bond1 (Storage Network); Second slave sn_link2's link status has changed!
going back -> up
Bond ifn_bond1 (Internet-Facing Network); Second slave ifn_link2's link status has changed!
going back -> up
==[ Source Details ]==================================================
Company: Alteeve's Niche!
Anvil!: an-anvil-05
Node: an-a05n01.alteeve.ca
Description:
- Cluster 05 (Demo Cluster - "Tyson")
If you have any questions or concerns, please don't hesitate to
contact support.
https://alteeve.ca/w/Support
Alteeve's Niche!
Cluster Monitor
======================================================================
--
You received this email because you were listed as a contact for the
Anvil! described in this email. If you do not wish to receive these
emails, please contact your systems administrator. AN!CM runs on
Anvil! nodes directly and are not sent by Alteeve's Niche!. |
|---|
Lets check the state of things on an-a05n02.
| an-a05n01 | clustatCluster Status for an-anvil-05 @ Thu Dec 5 13:04:05 2013
Member Status: Quorate
Member Name ID Status
------ ---- ---- ------
an-a05n01.alteeve.ca 1 Offline
an-a05n02.alteeve.ca 2 Online, Local, rgmanager
Service Name Owner (Last) State
------- ---- ----- ------ -----
service:libvirtd_n01 an-a05n01.alteeve.ca started
service:libvirtd_n02 an-a05n02.alteeve.ca started
service:storage_n01 (an-a05n01.alteeve.ca) stopped
service:storage_n02 an-a05n02.alteeve.ca started
vm:vm01-win2008 an-a05n02.alteeve.ca started
vm:vm02-win2012 an-a05n02.alteeve.ca started
vm:vm03-win7 an-a05n02.alteeve.ca started
vm:vm04-win8 an-a05n02.alteeve.ca started
vm:vm05-freebsd9 an-a05n02.alteeve.ca started
vm:vm06-solaris11 an-a05n02.alteeve.ca started
vm:vm07-rhel6 an-a05n02.alteeve.ca started
vm:vm08-sles11 an-a05n02.alteeve.ca started |
|---|
Everything looks good, so lets rejoin an-a05n01 now.
| an-a05n01 | /etc/init.d/cman startStarting cluster:
Checking if cluster has been disabled at boot... [ OK ]
Checking Network Manager... [ OK ]
Global setup... [ OK ]
Loading kernel modules... [ OK ]
Mounting configfs... [ OK ]
Starting cman... [ OK ]
Waiting for quorum... [ OK ]
Starting fenced... [ OK ]
Starting dlm_controld... [ OK ]
Tuning DLM kernel config... [ OK ]
Starting gfs_controld... [ OK ]
Unfencing self... [ OK ]
Joining fence domain... [ OK ]/etc/init.d/rgmanager startStarting Cluster Service Manager: [ OK ]clustatCluster Status for an-anvil-05 @ Thu Dec 5 18:20:31 2013
Member Status: Quorate
Member Name ID Status
------ ---- ---- ------
an-a05n01.alteeve.ca 1 Online, Local, rgmanager
an-a05n02.alteeve.ca 2 Online, rgmanager
Service Name Owner (Last) State
------- ---- ----- ------ -----
service:libvirtd_n01 an-a05n01.alteeve.ca started
service:libvirtd_n02 an-a05n02.alteeve.ca started
service:storage_n01 an-a05n01.alteeve.ca started
service:storage_n02 an-a05n02.alteeve.ca started
vm:vm01-win2008 an-a05n02.alteeve.ca started
vm:vm02-win2012 an-a05n02.alteeve.ca started
vm:vm03-win7 an-a05n02.alteeve.ca started
vm:vm04-win8 an-a05n02.alteeve.ca started
vm:vm05-freebsd9 an-a05n02.alteeve.ca started
vm:vm06-solaris11 an-a05n02.alteeve.ca started
vm:vm07-rhel6 an-a05n02.alteeve.ca started
vm:vm08-sles11 an-a05n02.alteeve.ca started |
|---|---|
| an-a05n02 | clustatCluster Status for an-anvil-05 @ Thu Dec 5 18:20:48 2013
Member Status: Quorate
Member Name ID Status
------ ---- ---- ------
an-a05n01.alteeve.ca 1 Online, rgmanager
an-a05n02.alteeve.ca 2 Online, Local, rgmanager
Service Name Owner (Last) State
------- ---- ----- ------ -----
service:libvirtd_n01 an-a05n01.alteeve.ca started
service:libvirtd_n02 an-a05n02.alteeve.ca started
service:storage_n01 an-a05n01.alteeve.ca started
service:storage_n02 an-a05n02.alteeve.ca started
vm:vm01-win2008 an-a05n02.alteeve.ca started
vm:vm02-win2012 an-a05n02.alteeve.ca started
vm:vm03-win7 an-a05n02.alteeve.ca started
vm:vm04-win8 an-a05n02.alteeve.ca started
vm:vm05-freebsd9 an-a05n02.alteeve.ca started
vm:vm06-solaris11 an-a05n02.alteeve.ca started
vm:vm07-rhel6 an-a05n02.alteeve.ca started
vm:vm08-sles11 an-a05n02.alteeve.ca started |
Now we wait for the DRBD resource to both be UpToDate on both nodes.
| an-a05n01 | /etc/init.d/drbd statusdrbd driver loaded OK; device status:
version: 8.3.16 (api:88/proto:86-97)
GIT-hash: a798fa7e274428a357657fb52f0ecf40192c1985 build by phil@Build64R6, 2013-09-27 16:00:43
m:res cs ro ds p mounted fstype
... sync'ed: 71.2% (176592/607108)K
0:r0 SyncTarget Primary/Primary Inconsistent/UpToDate C
1:r1 Connected Primary/Primary UpToDate/UpToDate CWait a bit... Ding! /etc/init.d/drbd statusdrbd driver loaded OK; device status:
version: 8.3.16 (api:88/proto:86-97)
GIT-hash: a798fa7e274428a357657fb52f0ecf40192c1985 build by phil@Build64R6, 2013-09-27 16:00:43
m:res cs ro ds p mounted fstype
0:r0 Connected Primary/Primary UpToDate/UpToDate C
1:r1 Connected Primary/Primary UpToDate/UpToDate C |
|---|
Last step is to start live-migrating the five servers back.
| an-a05n01 | clusvcadm -M vm:vm01-win2008 -m an-a05n01.alteeve.caTrying to migrate vm:vm01-win2008 to an-a05n01.alteeve.ca...Successclusvcadm -M vm:vm03-win7 -m an-a05n01.alteeve.caTrying to migrate vm:vm03-win7 to an-a05n01.alteeve.ca...Successclusvcadm -M vm:vm04-win8 -m an-a05n01.alteeve.caTrying to migrate vm:vm04-win8 to an-a05n01.alteeve.ca...Successclusvcadm -M vm:vm07-rhel6 -m an-a05n01.alteeve.caTrying to migrate vm:vm07-rhel6 to an-a05n01.alteeve.ca...Successclusvcadm -M vm:vm08-sles11 -m an-a05n01.alteeve.caTrying to migrate vm:vm08-sles11 to an-a05n01.alteeve.ca...SuccessclustatCluster Status for an-anvil-05 @ Thu Dec 5 18:26:41 2013
Member Status: Quorate
Member Name ID Status
------ ---- ---- ------
an-a05n01.alteeve.ca 1 Online, Local, rgmanager
an-a05n02.alteeve.ca 2 Online, rgmanager
Service Name Owner (Last) State
------- ---- ----- ------ -----
service:libvirtd_n01 an-a05n01.alteeve.ca started
service:libvirtd_n02 an-a05n02.alteeve.ca started
service:storage_n01 an-a05n01.alteeve.ca started
service:storage_n02 an-a05n02.alteeve.ca started
vm:vm01-win2008 an-a05n01.alteeve.ca started
vm:vm02-win2012 an-a05n02.alteeve.ca started
vm:vm03-win7 an-a05n01.alteeve.ca started
vm:vm04-win8 an-a05n01.alteeve.ca started
vm:vm05-freebsd9 an-a05n02.alteeve.ca started
vm:vm06-solaris11 an-a05n02.alteeve.ca started
vm:vm07-rhel6 an-a05n01.alteeve.ca started
vm:vm08-sles11 an-a05n01.alteeve.ca started |
|---|---|
| an-a05n02 | clustatCluster Status for an-anvil-05 @ Thu Dec 5 18:26:58 2013
Member Status: Quorate
Member Name ID Status
------ ---- ---- ------
an-a05n01.alteeve.ca 1 Online, rgmanager
an-a05n02.alteeve.ca 2 Online, Local, rgmanager
Service Name Owner (Last) State
------- ---- ----- ------ -----
service:libvirtd_n01 an-a05n01.alteeve.ca started
service:libvirtd_n02 an-a05n02.alteeve.ca started
service:storage_n01 an-a05n01.alteeve.ca started
service:storage_n02 an-a05n02.alteeve.ca started
vm:vm01-win2008 an-a05n01.alteeve.ca started
vm:vm02-win2012 an-a05n02.alteeve.ca started
vm:vm03-win7 an-a05n01.alteeve.ca started
vm:vm04-win8 an-a05n01.alteeve.ca started
vm:vm05-freebsd9 an-a05n02.alteeve.ca started
vm:vm06-solaris11 an-a05n02.alteeve.ca started
vm:vm07-rhel6 an-a05n01.alteeve.ca started
vm:vm08-sles11 an-a05n01.alteeve.ca started |
Everything is back to normal.
You should see numerous alert emails showing an-a05n01 rejoining the cluster and the servers moving back.
Crashing an-a05n02
Last test!
As mentioned, we're going to cut the power to this node. We could just pull the power cables out and that would be perfectly fine. Downside to that is that it requires getting up, and who wants to do that?
So we'll use the fence_apc_snmp fence agent to call each PDU and turn off outlet #2, which powers an-a05n02.
As we saw in our initial round of fence testing, the initial fence attempt using IPMI will fail. Then the PDUs should be called and the outlets we turned off will be verified as off, then turned back on.
If your server is set to boot when power is restored, or if you have it set to "Last State", the server should boot automatically. If it stays off, simply call an on action against it using fence_ipmilan. It will be great practice!
So, let's watch the logs, kill the power, and look at the email alerts.
| an-a05n01 | fence_apc_snmp -a an-pdu01 -n 2 -o offSuccess: Powered OFF |
|---|
An alert!
| an-a05n01 | Subject: [ AN!CM ] - Alteeve's Niche! - Cluster 05 (Demo Cluster - "Tyson") - an-a05n02 - Warning! - State Change!Changes have been detected in the cluster. If you anticipated this
change then there is no reason for concern. If this change was
unexpected, please feel free to contact support.
----------------------------------------------------------------------
Host's "FAN1 PSU1" fan speed has dropped below the minimum of 500 RPM!
ok, 6360 RPM -> ok, 0 RPM
Host sensor "FAN1 PSU1 State" has change!
ok, 0x01 -> bad!, 0x08
Host's "FAN2 PSU1" fan speed has dropped below the minimum of 500 RPM!
ok, 6480 RPM -> ok, 0 RPM
Host sensor "FAN2 PSU1 State" has change!
ok, 0x01 -> bad!, 0x08
Host sensor "Power Unit" has change!
ok, 0x01 -> ok, 0x02
Host sensor "PSU1 State" has change!
ok, 0x02 -> bad!, 0x08
==[ Source Details ]==================================================
Company: Alteeve's Niche!
Anvil!: an-anvil-05
Node: an-a05n02.alteeve.ca
Description:
- Cluster 05 (Demo Cluster - "Tyson")
If you have any questions or concerns, please don't hesitate to
contact support.
https://alteeve.ca/w/Support
Alteeve's Niche!
Cluster Monitor
======================================================================
--
You received this email because you were listed as a contact for the
Anvil! described in this email. If you do not wish to receive these
emails, please contact your systems administrator. AN!CM runs on
Anvil! nodes directly and are not sent by Alteeve's Niche!. |
|---|
This is because we took our time killing the second power supply. The node stayed up long enough for a scan to run and it saw all power lost to its primary PSU, so its fans have died as well as the power itself vanishing. If you're in earshot on the node, you can probably hear an audible alarm, too.
Lets finish the job.
| an-a05n01 | fence_apc_snmp -a an-pdu02 -n 2 -o offSuccess: Powered OFFSystem logs: Dec 5 18:38:02 an-a05n01 kernel: block drbd1: PingAck did not arrive in time.
Dec 5 18:38:02 an-a05n01 kernel: block drbd1: peer( Primary -> Unknown ) conn( Connected -> NetworkFailure ) pdsk( UpToDate -> DUnknown ) susp( 0 -> 1 )
Dec 5 18:38:02 an-a05n01 kernel: block drbd1: asender terminated
Dec 5 18:38:02 an-a05n01 kernel: block drbd1: Terminating drbd1_asender
Dec 5 18:38:02 an-a05n01 kernel: block drbd1: Connection closed
Dec 5 18:38:02 an-a05n01 kernel: block drbd1: conn( NetworkFailure -> Unconnected )
Dec 5 18:38:02 an-a05n01 kernel: block drbd1: receiver terminated
Dec 5 18:38:02 an-a05n01 kernel: block drbd1: Restarting drbd1_receiver
Dec 5 18:38:02 an-a05n01 kernel: block drbd1: receiver (re)started
Dec 5 18:38:02 an-a05n01 kernel: block drbd1: conn( Unconnected -> WFConnection )
Dec 5 18:38:02 an-a05n01 kernel: block drbd1: helper command: /sbin/drbdadm fence-peer minor-1
Dec 5 18:38:02 an-a05n01 rhcs_fence: Attempting to fence peer using RHCS from DRBD...
Dec 5 18:38:02 an-a05n01 kernel: block drbd0: PingAck did not arrive in time.
Dec 5 18:38:02 an-a05n01 kernel: block drbd0: peer( Primary -> Unknown ) conn( Connected -> NetworkFailure ) pdsk( UpToDate -> DUnknown ) susp( 0 -> 1 )
Dec 5 18:38:02 an-a05n01 kernel: block drbd0: asender terminated
Dec 5 18:38:02 an-a05n01 kernel: block drbd0: Terminating drbd0_asender
Dec 5 18:38:02 an-a05n01 kernel: block drbd0: Connection closed
Dec 5 18:38:02 an-a05n01 kernel: block drbd0: conn( NetworkFailure -> Unconnected )
Dec 5 18:38:02 an-a05n01 kernel: block drbd0: receiver terminated
Dec 5 18:38:02 an-a05n01 kernel: block drbd0: Restarting drbd0_receiver
Dec 5 18:38:02 an-a05n01 kernel: block drbd0: receiver (re)started
Dec 5 18:38:02 an-a05n01 kernel: block drbd0: conn( Unconnected -> WFConnection )
Dec 5 18:38:02 an-a05n01 kernel: block drbd0: helper command: /sbin/drbdadm fence-peer minor-0
Dec 5 18:38:02 an-a05n01 rhcs_fence: Attempting to fence peer using RHCS from DRBD...
Dec 5 18:38:03 an-a05n01 corosync[27890]: [TOTEM ] A processor failed, forming new configuration.
Dec 5 18:38:05 an-a05n01 corosync[27890]: [QUORUM] Members[1]: 1
Dec 5 18:38:05 an-a05n01 corosync[27890]: [TOTEM ] A processor joined or left the membership and a new membership was formed.
Dec 5 18:38:05 an-a05n01 corosync[27890]: [CPG ] chosen downlist: sender r(0) ip(10.20.50.1) ; members(old:2 left:1)
Dec 5 18:38:05 an-a05n01 corosync[27890]: [MAIN ] Completed service synchronization, ready to provide service.
Dec 5 18:38:05 an-a05n01 kernel: dlm: closing connection to node 2
Dec 5 18:38:05 an-a05n01 fenced[27962]: fencing node an-a05n02.alteeve.ca
Dec 5 18:38:05 an-a05n01 kernel: GFS2: fsid=an-anvil-05:shared.0: jid=1: Trying to acquire journal lock...
Dec 5 18:38:22 an-a05n01 fence_node[19868]: fence an-a05n02.alteeve.ca success
Dec 5 18:38:22 an-a05n01 kernel: block drbd1: helper command: /sbin/drbdadm fence-peer minor-1 exit code 7 (0x700)
Dec 5 18:38:22 an-a05n01 kernel: block drbd1: fence-peer helper returned 7 (peer was stonithed)
Dec 5 18:38:22 an-a05n01 kernel: block drbd1: pdsk( DUnknown -> Outdated )
Dec 5 18:38:22 an-a05n01 kernel: block drbd1: new current UUID 982B45395AF5322D:AC7D34993319CF07:96949998C25B00D5:96939998C25B00D5
Dec 5 18:38:22 an-a05n01 kernel: block drbd1: susp( 1 -> 0 )
Dec 5 18:38:23 an-a05n01 fence_node[19898]: fence an-a05n02.alteeve.ca success
Dec 5 18:38:23 an-a05n01 kernel: block drbd0: helper command: /sbin/drbdadm fence-peer minor-0 exit code 7 (0x700)
Dec 5 18:38:23 an-a05n01 kernel: block drbd0: fence-peer helper returned 7 (peer was stonithed)
Dec 5 18:38:23 an-a05n01 kernel: block drbd0: pdsk( DUnknown -> Outdated )
Dec 5 18:38:23 an-a05n01 kernel: block drbd0: new current UUID 46F3B4E245FCFB01:20CEE1AD5C066F57:BF8A350BA62F87D1:BF89350BA62F87D1
Dec 5 18:38:23 an-a05n01 kernel: block drbd0: susp( 1 -> 0 )
Dec 5 18:38:26 an-a05n01 fenced[27962]: fence an-a05n02.alteeve.ca dev 0.0 agent fence_ipmilan result: error from agent
Dec 5 18:38:26 an-a05n01 fenced[27962]: fence an-a05n02.alteeve.ca success
Dec 5 18:38:27 an-a05n01 kernel: GFS2: fsid=an-anvil-05:shared.0: jid=1: Looking at journal...
Dec 5 18:38:28 an-a05n01 kernel: GFS2: fsid=an-anvil-05:shared.0: jid=1: Acquiring the transaction lock...
Dec 5 18:38:28 an-a05n01 kernel: GFS2: fsid=an-anvil-05:shared.0: jid=1: Replaying journal...
Dec 5 18:38:28 an-a05n01 kernel: GFS2: fsid=an-anvil-05:shared.0: jid=1: Replayed 3 of 5 blocks
Dec 5 18:38:28 an-a05n01 kernel: GFS2: fsid=an-anvil-05:shared.0: jid=1: Found 12 revoke tags
Dec 5 18:38:28 an-a05n01 kernel: GFS2: fsid=an-anvil-05:shared.0: jid=1: Journal replayed in 1s
Dec 5 18:38:28 an-a05n01 kernel: GFS2: fsid=an-anvil-05:shared.0: jid=1: Done
Dec 5 18:38:28 an-a05n01 rgmanager[28154]: Marking service:storage_n02 as stopped: Restricted domain unavailable
Dec 5 18:38:28 an-a05n01 rgmanager[28154]: Marking service:libvirtd_n02 as stopped: Restricted domain unavailable
Dec 5 18:38:28 an-a05n01 rgmanager[28154]: Taking over service vm:vm02-win2012 from down member an-a05n02.alteeve.ca
Dec 5 18:38:29 an-a05n01 rgmanager[28154]: Taking over service vm:vm05-freebsd9 from down member an-a05n02.alteeve.ca
Dec 5 18:38:29 an-a05n01 kernel: device vnet5 entered promiscuous mode
Dec 5 18:38:29 an-a05n01 kernel: ifn_bridge1: port 7(vnet5) entering forwarding state
Dec 5 18:38:29 an-a05n01 rgmanager[28154]: Taking over service vm:vm06-solaris11 from down member an-a05n02.alteeve.ca
Dec 5 18:38:29 an-a05n01 rgmanager[28154]: Service vm:vm02-win2012 started
Dec 5 18:38:29 an-a05n01 kernel: device vnet6 entered promiscuous mode
Dec 5 18:38:29 an-a05n01 kernel: ifn_bridge1: port 8(vnet6) entering forwarding state
Dec 5 18:38:30 an-a05n01 kernel: device vnet7 entered promiscuous mode
Dec 5 18:38:30 an-a05n01 kernel: ifn_bridge1: port 9(vnet7) entering forwarding state
Dec 5 18:38:30 an-a05n01 rgmanager[28154]: Service vm:vm06-solaris11 started
Dec 5 18:38:31 an-a05n01 rgmanager[28154]: Service vm:vm05-freebsd9 started
Dec 5 18:38:33 an-a05n01 ntpd[2182]: Listen normally on 16 vnet6 fe80::fc54:ff:feb0:6caa UDP 123
Dec 5 18:38:33 an-a05n01 ntpd[2182]: Listen normally on 17 vnet7 fe80::fc54:ff:fe29:383b UDP 123
Dec 5 18:38:33 an-a05n01 ntpd[2182]: Listen normally on 18 vnet5 fe80::fc54:ff:fe5e:291c UDP 123
Dec 5 18:38:33 an-a05n01 ntpd[2182]: peers refreshed
Dec 5 18:38:44 an-a05n01 kernel: ifn_bridge1: port 7(vnet5) entering forwarding state
Dec 5 18:38:44 an-a05n01 kernel: ifn_bridge1: port 8(vnet6) entering forwarding state
Dec 5 18:38:45 an-a05n01 kernel: ifn_bridge1: port 9(vnet7) entering forwarding state |
|---|
We see here that the log entries are almost the same as we saw when an-a05n01 was crashed. The main difference is that the first fence attempt failed, as expected.
Lets look at the timeline;
| Time | Event |
|---|---|
| 18:38:02 | DRBD detects the failure and initiates a fence. |
| 18:38:03 | Corosync detects the failure, reforms the cluster. |
| 18:38:05 | DLM blocks. |
| 18:38:22 | DRBD-called fence succeeds. We do not see the failed IPMI attempt in the log. |
| 18:38:26 | The cman initiated IPMI call fails, the PDU-based fence succeeds. |
| 18:38:27 | GFS2 cleans up /shared. |
| 18:38:28 | rgmanager begins recovery, boots lost servers. |
| 18:38:44 | The vnetX interfaces link the recovered servers to the bridge. Recovery is complete. |
In this case, recovery took 42 seconds, actually faster than the recovery of an-a05n01. This shows the difference in timings to detect losses. Normally, this is a little slower because of the time taken to declare the IPMI fence method "failed".
Lets look again at the alerts from an-a05n02 triggered by the failure of an-a05n02.
| an-a05n01 | Subject: [ AN!CM ] - Alteeve's Niche! - Cluster 05 (Demo Cluster - "Tyson") - an-a05n01 - State Change!Changes have been detected in the cluster. If you anticipated this
change then there is no reason for concern. If this change was
unexpected, please feel free to contact support.
----------------------------------------------------------------------
Node an-a05n02.alteeve.ca; State change!
Online, rgmanager -> Offline
==[ Source Details ]==================================================
Company: Alteeve's Niche!
Anvil!: an-anvil-05
Node: an-a05n01.alteeve.ca
Description:
- Cluster 05 (Demo Cluster - "Tyson")
If you have any questions or concerns, please don't hesitate to
contact support.
https://alteeve.ca/w/Support
Alteeve's Niche!
Cluster Monitor
======================================================================
--
You received this email because you were listed as a contact for the
Anvil! described in this email. If you do not wish to receive these
emails, please contact your systems administrator. AN!CM runs on
Anvil! nodes directly and are not sent by Alteeve's Niche!.Half a minute later; Subject: [ AN!CM ] - Alteeve's Niche! - Cluster 05 (Demo Cluster - "Tyson") - an-a05n01 - State Change!Changes have been detected in the cluster. If you anticipated this
change then there is no reason for concern. If this change was
unexpected, please feel free to contact support.
----------------------------------------------------------------------
Service libvirtd_n02; State change!
started -> stopped
an-a05n02.alteeve.ca -> (an-a05n02.alteeve.ca)
Service storage_n02; State change!
started -> stopped
an-a05n02.alteeve.ca -> (an-a05n02.alteeve.ca)
VM vm02-win2012; State change!
started -> started
an-a05n02.alteeve.ca -> an-a05n01.alteeve.ca
VM vm05-freebsd9; State change!
started -> started
an-a05n02.alteeve.ca -> an-a05n01.alteeve.ca
VM vm06-solaris11; State change!
started -> started
an-a05n02.alteeve.ca -> an-a05n01.alteeve.ca
==[ Source Details ]==================================================
Company: Alteeve's Niche!
Anvil!: an-anvil-05
Node: an-a05n01.alteeve.ca
Description:
- Cluster 05 (Demo Cluster - "Tyson")
If you have any questions or concerns, please don't hesitate to
contact support.
https://alteeve.ca/w/Support
Alteeve's Niche!
Cluster Monitor
======================================================================
--
You received this email because you were listed as a contact for the
Anvil! described in this email. If you do not wish to receive these
emails, please contact your systems administrator. AN!CM runs on
Anvil! nodes directly and are not sent by Alteeve's Niche!. |
|---|
Unlike last time, we didn't see rgmanager disappear. This is because the fence completed, so rgmanager didn't block when the monitoring system checked it. Half a minute later, the servers were already recovered so the alert system saw them move rather than recover.
Let's verify that the servers are indeed back up.
| an-a05n01 | clustatCluster Status for an-anvil-05 @ Thu Dec 5 18:56:04 2013
Member Status: Quorate
Member Name ID Status
------ ---- ---- ------
an-a05n01.alteeve.ca 1 Online, Local, rgmanager
an-a05n02.alteeve.ca 2 Offline
Service Name Owner (Last) State
------- ---- ----- ------ -----
service:libvirtd_n01 an-a05n01.alteeve.ca started
service:libvirtd_n02 (an-a05n02.alteeve.ca) stopped
service:storage_n01 an-a05n01.alteeve.ca started
service:storage_n02 (an-a05n02.alteeve.ca) stopped
vm:vm01-win2008 an-a05n01.alteeve.ca started
vm:vm02-win2012 an-a05n01.alteeve.ca started
vm:vm03-win7 an-a05n01.alteeve.ca started
vm:vm04-win8 an-a05n01.alteeve.ca started
vm:vm05-freebsd9 an-a05n01.alteeve.ca started
vm:vm06-solaris11 an-a05n01.alteeve.ca started
vm:vm07-rhel6 an-a05n01.alteeve.ca started
vm:vm08-sles11 an-a05n01.alteeve.ca started |
|---|
Success!
Recovering an-a05n02
Once an-a05n02 boots up, we'll get the usual "I'm alive!" alert.
| an-a05n02 | Subject: [ AN!CM ] - Alteeve's Niche! - Cluster 05 (Demo Cluster - "Tyson") - an-a05n02 - Cluster Monitor StartCluster node's monitor program has started.
Current State:
--[ Cluster Status ]--------------------------------------------------
This node is not currently in the cluster.
--[ Network Status ]--------------------------------------------------
Bridge: ifn_bridge1, MAC: 00:1B:21:81:C2:EA, STP disabled
Links(s): \- ifn_bond1
Bond: bcn_bond1 -+- ifn_link1 -+-> Back-Channel Network
\- ifn_link2 -/
Active Slave: ifn_link1 using MAC: 00:19:99:9C:A0:6C
Prefer Slave: ifn_link1
Reselect: Primary always, after 120000 seconds
Link Check: Every 100 ms
MTU Size: 1500 Bytes
+-------------------+-------------------+
Slaves | ifn_link1 | ifn_link2 |
+------------+-------------------+-------------------+
| Link: | Up | Up |
| Speed: | 1000 Mbps FD | 1000 Mbps FD |
| MAC: | 00:19:99:9C:A0:6C | 00:1B:21:81:C2:EB |
| Failures: | 0 | 0 |
+------------+-------------------+-------------------+
Bond: sn_bond1 -+- sn_link1 -+-> Storage Network
\- sn_link2 -/
Active Slave: sn_link1 using MAC: 00:19:99:9C:A0:6D
Prefer Slave: sn_link1
Reselect: Primary always, after 120000 seconds
Link Check: Every 100 ms
MTU Size: 1500 Bytes
+-------------------+-------------------+
Slaves | sn_link1 | sn_link2 |
+------------+-------------------+-------------------+
| Link: | Up | Up |
| Speed: | 1000 Mbps FD | 1000 Mbps FD |
| MAC: | 00:19:99:9C:A0:6D | A0:36:9F:07:D6:2E |
| Failures: | 0 | 0 |
+------------+-------------------+-------------------+
Bond: ifn_bond1 -+- ifn_link1 -+-> Internet-Facing Network
\- ifn_link2 -/
Active Slave: ifn_link1 using MAC: 00:1B:21:81:C2:EA
Prefer Slave: ifn_link1
Reselect: Primary always, after 120000 seconds
Link Check: Every 100 ms
MTU Size: 1500 Bytes
+-------------------+-------------------+
Slaves | ifn_link1 | ifn_link2 |
+------------+-------------------+-------------------+
| Link: | Up | Up |
| Speed: | 1000 Mbps FD | 1000 Mbps FD |
| MAC: | 00:1B:21:81:C2:EA | A0:36:9F:07:D6:2F |
| Failures: | 0 | 0 |
+------------+-------------------+-------------------+
--[ Storage Status ]--------------------------------------------------
Adapter: #0
Model: RAID Ctrl SAS 6G 5/6 512MB (D2616)
Revision:
Serial #:
Cache: 512MB
BBU: iBBU, pn: LS1121001A, sn: 18704
- Failing: No
- Charge: 95 %, 65 % of design
- Capacity: No / 841 mAh, 1215 mAh design
- Voltage: 4052 mV, 3700 mV design
- Cycles: 31
- Hold-Up: 0 hours
- Learn Active: No
- Next Learn: Mon Dec 23 05:29:33 2013
Array: Virtual Drive 0, Target ID 0
State: Optimal
Drives: 4
Usable Size: 836.625 GB
Parity Size: 278.875 GB
Strip Size: 64 KB
RAID Level: Primary-5, Secondary-0, RAID Level Qualifier-3
Cache Policy: WriteBack, ReadAheadNone, Direct, No Write Cache if Bad BBU
Bad Blocks: No
Drive: 0
Position: disk group 0, span 0, arm 0
State: Online, Spun Up
Fault: No
Temp: 41 degrees Celcius
Device: Seagate ST3300657SS, sn: 17036SJ3DE9Z
Media: Hard Disk Device
Interface: SAS, drive: 6.0Gb/s, bus: 6.0Gb/s
Capacity: 278.875 GB
Drive: 1
Position: disk group 0, span 0, arm 1
State: Online, Spun Up
Fault: No
Temp: 42 degrees Celcius
Device: Seagate ST3300657SS, sn: 17036SJ3DNG7
Media: Hard Disk Device
Interface: SAS, drive: 6.0Gb/s, bus: 6.0Gb/s
Capacity: 278.875 GB
Drive: 2
Position: disk group 0, span 0, arm 2
State: Online, Spun Up
Fault: No
Temp: 39 degrees Celcius
Device: Seagate ST3300657SS, sn: 17036SJ3E01G
Media: Hard Disk Device
Interface: SAS, drive: 6.0Gb/s, bus: 6.0Gb/s
Capacity: 278.875 GB
Drive: 6
Position: disk group 0, span 0, arm 3
State: Online, Spun Up
Fault: No
Temp: 38 degrees Celcius
Device: HITACHI HUS156045VLS600 A42BJVWMYA6L
Media: Hard Disk Device
Interface: SAS, drive: 6.0Gb/s, bus: 6.0Gb/s
Capacity: 418.656 GB
--[ Host Power and Thermal Sensors ]----------------------------------
+--------+------------+---------------+---------------+
Power Supplies | Status | Wattage | Fan 1 Speed | Fan 2 Speed |
+---------------+--------+------------+---------------+---------------+
| PSU 1 | ok | 90 Watts | 6360 RPM | 6480 RPM |
| PSU 2 | ok | 100 Watts | 6360 RPM | 6360 RPM |
+---------------+--------+------------+---------------+---------------+
+--------------+--------------+--------------+
Power Levels | State | Voltage | Wattage |
+------------------+--------------+--------------+--------------+
| BATT 3.0V | ok | 3.14 Volts | -- |
| CPU1 1.8V | ok | 1.80 Volts | -- |
| CPU1 Power | ok | -- | 4.40 Watts |
| CPU2 1.8V | ok | 1.80 Volts | -- |
| CPU2 Power | ok | -- | 4.40 Watts |
| ICH 1.5V | ok | 1.50 Volts | -- |
| IOH 1.1V | ok | 1.10 Volts | -- |
| IOH 1.1V AUX | ok | 1.09 Volts | -- |
| IOH 1.8V | ok | 1.80 Volts | -- |
| iRMC 1.2V STBY | ok | 1.19 Volts | -- |
| iRMC 1.8V STBY | ok | 1.80 Volts | -- |
| LAN 1.0V STBY | ok | 1.01 Volts | -- |
| LAN 1.8V STBY | ok | 1.81 Volts | -- |
| MAIN 12V | ok | 12.06 Volts | -- |
| MAIN 3.3V | ok | 3.37 Volts | -- |
| MAIN 5.15V | ok | 5.15 Volts | -- |
| PSU1 Power | ok | -- | 90 Watts |
| PSU2 Power | ok | -- | 100 Watts |
| STBY 3.3V | ok | 3.35 Volts | -- |
| Total Power | ok | -- | 190 Watts |
+------------------+--------------+--------------+--------------+
+-----------+-----------+
Temperatures | State | Temp (*C) |
+----------------+-----------+-----------+
| Ambient | ok | 27 |
| CPU1 | ok | 31 |
| CPU2 | ok | 36 |
| Systemboard | ok | 43 |
+----------------+-----------+-----------+
+-----------+-----------+
Cooling Fans | State | RPMs |
+----------------+-----------+-----------+
| FAN1 PSU1 | ok | 6360 |
| FAN1 PSU2 | ok | 6360 |
| FAN1 SYS | ok | 4920 |
| FAN2 PSU1 | ok | 6480 |
| FAN2 PSU2 | ok | 6360 |
| FAN2 SYS | ok | 5100 |
| FAN3 SYS | ok | 4860 |
| FAN4 SYS | ok | 4980 |
| FAN5 SYS | ok | 5160 |
+----------------+-----------+-----------+
--[ UPS Status ]------------------------------------------------------
Name: an-ups01
Status: ONLINE Temperature: 33.0 *C
Model: Smart-UPS 1500 Battery Voltage: 27.0 vAC
Serial #: AS1038232403 Battery Charge: 100.0 %
Holdup Time: 54.0 Minutes Current Load: 24.0 %
Self Test: OK Firmware: UPS 05.0 / COM 02.1
Mains -> 122.0 Volts -> UPS -> 122.0 Volts -> PDU
Name: an-ups02
Status: ONLINE Temperature: 32.0 *C
Model: Smart-UPS 1500 Battery Voltage: 27.0 vAC
Serial #: AS1224213144 Battery Charge: 100.0 %
Holdup Time: 55.0 Minutes Current Load: 24.0 %
Self Test: OK Firmware: UPS 08.3 / MCU 14.0
Mains -> 122.0 Volts -> UPS -> 122.0 Volts -> PDU
==[ Source Details ]==================================================
Company: Alteeve's Niche!
Anvil!: an-anvil-05
Node: an-a05n02.alteeve.ca
Description:
- Cluster 05 (Demo Cluster - "Tyson")
If you have any questions or concerns, please don't hesitate to
contact support.
https://alteeve.ca/w/Support
Alteeve's Niche!
Cluster Monitor
======================================================================
--
You received this email because you were listed as a contact for the
Anvil! described in this email. If you do not wish to receive these
emails, please contact your systems administrator. AN!CM runs on
Anvil! nodes directly and are not sent by Alteeve's Niche!. |
|---|
Let's log in and double check the state of affairs.
| an-a05n01 | clustatCluster Status for an-anvil-05 @ Thu Dec 5 21:46:35 2013
Member Status: Quorate
Member Name ID Status
------ ---- ---- ------
an-a05n01.alteeve.ca 1 Online, Local, rgmanager
an-a05n02.alteeve.ca 2 Offline
Service Name Owner (Last) State
------- ---- ----- ------ -----
service:libvirtd_n01 an-a05n01.alteeve.ca started
service:libvirtd_n02 (an-a05n02.alteeve.ca) stopped
service:storage_n01 an-a05n01.alteeve.ca started
service:storage_n02 (an-a05n02.alteeve.ca) stopped
vm:vm01-win2008 an-a05n01.alteeve.ca started
vm:vm02-win2012 an-a05n01.alteeve.ca started
vm:vm03-win7 an-a05n01.alteeve.ca started
vm:vm04-win8 an-a05n01.alteeve.ca started
vm:vm05-freebsd9 an-a05n01.alteeve.ca started
vm:vm06-solaris11 an-a05n01.alteeve.ca started
vm:vm07-rhel6 an-a05n01.alteeve.ca started
vm:vm08-sles11 an-a05n01.alteeve.ca started |
|---|---|
| an-a05n02 | clustatCould not connect to CMAN: No such file or directory |
As expected. Time to start cman and rgmanager.
| an-a05n02 | /etc/init.d/cman startStarting cluster:
Checking if cluster has been disabled at boot... [ OK ]
Checking Network Manager... [ OK ]
Global setup... [ OK ]
Loading kernel modules... [ OK ]
Mounting configfs... [ OK ]
Starting cman... [ OK ]
Waiting for quorum... [ OK ]
Starting fenced... [ OK ]
Starting dlm_controld... [ OK ]
Tuning DLM kernel config... [ OK ]
Starting gfs_controld... [ OK ]
Unfencing self... [ OK ]
Joining fence domain... [ OK ]/etc/init.d/rgmanager startStarting Cluster Service Manager: [ OK ] |
|---|
Watch the status of the drbd resources and wait until both are UpToDate on both nodes.
| an-a05n02 | /etc/init.d/drbd statusdrbd driver loaded OK; device status:
version: 8.3.16 (api:88/proto:86-97)
GIT-hash: a798fa7e274428a357657fb52f0ecf40192c1985 build by phil@Build64R6, 2013-09-27 16:00:43
m:res cs ro ds p mounted fstype
... sync'ed: 36.7% (391292/612720)K
... sync'ed: 7.1% (653544/699704)K
0:r0 SyncTarget Primary/Primary Inconsistent/UpToDate C
1:r1 SyncTarget Primary/Primary Inconsistent/UpToDate CWait a few... /etc/init.d/drbd statusdrbd driver loaded OK; device status:
version: 8.3.16 (api:88/proto:86-97)
GIT-hash: a798fa7e274428a357657fb52f0ecf40192c1985 build by phil@Build64R6, 2013-09-27 16:00:43
m:res cs ro ds p mounted fstype
0:r0 Connected Primary/Primary UpToDate/UpToDate C
1:r1 Connected Primary/Primary UpToDate/UpToDate C |
|---|
Ready.
Verify everything with clustat.
| an-a05n01 | clustatCluster Status for an-anvil-05 @ Thu Dec 5 21:51:43 2013
Member Status: Quorate
Member Name ID Status
------ ---- ---- ------
an-a05n01.alteeve.ca 1 Online, Local, rgmanager
an-a05n02.alteeve.ca 2 Online, rgmanager
Service Name Owner (Last) State
------- ---- ----- ------ -----
service:libvirtd_n01 an-a05n01.alteeve.ca started
service:libvirtd_n02 an-a05n02.alteeve.ca started
service:storage_n01 an-a05n01.alteeve.ca started
service:storage_n02 an-a05n02.alteeve.ca started
vm:vm01-win2008 an-a05n01.alteeve.ca started
vm:vm02-win2012 an-a05n01.alteeve.ca started
vm:vm03-win7 an-a05n01.alteeve.ca started
vm:vm04-win8 an-a05n01.alteeve.ca started
vm:vm05-freebsd9 an-a05n01.alteeve.ca started
vm:vm06-solaris11 an-a05n01.alteeve.ca started
vm:vm07-rhel6 an-a05n01.alteeve.ca started
vm:vm08-sles11 an-a05n01.alteeve.ca started |
|---|---|
| an-a05n02 | clustatCluster Status for an-anvil-05 @ Thu Dec 5 21:51:48 2013
Member Status: Quorate
Member Name ID Status
------ ---- ---- ------
an-a05n01.alteeve.ca 1 Online, rgmanager
an-a05n02.alteeve.ca 2 Online, Local, rgmanager
Service Name Owner (Last) State
------- ---- ----- ------ -----
service:libvirtd_n01 an-a05n01.alteeve.ca started
service:libvirtd_n02 an-a05n02.alteeve.ca started
service:storage_n01 an-a05n01.alteeve.ca started
service:storage_n02 an-a05n02.alteeve.ca started
vm:vm01-win2008 an-a05n01.alteeve.ca started
vm:vm02-win2012 an-a05n01.alteeve.ca started
vm:vm03-win7 an-a05n01.alteeve.ca started
vm:vm04-win8 an-a05n01.alteeve.ca started
vm:vm05-freebsd9 an-a05n01.alteeve.ca started
vm:vm06-solaris11 an-a05n01.alteeve.ca started
vm:vm07-rhel6 an-a05n01.alteeve.ca started
vm:vm08-sles11 an-a05n01.alteeve.ca started |
Excellent!
Ready to live-migrate the servers back now.
| an-a05n01 | clusvcadm -M vm:vm02-win2012 -m an-a05n02.alteeve.caTrying to migrate vm:vm02-win2012 to an-a05n02.alteeve.ca...Successclusvcadm -M vm:vm05-freebsd9 -m an-a05n02.alteeve.caTrying to migrate vm:vm05-freebsd9 to an-a05n02.alteeve.ca...Successclusvcadm -M vm:vm06-solaris11 -m an-a05n02.alteeve.caTrying to migrate vm:vm06-solaris11 to an-a05n02.alteeve.ca...SuccessclustatCluster Status for an-anvil-05 @ Thu Dec 5 21:54:33 2013
Member Status: Quorate
Member Name ID Status
------ ---- ---- ------
an-a05n01.alteeve.ca 1 Online, Local, rgmanager
an-a05n02.alteeve.ca 2 Online, rgmanager
Service Name Owner (Last) State
------- ---- ----- ------ -----
service:libvirtd_n01 an-a05n01.alteeve.ca started
service:libvirtd_n02 an-a05n02.alteeve.ca started
service:storage_n01 an-a05n01.alteeve.ca started
service:storage_n02 an-a05n02.alteeve.ca started
vm:vm01-win2008 an-a05n01.alteeve.ca started
vm:vm02-win2012 an-a05n02.alteeve.ca started
vm:vm03-win7 an-a05n01.alteeve.ca started
vm:vm04-win8 an-a05n01.alteeve.ca started
vm:vm05-freebsd9 an-a05n02.alteeve.ca started
vm:vm06-solaris11 an-a05n02.alteeve.ca started
vm:vm07-rhel6 an-a05n01.alteeve.ca started
vm:vm08-sles11 an-a05n01.alteeve.ca started |
|---|---|
| an-a05n02 | clustatCluster Status for an-anvil-05 @ Thu Dec 5 21:54:36 2013
Member Status: Quorate
Member Name ID Status
------ ---- ---- ------
an-a05n01.alteeve.ca 1 Online, rgmanager
an-a05n02.alteeve.ca 2 Online, Local, rgmanager
Service Name Owner (Last) State
------- ---- ----- ------ -----
service:libvirtd_n01 an-a05n01.alteeve.ca started
service:libvirtd_n02 an-a05n02.alteeve.ca started
service:storage_n01 an-a05n01.alteeve.ca started
service:storage_n02 an-a05n02.alteeve.ca started
vm:vm01-win2008 an-a05n01.alteeve.ca started
vm:vm02-win2012 an-a05n02.alteeve.ca started
vm:vm03-win7 an-a05n01.alteeve.ca started
vm:vm04-win8 an-a05n01.alteeve.ca started
vm:vm05-freebsd9 an-a05n02.alteeve.ca started
vm:vm06-solaris11 an-a05n02.alteeve.ca started
vm:vm07-rhel6 an-a05n01.alteeve.ca started
vm:vm08-sles11 an-a05n01.alteeve.ca started |
That is beautiful.
Done and Done!
That, ladies and gentlemen, is all she wrote!
You should now be safely ready to take your Anvil! into production at this stage.
Happy Clustering!
Troubleshooting
Here are some common problems you might run into.
SELinux Related Problems
SELinux is a double-edged sword. It can certainly protect you, and it is worth having, but it can cut you, too. Here we cover a couple common issues.
Password-less SSH doesn't work, but ~/.ssh/authorized_keys is fine
If you've double-checked that you've copied your public keys into a target node or server's ~/.ssh/authorized_keys file, it could be that the file's context is not correct. To check:
ls -lahZ /root/.ssh/authorized_keys-rw-------. root root unconfined_u:object_r:admin_home_t:s0 /root/.ssh/authorized_keysNotice how the context is admin_home_t? That should be ssh_home_t. So we need to update the context now.
semanage fcontext -a -t ssh_home_t /root/.ssh/authorized_keys
restorecon -r /root/.ssh/authorized_keys
ls -lahZ /root/.ssh/authorized_keys-rw-------. root root unconfined_u:object_r:ssh_home_t:s0 /root/.ssh/authorized_keysYou should now be able to log in to the target machine without a password.
Live-Migration fails with '[vm] error: Unable to read from monitor: Connection reset by peer'
When trying to migrate a server using the dashboard, you will see an error like:
Trying to migrate vm01-win2008 to an-a05n01.alteeve.ca...Failed; service running on original ownerIn /var/log/messages you will see errors like:
Mar 17 01:14:05 an-a05n01 rgmanager[8474]: [vm] Migrate vm01-win2008 to an-a05n02.alteeve.ca failed:
Mar 17 01:14:05 an-a05n01 rgmanager[8496]: [vm] error: Unable to read from monitor: Connection reset by peer
Mar 17 01:14:05 an-a05n01 rgmanager[3412]: migrate on vm "vm01-win2008" returned 150 (unspecified)
Mar 17 01:14:05 an-a05n01 rgmanager[3412]: Migration of vm:vm01-win2008 to an-a05n02.alteeve.ca failed; return code 150This can happen for two reasons;
- You forgot to populate /root/.ssh/known_hosts.
- The context on /root/.ssh/known_hosts is not correct.
It is usually the second case, so that is what we will address here.
Check to see what context is currently set for known_hosts:
ls -lahZ /root/.ssh/known_hosts-rw-r--r--. root root unconfined_u:object_r:admin_home_t:s0 /root/.ssh/known_hostsThe context on this file needs to be ssh_home_t. To change it, run:
semanage fcontext -a -t ssh_home_t /root/.ssh/known_hosts
restorecon -r /root/.ssh/known_hosts
ls -lahZ /root/.ssh/known_hosts-rw-r--r--. root root unconfined_u:object_r:ssh_home_t:s0 /root/.ssh/known_hostsYou should now be able to live-migrate your servers to the node.
Attempting to Live Migrate Fails with 'Host key verification failed.'
Attempting to Live-Migrate a server from one node to another fails with:
clusvcadm -M vm:vm02-win2008r2 -m an-a05n01.alteeve.caTrying to migrate vm:vm02-win2008r2 to an-a05n01.alteeve.ca...Failed; service running on original ownerIn the system log, we see:
Aug 4 19:18:41 an-a05n02 rgmanager[3526]: Migrating vm:vm02-win2008r2 to an-a05n01.alteeve.ca
Aug 4 19:18:41 an-a05n02 rgmanager[10618]: [vm] Migrate vm02-win2008r2 to an-a05n01.alteeve.ca failed:
Aug 4 19:18:41 an-a05n02 rgmanager[10640]: [vm] error: Cannot recv data: Host key verification failed.: Connection reset by peer
Aug 4 19:18:41 an-a05n02 rgmanager[3526]: migrate on vm "vm02-win2008r2" returned 150 (unspecified)
Aug 4 19:18:41 an-a05n02 rgmanager[3526]: Migration of vm:vm02-win2008r2 to an-a05n01.alteeve.ca failed; return code 150This has two causes:
- /root/.ssh/known_hosts isn't populated.
- The selinux context is not correct.
If you've confirmed that your known_hosts file is correct, then you can verify you've hit an SELinux issue by running setenforce 0 on both nodes and trying again. If the migration works, you have an SELinux issue. Re-enable setenforce 1 and we'll fix it.
If we look at the current context:
ls -lahZ /root/.sshdrwx------. root root system_u:object_r:admin_home_t:s0 .
drwxr-xr-x. root root system_u:object_r:admin_home_t:s0 ..
-rw-------. root root unconfined_u:object_r:ssh_home_t:s0 authorized_keys
-rw-------. root root system_u:object_r:admin_home_t:s0 id_rsa
-rw-r--r--. root root system_u:object_r:admin_home_t:s0 id_rsa.pub
-rw-r--r--. root root unconfined_u:object_r:admin_home_t:s0 known_hostsWe see that it is currently admin_home_t on id_rsa, id_rsa.pub and known_hosts, but authorized_keys is fine. We want all of them to be ssh_home_t, so we'll have to fix it.
| Note: Check both nodes! If one node has a bad context, it's likely the other node is bad, too. Both nodes will need to be fixed for reliable migration. |
semanage fcontext -a -t ssh_home_t /root/.ssh/known_hosts
semanage fcontext -a -t ssh_home_t /root/.ssh/id_rsa
semanage fcontext -a -t ssh_home_t /root/.ssh/id_rsa.pub
restorecon -r /root/.ssh/known_hosts
restorecon -r /root/.ssh/id_rsa
restorecon -r /root/.ssh/id_rsa.pub
ls -lahZ /root/.sshdrwx------. root root system_u:object_r:admin_home_t:s0 .
drwxr-xr-x. root root system_u:object_r:admin_home_t:s0 ..
-rw-------. root root unconfined_u:object_r:ssh_home_t:s0 authorized_keys
-rw-------. root root system_u:object_r:ssh_home_t:s0 id_rsa
-rw-r--r--. root root system_u:object_r:ssh_home_t:s0 id_rsa.pub
-rw-r--r--. root root unconfined_u:object_r:ssh_home_t:s0 known_hostsNow we can try migrating again, and this time it should work.
clusvcadm -M vm:vm02-win2008r2 -m an-a05n01.alteeve.caTrying to migrate vm:vm02-win2008r2 to an-a05n01.alteeve.ca...SuccessFixed!
Other Tutorials
These tutorials are not directly related to this one, but might be of use to some.
- Anvil! Tutorial 2 - Growing Storage
- Configuring Brocade Switches
- Anvil! m2 Tutorial
- Configuring Network Boot on Fujitsu Primergy
- Configuring Hardware RAID Arrays on Fujitsu Primergy
- Encrypted Arrays with LSI SafeStore
- Configuring an APC AP7900
- Configuring APC SmartUPS with AP9630 Network Cards
- Anvil! m2 Tutorial - Installing RHEL/Centos
- Grow a GFS2 Partition
Older Issues From Previous Tutorials
These links have older troubleshooting issues that probably aren't needed anymore, but you never know.
| Any questions, feedback, advice, complaints or meanderings are welcome. | |||
| Alteeve's Niche! | Enterprise Support: Alteeve Support |
Community Support | |
| © Alteeve's Niche! Inc. 1997-2024 | Anvil! "Intelligent Availability®" Platform | ||
| legal stuff: All info is provided "As-Is". Do not use anything here unless you are willing and able to take responsibility for your own actions. | |||